SDBK 2200 C3 - Iron SILVERCREST - Free user manual and instructions
Find the device manual for free SDBK 2200 C3 SILVERCREST in PDF.
User questions about SDBK 2200 C3 SILVERCREST
0 question about this device. Answer the ones you know or ask your own.
Ask a new question about this device
Download the instructions for your Iron in PDF format for free! Find your manual SDBK 2200 C3 - SILVERCREST and take your electronic device back in hand. On this page are published all the documents necessary for the use of your device. SDBK 2200 C3 by SILVERCREST.
USER MANUAL SDBK 2200 C3 SILVERCREST
Operating instructions
FR BE
FERÀ REPASSER VAPEUR
Mode d'emploi
CZ
NAPAROVACI ZEHLICKA
Návod k obsluze
SK
NAPAROVACIA ZEHLICKA
Návod na obsluhu
DK
DAMPSTRYGEJERN
Before reading, unfold the page containing the illustrations and familiarise yourself with all functions of the device.
DE AT CH
GB/IE Operating instructions Page 1
Information about these operating instructions 2
Intended use 2
Safety information 2
Package contents and transport inspection 6
Appliance description 6
Symbols on the appliance 7
Before first use
Filling the water tank. 7
Plugging in and ironing 9
Steam ironing 10
Ironing with steam blast 10
Putting the steam iron down 10
After use
Automatic switch-off 11
Anti-drip system 11
1 Tips for energy-saving ironing 12
Cleaning 12
Cleaning the housing and soleplate 12
Self-cleaning function 12
13
Anti-limescale function 13
Dscaling the steam iron 13
Storage
Troubleshooting 14
Technical specifications 15
Disposal 15
Kompernass Handels GmbH warranty 16
Service 17
Importer 17
Introduction
Information about these operating instructions
Congratulations on the purchase of your new appliance!
You have chosen a modern, high-quality product. These operating instructions are part of the product. They contain important information about safety, usage and disposal. Before using the product, please familiarise yourself with all operating and safety instructions. This product may only be used as described and for the purposes indicated. Please also pass these operating instructions on to any future owner.
Intended use
The steam iron is intended exclusively for the ironing of textiles. The iron may only be used indoors and in private households. Any other use is deemed improper. The appliance is not intended for use in commercial or industrial environments.
Claims of any kind for damage resulting from misuse, incompetent repairs, unauthorised modification or the use of unauthorised replacement parts will not be accepted. The operator bears sole liability.
Safety information
DANGER! RISK OF ELECTRIC SHOCK!
The voltage of the power source must correspond with the details given on the type plate of the appliance.
- To avoid potential risks, arrange for a defective appliance to be checked and possibly repaired by qualified technicians, or contact our Customer Service Department.
- To prevent accidents, have defective plugs and/or power cables replaced immediately by an authorised specialist, our Customer Service or a similarly qualified person.
- When disconnecting the appliance from the power source, pull only on the plug itself, never on the cable.
- Never bend (kink) or crush the power cable, and always route it in such a way that it cannot come into contact with hot surfaces and so that no one can step on or trip over it.
DANGER! RISK OF ELECTRIC SHOCK!
After every use, before cleaning and when refilling with tap water, always remove the plug from the mains power socket.
Always unroll the power cable fully before switching on and do not use an extension cable.
- Never touch the power cable or the plug with wet hands.
- Never use the steam iron adjacent to water contained in a bath, shower, wash basin or other vessels. The proximity of water is hazardous, even if the appliance is switched off.
- Never immerse the steam iron in any liquid or permit liquids to penetrate into the housing of the steam iron. Do not expose the appliance to humidity and do not use it outdoors. If any liquid gets into the housing, disconnect the appliance from the mains power socket im mediately and have it repaired by a qualified technician.
- Do not open the steam iron housing. Have a defective steam iron repaired only by an authorised technician.
- Do not use the steam iron if it is visibly damaged, has been dropped or is leaking water. Have it repaired by qualified specialists.
- Stop using the appliance if the anti-kink protection on the power cable is damaged.
Always pull the plug out of the power socket before filling the water tank with water.

DANGER! RISK OF ELECTRIC SHOCK!
- This appliance may be used by children aged 8 years or older and by persons with reduced physical, sensory or mental capabilities or lack of experience and/or knowledge, if they are supervised or have been instructed in the safe use of the appliance and understand the potential risks. Do not allow children to use the appliance as a toy. Cleaning and user maintenance tasks may not be carried out by children unless they are supervised.

RISK OF INJURY!
Caution, hot surfaces!
- When the steam iron is hot, hold it only by the handle.
Children should be supervised to ensure that they do not play with the appliance. - Never place your hands in the steam spray or on hot metal parts.
- Do not open the filler opening for the water tank while the iron is in use. Allow the steam iron to cool down first and remove the plug from the power socket.
The iron and its connecting cable must be kept out of the reach of children under the age of 8 while the iron is switched on or cooling down. - This steam iron should only be used and set down on stable surfaces.
- Place the steam iron only on level and heat-resistant surfaces. The steam iron must be stable.
- When you want to put the steam iron down, always stand it on its base.
RISK OF FIRE!
- Never leave a hot steam iron unattended if it is switched on or connected to the mains power supply.
- Do not put the steam iron away until it has cooled down completely.
ATTENTION! PROPERTY DAMAGE!
-
If the clothing care instructions forbid ironing, (图标 symbol), the clothing item may not be ironed. Ignoring this warning could lead to permanent damage to the clothing item.
-
Use only the ironing temperatures stated in the care instructions as suitable for the material. Otherwise, you could damage the textiles. If you do not know the correct care instructions, start with the lowest temperature setting.
The water tank should only be filled with tap water or distilled water. Otherwise, you will damage the steam iron.
- Do not clean the steam iron with solvents, alcohol or abrasive cleaning agents. They could damage it.
NOTE
- No user action is required to switch the product between 50 and 60Hz . The product switches automatically to either 50 or 60Hz .
Package contents and transport inspection
- Remove all parts of the appliance and the operating instructions from the packaging.
■ Remove all packaging material and any films and stickers.
Check the contents of the package. The package contents include the following components (see fold-out page for illustrations):
- Steam iron
- Measuring cup
- Operating instructions
NOTE
- Check the package for completeness and signs of visible damage.
If the delivery is incomplete or damage has occurred as a result of defective packaging or during transport, contact the customer service hotline (see section Service).
Appliance description
(See fold-out page for illustrations)

Water jet
Filler opening for the water tank
3 Steam control
4 Steam blast button
Spray button
6 Temperature control
7 Control lamp
8 Power cable with plug and anti-kink protection
9 Base
Soleplate
Self clean button
12 Measuring cup
Symbols on the appliance
| Symbol Meaning | |
| Power output (2400 W) | |
| Continuous steam volume (40 g/min) | |
| Ceramic-coated soleplate | |
| Self clean | |
| Automatic switch-off |
Before first use
1) Fill the water tank with water (See the section Filling the water tank).
2) Insert the plug into a mains power socket supplying an electrical current corresponding to that given on the rating plate.
3) Set the steam control 3 to the highest level (maximum steam).
4) Turn the temperature controller 6 to the highest level max. The control lamp 7 flashes while the appliance heats up. As soon as the set temperature is reached, the control lamp 7 lights up. Wait until the control lamp 7 lights up.
5) Press the steam blast button ④ a couple of times so that steam comes out of the soleplate 10.
6) Iron over a piece of scrap material, to remove any production residues that may remain on the soleplate 10.
Filling the water tank

RISK OF ELECTROCUTION!
Always disconnect the plug from the mains socket before filling the water tank. There is a risk of electric shock!

RISK OF INJURY!
- Allow the appliance to cool down before filling the water tank. Otherwise, there is risk of burns!
ATTENTION! PROPERTY DAMAGE!
- Fill the water tank only with tap water or distilled water. Otherwise, you will damage the steam iron.
1) Make sure that the temperature control 6 is set to the position min.
2) Hold the iron in your hand at an angle and open the lid of the filler opening for the water tank.
3) Use the measuring cup 12 to fill the water tank D 2 up to no more than the MAX marking (see fig. 1).

Fig. 1
4) Close the cover of the filler opening for the water tank 2.
NOTE
If the mains water in your location is rated as hard, we recommend that you mix the mains water with some distilled water. Otherwise, the jets for the steam blast function could become blocked with limescale prematurely. To extend the optimal steam blast function, mix mains water with distilled water according to the table.
- Ask your local water utility about the water hardness in your area.
| Water hardness Ratio of distilled water to tap water |
| very soft/soft 0 |
| medium 1:1 |
| hard 2:1 |
| very hard 3:1 |
Plugging in and ironing
ATTENTION! PROPERTY DAMAGE!
If the clothing care instructions forbid ironing), the garment may not be ironed. Ignoring this warning could lead to permanent damage to the clothing item.
NOTE
Dry ironing without steam is possible at all temperatures. Steam ironing is only possible from the setting on the temperature control 6
1) Insert the plug into a mains power socket.
2) Check the care instructions on the labels in garments to see if they are suitable for being ironed, and at which temperature setting.
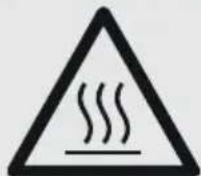
3) Select the appropriate temperature setting using the temperature control (see table below and fig. 2).
| Temperature control symbol ⑥ | Temperature Material type |
| ● | 70-120°C Synthetics |
| ●● | 100-160°C Silk, wool |
| ●●● | 140-210°C Cotton, linen |
Fig. 2
NOTE
- While it is heating up, always place the steam iron on its bas ⑨ . If you place the steam iron down on its soleplate ⑩ and do not move it, the automatic switch-off will be activated after 30 seconds (see section Automatic switch-off) and the appliance stops heating up.
The control lamp ⑦ flashes while the appliance heats up. As soon as the set temperature is reached, the control lamp ⑦ lights up.
To moisten the laundry, press the spray button. This function is suitable for very dry and very crumpled garments.
Steam ironing
NOTE
The temperature control must be set to at least the setting. Otherwise, no steam will be produced.
Set the steam control to the desired steam setting:
O no steam
I/II medium steam
maximum steam
Ironing with steam blast
NOTE
The temperature control must be set to at least the setting. Otherwise, no steam will be produced.
To generate the maximum quantity of steam, the steam control 3 must be set to the highest level.
The steam blast function is ideal for smoothing difficult-to-reach parts of a garment.
1) Raise the steam iron slightly.
2) For a steam blast, press the steam blast button
Putting the steam iron down
WARNING! RISK OF FIRE!
- Never leave a hot steam iron unattended if it is switched on or connected to the mains power supply.
1) Set the temperature control to the min setting.
2) Stand the steam iron only on its base 9.
After use
1) Set the temperature control 6 to the min setting.
2) Remove the plug from the mains power socket.
3) Stand the steam iron on its base ⑨ and allow it to cool down completely.
4) Empty the water tank via the filling opening 2 and clean the soleplate 10 (see section Cleaning the housing and soleplate).
5) Place the steam iron back on its base 9.
Automatic switch-off
This steam iron is fitted with an automatic switch-off system. This stops the steam iron from heating up if it is not moved within a certain amount of time:
If the iron is resting on its soleplate 10 and is not moved for about 30 seconds, you will hear a warning beep and the control lamp for the automatic switch-off 7 starts flashing. The steam iron will automatically stop heating up. To deactivate the automatic switch-off, lift up the steam iron and move it gently from side to side. The steam iron will heat up again.
If the iron is on its base and is not moved for about 8 minutes, you will hear a warning beep and the control lamp for the automatic switch-off 7 starts flashing. The steam iron will automatically stop heating up. To deactivate the automatic switch-off, lift up the steam iron and move it gently from side to side. The steam iron will heat up again.
NOTE
The automatic switch-off is not intended as a substitute for removing the plug from the mains power! It is merely intended to reduce the fire hazard if you forget to switch off the steam iron.
Anti-drip system
The steam iron has an anti-drip system that automatically switches off the steam blast at low temperatures. If this happens, you will hear a click. You must then set a suitable temperature with the temperature control 6. As soon as this temperature is reached, steam production is resumed.
NOTE
Wait until the set temperature has been reached and the control lamp lights up before pressing the steam blast button again. Otherwise, water may drip from the soleplate.
Tips for energy-saving ironing
Iron once a week rather than every day. This reduces the amount of energy required, as you only need to heat up the iron once.
Pre-sort the washing: first iron the washing that requires a low temperature.
You will find the temperature recommendation for ironing on the care label of the laundry items.
Steam is not always necessary. Many items of laundry can be ironed flat even without a steam blast.
Clean and descale the iron regularly so that the nozzles do not become clogged. If the nozzles become clogged, ironing takes a great deal more time and energy.
Cleaning
RISK OF ELECTROCUTION!
Before cleaning, always disconnect the mains plug from the mains socket (except when using the self-cleaning function). There is a risk of electric shock!
RISK OF INJURY!
- Allow the appliance to cool down before cleaning it. Otherwise, there is a risk of burns!
Cleaning the housing and soleplate
ATTENTION! PROPERTY DAMAGE!
- Do not use abrasive, aggressive or chemical cleaning agents. They can damage the surface and also lead to irreparable damage to the appliance.
Clean the housing with a soft, dry cloth only.
Clean the soleplate using a damp cloth and a mild, non-scouring detergent.
Self-cleaning function
1) Fill the water tank to the MAX marking.
2) Insert the plug into the mains power socket.
3) Set the temperature control 6 to the max setting.
4) Set the steam control 3 to the highest level.
5) Allow the steam iron to heat up until the control lamp ⑦ lights up permanently.
6) Hold the steam iron horizontally over a sink or suitable container.
7) Press and hold down the self clean button ①. Move the steam iron back and forth a little. Steam and boiling water will flow from the steam holes in the soleplate ⑩. Any impurities that may be present are flushed out.
8) Release the self clean button 11 as soon as all of the water in the water tank is used up. Pour out any water left in the water tank through the filler opening 2.
9) Dry the soleplate 10 thoroughly. To do this, move the soleplate 10 back and forth several times over a towel or an old piece of material.
10) Remove the power plug from the mains power socket and allow the steam iron to cool down before placing it in storage.
Descaling
Anti-limescale function
NOTE
- The iron has an integrated anti-limescale function that reduces limescale deposits during steam ironing and thus prolongs the life of the steam iron. However, the anti-limescale function cannot completely prevent the natural process of limescale build-up.
- To avoid impairing the anti-limescale function, fill the water tank with tap water or distilled water only.
Dscaling the steam iron
NOTE
The steam iron is designed for use with tap water (for information on using tap water, see section Filling the water tank). However, it is necessary to descale the steam chamber regularly with a descending agent to remove limescale residues and thus maintain the maximum performance of the steam iron.
The frequency of descending depends on the hardness of the water and how often the appliance is used. We recommend descending at least once every two months or as soon as you notice that the appliance is generating less steam.
We recommend using the descaling agent durgol universal bio fast decalcifier to descale the steam iron.
To descale the steam iron, proceed as follows:
1) Remove the plug from the mains power socket. Make sure that the steam iron has completely cooled down.
2) Empty the water tank of the steam iron completely into a sink via the filler opening ②.
3) Mix 150ml of tap water with 150ml of descending agent (ratio 1:1) and pour the mixture into the water tank.
4) Allow the solution to work for approx. 30 minutes.
5) Hold the steam iron horizontally over a sink or suitable container.
6) Press and hold down the self clean button 1. Move the steam iron back and forth a little so that the contents of the water tank come out of the steam holes of the soleplate 10.
7) Release the self clean button 11 as soon as the amount of water flowing out of the steam holes on the soleplate 10 becomes noticeably less. Empty the remaining contents of the water tank completely into a sink via the filler opening 2.
NOTE
After descending the steam iron, always carry out two rinsing cycles using the self clean button ①. Do not use a descending agent without subsequently thoroughly rinsing the water tank with tap water.
8) Use the measuring cup to fill the water tank up to the MAX marking with tap water and repeat steps 5 to 7 twice. To rinse the water tank thoroughly, use only tap water for the two rinses.
Storage
Store the cooled-down appliance in a clean, dust-free and dry location.
Troubleshooting
| Problem Cause Solution | ||
| The steam iron blasts out no steam/very little steam. | The steam iron's water tank is empty. | Fill the water tank with tap water (See section Filling the water tank). |
| Limescale deposits reduce the steam output. | Descale the steam iron (see section Descaling the steam iron). | |
| The steam iron does not get hot. | The steam iron is not plugged in or is not switched on. | Insert the plug into a wall power socket and adjust the temperature control 6 to the desired ironing temperature. |
| The steam iron cannot be switched on. | The steam iron is defective. | Have the steam iron repaired by a qualified technician (see section Service). |
Technical specifications
Supply voltage 220 - 240 V ~ (AC), 50/60 Hz
Power consumption 2400 W
Disposal
Never dispose of the appliance in your normal domestic waste.
The adjacent symbol of a crossed-out dustbin means that this appliance is subject to Directive 2012/19/EU. This directive states that this appliance may not be disposed of in the normal household waste at the end of its useful life, but must be taken to specially set-up collection locations, recycling depots or disposal companies.
The disposal is free of charge for the user. Protect the environment and dispose of this appliance properly.

Your local community or municipal authorities can provide information on how to dispose of the worn-out product.

The product is recyclable, subject to extended producer responsibility and is collected separately.

The packaging is made from environmentally friendly material and can be disposed of at your local recycling plant.
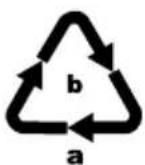
Note the labelling on the various materials and separate them for disposal as required. The materials are labelled with abbreviations (a) and numbers (b) with the following meanings: 1-7: plastics, 20-22: paper and cardboard, 80-98: composites.
This appliance has a 3-year warranty valid from the date of purchase. If this product has any faults, you, the buyer, have certain statutory rights. Your statutory rights are not restricted in any way by the warranty described below.
Warranty conditions
The warranty period starts on the date of purchase. Please keep your receipt in a safe place. This will be required as proof of purchase.
If any material or manufacturing fault occurs within three years of the date of purchase of the product, we will either repair or replace the product for you or refund the purchase price (at our discretion). This warranty service requires that you present the defective appliance and the proof of purchase (receipt) within the three-year warranty period, along with a brief written description of the fault and of when it occurred.
If the defect is covered by the warranty, your product will either be repaired or replaced by us. The repair or replacement of a product does not signify the beginning of a new warranty period.
Warranty period and statutory claims for defects
The warranty period is not prolonged by repairs effected under the warranty. This also applies to replaced and repaired components. Any damage and defects present at the time of purchase must be reported immediately after unpacking. Repairs carried out after expiry of the warranty period shall be subject to a fee.
Scope of the warranty
This appliance has been manufactured in accordance with strict quality guidelines and inspected meticulously prior to delivery.
The warranty covers material faults or production faults. The warranty does not extend to product parts subject to normal wear and tear or to fragile parts which could be considered as consumable parts such as switches, batteries or parts made of glass.
The warranty does not apply if the product has been damaged, improperly used or improperly maintained. The directions in the operating instructions for the product regarding proper use of the product are to be strictly followed. Uses and actions that are discouraged in the operating instructions or which are warned against must be avoided.
This product is intended solely for private use and not for commercial purposes. The warranty shall be deemed void in cases of misuse or improper handling, use of force and modifications / repairs which have not been carried out by one of our authorised Service centres.
Warranty claim procedure
To ensure quick processing of your case, please observe the following instructions:
Please have the till receipt and the item number (IAN) 390790_2201 available as proof of purchase.
■ You will find the item number on the type plate on the product, an engraving on the product, on the front page of the operating instructions (below left) or on the sticker on the rear or bottom of the product.
If functional or other defects occur, please contact the service department listed either by telephone or by e-mail.
■ You can return a defective product to us free of charge to the service address that will be provided to you. Ensure that you enclose the proof of purchase (till receipt) and information about what the defect is and when it occurred.
You can download these instructions along with many other manuals, product videos and installation software at www.lidl-service.com.
This QR code will take you directly to the Lidl service page (www.lidl-service.com) where you can open your operating instructions by entering the item number (IAN) 390790_2201.
Service
GB Service Great Britain
Tel.: 0800 404 7657
E-Mail: kompernass@lidl.co.uk
IE Servicelreland
Tel.: 1800 101010
E-Mail: kompernass@lidl.ie
IAN390790_2201
Importer
Please note that the following address is not the service address. Please use the service address provided in the operating instructions.
KOMPERNASS HANDELS GMBH
BURGSTRASSE 21
44867 BOCHUM
GERMANY
www.kompernass.com
Inhaltsverzeichnis
Einführung 20
KOMPERNASS HANDELS GMBH
BURGSTRASSE 21
44867 BOCHUM
DEUTSCHLAND
www.kompernass.com
Table des matieres
Introduction 38
Chere cliente, cher client,
Chere cliente, cher client,
KOMPERNASS HANDELS GMBH
BURGSTRASSE 21
44867 BOCHUM
ALLEMAGNE
www.kompernass.com
Inhoud
Inleiding 60
WAARSCHUWING! BRANDGEVAAR!
KOMPERNASS HANDELS GMBH
BURGSTRASSE 21
44867 BOCHUM
DUITSLAND
www.kompernass.com
Obsah
Uvod. 78
Informace k tomuto navodu k obsluze 78
Pouziti v souladu s urcenim 78
POZORI HMOTNÉ ŠKODY!
Nadržku na vodu plnte vylucnevodou zvodovodu nebo destilovanouvodou.Jinak by se mohla naparovaci zhhlicka poskodit.
POZORI HMOTNÉ SKODYI
POZORI HMOTNÉ SKODY!
KOMPERNASS HANDELS GMBH
BURGSTRASSE 21
44867 BOCHUM
NÉMECKO
www.kompernass.com
Spistresci
Wstep 96
KOMPERNASS HANDELS GMBH
BURGSTRASSE 21
44867 BOCHUM
NIEMCY
www.kompernass.com
Obsah
Uvod. 114
KOMPERNASS HANDELS GMBH
BURGSTRASSE 21
44867 BOCHUM
NEMECKO
www.kompernass.com
Indices
Introduccion 132
KOMPERNASS HANDELS GMBH
BURGSTRASSE 21
44867 BOCHUM
ALEMANIA
www.kompernass.com
Indholdsfortegnelse
Indledning 150
KOMPERNASS HANDELS GMBH
BURGSTRASSE 21
44867 BOCHUM
TYSKLAND
www.kompernass.com
Indice
KOMPERNASS HANDELS GMBH
BURGSTRASSE 21
44867 BOCHUM
GERMANIA
www.kompernass.com
Tartalomjegyzék
Bevezeto 186
KOMPERNASS HANDELS GMBH
BURGSTRASSE 21
44867 BOCHUM
NÉMETORSZÁG
www.kompernass.com
Kazalo
Uvod. 204
Informaciono teh navodilih za uporabo. 204
Predvidena uporaba 204
Varnostna navodila 204
Vsebina kompleta in pregled po prevozu 208
Opis naprave. 208
Simboli na napravi 209
Pred prvo uporabo 209
Polnjenje posode za vodo 209
KOMPERNASS HANDELS GMBH
BURGSTRASSE 21
44867 BOCHUM
NEMCIJA
www.kompernass.com
Pooblasceni serviser
SI ServisSlovenija
Tel.: 080080917
E-Mail: kompernass@lidl.si
IAN 390790_2201
Garancijski list
KOMPERNASS HANDELS GMBH
BURGSTRASSE 21
44867 BOCHUM
GERMANY
www.kompernass.com