LB 88 - Humidifier BEURER - Free user manual and instructions
Find the device manual for free LB 88 BEURER in PDF.
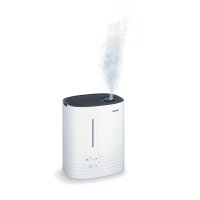
| Product type | Air humidifier |
| Brand | Beurer |
| Model | LB 88 |
| Dimensions (L x W x H) | 29.5 cm x 19.5 cm x 28 cm |
| Empty weight | 2.24 kg |
| Power supply | 220-240 V AC / 50-60 Hz |
| Rated power | 280 W |
| Tank capacity | 6 liters |
| Max. evaporation output | 550 ml/h |
| Recommended room size | Up to 48 m² |
| Technology | Ultrasonic + evaporation |
| Heated water evaporation function | Yes, 3 levels |
| Aroma diffuser | Yes, with aroma pads |
| Automatic shut-off | Yes, when water level is low |
| Water level indicator | Red LED |
| Cleaning | Cleaning brush included |
| Anti-limescale | Anti-limescale tablets included (15) |
| Included accessories | 15 aroma pads, 15 anti-limescale tablets, cleaning brush |
| Warranty | 3 years |
Frequently Asked Questions - LB 88 BEURER
User questions about LB 88 BEURER
0 question about this device. Answer the ones you know or ask your own.
Ask a new question about this device
Download the instructions for your Humidifier in PDF format for free! Find your manual LB 88 - BEURER and take your electronic device back in hand. On this page are published all the documents necessary for the use of your device. LB 88 by BEURER.
USER MANUAL LB 88 BEURER
natural_image
Two beurer refrigerators with control knobs and display cases, shown from different angles (no visible text or symbols on the devices themselves)Funktionsschema
natural_image
Technical line drawing of a mechanical device with internal components and a directional arrow (no text or symbols)natural_image
Technical line drawing of a mechanical device with internal components and directional arrows (no text or symbols)natural_image
Technical line drawing of a mechanical device with internal components and an arrow indicating direction (no text or symbols)natural_image
Technical line drawing of a mechanical device with internal components and a control panel (no text or symbols)natural_image
Technical line drawing of a mechanical assembly with gears and housing (no text or symbols)natural_image
Simple line drawing of a container with a square object above it, no text or symbols present.natural_image
Three technical line drawings of a mechanical device open, showing internal components and assembly (no text or symbols)natural_image
Hand pouring liquid into a container on a wooden base (no text or symbols visible)Kalkfilter einbauen
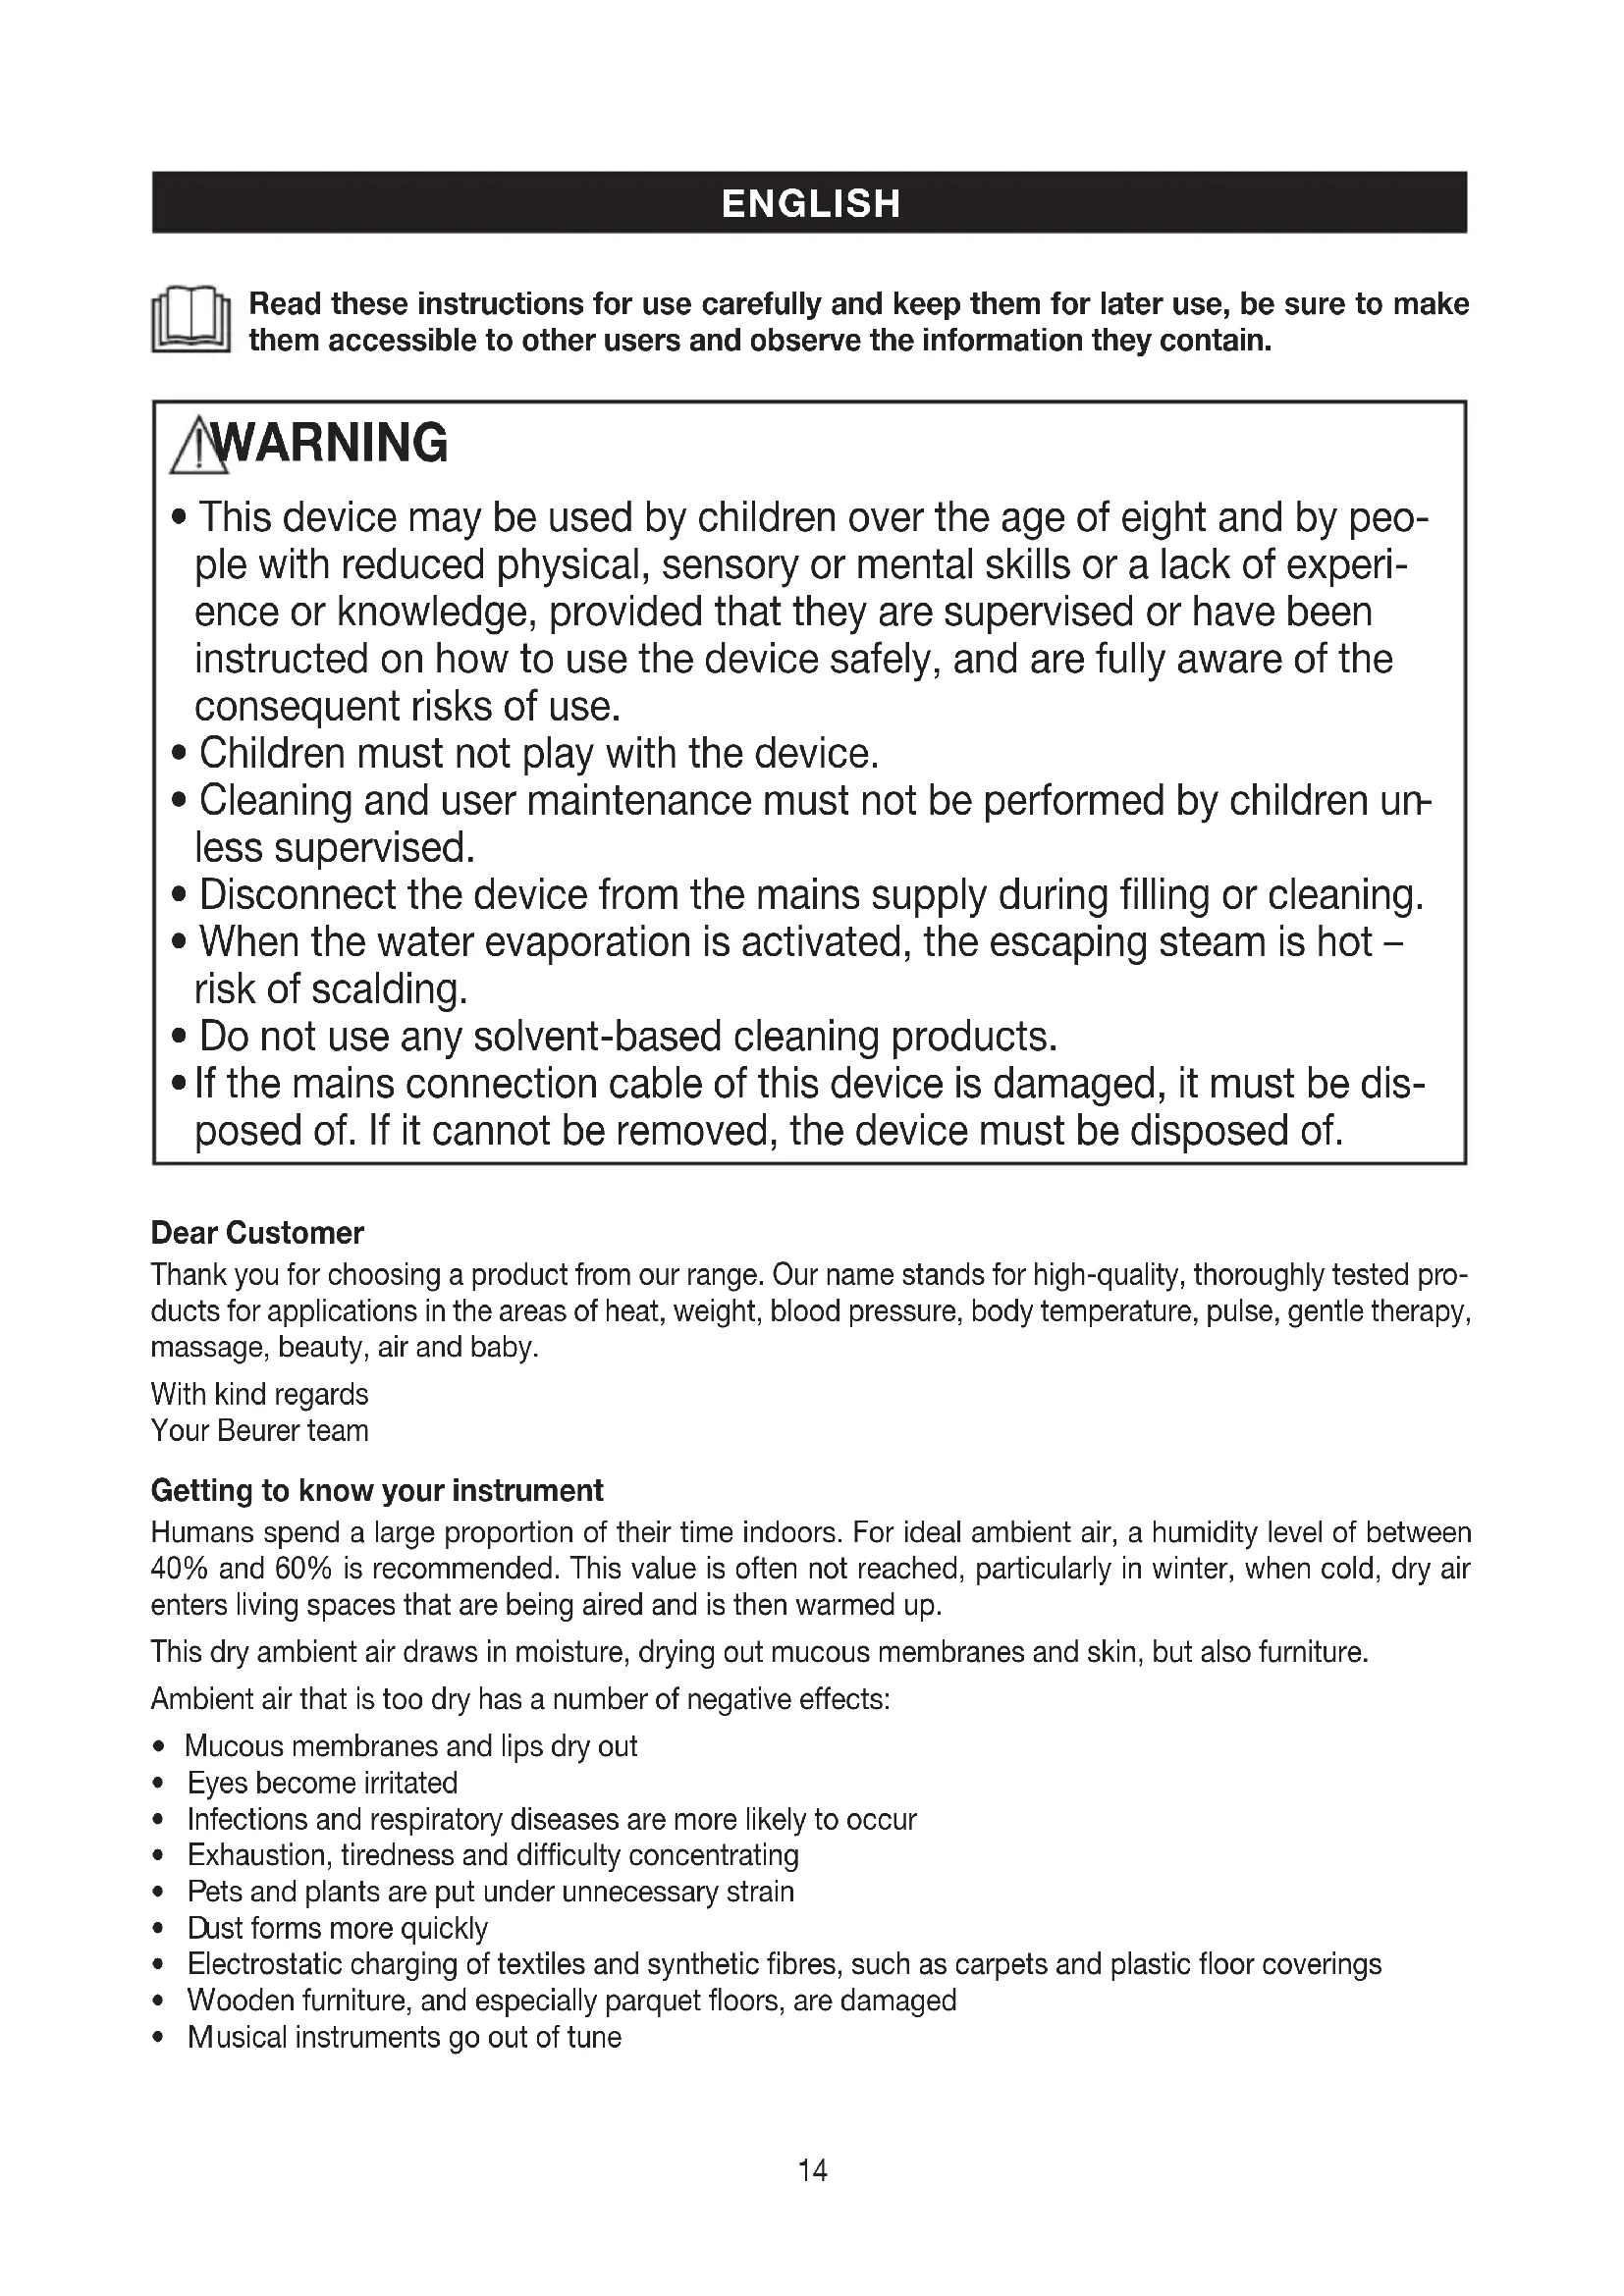
Read these instructions for use carefully and keep them for later use, be sure to make them accessible to other users and observe the information they contain.
WARNING
- This device may be used by children over the age of eight and by people with reduced physical, sensory or mental skills or a lack of experience or knowledge, provided that they are supervised or have been instructed on how to use the device safely, and are fully aware of the consequent risks of use.
• Children must not play with the device. - Cleaning and user maintenance must not be performed by children unless supervised.
- Disconnect the device from the mains supply during filling or cleaning.
- When the water evaporation is activated, the escaping steam is hot – risk of scalding.
- Do not use any solvent-based cleaning products.
- If the mains connection cable of this device is damaged, it must be disposed of. If it cannot be removed, the device must be disposed of.
Dear Customer
Thank you for choosing a product from our range. Our name stands for high-quality, thoroughly tested products for applications in the areas of heat, weight, blood pressure, body temperature, pulse, gentle therapy, massage, beauty, air and baby.
With kind regards
Your Beurer team
Getting to know your instrument
Humans spend a large proportion of their time indoors. For ideal ambient air, a humidity level of between 40% and 60% is recommended. This value is often not reached, particularly in winter, when cold, dry air enters living spaces that are being aired and is then warmed up.
This dry ambient air draws in moisture, drying out mucous membranes and skin, but also furniture.
Ambient air that is too dry has a number of negative effects:
• Mucous membranes and lips dry out
- Eyes become irritated
• Infections and respiratory diseases are more likely to occur
• Exhaustion, tiredness and difficulty concentrating
- Pets and plants are put under unnecessary strain
• Dust forms more quickly
• Electrostatic charging of textiles and synthetic fibres, such as carpets and plastic floor coverings
- Wooden furniture, and especially parquet floors, are damaged
• Musical instruments go out of tune
- Works with the dual technology function for ultrasonic nebulisation and water evaporation
- Boasts high humidifying performance, max. 550 ml/hour
– Is suitable for rooms of up to 48 m ^2 - Humidifies the air particularly hygienically – bacteria can be killed by heating
– Is suitable for use with aromas - Can be used with anti-lime pads depending on water hardness, to avoid heavy calcifications
- Makes little noise
- Switches off automatically if the water runs out
- Is easy to clean with a cleaning brush
Contents
- Included in delivery.... 15
- Signs and symbols....15
- Warnings and safety notes....16
- Intended use....17
- Device description....18
- Initial use 18
-
Usage 19
-
Cleaning and maintenance....19
- Accessories and replacement parts......22
- What if there are problems? 23
- Disposal.... 23
- Technical specifications 23
- Warranty / Service 24
1. Included in delivery
- Base unit for air humidifier
• Water tank for air humidifier - 15 aroma pads
• 15 anti-lime pads - Cleaning brush
• These instructions for use
2. Signs and symbols
The following symbols appear in the instructions for use and on the type plate:
 | WARNINGWarning instruction indicating a risk of injury or damage to health |  | Manufacturer |
 | IMPORTANTSafety note indicating possible damage to the device/accessory |  | CE labellingThis product satisfies the requirements of the applicable European and national directives. |
 | Product informationNote on important information |  | Dispose of packaging in an environmentally friendly manner |
 | Read the instructions |  | Certification symbol for products that are exported to the Russian Federation and members of the CIS |
 | Disposal in accordance with the Waste Electrical and Electronic Equipment EC Directive – WEEE |  | Protection class II deviceThe device is double-protected and thus corresponds to protection class 2 |
3. Warnings and safety notes
Read these instructions for use carefully. Non-observance of the following information may result in personal injury or material damage. Store these instructions for use and make them accessible to other users. Make sure you include these instructions for use when handing over the device to third parties.

WARNING
Keep packaging material away from children! There is a choking hazard.
Electric shock

WARNING
-
As with every electrical device, use this air humidifier carefully and cautiously, in order to avoid hazards due to electric shock.
• Therefore, observe the following instructions for use: -
Only use this device with the voltage specified on the device
- Never use the device if it or its accessories show visible signs of damage
- Do not use the device during a thunderstorm
- In the case of defects or operational faults, switch the device off immediately and disconnect the device from the mains socket. Do not pull on the mains cable or on the device to disconnect the plug from the socket. Never hold or carry the device by the mains cable. Keep the cables away from hot surfaces.
- Only use the device in dry rooms (e.g. never in the bath, sauna).
- Never reach for a device that has been submerged in water. Disconnect the mains plug immediately.
- Do not use the device if it or its accessories are visibly damaged.
-
Do not drop the device or subject it to any impacts.
-
Do not use the device during a storm.
- Do not clamp or pinch the mains cable.
- Ensure that the mains cable and plug do not come into contact with water, steam or other liquids.
Repairs

WARNING
- Do not open the base unit.
- Only specialist personnel may perform repairs on electrical devices. Improper repairs may subject users to considerable danger. For repairs, please contact Customer Services or an authorised retailer.
Risk of fire

WARNING
- There is a risk of fire if the device is used improperly or these instructions for use are ignored. Therefore, never use the air humidifier
• Underneath a cover, such as blanket, pillow, etc. - Near petrol or other highly flammable substances.
Risk of scalding

WARNING
- When using the device with the water evaporation activated, the escaping steam is hot.
- Under no circumstances should you put your hands or face above the misting outlet nozzles during operation.
- Avoid contact with hot surfaces.
- Do not try to remove the misting outlet nozzles or the anti-lime pad during operation or for up to 15 minutes after switching off and unplugging the device. These parts may only be removed for cleaning purposes.
- As high temperatures prevail in this air humidifier, please take the appropriate safety precautions, particularly where children are present, and situate the device somewhere inaccessible to children.
Handling

IMPORTANT
- The device must be switched off and disconnected from the mains every time after use and before cleaning.
- The device is only intended for the purpose described in these instructions for use. The manufacturer is not liable for damage resulting from improper or careless use.
- Ensure that the mains cable does not pose a trip hazard.
- Do not insert any objects into openings on the device.
- Do not place any objects on the device.
- Do not expose the device to high temperatures.
- Avoid water damage by handling the device carefully (e.g. water damage from splashing in the vicinity of wooden floors).
- If the device should accidentally tip over, water may escape, even if the device is switched off and unplugged.
- The immediate vicinity of the air humidifier may become damp.
- Calcareous water can leave white deposits.
- Do not place the device on the floor, but in a raised position (e.g. on a table or chest of drawers).
- Position the device so that the mist outlet is not directed towards objects.
• Empty any remaining water when the device is not in use. - Do not expose the device to high temperatures.
4. Intended use
This air humidifier is intended for humidifying ambient air.
The device is intended for private use.

WARNING
- If you suffer from a severe respiratory or lung disease, consult your doctor before using the air humidifier.
- The device is only intended for the purpose described in these instructions for use. The manufacturer is not liable for damage resulting from improper or careless use.
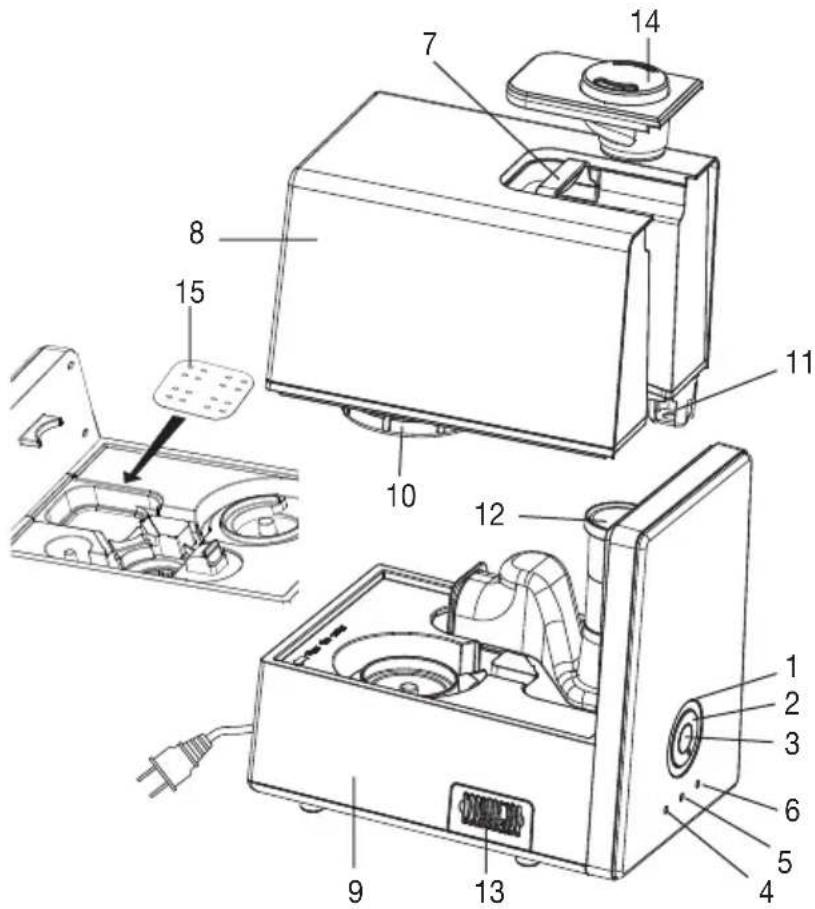
5. Device description
- Control dial
- Illuminated operating loop for displaying the operation
- Button for activating the water evaporation
- LED display water evaporation level 1
- LED display water evaporation level 2 (if 4+5, level 3 lights up)
- Water level indicator
- Recessed grip (when removing the mist outlet)
- Water tank
- Base unit for air humidifier
- Water tank screwed plug
- Fill level sensor
- Air outlet
- Aroma compartment
- Mist outlet with two nozzles
- Pad
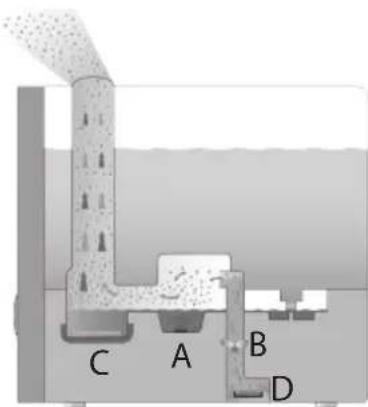
Functional layout
A High-frequency vibrations release tiny drops from the surface of the water.
B The fan air flow transports the humid air out into the room.
C Water evaporation can also be switched on.
D If you wish, the device can be used with aromas.
6. Initial use
- Open the cardboard packaging.
- Now remove all plastic films.
- Check the device, mains plug and cable for damage.
Fill with water
- When filling the tank with water, disconnect the plug from the mains.
- Remove the misting outlet nozzles.
- Lift the water tank by the recessed grip and turn it upside down.
- To fill the tank, open the screwed plug underneath it.
- Now fill the tank with water. The water tank holds a maximum of six litres, and the water level is visible from the outside.
- Lock the water tank with the screwed plug.
- You may now optionally insert the anti-lime pad (15) into the evaporator pan. We recommend doing so if you live in a hard water area.
• The tank should sit tightly on the base unit. - Check whether the misting outlet nozzle is positioned correctly on the water tank.

IMPORTANT
- Do not add any essential oils or fragrances to the water. If other additives are used, the plastic material and the ultrasound membrane may become discoloured and damaged.
- Use fresh water in the device.
- Use warm water (30°C – 45°C) and always fill the tank to the maximum level, otherwise the device could leak due to physical factors.
Positioning the device
- Place the air humidifier on a firm, level and water-resistant surface.
- Position the air humidifier in the vicinity of a heating pad to improve evaporation output, particularly in large rooms (do not exceed a max. temperature of 50 °C). Always ensure that the air inlet and air outlet remain clear and that the air flows freely.
7. Usage

IMPORTANT
Check the humidity of your ambient air regularly. Intensive continuous operation can cause the ambient air to become excessively humid. The relative air humidity should not exceed 60%.
Switching on the device
- Insert the plug into the mains socket.
- From the min./°position, turn the control dial to the right. The blue illuminated operating loop lights up. If there is not enough water or no water at all in the water tank, a red LED lights up. The device has switched off for safety reasons.
- Use the control dial to set the desired evaporation output. Evaporation output is limited to a maximum of 550 ml per hour.
- When the device is switched on, the water evaporation level is already set to 1; a single blue LED shows the operation. By pushing the middle control knob ( ), the water evaporation level increases to 2 (second blue LED lights up). By pressing it again, both LEDs turn on – level 3. (Evaporation level). The vaporisation stops when the controller is turned to the left again.
- Check the water level regularly during operation and refill the tank if necessary.

NOTE
You may optionally add drops of aroma/scented oils to the aroma compartment (13). These will lend a pleasant odour to the room.
8. Cleaning and maintenance
Regular cleaning is a prerequisite for hygienic and fault-free operation.
The air humidifier can be dismantled easily and without tools for cleaning.
Always empty and thoroughly clean the air humidifier if the device contains water and has not been operated for longer than 3 days.
A lack of cleaning and hygiene can cause bacteria, algae and fungi to form in the water.
In any case, we recommend the following cleaning intervals.
| Every three days | As required | |
| x Cleaning the ultrasound membrane with a brush, rinsing the base | ||
| x Rinsing the water tank, replacing the water | ||
| x Clean the air humidifier inside and out | ||
| x Descaling | ||

NOTE
- Clean the device using only the methods specified.
• Under no circumstances may liquid enter the base unit. - Do not use any solvent-based cleaning products.
- Only use a mild flushing agent or vinegar/vinegar-based cleaner to perform cleaning or disinfection work.
Cleaning the ultrasound membrane with a brush, rinsing the base

NOTE
Empty the water from the base unit via the side rim.
- Clean the ultrasound membrane with the cleaning brush provided. Should dirty residue remain in the base unit, pour some clean, fresh water into the base unit and empty it out via the side edge.
Clean the water evaporation pan
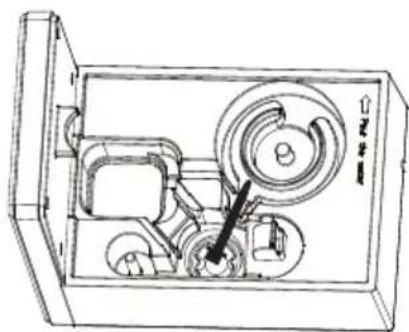
natural_image
Technical line drawing of a mechanical device with gears and a handle (no text or symbols)
NOTE
- The evaporation pan is hot during operation. Allow the device to cool sufficiently before cleaning it.
1) Hold the air outlet in one hand and turn it gently backwards.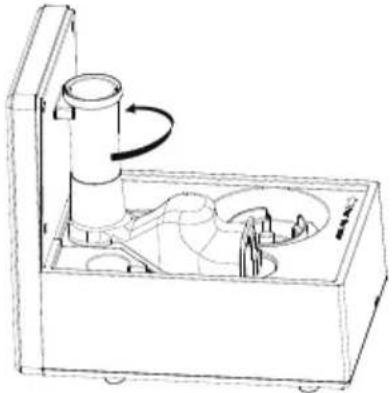 | 2) Hold the air outlet firmly and remove it.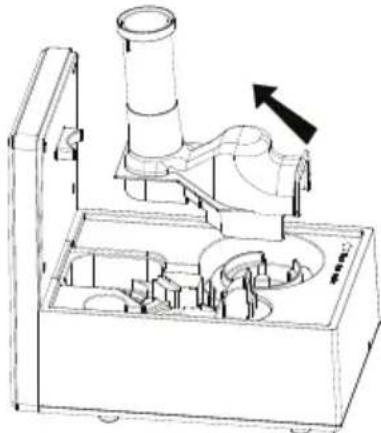 |
3) If necessary, remove the anti-lime pad. | 4) Clean the evaporation pan with the cleaning brush.For heavy contamination, use a mild cleaning product, and allow it to work together with water in the pan for 10-15 minutes. Then clean again with the cleaning brush.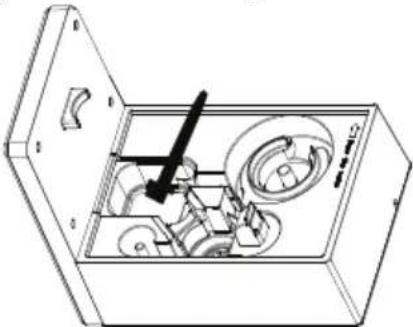 |
5) Should dirty residue remain in the evaporation pan, pour some clean, fresh water into the base unit and empty it out via the side edge.
6) Rinse the anti-lime pad in clear water.
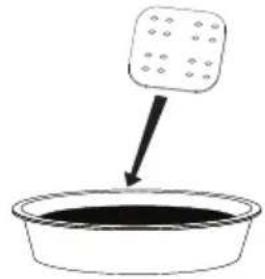
natural_image
Simple line drawing of a bowl with a square object above it, no text or symbols present.7) Reinsert the anti-lime pad and position the air outlet back on the base unit.
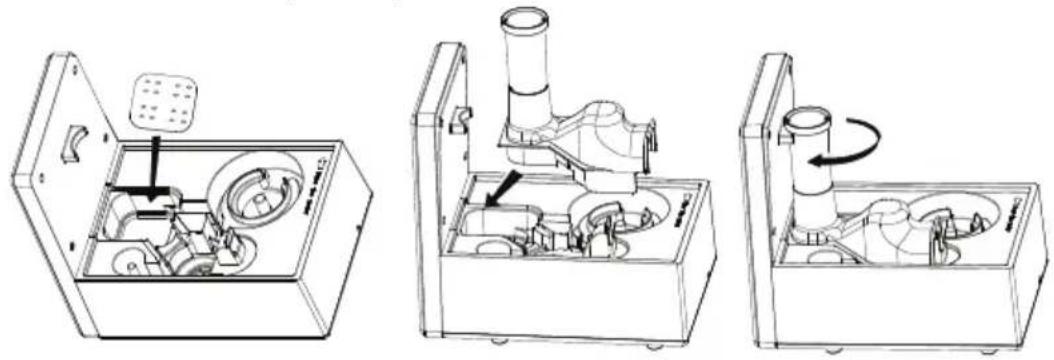
natural_image
Three technical line drawings of a mechanical device open, showing internal components and assembly (no text or symbols)Rinsing the water tank, replacing the water
- Clean the water tank regularly, at least once a week if using daily.
- Use a mild cleaning product or vinegar/vinegar-based cleaner.
- Clean the thread of the screwed plug using the brush.
• Fill the water tank halfway with water. - Tightly close the water tank using the screwed plug.
- Shake the water tank by rocking it back and forth several times.
• Empty out the water completely. - Repeat the process using clean, fresh water.
Clean the air humidifier inside and out
• Empty the water from the base unit via the side edge.
- Wipe the air humidifier with a damp cloth inside and out.
Only use a mild flushing agent or vinegar/vinegar-based cleaner to perform cleaning work.
Descaling
Descaling the ultrasound membrane
Hard water can cause limescale to build up in the device and especially on the ultrasound membrane. This forms white deposits. Descale the device regularly.
- Drop some descaler onto the ultrasound membrane.
- Leave it to take effect for two to five minutes.
- Clean the ultrasound membrane using the cleaning brush.
- Rinse the base unit twice with clean, fresh water.
Cleaning inside the base unit
- Dip a damp, soft cloth briefly in descaling solution.
- Use the cloth to wipe the inside of the base unit.
- Carefully pour some clean, fresh water into the base unit.
• Empty the water from the base unit via the side edge. - Repeat the process using clean, fresh water.
Descaling the water tank
- Fill the water tank halfway with water.
- Add a small quantity of descaler.
- Tightly close the water tank using the screwed plug.
- Shake the water tank by rocking it back and forth several times.
• Empty the descaling solution completely. - Rinse the base unit twice with clean, fresh water.
Storage
If you do not plan to use the device for a relatively long period of time, we recommend that you thoroughly empty, clean and dry the device and store it in the original packing in a dry environment, ensuring it is not weighed down by additional items.
9. Accessories and replacement parts
TIP!
If the water is hard, we recommend using the optional anti-limescale filter in addition to the anti-lime pads supplied.

NOTE
- If the anti-limescale filter does not prevent limescale build-up, or if white deposits form on or in the device, the anti-limescale filter should be replaced.
- The service life of the anti-limescale filter is around two to three months at most.
- If the device is not used for a relatively long time, the anti-limescale filter must be removed from the water tank and dried out.

natural_image
Hand pouring liquid into a container on a rectangular base (no text or symbols visible)Fitting the anti-limescale filter
- Lift the water tank and rotate it.
- Open the screwed plug on the water tank.
- Screw the anti-limescale filter onto the screwed plug on the inside.
- Tightly seal the water tank using the screwed plug.
Replacement items
For replacement parts and additional items visit www.beurer.com or contact the corresponding service address in your country (according to the service address list).
Replacement parts and additional items are also available from retailers.
| Item Item number | |
| 10 anti-lime pads 163.141 | |
| 10 aroma pads 163.142 | |
| Beurer by Taoasis “Vitality” aroma oil (10 ml) 681.30 | |
| Beurer by Taoasis “Harmony” aroma oil (10 ml) 681.31 | |
| Beurer by Taoasis “Relax” aroma oil (10 ml) 681.32 | |
| Beurer by Taoasis “Sleep Well” aroma oil (10 ml) 681.33 | |
| Anti-limescale filter 162.843 | |
10. What if there are problems?
| Problem Cause Solution | ||
| The operating loop does not light up. | The mains cable is not plugged in. Connect the plug. | |
| The control dial is at its minimum position. | Turn the control dial clockwise towards the maximum position. | |
| No LED display. The | mains cable is not plugged in. Connect the plug. | |
| The control dial is at its minimum position. | Turn the control dial clockwise towards the maximum position. | |
| Red LED display. | The water level is too low; the water tank is empty. | Fill the water tank. |
| No mist is produced. | The LED display lights up red. Fill the water tank. | |
| The LED display does not light up. Connect the plug. | ||
| The mist has a strange smell. | The device is new. Remove the water tank, turn the screwed plug and remove it.Air the open, empty water tank in a cool, dry place for twelve hours. | |
| Stale or dirty water. Empty the base unit and the water tank and clean them thoroughly.Fill the water tank with fresh water. | ||
| Strange noise. The w | water tank is not positioned correctly on the base unit. | Lift up the water tank and position it correctly on the base unit.The tank should sit tightly on the base unit. |
| There is too little water in the water tank. | Fill the water tank. | |
| The device is not level and unstable. | Place the device on a firm, level surface. | |
| Mist escapes from underneath the water tank. | The water tank is not positioned correctly on the base unit. | Lift up the water tank.Check whether the join between the base unit and water tank is clean.Clean if required.Position the water tank correctly on the base unit.The tank should sit tightly on the base unit. |
11. Disposal
For environmental reasons, do not dispose of the device in the household waste at the end of its useful life. Dispose of the unit at a suitable local collection or recycling point. Dispose of the device in accordance with EC Directive – WEEE (Waste Electrical and Electronic Equipment). If you have any questions, please contact the local authorities responsible for waste disposal.
12. Technical specifications
| Dimensions (L x W x H) Approx. 29.5 cm x 19.5 cm x 28 cm | |
| Cable length Approx. 1.4 m | |
| Weight when empty Approx. 2.24 kg | |
| Mains voltage/frequency | 220-240 V AC / 50/60 Hz |
| Nominal power | 280 W |
| Room size Up to 48 m | 2 |
| Maximum capacity Approx. 6 litres | |
| Evaporation output 550 ml/hour | |
13. Warranty / Service
Beurer GmbH, Söflinger Straße 218, 89077 Ulm, Germany (hereinafter referred to as “Beurer”) provides a warranty for this product, subject to the requirements below and to the extent described as follows.
The warranty conditions below shall not affect the seller's statutory warranty obligations which ensue from the sales agreement with the buyer.
The warranty shall apply without prejudice to any mandatory statutory provisions on liability.
Beurer guarantees the perfect functionality and completeness of this product.
The worldwide warranty period is 3 years, commencing from the purchase of the new, unused product from the seller.
The warranty only applies to products purchased by the buyer as a consumer and used exclusively for personal purposes in the context of domestic use.
German law shall apply.
During the warranty period, should this product prove to be incomplete or defective in functionality in accordance with the following provisions, Beurer shall carry out a repair or a replacement delivery free of charge, in accordance with these warranty conditions.
If the buyer wishes to make a warranty claim, they should approach their local retailer in the first instance: see the attached “International Service” list of service addresses.
The buyer will then receive further information about the processing of the warranty claim, e.g. where they can send the product and what documentation is required.
A warranty claim shall only be considered if the buyer can provide Beurer, or an authorised Beurer partner, with
- a copy of the invoice/purchase receipt, and
- the original product.
The following are explicitly excluded from this warranty:
- deterioration due to normal use or consumption of the product;
- accessories supplied with this product which are worn out or used up through proper use (e.g. batteries, rechargeable batteries, cuffs, seals, electrodes, light sources, attachments and nebuliser accessories);
- products that are used, cleaned, stored or maintained improperly and/or contrary to the provisions of the instructions for use, as well as products that have been opened, repaired or modified by the buyer or by a service centre not authorised by Beurer;
- damage that arises during transport between manufacturer and customer, or between service centre and customer;
- products purchased as seconds or as used goods;
- consequential damage arising from a fault in this product (however, in this case, claims may exist arising from product liability or other compulsory statutory liability provisions).
Repairs or an exchange in full do not extend the warranty period under any circumstances.
FRANÇAIS

natural_image
Technical line drawing of a mechanical device with internal components and a central knob (no text or symbols)natural_image
Hand pouring liquid into a container on a rectangular base (no text or symbols visible)Installer le filtre anti-calcaire
natural_image
Technical line drawing of a mechanical device with gears and housing (no text or symbols)natural_image
Technical line drawing of a mechanical device with rotating components and a cylindrical component (no text or symbols)natural_image
Technical line drawing of a mechanical device with internal components and an arrow indicating direction (no text or symbols)natural_image
Hand pouring liquid into a container on a wooden box (no text or symbols visible)natural_image
Technical line drawing of a mechanical device with internal components and a pointer (no text or symbols)
AVVERTENZA
natural_image
Simple line drawing of a bowl with a tray of food being inserted into it (no text or symbols)natural_image
Three technical line drawings of a mechanical device with internal components and directional arrows (no text or symbols)natural_image
Hand pouring liquid into a container on a white box (no text or symbols visible)Fonksiyon şeması
natural_image
Technical line drawing of a mechanical device with gears and housing (no text or symbols)