Anita PL042TEMD - Coffee machine Lelit - Free user manual and instructions
Find the device manual for free Anita PL042TEMD Lelit in PDF.
User questions about Anita PL042TEMD Lelit
0 question about this device. Answer the ones you know or ask your own.
Ask a new question about this device
Download the instructions for your Coffee machine in PDF format for free! Find your manual Anita PL042TEMD - Lelit and take your electronic device back in hand. On this page are published all the documents necessary for the use of your device. Anita PL042TEMD by Lelit.
USER MANUAL Anita PL042TEMD Lelit
MACCHINA PER CAFFÉ ESPRESSO CON MACININO INCORPORATO E DUAL PID
ESPRESSOMACHINEWITHBUILT-INGRINDERANDDOUBLEPID
MACHINE A CAFÉ ESPRESSO AVEC MOULIN INTEGRE' ET PID DOUBLE
ESPRESSOMASCHINE MIT INTEGRIERTER KAFFEMUHLE UND DOPPelter PID
TEMPERATURSTEUERUNG
KOΦEBAPKA 3CIPPECCO CO BCTPOHON KOΦEMOJIKOH N C DBOHOM PID JIJI
KOΦE I NAPA
CAFETIERA ESPRESSO CU RÁSINITÀ INCORPORATA ŞI DUBLU PID
CAFETERA CON MOLINILLO INCORPORADO Y DOBLE PID

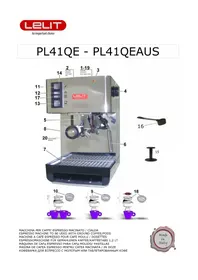
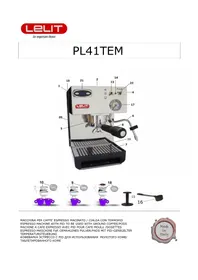
COMPONENTI:
- Cold water tank
- Cup warmer
- \
- Steam/hot water knob
- Brewing group
- Steam/hot water wand
- Removable drip tray grate
- Filterholder
- Single cup filter
- Two cups filter
- On/off switch
- Coffee/hot water/steam lever switch
-
Indicator light: machine ready
-
Integrated tamper
- Blind filter
- Coffee bean container
- Filter for pods
- Removable drip tray
- Removable ground coffee catch tray
- Ground coffee switch
- Grinding degree scale
- Grinding regulation knob
- Ground coffee distributor
- Manometer
- Pump lever switch
- Double PID

GENERAL WARNINGS
This manual is an integral and essential part of the product. Please read all these warnings carefully as they provide important information on safe installation, use and maintenance. These instructions should be carefully retained for future reference.
- This appliance can be used by children aged from 8 years and above and persons with reduced physical, sensory or mental capabilities or lack of experience and knowledge if they have been given supervision or instruction concerning use of the appliance in a safe way and understand the hazards involved. Children shall not play with the appliance. Cleaning and user maintenance shall not be made by children without supervision.
- This appliance can be used by children aged from 8 years and above if they have been given supervision or instruction concerning use of the appliance in a safe way and if they understand the hazards involved. Cleaning and user maintenance shall not be made by children unless they are older than 8 and supervised. Keep the appliance and its cord out of reach of children aged less than 8 years.
- Appliances can be used by persons with reduced physical, sensory or mental capabilities or lack of experience and knowledge if they have been given supervision or instruction concerning use of the appliance in a safe way and understand the hazards involved. Children shall not play with the appliance.
- This appliance is intended to be used in household and similar applications such as: staff kitchen areas in shops, offices and other working environments; farm houses; by clients in hotels, motels and other residential type environments; bed and breakfast type environments.
- The appliance is only designed for making espresso coffee or hot drinks using the hot water or steam wes and for preheating cups.
- Store the packaging material (plastic bags, polystyrene, etc.) out of the reach of children.
- The appliance is only designed for making espresso coffee or hot drinks using the hot water or steam wands and for preheating cups.
- Any use other than that described above is improper and could be hazardous; the manufacturer accepts no liability whatsoever for any damage arising from improper use of the appliance.
- This appliance is not intended for use by persons (including children) with reduced physical, sensory or mental capabilities, or lack of experience and knowledge, unless they have been given supervision or instruction concerning use of the appliance by a person responsible for their safety.
- Children must not be allowed to play with the appliance.
- The appliance must not be left unattended or used outdoors.
- The appliance should not be immersed in water or cleaned by spraying
- The appliance must not be exposed to atmospheric agents (rain, sun, ice).
- If the appliance is stored in rooms where the temperature can go below freezing, the tank and the water pipes must be emptied.
- All the packing material (plastic bags, polystyrene, etc.) should be kept out of the reach of children.
- No liability is accepted for the use of unauthorized spares and/or accessories.
- No liability is accepted for repairs not carried out by authorized service centres.
- The manufacturer accepts no liability for tampering with any of the appliance components.
In all the above cases the warranty will be void.

ESSENTIAL SAFETY WARNINGS
As with all electrical appliances, the risk of electric shock cannot be excluded, therefore, the following safety warnings should be carefully observed.
To avoid spilling the connector, never pull the power cord.
- Always attach plug to appliance first, then plug cord into the wall outlet.
- To disconnect the appliance, turn any control to "off", then remove plug from wall outlet.
- In the event of any fault or malfunction, do not attempt to carry out repairs. Switch the appliance off, remove the plug and contact the Service Centre.
- In the event of damage to the plug or the power cord, do not operate the appliance, these should be replaced only and
exclusively by the Service Centre. - Unplug from outlet when not in use.
- Before cleaning the exterior surfaces of the appliance, putting on or taking off parts, switch it off, remove the plug from the outlet and allow to cool.
- To reduce the risk of injury do not drape cord over the counter top or table top where it can be pulled on by children or tripped
over unintentionally - Do not let cord touch hot surfaces.
- Do not let cord hang over edge of table or counter.
- The use of accessory attachments not recommended by the appliance manufacturer may result in fire, electric shock or injury to persons.
- Do not place on or near a hot gas or electric burner, or in a heated oven.
- Before switching on, ensure that the power supply voltage corresponds to that indicated on the plate on the base of the appliance and that the power supply is properly earthed.
- Do not tamper with the appliance. Contact an authorized technician or the nearest service centre for any problem.
- Do not touch the appliance if your hands or feet are wet.
- Do not touch the plug with wet hands.
- Ensure that the electrical outlet is always freely accessible so that the plug can be easily removed when necessary.
- When removing the plug, always hold it directly. It should never be removed by pulling on the power cord, as this can cause damage.
- To protect against fire, electric shock and injury to persons do not immerse cord, plugs in water or other liquid.
- Avoid splashing or dripping water since this can dampen electrical elements, plugs, sockets and machine cables.
- Do not use adapters, multiple sockets or extension cords. If their use is unavoidable, use simple adapters or multiple sockets and extension cords that conform to current safety standards, taking care not to exceed the current limit marked on the simple adapter or extension cord, or the ma-ximum capacity of the multiple socket.

WARNING ABOUT BURN/SCALD RISKS
This appliance produces hot water and steam; therefore, the following safety warnings should be strictly observed
- Warning: hot surfaces remain hot for a certain time also after use.
- Take care to avoid contact with water spray or jets of steam.
- When the appliance is switched on, do not touch the cup warming plate as it is hot.
- Never direct the steam or water spray towards your body.
- Be careful when touching the steam/ hot water dispensing wand (6).
- Never remove the filterholder (8) during operation.
- The parts labelled "CAUTION HOT" are very hot, so approach and operate them with maximum caution.
- Only place cups and glasses for use with the coffee machine on the cup warmer (2). Other objects should not be placed there.
- Dry the cups thoroughly before placing them on the cup warmer (2).
SAVE THESE INSTRUCTIONS
USER INSTRUCTIONS
1^st start up of the machine:
- Remove the machine from its packing and make sure all packing parts have been taken off (including the protection bags).
- Lay the machine on a flat and steady surface far away from hot places and from the water taps.
- Remove the water tank cover on the back of the machine and pull out the water tank (1) paying attention not to damage the silicone tubes inside it.
- Rinse the water tank thoroughly with cold water.
- Fill the tank (1) with cold water.
- Replace the water tank (1) back in the machine and check that the water tubes are not bent and that the filter is well set on one of them.
- Place the filterholder (8) under the brewing group (5) and turn it from the left to the right. Leave it there so that it can get warm and it gets ready for use.
- Open the steam/hot water knob (4).
- Place an empty jug under the steam/hot water wand (6). Position the coffee/hot water/steam lever switch (13) on hot water mode (middle position) and lift the pump lever switch (26).
- Plug in the machine in the mains. Make sure that the wall socket has the right voltage.
- Turn the machine on by lifting the on/off switch (11). The integrated indicator light (11) turns on to confirm the power supply.
- When water is dispensed from the steam/hot water wand (6), lower the pump lever switch (26) and close the steam/hot water knob (4).
- Position the lever switch (13) on coffee mode (down), lift the pump lever switch (26) and deliver water from the brewing group (5) for around 2 minutes with the filterholder inserted (8), after that stop the delivery by lowering the pump lever switch (26). Wait at least 1 minute before proceeding with the next operation.
- Fill the tank (1) with cold water.
- Position the lever switch (13) on hot water mode (middle position), open the steam/hot water knob (4) and lift the pump lever switch (26). Water is dispensed from the steam/hot water wand (6) immediately. Deliver water for around 2 minutes from the steam/hot water wand (6); after that stop the delivery by lowering the coffee/hot water extraction lever switch (26). Close the steam/hot water knob (4).
- Wait at least 1 minute before proceeding with the next operation.
- After completing all these operations, leave the machine on.
- The PID (27) will visualize the degrees inside the boiler and will control the boiler's heating.
- The PID is already set from the producer on 95^ for coffee mode, i.e. the ideal temperature for a good cup of coffee. (If you want to change the PID's temperature, please follow the instructions written under How to set the temperature inside the boiler by means of the PID).
Grinding adjustment:
- As a reference for the grinding degree, a grinding degree scale (22) has been placed on the coffee bean container (17): "7.6.5.4.3.2.1"
- By taking as a point of reference the tally mark in the machine frame and by turning grinding regulation knob (23), the grinding degree scale will turn accordingly.
- Choose higher degrees to get coarse-ground coffee, or smaller degrees to get fine-ground coffee.
- A correct grinding degree (taking into consideration the various coffee blends) is essential to get a good cup of coffee. We suggest degree 3 to get a medium grinding.
Preparing an espresso coffee:
- Check that the tank (1) contains water by looking at the water level indicator.
- Lift the on/off switch (11): the integrated indicator light of the switch (11) will turn on. Do this operation only if the machine is off. If it's on, proceed to the next step.
- As soon as the PID's display shows the set temperature and the indicator light (14) turns on, the machine is ready for use.
- Place the single cup filter (9) or the two-cup filter (10) in the filterholder (8) as described in point 7.
- Before preparing your coffee, it is advisable to position the coffee/hot water/steam lever switch (13) on coffee mode (down) and lift the pump lever switch (26) to dispense water for 5 seconds from the brewing group (5) with the tightened filterholder (8) into the drip tray. After dispensing water for the indicated time, lower the pump lever switch (26) in order to stop the purge.
- Drop the bean coffees in the coffee bean hopper (17).
- Press the button (21) with the filterholder (8) to activate the coffee grinder. When you have got the desired coffee quantity, take the filterholder (8) off.
- Press the coffee in the filter against the tamper (15).
- Insert the filterholder (8) into the brewing group (5) and turn it hard to the right; place the cups on the removable drip tray grate (7).
- Position the lever switch (13) on coffee mode and lift up the pump switch (26). The pressure value on the manometer (25) should reach the green zone during the extraction.
- Once you get the desired quantity of coffee, lower the pump switch (26).
- Remove the filterholder (8) and throw away the coffee grounds. Make sure that the filterholder is clean and reposition it in the brewing group to warm up again.
Preparing an espresso with the use of coffee pods:
- Check that the water tank (1) has been filled in with water by looking at the water level indicator.
- Press the on/off switch (11): the indicator light of the switch (11) turns on. Do this operation only if the machine is off. If it's on, proceed to the next step.
-
As soon as the PID's display shows the set temperature and the indicator light (14) goes on, the machine is ready for use.
-
Fit the pod filter (18) into the filterholder (8) that has been warmed up by leaving it attached to the brewing group as described in point 7.
- Before preparing your coffee, it is advisable to position the coffee/hot water/steam lever switch (13) on coffee mode (down) and lift the pump lever switch (26) to dispense water for 5 seconds from the brewing group (5) with the tightened filterholder (8) into the drip tray. After dispensing water for the indicated time, lower the pump lever switch (26) in order to stop the purge.
- Open the single packed pod not damaging the pod.
- Place the pod in its filter (18).
- Insert the filterholder (8) into the brewing group (5), turn it from left to right with force, then put the cup on the removable drip tray grate (7).
- Position the lever switch (13) on coffee and lift the pump switch (26). The pressure value on the manometer (25) should reach the green zone during the extraction.
- Once you get the desired quantity of coffee, push the pump switch (26) down again.
- Remove the filterholder (8) and throw the used pod away and reposition the filterholder in the brewing group (5) to warm up again.
Steam:
- Check that the water tank (1) has been filled in with water by looking at the water level indicator.
- Press the on/off switch (11): the indicator light of the switch (11) will come on. Do this operation only if the machine is off. If it's on, proceed to the next step.
- Position the lever switch (13) on steam mode. NB: the PID's display will automatically show the writing STE and alternatively the set temperature degree for steam. The PID is already set from the producer on 125^ , i.e. the ideal temperature for steam distribution. (If you want to change the PID's temperature, please follow the instructions written under How to set the temperature inside the boiler by means of the PID).
- As soon as the light (14) goes on, the machine is ready for use.
- Open the steam/hot water knob (4). First some water will flow out and then the steam.
- Put the cup with the desired infusion under the steam wand (6) and turn the knob (4) completely.
- When the drink has been suitably frothed, close the steam/hot water knob (4).
- IMPORTANT: after you have frothed your milk, reopen the steam/hot water knob (4) and position the steam switch (13) on hot water, and lift the pump switch up (26). When the water flows out of the steam wand (6), close the steam/hot water knob (4) again and at the same time push the pump switch down (26) and re-position the switch (13) on coffee again. Clean carefully the steam/hot water tube (6). This operation is needed in order to restore the water circuit inside the machine tubes.
Hot water:
- Check that the water tank (1) has been filled in with water by looking at the water level indicator.
- Press the on/off switch (11): the indicator light of the switch (11) will come on. Do this operation only if the machine is off. If it's on, proceed to the next step.
- Position the lever switch (13) on hot water mode.
- As soon as the PID's display (27) shows the set temperature and the indicator light (14) goes on, the machine is ready for use.
- Before preparing your hot drinks, it is advisable to open the steam/hot water knob (4), turn the lever switch on hot water (13) and lift the pump switch (26). Hot water coming is dispensed from the steam/hot water wand (6) immediately. Dispense water into the drip tray for 5 seconds. After that lower the pump switch (26), then close the steam/hot water knob (4).
- Put an empty cup under the steam/hot water wand (6), open the steam/hot water knob (4) and lift the pump switch (26).
- Hot water is dispensed from the steam wand (6) immediately.
- Once you have got the desired quantity of water, lower the pump switch (26) again and close the steam/water knob (4).
- After obtaining hot water from the wand (6), make sure that there is still water in the tank (1).
HOW TO SET THE BOILER TEMPERATURE BY MEANS OF THE PID:
The PID has been set by the producer of this machine on a temperature of 95^ for coffee mode and on 125^ for steam mode. In order to change the temperatures please proceed as follows:
- press the button once: the display will show the writing "t1" that refers to the coffee thermostat set on 95^
press the button twice: the display will show the writing "t2" that refers to the steam thermostat set on 125^ - as soon as the display shows the writing t1 or t2 press the button to change the previously set temperature. NB: in order to change the temperature's value, it's necessary to press the button first
and only afterwards you can help yourself with the buttons and in order to set the desired temperature, decreasing or increasing it.
after 3 sec. from pressing the last button, the inserted temperature is memorized, and the display shows the set temperature for coffee or steam.
the temperature's value can be set starting from a min. of 80C^ up to a max. of 130C^ for coffee mode and from a min. of 120^ up to a max. of 140^ for steam mode. NB: the display will flash while changing from steam mode to coffee mode and it will automatically stop only after reaching the set temperature for coffee mode.
Useful Tips:
The filters (9, 10, 16 and 18) do not need to be washed after every single use but we suggest checking that the holes are not obstructed.
For a better result, we suggest keeping the cups warm on the cup-warmer (2) which only operates by machine on.
The PID (27) is already set by the producer on the right temperature for an excellent espresso and a constant steam distribution. During heating and coffee or water distribution, the temperature can oscillate (+/- 10/12^) . Also, a warning has been inserted for coffee mode (t1): after 108^ the PID's display shows the temperature but intermittently; this is normal, and it warns the user that the temperature is too high for a good espresso.
CLEANING AND MAINTENANCE
Cleaning and maintenance of the machine are essential for the quality of the coffee and the durability of the appliance.
The machine must be cleaned at least once a week.
Before starting, remove the plug from the electrical outlet and allow the machine to cool.
Use a soft cloth, preferably microfiber, like the LELIT cloth (code PLA9101 - not included), and moisten
it with plain water. Do not use abrasive detergents and do not immerse the machine in water.
For thorough maintenance, we suggest you use the LELIT brush (code PLA9101 - not included), which will help you clean the nozzles and the spaces between the gaskets more effectively, removing stains and coffee residues from even the smallest cracks.
Warm running water can be used to clean the removable parts of the machine. The filters and filterholder should never be washed in a dishwasher.
There is no need to clean the filters after each use, but please make sure that they are not clogged.
However, to ensure the best performance of your machine, it is essential to thoroughly clean the steam wand and filterholder after each use.
The filterholder should be cleaned to remove the greasy coffee residues that can negatively affect the taste of your espresso.
Wash the exterior part of the steam wand with a damp cloth and release a little steam to remove any milk residues from inside the wand, as these could obstruct the steam output, making it more difficult to froth milk properly.
BACKFLUSHING:
It is recommended clean the brewing group at least once a week and / or at least every 100 brewed coffees
The following instructions apply to all types of groups fitted to our espresso machines.
Material needed:
- Blind filter (16)
Brush (code PLA9101) - Detergent powder for espresso machine (code PLA9201)
Group cleaning. Follow these steps:
- Place the blind filter (16) into the filterholder
- Add 1 single-dose bag of detergent powder (3,5 grams) in the blind filter
- Insert the filterholder into the brewing group
- Lift the espresso switch for about 10 seconds
- Stop the espresso brewing and wait for 10 seconds
- Without removing the filterholder, repeat this operation 5 times
- Remove the filterholder, lift the lever switch (26) again and rinse the filterholder under the hot water that is dispensed from the group. Lower the lever switch (26).
- Clean the brew group and the brew gasket first with the brush and then with a damp cloth in order to remove all coffee powder residues
- Insert the filterholder into the brewing group again and repeat points 4-5-6 without detergent powder
- Throw away the first espresso you brew
Cleaning of the accessories through immersion. Follow these steps:
- Place the filters and filterholder in a jug with the filterholder handle upwards
- 2 single-dose bags of detergent powder in the jug (7 grams)
- Pour 1 liter of hot water in the jug until the metallic part of the filterholder is completely immersed
- Wait at least 15 minutes
- Remove the immersed parts and rinse them with plenty of warm tap water
- Throw away the first espresso you brew
DESCALING THE MACHINE
The use of the machine creates a natural formation of limescale, over a time period depending on the frequency of use of the machine and on the hardness of the water.
Limescale deposits can obstruct the tubes and decrease the brewing temperature, altering the quality of the coffee and reducing the lifetime of your machine. To avoid the formation of limescale, which can also deposit in the internal circuits, we recommend the use of our LELIT resin filter (code PLA930M - not included) to soften the water. Please insert the filter in the tank following the instructions on the packaging. The filter purifies the water from the calcium and magnesium salts which are deposited to form limescale and affect the taste of your coffee. Remember that the filter loses its effectiveness after a certain number of gallons treated, so replace it periodically. Instructions for the use and replacement of the filter are given on the box. To avoid any possibility of damaging the components of the machine, ADD ONLY NATURAL DESCALING PRODUCTS INTO THE WATER TANK.
TECHNICAL DATA:
Voltage: 220-240V - 50 Hz; Power: 1200W
Pump pressure: 15 bar -- Heating time: ca. 3 min.
PID regulation: from min 80^ C to max 130^ C for the coffee mode;
from min 120^ to max 140^ for the steam mode
Water tank: 2.7 litres; Dimensions: 31,5^25^37 cm
Weight: 10.2kg - To be operated with ground coffee and coffee pods
PL042TEMD-120: 120v: 60Hz, power: 1200W
PL042TEMD-AS: 220V: 60Hz, power: 950W
TROUBLESHOOTING:
Dear Customer, we thank you for buying one of our products, conceived and assembled in accordance with the most up-to date technological innovations. Follow carefully the simple operations of use contained in this manual, which comply with essential safety regulations, you will get the best performances and notice the remarkable reliability of this product along the years.
You find here below an easy table describing some malfunctioning of the machine with its solutions:
| PROBLEM | CAUSE | SOLUTION |
| Coffee is produced without "cream". | 1. Coffee not suitable for machine 2. Improper grind 3. Too little coffee in filter 4. The filterholder has not been tightened under the brewing group | 1. Change the coffee blend 2. Adjust the coffee grinding 3. Put more coffee in the filter 4. Tighten the filterholder more firmly |
| Coffee too cold 1. The machine had not reached the proper temperature 2. Filterholder not preheated 3. Cups not preheated 4. Pressure switch malfunction. | 1. See section "Starting the Machine" and "Making an Espresso Coffee" 2. Filterholder must be heated together with the water - see section "Starting the Machine" 3. Properly heat the cups on the cup-warmer 4. Contact the nearest SERVICE CENTER | |
| Coffee produced too quickly | 1. Coffee too coarsely ground 2. Not enough coffee in the filter 3. Coffee not pressed enough 4. Coffee/pod old or unsuitable | 1. Use a finer grind 2. Put more coffee in the filter 3. Press coffee more firmly 4. Use different coffee/pod |
| Coffee leaks between the coffee group and the filter-holder | 1. Filterholder not properly inserted 2. Too much coffee in the filter 3. Edge of the filterholder not clean 4. The douche seal is worn or damaged | 1. Insert the filterholder correctly 2. Put less coffee in the filter 3. Clean the edge of the filterholder 4. Contact the nearest SERVICE CENTER |
| Coffee is produced in drops | 1. Coffee too finely ground 2. Too much coffee in the filter 3. Coffee too firmly pressed | 1. Use a coarser grind 2. Put less coffee in the filter 3. Press the coffee more gently |
| The machine does not produce steam | 1. Obstructed the nozzle of the steam/hot water wand 2. Too little water in tank | 1. Clean the hole of the nozzle with a needle 2. See section "Starting the Machine" |
| No coffee produced during the coffee cycle | 1. Too little water in tank 2. Steam switch on 3. Coffee too finely ground 4. Too much coffee in the filter 5. Coffee too firmly pressed 6. Shower plate obstructed | 1. Fill tank 2. Turn off the steam switch 3. Use a coarser grind 4. Put less coffee in the filter 5. Press the coffee more gently 6. Contact the nearest SERVICE CENTER |
| The machine does not work and the ON light does not go on | 1. No electricity 2. The main cable is not properly plugged in 3. The main cables damaged | 1. Restore electrical power 2. Plug the main cable in correctly 3. Contact the nearest SERVICE CENTER for a replacement cable |
| The ON light is on and the steam light does not go on after 10 minutes | 1. Thermostat malfunction, 2. Heating element malfunction | 1. Contact the nearest SERVICE CENTER 2. Contact the nearest SERVICE CENTER |
The inserted data and pictures can be subject to changes without previous notice for the improvement of the machine's performances.
LIMITED GUARANTEE
Depending on the place of purchase either the seller or LELIT guarantee this product for domestic use in specified territories for a limited time from the date of purchase against defects caused by faulty workmanship and materials.
During this guarantee period either the seller or LELIT will repair, replace or refund any defective product at their sole discretion. All legal warranty rights under applicable national legislation will be respected and will not be impaired by any written guarantee.
For Australian consumers, this product comes with guarantees that cannot be excluded under the Australian
Consumer Law. You are entitled to a replacement or refund for a major failure and compensation for any other reasonably foreseeable loss or damage.
You are also entitled to have the goods repaired or replaced if the goods fail to be of acceptable quality and the failure does not amount to a major failure.
Important requirements as well as instructions on how to make a claim can be found on the LELIT website in the full warranty terms and conditions.
PRÉSENTATION :
EINSCHRANKTE GARANTIE
PnroToBneHne KoFe 3cnpecco n3 Ta6netnpoBaHHoro KoFe (aand):
-
PpOBepbTe, yTo KOHTeHep Ia BObbl (1) 3aONHeB ODoI, NocMOTpeBa HnHdkaTOp ypOBHb BObl.
-
HaxmTe o6uN BbIKNoaTeIb (11): INHnKaTOp BbIKNoaTeIa (11) 3arOpTc. BblOnHraTe 3Ty onepauuToIbkoB Tom clyuae, ecn KoΦeBaPka BbIKNouHe. Ecn OHa BKIOUHe, nepeiDte K CneDeyIoUeMy NyHKTu.
-
KaK ToIbKO Ha IInCnIeep PID NoaBntc 3aDaHna TeMpepaTpa n 3aRopntc HndNKatOp (14), MaunHa roToBa K nCNoJIb3OBAHnIO.
-
YcTaHOBtE fIbTp nOd qaIdbI (18) B pa3oRpeTbI ΦIbTpOpejKaTeIb (8), oCTaBnB erO BCTaBHeHHbIM B BapOuHO rpynnne, KAK ONiCaHO B nyHKTe 7.
-
Npeed npiroToBHeHem Koepe peKomeHdyetcYcTaHOBnTbe nepeKIOUaTeNb-pbIur KoFe/ropeyE BoDblnapa (13) BpeKIM Koepe(BHN3)NIOHnTB BKIOUaTeNb HAcoca (26),uTO6bl B TeeHne 5 cekHyd NdoBaTb Body n3 BapouHn rpynnbl (5) C 3aTAYtbM fHbTpOepXaTeMe (8) B NODoH dna c6opa Kaenb. Nocne Ndaun BoDbl TceHne yKaazHHoro BpemeHn ONyCTNTe BKIOUaTeNb-pbIur HAcoca (26),uTO6bl OCTaHOBnTbpOMbIKy.
-
OtkpoTe naketnK C yanDoN, He nobpeDnB ee.
42.ПомecтenteЧалуВфньтр(18).
-
BCTaBbTe fIbIbTpOepKxATEb (8) B BapouHyI rpynny (5), c cnno IIOBepHIne ero CneBa HnpaBO, 3aTeM nocTaBBte yawky Ha CbeMHyIO peWetKy NOdoHa dna KaneB (7).
-
PacnoIoxnTe nepeKIOuateIb-pbIur (13) Ha Kofoe I NOHMnTe BkIOuateIb HAcoca (26). Bo Bpemr 3KCTpaKun 3HaueHne daBHeHna MaHOMeTpe (25) doJxHO doCTNu b 3eJeHo 3OHi.
-
KaK ToIbKO Bbl noIyUHTe JeknaeMoE KOJIueCTBO KoFe, onyCTnTe BKIIouaTeIb Hacoca (26).
-
Chmnte fnlbtpoepkaTeIb (8), Bbl6poCbTe nCnoJb3ObaHHyTo Ta6NeTky uYcTaHOBnTe fnlbTpOepkaTeIb B BapOHyOrpynny (5), 0TO6bl OH cHOba Harpencra.
Nap:
- PpOBepbTe, YTO KOHTeHep IaIy BObI (1) 3aONHeH BODoN, NOCMTpeB Ha INDkaTOp yPOBnR.
- Haxmte BbIKHouateIb (11): 3aOpntc HnDkaTOp BbIKHouateIa (11). BbINOJHrTe 3Ty onepauuToIbKO B TOM Cnyae, ecnn MaunHa BbIKHoueHa. Ecn OHa BKlUoHe, nepeiDnte K cJeDyHOseMy NvHKty.
- UctahOBIne nepeKJIouaTeIb-pbUar (13) B pexk m npa. PpmeaHne: ha dncnlee PID-peryJrTOp aBtOMaTuueckn OTo6pa3ntcHaadnncb STE n, aIbTepeHaTnBHO, yCTAHOBJIeHHa CTeneHb Tempeatpyi npa. PID-peryJrTOp yXe yCTaHOBLeH npoIN3BOInTeJeM Ha 125°C, To ecTb Ha IdeAInhHyTo TemepaTyPd npa pacnpedEnHn npa. (EcIn Bbl XOTte INMeHtB TemepaTyPd KAc IN3MeHtB TemepaTyPd BHTpn 60Jnepa C nomOuBIO PID').
- KaK ToIbko 3aRopntcJaMNoUka (14), KoΦeBapKa rOToBa K nCnOJb3ObaHnIO.
- OtkpoiTe peryIaTOp npapa/ropeuH BObl (4). Chauana BbIteUeH MeHOrO Bobl, a 3aTeM nap.
- NocTaBbTe EMKoCTb C KINKOCTbIO DnA B36NBaHnI NO napOByTOpy6Ky (6) I nonHOctbIO nobepHnte pyuKy (4).
- Korga moIoko 6ydet xopoWo BCnHeHo, 3akpoTeperyIaTOp nOaH npA/ropeuB OdbI (4).
- BAXKHO: nocne toro, kak bbl BCnEHnn MOJOKO, CHOBA OTKpoIte peryIaTOp npa/ropaeB OdbI (4), yCTaHObITe nepeKIOUaTeIb-pbIar (13) ha ropayu BOy u NOHMITE BKIOUaTeIb HACoca BBepx (26). KOrDa BOda noteet n3 Tpy6Kn (6), CHOBa 3akpoIte peryIaTOp noaun npa/ropaeB OdbI (4) u B To Jke Bpemra HaxMITE BbIKIOUaTeIb HACoca BHN3 (26) n CHOBA yCTaHOBIne peKIOUaTeIb (13) Ha KoFe. TuaTeJIbHO OunchTE Tpy6Ky npa/ropaeB OdbI (6) ot OCTaTKOB MOnoka. 3Ta onepaun Heo6XoIMMa, YTO6bl BOCCTAHOBNTk Kpyro06OpOT Bobl B Tpy6ax KoFEBAPKn.
Topyua Boga:
- PpOBepbTe, YTO KOHTeHep (1) 3aONHeB BODoN, NOCMOtpEB Ha INDnKaTOp yPoBnBaI.
- Haxmte 06n BknoateBb (11): 3aropntc BCTpoeHHb mHdkaTOp BknoateTn (11). BboJnHrTe 3Ty onepauuTOIbKO TOM Cnyae, eCNI MaunHa BkNooyea. EcN OHa BkNooyea, nepeDNTe K cneDyOoemy NyKtY.
- YctahOBInTe nepeKlnuOaTeNb-pbUar (13) B pexnM ropuee BObl.
- KaK ToIbKO Ha Iucnnee PID (27) noBntc3aHaHHa TeMnepaTpyu 3arOpNTc HndkaTOp (14), MaunHa roToBa K nCNoJIb3OBAHnIO.
- Npeed npriroTOBneHemrnpaunx HauNTKOB peKomeHdyETcO TkpbTb peryIaTOP npa/ropaue BoI (4), yCTaHOBTb nepeKIOuATEb-pbUar (13) Ha ropayuBOy u noHraB BKIOuATeB HAcoca (26).NocTypaouaRrpoaBa BOa HemeJeHHo NaHHT NoDABaTBcA 3tpy6k (6).NoDaBaTe BOy B noDOn dJa c6opa Kaenb B TeueHne 5 cekynd. Pocne 3TORO onyctnte BKIOuATeB HAcoca (26), 3aTeM 3akpoTe peryIaTOP npa/ropaue BoI (4).
- NocTaBbTe NcyTo EMKoCTb NoT py6ky npa/ropey BODbl (6), OTKpoIe peryIaTOp npa/ropey BoDbl (4) nnoHmnte BKIOuATelb Hacoca (26).
- Topraa BODa HemeJeHNO NoidaTcN 3 Tpy6Kn nap/BODa (6).
-
KaT OJIbKO Bbl NOnyUHrTe KeNaEMOe KOInuHecTBo BOdBi, CHOBa ONyCTHrTe BKInOHaTeNb HAcoca (26) n 3aKpOHTe peryIraTop npa/BoDbI (4).
-
Nocne noJyueHnra ropee BOdbI n3 Tpy6Kn (6) y6eINTecb, YTO B KOHTHepe (1) eue ectb BOda.
KAK N3MEHHTb TEMNEPATPY BOJIEPA C IMOOJIPO PID:
Temnepatypa PID 6bI yctahOBHeHa npOn3BOUnteHem 3ToI KOeBapKn Ha 95^ dIy npOn3BOOCTBa KoFe n 125^ dIy npa. T06bl mMeHHTb Temnepatypy, noKaJyNCTa, noCTynAte CneDyUoM o6pa3OM:
- NaKMnTe OdnH pa3 Ha KhoNkU - DnCnIe NOKaKet HApNcB "t1" Bbl 6paTnNcB K TepMoCTaty KoFe Ha 95^
- NaJMMTe KhoNky DbaXdbI -DnCpIe NOKaKet HaIINcB "t2" Bbl o6paTInncb K TepMoCTaTy npa Ha 125°C;
- KaK TOnbKO DnCpIe NOKaKeT HApIcNc "t1" IIN "t2" HaxMIte Odn pa3 KhoNkU n ToIbKO NoCne 3TOrO MoKeTe MeHApTaHee yCTaHOBJIeHHyUo TempePAtyp.
BHIMAHNE: yTo6bI n3MeHnTb TempeaTypy, Heo6xOdmo HaKaTb OAnH pa3 KOnKy n TOnbko nocne 3TorO Bbi
DOnKbI ynpabTb KOnkamn , Bblupar HxKyHyo Bam Tempeatpy,ymeHbwa nn yBennuBa ee. -Yepe3 3cekyHdi, nocne nocleJeHero HaxmHa KOnkN, PID 3anomHHT BbictabHeHHy Toempeatpy NOKaXeT BblpaHHyo Bamn Temepatpy dna Kofo nn npa.
- 3haueHHe Tempeatpyb MoKeT 6bIb yCTaHOBHeO: Ira npiroTOBHeHn Ecnpecco HaunHa c min. Tempeatpyb 80°C do max. 130^ ; ДяnpiroTOBHeHn napa c MInH. Tempeatpyb 120°C do MaKcmaJIbHoH 140°C.
BHIMAHNE: nocne nepexoia O "npirotoBleHn npa" K "npirotoBleHIO Kofo" npi noHKeHHN TempeaTpybl dncnnie 6ytd mraTb N ABtOMaTHueckn OCTaHOBHTcN oCne doCTHXeHHY UCTaHOBHeHHO TempeaTpybl dny Kofo.
UcTka n yxOa
OuCTKa n oBcIyKmbaHne KoFeBapKn Heo6xOIMMb, Ka Ira KauCTBeHHoro BbIycka KoFe, TaN dIra DITeHoro cPoka CnykbI yCTpOImCTBa. OuchTy KoFeBapKn Heo6xOIMMo BbIOnJIHrTb He pexe Ondoro pa3a B HeJeIO.
Ipeed Hauanom Ouchk BbItaunite Bnky n03poTe N noOdoJnte, NOKA yCTpoCTBO He OCTbiHET.
IcnoB3yIe Mrgkyo TkaHb, npednoHTeNbHO n3 MmKpOΦn6pbI, KaK LELIT (KoD PLA9101 He BxOuT B KOMnKeT), n CMOHTe eepocToBdoH. He nCnoB3yIte abpa3aHBhe MOUune cpeCTBa Hne norpykaTe annapat B Body.
I 10000000000000000000000000000000000000000000000000000000000000000000000000000000000000000000000000000
Het Heo6xOIMOCTH OuHtBfNbTbpI NOcNE KAKDORIO NcNOJb3OBaHm, ECNI TOnbKO INOTBePCTN He 6dyT 3a6nTb. HanpoNTB, IINIOpeKAnHBA BICOKHX pa6OuNX NOKa3aTeJe KOpEeBapKn BaXHO, YTO6bI Tpy6Ka dI Na npA n HINbTpOpePKeTaJIb TuaTeJIbHo OOUaANnc NoCNE KAKDORIO NCNOJb3OBaHm.
OuHnAte HnIbTpOepKaeTb Iy yIaIeHn KInpHbIX OCTaTKOB KOpe, KOtOpBie OtpuIaTeNbHO BnIraHOT Ha Bkyc 3cnpecco.
BbIMOnTe HApKyHNo cactb Tpy6Kn IaI npa BnAxAHOI KAnHbIO INpOyCTNe HEMHO npa Ype3 Tpy6ky IIN ydaJIeHHN BHyTpeHHIX OCTaTKOB MOnIOKa, KOtOpBle MOrY IOMeHaTB npoxoJdeHIO npa, YTO, B CBOIO OuepeDb, Mewaet peryIInpoBaT NeHy.
06paTHa npombibka
PekomeHnyETcBbINONHrTb3TyUcTky no KpaHne Mepe pa3 B HeDIO u /uNn NO KpaHne Mepe KaXdble 100 CBexEcBaPeHHbKoFe.
CneDyUOuHnCTpyKuIN OTHOCATc KOBCEm TINAM rpynn, yCTaHOBNEHHbIX Ha HauXx 3cnpecco-MaunH.
Heo6xOaMbIe:
ClenoiΦnIbTp (16)
-
UeTka (KoI PLA9101)
-
YnctTnn noPo0k dny KoFeBapok (KoD PLA9201)
Ynctka rpynnbl. BbInonHnnte cneyuOnne deNCTBna:
- Nomecnte cnenoi fnhtp (16) B fnnbtpoepkataeb.
2.ДобавьтЕ 1Онhoeраоьвий naketик усTRAуero npoшka(3,5rpaMa)В слело Фильtp.
3.BcTaBbTeΦnIbTpOpejxAteIb B BapouHyI rpynny. - YctahOBHTe nepeKIOHATeJIb HA Kofo I NOdHMITe BkIOHATeJIb HAcOca pIIMepHO Ha 10 ckyHd
- OTKIOHTE BKNIOATEJIb HACOa n IIOJOKNTe 10 cekyHd.
6.He ChImaFnIbTpOepKgataTeNIOBTOPHTeDaHHyIO OpeaHIO 5 pa3. - CHHMMTE pIbTPOepjxATEB, CHOBA NOHNMITE BKIOUATeNB HAcoca (26) INPOMTe PJIbTPOepjxATENB NOI TROPAE BDOJ, NODaBaEMN I3 BapOHyoRpynnbl. Onyctte pbIar BKIOUATeNB HAcoca (26).
- Ouchntte Bapouhyo rpynny n npoknady B Bapouho rpynne Chayana ueTKO, a 3aTe BnaxHO TpRKnO, yTo6bI ydaNTb octATkn Kope. ChobaBCTabTe fnhTpoepkataeB 3aBapouhyo rpynny n nobTopnte nyHKtbi 4-5-6 be3 uctraero nopooka.
- PnroTOBbTe N BbIeIte nepBbI CBapeHHb KoPe.
Ynctka akceccayapOB yepe3 norpyxeHne B pactbop. BblnoJIHnte cIeDyUOne DeIcTBnA:
- NomeCTnTb B KOHTeHep FInIbTpbl n FInIbTpOpeJxateJIb pyKoB BBexp.
2.Помecгпь 2ондогдзовьхaketикчсstяшero nopoшkaВ кOTteHep(7ramM). - 3aIbT doctoHoe kOJIueCTBO ropey BoBb BOHTeHep Do KOHa MetanJWecko qactn fNtBtropeKataTeNa
4.Подожды МИн ИМу 15 MInHyT.
5.BbHytB norgyKeHHBeIeTaln I npMbItb nx 6oJIbIIMKOnIueCTBOM TENIOB OBOIopBOHOHO BObI.
6.Пи���овыт e n bIeJIte npBbI CBaepHbI KoPe.
YdaenHe Haknn C Kofebapkn
NcnoB3OBaHne KoeEapKn PnBODHT K eCTeCTBeHHOMy OTIOXeHNIO HAKIN, CKOPoCTb KOtOPO 3aBNCIT OT YAcTOTb IMNoIb3OBaHna yCToiCTBa INKECTKOCTN BObl.
I3BecTKOBbIe OTIOXeHn 3a6nBaKoT Tpy6Kn I CNJkaIoT TempeA Ty Ha BbIXOe, BnnaHa KaueCTBO BbIXOJaero KoFe n COKpaIaer cpoK cnjXbIyCTPOCTBA.
Bo n36eKaHHe o6pa3oBaHnHaKnH, KOtOpa OTKnlaDbIbAetcBByTpN 60Inepa, Mbl peKOMeHdyem Bcerda NcOnl3oBaTb pInIbTp-ymrHTeNb BoDbl Ha OCHOBe NOOooMeHHbIX CMON LELIT (KoD PLA930M He BXoJNT B KOMPiKeT), KOtOpbl, 6byuyn BCTabNeHHbIM B pe3epByap, Ounuaet BOyOT Coen KaIbUryn MaHnra, KOtOpbl O6pa3yHt HkKnbl BNIIHOT HA BKc KoPe.
He 3a6yDte, YTO fNtBtp TepraeT CBOO 3fpeKtnBHOCTb Nocie ONpeDeHnHO KOnuHcTeBa fNtBPOBaHHo BODJI.
TopdOK mIcIb3OBAHn I 3aMeHbI yka3aHa ynaKOBKe camoro fIbTa.
TTO, TTObI npDoTbpaTb BO3MOxHoe NOBpeXdHHe KOMHOHTOB MaunHbI, IO5ABJNE TOJIbKO HATyPAJIbHbIE CPEICTBA IJIYDAJIENHRA HAKINB B pe3epByap dRBoDbl
NIOJE3HbIE COBETbl:
- Φиьтпь Ha 1 nopцио (9), 2 nopци (10), Дя Таблетрован Horo Koфe (18) И сlenои Фильт (16) He ImeHT HeobxOДIMOCn 6bIb BbIMbITbIMn NOcJIe KaxdOrO NOlb3OBaHnA. BaxHOb NOCTOЯн Ho npOBepaTb, YTO6bl He 6bln 3a6ntbI bIpoKnФиьтрВ.
- TTo6bl DoCTnHryTb LyuWxpe3yIbTaTOB B NoJIyuEHHN 3cPipecco, COBeTyem PpeBaPHTeJIbHO NODOrpeBaTb YauKn Ha CneuaJIbHoN PJIaTΦOpMe (2), KOTOPa pa6OtaET ToJIbKO pRn BKIIoueHHo KoΦeBaPKe.
PID yxge yctahobnenn npon3bOndtelem Ha npabInbHyto Tempeatpy, KOtopa HauNyuaa dna nonyuehna 3cnpecco. BoBpem HApeBaHHa TempeatpaDn npon3bOcTba Kofo napa MoKeT Kone6aTbcra (+ / - 10 / 12^) .Takke, o6paTne BHMaHne, t0 dna (t1) npiroToOBHeHne Kofo BcIcTaBHeNo npdeynpeKdHeHne: nocne 108^ dinCnnei PID noKa3bIbAet Tempeatpy Mmra nepnoDnueckn, npdeynpeXdaan Nb3oBaTeNa, YTO TempeatpaTpa CnWkOM BbICOKa Dna 3cnpecco.
TEX.XAPAKTEPHCTNKU:
HappxeHne:220-240V-50Hz
MoHocTb:1200BT.
BpemraTOOBHOCTKpa6Ote:OKoJIO3MnHyT
Dablenne Hacoca:156ap
PerynpoBanie PID: ot 80^ do 130°C dЯ kofe; ot 120°C do 140°C dЯ npo3BOcTba npa
06bEM KOHTeHepa DnB BoDbl: 2.7 Ntpa
Pa3mepb(BxUxΓ): 31,52537 cm
Bec: 10.2 kR.
Функюнроване:зерно,MonotbIM Ta6netypobAHHbI Kofoe
PL042TEMD-120: 120v: 60Hz, Moushoctb: 1200 BT
PL042TEMID-AS:220V:60Hz, MoiHocTb 950 BT
OPPAHNUEHHA TAPAHNTN
B 3aBnCmOCTn OT MeCTa NOKyKN IpOdaBeu, IIn6o KOMNaHnA «LELIT», npedocTbIaTOT rapaHTnIO Ha daHHoe n3dJIe DnI DAmaHHeRo NCNoJIb3OBaHnHa ONpeJenEHHbIX TeppntOpnx, OHO DeIcTByET BTeueHne orpaHnueHHoro nepnoDa BpeMeHn C DaTbI NOKyKN B OTHOWeHn DeΦeKToB, Bbl3BaHHbIX HeKaueCTBeHHoN c6OpKo n MaTePnaIamn.
B TeueHne 3Toro rapaHTnHoro nepnoDa IIn6o npOaBeu, IIn6o LELIT oTpemOnTyIOT, 3aMeHr Tnn BepHyTeHbTn 3a IIO6o npOyKT C DepeKToM NO CBOeMy yCMOTpeHIO. BCE opNduJeckne rapaHTnHbe npaba coIacHO DeiCTByIOUeMy HaUNoHaJIbHOMy 3aKOHOdaTeJbCTBy 6ydyT Co6JIHOdaTbcra He 6ydyT HApUaTbcra HnKaKIMNIncbMeHHbIMr rapaHTnMaM.
Дя abctpaHncknx notpe6nteJey 3OT npOdyKT noCTabIaTeC r rapaHTnMn, KOtOpbIe He MOryt 6bITb NcKIOUeHb B COOTBeTCTBUN C 3aKOHOM ABCTpaHIn O 3auNTe npAB notpe6nteJ. Bby ImeTe npABo Ha 3aMeHy INN BO3MeueHne B clyuae 3HaunTeJIbHorO c60r n KompeHcauHIO 3a IIO6bIe dpyrNe o6ochOBaHHo npedcka3yeMbIe NOTePn INN NOBpeXKeHnJ.
BbI TAKKe IMeete npaBO Ha peMOHT nn 3ameHy TObAp, ecn ToBap He IMeET npneMJeMoRo KaueCTBa HHeNCnpaBHOCTb He JABLAEcTc cepbe3Hoi.
Baxhble Tpe6oBaHn, a TaKxe HnCTpyKcun O ToM, KaK nOdaTb peKnaMauIIO, MoXHO HaHTn Ha Be6-caTe LELIT B NOHbIX YCNOBnX rapaHTn.
PA3PEUHEHNE BCTPEAUOLIXXCRIPOBJIEM:
YbaxaemblnokynateIb!
Bnaorapn Bac 3a nokynk HauwepnoyKun, KOtopa cKOHCTpynpoBaHa no nocleHm TexHOJorueckm HOweCTbAM. TuaTeIbNo cneMy npocTbIM npabNlAm No KoppeKTHOMy Nolb3ObaHHU, yka3aHHbIM B hactoae IHCTpyKUn, Bbl nOlyuHTe MaKcMaJIbHyIO OTaay O TpaobTb KoFeBapKn UYbepeHHOCTb B HaedXHcTb ToTo npOdyKUn Ha npotjKeHN MHornx Net. Hxke npedlaraeTc npakTucecka Tabnla, B KOTOpO JTO6paKeHb BCTpeaIouneCHeNoLaKn INx 6bICTpoe yctpaHene.
Material necessities:
- Filtru orb (16)
Periut (cod PLA9101) - Detergent masinapresso (cod PLA9201)
Material necessities:
- Filtro ciego (16)
Cepillo - Detergente paraquina Espresso
(codigo PLA9101)
(códio PLA9201)
IMPORTANT INFORMATION FOR CORRECT DISPOSAL OF THE PRODUCT IN ACCORDANCE WITH EC DIRECTIVE 2012/19/EC AND WITH LEGISLATIVE DECREE No. 151 of 25 July 2005
At the end of its working life, the product must not be disposed of as urban waste. It must be taken to a special local authority differential waste collection centre or to a dealer providing this service. Disposing of a household appliance separately avoids possible negative consequences for the environment and health deriving from inappropriate disposal of enables the constituent materials to be recovered to obtain significant savings in energy and resources. As a reminder of the need to dispose of household appliances separately, the product is marked with a crossed-out wheeled dustbin.
EC DECLARATION OF CONFORMITY
LELIT srl a socio unico declares under its own responsibility that the product: Coffee machine type: PLO42TEMD to which this declaration relates conforms to the following standards:
EN 60335-2-14:2006 + A1:2008 + A11:2012, EN 60335-2-15:2016 + A11:2018 + A1:2021 + A2:2021 + A12:2021, EN 60335 1:2012 + AC:2014 + A11:2014 + A13:2017 + A1:2019 + A14:2019 + A2:2019 + A15:2021; EN 62233:2008; CISPR 14-1; CISPR 14-2; EN 61000-3-2; EN 61000-3-3; EN 55014-1:2017; EN 55014-2:2015; EN 50564:2011
pursuant to directives: 2014/35/EC; 2011/65/EU; 1907/2006/EU NB: This declaration is null and void should the machine be modified without our specific authorisation.
DEUTSCH