Anita PL042QE - Coffee machine Lelit - Free user manual and instructions
Find the device manual for free Anita PL042QE Lelit in PDF.
User questions about Anita PL042QE Lelit
0 question about this device. Answer the ones you know or ask your own.
Ask a new question about this device
Download the instructions for your Coffee machine in PDF format for free! Find your manual Anita PL042QE - Lelit and take your electronic device back in hand. On this page are published all the documents necessary for the use of your device. Anita PL042QE by Lelit.
USER MANUAL Anita PL042QE Lelit
Hbith HOOB3aic3B brrTH THOONbH:
IgBMHrHbicBΦBr OHaae BAMFBAc OC3 OHaae THObiHdC:
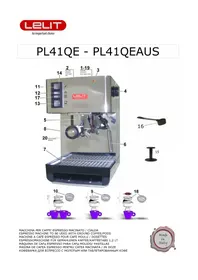
HM Indicator light: steam reada
4M SteamThot water knob
5M Filter holder retaining ring
6M SteamThot water tube
7M Removable water drainage trail
8M Filter holder
9M Single cup filter
NbIM Two cup filter
VMM OnToff switch
H5M Steam switch
UHM Coffee switch
IV4M Indicator light: machine on
IV5M Coffee press
U6M Measuring spoon
U7M Hot water switch
U8M Filter for pods
N9M Removable water tank cover
BblM Water level indicator
AyaP OTOUPCIObIy:
YdHrIbIp ca nB THonbiB:
IM Remove the machine from its packing and make sure all packing parts have been taken off Pincluding the protection bagsM
EM La the machine on a flat and stead surface far awa from hot places and from the water tapsM
HM Remove the water tank cover PN9 on the back of the machine and take out the water tank PN10 paing attention not to damage the water tubes inside itM
4M Fill the tank PND with cold waterM
5M Replace the water tank back in the machine and check that the water tubes are not bent and that the filter is well set on one of themM
6M Plug in the machine in the mainsM Make sure that the wall socket is of the right voltageM
7M Place the filter holder under the brewing group P5 and turn it from the left to the right M Leave it there so that it can get warm and it gets read for useM
8M Turn the machine on bα pushing the on Toff switch PnIM The indicator light: machine on PN4 comes on to confirm the power supplM
9M Press the hot water switch PN7ДМ
IVbIM Open the hot water knob P4IM
When water comes out of the steam spout P6DC press the hot water switch PN7 and the steam switch PN5 again and close the steamThot water knob P4DM
M After completing all these operationsC leave the machine onM
NfBMHfBipH3BAMFBAAC:
HMM Check that the water tank PND has been filled in with water bǎ looking at the water level indicator Pbblm
IV4M Press the onToff switch PN and the indicator light: machine on PN4 will come onM Do this operation onla if the machine is offM If it's on pass to the following pointM
M5M As soon as the indicator light: steam reada PH goes onC the machine is read for useM
16M Fit the single cup filter P9 or the two cup filter PNbl into the filter holder P8 that has been warmed up b leaving it attached to the brewing group as described in point 4M
I7M Fill the filter with the ground coffee ba means of the supplied measure spoon PN6Д: IЯ ½ measuring spoonful PN6Д = И coffee cup Π H measuring spoonful PN6Д = Б coffee cupsM Everä time āou fill the filter with a spoonful of coffeeC press the coffee with the coffee press PN5Д before proceeding to fill it with the nett spoonfulM Check that the borders of the filter holder are cleanC with no coffee restsM
I8M Insert the filter holder P8 in the brewing group ring P5DC turn it from left to right with forceC then put the cup on the removable water drainage traP7DM
M9M Push the coffee switch PNHdM
БblM Once āou get the coffee desired βuantitaC push the coffee switch PИнД againM
BIM Remove the filter holder P8 and throw away the coffee groundsM Replace the filter holder in its seat P5DC in order to be warmed upM
IgBMHbipn H3BAMGBAC XbIaIaIbAaBaBCaOcAABB Mcf:
BbM Check that the water tank Pd has been filled in with water b looking at the water level indicator PBblm
BHM Press the onToff switch PN and the indicator light: machine on PN4 will come onM Do this operation onla if the machine is offM If it's on pass to the following pointM
B4M As soon as the indicator light: steam reada PH goes onC the machine is read for useM
E5M Fit the pod filter Pn8 into the filter holder P8 that has been warmed up b leaving it attached to the brewing group as described in point 4M
6M Open the single packed pod not damaging the podM
67M Place the pod in its filter PN8DC making sure that the pod edges do not remain outside the filter holderM
68M Insert the filter holder P8 in the brewing group ring P5DC turn it from left to right with forceC then put the cup on the removable water drainage traP7DM
B9M Push the coffee switch PINDM The manometer PN7 will show the reached pressureC between 8 and N4 barM
HbIM Once aou get the coffee desired quantitaC push the coffee switch PnHd againM
HIM Remove the filter holder P8 and throw away the used podM Replace the filter holder in its seat P5DC in order to be warmed upM
YdBHT:
H5M Check that the water tank PIVd has been filled in with water b looking at the water level indicator P5bIDM
HHM Press the onToff switch PN and the indicator light: machine on PN4 will come onM Do this operation onla if the machine is offM If it's on pass to the following pointM
H4M Press the steam switch Pn6dM
H5M As soon as the light: steam readă PHД goes onC the machine is readă for useM
H6M Open the steamThot water knob P4ДМ First some water will flow out and then the steamM
H7M Put the cup with the desired infusion under the steam tube P6 and turn the knob completeläM
H8M When the drink has been suitabla frothedC close the steamThot water knob P4Д and press the steam switch Pn6Д againM
H9M Reopen the steamThot water knob P4 and press the hot water switch PN7M When the water flows out of the steam tube P6DC close the steamThot water knob P4 again and at the same time press the hot water switch PN7 again Clean carefully the steamThot water tube P6DM This operation is necessar for cleaning the internal hot waterTsteam tubes and refill them with some waterM
KcD XHdB:
4bIM Check that the water tank PND has been filled in with water bǎ looking at the water level indicator P5blDM
4NM Press the onToff switch PN and the indicator light: machine on PN4 will come onM Do this operation onla if the machine is offM If it's on pass to the following pointM
4bM As soon as the light: steam reada PH goes onC the machine is reada for useM
4HM Open the steamThot water knob P4M
44M Press the hot water switch PN7ДМ Hot water will flow out from the steam tube P6Д immediatelaM
45M Once aou have got the desired quantita of waterC repress the hot water switch P17 again and close the steamTwater knob P4DM
46M After obtaining hot water from the tubeC make sure that there is still water in the tank PIM
AaAH LONY:
The single cup filter P9DC the two cup filter PNbID and the pod filter PN8 do not need to be washed after each use but check that the holes are not blockedM
- For best resultsC we suggest warming the cups up on the cup warmer PBД which works onla when the machine is onM
PbIaOToA EAOTAUcA ATD NpaCAraObIy:
-
It is recommended to cleanC after each useC the steam tube and the strainer holder carefully
-
For cleaning it is recommended the use of a wet damp cloth
I Do not leave the machine outdoorM And do not immerse the machine in waterM
The machine can be used onla b adults and must be kept awa from children
Do not wash strainer and strainer holder in dishwasher
LáCTOCAH DALA:
Voltage: 5Hbl V Π 5bl Hz Π N6bl V - 6bl Hz
Power: Nbl5bl W
Heating time: caM H minM
Pump pressure: N5 bar
Water tank: BC7 litres
Dimensions PHtLtD: H4JIbHJI67 cm
Weight: 9 kg
To be operated with ground coffee and coffee pods
AHbIrHnRbblA nB 240J -50 KUcndpB->Ecφ. H41CaAAY
LpblTHaYkbblUOTG:
We thank ao for buing one of our productsC projected and assembled in accordance with the most upto date technological innovationsM
Following carefully the simple operations described in this manualC which respect all essential safetä regulationsC āou will get the best performances and will appreciate the remarkable reliabilità of this product in the Āears to comeM Please find below the description of the most freβuent problems and of their solution:
| PROBLEM CAUSE | SOLUTION | |
| Coffee is not creamă | IM Coffee blend not suitable for machine БM Improper grinding HM Too little coffee in filterM 4M The filter holder has not be tightened under the brewing group ring | IM Use a different coffee blend БM Adjust coffee grinding HM Put more coffee in the filter and press itproperlă 4M Tighten better the filter holder |
| The coffee is too cold | IM The machine had not reached the proper temperature БM FilterTholder has not been preheated HM Cups have not been preheated 4M Pressure switch malfunctionM | IM See section "Starting the Machine" and "Making an Espresso Coffee" БM FilterTholder must be heated together with the water - see section "Starting the Machine" HM Properlă heat the cups on the cupThwarmer РБД 4M Contact the nearest SERVICE CENTER |
| The coffee comes out too βuicklă | IM Coffee too coarselă ground БM Too little coffee in the filter HM Coffee has not been pressed enough 4M CoffeeTpod old or unsuitable | IM Use a finer grinding БM Put more coffee in the filter HM Press the coffee more firmlă 4M Use a different coffee blend |
| Coffee comes out between the coffee group and the filterTholder | IM FilterTholder not properlă inserted БM Too much coffee in the filter HM Edge of the filterTholder not clean 4M The douche seal is worn or damaged | IM Insert the filterTholder correctlă БM Put less coffee in the filter HM Clean the edge of the filterTholder and thebrewing group seal 4M Contact the nearest SERVICE CENTER |
| Coffee comes out in drops | IM Coffee too finelă ground БM Too much coffee in the filter HM Coffee too firmlă pressed | IM Use a coarser grinding БM Put less coffee in the filter HM Press the coffee more gentlă |
| The machine does not produce steam | IM The water tube hole măă be obstructed БM Lack of water in the tank HM The steam nozzle has been improperlă positioned | IM Clean the hole with a needle БM See section "Starting the Machine" HM Reposition the steam nozzle |
| No coffee produced during the coffee căcle | IM Lack of water in the tank БM Steam switch on | IM Fill the tank БM Turn off the steam switch |
| No coffee produced during the coffee căcle | IM Coffee too finelă ground БM Too much coffee in the filter HM Coffee too firmlă pressed 4M The brewing group douche is dirtă | IM Use a coarser grinding БM Put less coffee in the filter HM Press the coffee more gentlă 4M Contact the nearest SERVICE CENTER |
| The machine does not work and the ON light does not come on | IM No electricitiă БM The power cable is not properlă plugged in HM The power cable is damaged | IM Restore electrical power БM Plug in the power cable correctlă HM Contact the nearest SERVICE CENTER for a replacement cable |
| The ON light is on but the readă steam indicator does not go off within Nbl minutes | IM Thermostat malfunction БM Heating element malfunction | IM Contact the nearest SERVICE CENTER БM Contact the nearest SERVICE CENTER |
The inserted data and pictures can be subject to changes without previous notice for the improvement of the machine's performancesM
DáyCPONOblT:
IM Ruservoir
BM Chauffe tasses
HM Voaant lumineut vapeur prute
4M Bouton vapeurTeau chaude
OaHbIbINHTBgEHNbI3B:
Druckpumper: IV5 Bar
Tankvolumen: BC7 Liter
NMM Intreruptor general onToff
M6M Intrerupator furnizare abur
UHM Intrerupator cafe
M4M Led tensione
N5M Presa
U6M Lingurita dozatoare
M7M Intrerupator apa calda
OTUPLPRACTORTO DE FbIHbIyOPE:
N43BbH b1a30abid3B H TH5b3bbl:
IOBCEHEBHbIyXoI INMEPbI INPEOCTOPOXHOCTN:
- PekomeHdyTcnaocne kaxdoIIOIb3OBAHHaKKypaTHo npMbIBaTb Tpy6ky BbIaM npaIΦnIbTpOepKaTeJIb.
-
Pa60T no uNCTKn peKOMeHdyem NOb3ObaTbcra npocToTkaHbU yBnaXHeHHoBdoJ.
He octabTb 3JeKtponp6Op B MecTx Bo3DeiCTBnA tMOCΦepHbIX ABlHn I He norpyKaTb B BODy.
Функционповане злкгрпбoga должно пponcxoindь по КНрелм Всрсlorо сенobeka,лкгрпбордржатнадыш ot dete. -
HeMbITb ΦnIbTpbl n ΦnIbTpOpePkataTeB B nocydoMoeHOn MaunHe.
TEXHNUECKNE DAHHbIe:
HapxkeHe:230B-50Hz;120V-60Hz
MoHocTb:1050BT.
Bpemra roTOBHOCTN K pa6Ote: OKoNo 3 MmHyT
Dablenhe Hacoca:156ap
Obem 60ka:2,7nntpa
Pa3mepb(BxUxD): 342327 cm
Bec: 9 Kr
ФункuaHpoBaHnE:MonToBk KoFeN KoFeB Ta6NetKax
Bepcn 240 Bt - 50Hz -> Mod. PL41QEAUS
PA3PEUHEHNE BCTPEAUXCSIPOBJIEM:
BnaOapm n no3dpabnem Bac c npno6peTHeHem Hawei npodyKun, KOtopa cKOHCTpynpoBaHa no nocneHMM texHOJIOrueckm HOBseCTbAM. TuaTeNbHO CJeDyI npocTBIM Oepaum No KOPpeKTHom yNoB3OBAHNO Haewo 3JeKtpopnp6op a N BOOTBeCTBn C npedncaHnMn NO 6eONACHOCTY kAzaHHbIMN B Hactoae IHCTpyKUn, Bbl CMOXeTe nOlyuHTb MaKcMaJIbHyIO OTdauN, 3HaUteNbHO - YBepeHHOCTb B HadexHoCTN 3ToI npOdyKUn n no npOwECTBn MHOrNX Iet. Hxke npedlaeraTc npakTuYeCKa Ta6nUa, B KOtopoB BOCpOn3BeDeHbI BCTpeaHouinec HenoJaKn INx 6bICTpoe pa3peWeHne.
At the end of its working lifeC the product must not be disposed of as urban wasteM It must be taken to a special local authority differential waste collection centre or to a dealer providing this serviceM Disposing of a household appliance separately avoids possible negative consequences for the environment and health deriving from inappropriate disposal of enables the constituent materials to be recovered to obtain significant savings in energy and resourcesM As a reminder of the need to dispose of household appliances separately the products is marked with a crossed out wheeled dustbinM
Gemme Italian Producers srl declares under its own responsibilità that the products NH41Cà and NH41CàAryC to which this declaration relatesC are in accordance with the provisions of the specific directives:
CEI EN 6bIHHSNC CEI EN 6bIHHSNNS
It also declares that the above mentioned products conform with the electromagnetic compatibility test EMCM
NB: The present declaration voids should the machine be modified without our specific authorizationM
FRANCAIS

AJIAPUOYyEaTt NbIYP H'EHOEOTAQObIT CbIPPaCua Dn NpBIDROc A3 UPEay Da HA DOPaCQUJa aRpbInEaTa 200/96/AC
This product is covered by the warranty laws valid in the country where the product has been sold; specific information about the warranty terms can be given by the seller or by the importer in the country where the product has been purchased. The seller or importer is completely responsible for the product.
The importer is completely responsible also for the fulfillment of the laws in force in the country where the importer distributes the product, including the correct disposal of the product at the end of its working life.
Inside the European countries the laws in force are the national laws implementing the EC Directive 44/99/CE.
Françaisn
CONDITIONS DE GARANTIE
GARANTIE LEGALE
Gemme Italian Producers srl