PL41TEM - Coffee machine Lelit - Free user manual and instructions
Find the device manual for free PL41TEM Lelit in PDF.
Frequently Asked Questions - PL41TEM Lelit
User questions about PL41TEM Lelit
0 question about this device. Answer the ones you know or ask your own.
Ask a new question about this device
Download the instructions for your Coffee machine in PDF format for free! Find your manual PL41TEM - Lelit and take your electronic device back in hand. On this page are published all the documents necessary for the use of your device. PL41TEM by Lelit.
USER MANUAL PL41TEM Lelit
DimensioniENHxLxD:E34N23N27Ecm;EEE
Peso:E735EKgE
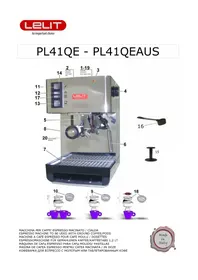
BM ColdEwaterEtankE
2M CupEwarmerE
3M \E
4M SteamThotEwaterEknobEJlonEtheErightEsideRE
5M FilterEholderEretainingEringE
6M SteamThotEwaterEarmE
7M RemovableEwaterEdrainageEtrayE
8M FilterEholderE
9M SingleEcupEfilterE
BΓM TwoEucpEfilterE
БМ OnToffEswitchENonEtheErightEsideRE
62M \E
53M CoffeeThotEwaterTsteamEleverEswitche
54M IndicatorElight:EmachineEreadyE
B5M CoffeeEpressTtamperE
56M MeasuringEspoonE
57M ManometerE
58M FilterEforEpodsE
59M RemovableEwaterEtankEcoverE
2ΓM WaterElevEindicatorE
26M PIDEtemperatureEcontrolEE
22M PumpEleverEswitchE
MAHB YOAIOBMCIOYIOA:
E
Ab3aBlbInBΦblpH63IOpbInH:
B M RemoveE theEmachineEfromE itsE packingE andE makeE sureE allE packingE partsE haveE beenE takenE offE JIncludingE the protectionEbagsJMEE
2M LayEtheEmachineEonEaEflatEandEsteadyEsurfaceEfarEawayEfromEhotEplacesEandEfromEtheEwaterEtapsME
3M RemoveEtheEwaterEtankEcoverEJI69EonEtheEtopEofEtheEmachineEandEtakeEoutEtheEwaterEtankEJI69EpayingEattent notEtoEdamageEtheEwaterEtubesInsideEtheEtankME
4M FillEtheEtankEJI6EwithEcoldEwaterME
5M ReplaceEtheEwaterEtankEbackEinEtheEmachineEandEcheckEthatEtheEwaterEtubesEareEnotEbentEandEthatEtheFilterE wellEsetEonEoneEofEthem; ErepositionEtheEtankEcoverEJI69JME
6M PlugEinEtheEmachineEinEtheEmainsMEMakeEsureEthatEtheEwallEsocketEhasEtheErightEvoltageME
7M PlaceEtheEfilterEholderEJI8EunderEtheEbrewingEgroupEJI5EandEturnEitEfromEtheEleftEtoEtheErightMELeaveEitEther thatEitEcanEgetEwarmEandEitEgetsEreadyEforEuseME
8M TurnEtheEmachineEonEbyE pushingEtheEonEToffEswitchEJIb5aMETheEindicatorElightEofEtheE switchEJIb5aEcomesEO confirmEtheEpowerEsupplyME
9M OpenEtheEsteamThotEwaterEknobEJI4JME
BΓM PositionEtheEleverEswitchΕΠ63ΕonEcoffeeEmodeEandEpressEtheEpumpEswitchΕΠ22ΑME
B6M WhenEwaterEcomesEoutEofEtheEsteamEnozzleEJ63EletEdownEtheEpumpEswitchEJ22EandEcloseEtheEsteamThotEwa knobEJ4RMEE
B2M AfterEcompletingEallEtheseEoperations3EleaveEtheEmachineEonME
B3M TheEPIDEJ26EwillEvisualizeEtheEdegreesEinsideEtheEboilerEandEwillEcontrolEtheEboiler'sEheatingMEE
64M TheEPIDEsEaReadyEsetEfromEtheEproducerEonE95LC3EiMeMEtheEidealEtemperatureEforEaEgoodEcupEofEcoffeeMEJ] wantE toE changeE theE PID'sE temperature3E pleaseE followE theE instructionsE writtenE underE How to set the temperature inside the boiler by means of the PIDRM
bany3ybin3n HUpaHUsa:
B5M CheckEthatEtheEwaterEtankEJIbEhasEbeenEfilledEinEwithEwaterEbyElookingEatEtheEwaterEleviEindicatorEJI2TJME
B6M PressEtheEonToffE switchE1568: E the EindicatorElightEofE the E switchE1568E willEcomeEonMEDoThisOperationEonlyIf machineEisEoffMEIfEit'sEonEpassEtoEtheEfollowingEpointME
67M AsEsoonEasEtheEPID'sEdisplayEshowsEtheEsetEtemperatureEandEtheEindicatorElightEJI64ERemainsEon3EtheEmachine readyEforEuseMEE
B8M FitEtheEsingleEcupE filterEJI9RE orEthe twoEcupE filterEJI6FRE intoE theEfilterEholderEJI8RethatE hasEbeenEwarmedEu leavingEitEattachedEtoEtheEbrewingEgroupEasEdescribedEinEpointE7ME
B9M FillEtheEfilterEwithEgroundEcoffeeEbyEmeansEofEtheEsuppliedEmeasureEspoonEJI68:EBbE1/2EEmeasuringEspoonfulIEJI6 = EBEcoffeecupEEHE3EmeasuringEspoonfulEJI68E = E2EcoffeecupsMEEveryEtimeEyouEfillEtheFilterEwithEaEsponfulEcoffe3EpressEtheEcoffeewithEtheEcoffeEpressTtamperEJI65EbeforeEproceedingEtoEfillEtEwithEtheEnextEspoonfulIE andEmakeEsureEthatEthereAearNoEcoffeEcrestsEonEtheFilterEborderME
2ΓM InsertEtheFilterEholderE8EinEtheBrewingEgroupEringE53EturnEitEfromEleftEtoErightEwithEforce3EthenEputEthe onEtheRemovableEwaterEdrainageEtrayE7RME
26M PositionEtheEleverEswitchEJI53EonEcoffeeEmodeEandEliftEupEtheEpumpEswitchEJI22rMEtheEmanometerEJI67rEwilIE theEreachedEpressure3EbetweenE8EandE64EbarME
22M OnceEyouEgetEtheEdesiredEquantityEofEcoffee3EpushEdownEtheEswitchEJI22RAgainME
23M RemoveEtheEfilterEholderEJI8R EandEthrowEawayEtheEcoffeeEgroundsMEMakeEthatEtheEfilterEholderEisEcleanEa repositionEitEinEtheEbrewingEgroupEtoEwarmEupEagainME
E
bHp3aBnB 3n HUpaHUsXbIbpbln dUH dOdΦHH paU:
24M CheckEthatEtheEwaterEtankEJI6EhasEbeenEfilledEinEwithEwaterEbyElookingEatEtheEwaterElevelEindicatorEJI2ΓIAME
25M PressEtheEonToffE switchEJIbB: EtheEindicatorElightEofE theE switchEJIbB: E willE comeEonME DoThisOperationEonlyIf machineEisEoffMEIfEit'sEonEpassEtoEtheEfollowingEpointME
26M AsEsoonEasEtheEPID'sEdisplayEshowsEthesEsetEtemperatureEandEtheEindicatorElightEJI64 remainsEon3EtheEmachineReadyEforEuseME
E
27M FitEtheEpodEffilterEJI68EintoEtheEffilterEholderEJI8EthatEhasEbeenEwarmedEupEbyEleavingEitEattachedEtoEtheEbrev groupEasEdescribedEinEpointE7ME
28M OpenEtheEsingleEpackedEpodEandEpayEattentionEnotEtoEdamageEtheEpodME
29M PlaceEtheEpodEinEitsEfilterEJI68rME
3ΓM InsertEtheFilterEholderE8R8EinEtheBrewingEgroupEringE153EturnEitEfromEleftEtoErightEwithEforce3EthenEputEthe onEtheEremovableEwaterEdrainageEtrayE7RME
36M PositionE theE leverE switchE I53E onE coffeeE andE liftE theE pumpE switchE I22ME TheE manometer E I57E will show reachedEpressure3EBetweenE8EandEB4EbarME
32M OnceEyouEgetEtheEdesiredEquantityEofEcoffee3EpushEdownEtheEswitchE122EAagainME
33M RemoveEtheEfilterEholderEJI8AeandEthrowEawayEtheEusedEpodME
AbH36:
34M CheckEthatEtheEwaterEtankEJIbEhasEbeenEfilledEinEwithEwaterEbyElookingEatEtheEwaterElevelEindicatorEJI2ΓIAME
35M PressEtheEonToffE switch E168: EtheEindicatorElightEofE theE switch E168E willEcomeEonMEDoThisOperationEonlyEif machineEisEoffMEIfEit'sEonEpassEtoEtheEfollowingEpointME
36M PositionEtheEleverEswitchEJI63RJeonEsteamEmodeME
37M AsEsoonEasEtheElightEJI64ReoesEon3EtheEmachineEisEreadyEforEuseME
38M OpenEtheEsteamThotEwaterEknobEJI4YMEFirstEsomeEwaterEwilEflowEoutEandEthenEtheEsteamME
39M PutEtheEcoopewithEtheEdesiredEinfusionEunderEtheEsteamEtubeE16AeandEturnEtheEknobE14ARepletelyME
4ΓM WhenEtheEdrinkEhasEbeenEsuitablyEfrothed3EcloseEtheEsteamThotEwaterEknobΕЛ4ЯME
46M IMPORTANT: EafterEyouEhaveEfrothedEyourEmilk3EreopenEtheEsteamThotEwaterEknobE14EandEpositionEtheEstean switchEJI63EonEhotEwater3EandEliftEupEtheEpumpEswitchEJI22RMEWhenEtheEwaterEflowsEoutEofEtheEsteamEtubeJI closeEtheEsteamThotEwaterEknobEJI4EagainEandEatEtheEsameTimeEpushEdownEtheEswitchEJI22RAndEreHposition Et switchEJI63EonEcoffeeEagainMECleanEcarefullyEtheEsteamThotEwaterEtubeEJI6RMEThisOperationEisEneededEinEorder restoreEtheEwaterEcircuitEinsideEtheEmachine'sEtubesMEE
E
Pdbl X3bln:
42M CheckEthatEtheEwaterEtankEJIbEhasEbeenEfilledEinEwithEwaterEbyElookingEatEtheEwaterElevelEindicatorEJI2ΓIAME
43M PressEtheEonToffEswitchEJIb58:EtheEindicatorElightEofEtheEswitchEJIb58EwillEcomeEonMEDoThisOperationEonlyEif machineEisEoffMEIfEit'sEonEpassEtoEtheEfollowingEpointME
44M PositionEtheEleverEswitchEJI63RJeonEhotEwaterMEE
45M AsE soonE asE theP ID'sE displayE J26E showsE theE setE temperatureE andE theE indicatorE lightE J64E remainsE on3E t machineEisEreadyEforEuseME
46M OpenEtheEsteamThotEwaterEknobEJ4R EandEliftEtheEpumpEswitchEJI22RMEE
47M HotEwaterEwillEflowEoutEfromEtheEsteamEarmEImmediatelyME
48M OnceEyouEhaveEgotEtheEdesiredEquantityEofEwater3RepressEtheEswitchEJ22RrEandEcloseEtheEsteamTwaterEknobEJ4
49M AfterEobtainingEhotEwaterEfromEtheEarmEJ63EmakeEsureEthatEthereEisEstillEwaterEinEtheEtankEJI6JME
PJIINIOAHIO IOPH BJYARHB'A IOHNbHBAOMBH K NHAOA JIC IOPH bYN:
TheEPIDehasEbeenEsetEbyEtheEproducerEofEthisEmachineEonEaEtemperatureEofE95LCMEInEorderEtoEchangeEtheEtemperaturepleaseEproceedEasEfollows:E
- pressEtheEbutton E;EasEsoonEasEtheEdisplayEshowsEtheEwritingE“PRG”EpressEtheEbutton E E;EE
FecocEcoEcoEdisayEcbowEcoBiealer's Etemperature2EcbowEcoVsealEwithEcoBie
-
-
-
-
-
-
-
-
-
-
-
-
-
-
-
-
-
-
-
-
-
-
-
-
-
-
-
-
-
-
-
-
-
-
-
-
-
-
-
-
-
-
-
-
-
-
-
-
-
-
-
-
-
-
-
-
-
-
-
-
-
-
-
-
-
-
-
-
-
-
-
-
-
-
- orderEtoEsetEtheDesiredEtemperature3EstartingEfromEaEminMEofE80C° upEtoEaEmaxMEofE130C°ME
-
-
-
-
-
-
-
-
-
-
-
-
-
-
-
-
-
-
-
-
-
-
-
-
-
-
-
-
-
-
-
-
-
-
-
-
-
-
-
-
-
-
-
-
-
-
-
-
-
-
-
-
-
-
-
-
-
-
-
-
-
-
-
-
-
-
-
-
-
-
-
-
-
- afterE3EsecMEfromEpressingEtheElastEbutton3EtheEinsertedEtemperatureEisEmorizedEandEtheEdisplayEshowsEthe setEtemperatureMEE
OB:EifEtheEtemperatureEisEsetEtooEhigh3EonceEaEcoffeeErequestEisEmade3EtheEdisplayEstartsEtoFlashMEE
MAHCMYIOyBa:
TheEsingleEcupEfilterEJ9R3EtheEtwoEcupEfilterEJI6FRAeandEtheEpodEfilterEJI68ReoEnotEneedEtoEbeWashedEafterE useEbutEpleaseEcheckEthatEtheEholesEareEnotEblockedME
- ForEbestEresults3EweEsuggestEwarmingEtheEcupsEupEonEtheEcupEwarmerEJI2REwhichEworksEonlyEwhenEtheEmachin isEonME
TheEPIDEisEalreadyEsetEbyEtheEproducerEonEtheErightEtemperatureEforEanExcellentEspressoMEDuringEheatingEand coffeeEorEwaterEdistribution3EtheEtemperatureEcanEoscillateELbTBEITB2LCRAMEAlso3EaEwarningEhasEbeenInserted: afterEBΓ8LCetheEPID'sEdisplayEshowsEtheEtemperatureEbutEintermittently;EthisEisEnormalEandEitEwarnsEtheEuserE thatEtheEcoffeeEwillEnotEbeEgoodEifEmadeewithEsuchEhighEtemperatureMEE
BJMIOYOH NAYOAOCH AON bBHCAMIOYIOA:
- ItEisErecommendedEtoEclean3AfterEachEuse3EtheEsteamEarmE16EandEtheEstrainerEholderE18EcarefullyME
- ForEcleaningEitEisErecommendedEtheEuseEofEaEwetEdampEclothME
H DoEnotEleaveEtheEmachineEoutdoorMEAndEdoEnotEimmerseEtheEmachineEinEwaterME
H TheEmachineEcanEbeEusedEonlyEbyEadultsEandEmustEbeEkeptEawayEfromEchildrenME
H DoEnotEwashEstrainerEandEstrainerEholderEinEdishwasherE
E
E
E
E
IOHCOYCAI NAIOA:
Voltage:E23FEVE-E5FEHz;EPL46TEMTE6FE-E62ΓVH6FEHzE
Power:EB5EWE
HeatingEtime:EcaME3EminME
PumpEpressure:EB5EbarE
PID'sEregulation:EfromE8ΓLCEupEtoEB3ΓLCE
WaterEtank:E237ElitresE
DimensionsEJIHxLxD:E34N23N27EcmE
Weight:E735EkgE
ToEbeEoperatedEwithEgroundEcoffeeEandEcoffeeEpodsE
IOBJMBHAPJIIOYOT:
E
WeE thank you for buying one of our products and assembled in accordance with the most up to date technological InnovationsME
FollowingEcarefullyEtheEsimpleEoperationsEdescribedEinEthisEmanual3EwhichErespectEallEssentialE safetyEregulations3EyouE willEgetEtheEbestEperfomancesEandEwillEappreciateEtheEremarkableEreliabilityEofEthisEproductEinEtheEyearsEtoEcomeME
PleaseEfindEbelowEtheEdescriptionEofEtheEmostEfrequentEproblemsEandEofEtheirEsolution:EE
E
| PROBLEMEECAUSEEESOLUTIONTEE | ||
| CoffeeEisEnotEcreamY | 5MECoffeeEblendEnotEsuitableEforEmachin eEE2MEImproperEgrindingEE3METooElittleEcoffeEinEfilter;EtheEpressindicatedEbyEthesmanometerEJIb7A Eise underE8EbarE4METheFilterEholderEhasEnotEbeEtightened underEtheEbrewingEgroupEringE | 5MEUseEaEdifferentEcoffeeEblendEAEAdjustEcoffeeEgrindingEE3MEPutEmoreEcoffeeEinEtheEfilterEandEpressEitE properlyE4METightenEBetterEtheFilterEholderE |
| TheEcoffeeEisEtooEcoldE | 5METheEmachineEhadEnotEreachedEtheE properEtemperatureEE2MEFilterHholderEhasEnotEbeenEpreheated3MECupsEhaveEnotEbeenEpreheatedEE4METhermostatEmalfunctionMEE | 5MESeeEsection "Starting the Machine" andE"Making an Espresso Coffee"2MEFilterHholderEmustEbeEhaledtogetherEwithE"Eewater-E-SeeEsectionE"Starting the Machine"3MEProperlyEheatEtheEcapsEonEtheEupHwarmerJ2A4MEContactEtheEnarestESERVICEECENTEREE |
| TheEcoffeeEcomesEoutEtoo quicklyE | 5MECoffeeEtooEcoarselyEgroundEE2METooElittleEcoffeeEinEtheFilterEE3MECoffeeEhasEnotEbeenEpressedEnough4MECoffeeTpodEoldEorEunsuitableEE | 5MEUseEaFinerEgrindingEE2MEPutEmoreEcoffeeEinEtheFilterEE3MEPressEtheEcoffeeEmoreEfirmlyEE4MEUseEaDifferentEcoffeeEblendE |
| CoffeeEcomesEoutE betweenEtheEcoffeeEgroupE andEtheEfilterHholderEE | 5MEFilterHholderEnotEproperlyEinsertedEE2METooEmuchEcoffeeEinEtheFilterEE3MEEdgeEofEtheFilterHholderEnonEcleanE4METheEdoucheEsealEisenEorEdamage | 5MEInsertEtheFilterHolderEcorrectlyEE2MEPutElessEcoffeeEinEtheFilterEE3MECleanEtheEedgeEofEtheFilterHholderEandEtheEbrewingEgroupEseale4MEContactEtheEnarestESERVICEECENTEREE |
| CoffeeEcomesEoutEinEdropE | 5MECoffeeEtooEfinelyEgroundEE2METooEmuchEcoffeeEinEtheFilterEE3MECoffeeEtooEfirmlyEpressedEE | 5MEUseEaEcoarserEgrindingEE2MEPutElessEcoffeeEinEtheFilterEE3MEPressEtheEcoffeeEmoreEgentlyEE |
| TheEmachineEdoesEnotE produceEsteamEE | 5METheEwaterEtubeEholeEmayEbeE obstructedEE2MELackEofEwaterEinEtheEtankE | 5MECleanEtheEholeEwithEaEneedleEE2MESeeEsectionE"Starting the Machine" |
| NoEcoffeeEproducedE during theEcoffeeEcycle;EthesE manometerEindicatesEET barEpressureE | 5MELackEofEwaterEinEtheEtankEE2MESteamEswitchEonEEEE | 5MEFillEtheEtankEE2MTurnEoffEtheEsteamEswitchEEEE |
| NoEcoffeeEproducedE during theEcoffeeEcycle;EthesE manometerEindicatesE moreEthanEB4EbarE pressureE | 5MECoffeeEtooEfinelyEgroundEE2METooEmuchEcoffeeEinEtheFilterEE3MECoffeeEtooEfirmlyEpressedE4METheEbrewingEgroupEdoucheEisenEdirtyE | 5MEUseEaEcoarserEgrindingEE2MEPutElessEcoffeeEinEtheFilterEE3MEPressEtheEcoffeeEmoreEgentlyE4MEContactEtheEnarestESERVICEECENTEREE |
| TheEmachineEdoesEnotE workEandEtheEONElightE doesEnotEcomeEonE | 5MENoElectricityEE2METheEpowerE cableEisEnotEproperlyE pluggedEinE3METheEpowerE cableEisenEdamagedEE | 5MERestoreEelectricalEpowerEE2MEPlugEinEtheEpowerE cableEcorrectlyEE3MEContactEtheEnearestESERVICEECENTEREReforE replacementE cableE |
| TheEONElightEisEonButEthe readyEsteamEindicatorE doesEnotEgoEoffEwithinEB1E2MEHeatingEelementEmalfunctionEE minutesE | 5METhermostatEmalfunctionEE2MEHeatingEelementEmalfunctionEE | 5MEContactEtheEnarestESERVICEECENTEREE2MEContactEtheEnarestESERVICEECENTEREE |
TheE inserted data and pictures can be subject changes without previous notice for the improvement of the machine's performance.
E E
NHACBybOyJIO:
- R6servoirE
- ChauffeEtassesE
- \E
- BoutonEEvapeurTeauEEchaudeEEIsurEEIaEEpartieE14. VoyantElumineuxEmachineEpryteE droiteRE 15. TasseurEMecaf6TTamperEE
- SicgeEporteEfiltreEE
- DistributeurEvapeurTeauEchaudeEE
- GrilleEamovableEappuieEtasseEE
- PorteEfiltreEE
- FiltreEBEtasseE
- FiltreE2EtassesE
- \EE
- InterrupteurEcaf6TeauEchaudeTvapeurEE
- VoyantElumineuxEmachineEpryteE
- TasseurEMEcaf6TTamperEE
- MesureEMEcaf6EE
- ManomctreEE
- FiltreEpourEdosettesE
- CouvercleEamovableEr6servoirE
- VerreEniveauEdeEl'eaer6servoirE
-
PIDEcontraleEtemp6natureE
-
InterrupteurEg6n6ralEonToffElsurElaEpartieEdroiteRE
- InterrupteurEpompeE
ПИИН'нБАЛY:
NbiHn pAnIOblbn qH M3 63OpbnH:
BM OtezElaEmachineEdeElaEboiteEetE6IoignezEtousElesEsachetsEetEleEmatGrieEd'emballageME
2M PositionnezE laE machineE surE uneE surfaceE stableE etE plane3E loinE deE fontesE deE chaleurR etE deR robinetsE duE r6seau hydriqueMEE
3M EnlevezIeE couvercleA movibleE I698 duE r6servoirEtE 3tezE leE r6servoir E I68 enF faisantE attentionEM ne endommagerElesEtubesEMl'int6rieurMEE
4M RemplissezEleEr6servoirEJIbEaevacEdeI'eeUEfroideMEE
5M RemettezE IeR6servoirE JI6E dansE sonEsicge3E enE contr3antE queE lesE tubesE neE soientE pli6sE etE queE leE filtrE mis I'extr6mit6Ed'unEdesEdeuxEtubesEsoitEbienEfix6MERemettezEleEcouvercleEJI69rEEE
6M Ins6rezElaEficheEduEcnbleEd'alimentationEdansElaEpriseEdeCourantEJv6rifiezEleEvoltageRMEEE
7M Ins6rezEleEporteEfiltreEJ8REdansEleEsicgeEfiltreEJ5REnEtournantEdeEgaucheEMEdroite3EdeEsorteEqu'ilEseEr6chauff qu'ilEsoitEprytEmEl'emploiME
8M AllumezElaEmachineEenEappuyantEsurEl'interrupteurEg6n6ralEJI56yMELeEvoyantElumineuxEdeEl'interrupteurEmyme s'ilmineraEpourEconfirmerEl'alimentationEauEr6seauE6lectriqueMEE
9M OuvrezEleEboutonEvapeurTeauEchaudeEN4RME
БГМ PositionnezEl'interrupteurEmElevierEJI63ЯEsurEcaf6EetEappuyezEl'interrupteurEpompeEEJ22RME
B5M LorsqueE I'eau sortE duE bacE deE laE buseE deE vapeurE J63E abaissezE l'interrupteur E J22RE etE fermezEVapeurTeauEchaudeJ4RMEE
62M LorsqueEcesEop6rationsEsontEtermin6es3ElaEmachineEpeutEresterEbranch6eME
63M LeEPIDEJ26EmontreElesEdegr6sEmI'int6rieurEdeElaEchaudicre3EenEcontralantElaEr6chauffementMEE
64M LeEPIDEestEd6jmEr6gul6EparEleEproducteurEdeEcetteEmachineEM95UC3Ec'estEMEdireElaTemp6ratureEoptimaleEpour pr6paration d'unE bonE caffe6ME JSiE vous d6sirezE changerE cetteE temp6rature3E vous ytesE pri6sE deE suiv instructionsEfourniesEdansEleEparagrapheEComment régulé la tempéature dans la cuve avec l'aide du PIDRE
E
bép3a3blbn 4H03Φ HxKpaHUuA 3HIO 4H03Φ6dMd:
B5M ContralezEqueEleEr6servoirEJI6EcontientEdeI'eeau3EenEregardantEleEverreEniveauEdeI'eeauJI2TAME
B6M AppuyezE surE l'interrupteurE g6n6raE J56RME LeE voyantE deE l'interrupteurE J56R E s'allumeE JfaitesE cesE op6ratior seulementEsiElaEmachineEestEteinte3EautrementEpassezEauEpointEsuivantRME
B7M DcsEqueEl'6cranEduEPIDEmontreElaEtemp6ratureEr6gul6eEetEqueEleEvoyantEJI64ReesteEallum63ElaEmachineEestEprmyEI'employIEME
B8M Ins6rezEleEfiltreEJ9E6EtasseEouEleEfiltreE2EtassesEJI5FJEdansEleEporteHfiltreEJI8J3EaprcsEl'avoirEfaitEr6chaufferEcc d6critEauEpointE7ME
B9M AvecEl'aideEdeElaEmesureEmEca6EJIb6REnEdotation3EJIb6E1/2EmesureE=EBtasse;E3EmesuresE=E2EtassesRA3Erempl leEfiltreEavecEleEca6EmouluMEAprcsEchaqueEmesureEmiseEdansEleEfiltreEutilisezEleEtamperEJI55RAEnEdotationEpourE presserIeEcaf6ME AssurezhvousE queIeE bordEU portefiltreSoitE propre3ESansE tracesE deE Caf63E quiE pourraient empcherElaEfixationEcorrecteEduEportefiltre3EenEcausantEdesEpertesMEE
2ΓM Ins6rezEleEporteEfiltreEJ8EdansEleEsicgeEduEporteHfiltreEJ5EenEleEtournant3EavecEforce3EdeEgaucheEversElaEdensuiteEpositionnezElesEtassesEsurElaEgrilleEappuieEtassesEJ7RMEE
26M PositionnezE1'interrupteurEJI63E surEcaf6E etElevezE1'interrupteurE pompeEJI22rME LeEmanomctreEJI67rE indiqueraE
pressionEatteinte3EdeE8EMEB4EbarME
22M LorsqueElaEquantit6EdeEcaf6Esouhait6eEestEatteinte3EabaissezEdeEnouveauEsurI'interrupteurEL22RME
23M EnlevezEleEporteHfiltreEJI8EetEjetezEleEmarcEdeEcaf63Ev6rifiezEqu'ILEsoitEpropreEtEins6rezHleEdansEleEsupportE pourEleEmaintenirEMElAeJesteEtemp6ratureMEE
E E E
E
bεp3a3bblan 4Д IO3фé HxKpyHUuД 3HIO MHIu 4dHbIbIHU:
E
24M ContralezEqueEleEr6servoirEJI6EcontientEdeEl'ea3EenEregardantEleEverreEniveauEduEr6servoirEJI2TAME
25M AppuyezE surE l'interrupteurE g6n6raIE JIbBAME LeE voyantE deE I'interrupteurEmymeE s'allumeE JfaitesE cesE op6rations seulementEsiElaEmachineEestE6teinte3EautrementEpassezEauEpointEsuivantame
26M DcsEqueEl'6cranEduEPIDEmontreElaEtemp6ratureEr6gul6eEetEqueEleEvoyantEJI64ReesteEallum63ElaEmachineEestEprmyEI'employIEME
27M Ins6rezEleEfiltreEpourEdosettesEJIb8rEdansEleEporteEftreEJI3EaprcsEl'avoirEr6chauff6EcommeEd6critEauEpointE7ME
28M OtezElaEdosetteEdeEsonEemballageEenEfaisantEattentionEmEneEpasElendommagerME
29M Ins6rezElaEdosetteEdansEleEfiltreEpourEdosettesEJI68YME
3ΓM Ins6rezEleEporteEfiltreEJ8EdansEsonEsicgeEJ5EenErotantEdeEgaucheEmEdroiteEavecEforceEetEensuiteEpositionneZtassesEsurElaEgrilleEamovableEappuiEtassesEJ7YME
36M PositionnezE I'interrupteur E J63E surEcaf6E etE levezE I'interrupteurE pompeE J22rME LeEmanomctreE J67rE indiqueraE prssionEatteinte3Ede8EMEB4EbarME
32M LorsqueElaEquantit6EdeEcaf6Ed6sir6EestEatteinte3ElevezEdeEnouveauEl'interrupteurEJ22RMEE
33M EnlevezEleEporteEfiltreEJ8EetEjetezElaEdosetteEus6eME
E
EzphA:
E
34M ContralezEqueEleEr6servoirEJIbEcontientEdeEl'ea3EenEregardantEleEverreEniveauEduEr6servoirEJI2TJME
35M AppuyezE surE l'interrupteurE g6n6raI E IbBAME LeE voyantE deE l'interrupteurEmymeEsallumeE JfaitesE cesOp6rationsseulementEsiElaEmachineEestE6teinte3EautrementEpassezEauEpointEsuivantRME
36M PositionnezEl'interrupteurEJb53ReSurEvapeurMEE
37M QuandEleEvoyantEJI64Re's'allume3ElaEmachineEestEpryteEMI'emploiMEEE
38M OuvrezEleEboutonEvapeurTeauEchaudeEN4MAuEd6butEiEyEauraEuneEperteEd'eauEetEdeElaEvapeurME
39M Mettez3E sousE laE buseE vapeurE J63E leE r6cipientE contenantE laE boissonE souhait6eE etE tournezE complctementE le boutonEn4rMEE
4ΓM AElaEfinEdeEl'op6ration3ErefermezEleEboutonEvapeurTeauEchaudeEJ4RME
46M IMPORTANT:EaprcsEchaqueEutilisationEdeElaEvapeur3EsurtoutEsiEcelaEa6t6Eutilis6EpourEfaireElcmeEduElaitEpou laEEpr6parationEEd'unEEcappuccino3EEouvrezEEdeENouveauEEleEBoutonEEvapeurTeauEEchaudeEEJ4REEtEEpositionI interrupteurEL63RE surE eau EchaudeE etE levezE I'interrupteur E J22rME QuandE I'eauCommenceEM sortirE deLAe bus vapeurTeauEEchaudeEEJ63EEfermezEEleEBoutonEEvapeurTeauEEchaudeEEJ4REEtEEsimultan6mentEEabaissezEEI'int J22rEetEremettezEl'interrupteurEEJI63REEsurEEcaf6;EEnettoyezElaEbuseEvapeurTeauEchaudeEEJ6RMEECetteEEop6ratn6cessaireEpourEmaintenirElesEconduitsEeuTvapeurEpropresEetEr6tablrEleEcircuitEdeI'eauEdansElesEconduitsMEEE
E
H3Дюрзч:
42M ContralezEqueEleEr6servoirEJI6REcontentEdeEl'ea3EenEregardantEleEverreEniveauEduEr6servoirEJI2rME
43M AppuyezEsurEl'interrupteurEg6n6ralEJIbBMELeEvoyantEdeEl'interrupteurEmymeEs'llumeEJiseulementEsiElaEmachine estE6teinte3EautrementEpasserEauEpointEsuivantame
44M PositionnezEl'interrupteurEJI63ReSurEeaEchaudeME
45M LorsqueE16cranE duE PIDE J2BJE montreE laE temp6ratureE r6gul6eE etE leE voyantE J164JE resteE allum63E laE machineE pryteEMEl'emploiME
46M OuvrezEleEboutonEdeEvapeurTeauEchaudeEN4EetElevezEl'interrupteurEpompeEN22RME
47M IIEyEauraEimm6diatementEuneEsortieEd'eauElaEbuseEvapeurEL6YME
48M LorsqueElaEquantit6Ed'eauSousaht6eEstEatteinte3EappuyezEdenouveauSurEl'interrupteurEL22REetERefermezEle boutonEdeEvapeurTeauEchaudeEL4RMEE
49M AprcsEleEpr6IcvementEd'eaueEchaude3EileEestErecommand6EdeEcontr3lerEqueEleEr6servoirEIL8EcontentEdeEl'eaUME
CINHIO BHTMHB RA IOHbHBAOMBH NAOA RA CPAMNYHB AEHC R'AYH NM byn:
LeEPIDEaE6t6Er6gul6EM95LCMEPourEchangerElaEtemp6ratureEvousEytesEpri6EdeEsuivreElesEpointsEsuivants:E
appuyezEsurEleEbouto E;EdcsEqueEl'6cranEduEPIDEmontreEl'6critureE"PRG"EappuyezEsurEleEboutenE EEE
quandEl6cranEduEPIDEmontreElaEtemp6ratureEdeElaEchaudicre3Er6gulezEavecElesEbautond E FaE ElaEvalueurEdeElaEtemp6ratureEdesir6e3EMepartirEde80C ^ jusqu'mE130C ^ ME
- 3EsecMEaprcsEavoirEappuy6EleEdernierEbouton3ElaEttemp6natureEestEdansElaEMcmoireEetEl'6cranEmontreElaTemp6natureEr6gul6eME
OB:EsiElaEtemp6ratureEestEr6gul6eEtropEhaute3EuneEfoisEdemand6EleEcaf63El'6cranEduEPIDEcommenceraEMEs'allumerEavec intermittanceMEE
E
F
F
E
E
E
E
CLOAHyA bBAKOy3MHA:
- LesE filtrés E B E tasseE J93E 2E tassesE J67E etE leE filtréE pourE dosettesE J68E neE doiventE pas ytreEn6cessairementEla aprcsEchaqueEutilisationMEL'importantEestEdeEs'assurerEqueElesEtrousEneEsontEpasEcolmat6sME
PourE obtenirE unE excellentER6sultat3E iE estE conseill6E deE r6chaufferE lesE tassesE surE leE chauffeHtassesE I2RE quiEnfonctionneEqueEsiElaEmachineEestEallum6eME
LeE PIDE aE 6t6r6gul6e avecdesesvalueurs impos6esE parE leE producteurE pourE obtenirE unE Caf6E excellentME PendantEle r6chauffageEetElaEdistributionEduEcaf6EouEauEchaudeElaEttemp6ratureEpeutEoscillerELbTHEbTb2LCaEparErapportEmel temp6ratureEr6gul6eMEIIEestEinclusEaussiEunEavertissement: EaprcsEB8LCEI'6cranEduEPIDemontreElaEttemp6ratureE maisEavecEintermittence;EEc'estEnormal3EenEs'agissantEd'unEavertissementEpourEl'tilisateurEqueEleEcaf6EneEseraE pasEbonEs'ilEseraEfaitEenEutilisantEuneEtemp6ratureEsiEhauteMEE
E
E
HOIBHIOYHO CJIMBAOIO HIO bBHCAMIOJIOA:
- IIEestEconseill6EdeEnettoyer3EaprcsEchaqueEutilisation3ElaEbuseEdevapeurEJ6EetEleEportefiltreEJ8RMEE
- PourEleEnettoyage3EutilisezEunEchiffonEhumidifi6Ed'eauME
- NeEpasEexposerEl'appareilEauxEagentsEatmosph6riquesME
- NeEpasEplongerEl'appareilEdansEl'eauME
- NeEfaireEfonctionnerEl'appareilEqueEsousEleEcontrəleEdesEadultesEetEleEtenirEhorsEdeElaEport6EdesEenfantsME
- NeEpasElaverEfiltreEetEporteHfiltreEdansElaEmachineEmelaverElaEvaisselleME
- PourEtoutEproblcmeEilEfaitEs'adresserEauEpersonnelEtechniqueEautoris6MEE
E
E
HIOOHHA IOHCPOY3MHA
E
AlimentationE6lectriqueE:E23VE-E5EHzE
PuissanceE:EBF5FEWE
Dur6eEdeEr6chauffageE:EenvironE3EminE
PressionEdeElaEpmpeE:EB5EbarE
R6gulationEduEPID:EMEpartirEdeE8ΓLCEetEjesqu'mEB3ΓLCE
Capacit6EduEr6servoirEd'eauE:E237EElitresEE
Dimensions:E34N23N27EcmE
Poids:E735EkgE
Haebl-YncbIbIbIHcn3p6n HnPiOpbInH:
IOBCEDAHBHbI YXOD I MEPbI PPEOCTOPOXHOCTN:
- Pekomehnyetcnaocne kaxdooro noIb30BaHnra TcaTeNbHO npOMbIBaTb Tpy6ky Bblaun napa (6) m
- Pa60T no YnCTKn peKOMeHdyem NOJb3OaTbcra npocToBlaJXHO TkaHbIO.
He octabTb 3neKtpnpn6op B MeCTax BO3dEeCTBnA tMOcΦepHbIX YBaJIeHN I He NorpyKaTb B Body.
-ФункиониюваимеэнгсрпбopadoJxHnoPOnCxOДNTbpoKcHpOeM B3pocIoroYeIOBeka,элкрponp6OpdePkataNbndaJIbweOTdTeN.
-HeMbIbΦnIbTpblnΦnIbTPOdepKaTeblBnocydomoeyHoMaunHe.
TEXHNUECKNE DAHHbIe:
HapjkeHe:230B-50/60Hz;
MouHocTb:1050BT.
Bpem rTOOBHOCTKpa6oTe:OKOJ03MnHyT
Давелене Насoca:156ap
PerynnpoBaHne PID:OT 80°C Do 130°C
Obem 6oyna DnB Odbi:2,7 nItpa
Pa3mepbl(BxUxD):34*23*27cm
Bec: 7.5 kR.
HC NHCRAABAIOJNCNOCBNIYKEE
GemmeEItalianEProducersEsrlEdeclarEsunderEitsEownEresponsibilityEthatEtheEproductEb43BHN whichEthisEdeclarationErelates3EisEinEaccordanceEwithEtheEprovisionsEofEtheEspecificEdirectives:E CEIEENE6Γ335H63ECEIEENE6Γ335H2H65E
ItEEalsoEe declares Eethat EEtheEEaboveEEmentionedEEproductsEEconformEEwithEEtheEEEelectro compatibilityEEtestEEMCME
NB:EETheEePresentEEdeclarationEEvoidsEEshouldEEtheEEmachineEEbeEEmodifiedEEwithoutEEour authorizationME
FRANCAIS

E E
AEHBIOYAANHIO bJMB RAUYNYAOYIO CINBBHCIOH NM BBNIIMyIO AMO IOBNIH NBYHCIOYEH HMBJIb3HOH 200/96/HCEE
AuEtermeEEdeEesonEEutilisation3EEleEEproduitEEeneEEdoitEEepasEEytreEE6limin6EEavecEElesEEproduitE doitE ytreE remis E l'unE desE cetteFolcte s5ectiveE pr6vusE parE l'administcommunaleEEouEEauprcsEEdesEErevendeursEEassurantEEceEEserviceMEEa liminerEEs6par6ment6lectrom6nagerEpermetEd6viterElesEretomb6eEN6gativesEpouEI'environnementEetElaEsant6Edd'uneE6liminationEincorecte3EetpermetEder6cup6rerElesEmat6riauxEquiEleecomposentEdansEleduneE conomieE importanteEn termsE d'energieE etE deE ressourcesME PourERappelerE ol'd6liminer EE6par6mentElesEappareilsE6lectrom6nagers3EleProduitEporteEleSymboleEdus5osorsorduresEbarr6ME
NHCRABAOYIO NH CNOCLBNIYOH CH
GemmeItalianEProducersEsrlEd6clareEqueEleEproduitEsuivant:EB41IOHNEmelaesfcreEcett d6claration3EestEfaitEselonElesEprescriptionsEdesDirectivesEsp6cifiques:E CEIEENE6Γ335H63ECEIEENE6Γ335H2H65ME
IIEd6clareEaussiEqueEleEproduitEseEconformEmElesEessaisEdeEcompatilit6E6lectromagn6tiquEMCMEE NB:EELaEEPr6senteEEd6clarationEEperdEEsaEEvalidit6EEd6sEEIorsEEqueEElaEEmachineEEestEE expresseAutorisationME
E E E E E E E E E E E E E AministratoreEdefegato

E E E E E E E E E E E E E E E E E E E E E E E

This product is covered by the warranty laws valid in the country where the product has been sold; specific information about the warranty terms can be given by the seller or by the importer in the country where the product has been purchased. The seller or importer is completely responsible for the product. The importer is completely responsible also for the fulfillment of the laws in force in the country where the importer distributes the product, including the correct disposal of the product at the end of its working life.
Inside the European countries the laws in force are the national laws implementing the EC Directive 44/99/CE.
Français
CONDITIONS DE GARANTIE: GARANTIE LEGALE
TAPAHINHbIE 053ATEJIbCTBA
3Ta npodykunna 3aunuhe napantnHbim 3akoHOM, deNCTBvUoMn B cTpaHe, rde OHa 6bIna npodaHa; KOHKpeTHa HhOpMaunr o rapaHTnHbIX cPOKAKMOKET 6bIt bHa npoadauCm/IMnpTePOB C TPAHe, rde npdykunna 6bln KynIeHa. PpOdaue/MmnpTeP NOJHOCTbIO OTBcTBeHHb3a 3Ty npadykunio. MMnpTe OTBeTcTBeHEn 3a BblINOnHeHne DeNCTBvUOx 3akoHOB B cTpaHe, rde paCpOCTpaHReT npOyKT, BKIOUaŋ npabnlbHyu ytniHa3uaNu npodykta no OKOHaHNn erO cPoka CnyX6bl.
B eBponecknX ctpaHax DeIcTByIOT HauNoHaJIbHbIe 3aKoHbI, KOTOpBle OcyueeCTBIAIOT DeTeNbHOCTb DInpeKTNBbl 44/99/CE

An important choice
E


AB01
Gemme Italian Producers srl