Diana PL60T - Coffee machine Lelit - Free user manual and instructions
Find the device manual for free Diana PL60T Lelit in PDF.
Frequently Asked Questions - Diana PL60T Lelit
User questions about Diana PL60T Lelit
0 question about this device. Answer the ones you know or ask your own.
Ask a new question about this device
Download the instructions for your Coffee machine in PDF format for free! Find your manual Diana PL60T - Lelit and take your electronic device back in hand. On this page are published all the documents necessary for the use of your device. Diana PL60T by Lelit.
USER MANUAL Diana PL60T Lelit
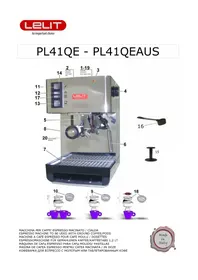
ResistenWaHcaffb:H1000WH
ResistenUJaHvapore:H1200WH
PressioneHpompaHcaffb:H12/15HbarHH
PompaHcaldaiaHcaffbHULKA:H48WH--HPompaHcaldaiaHvaporeHULKA:H21WH
RegolaUjioneHTermopiddbHmin5H80°CHfinoHaHmax5H1H30°C
Capacit6HserbatoioHacqua:H27HlitriH
Capacit6HcaldaiaHcaffb:H250HmIH--HCapacit6HcaldaiaHvapore:H400HmlH
DimensioniHdHxLxP3:H30x30x42HcmH--HPesoHnetto:H10Γ5HkgH
FunLionamento:HcaffbHmacinatoH/HcialdeHcartaH
H
NIHKLTYIKNE DEI ONKBLEMI OIU FNIEMTENEI:
GentileHClienteFH
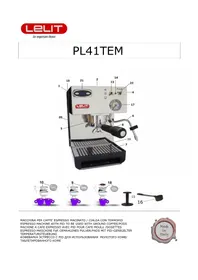
15 RemoveH theH machineH fromHitsH packingH andH makeH sureH allH packingH partsH haveH beenH takenH offH includingH theH prote bags36HH
25 LayHtheHmachineHonHaHflatHandHsteadyHsurfaceHfarHawayHfromHhotHplacesHandHfromHtheHwaterHtpsEH
35 RemoveH theH waterH tankH coverH 193H onH theH topH ofH theH machine; H extractH theH plasticH tubeH thatH hasH aH resinH filter attached; HextractHtheHwaterHtank5H
45 FillHtheHtankHwithHcoldHwater5HH
56 ReplaceHtheHwaterHtankHbackHinHtheHmachine;HinsertHtheHplasticHtubeHandHpayHattentionHnotHtoHbendHit;HreplaceHthe D193HinHitsHrightHposition5H
65 InsertHtheHpowerHcordH13HinHtheHmainsEHHMakeHsureHthatHtheHwallHsocketHisHofHtheHrightHvoltageEHH
75 PlaceHtheHfilterHholderHД123HunderHtheHbrewingHgroupHД133HandHturnHitHfromHtheHleftHtoHtheHrightEHLaveHitHthere canHgetHwarmHandHitHgetsHreadyHforHuse5H
85 TurnHonHtheHmachineHbyHpressingHtheHmainHswitchHД23;HtheHbuild-inHpilotHlightHconfirmsHthatHtheHmachineHisHonEHTh groupHandHtheHsteamHboilerHrechargeHgoHonHautomaticallyБHPressHtheHhotHwaterHtoggleHswitchHД203Hup: HonceHwaterH flowHoutHofHtheHwaterHtubeHД113HpressHtheHtoggleHswitchHД203Hdown5HH
96 PressHtheHsteamHgroupHmainHswitchHД63HinHorderHtoHturnHonHtheHboilers'HheatingHelement:HtheHcoffeeHreadyHpilotHli andHtheHsteamHreadyHpilotHlightHД33HwillHcomeHonHconfirmingHthatHtheHmachineHisHreadyHforHuse5HHH
105 TheHPIDHД163HwillHvisualiWeHtheHdegreesHinsideHboilerHandHwillHcontrolHtheHboiler'sHheatingBHH
115 TheHPIDHisHalreadyHsetHfromHtheHproducerHonH95°CHiBe5HtheHidealHtemperatureHforHaHgoodHcupHcoffeeEHHIf toHchangeHtheHPID'sHtemperatureΓHpleaseHfollowHtheInstructionsHwrittenHunderHHow to set the temperature inside the boiler by means of the PID3EH
H
H
MnHwB Nw 3pBc3bI rAIO BbbWt abinnu:
H
126 CheckHthatHtheHtankHcontainsHwater5HAEEENEIKN:HtheInternalHtankHhasHaHspecialHfloatingHdeviceHthatHcontrolsHtheHlevel5HInHcaseHofHlackHofHwaterΓtheHwaterHmissingHpilotHlightHД173CoomsHonHautomaticallyHandHatHtheHsameHtimeHalarmHbuUJes5HPleaseHfillHtheHwaterHtankHwithHwaterHdasHdescribedHunderHStartingHtheHmachineΓHpointsH3-53:HthisHoffHtheHpilotHlightHД173HandHtheHbuUJerΓ confirmingHthatHtheHwaterHlevelHisSuitableEHNB:HtheHwaterHTankHmustHb withHwaterHtilIhtheHMAXHlevelHindicatedHonHtheHapplianceHbodySHH
135 FollowHtheHinstructionHatHpointH9HinHcaseHtheHaboveHwrittenHoperationsHhaveHnotHbeenHyetHdoneBHH
145 AsHsoonHasHtheHPID'sHД163HdisplayHshowsHtheHsetHtemperatureHandHtheHcoffeeHreadyHpilotHlightHД43HgoesHonΓHtheHm readyHforHuseB
156 PlaceHtheHfilterHД25-263HinHtheHfilterHholderHД123B解锁HtheHfilterHholderHД123HInHtheHbrewingHgroupHД133HturningHi leftHtoHtheHrightΓafterHhavingHpouredHtheHdesiredHquantityHofHgroundHcoffeeHД1HdoserHД233HcorrespondsHtoH1Hcoffee toHgetH2HcoffeeHcapsHpourH2HdoWersHofHgroundHcoffeeHinHtheHfilterHholderHД123H3HandHafterHhavingHpressedHithproj theHpressingHtool/tamperHД223BHHH
165 PlaceHtheHespressoHcup/sHonHtheHcupHrestHД143БHNB:HthisHmachineHhasHaHremovableHtrayHД143HforHespressoHcupsHa grillHД153HforHcups/mugHofHmaxБH11cmHheight5H
175 NB: Eoц abinuz 3rAao (5) 103 2 pbI34Abyu3:HupHit'sHonHdowHit'sHoffbHTurnHtheHcoffeeHswitch HonHД53HtoHst andH onceH youH haveH reachedH theH desiredH quantityH ofH coffeeH pressH theH toggleH switchHД53H downH toH stopH dispensing coffeeEHH
186 RemoveHtheHfilterHholderHd123HfromHitsHsupportHd133HandHthrowHawayHtheHcoffeeHgroundsEHNB:HPlaceHtheHfilterHhold emptyHwithoutHcoffee3HbackHinHitsHsupportHd133HinHorderHtoHmaintainHtheHentireHcoffeeHgroupHatHtheHsuitableHtempera
H H
HAUm:
H
195 CheckHthatHtheHtankHcontainsHwater5HAEEENEIKN: HtheHinternalHtankHhasHaHspecialHfloatingHdeviceHthatHcontrolsHtheHlevel5HInHcaseHofHlackHofHwaterHwaterHmissingHpilotHlightHД173HcomesHonHautomaticallyHandHatHtheHsameHtimeHallarmHbuUJesEHPleaseHfillHtheWaterHtankHwithHwaterHdasHdescribedHunderHStartingHtheHmachineHpointsH3-53:HthisHoffHthePilotHlightHД173HandHtheBuUJwerΓ confirmingHthatHtheHwaterHlevelHissuitableSHNB: HtheHwaterHtankHmustHb withHwaterTtilIHTheHMAXHLevelIndicatedHonHtheHapplianceHbodySHH
206 SwitchHonHtheHsteamHgroupHbyHpressingHtheHsteamHmainHswitchHД63HДonlyHifHitHhasHnotHbeenHyetHdone3:HtheHpilot getsHonBHTheHmachineHisHatHtheHrightHtemperatureΓhreadyHtoHmakeHsteam5HHHH
215 PlaceHtheHcup/mugHwithHtheHdrinkHtoHbeHteatedHunderHtheHsteamHtubeH103EH
H
226 PressH theH toggleH steamH switchHД93H upH payingH attentionH thatH theH steamerH alwaysH staysHimmerseH inH theH liquidH toI possible HhotHdrinkHspraysБH
23E PressHtheHtoggleHsteamHswitchHД93HdownHtoHstopHsteamingHandHremoveHtheHsteamHtubeHД103HfromHtheHcup/mugEHH
246 TheHsteamHtubeHd103HcanHbecomeHextremelyHhotHsoHmakeHsureHtoHhandleHitHonlyHtouchingHtheHrubberHsafetyHprotectic
256 CleanHtheHsteamHtubeHД103HaccordinglyHwithHaHnormalHdampHclothБH
HbIAaB:
H
265 CheckHthatHtheHtankHcontainsHwater5HAEEENEIKN:HtheHinternalHtankHhasHaHspecialHfloatingHdeviceHthatHcontrolsHtheHlevel5HInhCaseHofHlackHofHwaterΓtheHwaterHmissingHpilotHlightHД173HcomesHonHautomaticallyHandHatHtheHsameHtimeHthallarmHbuUlusEHPleaseHfillHtheHwaterHtankHwithHwaterHdasHdescribedHunderHStartingHtheHmachineΓHpointsH3-53:HthisHoffHtheH pilot Hlight HД173HandHtheHbuUluserΓ confirmingHthatHtheHwaterHlevelHisSuitableEHNB:HtheHwaterHTankHmustHb with Hwater HtilIhtheHMAXHlevelIndicated HonHtheHappliance HbodyE
276 WaitHtilItheHPID'sHД163HdisplayHshowsHtheHsetHtemperatureHandHtheHcoffeeHreadyHpilotHlightH43HcomesHonBHH
286 PlaceHaHmugHunderHtheHhotHwaterHfaucetHД113HandHpressHtheHhotHwaterH switchHД203Hup:HthePilotHlightHД213Hcor startingБHHOnceHyouHgetHtheHdesiredHamountHofHhotHwaterHpressHtheHswitchHД203HdownHtoHstopHdispensingBH
296 AfterHhavingHtakenHhotHwaterΓHalwaysHcheckHthatHthereHisHstillHwaterHinHtheHtankHandHifHitHisNecessaryΓHfillHtheHwasHindicatedHatHpointH245H
H
HKN EK HEE EHE BKILEN'H EEMOENAETNE BP MEANH KF EHE OID:
TheHPIDHhasHbeenHsetHbyHtheHproducerHofHthisHmachineHonHaHtemperatureHofH95°C6HInHorderHtoHchangeHtheHtempe pleaseProceedHasHfollows:H
45 pressHtheHbuttonH"H; HasHsoonHasHtheHdisplayHshowsHtheHwritingH"PRG"HpressHtheHbuttonHH;HH
55 asHsoonHasHtheHdisplayHshowsHtheHboiler'sHtemperatureHhelpHyoursfHwithHtheHhonsH Hand HInl orderHtoHsetHtheHdesiredHtemperatureHstartingHfromHaHmin5HofH80C ^ upHtoHaHmax6HofH130C ^ 6H
65 afterH3HsecBfromHpressingHtheHlastHbuttonΓHtheHinsertedHtemperatureHisHmemoriWedHandHtheHdisplayHshowsH temperatureBHH
NB:HifHtheHtemperatureHisHsetHtooHhighHhonceHaHcoffeeHrequestHisHmadeHtheHdisplayHstartsHtoHflash5HH
H
IKTEINE MAINEENANCE AND ONECATEIKNH:
CleanHupHtheHsteamHtubeHД103HafterHeveryHuseBHH
- UseHaHnormalHdampHclothHtoHcleanHtheHmachine6H
-DoHnotHleaveHtheHmachineHoutdoorsBH
- DoHnotHimmerseHtheHmachineHinHwater5H
UseHtheHmachineHonlyHunderHadultHcontrolHandHkeepHitHawayHfromHchildren'sHreachEH
- DoHnotHwashHfiltersHandHfilterHholderHhinHtheHdishwasher6H
- DuringHnormalHfunctioningHsomeHpartsHofHtheHapplianceHbodyHcanHreachHhighHtemperatures:HpleaseHhandleHwithHducationAH
TheHPIDHisHalreadyHsetHbyHtheHproducerHonHtheHrightHtemperatureHforHanHexcellentHespressoBHDuringHheating coffeeHorHwaterHdistributionHtheHtemperatureHcanHospillateHT/-H10/12°C35HAisoHaHwarningHhasHbeenHinserte afterH108°CHtheHPID'sHdisplayHshowsHtheHtemperatureHbutHintermittently;HthisHisNormalHandHitHwarnsHtheHuse thatHtheHcoffeeHwillHnotHbeHgoodHmadeHwithHsuchHhighHtemperatureBHH
H
AEEENEIKN: theHmachineHisEquippedHwithHaHwaterHtankHof257IHwithHmissingHwaterHsensorHconnectedHtoHanHallarmHpilotHI173HandHalsoHtoHaHbuUWer5HTheHsoundHofHtheHbuUWerHcausedHbyHtheBlackHofHwaterHatHstartingHtheHmachineHisHdiffere soundHmadeHtoHindicateHtheBlackofHwaterHduringHnormalHfctioning6HTheRestorationHofTheSuitable HwaterHlevelHwillHshu theHallarmPilotHlightHД173HandHtheBuUWer6IfHtheHwaterHfinishesDuringHtheNormalHfctioningHtheMissingHwaterHsen allowH15sec5HofTimeHtoHfinishHtheHcoffee; HonceHtheHcoffeeHisHDoneHtheWaterTankHmustHbeHfilledDwithHwaterTtilIhtheHma indicatedHonHtheHapplianceHbody5HH
WeHsuggestHreadingHtheHinstructionHbookletHcarefullyHandHcheckingHtheHwaterHlevelHinHtheHwaterHtankHregularly5HH
H
HnAubuauuBwafbTt (uw3BAtbIw AIOU pfl3Aua Abyu, w3Tu AIOU flAub Anh):HoneHwayHwaterHsoftenerH machines5H ItH protectsH theH machineH fromH limestoneH residues5H ItH needsH toH beH replacedH accordingH toH theH waterH hardness consumptionHfollowingHtheHbelowHtable:H
H
| WaterH hardness H Quantity H |
| 10°FHH90HtH |
| 20°FHH45HtH |
| 27°FHH35HtH |
| 35°FHH23HtH |
| 45°FHH20HtH |
H
NB: It'sHisNecessaryHtoHreplaceHtheHresinHfilterHasHindicatedHaboveHotherwiseHtheHlimestoneHresiduesHcanHdamageHtheHcofi machineHtheHwarrantyHdoesHnotHcoverHthisHtypeHofHdamage35H
EuauwuaΦtnAn:
PowerHsupply:H220-230V:H50HWH-H220-230V:H60HWH
CoffeeHheatingHelement:H1000WH
SteamHheatingHelement:H1200WH
CoffeeHpumpHpressure:H12/15HbarHH
PumpHonHcoffeeHboilerHDLKA3:H48WH--HPumpHonHsteamHboilerHDLKA3:H21WH
PID'sHregulation:HfromH80°CHupHtoH130°CH
WaterHtankHcapacity:H27HlitriH
CoffeeHboilerHcapacity:H250HmIH-HSteamHboilerHcapacity:H400HmIH
DimensionsHДHxLxP3:H30x30x42HcmH-HNetHWeight:H10Γ5HkgH
ToHbeHoperatedHwithHgroundHcoffeeHorHcoffeeHpodsh
ENKTBLEHHKKEING:
H
WeHthankHyouHforHbuyingHoneHofHourHproductsTProjectedHandHassembledHnHaccordanceHwithHtheHmostHup-toHdateHtechnolc innovations5H
FollowingHcarefullyHtheHsimpleHoperationsHdescribedHinHthisHmanualHwhichHrespectHtoHallEssentialHsafetyHregulationsHyouH getHtheHbestHperformancesHandHwillAppreciateHtheHremarkableHreliabilityHofHthisHproductHinHtheHyearsHtoHcome5H
PleaseHfindHbelowHtheHdescriptionHofHtheHmostHfrequentHproblemsHandHofHtheirHsolution:HH
H
| PROBLEMHHHCAUSEHHHSOLUTIONHH | ||
| CoffeeHtooHcoldHH | 16HTheHmachineHhadHnotHreachedHtheHpropertemperatureHH25HFilter-holderHnotHpreheatedHH35HCupsHnotHpreheatedHH45HThermostatHmalfunctionsHH | 16HSeeHsectionH"StartingHtheHmachine"HandH"MakingHanHespresso"H25HFilter-holderHmustHbeHteatedHtogetherHwithwaterH-HseeHsectionH"StartingHtheHmachine"H35HProperlyHheatHtheHcupsHHonHtheHcup-warmД183H45HContactHtheHnearestHSERVICEHCENTERHH |
| CoffeeHcomesHoutHtooHquicklyH | 16HToohhittleHcoffeeHinHtheHfilterHH25HCoffeeHnotHpressedHenoughHH35HCoffeeHisHoldHorHunsuitableHH | 16HPutHmoreHcoffeeHinHtheHfilterHH25HPressHcoffeeHmoreHfirmlyHH35HUseHaHdifferentHcoffeeHblendHH |
| CoffeeHleaksHbetweenHthecoffeeHgroupHandHtheHfilter-holderHH | 16HToeholderHnotHproperlyHinsertedHH25HToohmucHcoffeeHinHtheHfilterHH35EdgeHofHtheHfilter-holderHnotHcleanHH45HTheHdoucheHsealHisHwornHoutHorHdamagedBHContactHtheHnearestHSERVICEHCENTERHH | |
| CoffeeHcomesHoutHinhdropsHH | 16HToohmucHcoffeeHinHtheHfilterHH25HCoffeeHtooHfirmlyHpressedHH | 16HPutHlessHcoffeeHinHtheHfilterHH25HPressHtheHcoffeeHmoreHgentlyHH |
| TheHmachineHdoesHnothproduceHsteamHevenHifththeHLEDHД63HandHД93handHH | 16HMicroHpumpHnotHfunctioningHH25HObstructedHoutletHholeHatHendHofHsteamHH25HToohhittleHwaterHinHtankHH | 16HSeeHsectionH"Steam"HhCleanHtheHoutletHholeHwithHaHneedleHH35HSeeHsectionH"Starting the Machine" |
| TheHmachineHdoesHnothworkHandHtheHONHlightHdoesnHnotHturnHonБH | 16HNoHelectricity/powerHsupplyHH25HTheHpowerH cableHisHnotHproperlyHpluggedHH35HTheHpowerH cableHisHdamagedHH | 16HCheckHandHrestoreHtheHelectricalHpowerHH25HPlugHinHtheHpowerH cableHcorrectlyHH35HContactHtheHnearestHSERVICEHCENTERHRforHreplacementH cableH |
| IMOKPIANE INFKIINAIEKN FKN CKII NCE DEHOKHAL KF EHE OIKDTCE IN ACCNDANCE MIEH EC DINCEEIBE 2002/96/ECHH AtH theH endH ofH hitsH workingH lifeH theH productH mustH notH beH disposedH ofH asH urbanH waste5H ItH mustH be specialH localH authorityH differentialH wasteH collectionH centreH orHa H dealerH providingH thisH service5HDisposing householdH appliHanceH separatelyH avoidsH possibleH negativeH consequencesH forH theH environmentH andH derivingH fromH inappropriateH disposalH HofHenablesH theH constituentH materialsH toH beH recoveredH toHobtainH signH savingHinH energyHandResources5HHAsHa reminderH theH needH toH disposeHofH householdHappliancesH sepa theH productsHisHmarkedHwithHa crossed-outHwheeledHdustbinE | |
| EC DECLANIAEIKN KF CKNFKIIMIEPHH GemmeH ItalianH ProducersH srlH declaresH underH itsH ownH responsibilityH thatH theH productH OL60EHToH wh declarationH relatesH HisHicordanceHwithH theProvisionsHofH theH specificH directives:H CEIHENH60335-1ΓHCEIHENH60335-2-15H ItHalsoH declaresH thatH theH aboveH mentionedH productH conormsH withH theH eletromagneticH compatiblityHhtes NB:HTheH presentH declarationHvoidsHshouldH theH machineHbeH modifiedH withoutHourH specificHautH ilUation CastegnatoΓH01/07/2011H AdminISTRatoreHDelegatoH |
H
TheH insertedH dataH andH picturesH canH beH subjectH toH changesH withoutH previousH noticeH forH theH improvementH ofH theH machine performancesEHH
KbIMpbIuua:
15 StromkabelH
85 CouverageHcuveHd4chargeHeauHH
146 SupportHamovableHpourHlesHtassesHespressoHH 28E CartoucheHfiltranteH6Hr4sinesH
MKDE D'EMOLKI:
M3uBbAtuΦmnaiou:
H
15 OteUHlaHmachineHdeHlaHboiteHetHyloigneUHTousHlesHsachetsHetHleMaturielHd'emballageEH
26 PositionneluHlaHmachineHsurHuneHsurfaceHstableHetHplaneHloinHdeHfontesHdeHchaleurHetHdeHrobinetsHduHryseauHhydriqu
36 LevelHouHenlevelHcompletement3HleHcovercleHamovibleH193HduHrsvoirHmisHsurHlaHpartieHsupvireeHdeHHaHma enlevHevecHatentionHleHtubeHenHplastiqueHsurHlequelHestHinsurHcartoucheHfllranteH6HrsinesH283;HensuiteHx ryservoirHH
ObepnBnAuybTb ane 3pBc3bl nca Tb aneMbibb:
H
PerynipoBaHne PID: ot 80^ do 130^
06bem pe3epByapa Dnla BoDbl: 2,7 n.
06bem 6oJIepa IJI KOfe: 250 Ml - O6bem 6oJIepa IJI npa: 400 Ml
Pa3Mepb: 30x30x42 cm.; Bec: 10,5 Kr
This product is covered by the warranty laws valid in the country where the product has been sold; specific information about the warranty terms can be given by the seller or by the importer in the country where the product has been purchased. The seller or importer is completely responsible for the product. The importer is completely responsible also for the fulfillment of the laws in force in the country where the importer distributes the product, including the correct disposal of the product at the end of its working life.
Inside the European countries the laws in force are the national laws implementing the EC Directive 44/99/CE.
Deutsch
GARANTIEBEDINGUNGENIO GESETZLICHE GARANTIE
TAPAHTHHbIE O83ATEJIbCTBA
3Ta npOdyKcIy 3aunuHe rapaHTnHbIM 3aKOHOM, DeiCTBHyUcIM B CtpaHe, rDe OHa 6blNa npOdaHa; KOHKpeTHa HΦopMauI O rapaHTnHbIX cPOKAX MOKeT 6blb DaHa npOdaBcOM/IMNOpTePOM B CtpaHe, rDe npOdyKcIy 6blNa KynIeHa. PpOdaBeU/IMNOpTeP NOJIHOCTbIO OTBeTCTBeHHbI 3a 3Ty npOdyKcIyIO. IMNOpTeP OTBeTCTBeHEN 3a BBINONHeHne DeiCTByUxix 3aKOHOB B CtpaHe, rDe pAcnpocTpAraET npOdyKT, BKlIOuAЯ nPaBnIbHyU yTNIu3aCIO npOdyKt a no OKOHaHm erO cPoka cnYk6bl.
B eBponecknx cTpaHax DeIcTByIOT HauNoHaJIbHbIe 3aKoHbI, KOtOpbIe OcyuEcTBnIOT DeTeJIbHocTb DInpeKTHbI 44/99/CE

An important choice
H


AB01
GUMMIAIΦHNI OBBtbaucB3BΦ
ViaHdellhLaboroH45H-HIH-H25045HCastegnatoHDBS3H ItalyH
Tel:HT39H030H2141199H-HFax:HT39H030H 2147637H
www.Blelit5comH-HIlet@Ielit5comH-HP5IvaH 03426920173H