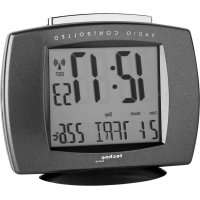
WT 197 - Alarm bell TECHNOLINE - Free user manual and instructions
Find the device manual for free WT 197 TECHNOLINE in PDF.
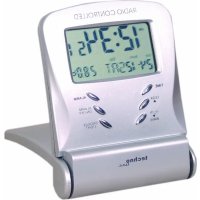
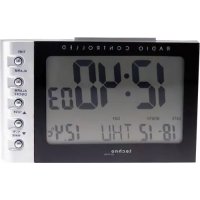
| Product type | Radio-controlled alarm clock with calendar and indoor thermometer |
| Brand | TECHNOLINE |
| Model | WT 197 |
| Dimensions (approximate) | Approximately 120 x 70 x 80 mm |
| Weight (approximate) | Approximately 150 g (without batteries) |
| Power supply | 3 AAA (LR03) 1.5 V batteries |
| Time reception | DCF 77.5 kHz signal, automatic daily (1am, 2am, 3am) and manual (WAVE button) |
| Time display | 12h/24h format, adjustable time zone (GMT+1, GMT+2, GMT) |
| Calendar | Year, month, date and day of the week (selectable language: EN, GE, FR, IT, DU, SP, DA) |
| Alarm | Audible, 2-minute duration, snooze function (5 minutes) |
| Indoor thermometer | Range: -10 °C to +50 °C (14.2 °F to 122 °F), resolution 0.1 °C/°F |
| Main functions | Time/date/temperature display, alarm with snooze, radio-controlled reception, manual setting, reset button |
| Maintenance and cleaning | Do not expose to water, extreme temperatures, shocks, dust; use a soft, dry cloth |
| Safety | Do not open the case, do not modify components, use only recommended batteries |
| Spare parts and repairability | Not specified by the manufacturer; in case of malfunction, use the RESET button |
| General information | Multilingual manual (35 pages), version 1.0 dated 11.01.2010 |
Frequently Asked Questions - WT 197 TECHNOLINE
User questions about WT 197 TECHNOLINE
0 question about this device. Answer the ones you know or ask your own.
Ask a new question about this device
Download the instructions for your Alarm bell in PDF format for free! Find your manual WT 197 - TECHNOLINE and take your electronic device back in hand. On this page are published all the documents necessary for the use of your device. WT 197 by TECHNOLINE.
USER MANUAL WT 197 TECHNOLINE
For best reception of radio controlled signal, keep your clock close to a window and away from metal surfaces, electrical appliances and magnetic fields.
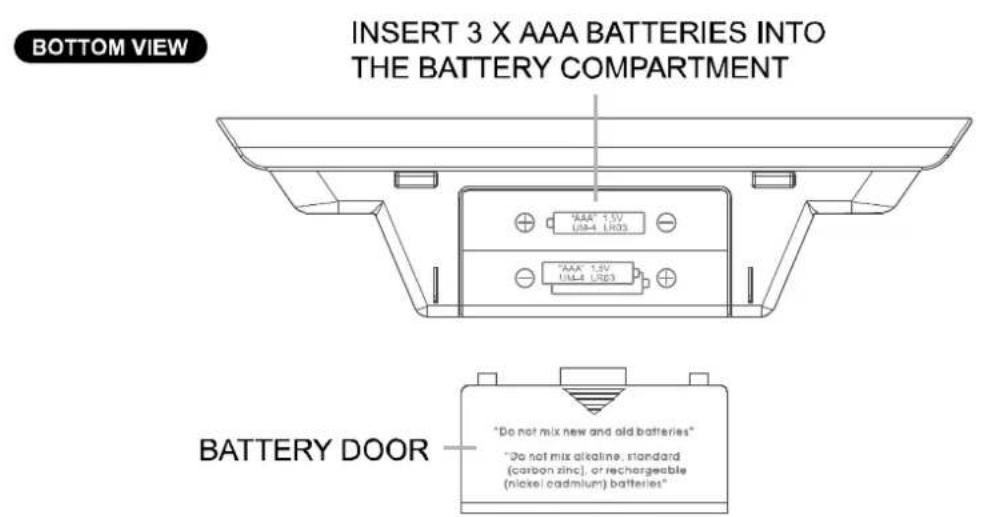
BATTERY INSTALLATION
- Slide open the battery cover at the bottom of your unit.
- Insert 3 × AAA batteries into the battery compartment by observing the correct + / - polarity signs inside the battery compartment.
- Replace the battery cover. Your clock is ready to work you.
ENVIRONMENTAL RECEPTION EFFECTS
Your radio controlled clock obtains the accurate time with wireless technology. Same as All wireless devices, the receiving ability maybe affected by, but not limited to, the following circumstances:
- Long transmitting distance
- Nearby mountains and valleys
- Among tall buildings
- Near railway, high voltage cable etc.
Near freeway, airport, etc - Near construction site
- Inside concrete buildings
Near electrical appliances
Near computers and TV's - Inside moving vehicles
Near metallic structures
Place your clock at a location with optimal signal, i.e. close to a window and way from metal surfaces or electrical appliances.
DCF SINGAL RECEPTION AND SIGNAL INDICATOR
After your clock is powered up, it starts to receive DCF signal. The icon flashes.
Weak or no DCF signal
(only icon flashing)
Receiving strong DCF signal
(icon flashing)
Successful Reception
(icon becomes static)
Failed Reception
(icon disappear)
Automatic reception and Manual Reception
Your clock starts automatic reception everyday at 1:00, 2:00, 3:00. If it fails to receive the DCF time signal at 3:00, it will start reception at 4:00. If it fails again it will start reception at 5:00. If it fails again it will start automatic reception at 1:00 again in the next day.
Manual reception: simply press WAVE button once to start manual reception. Press and hold WAVE for 2 seconds to stop manual reception.
Remark: when your clock is receiving radio controlled time signal, all buttons except the snooze / light button do not function.
TO SETCALENDAR, 12/24 TIME AND TIME
- Press and hold SET for 2 seconds, time digits change to "24 Hr" and flash, press +/- to select "12 Hr" time format or "24 Hr" time format. When 12HR is selected, AM or PM will be displayed.
- Then press SET once again, time digits change to "00" and flash. Press +/- button to select time zone:
$$ \begin{array}{l} 0 0 ^ {\prime \prime} = G M T + 1 h o u r (e. g. G e r m a n y) \ 0 1 ^ {\prime \prime} = G M T + 2 h o u r s (e. g. F i n l a n d) \ - 0 1 ^ {\prime \prime} = G M T 0 0 h o u r (e. g. U. K.) \ \end{array} $$
- Then press SET once again, hour digits flash. Press +/- button to set hour.
- Then press SET once again, minute digits flash. Press +/- button to set minute.
- Then press SET once again, time digits change to year "2009" and flash. Press + / - to set the year.
- Then press SET once again, month digits flash. Press +/- button to set month.
- Then press SET once again, date digits flash. Press +/- button to set date.
- Then press SET once again, day of week digits flash. Press +/- button to select the language of day of week.
$$ \begin{array}{l} E N = E n g l i s h \ G E = \text {G e r m a n} \ F R = F r e n c h \ I T = I t a l i a n \ D U = D u t c h \ \mathrm {S P} = \text {S p a n i s h} \ D A = \text {D a n i s h} \ \end{array} $$
- Press SET to return to normal mode, or it will return to normal mode in around 30 seconds if no press of any other buttons.
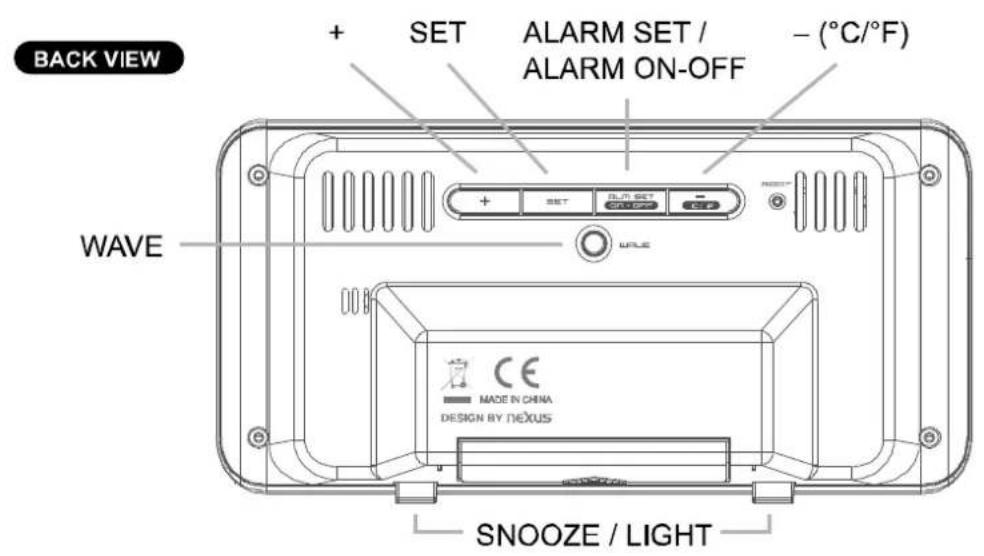
TO SET ALARM TIME
Press and hold ALM SET / ON-OFF once, time digits change to alarm time digits "0:00 AL" and hour digits flash. Then press +/- to set your desired hours of alarm time.
Press ALM SET / ON-OFF once, alarm minute digits flash. Press +/- to set your desired minutes of alarm time.
Press ALM SET / ON-OFF once to return to normal mode, or it will return to normal mode in around 30 seconds if no further press of any other buttons.
TO TURN ON OR OFF YOUR ALARM
Press ALM SET / On-Off once to turn on or off the daily alarm. When the alarm function is turned on, the icon appears between the hour and minute digits.
TO USE SNOOZE ALARM
When time reaches your set alarm time, your clock will give beep sound to wake you up. The con will flash.
1) Press SNOOZE on the top once to stop the alarm temporarily, the “ ” and “ Zz ” icon keep flashing. The alarm will beep again in 5 minutes.
2) To stop the alarm, press ALM SET/ON-OFF once, the alarm beep will stop and the icon become static, alarm will beep again same time next day.
Alarm Duration: 2 minutes
TO DISPLAY TEMPERATURE IN DEGREE ^ C OR ^ F
Simply press - (^ / ^) to display temperature in degree ^ C or degree ^ F
TROUBLE SHOOTING
In case your clock shows irrelevant information or digits, it may be affected by electrostatic discharge or interferences from other devices. Press the RESET button on the top of your clock. Your clock will be reset to default setting of time and calendar and it will start to receive radio controlled time signal again.
CARE OF YOUR RADIO CONTROLLED CLOCK
- Do not expose the unit to extreme temperature, water or direct sunlight
- Avoid contact with any corrosive materials
- Do not subject the unit to excessive force, dust or humidity
- Do not open the inner back case or tamper with any components of this unit
SPECIFICATIONS
Indoor Temperature Range -10°C to +50°C (+14.2°F to +122°F)
Temperature Resolution 0.1°C
Alarm Duration 2 minutes
Snoopze Duration 5 minutes
VERSION 1.0
2010.01.11
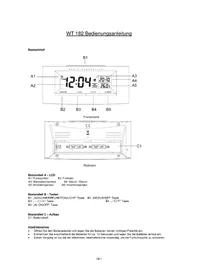
Words in the figure:
| ENGLISH | OTHER LANGUAGE | |
| Figure 1: | FRONT VIEW | |
| PM | ||
| ALARM ON | ||
| TIME | ||
| DCF SIGNAL INDICATOR | ||
| TEMPERATURE | ||
| DAY OF WEEK | ||
| MONTH / DATE | ||
| SNOOZE ICON | ||
| BACK VIEW | ||
| + | ||
| SET | ||
| ALARM SET / ALARM ON-OFF | ||
| - (°C/°F) | ||
| SNOOZE / LIGHT | ||
| WAVE | ||
| BOTTOM VIEW | ||
| INSERT 3 X AAA BATTERIES INTO THE BATTERY COMPARTMENT | ||
| BATTERY DOOR | ||
MANUEL D'UTILISATION WT 197
RÉVEIL RADIO-PILOTÉ AVEC TEMPERATURE ET CALENDRIER