KT 300 - Alarm bell TECHNOLINE - Free user manual and instructions
Find the device manual for free KT 300 TECHNOLINE in PDF.
| Product type | Alarm ringer / Digital timer |
| Brand | TECHNOLINE |
| Model | KT 300 |
| Power supply | 2 AAA batteries (not included) |
| Display | LCD with 3 display zones |
| Main functions | 12/24h clock, 3 countdown timers, stopwatch (chronometer) up to 1/100s, memory function, audible alarm |
| Maximum countdown capacity | 19 hours 59 minutes 59 seconds |
| Number of timers | 3 (T1, T2, T3) independent |
| Clock format | 12 hours (AM/PM) or 24 hours |
| Countdown end alarm | Audible signal for about 1 minute, flashing icon |
| Memory | Recall last settings for each timer |
| Mounting | Magnet on back, stand, wall mount via opening |
| Maintenance and cleaning | Do not use abrasive or corrosive products. Protect from sunlight, excessive heat, cold, humidity |
| Safety | Do not open the casing, do not expose to fire, use only alkaline batteries, observe polarity, remove used batteries |
| Operating environment | Indoors only, avoid shocks, dust and humidity |
| Disposal | Do not dispose of with household waste. Recycle according to current legislation (WEEE and batteries) |
| Reset | RESET button (B10) using a pin |
Frequently Asked Questions - KT 300 TECHNOLINE
User questions about KT 300 TECHNOLINE
0 question about this device. Answer the ones you know or ask your own.
Ask a new question about this device
Download the instructions for your Alarm bell in PDF format for free! Find your manual KT 300 - TECHNOLINE and take your electronic device back in hand. On this page are published all the documents necessary for the use of your device. KT 300 by TECHNOLINE.
USER MANUAL KT 300 TECHNOLINE
B6: "CLOCK/TIMER"
B7: "HR"
B8:“MIN”12/24"
B9: "SEC"
B10:"RESET"
Teil C-Auau
C1: Wandaungung
C3: Magnethalterung
Real Time with 12/24 Hr Time Display Selectable
1.2 Timer
- 3 Countdown Timers Funcons with 18 Digit Display
A Count up Timer with 1/100 Second Display
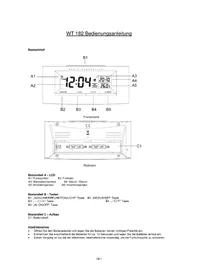
2. Unit Appearance
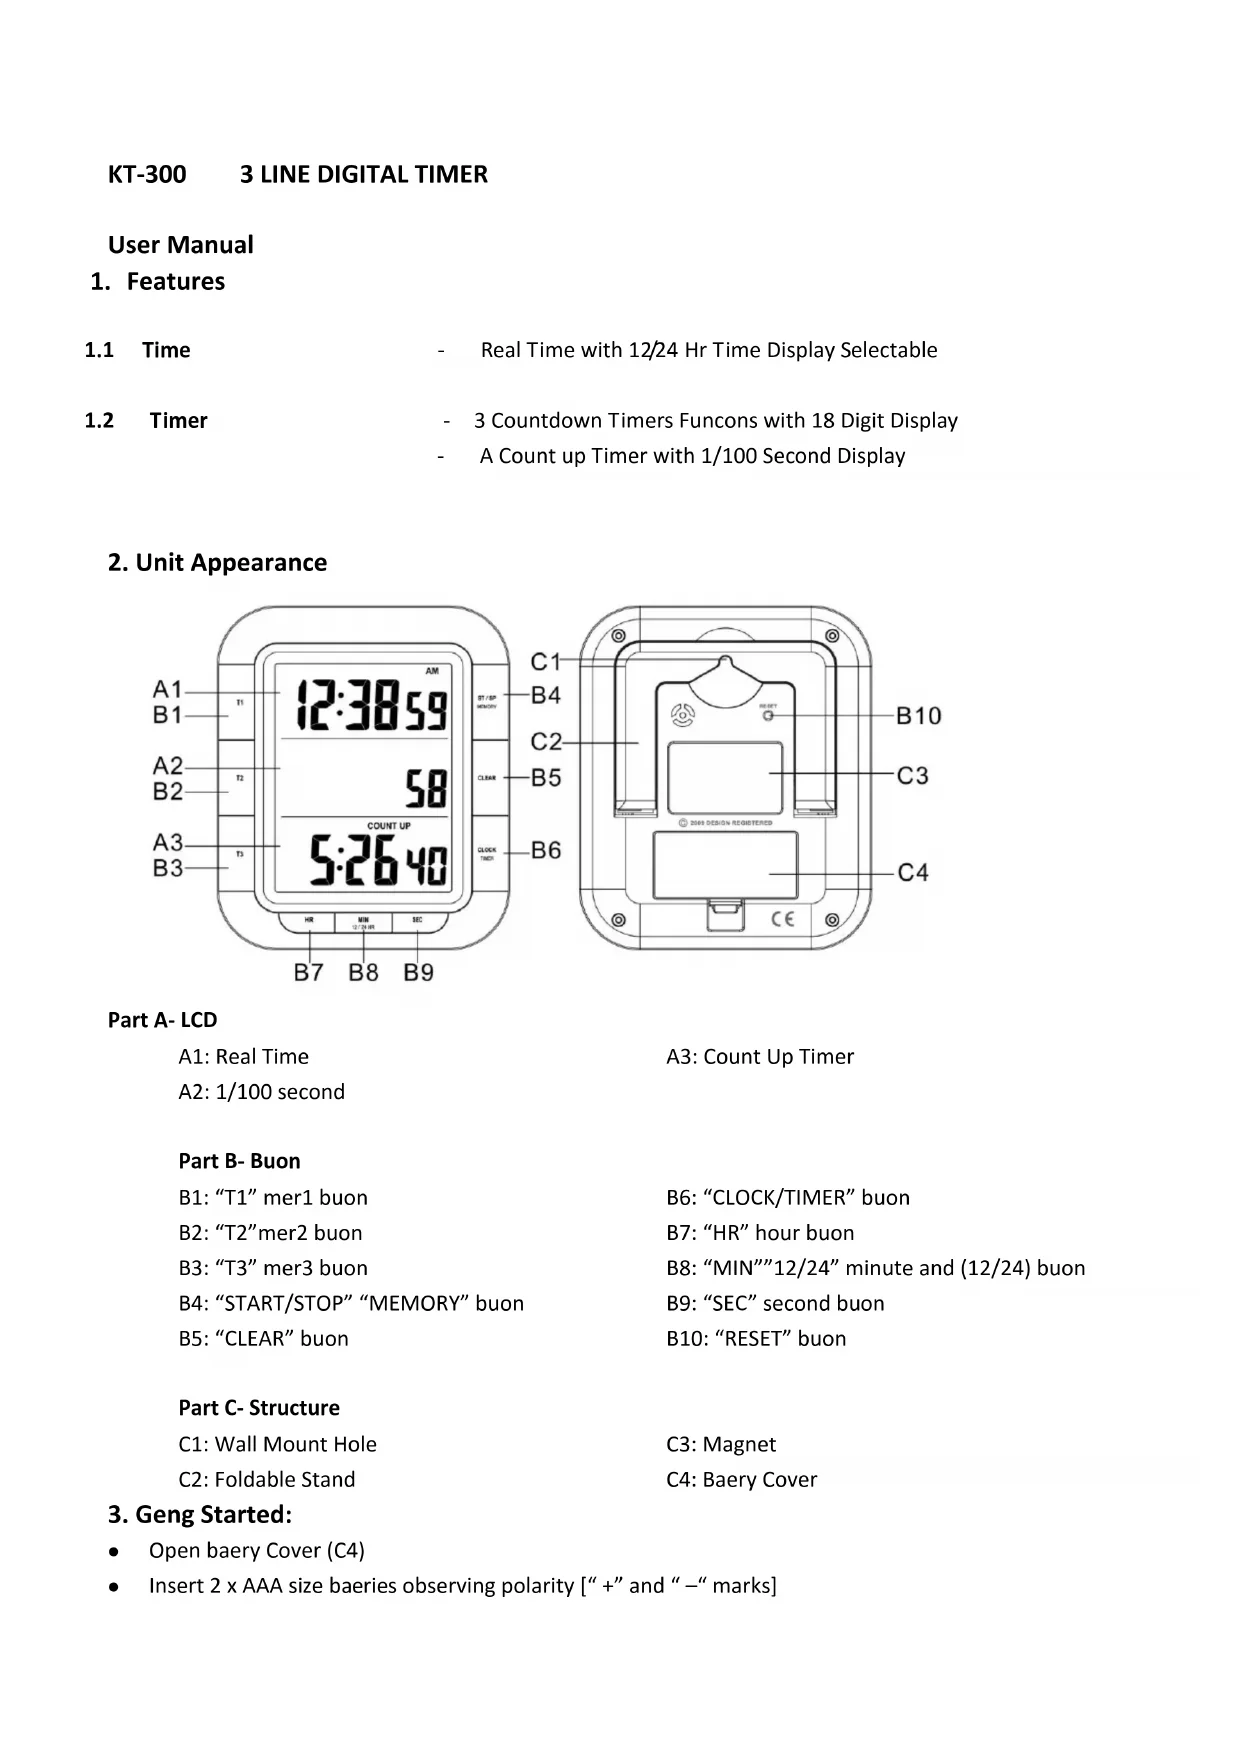
Part A-LCD
A1: Real Time
A3: Count Up Timer
A2: 1/100 second
Part B-Buon
B1:"T1"mer1buon
B8: "MIN"12/24" minute and (12/24) buon
B4: "START/STOP" "MEMORY" buon
B9: "SEC" second buon
B5: "CLEAR" buon
B10: "RESET" buon
Part C- Structure
C1: Wall Mount Hole
C3: Magnet
C2: Foldable Stand
C4: Baery Cover
3. Geng Started:
Open baery Cover (C4)
- Insert 2 x AAA size baeries observing polarity [^ + ^ and " - " marks]
- Replace baery compartment cover. The product briey shows all the display segment
4. Installaon:
- The mer has a magnet for aching it to metal surfaces; it also can be placed onto any at surface by the foldable stand (C2) on the back of the housing, Or wall mounted by the hanging hole (C1) at the back of the unit.
5. Time Seng
5.1 Time Seng
Ensure that the clock display is showing in the display.
If necessary press the "CLOCK/TIMER" (B6) Button to change the display
- Hold "CLOCK" (B6) buon for 3 seconds until the time of day display ashes in the upper display panel, and enter to me seng mode.
- Use the "HR" buon (B7) "MIN" buon (B8) and "SEC" buon (B9) to set the current me. Keep the buon pressed to accelerate the change in value.
- Press "CLOCK" (B6) buon to nish the seng process and save the set me of day.
5.2 12/24 Time Format:
- The time of day can be displayed either in 24- or 12-hour mode. Press " (12/24)" buon (B8) to select 12 or 24 hours format.
In the 12-hour mode, the morning hours are shown with AM and the aeroon hours with PM.
6. Timer
6.1 Count Up Timer
- At me display mode, press "START/STOP" (B4) buon to start count up
Press "START/STOP" (B4) buon in the me display mode again, to stop the count-up mer. - Press "CLEAR" (B5) buon in stop status, the count up mer will reset to "0".
6.2 Countdown Timer
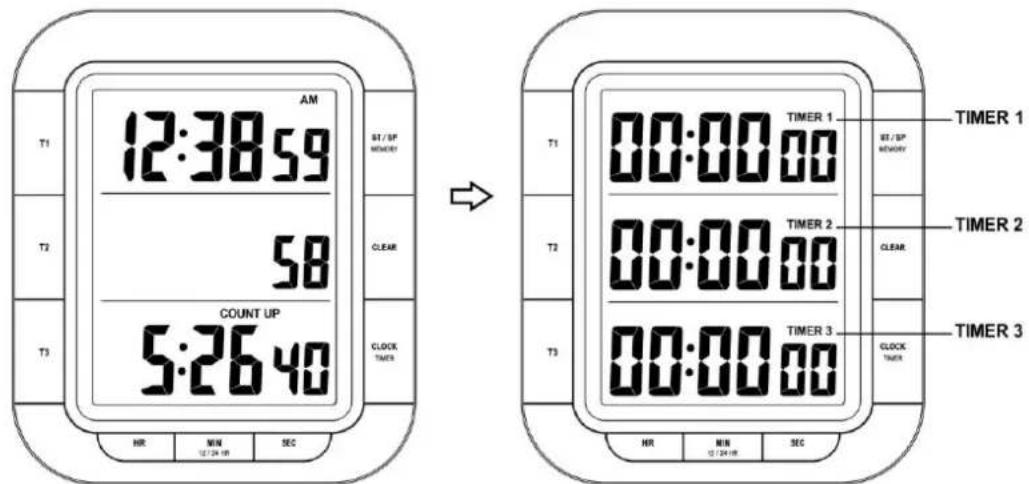
Real me display mode Timer display mode
6.2.1 Seng Countdown Timer:
TIMER 1, 2 and 3 must be displayed. Press "CLOCK/TIMER", if necessary.
- Hold "T1 (T2 or T3)" buon unl the numbers begin to ash
- Use HR (hours), MIN (minutes), SEC (seconds) to set the mer.
Press "CLEAR" buon reset to zero.
Press T1 (T2 or T3), to conrm and nish the seng, the mer display stop ashing
NOTE:
- A countdown cannot last longer than a maximum of 19 hours, 59 minutes and 59 seconds.
You can set up to 3 countdowns. They can be stopped and started either simultaneously or staggered.
While you set mes to be measured, no other sengs can be made (For example toggle to me of day etc.)
6.2.2 Countdown funcon
Timer function in countdown mode is carried out in the same way in all TIMER1, 2 &3 displays
- Press "T1" (B1) to start / stop the countdown funcon of TIMER1.
Press "T2"(B2) to start / stop the countdown funcon of TIMER2
Press "T3"(B3) to start / stop the countdown funcon of TIMER3 - When all mer in stop status, Press "START/STOP" (B4) buon to start or stop all the mers (T1, T2 & T3) in same me. (When one of the mer is running, this funcon is not available)
6.2.3 Countdown Timer Alarm
- When the mer counts to zero, a signal sound will emit for around 1 minute, the icon "TIME'S UP" will ash on the display.
- Press "START/STOP" or the corresponding key (T1, T2 or T3) to deacvate the alarm sound.
6.2.4 Reset Countdown Timer
- When the countdown mer in stop status, press "CLEAR" (B5) buon to reset them to zero.
- If one of the mer is sll running, it will only reset for other mer, for example, Timer1 is running and Timer2 & Timer3 are in stop status, only Timer2 & 3 will reset to Zero aer pressing "CLEAR" (B5) buoy. Timer1 will keep count down.
7. Memory Recall
The mer respectively recalls the length of the previous me measurement.
- Aer you input a new data in the mer, it will update the memory automatically.
- When the mer display is zero, press corresponding "T" (T1/T2/T3) buoy to recall the last memory data of certain Timer record. And the last me seng and memory icon will appear in the selected display panel.
- When the me is in stop status and all is 0:0000, press "MEMORY" buoy to recall all the last memory date for T1, T2& T3, and memory icon turn on the display.
8. Precauons
- Use a pin to press the reset buon (B10) if the Unit does not work properly.
- Do not expose it to direct sunlight, heavy heat, cold, high humidity or wet areas
- Never clean the device using abrasive or corrosive materials or products. Abrasive cleaning agents may scratch plasc parts and corrode electronic circuits
Precauons
- This main unit is intended to be used only indoors.
- Do not subject the unit to excessive force or shock.
- Do not expose the unit to extreme temperatures, direct sunlight, dust or humidity.
- Do not immerse in water.
- Avoid contact with any corrosive materials.
- Do not dispose this unit in a re as it may explode.
- Do not open the inner back case or tamper with any components of this unit.
Baeries safety warnings
- Use only alkaline baeries, not rechargeable baeries.
Install baeries correctly by matching the polaries (+ / - ) - Always replace a complete set of baeries.
- Never mix used and new baeries.
- Remove exhausted baeries immediately.
- Remove baeries when not in use.
- Do not recharge and do not dispose of batteries in re as the baeries may explode.
- Ensure batteries are stored away from metal objects as contact may cause a short circuit.
- Avoid exposing batteries to extreme temperature or humidity or direct sunlight.
- Keep all batteries out of reach from children. They are a choking hazard.
Use the product only for its intended purpose!
Consideraon of duty according to the baery law

Old baeries do not belong to domesc waste because they could cause damages of health and environment. You can return used baeries free of charge to your dealer and collecon points. As end-user you are commied by law to bring back needed baeries to distributors and other collecng points!
Consideraon of duty according to the law of electrical devices
This symbol means that you must dispose of electrical devices separated from the General household waste when it reaches the end of its useful life. Take your unit to your local waste collecon point or recycling centre. This applies to all countries of the European Union, and to other European countries with a separate waste collecon system.