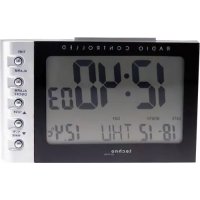
WT 195 - Alarm bell TECHNOLINE - Free user manual and instructions
Find the device manual for free WT 195 TECHNOLINE in PDF.
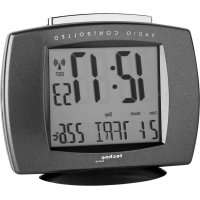
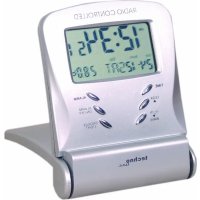
| Product type | Radio-controlled alarm chime |
| Brand | TECHNOLINE |
| Model | WT 195 |
| Power supply | 2 AA batteries (1.5V, not included) |
| Display | LCD with backlight (5 seconds) |
| Clock reception | Radio-controlled DCF-77 (manual adjustment possible) |
| Clock functions | Time, date, day of week, year, 12/24h, automatic daylight saving time |
| Alarm | With snooze (5 repetitions every 5 minutes, increasing volume) |
| Night light | Integrated night light with light sensor (ON/OFF) |
| Temperature | Display in °C or °F (select via RCC button) |
| Available languages | English, French, German, Spanish, Italian |
| Manual adjustment | Yes (via CLOCK, UP/DOWN buttons) |
| RESET button | Restores default settings |
| Compatibility | Indoor use only |
| Care and cleaning | Soft dry cloth, no chemicals |
| Safety - batteries | Use only alkaline batteries, observe polarity, remove if not used for extended period |
| Safety - device | Do not expose to water, shocks, extreme temperatures, do not open |
| Spare parts and repairability | Not available (contact after-sales service) |
| General information | Compliant with EU directives 2014/53/EU and ROHS 2011/65/EC |
Frequently Asked Questions - WT 195 TECHNOLINE
User questions about WT 195 TECHNOLINE
0 question about this device. Answer the ones you know or ask your own.
Ask a new question about this device
Download the instructions for your Alarm bell in PDF format for free! Find your manual WT 195 - TECHNOLINE and take your electronic device back in hand. On this page are published all the documents necessary for the use of your device. WT 195 by TECHNOLINE.
USER MANUAL WT 195 TECHNOLINE
Please read the instructions carefully and keep the manual well for future reference.
GETTING STARTED
- Remove the battery door.
- Install two new AA size batteries as per the polarity information marked on the battery compartment.
- Replace the battery door.
- Once the battery is installed, the normal segments of the LCD will be shown before entering the radio controlled time reception mode.
- The RC clock will automatically start scanning for the radio controlled time signal in 8 seconds.
Note
If no display appears on the LCD after inserting the battery, press the "RESET" key by using a metal wire. In some cases, you may not receive the signal immediately. Due to the atmospheric disturbance, the best reception often occurs during nighttime.
FUNCTION KEYS
CLOCK key:
- In normal time mode, press and hold it for 2 seconds to enter normal time setting.
- In setting mode, press it to step the setting items. Or press and hold it for 2 seconds to return to normal time mode and save the values.
ALARM key:
- In normal time mode, press it to display alarm time for 5 seconds. Or press and hold it for 2 seconds to enter alarm time setting.
- In setting mode, press it to step the setting items.
- After setting, press it again to save the setting values.
ALARM ON / OFF switch:
- Slide the switch to turn on/off the alarm.
DOWN key:
- In setting mode, press it to decrease the setting value. Press and hold it to speed up the setting.
UP key:
- In setting mode, press it to increase the setting value. Press and hold it to speed up the setting.
SNOOZE/LIGHT
- Press it once to turn on the backlight for 5 seconds.
GB2
- When the unit is sounding, press it to stop the current alarm and enter the snooze mode.
- Slide it to ON position to turn on the night light function, that the backlight will turn on automatically when the light-sensor can not sense light in dark environment.
- Slide it to OFF position to turn off the night light function.
RCC key:
- Press it to switch between Celsius and Fahrenheit.
- Press and hold it for 3 seconds to receive the RC signal for reception testing.
RESET key:
- Press it to set all values to default values. In case of mal-function, the unit may be required to reset.
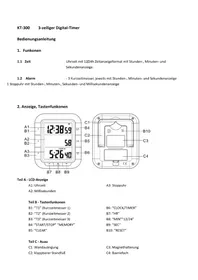
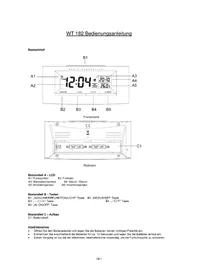
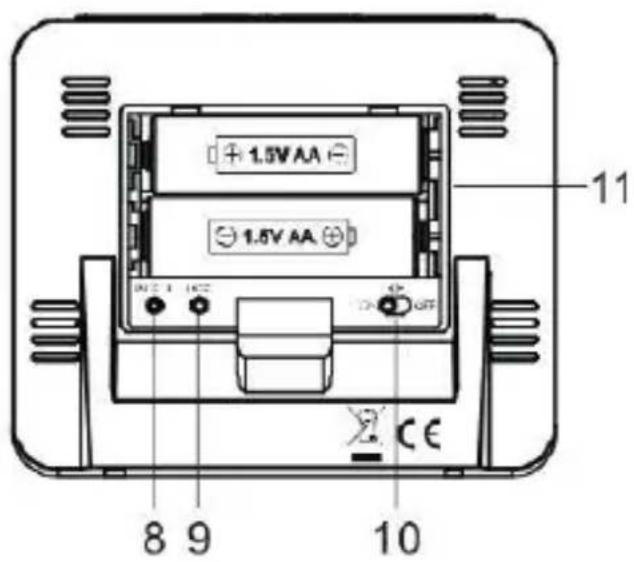
PRODUCT DESCRIPTION
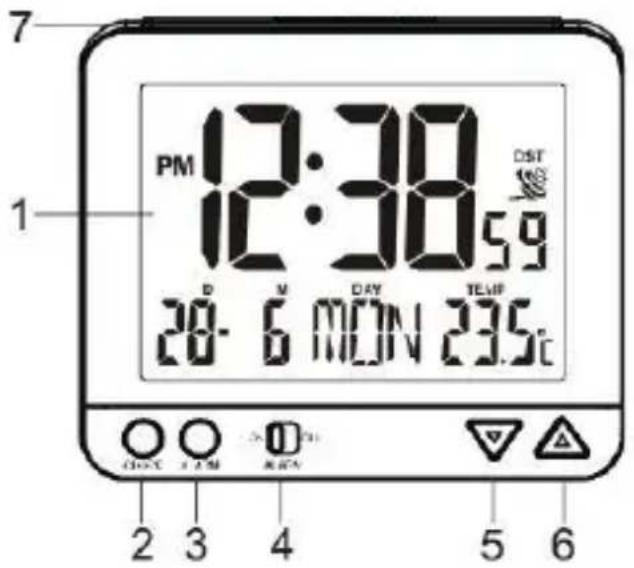
- LCD display
- CLOCK key
- ALARM key
- ALARM ON/OFF switch
- DOWN key
- UP key
- SNOOZE/LIGHT key
-
RESET key
-
RCC key
- NIGHT LIGHT FUNCTION ON/OFF switch
- Battery compartment
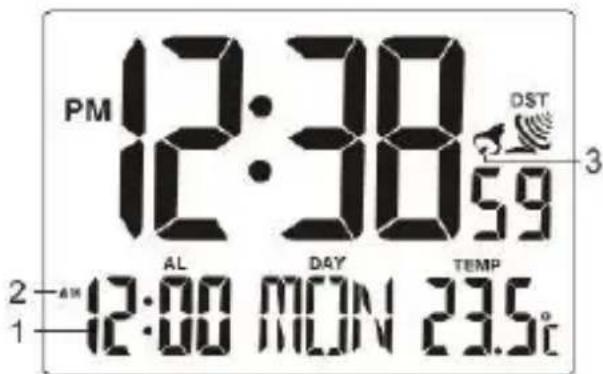
DISPLAY SYMBOLS
Normal time mode
- Time
- AM/PM
- Month
- Date
- Day of the week
- Temperature
- Signal strength indication
- Daylight saving time
Alarm time mode
- Alarm time
- AM/PM
- Alarm icon

DAYLIGHT SAVING TIME (DST)
The clock has been programmed to automatically switch when the daylight saving time is in effect. Your clock will show "DST" during the summer.
SIGNAL STRENGTH INDICATOR
The signal indicator displays signal strength in 4 levels.
Wave segment flashing means time signals are being received.
The signal quality could be classified into 4 types:

- No signal quality
- Weak signal quality
- Acceptable signal quality
-Excellent signal quality
If the RC clock receives signal successfully, a sync-time symbol “ 串 ” will appear on the LCD. The unit has already received the time signal.
Otherwise the signal strength
symbol will disappear from the LCD display.
Note
You may use the "RCC" button to receive the time signal manually. The unit will exist the receive mode automatically after 6-12 minutes. Receive mode consumes more battery power that may reduce battery lifetime.
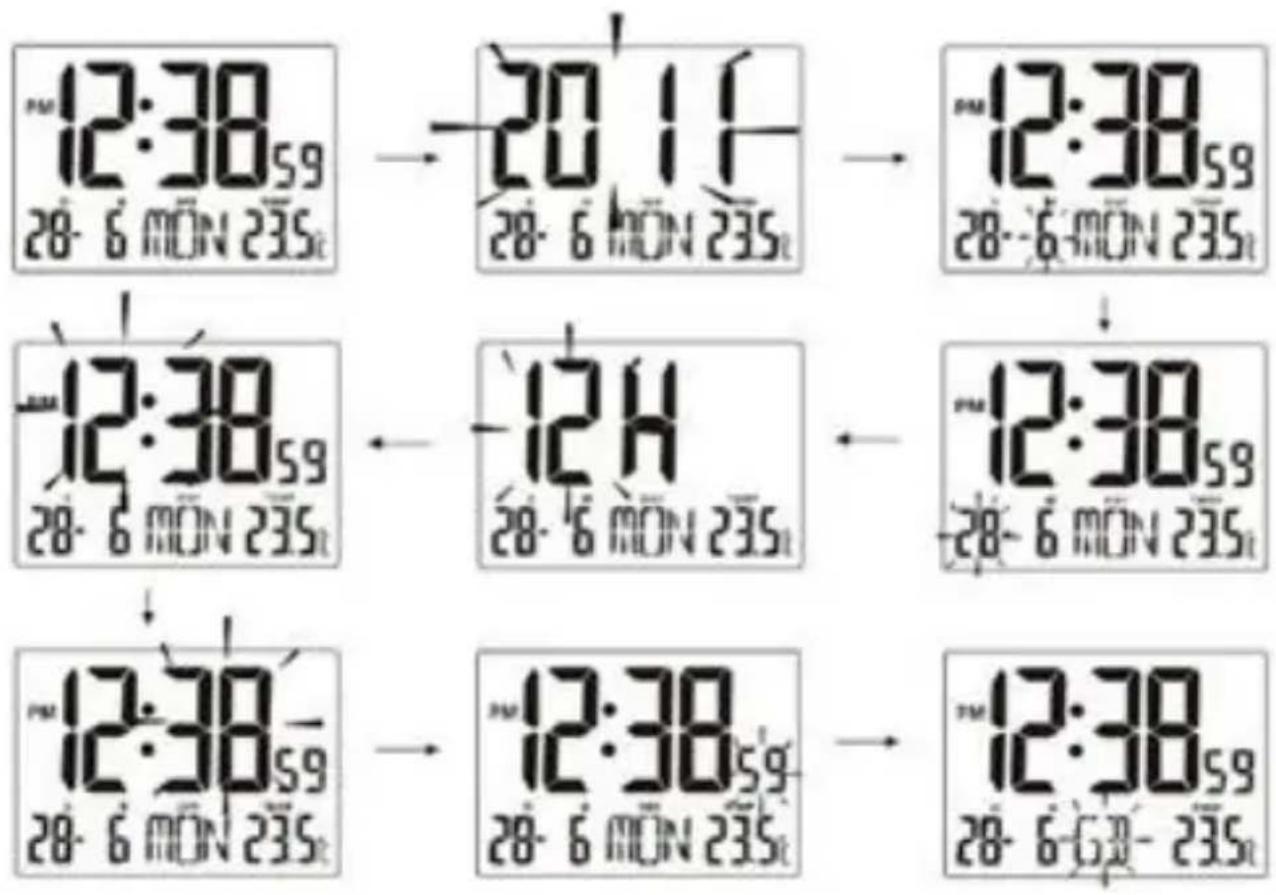
TIME ANDCALENDAR SETTING
If the clock does not receive the time signal successfully, you can set the time manually. As soon as the transmitter is received again, the clock will automatically synchronize with the received time.
- In normal time mode, press and hold CLOCK key for 2 seconds until the Year digit flashes.
- Press UP or DOWN key to set the desired value of the flashing digit, press and hold UP or DOWN key to speed up the setting.
- Press CLOCK key again until the next digit flashes.press UP or DOWN key to change its value.
- Repeat above operations to set the time and calendar in this order: Year > Month > Date > 12/24-hr > Hour > Minute > Second > Language. The following languages are selectable: English, French, German, Spanish, Italian.
- Press the CLOCK key to save and exit the setting, or let it exit automatically 30 seconds later without pressing any key.
GB8
ALARM TIME SETTING
- In normal mode,press and hold ALARM key for 2 seconds until Hour digit flashes.
- Press UP or DOWN key to set the desired value, press and hold UP or DOWN key to speed up the setting.
-
- Press ALARM key again until Minute digit flashes.and press UP or DOWN key to change its value.
-
- Press ALARM key again to save and exit the setting, or let it exit automatically 30 seconds later without pressing any key.

USING ALARM AND SNOOZE FUNCTION
- Slide ALARM ON/OFF switch to ON position to turn on the alarm, with the alarm icon “ displayed on the LCD.
-
Slide ALARM ON/OFF switch to OFF position to turn off the alarm.
-
When it is sounding, press SNOOZE/LIGHT to stop the current alarm and enter the snooze mode, with the alarm icon flashing. Or the sound will stop automatically one minute later.
- Once the snooze function is activated, the 4 step crescendo alarm will sound 5 times in 5-minute interval. The alarm duration is 60 seconds.
BATTERY REPLACEMENT
When the LCD becomes dim, replace with 2 new AA size batteries at once. Pay attention to the battery polarity.
Hereby, Technotrade declares that this product WT195 is in compliance with the essential requirements and other relevant provisions of Directive 2014/53/EU and ROHS 2011/65/EC. The original EU declaration of conformity may be found at: www.technoline.de/doc/4029665001951
Environmental reception effects
The clock obtains the accurate time with wireless technology. Same as all wireless devices, the reception is maybe affected by the following circumstances:
- long transmitting distance
- nearby mountains and valleys
- near freeway, railway, airports, high voltage cable etc.
GB 10
- near construction site
among tall buildings - inside concrete buildings
- near electrical appliances (computers, TV's, etc) and metallic structures
- inside moving vehicles
Place the clock at a location with optimal signal, i.e. close to a window and away from metal surfaces or electrical appliances.
Precautions
- This main unit is intended to be used only indoors.
- Do not subject the unit to excessive force or shock.
- Do not expose the unit to extreme temperatures, direct sunlight, dust or humidity.
- Do not immerse in water.
- Avoid contact with any corrosive materials.
- Do not dispose this unit in a fire as it may explode.
- Do not open the inner back case or tamper with any components of this unit.
Batteries safety warnings
- Use only alkaline batteries, not rechargeable batteries.
- Install batteries correctly by matching the polarities (+/-) .
- Always replace a complete set of batteries.
- Never mix used and new batteries.
- Remove exhausted batteries immediately.
- Remove batteries when not in use.
- Do not recharge and do not dispose of batteries in fire as the batteries may explode.
- Ensure batteries are stored away from metal objects as contact may cause a short circuit.
- Avoid exposing batteries to extreme temperature or humidity or direct sunlight.
- Keep all batteries out of reach from children. They are a choking hazard.
Use the product only for its intended purpose!
Consideration of duty according to the battery law

Old batteries do not belong to domestic waste because they could cause damages of health and environment. You can return used batteries free of charge to your dealer and collection points. As end-user you are committed by law to
bring back needed batteries to distributors and other collecting points!
Consideration of duty according to the law of electrical devices

This symbol means that you must dispose of electrical devices separated from the General household waste when it reaches the end of its useful life. Take your unit to your local waste collection point or recycling centre. This applies to all countries of the European Union, and to other
European countries with a separate waste collection system.
WT195 - HORLOGE RADIO-PILOTÉE AVEC TEMPERATURE GUIDE D'UTILISATION
- No signal quality
- Weak signal quality
- Acceptable signal quality
-Excellent signal quality
ALARM ON/OFF-schakelaar:
- Acceptable signal quality

-Excellent signal quality
- No signal quality
- Weak signal quality
- Acceptable signal quality
-Excellent signal quality
- No signal quality
- Weak signal quality
- Acceptable signal quality
-Excellent signal quality
NASTAVENÍ CASU ALARMU
- No signal quality
- Weak signal quality
- Acceptable signal quality
-Excellent signal quality