USER MANUAL TT200 THOMSON
natural_image
White THOMSON radio typewriter with red cover and black buttons, displayed against plain background (no text or symbols on device body)
MODÈLE TT200/201BT
MANUEL D'UTILISATION
VEUILLEZ LIRE ATTENTIVEMENT CE MANUEL D'UTILISATION
AVANT D'UTILISER L'APPAREIL, ET LE CONSERVER POUR VOUS Y RÉFÉRER
ULTÉRIEUREMENT.

The lighting flash and arrow head within the triangle is warning sign alerting you of dangerous voltage inside the product
CAUTION
RISK OF ELECTRIC SHOCK DO NOT OPEN
CAUTION: TO REDUCE THE RISK OF ELECTRIC SHOCK DO NOT REMOVE COVER (OR BACK). NO USER SERVICIABLE PARTS INSIDE. REFER SERVICING TO QUALIFIED SERVICE PERSONNEL.

The exclamation point within the triangle is a warning sign alerting you of important instructions accompanying the product
CONSIGNES DE SÉCURITÉ IMPORTANTES :

Attention :
Installation du contrepoids
flowchart
graph TD
    A["Step ①: Roll and end"] --> B["Step ②: Rotation and displacement"]
    B --> C["Step ③: Rotation and displacement"]
    C --> D["Step ④: Rotation and displacement"]
natural_image
Illustration of a hand holding a thin bundle with an arrow indicating direction (no text or symbols)
Mettre la lecture en pause
Transmission Bluetooth
customerservice@bigben-interactive.be
ESPAÑA, sat@bigbeninteractive.es
ITALIA, support@bigbeninteractive.it
www.bigben.eu
natural_image
White THOMSON radio typewriter with red cover and black buttons, displayed against plain background (no text or symbols on device body)
MODEL
TT200/201BT
OPERATING INSTRUCTIONS
PLEASE READ OPERATING INSTRUCTIONS CAREFULLY BEFORE USE AND KEEP FOR FUTURE REFERENCE.

The lighting flash and arrow head within the triangle is warning sign alerting you of dangerous voltage inside the product
CAUTION
RISK OF ELECTRIC SHOCK DO NOT OPEN
CAUTION : TO REDUCE THE RISK OF ELECTRIC SHOCK DO NOT REMOVE COVER (OR BACK). NO USER SERVICIABLE PARTS INSIDE. REFER SERVICING TO QUALIFIED SERVICE PERSONNEL.

The exclamation point within the triangle is a warning sign alerting you of important instructions accompanying the product
IMPORTANT SAFETY INSTRUCTIONS:
- Read these instructions. All guidelines must be read before turning the unit on.
- Keep these instructions for future use.
- Respect operating and security guidelines.
- Do not use the unit near water or in a humid environment.
- Make sure no liquid is spilled on or inside the unit.
- Move the unit carefully; avoid shocks.
- Do not obstruct the device's ventilation openings.
- Do not place the unit near a heat source such as a radiator. Do not expose it to direct sunlight.
- Connect the device as indicated in these instructions.
- This unit has an overload protector. If the protector must be replaced, please contact a certified technician or the manufacturer.
- The unit should be unplugged if not used for a long period of time.
- Refer all servicing to qualified service personnel. Servicing is required when:
a. The power supply cord or plug is damaged.
b. Objects have fallen on the unit or liquid has been spilled.
c. The unit has been exposed to rain.
d. The unit does not operate normally, although there is no visible damage.
e. The unit is damaged.
- The user shall not use the unit for any purpose other than as described in these instructions. Failure to comply will void the warranty.
- Do not expose the unit to dripping or splashing and make sure that no objects filled with liquids, such as vases, are placed on it.
- To disconnect the unit, the plug should be fully disconnected from the mains socket outlet. The mains plug should not be obstructed and should be easily accessible during use.
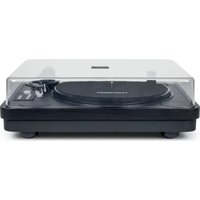
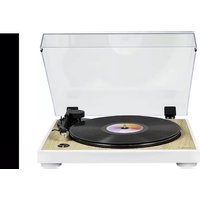
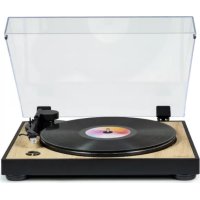
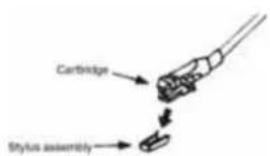
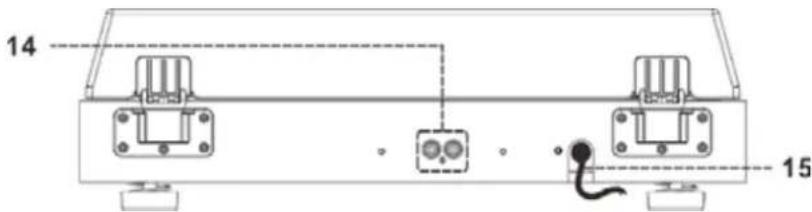
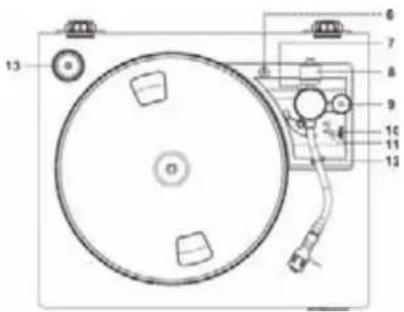
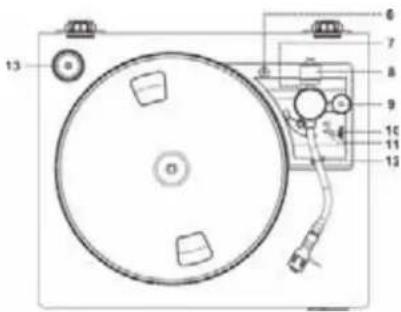
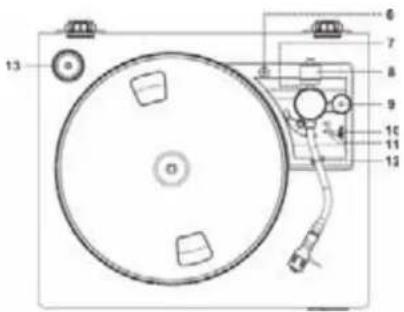
- Dust cover
- Bluetooth button
- Powerbutton
- Power ON LED indicator
- Bluetooth LED indicator
- Turntable lock screw
- Alignment screw with rubber cover
- Counterweight
- Pitch control knob
- Speed selector
- Cueing lever
- Tonearm lock
- 45 pm record adapter
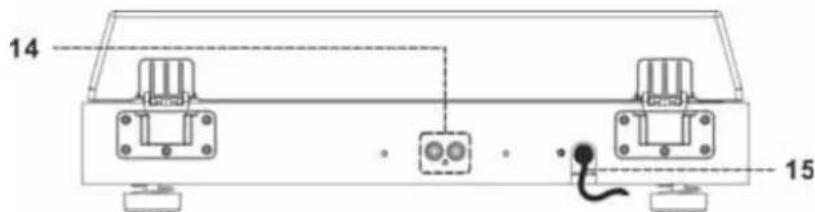
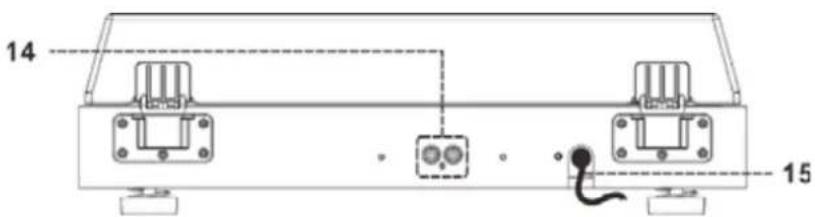
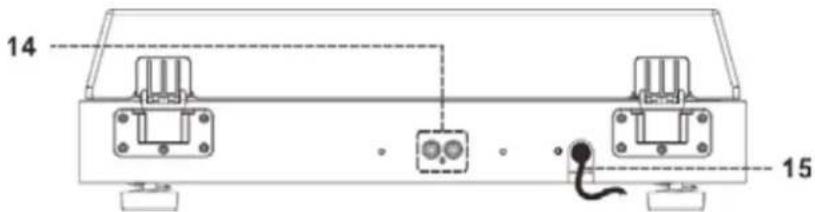
- Line out socket (L/R)
- AC power cord
Caution:
Using controls and making adjustments or conducting procedures other than those specified herein may result in hazardous exposure to radiation.
This unit should only be modified or repaired by qualified service personnel.
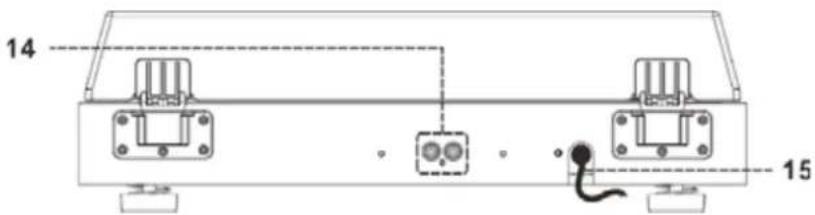
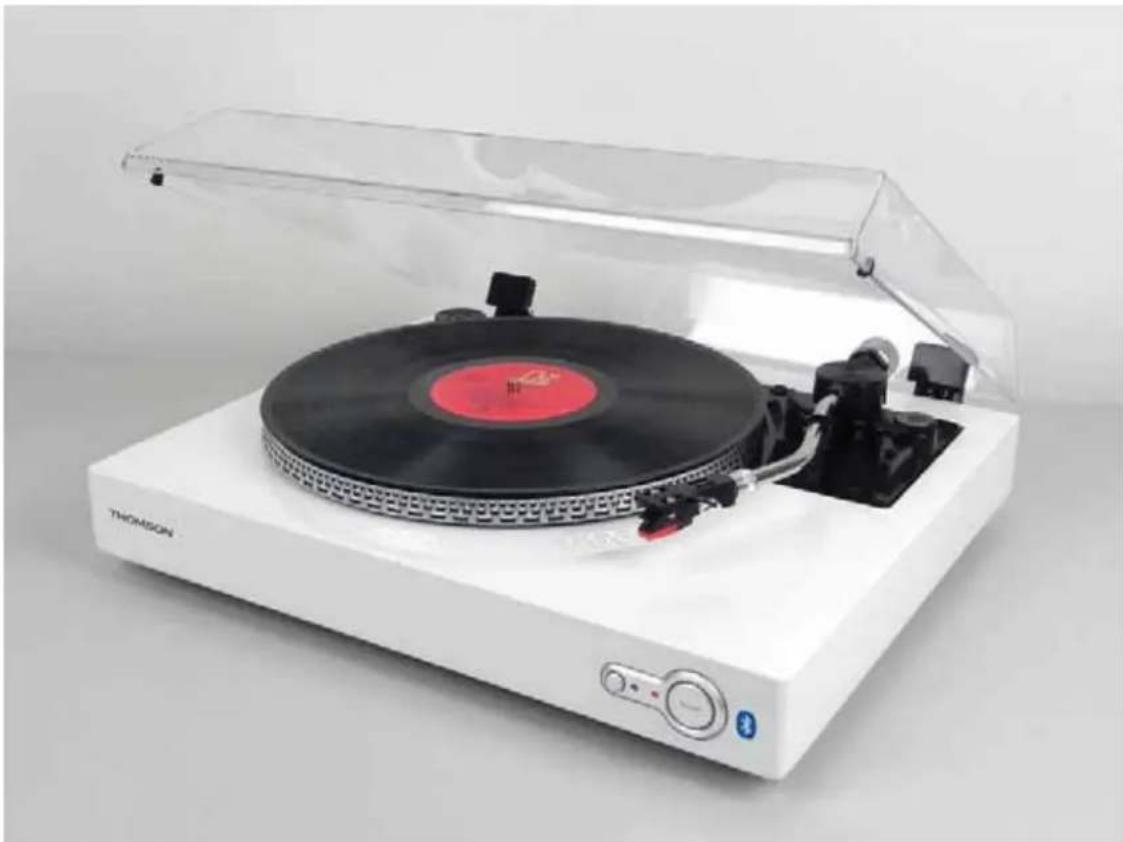
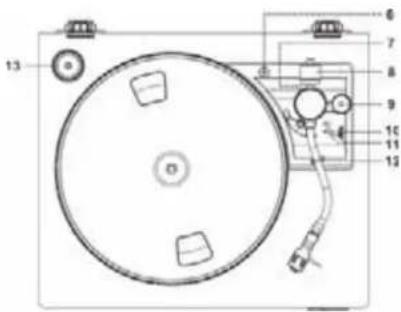
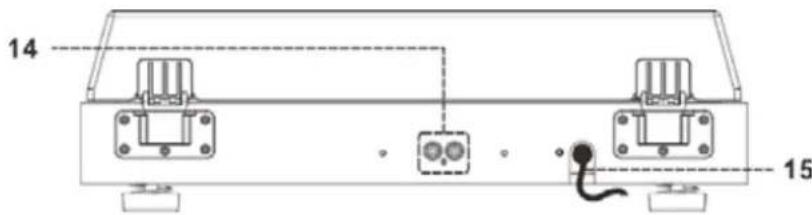
Connecting the turntable
- Connect the power cord (15) to an AC outlet.
- Plug line-out RCA connectors into the line out socket (14) located on the back of the unit and to your external amplifier to listen to the music.
- Press the power switch (3) to turn on the unit. The power ON LED indicator (4) will light up. The turntable is now ready to play your music. Please refer to the "Operating the turntable" section of this manual for details.
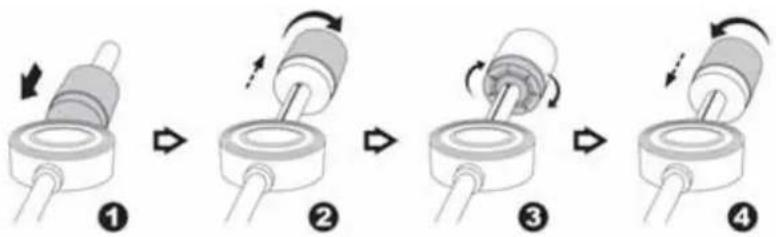
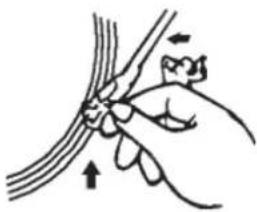
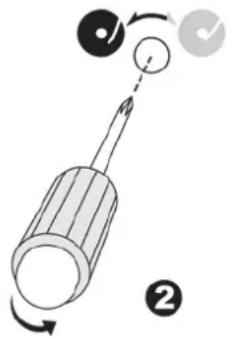
Installing the counterweight
- Slide the counterweight (8) to the front of the tonearm. Turn it clockwise until it clicks into place.
- Turn the counterweight clockwise and push it back onto the rear of the tonearm, until it reaches the white line, as shown in figure 2.
- Turn the anti-skate dial to the "1" position.
- Turn the counterweight anti-clockwise and push it to the front of the tonearm until the right tracking force is obtained.
flowchart
graph TD
    A["Step ①: Top cylindrical component with rotation arrow"] --> B["Step ②: Rotation arrow on top cylinder"]
    B --> C["Step ③: Rotation arrow on top cylinder"]
    C --> D["Step ④: Rotation arrow on top cylinder"]
Note: the cartridge provided has a tracking force range of 4-6 grams according to the manufacturer. All cartridges have their own tracking force; please refer to their respective specifications.
Before use, make sure to:
-Remove the stylus protector.
- Release the tonearm clamp and make sure the tonearm is free to move from the tonearm rest. Lock the tonearm in place again when not in use.
- Lift the turntable dust cover (1).
- Place the record on the platter (use the 45 rpm record adapter to play 45 rpm records).
- Set the speed selector (10) to the right position for the record you are playing.
- Push the cueing lever (11) upwards.
- Lift the tonearm from the tonearm rest and slowly move it over the record to the desired position. The platter will start turning.
- Push the cueing lever (11) down to slowly lower the tonearm onto the record and start playback.
- When the record is finished, the tonearm will automatically return to the tonearm rest.
- To stop manually, lift the tonearm from the record and return it to the rest.
natural_image
Illustration of a hand holding a thin bundle with an arrow indicating direction (no text or symbols)
Pausing the playback
Pushing the cueing lever (11) upwards will lift the tonearm and temporarily stop playback.
Note:
- The turntable's mechanical auto-return system may enable during transportation. Thus, the tonearm will automatically return to the rest the first time it is placed on the platter – this is not a malfunction.
- Since records vary in length, you may find the tonearm cannot automatically return to the rest once the record has finished. In this case, please adjust the tonearm's stop position as indicated below.
- Do not use a magnetic cartridge or it will no longer be possible to connect the unit via the Aux-in on an external device.
Adjusting the pitch
Use the pitch control knob (9) to adjust the turntable speed.
Tonearm stop position alignment
You can adjust when the tonearm returns to the tonearm rest once the record has finished as follows:
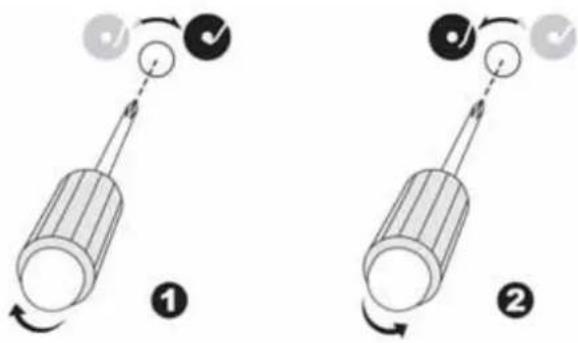
Before you start, please remove the rubber cover from the alignment screw (7).
a) If the tonearm returns to the rest before a record is finished: use a crosshead screwdriver to turn the alignment screw (7) clockwise; the tonearm's stop position will move inward, toward the centre of the record.
b) If the tonearm does not return to the rest when a record is finished: use a crosshead screwdriver to turn the alignment screw (7) anti-clockwise; the tonearm's stop position will move outward, away from the centre of the record.
Note:
- The ideal tonearm stop position is subjective and differs from customer to customer; please select the most suitable position for your own record collection. The factory setting uses the most common position.
- Please check the stop position adjustment from time to time to ensure that the screw is not loose.
Bluetooth transmission
This product comes with an internal Bluetooth transmitter which can connect to your Bluetooth speakers so you can enjoy music directly from vinyl:
1) Turn on your Bluetooth speakers and keep them in search mode.
2) Press the Bluetooth button (2) once; the Bluetooth LED indicator (5) will start flashing quickly. The Bluetooth transmitter will remain in search mode for around 30 seconds. If the Bluetooth transmitter cannot find any Bluetooth speaker to pair with, it will automatically switch to standby mode and the Bluetooth LED indicator (5) will flash slowly.
3) Once connected to the Bluetooth speakers, the turntable's Bluetooth LED indicator (5) will light up. Now you can play your records on the turntable and listen to the music from your Bluetooth speakers.
4) If you want to pair with a different Bluetooth device, press the Bluetooth button (2) once; the Bluetooth transmitter will go into standby mode.
5) Turn on the other Bluetooth speakers and press the Bluetooth button (2) again. The Bluetooth transmitter will enter search mode and will connect to the new Bluetooth speakers.
Remark: The max. connection distance is around 9 meters. Please place your Bluetooth speaker as close as possible to this device to avoid connection getting disturbed.
Turntable lock
A turntable lock screw (6) protects your turntable during transportation. Turn the screw clockwise to release the lock before using the unit.
Note:
When there is no sound output, the unit will automatically switch to standby mode after a while in order to save energy. It can be turned ON again by using the Power button (3).
The Bluetooth® word, mark and logo are registered trademarks owned by Bluetooth SIG, Inc. and any use of such marks by Bigben Interactive is under license. Other trademarks and trade names are those of their respective owners.
Bigben Interactive SA hereby declares that the TT200BT and TT201BT units comply with the essential requirements of directive 1995/5/EC of the European Parliament and of the Council of March 9 ^th , 1999 on radio equipment and telecommunications terminal equipment and the mutual recognition of their compliance. To download the full statement, please visit our website: http://www.bigben-interactive.co.uk/support and the section `Declaration of conformity'.
Don't discard electrical and electronic appliances with regular waste.
• Take them to an official collection point.
- Some components may be hazardous to health and the environment.
Imported by BIGBEN INTERACTIVE SA
396, Rue de la Voyette
CRT2 - FRETIN
CS 90414
59814 LESQUIN Cedex - France
www.bigben.eu
Made in China

bigben INTERACTIVE
customerservice@bigben-interactive.be
ESPAÑA, sat@bigbeninteractive.es
ITALIA, support@bigbeninteractive.it
www.bigben.eu
THOMSON is a trademark of TECHNICOLOR SA or its affiliates and is used under license by Bigben Interactive.
TOCADISCOS CON TRANSMISOR BLUETOOTH
natural_image
White THOMSON radio tab with red cover and black buttons, displayed under clear glass (no visible text or symbols on device body)
MODELO TT200/201BT
INSTRUCCIONES DE USO
The lighting flash and arrow head within the triangle is warning sign alerting you of dangerous voltage inside the product
CAUTION
RISK OF ELECTRIC SHOCK DO NOT OPEN
CAUTION: TO REDUCE THE RISK OF ELECTRIC SHOCK DO NOT REMOVE COVER (OR BACK). NO USER SERVICIABLE PARTS INSIDE. REFER SERVICING TO QUALIFIED SERVICE PERSONNEL.

The exclamation point within the triangle is a warning sign alerting you of important instructions accompanying the product

Precaución:
natural_image
Illustration of a hand holding a thin bundle with an arrow indicating direction (no text or symbols)
customerservice@bigben-interactive.be
ESPAÑA, sat@bigbeninteractive.es
ITALIA, support@bigbeninteractive.it
www.bigben.eu
natural_image
White THOMSON radio typewriter with red cover and black buttons, displayed against plain background (no text or symbols on device body)
MODELLO TT200/201BT
ISTRUZIONI PER L'USO
PRIMA DI UTILIZZARE IL PRODOTTO, LEGGERE ATTENTAMENTE LE ISTRUZIONI PER L'USO E CONSERVARLE PER CONSULTAZIONI FUTURE.

The lighting flash and arrow head within the triangle is warning sign alerting you of dangerous voltage inside the product
CAUTION
RISK OF ELECTRIC SHOCK DO NOT OPEN
CAUTION: TO REDUCE THE RISK OF ELECTRIC SHOCK DO NOT REMOVE COVER (OR BACK). NO USER SERVICIABLE PARTS INSIDE. REFER SERVICING TO QUALIFIED SERVICE PERSONNEL.

The exclamation point within the triangle is a warning sign alerting you of important instructions accompanying the product
INDICAZIONI IMPORTANTI PER LA SICUREZZA:
Avvertenza:
flowchart
graph TD
    A["Step 1: Rotation of cylindrical component"] --> B["Step 2: Rotation of cylindrical component"]
    B --> C["Step 3: Rotation of cylindrical component"]
    C --> D["Step 4: Rotation of cylindrical component"]
natural_image
Illustration of a hand holding a thin bundle with an arrow indicating direction (no text or symbols)
customerservice@bigben-interactive.be
ESPAÑA, sat@bigbeninteractive.es
ITALIA, support@bigbeninteractive.it
www.bigben.eu
natural_image
White TP50023021 typewriter with red cover and black buttons, displayed under clear glass (no visible text or symbols on device body)
MODELO TT200/201BT
The lighting flash and arrow head within the triangle is warning sign alerting you of dangerous voltage inside the product
CAUTION
RISK OF ELECTRIC SHOCK DO NOT OPEN
CAUTION: TO REDUCE THE RISK OF ELECTRIC SHOCK DO NOT REMOVE COVER (OR BACK). NO USER SERVICIABLE PARTS INSIDE. REFER SERVICING TO QUALIFIED SERVICE PERSONNEL.

The exclamation point within the triangle is a warning sign alerting you of important instructions accompanying the product
INSTRUÇÕES DE SEGURANÇA IMPORTANTES:
Aviso:
flowchart
graph TD
    A["Step 1: Rotation of cylindrical component"] --> B["Step 2: Rotation of cylindrical component"]
    B --> C["Step 3: Rotation of cylindrical component"]
    C --> D["Step 4: Rotation of cylindrical component"]
natural_image
Illustration of a hand holding a thin bundle with an arrow indicating direction (no text or symbols)
Pausar a reprodução
customerservice@bigben-interactive.be
ESPAÑA, sat@bigbeninteractive.es
ITALIA, support@bigbeninteractive.it
www.bigben.eu
natural_image
White THOMSON radio typewriter with red cover and black buttons, displayed under clear canopy (no text or symbols on device body)
MODELL TT200/201BT
BEDIENUNGSANLEITUNG
The lighting flash and arrow head within the triangle is warning sign alerting you of dangerous voltage inside the product
CAUTION
RISK OF ELECTRIC SHOCK DO NOT OPEN
CAUTION: TO REDUCE THE RISK OF ELECTRIC SHOCK DO NOT REMOVE COVER (OR BACK). NO USER SERVICIABLE PARTS INSIDE. REFER SERVICING TO QUALIFIED SERVICE PERSONNEL.

The exclamation point within the triangle is a warning sign alerting you of important instructions accompanying the product
Achtung!
natural_image
Illustration of a hand holding a thin bundle with an arrow indicating direction (no text or symbols)
customerservice@bigben-interactive.be
ESPAÑA, sat@bigbeninteractive.es
ITALIA, support@bigbeninteractive.it
www.bigben.eu
natural_image
White THORUSAN radio with red cover and black buttons, displayed under a clear glass cover (no visible text or symbols on the device body)
MODEL
TT200/201BT
BEDIENINGSINSTRUCTIES
LEES DE HANDLEIDING ALVORENS EEN GEBRUIK AANDACHTIG DOOR EN BEWAAR VOOR TOEKOMSTIGE NASLAG.

The lighting flash and arrow head within the triangle is warning sign alerting you of dangerous voltage inside the product
CAUTION
RISK OF ELECTRIC SHOCK DO NOT OPEN
CAUTION : TO REDUCE THE RISK OF ELECTRIC SHOCK DO NOT REMOVE COVER (OR BACK). NO USER SERVICIABLE PARTS INSIDE. REFER SERVICING TO QUALIFIED SERVICE PERSONNEL.

The exclamation point within the triangle is a warning sign alerting you of important instructions accompanying the product
BELANGRIJKE VEILIGHEIDSINSTRUCTIES
Waarschuwing:
flowchart
graph TD
    A["Step 1: Rotation of cylindrical component"] --> B["Step 2: Rotation of cylindrical component"]
    B --> C["Step 3: Rotation of cylindrical component"]
    C --> D["Step 4: Rotation of cylindrical component"]
natural_image
Illustration of a hand holding a thin wire with an arrow indicating force or movement (no text or symbols)
Afspelen pauzeren
customerservice@bigben-interactive.be
ESPAÑA, sat@bigbeninteractive.es
ITALIA, support@bigbeninteractive.it
www.bigben.eu