PerfectCare Elite GC9610 - Iron PHILIPS - Free user manual and instructions
Find the device manual for free PerfectCare Elite GC9610 PHILIPS in PDF.
User questions about PerfectCare Elite GC9610 PHILIPS
0 question about this device. Answer the ones you know or ask your own.
Ask a new question about this device
Download the instructions for your Iron in PDF format for free! Find your manual PerfectCare Elite GC9610 - PHILIPS and take your electronic device back in hand. On this page are published all the documents necessary for the use of your device. PerfectCare Elite GC9610 by PHILIPS.
USER MANUAL PerfectCare Elite GC9610 PHILIPS
PHILIPS and the Philips Strategic Problem are registered trademarks at Koninklijke Philips NV and their owners/associates.
This print is not have been published by and will under the responsibility of The Company Holding BV, and Guarantor Holding B.V. In connection to matters in this journal,
429.06.118725[07/07/262]
PHILIPS
GC9600 range

EN User Manual
DE Benutzerhandbuch
FI Kajttöopas
FR Mode d'emploi
IT Manuale per l'utente
NL Gebruiksaanwijzig
SV Anvandarhandbok
DA Brugervejledning
NO Brukerhandbok
ES Manual del usuario
PT Manual do'utilizaro
EL Exyepipio xpnons
HEWON7Y

A

B
C

EN IMPORANT Perform sealing regularly for grant thaw and storage age. Let the epoxy cool down completely, before you remove the FASY DE-CAL C-DR.
Congratulations on your purchase and welcome to Philips! To fully benefit from the support that Philips offers, register your product at www.philips.com/welcome.
Read the separate important information leaflet and the user manual carefully before you use the appliance. Save both documents for future reference.
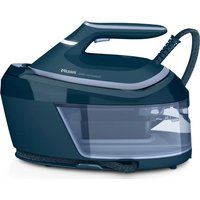
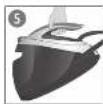
Product overview (Fig. 3)
1 Steam supply hose
2 Iron platform
3 First supply hose storage compartment
4 Mains cord with plug
5 ECO button with light
6 On/off button with safety auto off light and TURBO setting
7 'Water tank empty' light
8 EASY DE-CALC light
9 EASY DE-CALC knob
10 Cord storage compartment
11 Second supply hose storage compartment
12 Detachable water tank
13 Carry lock
14 Carry lock release button
15 Soleplate
16 Steam trigger
17 'Iron ready' light
18 Filling hole
Using your appliance
Type of water to use
This appliance has been designed to be used with tap water. However, if you live in an area with hard water, fast scale build-up may occur. Therefore, it is recommended to use distilled or demineralized water (50% demineralized/distilled water mixed with water could be used as well) to prolong the lifetime of the appliance.
Do not add perfume, water from the tumble dryer, vinegar, starch, descaling agents, ironing aids, chemically descaled water or other chemicals, as they may cause water spitting, brown staining or damage to your appliance.
Filling the water tank
Fill the water tank before every use or when the 'water tank empty' light flashes. You can refill the water tank at any time during use.
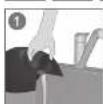
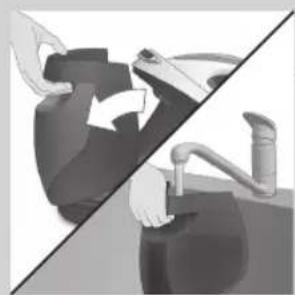
1 Remove the water tank from the appliance and fill it with tap water up to the MAX indication.
Put the water tank back into the appliance by fitting the bottom part into the appliance first.
3 Push in the top part of the water tank until it locks into place ('click').
'Water tank empty' light
When the water tank is almost empty, the 'water tank empty' light flashes. Fill the water tank and press the steam trigger to let the appliance heat up again. When the 'iron ready' light lights up continuously, you can continue steam ironing.
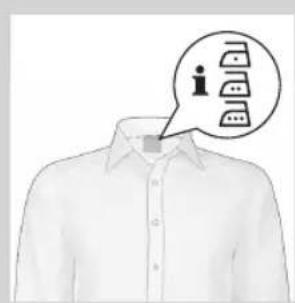
Optimal Temp Technology
The Optimal Temp Technology enables you to iron all types of ironable fabrics, in any order, without adjusting the iron temperature setting. Fabrics with these symbols are ironable, for example linen, cotton, polyester, silk, wool, viscose and rayon.
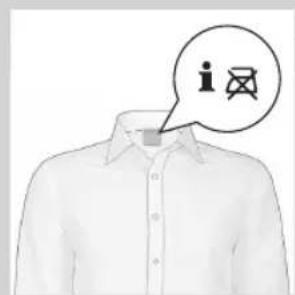
Fabrics with this symbol are not ironable. These fabrics include synthetic fabrics such as Spandex or elastane, Spandex-mixed fabrics and polyolefins (e.g. polypropylene), but also prints on garments.
8 ENGLISH

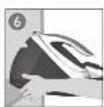
Ironing
1 Place the steam generator on a stable and even surface.
2 Make sure that there is enough water in the water tank (see section 'Filling the water tank').
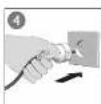
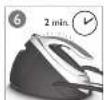
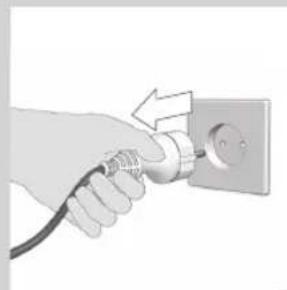
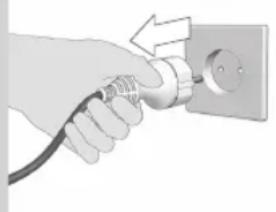
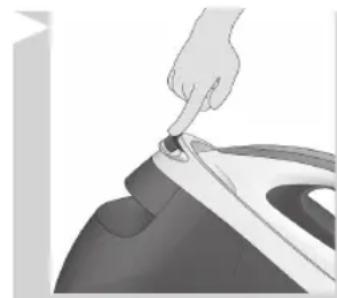
3 Put the mains plug in an earthed wall socket and press the on/off button to switch on the steam generator. The blue power-on light on the appliance and the 'iron ready' light start to flash to indicate that the appliance is heating up (this takes approx. 2 minutes).
-
When the appliance is ready for use, the 'iron ready light' and the power-on light stop flashing and light up continuously. Additionally you hear a short beep.
-
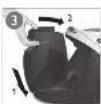
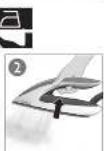
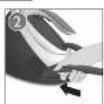
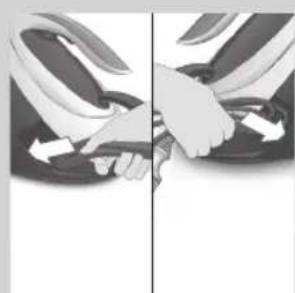
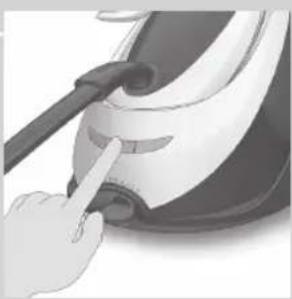
Press the carry lock release button to unlock the iron from the iron platform.
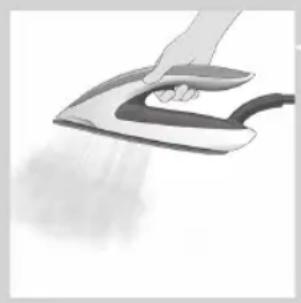
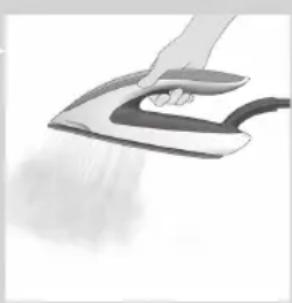
5 Press and hold the steam trigger to start ironing.
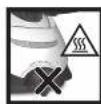
Never direct steam at people.
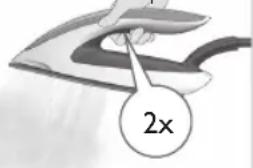
Steam boost function
The steam boost function is designed to help tackle difficult creases.
- Double press the steam trigger for a continuous shot of steam. It is not necessary to press and hold the steam trigger continuously when the steam boost function is activated. To stop the steam boost function, press the steam trigger once.
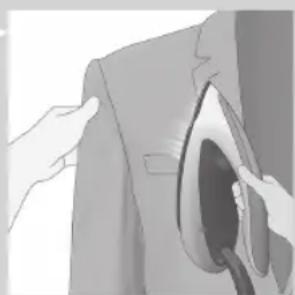
Vertical ironing
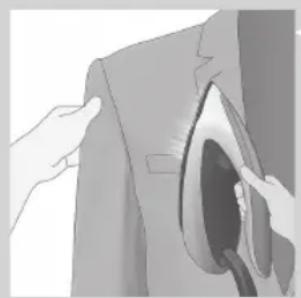
Hot steam is emitted from the iron. Never attempt to remove creases from a garment that someone is wearing. Do not apply steam near your or someone else's hand.
You can use the iron in vertical position to remove wrinkles from hanging fabrics.
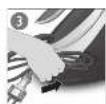
1 Hold the iron in vertical position, press the steam trigger and touch the garment slightly with the soleplate.
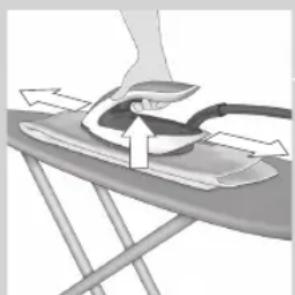
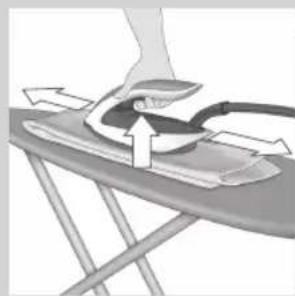
Putting down the iron during ironing
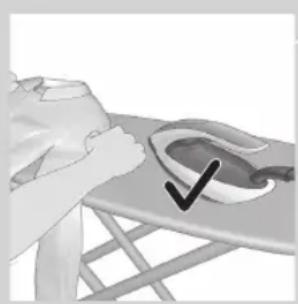
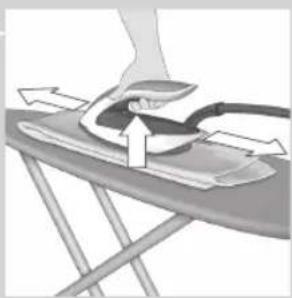
- During ironing, you can place the iron either on the iron platform or horizontally on the ironing board. Thanks to the OptimalTemp technology, the soleplate will not damage the ironing board cover.
Energy saving
ECO mode
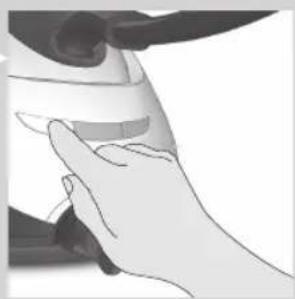
- By using the ECO mode (reduced amount of steam), you can save energy without compromising on the ironing result. The green light is on.
- You can deactivate the ECO mode by pressing the ECO button. The green light goes off.
Safety auto-off mode
- To save energy, the appliance switches off automatically when it has not been used for 10 minutes. The auto-off light in the on/off button starts to flash.
- To activate the appliance again, press the on/off button. The appliance then starts to heat up again.
Note: The appliance is not switched off completely when it is in safety auto-off mode. To switch off the appliance, press the on/off button.
10 ENGLISH
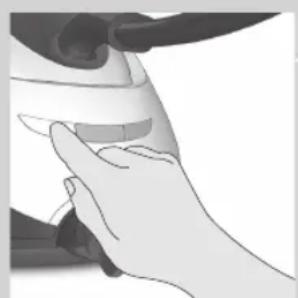
Turbo steam
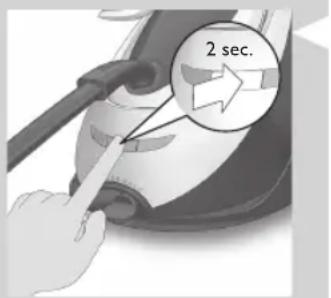
For faster ironing and a higher amount of steam, you can use Turbo steam.
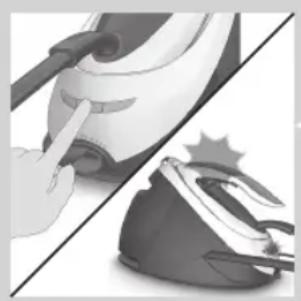
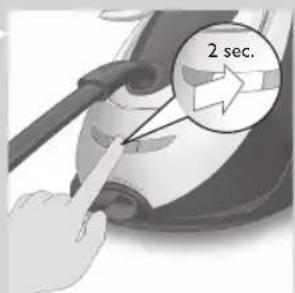
1 Press and hold the on/off button for 2 seconds until the light turns white.
2 To deactivate Turbo steam, press and hold the on/off button again for 2 seconds until the white light turns blue
Ironing tips
Minimising wrinkles while drying
Start wrinkle removal early in the drying process by spreading out your laundry properly after washing and by putting garments on hangers to make them dry naturally with fewer wrinkles.
Best practice shirt ironing
Start with the time-consuming parts like collar, cuff links and sleeves. Next, iron the bigger parts like front and back to prevent wrinkling the bigger parts when you are busy ironing the time-consuming parts.
Collar: When you iron a collar, start on its underside and work from the outside (the pointy end) inwards. Turn over and repeat. Fold down the collar and press the edge for a more crisp finish.
Buttons: Iron on the reverse side of the buttons for more effective and faster ironing.
Cleaning and maintenance
To properly maintain your appliance, clean the iron and the appliance regularly.
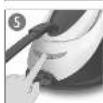
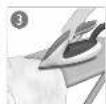
1 Clean the appliance with a moist cloth. To remove stubborn stains, you can use a small amount of washing-up liquid.
2 To easily and effectively remove stains from the soleplate, switch on the appliance and let it heat up. When the appliance has heated up, move the iron over a moist cloth while you press the steam trigger.
Tip: Clean the soleplate regularly to ensure smooth gliding.
IMPORTANT - DESCALING
It is very important to perform the descending procedure as soon as the EASY DE-CALC light starts to flash and the appliance beeps continuously.
The EASY DE-CALC light flashes and the appliance beeps continuously after about a month or 10 ironing sessions to indicate that the appliance needs to be descaled. Perform the following descaling procedure before you continue ironing.
To avoid the risk of burns, unplug the appliance and let it cool down for at least two hours before you perform the descaling procedure.
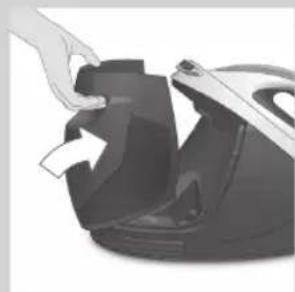
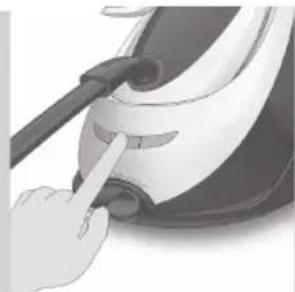
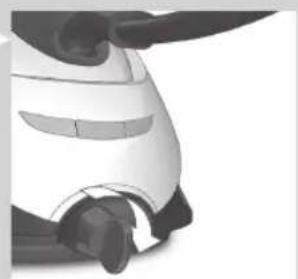
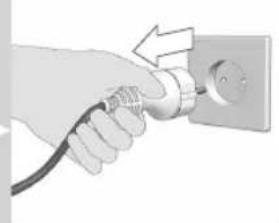
1 Remove the plug from the wall socket.
2 Place the appliance on the edge of the tabletop.
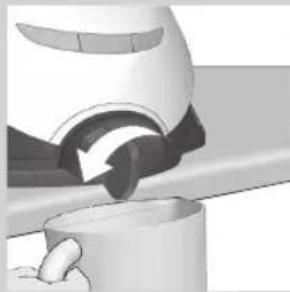
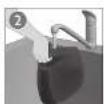
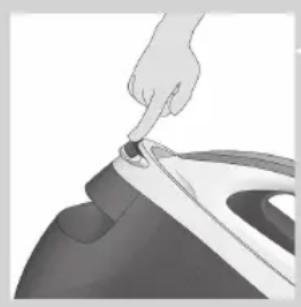
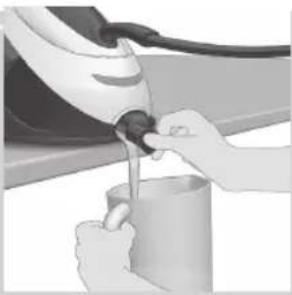
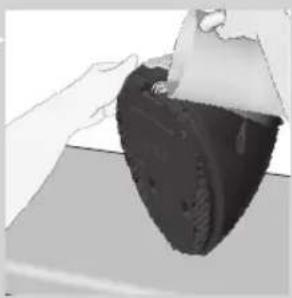
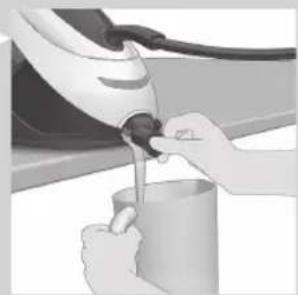
3 Hold a cup (with a capacity of at least 350ml ) under the EASY DE-CALC knob and turn the knob anticlockwise.
4 Remove the EASY DE-CALC knob and let the water with scale particles flow into the cup.
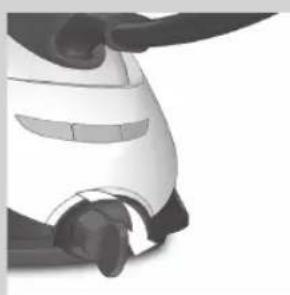
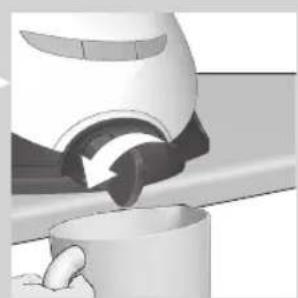
5 When no more water comes out of the appliance, reinsert the EASY DE-CALC knob and turn it clockwise to fasten it.
12 ENGLISH
IMPORTANT - Dscaling the soleplate

If you do not use the EASY DE-CALC function regularly, scale particles may build up in the soleplate and brown stains may come out of the soleplate during ironing. In this situation, you need to descale the soleplate by following the procedure below. We advice you to repeat the procedure twice to better clean the soleplate.
To avoid the risk of burns, unplug the appliance and let it cool down for at least two hours before you descale the soleplate.
1 Remove the plug from the wall socket.
2 Place the appliance on the edge of the tabletop.
3 Make sure that the water tank is empty.
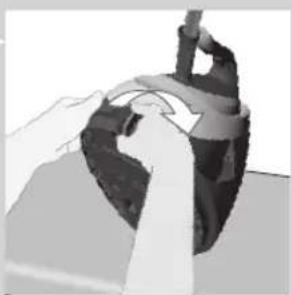
4 Hold a cup (with a capacity of at least 350ml ) under the EASY DE-CALC knob and turn the knob anticlockwise.
5 Remove the EASY DE-CALC knob and let the water with scale particles flow into the cup.
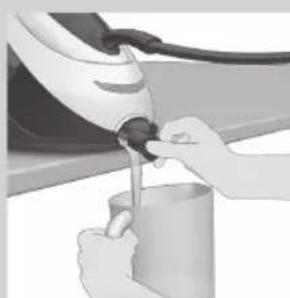
6 Hold the appliance in the position that EASY DE-CALC opening is facing up and pour 900ml distilled water into the opening.
Note: Be mindful on the heavy weight of the appliance when you tilt it.
7 Keep the EASY DE-CALC opening facing up, reinsert the EASY DE-CALC knob and turn it clockwise to fasten it.
8 Put the appliance back on a stable and even surface. Plug in the appliance and switch it on.
9 Wait for 5 minutes for the appliance to heat up.
10 Keep the steam trigger pressed continuously while you move the iron on a piece of thick cloth for 3 minutes.
Warning: hot, dirty water comes out of the soleplate.
11 Stop moving the iron when no more water comes out or when steam starts coming out.
12 You can continue to use the appliance immediately. Otherwise unplug the appliance after the descending is completed.
Storage
1 Switch off the appliance and unplug it.
2 Remove the water tank and empty it.
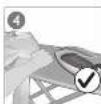
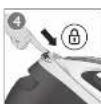
3 Put the iron on the iron platform. Push the carry lock to lock the iron onto the platform.
4 Fold the supply hose and mains cord. Put them in their respective storage compartments.
5 You can carry the appliance with one hand by the handle of the iron.
Do not carry the appliance by holding the water tank release lever.
14 ENGLISH
Troubleshooting
This chapter summarises the most common problems you could encounter with the appliance. If you are unable to solve the problem with the information below, visit www.philips.com/support for a list of frequently asked questions or contact the Consumer Care Centre in your country.
Problem Possible cause Solution
| The ironing board cover becomes wet or there are water droplets on the garment during ironing. | Steam has condensed on the ironing board cover after a long ironing session. | Replace the ironing board cover if the foam material has worn out. You can also add an extra layer of felt material under the ironing board cover to prevent condensation on the ironing board. You can buy felt in a fabric shop. |
| You have an ironing board cover that is not designed to cope with the high steam rate of the appliance. | Put an extra layer of felt material under the ironing board cover to prevent condensation on the ironing board. You can buy felt in a fabric shop. | |
| Water droplets come out of the soleplate. | The steam that was still present in the hose has cooled down and condensed into water. This causes water droplets to come out of the soleplate. | Steam away from the garment for a few seconds. |
| Steam and/or water come out from under the EASY DE-CALC knob. | The EASY DE-CALC knob is not tightened properly. | Switch off the appliance and let the appliance cool down for 2 hours. Unscrew the EASY DE-CALC knob and screw it back onto the appliance properly. Note: Some water may escape when you remove the knob. |
| The rubber sealing ring of the EASY DE-CALC knob is worn. | Contact an authorised Philips service centre for a new EASY DE-CALC knob. | |
| Dirty water and impurities come out of the soleplate or the soleplate is dirty. | Impurities or chemicals present in the water have deposited in the steam vents and/or on the soleplate. | Clean the soleplate with a damp cloth. |
| Too much scale and minerals have accumulated inside the appliance. | Descale the appliance regularly (see chapter 'Important - DESCALING'). | |
| The iron leaves a shine or an imprint on the garment. | The surface to be ironed was uneven, for instance because you were ironing over a seam or a fold in the garment. | PerfectCare is safe on all garments. The shine or imprint is not permanent and will come off if you wash the garment. Avoid ironing over seams or folds or you can place a cotton cloth over the area to be ironed to avoid imprints at seams and folds. |
| The appliance does not produce any steam. | There is not enough water in the water tank (the 'water tank empty' light flashes). | Fill the water tank (see chapter 'Using your appliance', section 'Filling the water tank'). |
| The appliance is not hot enough to produce steam. | Wait until the 'iron ready' light on the iron lights up continuously. |
Problem Possible cause Solution
| You did not press the steam trigger. | Press the steam trigger and keep it pressed while you iron. | |
| The water tank is not placed in the appliance properly. | Slide the water tank back into the appliance firmly ('click'). | |
| The appliance is not switched on. Insert the plug in the wall socket and press the on/off button to switch on the appliance. | ||
| The appliance has switched off. The light in the on/off button flashes. | The auto-off function is activated automatically when the appliance has not been used for more than 10 minutes. | Press the power on/off button to switch on the appliance again. |
| The appliance produces a pumping sound. | Water is pumped into the boiler inside the appliance. This is normal. | If the pumping sound continues nonstop, switch off the appliance and remove the plug from the wall socket. Contact an authorised Philips service centre. |
Einführung
.7wnnnninn Dn nn n nn
.
y
yannnnn7ynnnn nn 717 nnn
.00000000000000000000000000000
IN NNNN DNOOHNNNNNTN
.07977nnn
wnnnn nix nnnn, nON. n nn nn nn nn nn nn nn nn nn nn nn nn nn nn nn nn nn nn nn nn nn nn nn nn nn nn nn nn nn nn nn nn nn nn nn nn nn nn nn nn nn nn nn nn nn nn nn nn nn nn nn nn nn nn nn nn nn nn nn nn nn nn nn nn nn nn nn nn nn nn nn nn nn nn nn nn nn nn nn nn nn nn nn nn nn nn nn nn nn nn nn nn nn nn nn nn nn
n nn nn nn nn nn nn nn nn nn nn nn nn nn nn nn nn nn nn nn nn nn nn nn nn nn nn nn nn nn nn nn nn nn nn nn nn nn nn nn nn nn nn nn nn nn nn nn nn nn nn nn nn nn nn nn nn nn nn nn nn nn nn nn nn nn nn nn nn nn nn nn nn nn nn nn nn nn nn nn nn nn nn nn nn nn nn nn nn nn nn nn nn nn nn nn nn nn nn
126n
nnn (nin7 350 w n1y) oD nnn .Jnuu nn9n NIO EASY DE-CALC n927
77n Dv DnEASYDE-CALCnnDn
yinn D'0n, nnn nn 7 09nu ININ 77 Iuvn IIN DIOI EASY DE-CALC 1992

DIOONN -IUN
7y 77777777777777777777777777777777777777777
nnnnnnnnnnnnnnnnnnnnnnnnnnnnnnnnnnnnnnnnnnnnnnnnnnnnnnnnnnnnnnnnnnnnnnnnnnnnnnnnnnnnnnnnnnnnnnnnnnnnnnnnnnnnnnnnnnnnnnnnnnnnnnnnnnnnnnnnnnnnnnnnnnn
7777777777777777777777777777
EASY DE-CALC nnnn (nin7 350 nn) D D
yin7D9
y
n 7777777777777777777777777777
10 IN TINN NINNNN NINNNN NINNNN NINNNN NINNNN NINNNN NINNNN NINNNN NINNNN NINNNN NINNNN NINNNN NINNNN NINNNN NINNNN NINNNN NINNNN NINNNN NINNNN NINNNN NINNNN NINNNN NINNNN NINNNN NINNNN NIN
yni yni yinnn nn nynn nny
JINNNN NNNN NNNN NNNN NNNN NNNN NNNN
77777777777777
JIN7WnN7yIOWnNxOIN
yinnnynnnnn
70100nnn nn nnnnn OptimalTEMP 1000000000000000
-77,INNINYNNNNN

7wn1|D0n
ECO
nNn7 nnnn nn (nnn9n 107 nnn) ECO nnnn nnnn .n7n nnnn nn. nnnn ECO nnn.ECO n7y nnn7 y ECO nnn nn nnnn .n
NININ7OIOIN
.77 10 nnnn nn nnnn nnnn nnnn nnnn nnnn nnnn nnnn nnnn nnnn nnnn nnnn nnnn nnnn nnnn nnnn nnnn nnnn nnnn nnnn nnnn nnnn nnnn nnnn nnnn nnnn nnnn nnnn nnnn nnnn nnnn nnnn nnnn nnnn nnnn
-7nnn nn n/nynnn 7y n17,
ninnnnnnnnnnnnnnnnnnnnnnnnnnnnnnnnnnnnnnnnnnnnnnnnnnnnnnnnnnnnnnnnnnnnnnnnnnnnnnnnnnnnnnnnnnnnnnnnnnnnnnnnnnnn

1716 1017
Turbo nnnn nn nnnn nnnn nnnn nnnn nnnn nnnn nnnn nnnn nnnn nnnn nnnn nnnn nnnn nnnn nnnn nnnn nnnn nnnn nnnn nnnn nnnn nnnn nnnn nnnn nnnn nnnn nnnn nnnn nnnn nnnn nnnn nnnn nnnn nnnn nn
2
129n
nnnnn nn nnnn 7 7 7 7 7 7 7
yann
y7 77nnn nn nn nn n
.000N7N D7N11D71N
1017 nnnn nn 19
17 17 17 17 17 17 17 17 17 17 17 17 17 17 17 17 17 17 17 17 17
717n7y7197077n77n77n77n77n77n77n77n77n77n77n77n77n77n77n77n77n77n77n77n77n77n77n77n77n77n77n77n77n
7107n77n
DIN YINDI
Tn nn nnnn nn nnnn nn nnnn nn
.1NN DNT WIX D7W TIN 77W97 JN IN W17 INW
7 777777777777777
177 177 177 177 177 177 177
nnn
77NJIN9D777777
130n
1.INDIN NOIN 7IIN 7INN
.("n7n"7n"y)nnn nn n