Stereo - Hi-fi system SONORO - Free user manual and instructions
Find the device manual for free Stereo SONORO in PDF.
| Product type | Stereo hi-fi system |
| Brand | Sonoro |
| Model | Stereo |
| Dimensions (W x D x H) | approx. 450 x 262.5 x 153 mm |
| Weight | approx. 6.3 kg |
| Power supply | 100-240 V ~50/60 Hz (mains cable included) |
| Power consumption | Not specified, built-in power adapter |
| FM radio | 87.5 MHz - 108 MHz, RDS |
| DAB/DAB+ radio | 174.928 MHz - 239.2 MHz |
| CD player | Audio CD, CD-R, CD-RW, MP3 CD, WMA CD |
| Bluetooth connectivity | Version 3.0 (EDR), profiles AVRCP 1.0 and A2DP 1.2, aptX support |
| USB port | MP3/WMA playback, charging 5V/1A, FAT16/FAT32, max 32 GB |
| Auxiliary inputs | 2: AUX1 (RCA, sensitivity 500 mV), AUX2 (3.5 mm jack, 300 mV) |
| Line output | RCA, 2 V/47 kOhm |
| Headphone output | 3.5 mm jack |
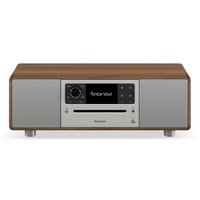
| Speakers | Built-in (subwoofer on bottom face) |
| Alarm function | 2 independent alarms, source: FM/DAB/CD/Relax/Ringtone |
| Auto shutdown (Sleep) | Yes, adjustable up to 120 minutes |
| Equalizer | Presets: Bass MAX, Voice MAX, Treble MAX; manual bass and treble |
| Display | LCD screen with adjustable backlight |
| Remote control | Yes, with CR2032 button cell included |
| Clock backup battery | CR2032, 3 V (built-in at rear) |
| Antenna | FM/DAB supplied, T dipole |
| Maintenance and cleaning | Dry, soft cloth; avoid harsh products |
| Safety | Laser class 1, child protection (packaging), emergency stop by disconnecting |
| Warranty | 2 years (1 year North America and Australia) |
Frequently Asked Questions - Stereo SONORO
User questions about Stereo SONORO
0 question about this device. Answer the ones you know or ask your own.
Ask a new question about this device
Download the instructions for your Hi-fi system in PDF format for free! Find your manual Stereo - SONORO and take your electronic device back in hand. On this page are published all the documents necessary for the use of your device. Stereo by SONORO.
USER MANUAL Stereo SONORO
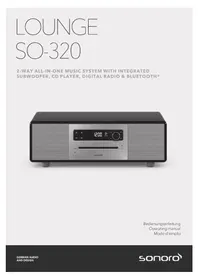
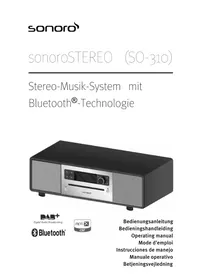
sonoroSTEREO (SO-310)
Computers Unlimited - Main Office
The Technology Park
Colindeep Lane
London NW9 6BX
United Kingdom
Telephone: +44 20 82 00 82 82
Fax: +44 20 82 00 37 88
email: general@unlimited.com
sonoro
Table of contents
1 Introduction 43
2 For your own safety. 43
2.1 Symbols in this manual 43
2.2 Intended use. 43
2.3 Children and persons with limited cognitive abilities 43
2.4 Power supply 44
2.5 Batteries 44
2.6 Laser 44
2.7 Transport 44
2.8 Ambient conditions 44
2.9 Operation 45
2.10 Headphone use 45
2.11 Defects 45
2.12 Cleaning 45
3 Scope of delivery. 45
4 Compatible formats. 45
5 Controls and ports. 46
6 Display 50
7 Unpacking the device and first use 51
7.1 Unpacking the device.. 51
7.2 Inserting the battery.. 51
7.3 Connecting the power cord.. 51
7.4 Connecting the antenna 52
7.5 Preparing the remote control. 52
7.6 Connecting the headphones 52
8 Setting the basic functions. 52
8.1 Switching on the device for the first time 53
8.2 Standby menu.. 53
8.3 Settings menu.. 53
8.4 Setting the Sleep Timer 55
8.5 Setting the dimmer 55
8.6 Adjusting the sound.. 56
8.6.1 Setting bass and treble.. 56
8.6.2 Setting the equalizer 56
8.7Sound effect 56
9 Alarm function. 56
9.1 Setting the alarm time.. 57
9.2 Setting the alarm source.. 57
9.3 Setting the alarm volume.. 57
© 2013 41
sonoro
9.4 Setting the alarm repeat frequency.. 57
9.5 Switching the alarm function on/off.. 58
9.6 Switching off the alarm clock after the alarm sounds 58
9.7 Setting the Snooze function.. 58
10 General audio playback functions 58
10.1 Selecting a playback mode.. 58
10.2 Setting the volume.. 59
10.3 Setting playback to mute.. 59
11 Radio playback 59
11.1 FM radio 59
11.1.1 Searching an FM station 59
11.1.2 Storing FM stations 60
11.1.3 Accessing saved FM stations.. 60
11.2 DAB radio 60
11.2.1 Finding a DAB station 60
11.2.2 Storing a DAB station 61
11.2.3 Accessing saved DAB stations 61
11.2.4 Accessing DAB information 61
11.2.5 Setting the DRC.. 61
12 CD playback 62
13 Bluetooth playback 62
13.1 Connecting and deleting Bluetooth devices 63
13.2 Playing music via Bluetooth 63
14 AUX playback 63
15 USB playback 63
16 Relax Music playback 64
17 Demo Music playback 64
18 Troubleshooting 65
19 Cleaning 66
20 Technical Data. 67
21 Disposal 68
22 Symbols 68
23 Declaration of Conformity 68
24 Warranty 68
1 Introduction
Thank you for deciding to purchase a sonoroSTEREO.
This manual and the safety iThe Technology Park instructions provide all the information required for trouble-free and safe operation of the device.
Read these operating instructions in their entirety before using the device.
- Keep this manual for future reference.
If you pass the device on to a third party, please provide them with the operating instructions and safety instructions as well.
Failure to follow these instructions can result in serious injury or damage to the device.
We assume no liability for damage resulting from failure to observe the instructions in this manual.
The images in this manual are intended to illustrate the necessary actions to operate the device.
We wish you many hours of pleasure with this product!
Contact data
| Address sonoro Service CenterGB Computers Unlimited - Main Office The Technology Park Colindeep Lane London NW9 6BX United Kingdom |
| Phone +44 20 82 00 82 82 |
| Fax +44 20 82 00 37 88 |
| Email general@unlimited.com |
| Internet www.sonoro-audio.com |
2 For your own safety
2.1 Symbols in this manual
Safety instructions
Important information for your safety is highlighted. Make sure you adhere to these instructions, so as to prevent accidents and damage to the device:
WARNING!
Indicates a possibly dangerous situation that can lead to death or severe injuries.
CAUTION!
Indicates a potentially hazardous situation that may result in minor or moderate injury.
NOTICE!
Indicates a potentially hazardous situation that may result in material and environmental damage.
Helpful tips and recommendations
i
Highlights information and useful recommendations.
2.2 Intended use
The device is for personal use only. It is not intended for commercial use. The device is solely intended for the following tasks:
Playback of FM/DAB radio stations.
Playback of audio CDs and MP3/WMA CDs.
Audio playback from external USB devices.
Audio playback from external devices connected via AUX.
Audio playback from Bluetooth-enabled devices (e.g-mobile phones).
- Charging of external devices that are connected via USB.
i
Regarding the charging function, please note the specifications described in the manufacturer's operating instructions.
Any other use is not in keeping with the intended purpose of the device and is not permitted. We do not accept any liability for damage resulting from use of the device that is contrary to its intended purpose.
2.3 Children and persons with limited cognitive abilities
- Do not leave the device unattended and do not use it when children or persons who cannot estimate the associated risks are nearby.
Persons (including children) who are not able to safety operate the device due to their physical, sensory or mental capabilities or lack of experience or knowledge regarding the device, should not operate this device without proper supervision or instruction by a responsible person. Please keep it safely out of their reach.
Remember that packaging materials should not be toyed with. Risk of suffocation!
2.4 Power supply
The device is electric powered, so there is always a risk of electric shock. Therefore pay particular attention to the following:
Never touch the power plug with wet hands.
- When you want to pull the power plug from the wall outlet, always pull directly on the plug itself. Never pull on the cable. It could break.
Ensure unobstructed access to the power outlet so that the power plug can be pulled out immediately in case of an emergency.
Make sure that the power cord is not bent, pinched or run over. Lay the power cord in such a way that it is not a tripping hazard or within reach of children.
Only use extension cords that are rated for the current of the device.
- Keep the device away from rain and moisture and any heat sources.
Only operate the device if the electrical voltage indicated on the device nameplate and the power plug matches the voltage of your power outlet. Incorrect voltage may destroy the device.
To avoid a fire hazard, disconnect the device completely from the power supply when you are not using the device for a long time. Do this by unplugging the power cord from the AC outlet.
2.5 Batteries
Remove the batteries from the battery compartment as soon as they are empty or if you do not intend to use the device for a prolonged period of time.
Never dispose of any batteries in an open fire and never expose them to high temperatures.
- Never attempt to recharge normal batteries. Never attempt to open or short-circuit the batteries. Risk of explosion!
Liquid discharged from the batteries when they are used incorrectly can cause skin irritation. If you come in contact with the liquid, wash it off with plenty of water. If the liquid gets into your eyes, never rub your eyes, but rinse them straight away with water for 10 minutes and contact a doctor immediately.
Only use batteries of the same or equivalent type. Risk of explosion!
- Button type batteries can be easily swallowed. Swallowing can lead lead to searious injury or death. Keep the battery out of reach of children at all times. If you suspect that a battery has been swallowed, seek immediate medical attention.
2.6 Laser
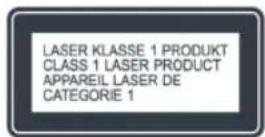
Fig. 1: Laser
This device is classified as a Class 1 laser device. Laser beams can injure your eyes. So please observe the following:
Do not attempt to disassemble the device.
To avoid risks: All maintenance and repair work must only be performed by the manufacturer or its customer service department.
2.7 Transport
To avoid damage to the inserted medium, remove it from the device before transporting/shipping the device.
Whilst driving in a vehicle, store the device so as not to endanger its occupants.
If you ship the device, please stow it in its original packaging. Keep the packaging for this purpose.
2.8 Ambient conditions
Safe operation of the device is only ensured if it is used under suitable ambient conditions. So please observe the following:
Protect the device against the effects of the weather. Never use the device outdoors and never place it where it is exposed to strong sunlight.
Never place the device on or near heat and fire sources such as burning candles, cooker plates, ovens etc.
Position the device so that sufficient air circulation is ensured. This will prevent heat accumulating inside the device. Always keep the device at a minimum distance of 10cm from other equipment or from walls.
Protect the device against mechanical shocks and place it on a firm surface.
Protect the remote control from the weather, humidity and high temperatures (e.g. from direct sunlight).
Protect the device against dripping water and splashes. Never place a container of liquid next to or on the device.
2.9 Operation
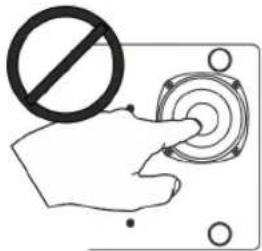
Fig. 2: Subwoofer
Do not touch or push the subwoofer on the bottom of the device (Fig. 2). This can destroy the loudspeaker.
Do not insert any object other than the permitted CDs into the CD slot of the device. Special formats can result in damage to your device.
Do not use any media other than those specified in this manual.
The rubber feet of the device may produce stains on certain surfaces. Please choose a suitable surface on which you will place the device.
2.10 Headphone use
Always decrease the volume of the device before putting on the headphones. Increase the volume to the desired level only after the headphones are in the correct position.
Do not adjust the volume too high when listening on headphones. If you hear permanent noise or background noise in your ears (ringing), immediately decrease the volume or stop using the headphones altogether.
Even if your headphones are designed in such a way that you can hear outside noises, remember to never adjust the volume so high that you are no longer aware of your immediate surroundings.
2.11 Defects
If the device should be defective, never try to carry out repairs your-self.
If the mains plug, the adapter or the mains cable of the device is damaged, it must be replaced by the manufacturer or the customer service department to prevent the risk of electric shock.
If liquids have entered the device or it has been damaged in any other way, it must be inspected by an authorised specialist. Disconnect the device from the AC adapter and contact an authorised specialist.
2.12 Cleaning
Only clean the outside of the device with a dry, soft cloth. Never use aggressive cleaning agents or solvents to clean the device, as these corrode its surface.
If the device is badly soiled, wipe it with a slightly moistened cloth and dry it immediately with a dry, soft cloth.
3 Scope of delivery
The sonoroSTEREO is supplied with a number of accessories that you need to receive radio signals or to connect additional devices.
sonoroSTEREO with protective cover
Remote control
Two button cells (CR2032, 3 V)
Power cord (CE and UK)
FM/DAB antenna
Gloves
Operating instructions
4 Compatible formats
Compatible CD formats
A NOTICE!
Using an incorrect CD format can result in material damages!
Inserting a mini-disc can damage the device.
-Only use compatible CD formats.
- Compact Disc Digital Audio CD-DA
CD-R
CD-RW
Compatible audio formats
CD-DA
MP3
WMA
5 Controls and ports
sonoroSTEREO front view
Fig. 3: sonoroSTEREO front view
| Item(Fig. 3) | Designation Functio | |
| 1 Loudspeaker | Loudspeaker | opening. |
| 2 Play/Pause CD/USB start/pause playback. | ||
| 3 Stop CD/USB stop playback. DAB and FM: info button. | ||
| 4 LC-Display Displays curren't time and date when the device is switched off. Displays mode-related information when the device is switched on. | ||
| 5 MENU Open and save/close | ||
| 6 Click wheel | Turn: set volume, FM/DAB station, alarm, navigation. Press: confirm individual submenus, FM station list/DAB station list, start/stop audio playback, stop alarm. Press and hold, then turn: set FM frequency/DAB frequency manually. | |
| 7 MODE Switch to next playback mode. | ||
| 8 Alarm 2 | Press: switch alarm 2 on/off, stop alarm. Press and hold: set alarm. | |
| 9 Eject Eject CD | ||
| 10 Alarm 1 | Press: switch alarm 1 on/off, stop alarm. Press and hold: set alarm. | |
| 11 CD slot | Loads CD when | the device is switched on or in Standby mode. |
| 12 Next | ×× | Press: navigate menu items; search FM/DAB stations, next track in CD, USB, Bluetooth, Relax Music, Demo Music modes. Press and hold: fast forward. |
| 13 Standby Switch device | on/off. Stop alarm. | |
| 14 Previous | ×× | Press: navigate menu items; search FM/DAB stations, previous track in CD, USB Bluetooth, Relax Music, Demo Music modes. Press and hold: fast reverse. |
sonoroSTEREO rear view
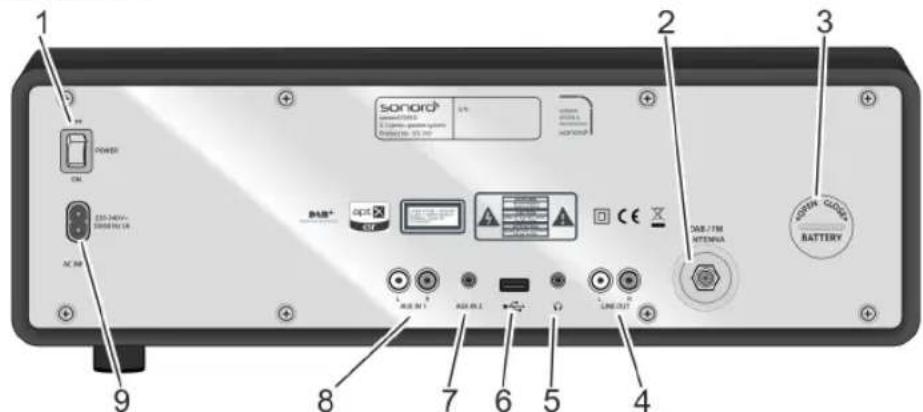
Fig. 4: sonoroSTEREO rear view
| Item (Fig. 4) | Designation Function | ction |
| 1 On/off switch | Switch Switch device | ice on/off. |
| 2 DAB/FM | ANTENNA | Port for the included antenna or an external antenna. |
| 3 Battery | com-partment | The battery (CR2032 button cell, 3 V) ensures continued operation of the clock in case of power failure. |
| 4 LINE OUT | T Port for external | al audio playback. |
| 5 Headphones | ones Port for headphones. | |
| 6 USB-Charge &Playback | Charge &Playback | Port for USB stick or USB cable. Port to charge external devices via a USB cable. |
| 7 AUX IN | 2 Port for external | audio devices (3.5 mm jack). |
| 8 AUX IN | L Port for external | audio devices (RCA). |
| 9 AC INPL | T 100 to 240V socket | packet for included power cable. |
Remote control
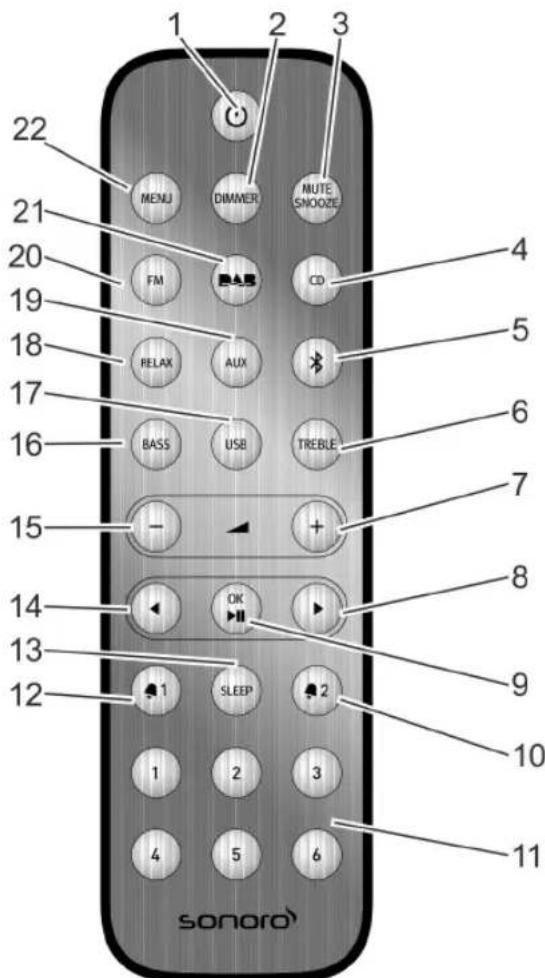
Fig. 5: Remote control
| Item (Fig. 5) | Button Function | |
| 1 Standby | Switch device o | n/off. |
| 2 DIMMER Switch dimmer | on/off. Adjust dimmer settings. | |
| 3 MUTE | SNOOZE | Press briefly (in playback mode): switch audio playback on/off (Mute). Press briefly (in alarm mode): start snooze function (Snooze). Press and hold for a while: call up menu [Snoopze Setting] to set the snooze time. |
| 4 CD Select CD playback; p | press briefly (in CD mode): display ID3 tags. | |
| 5 Bluetooth Select Bluetooth | th function. | |
| 6 TREBLE Adjust treble. | ||
| 7 VOL + All playback modes: increase the volume. | ||
| 8 Next Station scan and navigation through menus. | ||
sonoro
| Item (Fig. 5) | Button Function | |
| 9 OK, Play | Pause Confirm | selected settings in the menu. Play or pause selected track. |
| 10 Alarm | 2 | Press: switch alarm 2 on/off, stop alarm. Press and hold: set alarm. |
| 11 Preset | 1-6 | Station memory. In USB playback mode (if MP3 folders are set up): -Preset 1: select previous folder -Preset 2: select next folder |
| 12 Alarm | 1 | Press: switch alarm 1 on/off, stop alarm. Press and hold: set alarm. |
| 13 SLEEP | Switch automatic sleep function (Sleep Timer) on/off. Press briefly (in Standby mode): device switches itself on. | |
| 14 Previous | Station can and navigation through menus. | |
| 15 VOL | All playback modes: reduce volume. | |
| 16 BASS Adjust bass. | ||
| 17 USB Select USB playback. Switch between artist and track information (if available). | ||
| 18 RELAX Select saved Relax Music. | ||
| 19 AUX Select AUX input. | ||
| 20 FM | Switch FM radio on. Press briefly (in FM mode): switch RDS on/off. | |
| 21 DAB | DAB | Switch DAB radio on. Press briefly (in DAB mode): switch DAB information. |
| 22 MENU | Open and close the menu. | |
6 Display
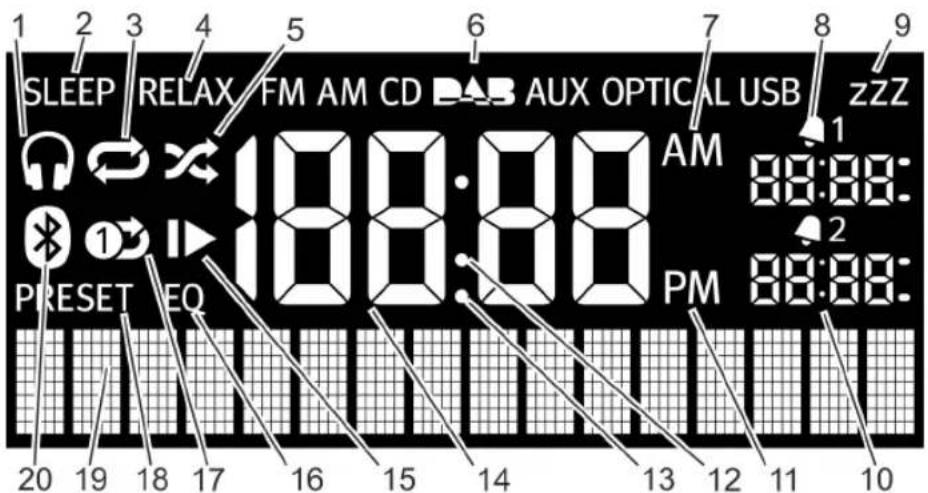
Fig. 6: Display
| Item (Fig. 6) | Symbol Function | |
| 1 Headphones Headphones are connected. | ||
| 2 Sleep Slleep Timer is active. | ||
| 3 Repeat CD: repeat all tracks on the CD. | ||
| 4 Relax Relax mode is active. | ||
| 5 Shuffle CD: shuffle the play order of individual tracks. | ||
| 6 FM/AMCD/CD/DAB/AUX/USB | Shows the selected operating mode. | |
| 7 AM Time suffix in the 12-hour setting. | ||
| 8 Alarm 1 Displays the set Alarm 1 time. | ||
| 9 Snooze Snooze function is activated. | ||
| 10 Alarm 2 Displays the set Alarm 2 time. | ||
| 11 PM Time suffix in the 12-hour setting. | ||
| 12 Colon Flashes to indicate seconds. | ||
| 13 Dot For FM frequency range. | ||
| 14 Time Display the current time. | ||
| 15 Resume CD: resume playback. | ||
| 16 EQ equalizer to adjust the sound. | ||
| 17 Repeat One CD: repeat one track. | ||
| 18 Preset Station memory. | ||
| 19 Lower display section Display for date, menus, frequencies etc. | ||
| 20 Bluetooth Bluetooth is active. | ||
7 Unpacking the device and first use
Only connection cables and external devices that are designed for this product in terms of safety, electromagnetic compatibility and shielding quality may be used in conjunction with the device.
7.1 Unpacking the device
All parts of the device are delivered in a cardboard box.
WARNING!
The packaging is not a toy! Risk of suffocation!
There is a risk of suffocation if the packaging is used for playing.
-
Keep the packaging in a place that is inaccessible to children and persons who cannot assess the dangers.
-
Unpack the device and all accessories and check the content to ensure that all parts are included and intact.
i
Should you detect any damage, please contact your dealer or sonoro support (Contact data' on page 43) immediately.
- Place the device in a suitable location and remove the protective foil from the display.
i
Always comply with the safety instructions regarding the ambient conditions (Chapter 2 'For your own safety' on page 43).
3.
NOTICE!
Damage to the subwoofer!
Carefully remove the cover from the subwoofer without touching it.
7.2 Inserting the battery
The battery ensures the function of the clock in case of power failure.

WARNING!
Risk of injury if batteries are handled incorrectly! The incorrect handling of batteries can lead to injuries due to an explosion hazard.
- Never attempt to recharge, open or short-circuit the batteries. Risk of explosion!
- Never damage or deform the batteries.
- Never dispose of any batteries in an open fire or expose them to high temperatures.
- Keep batteries out of reach of children, as it poses a suffocation risk.
-Fluid may escape due to misuse and cause skin irritation. In case of skin contact:
Rinse it off with plenty of water.
- Do not rub your eyes, but rinse eyes with plenty of water for 10 minutes and seek immediate medical attention.
NOTICE!
Improper handling of batteries can lead to material damages!
Improper handling of batteries can damage the device.
-Do not insert batteries the wrong way. Ensure that they have the correct polarity.
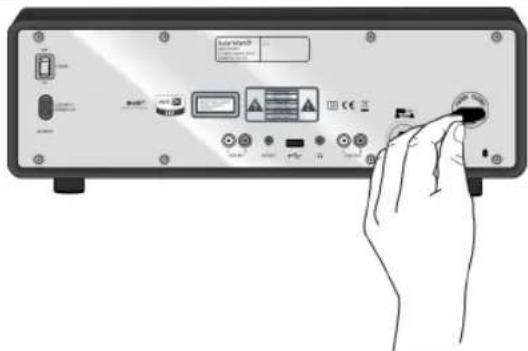
Fig. 7: Inserting the battery
- Open the battery compartment cover on the back of the device with a small coin (Fig. 7).
- Insert the supplied battery with the label side up.
- Insert the battery compartment cover and close it with a small coin.
7.3 Connecting the power cord
The device is supplied with power by means of the supplied mains cable. The AC transformer is integrated in the device itself.
WARNING!
Risk of injury if handled incorrectly!
Risk of electric shock if the mains cable is handled incorrectly.
- Pull the mains cable straight out of the outlet.
A NOTICE!
Risk of damage to equipment in the event of incorrect power connection!
Connection ratings that exceed the maximum permissible values of the device can destroy it.
-Only use the mains cable supplied with the device.
- Only use the device if the indicated voltage corresponds with the voltage of your mains socket.
- Insert the plug of the mains cable into the power socket on the back of the device.
- Insert the mains plug in the outlet.
7.4 Connecting the antenna
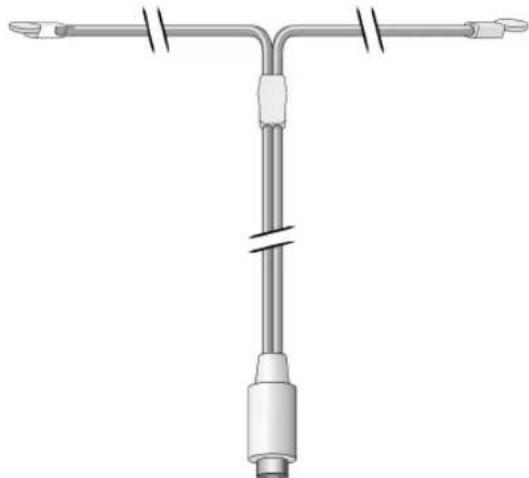
Fig. 8: Connecting the antenna
The included antenna is needed for radio reception in the FM frequency range and for DAB radio stations.
- Screw the included FM/DAB antenna on the back of the device to the DAB/FM antenna connector.
- Unfold and align the supplied FM/DAB antenna to obtain optimum reception.
i
For good FM/DAB radio reception, the two ends of the antenna should form a "T" (dipole) with the connecting cable (Fig. 8).
For even better reception, attach the cable to a suitable house antenna.
7.5 Preparing the remote control
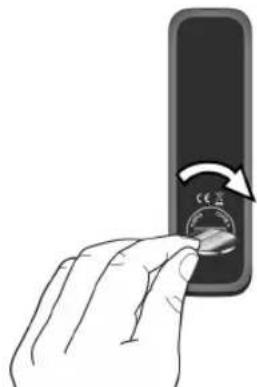
Fig. 9: Inserting the battery in the remote control
- Open the battery compartment of the remote control (Fig. 9).
- Insert the supplied button celle (CR2032, 3 V) with the label side (+) up.
- Close the battery compartment.
7.6 Connecting the headphones
Headphones with a 3.5mm jack plug (not supplied) can be connected to the device.
WARNING!
Risk of injury if headphones are used incorrectly!
Incorrect use of headphones can cause severe accidents and damage your health.
-
When you are using the headphones, do not set an excessively high volume.
-
Turn the click wheel to the left to set the volume to minimum.
- Insert the headphone jack plug into the port on the back of the device.
- Slowly turn the click wheel to the right to increase the volume.
8 Setting the basic functions
The individual menus let you select the functions and settings of the device.
8.1 Switching on the device for the first time
After you have switched the device on for the first time, the LC display shows the clock display and the [Tune to FM RDS station to set time & date] message.
i
In FM/DAB mode, the time and date are set automatically unless this function has been disabled.
8.2 Standby menu
The following settings can be configured in the Standby menu:
Setting the time manually.
Setting the date manually.
Switch the date on the display on/off.
The procedure to set the individual functions is the same.
Setting the time manually

Fig. 10: Setting the time manually
- In Standby mode, press the [MENU] button on the device or the remote control.
The display shows the [Set Time] menu (Fig. 10). - Press the click wheel to set the hours.
The hour display will flash. - Turn the click wheel to set the hours.
- Press the click wheel to confirm the setting.
The minute display will flash. - Turn the click wheel to set the minutes.
- Press the click wheel to confirm the setting.
The time is set.
i
Use the [Next] and [Previous] buttons to toggle between the hours and minutes display.
i
After 10 seconds of inactivity, the device automatically switches to Standby mode without saving the settings.
Setting the date manually

Fig. 11: Setting the date
- In Standby mode, press the [MENU] button on the device or the remote control.
The display shows the [Set Time] menu (Fig. 10). - Turn the click wheel until [Set Date] is shown.
- Press the click wheel.
Now you can set the date by rotating the click wheel.
i
You can switch between the day, month and year display by pressing the click wheel.
Switching the date on/off

Fig. 12: Switching the date on/off
- In Standby mode, press the [MENU] button on the device or the remote control.
The display shows the [Set Time] menu (Fig. 10). - Turn the click wheel until [Display Date] is shown.
- Press the click wheel.
Now you can switch the date on or off.
8.3 Settings menu
In operating mode, the following configurations can be made in the [Settings] menu:
Set the time format.
Set the date format.
Set the Sleep Timer.
Set display brightness.
Set automatic time/date update function.
Set display language.
Activate/deactivate Demo Music.
Restore factory settings.
To adjust the settings, proceed as follows:
- Press the [MENU] button on the front of the device or the remote control to enter the corresponding submenu.
- Press the [Next] or [Previous] button or turn the click wheel to scroll through the individual menu items.
- To open the selected menu item, briefly press the click wheel or the [OK] button on the remote control.
- To exit the menu, briefly press the [MENU] button on the device or on the remote control.
i
If you do not make any further entries, the menu will close and the display switches to the previous mode.

Setting the time format
Fig. 13: Setting the time format
You can choose between the 24-hour and 12-hour formats. In the 12-hour format, the time of day is indicated by [AM] and [PM].
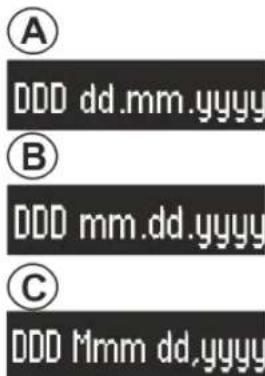
Setting the date format
Fig. 14: Setting the date format
You can set three different date formats (Fig. 14/A, B und C) as well as the current day. The configuration options are:
A: Current day, day, month, year.
B: Current day, month, day, year.
C: Current day, month (in words), day, year.
Setting the Sleep Timer
You can change the Sleep Timer settings in the [Settings] menu (siehe 念 Chapter 8.4 Setting the Sleep Timer' on page 55).
Setting the display brightness
You can change the brightness of the display backlight in the [Settings] menu (siehe Chapter 8.5 Setting the dimmer on page 55).
Setting the automatic time/date update function

Fig. 15: Configuring automatic updating
You can select the automatic updating in the [Clock update] submenu (Fig. 15). By switching on the function, the time as well as the date are automatically synchronised in the FM radio and DAB radio operating modes.

Setting the display language
Fig. 16: Setting the language
You can set the language of the menus as well as of the playback display (Fig. 16). The available languages are:
■ English
German

Switching the Demo Music on/off
Fig. 17: Switching the Demo Music on/off
You can switch the Demo Music on/off (Fig. 17).
Restoring factory settings on the device

Fig. 18: Restoring factory settings
If necessary, all configured settings, such as language and time formats and saved stations, can be reset to factory settings (Fig. 18).
8.4 Setting the Sleep Timer
The Sleep Timer is an automatic power-off function that switches the device to Standby mode after the specified time has expired.
Switching the Sleep Timer on
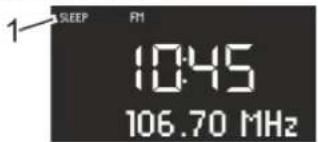
Fig. 19: Switching the Sleep Timer on/off
- Press the [SLEEP] button on the remote control.
The display shows the [SLEEP] symbol (Fig. 19/1).
Switching the Sleep Timer off
- To switch the Sleep Timer off, press the [SLEEP] button again.
The symbol no longer appears on the display.
i
If the device was switched off by the Sleep Timer, it will start in the most recently heard mode when you turn it on the next time.
Setting the time interval for the Sleep Timer

Fig. 20: Setting the time interval for the Sleep Timer
- Press the [SLEEP] button on the remote control for a long time.
i
Alternatively, you can also turn the click wheel in the [Settings] menu until the display indicates [Sleep Timer]. Press the click wheel to confirm your choice.
The display shows the Sleep Timer (Fig. 20) and the [SLEEP] symbol flashes (Fig. 20/1).
- Turn the click wheel to select the desired length of the interval (Fig. 20/2).
i
The maximum interval is 120 minutes.
- Press the click wheel to confirm the settings.
When the specified time expires, playback gradually fades out.
8.5 Setting the dimmer
You can use the dimmer setting to adjust brightness of the display background.
A

B

Fig. 21: Setting the dimmer
- Press the [DIMMER] button on the remote control for approx. 2 seconds.
i
Alternatively, you can also turn the click wheel in the [Settings] menu until the display indicates [Brightness level]. Press the click wheel to confirm your choice.
The display indicates [Light High] (Fig. 21/A).
-
Adjust the brightness from 8-15 by rotating the click wheel.
-
Press the click wheel or the [OK] button on the remote control to confirm the setting.
The display indicates [Light Low] (Fig. 21/B).
-
Adjust the brightness from 1-8 by rotating the click wheel.
-
Press the click wheel or the [OK] button on the remote control to confirm the setting.
i
The backlight is set automatically depending on the ambient lighting.
8.6 Adjusting the sound
8.6.1 Setting bass and treble
When the device is switched on, the sound of the audio playback can be adjusted via the bass and treble controls.
Configuring settings via the remote control
A
B


Fig. 22: Adjusting the sound
- Press the [Bass] or [Treble] button on the remote control.
- To adjust the bass, select [Bass] (Fig. 22/A) and press the [VOL + ] or [VOL - ] button.
- To adjust the treble, select [Treble] (Fig. 22/B) and press the [VOL + ] or [VOL - ] button.
- Press the [OK] button or wait 10 seconds to confirm the setting.
Configuring settings via the device
- Press the [MENU] button in the front of the device.
- Turn the click wheel until [Bass] or [Treble] is shown.
- Press the click wheel to confirm your selection.
- To configure the bass, select [Bass] and turn the click wheel. To configure the treble, select [Treble] and turn the click wheel.
- Press the click wheel or wait 10 seconds to confirm the setting.
8.6.2 Setting the equalizer
Activating and setting the equalizer

Fig. 23: Setting the equalizer
- Press the [MENU] button while the device is switched on.
- Turn the click wheel until [Equalizer Effect] is shown (Fig. 23).
-
Press the click wheel to confirm your selection.
-
Turn the click wheel to select a default setting.
You can select one of the following default settings:
Maximum bass
Maximum voice
Maximum treble
- Press the click wheel to confirm your selection.
The display shows the [EQ] symbol (Fig. 23/1).
Deactivating the equalizer
- Turn the click wheel in the [Equalizer Effect] sub menu until the display shows [Equalizer Off].
- Press the click wheel to confirm your selection.
The [EQ] symbol no longer appears in the display.
8.7 Sound effect
Switching the sound effect on
- Press the [MENU] button while the device is switched on.
- Turn the click wheel until [Equalizer Effect] is shown (Fig. 23).
- Press the click wheel to confirm your selection.
- Turn the click wheel until [Max. Stereo] is shown.
- Press the click wheel to confirm your selection.
- Turn the click wheel until [Max. Stereo On] is shown.
- Press the click wheel to confirm your selection.
The sound effect is switched on.
Switching off the sound effect
- Turn the click wheel in the [Max. Stereo] submenu until [Max.Stereo Off] is shown.
- Press the click wheel to confirm your selection.
The sound effect is switched off.
9 Alarm function
You can have the device wake you up with FM/DAB radio, a CD, Relax Music or stored alarm sounds.
All settings are configured by pressing the [Alarm 1] or [Alarm 2] button on the front of the device or the remote control for a while.
The alarm functions can also be set if the device is in Standby mode.
The Alarm Setup menu is structured as follows:
Set alarm time Set alarm source
Set alarm volume
Set the alarm repeat frequency End
i
If you do not enter any information for approx. 10 seconds when setting the alarm, the setting is terminated without being saved.
9.1 Setting the alarm time

Fig. 24: Setting Alarm 1
- Keep the [Alarm 1] or [Alarm 2] button pressed.
The display shows the [Set Alarm 1 Time] (Fig. 24) or [Set Alarm 2 Time] menu. - Turn the click wheel to set the hours.
- Press the click wheel to confirm your choice.
The minutes display will flash. - Turn the click wheel to set the minutes.
- Press the click wheel to confirm your choice.
i
Use the [Next] or [Previous] buttons to toggle between the hours and minutes display.
The alarm time is set.
9.2 Setting the alarm source
After you have set and confirmed the alarm time, you can choose the alarm source (Fig. 25).

Fig. 25: Setting the alarm source
- Turn the click wheel to select the desired source:
| FM | Select an FM station preset from the station memory that you want to use for the alarm. |
| DAB Select a DAB station preset from the station memory that you want to use for the alarm. | |
| CD Select a track from the CD that you want to use for the alarm. | |
| Relax Music Select a Relax Music sound from the memory that you want to use for the alarm. | |
| Ringtone Select a ringtone from the memory that you want to use for the alarm. | |
- Press the click wheel or the [OK] button on the remote control to confirm the setting.
The alarm source is set.
9.3 Setting the alarm volume
After you have set and confirmed the alarm source, you can choose the alarm volume (Fig. 26).
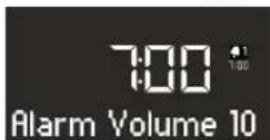
Fig. 26: Setting the alarm volume
- Turn the click wheel to select the desired volume.
- Press the click wheel or the [OK] button on the remote control to confirm the setting.
The alarm volume is set.
i
The alarm audio playback always starts with the minimum volume and gradually increases to the specified volume level.
9.4 Setting the alarm repeat frequency
After you have set and confirmed the alarm volume, you can choose the alarm repeat frequency (Fig. 27).
Fig. 27: Setting the alarm repeat frequency

1. Turn the click wheel to select the desired Snooze setting. You can choose one of the following settings:
once
daily
weekends
weekdays
- Press the click wheel or the [OK] button on the remote control to confirm the setting.
The alarm repeat frequency function is set.
9.5 Switching the alarm function on/off
Switching the alarm function on
- To switch on the alarm clock, briefly press the [Alarm 1] or [Alarm 2] button on the front of the device or the remote control.
Switching the alarm function off
- To switch off the alarm clock, briefly press the [Alarm 1] or [Alarm 2] button again.
9.6 Switching off the alarm clock after the alarm sounds
- To switch off the alarm, press one of the following buttons:
[Alarm 1]
[Alarm 2]
Click wheel
[Standby]
The alarm will remain activated for the next day. The only exception to this is the nonrecurring alarm setting.
- Press the [SNOOZE] button on the remote control to activate the Snooze function.
i
Alternatively, you can also turn the click wheel when the alarm sounds to adjust the desired snooze time and confirm it by pressing the click wheel.
The remaining snooze time is displayed. The alarm will sound again after the set time expires.
9.7 Setting the Snooze function
Fig. 28: Setting the Snooze function
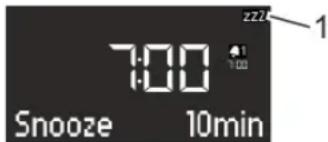
1. In Standby mode, briefly press the [SNOOZE] button on the remote control. When the device is switched on, press and hold the [SNOOZE] button on the remote control until the Snooze submenu appears (Fig. 28).
The display shows the [Snoopze] symbol (Fig. 28/1).
2. Turn the click wheel to set the snooze time.
3. Press the click wheel to confirm your choice.
10 General audio playback functions
10.1 Selecting a playback mode
Select the desired mode for audio playback of the different media or from external devices.

Fig. 29: Selecting a playback mode
- Switch on the sonoroSTEREO.
- Press the [MODE] button on the front of the device until the desired mode is shown, or select it on the remote control.
i
Alternatively, you can also turn the click wheel after pressing the [MODE] button to toggle through the different modes. Press the click wheel to confirm the mode.
The selected mode is displayed (Fig. 29).
10.2 Setting the volume
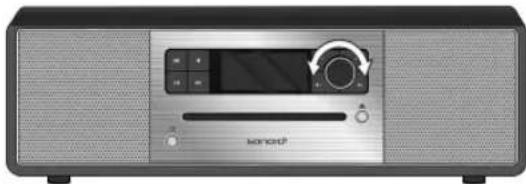
Fig. 30: Setting the volume
- Turn the click wheel to increase or decrease the volume (Fig. 30).
A volume control is shown in the display.
10.3 Setting playback to mute
Mute

Fig. 31: Mute
- In playback mode, briefly press the [MUTE] button on the remote control to mute the sound during playback.
The display will show the text [Volume Mute] (Fig. 31).
Switching the sound back on
- To switch the sound on again, press the [MUTE] button on the remote control again or turn the click wheel clock-wise.
11 Radio playback
- Press the [MODE] button on the front of the device until FM or DAB mode is shown, or select the respective mode on the remote control.
The display will show the [FM Radio] or [DAB Radio] symbol.
The display shows the following information in radio mode:
Mode: FM Radio or DAB Radio.
- Stored program channel, if the radio station is stored in the program memory.
Station name, if the station transmits RDS text.
RDS text transmitted by the station, if the station transmits RDS text.
i
RDS is only available for stations in the FM frequency range and only if the corresponding station transmits RDS data.
If the station does not broadcast RDS text, then the frequency is displayed instead of the station name.
11.1 FM radio
11.1.1 Searching an FM station
Automatic tuning
Condition:
The DAB/FM antenna is connected.
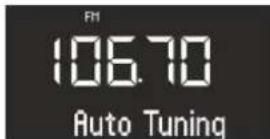
Fig. 32: Automatic tuning
- In FM playback mode, press and hold the [Next] or [Previous] button to activate the automatic tuning function.
The display shows the [Auto Tuning] text (Fig. 32).
Manual tuning
Condition:
The DAB/FM antenna is connected.
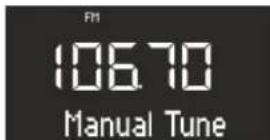
Fig. 33: Manual tuning
- Press and hold the click wheel to activate manual tuning.
The display shows the [Manual Tune] text (Fig. 33). - Turn the click wheel to change the frequency range.
- Press the click wheel to confirm your selection.
Automatic tuning
Automatic tuning automatically generates and stores a station list of up to 30 stations. The stations are sorted according to strength of reception.
Condition:
The DAB/FM antenna is connected.
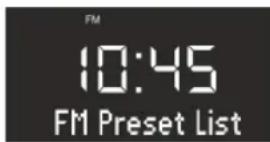
Fig. 34: FM Preset List
- Press the [MENU] button.
The display shows the [FM Preset List] text (Fig. 34). - Turn the click wheel until [FM Auto Search] is displayed.
- Press the click wheel.
The display shows the [Auto Search YES] text. - Press the click wheel again.
The automatic tuning is started. After the search is complete, the device will jump to the first station on the list.
11.1.2 Storing FM stations
Via the remote control
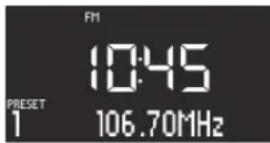
Fig. 35: Storing FM stations
- Press and hold one of the station preset buttons on the remote control.
The display shows the station preset (Fig. 35).
i
You can save up to 6 FM stations via the remote control.
In the menu
- Press the [MENU] button.
The display shows the [FM Preset List] text. - Turn the click wheel until [FM Preset store] is shown.
The display shows the station preset. -
Press the click wheel to select the desired station preset.
-
Press the click wheel to save the station.
11.1.3 Accessing saved FM stations
- Briefly press one of the station preset buttons on the remote control.
The selected station is played.
11.2 DAB radio
11.2.1 Finding a DAB station
Automatic tuning
Condition:
The DAB/FM antenna is connected.

Fig. 36: Automatically finding a DAB station
- In DAB playback mode, press the [MENU] button.
The display shows [DAB Preset List] (Fig. 36). - Turn the click wheel until [DAB Full Scan] is displayed.
- Press the click wheel on the device or the [OK] button on the remote control to confirm the selection.
The device now searches for available radio stations and plays the first available station.
i
The station scan takes place automatically when first switching to DAB mode or after resetting to factory settings.
Manual tuning
Condition:
The DAB/FM antenna is connected.
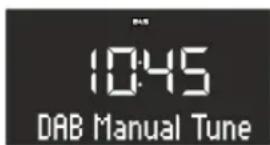
Fig. 37: Manually tuning a DAB station
- In DAB playback mode, press the [MENU] button.
The display shows [DAB Preset List].
- Turn the click wheel until [DAB Manual Tune] is displayed (Fig. 37).
- Press the click wheel on the device or the [OK] button on the remote control to confirm the selection.
- Turn the click wheel to different frequencies.
- Press the click wheel to confirm your selection.
Removing inactive stations - Prune list Condition:
The DAB station list created using the DAB scan function is out of date (e.g., after moving to a different location).

Fig. 38: Deleting inactive DAB stations
- In DAB playback mode, press the [MENU] button.
The display shows [DAB Preset List].
- Turn the click wheel until [Prune list] is shown (Fig. 38).
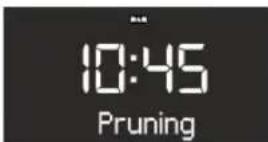
Fig. 39: Pruning
- Press the click wheel to confirm your selection.
The inactive DAB stations will be deleted. The display will show [Pruning] during this process (Fig. 39).
11.2.2 Storing a DAB station
- Press and hold one of the station preset buttons on the re-mote control.
The display shows the station preset.
i
You can save up to 6 DAB stations via the remote control.
11.2.3 Accessing saved DAB stations
- Briefly press one of the station preset buttons on the remote control.
The selected station is played.
11.2.4 Accessing DAB information
In DAB mode, you can access information about the station, program, etc. The information is shown in the following order:
Station name (starting point)
■ Broadcaster
DLS ("Dynamic Label Service", program-related information such as artist, track, etc.)
Program type (e.g. sports)
Station frequency
Signal quality
- In DAB mode, press the [STOP] button on the device to access the DAB information. Alternatively, you can press the [DAB] button on the remote control.
The display shows the information in the sequence indicated above. - Press the [STOP] button on the device or the [DAB] button on the remote control again.
The display shows the next information. - Proceed accordingly to access the remaining DAB information.
11.2.5 Setting the DRC
The DRC setting (Dynamic Range Compression) reduces the difference in volume between quiet and loud passages.
There are 3 different setting possibilities for the DRC:
The device is in DAB mode.
- Press the [MENU] button.
The display shows the [DAB Preset List] text.
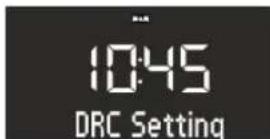
Fig. 40: DRC Setting
-
Turn the click wheel until [DRC Setting] is shown (Fig. 40).
-
Press the click wheel or the [OK] button on the remote control to confirm the selection.
- Turn the click wheel to carry out the desired setting.
- Press the click wheel to confirm the setting.
12 CD playback
NOTICE!
Improper operation can result in material damages!
Do not insert any recording media that deviate from the standard CD format (e.g. mini-discs, etc.) into the CD player. These may not be played and ejected correctly. Insert only one disc at a time into the CD player.
- Switch on the sonoroSTEREO.
- Insert the CD into the CD slot with the label side up.
The CD player will automatically load the CD and start playback.
i
If the device is in a different mode, it will automatically switch to CD mode.
The display shows the following information in CD mode:
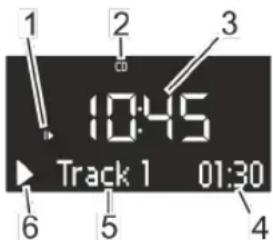
Fig. 41: Display in CD mode
1 Playback sequence (Repeat, Shuffle, CD Resume)
2 CD mode
3 Time
4 Elapsed playback time in minutes
5 Track number
6Playbackstatus(Play/Pause)
To pause playback of the CD, press the [Play/Pause] button.
To resume playback of the CD, press the [Play/Pause] button.
To switch to the next track, press the [Next] button once.
To fast forward through a track, press and hold [Next].
To switch to the previous track, press the [Previous] button.
To fast reverse through a track, press and hold [Previous].
To stop CD playback, press [Stop].
To eject the CD, press [Eject]
Adjusting CD playback
You can choose different playback sequences to play tracks on a CD.
- Press the [MENU] button to open the CD menu. This includes the following functions:
Repeat a single track
Repeat all tracks on the CD
Shuffle
CD Resume
Adjust bass
Adjusttreble
Equalizer Effect
Settings
-
Press the click wheel to select the function.
-
Press the click wheel to confirm your selection.
Repeating a single track
The current track is played repeatedly. This function is terminated when you switch modes or eject the disc
Repeating all tracks
All tracks on the CD are played repeatedly. This function is terminated when you switch modes or eject the disc.
Shuffle
The tracks on the CD are played in random sequence. This also happens when you press [Next] or [Previous]. This function is terminated when you switch modes or eject the disc.
CD Resume
The CD will resume playback from the last played position, even if you have switched modes or switched the device to Standby mode. This function is terminated when you eject the CD. This function is intended for audio books, for example.
13 Bluetooth playback
Mobile phones and other Bluetooth-enabled devices can be connected to the sonoroSTEREO via Bluetooth.
i
Consult the manual of your mobile phone or your Bluetooth-enabled device for help.
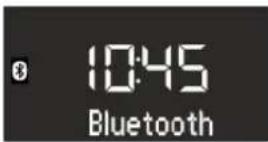
Fig. 42: Setting Bluetooth mode
-
Switch on the sonoroSTEREO.
-
Press the [MODE] button on the front of the device until the device shows the [Bluetooth] symbol on the display. You can also press the [Bluetooth] button on the remote control.
The Bluetooth mode is now active (Fig. 42).
- Connect your mobile phone or your Bluetooth-enabled device to the sonoroSTEREO via Bluetooth.
i
The sonoroSTEREO can store up to 8 Bluetooth-enabled devices and connects automatically to previously configured devices if Bluetooth is activated.
13.1 Connecting and deleting Bluetooth devices

Connecting Bluetooth-enabled devices
Fig. 43: Searching for Bluetooth
- Activate Bluetooth mode.
The display will show [Searching] and the [Bluetooth] symbol will flashing (Fig. 43).
- Connect your mobile phone or your Bluetooth-enabled device to the sonoroSTEREO via Bluetooth.
After connecting, the display will permanently show the [Bluetooth] text.
Deleting connected devices
-
- Press and hold the [Stop] button on the front of the sonoroSTEREO to delete the Bluetooth-enabled device and interrupt the connection.
13.2 Playing music via Bluetooth
Starting playback
- Press the click wheel or the [Play/Pause] button on the front of the sonoroSTEREO or on the remote control to start playback.
Pausing playback
- To pause playback, press the click wheel or the [Play/Pause] button again.
i
The operation of an external device using the buttons on the sonoroSTEREO is possible to a limited extent.
14 AUX playback
Using an RCA cable, you can connect and play additional audio devices via the AUX 1 port. Using a 3.5mm jack plug, you can connect additional audio devices to the sonoroSTEREO via the AUX 2 port.
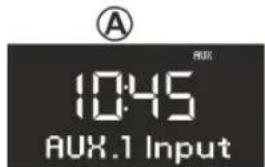

Fig. 44: Activating AUX playback
- Switch on the sonoroSTEREO.
- Plug the RCA cable into the AUX 1 port or the 3.5mm jack plug into the AUX 2 port on the rear of the device.
- Press the [MODE] button until the display shows [AUX.1 Input] or [AUX.2 Input]. You can also press the [AUX] button on the remote control.
The display will show the [AUX.1 Input] or [AUX.2 Input] (Fig. 44). - Switch on the external device and start playback on the external device.
15 USB playback
You can connect additional devices and play music using the USB Charger & Playback port on the rear of the sonoroSTEREO.
i
The MP3 and WMA formats can be played back.
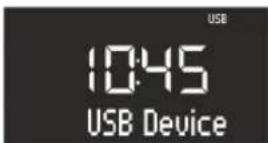
Fig. 45: Setting USB playback
-
Switch on the sonoroSTEREO.
-
Press the [MODE] button until the display shows [USB Device] or press the [USB]-button on the remote control.
The display shows [USB Device] (Fig. 45).
- Connect an external USB device to the sonoroSTEREO.
The display shows [Searching].
- Press the [Play/Pause] button to start playback.
i
You can display the ID3 metadata, if available, by pressing the [USB] button on the remote control. The sequence is:
Track Artist Album Elapsed time
Pause/Stop USB playback
- Press the click wheel or the [Stop] button on the front of the device to pause or stop USB playback.
Selecting MP3 folders
-
Press the [Preset 1] button to select the previous MP3 folder.
-
Press the [Preset 2] button to select the next MP3 folder.
16 Relax Music playback

Fig. 46: Setting Relax Music
-
Switch on the sonoroSTEREO.
-
Press the [MODE] button until [Relax Music] appears on the display. You can also press the [RELAX] button on the remote control.
The Relax Music menu appears on the display (Fig. 46).
- Press one of the preset keys or the [Next] or [Previous] button to select music:
Ocean Surf
Whales
Birds
Rain
WindChimes
Fireplace
17 Demo Music playback
Demo Music can be played in Standby mode to demonstrate the device in a shop, for example.
Activating Demo Music mode
- Press and hold the click wheel for approx. 3 seconds.
The Demo Music mode is activated.
- Press the 1-6 preset keys on the remote control to select a demo track.
The display shows the demo music track.
i
The following buttons are active:
-Play/Pause
-Mute
-Stop
-Next
- Previous
Volume
Exiting Demo Music mode
- Press the [Standby] button or press and hold the click wheel for approx. 3 seconds to exit Demo Music mode.
18 Troubleshooting
Faults can occur on all electrical devices. This does not necessarily mean that the device is defective. Use the information in the following table to see if you can remedy the fault yourself.
| Malfunction Possible cause Elimination | ||
| The device does not switch on Mains | cable is not connected properly | Connect the mains cable properly(see Chapter 7.3 'Connecting the power cord' on page 51). |
| No sound Volume is set to minimum | Increase the volume (see | Chapter 10.2 'Setting the volume' on page 59). |
| Sound is switched off Switch the sound | and on (see Chapter 10.3 'Setting playback to mute' on page 59). | |
| Headphones are connected Remove | the headphones from the socket. | |
| Different mode is selected Set the correct mode (see Chapter 10.1 'Selecting a play-back mode' on page 58). | ||
| CD playback does not start CD format | is not compatible Insert a different CD into the CD slot. | |
| CD is dirty Clean the CD. | ||
| CD is damaged Insert a different CD into the CD slot. | ||
| CD is upside down in the CD slot Ejected the CD and insert it in the CD slot the right way up. | ||
| USB playback does not start USB device | ice is not plugged in Plug the USB device into the port on the rear of the device (see Chapter 15 'USB playback' on page 63). | |
| USB device is not compatible Check if your USB device is compatible with the sonoroSTEREO. | ||
| USB device contains no readable audio files | Check the files on the USB device. | |
| No or faulty Bluetooth connection In | terference caused by other radio transmitters or devices | Increase the distance between the sonoroSTEREO and the TV. |
| Software is not up to date Make sure that the current soft-ware version is installed on your external Bluetooth device. | ||
| Device does not react | Error in the device | Switch the device off and then on again. |
| Poor FM/DAB reception quality | The FM/DAB antenna is not correctly positioned | Change the position of the FM/DAB antenna. |
| Remote control does not work correctly or does not work at all | Distance is too great | Reduce the distance between the remote control and the device. |
sonoro
| Malfunction Possible cause Elimination | ||
| The battery is empty Exchange the b | battery in the re-mote control (see Chapter 7.5 'Preparing the remote control' on page 52). | |
| Interference caused by other radio transmitters or devices | Increase the distance between the source of interference and the sonoroSTEREO. Connect the device to a different socket, so that the source of the interference and the sonoroSTEREO are connected to different branch circuits. | |
| Alarm does not work Alarm is not sw | witched on Switch the alarm on (see | Chapter 9.5 'Switching the alarm function on/off' on page 58). |
| Alarm volume is set to minimum Inc | ease the volume (see Chapter 9.3 'Setting the alarm volume' on page 57). | |
| Headphones are connected Remove | the headphones from the socket. | |
19 Cleaning
NOTICE!
Material damage from improper cleaning!
Only clean the device from the outside using a dry, soft cloth. Never use abrasive or solvent-based cleaning agents as these may damage the surface of the device.
20 Technical Data
| Specification Value | |
| Dimensions (WxDxH) approx. 450 x 262.5 x 153 mm | |
| Weight approx. 6.3 kg | |
| FM reception range 87.5 MHz - 108 MHz | |
| DAB/DAB+ reception range 174.928 MHz - 239.2 MHz | |
| Tuning range (FM) 50 KHz | |
| Mains cable, power Input: 100 - 240 V ~50/60 Hz | |
| Bluetooth Version: 3.0 (EDR) | Profile: AVRCP 1.0, A2DP 1.2Supports Bluetooth aptX® streaming |
| AUX1-IN Port: RCA | Sensitivity: 500 mV |
| AUX2-IN Port: 3,5 mm jack | Sensitivity: 300 mV |
| LINE-OUT Port: RCA | Sensitivity: 2 V/47 kOhm |
| Batterien Lithium battery: 3 V, C | R2032 type (button cell) |
| Laser Class 1 | |
| Ports Headphones, AUX1-IN, AUX | X2-IN, USB, Line-Out(Charge and play USB device) |
| CD Playback formats: Audio CD, MP3 CD, WMA CD, CD-R* and CD-RW*(*Playback depends on the CD and the recording quality) | |
| USB Playback formats: MP3, WM | AOutput: DC 5V, 1ACompatible systems: FAT 16, FAT 32 (no NTFS systems are supported)Maximum capacity of the USB device: 32 GBMaximum supported file size: < 2 GBMaximum supported tracks: 999Supports ID3 tags for track/artist display |
i
Subject to technical modifications!
21 Disposal


Fig. 47: Do not dispose of in household waste
It is not permitted to dispose of devices marked with this symbol with the household waste. They must be taken to a collection and recycling point for electrical and electronic devices. Information and advice regarding the disposal of old devices can be obtained from your local administration, the local waste disposal service provider or the retailer from which you purchased this product. Correct disposal of old devices will protect the environment and your health.
Batteries can contain heavy metals and must be treated as toxic waste. Dispose of all batteries at a municipal collection point or have them disposed of by a specialist company.
22 Symbols
Bluetooth

Bluetooth
Fig. 48: Bluetooth symbol
The Bluetooth® word mark and logos are the property of Bluetooth SIG, Inc. sonoro audio GmbH obtained the necessary licence to use this word mark and the logos.
23 Declaration of Conformity
Declaration of Conformity

Fig. 49: CE marking
Manufacturer: sonoro audio GmbH
We hereby declare that on the basis of its design and construction, the sonoroSTEREO meets the fundamental requirements of the EMC Directive 2004/108/ EC, the Low Voltage Directive 2006/95/EC, the R&TTE Directive 1999/5/EC and the Eco Design Directive 2009/125/EC, including any changes applicable at the time of this declaration.
24 Warranty
When submitting warranty claims, the following is valid - without restricting - your legal rights:
Warranty claims can only be asserted within a period of max. 2 years (1 year in North America and Australia), calculated from the date of purchase.
sonoro audio GmbH shall, at its own discretion, repair or replace the device free of charge any defects caused by material or manufacturing defects within the warranty period.
In case of a complaint, please contact our customer service department. You can find contact details in this manual ( 'Contact data' on page 43) or at www.sonoro-audio.com.
No new warranty period begins following repair or replacement of the device. The warranty period of 2 years (1 year in North America and Australia) from date of purchase remains applicable.
Excluded from the warranty are batteries, damage caused by improper use, normal wear and tear, as well as defects which only minimally affect the value or usability of the device. The warranty also expires for any modifications not made by our authorised service centre.
sonoroSTEREO (SO-310)

Fig. 34: Mémoire de stations FM
[Tune to FM RDS station to set time & date].
i
Bass MAX
Voice MAX
Treble MAX
[Tune to FM RDS station to set time & date] pà displayt.
i

Fig. 23: Indstilling of equalizer
Bass MAX
Voice MAX
Treble MAX
- Tryk pa betjeningsknappen for at bekraefte dit valg.
Pá displayet vises symbolet [EQ] (Fig. 23/1).
Deaktivering af equalizenen
- Drej på betjeningsknappen i untermenuen [Equalizer Effect], indtil [Equalizer Off] vises på displayet.
- Tryk pā betjeningsknappen for at bekraefte dit valg.
Symbolet [EQ] på displayet forsvdner.
8.7 Sound-effekt
11.2.1 Søgnig after DAB-stationer

Fig. 37: Manuel sogning after DAB stationer

Fig. 38: Sletting of inaktive DAB stationer
Med DRC Setting (Dynamic Range Compression) reduces dorsifasciatus, which is a good candidate for the treatment of patients with spinal pain.
Derfindes3forskelligeindstellingsmulighederfor DRC:
DRC High
DRC Low
DRC Off
Foruedsaetning:
Apparatet er i DAB-funktion.
Repeat One
Repeat Disc
Shuffle Disc
CDResume
Bass
Treble
Equalizer Effect
Settings
- Drej pa betjeningsknappen for at vaelge en Funktion.
- Tryk pa betjeningsknappen for at bekraefte dit valg.