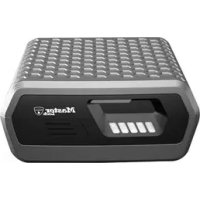
MLD08EB - Safe Master Lock - Free user manual and instructions
Find the device manual for free MLD08EB Master Lock in PDF.
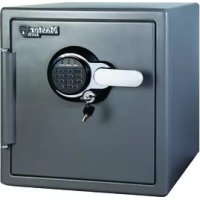
| Product type | Safe |
| Brand | Master Lock |
| Model | MLD08EB |
| Power supply | 4 AA alkaline batteries |
| User code | 4 to 6 digits |
| Fingerprint | Yes (on select models, up to 2 users) |
| Override key | Yes, for opening when batteries are low |
| Auto-lock | Yes, upon closing the lid |
| Bolting | Yes, kit included (2 lag bolts + 2 washers) |
| Material | Steel |
| LED indicators | Green (success), Red (failure, low battery) |
| Delay on error | 2 minutes after 5 failures |
| Code entry timeout | 10 seconds for 4 or 5 digit code |
| Fingerprint capacity | 2 per user (primary and secondary) |
| Reset | Button behind battery compartment |
| Maintenance | Replace batteries with 4 AA alkalines if red LED blinks every 10 seconds |
| Troubleshooting | Red blinking LED: incorrect code or low batteries |
Frequently Asked Questions - MLD08EB Master Lock
User questions about MLD08EB Master Lock
0 question about this device. Answer the ones you know or ask your own.
Ask a new question about this device
Download the instructions for your Safe in PDF format for free! Find your manual MLD08EB - Master Lock and take your electronic device back in hand. On this page are published all the documents necessary for the use of your device. MLD08EB by Master Lock.
USER MANUAL MLD08EB Master Lock
Quick Access Compact Safe

natural_image
Exterior view of a black Master Lock device (no visible text or symbols on body)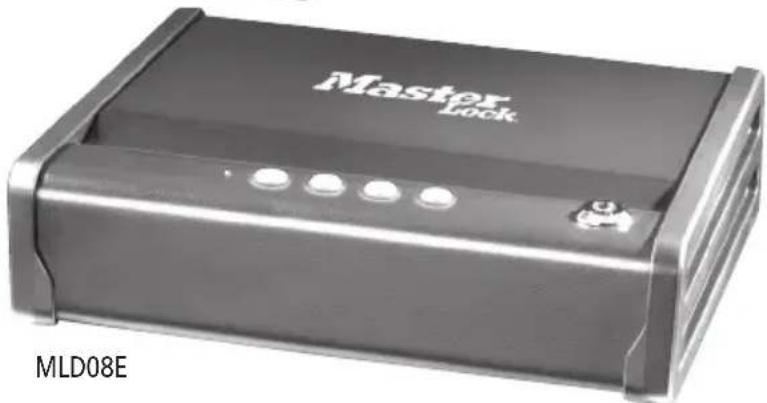
natural_image
Exterior view of a black Master Lock device (no visible text or symbols on body)GB INSTRUCTIONS FOR USE 2
FR MODE D'EMPLOI....8
DE GEBRAUCHSANWEISUNG......14
NL GEBRUIKSAANWIJZINGEN....20
ES INSTRUCCIONES DE USO......26
IT ISTRUZIONI PER L'USO 32
PT INSTRUÇÕES DE UTILIZAÇÃO .....38
GR OΔΗΓΙΕΣ ΧΡΗΣΗΣ 44
NW BRUKSANVISNING....50
DK BRUGSANVISNING 56
FN KÄYTTÖOHJE....62
SW ANVÄNDNINGSINSTRUKTIONER ......68
PL INSTRUKCJA OBSŁUGI....74
HU HASZNÁLATI ÚTMUTATÓ .....80
RO MOD DE UTILIZARE....86
CZ NÁVOD K POUŽITÍ .....92
RU ИНСТРУКЦИИ ПО ЭКСПЛУАТАЦИИ .....98
TK KULLANIM TALİMATLARI....104
JP 使用説明書....110
Master Lock.
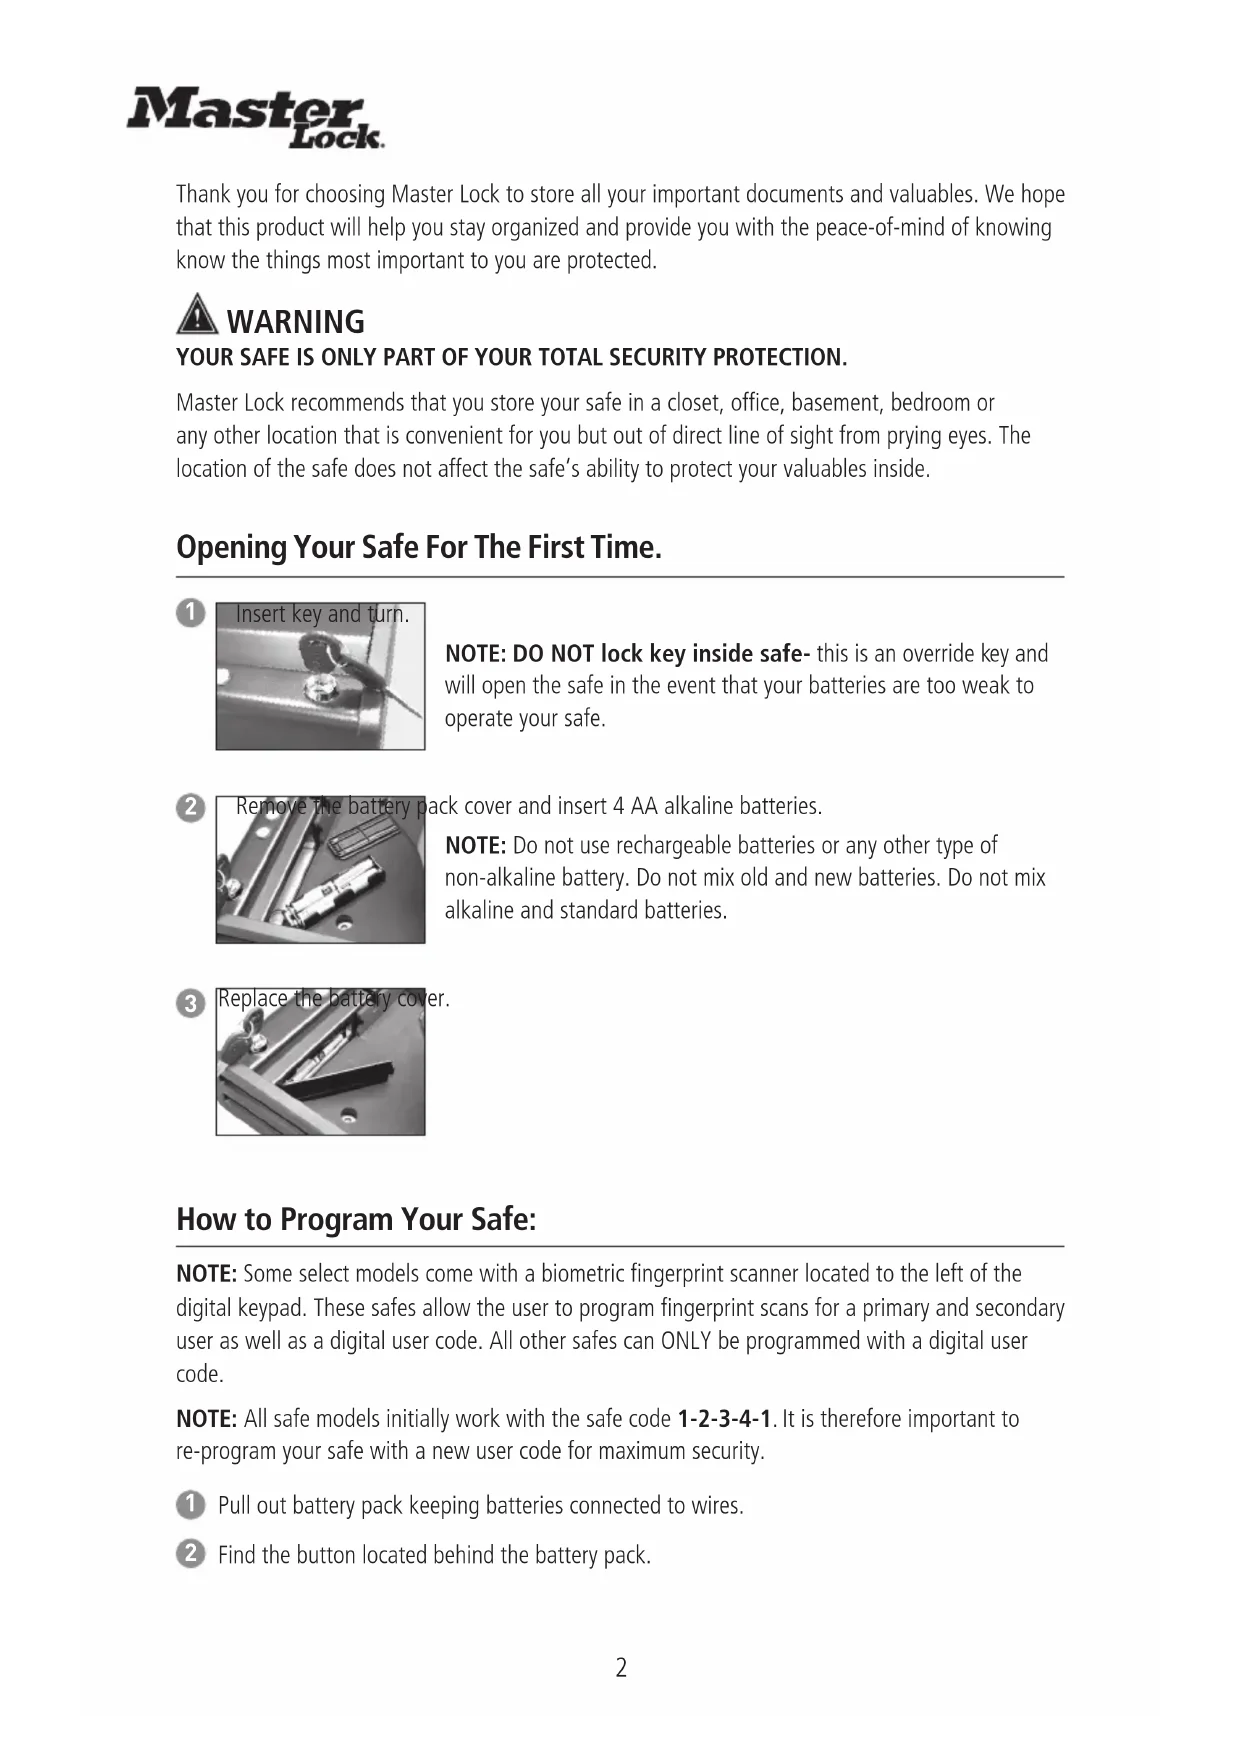
Thank you for choosing Master Lock to store all your important documents and valuables. We hope that this product will help you stay organized and provide you with the peace-of-mind of knowing know the things most important to you are protected.

WARNING
YOUR SAFE IS ONLY PART OF YOUR TOTAL SECURITY PROTECTION.
Master Lock recommends that you store your safe in a closet, office, basement, bedroom or any other location that is convenient for you but out of direct line of sight from prying eyes. The location of the safe does not affect the safe's ability to protect your valuables inside.
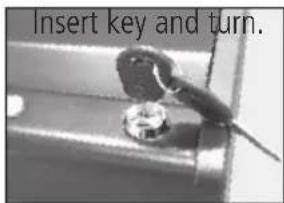
Opening Your Safe For The First Time.
1
text_image
Insert key and turn.NOTE: DO NOT lock key inside safe- this is an override key and will open the safe in the event that your batteries are too weak to operate your safe.
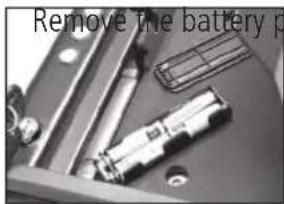
2
natural_image
Close-up of mechanical components with no visible text or symbolsck cover and insert 4 AA alkaline batteries.
NOTE: Do not use rechargeable batteries or any other type of non-alkaline battery. Do not mix old and new batteries. Do not mix alkaline and standard batteries.
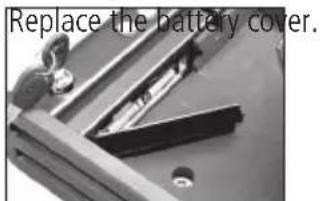
3
text_image
Replace the battery cover.How to Program Your Safe:
NOTE: Some select models come with a biometric fingerprint scanner located to the left of the digital keypad. These safes allow the user to program fingerprint scans for a primary and secondary user as well as a digital user code. All other safes can ONLY be programmed with a digital user code.
NOTE: All safe models initially work with the safe code 1-2-3-4-1. It is therefore important to re-program your safe with a new user code for maximum security.
1 Pull out battery pack keeping batteries connected to wires.
2 Find the button located behind the battery pack.
With a Digital User Code:
1
text_image
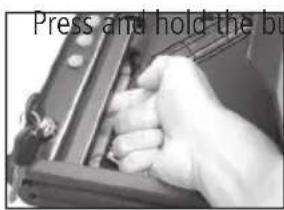
Press and hold the buton until the keypad flashes 3 times. The LEDs will remain on to indicate it is ready to accept a new user code or fingerprint.
2 Enter a user code that is four, five or six digits long. A successful programming of the user code is indicated when the LED light flashes green three times.
NOTE: If using a 4 or 5 number combination, there will be a time delay before code is accepted.
NOTE: Write down your user code, and keep it in a secure location.
-or-
With a Primary User's Fingerprints (select models only- 2 fingerprints can be programmed per user)
1
text_image
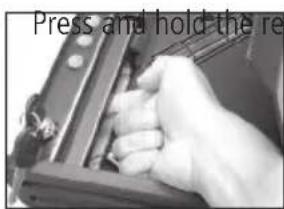
Press and hold the reet button until the keypad flashes 3 times. The LEDs will remain on to indicate it is ready to accept a new primary fingerprint.
2
text_image
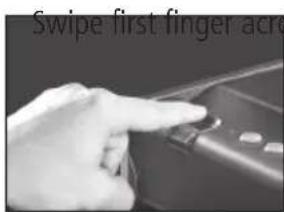
Swipe first finger acress fingerprint scanner. You will need to swipe this finger multiple times. The LED light will flash green once for each valid scan.
3 When enough valid scans have been done (between 5-10 scans) the LED light will flash green three times. There is a slight delay before the fingerprints are enrolled and the LED flashes green 3 times.
4 After enrolling your first finger, immediately swipe your second finger across the fingerprint scanner. You will need to swipe this finger multiple times. The LED light will flash green once for each valid scan.
5 When enough valid scans have been done (between 5-10 scans) the LED light will flash green three times.
-or-
With a Secondary User's Fingerprints
(select models only- 2 fingerprints can be programmed per user)
1 Press and hold the reset button until the keypad flashes 3 times.
2 Press and hold the reset button again until the keypad flashes 3

times. The LEDs remain on to indicate is now ready to accept a new secondary user fingerprint.
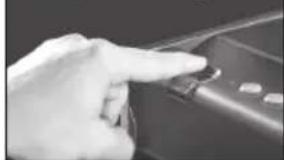
3 Swipe first finger across fingerprint scanner. You will need to swipe
natural_image
Close-up of a hand pressing a button on a device (no visible text or symbols)this finger multiple times. The LED light will flash green once for each valid scan.
4 When enough valid scans have been done (between 5-10 scans) the LED light will flash green three times. There is a slight delay before the fingerprints are enrolled and the LED flashes green 3 times.
5 After enrolling your first finger, immediately swipe your second finger across the fingerprint scanner. You will need to swipe this finger multiple times. The LED light will flash green once for each valid scan.
6 When enough valid scans have been done (between 5-10 scans) the LED light will flash green three times.
To Remove a Primary User's Fingerprints
1 Press and hold the button until the keypad flashes 3 times. The LEDs will remain on to indicate it is ready.
2 Swipe a finger across the fingerprint scanner only once, then wait 10 seconds. The red LED will flash 3 times to indicate the primary user's fingerprints have been erased.
To Remove a Secondary User's Fingerprints
1 Press and hold the button until the keypad flashes 3 times.
2 Press and hold the button until the keypad flashes 3 times. The LEDs will remain on to indicate it is ready.
3 Swipe a finger across the fingerprint scanner only once, then wait 10 seconds. The red LED will flash 3 times to indicate the primary user's fingerprints have been erased.
NOTE:
- The user code or fingerprint programmed will not be erased when the battery power is removed.
- If you program a four or five digit user code, you will need to wait 10 seconds until your code is accepted. This is only valid during the setup of your safe. If you program a six digit user code, then the light will immediately turn green.
- If the red LED flashes 3 times, programming has failed.
- For Select Models with Fingerprint Scanner: Up to two fingerprints can be programmed for two users.
- When you are finished programming your safe, replace the battery pack cover.

WARNING
TEST YOUR CODE SEVERAL TIMES BEFORE PUTTING VALUABLES INSIDE YOUR SAFE.
Locking Your Safe
1 Close the lid. Once the lid is closed the safe is securely locked.
NOTE: The override key needs to be in the locked position. Remove and store in a secure location.
Unlocking Your Safe
1 Press any button once to bring the safe out of standby mode:
2 Put in your programmed code
-or-
1 Use the override key to gain access to your safe
-or-
For select models with fingerprint scanner:
1 Press any button once or touch the fingerprint scanner to bring the safe out of standby mode.
2 Swipe a programmed finger.
Bolting Down Your Safe
Bolt down kit contents:
2 Lag screws
2 Washers
Tools needed to bolt safe to a surface:
Drill
Wrench


text_image
Select a suitable locatioIn for your safe. Set the safe in place, and use the pre-drilled holes provided on the bottom of the safe to mark the location of the holes to be drilled in the surface.

WARNING
NOTE: This product is intended to be mounted with a horizontal orientation.

Move the safe while you drill the marked holes in the surface.
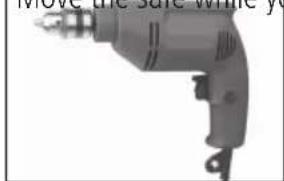
text_image
Move the safe while you
Drill the holes in the surface using the appropriate diameter and depth for the type of hardware and the mounting surface being used.

A Replace the safe over the newly created holes.
B Install the screws and washers as required.

WARNING
MASTER LOCK IS NOT RESPONSIBLE FOR COSTS INCURRED IF THE UNIT IS TO BE REPLACED.
BOLTING/UNBOLTING THE UNIT IS AT A CONSUMER'S EXPENSE AND DISCRETION
Troubleshooting Table
| The Problem: Why It Is Happening: The Solution: | ||
| Red LED blinks three times | Incorrect code or fingerprint has been entered | Verify the code and re-enter or reprogram |
| Programming error | ||
| Red LED slowly blinks for two minutes | An incorrect code or fingerprint has been entered five times | Wait for two minutes or use the override key to access the safe |
| Red LED blinks once every ten seconds | Battery power is low Replace with four AA alkaline batteries (do not use rechargeable batteries or any other type of non-alkaline battery) | |
| Cannot open the lid after entering the code | Batteries have reached end of life | Open using override key. Replace with four AA alkaline batteries (do not use rechargeable batteries or any other type of non-alkaline battery) |
| After code entry, lid does not open, backlights stay on, then turn off, red LED blinks three times | Incorrect code entry Re-enter the code with distinct key presses | |
| Lid does not open when using override key | Gas strut has stopped working | Use a magnet to open the lid. Turn unit upside down for lid to open. NOTE: Use caution as contents may fall out. |
| Red LED blinks five times System error: power failure Replace with four AA alkaline batteries (do not use rechargeable batteries or any other type of non-alkaline battery) | ||
Customer Service

: masterlock.eu/safes
natural_image
Close-up of mechanical components including a cylindrical tool and a bracket (no visible text or symbols)natural_image
Close-up of a mechanical component with a V-shaped opening and mounting holes (no visible text or symbols)natural_image
Close-up of mechanical components with no visible text or symbolsng en plaats 4 AA alkaline-batterijen.
natural_image
Close-up of mechanical components with no visible text or symbols3
natural_image
Close-up of a mechanical component with a metallic bracket and circular holes (no visible text or symbols)natural_image
Close-up of a handheld electric drill bit with visible trigger and mounting bracket (no text or symbols)natural_image
Close-up of mechanical components including a bracket and a tool, with no visible text or symbols.natural_image
Close-up of a mechanical power drill with no visible text or symbols3
natural_image
Close-up of a hand pressing a button on a car dashboard (no visible text or symbols)natural_image
Close-up of a handheld electric drill bit with no visible text or symbols
natural_image
Close-up of mechanical components including a metallic connector and a cylindrical part (no visible text or symbols)natural_image
Close-up of a handheld electric drill bit with visible trigger and mounting bracket (no text or symbols)3
natural_image
Close-up of a mechanical component with a metallic knob and a small circular feature, labeled 'Sett inn nøkkelen og' (no other text or symbols visible)vri.
natural_image
Close-up of electronic components including a battery holder and circuit board (no visible text or symbols)natural_image
Close-up of a mechanical component with no visible text or symbolsslet igjen.
natural_image
Close-up of a hand holding a small electronic device with visible ports and wiring (no text or symbols)natural_image
Close-up of a hand holding a small electronic device component (no visible text or symbols)natural_image
Close-up of a hand pressing a button on a car (no visible text or symbols)fingeren over avleseren flere ganger. LED-lyset vil blinke grønt for hver gyldige skanning.
natural_image
Close-up of a mechanical power drill with visible blades and handle (no text or symbols)
natural_image
Close-up of a mechanical component with a metallic bracket and mounting holes (no visible text or symbols)natural_image
Close-up of a handheld electric drill bit with visible blade and mounting bracket (no text or symbols)
natural_image
Close-up of mechanical components including a bracket, screwdriver, and a car (no visible text or symbols)natural_image
Black-and-white photo of a person sitting on a bench with an open bench and wheels, no visible text or symbols.natural_image
Close-up of electronic components including a battery pack and circuit board (no visible text or symbols)natural_image
Close-up of a mechanical component with metallic parts and a small animal, labeled 'Sätt tillbaka batternackets' (no other text or symbols visible)lucka.
natural_image
Close-up of a hand holding a mechanical component, no visible text or symbolsnatural_image
Close-up of a hand pressing a button on a device (no visible text or symbols)natural_image
Illustration of a handheld electric drill (no text or symbols visible)natural_image
Close-up of mechanical components with no visible text or symbolsnatural_image
Close-up of a handheld electric drill (no visible text or symbols)3
natural_image
Close-up of mechanical components with no visible text or symbolsnatural_image
Close-up of a hand pressing a button on a car (no visible text or symbols)natural_image
Close-up of a hand pressing a button on a dark surface (no visible text or symbols)natural_image
Black-and-white photo of a dog sitting on a wooden bench with metal frames, no visible text or symbols.entului bateriilor.