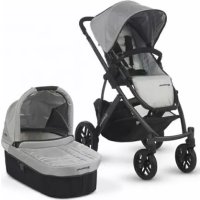
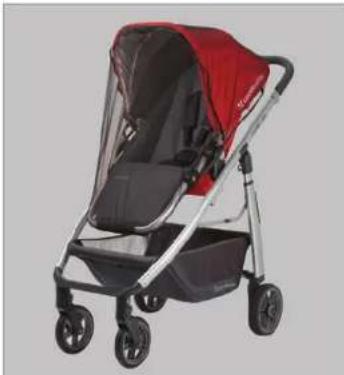
Cruz - Stroller UPPAbaby - Free user manual and instructions
Find the device manual for free Cruz UPPAbaby in PDF.
User questions about Cruz UPPAbaby
0 question about this device. Answer the ones you know or ask your own.
Ask a new question about this device
Download the instructions for your Stroller in PDF format for free! Find your manual Cruz - UPPAbaby and take your electronic device back in hand. On this page are published all the documents necessary for the use of your device. Cruz by UPPAbaby.
USER MANUAL Cruz UPPAbaby
Warnings + General Safety Information 3
Cleaning + General Maintenance 5
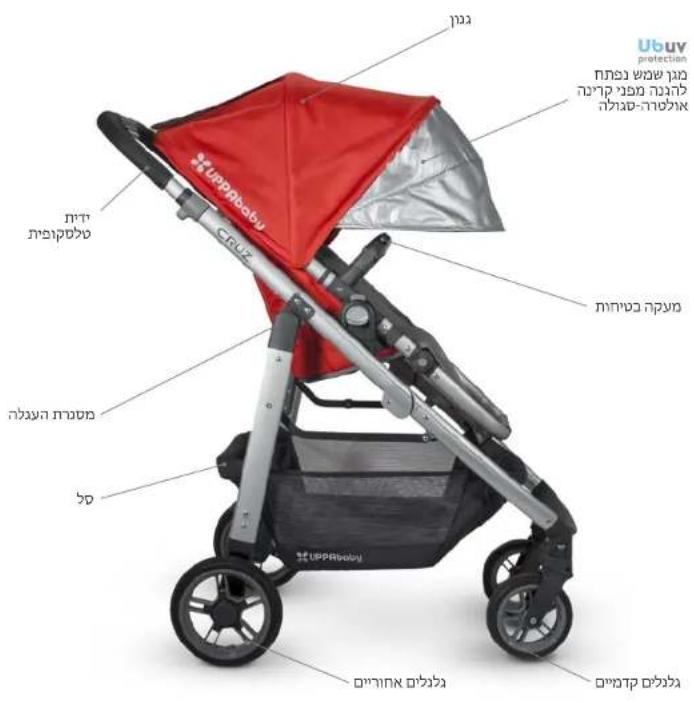
Parts List 6
Pushchair Assembly 7
Pushchair Operation 9
Car Seat Adapter Operation 16
Limited Warranty 17
Please read these instructions carefully prior to assembly and use.
ES TABLATE CONTENIDOS
- A CHILD'S SAFETY IS YOUR RESPONSIBILITY.
NEVER leave your child unattended. - Ensure that all the locking devices are engaged before use.
- Check that the pram body or seat unit or car seat attachment devices are correctly engaged before use.
This seat unit is not suitable for children under 6 months. - The UPPAbaby CRUZ is suitable from 6 months and designed to accommodate a child up to a weight of 15kg (33 lbs) and a height of 101cm (40^ ) . Excessive weight may cause a hazardous unstable condition to exist. The product will become unstable if the manufacturer's recommended load is exceeded.
- Any load attached to the handle affects the stability of the pram/pushchair.
- Unit may become unstable if the manufacturer's recommended load is exceeded, or if a parcel bag, accessory, or rack other than that recommended by the manufacturer is used or hung from the unit.
Maximum weight for the storage basket is 11.3kg (25 lbs). - This pushchair is intended to be used with one child only, unless equipped with UPPAbaby accessories.
- Accessories other than those approved by UPPAbaby should not be used.
Always use the restraint system.
Always use the crotch strap in combination with the waist belt and shoulder belts. - To avoid injury ensure that your child is kept away when folding and unfolding this product.
- DO NOT let your child play with this product.
The canopy for the seat is not intended to retain the child. - The brake must be locked while taking the child in or out of the pushchair, and when parked.
- Bumper bar must be attached at all times.
DO NOT lift the stroller by bumper bar as it may disengage.
WARNING GENERAL SAFETY INFORMATION
WARNING
- Children and adults should be clear of moving parts while making pushchair adjustments. Damage to fingers or extremities may occur when opening or closing the pushchair chassis.
NEVER leave child in the pushchair while ascending or descending stairs, or using an escalator.
Children should not be left unattended in the pushchair with rain shield fitted. - The stability of the pushchair will be impaired in high winds with the rain shield fitted and should be steadied by an adult at all times.
- Rain shield must be removed when indoors and in hot weather to prevent overheating and possible risk of suffocation.
- Pram, pushchair and buggy comply with standard EN 1888:2012.
All fabric complies with Furniture and Furnishings Fire Safety Regulations. - This product is not suitable for running or skating.
WARNING CARELESSNESS CAUSES FIRE
- Be aware of the risk of open fire and other sources of strong heat, such as electric bar fires, gas fires, etc. in the near vicinity of the carrycot.
- All fillings and composites have been tested to ensure compliance with the relevant ignitability test.
- All covers and fillings have been tested to ensure that they are cigarette resistant.
- All covers have been tested to ensure they are match resistant.
- Tested to ensure compliance with the Furniture and Furnishings (Fire) (Safety) Regulations.
MAXI-COSI INFANT CAR SEAT ADAPTER WARNINGS:
WARNING
- Weight limitations: recommended only for infants within the height and weight limits of infant car seat models specified in this manual.
Always use infant car seat restraint system as recommended by manufacturer. - Intended for use with UPPAbaby CRUZ pushchair only.
CLEANING + GENERAL MAINTENANCE
CLEANING:
Clean chassis with a damp cloth and a mild detergent; dry thoroughly. DO NOT use abrasives.
- If the pushchair chassis parts have been exposed to salt water we recommend that they be rinsed with fresh (tap) water as soon as possible to avoid corrosion. Always dry chassis if wet.
All fabrics are removable.
To extend the life of your CRUZ's fabric, keep it clean and do not leave it in direct sunlight for long periods of time.
DO NOT fold or store the CRUZ if it is damp or wet, nor store in a damp environment.
MAINTENANCE AND REPAIR:
- This pushchair requires regular user maintenance. Regularly check all connecting hardware (rivets, screws, etc.) for tightness and security.
- Inspect your CRU7 periodically. Seek prompt repairs, replacing worn or broken parts as needed. Check all safety devices, locks and harnesses for correct and secure operation. Never continue to use a product that is structurally unsound.
- Only UPPAbaby replacement parts should be used. It may be unsafe to use parts supplied by another manufacturer.
Do not make any alterations or modifications to the pushchair with products not supplied by the manufacturer as this may cause instability or structural damage not covered under warranty. - Contact Customer Service with any repair questions.
CLEANING ALL REMOVABLE FABRICS

Spot clean or hand wash gently in cold water with mild detergent.

Dry flat and away from direct sunlight before re-use or storage.
DO NOT bleach, iron or dry clean.
UPPA baby reserves the right to make design changes and improvements to any of our products as part of our commitment to innovation.
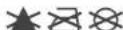
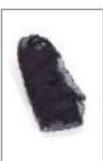
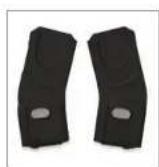
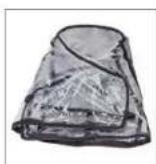
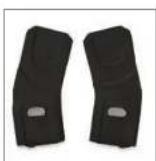
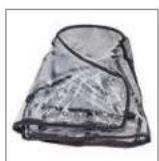
PARTS LIST
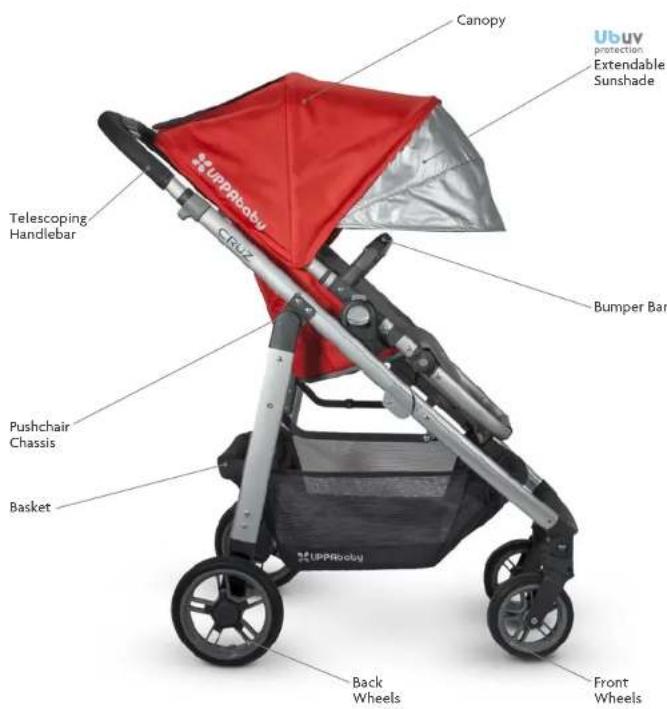
Maxi-Cosi Adapter
Rain Cover Insect Net
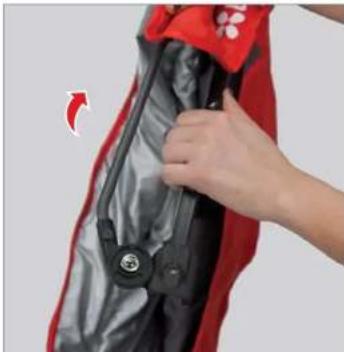
PUSHCHAIR ASSEMBLY
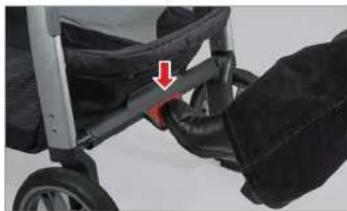
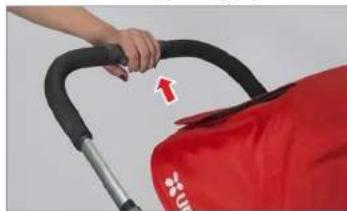
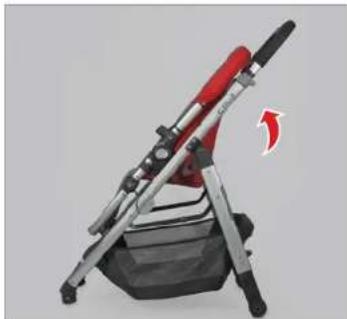
UNFOLDING THE PUSHCHAIR
STEP1: Pull latch back with thumb to release locking mechanism.

STEP 2: Pull handle upward until chassis locks open as shown.
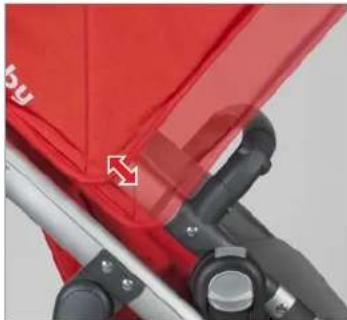
CANOPY INSTALLATION AND OPERATION
To Attach Canopy: Snap each side of canopy attachment to seat chassis above plastic ring.

To Adjust Canopy Height: Slide canopy attachment simultaneously up or down the seat chassis, in between two plastic rings, for desired height.
PUSHCHAIR ASSEMBLY
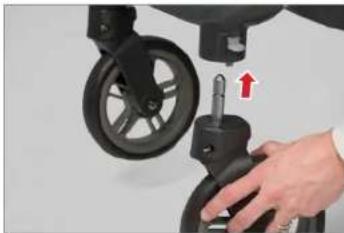
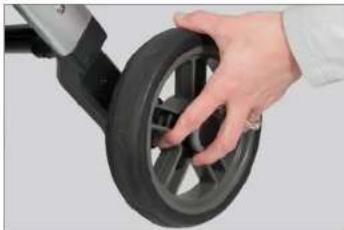
INSTALLING FRONT WHEELS
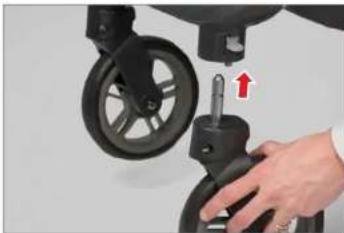
To Install Front Wheels: Slide wheel post into housing until it locks into place.
To Remove Front Wheels: Push button located on the inside of the front fork and slide wheel off.
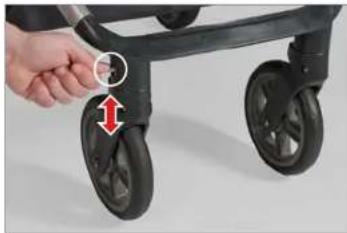
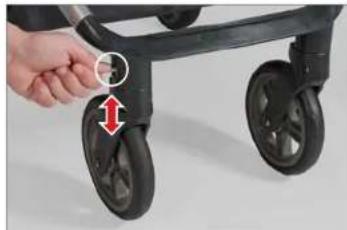
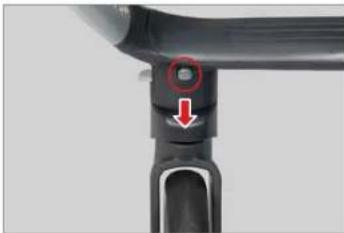
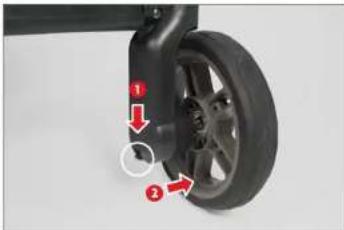
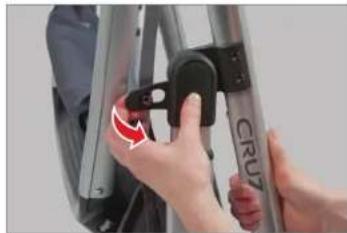
INSTALLING BACK WHEELS

To Install Back Wheels: Slide wheel post into housing until it locks into place.
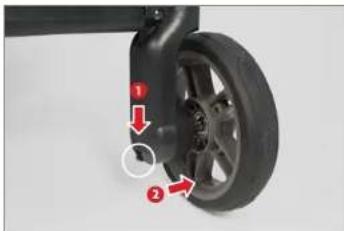
To Remove Back Wheels: Full tab down on bottom of fork 1 and slide wheel out 2
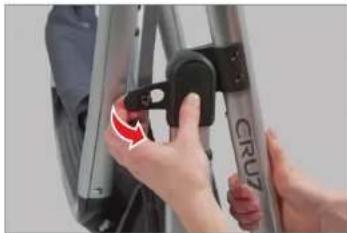
ATTACHING/REMOVING THE BUMPER BAR
STEP 1: Insert metal posts into bumper bar attachment slots found on both sides of seat.
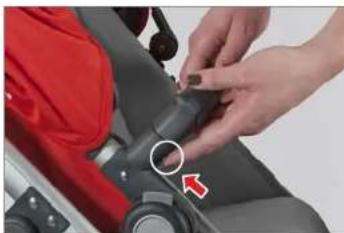
STEP 2: To remove, press button at bottom of plastic housing and lift bumper bar out.
PUSHCHAIR OPERATION
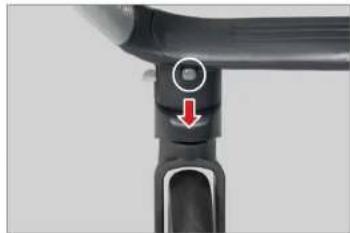
SETTING THE SWIVEL/LOCKING SYSTEM
To Lock Wheel Swivel: Push button down to lock. Lock wheel: swivel if traveling through rough terrain or sand.
To Unlock Wheel Swivel: Slide button up.
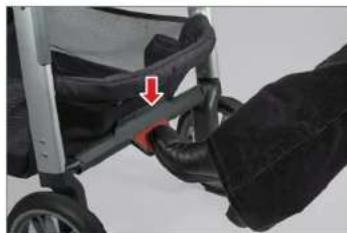
SETTING THE BRAKE
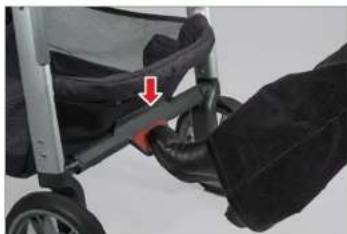
To Lock Brake: Brake is located in center of rear crossbar. Push down pedal with foot to lock.
To Release Brake: Either push front edge of pedal forward or use foot to lift pedal up.
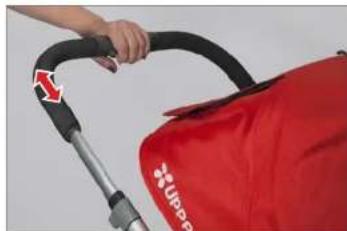
ADJUSTING HANDLE HEIGHT + LEG REST
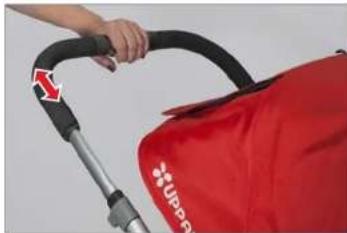
To Adjust Handle: Squeeze button at top and slide handle to one of three desired positions suited to user height and comfort.
To Adjust Leg Rest: Simultaneously push buttons on sides of leg rest and rotate to desired position.
PUSHCHAIR OPERATION
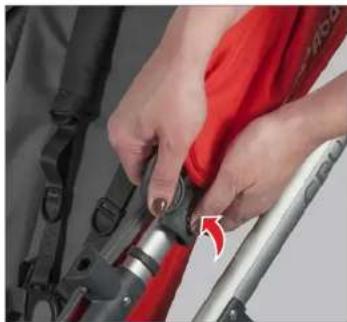
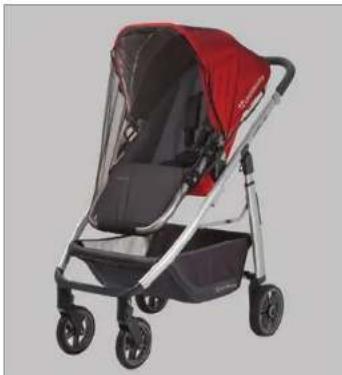
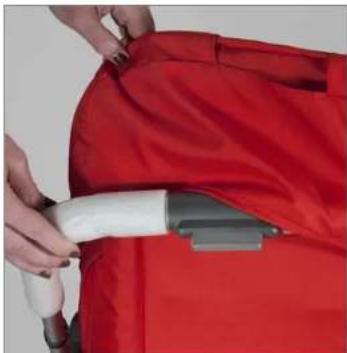
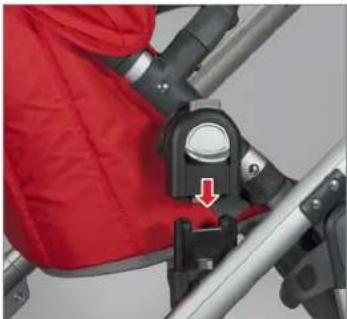
OPERATING THE SEAT
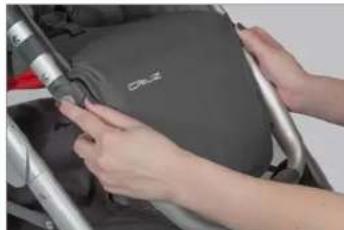
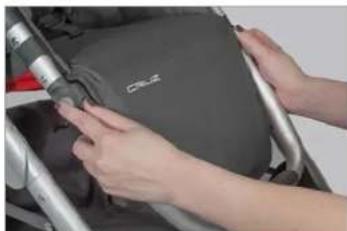
To Attach Seat: Lower seat onto chassis in forward or reverse position and press down until it clicks into place. Pull up on seat to ensure it is locked to chassis.
To Remove Seat: Simultaneously push down both release buttons 1 and lift seat from chassis 2.
To Recline Seat: Engage button on seat back and tilt seat to desired position. Release button to lock in one of five preset positions.
NOTE: DO NOT use upright position for infants less than six months old. Use the most reclined position and gradually reposition seat more upright as child is able to support his or her head without assistance.
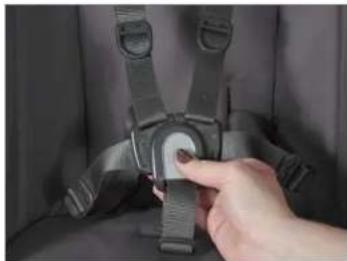
PUSHCHAIR OPERATION
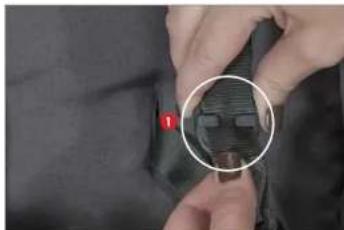
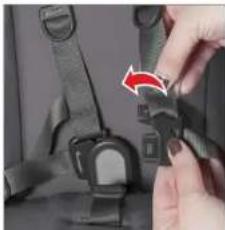
To Lock the Harness: Slide belt ends into center lock housing until it clicks together.
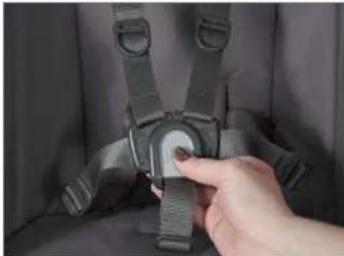
To Unlock the Harness: Depress grey button at center and pull apart.
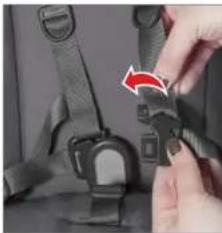
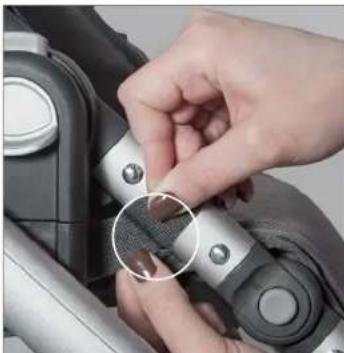
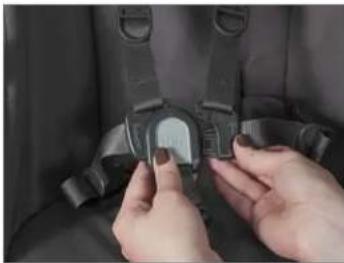
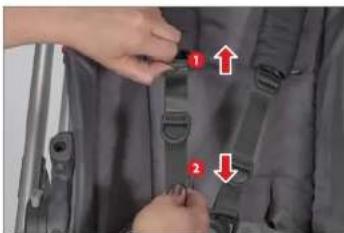
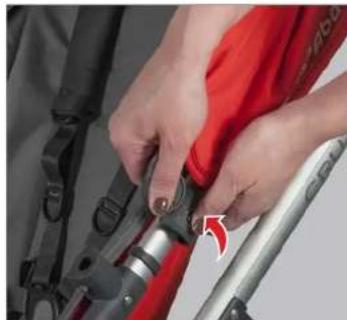
ADJUSTING THE HARNESS STRAP LENGTH
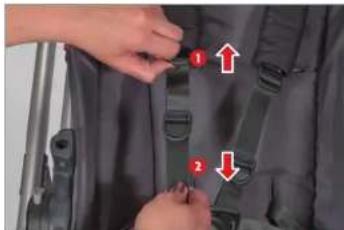
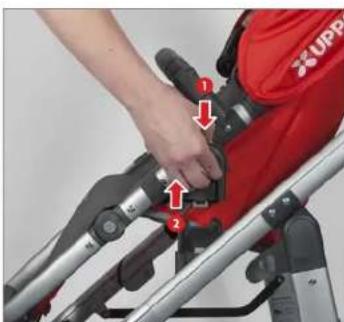
To Loosen Harness Strap: Pull up on ladder lock 1 and pull down on webbing 2
To Tighten Harness Strap: Pull down on slip ring.

For a Tighter Fit: Pinch webbing and release from back of slip ring. Pull strap down until snug 2
PUSHCHAIR OPERATION
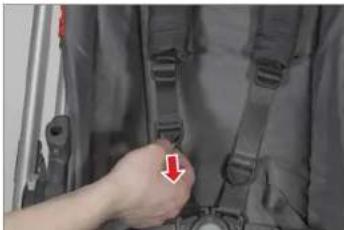
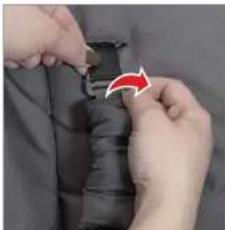
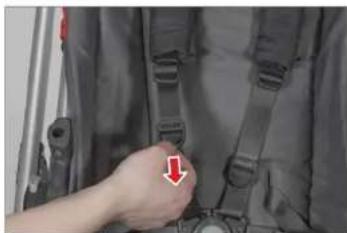
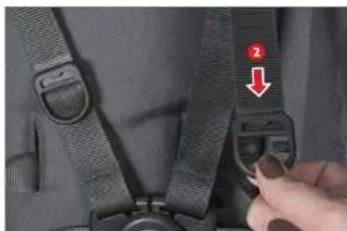
ADJUSTING SHOULDER HARNESS HEIGHT
STEP1: Slide harness webbing through channel to separate fork buckle and webbing.
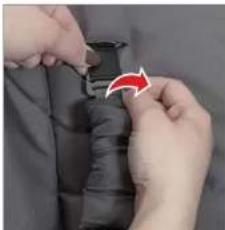
STEP 2: Delach grey adjustment clip from harness attachment loop.
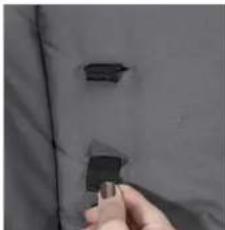
STEP 3: Reattach clip to the desired harness loop.
NOTE: Use loop location above child's shoulder line, or closest to child's shoulder.
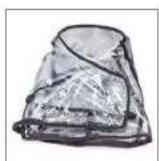
CORRECT ATTACHMENT OF ACCESSORIES
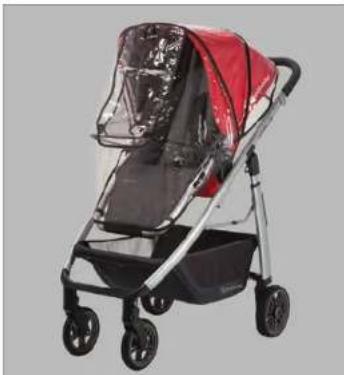
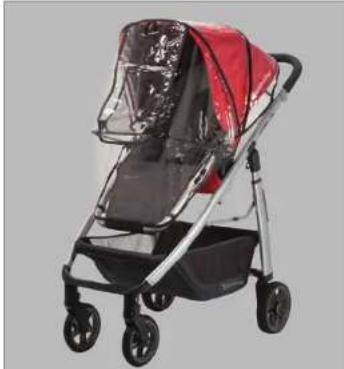
Proper Installation of Rain Cover
Proper Installation of Insect Net
PUSHCHAIR OPERATION
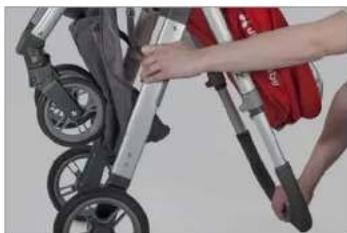
FOLDING THE PUSHCHAIR
NOTE: When folding chassis with seat attached, seat must be in forward facing and upright position.
STEP1: Activate brake to prevent pushchair from rolling forward while folding.
STEP2: Engage button on top of handle bar and extend to highest position.
NOTE: Handle must be in highest position for pushchair to stand when folded.
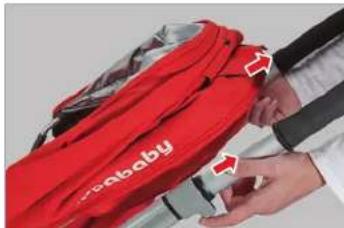
STEP 3: Place index fingers on both slide release triggers and slide upward until chassis begins to fold.
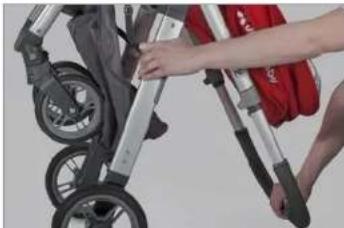
STEP4: Once pushchair begins to fold, hold handle bar with right hand and reposition left hand onto back leg.
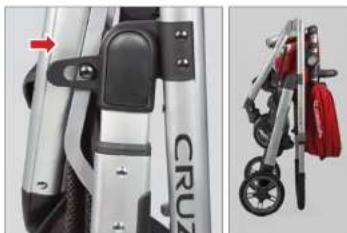
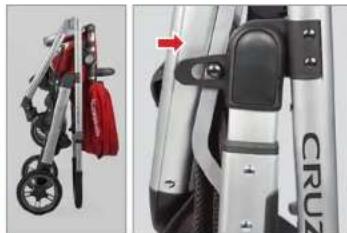
STEP 5: Continue to fold pushchair until latch on left side has engaged. Pushchair will stand when folded.

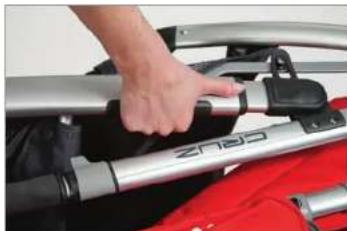
STEP 6: Use carry grip for easy transport.
PUSHCHAIR OPERATION
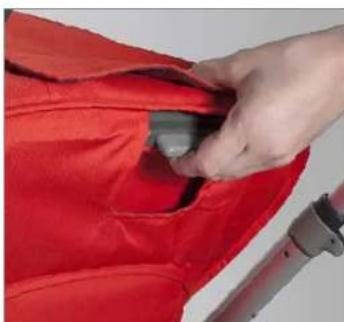
REMOVING FABRICS FROM SEAT
STEP1: Unfasten elastic loops from lower footrest.
STEP 2: Unzip retainer pocket located on underside of seat.
STEP3: Ursnap nylon webbing from frame.
STEP 4: Remove seat fabric from chassis. Reverse process when putting fabric back on.
PUSHCHAIR OPERATION
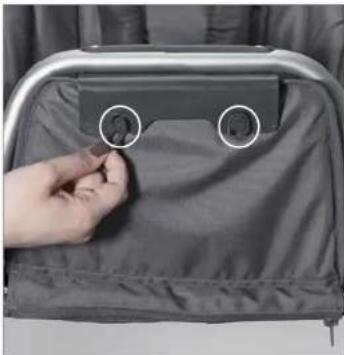
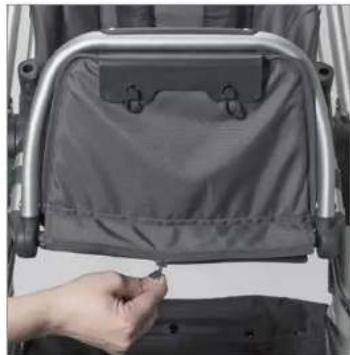
REMOVING FABRICS FROM CANOPY

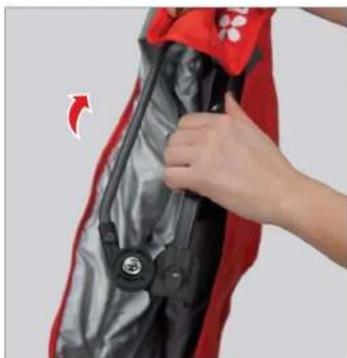
STEP1:Unscrew hinge on one side of canopy.

STEP 2: Remove hinge from aluminum chassis.
STEP 3: Remove plastic chassis from hinge by sliding it upward.
STEP4: Remove chassis from canopy by sliding fabric off of both aluminum and plastic chassis.
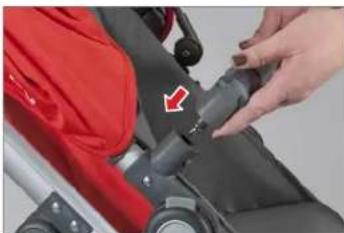
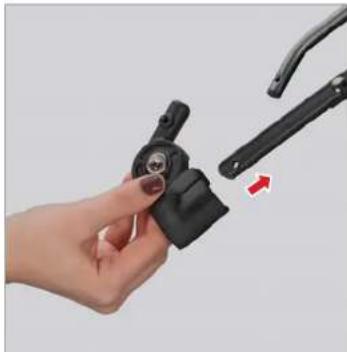
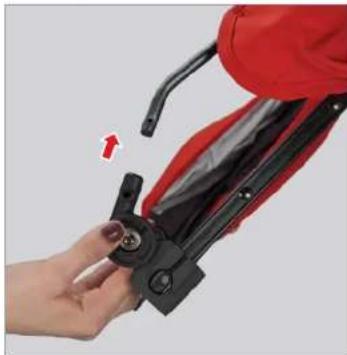
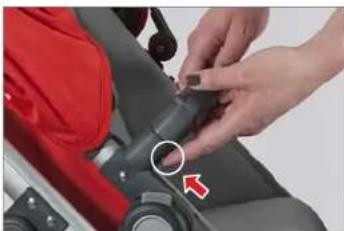
NOTE: Prior to fitting adapter to CRUZ chassis, engage brake on CRUZ and remove seat from chassis.
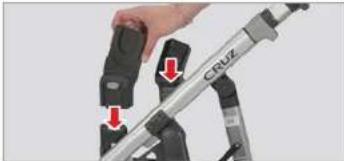
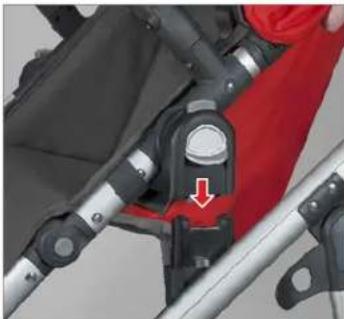
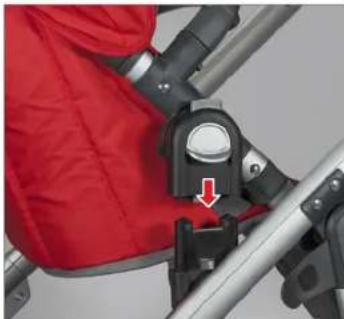
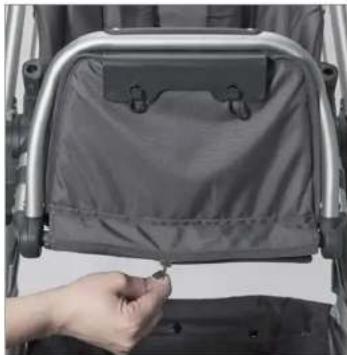
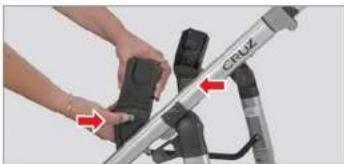
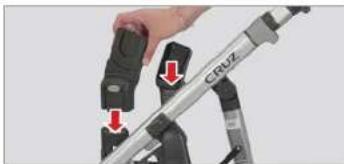
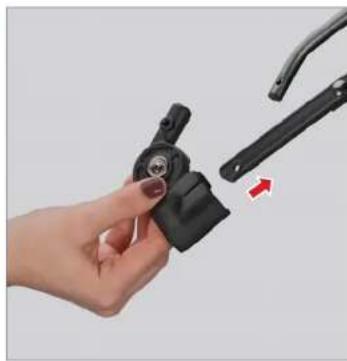
TO ATTACH: Place adapters (logo facing out) onto seat attachments and press until you hear a click.
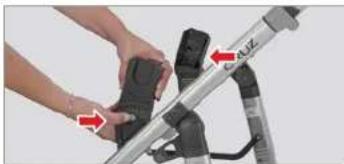
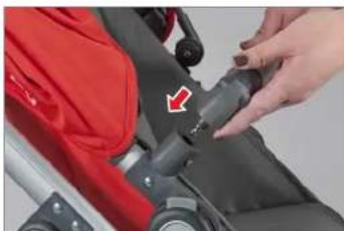
TO REMOVE: Press button to lift from pushchair frame.
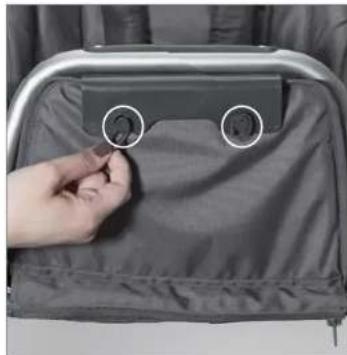
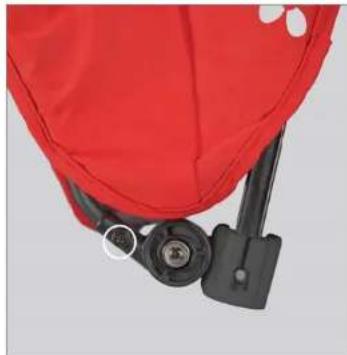
NOTE: The adapters are left and right specific.
Match the colored dot to the coordinating color dot on the pushchair chassis.
FITTING MAXI-COSI SEAT TO ADAPTERS
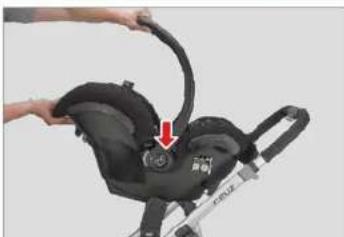
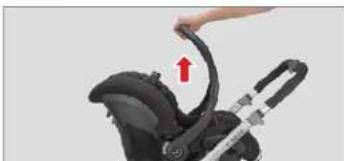
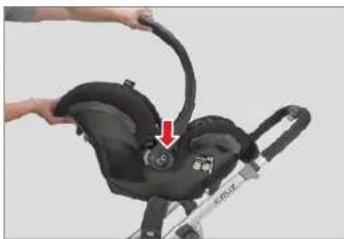
STEP 1: With infant car seat facing pushchair handle, position above chassis aligning base of car seat handle with adapters.
STEP 2: Push car seat onto adapter posts.
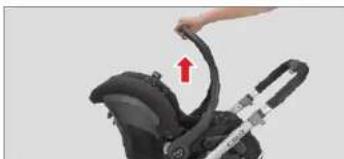
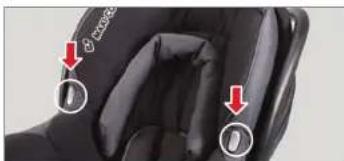
STEP 3: Make sure side lock tabs are engaged. Lift up on car seat handle to check attachment.
TO REMOVE: Simultaneously push release triggers found on car seat located by inside of carry handle.
Compatible with the following Maxi-Cosi infant car seats:
Citi, Cabrio, CabrioFix and Mico
LIMITED WARRANTY
Your UPPAbaby pushchair is warranted to be free from any manufacturing defects for a period of 2 years from the date of purchase under normal use and in compliance with the operating instructions.
This warranty cannot be extended and an extended warranty cannot be purchased.
This warranty is not transferable and extends only to the original retail purchaser and is only valid when supplied with proof of purchase. PLEASE RETAIN PROOF OF PURCHASE FOR THIS LIMITED WARRANTY.
The warranty is valid only in the original country of purchase. This warranty is subject to the conditions set forth by country in which the items were purchased. Conditions may vary. UPPAbaby will not ship replacement or repair parts out of the country of purchase.
UPPAbaby will provide replacement parts or conduct repairs as determined fitting by the company. UPPAbaby reserves the right to exchange item with a replacement part. Some parts may be replaced with newer model parts as the pushchair is improved over time.
Please NOTE that a repair issue will NOT be covered by this warranty if:
- The issue is caused by misuse or poor maintenance. Please refer to this instruction booklet for guidance on pushchair use and maintenance.
- Damage is caused by improper installation of UPPA baby parts and/or accessories. Please refer to this instruction booklet for guidance on pushchair assembly and use.
- Damage is corrosion, mold or rust caused by lack of maintenance or service.
- Damage is due to general wear and tear, which is the result of everyday use or negligence.
- Damage is caused by sun intensity, sweat, detergents, damp storage or frequent washings.
Repairs or modifications are carried out by a third party. - Pushchair is purchased from an unauthorized retailer. Approved retailers are listed on our website at www.uppababy.com.
- Pushchair is second-hand.
- Pushchair is damaged as a result of an accident, airline or freight damage.
UPPAbaby reserves the right to determine if warranty terms and conditions have been met. Please contact your local distributor if you have any questions regarding warranty.
CUSTOMER SERVICE
| COUNTRY CONTACT TELEPHONE WEBSITE | ||
| US | Monahan Products, 60 Sharp Street Hingham, MA 02043 | 781.413.3000 www.uppababy.com |
| UK | Distributor Corporation UK Ltd. Suite G444, Dean Clough Mills, Halifax, HX3 5AX | 0203.371.7784 www.uppababy.com |
IMPORTANTE
BESCHRANKTE GARANTIE
FIXATION DES ADAPTATEURS AU CHASSIS CRUZ
WAARSCHUWINGEN + ALGEMENE VEILIGHEIDSINFORMATIE
BELANGRIJK
BEWAAR DEZE INSTRUCTIES ZODAT U DEZE LATER NOG KUNT RAADPLEGEN. LEES DE INSTRUCTIES VOOR GEBRUIK ALTIJD ZORGVULDIG DOOR. DE VEILIGHEID VAN UW KIND KAN IN HET GEDING KOMEN ALS U DE INSTRUCTIES NIET OPVOLGT.
WAARSCHUWING
WAARSCHUWINGEN + ALGEMENE VEILIGHEIDSINFORMATIE
WAARSCHUWING ONACHTZAAMHEID KAN BRAND VEROORZAKEN
DONUS/KILIT SISTEMINI AYARLAMA
| www.uggababy.com | 781.413.3000 | Monahan Products, 60 Sharp Street Hingham, MA 02043 | |
| www.uggababy.com | +971 (0) 4323 2500 | Dutch Kids Office 107 Matloob Bldg. 2, Al Safa 1, Sheikh Zayed Rd., Dubai, United Arab Emirates |
jablai aye sao Joao Jaaee
CRUZ 1b2y
Jaaagaoa Cgll Lwcl 2gol
100
10g25 g 10000000000000000000000000000000000000000000
jabll 4y e Jss
Jal/1jglal
aai aai jai jai jai kai ai jai ai jai ai
gaaal jlaaall aalaaal 1
L
= | x - 1| · 15^
Maxi-Cosi Jgwo
yallalb
paal gai 5
aollalilwll cloglso+abwl
:
daii daiiol elaiu iou lalow gao aiaa cabiag dllo jala aalauy jbyl ai
(1gaiell)wiclo 10
u 100y1 Lg00201 Buaa Caa
alilallaolallalgois
aagb oaiol aalwaae ydoao gayg kbao. CRUZ oaiol algo 8jia
aB aB aB aB aB aB aB CRUZ Jabal jyjg jy
:
aalal aalal aagkall gaaagaaagaaagaaagaaagaaagaaagaaagaaagaaagaaagaaagaaagaaagaaagaaagaaagaaagaaagaaagaaagaaagaaagaaagaaagaaagaaagaaagaaagaaagaaagaaagaaagaaagaaagaaagaaagaaagaa
gol g yall juyl koy l aagd agal palwal g ayll
aill aill gll 1y jy yj yj yj yj yj yj yj CRUZ jall jg
alai aia 1aai yai gao ayaiy aiayaiy aaiyaiy aaiyaiy
aalgl gwl jc aayy yol
40 402a aall gabolusuul jut no y UPPA baby lgl glal o
5
Bai fai aill dge jn dae np Cauo nolunny Jabi lje Jc Oygi Oxuaa
y 1
ylll lcll alil (1) 1111111111111111
XJX4UULH,1eH3
#
y
#
gaaal aai 1000
gjy jglgaleal
#
WuLiKaiBgJg-
aai 1
1
Kepnpepepepepepepepepepepepepepepepepepepepepepepepepepepepepepepepepepepepepepepepepepepepepepepepepepepepepepepepepepepepepepepepepepepepepepepepepepepepepepepepepepepepepepepepepepepe pe
aalai aolwglagglg+
#
alaiuuiisglalwUggi gagauoljalljlaalj jao
alal alco s yol g aall jyag aol jgulj
0g 0000000000000000000000000000000
Ie Ie aieaie eae aeaae aegs gag sball albo
abjaojol jol jol jol jol jol jol jol jol jol jol jol jol jol
jbs jbs 1
EN 1888:2012. yIeoo gao gai gao jabiI ayg cagd aai
aagaaalglg aaoaalll aayaw go aolgog aall algo
jill g s ylll wuio jywl11
#
J
gjyol Jz, gjzbl aqjwJluaag agaiaaJg jll jbs no jz1
( \left{ {1,2,3,4}\right} \Rightarrow \left{ {{0,1},{11},{12}}\right} \Rightarrow \left{ {{0,2,3,4}\text{舍去},1,{12}}\right} \Rightarrow \left{ {{0,3,4}\text{舍去},1,{12}}\right} \Rightarrow \left{ {{0,4,5}\text{舍去},1,{12}}\right} \Rightarrow \left{ {{0,5,6}\text{舍去},1,{12}}\right} \Rightarrow \left{ {{0,6,7}\text{舍去},1,{12}}\right} \Rightarrow \left{ {{0,7,8}\text{舍去},1,{12}}\right} \Rightarrow \left{ {{0,8,9}\text{舍去},1,{12}}\right} \Rightarrow \left{ {{0,{91}}\text{舍去},1,{12}}\right} \Rightarrow \left{ {{0,{10},{11}}\text{舍去},1,{12}}\right} \Rightarrow \left{ {{0,{10},{11}}}\right} \Rightarrow \left{ {{0,{11},{12}}}\right} \Rightarrow \left{ {{0,{12},{13}}}\right} \Rightarrow \left{ {{0,{13},{14}}}\right} \Rightarrow \left{ {{0,{14},{15}}}\right} \Rightarrow \left{ {{0,{15},{16}}}\right} \Rightarrow \left{ {{0,{16},{17}}}\right} \Rightarrow \left{ {{0,{17},{18}}}\right} \Rightarrow \left{ {{0,{18},{19}}}\right} \Rightarrow \left{ {{0,{19},{20}}}\right} \Rightarrow \left{ {{0,{20},{21}}}\right} \Rightarrow \left{ {{0,{21},{22}}}\right} \Rightarrow \left{ {{0,{22},{23}}}\right} \Rightarrow \left{ {{0,{23},{24}}}\right} \Rightarrow \left{ {{0,{24},{25}}}\right} \Rightarrow \left{ {{0,{25},{26}}}\right} \Rightarrow \left{ {{0,{26},{27}}}\right} \Rightarrow \left{ {{0,{27},{28}}}\right} \Rightarrow \left{ {{0,{28},{29}}}\right} \Rightarrow \left{ {{0,{29},{30}}}\right} \Rightarrow \left{ {{0,{30},{31}}}\right} \Rightarrow \left{ {{0,{31},{32}}}\right} \Rightarrow \left{ {{0,{32},{33}}}\right} \Rightarrow \left{ {{0,{33},{34}}}\right} \Rightarrow \left{ {{0,{34},{35}}}\right} \Rightarrow \left{ {{0,{35},{36}}}\right} \Rightarrow \left{ {{0,{36},{37}}}\right} \Rightarrow \left{ {{0,{37},{38}}}\right} \Rightarrow \left{ {{0,{38},{39}}}\right} \Rightarrow \left{ {{0,{39},{40}}}\right} \Rightarrow \left{ {{0,{40},{41}}}\right} \Rightarrow \left{ {{0,{41},{42}}}\right} \Rightarrow \left{ {{0,{42},{43}}}\right} \Rightarrow \left{ {{0,{43},{44}}}\right} \Rightarrow \left{ {{0,{44},{45}}}\right} \Rightarrow \left{ {{0,{45},{46}}}\right} \Rightarrow \left{ {{0,{46},{47}}}\right} \Rightarrow \left{ {{0,{47},{48}}}\right} \Rightarrow \left{ {{0,{48},{49}}}\right} \Rightarrow \left{ {{0,{49},{50}}}\right} \Rightarrow \left{ {{0,{50},{51}}}\right} \Rightarrow \left{ {{0,{51},{52}}}\right} \Rightarrow \left{ {{0,{52},{53}}}\right} \Rightarrow }
Jabll aee no yjull aessg jslg
aJl jIgolgaI gai JIJI 1JIJIJIJIJIJIJIJIJIJIJIJIJIJIJIJIJIJIJIJIJIJIJIJIJIJIJIJIJIJIJIJIJIJIJIJIJIJIJIJIJIJIJIJIJIJIJIJIJIJIJIJIJIJIJIJIJIJIJIJIJIJIJIJIJIJIJIJIJIJIJIJIJIJIJIJIJIJIJIJIJIJIJIJIJIJIJIJIJIJIJIJIJIJIJIJIJIJIJIJIJ
Joo
NNNN NNNN NNNN NNNN NNNN
p 1
n91031 mnnn nn nnnn nn nnnn nnnn
UPPA baby. monn Dmny Dnnn nn nnnn nn nnnn nn
Dn nn nnnn nn nnnn nn nnnn nn
xnnnnn nnynnnn ynnn nnnn ppon UPPAbaby
mnnn nnnnnnnnnnnnnnnnnnnnnnnnnnnnnnnnnnnnnnnnnnnnnnnnnnnnnnnnnnnnnnnnnnnnnnnnnnnnnnnnnnnnnnnnnnnnnnnnnnnnnnnnn
y
:00000000000000000000
y
nnnnn nn nnnn nn nnnn
PUPPA baby DnN DpN nn npnn
n
nnpnnnnnnnnnnnnnnnnnnnnnnnnnnnnnnnnnnnnnnnnnnnnnnnnnnnnnnnnnnnnnnnnnnnnnnnnnnnn
nnnnnnnnnnnnnnnnnnnnnnnnnnnnnnnnnnnnnnnnnnnnnnnnnnnnnnnnnnnnnnnnnnnnnnnnnnnnnnnnnnnnnnnnnnnnn
mnnnnn nn nnnn,nnn,ny, npnnn pnnn
y
nannnnnnnnnnnnnnnnnnnnnnnnnnnnnnnnnnnnnn
www.uppababy.com
NIN
nnnnnnnnnnnnn n by nnnnnnnnnnn npnnn
mnnn nn nnnn nn nnnn nn nnnn nnnn nnnn nnnn nnnn nnnn nnnn nnnn nnnn nnnn nnnn nnnn nnnn nnnn nnnn nnnn nnnn nnnn nnnn nnnn nnnn nnnn nnnn nnnn nnnn nnnn nnnn nnnn nnnn nnnn nnnn nnnn nnnn nnnn
mipn7yab m5b 10mn5ybn2n
mm
| ISSUED BY: | ISSUED | ISSUED | ISSUED |
| www.uppababy.com | 781,413,3000 | Monahan Products, 60 Sharp Street Hingham, MA 02043 | ### |
| www.uppababy.com | 09-7488899 | Nobel Infinity Ltd. 6 Alomot Str, 42836 Moshev Nitsanei Ozi, Israel | ### |
bbonnnayn
nnnnnnn nnnnCRUZ
JUPANNNN CRUZ-1 5ywn nn yyns,CRUZ nnpoONNNnD
y
mnnnnae nnnnne nnne ennnnne
n nnnnnnnnnnnnnnnnnnnnnnnnnnnnnnnnnnnnnnnnnnnnnnnnnnnnnnnnnnnnnnnnnnnnnnnnnnnnnnnnnnnnnnnnn
nnnnnnnnp MAXI-COSI
mnnn nnnnnnnnnnnnnnnnnnnnnnnnnnnnnnnnnnnnnnnnnnnnnnnnnnnnnnnnnnnnnnnnnnnnnnnnnnnnnnnnnnnnnnnnnnnnnnnnnnnnnnnnn
mnnn nnnn nn nnnn nnnn nnnn nnnn nnnn nnnn nnnn nnnn nnnn nnnn nnnn nnnn nnnn nnnn nnnn nnnn nnnn nnnn nnnn nnnn nnnn nnnn nnnn nnnn nnnn nnnn nnnn nnnn nnnn nnnn nnnn nnnn nnnn nnnn

MAXI-COSI (1) MAXI-COSI (2) MAXI-COSI (3) MAXI-COSI (4) MAXI-COSI (5) MAXI-COSI (6) MAXI-COSI (7) MAXI-COSI (8) MAXI-COSI (9) MAXI-COSI (10) MAXI-COSI (11) MAXI-COSI (12) MAXI-COSI (13) MAXI-COSI (14) MAXI-COSI (15) MAXI-COSI (16) MAXI-COSI (17) MAXI-COSI (18) MAXI-COSI (19) MAXI-COSI (20) MAXI-COSI (21) MAXI-COSI (22) MAXI-COSI (23) MAXI-COSI (24) MAXI-COSI (25) MAXI-COSI (26) MAXI-COSI (27) MAXI-COSI (28) MAXI-COSI (29) MAXI-COSI (30) MAXI-COSI (31) MAXI-COSI (32) MAXI-COSI (33) MAXI-COSI (34) MAXI-COSI (35) MAXI-COSI (36) MAXI-COSI (37) MAXI-COSI (38) MAXI-COSI (39) MAXI-COSI (40) MAXI-COSI (41) MAXI-COSI (42) MAXI-COSI (43) MAXI-COSI (44) MAXI-COSI (45) MAXI-COSI (46) MAXI-COSI (47) MAXI-COSI (48) MAXI-COSI (49) MAXI-COSI (50) MAXI-COSI (51) MAXI-COSI (52) MAXI-COSI (53) MAXI-COSI (54) MAXI-COSI (55) MAXI-COSI (56) MAXI-COSI (57) MAXI-COSI (58) MAXI-COSI (59) MAXI-COSI (60) MAXI-COSI (61) MAXI-COSI (62) MAXI-COSI (63) MAXI-COSI (64) MAXI-COSI (65) MAXI-COSI (66) MAXI-COSI (67) MAXI-COSI (68) MAXI-COSI (69) MAXI-COSI (70) MAXI-COSII(71)
nynbny
nannnnn
25
1207 100
n nnnnnnnnnnnnnnnnnnnnnnnnnnnnnnnnnnnnnnnnnnnnnnnnnnnnnnnnnnnnnnnnnnnnnnnnnnnnnnnnnnnnnnnnnnnnnnnnnnnnnnnnnnn
m y mnnn prooan mnnn nn nnn en 3 aee
mnnn nn 77777777777777777777777
#
#
2
yennnnnne nnnnne nnne nee
nnn nnnnnnnnnnnnnnnnnnnnnnnnnnnnnnnnnnnnnnnnnnnnnnnnnnnnnnnnnnnnnnnnnnnnnnnnnnnnnnnnnnnnn
nannnnnnnnnnnnnnn 32
en nn mnnnny 701 2000 0000
bynnbyn
p#n#
nprnnnnnnnnnnnnnnnnnnnnnnnnnnnnnnnnnnnnnnnnnnnnnnnnnnnnnnnnnnnnnnnnnnnnnnnnnnnnnnnnnnnnnnnnnnnnnnnnnnnnnnnn

nannnnn nn nnnn nn nn 2
y
m

yynn yynn nn nynnn ne 150
bnnnaaannnnn
nynnnn nnnn nnny 430
nnnnn nn nn nn nnnnnnnnnnnnnnnnnnnnnnnnnnnnnnnnnnnnnnnnnnnnnnnnnnnnnnnnnnnnnnnnnnnnnnnnnnnnnnnnnnnnnnnnnnnnnnnnnnnnnnn

y 3
Pnnnnaaannnne nnnnnae aee
nppnnnnnnnnnnnnn 6
mnnn nyny np nn nbp nnnn 5 a
nnpnnnnnnnnnnnnnnnnnnnn
#
111111111111
1
2
nnpnnnnnnn nnnnnnnnnnnnnnnnnnnnnnnnnnnnnnnnnnnnnnnnnnnnnnnnnnnnnnnnnnnnnnnnnnnnnnnnnnnnnnnnn
n77777777777777777777777777777777
n#
pnn nbn by nn npnn
pnnn
byn byn
nannnnn
e e
mnnnnn nnnnnnnnnnnnnnnnnnnnnnnnnnnnnnnnnnnnnnnnnnnnnnnnnnnnnnnnnnnnnnnnnnnnnnnnnnnnnnnnnnnnnnnnnnnnnnnnnnn
11111111111
nno 1
n
pnnn nnnn nn nnnn nnnn nnnn nnnn nnnn nnnn nnnn nnnn nnnn nnnn nnnn nnnn nnnn nnnn nnnn nnnn nnnn nnnn nnnn nnnn nnnn nnnn nnnn nnnn nnnn nnnn nnnn nnnn nnnn nnnn nnnn nnnn nnnn nnnn
n
y
nnnnn nn nnnnnnnnnnnnnnnnnnnnnnnnnnnnnnnnnnnnnnnnnnnnnnnnnnnnnnnnnnnnnnnnnnnnnnnnnnnnnnnnnnnnnnnnnnnnnnn
#
#
yannnnn nn nnnnnnnnnnnnnnnnnnnnnnnnnnnnnnnnnnnnnnnnnnnnnnnnnnnnnnnnnnnnnnnnnnnnnnnnnnnnnnnnnnnnnnnnnnnnnnn
n nn nnnnnnnnnnnnnnnnnnnnnnnnnnnnnnnnnnnnnnnnnnnnnnnnnnnnnnnnnnnnnnnnnnnnnnnnnnnnnnnnnnnnnnnnnnnnnnnnnnnnn
00nnnnaa
mnnn nn nnnn nn nnnn nn nnnn nn nnnn nn nnnn nn nnnn nn nnnn nn nnnn nn nnnn nn nnnn nn nnnn nn nnnn nn nnnn nn nnnn nn nnnn nn nnnn nn nnnn nn nnnn nn nnnn nn nnnn nn nnnn nn nnnn nn nnnn nn nnnn nn nnnn nn
Dn nn nnnnnnnnnnnnnnnnnnnnnnnnnnnnnnnnnnnnnnnnnnnnnnnnnnnnnnnnnnnnnnnnnnnnnnnnnnnnnnnnnnnnnnnnnnnnnnnnnnnnn
mnnnn nn nnnn
mnnnnnnn nn nnnnnnnnnnnnnnnnnnnnnnnnnnnnnnnnnnnnnnnnnnnnnnnnnnnnnnnnnnnnnnnnnnnnnnnnnnnnnnnnnnnnnnnnnnnnnnnnnnnnnnnnnnn
y
yannnnn
#
2
1
1
mnnn mnnnnnnnnnnnnnnnnnnnnnnnnnnnnnnnnnnnnnnnnnnnnnnnnnnnnnnnnnnnnnnnnnnnnnnnnnnnnnnnnnnnnnnnnnnnnnnnnnnnnnnnnnnnnnn
mnnn nnnnnnnnnnnnnnnnnnnnnnnnnnnnnnnnnnnnnnnnnnnnnnnnnnnnnnnnnnnnnnnnnnnnnnnnnnnnnnnnnnnnnnnnnnnnnnnnnnnnn
#
Maxi-CosiON
000000000000
mbbnn
mnnn mnnnnn nnnnnnnnnnnnnnnnnnnnnnnnnnnnnnnnnnnnnnnnnnnnnnnnnnnnnnnnnnnnnnnnnnnnnnnnnnnnnnnnnnnnnnnnnnnnnnnnnnnnnnnnnnnnnnnnnnnnn
nnnnnnnnnnnnnnnnnnnnnnnnnnnnnnnnnnnnnnnnnnnnnnnnnnnnnnnnnnnnnnnnnnnnnnnnnnnnnnnnnnnnnnn
.
mnnn nnnnnnnnnnnnnnnnnnnnnnnnnnnnnnnnnnnnnnnnnnnnnnnnnnnnnnnnnnnnnnnnnnnnnnnnnnnnnnnnnnnnnnnnnnnnnnn
nnnnnnnnnnnnnnnnnnnnnnnnnnnnnnnnnnnnnnnnnnnnnnnnnnnnnnnnnnnnnnnnnnnnnnnnnnnnnnnnnnnnnnnnnnnnnnnnnnnnnnnnnnn
:dpn npnn
mnnn nnnn nn nnnn nnnn nnnn nnnn nnnn nnnn
n nnnn nn nnnn nnnn nnnn nnnn nnnn nnnn nnnn nnnn nnnn nnnn nnnn nnnn nnnn nnnn nnnn nnnn nnnn nnnn nnnn nnnn nnnn nnnn nnnn nnnn nnnn nnnn nnnn nnnn nnnn nnnn nnnn nnnn nnnn nnnn
mnyopnnnnpnnnne nnnnne nnnnne nnnnne nnnnne nnnnne nnnnne nnnnne nnnnne nnnnne nnnnne nnnnne nnnnne nnnnne nnnnne nnnnne nnnnne nnnnne nnnnne nnnnne nnnnne nnnnne nnnnne nnnnne nnnnne nnnnne
mnnn nnnnnnnnnnnnnnnnnnnnnnnnnnnnnnnnnnnnnnnnnnnnnnnnnnnnnnnnnnnnnnnnnnnnnnnnnnnnnnnnnnnnnnnnnnnnnnnnnnnnnnnnnnn
nnnnnnnnnnnnnnnnnnnnnnnnnnnnnnnnnnnnnnnnnnnnnnnnnnnnnnnnnnnnnnnnnnnnnnnnnnnnnnnnnnnnnnnnnnnnnnnnnnnnnnnnn
mnnn nn n
y

Nnnn nnnn nn nnnn nn nnnn nn nnnn nn nnnn nn nnnn nn nnnn nn nnnn nn nnnn nn nnnn nn nnnn nn nnnn nn nnnn nn nnnn nn nnnn nn nnnn nn nnnn nn nnnn nn nnnn nn nnnn nn nnnn nn nnnn nn nnnn nn nnnn nn nnnn nn nnnn

D
y
555nnvya+nnnx
DAN
IN,ININININNINNNNNNNNNNNNNNN
y
P
Dy,dy,dy dy dy dy dy dy dy dy dy dy dy dy dy dy dy dy dy dy dy dy dy dy dy dy dy dy dy dy dy dy dy dy dy dy dy dy dy dy dy dy dy dy dy dy dy dy dy dy dy dy dy dy dy dy dy dy dy dy dy dy dy dy dy dy dy dy dy dy dy dy dy dy dy dy dy dy dy dy dy dy dy dy dy dy dy dy dy dy dy dy dy dy dy dy dy dy dy dy dy dy dy
1.
TNNN NNNN NNNN NNNN
Pn 5yNn nn nnnn nn
EN 1888:2012 pnn nni ynn npnn ny
nnnnnnnnnnnnnnnnnnnnnnnnnnnnn
nnnnnnnnnnnnnnnnnnnnnnnnnnnnnnnnnnnnnnnnnnnnnnnnnnnnnnnnnnnnnnnnnnnnnnnnnnnnnnnnnnnnnnnnnnnnnnnnn
#
n
,
100000000000000000000000000000
mnnn nnnnnnnnnnnnnnnnnnnnnnnnnnnnnnnnnnnnnnnnnnnnnnnnnnnnnnnnnnnnnnnnnnnnnnnnnnn
00000000000000000000
(1) (2)
:MAXI-COSIPbONNN
#
pwn nn mnn mnaon mnaon npyn pynn .pnn n
n nn nnnn nnnn
.77n 77n 77n 77n 77n 77n 77n
UPPA baby CRUZ nyn ynnn
mnnn+nnnx
#
JN JNJN NNN
nnn nn n on yenn no nnnnnnnnnnn
#
.
.
y
n npnn nnnn nnnn nn nnnn nn nnnn nn
n nn nnnn nn
.
Nn nn nnnn 6nnn UPPA baby CRUZ-n
myn by myn by ynnn nnnn bn
yannnnn nn nnnn nn nn nn nnnnnnnnnnnnnnnnnnnnnnnnnnnnnnnnnnnnnnnnnnnnnnnnnnnnnnnnnnnnnnnnnnnnnnnnnnnnnnnnnnnnnnnnnnn
100000000000000000000000000000000000000
1
11.3nnn nn nnnn
NONNN,7n/tnn/nyyynnnn
UPPAbaby
UPPAbabybywnnnnbnnnnnnnnnnnn
111111111111111
y
.0000
y
ninnnnn
nynnypnn/tnnnp
.7/7777777777777777
.
.
pnn nnnn nn nn nn nn nn nn nn nn nn
y
ynnn nnnnny yynnny nyynny myxynny
.
| 2 | ### |
| 4 | ### |
| 5 | ### |
| 6 | ### |
| 8 | ### |
| 15 | ### |
| 16 | ### |