GLINK - Stroller UPPAbaby - Free user manual and instructions
Find the device manual for free GLINK UPPAbaby in PDF.
User questions about GLINK UPPAbaby
0 question about this device. Answer the ones you know or ask your own.
Ask a new question about this device
Download the instructions for your Stroller in PDF format for free! Find your manual GLINK - UPPAbaby and take your electronic device back in hand. On this page are published all the documents necessary for the use of your device. GLINK by UPPAbaby.
USER MANUAL GLINK UPPAbaby
- HKV | 27 vandermost Avenue, London, Toronto, CA 147 | pesabay.com | Teneron LLC
1.2017/6/15
All rights reserved 3.05 UTA baby, UTA baby and all applicable logos are undermarks. All product specifications are correct at time of print UTA baby reserve the right to change anything at any time without chromosome co-representation set close as print process allows for colon swabecal and rectal.
UPPAbaby
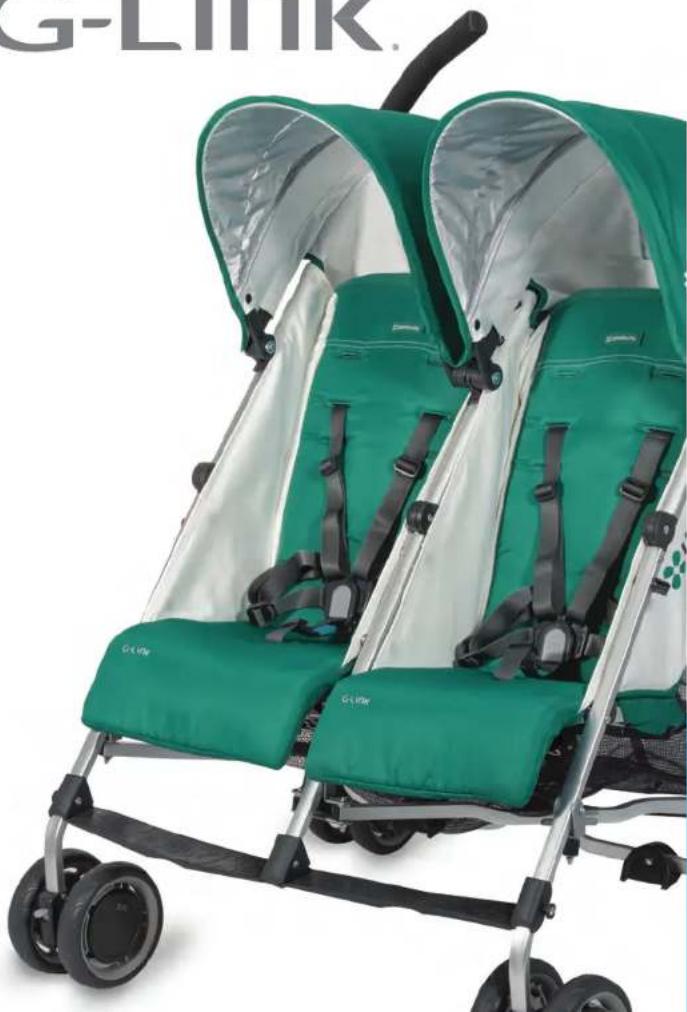
G-LINK
natural_image
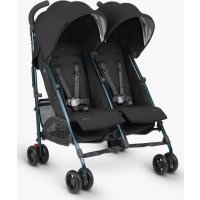
Green and silver children's stroller with black straps, no visible text or symbols on the device itself.TABLE OF CONTENTS TABLA DE CONTENIDOS / TABLE DES MATIÈRES
ENGLISH
Warnings + General Safety Information 2
Cleaning + General Maintenance 3
Overview 4
Stroller Assembly 6
Stroller Operation 9
Limited Warranty 14
ESPAÑOL
Please read these instructions carefully prior to assembly and use.
Keep these instructions for future reference.
- This stroller seats two passengers. Each seat is suitable from birth up to 55 lbs (25 kg) and 45 in (114 cm).
• Maximum weight for the storage basket is 10 lbs (4.5 kg).
• Maximum carrying capacity of each canopy pocket is 2 lbs (.9 kg). - Maximum cup holder weight is 1.5 lbs (.7 kg). Excessive weight may cause a hazardous, unstable condition to exist. DO NOT place hot liquids in holder.
• Total weight load recommended for this stroller is 127 lbs (57.6 kg).
- Unit may become unstable if manufacturer's recommended load is exceeded, or if parcel bag or accessory other than that recommended by the manufacturer is used or hung from the unit.
• Always make sure stroller is fully open and locked before use.
- The brake must be locked while taking the child in or out of the stroller.
- NEVER leave child in the stroller while ascending or descending stairs, or using an escalator.
- DO NOT make any alterations or modifications to the stroller with products not supplied by the manufacturer, as this may cause instability or structural damage not covered under warranty.
- To avoid serious injury from sliding or falling out, always use complete 5-point harness.
- Child may slip into leg openings and strangle. NEVER use in a reclined position unless child is secured in 5-point harness system.
- Children and adults should be clear of moving parts while making stroller adjustments. Damage to fingers or extremities may occur when opening or closing the frame.
- Hold center handle to open stroller. Listen for audible click to ensure stroller is locked open before use.
This product is designed and manufactured to comply with ASTM F833 Standard Consumer Safety Performance Specification for Carriages/Buggies and is JPMA certified. This product is designed and manufactured to comply with Canadian Standard SOR/85 379 Carriages and Strollers Regulations.
CLEANING + GENERAL MAINTENANCE
CLEANING:
- Clean frame with a damp cloth and a mild detergent and dry thoroughly. DO NOT use abrasives.
- If the stroller chassis parts have been exposed to salt water we recommend that they be rinsed with fresh (tap) water as soon as possible to avoid corrosion.
- The infant head roll is machine washable. Please wash separately in cold water on gentle cycle with mild detergent. Dry flat and away from direct sunlight before re-use or storage. DO NOT bleach, iron or dry clean.
- The seat pads with harness straps, canopy and basket are not machine washable. Hand wash in cold water with mild detergent. Dry flat and away from direct sunlight before re-use or storage. DO NOT bleach, iron or dry clean.
MAINTENANCE AND REPAIR:
- This stroller requires routine user maintenance. Regularly check all connecting hardware (rivets, screws, etc.) for tightness and security. Inspect brakes, wheels and tires and replace or repair as necessary.
- Check all safety devices, locks and harnesses for correct and secure operation. NEVER continue to use a product that is structurally unsound.
- Only UPPA baby replacement parts should be used. It may be unsafe to use parts supplied by another manufacturer.
- Contact Customer Service with any repair questions at 1.844.823.3132 or contact@uppababy.com.
CLEANING SEAT PAD WITH HARNESS STRAPS, CANOPY AND BASKET

Hand wash in cold water with mild detergent.

Dry flat and away from direct sunlight before re-use or storage.
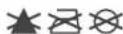
DO NOT bleach, iron or dry clean.
CLEANING INFANT HEAD ROLL

Machine wash separately in cold water on gentle cycle with mild detergent.

Dry flat and away from direct sunlight before re-use or storage.

DO NOT bleach, iron or dry clean.
UPPAbaby reserves the right to make design charges and improvements to any of our products as part of our commitment to innovation.
OVERVIEW OVERVIEW
text_image
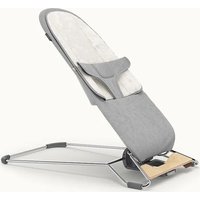
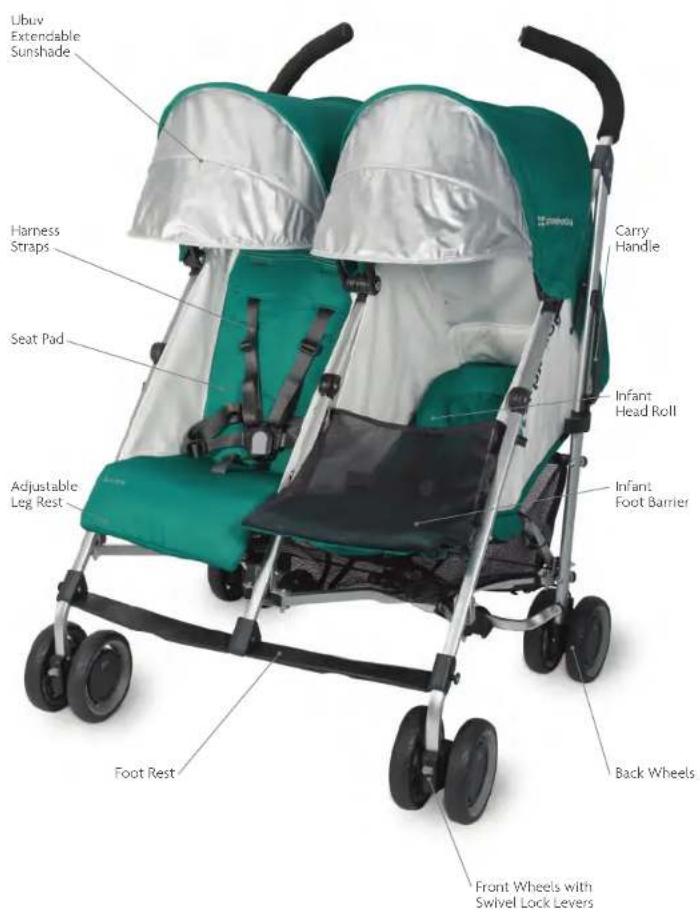
Ubuv Extendable Sunshade Harness Straps Seat Pad Adjustable Leg Rest Foot Rest Carry Handle Infant Head Roll Infant Foot Barrier Back Wheels Front Wheels with Swivel Lock Levers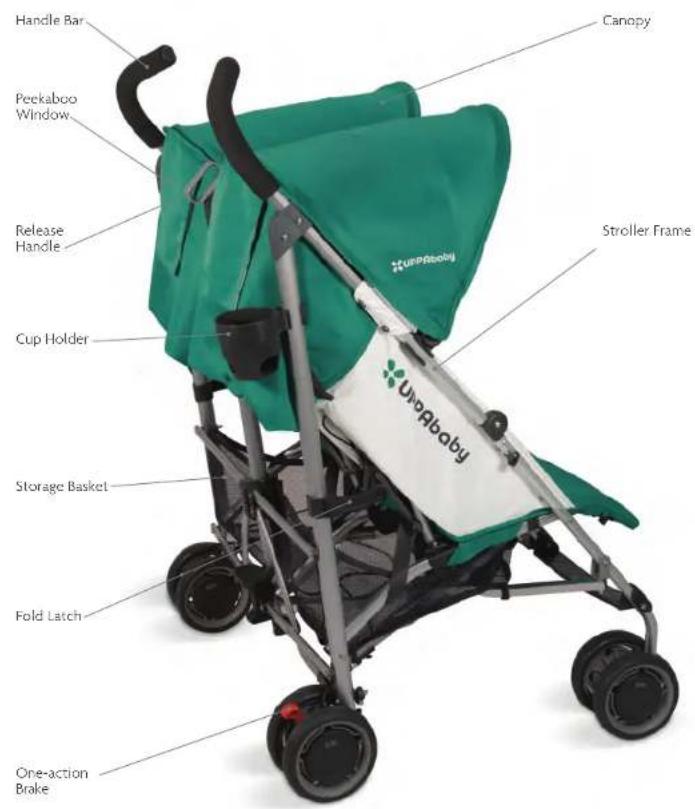
text_image
Handle Bar Canopy Peekaboo Window Release Handle Cup Holder Stroller Frame UmpRisbee Storage Basket Fold Latch One-action BrakeATTACHING THE FRONT WHEELS

natural_image
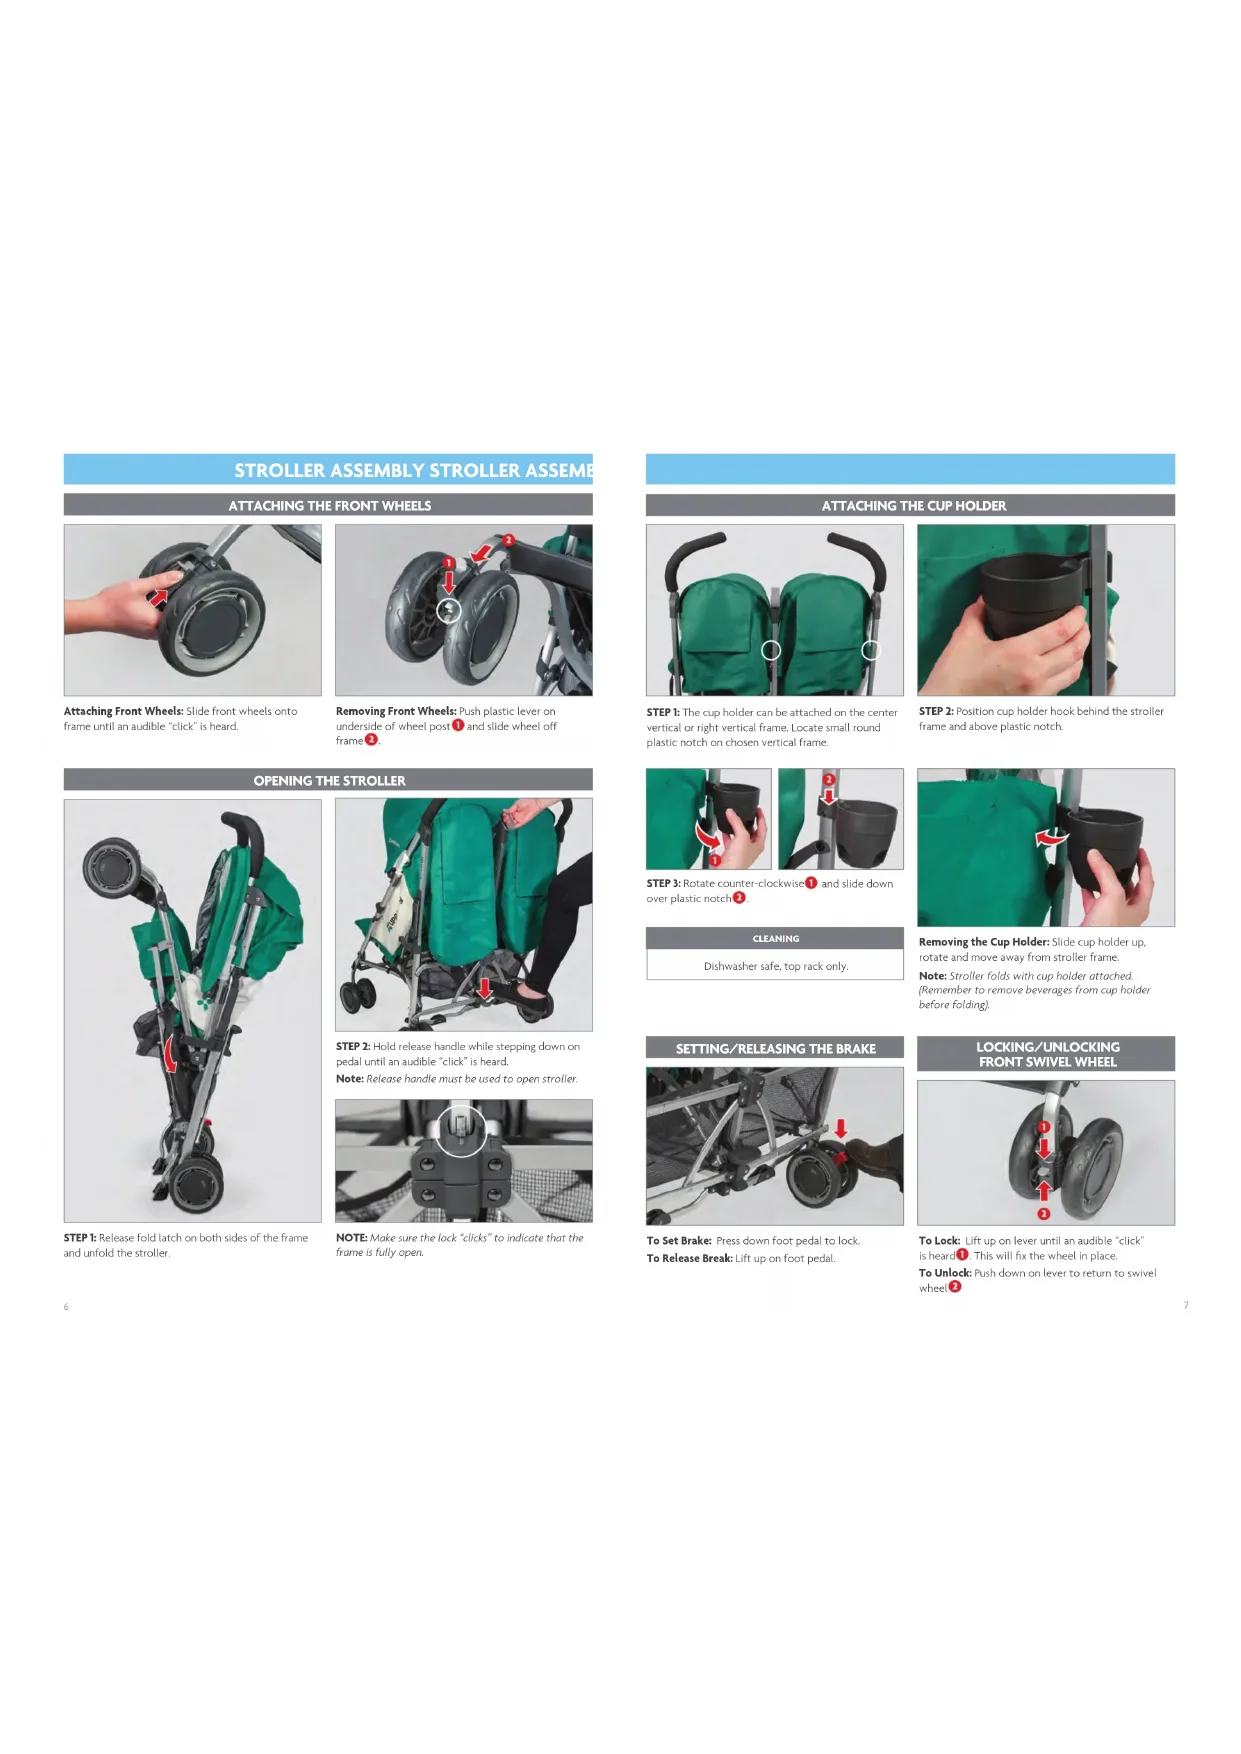
Close-up of a hand holding a black hardcover head with a red arrow pointing to the component (no text or symbols visible)Attaching Front Wheels: Slide front wheels onto frame until an audible "click" is heard.
natural_image
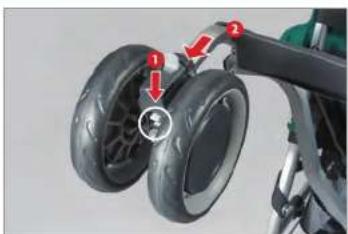
Close-up of a stroller with two wheels and a handle, showing red arrows indicating motion direction (no text or symbols)Removing Front Wheels: Push plastic lever on underside of wheel post ① and slide wheel off frame ②.
natural_image
Green and black stroller with camera mount, no visible text or symbolsSTEP 1: Release fold latch on both sides of the frame and unfold the stroller.
natural_image
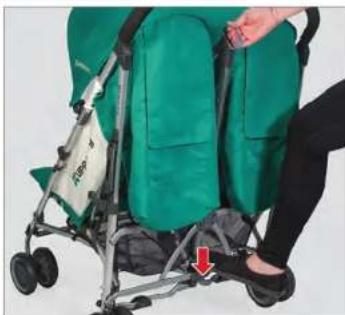
Person wearing a green trolley seat with a red arrow pointing to the lower leg (no text or symbols visible)STEP 2: Hold release handle while stepping down on pedal until an audible "click" is heard. Note: Release handle must be used to open stroller.
natural_image
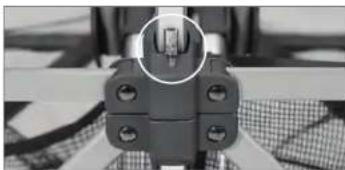
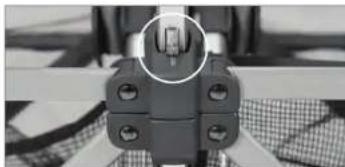
Close-up of a mechanical component with a circular inset highlighting a small feature (no visible text or symbols)NOTE: Make sure the lock "clicks" to indicate that the frame is fully open.
ATTACHING THE CUP HOLDER
natural_image
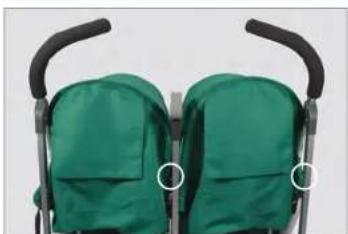
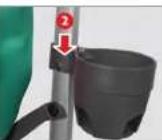
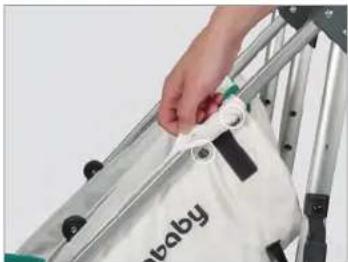
Close-up of two green children's stroller Children's backpacks with black handles, no visible text or symbolsSTEP 1: The cup holder can be attached on the center vertical or right vertical frame. Locate small round plastic notch on chosen vertical frame.
natural_image
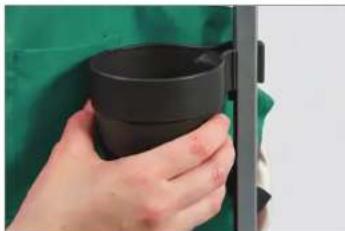
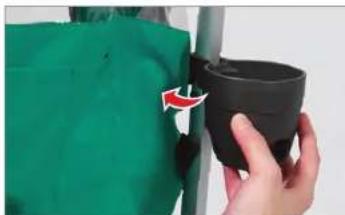
Hand holding a black mug against a green background (no text or symbols visible)STEP 2: Position cup holder hook behind the stroller frame and above plastic notch.
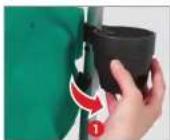
STEP 3: Rotate counter-clockwise and slide down over plastic notch.
CLEANING
Dishwasher safe, top rack only.
natural_image
Close-up of a hand holding a black plastic cup with green fabric, no visible text or symbolsRemoving the Cup Holder: Slide cup holder up, rotate and move away from stroller frame.
Note: Stroller folds with cup holder attached. (Remember to remove beverages from cup holder before folding).
natural_image
Close-up of a car chassis with visible wheels and a hand adjusting the wheel (no text or symbols)To Set Brake: Press down foot pedal to lock. To Release Break: Lift up on foot pedal.
LOCKING/UNLOCKING
FRONT SWIVEL WHEEL
natural_image
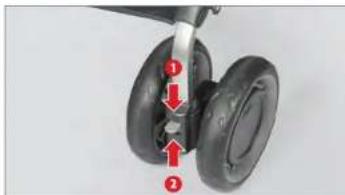
Close-up of a mechanical component with red arrows indicating parts of a joint (no text or symbols visible)To Lock: Lift up on lever until an audible "click" is heard ①. This will fix the wheel in place. To Unlock: Push down on lever to return to swivel wheel ②
STROLLER ASSEMBLY
ATTACHING THE CANOPY
natural_image
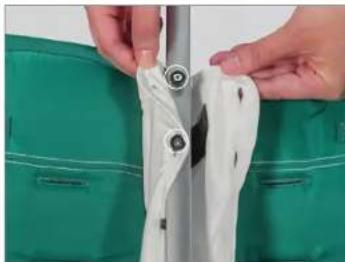
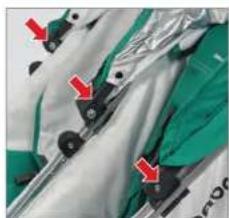
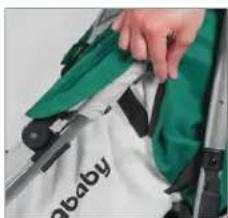
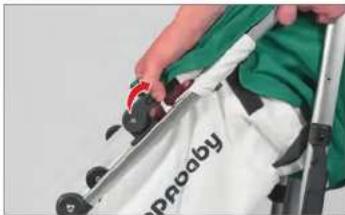
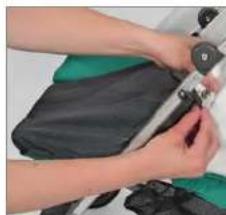
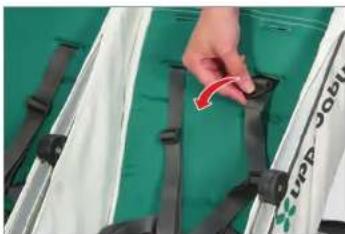
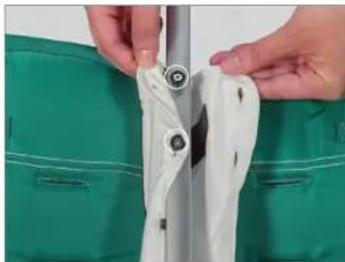
Close-up of a mechanical component with red arrows pointing to features, no visible text or symbolsSTEP 1: Clamp canopy attachment to frame. Line up openings on canopy attachment to plastic post located inside the left side of the stroller frame. Repeat same action with the center and right openings on canopy and frame.
natural_image
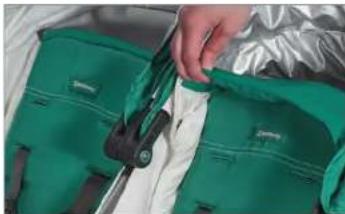
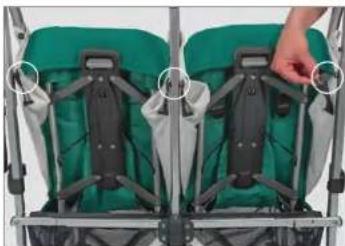
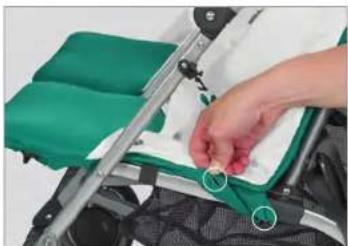
Close-up of a hand placing a green and white bag labeled 'baby' with black buttons (no other text or symbols visible)STEP 2: Attach Velcro to side panels of seat. Repeat on other side.
natural_image
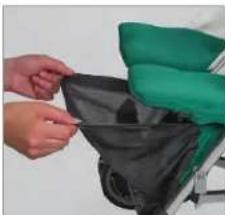
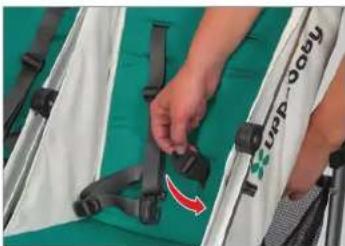
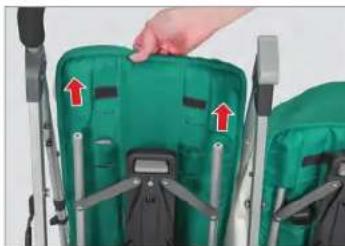
Close-up of a green safety belt buckle being adjusted with red arrows (no text or symbols visible)STEP 3: Attach Velcro located on back flap of canopy to back of seat pad.
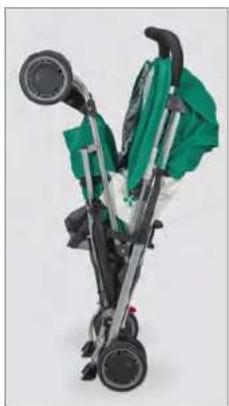
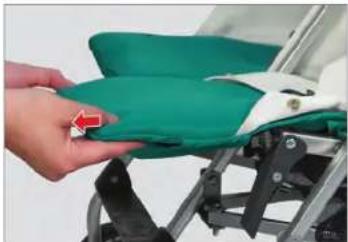
NOTE: Set brakes on stroller prior to folding.
natural_image
Person adjusting a green safety seat cover (no visible text or symbols)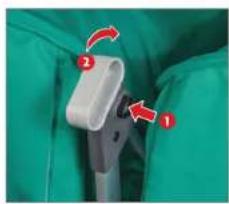
natural_image
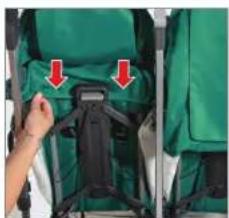
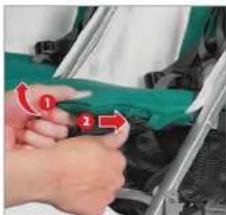
Close-up of a medical device with green fabric and red arrows indicating motion or force (no text or symbols)STEP 1: Push button ① and rotate handle up ②. The frame will begin to fold.

natural_image
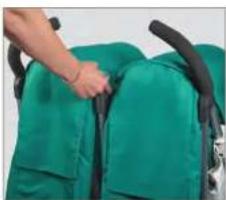
Person using a green and black stroller with a red rotation arrow indicating motion (no text or symbols visible)STEP 2: Pull front wheels toward you until fold latch is engaged on both sides.
natural_image
Green and black stroller with a camera lens, no visible text or symbolsNOTE: Stroller will stand when properly latched.
STROLLER OPERATION
natural_image
Person adjusting a green safety umbrella with black trim and white cloth (no visible text or symbols)Reclining Seat Back: Squeeze release lever and recline seat back to desired position.

natural_image
Close-up of a green and white chair seat with metal frame, showing a hand adjusting the seat (no text or symbols visible)Resetting Seat Back: From any of the reclined positions, push seat back towards front of stroller. No need to use release lever.
ADJUSTING THE HEAD BARRIER
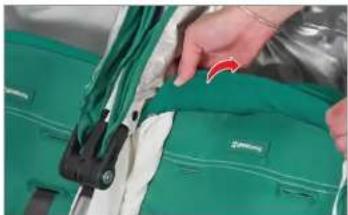
natural_image
Close-up of a hand adjusting a green and white jacket with a red arrow (no visible text or symbols)The head barrier is for infant use. To store out of the way, wrap head barrier behind top of seat.
ADJUSTING THE FOOTREST
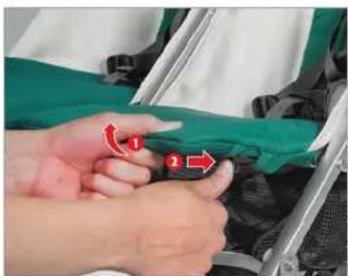
natural_image
Close-up of hands adjusting a green and black fabric item with red directional arrows (no text or symbols visible)To Move Up: Lift footrest on each side ^1 and slide tabs to lock in place ^2 .
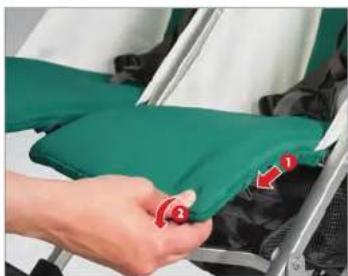
natural_image
Close-up of a hand holding a green and white seatbelt, with red buttons and a black seat cover visible (no text or symbols)To Move Down: Slide tabs to unlock 1 and gently push footrest down 2.
natural_image
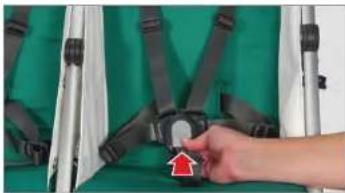
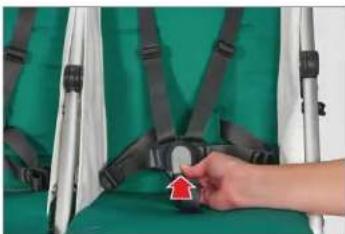
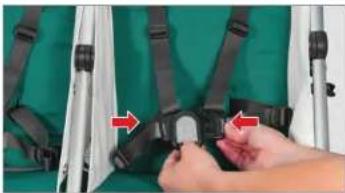
Close-up of hands adjusting a black and gray backpack seatbelt on a green surface (no text or symbols visible)Attaching the Restraint Buckle: Slide plastic clip into buckle until you hear a "click".
natural_image
Close-up of a hand adjusting a green table with black straps and a red arrow pointing to the button (no text or symbols visible)Releasing the Restraint Buckle: Press center button to disengage.
ADJUSTING THE SEAT HARNESS
natural_image
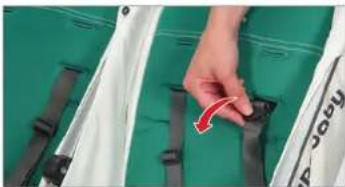
Close-up of a hand adjusting a white and gray backpack with a red arrow pointing to the black strap (no text or symbols visible)STEP 1: Locate plastic clip on back of seat and pull through the harness slot to remove.
natural_image
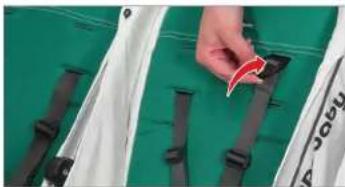
Close-up of a hand adjusting a white safety belt with black straps, against a green background (no text or symbols visible)STEP 2: Feed plastic clip through desired slot and push completely through until plastic clip rests against seat back. Pull on harness strap to ensure plastic clip is secured in place.
REMOVING THE CANOPY
natural_image
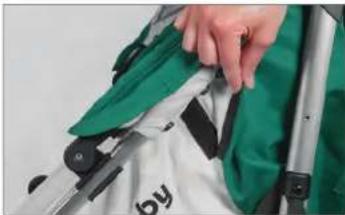
Close-up of a hand adjusting a green and gray safety cover (no text or symbols visible)STEP 1: Release Velcro located on left, right and center of each seat pad.
natural_image
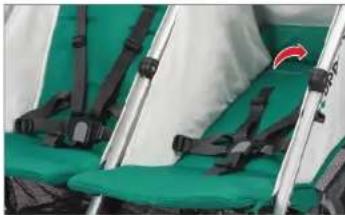
Close-up of a person using a sports equipment kit, no visible text or symbols on the device itselfSTEP 2: Rotate canopy attachments away from stroller frame to release.
INFANT MODE FOR NEWBORN USE
ADJUSTING THE HEAD BARRIER
natural_image
Close-up of a hand adjusting a green and white jacket with a black clip (no visible text or symbols)Rotate head barrier forward from behind top of seat.
USING THE INFANT FOOT BARRIER
natural_image
Close-up of a hand holding a green safety belt with red arrows indicating adjustment (no text or symbols visible)STEP 1: Raise footrest to the upright position by lifting each side ① and sliding tabs to lock in place ②.
natural_image
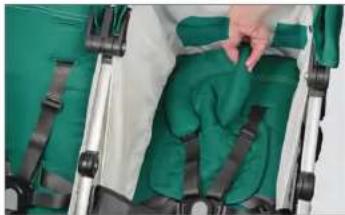
Close-up of hands installing a black fabric bag on a machine (no text or symbols visible)STEP 2: Locate mesh foot barrier tucked under seat pad.
natural_image
Close-up of hands using a pliers to adjust or install a dark fabric item (no visible text or symbols)STEP 3: Attach snaps to bottom of outer side flaps. Repeat on other side.
ADJUSTING THE INFANT HEAD ROLL
natural_image
Green and silver seatbelt device with black straps, no visible text or symbolsSTEP1: Recline seat fully.
natural_image
Close-up of a person wearing green safety gloves inside a stroller, with no visible text or symbols.STEP 2: Slide shoulder harness straps through slots on head roll.
NOTE: DO NOT use upright position for infants less than six months old. Use the most reclined position and gradually reposition seat upright as child is able to support his or her head without assistance.
REMOVING THE SEAT FABRIC REMOVING THE SEAT FABR
NOTE: Remove canopy prior to removing seat fabric.
natural_image
Close-up of a hand adjusting a green seatbelt with a red arrow pointing to the seat area (no text or symbols visible)STEP 1: Press center button to disengage restraint buckle.
natural_image
Close-up of a hand adjusting a green and white safety belt with black straps (no visible text or symbols)STEP 2: Locate plastic clip on back of seat and pull through the harness slots to remove.
natural_image
Close-up of a person adjusting a white and green backpack with black straps, showing a red curved arrow (no text or symbols visible)STEP 3: From back of seat pad, pull bottom portion of harness and buckles through harness slot until completely removed from seat pad
natural_image
Green and black children's seat frame with hand pointing to the side panel (no text or symbols visible)STEP 4: Unsnap webbing from sides & center of stroller frame.
NTINUED)
natural_image
Close-up of a hand placing a white bag labeled 'baby' on a metal rack (no other text or symbols visible)STEP 5: Release upper seat fabric buttonhole openings from side and center posts located at top of seat pad.
natural_image
Close-up of hands adjusting a white fabric or zipper with a black bolt, against a green work uniform background (no text or symbols visible)n side and center posts located at top of seat pad.
natural_image
Close-up of a hand adjusting a green and white athletic chair seat with a metal frame (no visible text or symbols)STEP 6: Release bottom seat fabric from buttonhole openings on side and center posts located underneath stroller frame.
natural_image
Close-up of a green backpack seat with red arrows pointing to the front panel (no text or symbols visible)STEP 7: Remove back seat pockets from seat frame posts.
natural_image
Close-up of a hand holding a green fabric or cushion on a bicycle (no text or symbols visible)NOTE: Reverse steps to replace seat fabric and harness straps on stroller frame.
LIMITED WARRANTY ADVERTENCIAS E II
Your UPPAbaby stroller is warranted to be free from any manufacturing defects for a period of 2 years from the date of purchase under normal use and in compliance with the operating instructions.
This warranty is not transferable and extends only to the original retail purchaser and is only valid when supplied with proof of purchase. PLEASE RETAIN PROOF OF PURCHASE FOR THIS LIMITED WARRANTY
The warranty is valid only in the original country of purchase. This warranty is subject to the conditions set forth by country in which the items were purchased. Conditions may vary. UPPAbaby will not ship replacement or repair parts out of the country of purchase.
UPPAbaby will provide replacement parts or conduct repairs as determined fitting by the company. UPPAbaby reserves the right to exchange item with a replacement part. Some parts may be replaced with newer model parts as the stroller is improved over time.
Please note that a repair issue will NOT be covered by this warranty if:
- The issue is caused by misuse or poor maintenance. Please refer to this instruction booklet for guidance on stroller use and maintenance.
- Damage is caused by improper installation of UPPAbaby parts and/or accessories. Please refer to this instruction booklet for guidance on stroller assembly and use.
- Damage is corrosion, mold or rust caused by lack of maintenance or service.
- Damage is due to general wear and tear, which is the result of everyday use or negligence.
- Damage is caused by sun intensity, sweat, detergents, damp storage or frequent washings.
• Repairs or modifications are carried out by a third party. - Stroller is purchased from an unauthorized retailer. Approved retailers are listed on our website at uppababy.com.
- Stroller is second-hand.
- Stroller is damaged as a result of an accident, airline or freight damage.
UPPAbaby reserves the right to determine if warranty terms and conditions have been met.
Please contact your local distributor if you have any questions regarding warranty.
CUSTOMER SERVICE
| COUNTRY CONTACT TELEPHONE WEBSITE | |||
| US | 60 Sharp Street Hingham, MA 02043 1.844.823.3132 uppababy.com | ||
| CANADA | 5514KM109 Vanderhoof Avenue, Unit 6Toronto, Ontario MG 2H7 | 1.844.823.3132 | uppababy.com |
Register your stroller online at uppababy.com
natural_image
Close-up of a hand holding a black plastic head with a red arrow pointing to the ring (no text or symbols visible)natural_image
Close-up of a stroller with two wheels and red arrows indicating motion direction (no text or symbols)natural_image
Green and black stroller with camera mount, no visible text or symbolsnatural_image
Person wearing a green children's stroller with a hand adjusting the back (no visible text or symbols)NOTA: Release handle must be used when opening stroller.
natural_image
Close-up of a mechanical component with a circular annotation highlighting a small feature (no visible text or symbols)natural_image
Close-up of a green stroller with black handles and two side pockets, no visible text or symbolsnatural_image
Close-up of a hand holding a black mug against a green background (no text or symbols visible)natural_image
Two-step illustration showing a hand holding a black cup and a black cup with a handle, both with arrows indicating direction (no text or symbols)natural_image
Close-up of a hand holding a black cylindrical object with a red arrow indicating rotation (no text or symbols visible)natural_image
Close-up of a mechanical device with a hand adjusting a wheel (no visible text or symbols)natural_image
Close-up of a mechanical component with two wheels and a tool, showing red arrows indicating movement or force direction (no text or symbols)natural_image
Close-up of a mechanical component with red arrows indicating features (no visible text or symbols)natural_image
Close-up of a hand placing green and white fabric on a machine component (no visible text or symbols)natural_image
Close-up of a green safety seatbelt with red arrows pointing to the seat area (no text or symbols visible)natural_image
Close-up of a person adjusting a green and black athletic vest (no visible text or symbols)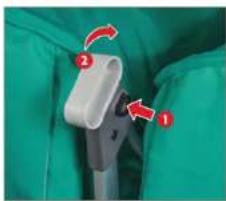
natural_image
Close-up of a medical device with green fabric and white plastic component, no visible text or symbolsnatural_image
Person in a green and black stroller with a red rotation arrow indicating motion (no text or symbols)natural_image
Green and black stroller with a circular headbell, no visible text or symbolsnatural_image
Close-up of a hand adjusting a white cloth on a green chair (no visible text or symbols)natural_image
Close-up of a person wearing a green and white chair seat, with a hand adjusting the seat (no visible text or symbols)natural_image
Close-up of hands cutting a green fabric with scissors and a red clip (no visible text or symbols)natural_image
Close-up of hands adjusting a green and black fabric item with red arrows (no visible text or symbols)natural_image
Close-up of a hand holding a green fabric item, with a red arrow pointing to it (no visible text or symbols)natural_image
Close-up of hands adjusting a black and white safety harness with red arrows indicating adjustment (no text or symbols visible)natural_image
Close-up of a hand adjusting a green seatbelt with a red arrow pointing to the seat (no text or symbols visible)natural_image
Close-up of a hand adjusting a white safety belt with black straps, against a green background (no text or symbols visible)natural_image
Close-up of a hand adjusting a white safety belt with black straps on a green background (no text or symbols visible)natural_image
Close-up of a hand adjusting a green and silver safety patch with a 'by' logo (no text or symbols on the patch itself)natural_image
Close-up of a person wearing a green shirt and white backpack, holding a bag with visible text (no readable document text)natural_image
Close-up of a hand adjusting a green and white safety belt (no text or symbols visible)natural_image
Close-up of a hand holding a green and black object with red arrows pointing to features (no visible text or symbols)natural_image
Close-up of hands folding a dark fabric or garment with green and black clothing (no visible text or symbols)natural_image
Close-up of hands holding a sewing machine needle and fabric (no visible text or symbols)natural_image
Close-up of a green and white baby seat with black straps and a red arrow indicating a motion (no text or symbols visible)natural_image
Close-up of a person adjusting green fabric in a white chair (no visible text or symbols)natural_image
Close-up of a person's hand adjusting a green and white seatbelt device (no text or symbols visible)natural_image
Close-up of a hand adjusting a green and white safety belt with a red clip (no visible text or symbols)natural_image
Close-up of a person adjusting a blue and black bicycle seatbelt with a red arrow indicating rotation (no text or symbols visible)natural_image
Green and black children's seatbelt device with hand pointing to the side panel (no text or symbols visible)natural_image
Close-up of a hand placing a white bag labeled 'baby' on a metal rack (no other text or symbols visible)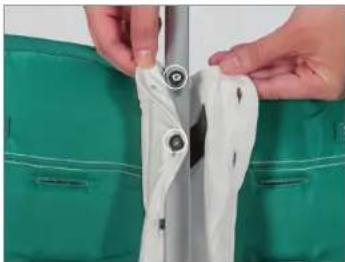
natural_image
Close-up of hands adjusting a white fabric or cable component against a green background (no text or symbols visible)natural_image
Close-up of a hand adjusting a green and white athletic cushion with a metal frame (no text or symbols visible)
natural_image
Close-up of a green children's seat with red arrows indicating features, no visible text or symbolsnatural_image
Close-up of a hand holding a green cushioned object, partially lifted by a black metal frame (no visible text or symbols)natural_image
Close-up of a hand holding a black hardcover head with a red arrow pointing to the wheel (no text or symbols visible)natural_image
Close-up of a stroller with two wheels and a handle, showing red arrows indicating motion direction (no text or symbols)natural_image
Green and black stroller with camera mount, no visible text or symbolsnatural_image
Person wearing a green children's stroller with a red arrow pointing to the lower back (no text or symbols visible)natural_image
Close-up of a mechanical component with a highlighted circular detail (no visible text or symbols)natural_image
Close-up of two green children's strollers with black handles and white circular annotations (no text or symbols)natural_image
Hand holding a black mug against a green background (no text or symbols visible)natural_image
Two-step illustration showing a hand holding a black cup and a black container with a red arrow indicating the step (no text or symbols present)natural_image
Close-up of a hand holding a black container with a red arrow indicating rotation (no text or symbols visible)natural_image
Close-up of a car's wheel assembly with a red arrow indicating a specific component (no text or symbols visible)natural_image
Close-up of a mechanical component with red arrows indicating parts of a joint (no text or symbols visible)natural_image
Close-up of a mechanical component with red arrows pointing to features, no visible text or symbolsnatural_image
Close-up of a hand placing a green and white fabric item with 'baby' branding (no readable text or symbols beyond branding)natural_image
Close-up of a green safety belt with red arrows pointing to a black strap (no text or symbols visible)natural_image
Close-up of a person adjusting a green seatbelt (no visible text or symbols)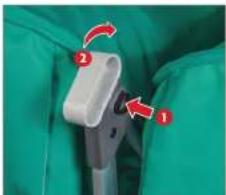
natural_image
Close-up of a medical device with green fabric and red arrows indicating motion or force (no text or symbols)natural_image
Person in green and black stroller with green seat, showing a red curved arrow indicating motion (no text or symbols)natural_image
Green and black stroller with a camera lens, shown from top (no text or symbols visible)natural_image
Close-up of a person adjusting a green safety umbrella with black metal components (no visible text or symbols)natural_image
Close-up of a person wearing a green and white chair seat with metal frame, no visible text or symbolsnatural_image
Close-up of a hand adjusting a green jacket with a red clip (no visible text or symbols)natural_image
Close-up of hands adjusting a green fabric with red directional arrows (no text or symbols visible)natural_image
Close-up of a person adjusting a green fabric or cushion on a white background, with a red belt and black interior (no visible text or symbols)Pour l'Abaisser: Slide tabs to unlock 1 and gently push footrest down 2.
UTILISATION DE LA POUSETTE UTILISATION
UTILISATION DE LA BOUCLE DE RETENUE
natural_image
Close-up of hands adjusting a black seatbelt with red arrows indicating adjustment (no text or symbols visible)natural_image
Close-up of a hand adjusting a black seatbelt on a green background (no text or symbols visible)natural_image
Close-up of a hand adjusting a green and white safety belt with a red arrow (no text or symbols visible)natural_image
Close-up of a hand adjusting a white safety belt with black straps against a green background (no text or symbols visible)natural_image
Close-up of a hand adjusting a green and gray safety patch on a vehicle chassis (no visible text or symbols)natural_image
Close-up of a person wearing a green shirt and holding a white bag with 'Prooby' text (no other visible text or symbols)natural_image
Close-up of a person adjusting a green and white backpack with a black clip (no visible text or symbols)natural_image
Close-up of a hand holding a green fabric with red arrows indicating direction (no text or symbols visible)natural_image
Close-up of hands installing a dark fabric bag onto a green cushioned garment (no text or symbols visible)natural_image
Close-up of hands using a tool to adjust or install a dark fabric item (no visible text or symbols)natural_image
Green and silver chair seats with black straps, no visible text or symbolsnatural_image
Close-up of a green baby stroller with black straps and a hand adjusting the seat (no visible text or symbols)natural_image
Close-up of a hand adjusting a green seatbelt with black straps and a red arrow pointing to the seat (no text or symbols visible)natural_image
Close-up of a hand adjusting a black button on a green and white striped surface, with no visible text or symbols.natural_image
Close-up of a person adjusting a white and green athletic vest with black straps, showing a red curved arrow (no text or symbols visible)natural_image
Green and gray children's seat frame with black support structures, no visible text or symbolsnatural_image
Close-up of a hand placing a white bag labeled 'baby' on a metal rack (no other text or symbols visible)