Vista - Stroller UPPAbaby - Free user manual and instructions
Find the device manual for free Vista UPPAbaby in PDF.

User questions about Vista UPPAbaby
0 question about this device. Answer the ones you know or ask your own.
Ask a new question about this device
Download the instructions for your Stroller in PDF format for free! Find your manual Vista - UPPAbaby and take your electronic device back in hand. On this page are published all the documents necessary for the use of your device. Vista by UPPAbaby.
USER MANUAL Vista UPPAbaby
natural_image
Exterior view of a red and silver baby stroller with black body, shown from front and side views (no text or symbols visible)EN TABLE OF CONTENTS
Warnings + General Safety Information 4
Cleaning + General Maintenance 8
Parts List 9
Pushchair Assembly 10
Carrycot Assembly 12
Carrycot Operation 13
Pushchair Operation 15
Car Seat Adapter Operation 22
Limited Warranty 23
Please read these instructions carefully prior to assembly and use.
ES TABLA DE CONTENIDOS
• NEVER leave your child unattended.
- Ensure that all the locking devices are engaged before use.
- Check that the pram body, seat unit or car seat attachment devices are correctly engaged before use.
- This seat unit is not suitable for children under 6 months.
- The UPPAbaby VISTA is suitable from 6 months and designed to accommodate a child up to a weight of 15kg (33 lbs) and a height of 101cm (40 in). Excessive weight may cause a hazardous unstable condition to exist. The product will become unstable if the manufacturer's recommended load is exceeded.
- Any load attached to the handle affects the stability of the pram/pushchair.
- Unit may become unstable if the manufacturer's recommended load is exceeded, or if a parcel bag, accessory, or rack other than that recommended by the manufacturer is used or hung from the unit.
• Maximum capacity for seat pocket .5 kg (1 lb).
• Maximum weight for the storage basket is 5 kg (11 lbs).
- This pushchair is intended to be used with one child only, unless equipped with UPPAbaby accessories.
- Accessories other than those approved by UPPAbaby should not be used.
• Always use the restraint system.
• Always use the crotch strap in combination with the waist belt and shoulder belts.
- To avoid injury, ensure that your child is kept away when folding and unfolding this product.
WARNINGS + GENERAL SAFETY INFORMATION
PUSHCHAIR WARNINGS:
⚠ WARNING
• DO NOT let your child play with this product.
- The canopy for the seat is not intended to retain the child.
- The brake must be locked while taking the child in or out of the pushchair, and when parked.
- Bumper bar must be attached at all times.
• DO NOT use the bumper bar without the bumper bar cover.
• DO NOT lift the pushchair by bumper bar as it may disengage.
- Children and adults should be clear of moving parts while making pushchair adjustments. Damage to fingers or extremities may occur when opening or closing the pushchair frame.
- NEVER leave child in the pushchair while ascending or descending stairs, or using an escalator.
- Children should not be left unattended in the pushchair with rain shield fitted.
- The stability of the pushchair will be impaired in high winds with the rain shield fitted and should be steadied by an adult at all times.
- Rain shield must be removed when indoors and in hot weather to prevent overheating and possible risk of suffocation.
• This product is not suitable for running or skating.
MAXI-COSI' INFANT CAR SEAT ADAPTER WARNINGS:
⚠ WARNING
- Weight limitations: recommended only for infants within the height and weight limits of infant car seat models specified in this manual.
- Always use the infant car seat restraint system as recommended by manufacturer.
- Intended for use with UPPAbaby VISTA pushchair only.
WARNINGS + GENERAL SAFETY INFORMATION
CARRYCOT WARNINGS:
⚠ WARNING
• DO NOT use if any part is broken, torn or missing.
• DO NOT let other children play unattended near the carrycot.
- Use only replacement parts supplied or approved by UPPAbaby.
- Audible "click" must be heard in order to determine that each lock is in the proper position. To ensure proper locking engagement, check to see that the carrycot/carry handle cannot be disengaged from the pram without unlocking the device.
- Check the handle and bottom of carrycot regularly for signs of damage and wear.
- The head of the child in the carrycot should never be lower than the child's body.
- This product is suitable only for a child who cannot sit up unaided, roll over and cannot push itself up on its hands and knees.
• Maximum weight of the child: 9 kg (20 lbs). Maximum child height: 63 cm (25 in).
⚠ WARNING CARELESSNESS CAUSES FIRE
Be aware of the risk of open fire and other sources of strong heat, such as electric bar fires, gas fires, etc. in the near vicinity of the carrycot. All fillings and composites have been tested to ensure compliance with the relevant ignitability test.
All covers and fillings have been tested to ensure that they are cigarette resistant.
All covers have been tested to ensure they are match resistant.
Tested to ensure compliance with the Furniture and Furnishings (Fire) (Safety) Regulations.
WARNINGS + GENERAL SAFETY INFORMATION
⚠ WARNING SUFFOCATION HAZARD
- Infants can suffocate in gaps between an extra pad and side of carrycot or on soft bedding.
- NEVER add a mattress, pillow, comforter, or padding. Use ONLY the pad provided by the manufacturer.
- Infant carrycot can roll over on soft surfaces and suffocate child. NEVER place carrycot on beds, sofas, or other soft surfaces.
• To reduce the risk of SIDS Pediatricians recommend healthy infants be placed on their backs to sleep, unless otherwise advised by a Physician.
⚠ WARNING FALL HAZARD
- To prevent falls, do not use this product when the infant begins to push up on hands and knees or has reached manufacturer's recommended maximum weight, whichever comes first.
- Child's movement can slide carrycot. NEVER place carrycot near edges of counter tops, tables, or other elevated surface.
- Use only on a firm, horizontal, level and dry surface when not in use with the pushchair.
- If the carrycot is intended to be used with a stand, check that the dimensions of the latter correspond to those of the carrycot base (36 cm w x 69.9 cm h).
- This carrycot is designed to be used with the UPPAbaby VISTA pushchair and UPPAbaby carrycot stand only.
- NEVER use the carrycot as a means to transport an infant in a motor vehicle.
- To avoid serious injury or death to your child, do not use this carrycot as a car bed.
- Use of carrycot cover is recommended for added safety of your child.
• Manufactured to comply with: BS EN 1888:2012, EN 1466:2014. - All fabric complies with Furniture and Furnishings Fire Safety Regulations.
CLEANING + GENERAL MAINTENANCE
CLEANING:
- Clean frame with a damp cloth and a mild detergent; dry thoroughly. DO NOT use abrasives.
- If the pushchair chassis parts have been exposed to salt water we recommend that they be rinsed with fresh (tap) water as soon as possible to avoid corrosion. Always dry frame if wet
- All fabrics are removable.
• To extend the life of your VISTA's fabric, keep it clean and do not leave it in direct sunlight for long periods of time. - Do not fold or store the VISTA if it is damp or wet, nor store in a damp environment.
MAINTENANCE AND REPAIR:
- This pushchair requires regular user maintenance. Regularly check all connecting hardware (rivets, screws, etc.) for tightness and security.
- Inspect your VISTA periodically. Seek prompt repairs, replacing worn or broken parts as needed. Check all safety devices, locks and harnesses for correct and secure operation. Never continue to use a product that is structurally unsound.
- Only UPPAbaby replacement parts should be used. It may be unsafe to use parts supplied by another manufacturer.
- Do not make any alterations or modifications to the pushchair with products not supplied by the manufacturer as this may cause instability or structural damage not covered under warranty.
- Contact Customer Service with any repair questions.
CLEANING ALL REMOVABLE FABRICS

Spot clean or hand wash gently in cold water with mild detergent.

Dry flat and away from direct sunlight before re-use or storage.
DO NOT bleach, iron or dry clean.
CLEANING INNER CARRYCOT FABRICS

Machine wash cold gentle cycle with mild detergent.

Dry flat and away from direct sunlight before re-use or storage.
DO NOT bleach, iron or dry clean.
UPPAbaby reserves the right to make design changes and improvements to any of our products as part of our commitment to innovation.
PARTS LIST

text_image
Ubuv protection Canopy Bumper Bar with Cover Telescoping Handlebar Pushchair Frame BasketSeat Ubuv protection Carrycot Canopy Mattress + Mattress Cover Front Wheels Back Wheels Carrycot Cover Carrycot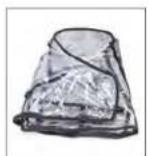
Toddler Seat
Rain Shield
Toddler Seat Insect Net
Carrycot Rainshield
Carrycot Insect Net
Maxi-Cosi Car Seat Adapter
Carrycot Storage Bag
PUSHCHAIR ASSEMBLY
UNFOLDING THE PUSHCHAIR
natural_image
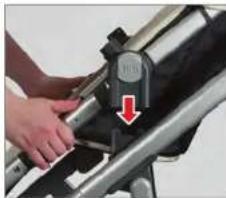
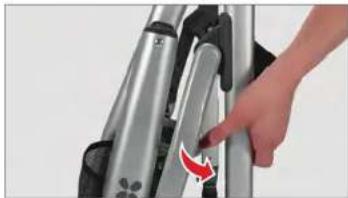
Close-up of a hand adjusting a metallic chair seat with a red arrow indicating the adjustment (no text or symbols visible)STEP 1: Push latch back with your thumb to release locking mechanism.
natural_image
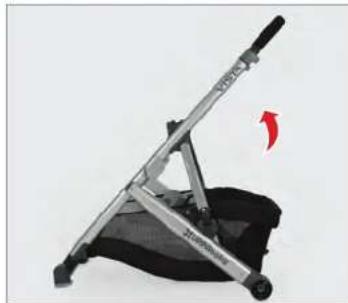
Mechanical device with a black base and metallic lever, showing a red arrow indicating motion direction (no text or symbols)STEP 2: Pull handle upward until frame locks open.
INSTALLING FRONT/BACK WHEELS

natural_image
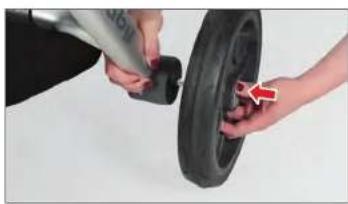
Close-up of a hand adjusting a black bicycle tire with a red arrow indicating the handle (no text or symbols visible)To Install Front Wheels: Slide wheel post into housing until it locks into place.
natural_image
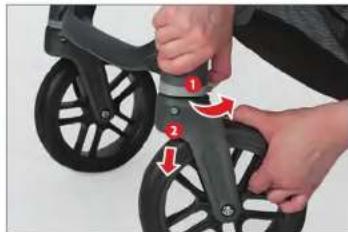
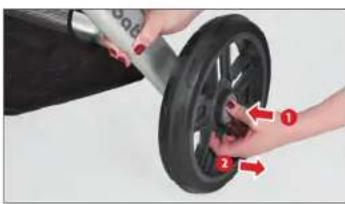
Close-up of hands adjusting a black bicycle seat with numbered adjustment arrows (no text or symbols visible)To Remove Front Wheels: Slide plastic lever clockwise 1 and pull the wheel out 2.
natural_image
Close-up of hands adjusting a black tire with a red arrow pointing to the wheel (no text or symbols visible)To Install Back Wheels: While pressing in hubcap, slide wheel onto axle until it locks into place.
natural_image
Close-up of hands using a car tire to adjust the wheel (no text or symbols visible)To Remove Back Wheels: Push the hubcap in ① and pull the wheel out ②.
PUSHCHAIR ASSEMBLY
ATTACHING/REMOVING THE SEAT
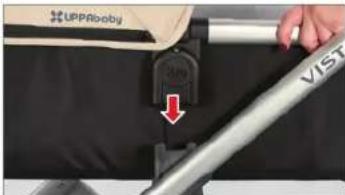
natural_image
Close-up of a hand using a mechanical tool to adjust or install a component, with a red arrow pointing to the component (no visible text or symbols)
natural_image
Close-up of hands operating a metal mechanical device with a red arrow indicating a downward motion (no text or symbols visible)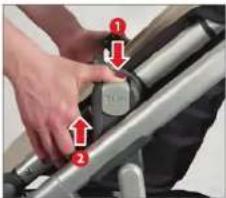
text_image
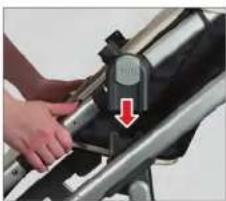
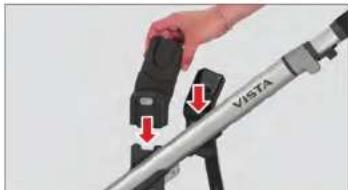
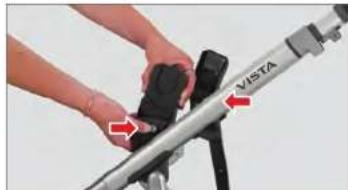
Instructional image showing hand positioning of a mechanical component with numbered callouts and red arrows indicating movement or adjustment.To Attach Seat: Lower seat onto frame in forward or reverse position and press down until it clicks into place. Pull up on seat to ensure it is locked to frame.
To Remove Seat: Simultaneously push down release buttons ① and lift seat from frame ②
ATTACHING/REMOVING THE BUMPER BAR
natural_image
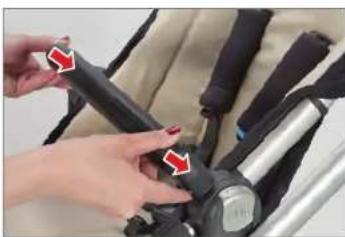
Close-up of hands adjusting a black seatbelt buckle (no text or symbols visible)STEP 1: Insert metal posts into bumper bar attachment slots found on both sides of seat.
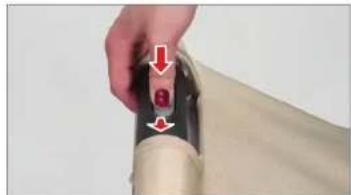
natural_image
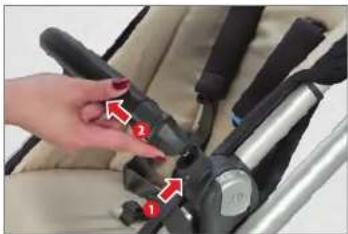
Close-up of a hand adjusting a car seatbelt with red arrows pointing to specific parts (no text or symbols visible)STEP 2: To remove, press button at bottom of plastic housing ① and lift bumper bar out ②.
NOTE: Bumper bar should not be used without the bumper bar cover.
CANOPY INSTALLATION
natural_image
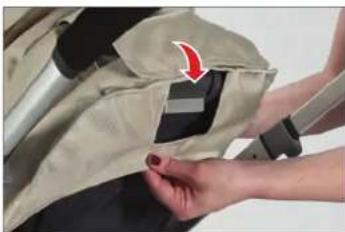
Close-up of hands adjusting a beige garment with a red arrow pointing to the seam (no text or symbols visible)STEP 1: Pull canopy fabric over seat back recline button.
natural_image
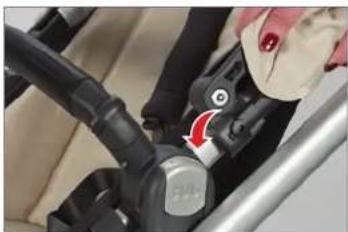
Close-up of a hand adjusting a bicycle seatbelt with a red arrow indicating the angle (no text or symbols visible)STEP 2: Snap each side of canopy attachment to seat frame.
CARRYCOT ASSEMBLY
SETTING UP THE CARRYCOT
natural_image
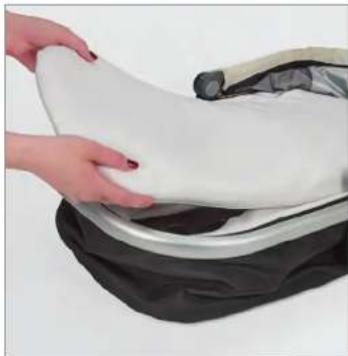
Close-up of hands pressing down on a white fabric or cushioned object (no text or symbols visible)STEP 1: Remove mattress.
natural_image
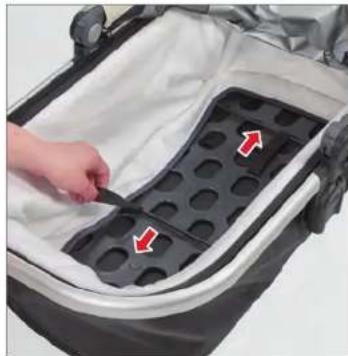
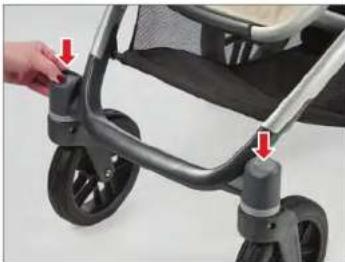
Close-up of a hand placing a plastic tray with red arrows indicating direction (no text or symbols visible)STEP 2: Pull both steel braces firmly towards the outer ends of the carrycot into their respective sockets. Make sure both braces are properly locked in place.
natural_image
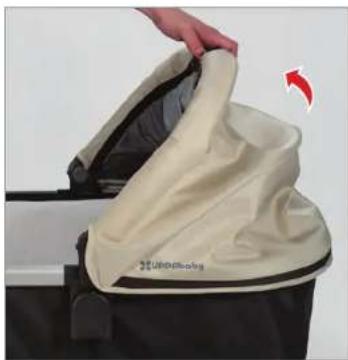
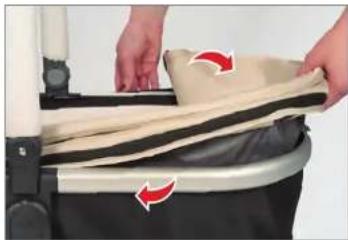
Close-up of a beige fabric bag with a hand adjusting its top part, showing a red arrow indicating rotation (no text or symbols visible)STEP 3: Pull carrycot canopy handle upright until an audible "click" is heard.
natural_image
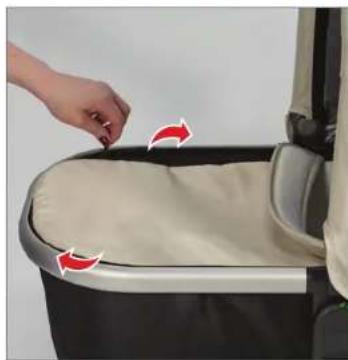
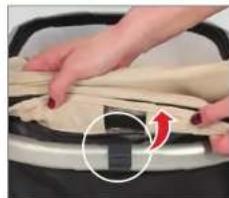
Close-up of a hand pressing down on a beige car trunk with red arrows indicating motion (no text or symbols visible)STEP 4: Zip carrycot cover onto carrycot frame
CARRYCOT OPERATION
ATTACHING CARRYCOT TO PUSHCHAIR FRAME
text_image
UPPRooby 300 VISTTo Attach Carrycot to Pushchair Frame: Guide the carrycot hubs over the posts on the pushchair frame. Push until you hear a "click" on both sides.
NOTE: Check that safety indicator is green to ensure carrycot is properly installed.
natural_image
Close-up of a hand holding a small object with red arrows indicating movement or force (no text or symbols visible)To Remove Carrycot from Pushchair Frame: Slide plastic button on carry handle in the direction indicated and press down to release carrycot. Lift carrycot off frame using carry handle.
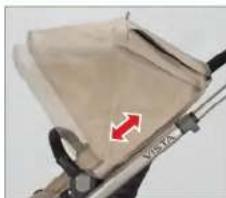
CANOPY VENTILATION
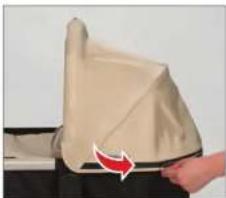
natural_image
Close-up of a hand holding a beige fabric or cloth, with a red arrow pointing to the fabric area (no text or symbols visible)STEP 1: Unzip the bottom zipper on the canopy hood.
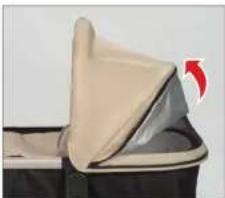
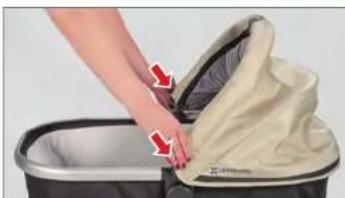
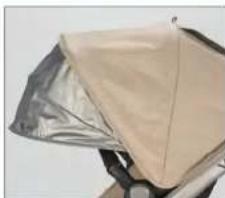
natural_image
Close-up of a folded fabric or cushion with beige top and gray side, no visible text or symbolsSTEP 2: Lift and line up seam half-way until magnets connect.
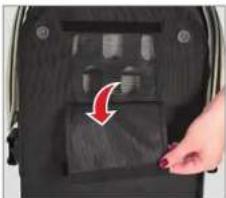
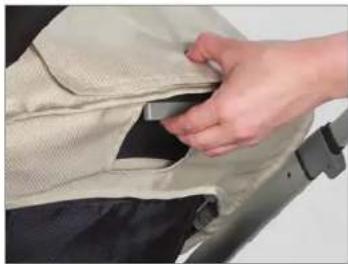
natural_image
Close-up of a hand pressing down on a black plastic bag with a red arrow indicating the motion (no text or symbols visible)For Additional Ventilation: Undo Velcro flap found on bottom exterior of carrycot and adhere to lower Velcro strip.
COLLAPSING CARRYCOT
natural_image
Close-up of a hand placing a beige bag into a trash bin (no text or symbols visible)STEP 1: Collapse carrycot canopy by simultaneously pressing buttons on both sides and pushing back.
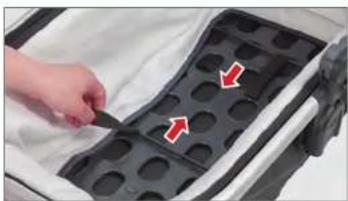
natural_image
Close-up of a hand using a tool to cut a black plastic tray with circular indentations (no text or symbols visible)STEP 2: Lift mattress out of the way. Disengage by pulling steel braces from their respective sockets.
CARRYCOT OPERATION
PROPER USE OF ACCESSORIES
natural_image
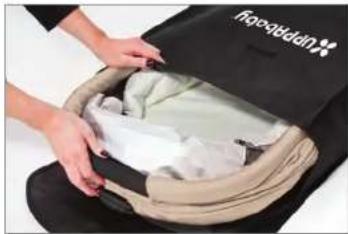
Person placing a black bag labeled 'floepstubb' into a brown box filled with folded clothes (no text or symbols visible)Using Carrycot Storage Bag: Slide collapsed carrycot into bag and fasten Velcro tab.
natural_image
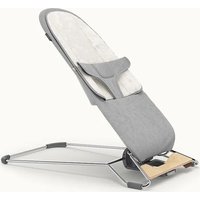
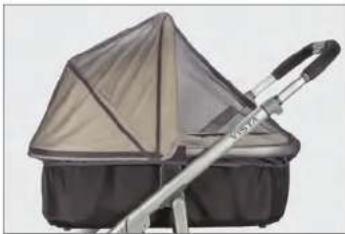
Product photo of a baby crib with a metal handle and triangular canopy (no text or symbols visible)Proper Use of Carrycot Insect Net
REMOVING CARRYCOT FABRICS

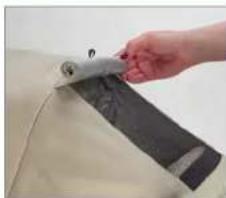
natural_image
Person adjusting a beige seatbelt with red arrows indicating motion (no text or symbols visible)STEP 1: Unzip canopy zippers located on the underside of canopy where fabric meets the carry handle.

natural_image
Close-up of a person's hands securing a black cable clip (no text or symbols visible)STEP 2: Pull canopy support frame from hub on one side.
natural_image
Close-up of hands folding a piece of paper into a pot (no text or symbols visible)STEP 3: Detach support frame from rear clip.
natural_image
Close-up of hands performing a massage or rolling exercise on a chair (no text or symbols visible)STEP 4: Slide fabric off canopy support frame.

natural_image
Close-up of a hand placing a white plastic bag with red directional arrows on its side (no text or symbols visible)To Remove Carrycot Fabric: Unzip liner from interior carrycot frame.
PUSHCHAIR OPERATION
SETTING THE SWIVEL/LOCKING SYSTEM
natural_image
Close-up of a baby stroller with hand adjusting the wheel (no text or symbols visible)To Lock Front Wheel Swivel: Push grey button down to activate lock.
To Unlock Front Wheel Swivel: Push grey button down to deactivate lock.
SETTING THE BRAKE
natural_image
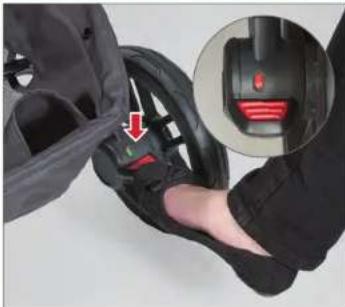
Close-up of a hand adjusting a black seatbelt with red buttons, showing the mechanism and detail (no text or symbols visible)To Lock Brake: Push down pedal with foot to lock. NOTE: Check that safety indicator is RED to ensure lock is engaged.
natural_image
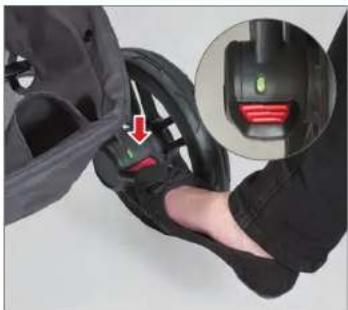
Close-up of a hand pressing a black brake pad with a red belt, showing the mechanism and magnified detail (no text or symbols visible)To Release Brake: Push pedal down again to release. NOTE: Safety indicator will return to GREEN.
PUSHCHAIR OPERATION
ADJUSTING HANDLE HEIGHT + LEG REST
natural_image
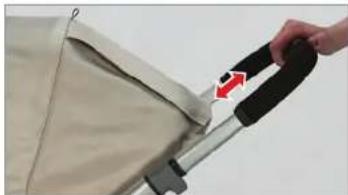
Close-up of a hand holding a black handle with a red arrow pointing to a beige fabric item (no text or symbols visible)To Adjust Handle: Squeeze button at top and slide handle to one of three desired positions suited to user height and comfort.
natural_image
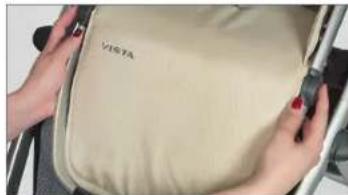
Close-up of hands holding a beige VISTA cushion device (no visible text or symbols on the device itself)To Adjust Leg Rest: Simultaneously push buttons on sides of leg rest and rotate to desired position.
ADJUSTING CANOPY
natural_image
Close-up of a beige stroller with a red arrow pointing to the seat area, no visible text or symbols.To Adjust Canopy: Slide canopy attachment simultaneously up or down the seat frame for desired height.
natural_image
Close-up of a beige and silver fabric sample (no text or symbols visible)To Use Sunshade: Pull sunshade out for SPF 50 sun protection.
natural_image
Close-up of a hand adjusting a dark fabric or material on a beige surface (no text or symbols visible)To Use Peek-a-boo Window: Roll flap and secure toggle button to elastic.
RECLINING SEAT
natural_image
Close-up of a hand adjusting a beige fabric or cushion with a zipper, no visible text or symbolsTo Recline Seat: Engage button on seat back and tilt seat to desired position. Release button to lock in one of five preset positions.
NOTE: DO NOT use upright position for infants less than six months old. Use the most reclined position and gradually reposition seat upright as child is able to support his or her head without assistance.
PUSHCHAIR OPERATION
natural_image
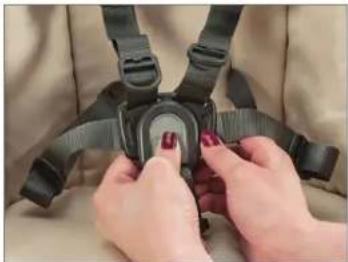
Close-up of hands adjusting a black car seatbelt buckle (no text or symbols visible)To Lock the Harness: Slide belt ends into center lock housing until it clicks together.
natural_image
Close-up of hands adjusting a black seatbelt buckle (no text or symbols visible)To Unlock the Harness: Depress grey button at center and pull apart.
ADJUSTING THE HARNESS STRAP LENGTH
text_image
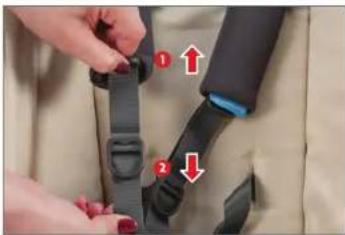
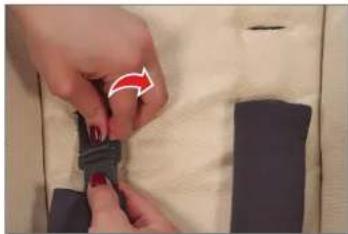
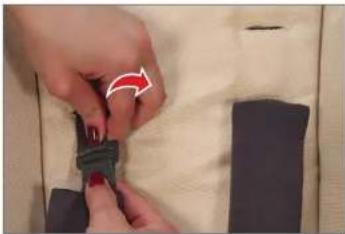
Close-up of a belt buckle assembly with numbered parts and red arrows indicating adjustment stepsTo Loosen Harness Strap: Pull up on ladder lock 1 and pull down on webbing 2.

natural_image
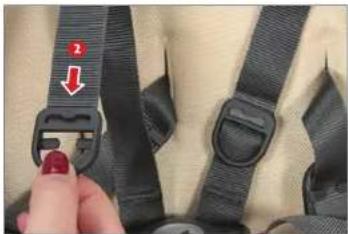
Close-up of a hand adjusting a black belt buckle with a red arrow pointing to the buckle (no text or symbols visible)To Tighten Harness Strap: Pull down on slip ring.
natural_image
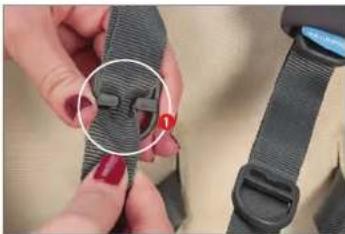
Close-up of hands adjusting a gray belt buckle with a red button, no visible text or symbolsFor a Tighter Fit: Pinch webbing and release from back of slip ring 1 Pull strap down until snug 2
natural_image
Close-up of a hand adjusting a belt buckle with a red arrow pointing to the buckle (no text or symbols visible)PUSHCHAIR OPERATION
ADJUSTING SHOULDER HARNESS HEIGHT

natural_image
Close-up of hands adjusting a dark fabric buckle with a red arrow indicating rotation (no text or symbols visible)STEP 1: Detach grey adjustment clip from harness attachment loop.
natural_image
Close-up of a hand holding a dark rectangular object, partially visible against a white background (no text or symbols)STEP 2: Reattach clip to the desired harness loop.
NOTE: Use loop location above child's shoulder line, or closest to child's shoulder.
CORRECT ATTACHMENT OF ACCESSORIES
natural_image
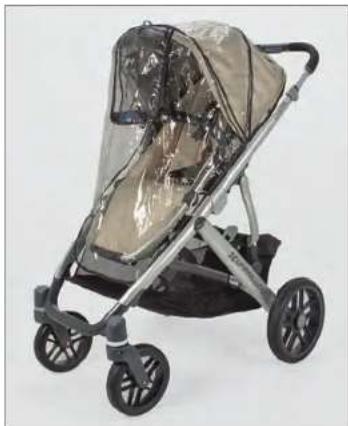
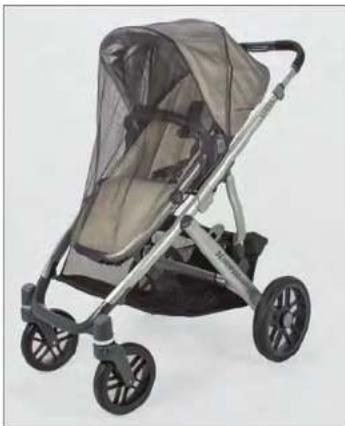
Exterior view of a baby stroller with transparent cover and black wheels (no text or symbols visible)Proper Installation of Rain Shield Proper Installation of Insect Net
natural_image
Exterior view of a baby stroller with black wheels and a mesh canopy (no text or symbols visible)PUSHCHAIR OPERATION
FOLDING THE STROLER
NOTE: When folding frame with seat attached, seat must be in forward facing and upright position.
natural_image
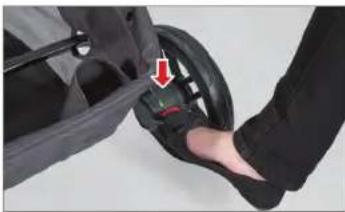
Close-up of a person's foot wearing a black athletic shoe, with a red arrow pointing to the wheel (no text or symbols visible)STEP 1: Activate brake to prevent pushchair from rolling forward while folding.
natural_image
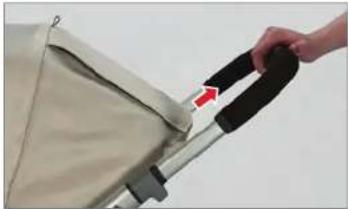
Close-up of a hand holding a black handle attached to a beige fabric or towel, with a red arrow pointing to the handle (no text or symbols visible)STEP 2: Engage button on top of handle bar and extend to highest position.
NOTE: Handle must be in highest position for pushchair to stand when folded.

natural_image
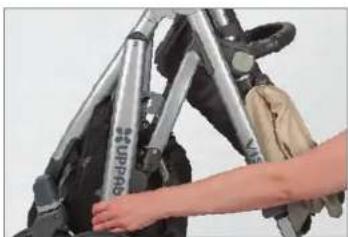
Close-up of a hand holding a beige fabric with red arrows pointing to the band (no text or symbols visible)STEP 3: Place index fingers on both slide release triggers and slide upward until frame begins to fold.
natural_image
Close-up of a hand adjusting a stroller with metal frame and cloth (no visible text or symbols)STEP 4: Once pushchair begins to fold, hold handle bar with right hand and reposition left hand onto back leg.
natural_image
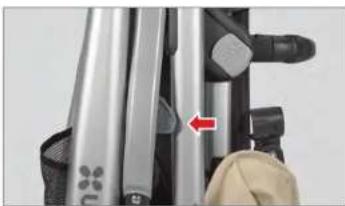
Close-up of a hand holding a metallic object with a red arrow pointing to a small component (no visible text or symbols)STEP 5: Continue to fold pushchair until latch on left side has engaged.
natural_image
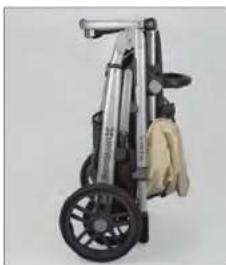
Exterior view of a modern office building (no signage)NOTE:
Pushchair will stand when folded.
PUSHCHAIR OPERATION
REMOVING FABRICS FROM SEAT
natural_image
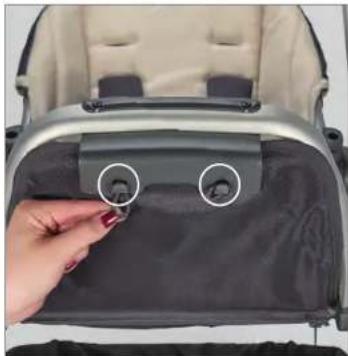
Close-up of a baby stroller with a hand adjusting the pocket, showing black fabric and buttons (no text or symbols visible)STEP 1: Unfasten elastic loops from lower footrest.
natural_image
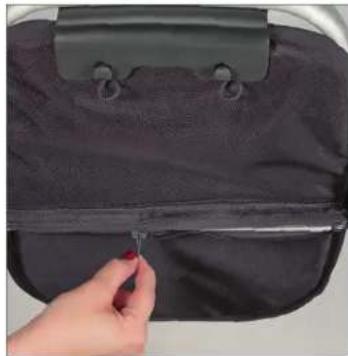
Close-up of a hand inserting a small object into a dark fabric bag (no text or symbols visible)STEP 2: Unzip retainer pocket located on underside of seat.
natural_image
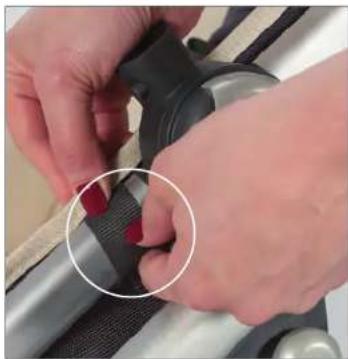
Close-up of hands adjusting a zipper on a car seatbelt (no text or symbols visible)STEP 3: Unsnap nylon webbing from frame.
natural_image
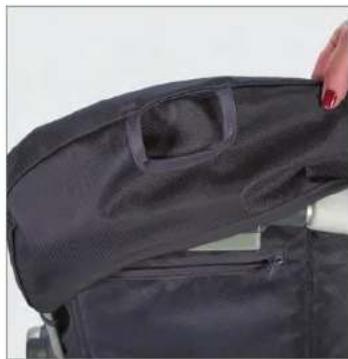
Close-up of a dark fabric jacket with zipper and pocket, partially open by hand (no visible text or symbols)STEP 4: Remove seat fabric from frame.
NOTE: Reverse steps when replacing seat fabric.
PUSHCHAIR OPERATION
REMOVING FABRICS FROM CANOPY
NOTE: Remove canopy from toddler seat prior to removing canopy fabric.
natural_image
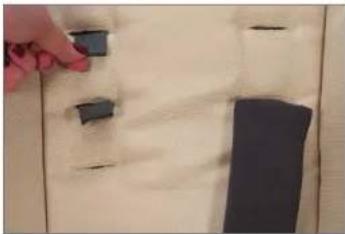
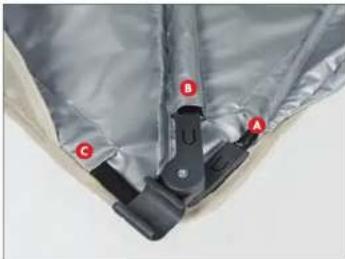
Close-up of a metallic fabric with black connectors and red labels (A, B, C) pointing to specific parts (no readable text or symbols beyond labels)STEP 1: Lift canopy fabric up to view canopy support frames and canopy mounting bracket from interior of canopy.
NOTE: Front rounded canopy support frame A middle support frame and back support frame attached to mounting bracket C.
natural_image
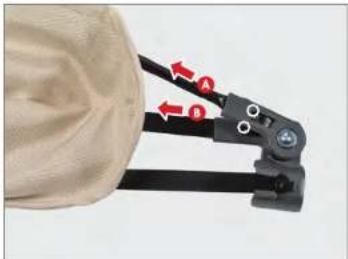
Close-up of a crimping tool with red arrows indicating force direction (no text or symbols visible)STEP 2: Flip canopy over to outside view. With a small screw driver, push tabs in opening on hinges in and pull canopy support frames A and B out.
natural_image
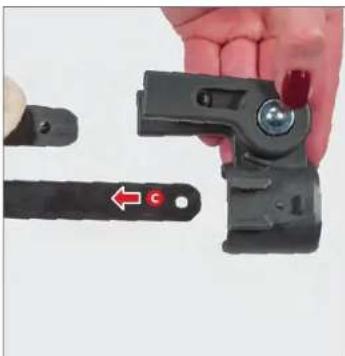
Close-up of a hand holding a black mechanical clamp with a red arrow pointing to a circular mark (no text or symbols visible)STEP 3: Remove back canopy support frame C from canopy mounting bracket by sliding it upward.
natural_image
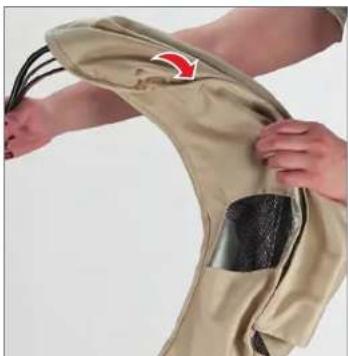
Close-up of hands holding a beige fabric or sleeve with a black zipper, no visible text or symbolsSTEP 4: Sliding canopy fabric off of all three exposed canopy support frames.
NOTE: Reverse steps when replacing canopy.
NOTE: Prior to fitting adapter to VISTA chassis, engage brake on VISTA and remove seat from chassis.
natural_image
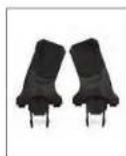
Close-up of a hand holding a camera lens and a VISTA tool, with red arrows indicating motion direction (no text or symbols on the device itself)To Attach: Place adapters (logo facing out) onto seat attachments and press until you hear a click.
text_image
VISTATo Remove: Press button to lift from pushchair frame.
NOTE: The adapters are left and right specific.
Match the colored dot to the coordinating color dot on the pushchair chassis.
FITTING MAXI-COSI SEAT TO ADAPTERS
natural_image
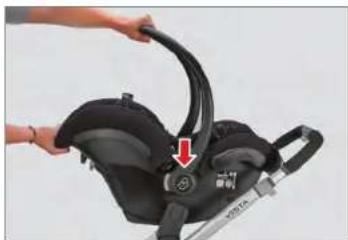
Close-up of a hand holding a black car seatbelt device with a red arrow pointing to the seatbelt (no text or symbols visible)STEP 1: With infant car seat facing pushchair handle, position above chassis aligning base of car seat handle with adapters.
STEP 2: Push car seat onto adapter posts.
natural_image
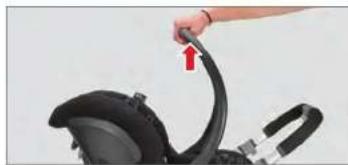
Close-up of a hand holding a black bicycle seatbelt with a red arrow pointing to the handle (no text or symbols visible)STEP 3: Make sure side lock tabs are engaged. Lift up on car seat handle to check attachment.
natural_image
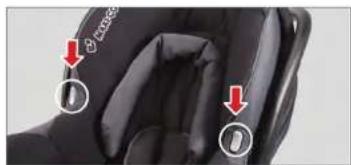
Close-up of a black car seat with red arrows pointing to labeled parts (I and D), no visible text or symbols beyond labels.To Remove: Simultaneously push release triggers found on car seat located by inside of carry handle.
Compatible with the following Maxi-Cosi* infant car seats: Citi*, Cabrio*, CabrioFix* and Mico*.
LIMITED WARRANTY
Your UPPAbaby pushchair is warranted to be free from any manufacturing defects for a period of 2 years from the date of purchase under normal use and in compliance with the operating instructions.
This warranty is not transferable and extends only to the original retail purchaser and is only valid when supplied with proof of purchase. PLEASE RETAIN PROOF OF PURCHASE FOR THIS LIMITED WARRANTY.
The warranty is valid only in the original country of purchase. This warranty is subject to the conditions set forth by country in which the items were purchased. Conditions may vary. UPPAbaby will not ship replacement or repair parts out of the country of purchase.
UPPAbaby will provide replacement parts or conduct repairs as determined fitting by the company. UPPAbaby reserves the right to exchange item with a replacement part. Some parts may be replaced with newer model parts as the pushchair is improved over time.
Please NOTE that a repair issue will NOT be covered by this warranty if:
- The issue is caused by misuse or poor maintenance. Please refer to this instruction booklet for guidance on pushchair use and maintenance.
- Damage is caused by improper installation of UPPA baby parts and/or accessories. Please refer to this instruction booklet for guidance on pushchair assembly and use.
- Damage is corrosion, mold or rust caused by lack of maintenance or service.
- Damage is due to general wear and tear, which is the result of everyday use or negligence.
- Damage is caused by sun intensity, sweat, detergents, damp storage or frequent washings.
• Repairs or modifications are carried out by a third party. - Pushchair is purchased from an unauthorized retailer. Approved retailers are listed on our website at uppababy.com.
- Pushchair is second-hand.
- Pushchair is damaged as a result of an accident, airline or freight damage.
UPPAbaby reserves the right to determine if warranty terms and conditions have been met.
Please contact your local distributor if you have any questions regarding warranty.
CUSTOMER SERVICE
| COUNTRY CONTACT TELEPHONE WEBSITE | |||
| US | Monahan Products, 60 Sharp Street Hingham, MA 02043 | 1.844.823.3132 uppababy.com | |
| UK | Distributor Corporation UK Ltd.Suite G444, Dean Clough Mills, Halifax, HX3 5AX | 0203.371.7784 uppababy.com | |
Register your pushchair online at uppababy.com.
natural_image
Close-up of a hand adjusting a metallic chair seat with a red accent (no text or symbols visible)natural_image
Mechanical device with a black base and metallic lever, showing a red arrow indicating motion direction (no text or symbols visible)natural_image
Close-up of a hand adjusting a black stroller with a red arrow pointing to the handle (no text or symbols visible)natural_image
Close-up of hands adjusting a black bicycle frame with numbered adjustment arrows (no text or symbols visible)natural_image
Close-up of hands adjusting a tire with a small mechanical component (no visible text or symbols)natural_image
Close-up of hands using a tire to adjust the wheel, showing red arrows indicating motion (no text or symbols)natural_image
Close-up of hands using a mechanical device to adjust or install a component, with a red arrow pointing to the component (no visible text or symbols)natural_image
Close-up of hands operating a mechanical device with a red arrow pointing to a component (no visible text or symbols)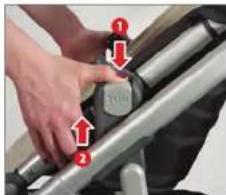
text_image
Instructional image showing hand positioning on a device with numbered arrows and labelsnatural_image
Close-up of hands adjusting a black seatbelt component with red arrows pointing to the handle (no text or symbols visible)natural_image
Close-up of a hand adjusting a car seatbelt switch (no visible text or symbols)natural_image
Close-up of hands adjusting a beige belt buckle with a red arrow pointing to the buckle (no text or symbols visible)natural_image
Close-up of a hand adjusting a car seatbelt switch with a red arrow indicating rotation (no text or symbols visible)natural_image
Close-up of hands pressing down on a white cushioned object, partially covered by black and gray fabric (no text or symbols visible)natural_image
Close-up of a baby stroller with a hand adjusting its tray, showing red arrows indicating movement or features (no text or symbols visible)natural_image
Close-up of a hand holding a beige fabric or cushion, with a red arrow indicating rotation (no text or symbols visible)natural_image
Close-up of a hand pressing down on a car interior with red arrows indicating motion (no text or symbols visible)natural_image
Close-up of a hand holding a small object with red arrows indicating movement or force (no text or symbols visible)natural_image
Close-up of a hand holding a beige fabric or cloth, with a red arrow pointing to the fabric area (no text or symbols visible)natural_image
Close-up of a folded fabric or cushion with beige top and gray side, showing a red arrow indicating direction (no text or symbols)natural_image
Close-up of a black backpack cover with a hand adjusting its side panel, showing a red arrow pointing to the interior (no text or symbols visible)natural_image
Close-up of hands cleaning a beige bag from a metal trash bin (no text or symbols visible)natural_image
Close-up of a hand using a tool to cut a black plastic tray with circular holes, marked by red arrows (no text or symbols visible)natural_image
Person placing a bag of clothes into a blanket (no visible text or symbols)natural_image
Product photo of a baby walker with a mesh canopy and handle (no text or symbols visible)natural_image
Person adjusting a beige helmet with red arrows indicating motion (no text or symbols visible)natural_image
Close-up of a hand using a clamping tool to lift a piece of fabric (no text or symbols visible)natural_image
Close-up of hands pressing down on a cloth or fabric component with a magnified inset showing a circular detail (no text or symbols visible)natural_image
Close-up of hands handling a beige fabric or cushion on a black tray, with red arrows indicating direction (no text or symbols visible)natural_image
Close-up of a hand placing a white plastic bag into a black box, with red arrows indicating rotation (no text or symbols visible)natural_image
Close-up of a baby stroller with red arrows pointing to the handle (no text or symbols visible)natural_image
Close-up of a hand pressing a black brake pad with red buttons, showing the pad's mechanism (no text or symbols visible)natural_image
Close-up of a hand pressing a black brake pad with a red belt buckle, showing the mechanism (no text or symbols visible)natural_image
Close-up of a hand holding a black handle attached to a beige fabric or towel, with a red arrow pointing to the handle (no text or symbols visible)natural_image
Close-up of hands holding a beige VISTA cushion cover, placed on a metal frame (no text or symbols visible)natural_image
Close-up of a beige stroller with a red arrow pointing to the seat area (no text or symbols visible)natural_image
Close-up of a beige fabric bag attached to a metallic foil, no visible text or symbolsnatural_image
Close-up of a hand holding a gray fabric strip attached to a white surface (no text or symbols visible)natural_image
Close-up of a hand adjusting a beige fabric or cushion with a black hole, no visible text or symbolsnatural_image
Close-up of hands adjusting a black seatbelt buckle (no text or symbols visible)natural_image
Close-up of hands adjusting a black seatbelt buckle (no text or symbols visible)natural_image
Close-up of a person's seatbelt buckle being adjusted, showing red arrows indicating fastening (no text or symbols visible)natural_image
Close-up of a hand adjusting a black belt buckle with a red arrow pointing to the buckle (no text or symbols visible)natural_image
Close-up of hands adjusting a gray belt buckle with a red circular detail (no text or symbols visible)natural_image
Close-up of a hand adjusting a black belt buckle with a red arrow pointing to the buckle (no text or symbols visible)natural_image
Close-up of hands adjusting a belt buckle with a red arrow indicating rotation (no text or symbols visible)natural_image
Hand placing a dark rectangular object onto a white surface, with no visible text or symbolsnatural_image
Exterior view of a baby stroller with transparent cover and black frame (no text or symbols visible)natural_image
Exterior view of a modern baby stroller with black wheels and a mesh canopy (no text or symbols visible)natural_image
Close-up of a person's foot wearing a black athletic helmet and wristband, with a red arrow pointing to a small electronic component (no text or symbols visible)natural_image
Close-up of a hand adjusting a black handle with a red arrow pointing to a beige fabric item (no text or symbols visible)natural_image
Close-up of hands holding a beige fabric with a black handle, no visible text or symbolsnatural_image
Close-up of a person's arm wearing a UPRB-branded metal vehicle (no visible text or symbols)natural_image
Close-up of a hand holding a metallic camera lens and grip, with a red arrow pointing to the lens (no text or symbols visible)natural_image
Close-up of a silver and black stroller with a cloth, no visible text or symbolsnatural_image
Close-up of a baby stroller with a hand adjusting a button (no text or symbols visible)natural_image
Close-up of a hand inserting a small object into a dark fabric bag (no text or symbols visible)natural_image
Close-up of hands adjusting a black textured object with a red circular highlight (no text or symbols visible)natural_image
Close-up of a black garment sleeve with zipper, partially open by hand (no visible text or symbols)natural_image
Close-up of a metallic fabric with labeled points A, B, C (no text or symbols beyond labels)natural_image
Close-up of a mechanical crimping tool with labeled parts (A, B) and directional arrows indicating movement (no text or symbols on the tool itself)natural_image
Close-up of a hand holding a black mechanical clamp with a red arrow pointing to a small circular mark (no text or symbols visible)natural_image
Close-up of hands holding a beige fabric with black bands and a red arrow indicating direction (no text or symbols)natural_image
Close-up of a hand holding a camera lens with red arrows indicating motion, next to a metallic object labeled 'VISTA' (no text beyond label)natural_image
Close-up of hands holding a camera lens with red arrows indicating motion direction (no text or symbols visible)natural_image
Close-up of a hand adjusting a black athletic seatbelt device with a red arrow pointing to the seat area (no text or symbols visible)natural_image
Close-up of a hand holding a black car seatbelt with a red arrow pointing to the handle (no text or symbols visible)natural_image
Close-up of a black car seat with red arrows and circular annotations (no readable text or symbols)natural_image
Close-up of a hand adjusting a metallic mechanical device with a red arrow indicating the adjustment (no text or symbols visible)natural_image
Mechanical device with a black base and metallic lever, showing a red arrow indicating motion direction (no text or symbols)natural_image
Close-up of a hand adjusting a black stroller with a red arrow pointing to the handle (no text or symbols visible)natural_image
Close-up of hands adjusting a black bicycle seatbelt with red arrows indicating adjustment (no text or symbols visible)natural_image
Close-up of hands adjusting a black tire with a red arrow pointing to the wheel (no text or symbols visible)natural_image
Close-up of hands using a tire to adjust the wheel (no text or symbols visible)natural_image
Close-up of a hand using a mechanical clamp to adjust or install a component, with a red arrow pointing to the component (no visible text or symbols)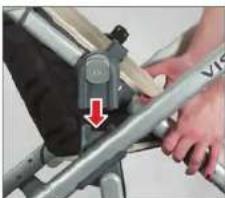
natural_image
Close-up of hands using a mechanical clamp or bracket to adjust a metal component (no visible text or symbols)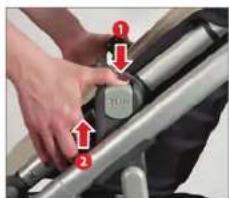
text_image
Instructional image showing hand positioning of a mechanical component with numbered arrows and labelsnatural_image
Close-up of hands adjusting a black seatbelt component with red arrows indicating adjustment (no text or symbols visible)text_image
Close-up of a hand adjusting a car seatbelt with numbered labels pointing to specific partsnatural_image
Close-up of hands adjusting a beige garment with a red arrow pointing to the seam (no text or symbols visible)natural_image
Close-up of a hand adjusting a bicycle wheel handle with a red arrow indicating the lever (no visible text or symbols)natural_image
Close-up of hands pressing down on a white fabric or cushioned object (no text or symbols visible)natural_image
Close-up of a hand adjusting a black plastic tray with red arrows indicating features (no text or symbols visible)natural_image
Close-up of a hand holding a beige fabric bag with a red arrow indicating rotation (no text or symbols visible)natural_image
Close-up of a hand pressing down on a beige plastic bag with red arrows indicating rotation (no text or symbols visible)natural_image
Close-up of a hand holding a black object with red arrows pointing to a small circular feature, no visible text or symbols.natural_image
Close-up of a hand holding a beige fabric with a red arrow indicating compression (no text or symbols visible)natural_image
Close-up of a beige fabric or cushion component with a red arrow indicating rotation (no text or symbols visible)natural_image
Close-up of a hand pressing down on a black plastic component with a red arrow indicating rotation (no text or symbols visible)natural_image
Close-up of a hand placing a beige bag into a trash bin with red arrows indicating the process (no text or symbols visible)natural_image
Close-up of a hand using a tool to adjust a black plastic tray with circular holes, no text or symbols visiblenatural_image
Person placing folded clothes into a black bag with white text 'floostudin' on the cover (no other visible text or symbols)natural_image
Product photo of a baby walker with a triangular canopy and metal handle (no text or symbols visible)natural_image
Person adjusting a beige car seatbelt with red arrows indicating motion (no text or symbols visible)natural_image
Close-up of a person's hands holding a black clip attached to a white shirt, with a red arrow pointing to the clip (no text or symbols visible)natural_image
Close-up of hands folding a piece of dough into a pot (no text or symbols visible)natural_image
Close-up of hands performing a sewing machine with fabric bands and red directional arrows indicating movement (no text or symbols visible)natural_image
Close-up of a hand placing a white fabric item into a black car cab, with red arrows indicating rotation (no text or symbols visible)natural_image
Close-up of a baby stroller with red arrows pointing to the handle (no text or symbols visible)natural_image
Close-up of a person's foot wearing a black seatbelt, with a close-up inset showing the same seatbelt detail (no text or symbols visible)natural_image
Close-up of a hand adjusting a black athletic belt buckle, with an inset showing the same belt (no text or symbols visible)natural_image
Close-up of a hand holding a black handle next to a beige fabric or seat, with a red arrow pointing to the handle (no text or symbols visible)natural_image
Close-up of hands holding a beige VISTA cushion, no visible text or symbols on the cushion surfacenatural_image
Close-up of a beige stroller with a red arrow pointing to the seat area, no visible text or symbols.natural_image
Close-up of a metallic fabric with beige and silver bands, no visible text or symbolsnatural_image
Close-up of a hand adjusting a dark fabric sleeve on a beige garment (no text or symbols visible)natural_image
Close-up of a hand adjusting a beige fabric patch with a small inset showing a hole (no text or symbols visible)natural_image
Close-up of hands adjusting a black seatbelt buckle (no text or symbols visible)natural_image
Close-up of hands adjusting a seatbelt buckle (no text or symbols visible)text_image
Instructional image showing a belt buckle being adjusted, with numbered arrows indicating the step and direction of change.natural_image
Close-up of a hand adjusting a beige belt buckle with a red arrow pointing to the buckle (no text or symbols visible)natural_image
Close-up of hands adjusting a gray athletic belt buckle, with a magnified inset showing the detail (no text or symbols visible)natural_image
Close-up of a hand adjusting a black belt buckle with a red arrow pointing to the button (no text or symbols visible)UTILIZZO DEL PASSEGGINO
natural_image
Close-up of hands adjusting a black belt buckle with a red arrow indicating rotation (no text or symbols visible)natural_image
Close-up of a hand holding a small dark object on a light surface, with no visible text or symbols.natural_image
Model of a baby stroller with transparent cover and black wheels (no text or symbols visible)natural_image
Exterior view of a two-wheeled baby stroller with black wheels and a gray canopy cover (no text or symbols visible)natural_image
Close-up of a person's foot wearing a black athletic helmet and wheel, with a red arrow pointing to the wheel (no text or symbols visible)natural_image
Hand holding a black handle next to a beige fabric or cloth component, with a red arrow pointing to the handle (no text or symbols visible)natural_image
Close-up of a hand using a tool to lift fabric from a beige bag (no text or symbols visible)natural_image
Close-up of a person's hand resting on a bicycle tire, no visible text or symbolsnatural_image
Close-up of a hand holding a metal device with a red arrow pointing to a small component (no visible text or symbols)natural_image
Black and white photo of a children's stroller with a cloth on the wheel (no visible text or symbols)natural_image
Close-up of a baby stroller with a hand adjusting the back panel, showing two circular buttons (no text or symbols visible)natural_image
Close-up of a hand inserting a small object into a dark fabric bag (no text or symbols visible)natural_image
Close-up of hands adjusting a zipper with a magnified inset showing red band detail (no text or symbols visible)natural_image
Close-up of a black athletic jacket with zipper and pocket, partially open by hand (no visible text or symbols)natural_image
Close-up of a metallic fabric with labeled points A, B, and C (no text or symbols beyond labels)natural_image
Close-up of a hand holding a crimping tool with red arrows indicating force direction (no text or symbols visible)natural_image
Close-up of a hand holding a black mechanical clamp with a red arrow pointing to a circular mark (no text or symbols visible)natural_image
Close-up of hands holding a beige fabric with black bands and a red arrow indicating a specific area (no text or symbols visible)natural_image
Close-up of a hand holding a black tool with red arrows pointing to a metallic object labeled 'VISTA' (no text beyond label)natural_image
Close-up of a hand adjusting a black car seatbelt device with a red arrow pointing to the seatbelt (no text or symbols visible)natural_image
Close-up of a hand holding a black hover chair with a red arrow pointing to the handle (no text or symbols visible)natural_image
Close-up of a hand adjusting a metallic mechanical component with a red arrow indicating rotation (no text or symbols visible)natural_image
Mechanical device with a black base and metallic lever, showing a red arrow indicating rotation (no text or symbols visible)natural_image
Close-up of a hand adjusting a black stroller with a red arrow pointing to the handle (no text or symbols visible)natural_image
Close-up of hands adjusting a black bicycle seatbelt with red arrows indicating adjustment (no text or symbols visible)natural_image
Close-up of hands adjusting a black tire with a red arrow pointing to the wheel (no text or symbols visible)natural_image
Close-up of a hand using a bicycle tire to lift a car, with red arrows indicating the wheel's direction (no text or symbols visible)natural_image
Close-up of a hand using a mechanical device to adjust or install a component, with a red arrow pointing to the component (no visible text or symbols)natural_image
Close-up of hands using a mechanical device to adjust or install a component, with a red arrow pointing to the component (no visible text or symbols)
text_image
Close-up of a hand adjusting a mechanical component with numbered callouts and red arrows indicating motion or assembly steps.natural_image
Close-up of hands adjusting a black seatbelt buckle with red arrows pointing to the adjustment (no text or symbols visible)natural_image
Close-up of a hand adjusting a car seatbelt with numbered arrows pointing to the adjustment (no text or symbols visible)natural_image
Close-up of hands adjusting a beige fabric with a red arrow pointing to a detail (no text or symbols visible)natural_image
Close-up of a hand adjusting a car seatbelt with a red arrow pointing to the belt (no visible text or symbols)natural_image
Close-up of hands folding a white fabric or cushion on a dark surface, with a partially visible garment in the background (no text or symbols)natural_image
Close-up of a baby bottle tray with black plastic tray and red arrows indicating features (no text or symbols)natural_image
Close-up of a hand holding a beige fabric bag with a red arrow indicating rotation (no text or symbols visible)natural_image
Close-up of a hand pressing down on a car interior with red arrows indicating motion (no text or symbols visible)text_image
UPPAbaby VISTtext_image
Close-up of a hand holding a wrist with red arrows and angle measurement 'θ' indicating movement or pressure direction.natural_image
Close-up of a beige fabric or cloth being folded with a red arrow indicating the fold (no text or symbols visible)natural_image
Close-up of a beige fabric or cushion being folded into a black container, with a red arrow indicating the fold (no text or symbols visible)natural_image
Close-up of a hand pressing down on a black plastic bag with a red arrow indicating the motion (no text or symbols visible)natural_image
Close-up of hands cleaning a beige bag from a trash bin (no text or symbols visible)natural_image
Close-up of a hand holding a black plastic tray with circular indentations, marked by red arrows (no text or symbols visible)natural_image
Person placing a bag of clothes into a box (no visible text or symbols)natural_image
Exterior view of a baby stroller with a metal handle (no text or symbols visible)natural_image
Person adjusting a beige helmet with red arrows indicating motion (no text or symbols visible)natural_image
Close-up of a hand holding a black clip attached to a white shirt, with a red arrow pointing to the clip (no text or symbols visible)natural_image
Close-up of hands folding a piece of folded fabric on a metal pot (no text or symbols visible)natural_image
Close-up of hands handling a beige fabric or cushion with red arrows indicating direction (no text or symbols visible)natural_image
Close-up of a hand placing a white plastic bag with red arrows indicating rotation (no text or symbols visible)natural_image
Close-up of a baby stroller with red arrows pointing to the handle (no text or symbols visible)natural_image
Close-up of a person's foot wearing a black seatbelt, with a close-up inset showing the same seatbelt detail (no text or symbols visible)natural_image
Close-up of a hand holding a black handle attached to a beige fabric or towel, with a red arrow pointing to the handle (no text or symbols visible)natural_image
Close-up of hands holding a beige VISTA cushion (no text or symbols visible on the cushion itself)natural_image
Close-up of a beige VISTA plastic bag with a red arrow pointing to it, mounted on a metal stand (no text or symbols visible)natural_image
Close-up of a beige and silver fabric item (no text or symbols visible)natural_image
Close-up of a hand holding a dark fabric or cable with a small circular mark, against a plain background (no text or symbols visible)natural_image
Close-up of a hand adjusting a beige fabric or cushion with a black button, no visible text or symbolsnatural_image
Close-up of hands adjusting a black seatbelt buckle (no text or symbols visible)natural_image
Close-up of hands adjusting a black seatbelt buckle (no text or symbols visible)natural_image
Close-up of a person's seatbelt buckle being adjusted, showing two red arrows indicating the adjustment (no text or symbols present)natural_image
Close-up of a hand adjusting a black belt buckle with a red arrow pointing to the buckle (no text or symbols visible)natural_image
Close-up of hands adjusting a gray fabric buckle strap with a red button (no text or symbols visible)natural_image
Close-up of a hand adjusting a black belt buckle with a red arrow pointing to the buckle (no text or symbols visible)natural_image
Close-up of hands adjusting a belt buckle with a red arrow indicating the angle (no text or symbols visible)natural_image
Close-up of a hand holding a small dark object, partially covered by white foam or paper (no visible text or symbols)natural_image
Exterior view of a baby stroller with transparent cover and black wheels (no text or symbols visible)natural_image
Exterior view of a baby stroller with black wheels and a light blue cover (no text or symbols visible)natural_image
Close-up of a hand adjusting a bicycle wheel with a red arrow pointing to the wheel (no text or symbols visible)natural_image
Close-up of a hand holding a black handle next to a beige fabric or cushion, with a red arrow pointing to the handle (no text or symbols visible)natural_image
Close-up of hands using a power tool to spread fabric on an iron (no text or symbols visible)natural_image
Close-up of a hand adjusting a black bicycle seat frame with metal brackets (no visible text or symbols)natural_image
Close-up of a hand holding a metallic cylindrical device with a red arrow pointing to a button (no visible text or symbols)natural_image
Black and white photo of a stroller with wheels and a cloth cover (no visible text or symbols)natural_image
Close-up of a baby stroller with a hand adjusting its seat, showing two circular buttons (no text or symbols visible)natural_image
Close-up of a hand inserting a zipper into a dark fabric bag (no text or symbols visible)natural_image
Close-up of hands adjusting a black textured object with a red circular highlight (no text or symbols visible)natural_image
Close-up of a black fabric garment being held by a hand, showing pocketing and stitching (no text or symbols visible)natural_image
Close-up of a metallic fabric with labeled points A, B, and C (no text or symbols beyond labels)natural_image
Close-up of a mechanical crimping tool with labeled parts A and B, no visible text or symbols on the tool itself.natural_image
Close-up of a hand holding a black mechanical clamp with a red arrow pointing to a small circular mark (no text or symbols visible)natural_image
Person adjusting a beige garment with black bands and a red arrow indicating the fabric detail (no text or symbols visible)natural_image
Close-up of a hand holding a camera module next to a VISTA sensor device (no text or symbols visible)natural_image
Close-up of hands holding a camera with red arrows pointing to the lens (no text or symbols visible)natural_image
Close-up of a hand holding a black car seatbelt with a red arrow pointing to the seat area (no text or symbols visible)natural_image
Close-up of a hand holding a black mechanical device with a red arrow pointing to the handle (no visible text or symbols)natural_image
Close-up of a black car seat with red arrows pointing to specific parts (labeled I and D), no visible text or symbols beyond labels.BESCHRÄNKTE GARANTIE
⚠ MISE EN GARDE RISQUE DE SUFFOCATION
natural_image
Close-up of a hand adjusting a metallic chair seat with a red arrow indicating the adjustment (no text or symbols visible)natural_image
Mechanical device with a black base and metallic lever, showing a red arrow indicating motion direction (no text or symbols)natural_image
Close-up of a hand adjusting a black bicycle stroller with a red arrow pointing to the wheel (no text or symbols visible)natural_image
Close-up of hands adjusting a black bicycle seat with numbered arrows indicating motion (no text or symbols)natural_image
Close-up of hands adjusting a black tire with a red arrow pointing to the wheel (no text or symbols visible)natural_image
Close-up of hands adjusting a car tire with red arrows pointing to the wheel (no text or symbols visible)natural_image
Close-up of a hand using a mechanical tool to adjust or install a component, with a red arrow indicating the downward motion (no visible text or symbols)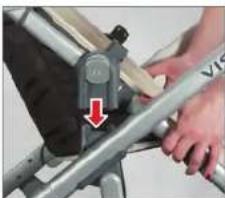
natural_image
Close-up of hands operating a mechanical device with a red arrow indicating a component (no visible text or symbols)
text_image
Close-up of a hand adjusting a mechanical component with numbered callouts and red arrows indicating steps 1 and 2.natural_image
Close-up of hands adjusting a black seatbelt buckle in a car (no text or symbols visible)natural_image
Close-up of a hand adjusting a stroller seatbelt with red arrows pointing to key points (no text or symbols visible)natural_image
Close-up of hands adjusting a beige garment with a red arrow pointing to the seam (no text or symbols visible)natural_image
Close-up of a car seatbelt switch mechanism with a red arrow indicating the lever (no text or symbols visible)natural_image
Close-up of hands pressing down on a white fabric or cushioned object (no text or symbols visible)natural_image
Close-up of a hand adjusting a black plastic tray with red arrows pointing to the interior (no text or symbols visible)natural_image
Close-up of a hand holding a beige fabric or cloth device, with a red arrow indicating rotation (no text or symbols visible)natural_image
Close-up of a hand pressing down on a beige cushioned car seat, with red arrows indicating clockwise motion (no text or symbols visible)natural_image
Close-up of a hand holding a small object with red arrows indicating movement or force (no text or symbols visible)natural_image
Close-up of a beige fabric or cloth being folded with a red arrow indicating the fold (no text or symbols visible)natural_image
Close-up of a folded garment with beige and gray fabric, showing a red arrow indicating a specific area (no text or symbols visible)natural_image
Close-up of a hand pressing down on a black plastic component with a red arrow indicating rotation (no text or symbols visible)natural_image
Close-up of a hand opening a beige bag into a trash bin (no text or symbols visible)natural_image
Close-up of a hand holding a black plastic tray with circular indentations, marked by red arrows (no text or symbols visible)natural_image
Person placing a black fabric bag into a white bag with folded clothes (no text or symbols visible)natural_image
Product photo of a baby crib with a metal handle and umbrella (no visible text or symbols)natural_image
Person wearing a beige seatbelt with red arrows indicating motion or pressure points (no text or symbols visible)natural_image
Close-up of a person's arm holding a black cable buckle, with a red arrow pointing to the buckle (no text or symbols visible)natural_image
Close-up of hands folding a piece of paper over a pot (no text or symbols visible)natural_image
Close-up of hands performing a sewing machine with fabric bands and red directional arrows indicating movement (no text or symbols visible)natural_image
Close-up of a hand placing a white fabric item into a black car cab, with red arrows indicating rotation (no text or symbols visible)natural_image
Close-up of a baby stroller with red arrows pointing to the handle (no text or symbols visible)natural_image
Close-up of a hand pressing a black brake pad with red buttons, showing the grip and seat (no text or symbols visible)natural_image
Close-up of a hand adjusting a black helmet with a red trigger, showing the lock mechanism (no text or symbols visible)natural_image
Close-up of a hand holding a black handle next to a beige fabric or seat, with a red arrow pointing to the handle (no text or symbols visible)natural_image
Close-up of hands holding a beige VISTA cushion device (no visible text or symbols on the device itself)natural_image
Close-up of a beige stroller with a red arrow pointing to the seat area, no visible text or symbols.natural_image
Close-up of a beige and silver fabric item, possibly a lampshade or foil, with no visible text or symbols.natural_image
Close-up of a hand adjusting a dark fabric or sleeve on a beige surface (no text or symbols visible)natural_image
Close-up of a hand adjusting a beige fabric sleeve with a zipper (no text or symbols visible)natural_image
Close-up of hands adjusting a black car seatbelt buckle (no text or symbols visible)natural_image
Close-up of hands adjusting a seatbelt buckle (no text or symbols visible)text_image
Instructional image showing two steps of adjusting a beige seatbelt buckle, with numbered arrows indicating the step.natural_image
Close-up of a hand adjusting a black belt buckle with a red arrow pointing to the buckle (no text or symbols visible)natural_image
Close-up of hands adjusting a gray belt buckle with a red button, no visible text or symbolsnatural_image
Close-up of a hand adjusting a black belt buckle with a red arrow pointing to the buckle (no text or symbols visible)UTILISATION DE LA POUSSETTE
RÉGLAGE DE LA HAUTEUR DES HARNAIS AUX ÉPAULES
natural_image
Close-up of hands adjusting a belt buckle with a red arrow indicating rotation (no text or symbols visible)natural_image
Close-up of a hand holding a dark rectangular object, partially covered by white foam or paper (no visible text or symbols)natural_image
Small stroller with transparent cover and black wheels, no visible text or symbolsnatural_image
Exterior view of a two-wheeled baby stroller with black wheels and a gray canopy cover (no text or symbols visible)UTILISATION DE LA POUSSETTE
PLIAGE DE LA POUSSETTE
natural_image
Close-up of a person's foot wearing a black bicycle seatbelt, with a red arrow pointing to the wheel (no text or symbols visible)natural_image
Close-up of a hand holding a black handle next to a beige fabric or towel, with a red arrow pointing to the handle (no text or symbols visible)natural_image
Close-up of hands using a tool to lift a beige fabric item, with red arrows indicating direction (no text or symbols visible)natural_image
Close-up of a hand holding a metal mechanical device with attached clamps (no visible text or symbols)natural_image
Close-up of a hand holding a metallic object with a red arrow pointing to a component (no visible text or symbols)natural_image
Black and white photo of a stroller with wheels and a cloth (no visible text or symbols)natural_image
Close-up of a baby stroller with a hand adjusting the back panel, showing two circular buttons (no text or symbols visible)natural_image
Close-up of a hand inserting a zipper into a dark fabric bag (no text or symbols visible)natural_image
Close-up of hands adjusting a mechanical component with a red circular annotation (no visible text or symbols)natural_image
Close-up of a dark fabric bag with open pockets and a hand adjusting its top part (no visible text or symbols)natural_image
Close-up of a metallic fabric bag with labeled points A, B, and C (no text or symbols beyond labels)natural_image
Close-up of a crimping tool with red arrows indicating movement, no visible text or symbolsnatural_image
Close-up of a hand holding a black mechanical clamp with a red arrow pointing to a circular component (no text or symbols visible)natural_image
Person applying a beige fabric to a dark leather jacket, with a red arrow indicating the fabric's direction (no text or symbols visible)natural_image
Close-up of a hand holding a camera lens and a VISTA device, with red arrows indicating motion direction (no text or symbols on the device itself)natural_image
Close-up of a hand adjusting a black car seatbelt with a handle, showing a red arrow pointing to the seatbelt (no text or symbols visible)natural_image
Close-up of a hand holding a black ergonomic device with a red arrow pointing to the handle (no text or symbols visible)natural_image
Close-up of a black car seat with red arrows pointing to specific parts (no text or symbols visible)WAARSCHUWINGEN + ALGEMENE VEILIGHEIDSINFORMATIE
BELANGRIJK
BEWAAR DEZE INSTRUCTIES ZODAT U DEZE LATER NOG KUNT RAADPLEGEN. LEES DE INSTRUCTIES VOOR GEBRUIK ALTIJD ZORGVULDIG DOOR. DE VEILIGHEID VAN UW KIND KAN IN HET GEDING KOMEN ALS U DE INSTRUCTIES NIET OPVOLGT.
WAARSCHUWINGEN WANDELWAGEN:
▲WAARSCHUWING
WAARSCHUWINGEN + ALGEMENE VEILIGHEIDSINFORMATIE
WAARSCHUWINGEN WANDELWAGEN:
⚠ WAARSCHUWING
WAARSCHUWINGEN + ALGEMENE VEILIGHEIDSINFORMATIE
WAARSCHUWINGEN ADAPTER MAXI-COSI-AUTOSTOELTJE:
⚠ WAARSCHUWING
WAARSCHUWINGEN REISWIEG:
⚠ WAARSCHUWING
WAARSCHUWINGEN + ALGEMENE VEILIGHEIDSINFORMATIE
⚠ WAARSCHUWING ONACHTZAAMHEID KAN BRAND VEROORZAKEN
⚠ WAARSCHUWING VERSTIKKINGSGEVAAR
WAARSCHUWINGEN + ALGEMENE VEILIGHEIDSINFORMATIE
ΔWAARSCHUWING RISICO OM TE VALLEN
natural_image
Close-up of a hand inserting a device into a metal frame, with a red arrow indicating the insertion point (no text or symbols visible)natural_image
Mechanical device with a black base and metallic lever, showing a red arrow indicating rotation (no text or symbols visible)natural_image
Close-up of a hand adjusting a black bicycle tire with a red arrow pointing to the wheel (no text or symbols visible)natural_image
Close-up of hands assembling a black bicycle frame with red arrows indicating motion (no text or symbols visible)natural_image
Close-up of hands adjusting a black tire with a red arrow pointing to the wheel (no text or symbols visible)natural_image
Close-up of hands using a car tire to adjust the wheel rim (no text or symbols visible)natural_image
Close-up of hands using a mechanical device to adjust or install a component (no visible text or symbols)natural_image
Close-up of hands using a mechanical device to adjust or install a component, with a red arrow pointing to a component (no visible text or symbols)
text_image
Close-up of a hand adjusting a mechanical component with numbered callouts and red arrows indicating stepsnatural_image
Close-up of hands adjusting a black seatbelt buckle with red arrows pointing to the adjustment (no text or symbols visible)text_image
Close-up of a hand adjusting a stroller seatbelt with numbered red arrows indicating adjustment points.natural_image
Close-up of hands adjusting a beige garment with a red arrow pointing to the zipper (no text or symbols visible)natural_image
Close-up of a bicycle seatbelt mechanism with a hand adjusting the lever (no visible text or symbols)natural_image
Close-up of hands pressing down on a white fabric or cushioned garment (no text or symbols visible)natural_image
Close-up of a baby stroller with a hand adjusting its tray, showing red arrows indicating movement or inspection (no text or symbols visible)natural_image
Close-up of a beige fabric bag with black outline being held, showing a red arrow indicating rotation (no text or symbols visible)natural_image
Close-up of a hand pressing down on a car interior with red arrows indicating motion (no text or symbols visible)text_image
UPPAbaby VISTtext_image
Close-up of a hand holding a wrist with red arrows and angle measurement 'θ' indicating finger movement or pressure point.natural_image
Close-up of a beige fabric or cloth being folded with a red arrow indicating the fold (no text or symbols visible)natural_image
Close-up of a beige fabric or cushion being folded, with a red arrow indicating the fold (no text or symbols visible)natural_image
Close-up of a hand pressing down on a black plastic bag with a red arrow indicating the motion (no text or symbols visible)natural_image
Close-up of hands cleaning a beige bag from a stainless steel waste bin (no text or symbols visible)natural_image
Close-up of a hand holding a black plastic tray with circular indentations, marked by red arrows (no text or symbols visible)natural_image
Person placing a bag of clothes into a box (no visible text or symbols)natural_image
Black and beige baby frog shelter with a metal handle, no visible text or symbolsnatural_image
Person adjusting a beige helmet with red arrows indicating motion (no text or symbols visible)natural_image
Close-up of a hand using a clamping tool to lift a piece of fabric (no text or symbols visible)natural_image
Close-up of hands pressing down on a cloth with a magnified inset showing a small object (no text or symbols visible)natural_image
Close-up of hands performing a massage or rolling exercise on a beachside, with red arrows indicating motion direction (no text or symbols visible)natural_image
Close-up of a hand placing a white plastic bag into a black box, with red arrows indicating rotation (no text or symbols visible)natural_image
Close-up of a baby stroller with red arrows pointing to the handle (no text or symbols visible)natural_image
Close-up of hands adjusting a black helmet with a red brake pad, showing a close-up inset (no text or symbols visible)natural_image
Close-up of a hand adjusting a black car seatbelt with a red belt buckle, showing the mechanism and detail (no text or symbols visible)natural_image
Close-up of a hand holding a black handle with a red arrow pointing to a beige fabric item (no text or symbols visible)natural_image
Close-up of hands holding a beige VISTA backpack (no visible text or symbols on the backpack itself)natural_image
Close-up of a beige stroller with a red arrow pointing to the cover area (no text or symbols visible)natural_image
Close-up of a beige fabric bag attached to a metallic foil (no text or symbols visible)natural_image
Close-up of a hand holding a rolled-up fabric or cable with a black band, against a plain background (no text or symbols visible)natural_image
Close-up of a hand adjusting a beige fabric or leather jacket with a zipper (no visible text or symbols)12
natural_image
Close-up of hands adjusting a black car seatbelt buckle (no text or symbols visible)natural_image
Close-up of hands adjusting a seatbelt buckle (no text or symbols visible)natural_image
Close-up of a car seatbelt buckle being adjusted for a piece, with red arrows indicating the adjustment point (no text or symbols visible)natural_image
Close-up of a hand adjusting a black athletic belt buckle, with a red arrow pointing to the buckle (no text or symbols visible)natural_image
Close-up of hands adjusting a gray fabric buckle with a red circular detail (no text or symbols visible)natural_image
Close-up of a hand adjusting a black belt buckle with a red arrow pointing to the buckle (no text or symbols visible)122
GEBRUIK WANDELWAGEN
DE LENGTE VAN DE SCHOUDERRIEMEN AANPASSEN
natural_image
Close-up of hands adjusting a belt buckle with a red arrow indicating rotation (no text or symbols visible)natural_image
Close-up of a hand holding a small dark object, partially visible on a white surface (no text or symbols)natural_image
Exterior view of a baby stroller with transparent cover and black wheels (no text or symbols visible)natural_image
Exterior view of a four-wheeled baby stroller with a mesh canopy cover (no text or symbols visible)GEBRUIK WANDELWAGEN
DE WANDELWAGEN OPVOUWEN
natural_image
Close-up of a person's foot wearing a black athletic helmet and holding a tire, with a red arrow pointing to the wheel (no text or symbols visible)natural_image
Close-up of a hand holding a black handle attached to a beige fabric or towel, with a red arrow pointing to the handle (no text or symbols visible)natural_image
Close-up of hands using a tool to lift fabric from a bag (no text or symbols visible)natural_image
Close-up of a hand adjusting a bicycle seatbelt mechanism (no visible text or symbols)natural_image
Close-up of a hand holding a camera lens with a red arrow pointing to the lens (no text or symbols visible)natural_image
Exterior view of a modern office building (no signage)natural_image
Close-up of a baby stroller with a hand adjusting the pocket, showing two circular buttons (no text or symbols visible)natural_image
Close-up of a hand inserting a small object into a dark fabric bag (no text or symbols visible)natural_image
Close-up of hands adjusting a black belt buckle with a red clip, no visible text or symbolsnatural_image
Close-up of a black athletic bag with a hand adjusting its side panel (no visible text or symbols)natural_image
Close-up of a metallic fabric with labeled points A, B, and C (no text or symbols beyond labels)natural_image
Close-up of a mechanical crimping tool with labeled parts (A, B) and directional arrows indicating movement (no text or symbols on the tool itself)natural_image
Close-up of a hand holding a black mechanical clamp or bracket, with a red arrow pointing to a small circular mark on the clip (no text or symbols visible)natural_image
Close-up of hands holding a beige fabric or garment with a black patch, no visible text or symbolsnatural_image
Close-up of a hand holding a camera lens and a VISTA tool, with red arrows indicating motion direction (no text or symbols on the device itself)natural_image
Close-up of a hand adjusting a black car seatbelt with a handle, showing no text or symbols.natural_image
Close-up of a hand holding a black ergonomic device with a red arrow pointing to the handle (no text or symbols visible)natural_image
Close-up of a car seat with two red arrows pointing to specific areas (labeled I and D), no text or symbols present.natural_image
Close-up of a hand adjusting a metallic mechanical component with a red arrow indicating rotation (no text or symbols visible)natural_image
Mechanical device with a red arrow indicating motion direction (no text or symbols visible)natural_image
Close-up of a hand adjusting a black bicycle tire with a red arrow indicating the handle (no text or symbols visible)natural_image
Close-up of hands adjusting a black bicycle seatbelt with numbered adjustment arrows (no text or symbols visible)natural_image
Close-up of hands adjusting a black tire with a red arrow pointing to the wheel (no text or symbols visible)natural_image
Close-up of hands using a tire to adjust the wheel, with numbered arrows indicating steps (no text or symbols present)natural_image
Close-up of a hand using a mechanical tool to adjust or install a component, with a red arrow pointing to the component (no visible text or symbols)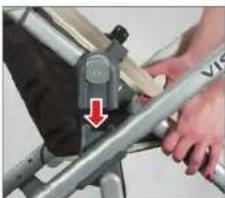
natural_image
Close-up of hands using a mechanical tool on a metal frame, with a red arrow indicating the motion direction (no text or symbols visible)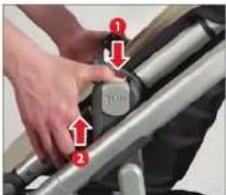
text_image
Instructional diagram showing hand pressing down on a mechanical component with numbered arrows and labelsnatural_image
Close-up of hands adjusting a black seatbelt buckle with red arrows pointing to the component (no text or symbols visible)natural_image
Close-up of a hand adjusting a seatbelt switch in a stroller (no visible text or symbols)natural_image
Close-up of hands adjusting a beige garment with a red arrow pointing to the seam (no text or symbols visible)natural_image
Close-up of a hand adjusting a car seatbelt switch mechanism (no visible text or symbols)natural_image
Close-up of hands pressing down on a white cushioned object, partially covered by black and gray fabric (no text or symbols visible)natural_image
Close-up of a hand adjusting a black plastic tray with red arrows indicating features (no text or symbols visible)natural_image
Close-up of a hand holding a beige fabric bag with a red arrow indicating rotation (no text or symbols visible)natural_image
Close-up of a hand pressing down on a beige car seat cover, with red arrows indicating clockwise motion (no text or symbols visible)natural_image
Close-up of a hand holding a small object with red arrows indicating movement or force (no text or symbols visible)natural_image
Close-up of a hand holding a beige fabric with a red arrow pointing to it, no visible text or symbolsnatural_image
Close-up of a beige fabric or cushion component with a red arrow indicating a specific area (no text or symbols visible)natural_image
Close-up of a hand pressing down on a black mechanical component with a red arrow indicating the motion direction (no text or symbols visible)natural_image
Close-up of hands removing a beige bag into a trash bin (no text or symbols visible)natural_image
Close-up of a hand holding a black plastic tray with circular cavities, marked by red arrows (no text or symbols visible)natural_image
Person placing a black bag labeled 'floostiddin' into a woven basket filled with clothes (no text or symbols visible on the bag itself)natural_image
Product photo of a baby walker with a triangular canopy and metal handle (no text or symbols visible)natural_image
Person adjusting a beige helmet with red arrows indicating motion (no text or symbols visible)natural_image
Close-up of a hand using a black clip to lift a beige fabric piece, with a red arrow indicating the motion (no text or symbols visible)natural_image
Close-up of hands folding a piece of dough on a metal steamer (no text or symbols visible)natural_image
Close-up of hands performing a massage or rolling exercise on a chair, with red arrows indicating motion direction (no text or symbols visible)natural_image
Close-up of a hand placing a white towel into a black car cab, with red arrows indicating motion (no text or symbols visible)natural_image
Close-up of a baby stroller with red arrows pointing to the handle (no text or symbols visible)natural_image
Close-up of a hand adjusting a black athletic helmet with red buttons, showing the seatbelt mechanism (no text or symbols visible)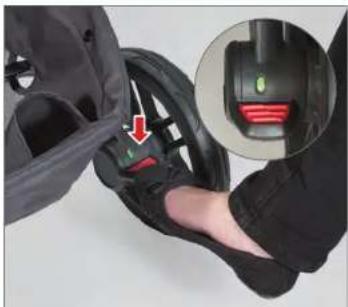
natural_image
Close-up of a hand pressing a black brake pad with a red trigger, showing the pad's mechanism and magnified view (no text or symbols visible)natural_image
Close-up of a hand holding a black handle next to a beige trolley, with a red arrow pointing to the handle (no text or symbols visible)natural_image
Close-up of hands holding a beige VISTA cushion, no visible text or symbols on the cushion surfacenatural_image
Close-up of a beige VISTA scooter seatbelt with a red arrow pointing to the seat area (no text or symbols on the device itself)natural_image
Close-up of a beige fabric with metallic foil, no visible text or symbolsnatural_image
Close-up of a hand holding a dark fabric or material strip attached to a beige surface (no text or symbols visible)natural_image
Close-up of a hand adjusting a beige fabric or cushion with a zipper, no visible text or symbolsnatural_image
Close-up of hands adjusting a black seatbelt buckle (no text or symbols visible)natural_image
Close-up of hands adjusting a seatbelt buckle (no text or symbols visible)text_image
Instructional image showing how to adjust seatbelt between two seats, with numbered arrows indicating changes.natural_image
Close-up of a hand adjusting a black seatbelt buckle with a red arrow pointing to the buckle (no text or symbols visible)natural_image
Close-up of hands adjusting a gray fabric buckle strap (no text or symbols visible)natural_image
Close-up of a hand adjusting a black belt buckle with a red arrow pointing to the buckle (no text or symbols visible)PUSETİ ÇALIŞTIRMA
natural_image
Close-up of hands adjusting a belt buckle with a red arrow indicating rotation (no text or symbols visible)natural_image
Close-up of a hand holding a dark rectangular object on a white surface, with no visible text or symbols.natural_image
Exterior view of a baby stroller with transparent cover and black wheels (no text or symbols visible)natural_image
Exterior view of a baby stroller with metal frame and black wheels (no text or symbols visible)PUSETİ ÇALIŞTIRMA
PUSETİN KATLANMASI
natural_image
Close-up of a person's foot wearing a bicycle seatbelt, with a red arrow pointing to the wheel (no text or symbols visible)natural_image
Close-up of a hand holding a black handle next to a beige fabric or towel, with a red arrow pointing to the handle (no text or symbols visible)natural_image
Close-up of a hand holding a cloth or umbrella with red arrows pointing to the handle (no text or symbols visible)natural_image
Close-up of a hand holding a metal climbing tool, no visible text or symbolsnatural_image
Close-up of a hand holding a metallic camera lens with a red arrow pointing to the lens (no text or symbols visible)natural_image
Black and white photo of a stroller with wheels and a cloth cover (no visible text or symbols)natural_image
Close-up of a baby stroller with a hand adjusting the back panel (no visible text or symbols)natural_image
Close-up of a hand inserting a zipper into a dark fabric bag (no text or symbols visible)natural_image
Close-up of hands adjusting a textured object with a magnified circular detail (no text or symbols visible)natural_image
Close-up of a dark fabric jacket with open pockets and a hand adjusting the pocket (no text or symbols visible)natural_image
Close-up of a hand holding a camera lens and a VISTA sensor on a tripod (no text or symbols visible)natural_image
Close-up of a hand holding a black exercise bike seat with a red arrow pointing to the handle (no text or symbols visible)natural_image
Close-up of a hand holding a black car seatbelt device with a handle and a knife inserted (no visible text or symbols)natural_image
Close-up of a black car seat with red arrows pointing to labeled parts (I and D), no visible text or symbols beyond labels.natural_image
Close-up of a mechanical clamp or crimping tool with red arrows indicating force direction (no text or symbols visible)natural_image
Close-up of a metallic tarp joint with labeled points A, B, and C (no text or symbols beyond labels)הכלה, A.הכלההוּרָהוּרָהוּרָהוּרָהוּרָהוּרָהוּרָהוּרָהוּרָהוּרָהוּרָהוּרָהוּרָהוּרָהוּרָה
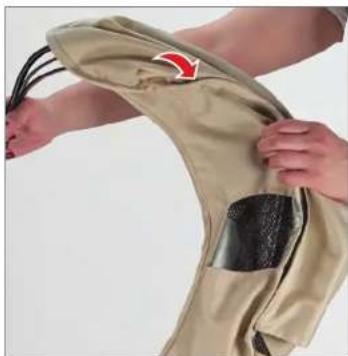
natural_image
Close-up of hands holding a beige garment with black straps and a red arrow indicating a specific part (no text or symbols visible)natural_image
Close-up of a hand holding a black mechanical clamp or bracket, with a red arrow pointing to a circular mark on the belt (no text or symbols visible)natural_image
Close-up of a hand inserting a zipper into a dark bag (no text or symbols visible)natural_image
Close-up of a hand inserting a small object into a dark bag, with no visible text or symbols.natural_image
Close-up of a black fabric bag with a hand adjusting its top part (no visible text or symbols)natural_image
Close-up of hands adjusting a black belt buckle with a magnified inset showing the detail (no text or symbols visible).הכלההוּרָהוּרָהוּרָהוּרָהוּרָהוּרָהוּרָהוּרָהוּרָהוּרָהוּרָהוּרָהוּרָהוּרָהוּרָה:3
תְבָרִיֹתְבָרִיֹתְבָרִיֹתְבָרִיֹתְבָרִיֹתְבָרִיֹת
תְבָרִי בְּשָׁ
natural_image
Close-up of a hand holding a black handle with a red arrow pointing to a beige fabric item (no text or symbols visible)natural_image
Close-up of a hand pressing down on a black bicycle wheel, with a red arrow pointing to the wheel (no text or symbols visible)natural_image
Close-up of a hand adjusting a metal bicycle frame with attached gear (no visible text or symbols)natural_image
Close-up of a hand holding a folded beige fabric with a black handle, showing red arrows indicating direction (no text or symbols)תְרָהוֹתִיָהַעֶלְרָהַעֶלְרָהַעֶלְרָהַעֶלְרָהַעֶלְרָהַעֶלְרָהַעֶלְרָהַעֶלְרָהַעֶלְרָה
natural_image
Close-up of a black and silver stroller with wheels and a cloth cover (no visible text or symbols)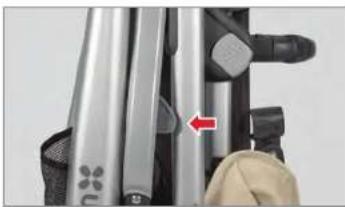
natural_image
Close-up of a hand holding a metallic object with a red arrow pointing to a vertical component (no visible text or symbols)natural_image
Close-up of a hand holding two small dark objects on a white surface, with no visible text or symbols.natural_image
Close-up of hands adjusting a dark fabric clip with a red arrow indicating the motion (no text or symbols visible)natural_image
Close-up of hands adjusting a black seatbelt buckle (no text or symbols visible)natural_image
Close-up of hands adjusting a black seatbelt buckle (no text or symbols visible)natural_image
Exterior view of a baby stroller with black wheels and a gray canopy cover (no text or symbols visible)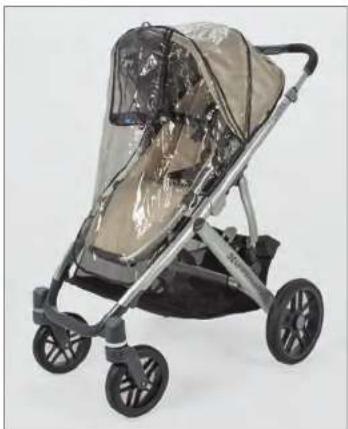
natural_image
Exterior view of a baby stroller with transparent cover and black wheels (no text or symbols visible)natural_image
Close-up of a hand adjusting a black seatbelt buckle, with a red arrow pointing to the buckle (no text or symbols visible)text_image
Photo showing a car seatbelt buckle being adjusted for a seatbelt, with numbered arrows indicating the adjustment point.natural_image
Close-up of hands holding a beige cream-colored cushion with 'VISTA' branding, no visible text or symbols on the cushion itself.natural_image
Close-up of a hand holding a black handle next to a beige fabric or towel, with a red arrow pointing to the handle (no text or symbols visible)natural_image
Close-up of a baby stroller with red arrows pointing to the handle (no text or symbols visible)תְבָרִי בְּרִי
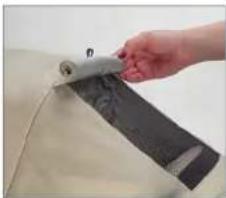
natural_image
Close-up of a hand holding a flexible band attached to a curved surface (no text or symbols visible)natural_image
Close-up of a beige envelope with silver foil wrapped around it (no text or symbols visible)natural_image
Close-up of a beige stroller with a red arrow pointing to the seat area (no text or symbols visible)natural_image
Close-up of a hand adjusting a beige fabric piece with a zipper (no text or symbols visible)תְרָה בַעּוֹת
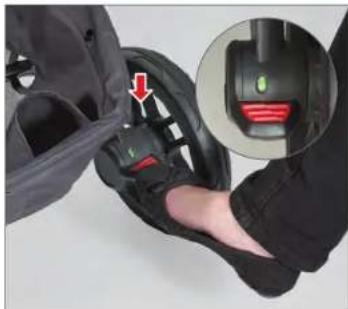
natural_image
Close-up of a hand adjusting a black car seatbelt with a red belt buckle, showing the grip and seat assembly (no text or symbols visible)natural_image
Close-up of a hand adjusting a black helmet with red brake buttons, showing the mechanism (no text or symbols visible)natural_image
Exterior view of a portable stove with a metal handle and roof cover (no text or symbols visible)natural_image
Person placing a baby bottle into a bag of clothes (no visible text or symbols)natural_image
Close-up of hands folding a piece of fabric on a metal pot (no text or symbols visible)הכלהה: 3
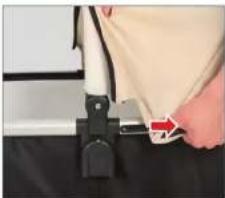
natural_image
Close-up of a person's hands using a clamping tool to attach a piece of fabric (no text or symbols visible)natural_image
Person adjusting a beige seatbelt with red arrows indicating motion (no text or symbols visible)natural_image
Close-up of a hand placing a white bag with red curved arrows on its side, next to a black box (no text or symbols visible)natural_image
Close-up of hands performing a massage or stretching exercise on a vehicle (no text or symbols visible)natural_image
Close-up of a hand holding a small object with red arrows indicating movement or force (no text or symbols visible)text_image
UPPAbaby VISTnatural_image
Close-up of a hand pressing down on a black plastic component with a red arrow indicating rotation (no text or symbols visible)natural_image
Close-up of a beige fabric or cushion being folded with a red arrow indicating rotation (no text or symbols)natural_image
Close-up of a beige fabric or cloth being folded with a red arrow indicating the fold (no text or symbols visible)natural_image
Close-up of a hand using a tool to adjust a black plastic tray with circular holes, marked by red arrows (no text or symbols visible)natural_image
Close-up of a hand pressing down on a beige bag over a metal container (no text or symbols visible)natural_image
Close-up of a baby stroller with a hand adjusting its tray, showing red arrows pointing to the interior (no text or symbols visible)natural_image
Close-up of hands pressing down on a white fabric or cushioned object, with a dark fabric underneath (no text or symbols visible)תְרָה בַרִיָה: 1

natural_image
Close-up of a hand pressing down on a beige cushioned tray, with red arrows indicating motion (no text or symbols visible)natural_image
Close-up of a beige fabric bag being held, with a red arrow indicating the fold (no text or symbols visible)text_image
Close-up of a hand adjusting a mechanical component with numbered callouts highlighting featuresnatural_image
Close-up of hands operating a mechanical device with a red arrow pointing to a component (no visible text or symbols)natural_image
Close-up of a hand using a mechanical tool to adjust or install a component, with a red arrow pointing to the component (no visible text or symbols)natural_image
Close-up of a hand adjusting a car seatbelt switch (no visible text or symbols)natural_image
Close-up of hands adjusting a black seatbelt buckle (no text or symbols visible)natural_image
Close-up of a car seatbelt switch with a hand adjusting the belt (no visible text or symbols)natural_image
Close-up of hands adjusting a beige belt buckle with a red arrow pointing to the buckle (no text or symbols visible)natural_image
Mechanical device with a black base and metallic lever, showing a red arrow indicating motion direction (no text or symbols)natural_image
Close-up of a hand adjusting a metallic chair seat with a red arrow indicating rotation (no text or symbols visible)natural_image
Close-up of hands adjusting a black bicycle seat with red arrows indicating motion (no text or symbols visible)natural_image
Close-up of a hand adjusting a black bicycle tire with a red arrow pointing to the wheel (no text or symbols visible)natural_image
Close-up of hands using a tire to adjust the wheel, showing red arrows indicating contact points (no text or symbols present)natural_image
Close-up of hands adjusting a black tire with a red arrow pointing to the wheel (no text or symbols visible)natural_image
Close-up of hands adjusting a camera lens with red arrows indicating the lens (no text or symbols visible)natural_image
Close-up of a hand holding a black object with red arrows pointing to a metallic object labeled 'VISTA' (no text beyond label)natural_image
Close-up of a hand holding a black outdoor seatbelt device with a red arrow pointing to the handle (no text or symbols visible)natural_image
Close-up of a hand adjusting a black car seatbelt device with a red arrow pointing to the seatbelt (no text or symbols visible)natural_image
Close-up of a black car seat with red arrows and labels (no readable text or symbols)natural_image
Close-up of a mechanical crimping tool with red arrows indicating fastening direction (no text or symbols visible)natural_image
Close-up of a metallic fabric with labeled points A, B, and C (no text or symbols beyond labels)natural_image
Close-up of hands holding a beige fabric with black bands and a red arrow indicating a specific part (no text or symbols visible)natural_image
Close-up of a hand holding a black mechanical clamp with a red arrow pointing to a small circular mark (no text or symbols visible)natural_image
Close-up of a hand inserting a zipper into a dark bag (no text or symbols visible)natural_image
Close-up of a hand inserting a small object into a dark bag, with no visible text or symbols.natural_image
Close-up of a black athletic jacket being held, showing front panel and pocket (no text or symbols visible)natural_image
Close-up of hands adjusting a black belt buckle with a red accent (no text or symbols visible)natural_image
Close-up of a hand adjusting a black handle with a red arrow pointing to a beige fabric item (no text or symbols visible)natural_image
Close-up of a person's foot wearing a black athletic suit, holding a small blue object with a red arrow pointing to a green component (no text or symbols visible)natural_image
Close-up of a hand adjusting a metal bicycle frame with a cloth (no visible text or symbols)natural_image
Close-up of a hand holding a cloth or towel with red arrows pointing to the band (no text or symbols visible)natural_image
Close-up of a black and silver stroller with wheels and a cloth cover (no visible text or symbols)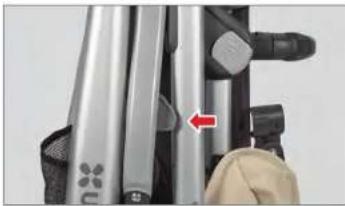
natural_image
Close-up of a hand holding a metallic object with a red arrow pointing to a small component (no visible text or symbols)natural_image
Close-up of a hand holding two small dark objects on a white surface, with no visible text or symbols.natural_image
Close-up of hands adjusting a belt buckle with a red arrow indicating the fold (no text or symbols visible)natural_image
Close-up of hands adjusting a black seatbelt buckle (no text or symbols visible)natural_image
Close-up of hands adjusting a black seatbelt buckle (no text or symbols visible)natural_image
Exterior view of a modern baby stroller with black wheels and a gray canopy cover (no text or symbols visible)natural_image
Small stroller with transparent cover and black wheels, no visible text or symbolsnatural_image
Close-up of a hand adjusting a black seatbelt buckle, with a red arrow pointing to the buckle (no text or symbols visible)text_image
Close-up of a car seatbelt buckle with numbered labels indicating adjustment stepsnatural_image
Close-up of a hand adjusting a black belt buckle with a red arrow pointing to the buckle (no text or symbols visible)natural_image
Close-up of hands adjusting a gray fabric buckle strap (no text or symbols visible)تشغيل عربة الطフル
natural_image
Close-up of hands holding a beige cushion with a label 'VISA' on the side (no other text or symbols visible)natural_image
Close-up of a hand holding a black handle with a red arrow pointing to a beige fabric item (no text or symbols visible)natural_image
Close-up of a hand holding a dark fabric or material strip attached to a curved surface (no text or symbols visible)natural_image
Close-up of a beige fabric with metallic foil wrapped around it (no text or symbols visible)natural_image
Close-up of a beige fabric or cushion device with a red arrow pointing to it, mounted on a metal stand (no visible text or symbols)natural_image
Close-up of a hand adjusting a beige fabric piece with a zipper (no text or symbols visible)تشخيل عربة الطفل
natural_image
Close-up of a stroller with black handle and wheels, no visible text or symbolsإعداد المكابح

natural_image
Close-up of hands adjusting a black helmet with a red-labeled sensor device (no text or symbols visible)natural_image
Close-up of a hand adjusting a black helmet with red buttons, showing a close-up inset (no text or symbols visible)natural_image
Product photo of a portable outdoor box with a metal handle and a triangular canopy cover (no visible text or symbols)natural_image
Person placing a bag of clothes into a leather car seat (no visible text or symbols)natural_image
Close-up of hands folding a piece of dough on a metal pot (no text or symbols visible)natural_image
Close-up of a person's hands using a black clip to attach a beige fabric or cable (no text or symbols visible)natural_image
Person wearing a beige seatbelt with red arrows indicating motion or pressure points (no text or symbols visible)natural_image
Close-up of a hand placing a white fabric item into a black box, with red arrows indicating rotation (no text or symbols visible)natural_image
Close-up of hands operating a beige fabric device with red directional arrows indicating movement (no text or symbols visible)natural_image
Close-up of a hand holding a small object with red arrows indicating movement or force (no text or symbols visible)natural_image
Close-up of a hand pressing down on a black plastic component with a red arrow indicating the motion (no text or symbols visible)natural_image
Close-up of a beige fabric or cushion being folded with a red arrow indicating rotation (no text or symbols)natural_image
Close-up of a beige fabric or cloth being folded with a red arrow indicating the fold (no text or symbols visible)natural_image
Close-up of a hand using a tool to adjust a black plastic tray with circular indentations (no text or symbols visible)natural_image
Close-up of hands cleaning a beige bag from a metal trash bin (no text or symbols visible)natural_image
Close-up of a baby stroller with black plastic tray and red arrows indicating parts (no text or symbols)natural_image
Close-up of hands pressing down on a white fabric or cushioned object (no text or symbols visible)natural_image
Close-up of a hand pressing down on a beige cylindrical object, with red arrows indicating motion (no text or symbols visible)natural_image
Close-up of a beige fabric bag with a hand holding it, showing a red arrow indicating rotation (no text or symbols visible)text_image
Close-up of a hand pressing down on a mechanical component with numbered callouts highlighting featuresnatural_image
Close-up of hands operating a mechanical device with a red arrow indicating a downward motion (no visible text or symbols)ل'EQUIBMedq: accf'##l### ### ### ### ### ### ### ### ###