CarDVR70 - Dashcam ROLLEI - Free user manual and instructions
Find the device manual for free CarDVR70 ROLLEI in PDF.
User questions about CarDVR70 ROLLEI
0 question about this device. Answer the ones you know or ask your own.
Ask a new question about this device
Download the instructions for your Dashcam in PDF format for free! Find your manual CarDVR70 - ROLLEI and take your electronic device back in hand. On this page are published all the documents necessary for the use of your device. CarDVR70 by ROLLEI.
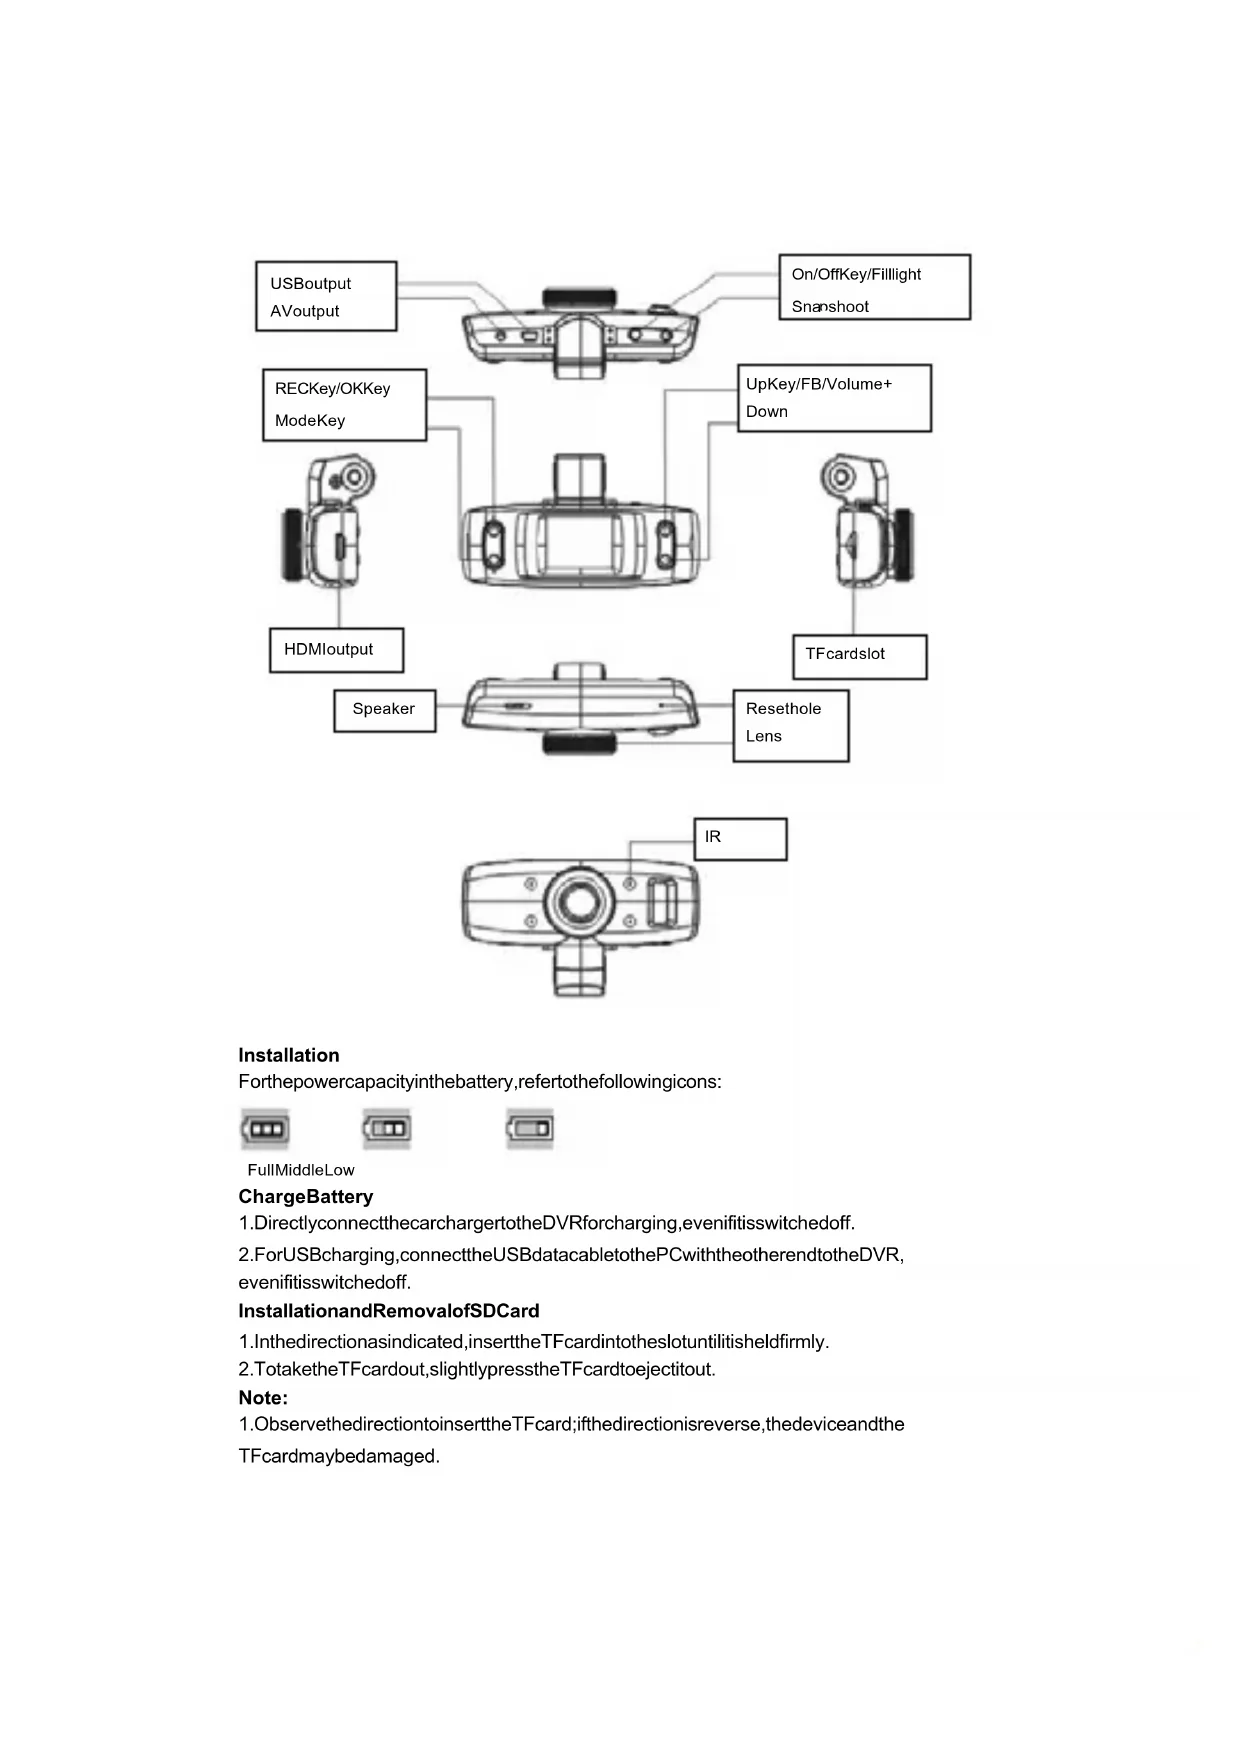
USER MANUAL CarDVR70 ROLLEI
Forthepowercapacityinthebattery,refertothefollowingicons:


FullMiddleLow
ChargeBattery
1.DirectlyconnectthecarchargertotheDVRforcharging,evenifitisswitchedoff.
2.ForUSBcharging,connecttheUSBdatababletothePCwiththeotherendtotheDVR, evenifitisswitchedoff.
InstallationandRemovalofSDCard
1.Inthedirectionasindicated,inserttheTFcardtotheslotuntilitisheldfirmly.
2. TotaketheTFcardout,slightlypresstheTFcardtobjectitout.
Note:
-
ObservethedirectiontoinserttheTFcard;ifthedirectionisreverse, thedeviceandthe TFcardmaybedamaged.
-
WhentheTFcardisinsertedintothedevice,themachinewillsettheTFcardaspreset storageunitandthedatabaintheoriginalTFcardwillbeunreadable.
- If the TF card is compatible with the device, please insert the card again or replace it for reentry.
- Alwaysuseahigh-speedTFcard.
UseGuidelines
DVRON/Off
1.HoldtheOn/Offkeyforaround1stoswitchonthedevic.
2.HoldtheOn/Offkeyforaround3stostswnchoffthedevic.
SwitchWorkingModes
PresstheModekeytoswitchvideo/image.

meansvideomode,
while

meansimagemode.PresstheModekeytwicetoentertheplaybackmode.
HowtoEnterSystemSetupOption
Hold the Mode key, then press the OK key/REC key to enter the "System Setup" option. In such case, the bar of "System Setup" is of blue background.
- Date/Time: You may set date/time.
2.AutoSwitch-off: You may set the automatics switch-off time.
3.Keytone:Youmayswitchon/offkeytone.
4.Language: Youmaysetthedesiredlanguageagemenu.
5.TVmode:NTSC/PALavailable.
6.Lightsourcefrequency:50Hz/60Hz. - Default:Factorysettings.
8.Version:F/Wversionnumber.
HowtoTakeVideosandSetVideoOptions
1.TakeVideos
WhentheDVRenterssthevideomodeandtheicon

occursontheleftuppercorner
ofthescreen,presstheRECkey/OKkeytostartrecording;inrecordingvideos,theicon
ontheleftuppercornerofthescreenwillflash.PresstheRECkey/OKkeytostop
andthentheicon ontheleftuppercornerofthescreenwilldisappear.
- SelectFillLight
Invideomode, presstheOn/Offkeyshortlytoswitchdaylightandnight.lfnightmodeis
chosen, thefillightwillbeactivated.
3.SetVideoOptions
PresstheModekeytoenterthesetupofvideooptions.
Resolution:720P/480P
Looprecording:Off/5min./10min./15min.
MotionDetection:On/Off.
RecordAudio:On/Off.
DateStamp:On/Off.
G-sensor:On/Off
TakeandSetPhotos
1.PresstheOn/Offkeytoenterthevideomode;presstheModekeytoentertheimage
modeindicatedwiththeicon

ontheleftuppercornerofthescreen.
- AligntheDVRAgainsttheobject,presstheUp/Downkeytochangethedigitalfocus;insuchcase,holdtheDVRfirmlynottoshockit.
- Press the Shooting key, when the DVR gives a sound of "Click", the shooting is completed.
- Self-TimerFunction
Intheimagemode, pressandholdtheModekeyandchoosethedesiredshootingmode, press the Up key to choose "Single, 2s, 5s, 10s and Sequence".
5.HoldtheModekeytoenterthesetupofthephotossshot
Capturemode:Single/2STimer/5STimer/10STimer/Sequence
Resolution:12M/8M/5M/3M
Imagequality:SuperFine/Fine/Normal
Sharpness:Strong/Normal/Soft
Whitebalance:Auto/Daylight/Cloudy/Tungsten/Fluorescent
Color: Normal/Black&White/Sepia
ISO:Auto/100/200/400
Exposure:-2.0-+2.0
FaceDetection:Off/FaceDetection/SmileDetection
Anti-Shaking:On/Off
QuickReview:Off/2s/5s.
DateStamp:Off/Date/(Date/Time)
Tip:
- Inanyofthemodesofvideo, image and playback, you may press the Modekeyto switch such modescircularly.
2.Inimagemode,presstheOn/Offkeytoactivatethefilllight.
PlaybackMode
- WhentheDVRcompletestesthestartupprocedureandentersthevideomode, pressthe Modekeytwicetoenterthe6-menubrowseestate.
2.ChoosethedesiredphotoorvideoandpresstheUp/Downkeytobrowseit.Insuch case,presstheOKkeytoenterthesingle-imagemodeoroperatethevideo.lftheicon

appearsonthelefuppercornerofthemenu,thefileisavideo,presstheOKkeyto
playorpauseplayingit;inplaying,presstheUp/Downkeytoturnup/downthevolume
andholdthesameforfastforwardandfastbackward.lftheiconappearsonthe

leftuppercornerofthemenu,thefileisaphoto.
3 删除
Inplaybackmode,holdthemodekeytohavetheoptionsofDeleteandFormat;pressthe
Down key to move to the option to be deleted, press the OK key to have "Delete" and "Delete All" options, then press the OK key to enter the desired option and again to confirm.
ModeofVideoingwhileCharging
ConnectthecharchargertotheUSBportofthedevic,switchitofftoentersuchmode.
DataBackup
USBAckupMode
ConnecttheDVRandPCwiththeUSBcable,thenthedevicewillautomaticallypoweron
MEMORY
PICTBRIDGE
andtheicon CAMERA will appear, choose "Memory" and press the OK key to confirm;
switch on the PC, then one mobile disc will appear on "My Computer" on the desktop and youmayfindthedesiredfileintheMobileDisc/DCIMfolder.
Remarks:
1.PCoperationsystem:Windows2000/XP/Vista/Windows7/Windows8,MACOSX
10.3.6orabove.
2. Choose "Camera", then the DVR may be used as a camera.
3.ChoosePICBRIDGEtoconnecttheprintertoprintpictures.
4. RemovetheUSBcabletoturnofftheDVR.
ConnecttoTV
- Use the HDMI connection line to connect the DVRtoa TV for playback.
2.UseaTVcabletoconnecttheDVRtoaTVforvideoing,shootingandbrowsing picturesandvideos.
Tip:Withoutdriverinstalled,themobilediscmaybeusedwhentheDVRisswitchedon.
Remarks:Whenthisdevicefreezesduetoimproperoperation,presstheResetbuttonto restartandrestoreit.
TechnicalSpecifications
| LCDsize1.5", 4:3, T F T L C D | |
| Lens120°A+classhigh-resolutionssuperwideangle | |
| LanguageforoptionsGerman,English(default),French,Spanish,Italian,Portuguese,Polish,Russian,Dutch,Greek,Hungarian,Czech,Danish,Swedish,Norwegian,andFinnish | |
| Video size720P/480P | |
| Video formatAVI | |
| Photoresolution3M(12M,8Mand5MInterpolated) | |
| PhotoformatJPG | |
| MemorycardSupport8GB-32GB/Class6-10MicroSDcard | |
| Microphone/SpeakerInbuilt | |
| ShootingmodeSingle/2STimer/5STimer/10STimer/Sequence | |
| Lightsource frequency | 50Hz/60Hz |
| TVoutputNTSC/PAL | |
| USBportUSB2.0 | |
| Powersupplyport5V500MA | |
| BatteryBuilt-in,3.7V,350mAh | |
| Operation system | Windows 2000/XP/Vista/Windows 7, Windows 8, MAC OSX 10.3.6 orabove |
Note: We reserve the right to change the design and specs of this product without further notice.
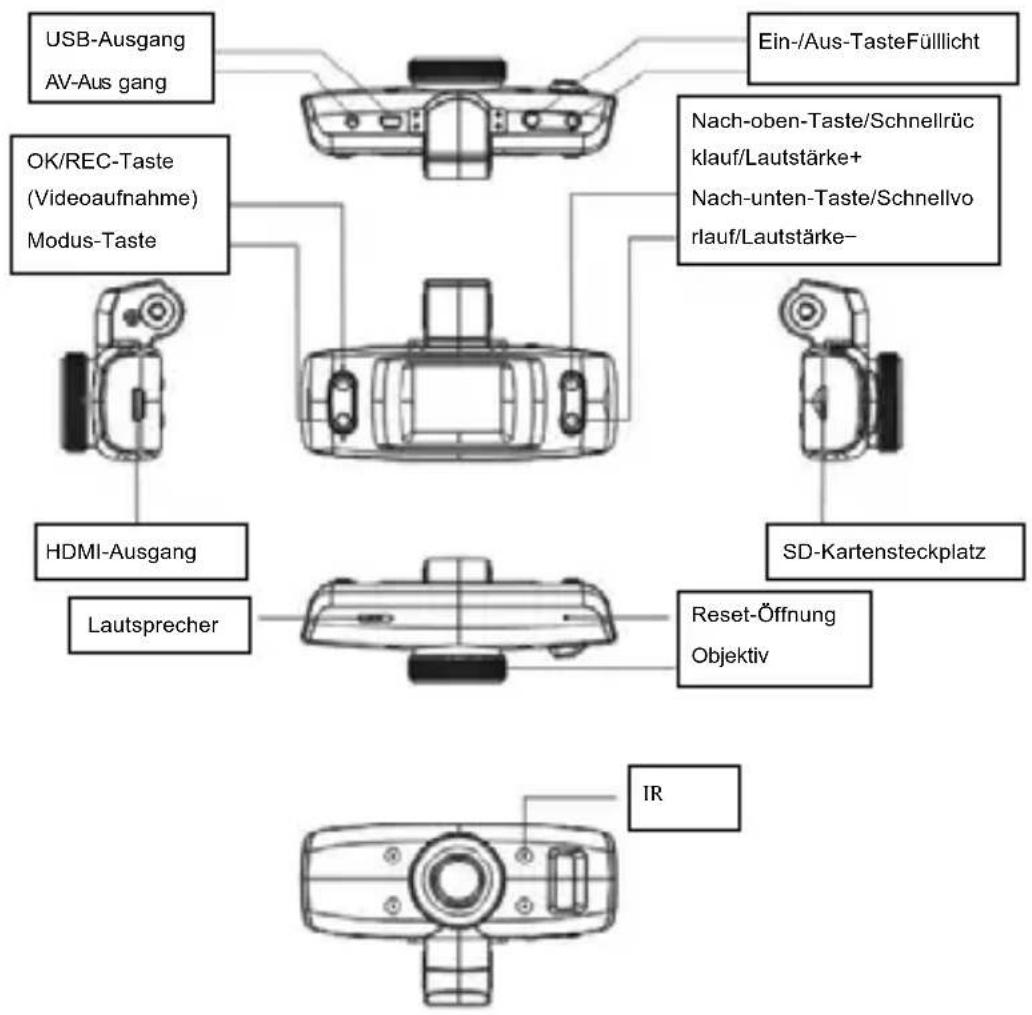
Installation
Ligar/Desligar(On/Off)DVR
- Mantenha premida a tecla Ligar/Desligar (On/Off) duranteorca de 2 segundos para ligarodispositivo.
- Mantenha premida a tecla Ligar/Desligar (On/Off) duranteorca de 3 segundos para desligarodispositivo.
Alternarnodosdefuncionamento
PrimaateclaModoparaalternarentrevideo/imagem.

correspondeaomodode
videoenquanto

G-sensor:Ligar/Desligar(On/Off)
Tirareconfigurafotos
Horodate:Marche/Arrét
Batape nonnoctbjo 3apjkeha Batape hemhoro pa3pjkheha Baatape nonnoctbjo pa3pjkheha
3apka 6aTapeu
- Moxho 3apjkaTb HnOcpeDCTBHeH0 C nOMOsbHO aBtOMo6nIbHOrO 3apJdHoro yctpoiCTBa chee3 USB nopT BnDEOKaMepbl, B BbIKNoyeHHOM peKIme TaKke MoxHo BbINOHrTb 3apJdky.
- 3apraKa ot kOMnbIOTepa uepe3 USB npT, B BBIKHoueHHOM pexHMe TaKKe MOxHO BbINOHrTb 3apRky.
YcTaHOBKa n m3BneueHne SDkapTbI
- BctaBbTe TF KapTu B TF cnot TaK, YTo6 TF KapTa HAdExHo 3aKePnInacb B Cnote.
2.ДяиИЗВЕЧЕНЯ,навКМTe сlerka Ha TF KapTy,пocne уero,пpyЖиHa BbITOKHET TF KapTyи ee MoKHO 6ydet ИЗВЕЧь.
06paTte BHMaHHe:
- 06patnte BnmaHne Ha yron yctahOBKn TF KapTbI, nonbltka ycTaHOBnTB TF KapTy nOd HnnpaBnBbIM Yrnom MOKeT npnbecTe K nobpeXdeHIO BundeKaMebpIi TFkapTbI
- Nocne yctaHOBKn TF kapTbI annapat MoKeT nepeBecTu TF kapTy b pexnM xpaHeNra, a HeKOTOpbie paJIbI TF kapTbI MOrYT he pacNo3HaBaTbcR.
- B cnyuae TF n Bndeokamepa nndeHTnФu npyOTcKa KHeOBMeCTnMbIe, nonpo6yTe eue pa3 BCTaBtB TF KapTy nnn nnonmHraTe ee Ha npryU.
- IcnoIb3yIte BBICOKOCKOPOCThble TF KapTbi
Yka3aTeJb noJIb3OBaTeJra
BknoueHne N BbIKnOyeHne BnDeOKaMepbl
1.3aKaTb KhoNkY BKnOuyeHnI n depKaTa b OkoI O 1 ceKHybl, annapaT BKnIOuHTcra
2.3aKaTb KhoNkY BbIKNoHeynI N depKaTb OKOJI 3 cekyH, annapaT BbIKNoHTcR
PpeeknoueHne pexmOB pa60TbI
Moxhno nepeKIOuATbca MeKdy peKIMaMn BundeOKaMepbI n fOToaannapata ,

peKIM BnDeOkMaepbl,

pekIM fOToaannapata,DBOHoe HaxKaTne Ha
Pe3KoCTb: BbICOKa/CTaHapTha/MrKa
BanaHc: ABTo /DHeBHO CBet / ObnaH0 / BoIbΦpam / ΦnyopeCHTbH
LBeT:ObIyHbI/YepHo-6eIbI/Oxpa
ISO:ABTo/100/200/400
Komnehcaun 3Kcno3u: -2.0 +2.0
Pacno3HaBaHne liu: Pacno3HaBaHne liu/Pacno3HaBaHne yIb6Kn
3aunTa OT cOtpcHnBKn/BbIK
BbICTpbn npocMToP:BkN/2ceKynDbI/5ceKynD
Пометка даты: Дata/(ДаТВрем)
Приимейанne:
- HaxoJcB B IIObOM n3 peKIMOB cBeMKn MOxHO nepeKNoUHTbcra B dpyroI peKIMn HaxaTHeM KONKn BblOba peXIma.
2.BpeKIme fOToCbEMKn MOxHO BkJIIOuHTb FyHKUIO KOMNeHCAuN CBeta HaXaTNEm KHONK BIIIOUHeHH.
Pexim BocnpOn3BeDeHnA
- Korda annapat 3aBepuNT npoueCC BKNHueHn I BOJET B pexIM BundeOcbemKn, DbaKdbI HAKMITE KONKy BbIbopa peXIMa, OTKpoeTcpeXIMnpocmOTpa no 6 kaIpOB.
2.Длгпрсмтра кадров habKMITE кнонки Вьерх/Виз. HabKMITE Kнонky OK дявхда вОдночьп ржим пссмтра,В 3Tom ржимdoctунho упразьнhoe napametpamn
H3o6paXeHn. IoBHeHne B BepxHem JEBOM yIy H3o6paXeHn CmBOHa 03Haayet, YTO Bbl HaxOHTecb B pexime ynpabHeHna aydNO-BnDeo MaTePnAamn. IJny npOnrpbBaHnry Bndeo nIi fOto MaTePnAIOB haxMnte OK. Bo BpEm npOnrpbBaHnry KOpOTKoe HaxaTne KHOKN BBepx/BHN3 dJa yMeHbSeHnry/YBeJIuYeHn rPOMKOCTN 3ByKa, DInTeJbHOe Haxatne dJa nepeMOTKn. IoBHeHne B BepxHem JEBOM yIy CmBOHa

O3HaayaeT, YTO Bbl npocmatpnaeTe N3o6paKeHn.
3.YdaJIeHne
BpeKIMe Bocnpoun3BeHnna, HaxMITE n depKITe KONky BbIbopa peKIMa, noBaTcOnuun ydaJIeHn yΦopMaupoBaHnna, HaxMITE KONky BnI3 dIy nepeXOda K onUuYdaJIeHnna, HaxMITE OK dIy nepeXOda K ONIaMm «YdaJIntb TeKyIun φpaRMeHT» «YdaJIntb BCE», HaxMITE OK dIy bIbopa, eIe pa3 HaxMITE OK dIy noDTBePjKeHnna.
CbeMka B peMe no3apAdkn
IocoeHnTe annapat K 3apAnHomy yctpoCTby aBtOMo6nna chee3 USB npT, npN BkJIOHeHnn annpapaTOBMOXHO BOITN BbINOJIHnTB CbeMKy B pekmne IOn3apAkn.
Pe3epBna KONNA
PexnM pe3epBHOJ USB konnn
IooeHNHe annapat K KombHepy c nOmoBHO USB npoBoa, annapat BKnHouHTc
ABTOMaTHueckn,
nocne
NOBJIeHJ
3TOI
KapTuHKn
3aONHHHBOOoe yCPOECTBO
PICTBRIDGE
Kamepa
,BB6epnte 3aONMHaOuue yctpoNCTBO),HaxMnTe OK
Длг NOДТВЕРЖDEHIN,OTКpoIte «MонkomnbIOTep»Ha pa6ooyem cTone,no8BHTcR 3NaUOK DNCKa,HaiDInTe HxKHyIO NaIky DCIM Ha OJHom n3 cbEmhblx DNCKOB
Приимеанно:
1.Операцнонные систemsы:Windows 2000/XP/Vista/Windows7,MACOSX10.3.6иьыБыш.
2. Bb6epnte peKIM Be6kamepebl, MoXHO nOnJb3oBaTb kaK Be6kamepy.
3.Длп neуати Фотографи, поknнчite К пинтуру и Вьберпte PICBRIDGE.
4. BbIepeHnTe USB npoBOID n BbIKJIOChte annapaT.
IopknHueHne TeleBn3opa
- TeJIeBn3Op MoKHO IOKnIOHTb cIOMOuHDMIpOBoJa.
2.ПоdkluчИВ TeIeBn3Op uepe3 TV npoBOd MOxH0 OcyuEcTBnTb BnDeO3aNcB、ΦOTOCbEmKy, a TAKKe IpOCMToP BnDeO n ΦOTO MaTePnAnOB.
O6paTne BHMaHHe:ycTaHObKa dpaBepOB He Tpe6yeTc. KoIa annapaT haoDntc BO BKJIIOeHHOM peKIMe MOXHO NJIb30BaTbc CBemHbIM DnCKOM.
Приимechаиме: ecн Heнадлесашпсюьзоване Данного apnapata npnbete K er03aBvcaHIO, HaxmTe KhoNky C6poc, 3aTeM BknHouHTe apnapat 3aHOBO, apnpataBepHeTcB HopMaJIbHbI peKIM pa6Otbl.
TexHueeckne xapaKTePnCTnKn
Forhandvisining:Av/2s/5s
Anti-handrystelse:On/Off
Hurtigvisning:Off/2s/5s
Skarphet:Sterk/Standard/Myk
Hvitbalanse:Auto/Dagslys/Skyet/Tungsten/Fluoroserende
Farge:Standard/Sort&Hvit/Brun
ISO:Auto/100/200/400
Rollei Service Germany
Denisstraße 28a
D-67663 Kaiserslautern
Hotline +49 (0)631/3428449
Distribution:
Subject to technical changes!