
KA 1 CB - Coffee machine BOMANN - Free user manual and instructions
Find the device manual for free KA 1 CB BOMANN in PDF.
| Brand | Bomann |
| Model | KA 1 CB |
| Type | Coffee machine |
| Power supply | 230 V ~, 50 Hz |
| Power consumption | 420 W |
| Protection class | I |
| Water tank capacity | 300 ml maximum |
| Net weight | Approx. 0.25 kg |
| Filter | Reusable permanent filter |
| Functions | Preparation of ground coffee, half cup or full cup |
| Cup included | Yes, thermal insulating stainless steel cup (300 ml) |
| Preparation time | Up to 4.5 minutes |
| Cleaning | Filter, holder, cup and lid hand-washable; cup and lid dishwasher-safe |
| Descaling | Recommended with citric acid-based products |
| Safety | Do not open the lid during preparation, unplug before cleaning |
| Number of pages of the manual | 38 pages |
Frequently Asked Questions - KA 1 CB BOMANN
User questions about KA 1 CB BOMANN
0 question about this device. Answer the ones you know or ask your own.
Ask a new question about this device
Download the instructions for your Coffee machine in PDF format for free! Find your manual KA 1 CB - BOMANN and take your electronic device back in hand. On this page are published all the documents necessary for the use of your device. KA 1 CB by BOMANN.
USER MANUAL KA 1 CB BOMANN
Thank you for choosing our product. We hope you will enjoy using the appliance.
Symbols in these Instructions for Use
Important information for your safety is specially marked. It is essential to comply with these instructions in order to avoid accidents and prevent damage to the machine:
WARNING:
This warns you of dangers to your health and indicates possible injury risks.
CAUTION:
This refers to possible hazards to the machine or other objects.
i NOTE:
This highlights tips and information.
General Safety Instructions
Read the operating instructions carefully before putting the appliance into operation and keep the instructions including the warranty, the receipt and, if possible, the box with the internal packing. If you give this device to other people, please also pass on the operating instructions.
- The appliance is designed exclusively for private use and for the envisaged purpose. This appliance is not fit for commercial use.
Do not use it outdoors. Keep it away from sources of heat, direct sunlight, humidity (never dip it into any liquid) and sharp edges. Do not use the appliance with wet hands. If the appliance is humid or wet, unplug it immediately. - When cleaning or putting it away, switch off the appliance and always pull out the plug from the socket (pull the plug itself, not the lead) if the appliance is not being used and remove the attached accessories.
- Do not operate the machine without supervision. If you leave the room you should always turn the device off. Remove the plug from the socket.
- The device and the mains lead have to be checked regularly for signs of damage. If damage is found the device must not be used.
- Do not try to repair the appliance on your own. Always contact an authorized technician. To avoid the exposure to danger, always have faulty cable be replaced only by the manufacturer, by our customer service or by qualified person and with a cable of the same type.
- Use only original spare parts.
- Pay careful attention to the following "Special Safety Instructions".
Children and Frail Individuals
- In order to ensure your children's safety, please keep all packaging (plastic bags, boxes, polystyrene etc.) out of their reach.
WARNING!
Caution! Do not allow small children to play with the foil as there is a danger of suffocation!
- This device is not intended to be used by individuals (including children) who have restricted physical, sensory or mental abilities and/or insufficient knowledge and/or experience, unless they are supervised by an individual who is responsible for their safety or have received instructions on how to use the device.
- Children should be supervised at all times in order to ensure that they do not play with the device.
Special Safety Instructions for this Device
- Place the coffee machine on a firm and flat surface. Position it so that it cannot tip over.
- Do not place the device directly next to a gas or electric cooker or any other source of heat.
- Before you open the filter cover, switch the device off and allow it to cool down for at least 30 seconds!
- The water tank must only be filled with cold water!
WARNING:
Never open the filter cover during the boiling process, as otherwise this may cause burns.
i NOTE:
During operation steam is emitted from above the filter holder! This may cause condensation to form on the upper cover of the device. This is normal and does not impair the functioning of the device!
- Do not move the device while it is in operation.
Intended Use
This appliance is intended to make coffee from ground coffeef beans.
It is intended for the use in private households and similar applications such as:
- in staff kitchens of shops, offices and similar work places;
- for guests in hotels, motels and other residential facilities.
It is not intended for applications in agricultural properties or B & B.
The appliance is only to be used as described in the user manual. Do not use the appliance for any commercial purposes.
Any other use is not intended and can result in damages or personal injuries.
The manufacturer assumes no liability for damages caused by improper use.
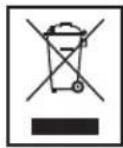
Overview of the Components
1 Permanent filter
2 Water outlet
3 Water tank lid
4 Filter holder
5 MAX markings for 12 cup (150 ml) and 1 cup (300 ml)
6 Water tank
7 1/0 - On/Off switch with integrated power indicator lamp
8 Power cord with plug
9 Cup shelf
10 Thermal stainless steel cup with lid (volume: max 300 ml)
Initial Operation of the Device
- Remove all packaging and transportation safety devices from the device that may be present.
- Rub all of the parts with a damp cloth. This will remove any dust that may have accumulated during transport.
- Clean the permanent filter, the filter holder, the thermal stainless steel cup and the lid by hand in a bowl of water.
- Reinsert all of the parts in the reverse order. Please use the recesses for the filter holder and the permanent filter to help you.
NOTE:
Before making coffee for the first time, allow water to pass through the device two to three times in order to clean it.
Electrical Connection
NOTE:
Please ensure that the device is switched off. The switch must be on "0".
Insert the mains plug into a properly installed socket with earthing contact. For information please see the type plate on the device.
Operation
NOTE:
You can prepare a half or a full thermal stainless steel cup.
- Fold open the water tank lid.
- Fill the water tank with cold water.

CAUTION:
Do not overfill the tank! Do not fill above the marks for the maximum quantity of water.
- Fill coffee powder into the permanent filter.
NOTE:
- For a full thermal cup, we recommend approx. 15 g or approx. 7.5 g of coffee powder for half a cup.
NOTE:
-
The permanent filter can contain a max. of 20g coffee powder. Do not overfill the filter. If it contains too much coffee powder there is the risk that the ground coffee may spill over the edge of the filter.
-
Put the thermal cup on the cup shelf without the lid and close the lid of the water tank.
- Position the switch in position "l". The brewing is started.
NOTE:
- The power indicator lamp lights up.
The preparation takes a max. of 4.5 minutes.
Take out the thermal cup after preparation. Close it with the lid. Keep the slider closed so that the coffee stays warm longer.

CAUTION:
The slider is not a non-drip, leak proof seal!
- Turn the device off. The control lamp goes out.

WARNING:
If you would like to make another cup of coffee immediately, switch the device off. Allow it to cool down with the water tank open in order to prevent hot water splashing out when the machine is refilled.
Dscaling
It is necessary to descale the coffee machine if the preparation time becomes considerably longer.
Only a commercially available decalcifier on a citric acid base should be used for descaling.
- Please use the quantities stated on the pack or instruction leaflet. Note the maximum water amount!
- Put the thermal cup without a lid or another suitable cup (approx. 300ml ) onto the cup shelf.

WARNING:
- Afterwards you should boil fresh water in the pot three or four times in order to rinse out residues of the descaling agent.
- Do not use any coffee powder!
- Do not use this water for consumption.
Cleaning

WARNING:
- Before cleaning, always remove the mains plug and wait until the device has cooled down.
- Do not immerse the device in water. Otherwise this might result in an electric shock or fire.

CAUTION:
- Do not use a wire brush or any abrasive items.
- Do not use any acidic or abrasive detergents.
-
The thermal cup and the lid are not dishwasher safe.
-
The exterior of the device should be cleaned as necessary with a slightly damp cloth - without any additives.
- Clean the permanent filter, the filter holder, the thermal stainless steel cup and the lid by hand in a bowl of water.
Technical Data
Model: KA 180 CB
Power supply: 230 V~, 50 Hz
Power consumption: 420 W
Protection class:
Filling quantity: max. 300 ml
Net weight: approx. 0.25 kg
Subject to technical changes without prior notice!
This device has been tested according to all relevant current CE guidelines, such as electromagnetic compatibility and low voltage directives, and has been constructed in accordance with the latest safety regulations.
Disposal
Meaning of the "Wheelie Bin" Symbol
Take care of our environment, do not dispose of electrical appliances via the household waste.
Dispose of obsolete or defective electrical appliances via municipal collection points.
Please help to avoid potential environmental and health impacts through improper waste disposal.
You contribute to recycling and other forms of utilization of old electric and electronic appliances.
Your municipality provides you with information about collecting points.
Instrukcja obslugi
3aIIIaEMO 3a co6oIO npaBO HaTexHHi3MiH!
Ley npnad 6yno nepebipeHo 3riHO Bcix BiNobiHNx, akTyanbHnx DnpekTINB CE, HnpiKnad 7oO eNeKtpomarHTHoi cyMICHOCTI Ta Hn3bKOBOThOI DnpeKTHIN, Ta 36yDoBaHO 3 a HOBITIMN NOJXeHHaM NTexHIK6e3neKN.
PykoBoIDCTBO no 3KcnnyatauN
Cnacn6o 3a Bb6op Hauero npodykta. Hadeemc, OH Bam noHpabITc.
CnMBOJI npIMeHReMbIe B DaHHOM pyKOBoDCTBe NOJIb-3OBaTeJIa
BaxhIe peKOMHeaUIN DnI O6ceueHnBaSeI 6eOnac-HOCTN o6o3HaeyHb IIO OC0eHHOMy. O63aTeJIbHO CneNyTe 3TNM peKOMHeAuaJm, YTO6bl PpeOTbPaTb HecactHbI CNyau nnI NpOMky n3deJINr:

IPENYIPEXDEHNE:
IpeDynpexJaetobOnachOCTnIpy3OpOBByIOB3MOxHOM pnckeIPOyHeHnTpaBMbl.

BHIMAHNE:
Yka3bIbaet Ha BO3MOXHyO ONaCHOCTb IINN3dEINN INpyTNX OKpyKaIOUxN PpeDMETOB.

PIMEYAHNA:
Jaet CoBtBu INHΦOpMaIuIc.
06uue yka3aHnno TExHnke 6e3oNaCHOCTN
Ipeepnauanom 3Kcnpnyataun npnbopa BHIMatelbno npo- nHTaTe npnilaraemyo INHCTpykunIO no 3Kcnpnyataunu coxpaHIne ee B HadeXHom MeCTe, BMeCTe C rapaHTnHBIM TaHOOM, KACCOBbIM YekOM n, NO BO3MOXHOCTN, KAPTOHN KOPO6KOc yNAKOBOyHbIM MaTePAnOM. Ecln daete KOMyINo NOnOB- 3OBaTBCr npbOpom, O6BaTeNBHO daITe BnpiDauy daHHyo INHCTpykunIO no 3Kcnpnyataun.
-Пльзутесь пибором только уаснымобраимип ha3hauehenIO.пибор He npedha3hauehenДгя кOMMepeCKOTOИСПЛьзOBAHЯ. He nIb3yITecb пиборom IOID OTkpblTbIM He6OM.пpeOxpanaHTe pni6Op ot kapbl,прamblix coNHeuHbIX JlyeH, BnaxKHOCTN (HIV B KOEM cIyuahe He norgpykaite erO B BOU) n ydapoB 06 octpblye yrlbl. He npikacaiTeCkКпрбopy BnaxHbIMn pykami. EcIn npi6Op yBnaJxHINCR nINn HAMOK, Tyt JKe BbIHbTe BNILky n3 po3ETKn.
- Pocne 3KcIpyataMn, MOtTaKe npHnAdNekHoCTe, YnCTKe nIIN NOONMe pnp60a Bcerda BbIHMaTe BnIKy n3 po3ETKn (TJHnTE 3a BNJIky, a He 3a KaBeJIb).
He octabnIte BkHoueHHbIe 3neKTpnp6Opbl 6ez npncmotpa.BbIXOJa n3 NOMEueHnB CBeJa BBIKIOHaTe np6Op.BbIHbTe WTEKepe n3 po3eTkn.
- Pn6bop n Ka6eBcTeBOro NITaHnH Heo6xoJIMOp peryI IApHO 06CneIOBaTb Ha HAIuHne CNeIOB NOBpeKDeHnI. PnO6hApUKeHnIOBpeKDeHnI ONb3OBaTbCra Pnp6bOpom 3anpeScaTcR.
HnB KOem cnyae He pemOHntpyte np6op camocToTeIbHo, a 6paaIeTcB TaKOM cnyae 3a NOMOuK CneuaJIncTy, IMeHOUcEMy COOTBeTCTByIOUsI dOnyck. N3 COo6paKeHn 6e30NaCHOCTN, 3aMeHa CeTeBOr OShypa Ha paBHO3NaHbI dONyCKaETC TOnbKO uepe3 3aBOIN3-
TOTOBNTJIb,HaUy cepBnCHyIO MaCTepCKyIO NIN COOTBetCTBYUOero KBaJINpOBAHORO CNEuaJIInCTA.
- IcnoIb3yIe ToIbKO opnHaHaNbHbe 3aIuaCTN.
- PtoKaJyIcTa, co6JIouJaTe HnKecNeUOuIe "CneuaJIbHbIe yka3aHnI NO TEXHnke 6e3oNaChOCTN".
TeHn nIuHa HyKDaHOUneC8 B npncMOrpe
- Ⅲ coobpaekhen 6e3oNaChocTn dner DeTeH He ocTaBJIaIte JExKaTb yNakOBky (IIaCTIKOBbIe MeuK, KapTOH, NeHONlaCT n T.d.) 6e3 npncmOTpa.

PENEYIPPEXDEHNEI
He no3BOJnIe TeTm INpTaB c nOIN3TNHeHOBo IneHko. Onachocb ydyuBa!
3TOT np6bOp He npedHa3Hauen IINI pONb3ObaHnI INaAMn (BKNUaJ DaTei) C OPAHnueHHbIMn Pm3NueckMM, CEHCOPHbIMN INI yMCTBeHHbIMN CNOOCHOCTAMN INI INaAMn, HE IMeEOUcIMN ONbITa N/INI HEOxOdMbIX 3HaHNI. NCKIOUeHne COCTABJIOT CNYaH, KOrDa OHN HAXoJATCR NOI pncmOTpOM INuca, OTBETCTBEHHORO 3a INx 6e3Onac-HocTb, INI KOrDa OT 3TORO INuZa NOnyHehbl Yka3AHnI NO N0lb3ObaHnIO np6bOpom.
Heo6xoJIMO npncMaTpNbTa 3a DeTbMn, YTo6bI y6eNtBcra B TOM, YTO OH He NrpaHOT C np6bOpom.
CneuaHbHbIe HNCTpyKcnn No 6e30nacHOCTn npn noJb3OBaHHN 3Tm yCTpOYCTBOM
CTabTe KoepBapKy Ha TBepDyIO INIOCKyIO NOBepxHocTb. CneIte 3a TeM, YTObOHa He MoRnOgONpOKHyTbcr.
He ctabte yctpoCTBO B HnocpeCTBeHHo6JI3OCTN K ra3OBoi IIN 3JNEKTPuYeCKO KyXOHHOI INITe INI DpyROMy NCTOCHNY TEIIa.
IpeoTkpbItnemKpbIuKnqΦnIbTpBaIKIOHTyeycPoITCTBOUdaTe emOcTbITB TeueHHe MeHee 30 ckyHn.
- BODaHON 6aOcK DoJIKeH 3aIOnHЯTbC8 ToJIbKO XoIOnHOB BOdo!

IPEDUYIPEXDEHNE:
HnKOrda He OTKpbIbAte KpbIbUky fIbTpa B npOuece KInHeH, B nPOTUBHOM Cnyuae MOxHO IOnIyHTb OXoR.

PIMEYAHIA:
Bo Bpempa60bI nap BbIXOHTnIepKATeIeM
PnIbTpa! 3To moKet npBODMb K KOHDeHcaUNn BnaRn
Ha bexHe KpbIuKe yCTpoiCTBa. 3To HopMaJIbHO n He
BnIaET Ha pa60Ty yCTpoiCTBa!
- He nepemeeaite pa6oTaUooee ycTpoiCTBO.
Ha3haeHne
JaHHoe yCTPOIcTBO IpeHa3HauHcIOI pNIroTOBnHnKoOe H3 MOJToBIX 3epeH KoPe.
UcTpoCTBO npeHa3HaueHO TOIbKO IINI NCIOnIb3OBAHnI DAOMA INI BIOOBbIX MeCtAx, HApIMep:
- Na KuxhJx MaCTepcknX, oΦicax nIIN dpynx pa6oynx MecTax;
ROCTMNOTENe,MOTeNeN DpyTNX UypeKdHnX ROCTNHUHO TINa.
YcTpoIcTBo He npEHa3HaueHo IINNcNoJIb3OBAHnB CenbCKOX03rCTBeHHbIX NOMEeHnX ININ B NaHCNOHATax.
YCTPOIcTBO MOKHO NCOJb30BaTb TOnbKO TaK, KaK ONiCaHO B DaHHOM pyKOBoDCTBe NOJb30BaTeJIa. He NcNoJb3yIte erO B KaIKXJI6o KOMMepeCkIX ZeJIx.
JIo6oeIpyoe IcNoJIb3OBAHHe CHTaETcR IcNoJIb3OBAHnEM He NoHa3HaueHnIO, IN MOKeT PpNBecrN K NOpYe IMyUeCTBa INJIN TpaBMam.
PpO3BODIeJIb He HecET HnKaKo OTBeCTBeHHOCt 3a yUep6, pNCHHeHbI HeNpaBnIbHbIM NcIOJIb3OBAHNem yCTpoiCTBa.
PacnoJoxKeHne 3JeMeHTOB
1 NocToHHbI dHbTp
2 BbInyckHoe OTBepCTne
3 Kpbilka BoaHoro 6aKa
4Дерхателфпьтра
5 Mapknipobka MAX nla 1/2 uawkn (150 m) n 1 uawkn (300 mn)
6Bodanyo6aohok
7 I0- IpeeknioateIb BkIOueHn/ByIKIOueHn CO BCTPOEHHbIM INDkATOpOM NITAHIN
8 Ka6eJIb nHTaHnC BvIkoN
9IocTabKaIJaTaWeK
10 TepmoaJka n3 HepKaBeOuJe CTaJIc C KpbIuKo (obem: mKc. 300 m)
PepBoe nCNoJIb3OBAHne yCTpoIcTBA
- Y6eHrTe BcO yNakOBky N TpaHcnpTnpoBOuHbIe npedoxpanHeBbIe CpeIcTBa, KOtOpbIe MOrY IprCyTCTBOBaTbByCtPOIcTBe.
2.ПOTPITe BCE KOMNHOENTbI BnAkhHOI TkaHbIO.PnI 3TOM Bbl ydaNTte Nblb, KOTOPaI HAKONITbcB O BpeM TpaHCnOPTuPOBKn. - BpyHyIO B MNCKE C BOIOO ONUCTIte NOCTOHHbIe FJIbTp, DEPKaTeNb FJIbTpA, TepMOUaUKy I3 HEPKABEOUe CTaJIN N KpbIuKy.
- YctahOBHTe BCE KOMNHOHeTb B o6paTHOM NopRJaKe. IoxaIyIcTa, dIy NOMOuN cNOnb3yTe yrny6JeHnA dIa IepKaTeNa fNtbp Ta nocToaHnOro fNtbp Ta.
IIPIMEUYAHJ:
IpeepIePbIM IcN0JIb3OBAHnEM yCTpoiCTBa npOnyCTNTe BOy Ype3 yCTpoiCTBO Dba-tpn pa3a, YTO6bl NOuHCTNb ero.
3neKtpnueckoe noKnHoueHne
I PIPMEUAHNIA:
Y6eIntecb, YTO yCTPOIcTB BblKIOueHo. IpeKeIIOuAtenb DoJIkeH 6bITB NNOJKeHN "0".
BknHnHTe CTeByIO BnIKy B npaBnIbHO yCTaHOBnEHyo 3a- 3emneHHyo po3eKy. HOpMaun yka3aHa Ha Ta6nHKe Ha yctpoiCTbe.
IcnoJb30BaHne
I P N I M E U A H N A:
Moxho npiroTOBbIb NOOBHy IINI NIOHy TOpeMoayu Kny HepKaeUOeI CTaII.
- OTKpoIe cKnadHyo KpbIly Ko BOJHOrO 6aKa.
- Hanieite B BojraHoi 6aOOK XoIIOHyIO BOy.
BHIMAHHE:
He nepenonnayte 6aoh! He hainbaite Body BbIe OTMETOK MAKCIMaJIbHOro KOINHecTBA BObl.
- 3acbinbte KoopeinHbI npoosK BIOCTOARHHb qnIbTp.
IINPIMEYAHNA:
-Дпя плно Терmoшк Мbl pekomehdyem npm. 15 rpaMM KOFeHORI NOpOuKa, INI INPm. 7,5 rpaMM ДЯ ПОЛOBHbI YauKn.
IocToHHbI qnIbTp MoKet CoepKaTb MaKc. 20 rpaMm KofeHoro nopoWka.He 3acbinaTe B qInIbTp 6oJIbwe.EcIN qInIbTp coepKNT cInuKOM MHORO KoFeHoro nopoWka, BO3HnKaeT pCK nepeJIINBaHnMoNtOro Kofe Yepe3 KpaIqNbTpA.
- Nocabte Tepmoaiky 6e3 KpbiKn Ha IOTOK dIraaikn 3akpoTe KpbIaKy BOJHoro 6aka.
- YctaHOBtne nepeKIOuATEb B noIOXeHHe "I". PpIROTOBJIeHHe HauHETcR.
I INPIMEYAHNIA:
- INHДИКATOP nHTaHЯ HauHET CBeTtbcra.
-Пи���罗нгпздамм.TMakc.4,5MHHyTbI.
Iocne npriroTOBNEHnN 13BNEKNTe TepMoHaUkny.3aKpOte ee KpbIshkoJ.DepXnTe 6eryHOK 3aKpbITbIM, YTO6bl Kope 6oJIbUee Bpem OCTabALIOCB roprHM.
BHIMAHHE:
BeryHok He o6ecneuBaet 3aunTy OT npOInTu, BO3-MoXHO BbInnecknBaHne!
- BbIKIIOHHTe NITAHHe. KOHTPOJIbHbI INHINKATOP NoraCHET.
PENEYNPEXKDEHNE:
EcHn HxNHO pIgROBtB BTOpyu KaUky KoFe cpa3y JKe, BbIKIOHTe yCTPOINCTBO. DaITe EMy OCTbITb PnO TKPbITOM BOJHOM BaUke, YTO6bl PpEOTBpATNTb PaCnNECKBaHHe TOpRHe BObl Pn3aONHHeHH NcKebapKn.
YdaneHne HAKINN
Ecnn npoccc npiroTOBnHnna CtaHET 3NaHTeNbHO DoJIbWe, TO Heo6xOIMO NOuHCTNtB KoepEBapKy OT HaKnHn.
Дя удаленя НakINи Heo6xOIMO nCOnIb3OBaTb TOnIbKO ImeHouueceB I npOdaXe CpeDCTBa,IЯ уdaneln OkaJIINHbI Ha OCHOBE JIMMOHHO KICNOTbl.
IcnoB3ynte KOJIueCTBa, yka3aHHbIe Ha ynaKOBKe ININ B npInraeMbIX INHCTpykUHX. ObpaTne BHIMaHHe Ha MAKCImaJIbHbI ObEbm BOJb!
IocTaBbTe TepMoUaUk6e3 KpbUuKm mIn DpyTuIOxOJaUyU OaUk (npM. 300 M) Ha IOTOK dJa UaUk.
TPEUYTPEJKDEHNE:
- 3aTeM BCKINIYI NTTE 3-4 pa3a CBexkyIO BOy, YTO6bl CMBITb OCTaTKn CpeiCTBa DnI ydaJIeHnHaKInN.
- Пг отм Не КладиTe MONIын Кофe!
3Ty BDOy BnUy He ynoTpe6JIbIb.
UncTka
TPEUYTPEJKDEHNE:
- Penei YIcCTKoB BCERda BbIHMaIte CeTeByIO BuNKU IN DOXINTECb NIOHORO OCTbBaHHaYcTPOIcTBa.
He nprgykaTe yctpoCTBO B body.B npotNBOM cIy- yae 3TO MOKET npINBeCTN K npopaxeHHIO 3JIeKTpHueCKM TOKOM INIIN BO3ROPAHIO.
BHIMAHINE:
He nIpb3yTe npOBOnuHyIO uETky IIN a6pa3nBhble cpeCTBa.
He nCIOJIb3yIte KICIOITbIe IINa6pa3NIBHbIe MOIOJIe cpeIcTbA.
- Tepmoaika Kpbiika He npedHa3HaueHbI Dnno cydomoeyhIX MaHH.
BHeuHIOIO NOBepxHOCTb yCTpoIcTbHaEO6xoIMIO npOTnPaTb CnERKa BnaxHOIT KAnHbO 6e3 BCaKIN Do6aBOK.
BpyHyIO B MnCKe C BoOJ OCHNTe NOCToHHbI ΦnIbTp, DepxKaTeNb ΦnIbTpa, TepMoHaUKy I3 HepXaBeIoUe i CTaII N KpbIuKy.
TexHnueckne daHHbIe
Moienb: KA 180 CB
3JIeKtpoMTaHHe: 230B\~,50T
Iotpe6JIeMaJ MOUHocTb: 420 BaTT
Knaacc 3aunTbI:
Bmectnmoctb: .MkC.300Mn
Bec HeTTo: npn6I. 0,25 K
Texnueckne n3MeHHeHH BHOcTcB 6e3 yBeDomJIeHnI!
3TO yCTPOIcTBO 6bJIIO IPOTEcTIPoBaHO B COOTBETCTBNM CO BCEMN COOTBETCTBYIOUIMN DeIcTByIOUIMN DnpeKtNBAMN CE,
TAKIMN KAK DnpeKTHBbI O6 3JNEKTpOMaHHTHOI COBMECTMIOCTN O Hn3KOM HaNPxKeHm, N 6blIO CnpoeKTIPOBaHO B COOTBeTCTBmC PocJeDnHMn Tpe6oBaHnRA M K 6be3ONaCHOCTN.


- Symbols in these Instructions for Use
- WARNING:
- CAUTION:
- i NOTE:
- General Safety Instructions
- Children and Frail Individuals
- WARNING!
- Special Safety Instructions for this Device
- Intended Use
- Overview of the Components
- Initial Operation of the Device
- NOTE:
- Electrical Connection
- Operation
- Dscaling
- Cleaning
- Technical Data
- Disposal
- Meaning of the "Wheelie Bin" Symbol
- Instrukcja obslugi
- PykoBoIDCTBO no 3KcnnyatauN
- CnMBOJI npIMeHReMbIe B DaHHOM pyKOBoDCTBe NOJIb-3OBaTeJIa
- IPENYIPEXDEHNE:
- BHIMAHNE:
- PIMEYAHNA:
- 06uue yka3aHnno TExHnke 6e3oNaCHOCTN
- TeHn nIuHa HyKDaHOUneC8 B npncMOrpe
- PENEYIPPEXDEHNEI
- CneuaHbHbIe HNCTpyKcnn No 6e30nacHOCTn npn noJb3OBaHHN 3Tm yCTpOYCTBOM
- IPEDUYIPEXDEHNE:
- PIMEYAHIA:
- Ha3haeHne
- PacnoJoxKeHne 3JeMeHTOB
- PepBoe nCNoJIb3OBAHne yCTpoIcTBA
- IIPIMEUYAHJ:
- 3neKtpnueckoe noKnHoueHne
- I PIPMEUAHNIA:
- IcnoJb30BaHne
- I P N I M E U A H N A:
- BHIMAHHE:
- IINPIMEYAHNA:
- I INPIMEYAHNIA:
- PENEYNPEXKDEHNE:
- YdaneHne HAKINN
- TPEUYTPEJKDEHNE:
- UncTka
- BHIMAHINE:
- TexHnueckne daHHbIe
Brand : BOMANN
Model : KA 1 CB
Category : Coffee machine