USER MANUAL BKS 4033 W D BOSCH
- Trypet in the world
- Tracta, Storano, 0251-03
- In contrast to page, regarding
- Impede an usual reexide
- The dealer of this project is environmentally identify.
e. In doing the process is well known for each part of the course.
- 24,3,7,10,6,9,10,8,15,16,17,18,19,20,21,22,23,24,25,26,27,28,29,30,31,32,33,34,35,36,37,38,39,40,41,42,43,44,45,46,47,48,49,50,51,52,53,54,55,56,57,58,59,60,61,62,63,64,65,66,67,68,69,70,71,72,73,74,75,76,77,78,79,80,81,82,83,84,85,86,87,88,89,90,91,92,93,94,95,96,97,98,99,100
The following table is provided in the image.
- Törn hizen manjöllussa en körn beti
you have all
Kakbi musztat konsilvel iniskayt,201. je vanse en
- To use the time to produce even daily prices
rec (15200)
OM TO REACH
- Dr. Tavlin, 2007, 10:31
107.258.496.258.258.258.258.258.
The following table is in English:
There is a way to get the right of the right.
de reyblings.
and the third of the
more presol or plastic per fire hydrate
For example, the following results are provided:
Far below the Indiagene
(3) 10.25
Срок, 2014-04-27, 13:30 AM, 14:30 AM, 15:30 AM, 16:30 AM.
delega sevra adveradat as, arri ees unenlare of Enelgna Enelgna ore
In the information obtained from the Spanish Language Language, it is considered as
In this case, the number of cases is 100,000.
ar Vorrigung
Rohort Bank University GmbH
Robert Busch, Margaret Smith
Erl. Woy-31, 24 L1778 Virochst 3, 10000
(2) 1987年1月1日
20
Fl. PaskAbkofmalkenzenz Arwandren-


natural_image
Simple line drawing of an open book with a right-pointing arrow indicating rotation (no text or symbols)
1 Maximum liquid level mark
2 Dirt container
3 Filter container
4 Hard furnishings brush
5 Crevice nozzle
6 Dirt container release button
7 Liquid nozzle with rubber lip
8 Handle
9 On/off button
10 Charging indicator
11 Suction unit
12 Cleaning brush
13 Filter fleece
14 Filter holder
15 Foam filter
16 Dirt filter
17 Charger
18 Charger plug
Please keep this instruction manual in a safe place. When passing the vacuum cleaner on to another person, please also pass on this instruction manual.
Intended use
This vacuum cleaner is intended for domestic use only, not for commercial use. Only use this vacuum cleaner in accordance with the instructions in this instruction manual. The manufacturer will not accept any responsibility for damage caused by improper use or incorrect operation. Therefore, please note the following points.
The vacuum cleaner must only be operated with:
■ Genuine filter inserts
■ Genuine spare parts and accessories
The vacuum cleaner is not to be used for:
■ Vacuuming persons or animals
■ Vacuuming up:
- Insects and spiders
– Hazardous, sharp-edged, hot or burning substances.
– Highly flammable or explosive substances and gases
- Ash, soot from tiled stoves and central heating systems
This vacuum cleaner complies with the generally recognised standards of technology and relevant safety regulations.
■ The charger must only be connected and operated as specified on the rating plate.
■ Never use the vacuum cleaner without filter inserts. => The appliance may be damaged.
■ When disconnecting the charger from the mains, pull on the plug, not the power cord.
■The appliance may be used by children over the age of 8 years and by persons with reduced physical, sensory or mental capacity or by persons with a lack of experience or knowledge if they are supervised or have been instructed on the safe use of the appliance and the have understood the potential dangers of using the appliance.
■ Children must never play with the appliance
■ Cleaning and user maintenance must never be carried out by children without supervision.
■ Do not charge the appliance in temperatures below 0 °C or above 40 °C.
■ Do not connect or open a defective charger; replace it with a new unit.
■ Do not operate a cordless vacuum cleaner if it is damaged.
■ To avoid dangerous situations, repairs and spare part replacements, which are not dealt with in this instruction manual under "Cleaning", must only be carried out by an authorised after-sales service.
■ Protect the vacuum cleaner and charger from exposure to weather, moisture and sources of heat.
■ At the end of its life, the vacuum cleaner should be disposed of in an appropriate manner.
Please contact your specialist retailer or your local council to find out about current means of disposal. Caution: This appliance contains rechargeable nickel cadmium batteries. Before disposing of the appliance, remove the discharged batteries (see Fig. 14) and dispose of them in an environmentally responsible manner.
Fold out the picture pages.
natural_image
Simple line drawing of an open book with a right-pointing arrow indicating rotation (no text or symbols)
Before using for the first time
Fitting the charger
The charger can be wall-mounted or used as a table-top cradle.
■ First connect the charger plug to the charger holder and secure by turning.
■ If using as a table-top cradle, guide the cable through the recess in the charger.
When mounting on the wall, select a location close to a socket and mount the charger on the wall using the screws provided
■ Insert the cordless vacuum cleaner into the charger as shown.
! Make sure that the contacts of the cordless vacuum cleaner and charger plug are not dirty. Clean the contacts if necessary.
! Before using the appliance for the first time, the cordless vacuum cleaner batteries must be charged for at least 16 hours.
■ Plug the charger plug into the socket.
■ The charging indicator lights up.
■ The indicator remains lit for as long as the vacuum cleaner is connected to the mains via the charger.
■ It does not go out even when the vacuum cleaner batteries are fully charged.
■ It is normal for the charger and vacuum cleaner to become hot and not a cause for concern.
■ You can charge the cordless vacuum cleaner at any time when it is not in use. In this way, it is always ready for use.
Vacuuming
Remove the appliance from the charger and move the on/off button in the direction of the arrow.
Crevice nozzle
For vacuuming crevices and corners, etc.
Insert the crevice nozzle into the air intake opening of the cordless vacuum cleaner, as illustrated.
Hard furnishings brush
For vacuuming picture frames, books, furniture requiring particular care, etc.
Fit the hard furnishings brush onto the crevice nozzle as shown.
Vacuuming liquids
! Empty the dirt container and clean the filter before
• vacuuming up liquids (see Cleaning the filter).
■ Insert the liquid nozzle into the air intake opening of the cordless vacuum cleaner, as illustrated.
■ Vacuum up liquids in the direction of the arrow.
! Caution: Liquids must only be vacuumed up to the MAX. mark -> the appliance may be damaged by overfilling
■ Empty the dirt container immediately after vacuuming up liquids.
After vacuuming, return the appliance to the charger.
Cleaning the filters
As far as possible, the cordless vacuum cleaner should be emptied every time after vacuuming.
■ Using the release button, unlock the dirt container and withdraw it from the suction unit.
Using the handle, remove the complete filter unit from the dirt container and clean it by tapping out or brushing out the dirt with the cleaning brush provided.
■ Empty the dirt container.
■ If heavily soiled, the filters and dirt container can be washed out.
Then wipe out the dirt container with a dry cloth. Allow the filter unit to dry completely before refitting.
a) Insert the filter container, filter holder, foam filter and dirt filter into the dirt container. Draw the filter fleece onto the suction unit.
b) Fit the dirt container onto the suction unit and lock in place.
Filters can be obtained from our after-sales service as required
Care
Before cleaning the cordless vacuum cleaner, it must be switched off and disconnected from the charger. It can be cleaned with a standard commercially-available plastic cleaner.
Do not use a scourer, glass-cleaning agent or all-purpose cleaning product. Never immerse the vacuum cleaner in water
Battery disposal
Before disposing of the appliance, please remove the battery cartridge and dispose of it separately.
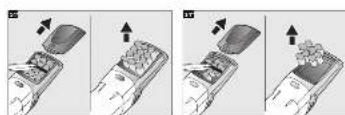
■ Slide open the battery compartment in the direction of the arrow.
- Cut through the retaining tape and remove the battery cartridge from the appliance.
- Cut through the power cables and, to ensure safety, bind and insulate each of the cable ends with tape.
*Depending on equipment

natural_image
Simple line drawing of an open book with a right-pointing arrow indicating rotation (no text or symbols)
natural_image
Simple line drawing of an open book with a right-pointing arrow indicating rotation (no text or symbols)
natural_image
Simple line drawing of an open book with a right-pointing arrow indicating rotation (no text or symbols)
natural_image
Simple line drawing of an open book with a right-pointing arrow indicating rotation (no text or symbols)
natural_image
Simple line drawing of an open book with a right-pointing arrow indicating rotation (no text or symbols)
natural_image
Simple line drawing of an open book with a right-pointing arrow on the right page (no text or symbols)
natural_image
Simple line drawing of an open book with a right-pointing arrow indicating rotation (no text or symbols)
natural_image
Simple line drawing of an open book with a right-pointing arrow indicating rotation (no text or symbols)
natural_image
Simple line drawing of an open book with a right-pointing arrow indicating rotation (no text or symbols)
natural_image
Simple line drawing of an open book with a right-pointing arrow indicating rotation (no text or symbols)
natural_image
Simple line drawing of an open book with a right-pointing arrow indicating rotation (no text or symbols)
natural_image
Simple line drawing of an open book with a right-pointing arrow indicating rotation (no text or symbols)
natural_image
Simple line drawing of an open book with a right-pointing arrow indicating rotation (no text or symbols)
natural_image
Simple line drawing of an open book with a right-pointing arrow indicating rotation (no text or symbols)
natural_image
Simple line drawing of an open book with a right-pointing arrow indicating the page direction (no text or symbols)
natural_image
Simple line drawing of an open book with a right-pointing arrow indicating rotation (no text or symbols)
natural_image
Simple line drawing of an open book with a right-pointing arrow indicating rotation (no text or symbols)
natural_image
Simple line drawing of an open book with blank pages (no text or symbols)
HEATHERTON, Victoria 3202
Tel.: 1300 368 339
Fax: 1300 306 818
valid only in AUS
mailto:bshau-as@bshg.com
www.bosch-home.com.au
BA Bosna i Hercegovina, Bosnia-Herzegovina
"HIGH" d.o.o.
Gradačačka 29b
71000 Sarajewo
Info-Line: 061 100 905
Fax: 033 213 513
mailto:delicnanda@hotmail.com
+ 7 snt/min (alv 23%)
+ 17 snt/min (alv 23%)
Kundendienst-Zentren • Central-Service-Depots • Service Après-Vente • Servizio Assistenza • Centrale Servicestation • Asistencia técnica • Servicevaerkter • Apparatservice • Huolto
FR France
BSH Electroménager S.A.S.
To arrange an engineer visit, to order spare parts and accessories or for product advice please visit www.bosch-home.co.uk or call
*Calls from a BT landline will be charged at up to 3 pence per minute. A call set-up fee of up to 6 pence may apply.
GR Greece, Ελλάς
BSH Ikiakes Siskeves A.B.E.
Central Branch Services
17 km E.O. Athinon-Lamias &
Potamou 20
145 64 Kifisia
Greece – Athens
Tel.: 2104 277 701
Fax: 2104 277 669
North-Greece – Thessaloniki
Tel.: 2310 497 200
Fax: 2310 497 220
South-Greece – Heraklion/Kreta
Tel.: 2810 325 403
Fax: 2810 324 585
Central-Greece – Patras
Tel.: 2610 330 478
Fax: 2610 331 832
mailto:cs_gr_helpdesk@bshg.com
www.bosch-home.gr
HK Hong Kong, 香港
BSH Home Appliances Limited
Unit 1 & 2, 3rd Floor
North Block, Skyway House
3 Sham Mong Road
Tai Kok Tsui, Kowloon
Hong Kong
Tel.: 2565 6151
Fax: 2565 6252
mailto:bshhkg.service@bshg.com
HR Hrvatska, Croatia
Andabaka d.o.o.
Kopilica 21a
21000 Split
Info-Line: 021 481 403
Info-Fax: 021 453 891
mailto:servis@andabaka.hr
IE Republic of Ireland
BSH Home Appliances Ltd.
Unit F4, Ballymount Drive
Ballymount Industrial Estate
Walkinstown
Dublin 12
Service Requests,
Spares and Accessories
Tel.: 01450 2655
Fax: 01450 2520
www.bosch-home.cu.uk
IL Israel,
C/S/B Home Appliance Ltd.
Uliel Building
2, Hamelacha St.
Industrial Park North
71293 Lod
Tel.: 08 9777 222
Fax: 08 9777 245
mailto:csb-serv@zahav.net.il
IN India, Bhārat, भारत
BSH Customer Service Front Office
Shop No.4, Everest Grande,
Opp. Shanti Nagar Bus Stop,
Mahakali Caves Road,
Andheri East
Mumbai 400 093
IS Iceland
Smith & Norland hf.
Noatuni 4
105 Reykjavik
Tel.: 0520 3000
Fax: 0520 3011
www.sminor.is
IT Italia, Italy
LT Lietuva, Lithuania
Senuku prekybos centras UAB
Jonavos g. 62
44192 Kaunas
Tel.: 0372 12146
Fax: 0372 12165
www.senukai.lt
LU Luxembourg
General Serviss Limited
Bullu street 70c
1067 Riga
Tel.: 07 42 41 37
mailto:bt@olimpeks.lv
Elkor Serviss
Brivibas gatve 201
1039 Riga
Tel.: 067 0705 20; -36
Fax: 067 0705 24
mailto:domoservice@elkor.lv
www.servisacentrs.lv
MD Moldova
S.R.L. "Rialto-Studio"
ул. Щусева 98
2012 Кишинев
тел./факс: 022 23 81 80
mailto:bosch-md@mail.ru
Kundendienst-Zentren • Central-Service-Depots • Service Après-Vente • Servizio Assistenza • Centrale Servicestation • Asistencia técnica • Servicevaerkter • Apparatservice • Huolto
ME Crna Gora, Montenegro
Elektronika komerc
UI. 27 Mart br.2
81000 Podgorica
Tel./Fax: 020 662 444
Mobil: 069 324 812
mailto:ekobosch.servis@t-com.me
Unit F 2, 4 Orbit Drive
Mairangi BAY
Auckland 0632
Tel.: 09 477 0492
Fax: 09 477 2647
mailto:bshnz-cs@bshg.com
www.bosch-home.co.nz
PL Polska, Poland
Union Industrial Building
Block A, #01-03
577177 Singapore
Tel.: 6751 5000
Fax: 6751 5005
mailto:bshsgp.service@bshg.com
SI Slovenija, Slovenia
BSH Hišni aparati d.o.o.
Litostrojska 48
1000 Ljubljana
Tel.: 01 583 08 87
Fax: 01 583 08 89
4th floor, No. 112 Sec 1
Chung Hsiao E Road
Taipei ROC 100
Tel.: 02 2321 6222
mailto:Bosch@achelis.com.tw
UA Ukraine, Україна
gama-electronics.com
XS Srbija, Serbia
15th Road Randjespark
Private Bag X36, Randjespark
1685 Midrand – Johannesburg
Tel.: 086 002 6724
Fax: 086 617 1780
mailto:applianceserviceza@
bshg.com
www.bosch-home.com
DE Garantie
GB Conditions of guarantee
For this appliance the guarantee conditions as set out by our representatives in the country of sale apply. Details regarding same may be obtained from the dealer from whom the appliance was purchased. For claims under guarantee the sales receipt must be produced.
FR Conditions de garantie
natural_image
Symbol of a trash bin crossed with two crossed lines, representing waste or discharge (no text or numbers present)

de
"This appliance is labelled in accordance with the European directive 2002/96/EG concerning waste electrical and electronic equipment – WEEE.
The directive provides the framework for the return and recycling of used appliances as applicable throughout the EU."
fr
natural_image
Symbol of a trash bin crossed with two crossed lines, representing waste or discharge (no text or labels)

pt
(waste electrical and electronic equipment - WEEE).