
Playmaker - Hi-fi system BANG & OLUFSEN - Free user manual and instructions
Find the device manual for free Playmaker BANG & OLUFSEN in PDF.
| Product type | Hi-fi system |
| Brand | Bang & Olufsen |
| Model | Playmaker |
| Category | Hi-fi system |
| Power supply | Mains 100-240 V AC, 50/60 Hz, power cord included |
| Network connectivity | Ethernet, Wi-Fi (802.11) |
| Audio streaming | AirPlay, DLNA |
| Audio inputs | Line-in (phono jack) |
| Audio outputs | Bang & Olufsen active speakers (SPEAKERS connectors) |
| Remote control | Compatible with Beo4 and Beo6 |
| Software update | Via configuration page, requires Ethernet and Internet connection |
| Factory reset | Hold the reset hole for 5 seconds |
| Operating temperature | 10 °C to 40 °C |
| Cleaning | Soft dry cloth, no liquid or aerosol products |
| Safety | Unplug to turn off; do not expose to water, open flames; adequate ventilation |
| Spare parts | Power cord available from Bang & Olufsen dealer |
| Compliance | Directive 1999/5/EC; Industry Canada CNR |
| Network indicator | Flashing white (searching), steady white (strong connection), steady orange (weak signal), flashing orange (no network), flashing red (error) |
| Volume control | Touch wheel (circular swipe) or remote control |
Frequently Asked Questions - Playmaker BANG & OLUFSEN
User questions about Playmaker BANG & OLUFSEN
0 question about this device. Answer the ones you know or ask your own.
Ask a new question about this device
Download the instructions for your Hi-fi system in PDF format for free! Find your manual Playmaker - BANG & OLUFSEN and take your electronic device back in hand. On this page are published all the documents necessary for the use of your device. Playmaker by BANG & OLUFSEN.
USER MANUAL Playmaker BANG & OLUFSEN
For information about which devices Playmaker supports, ask your Bang & Olufsen retailer or see the Playmaker section on:
www.bang-olufsen.com/faq
Cautions, 4
English, 8
Dansk (Danish), 14
Svenska (Swedish), 20
Suomi (Finnish), 26
Deutsch (German), 32
Espanol (Spanish), 38
Français (French), 44
Italiano (Italian), 50
Portugues (Portuguese), 62
Elambdaikα (Greek), 68
Important information, 74
English (English)
- Read these instructions.
- Keep these instructions.
- Heed all warnings.
- Follow all instructions.
- Do not use this apparatus near water.
- Clean only with dry cloth.
- Do not block any ventilation openings. Install in accordance with the manufacturer's instructions.
- Do not install near any heat sources such as radiators, heat registers, stoves, or other apparatus (including amplifiers) that produce heat.
- Do not defeat the safety purpose of the polarized or grounding-type plug. A polarized plug has two blades with one wider than the other. A grounding type plug has two blades and a third grounding prong. The wide blade or the third prong are provided for your safety. If the provided plug does not fit into your outlet, consult an electrician for replacement of the obsolete outlet.
- Protect the power cord from being walked on or pinched particularly at plugs, convenience receptacles, and the point where they exit from the apparatus.
- Only use attachments/ accessories specified by the manufacturer.

- Use only with the cart, stand, tripod, bracket, or table specified by the manufacturer, or sold with the apparatus. When a cart is used, use caution when moving the cart/ apparatus combination to avoid injury from tip-over.
- Unplug this apparatus during lightning storms or when unused for long periods of time.
Refer all servicing to qualified
service personnel. Servicing is required when the apparatus has been damaged in any way, such as power-supply cord or plug is damaged, liquid has been spilled or objects have fallen into the apparatus, the apparatus has been exposed to rain or moisture, does not operate normally, or has been dropped.
WARNING: To reduce the risk of fire or electric shock, do not expose this appliance to rain or moisture.
The lightning flash with arrowhead symbol within an equilateral
triangle, is intended to alert the user to the presence of un insulated "dangerous voltage" within the product's en closure that may be of sufficient magnitude to constitute a risk of electric shock to persons.

The exclamation point within an equi lateral triangle is intended to
alert the user to the presence of important operating and maintenance (servicing) instructions in the literature accompanying the product.
- The product can only be switched off completely by disconnecting it from the mains socket. The mains socket must always be accessible.
- Do not expose this equipment to dripping or splashing and ensure that no objects filled with liquids, such as vases are placed on the equipment.
- No naked flame sources, such as lighted candles should be placed on the equipment.
Follow instructions to ensure
correct and safe installation and interconnection of equipment in multimedia systems.
Dansk (Danish)
Portugues (Portuguese)
The Wi-Fi CERTIFIED Logo is a certification mark of the Wi-Fi Alliance.

The AirPlay Logo is a trademark of Apple Inc., registered in the U.S. and other countries.


CERTIFIED
DLNA CERTIFIED® is a certification mark of the Digital Living Network Alliance.
English How to get started
This guide contains information about the daily use of your Bang & Olufsen product. We expect your retailer to deliver, install and set up your product.
If you want to install Playmaker yourself, this guide explains how to set it up for use with AirPlay®, DLNA®, line-in and connected speakers. You can set up Playmaker in a wireless network using the Bang & Olufsen Setup Utility App* 1 or your computer or you can connect Playmaker to a wired network for immediate use. You can also see how to connect other sources to your Playmaker.
It is possible to set up and synchronise multiple Playmakers in your home. Contact your Bang & Olufsen retailer for more information.
You can find more information about Playmaker in the Frequently Asked Questions (FAQ) section on www.bang-olufsen.com/faq.
Before you connect any equipment to your Playmaker, remember to disconnect Playmaker from the mains supply.
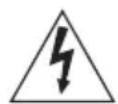
You must remove the back cover from Playmaker to access the connection panel.
Place Playmaker on a soft cloth with the Bang & Olufsen logo facing downwards.
Remove the table stand (if already mounted).
Press firmly on the snap hook and lift off the back cover.
Run cables through the enclosed cable cover. *2
Run cables through the hole in the back cover.
Connect Ethernet (optional), line-in (optional) and speakers before connecting the mains cord.
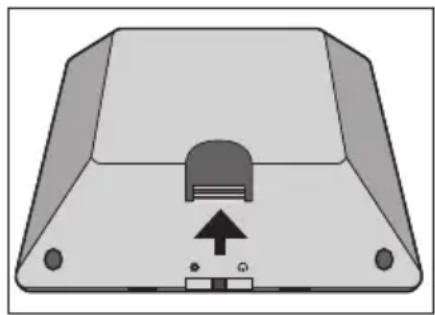
Reattach the back cover on Playmaker. Make sure to align the pivot points at the edges before closing the back cover.
Fit the table stand into the two holes at the bottom of the back cover. Run the cables above the table stand.
Press firmly on the snap hook to remove the back cover.
Make sure to align the pivot points at the edges before closing the back cover.
Play audio directly from your hand-held device through connected, active speakers. You can connect multiple sources to your Playmaker, either using the connection panel or wirelessly through your network. However, only one source can be active at a time.
AirPlay can be used to stream audio from your iPod touch, iPhone or iPad. Use a DLNA certified application to stream from other hand-held devices (e.g. Android smartphones).
You can use the BeoPlayer app*, iTunes* 2, Windows Media Player or other apps for AirPlay and DLNA. Also, you can connect and listen to an external audio source, such as an MP3 player or smartphone via line-in.
If you use AirPlay or DLNA, you can play music from anywhere within local network range. For other audio sources, use a phono line-in cable to connect your device to Playmaker.
To access the connection panel, remove the back cover, see 'How to get started' for more information. The product label is placed inside the back cover.
Priority of sources:
- AirPlay
- DLNA*3
- Sources connected to line-in
Starting a source with higher priority will always interrupt a source with lower priority. A source with higher priority must be stopped to start a source with lower priority. Sources with the same priority cannot interrupt each other. Therefore the playing source must be stopped to start a source with the same priority.
~ Mains supply
Use the enclosed mains cord only. The supplied plug and mains cord are specially designed for the product. Do not change the plug and if the mains cord is damaged, you must buy a new one from your Bang & Olufsen retailer.
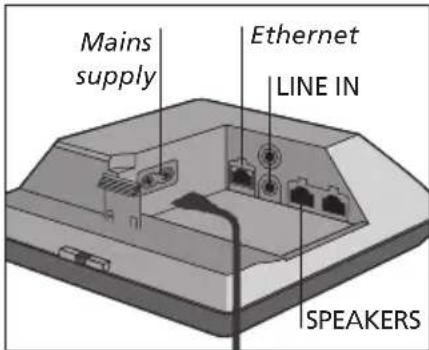
Ethernet
Ethernet socket for a wired connection or to set up your Playmaker in a wireless network via your computer.
LINE IN
Phono sockets for connection of external audio sources, for example, an MP3 player or a computer.
SPEAKERS
Speaker sockets for connection of Bang & Olufsen speakers. To connect Playmaker to an existing Bang & Olufsen setup, it may be necessary to replace cables. For more information, contact your Bang & Olufsen retailer.
Your Playmaker must be set up in a network either with a wired or wireless connection.
To perform the setup, Playmaker must be connected to the mains supply and switched on.
Choose between the following setup procedures:
- Bang & Olufsen Setup Utility App for iOS devices* 1
- Easy wireless setup
- Wireless connection setup via cable
Wired connection
When Playmaker is set up in a network, you can change different settings using the Bang & Olufsen Setup Utility App or your computer. For example, you can change the name of your Playmaker on the network or update its software. For more information about how to change settings, see the Playmaker section on www.bang-olufsen.com/faq.
Bang & Olufsen Setup Utility App
For iOS devices, use the Bang & Olufsen Setup Utility App*1 to setup your wireless network profile, to change the product name or to update software. You can also enter the Playmaker setup page on your computer.
First time setup ...
Connect Playmaker to the mains supply to switch on the product.
The network indicator flashes white for 1-2 minutes and then flashes orange.*2
Find and connect to'Playmaker AP' on your wireless device.
Open the Bang & Olufsen Setup Utility App.
The app will locate your product in the network.
Select your product and follow on-screen instructions.
To make changes in the network setup ...
Your iOS device must be connected to the same network as Playmaker.
Open the Bang & Olufsen Setup Utility App.
The app will find your product in the network.
Select your product and follow on-screen instructions.
Easy wireless setup
Press the button on Playmaker shortly.*2
Then press the wireless setup button on your router.
The network indicator on your Playmaker flashes green while searching the network.*2 When Playmaker and the router are connected, the network indicator becomes solid white.
You can also access the wireless setup via the web-based setup page of your router and configure from there.
2*For overview of buttons, see 'How to operate your Playmaker'.
A previously well-functioning setup may develop problems over time as surroundings change. Check your Ethernet connection or router. If the problem persists, contact your Bang & Olufsen retailer.
Set up a wireless connection
An Ethernet cable must be used temporarily to set up your Playmaker with a wireless connection.
Wireless setup via cable ...
Disable the wireless network on your computer.
Connect Playmaker directly to the computer using an Ethernet cable.
Connect Playmaker to the mains supply to switch on the product.
The network indicator flashes white for about 60 seconds and then becomes solid white.
Enter the IP address 'http://169.254.11.22' in the address bar of your internet browser and press 'Enter'.*3 If the web page is not displayed, wait a while and refresh the page.
Select the menu 'NETWORKS' and follow on-screen instructions.
Disconnect Playmaker from your computer.
When the network indicator becomes solid white, Playmaker is connected to the network.
^3 If you use Internet Explorer, version 7 or high er is required.
Make a wired connection
For the most reliable network connection use Bang & Olufsen recommended cables only.
Wired setup ...
Connect Playmaker directly to the router using an Ethernet cable.
Connect Playmaker to the mains supply to switch on the product.
The network indicator flashes white.* Then it becomes solid white and Playmaker is connected to the network.
If a static IP setup is needed, see the Playmaker section on www. bang-olufsen.com/faq for the static IP address.
Software update
If available, you can update your Playmaker with new software. Software update is performed using the Playmaker setup page. This requires an Ethernet cable and Internet connection (See 'Make a wired connection'). During software update, the Mute/standby button flashes red.*2
Factory reset
To return to default settings, you can reset your product. Note that you must set up Playmaker again after a factory reset. Before performing the factory reset, the network indicator must be solid white or orange.
Insert a small pin, such as a straightened paper clip in the reset button hole for minimum five seconds. 2
The network indicator and the Mute/standby button become solid orange for five seconds.
The product restarts automatically and is reset to default settings.
NOTE! Make sure the cable connection between the product and the router does not exit the building to avoid contact with high voltage.
NOTE! You may not be able to use your workplace computer for setup of Playmaker due to security restrictions, including firewall settings and assignment of IP addresses.
Browse and select audio from your digital music collection directly from your hand-held device to perform basic operation. Adjust volume on your Playmaker, your hand-held device or your Bang & Olufsen remote control.
When you want to stream audio to your Playmaker using Airplay/DLNA, Playmaker must be connected to your network. The device from which you stream music using AirPlay/ DLNA, for example a computer or an iPhone, must be connected to the same network as Playmaker.
When connected to a network, Playmaker is continuously ready to receive music. To switch Playmaker off, press the on/off button. Press again to switch Playmaker back on.
^1 AirPlay can be used with iPod touch®, iPhone® or iPad® with iOS 4.2 or higher and other AirPlay certified devices.
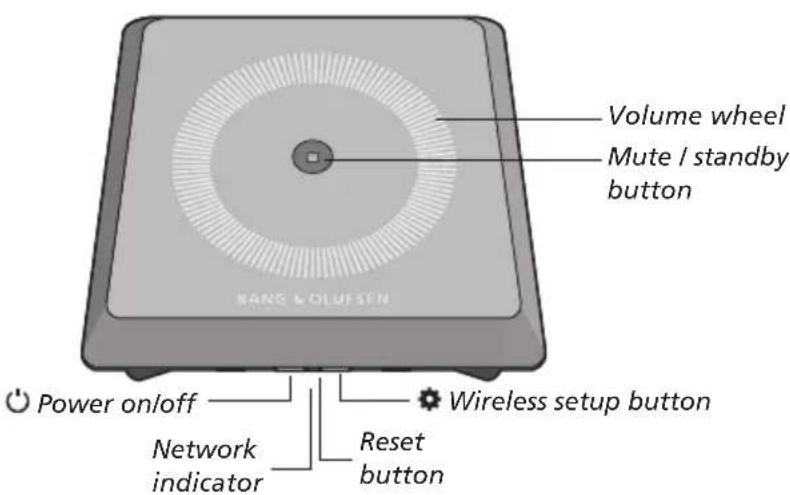
Volume up/down (+/-)
To increase the volume, slide your finger clockwise on the volume wheel. To lower the volume, slide your finger counter-clockwise on the volume wheel. The volume is synchronised with your device continuously.
Mute /standby
When Playmaker is playing, there is no light in the Mute/standby button. When Playmaker is playing, but muted, the Mute/standby button is solid green.
For standby mode, press the Mute/standby button for two seconds. To activate Playmaker, start playback of any audio source.
Network indicator
When the network module is starting up, the light flashes white while Playmaker searches for your network. When Playmaker is connected to the network and the signal is strong, the light becomes solid white. Orange light indicates that Playmaker is connected to your network, but the signal strength is low. If the light
flashes orange continuously, you are not connected to the network. Flashing red light indicates an error. For more information, see the Playmaker section on www.bangolufsen.com/faq.
Using AirPlay or DLNA
Connect Playmaker to your network and use AirPlay* or DLNA apps to stream from your hand-held device or computer to Playmaker. For AirPlay products, press the icon and select 'Playmaker xxxxxx' in the list. Use a DLNA enabled application to stream from other hand-held devices (e.g. Android smartphones).
Remote operation
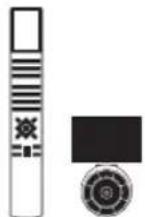
You can operate Playmaker with Beo4 and Beo6.
Start playback from your handheld device.
To select an AirPlay or DLNA source, press A.MEM on Beo4. On Beo6, press AIRPLAY* 2.
To select a source connected via line-in, press LIST and bring up A.AUX in the Beo4 display, then press the centre button. On Beo6, press LINE IN.*2
Use the volume button/volume wheel to adjust volume.
2*Your Beo4/Beo6 may be configured differently. See the documents supplied with your Beo4/Beo6.
NOTE! Operation with the Beo4 remote control can only take place when A.MEM or A.AUX is shown in the remote control display. On Beo6 AIRPLAY and LINE IN must be shown in the remote control display.
Cleaning
Wipe dust off the surfaces using a dry, soft cloth. Do not use liquid cleaners or aerosol cleaners. To remove stains or dirt, use a soft, damp cloth and a solution of water and mild detergent, such as washing-up liquid.
Important!
- Avoid placing the product in direct sunlight or direct artificial light, such as a spotlight.
- Make sure that the product is set up, placed and connected in accordance with the instructions.
- Place your product on a firm surface.
- Do not subject the product to high humidity, rain or sources of heat.
The product is intended for indoor use in dry, domestic environments only. Use within a temperature range of 10 - 40^ (50 - 105^)
If the product has been exposed to temperatures below 5^ (40^) , leave it at room temperature and wait until the product has regained normal room temperature before it is connected to the mains and switched on. - Leave enough space around the product for adequate ventilation.
- Do not attempt to open other parts of the product than the back cover. Leave such operations to qualified service personnel.
Technical specifications, features and the use thereof are subject to change without notice.
Dansk
Komigang
Bang & Olufsen Setup Utility app
Bang & Olufsen Setup Utility App
Bang & Olufsen Setup Utility App
Bang & Olufsen Setup Utility App
App Bang & Olufsen Setup Utility
- AirPlay
- DLNA* 3
- Fonti collegiate a line-in
Bang & Olufsen Setup Utility App
Bang & Olufsen Setup Utility App
Bang & Olufsen Setup Utility App
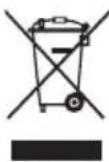
Electrical and electronic equipment, parts and batteries marked with this symbol must not be disposed of with normal
household wastage; it must be collected and disposed of separately to protect the environment.
Your Bang & Olufsen retailer will advise you of the correct way of disposal in your country.
This product complies with applicable environmental legislation throughout the world
This equipment should be installed and operated with minimum distance 20~cm between the antenna and your body.
C E ①
Hereby, Bang & Olufsen declares
that this audio product, Playmaker is in compliance with the essential requirements and other relevant provisions of Directive 1999/5/EC. The declaration of conformity may be consulted at www.bangolufsen.com/guides.
AT, BE, BG, CH, CY, CZ, DE, DK, EE, ES, FI, FR, GB, GR,HU, IE, IS, IT, LI, LT, LU, LV, MT, NL, NO, PL, PT, RO,SE, SI, SK, TR
For the US-market only!
NOTE: This equipment has been tested and found to comply with the limits for a class B digital device, pursuant to part 15 of the FCC Rules. These limits are designed to provide reasonable protection against harmful interference in a residential installation.
This equipment generates, uses and can radiate radio frequency energy and, if not installed and used in accordance with the instructions, may cause harmful interference to radio communications. However, there is no guarantee that interference will not occur in a particular installation. If this equipment does cause harmful interference to radio or television reception, which can be determined by turning the equip ment off and on, the user is encouraged to try to correct the interference by one or more of the following measures:
- Reorient or relocate the receiving antenna.
- Increase the separation between the equipment and receiver.
- Connect the equipment into an outlet on a circuit different from that to which the receiver is connected.
- Consult the retailer or an experienced radio/TV technician for help.
Changes or modifications not expressly approved by the party responsible for compliance could void the user's authority to operate the equipment.
This device complies with part 15 of the FCC Rules. Operation is subject to the following two conditions:
(1) This device may not cause harmful interference, and
(2) this device must accept any interference received, including interference that may cause undesired operation.
For the Canadian market only!
This device complies with Industry Canada licence-exempt RSS standard(s). Operation is subject to the following two conditions:
(1) this device may not cause interference, and
(2) this device must accept any interference, including interference that may cause undesired operation of the device.
Under Industry Canada regulations, this radio transmitter may only operate using an antenna of a type and maximum (or lesser) gain approved for the transmitter by Industry Canada. To reduce potential radio interference to other users, the antenna type and its gain should be so chosen that the equivalent isotropically radiated power (e.i.r.p.) is not more than that necessary for successful communication.
This equipment complies with IC RSS-102 radiation exposure limits set forth for an uncontrolled environment. This equipment should be installed and operated with minimum distance 20 cm between the antenna and your body.
Dansk (Danish)
Portugues (Portuguese)
- English (English)
- Dansk (Danish)
- Portugues (Portuguese)
- English How to get started
- Priority of sources:
- ~ Mains supply
- Ethernet
- LINE IN
- SPEAKERS
- Bang & Olufsen Setup Utility App
- First time setup ...
- To make changes in the network setup ...
- Easy wireless setup
- Set up a wireless connection
- Wireless setup via cable ...
- Make a wired connection
- Wired setup ...
- Software update
- Factory reset
- Volume up/down (+/-)
- Mute /standby
- Network indicator
- Using AirPlay or DLNA
- Remote operation
- Cleaning
- Important!
- Dansk
- Komigang
- App Bang & Olufsen Setup Utility
- C E ①
- For the US-market only!
- For the Canadian market only!
Brand : BANG & OLUFSEN
Model : Playmaker
Category : Hi-fi system