
HTR5730 - Home cinema amp YAMAHA - Free user manual and instructions
Find the device manual for free HTR5730 YAMAHA in PDF.

| Product Type | Home Theater Amplifier |
| Brand | YAMAHA |
| Model | HTR5730 |
| Output Power (per channel) | 100 W (6 ohms, 1 kHz, 0.1% THD) for Canada/US models; 90 W for other models |
| Number of Channels | 5.1 (expandable to 6.1 with Matrix 6.1) |
| Built-in Decoders | Dolby Digital, Dolby Pro Logic II, DTS, Dolby Digital EX, DTS ES Matrix 6.1 |
| Supported Audio Formats | PCM, Dolby Digital, DTS, Dolby Surround, etc. |
| Tuner | AM/FM with RDS (depending on model) |
| Preset Memory | 40 stations (5 groups of 8) |
| Dimensions (W × H × D) | 435 × 151 × 315 mm |
| Weight | 9.0 kg |
| Power Supply | 120 V / 60 Hz (Canada/US); 230 V / 50 Hz (Europe/UK); other models: 110-120 V / 220-240 V, 50/60 Hz |
| Power Consumption | 240 W (operation); standby: 0.5 W (US) / 0.7 W (others) |
| Audio Inputs | Optical and coaxial digital, analog (CD, MD/CD-R, etc.), 6-channel input (6CH INPUT) |
| Outputs | Speakers A/B (front), center, surround, subwoofer (pre-out), headphones (PHONES), recording (OUT REC) |
| DSP Functions | CINEMA DSP, SILENT CINEMA (headphones), Virtual CINEMA DSP, NIGHT mode, SLEEP timer |
| User Settings | SET MENU: speaker configuration, distances, LFE, dynamics, center equalizer, etc. |
| Supplied Accessories | Remote control, batteries (AA), AM loop antenna, indoor FM antenna |
| Maintenance and Cleaning | Use a dry, clean cloth; do not use chemical solvents |
| Safety | Do not expose to moisture; disconnect during thunderstorms; do not open the case; respect the specified voltage |
| Spare Parts and Repairability | Repairs must be carried out by an authorized YAMAHA service center; do not attempt to modify or repair yourself |
| General Information | Manual available in multiple languages; memory backup retains settings for up to one week |
Frequently Asked Questions - HTR5730 YAMAHA
User questions about HTR5730 YAMAHA
0 question about this device. Answer the ones you know or ask your own.
Ask a new question about this device
Download the instructions for your Home cinema amp in PDF format for free! Find your manual HTR5730 - YAMAHA and take your electronic device back in hand. On this page are published all the documents necessary for the use of your device. HTR5730 by YAMAHA.
USER MANUAL HTR5730 YAMAHA
1 To assure the finest performance, please read this manual carefully. Keep it in a safe place for future reference.
2 Install this sound system in a well ventilated, cool, dry, clean place — away from direct sunlight, heat sources, vibration, dust, moisture, and/or cold. Allow ventilation space of at least 30~cm on the top, 20~cm on the left and right, and 20~cm on the back of this unit.
3 Locate this unit away from other electrical appliances, motors, or transformers to avoid humming sounds.
4 Do not expose this unit to sudden temperature changes from cold to hot, and do not locate this unit in a environment with high humidity (i.e. a room with a humidifier) to prevent condensation inside this unit, which may cause an electrical shock, fire, damage to this unit, and/or personal injury.
5 Avoid installing this unit where foreign object may fall onto this unit and/or this unit may be exposed to liquid dripping or splashing. On the top of this unit, do not place:
- Other components, as they may cause damage and/or discoloration on the surface of this unit.
- Burning objects (i.e. candles), as they may cause fire, damage to this unit, and/or personal injury.
- Containers with liquid in them, as they may fall and liquid may cause electrical shock to the user and/or damage to this unit.
6 Do not cover this unit with a newspaper, tablecloth, curtain, etc. in order not to obstruct heat radiation. If the temperature inside this unit rises, it may cause fire, damage to this unit, and/or personal injury.
7 Do not plug in this unit to a wall outlet until all connections are complete.
8 Do not operate this unit upside-down. It may overheat, possibly causing damage.
9 Do not use force on switches, knobs and/or cords.
10 When disconnecting the power cord from the wall outlet, grasp the plug; do not pull the cord.
11 Do not clean this unit with chemical solvents; this might damage the finish. Use a clean, dry cloth.
12 Only voltage specified on this unit must be used. Using this unit with a higher voltage than specified is dangerous and may cause fire, damage to this unit, and/or personal injury. YAMAHA will not be held responsible for any damage resulting from use of this unit with a voltage other than specified.
13 To prevent damage by lightning, disconnect the power cord from the wall outlet during an electrical storm.
14 Do not attempt to modify or fix this unit. Contact qualified YAMAHA service personnel when any service is needed. The cabinet should never be opened for any reasons.
15 When not planning to use this unit for long periods of time (i.e. vacation), disconnect the AC power plug from the wall outlet.
16 Be sure to read the "TROUBLESHOOTING" section on common operating errors before concluding that this unit is faulty.
17 Before moving this unit, press STANDBY/ON to set this unit in standby mode, and disconnect the AC power plug from the wall outlet.
18 VOLTAGE SELECTOR (Asia and Greneral models only) The VOLTAGE SELECTOR on the rear panel of this unit must be set for your local main voltage BEFORE plugging into the AC main supply. Voltages are 110V-120V, 220V-240V AC, 50/60 Hz.
This unit is not disconnected from the AC power source as long as it is connected to the wall outlet, even if this unit itself is turned off. This state is called standby mode. In this state, this unit is designed to consume a very small quantity of power.
WARNING
TO REDUCE THE RISK OF FIRE OR ELECTRIC SHOCK,DO NOT EXPOSE THIS UNIT TO RAIN OR MOISTURE.
■For U.K. customers
If the socket outlets in the home are not suitable for the plug supplied with this appliance, it should be cut off and an appropriate 3 pin plug fitted. For details, refer to the instructions described below.
Note
- The plug severed from the mains lead must be destroyed, as a plug with bared flexible cord is hazardous if engaged in a live socket outlet.
Special Instructions for U.K. Model
IMPORTANT
THE WIRES IN MAINS LEAD ARE COLOURED IN ACCORDANCE WITH THE FOLLOWING CODE:
Blue: NEUTRAL
Brown: LIVE
As the colours of the wires in the mains lead of this apparatus may not correspond with the coloured markings identifying the terminals in your plug, proceed as follows:
The wire which is coloured BLUE must be connected to the terminal which is marked with the letter N or coloured BLACK. The wire which is coloured BROWN must be connected to the terminal which is marked with the letter L or coloured RED.
Making sure that neither core is connected to the earth terminal of the three pin plug.
CONTENTS
INTRODUCTION
CONTENTS 1
FEATURES 2
GETTING STARTED 3
Supplied accessories 3
Installing batteries in the remote control 3
CONTROLS AND FUNCTIONS 4
Front panel 4
Remote control 6
Front panel display 8
PREPARATION
CONNECTIONS 9
Before connecting components 9
Connecting video components 10
Connecting audio components 11
Connecting the antennas 12
Connecting an external decoder 13
Connecting the speakers 14
Connecting the power supply cords 17
Turning on the power 17
BASIC SYSTEM SETTINGS 18
Using the basic menu 18
Setting the unit to match your speaker system 20
2 SP LEVEL (Setting speaker output levels) 20
BASIC OPERATION
PLAYBACK 21
Input modes and indications 23
Selecting a sound field program 24
DIGITAL SOUND FIELD PROCESSING (DSP)
27
Understanding sound fields 27
HiFi DSP programs 27
CINEMA DSP 28
Sound design of CINEMA DSP 28
CINEMA DSP Programs 28
Sound field effects 30
TUNING 31
Presetting stations 32
Selecting preset stations 34
RECEIVING RDS STATIONS 35
Description of RDS data 35
Changing the RDS mode 35
PTY SEEK function 36
EON function 36
SLEEP TIMER 37
RECORDING 38
ADVANCED OPERATION
SET MENU 39
Set menu list 39
Adjusting the items on the set menu 39
SOUND 1 SPEAKER SET (speaker mode settings)
40
SOUND 2 SP DISTANCE (speaker distance) 42
SOUND 3 LFE LEVEL 42
SOUND 4 D. RANGE (dynamic range) 42
SOUND 5 CENTER GEQ (center graphic equalizer) 43
SOUND 6 HP TONE CTRL (headphone tone control) 43
INPUT 1 I/O ASSIGN (input/output assignment) .. 43
INPUT 2 INPUT MODE (initial input mode) ..... 43
OPTION 1 DISPLAY SET 44
OPTION 2 MEM. GUARD (memory guard) 44
OPTION 3 AUDIO MUTE 44
SETTING THE SPEAKER LEVELS 45
Adjusting the speaker levels during playback 45
Using the test tone 45
ADDITIONAL INFORMATION
EDITING SOUND FIELD PARAMETERS .... 46
Changing parameter settings 46
Sound field parameter descriptions 47
TROUBLESHOOTING 48
Resetting the factory presets 51
GLOSSARY 52
SPECIFICATIONS 54
FEATURES
Built-in 5-channel power amplifier
Minimum RMS output power (0.1% THD, 1 kHz, 6Ω)
[U.S.A. and Canada models]
Front: 100W + 100W
Center: 100 W
Surround: 100W + 100W
[Other models]
Front: 90W + 90W
Center: 90 W
Surround: 90W + 90W
Sound field features
Dolby Pro Logic/Dolby Pro Logic II decoder
Dolby Digital/Dolby Digital + Matrix 6.1 Decoder
DTS/DTS + Matrix 6.1 Decoder
CINEMA DSP: Combination of YAMAHA DSP technology and Dolby Pro Logic, Dolby Digital or DTS
Virtual CINEMA DSP
SILENT CINEMA TM
Sophisticated AM/FM Tuner
40-Station random access preset tuning
Automatic preset tuning
Preset station shifting capability (Preset editing)
Other features
96 kHz/24-bit D/A converter
Set menu for optimizing this unit for your Audio/ Video system
Test tone generator for easier speaker balance adjustment
6-channel external decoder input
Optical and coaxial digital audio signal jacks
Sleep timer
■About this manual
indicates a tip for your operation.
- Some operations can be performed by using either the buttons on the main unit or on the remote control. In cases when the button names differ between the main unit and the remote control, the button name on the remote control is given in parentheses.
- This manual is printed prior to production. Design and specifications are subject to change in part for the reason of the improvement in operativity ability, and others. In this case, the product has priority.

DIGITAL
PROLOGIC II
Manufactured under license from Dolby Laboratories.
"Dolby", "Pro Logic", and the double-D symbol are trademarks of Dolby Laboratories.

SURROUND
"DTS" and "DTS Digital Surround" are registered trademarks of Digital Theater Systems, Inc.
"SILENT CINEMA" is a trademark of YAMAHA CORPORATION.
GETTING STARTED
Supplied accessories
Please check that you received all of the following parts.
Remote control
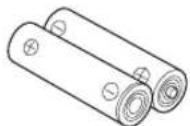
Batteries (2)
(AA, R06, UM-3)
AM loop antenna

Indoor FM antenna
(U.S.A., Canada, China, Asia and General models)
(Europe, U.K., Australia and Korea models)

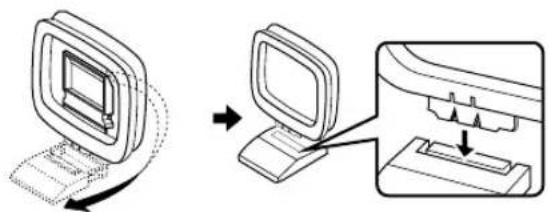
Installing batteries in the remote control
Insert the batteries in the correct direction by aligning the + and - marks on the batteries with the polarity markings (+) and (-) inside the battery compartment.
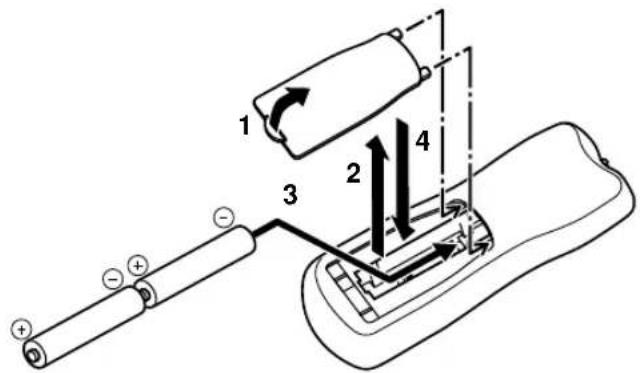
1 Press the tab of the battery compartment cover and pull it in the direction of the arrow to open the cover.
2 Remove the cover.
3 Insert the two batteries supplied (AA, R06, UM-3) according to the polarity markings on the inside of the battery compartment.
4 Put the cover back into place.
Notes on batteries
- Change all of the batteries if you notice a decrease in the operating range of the remote control.
- Do not use old batteries together with new ones.
- Do not use different types of batteries (such as alkaline and manganese batteries) together. Read the packaging carefully as these different types of batteries may have the same shape and color.
- If the batteries have leaked, dispose of them immediately. Avoid touching the leaked material or letting it come into contact with clothing, etc. Clean the battery compartment thoroughly before installing new batteries.
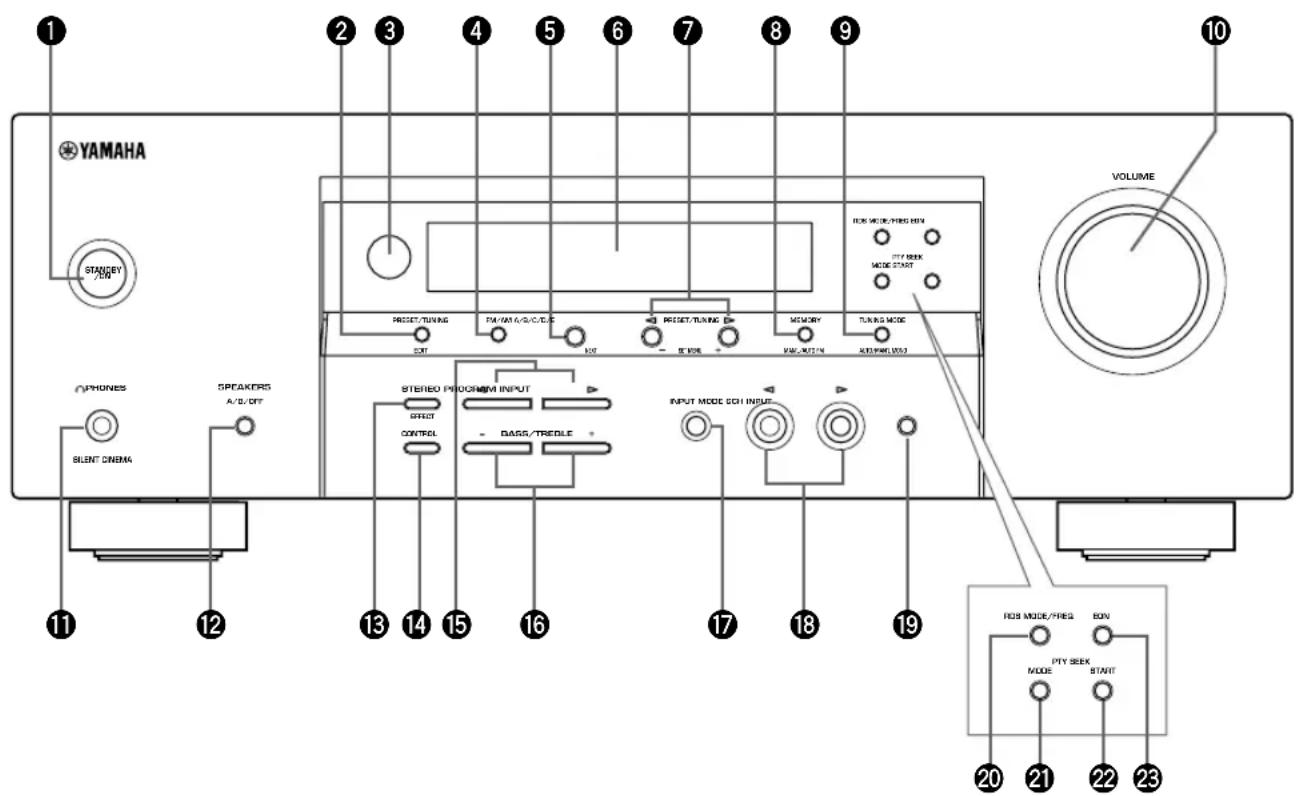
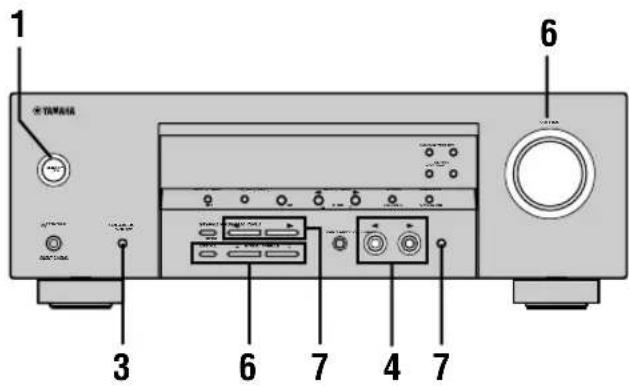
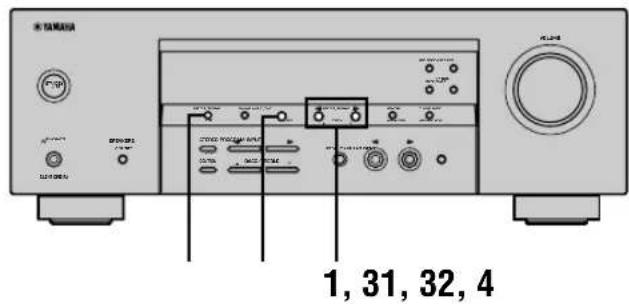
CONTROLS AND FUNCTIONS
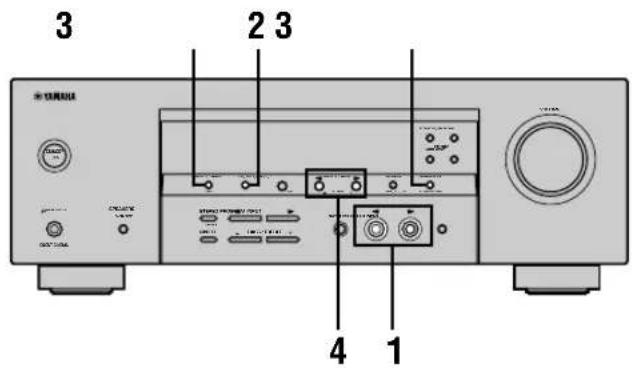
Front panel
(U.K. and Europe models only)
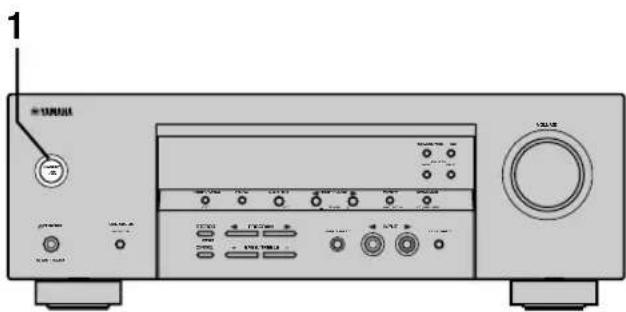
1STANDBY/ON
Turns on this unit or sets it to the standby mode. When you turn on this unit, you will hear a click and there will be a 4 to 5-second delay before this unit can reproduce sound.
Note
In standby mode, this unit consumes a small amount of power in order to receive infrared-signals from the remote control.
2 PRESET/TUNING
Switches the function of PRESET/TUNING < / > between selecting a preset station number and tuning (the colon (:)) turns on or off).
(EDIT)
This button is also used to exchange the assignment of two preset stations with each other.
Remote control sensor
Receives signals from the remote control.
FM/AM
Switches the reception band between FM and AM.
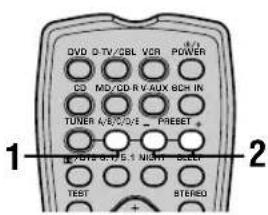
A/B/C/D/E
Selects preset station groups A to E when the unit is in tune mode.
(NEXT)
Selects the set menu mode when the unit is not in tuning mode.
6Front panel display
Shows information about the operational status of the unit.
7 PRESET/TUNING
- Select preset station numbers 1 to 8 when a colon (: ) is displayed in the front panel display.
- Select the tuning frequency when a colon (: ) is not displayed when the unit is in tuner mode.
(SET MENU - / +
Adjust settings on the set menu when the unit is not in tune mode.
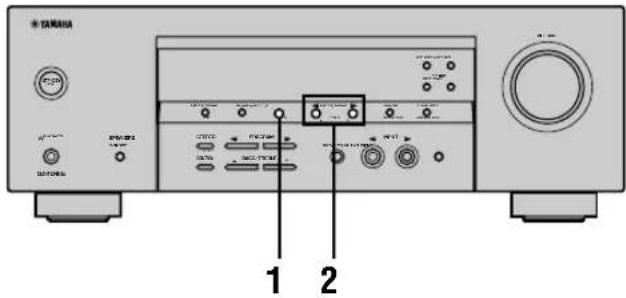
③MEMORY (MAN'L/AUTO FM)
Stores a station in the memory.
TUNING MODE (AUTO/MAN'L MONO)
Switches the tuning mode between automatic and manual.
10VOLUME
Controls the output level of all audio channels. This does not affect the OUT (REC) level.
PHONES (SILENT CINEMA)
Allows you to enjoy DSP effects when listening with headphones.
SPEAKERS A/B/OFF
Selects the set of front speakers connected to the A or B terminals. To turn off the speakers, press the button repeatedly and select OFF.
⑥STEREO (EFFECT)
Switches between normal stereo and DSP effect reproduction. When you select STEREO, the unit mixes down all Dolby Digital and DTS signals (except the LFE channel) as well as those 2-channel signals without effect sounds, to the front left and right speakers.
14CONTROL
Switches between Bass (low-frequency response) control mode and Treble (high-frequency response) control mode.
15PROGRAM
Use to select sound field programs.
16BASS/TREBLE-/+
Increase or decrease low/high-frequency response when the unit is in Bass/Treble control mode. The sound changes 2dB each time you press one of these buttons. Control range: -10 to +10dB
7INPUT MODE
Sets the priority for the types of input signals (AUTO, DTS, ANALOG) received when one component is connected to two types of input jacks. You cannot set priority for an audio sources if you have selected 6CH INPUT as the input source.
18INPUT /
Selects the input source you want to listen to or watch.
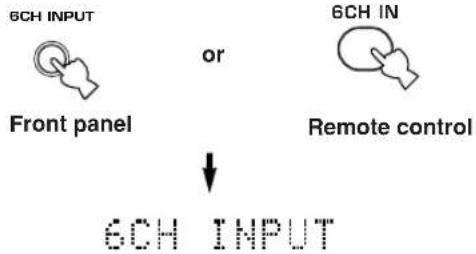
196CH INPUT
Selects the audio source connected to the 6CH INPUT jacks. This selection takes priority over sources selected with INPUT (or the input selector buttons on the remote control).
U.K. and Europe models only
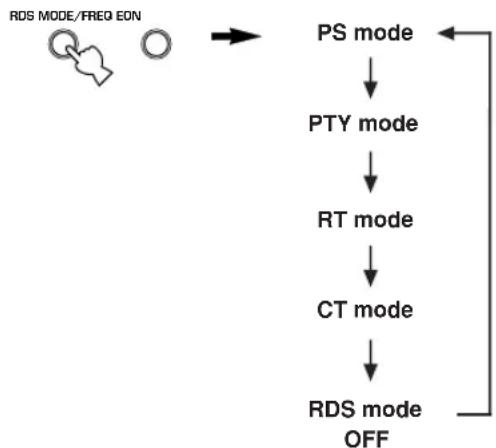
20RDS MODE/FREQ
Press this button when the unit is receiving an RDS station, to cycle the display mode among PS mode, PTY mode, RT mode, CT mode (if the station offers those RDS data service) and/or frequency display mode in turn.
④PTY SEEK MODE
Press this button to set the unit in the PTY SEEK mode.
2PTY SEEK START
Press this button to begin searching for a station after the desired program type has been selected in the PTY SEEK mode.
EON
Press this button to select a radio program type (NEWS, INFO, AFFAIRS, SPORT) to tune in automatically.
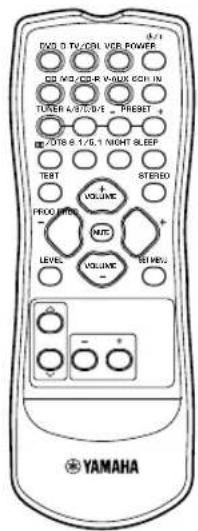
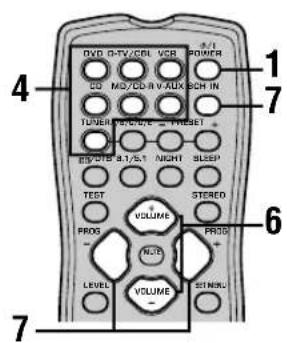
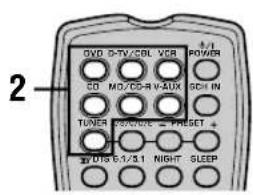
Remote control
This section describes the function of each control on the remote control.
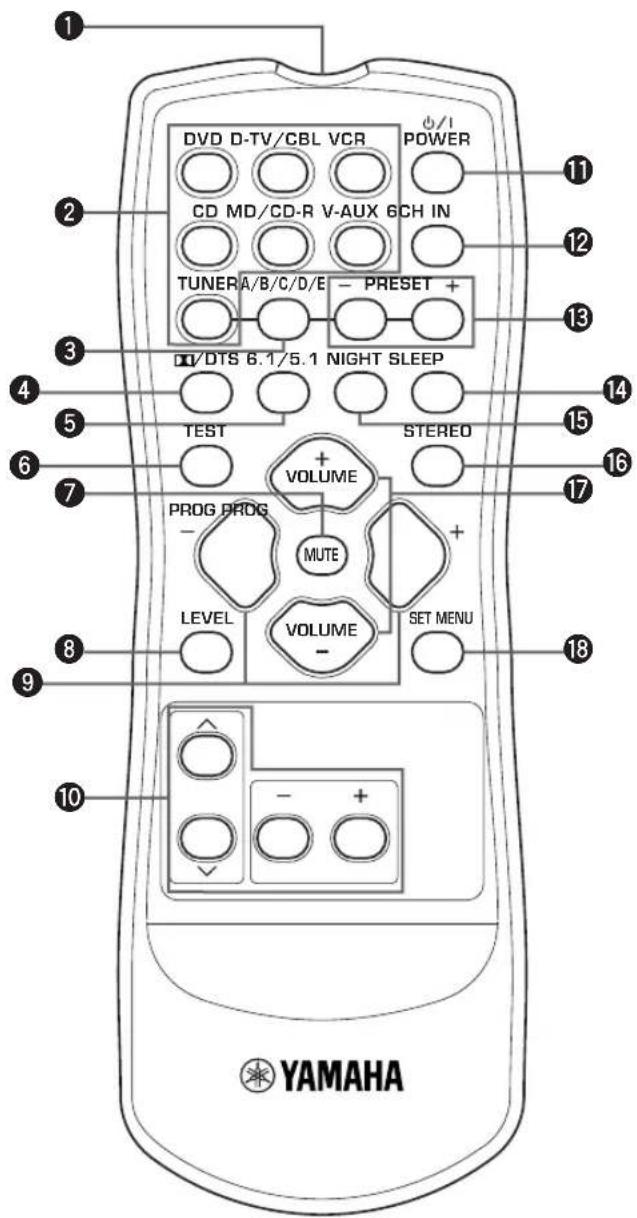
Infrared emitter
Outputs infrared control signals. Aim this emitter at the unit when using the remote control.
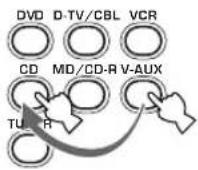
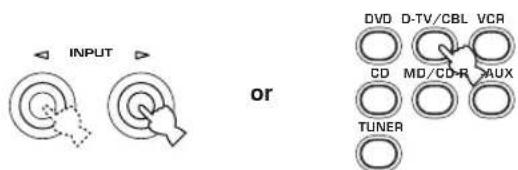
Input selector buttons
Select the input source and change the control area.
A/B/C/D/E
Selects preset station groups A to E when the unit is in tune mode.
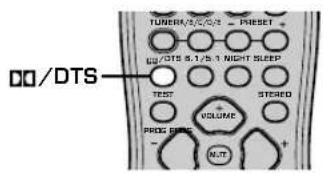
4D/DTS
Selects the built-in Dolby Digital, DTS, Dolby Pro Logic or Pro Logic II decoder.
6.1/5.1
Switches on or off the Dolby Digital + Matrix 6.1 or DTS + Matrix 6.1 decoder.
6TEST
Outputs the test tone to adjust the speaker levels.
MUTE
Mutes the sound. Press again to restore the audio output to the previous volume level.
LEVEL
Selects the effect speaker channel to adjust.
9PROGRAM-/+
Use to select sound field programs.
10Multi control section
Use to select and adjust sound field program parameters or SET MENU items.
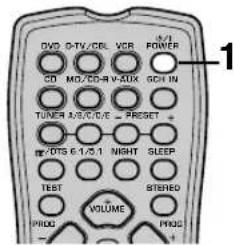
1 POWER
Turns the unit on, or sets it in standby mode.
26CH IN
Selects the audio source connected to the 6CH INPUT jacks.
15 PRESET-/+
Select preset station numbers 1 to 8.
4SLEEP
Sets the sleep timer.
15NIGHT
Sets the unit in night listening mode.
16STEREO
Switches between normal stereo and DSP effect reproduction. When you select STEREO the unit mixes down all Dolby Digital and DTS signals (except the LFE channel) as well as those 2-channel signals without effect sounds, to the front left and right speakers.
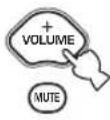
VOLUME + / -
Increases or decreases the volume level.
SET MENU
Selects the set menu mode.
Using the remote control
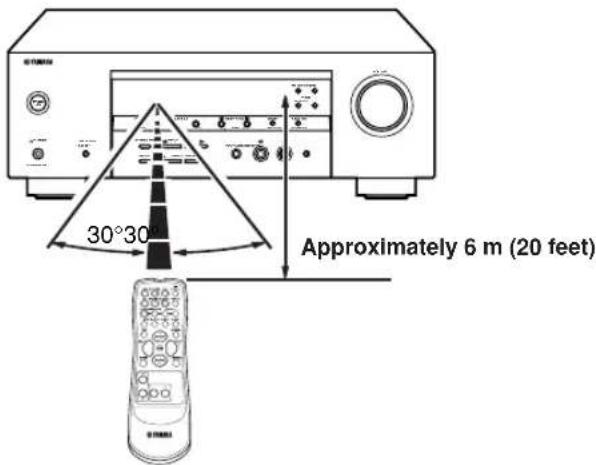
The remote control transmits a directional infrared beam. Be sure to aim the remote control directly at the remote control sensor on the main unit during operation.
■Handling the remote control
- Do not spill water or other liquids on the remote control.
- Do not drop the remote control.
- Do not leave or store the remote control in the following types of conditions:
- high humidity such as near a bath
- high temperature such as near a heater or stove
extremely low temperature
-dustyplaces
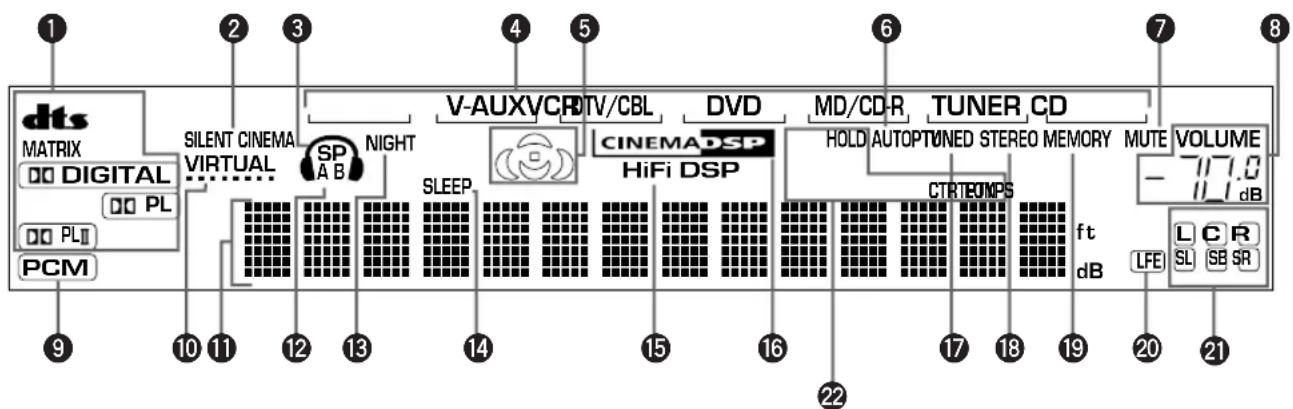
Front panel display
(U.K. and Europe models only)
1 Decoder indicators
When any of this unit's decoders function, the respective indicator lights up.
SILENT CINEMA indicator
Lights up when headphones are connected and a sound field program is selected (see page 26).
3 Headphones indicator
Lights up when headphones are connected to the.
headphone jack.
4 Input source indicator
Highlights the current input source with a cursor.
Sound field indicator
Light to indicate the active DSP sound fields.
AUTO indicator
Shows that this unit is in the automatic tuning mode.
MUTE indicator
Flashes while the MUTE function is on.
VOLUME level indicator
Indicates the volume level.
⑨ PCM indicator
Lights up when this unit is reproducing PCM (pulse code modulation) digital audio signals.
10 VIRTUAL indicator
Lights up when using Virtual CINEMA DSP.
1 Multi-information display
Shows the current sound field program name and other information when adjusting or changing settings.
SPABindicator
Lights up to indicate which set of front speakers is selected. Both indicators light up when both sets of speakers are selected.
15 NIGHT indicator
Lights up when the unit is set to night listening mode.
14 SLEEP indicator
Lights up while the sleep timer is on.
HiFi DSP indicator
Lights up when you select a HiFi DSP sound field program.
CINEMA DSP indicator
Lights up when you select a CINEMA DSP sound field program.
TUNED indicator
Lights up when this unit is tuned to a radio station.
STEREO indicator
Lights up when the unit is receiving a strong signal from a FM stereo broadcast while the "AUTO" indicator is lit.
19 MEMORY indicator
Flashes to show a station can be stored.
20 LFE indicator
Lights up when the input signal contains an LFE signal.
2 Input channel indicator
The indicators for the appropriate sound channels light up when a digital signal from a source is played back.
2 RDS indicator (U.K. and Europe models only)
The name(s) of the RDS data offered by the currently received RDS station light(s) up.
EON lights up when an RDS station that offers the EON data service is being received.
PTY HOLD lights up while searching for stations in the PTY SEEK mode.
CONNECTIONS
Before connecting components
CAUTION
Do not connect this unit or other components to the mains power until all connections between the components have been completed.
- Be sure to connect the left channel (L), right channel (R), "+" (red) and "-" (black) properly. Some components require different connection methods and have different jack names. Refer to the operation instructions for each component you wish to connect to this unit.
After you have completed all connections, check them again to make sure they are correct. - The jack names correspond to the names on the input selector.
Connecting to digital jacks
This unit has digital jacks for direct transmission of digital signals through either a coaxial or fiber optic cable. You can use the digital jacks to input PCM, Dolby Digital and DTS bitstreams. Use digital connections if you wish to enjoy the multi-channel sound track of DVD material, etc. with DSP effects. Both digital input jacks are acceptable for 96kHz sampling digital signals.
Note
- The OPTICAL jack on this unit conform to the EIA standard. If you use a fiber optic cable that does not conform to EIA standard, this unit may not function properly.
DIGITAL INPUT Jacks
(pages 9-11)
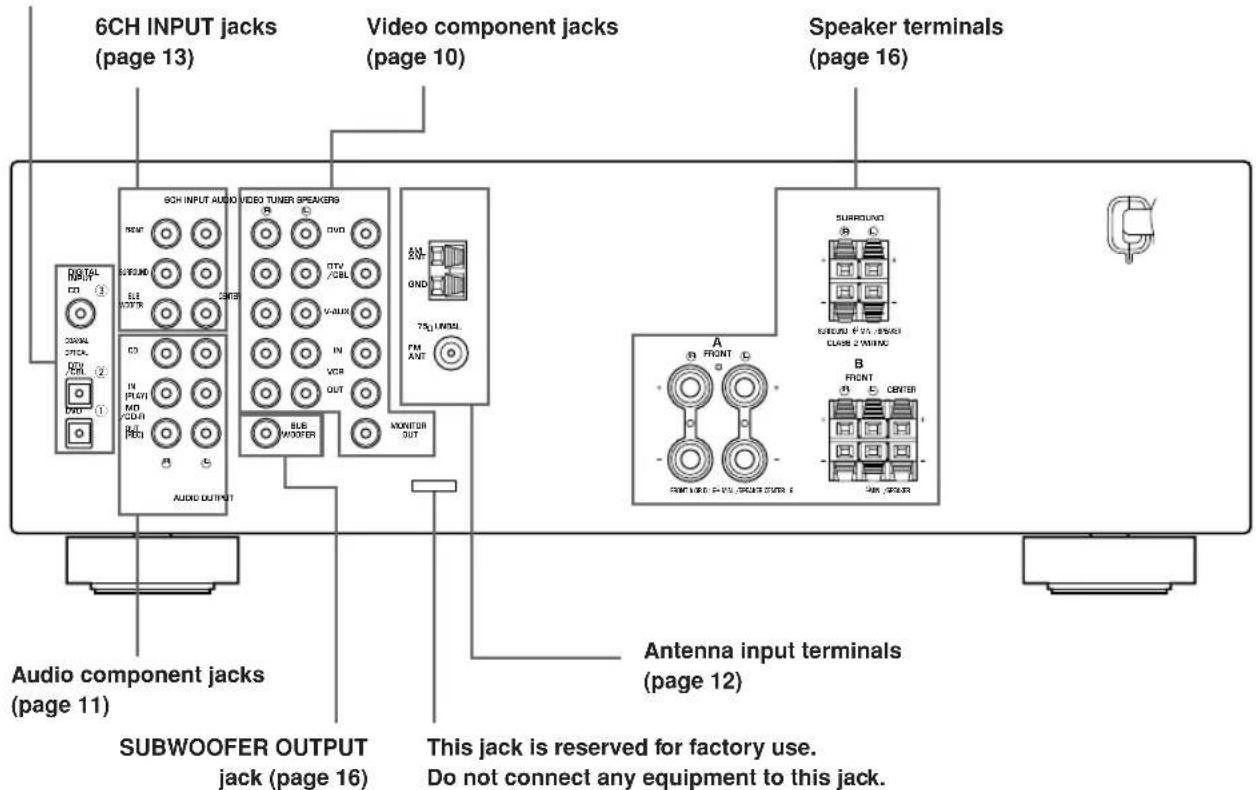
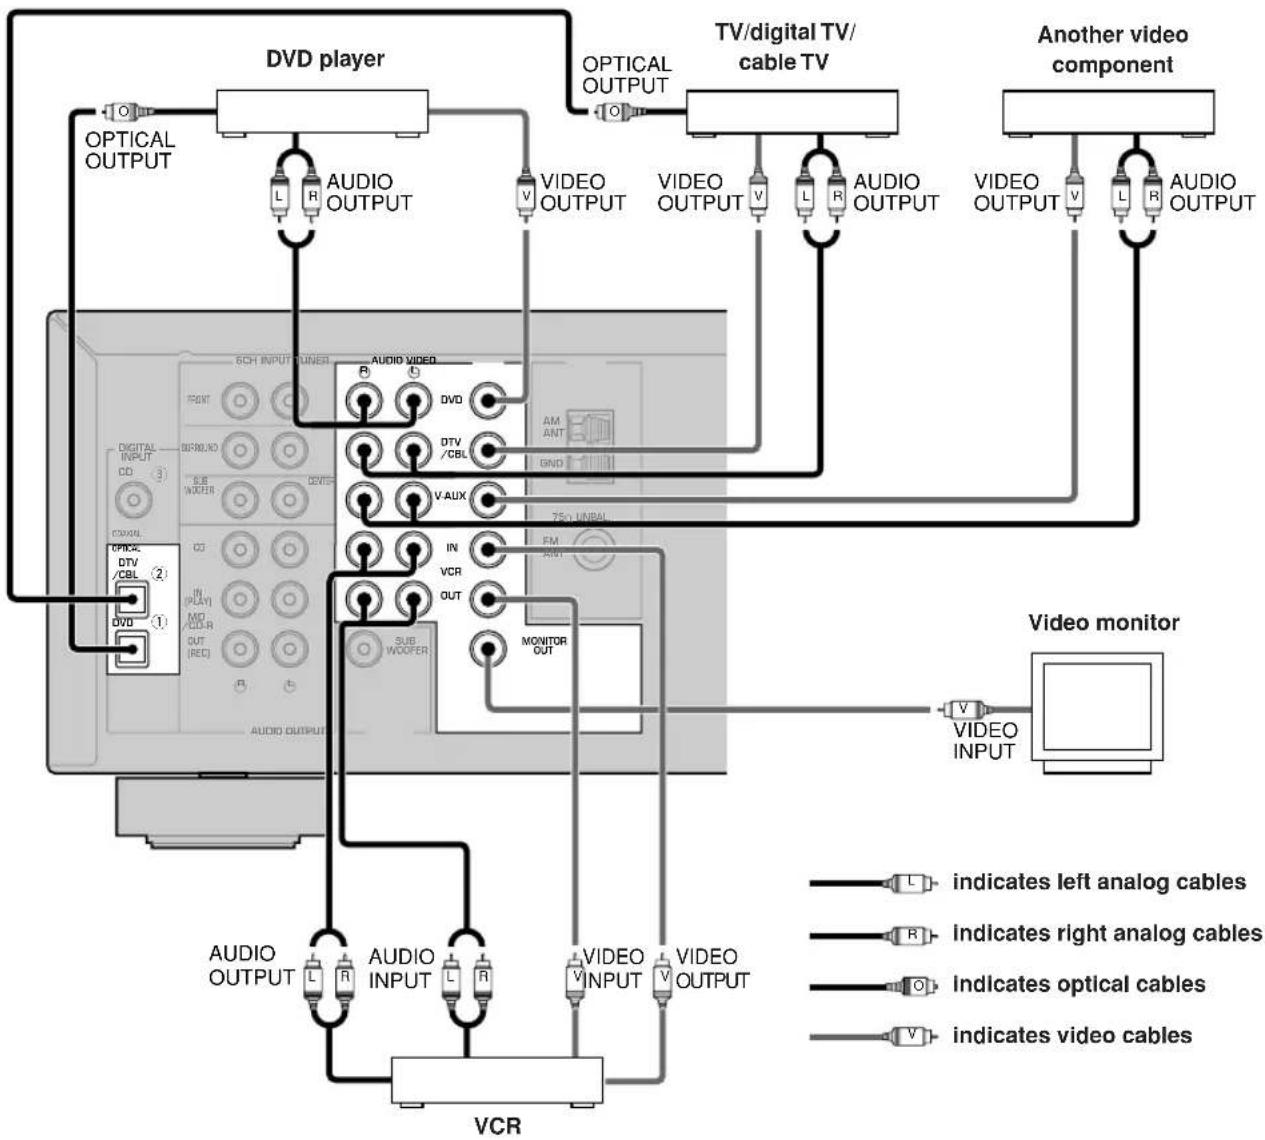
Connecting video components
Connecting a video monitor
Connect the video input jack on your video monitor to the MONITOR OUTVIDEO jack.
Connecting a DVD player/digital TV/cable TV
Connect the optical digital audio signal output jack on your component to the DIGITAL INPUT jack and connect the video signal output jack on the component to the VIDEO jack on this unit.
#
- Use the AUDIO jacks on this unit for a video component which does not have optical digital output jack. However, multi-channel reproduction cannot be obtained with audio signals input from the AUDIO jacks.
Connecting a digital TV/cable TV
Connect the video signal output jack on your component to the VIDEO jack on this unit.
Connect the audio signal output jacks on the component to the AUDIO jacks on this unit.
Connecting another video component
Connect the video signal output jack on your component to the VIDEO jack on this unit.
Connect the audio signal output jacks on the component to the AUDIO jacks on this unit.
Connecting a recording component
Connect the audio signal input jacks on your video component to the AUDIO OUT jacks on this unit. Then connect the video signal input jack on the video component to theVIDEO OUT jack on this unit for picture recording.
Connect the audio signal output jacks on your component to the AUDIO IN jacks on this unit. Then connect the video signal output jack on the component to theVIDEO IN jack on this unit to play a source from your recording component.
Note
- Once you have connected a recording component to this unit, keep its power turned on while using this unit. If the power is off, this unit may distort the sound from other components.
Connecting audio components
Connecting a CD player
Connect the coaxial digital output jack on your CD player to the DIGITAL INPUT CD jack on this unit.

- Use the AUDIO jacks on this unit to connect to a CD player that does not have a COAXIAL DIGITAL OUTPUT jack, or to record from CD players.
- Connecting a CD recorder or MD recorder
Connect the input jacks on your CD recorder or MD recorder to the MD/CD-R OUT (REC) jacks. Connect the output jacks on your CD recorder or MD recorder to the MD/CD-R IN (PLAY) jacks to play a source from your recording component.
Note
- Once you have connected a recording component to this unit, keep its power turned on while using this unit. If the power is off, this unit may distort the sound from other components.
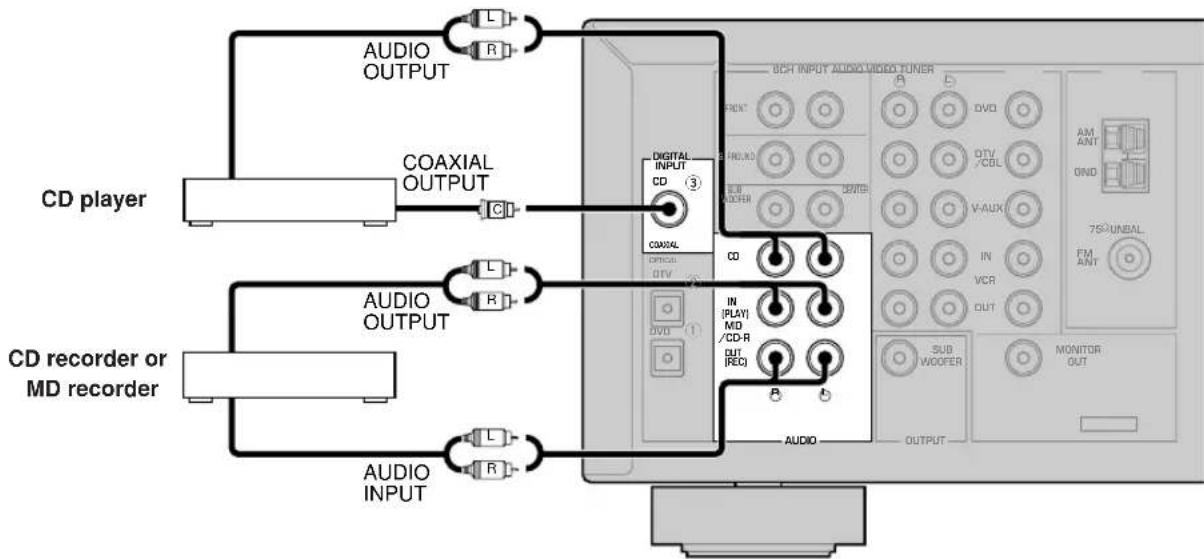


indicates left analog cables


indicates right analog cables


indicates coaxial cables
Connecting the antennas
Both AM and FM indoor antennas are included with this unit. In general, these antennas should provide sufficient signal strength.
Connect each antenna correctly to the designated terminals.
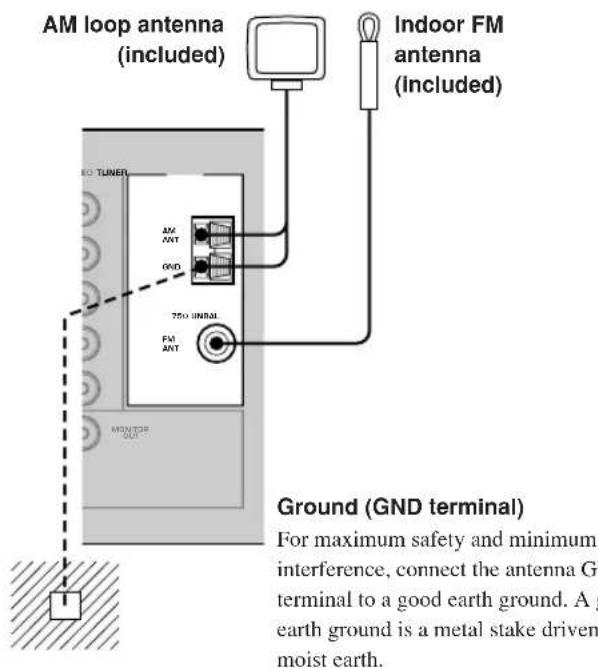
Connecting the AM loop antenna
1 Set up the AM loop antenna, then connect it to the terminals on this unit.
2 Press and hold the tab to insert the AM loop antenna lead wires into the AM ANT and GND terminals.

3 Orient the AM loop antenna for the best reception.

Notes
- The AM loop antenna should be placed away from this unit.
- The AM loop antenna should always be connected, even if an outdoor AM antenna is connected to this unit.
- A properly installed outdoor antenna provides clearer reception than an indoor one. If you experience poor reception quality, an outdoor antenna may improve the quality. Consult the nearest authorized YAMAHA dealer or service center about the outdoor antennas.
FREQUENCY STEP switch (Asia and General models only)

Because the interstation frequency spacing differs in different areas, set the FREQUENCY STEP switch (locating on the rear panel) according to the frequency spacing in your area.
North, Central and South America: 100kHz / 10kHz
- Other areas: 50kHz / 9kHz Before setting this switch, disconnect this unit's AC power cord from the wall outlet.
Connecting an external decoder
This unit is equipped with 6 additional input jacks (FRONT left and right, CENTER, SURROUND left and right and SUBWOOFER) for discrete multi-channel input from a component equipped with a multi-channel decoder and 6 channel output jacks such as a DVD/Super Audio CD player.
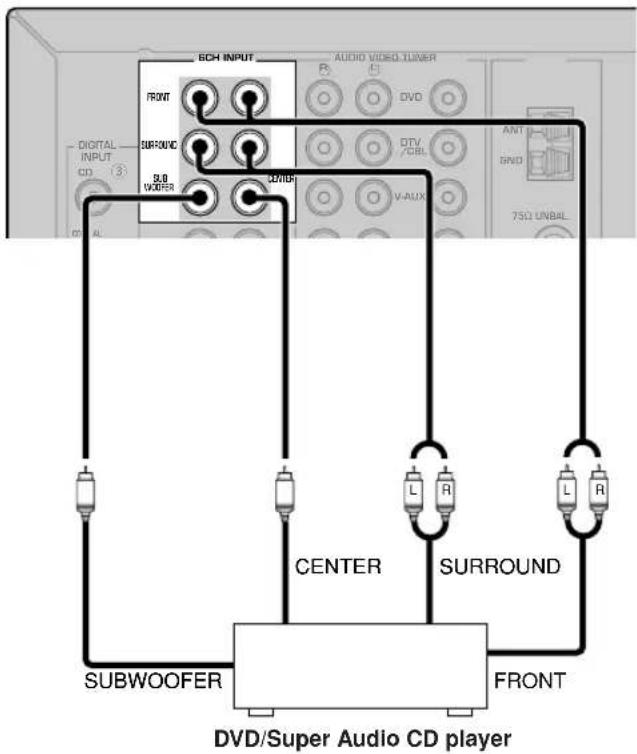
Notes
- When you select 6CH INPUT as the input source, this unit automatically turns off the digital sound field processor, and you cannot select sound field programs.
- When headphones are used, only front L/R channels are output.
Connecting the speakers
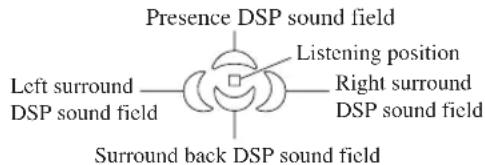
■Speaker placement
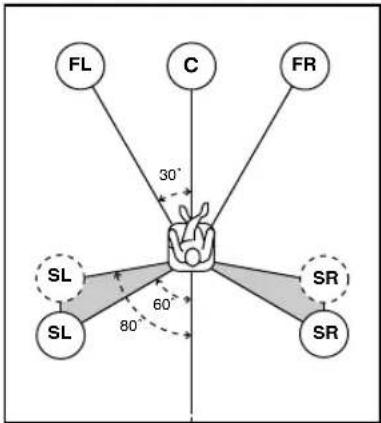
The speaker layout above shows the standard ITU-R speaker setting. You can use it to enjoy CINEMA DSP, multi-channel audio sources.
Front speakers (FR and FL)
The front speakers are used for the main source sound plus effect sounds. Place these speakers an equal distance from the ideal listening position. The distance of each speaker from each side of the video monitor should be the same.
Center speaker (C)
The center speaker is for the center channel sounds (dialog, vocals, etc.). If for some reason it is not practical to use a center speaker, you can do without it. Best results, however, are obtained with the full system. Align the front face of the center speaker with the front face of your video monitor. Place the speaker centrally between the front speakers and as close to the monitor as possible, such as directly over or under it.
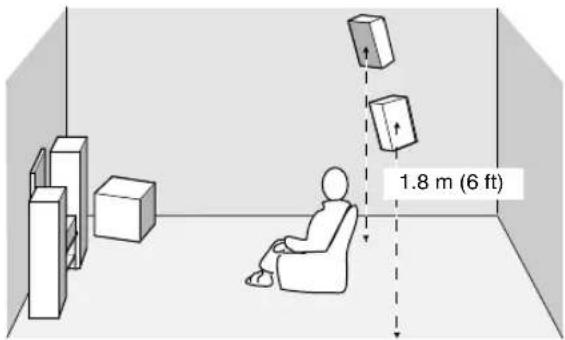
Surround speakers (SR and SL)
The surround speakers are used for effect and surround sounds. Place these speakers behind your listening position, facing slightly inwards, about 1.8m (6 ft) above the floor.
Subwoofer
The use of a subwoofer, such as the YAMAHA Active Servo Processing Subwoofer System, is effective not only for reinforcing bass frequencies from any or all channels, but also for high fidelity reproduction of the LFE (low frequency effect) channel included in Dolby Digital and DTS software. The position of the subwoofer is not so critical, because low bass sounds are not highly directional. But it is better to place the subwoofer near the front speakers. Turn it slightly toward the center of the room to reduce wall reflections.
■Speaker connections
Be sure to connect the left channel (L), right channel (R), "+" (red) and "-" (black) properly. If the connections are faulty, no sound will be heard from the speakers, and if the polarity of the speaker connections is incorrect, the sound will be unnatural and lack bass.
CAUTION
- Use speakers with the specified impedance shown on the rear panel of this unit.
- Before connecting the speakers, make sure that the power of this unit is off.
- Do not let the bare speaker wires touch each other or do not let them touch any metal part of this unit. This could damage this unit and/or speakers.
- Use magnetically shielded speakers. If this type of speakers still creates the interference with the monitor, place the speakers away from the monitor.
Connecting to the FRONT A SPEAKERS terminals
A speaker cord is actually a pair of insulated cables running side by side. One cable is colored or shaped differently, perhaps with a stripe, groove or ridges. Connect the striped (grooved, etc.) cable to the “+” (red) terminals on this unit and your speaker. Connect the plain cable to the “-” (black) terminals.

Red: positive (+) Black: negative (-)
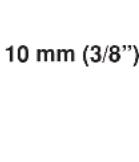
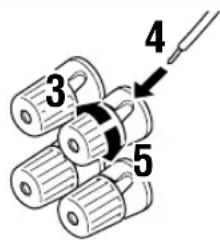
1 Remove approximately 10mm (3 / 8^ ) of insulation from the end of each of the speaker cables.
2 Twist the exposed wires of the cable together to prevent short circuits.
3 Unscrew the knob.
4 Insert one bare wire into the hole in the side of each terminal.
5 Tighten the knob to secure the wire.
Banana plug
(With the exception of U.K., Europe and Asia models)
Banana plug connections
(With the exception of U.K., Europe and Asia models) First, tighten the knob and then insert the banana plug connector into the end of the corresponding terminal.
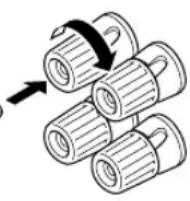
Connecting to the FRONT B, CENTER and SURROUND SPEAKERS terminals
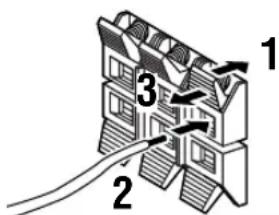
Red: positive (+) Black: negative (-)
1 Press and open the tab.
2 Insert one bare wire into the hole of each terminal.
3 Release the tab to secure the wire.
CONNECTIONS
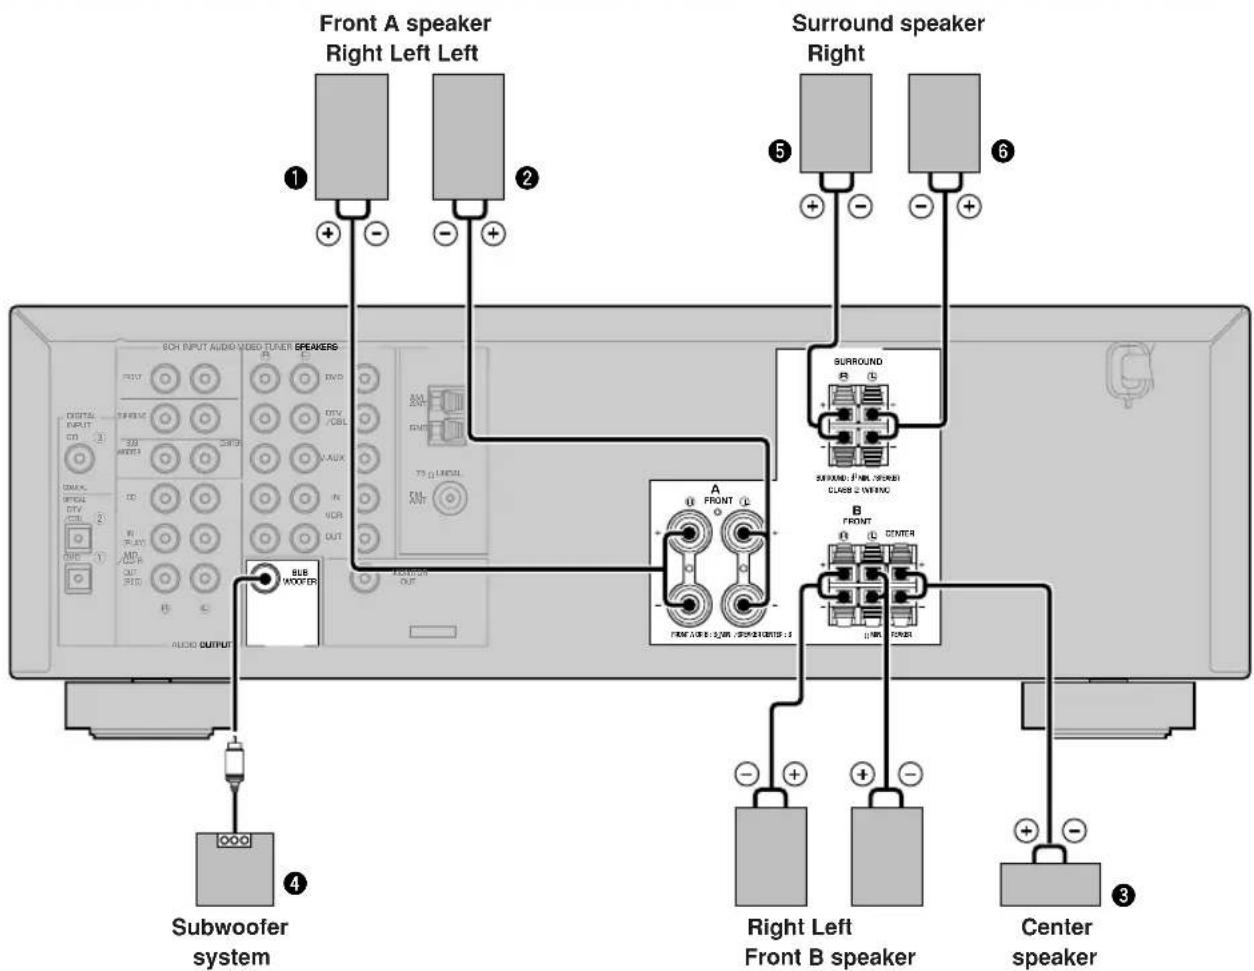
FRONT SPEAKERS terminals
You can connect up to two speaker systems to these terminals. When using only one speaker system, connect it to either of the FRONT A or the FRONT B terminals.
A surround speaker system can be connected to these terminals.
CENTER SPEAKER terminals
A center speaker can be connected to these terminals.
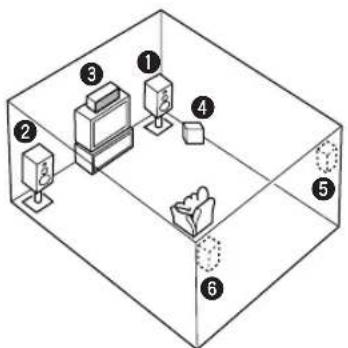
The diagram shows the speaker layout in the listening room.
SUBWOOFER jack
When using a subwoofer with built-in amplifier, including the YAMAHA Active Servo Processing Subwoofer System, connect the input jack of the subwoofer system to this jack. This unit will direct low bass signals distributed from the front, center and/or surround channels to this jack in accordance with your SPEAKER SET selections. The LFE (low-frequency effect) signals generated when Dolby Digital or DTS is decoded are also directed to this jack in accordance with your SPEAKER SET selections.
Notes
The cut-off frequency of the SUBWOOFER jack is 90Hz
- If you do not use a subwoofer, allocate the signals to the front left and right speakers by changing the setting of "SOUND 1 SPEAKER SET" item "1D BASS" on the set menu to FRONT.
- Use the control on the subwoofer to adjust its volume level. You can also adjust the volume level by using this unit's remote control (see "SETTING THE SPEAKER LEVELS" on page 45).
Connecting the power supply cords
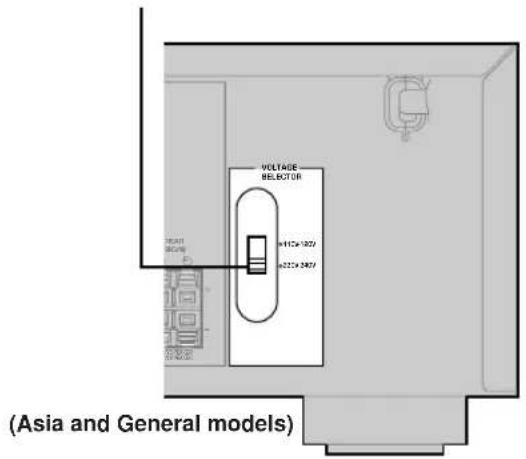
VOLTAGE SELECTOR
Connecting the AC power cord
Plug the power cord into an AC wall outlet.
■VOLTAGE SELECTOR
(Asia and General models only)
The VOLTAGE SELECTOR on the rear panel of this unit must be set for your local main voltage BEFORE plugging into the AC main supply. Voltages are 110V - 120V / 220V - 240VAC 50 / 60Hz
Turning on the power
When all connections are complete, turn on the power of this unit.
1 Press STANDBY/ON (POWER on the remote control) to turn on the power of this unit.
Front panel

or


Remote control
The level of the volume, and then the current sound field program name appear on the front panel display.
BASIC SYSTEM SETTINGS
The "BASIC" menu allows you to set some of the basic "SOUND" menu parameters with a minimum of effort. If you wish to configure the unit more precisely to suit your listening environment, use the more detailed parameters from the "SOUND" menu instead of those under the "BASIC" menu (See page 40). Altering any parameters in the BASIC menu will reset all parameters in the "SOUND" menu.
Using the basic menu
Use the remote control to make adjustments.
- Press SPEAKERS A/B/OFF on the front panel to select the front speakers you want to use.
- Make sure you disconnect headphones from this unit.
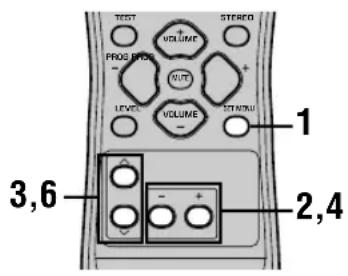
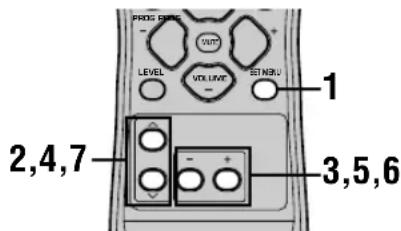
1 Press SET MENU.
"BASIC MENU" appears on the front panel display.


BASIC MENU
If the front panel display changes to show anything other than "BASIC MENU", press SET MENU until it displays "BASIC MENU".
2 Press - / + to enter into the BASIC menu.
"1 SETUP" appears on the front panel display.

3 Press / to change the display to the setting you want to alter.
1 SETUP
Changes the speaker and amplifier settings to suit the size of the room you are using. Refer to "Setting the unit to match your speaker system" on page 20 for more information.
2 SP LEVEL
Adjusts the output levels of the speakers.
Refer to "SP LEVEL" on page 20 for more information.
4 Press - / + to enter the desired setting mode.
5 Change the unit settings to suit your listening environment.
6 Press / to exit from the set menu.
The front panel display changes in the following order:


Exit

BASIC

SOUND

INPUT

OPTION

Exit
■Basic menu operation sequence
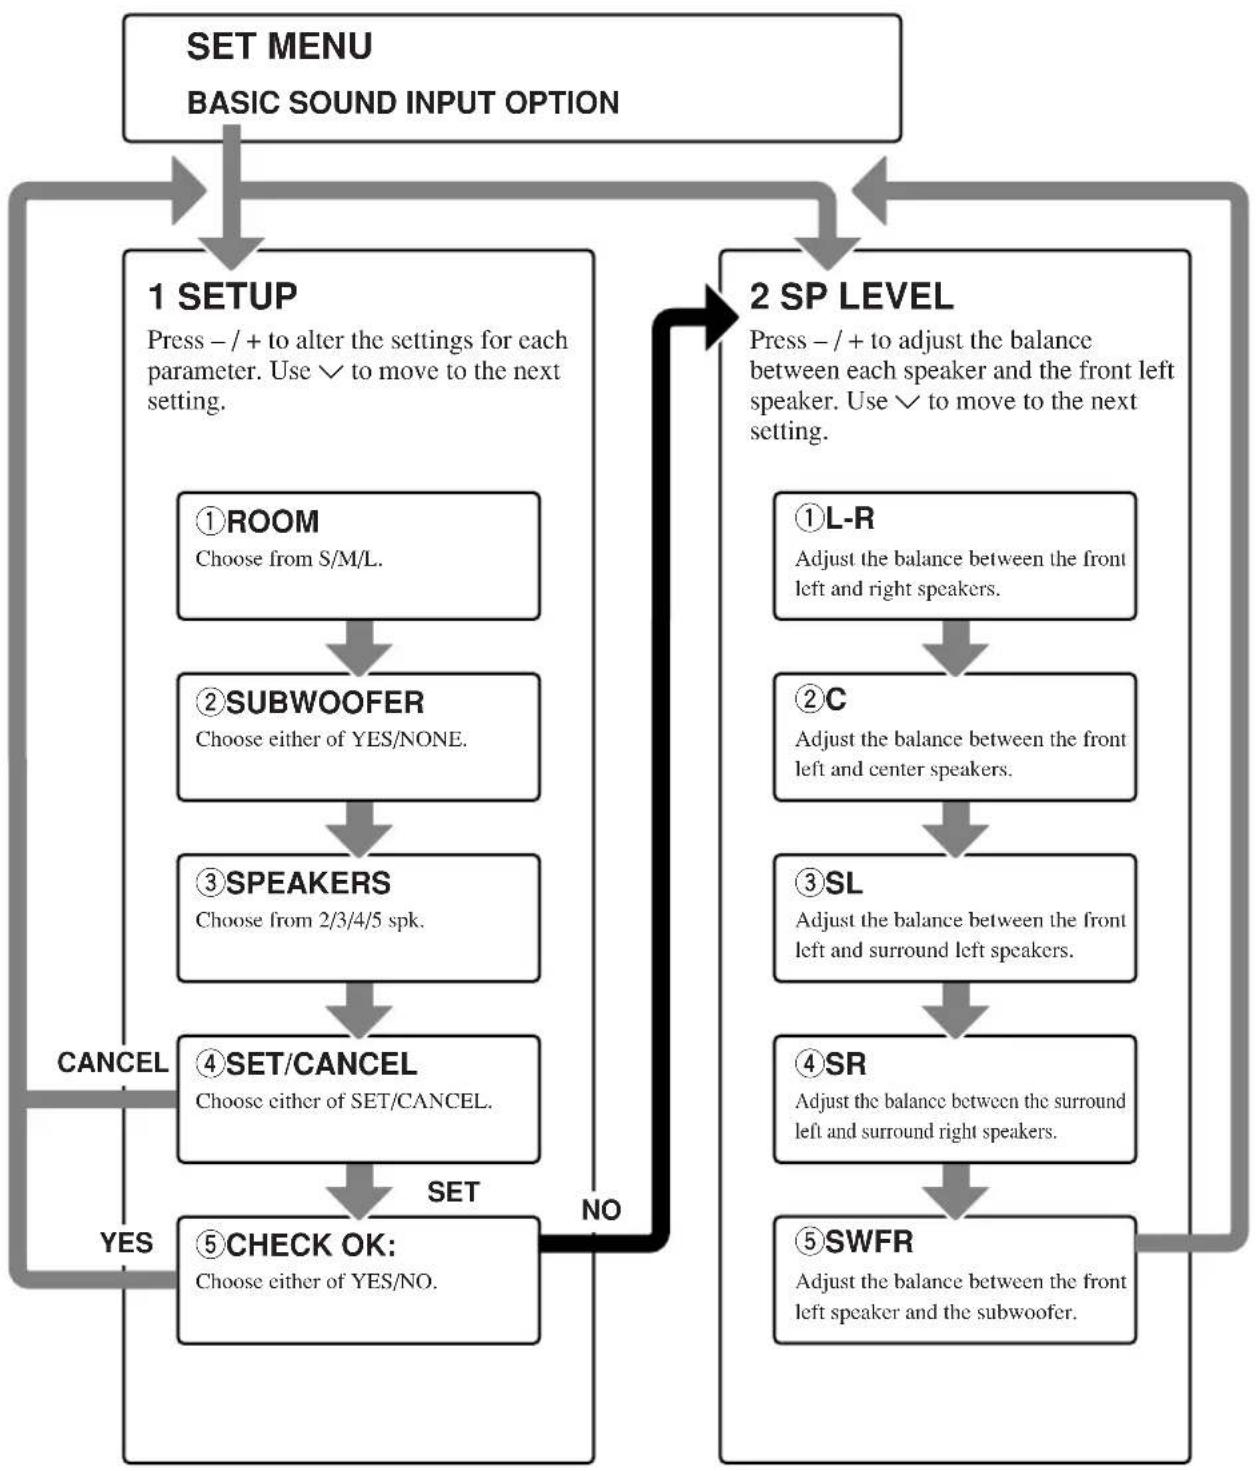
After altering the "1 SETUP" parameters, readjust the output levels of the speakers at "2 SP LEVEL".
See pages 39-44 for a detailed explanation of the "SOUND", "INPUT" and "OPTION" menus.
Setting the unit to match your speaker system
Follow the instructions below to set the amplifier output to match the size of your room and speakers. Press / to cycle through parameters 1 through 4, and -/+ to alter the parameter setting.
Factory default settings are highlighted.
①ROOM
Settings: S, M, L
Select the size of the room you have installed your speakers in. Roughly speaking, the room sizes are defined as follows:
[U.S.A. and Canada models]
S:16x13ft,200 ft ^2 (4.8x4.0m,20m²)
M: 20 × 16 ft, 300 ft^2 (6.3 × 5.0 ~m, 30 ~m^2)
Select YES if you have a subwoofer in your system, or NONE if you do not.
③SPEAKERS
Settings: 2, 3, 4, 5 (spk)
Select the number of speakers connected in your speaker configuration. This number does not include your subwoofer.
| Setting | Display | Speaker |
| 2spk | L R | Front L/R |
| 3spk | L C R | Front L/R, Center |
| 4spk | L R SL SR | Front L/R, Surround L/R |
| 5spk | L C R SL SR | Front L/R, Center, Surround L/R |
④SET or CANCEL
Select SET to confirm the changes you made. Select CANCEL to exit SETUP MENU without altering any of the unit settings. The unit will output a test tone to the speakers (see 5).
Use the test tone to check the speaker levels.
When you select SET in 4, the display changes to "CHECK: Test Tone" for a few seconds, and the unit outputs a test tone to each of the speakers in turn twice. When the test tone begins, the display changes to "CHECK OK?--YES".
If the test tone is output at the same volume from all of the speakers, select "CHECK OK: YES". Press to exit from the SETUP menu.
If the volume of the test tone varies between speakers, press - / + to change the display to "NO".
Note
- The indicator of the speaker currently outputting the test tone flashes on the front panel display.
2 SP LEVEL
(Setting speaker output levels)
Use this menu to compare and adjust the test tone output from each speaker to the output from the front left (or surround left) speaker so that the volume level for all speakers is identical. Press / to select a speaker, then adjust the balance using -/+ .
Note
- The unit outputs the test tone from the selected speaker and the front left (or surround left) speaker in turn. The indicator of the speaker currently outputting the test tone flashes on the front panel display.
L-R
Adjust the balance between the front left and right speakers.
C
Adjust the balance between the front left and center speakers.
SL
Adjust the balance between the front left and surround left speakers.
SR
Adjust the balance between the surround left and surround right speakers.
SWFR
Adjust the balance between the front left speaker and the subwoofer.
PLAYBACK
1 Press STANDBY/ON (POWER on the remote control) to turn on the power.

Front panel
or

Remote control
2 Turn on the video monitor connected to this unit.
3 Press SPEAKERS A/B/ OFF on the front panel to select the front speakers you want to use.

SPEAKERS A/B/OFF
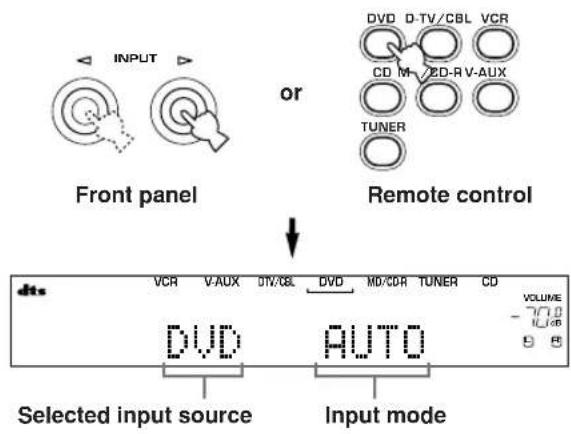
4 Press INPUT / repeatedly (one of the input selector buttons on the remote control) to select the input you desire.
The selected input source name and input mode appear on the front panel display for a few seconds.
5 Start playback or select a broadcast station on the source component.
Refer to the operation instructions for the component.
6 Adjust the volume to the desired level.
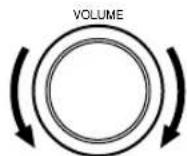
Front panel
or
Remote control
If desired, use CONTROL and BASS/TREBLE - / + These controls only effect the sound from the front speakers.

Front panel
Notes
If you increase or decrease the high-frequency or the low-frequency sound to an extreme level, the tonal quality from the center and surround speakers may not match that of the front left and right speakers.
- If you have connected a recording component to the VCR OUT, or MD/CD-R OUT jacks, and you notice distortion or low volume during playback from other components, try turning on the recording component.
7 Select a sound field program if desired.
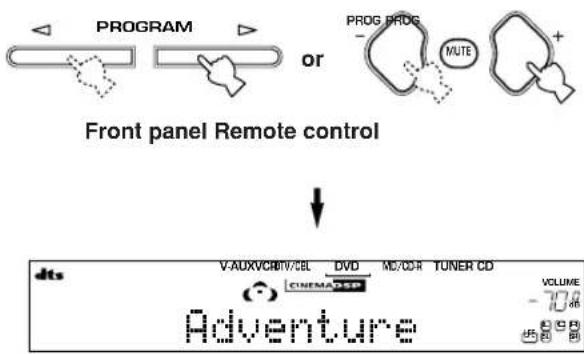
Use PROGRAM < / > (PROG - / + on the remote control) to select a sound field program. See pages 27-30 for details about sound field programs.

Front panel Remote control
■Selecting the 6CH INPUT
Press 6CH INPUT until "6CH INPUT" appears on the front panel display.
Note
- If "6CH INPUT" is shown on the front panel display, no other source can be played. To select another input source, first press 6CH INPUT so that "6CH INPUT" disappears from the front panel display.
■Playing video sources in the background
You can combine a video image from a video source with a sound from an audio source. For example, you can enjoy listening to classical music while having beautiful scenery from the video source on the video monitor.
Use the input selector buttons to select a video source, then select an audio source.
■To mute the sound
Press MUTE on the remote control.
"MUTE" blinks on the front panel display.
To resume audio output, press MUTE again.


- You can also cancel mute by pressing VOLUME +/-, etc.
- You can adjust the muting level (see page 44).
Night listening mode
This mode reproduces dialogue clearly while reducing the volume of loud sound effects for easier listening at low volumes or at night.
Press NIGHT on the remote control.
The NIGHT indicator in the front panel display lights up. Press NIGHT once more to return to normal reproduction


- You can use night listening mode with any of the sound field programs.
- Night listening mode may vary in effectiveness depending on the input source and surround sound settings you use.
When you have finished using this unit
Press STANDBY/ON (POWER on the remote control) to set this unit in standby mode.

Front panel Remote control
Input modes and indications
This unit is equipped with 2 types of input jacks. Do the following to select the type of input signals you want to use.
Press INPUT MODE repeatedly until the desired input mode is shown on the front panel display.

INPUT MODE
Front panel
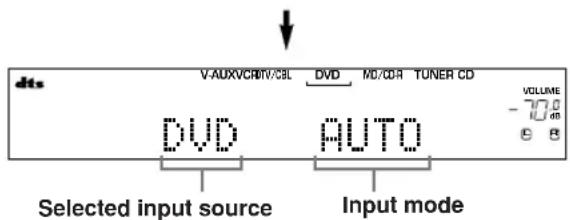
AUTO Automatically selects input signals in the following order:
1) Digital signals*
2) Analog signals
DTS Selects only digital signals encoded in DTS. If no DTS signals are input, no sound is output.
ANALOG Selects only analog signals. If no analog signals are input, no sound is output.
- If this unit detects a Dolby Digital or DTS signal, the decoder automatically switches to the appropriate sound field program.
You can adjust the default input mode this unit selects when the power is turned on (see page 43).
Notes
- When you play DTS encoded CD/LDs with the input mode set to AUTO:
- This unit automatically switches to the DTS decoding mode. The unit remains in DTS mode (and the "dts" indicator may flash) for up to 30 second after playback of the DTS source is complete. To manually release the DTS mode, press INPUT MODE to reselect AUTO.
- The DTS decoding mode may be released if search or skip operations are performed for more than 30 seconds. To prevent this, press INPUT MODE to select DTS.
- If the digital output data of the player has been processed in any way, you may not be able to perform DTS decoding even if you make a digital connection between this unit and the player.
Selecting a sound field program
You can enhance your listening experience by selecting sound field programs. For details about each program, see pages 27 - 30.
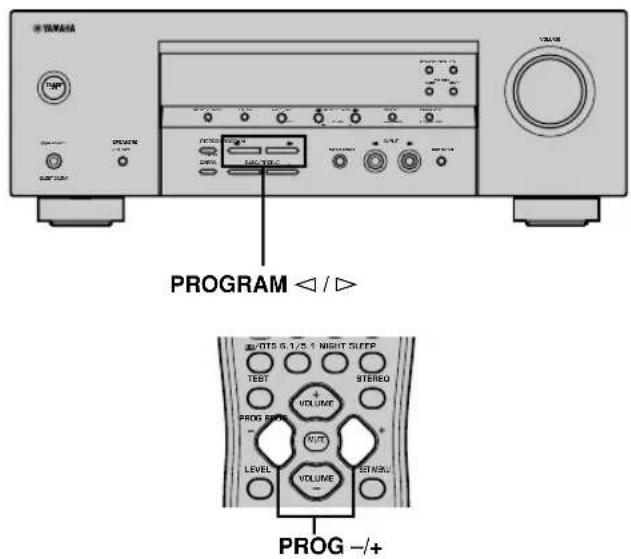
Press PROGRAM < / > (PROG - / + on the remote control) repeatedly to select the desired program (including sub-programs if available).
The name of the selected program appears on the front panel display.

- Select a program based on your listening preference. Program names are just for reference.
Notes
- There are 9 programs with sub-programs available with this unit. However, the selection depends on the input signal format and not all sub-programs can be used with all input signal formats.
- You cannot use the digital sound field processor with a source connected to the 6CH INPUT jacks of this unit or when the unit is reproducing a digital source with a sampling frequency greater than 48kHz .
- The acoustics of your listening room affect sound field programs. Minimize sound reflections in your room to maximize the effect created by the program.
- When you select an input source, this unit automatically selects the last sound field program used with that source.
- When you set this unit in standby mode, it stores the current source and sound field program in memory and automatically selects them when you turn on the power again.
- If the unit receives a Dolby Digital or DTS signal when the input mode is set to AUTO, the sound field program (No. 7-9) automatically switches to the appropriate decoding program.
- When the unit is reproducing a monaural source with PRO LOGIC or PRO LOGIC/Enhanced, or PRO LOGIC II Movie, no sound is output from the front and surround speakers. Sound can only be heard from the center speaker. (If "1A CENTER" on the set menu is set to NON, the center channel sound is output from the front speakers.)
■Selecting PRO LOGIC or PRO LOGIC II
You can listen to 2-channel sources decoded into five discrete channels by selecting PRO LOGIC or PRO LOGIC II in program No.9.
1 Select a 2-channel source and start playback on the source component.
2 Press D/DTS.
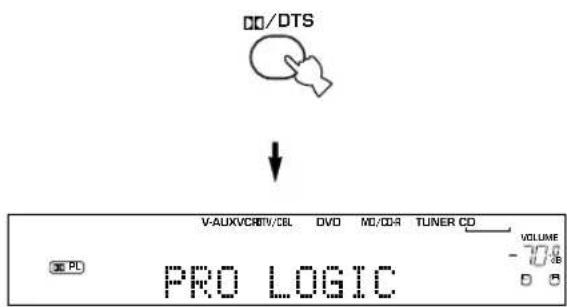
The display cycles as follows each time you press D0/ DTS: PRO LOGIC PRO LOGIC Enhanced PRO LOGIC Movie PRO LOGIC II Music PRO LOGIC ...
- You can select PRO LOGIC, PRO LOGIC Enhanced, PRO LOGIC II Movie, and PRO LOGIC II Music by pressing PROGRAM < 1 / 口 on the front panel repeatedly.
■Playing Dolby Digital EX or DTS ES material
Press 6.1/5.1 to turn on the Dolby Digital + Matrix 6.1 or DTS + Matrix 6.1 decoder.
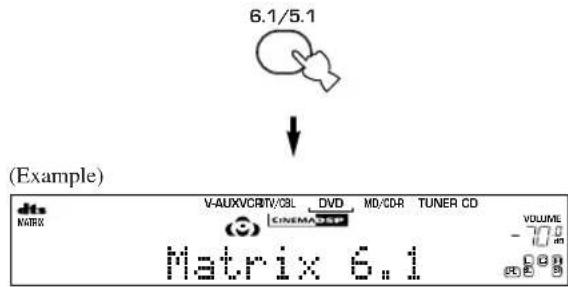
The display changes AUTO Matrix6.1 OFF each time 6.1/5.1 is pressed.
AUTO: Automatically switches Dolby Digital + Matrix 6.1 and DTS + Matrix 6.1 depending on the signal. Virtual surround back speaker does not work for 5.1- channel sources.
Matrix 6.1: Produces 6-channel playback of the input source using the Matrix 6.1 decoder. The virtual surround back speaker can be used when playing a 5.1-channel source.
OFF: Virtual surround back speaker does not work.
Notes
- Some 6.1-channel compatible discs do not have a signal (flag) that this unit can automatically detect. Select "Matrix 6.1" to play these kinds of discs with 6.1-channel sound.
- 6.1-channel playback is not possible even if you press 6.1/5.1 in the following cases:
- When effects are turned off.
- When the source connected to the 6CH INPUT jacks is being played.
- When the unit is reproducing a Dolby Digital KARAOKE source.
- When headphones are connected to the PHONES jack.
- The input mode resets to AUTO when you turn the unit power off.
PLAYBACK
■Virtual CINEMA DSP
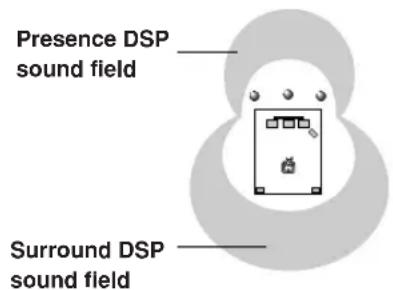
With Virtual CINEMA DSP, you can enjoy all sound field programs without surround speakers. It creates virtual speakers to reproduce a natural sound field.
You can listen to virtual CINEMA DSP by setting "1C SURROUND LR" in the set menu to NON. Sound field processing changes to Virtual CINEMA DSP automatically.
Note
- Virtual CINEMA DSP will not activate, even when IC SURROUND LR is set to "NON" (see page 41) in the following cases:
- When the 5ch Stereo, DOLBY DIGITAL, Pro Logic, Pro Logic II, or DTS program is selected.
- When the sound effect is turned off.
- When 6CH INPUT is selected as the input source.
- When a digital signal with a sampling frequency greater than 48kHz is input to this unit.
- When using the test tone.
- When connecting the headphones.
■To listen with headphones (SILENT CINEMA)
The SILENT CINEMA mode allows you to enjoy multichannel music or movie sound, including Dolby Digital and DTS surround, through ordinary headphones.
SILENT CINEMA activates automatically whenever you connect headphones to the PHONES jack while listening to CINEMA DSP or HiFi DSP sound field programs. The "SILENT CINEMA" indicator lights up on the front panel display. (If the sound field programs are off, you listen with normal stereo reproduction.)
Notes
- This feature is not available when 6CH INPUT is selected or the unit is receiving a digital signal with a sampling frequency greater than 48kHz .
- The sound from the LFE channel will be mixed and output from the headphones.
■Normal stereo reproduction
Press STEREO to turn off the sound effect for normal stereo reproduction.
Press STEREO again to turn the sound effect back on.

or


Front panel
Remote control
Notes
- If you turn off the sound effects, no sound is output from the center speaker or surround speakers.
- If you turn off the sound effects while the unit is reproducing sound from a Dolby Digital or DTS signal, the dynamic range of the signal is automatically compressed and the unit will mix the sounds of the center and surround speaker channels and output them from the front speakers.
- The volume may be greatly reduced when you turn off the sound effects or if you set "SOUND 4 D. RANGE (dynamic range)" on the set menu to MIN. In this case turn on the sound effect.

- During stereo reproduction, you can display information such as the type, format and sampling frequency of the signal input from the components connected to this unit.
(While playing a source)
1 Press / to display the information about the input signal.


(Format): The display shows the signal format. When the unit cannot detect a digital signal it automatically switches to analog input.
in: The display shows the number of input signal source channels, as follows: For multi-channel soundtrack such as front 3 channels, surround 2 channels and LFE, the display shows "3/2/LFE".
fs: The display shows the sampling frequency. When the unit is unable to detect the sampling frequency "Unknown" shows in the front panel display.
rate: The display shows the bit rate. When the unit is unable to detect the bit rate "Unknown" shows in the front panel display.
flg: The display shows the flag - data encoded in a DTS or Dolby Digital signal that causes this unit to automatically switch to the appropriate decoder for playback.
DIGITAL SOUND FIELD PROCESSING (DSP)
Understanding sound fields
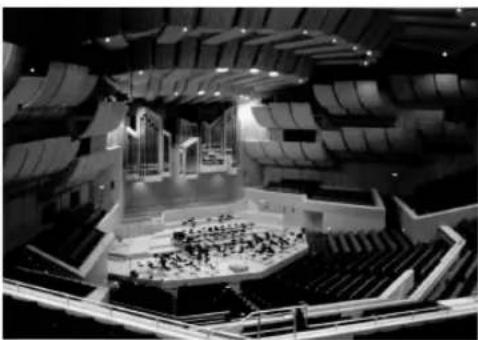
A sound field is defined as the "characteristic sound reflections of a particular space." In concert halls and other music venues, we hear early reflections and reverberations as well as the direct sound produced by the artist(s). The variations in the early reflections and other reverberations among the different music venues is what gives each venue its special and recognizable sound quality.
YAMAHA sent teams of sound engineers all around the world to measure the sound reflections of famous concert halls and music venues, and collect detailed sound field information such as the direction, strength, range, and delay time of those reflections. Then we stored this enormous amount of data in the ROM chips of this unit.
Recreating a sound field
Recreating the sound field of a concert hall or an opera house requires localizing the virtual sound sources in your listening room. The traditional stereo system that uses only two speakers is not capable of recreating a realistic sound field. YAMAHA's DSP requires four effect speakers to recreate sound fields based on the measured sound field data. The processor controls the strength and delay time of the signals output from the four effect speakers to localize the virtual sound sources and fully encompass the listener.
HiFi DSP programs
The following list gives you a brief description of the sound fields produced by each of the sound field programs. Keep in mind that most of these are precise digital recreations of actual acoustic environments.
| No. | Program | Features |
| 1 | CONCERT HALL | A large round concert hall with a rich surround effect. Pronounced reflections from all directions emphasize the extension of sounds. The sound field has a great deal of presence, and your virtual seat is near the center, close to the stage. |
| 2 | JAZZ CLUB | This is the sound field at stage front in “The Bottom Line”, a famous New York jazz club, that seats up to 300 people. Its wide left to right scating arrangement offers a real and vibrant sound. |
| 3 | ROCK CONCERT | The ideal program for lively, dynamic rock music. The data for this program was recorded at LA’s “hottest” rock club. The listener’s virtual seat is at the center-left of the hall. |
| 4 | ENTERTAINMENT/Disco | This program recreates the acoustic environment of a lively disco in the heart of a big city. The sound is dense and highly concentrated. It is also characterized by a high-energy, “immediate” sound. |
| ENTERTAINMENT/5ch Stereo | Using this program increases the listening position range. This is a sound field suitable for background music at parties, etc. |
CINEMA DSP
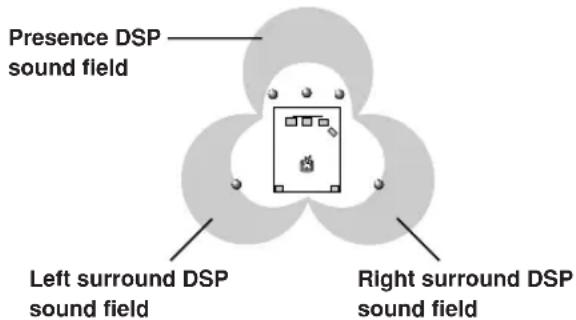
Sound design of CINEMA DSP
Filmmakers intend for the dialog to be located right on the screen, the effect sound a little farther back, the music spread even farther back, and the surround sound around the listener. Of course, all of these sounds must be synchronized with the images on the screen.
CINEMA DSP is an upgraded version of YAMAHA DSP specially designed for movie soundtracks. CINEMA DSP integrates the DTS, Dolby Digital, and Dolby Pro Logic surround sound technologies with YAMAHA DSP sound field programs to provide a surround sound field. It recreates comprehensive movie sound design in your audio room. In CINEMA DSP sound field programs, YAMAHA's exclusive DSP processing is added to the Front left and right, and Center channels, so the listener can enjoy realistic dialogue, depth of sound, smooth transition between sound sources, and a surround sound field that goes beyond the screen.
When a DTS or Dolby Digital signal is detected, the CINEMA DSP sound field processor automatically chooses the most suitable sound field program for that signal.
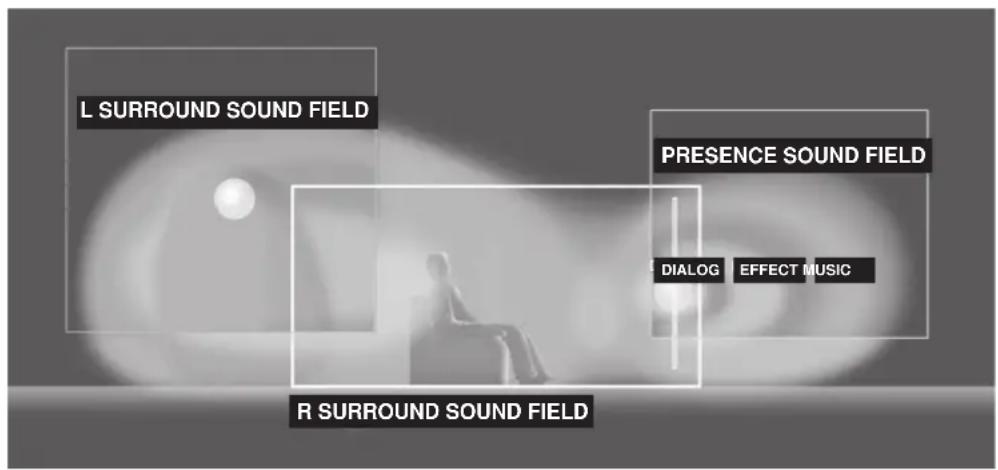
In addition to the DSP, this unit is equipped with a variety of precise decoders; Dolby Pro Logic decoder for Dolby Surround sources, Dolby Pro Logic II decoder for Dolby Surround and 2-channel sources, Dolby Digital/DTS decoder for multi-channel sources and Dolby Digital + Matrix 6.1 or DTS + Matrix 6.1 decoder for adding a surround back channel (the surround back channel is outputted from virtual surround back speaker). You can select CINEMA DSP programs to optimize these decoders and the DSP sound patterns depending on the input source.
CINEMA DSP Programs
The following list gives you a brief description of the sound fields produced by each of the sound field programs. Keep in mind that most of these are precise digital recreations of actual acoustic environments. Select the sound field program that you feel sounds best regardless of the name and description given for it below.
For audio-video sources: No. 4 to 6
| No. | Program | Features |
| 4 | ENTERTAINMENT/ Game | This program adds a deep and spatial feeling to video game sounds. |
| 5 | MUSIC VIDEO | This program lends an enthusiastic atmosphere to the sound, giving you the feeling you are at an actual jazz or rock concert. |
| 6 | TV THEATER/ Mono Movie | This program is provided for reproducing monaural video sources (such as old movies). The program produces the optimum reverberation to create sound depth using only the presence sound field. |
| TV THEATER/Variety/ Sports | Though the presence sound field is relatively narrow, the surround sound field employs the sound environment of a large concert hall. This effect enhances the experience of watching various TV programs such as news, variety shows, music programs or sports programs. |
■For movie programs
| No. | Program | Features | |
| 7 | MOVIE THEATER 1 | Spectacle | This program creates the extremely wide sound field of a 70-mm movie theater. It precisely reproduces the source sound in detail, making both the video and the sound field incredibly real. This is ideal for any kind of video source encoded with Dolby Surround, Dolby Digital or DTS (especially large-scale movie productions). |
| Sci-Fi | This program clearly reproduces dialog and sound effects in the latest sound form of science fiction films, thus creating a broad and expansive cinematic space amid the silence. You can enjoy science fiction films in a virtual-space sound field that includes Dolby Surround, Dolby Digital and DTS-encoded software employing the most advanced techniques. | ||
| 8 | MOVIE THEATER 2 | Adventure | This program is ideal for precisely reproducing the sound design of the newest 70-mm and multichannel soundtrack films. The sound field is made to be similar to that of the newest movie theaters, so the reverberations of the sound field itself are restrained as much as possible. |
| General | This program is for reproducing sounds from 70-mm and multichannel soundtrack films, and is characterized by a soft and extensive sound field. The presence sound field is relatively narrow. It spatially spreads all around and toward the screen, restraining the echo effect of conversations without losing clarity. | ||
| 9 | Straight Decode | The built-in decoder reproduces source sounds and sound-effects precisely. No DSP effect is applied in this program. | |
| Enhanced Mode | This program ideally simulates the multi-surround speaker systems of the 35-mm film theaters. Dolby Pro Logic decoding, Dolby Digital decoding or DTS decoding and digital sound field processing create precise effects without altering the original sound orientation. The surround effects produced by this sound field wrap around the viewer naturally from the back to the left and right, and toward the screen. | ||
Straight Decode
This unit is equipped with various precise decoders;
- Dolby Digital/DTS decoder for multi-channel reproduction of the original sound
- Dolby Pro Logic/Pro Logic II decoder for multi-channel reproduction of 2-channel sources
Select any of the Straight Decode modes in Program 9 (except for the sub-program "Enhanced") to use any of these decoders for reproducing the original sound without any sound effects added. In this case, no DSP effect is applied and the DSP indicator turns off.
Note
- When playing a monaural source with a CINEMA DSP program, the source signal is directed to the center channel, and the front and surround speakers output effect sounds.
Sound field effects
The 6-channel soundtracks found on 70-mm film produce precise sound field localization and rich, deep sound without using matrix processing. This unit's MOVIE THEATER programs provide the same quality of sound and sound localization that 6-channel soundtracks do. The built-in Dolby Digital or DTS decoder brings the professional-quality sound designed for movie theaters into your home. With this unit's MOVIE THEATER programs, you can use Dolby Digital or DTS technology to recreate a dynamic sound that gives you the feeling of being in a public theater.
■Dolby Digital/DTS + DSP sound field effect
These programs use YAMAHA's tri-field DSP processing on each of the Dolby Digital or DTS signals for the front, left surround, and right surround channels. This processing enables this unit to reproduce the immense sound field and surround expression of a Dolby Digital-or DTS-equipped movie theater without sacrificing the clear separation of all channels.
■Dolby Digital/DTS + Matrix 6.1 + DSP sound field effect
These programs provide you with the maximum experience of the spacious surround effects by adding an extra surround back DSP sound field created from the virtual surround back speaker.
■Dolby Pro Logic + DSP sound field effect
Most movie material has 4-channel (left, center, right, and surround) sound information encoded by Dolby Surround matrix processing and stored on the left and right tracks. These signals are processed by the Dolby Pro Logic decoder. The MOVIE THEATER programs are designed to recreate the spaciousness and delicate nuances of sound that tend to be lost in the encoding and decoding processes.
■Dolby Pro Logic II
Dolby Pro Logic II decodes Dolby Surround software into 5 discrete full-range channels (3 channels in front and 2 channels in surround). There are 2 modes; MOVIE for movies and MUSIC for 2-channel audio sources.
TUNING
There are 2 methods of tuning; automatic and manual. Automatic tuning is effective when station signals are strong and there is no interference.
Automatic tuning
1 Press INPUT / (TUNER on the remote control) to select TUNER as the input source.
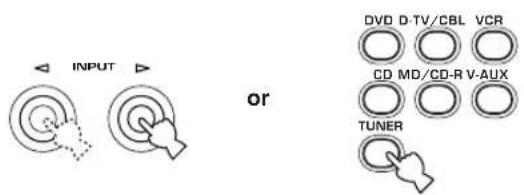
Front panel Remote control
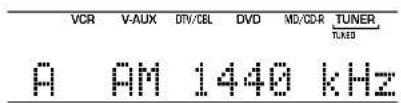
2 Press FM/AM to select the reception band. "FM" or "AM" appears on the front panel display.


3 Press Tuning Mode (AUTO/MAN'L MONO) so that the "AUTO" indicator lights up on the front panel display.


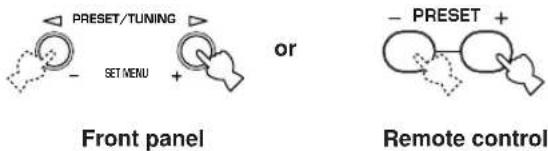
If the colon (:) appears on the front panel display, tuning is not possible. Press PRESET/TUNING (EDIT) to turn it off.

4 Press PRESET/TUNING < / > once to begin automatic tuning.
Press to tune in to a higher frequency, or press to tune in to a lower frequency.
When the unit is tuned in to a station, the "TUNED" indicator lights up and the frequency of the station received is shown on the front panel display.
Manual tuning
If the signal from the station you are trying to select is weak, tune in to it manually.
1 Select TUNER and the reception band following steps 1 and 2 described in "Automatic tuning" at left.
2 Press TUNING MODE (AUTO/MAN'L MONO) until the "AUTO" indicator disappears from the front panel display.


If the colon () appears on the front panel display, press PRESET/TUNING (EDIT) to turn it off.

3 Press PRESET/TUNING to tune in to the desired station manually.

Hold down the button to continue searching.
Note
- Manually tuning in to an FM station will automatically change the reception mode to monaural to increase the signal quality.
Presetting stations
Automatically presetting FM stations You can use the automatic preset tuning feature to store FM stations. This function enables the unit to automatically tune in to FM stations with strong signals, and to store up to 40 (8 stations in 5 groups, A1 through E8) of those stations in order. You can then recall any preset station easily by selecting the preset number.
1 Press FM/AM to select the FM band.


FM
2 Press TUNING MODE (AUTO/MAN'L MONO) until the "AUTO" indicator lights up on the front panel display.


AUTO Lights up
3 Press and hold MEMORY (MAN'L/AUTO FM) for more than 3 seconds.
The preset number, the "MEMORY" and "AUTO" indicators flash. After about 5 seconds, automatic presetting starts from the frequency currently displayed and proceeds toward the higher frequencies.
When automatic preset tuning is completed, the front panel display shows the frequency of the last preset station.
Notes
- Any stored station data existing under a preset number is cleared when you store a new station under that preset number.
- If the number of the received stations does not reach 40 (E8), automatic preset tuning has automatically stopped after searching all stations.
- Only FM stations with sufficient signal strength are stored automatically by automatic preset tuning. If the station you want to store is weak in signal strength, tune in to it manually in the monaural mode, and store it by following the procedure described in "Manually presetting stations" on page 33.
Automatic preset tuning options
You can select the preset number from which this unit will store FM stations and/or begin tuning toward lower frequencies.
After pressing MEMORY in step 3:
1 Press A/B/C/D/E, then PRESET/TUNING < / > to select the preset number under which the first station will be stored. Automatic preset tuning will stop when stations have all been stored up to E8.
2 Press PRESET/TUNING (EDIT) to turn off the colon (:) and then press PRESET/TUNING < to begin tuning toward lower frequencies.
Memory back-up
The memory back-up circuit prevents the stored data from being lost even if this unit is set in the standby mode, the power cord is disconnected from the AC outlet, or the power supply is temporarily cut due to power failure. However, if the power is cut for more than one week, the preset stations may be cleared. If so, store the stations again by using the presetting station methods.
Manually presetting stations
You can store up to 40 stations (8 stations x 5 groups) manually.
1 Tune in to a station.
See page 31 for tuning instructions.
When tuned in to a station, the front panel display shows the frequency of the station received.
2 Press MEMORY (MAN'L/AUTO FM).
The "MEMORY" indicator flashes for about 5 seconds.

3 Press A/B/C/D/E repeatedly to select a preset station group (A to E) while the "MEMORY" indicator is flashing.
The group letter appears. Check that the colon (·) is showing on the front panel display.

4 Press PRESET/TUNING to select a preset station number (1 to 8) while the "MEMORY" indicator is flashing.
Press to select a higher preset station number. Press to select a lower preset station number.

5 Press MEMORY (MAN'L/AUTO FM) on the front panel while the "MEMORY" indicator is flashing.
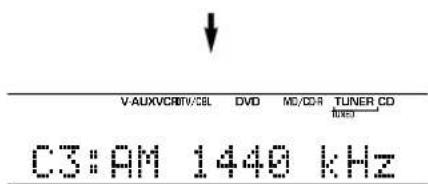
The station band and frequency appear on the front panel display with the preset group and number you have selected.
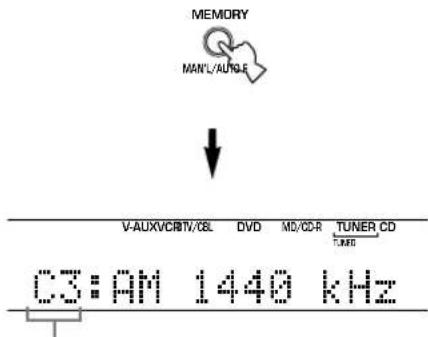
Shows the displayed station has been stored as C3.
6 Repeat steps 1 to 5 to store other stations.
Notes
- Any stored station data existing under a preset number is cleared when you store a new station under that preset number.
- The reception mode (stereo or monaural) is stored along with the station frequency.
Selecting preset stations
You can tune any desired station simply by selecting the preset station number under which it was stored.
1 Press A/B/C/D/E (A/B/C/D/E on the remote control) to select the preset station group.
The preset group letter appears on the front panel display and changes each time you press A/B/C/D/E.

Front panel


Remote control
2 Press PRESET/TUNING / (PRESET- 1+ on the remote control) to select a preset station number (1 to 8).
The preset group and number appear on the front panel display along with the station band, frequency and the "TUNED" indicator lights up.
Exchanging preset stations
You can exchange the assignment of two preset stations with each other. The example below describes the procedure for exchanging preset station "E1" with "A5".
1 Select preset station "E1" using A/B/C/D/E and PRESET/TUNING /
See "Selecting preset stations" at left.
2 Press and hold PRESET/TUNING (EDIT) for more than 3 seconds.
"E1" and the "MEMORY" indicator flash on the front panel display.

3 Select preset station "A5" using A/B/C/D/E and PRESET/TUNING /
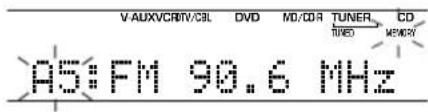
"A5" and the "MEMORY" indicator flash on the front panel display.
4 Press PRESET/TUNING (EDIT) again.
The stations stored at the two preset assignments are exchanged.

Shows the exchange of stations has been completed.
RECEIVING RDS STATIONS
RDS (Radio Data System) is a data transmission system used by FM stations in many countries.
RDS data contains a variety of information such as PS (Program Service name), PTY (Program Type), RT (Radio Text), CT (Clock Time), EON (Enhanced Other Networks), and others.
Description of RDS data
This unit can receive, PS, PTY, RT, CT, and EON data when tuned to stations broadcasting RDS.
■PS (Program Service name) mode:
The name of the RDS station being received is displayed.
■PTY (Program Type) mode:
There are 15 program types used to classify RDS stations.
| NEWS | News |
| AFFAIRS | Current affairs |
| INFO | General information |
| SPORT | Sports |
| EDUCATE | Education |
| DRAMA | Drama |
| CULTURE | Culture |
| SCIENCE | Science |
| VARIED | Light entertainment |
| POP M | Pops |
| ROCK M | Rock |
| M.O.R. M | Middle-of-the-road music (easy-listening) |
| LIGHT M | Light classics |
| CLASSICS | Serious classics |
| OTHER M | Other music |
RT (Radio Text) mode:
Information about the program (such as the title of the song, name of the singer, etc.) on the RDS station being received is displayed using a maximum of 64 alphanumeric characters, including the umlaut symbol. Any other characters used in RT data are displayed with under-bars.
CT (Clock Time) mode:
The current time is displayed and updated every minute. "CT WAIT" may appear if the data is accidentally cut off.
■EON (Enhanced Other Networks):
Refer to the following page.
Changing the RDS mode
This unit provides four modes for displaying RDS data. The PS, PTY, RT and/or CT mode indicators that correspond to the RDS data services offered by the station light up on the front panel display when an RDS station is being received. Press RDS MODE/FREQ repeatedly to cycle the display through the RDS data offered by the transmitting station in the order shown below.
Notes
- Do not press RDS MODE/FREQ when an RDS station is being received until one or more RDS mode indicators light up on the front panel display. You cannot change the mode if you press this button prior to this. This is because this unit has not finished receiving all of the RDS data on the station.
- RDS data not offered by the station cannot be selected.
- This unit cannot utilize the RDS data service if the signal received is not strong enough. In particular, the RT mode requires a large amount of data, so it is possible that the RT mode may not be displayed even if other RDS modes (PS, PTY, etc.) are displayed.
- Sometimes, RDS data cannot be received in poor reception conditions. If this is the case, press TUNING MODE so that the "AUTO" indicator disappears from the front panel display. Although this will change the reception mode to monoaural, RDS data may be displayed when you change the display to RDS mode.
- If the signal strength is weakened by external interference during the reception of an RDS station, the RDS data service may cut off suddenly and "...WAIT" will appear on the front panel display.
PTY SEEK function
If you select the desired program type, the unit automatically searches all preset RDS stations that are broadcasting a program of the required type.
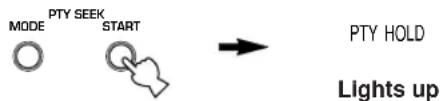
1 Press PTY SEEK MODE to set the unit in PTY SEEK mode.
The program type of the station the unit is currently receiving, or "NEWS" flashes on the front panel display.

Flashes
2 Press PRESET/TUNING / to select the desired program type.
The selected program type appears on the front panel display.

3 Press PTY SEEK START to begin searching all preset RDS stations.
The selected program type flashes and the "PTY HOLD" indicator lights up on the front panel display while the unit is searching for stations.
- The unit will stop searching if a station that is broadcasting a program of the required type is found.
- If the station found is not the desired one, press PTY SEEK START again. The unit begins searching for another station that is broadcasting a program of the same type.
■To cancel this function
Press PTY SEEK MODE twice.
EON function
This function uses the EON data service on the RDS station network. If you select the desired program type (NEWS, INFO, AFFAIRS or SPORT), the unit automatically searches for all preset RDS stations that are scheduled to broadcast a program of the required type and switches from the station being currently received to the new station when the broadcast starts.
Note
- This function can only be used when an RDS station that offers the EON data service is being received. When the unit is tuned to such a station, the "EON" indicator lights up on the front panel display.
1 Check that the "EON" indicator lights up on the front panel display.
If the "EON" indicator does not light up, tune in to another RDS station so that the "EON" indicator lights up.
2 Press EON repeatedly to select the desired program type (NEWS, INFO, AFFAIRS or SPORT).
The selected program type name appears on the front panel display.

- If a preset RDS station of the selected program type starts broadcasting, the unit will automatically switch from the program being currently received to that program. (EON indicator flashes.)
- When broadcasting of the required program ends, the unit returns to the previous station (or another program on the same station).
■To cancel this function
Press EON repeatedly until the program type name disappears from the front panel display.
SLEEP TIMER
Use this feature to automatically set this unit in the standby mode after a certain amount of time. The sleep timer is useful when you are going to sleep while this unit is playing or recording a source.
The sleep timer can only be set with the remote control.

- By connecting a commercially available timer to this unit, you can also set a wake-up timer. Refer to the operation instructions of the timer.
Setting the sleep timer
1 Select a source and start playback on the source component.
2 Press SLEEP repeatedly to set the amount of time.
Each time you press SLEEP, the front panel display changes as shown below. The SLEEP indicator flashes while switching the amount of time for sleep timer.

SLEEP

3 The "SLEEP" indicator lights up on the front panel display after the sleep timer has been set.

Canceling the sleep timer
Press SLEEP repeatedly until "SLEEP OFF" appears on the front panel display.
After a few seconds, "SLEEP OFF" disappears, and the "SLEEP" indicator goes off.


SLEEP OFF

The sleep timer setting can also be canceled by pressing POWER on the remote control (or STANDBY/ON on the front panel) to set this unit to the standby mode.
RECORDING
Recording adjustments and other operations are performed on other recording components. Refer to the operation instructions for these components for details on their operation.
Notes
- Do a test recording before you start an actual recording.
- When this unit is set in the standby mode, you cannot record between other components connected to this unit.
- The setting of TONE CONTROL, VOLUME, "SP LEVEL" (page 20) and programs does not affect the recorded material.
- A source connected to the 6CH INPUT jacks of this unit cannot be recorded.
- A given input source is not output on the same REC OUT channel. (For example, the signal input from VCR 1 IN is not output on VCR 1 OUT.)
- Check the copyright laws in your country to record from records, CDs, radio, etc. Recording of copyrighted material may infringe copyright laws.
If you playback a video source that uses scrambled or encoded signals to prevent it from being dubbed, the picture itself may be disturbed due to those signals.
1 Turn on the power of this unit and all connected components.
2 Select the source component you want to record from.
Front panel Remote control
3 Start playback (or select a broadcast station) on the source component.
4 Start recording on the recording component.
SET MENU
You can set the following parameters on the set menu to obtain a better sound from the unit. Change the settings to reflect the needs of your listening environment.
Set menu list
The set menus are divided by use and function into the 4 categories listed here.
■BASIC MENU
The BASIC MENU contains the basic parameters that you must set before using this unit. It consists of the following menus. See pages 18-20 for a detailed explanation.
1 SETUP
2 SP LEVEL (Speaker level)
■SOUND MENU
The SOUND MENU contains parameters for altering sound output. It consists of the following menus that you can use to alter the quality and tone of the sound output by the system.
1 SPEAKER SET
2 SP DISTANCE (Speaker distance)
3 LFE LEVEL (Low frequency effect level)
4 D. RANGE (Dynamic range)
5 CENTER GEQ (Center graphic equalizer)
6 HP TONE CTRL (Headphone tone control)
INPUT MENU
The INPUT MENU contains parameters concerned with signal input. It consists of the following menus that you can use to change the assignment of input jacks.
1 I/O ASSIGN
2 INPUT MODE
■OPTION MENU
This is a supplementary set up menu provided for your convenience. It consists of the following menus that you can use to change display brightness, protect existing settings, and perform other non-essential functions.
1 DISPLAY SET
2 MEM. GUARD
3 AUDIO MUTE
- In the descriptions for each item from the following page, the default setting is indicated in bold.
Adjusting the items on the set menu
Use the remote control to make adjustments.

- You can change set menu parameters while the unit is reproducing sound.
- You can use NEXT and SET MENU +/- on the front panel to change these settings, if the unit is not set to TUNER mode. Press NEXT to select the category or field you wish to change, and SET MENU +/- to change the parameters.
Note
- You cannot change some set menu parameters while the unit is in night listening mode.
1 Press SET MENU to enter the set menu.
SET MENU

2 Press / repeatedly to select the desired menu.


3 Press - / + to enter the selected menu.

4 Press / repeatedly to select the item you want to adjust.


- By pressing SET MENU repeatedly, you can select items in the same order as when pressing .
5 Press - / + once to enter the setup mode of the selected item.
The last setting you adjusted appears on the front panel display.
Depending on the menu item, press / to select a sub item.


6 Press - / + repeatedly to change the menu item setting.

7 Press / repeatedly until the menu disappears.


Memory back-up
The memory back-up circuit prevents the stored data from being lost even if this unit is in standby mode. However, if the power cord is disconnected from the AC outlet, or the power supply is cut for more than one week, the stored data will be lost. If this happens, adjust the items again.
The BASIC and SOUND menus
The "BASIC" menu allows you to easily set the "SOUND 1 SPEAKER SET" and "SOUND 2 SP DISTANCE" parameters. It is not necessary to reset any of the parameters in the "BASIC" menu, but you can access more detailed parameters in the "SOUND" menu if you wish.
Note
After altering parameters in the "SOUND" menu, if you select "BASIC 1 SETUP" and then select "SET", the parameters from the "SOUND" menu alter in response to any changes you make in "BASIC 1 SETUP". Do not enter the "BASIC 1 SETUP" menu unless you wish to change these settings. If you accidentally enter the "BASIC 1 SETUP" menu, select CANCEL to return to the "BASIC" menu. (page 19)
SOUND 1 SPEAKER SET
-speaker mode settings)
Use this feature to select suitable output modes for your speaker configuration.
Note
- Some menu item settings have no effect when the unit is reproducing a source with a digital signal sampling frequency greater than 48kHz .
1A CENTER (center speaker mode)
If you add a center speaker to your speaker configuration, this unit can provide better dialog localization for several listeners and superior synchronization of sound and images.
Choices: LRG (large), SML (small), NON (none)
LRG
Select this if you have a large center speaker. The unit directs the entire range of the center channel signal to the center speaker.
SML
Select this if you have a small center speaker. The unit directs the low-frequency signals (90 Hz and below) of the center channel to the speakers selected with "1D BASS".
NON
Select this if you do not have a center speaker. The unit directs all of the center channel signal to the front left and right speakers.
■1B FRONT (front speaker mode)
Choices: LRG (large), SML (small)
LRG
Select this if you have large front speakers. The unit directs the entire range of the front left and right channel signals to the front left and right speakers.
SML
Select this if you have small front speakers. The unit directs the low-frequency signals (90Hz and below) of the front channel to the speakers selected with "1D BASS".
1C SURROUND LR (surround speaker mode)
Choices: LRG (large), SML (small), NON (none)
LRG
Select this if you have large surround left and right speakers. The entire range of the surround channel signal is directed to the surround left and right speakers.
SML
Select this if you have small surround left and right speakers. The low-frequency signals (90Hz and below) of the surround channel are directed to the speakers selected with "1D BASS".
NON
Select this if you do not have surround speakers. This unit is set in the virtual CINEMA DSP mode when you select NON for "1C SURROUND LR".
■1D BASS (bass out mode)
LFE signals carry low-frequency effects when this unit decodes a Dolby Digital or DTS signal. The Low-frequency signals can be directed to both front left and right speakers, and to the subwoofer (subwoofer can be used for both stereo reproduction and the sound field program).
Choices: SWFR (subwoofer), FRONT, BOTH
SWFR
Select SWFR if you connect a subwoofer. LFE and low-frequency signals from other channels are directed to the subwoofer according to the speaker settings.
FRONT
Select FRONT if you do not use a subwoofer. LFE and low-frequency signals from other channels are directed to the front speakers according to the speaker settings (even if you have previously set the front speakers to SMALL).
BOTH
Select BOTH if you connect a subwoofer and you want to output low-frequency signals from front channels to both front speakers and the subwoofer. LFE and low-frequency signals from other channels are directed to the subwoofer according to the speaker settings.
Use this function to reinforce low-frequency signals using the subwoofer when playing back source such as CDs.
Note
- When you select FRONT for "1D BASS", the unit directs the low-frequency signals (90Hz and below) of the front channel to the front speakers even if you select SMALL for the front speaker mode.
SOUND 2 SP DISTANCE (speaker distance)
Use this feature to manually input the distance of each speaker and adjust the delay applied to respective channel. Ideally, each speaker should be the same distance from the main listening position. However, this is not possible in most home situations. Thus, a certain amount of delay must be applied to the sound from each speaker so that all sound will arrive at the listening position at the same time.
1 Press / to select "UNIT".
2 Press - / + to select the unit "meters" or "feet" to be used in setting.
3 Press / to select a speaker.
4 Press - / + to set the distance. Press ^+ for higher values and - for lower values.
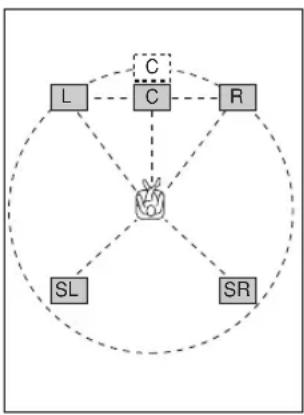
Setting by "meters"
Control range: 0.3 to 24.00m (for front L/R, center, surround L/R)
Initial settings: 3.00m (for front L / R , center, surround L/R)
Setting by "feet"
Control range: 1 to 80 ft (for front L/R, center, surround L/R)
Initial settings: 10.0 ft (for front L/R, center, surround L/R)
Note
- No delay will be set if you set the same distance for the front L/R and center, or the surround L/R.
SOUND 3 LFE LEVEL
Use to adjust the output level of the LFE (low-frequency effect) channel according to the capacity of your subwoofer or headphones. The LFE channel carries low-frequency special effects which are only added to certain scenes. This setting is effective only when this unit decodes Dolby Digital or DTS signals.
Control range:
SPEAKER -20 to 0 dB
HEADPHONE.....-20 to 0 dB
Initial setting: 0 dB
1 Press / to select the item to be adjusted.
2 Press - to adjust the LFE level.
Note
- Adjust the LFE level according to the capacity of your subwoofer or headphones.
SOUND 4 D. RANGE (dynamic range)
Use this feature to adjust the dynamic range. This setting is effective only when the unit is decoding Dolby Digital signals.
Choices: MAX, STD (standard), MIN (minimum)
MAX
Select MAX for feature films.
STD
Select STD for general use.
MIN
Select MIN for listening to sources at low volume levels.
SOUND 5 CENTER GEQ (center graphic equalizer)
Use this feature to adjust the built-in 5-band graphic equalizer so that the center speaker tonal quality matches that of the left and right front speakers. You can select the 100Hz 300Hz 1kHz 3kHz or 10kHz frequencies. Control range (dB): -6 to +6 Initial setting: 0 dB for 5-band
1 Press to select a higher frequency and to select a lower frequency.
2 Press - / + to adjust the level of that frequency.
Note
- You can monitor the center speaker sound while adjusting this parameter by using the test tone. Press TEST before starting the foregoing procedure. Once you begin this procedure, the test tone remains at the center speaker and you can hear how the sound changes as you adjust the various frequency levels. To stop the test tone, press TEST.
SOUND 6 HP TONE CTRL (headphone tone control)
Use this feature to adjust the level of the bass and treble when you are using headphones.
Control range (dB):
BASS -6 to +3
TRBL (treble) -6 to +3
Initial setting:
BASS 0 dB
TRBL 0 dB
INPUT 1 I/O ASSIGN (input/output assignment)
You can assign jacks according to the component to be used if this unit's initial settings do not correspond to your needs. Change the following parameters to reassign the respective jacks and effectively connect more components. Once the inputs have been reassigned, you can select the corresponding component by using INPUT < / > on the front panel or the input selector buttons on the remote control.
■1A (1) for OPTICAL INPUT jack
Choices: (1) DVD, MD/CD-R, CD, VCR, V-AUX, DTV/CBL
■1A (2) for OPTICAL INPUT jack
Choices: (2) DTV/CBL, DVD, MD/CD-R, CD, VCR, V-AUX
■1B (3) for COAXIAL INPUT jack
Choices: (3) CD, VCR, V-AUX, DTV/CBL, DVD, MD/CD-R
Note
- When you connect a component to both the COAXIAL and OPTICAL jacks, priority is given to the input signals from the COAXIAL jack.
INPUT 2 INPUT MODE (initial input mode)
Use this feature to designate the input mode for sources connected to the DIGITAL INPUT jacks when you turn on this unit (see page 23 for details about the input mode).
Choices: AUTO, LAST
AUTO
Select this setting to allow the unit to automatically detect the type of input signal and select the appropriate input mode.
LAST
Select this setting to set this unit to automatically select the last input mode used for the respective sources.
OPTION 1 DISPLAY SET
■DIMMER
Use this to adjust the brightness of the front panel display.
Control range: -4 to 0
OPTION 2 MEM. GUARD (memory guard)
Use this feature to prevent accidental changes to sound field program parameter values and other system settings.
Choices: ON, OFF
Select ON to protect:
Sound field program parameters
- All SET MENU items
- All speaker levels
When MEMORY GUARD is set to ON, you cannot use the test tone or select any other SET MENU items.
OPTION 3 AUDIO MUTE
Use to adjust how much the mute function reduces the output volume.
Choices: MUTE, -50dB, -20dB
MUTE
Completely halts all output of sound.
-50dB
Reduces the volume of the present sound output by 50dB.
-20dB
Reduces the volume of the present sound output by 20dB.
SETTING THE SPEAKER LEVELS
Adjusting the speaker levels during playback
You can adjust the output level of each speaker while listening to sound playback.

Using the test tone
Use the test tone to set speaker levels so that the volume from each speaker is identical when heard from your listening position.
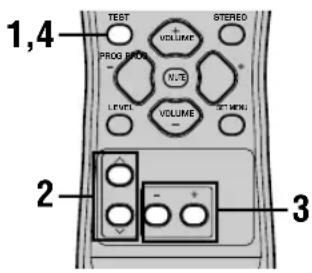
1 Press LEVEL repeatedly to select the speaker you want to adjust.
The unit cycles through the speakers in the following order each time you press LEVEL:
FRONT L CENTER FRONT R
SUR R. (surround R) SUR L. (surround L)
SWFR (subwoofer) ....

- Pressing LEVEL once opens the level display. Press / at this time to select a speaker.
2 Press - / + to adjust the speaker output level.
- The center and surround speakers can be adjusted by a maximum of -10dB +10dB .
- The front speakers and subwoofer can be adjusted by a maximum of -20dB 0dB .
Notes
- You cannot adjust speaker levels if the "SOUND 1 SPEAKER SET" parameter in the set menu is set to NON.
- You cannot adjust the subwoofer level if the "1D BASS" parameter in "SOUND 1 SPEAKER SET" in the set menu is set to FRONT.
- If you use LEVEL to adjust speaker levels, the speaker levels you previously set with the test tone will also change.
- If you select "BASIC 1 SETUP" in the set menu and then select "SET", speaker levels change in response to any changes you make in "BASIC 1 SETUP".
1 Press TEST.
The unit will output a test tone.
2 Press / repeatedly to select a speaker to adjust.
Each time you press , the unit will cycle through the speakers in the following order:
TEST LEFT (front L) TEST CENTER (center) TEST RIGHT (front R) TEST SUR R. (surround R) TEST SUR L. (surround L) TEST
SUBWOOFER (subwoofer)→....
(Press to cycle the speakers in the reverse order.)
3 Press - / + to adjust the speaker output level.
4 Press TEST when you have completed your adjustment.
The test tone halts.
Notes
- You cannot enter test mode if headphones are connected to the PHONES jack. Remove the headphones from the PHONES jack.
- You cannot adjust speaker volumes if the "SOUND 1 SPEAKER SET" parameter on the set menu is set to NON.
- You cannot adjust the subwoofer level if the "1D BASS" parameter in "SOUND 1 SPEAKER SET" in the set menu is set to FRONT.
- If you select "BASIC 1 SETUP" in the set menu and then select "SET", speaker levels change in response to any changes you make in "BASIC 1 SETUP".

- Depending on the source the unit is reproducing, the speaker levels set with the test tone may not be to your liking. If this is the case, adjust the speaker levels while listening to the source.
EDITING SOUND FIELD PARAMETERS
Changing parameter settings
The initial sound field program settings will provide you with an excellent listening experience as they are. But you can create an original listening environment by altering some settings.
Note
- The editable parameters vary depending on the sound field program you select. Refer to the explanation for the parameter.
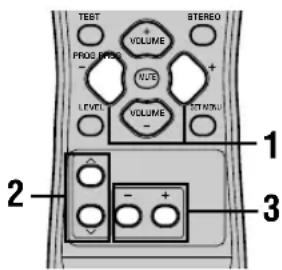
1 Select the sound field program you want to adjust.

2 Press / to select the parameters.


3 Press - / + to change the parameter value.

4 Repeat steps 1 - 3 if you wish to alter other parameters.
Note
- You cannot change parameter values when "OPTION 2 MEM. GUARD" is set to "ON". If you want to change the parameter values, set "OPTION 2 MEM. GUARD" to "OFF" (see page 44).
Sound field parameter descriptions
You can adjust the values of certain digital sound field parameters so the sound fields are recreated accurately in your listening room. Not all of the following parameters are found in every program.
DSP LEVEL
Function: This parameter adjusts the level of all the DSP effect sounds within a narrow range.
Description: Depending on the acoustics of your listening room, you may want to increase or decrease the DSP effect level relative to the level of the direct sound.
Control Range: -6 dB to +3 dB
■DELAY
Function: This parameter changes the apparent distance from the source sound by adjusting the delay between the direct sound and the first reflection heard by the listener.
Description: The smaller the value, the closer the sound source seems to the listener. The larger the value, the farther it seems. For a small room, set to a small value. For a large room, set to a large value.
Control range: 1-99 msec
For 5ch Stereo
Function: These parameters adjust the volume level for each channel in 5-channel stereo mode.
Control range: 0 to 100%
CT LEVEL (Center level)
■SL LEVEL (Surround left level)
■SR LEVEL (Surround right level)
For PRO LOGIC II Music
■PANORAMA
Function: Extends the front stereo image to include the surround speakers for a wraparound effect.
Choices: OFF/ON, initial setting is OFF.
DIMENSION
Function: Gradually adjusts the sound field either towards the front or towards the rear.
Control range: -3 (towards the rear) to +3 (towards the front), initial setting is STD (standard).
CTWIDTH (Center width)
Function: Adjusts the center image from all three front speakers to varying degrees. A larger value adjusts the center image towards the front left and right speakers.
Control range: 0 (center channel sound is output only from center speaker) to 7 (center channel sound is output only from front left and right speakers), initial setting is 3.
TROUBLESHOOTING
Refer to the chart below when this unit does not function properly. If the problem you are experiencing is not listed below or if the instruction below does not help, set this unit to standby mode, disconnect the power cord, and contact the nearest authorized YAMAHA dealer or service center.
■General
| Problem | Cause | Remedy | Refer to page |
| This unit falls to turn on when STANDBY/ON (or POWER) is pressed, or enters in standby mode soon after the power has been turned on. | The power cord is not connected or the plug is not completely inserted. | Connect the power cord firmly. | - |
| The protection circuitry has been activated. | Make sure all speaker wire connections on this unit and on all speakers are secure and that the wire for each connection is not touching anything other than its respective connection. | 15 - 16 | |
| This unit has been exposed to a strong external electric shock (such as lightning and strong static electricity). | Set this unit in standby mode, disconnect the power cord, plug it back in after 30 seconds, then use it normally. | - | |
| No sound. | Incorrect input or output cable connections. | Connect the cables properly. If the problem persists, the cables may be defective. | 9 - 16 |
| No appropriate input source is selected. | Select an appropriate input source with INPUT </▷ or 6CH INPUT (or the input selector buttons). | 21 | |
| The speaker connections are not secure. | Secure the connections. | 15 - 16 | |
| The front speakers to be used have not been selected properly. | Select the proper front speakers with SPEAKERS A/B/OFF. | 21 | |
| The volume is turned down. | Turn up the volume. | 22 | |
| The sound is muted. | Press MUTE or any operation buttons of this unit to cancel a mute and adjust the volume. | - | |
| The signals this unit cannot reproduce are being received from a source component e.g.: a CD-ROM. | Play a source whose signals this unit can reproduce. | - | |
| The sound suddenly goes off. | The protection circuitry has been activated because of a short circuit, etc. | Check that the speaker wires are not touching each other and then turn the unit back on. | - |
| The sleep timer has turned the unit off. | Turn on the power, and play the source again. | - | |
| The sound is muted. | Press MUTE or any operation buttons on the unit to cancel a mute and adjust the volume. | - | |
| No sound / weak sound from particular speakers. | Incorrect cable connections. | Connect the cables properly. If the problem persists, the cables may be defective. | 15 |
| No sound from the effect speakers. | The sound effect is switched off. | Press STEREO to turn it on. | - |
| A Dolby Surround, Dolby Digital or DTS decoding program is being used with material not encoded with Dolby Surround, Dolby Digital or DTS. | Select another sound field program. | 24 - 29 | |
| A digital signal with a sampling frequency of greater than 48 kHz is input to this unit. | - | ||
| No sound from the center speaker. | The output level of the center speaker is set to minimum. | Raise the level of the center speaker. | 45 |
| “SOUND 1A CENTER” on the set menu is set to NON. | Select the appropriate mode for your center speaker. | 40 | |
| One of the HiFi DSP programs (1 to 4) has been selected (except for 5ch Stereo). | Select another sound field program. | 24-29 | |
| The source encoded with a Dolby Digital or DTS signal does not have a center channel signal. | - | ||
| No sound from the surround speakers. | The output level of the surround speakers is set to minimum. | Raise the output level of the surround speakers. | 45 |
| A monaural source is being played with program 9. | Select another sound field program. | 24-29 | |
| No sound from the subwoofer. | “SOUND 1D BASS” on the set menu is set to FRONT when a Dolby Digital or DTS signal is being played. | Select SWFR or BOTH. | 41 |
| “SOUND 1D BASS” on the set menu is set to SWFR or FRONT when a 2-channel source is being played. | Select BOTH. | 41 | |
| The source does not contain low bass signals (90 Hz and below). | - | ||
| Poor bass reproduction. | “SOUND 1D BASS” on the set menu is set to SWFR or BOTH and your system does not include a subwoofer. | Select FRONT. | 41 |
| The speaker mode settings (front, center or surround) on the set menu does not match your speaker configuration. | Select the appropriate position for each speaker based on the size of the speakers in your configuration. | 40-41 | |
| A “humming” sound can be heard. | Incorrect cable connections. | Firmly connect the audio plugs. If the problem persists, the cables may be defective. | - |
| The volume level cannot be increased, or the sound is distorted. | The component connected to the OUT (REC) jacks of this unit is turned off. | Turn on the power to the component. | - |
| The sound effect cannot be recorded. | It is not possible to record the sound effect with a recording component. | - | |
| The sound field parameters and some other settings on the unit cannot be changed. | “OPTION 2 MEM. GUARD” in the SET MENU is set to ON. | Select OFF. | - |
| The unit does not operate properly. | The internal microcomputer has been frozen by an external electric shock (such as lightning or excessive static electricity) or by a power supply with low voltage. | Disconnect the AC power cord from the outlet and then plug it in again after about 30 seconds. | - |
| “CHECK SP WIRES” appears on the front panel display. | The speaker cables are short circuited. | Make sure all speaker cables are connected correctly. | - |
TROUBLESHOOTING
| Problem | Cause | Remedy | Refer to page |
| There is noise interference from digital or high-frequency equipment, or this unit. | This unit is too close to the digital or high-frequency equipment. | Move this unit further away from such equipment. | - |
| The unit suddenly turns into standby mode. | The internal temperature has become too high and the overheat protection circuitry has been activated. | Wait until the unit cools down and then turn it back on. | - |
■Tuner
| Problem | Cause | Remedy | Refer to page | |
| FM | FM stereo reception is noisy. | The characteristics of FM stereo broadcasts may cause this problem when the transmitter is too far away or the antenna input is poor. | Check the antenna connections.Try using a high-quality directional FM antenna. | 12 |
| Use the manual tuning method. | 31 | |||
| There is distortion, and clear reception cannot be obtained even with a good FM antenna. | There is multipath interference. | Adjust the antenna position to eliminate multipath interference. | - | |
| The desired station cannot be tuned in with the automatic tuning method. | The station is too weak. | Use a high-quality directional FM antenna. | - | |
| Use the manual tuning method. | 31 | |||
| Previously preset stations can no longer be tuned in. | The unit has been disconnected for a long period. | Preset the stations again. | 32 | |
| AM | The desired station cannot be tuned in with the automatic tuning method. | The signal is weak or the antenna connections are loose. | Tighten the AM loop antenna connections and orient it for best reception. | - |
| Use the manual tuning method. | 31 | |||
| There are continuous crackling and hissing noises. | Noises result from lightning, fluorescent lamps, motors, thermostats and other electrical equipment. | Use an outdoor antenna and a ground wire.This will help somewhat, but it is difficult to eliminate all noise. | 12 | |
| There are buzzing and whining noises (especially in the evening). | A TV set is being used nearby. | Move this unit away from the TV. | - | |
Remote control
| Problem | Cause | Remedy | Refer to page |
| The remote control does not work nor function properly. | Wrong distance or angle. | The remote control will function within a maximum range of 6 m (20 feet) and no more than 30 degrees off-axis from the front panel. | 7 |
| Direct sunlight or lighting (from an inverter type of fluorescent lamp, etc.) is striking the remote control sensor of this unit. | Reposition this unit. | - | |
| The batteries are weak. | Replace all batteries. | 3 |
Resetting the factory presets
If you want to reset all of your unit's parameters for any reason, do the following. This procedure completely resets ALL parameters, including the SET MENU, level and tuner presets.
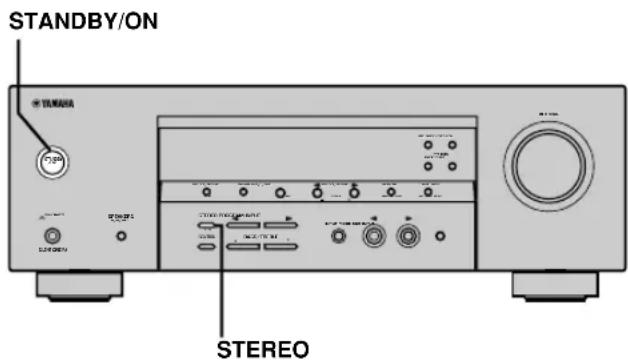
Be sure this unit is in standby mode.
1 Hold down STEREO on the front panel and press STANDBY/ON.
"FACTORY PRESET" appears in the front panel display.
中
To cancel the initialization procedure without making any changes, press STANDBY/ON.
2 Press STEREO to select the desired setting.
Reset To reset the unit to its factory presets.
Cancel To cancel without making any changes.
3 Press STANDBY/ON to confirm your selection.
If you selected "Reset", the unit is reset to its factory presets and switches to standby mode.
If you selected "Cancel", the unit switches to standby mode and nothing is reset.
GLOSSARY
CINEMA DSP
Since the Dolby Surround and DTS systems were originally designed for use in movie theaters, their effect is best felt in a theater having many speakers and designed for acoustic effects. Since home conditions, such as room size, wall material, number of speakers, and so on, can differ so widely, it's inevitable that there are differences in the sound heard as well. Based on a wealth of actually measured data, YAMAHA CINEMA DSP uses YAMAHA original sound field technology to combine Dolby Pro Logic, Dolby Digital and DTS systems to provide the visual and audio experience of movie theater in the listening room of your own home.
■Dolby Digital
Dolby Digital is a digital surround sound system that gives you completely independent multi-channel audio. With 3 front channels (left, center, and right), and 2 surround stereo channels, Dolby Digital provides 5 full-range audio channels. With an additional channel especially for bass effects, called LFE (low frequency effect), the system has a total of 5.1 channels (LFE is counted as 0.1 channel).
By using 2-channel stereo for the surround speakers, more accurate moving sound effects and surround sound environment are possible than with Dolby Surround. The wide dynamic range (from maximum to minimum volume) reproduced by the 5 full-range channels and the precise sound orientation generated using digital sound processing provide listeners with previously unheard of excitement and realism.
With this unit, any sound environment from monaural up to a 5.1-channel configuration can be freely selected for your enjoyment.
■Dolby Pro Logic II
Dolby Pro Logic II is an improved technique used to decode vast numbers of existing Dolby Surround software. This new technology enables a discrete 5-channel playback with 2 front left and right channels, 1 center channel, and 2 surround left and right channels (instead of only 1 surround channel for conventional Pro Logic technology). A music mode is also available for 2-channel sources in addition to the movie mode.
■Dolby Surround
Dolby Surround uses a 4 channel analog recording system to reproduce realistic and dynamic sound effects: 2 front left and right channels (stereo), a center channel for dialog (monaural), and a surround channel for special sound effects (monaural). The surround channel reproduces sound within a narrow frequency range. Dolby Surround is widely used with nearly all video tapes and laser discs, and in many TV and cable broadcasts as well. The Dolby Pro Logic decoder built into this unit employs a digital signal processing system that automatically stabilizes the volume on each channel to enhance moving sound effects and directionality.
DTS (Digital Theater Systems) Digital Surround
DTS digital surround was developed to replace the analog soundtracks of movies with a 6-channel digital sound track, and is now rapidly gaining popularity in movie theaters around the world. Digital Theater Systems Inc. has developed a home theater system so that you can enjoy the depth of sound and natural spatial representation of DTS digital surround in your home. This system produces practically distortion-free 6-channel sound (technically, a left, right and center channels, 2 surround channels, plus an LFE 0.1 channel as a subwoofer, for a total of 5.1 channels).
■LFE 0.1 channel
This channel is for the reproduction of low bass signals. The frequency range for this channel is 20Hz to 120Hz . This channel is counted as 0.1 because it only enforces a low frequency range compared to the full-range reproduced by the other 5 channels in a Dolby Digital or DTS 5.1 channel systems.
■Matrix 6.1
The unit incorporates Matrix 6.1 decoder for Dolby Digital and DTS multi-channel software that enables 6.1-channel reproduction by adding the surround back channel to existing 5.1-channel format. (The surround back channel is created from surround left and right channels, and outputted from virtual surround back speaker.) With this additional channel, you can experience more dynamic and realistic moving sound especially with scenes with "fly-over" and "fly-around" effects.
PCM (Linear PCM)
Linear PCM is a signal format under which an analog audio signal is digitized, recorded and transmitted without using any compression. This is used as a method of recording CDs and DVD audio. The PCM system uses a technique for sampling the size of the analog signal per very small unit of time. Standing for "pulse code modulation", the analog signal is encoded as pulses and then modulated for recording.
Sampling frequency and number of quantized bits
When digitizing an analog audio signal, the number of times the signal is sampled per second is called the sampling frequency, while the degree of fineness when converting the sound level into a numeric value is called the number of quantized bits.
The range of rates that can be played back is determined based on the sampling rate, while the dynamic range representing the sound level difference is determined by the number of quantized bits. In principle, the higher the sampling frequency, the wider the range of frequencies that can be played back, and the higher the number of quantized bits, the more finely the sound level can be reproduced.
■SILENT CINEMA
YAMAHA has developed a natural, realistic sound effect DSP algorithm for headphones.
Parameters for headphones have been set for each sound field so that accurate representations of all the sound field programs can be enjoyed using headphones.
■Virtual CINEMA DSP
YAMAHA has developed a virtual CINEMA DSP algorithm that allows you to enjoy DSP sound field surround effects even without any surround speakers by using virtual surround speakers.
It is even possible to enjoy virtual CINEMA DSP using a minimal 2-speaker system that does not include a center speaker.
SPECIFICATIONS
AUDIO SECTION
Minimum RMS Output Power for Front, Center, Surround 1 kHz, 0.1% THD, 6Ω
[U.S.A. and Canada models] 100 W
[Other models] 90 W
1 kHz, 0.7% THD, 6 Ω
[U.S.A.and Canada models] 103 W
[Other models] 93 W
DIN Standard Output Power
[Europe model]
1 kHz, 0.7% THD, 4 Ω 105 W
Maximum Power
[China, Korea and General models]
1 kHz, 10% THD, 6 Ω 110 W
- Dynamic Power (THF, 6/4/2 Ω)
[U.S.A. and Canada models] 110/140/170 W
[Other models] 105/135/165 W
Frequency Response
CD, etc. to Front L/R 10 Hz to 100 kHz, -3 dB
Total Harmonic Distortion
1 kHz, 50 W, 6 Ω, Front L/R 0.06%
- Signal to Noise Ratio (IHF-A Network)
CD (250 mV, shorted) to Front L/R, Effect Off ... ≥ 100 dB
- Residual Noise (IHF-A Network)
Front L/R 150 V or less
- Channel Separation (1 kHz/10 kHz)
CD, etc. (5.1 kΩ terminated) to Front L/R ... ≥60 dB/≥45 dB
- Tone Control (Front L/R)
BASS Boost/Cut ± 10dB / 100Hz
TREBLE Boost/Cut. ± 10dB / 20kHz
-
Phones Output 400 mV/470 Ω
-
Input Sensitivity
CD, etc. 200 mV/47 kΩ
6CH INPUT 200 mV/47 kΩ
Output Level
OUT (REC) 200 mV/1.2 kΩ
OUTPUT SUBWOOFER 4 V/1.2 kΩ
VIDEO SECTION
Video Signal Type NTSC or PAL
Composite Video Signal Level 1 Vp-p/75Ω
- Signal to Noise Ratio. ≥ 50 dB
Frequency Response (MONITOR OUT)
5 Hz to 10 MHz, -3 dB
FM SECTION
Tuning Range
[U.S.A. and Canada models] 87.5 to 107.9 MHz
[Other models] 87.50 to 108.00 MHz
- 50 dB Quieting Sensitivity (IHF, 100% mod.)
Mono/Stereo 2.0 V (17.3 dBf)/25 V (39.2 dBf)
- Selectivity (400 kHz) 70 dB
- Signal to Noise Ratio (IHF)
Mono/Stereo 76 dB/70 dB
- Harmonic Distortion (1 kHz)
Mono/Stereo 0.2%/0.3%
- Stereo Separation (1 kHz) 42 dB
Frequency Response 20 Hz to 15 kHz +0.5, -2 dB
AM SECTION
Tuning Range 530/531 to 1710/1611 kHz
- Usable Sensitivity 300 μV/m
GENERAL
Power Supply
[U.S.A. and Canada models] AC 120 V/60 Hz
[Australia model] AC 240 V/50 Hz
[U.K., and Europe models] AC 230 V/50 Hz
[Korea model] AC 220 V/60 Hz
[China model] AC 220 V/50 Hz
[Asia and General models] ... AC 110-120 V/220-240 V, 50/60 Hz
Power Consumption
[U.S.A.and Canada models] 240 W/320 VA
[Other models] 240 W
- Standby Power Consumption
[U.S.A. and Canada models] 0.5 W
[Other models] 0.7 W
Dimension (W x H x D) 435 x 151 x 315 mm
(17-1/8" x 5-15/16" x 12-7/16")
Weight 9 kg (19 lbs 13 oz)
*Specifications are subject to change without notice.
ATTENTION: VEUILLEZ LIRE CE QUI SUIT AVANT D'UTILISER L'APPAREIL.
Corrections CINEMA DSP 28
Effets de champ sonore 30
SYNTONISEUR 31
RECEPTION DES STATIONS RDS 35
OPTION 1 DISPLAY SET 44
OPTION 2 MEM. GUARD (secours de la mémoire) ... 44
OPTION 3 AUDIO MUTE 44
REGLAGE DU NIVEAU DE SORTIE DES
ENCEINTES 45
Prises DIGITAL INPUT
(pages 9 à 11)
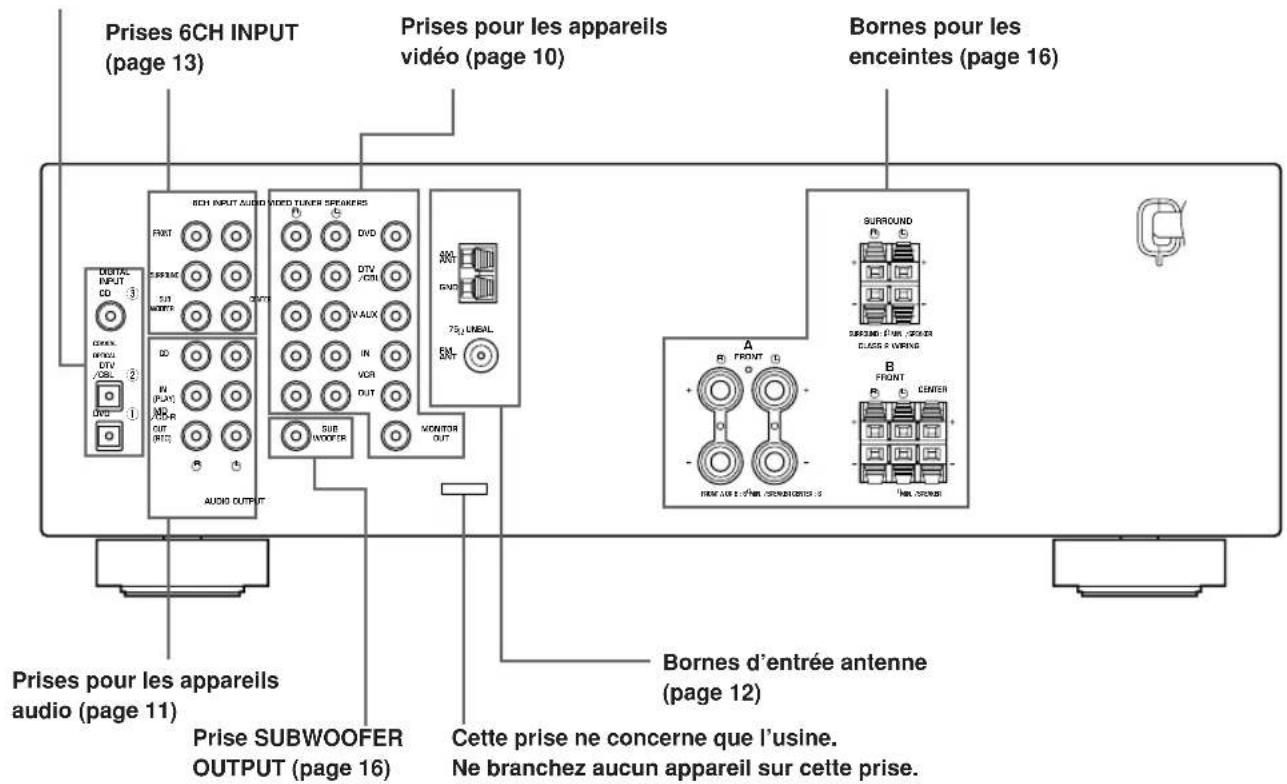
Corrections CINEMA DSP
Straight Decode (Decodage direct)
RéCEPTION DES STATIONS RDS
OPTION 1 DISPLAY SET
■DIMMER
■DTS (Digital Theater Systems) Digital Surround
DIGITAL-SOUNDFELD-PROZESSOR (DSP) 27
DIGITAL-SOUNDFELD-PROZESSOR (DSP)
CINEMA DSP Programme
■EON-Modus (Enhanced Other Networks):
OPTION 1 DISPLAY SET
DIMMER
CTWIDTH (Center-Breite)
DTS (Digital Theater Systems) Digital Surround
1 kHz, 0.1% Klrr, 6Ω
1 kHz, 0.7% Klirr, 6Ω
1 kHz, 0.7% Klirr, 4 Ω 105 W
(DSP-DIGITAL SOUND FIELD
PROCESSING) 27
Forstalefvorladludfaltar. 27
DSP-program for HiFi 27
BIOGRAF DSP (CINEMA DSP). 28
Ljuddesignen for CINEMA DSP 28
CINEMA DSP-program 28
Ljudfaltseffekt 30
STATIONSINSTÄLLNING 31
OPTION 1 DISPLAY SET 44
OPTION 2 MEM. GUARD (minneslasning) 44
OPTION 3 AUDIO MUTE 44
INSTALLING AV HOGTALARNIVA 45
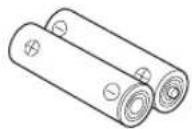
Batterier (2) (AA, R06, UM-3)
AM-ramantenn

INPUT MODE
Frontpanelen

DSP-program for HiFi
Ljuddesignen for CINEMA DSP
■Manuell stationsinstalling
OPTION 1 DISPLAY SET
DIMMER (ljusdampning)
■DTS (Digital Theater Systems) Digital Surround
1 kHz, 0.7% THD, 4 Ω 105 W
Maximal uteffekt
1 kHz, 10% THD, 6 Ω 110 W
Dynamisk effekt (IHF) 6/4/2 Ω
Total harmonisk distorsion
- Kanalseparation (1 kHz/10 kHz)
CD (5,1k ansluten) till vänster/högerfram. ≥ 60~dB / ≥ 45~dB
DIGITALE GELUIDSVELD BEWERKING
(DSP) 27
CINEMA DSPprogramma's 28
Geluidsveldeffecten 30
TUNER 31
OPTION 1 DISPLAY SET 44
OPTION 2 MEM. GUARD (geheugen vergrendcling) 44
OPTION 3 AUDIO MUTE 44
INSTellenEN VAN DE WEERGAVENIVEAUS
VAN DE LUIDSPREKERS 45
DIGITALE GELUIDSVELD BEWERKING (DSP)
CINEMA DSP programma's
OPTION 1 DISPLAY SET
■DIMMER
■DTS (Digital Theater Systems) Digital Surround
DONOHHTENbHAR MHΦOPMALI
PEDAKTIPOBAHNEIAPAMETPOB 3BYKOBOIIOJI 46 I3meHHeHn HAcTpoE npaMeTPOB 46 Oncanhe npametpoB 3BykoBOro noJr 47 BO3MOXHbIE HENCnPABHOCTN CnOCObI INX YCTPAHEHIN 48 C6poc HactpoeB nCxOHNbIe yCTaHOBKn 51 CINPABOUYHK 52 TEXHUNECKNE XAPAKTEPNCTUKN 3aHnKa KpbuKa
OCOBEHHOCTN
BcTpoeHHbI 5-KaHaJIbHbI yCnInTeJb
MnHmAbHoe nCXoJuee 3JeKtpueeckoe HapjKeHne RMS (0.1% THD (obüee HeJIINHeHoe nCKaXeHne), 1 KΓι, 6 OM) [MoJen nJIa CLJA n KaHaIbI] ΦoHTaHbHbI:100 BaTT + 100 BaTT LeHTpaIbHbI:100BaTT Okpykaiooero 3ByaHnA:100 BaTT +100 BaTT [DpyrneMoJeN] ΦρΟΤαJBHbI:90BaTT+90BaTT ZeHTpaHbHb:90BaTT Okpykaioeero 3ByuHa:90BaTT+90BaTT
3BykoBoe none
Декорс Dolby Pro Logic/Dolby Pro Logic II Декор Dolby Digital/Dolby Digital + Matrix 6.1 Декорд.TS/DTS+Matrix6.1 CINEMA DSP: KomboHaTne TexHoiTnYAMAHA DSP n Dolby Pro Logic, Dolby Digital nn DTS BvrtyajnbHcINEMA DSP SILENT CINEMA
YCOBepueHCTBOBaHHbI AM/FM TIOHEP
HacptpoKa CO cnUaHbIM DOCTyNOM INpeDyctaHOBka Do 40 paAnocTaHm ABTomatuecka HAcTpoKa nIpeDyucTaHOBka ФункцязамениMeCTamnпpeДуctaHOBJeHHbIX cTaHcN(PeJaKtIpOBaHne npdeUcyTahOBKn)
Dpyrme xapaKTepeuCTKn
D/A npoeo6pa30BaTeIb cIuΦpoBOrO CnHana Ha aHaNoRoBbI Ha 96 KU/24 6nt MeHIO yCTaHOBKn IJIa ONTUMn3aUNI daHHoro annapata noA Ayuio/BuJeocncTeMy TepaTop TectoBoro ToHaNbHOro CnHana dna o6nerHeHH peryunipOBKn banaHca KOHOK BxOД nIg 6-KaHaJIbHOro BHeuHero DeKoDepa OnTnueckne N KOaKcnaIbHbIe rHe3da cnpoBbIX ayDnO CnHaIOB TaMep cHa
O daHHo HnctpyKuH
-03Haayet COBET BO Bpem 3KcnjlyaTaun. - HeKOTOpbIe onepaunu npabneHn MoryT BblOnHrTcR C nCNoJIb3ObaHnEM KHOJOK OCHOBHoro 6Noka n nyIbTa Dv. B cnyuaX HecooTBeTCTBnH HaMeHOBaHn KHOJOK Ha OCHOBHom 6IOKe n NylbTe Dv, HaMeHOBaHn KHOJKN Ha NyIbTe Dv yka3aHo B CkO6kax. -Даннан ИНСТРУКИЗ ИЗДАHA Do HauHа npOu3BOcTBA.ДиЗaи N TeXHnueCKe XapakTePncTnK MOryT ChactNHy OI3MeHrTbC r C cIeMbIO yIyUWeHn KaYeCTBa, n T.d. B TaKOM cIyuae, annapat Imeet IpeMMyIeCTBO.  DIGITAL PROLOGIC II I3roToBnEHO no IInueH3nn fnpMb Dolby Laboratories. Dol6n,“Dolby”,“Pro Logic”и симьол с довныm “D”-Товарные 3нakи Фпрмы Dolby Laboratories.  1 "DTS" n "DTS Digital Surround" ABJIOCTaapeHCTpnpoBaHHbIMN TOPROBbIMN MapKaMn Digital Theater Systems, Inc. "SILENT CINEMA" ABNIEcTc TopROBm MapKoYAMAHA CORPORATION.
HaHAn KaKke nObl3yeTcIa OMeHa MeCTAm DByx yCTaHOBnEHbIX paDIOCTaHcN.
③ Cencop nylbTa Dy
Pnem CnHaNoB OTo nylbTa Dv.
FM/AM
IpeekJIIOueHne UM n AM dnaHa3oHOB npnema.
5 A/B/C/D/E
Korda daHHbI annapaT haxoNTcB peXmte TIOHEpa, no3BOJnEe TBb6paTb rpynny yCTaHOBN paAnocTaHcN ot A do E.
(NEXT)
Korda daHHbI aannapaT He HaxoHTcB peXIMe TIOHEpa, no3BOJnET Bbl6paTb peXIM MeHIO yCTaHOBKn.
6 DnCnne pOHTaJIbHOI naHeJIn
OTo6paXeHHe INHOpMaun O HaCToRiE M COCToHHn DaHHoro annapata.
7 PRESET/TUNING
PnOTo6paXeHNI BoeToyH (:) Ha Incnnee pOHTaJIbHOI NaHeJIN, N03BOJNeT Bbl6paTb Homep ycTaHOBneHHo CTaHcN 1-8. PnOTcyTCTBmI DBOeToyra () Ha nCnJee pOHTaJIbHOI NaHeJIN, N03BOJNeT Bbl6paTb HaCTOTy HAcTPOKn.
(SET MENU - / +
Korda daHHb annapaT He HaxoHTcB peXmTeHepa, No3BOJareT peryInpoBaTb yCTaHOBKn MeHIO HaCTpoIKN.
MEMORY (MAN'L/AUTO FM)
3anomnHaHne paAnocTaHcHn.
TUNING MODE (AUTO/MAN'L MONO)
IpeekJIIOUeHHe aBtOMaTnueCKoro n pyuHOrO peKIMOB HAcTPOIKN.
10VOLUME
PerynnpOBka ypoBHa 3ByaHnB CEx ayNoKaHaIOB.He BnIeT Ha ypoBeHb OUT (REC).
PHONES (SILENT CINEMA)
I03BOJRAET HACnAunTbcra 3cpeKtAm DSP BO BpEMr IPOCnyuBaHn C NcNoJIb3OBaHnEm HayuHKOB.
SPEAKERS A/B/OFF
Bb6op rpynnbl ppoHTaJIbHbIX KOHOK, NOkNIOUeHHbIX K TepMnHaJAm A nn B. DnA OTKnIOUeHnRA KOHOK, NOBTOpHO HaXkMaIte Ha DaHHyIO KNOpKY n Bb6epuTe OFF.
1STEREO (EFFECT)
IpeeknIOueHne BocnpOn3BeDeHnO 6bUHOro ctepeofoHnueckoro 3ByuHaHnN u 3pOeKTOB DSP. Pn BbIbope STEREO, annapat npOn3BOJNT MkUnpoBaHne Bcex CnHaNoB Dolby Digital n DTS (Kpome KaHaJa Hn3KoAcToTHbIX 3pOeKTOB LFE), a TaKxke 2-KaHaNbHbIX CnHaNoB 6e3 3pOeKTOB 3ByaHnI, C BbIXoDM Ha pOHTaNbHbIe JEBYIO n npaBYIO KOLOHKn.
1CONTROL
IpeeknIOuayet pexmbl ynpaBneHna Bass (Hn3Kne YactOTbl) n Treble (BbICOKne YactOTbl).
15 PROGRAM
Bb6op nporpamM 3ByKOBbIX NOJIe.
BASS/TREBLE -/+
Korda annapat haxoindTcB pexkme ynpabneHnBass/Treble, no3BONReT yBeJIuNBA Tb nnIyMeHbTaB Hn3KNe/BbICOKne YactOTbl. C KaXdbIM HaxaTneM OHOH N3 DaHHbIX KHOJOK, 3ByK MeHReTcC YactOTOn B 2d5. Dnana30h ynpabneHn: oT-10do+10d5.
INPUT MODE
Korda OdnH KOMNOHEHT-NUCTOCHNK NODKLIOUeH K DBYM TINam BXODHBIX RHe3D, N03BONRAET YCTAHOBNBAbT npNOPITET DnA TINOB NocTyNAIOx CNrHaNoB (AUTO, DTS, ANALOG). B Cnyuae, ecn BBi6pHaФyHKcIg 6CH INPUT KaK NCTOCHNK NOCTUAnIOJero CnHAla, yCTaHOBKa npNOPITETA nAayDNIONCTOHKNOB HeBO3MOXHa.
18 INPUT<1/D
Bb6op nCTOuHnKa CnHaJa dIy npocnyuBaHnI nn npocmoTpa.
96CH INPUT
Bb6op ayduonctOuHnka, noklHoueHHoro K rHe3daM 6CH INPUT. Pn Bb6ope daHHoJ cyHKun, npOpntET OTdaetcEi, Yem NO OTHoWeHIO K nCTOuHnKaM, Bb6paHHbIM C NcNoJIb3OBaHneM cyHKun INPUT (nnC nCNOJb3OBaHneM KHOJOK Bb6opa nCTOuHnKa cRHaHa Ha nyIbTe DY). ToIbKO dIa MoJeIeI dIa CoeHHeHHoro KopoJIeBCTBa BeIIKo6pHTaHn n CeBepHO IpnaHnn n EbpOnbl
20RDS MODE/FREQ
Korda annapaT haoDntcB pekIme npneema paAnocTaHnRDS, daHna KhoNka no3BOJareT noopeIHO nepeKIOUOATb peKIM dncJIeHa peKIM PS, peKIM PTY, peKIM RT, peKIM CT (ecIn paAnocTaHnIpeIoCTabJIeT ycnyr RDS) IIN peKIM YacToTbl.
②PTY SEEK MODE
Даннай КНонka NO3ВОЛЯТ yCTaHOBuTb aannapatВ peхи PM TY SEEK.
2PTY SEEK START
IocneToro,KakKeJaembInTNnporpaMMb6bln BbIbpaHbpexKmpePTYSEEK,haxMnte daHHyIO KhoNkyIaHaHaana noncka paAnocTaHun.
23EON
JaHHa KONKa NO3BOJHeT BbI6paTb TnPaanonporpamMbI (NEWS, INFO, AFFAIRS, SPORT) ABTomatuecko HacTpouKn.
IyIbT InCTaHcNoHHOrO ynpaBJeHnA
B daHHOM pa3deJe onncaHbI cyHKuIN KHOJOK ynpaBHeHrynblTa Dv.  1HΦpaKpaChbI n3nyaTeJIb I3daet nHppakpachbIe cIrHaIbI ynpaBneHnra.Bo BpemnncnoJb30BaHnnyIbTa Iy, ydepXnbAte TaHHbI n3NyUaTeJIb HApPabJeHHbIM Ha annapaT. 2KhoNKn Bb6opa nCTouHnKa noctynauoero cnHaJa IpeHa3NaYeHbI nIaBbIbOpa nCTOChnKa nocTynaIOUeO CnHaHa I nIepeKIOUeHn 30HbI ynpaBNeHn. A/B/C/D/E Korda annapaT haoDntcBpeXnme TIOhepa, nO3BOJnEe TBbI6paTb rpynny ycTaHOBKn paAnocTaHcN oT A do E. 4D/DTS BbIbpaet BcTpoeHHbI deKoep Dolby Digital, DTS,Dolby Pro Logic nII Pro Logic II. 6.1/5.1 Bknioaet nIn BbIKnoaet dekoep Dolby Digital + Matrix 6.1 nn DTS ^+ Matrix 6.1. 6TEST BbIOuNT TECTOBBI TOHaJIbHbI CNrHaI dna peryJInpOBNy yPOBHeKoJIOHOK. MUTE Pnirnywaet 3ByuHne. Ira Bo3o6JIeHnI 3ByuHnHa npexKHe ypOBHe rpoMkoCTn, NOBTOpHO Haxmnte DaHHyIO KONKy. LEVEL BbIbupaet KaHAn 3ΦΦeKta KOnOHok dnypeRyIpOBKn. 9PROGRAM-/+ VcnoB3yETcA DnB Bbl6opa nporpamM 3ByKOBbIX noJeI. Cekn MHorOyHKnHOHaJIbHOr KOHTPOJr NcnoB3yeTcIyBb6opa n perynipOBKn npametpoB nporpaMM 3ByKOBbIX NOe nn ycTaHOBOK MeHIO SET MENU. 1 POWER BkIIOUaET nJIn yCTaHaBJIbAeT annapat B peKIM OxNJaHn. 6CHIN BbIbpaetaydnoonctouHk,NOKJIIOueHHbIK rHe3dAm 6CH INPUT. 15 PRESET -/+ BbIbnpaET HOMepa yCTaHOBJeHHbIX paAnocTaHcNtOT 1do8. 14SLEEP YcTaHaBnBaet TaMep cHa.
15NIGHT
YcTaHaBnBaet annapaT Ha pexm HOHOro npocnyuBaHH.
16STEREO
IpeekluoyaET BOCPON3BedeHne 06bIyHoro CTepeofoHNueCKOro 3ByuHaHn I 3cpeKTOB DSP. PnB bIbope STEREO, annapat npOn3BOiNT MmKUnpoBaHnE BcexCnHAnOB Dolby Digital n DTS (KpOME KaHaHa Hn3KOAcTToTHbIX 3cpeKTOB LFE), a TaKxHe 2-KaHaNbHBix CnHAnOB 6e3 3cpeKTOB 3ByuHaHn, C BbIXoDM Ha cpoHTaJIbHbIe JEBYIO n PpaBYIO KOJOhKn.
VOLUME + / -
YBENHnBaETIyMEnbShaetypoBeHb3ByaHa.
SET MENU
BbIbpaet peKm MeHIO yCTaHOKn.
IcnoJb3ObaHne npJbTa DY
NylbT Dy nepeadaet HappaBHeHHbI HfpaKpaChbI Nyu.Bo BpMa nCNoB3OBAHNr, 06Ha3aTeNbHO yDepkNBaTe NylbT DY HaPpaBHeHHbIM pRMO Ha ceHCop Dy Ha annapate. 
O6paueHne c nYnbTom dY
He npolBaTe BoDy nnn dpyrne BnDbj XnkocTe Ha npbl T y. - Y6eperaTe nybT Dv ot naeHna. He octabnnte nnn xpaHnte npIbT yB Mectax CO CneDyIOUIMN ycNOBnMn: - C BblcOKoB BLaXHOCTbH, HApPIMep, BO3JIe BaHHOJ C NOBbIeHHoTempeatypoH,HaPIMep, BO3Je 06OrpeBaTeTn nn neu C OueHb Hn3KoTemnpaTypoi -B3aIbJIeHHbIX MeCTax
Dncnnen fpoontalbHO naheJIi

(TonbKO mIeMoei CoeHHeHHoro KopoJIeBCTBa BeNKo6pTuHaHn N CeBepHoN UpHaHm N EbpOnbl)
MHOFOyHKUHOHaBbHbMHΦoMaOnHHbIaCnJIe OTo6paKaet HaMeHOBaHne npOrpAmMbI 3ByKOBOrIO NOJI IN DpyryIO IHOpMaUIO npi HAcTPOKe IIN N3MeHeHNYcTaHOBOK. 12 HdkauaSPA B BbICBeuNbBaetcIgOB03HaueHnBb16paHHoAkyCTnueckO cnCTemblpOHTaJIbHbIXKoHOK.EcIN Bb16paHbI o6e akyCTnueckne CNTembl, BBICBeuNbAOTC O6e HnDnKaun. 15 INHnkaaN NIGHT 3aropaetcn npy yctaHOBe annapata Ha peKIM HooHOro npocJyunBaHa. 14 NHdNkaqua SLEEP 3aropaETcBCE TO Bpemn, NOKA BKIOeH TaMep cHa. 15 NHHkaqH HiFi DSP 3aropaetc npn BbIbpe nporpammbi 3BykoBOro nona HiFi DSP. 16 INHdkauCINEMA DSP 3aropaetc npBbIbOpepnporpammb3BykoBOr noJIN CINEMA DSP. HdNkaTUNED 3aropaeTcnpnHactpKe DaHHoro annapaTaHa paanocTaHcIO. 18 Hdkaa STEREO 3aropaetcBO BPmnpnmaanapatom CnIbHoro CnHana CTpeofoHHueckoiHM paioctaunpnpBkIOeHHOH INHnkaun "AUTO" 19 Nndkauna MEMORY Muraet dIra 06o3haueHnra TORO, YTO paAnocTaHnra MoKET 6bITb COxpaHeHa. 20 Nndkaun LFE 3aropaeTcK, KOrIa Noctynaoiun CnHaN codepknt CnHaL LFE. HnKauKaHaJa NcToHnKa NoctyNaOe Ro CnHaJa HnDnKaaCooTBeCTBvOuX 3ByKOBbIX KaHaIOB 3arpaOTc npBocnpOn3BeDeHNuΦpOBOr CnHaJa OT NcToHnKa. 2 HndkaRDS (TolboKO dIe MoedeJe dIe CoedHnHO KoponeBCTBa BeIinKo6pTaHmN CeBepHoN UpranDmN EbpOnbl) 3aropaetc(-OTc)HaHMeHOBaHHe(-Hn)HOpMaunCnCTEmB RDS, npedocabIReMoCtAnuEe CnCTEmB RDS, npHnMaemOn annapatOM Ha daHHbIMoMEHT. INdkaEON 3aropaeTc npnpneMe paanocTaHmCnCTembl RDS, npedoctabJIOUe HfOpMaunHOHbIe ycnyr nCnCTembl EON. INdkaPTY HOLD 3aropaeTc BO BpEMn noncka paanocTaHmB pexime PTY SEEK.
3 INHnKaTOp HayuHnKOB
3aropaeTc npn noKluoyehn HayuHKnOB B rHe3do nHaHayuHKnOB.
4 INHdkaTOp nCTOuHNka 3ByKObORo CnRHaJa
BbIeJnEET KypCopOM NCTOCHNK 3ByKOBOrO CnHana, nCNoJIb3yEmbI Ha DaHHbIM MOMHT.
5 INHdkaTop 3BykoBoro noJr
3aropaeTcIy 603HaehnA kTINBbIX 3ByKOBbIX nOei DSP. 3BykoBoe noJe DSP c 3dpeKToM npncyTCTB JeBoe 3BykoBoe none DSP Okpykaiozero 3ByHaHnI  cTo cLywaTeTnI lpaBoe 3BykoBoe none DSP OkpykaUoero bByaHn TbINOBoe 3BykoBoe none DSP OkpykaHcero 3ByaHn
6 HdkauH AUTO
O6o3HaayeT COCTOaHHe DaHHoro aannapata B aBTOMaTuYeCKOM pexKIme HaCTpoiKn.
7 HdNkaun MUTE
Miraet BO Bpemn AKTNBn3aunn cyHKnnpnrnyeHn 3ByaHn MUTE.
⑧ INHdNkaun ypoBn VOLUME
OTopaxkaet ypoBeHrpoMkoCTn.
9 Nndnkaqna PCM
3aRopaetcBOBpMaBOCnpOn3BedeHnDaHHbIM aannapatom UppoBbix aydnocnHaIOB PCM (MOyIyIeNmMyJbChoro KoJa).
10 INHdkauVA VIRTUAL
3aropaeTcBOBpemHICNOJIb30BaHHBnpyaIbHOyHKuIN CINEMA DSP.
ПОДКЛЮЧЕНЯ
Ipeed nodkJIOUeHneM KOMNOHeHTOB
IPEDOCTEPEXEHNE
He noKlnHouaTe DaHHb annapat n pyrne KOMNOHEHTbI K NCTOCHNKAM 3NeKTPo3Hepnn Do Tex nop, noka He npOn3BeJeHb BCE NOKJIIOUeHnmaXy KOMNHOENTamn. -6eIntecbB npabINbHOM NOKIOueHn JEBORO KaHana (L), npaBOrKaHana (R), " + " (KpaCHbI) n "-(Yephbl).DnHEKOtOpbIX KOMNOHeHTOB C pa3HbIMn HAMMeHOBaHNMA rHe3d Tpe6yETcnpimHeHne dpynx MeToOB NOKJIIOueHn. DnA NOKJIIOueHn KOMNOHeTOB K DaHHOMy aannapaty, pyKOBoIDCTByITecb INHCTpyKUHmN NO 3KCNlyatauNN K KaXDOMY KOMNOHeHTy. -Поссе Вынолинь Сбс NOДКЛIOЧЕН, y6eNTecb eue pa3, YTO NOДКЛIOчЕнЯ 6bln npOu3BeDEHbI HADJIeXaUIM O6pa3OM. HaHMeHOBaHHrHe3D COOTBETCTBYIOT HAnMeHOBaHNrMa Ha CeJIeKTope NCTOCHNkA NOCTyNaIOUeRO CnHana.
BbINOHeHne NOdKIOUeHn K uΦpOBbIM rHe3dAm
Ha daHHom annapaTe nmeOTc uNpOBBie rHe3da dIra npAMoNEpeDaunuPpOBbIX CnHaNoB NO KoAKCnAIBHOMY NNI ONTko-BOJOKOHOMy Ka6JIIO. UnpOBbie rHe3da MOrYT 6bITb NCNOJB3OBAHbl dJI BXoNbIx 6ntOBx noTOkOB PCM, Dolby Digital n DTS. IIN pOcnyuBaHHM HOROKaHaJIbHbx ayINO3aAnCe c DVD n T.D. c eΦpeKTamn DSP, NCNoJIb3yIne UnpOBbie nOdkJIOueHH. O6a UnpOBbx BXoHBIX rHe3da COBmectIMbl c UnpOBbIMn CnHaIIc c qactOTOI CTPObIPOBAHn 96 kI.
PpmeaHne
「He3do OPTICAL daHHoro annapata cooTBeTcTByeT cTaHdapTy EIA. DaHHb annapat moKeT pa60taB He npaBnIbHo npn nCNOb3ObaHHn ONTko-BONOKOHoro Ka6eJI, He COoTBeTcTByIOUe rTaHdapTy EIA.
Гнэзда DIGITAL INPUT
(ctp. 9-11) 
KoJohKn OkpykaIoUeO 3ByuHaHn (SR n SL)
KoONKn OKpykaIOUero 3ByaHnN IcNOJb3yIOTc IIN 3ByKObbIX CNHaIOB 3OeKTOB IN OKpykaIOUero 3ByaHn. PaMecTnte DaHHbie KoONKn 3a MeCTOM CnyuataTe, CJIerKa HAnpaNB IIueByIO YAcTb BO BHyTpEHIO CTOPOHY, PpINOHNB IN pnpmePHo Ha 1.8 M OT ypOBH NOJa.
Ca6ByΦep
IcnoJb3OBAHHe c6Bypepa, Hapmep, YAMAHA Active Servo Processing Subwoofer System, NO3BOJREr He TOJIbKO yCUNITb HN3KoayactOTHbIE CNHaJI bIO60r OIN BCEx KaHANOB, HO TaKKe BOCnpon3BOIDtB C BbICOKO ToHOCTBIO KaHAI LFE (HN3KoayctOTHbI 3ΦΦeKT), CoepKaunCBA nporpamMax DTS INl Dolby Digital. PacNoLoXeHne ca6Bypepa He TAK BaxHO, TAK KAK HN3KoayactOTHbIM 3BYK He ABJAEcR BbICOKOHApABNeHHbIM. Ho BCE-Ke IyUwe 6yDet paCNOJOxNTb c6Bypep BO3Ne ppoHTaNBbIX KOHOHK. dIny UMeHbWeHnO TpaXeHn HN3KoayactOTHbIX 3BYKOBbIX CnIHAOB Ha CTehax, Cnerka NoBepHnte IN HappaBBTe c6Bypep No HAnpaBJeHHIO ueHTpa KOMHaTBI.
IOnkNIOUeHnKoJIOHOK
Y6eIntecb B npabunbHOM NOKJIIOueHn JEBORO KAHAJa (L), npaboro KaHaja (R), " + " (KpaChb) n " - " (YeHb). 3ByaHne OT KOJHOK 6yET OTCyTCTBOBaTb npn HnnpaBnBHO BblONHeHHOM NOKJIIOueHn, N 3ByaHne 6yET HeecTeCTBeHHbIM C OTCyTCTBnEM Hn3Knx YactOT npn HecO6JIIOJeHHn POJrphocTn npn NOKJIIOueHn KOJHOK.
PPEOCTEPEXEHNE
- IMpeJaHc KOJIOHOK DOJKeH COOTBETCTBOBaTb IMpeJaHCy, yKa3aHHOMy Ha TBIOBOI NaHeJI NaHHORO annapaTa. -До NOДКЛЮЧЕпг KОLOHOK yбeДNTecь,чTO ПИТане ДaHHORO aannapapa OTKJIIOUChEO. - Hen30InpoBaHHbIe npOBoJa KOJIOHOK He DoJIxHbI cOpnKacatbcr dpyr C dpYROM, INIc IIO6oMteTALIIueCKo YactbIO daHHoro annapata. 3TO MOKeT pINBecT N K NOIOMKe daHHORO aannapata W/ INI KJIOHOK. - IVcnoIb3yIte KOLOHKn C MaHHTHnTHbIM 3KpaHOM. Ecnn DaHHbTn Tn KONOHOK BCE-Je Bbl3bIaET NOMEXn npu IcnoJIb3OBAHnC 3KpaHOM, pa3MeCTnte KOLOHKn Ha HeKOToPOM paCCTOHnOT 3KpaHa.
Поdkлючени К Термуншам FRONT A SPEAKERS
Ka6eJIb KOJIOHOK Ha cAmOM DeJe COCTOnT IN3 DByX CnapeHHbIX IN3OJIINPOBaHHbIX nPoBOIDOB, PRAOM dpyrC dpYROM. NObepxHOCTb OndHO rpoBOda OTJNUaEcTcA CBETOM INN IMeet dpyryo fOpMy, HApPIMep, OH MOKeT 6bITb OTMeueH NOLOCKAMn, Hape3amn INN bUgPamn. PoJKnIOChte npOBd C NoIocKAMn (Hape3amn, T.D.) K TePMHaJaM“+” (KpaCHbI) DaHHoro annapaTa n KOJOnHKn. POnKJIIOChte rJaIKn npOBd K TePMHaJaM“-” (UeRhbI).  10MM  Kpachny: IIOJOKHTeJIbHbI(+) Uepnbl: OTpnuataIbHbI (-)  "Банановы" wTeKKeP (3a ncknueHem moeJe dna CoeHHHO KoponebcTaBBeNko6pTuHaHmN CebepHo UpnaHn, EbpnoNn A3nn) 1 ydaIInTe npImepH0 10 MM n3OJauNHOro CIOHa KOHcax KaXdORo npOBoda Ka6eJIa KOJOhKn. 2 CkpyTnte OTKpbItbIe KOHcbl npoBOIOB Ka6eIa IJI npEDoTbpaueHn KopoTKoro 3amblKaHn. 3 OtkpyTne roJOBky. 4 BcTaBbTe OINn IpoBoD HeN3OJInpOBaHHoH YaCTbIO B OTKpbITbI INPOMExyTOK C BHyTpENHe NCTOpOHbI KaXdORo TepMNHaJa. 5 3akpyTte roIobky dIy 3akpenJIeHnI npoBOda.
CoeHHeHcNcNoJb3OBAHnEm“6aHaHOBoB" BUNK
(3a nckHneHem moJeI Jn CoeHHeHHoro KoponeBCTBa BeNKo6pTaHn n CeBepHoI UpnaHnn, EbpOnbl A3nn) Chayana 3aKpyTne rONOBky, 3aTeM BotKNHTe KOHHeKTOp "6aHaHOBoB" BUNIKn C 3aJHeN CTOpOHbI COOTBeTCTByIOUeTO TepMNHaJa.
Подключени К Термуналам FRONT B, CENTER u SURROUND SPEAKERS
Kpachny: IIOJOKHTeHbHbI(+) Uephbl: OTpuataIbHbI(-)  1 HaKmTe n OTKpOte 3aueIky. 2 BCTaBBTe OROJENHHyO qAcTb npOBoJa B OTKpbITbI npOMexyTOK KaXdORo TepMHaHa. 3 Otnyctnte 3aueJky dny 3akpenneHn npoBOda. 
TepmHaJIbI FRONT SPEAKERS
K DaHHbIM KOHOMKAM MOXHO NOKNIQUHTB DO DByX aKyCTnuecknx CnCTem. Pn NcNOJb3OBAHN TOJbKO ODHo aKyCTnuecko CnCTembl, NOKNIQUHTe ee K TepMHaIam FRONT A nIu FRONT B.
OCHOBHbIE CNCTEMHbIE HACTPOIKN
MeHIO "BASIC" no3BOJnREt JERKO yCTaHOBnTB HeKOTOpbIe OCHOBhIe npaMeTpbl MeHIO "SOUND". EcN Bbl XOTnte 6oJIee TOUHO cKOHcHmrgpnpOBaTb aIInapaT dIN H COOTBeTCTBnA ONpeJeHNHO CpeDe npocnyuBaHH, BMEcTO MeHIO "BASIC", BOCNoJIb3yIteCb 6OJIe DeTaJIbHbIM npaMeTpamn B MeHIO "SOUND" (CMOTpnte cTp. 40). IV3meHHeNe IIO6bIX npaMeTpOB B MeHIO BASIC npnbEdet K cbpccy Bcex npaMeTpOB B MeHIO "SOUND".
Использоване OCHOВHoro MeHIO
IperynpoBOK,BOcnoJb3yTeCb nybTOM y. Haxkab KhoNky SPEAKERS A/B/OFF Ha pOHTaJIbHOI naHeJI, BbIepeITe XeJaEMbIe pOHTaJIbHbIe KOJOhKn. - Y6eIITecb, YTO HayuHnKn OTKJIIOueHbI OT daHHoro annapaata.  1 HaXmTe KhONky SET MENU. HnDnKaun "BASIC MENU" noRbntcHa nncnnee pOHTaIbHOI naHenn.  BASIC MENU EcnBmecTo HnDnKaun "BASIC MENU"Ha dncnlee ppoHTaIbHOJ naneN OTo6paXaeTc dpyraHnDnKaun, HaxnMaTe KhONKy SET MENU Do NoRBeHnA HnDnKaun "BASIC MENU". 2 Haxmam KhoNky-/+, BoiDnte B MeHIO BASIC. Hnkaun“1SETUP"noBntcnaIncnnee pOHTaJIbHOI naHei.   1SETUP 3 Haxkab KhoNky / nepeKJIouaTe DnCIIneI Do Tex Nop, NOKa He NOBNTcH HAcTPOkA, KOtopyIO Bbl XOTnte N3MeHtB.
1 SETUP
IpeHa3HaueH IINa HAcTpoeK KOHOK UcNInTeA DnA COOTBeCTBnA pa3Mepy NcNoB3yeMoKOMHaTbI. Boone NOpO6Ho, CMoTpNe "HAcTpoiKa annapaTa IAn COOTBeCTBnA aKyCTnueckOn CnCTeme" Ha cTp.20.
2 SP LEVEL
IpeHa3HaueHДЯperyInpOBKn yPoBnI rpoMocTn KOJHOK.BoJee noDpo6Ho, cmOTpnte "SP LEVEL" Ha cTp. 20. 4 Haxmam KhONky -/+,BBeNTe XeJaembl peKm HacTpoKn. 5 OtperynpyuTe HacTpoKu annapaTa JIa COOTBeTCTBnCpeI npocnyuBaHna. 6 Haxnma KhONky / , BbIaTe n3 MeHIO Hactpoek. IinCnne ppoNTaJIbHOI nAHeIN I3MeHReTcB CLeDyUoSeI NocLeIOBaTeNbHOCTN:   BbIXOД ↑ BASIC ↓↑ SOUND ↓↑ INPUT ↓↑ OPTION ↓ BbIXoD
IocJeIOBATEJIbHOCTb DeIcTBnO OCHOBHOTo MeHIO
 -ПоссеизмениnapametpoB"1SETUP",3aHOBOOTperynpyTe ypoBHn rpoMkoCTN KOHOHOK B "2 SP LEVEL". -Bolee noopobno o meHNo "SOUND", "INPUT" n "OPTION", cmoptne ctp. 39 - 44.
Hacrtpoika annapata Дд COOTBETCTBЯ akyctneecKo CnCTeMe
CneIyHnCTpyKuHNHXKe,ycTaHOBnTe yPoBeHb BbIXOa ycNITeJIa IpNBEdEHnB COOTBeTCTBnpepa KOMHaTbI N KOLOHOK. Haxmaite KhoNkY /V IJIa nepeKJIuOHeHH npaMeTpOB 1-4, IN KhoNkY-/+IJIa N3MeHeHH YcTaHOBKn npaMeTpA. IcxOHDhie 3aBOIDCKNe yCTaHOBKn OTO6paXeHbl BblJeHnEM.
①ROOM
NapametpbI HacTpoiKn: S, M, L BbI6epnte pa3Mep KOMHaTbI, rDe yCTaHOBJIeHbI KoJOnHKn. rpy6 roBOpR, pa3Mepbl KOMHaTbI OnpdeJIeJIOTc CNeDyIOUIM 6pa3OM: [MoDennnclnCLHa nKaHaDb] S:16x13 cyTOB,200 cyTOB² (4.8 × 4.0 ~M, 20 ~M^2) M:20x16pTyOB,300pTyOB (6.3× 5.0M,30M^2) L:26x19 cyyTOB,450 cyyTOB² (7.9× 5.8M,45M^2) [Дугне модени] S:3.6x2.8M,10M M:4.8x4.0M,20M L:6.3x5.0M,30M
②SUBWOOFER
NapaMeTpbl NaCtpoiKn: YES, NONE Pn HauuHc6Byepa B CnCTeMe, BbIbepntE YES, NNN NONE npn erO oTcyTCTBn.
③SPEAKERS
NapametpbHaCtpoiKn:2,3,4,5(spk) BbI6epnte KOJIHecTBO NOKJIIOUeHHbIX KOJIOHOK B COOTBeTCTBnC KOHfNpyaueNe KOJHOK. JaHHoe KOJIuHecTBO He BKJIOuaET ca6Byep.
Onu n aBToMaTnuecko npedyctaHOBKn
BbMOXeTe BbIbpaTb HOMep npEynctaHOBKn, C KOTOpO JaHHbI aannapat 6yDet coxpaHrTa YMpaNIOCTaHcIN, N/INn Haayt b HAcTpOy B HAnpAbJeHN Hn3Knx YACTOT. Iocne haxknta KhoKn MEMORY ha Ware 3: 1 HaKmTe KhoNky A/B/C/D/E, 3aTeM, HaxKaB KhoNky PRESET TUNING 1 / 2 , BbIbePte Homep npEynCTaHOBKn DJIa COxpaHeHn NepBOI paAnocTaHcN. ABToMaTneCckA npEynCTaHOBKa npepbBaetcR, KaK ToJIbKO KOJInueCTBO COxpaHeHHbIX paAnocTaHcN IOCTnraET E8. 2 HaKaB KhoNky PRESET/TUNING (EDIT), OTKNoHTe DBoEToUne (:), 3aTeM, HaKaB KhoNky PRESET TUNING <, NaHnTe HacTpOuKy B HappaBHeHn Hn3Knx YactOT.
Pe3epBHaKONNAmATN
Cxema pe3epBHOKoNNnamrN ppeOxpaHReT coXpaHeHHyIO INHΦopMaIIO OT Ncye3HOBeHN, daKe ecnn DaHHbAnnapaY cTaHOBneH napeKIM OXnDaHn, CnIOBOJ Ka6JIb nepemehHOro TOKa OTKJIIOUeHOTp03eTKN, nIN BpeMeHHO ppeBaHO NITaHNe N3-3a OTKIIIOUeHHN 3JeKTPo3Hepn. OdHaKO, ecnn NITaHne ppeBaHO 6OJIee YcH Ma OdHy HeDeHNO, ppeDyCTaHOBHeHbIE CTaHmMOryt 6bITb cTeptbl. B TAKOM cnUyae, ppeDyCTaHOBNTe paINOCTaHcHOBa, NcNoJIb3yR MeTOdbI ppeDyCTaHOBKn.
PpeDyCTaHOBka paMIOCTaHcN BpyHyIO
BblMOKeTe coXpaHnTb do 40 paAnocTaHcN (8 paiaoctaHmB 5 rpynnax) BpyHyIO. 
1 HactpoNTecb Ha paAnocTaHcNIO.
INHCTpyKUHAACPOKe,CMOTpnte Ctp. 31.  Pn HacTpoKe Ha paNIOCTaHcHIO, YAcTOTa npINHMaEMoPaIOCTaHcIMBbICBeHNBaETcHa DaNCJIeE pOHTaIbHOJ NaHeJI.
2 HaxmTe KhONKy MEMORY (MAN'L/ AUTO FM).
OkoI 5ceKyHd Mmraet HnDnKaCnA "MEMORY". 
3 Bo BpemM MrraHn HnDnKaun "MEMORY", NOBTOPO HaXmMa KHOKny A/B/C/D/E, BB6epnte rpynnny npedcytaHOBKn (A-E).
IoBntcO603NaueHne rpynnbl.Y6eNTecb, YTO DBOEToUHe(:) OTo6paKeHo Ha DCnnee fpoHTaJIbHOI NaHeN.  rpynnn npedyctahOBKn
4 Bo Bpem MmraHn HndnKaun "MEMORY", Haxmam KhoNky PRESET TUNING / , BbIbePte Homep npeducTaHOBKn (1-8).
NnBbIbopa6oNbJeroHOMepa npEnyCTaHOBKn,HaXImaIteKHOJky> NnBbIbopaMeHbJeroHOMepa npEnyCTaHOBKn,HaXImaIteKHOJky<1. 
5 Bo Bpem MmraHn HndnkaCmN "MEMORY", haxmnte KhoNky MEMORY (MAN'L/ATO FM) Ha φpoHTaBHOI naHeII.
Iiana30H uactota paadnoctaHun, a TaKKe BbipahHbIe rpynna HOMep npedyctaHOBKn OTo6paKaOTcH Ha dncnnee pOHTaIbHOn naHeN.  OTo6paXeHHa paIIOCTaHcIIa 6bla coXpaHeHa KaK C3.
6 NOBTOPA WARM 1-5, COXPAHNTe OCTaJIbHbIe padnOCTAHcHn.
PnmuMeaHn
-ⅡIb6aHnΦopMaunOpaNocTaHcun,coXpaHeHHoH NOc cyueCTByUcIM HomepOM npedyctaHOBKn, CTnpaeTcpiu coXpaHeHN HOBO paNocTaHcUN Ha TOT-JKe Hoomep. Pexim npema (ctepeoohueckn mmoHooHouHueckn) coxpaHReTcH hapy c yacToOn paAnocTaHun.
BbI6Op npeducTaHOBJIeHHbIX paIIOCTaHcN
BblMOKETeJeRKOHaCTpOHTbCnHaJIIObYIO XeJIAeMYo paIIOCTaHcNIO,Bbl6paB HOMep IpeNyCTaHOBKn,NOKDOTOpbIM DaHHa paIIOCTaHcNIO 6blNa coXpaHeHa.  
1 HaKaB KhoNky A/B/C/D/E (KhoNkyA/B/C/D/E Ha nyIbTe y), BbIbePnte rpynny npedycTaHOBJIeHHoJ paAnocTaHm.
Obo3haueHne rpynnbI NOBnAeTcHa Iucnnee ppoNTaJIbHOI naHeII, INImeHReTcI npKakDom HaKaTIN KHOKN A/B/C/D/E.  ΦpoHTaIbHa naHeJb NNN  IyIbI dY
2 Haxkab KhoNky PRESET TUNING / (KhoNky PRESET- + + Ha npIbTe dy), BbI6epnTe Homep npEduCTaHOBJIeHNO paAnocTaHcnn (1-8).
Диana3OH uactOta paIIOCTaHcIMn, a TaKKe rpynnna n Homep npeDyuctaHOBKn OTobpaKaOTcHa IINCJIeE φpoHTaIbHoN naHei, n 3aropaetc INdkaunr "TUNED".  NIN  NyblrDy  
3aMeHa npeyctaHOBJIeHHbIX paHIOCTaHcN
BbMOKeTe 3aMeHHTb MeCTaMn DBe npEynCTaHOBHeHHbIe paAnOCTaHcNn. Ha npImpe Hxke OINcAHa PPOeDpya 3aMeHbI npEynCTaHOBHeHHo CTaHcNn "E1" Ha "A5".  2,4,31,3 1 BbI6epnte npedyctaHOBJIeHHUO cTaHcNIO "E1", nCNoJIb3yA KHOJKN A/B/C/D/E n PRESET TUNING / . CmOTpnte pa3dEn "BbI6Op npedyCTaHOBJIeHHbIX paAnIOCTaHcN" cIeBa. 2 HaxmTe u ydepXnBaIte HaXaToN KhoNky PRESET/TUNING (EDIT) Ha 6oJIee Yem 3 ceKynDbI. Ha dinCnlee fpoHtAlbHoN nAHeN MIRaOT nHdNkaun "E1" n "MEMORY". 
3 Bb6epnte npedyctaHOBJeHHyO cTaHcIIO "A5", nCnoJb3yR KhoNkA/B/C/D/E n PRESET TUNING /
Ha dncnnee ppoNTaIbHoi naHei MraIOT nHdkauu "A5" n "MEMORY". 
4 Eue pa3 HaxmTe KhoNky PREsT/TUNING (EDIT).
IBe IpeNyctaHOBHeHHbIe paAnocTaHcIMN 3aMeHHTCmCTaMn.  3aMeHa paAnocTaHcH 3aBepSeHa.
ПРИЕМ RAДноCTAHЦИ ССТЕМБI RDS
RDS (cncTeMa paHOnHOpMaun) - 3TO cncTeMa nepeaun HOpopMaun, nCIOJIb3yeMaJ CM-paHNOCTAHmM MHOINX CTpaH. INHOpMaunRDS coepxnt pa3nHyIO INHOpMaunIO, Takyo Ka PS (HaMeHOBaHne nporpaMb), PTY (TIN nporpambl), RT (paInoTeKCT), CT (TeKyuee BpeM), EON (dpyrue ycnJeHHbIe CET), n dpyroe.
OnncanHe nHopmaun RDS
Pn HacptpokHe Ha paAnocTaHcIIO CnCTembl RDS, daHHb annapa MoKet npHmAtb INOpMaCIO PS, PTY, RT, CT, n EON.
■Pexm PS (HaMeHOBaHne nporpaMMbl):
OTo6paKaeTcHaIMMeHOBaHne pINHMaEmo paAnocTaHcN CnCTembl RDS.
■Pexm PTY (Tn nporpammbi):
IJI KNaaccnDnKaun paAnocTaHcN CnCTeMbRDS, cyueCTByeT 15 TINOB nporpaMM.
| NEWS | НовOSTи |
| AFFAIRS | Текшие akтульные ВорPORы |
| INFO | Ов Ocяни Формачия |
| SPORT | Сport |
| EDUCATE | Образоваимe |
| DRAMA | Драма |
| CULTURE | Куньтурa |
| SCIENCE | Hayka |
| VARIED | РаЗвileчени |
| POP M | ПОН-МУзьka |
| ROCK M | Рок-МУзьka |
| M.O.R. M | МУзьka в руну (д��легкою пос(Cl)иваимe) |
| LIGHT M | Лergая Кlassоческа мУзьka |
| CLASSICS | Кlassочesska мУзьka д��ЗнотOKOB |
| OTHER M | Другieve Вidы мУзьки |
■PexmRT (paDnoteKCT):
HOpMaun O nporpamme (HaPnmupe, Ha3BaHne neCHN, Nm PEBua, Dpyroe), npHnmaemO t paAnocTaHcN CnCTembl RDS, oTo6paXaETcA C nCIOb3OBaHNEm Do 64 ByKBeHHo-LuΦpoBbIX 3HaKOB, BKIOUaH N3MeHeHHbIe CNMBOJIb. IIO6bIe dpyTne 3HaKn, INCIOJb3yEmbIe B HOpMaun RT, 0603HaayOTcHxHIMN YepTockamn.
■Pexm CT (Tekyüee Bpem):
OTobpaXaeTcN NOMHyTHO N3MeHReTcT Kcyuee Bpem. PnBHe3aHOM OTKJIIOHeHN INHOpMaun, MOKeT NOBtbcN HINkauN "CT WAIT".
EON (dpyrue ycnJeHHbIe cTeN):
CMOTpnte cneyouo ctpanu.
IpekeJIoueHne pexnMoB RDS
JaHbI annapaT oblaaAet yeTbpMpeKIMAMn OTo6paxeHN HΦopMaun RDS.Bo BpeM npEema paNocTaHcUN CnCTembl RDS,Ha dncnlee φpoHTaBHO nHeN 3arOpaeIOTCn INDnKaTOpbl peKIMOB PS,PTY,RTn/INCT,BCOOTBeTCTBnC nHΦopMaueh RDS,npEOCTabJIeMoI paNocTaHcNE.IOBTOPOH HAXIMaTe KONKy RDS MODE/FREQ dIy nepeKIOUeHN HΦopMaun RDS,npEOCTabJIeMoI nepedaIOSe paNocTaHcNe,B cJeDyIOSeM nopAKe. 
PnmuMeaHn
He haxmaite KhoNky RDS MODE/FREQ BO Bpem npnema paiooctaun cinctembl RDS do tex nop, noka oHa nn 6oonee uHdkauin pexmoB RDS he 3aropTcna DnCnlee fpoHTaIbHO nanei. Ecn KhoNka 6bJa Haxata Do 3TO, nepeKIOUeHne peXMOB cTaHET HeBO3MOXHBIM. PnHHa BVOM, YTO daHbI annapat eue He 3akOHnn npnem ot paiooctaun Bce nHfOpMaun RDS. Bb6op HOpmaun RDS, He npedocabnemop daNocTaHnei, HeBO3MOKeH. -Дань annapaT moKet He nOKa3bIbTaHnHΦopMauHrDRS,ecnnpINHMaemb CnHaH HeOCTaTOHcNJIeH.BoO6eHHoCTn,peXmRT,piKOTOpOM npINHMaETc8 BoJbW O6bEmnHΦopMaqM,MOxET He OTobpaKaTaCra,daXe ecnДpyrmepeXmB rDS (PS,PTY n.T.D.) nOKa3bIAoiTc H daNcJIee. B HeKoTOpbix CnyaIx, INΦopMaun RDS He MoXeT npHIMaTbcra B IIOxIX ycIOBnx npHeMa. B TaKOM cnyae, HaxmaiTe KhoNkY TUNING MODE Do OTKIOUeHN INDkaun "AUTO" c nCnIe pOHTaIbHO nAHei. HeCMOTpHa To, YTO peXmnpEma nepeKIOUChTc Ha MOHOPOHueckn, npn nepeKIOUeHN dncIeH a peXmRDS, Bbl CMOKeTe npocMaTpBaTa hΦopMaun RO RS Ha dncIee. - Pn ocna6eBaHHn Cnbl CnHaJl No npuHHe BHeHnx NOMEX BO Bpem npneMa paNocTaHcN CuCTEmb RDS, HhOpMaunRDS MoKET BHe3aHNO npeBaTcB, N Ha DnCnIee pOHTaJIbHO nnHeN NOBNTcH INDkaun "...WAIT".
ФункцЯ PTY SEEK
PnBbIbOpE JeaemOrTo Tna npoRpaMMbl, annapaT aBOMaTneCKn HaunHaet NCKaTb BCE npedyCTaHOBJeHbIe paNIOCTaHcIN CNCTEmbl RDS,pepeDauOxJeaemMy npoRpaMMy.
1 Haxkab KhoNky PTY SEEK MODE, yctaHOBnte annapat B peXm PTY SEEK.
Ha dncnlee fpoHTaIbHoi naHeJI Mmraet TIN nporpaMMbI paNIOCTaHcUN, npHIMMaemOJ annapaTOM B daHHbI MOMeHT, INI INHdkaCUNA "NEWS".  Mitraet
2 Haxkab KhoNky PRESET/TUNING / BB6epnte XeJaembl TnnporpaMbl.
BbI6paHHbI TnI nporpAMMb3aRopaetcHa dncnnee pOHTaJIbHOH naHeH. 
3 HaxmTe KhoNky PTY SEEK START nHaayana noncKa Bcex npeDyctaHOBJeHHbIX paAnocTaHcN CnCTembl RDS.
Bo Bpemra noncka paanoctaHn annapaTOM, Ha nncnnee ppoHTaJbHO nanei MmraeT BblpaHHb TIN nporpamMbI n 3aropaeTc Hndkauur "PTY HOLD".  - Annapat npekpaaaet nonck npn HaxoxKdHn paAnocTaHcnn, nepeaioe nporpammy Tpe6yemoro Tuna. - Ecni HaIeHHa RaIOCTaHcH He ABJIHeTcToi,Ha KOTOpYb Bbl XOTeIN HAcTpOHTbcH,HaKMITE KHOKNy PTY SEEK START eue pa3. AnnapaT NaHcHT NCKaTB Dpyryo paIOCTaHcHIO,pePaIOU nporpaMMy TaKOrO-Xe Tnna.
OTMeHa DaHHoN cyHKcun
Двждынхмnte кноку PTY SEEK MODE.
Функця EON
DaHHaФyHKUINICNOJIb3yeT INHΦopMaUOHHU OcIyry EON, npeIOCTabJIeMyIO CeTBIO paIIOCTaHmCnCTemBI RDS. IprBbIbOpE xeJaEMOro TnA nporpaMMbI (NEWS, INFO, AFFAIRS nII SPOrT), annapat npoi3BOJNT aBTOMaTIueCKn IOnCK BCex npeDyCTaHOBJIeHHbIX paIIOCTaHmCnCTemBI RDS, pnaHpyIoXu TpaHCJIaIIO npORpAMMbI Tpe6yEmoro TnA, n npri HaJaJIe TaKoi TpaHCJIaIIN, aBTOMaTIueCKN nepeKNIQUaETcR c paIIOCTaHcIIN, npocLyuINBaEMO B DaHHbIM MOMHT, Ha paIIOCTaHcIIO, TpaHCJIpyUOuYO nporpaMMy Tpe6yEmoro TnA.
PnmeuHne
-ДаннанфункшIMOKTe6bTbICNoIb3ObaHaToIbko npnnpneMe paAnocTaHcNmCnCTemblRDS, npedocTaBnHOuIOHΦopMaOnOHHyOyCnyEON. PnHactpoKe annapaTa Ha TaKyIO paAnocTaHcNIO,Ha dncnneeФpoHTaBHoI NaHeJI 3arOpaeTcHINdkaUN "EON".
1Y6eIntecbB npncyTcTBnn HndnKaun "EON"Ha dncJee fpoHTaIbHO nAHeJI.
PnOTcyTCTBn INHdkaun "EON", HacptponTeCb Ha npyryo paNIOCTaHcuio CnCTembl RDS, npnpneMe KOtopoJ 3aropaeTCH INHdkaun "EON".
2 NOBTOPOH HAXIMAR KONky EON, BbI6epnte XeJaaembl TnnporpaMMbl (NEWS, INFO, AFFAIRS nIN SPORT).
Ha dncnnee ppoNTaHbHn naHEn nOABnAreTc HauMeHOBAHHe BbIpaHHoro Tnna nporpamMbI.  - Pn NaJaNe TpaHcIaNn BbIbpaHHoro Tuna nporpamMb paIOCTaHcnei CnCTembl RDS, annapat aBtOMaTnueckn nepeKJIouaetCn paIOCTaHcnn, pOcLyuBaEMoB D aHHbIM MOMENT, Ha paIOCTaHcIO, TpaHCIpuyIOU nporpamMy BbIbpaHHoro Tuna. (Muraet HdkauEON.) - Pπn 3aBepseHnn TpaHCJIaIu NTpe6yemoro Tnna, aannapaT nepeKNIUOaETcHa paAnIOCTaHNUO, KOtopa IPOClyuINBaJACb B nocneHN pa3 (NII dpyryI nporpamMy ToJ Xe paAnIOCTaHUN).
OTmeHa daHHoN fYHKcHn
NobtopHo haxmMaTe KhoKy EON do OTKIOUeHn HaUMeHOBaHn Tnna nporpaMMbHa dnCnnee pOHTaBHO naHei.
TAIMEP CHA
Даннадункци NO3BOJЯET abTOMaOTnuecknyCTaHaBJIINBaTb DaHHbI aNnapaT BpeKIMOxIDAHN NOcNe OnpeJeHHO npomexyTKaBpemeH. TaMep cHa NOJe3eH, KOJa Bbl JIOXITecbCnA Tb, B TO BpemKa KaDahHbI aNnapaTBOCIpON3BOJNT INI INPOn3BOJNT 3aNNCb NCTOCHNka. TaNmep Cha MoKeT 6bITb yCTaHOBJIeH TOJbKO C nyIbTa Dv.
#
- PnnoKIOUOeHN Taimepa, npno6peTeHHoro OTdIbHO, K DaHHomy annapaTy, Bbl TaKKe MoKeTe YcTaHaBnBaTb TaMep npo6yXKeHn. N3yuNte HnCTpyKuH No 3KcnnyatauHn, npinlaRaemyo K TaIMepy.
YctaHOBka TaMepa cHa
 1 BbI6epnte nCTOuHnK nHaunTe BOCpON3BeDeHne Ha KOMNoHENTeNCTOuHnKe.
2 NOBTOPOHnKmJn
SLEEP KHonky SLEEP, yctaHOBNTe BpeMeHHoI OTpe3OK.  C KaKdIbIM HaxKaTneM KHOKn SLEEP, INHnKaUIn Ha DcNJIe e pOHTaBHoN naHeIn nepeKlIOuAOTc CJeDyIOUm O6pa3OM.Bo BpEMnpeKlIOUeHn BpeMeHHbIX OTpe3KOB TaImepa CHa, MrraET INHnKaUIn SLEEP. →SLEEP120min→SLEEP90min SLEEPOFF←SLEEP30min←SLEEP60min VCR VAUX DVB MD TUNER CD VOLUME 1 HIFDSP 100 SLEEP 120min 3ПиЗавершени установки таймера са, Ha диспee Фронтально панели 3aropaetca Инданkaця "SLEEP". VAUXVCIN/CEL DVD ME/CH TUNER CD VOLUME 1000 HIFI DSP -7780 ROCK CONCERT
OTmeHa TaMepa cHa
NoBtOPO HaKmMaIe KhoNkY SLEEP do NOBHeHn HnDnKaun "SLEEP OFF"Ha DnCJIee fpoHTaBHO nAHeJI. HnDnkaun“SLEEP OFF"ncye3neTchepe3 HeCKoIbKOceKHyN,INaTeMOTKJIIOUHTcR INnDnKaun“SLEEP".   SLEEP OFF
#
Bb moke Te TaKke OTMeHnTb TaImepe CHa, Hkaab KhoNky POWER Ha nyIbTe DY (uIN KhoNky STANDBY/ON Ha fpoHTaIbHoI nAHei), u yCTaHOVB daHHbI annapat B peXIM OXnDaHn.
3AПИСь
HactpoKn 3aIncn n dpyne onepaunn BbINOJIHrOTcHa dpyrom 3aIncsbIbaOuem KOMnoHeHTe. Boone noDpO6Ho o DeiCTBn TaKnx KOMIOHEHTOB, n3yUHTe INCHTpKUIN NO 3KCKnyataunn, npnilaraemblk HmM.   1 BkIIOUHTe NITaHne DaHHoro aNnapaTa N BCEx NOdkJIIOUeHHbIX KOMnOHeHTOB. 2 BbI6epNTe KOMNHOENT-NCTOUHNK, C KOtOPORBOblXOTNE npON3BecTn 3aNNCb.  #  ΦpoHTaJIbHaI naHeJIb Nyblny 3 Haunthe Bocnpn3BeHeHne (nHn Bb6epnte paAnocTaHnO) Ha KOMnoHETe-NCToHNKe. 4 Haunthe 3aHnscb Ha 3aHncsbIbAIOUeM KOMHOHeHTe.
Приимechаши.
- Do TORO, KaK npCtTyNTb K 3aNNcN, BbINOJIHnTe TECTOBYIO 3aNNCb. BbHe CMOKeTe npOn3BeCTn 3aHmcb Mekdy KOMNoHEHTAMN, NOKJIIOUeHHbIMN K DaHHOMy annapaTy, ecn daHHbI annapaT yCTaHOBJeH BpeKM OXnDaHn. HacpoKn TONE CONTROL, VOLUME, "SP LEVEL" (cTp.20) n HacpoKn nporpaMM He OKa3bIbaOT BJIaHnHa KaueCTBO 3aNCH. 3aIncb cntOuHnka, NOKNIoueHHoro K rHe3dAm 6CH INPUT daHHoro annapata, HeBO3MOxHa. - NocTynaOuIcHAn OT ONpeDeJIeHHOro nCTouHnKa He BBIOUncHa OINaHObB KaHAN REC OUT. (HanpImep, CnHAn, NoCtynaOuIcNOT VCR 1 IN, He BBIOUncHa VCR 1 OUT.) - Pn3aHcnc C c0HOrpamM, CD-dNcKOB, paNo nT.d., 3yUHe 3aKOHOaTeNbCTBO o6 aBtOpcknx npabax, DeIcTBHyOuee B Bauei CTpaHe. 3aNNbc C nCToHnKOB, 3aunueHHbIX aBtOpCKmM npaBAM, MOKeT pNBeCTN K HapyuHHeIO 3aKOHOaTeNbCTBa o6 aBtOpcknx npabax. PnBocnpOn3BeHeHm BnDeoNCToUHkA C 3aNcAHbIMN JIN 3aKOJNPOBaHHbIMN CNHaJAmN Dn3aUNTbI OT KONIPOBaHnA, CaMa KapTHKa MoKeT NCKaXaTbcr BCJeDCTBne TaKnx CnHAnOB.
MEHIO HACTPOIKNI
IIOCTNIXeHIN LyuWero yPOBn 3ByaHn DaHHoro annapata, Bbl MOKeTe HAcTpntb CneNyUOuine npametpbI B MeHIO HAcTPOuKn. N3MeHInTe HAcTPOuKn DJIr COOTBcTcBn CpeDe IpocnyuBaHn.
Cnncok MeHNo HaCTpoiKn
MeHIO HAcTpoKn pa3dEJIeHO nO nCNoIb3OBaHNIO n DeiCTBNUo Ha 4 cNeDyUOuNE KaTeOpN.
■BASIC MENU
B MeHIO BASIC MENU coIepKxatc oChOBhble napaMeTpbl, KOtOpbIe OJXHbI 6bItb yCTaHOBHeHbI Do IcNoJIb3OBAHnI DaHHoro annapaTa. DaHHoe MeHIO COCToNT n3 cIeDyUoiNx MeHIO. BoJeE noIpO6Ho, CMOTpIte Ctp. 18-20.
1 SETUP
2 SP LEVEL (YpoBHeB KOJHOK)
■SOUND MENU
B MeHIO SOUND MENU coJepKaatc npaMeTpbl n3MeHeHn 3ByaHn. DaHoe MeHIO COCTOIT N3 CNeDyUOxN MeHIO, NO3BOJIHOx HAcTPONTb KaueCTBO I TOH 3ByaHn, BOCPON3BOIMORO CNCTEMoN.
1 SPEAKER SET
2 SP DISTANCE (PacctoHne KOJIOHOK) 3 LFE LEVEL (YpOBeHb Hn3KoHaCTOTHOrO 3ΦΦeKTA) 4D.RANGE(AnHAmnueckn dnaana3OH) 5 CENTER GEQ (LêntpaIbHbI rpaΦnueckn 3KbaIaI3ep) 6 HP TONE CTRL (HactpoikKa ToHa HayshnKOB)
INPUT MENU
B MeHIO INPUT MENU coJepKataT npaMeTpbl, CB3aHHbIe C NOCTyNAIOUIM CNrHaJOM. DaHHoe MEHIO COCTOIT N3 CLEyIOUINX MeHIO, NO3BOJIAIOUINX HaCTpOHTb Ha3NaHeHne BXODHBIX rhe3.D.
1 I/O ASSIGN
2 INPUT MODE
OPTION MENU
JaHHe OJOnHnTeIbHO MeHIO yCTaHOBKn IpeIOCTaBJIeHO IЯ BAwero yO6CTBa. JaHHoe MeHIO COCToNT N3 CNeDyIOxN MeHIO, NO3BOJIAOxN HaCTpOHTbApKoCTb 3KpaHa, CoXpaHITb CyUeCTByIOuIe HAcTpoiKN, IN BbINONHrTb Dpyrne MeHee BaXhBiE cyHKuN.
1 DISPLAY SET
2 MEM. GUARD
3 AUDIO MUTE
BOnncanHXKaKDoRnapaMeTpa,npuBeHbIXHa cnJeIoue CTpaHue,NCXoHNbIe yCTaHOBKn OTMeHeHbIKnPHbIM uPnΦTom.
HacrtpoKa npaMeTpOB MeHIO HacrtpoiKn
ДЯ BBINONHeHn HAcTpoE, nCNoB3yIe nyIbT DY.   Bb moke Te n3MeHnTb npaMeTpbl MeHIO HAcToiKBO BpemBocpon3BeDeHH 3ByaHn annapaTOM. - Ecni annapat He yctaHOBJIe H pexm TUNER, Bbl MoKeTe BOCIOJIb3OBaTcBc KhoNkAmN NEXT n SET MENU + / - Ha poHTaNbHOI naHEnn dIy I3MeHeHn TaKxu YCTaHOBOK. HaxmaiTe KhoNky NEXT dIy BB6opa JeaemOn KaTEROpIN INI NOJn dIy IacToPoiKN, IN 3aTeM HaxmaiTe KhoNky SET MENU + / - dIy I3MeHeHn npaMetPOB.
PnmeaHne
BbI He cMOKeTe N3MeHnTb HakoTOpbl NapaMeTpbl MeHIO HAcTpoKn, ecn annapaT haoNTcB pexIMe HOHOr npocnyuBaHn.
1 Haxab KhoNky SET MENU, BOyDnTe B MeHIO HaCTpoiKn.
SET MENU 
2 NOBTOPOH HAXUMAR KHONKY 一 / 一 BBI6epTe XeJaaEMoe MeHO.
 
3 Haxab KhoNky -/+, BOIaTe B BbIbpaHHOe MEHIO.

4 NOBTOPOH HAXUMa KHOIKY 一 / 一 BbI6epnte npaMeTp dJa HAcTPOKn.
   - Повторно нахимая Коньу SET MENU, Ви може ТьбраьnapaMeTpbl TakOM Лордк, кад ппн Нжати Коннг ∨.
5 Haxab KhoNky -/ + oDnH pa3, BOyDnte B peXm HacTpoKb Bbl6paHHoro napaMeTpTa.
Ha dncnnee ppoNTaJIbHou nAHeNIOABNTcH NaCTPOKa, N3MeHENHaB INocJeHN pa3.  B 3aBnCmOCTN OT npaMeTpa MeHIO, HaxIMa KHOk Ky /V, BbI6epnte NOJ-napamETp. 
6 NOBTOPO Haxmam KHOKNy-/+, N3MeHnTe NaCTpOuKy napameTpa MeHIO.

7 NOBTOPHO HAXUMAR KHONKY / ,OTKJIIOHTe MEHIO.
 
Pe3epBHaKoHnHaMaTn
Cxema pe3epBHOI KOINI NaMRTI ppeOxpaHReT coXpaHeHHyIO INHOpMaUIO OT Ncye3HOBeHNIA daxe cNn DaHHbI aNnapaT yCTaHOBJeH apeKIM OxuaHn, CInOBoN Ka6eJIb NpeMeHHORO TOKa OTKnIOueH OT PO3eTKN, IIN BpeMeHH npeBaHO NITAHne N3-3a OTKnIOueHn 3JIeKTPO3HePnn. Ondako, cNn NITaHne npeBaHO 6OJee Yem Ha ODHy HeDeIIO, ppeDyCTaHOBJeHHbIe CTaHm MOrYt 6bITb CTepTbI. B TAKOM Cnyae, Ipon3BeIDTe NOBtophyIO HAcTpoIKy napaMeTPOB.
MeHIO BASIC u SOUND
C NOMOJIbIO MeHIO "BASIC", Bbl MoKTe JERKO NaCTpOnTb napaMeTpbl "SOUND 1 SPEAKER SET" n "SOUND 2 SP DISTANCE". He cyueCTByET Heo6xoDnMoCTn c6poca napaMeTPOB MeHIO "BASIC" B INCXoJHOe NOJoxHe, HO, pN XeJaHN, Bbl MoKTe HaHTN BoJee NoIpO6HbIe napaMeTpbl B MeHIO "SOUND".
PnmeaHne
- Ecni, nocne n3MeHeHn napaMeTpoB MeHIO "SOUND", Bb Bb6epnte MeHIO "BASIC 1 SETUP" n 3aTeM Bb6epnte SET",napaMeTpbl MeHIO "SOUND" n3MeHrOToC kAc CneIcTBnE IIO6bIX n3MeHEni, npOn3BeDeHHbIX B MeHIO "BASIC 1 SETUP". He BXoJIne T B MeHIO "BASIC 1 SETUP" Do Tex nop, noka Bbl He 3axOTte n3MeHHTb DaHHbIe HacTpoKn. Ecni Bbl CnyauHHO BOuIN N MeHIO "BASIC 1 SETUP", Haxab KhoNkY CANCE, Bo3BpaTntecb B MeHIO "BASIC". (ctp.19)
SOUND 1 SPEAKER SET
(HactpoIKN
peKIMOB KOJIOHOK)
DaHHaФункци NO3BOJЯET BbI6paTb peKIMbl 3ByuHnA, COOTBETCTBYIOUne akyCTNueCKO nCnCTeMe.
PnmeuHne
- HeKOTOpBie HAcTpoKn npaMaTePbO MEnIO MOrYT He DeIcTBoBaTb BO BpEmRA BocPOn3BeDeHnA annapaTom NCTouHnKa C cactToTOn CTpo6uPoBaHnU cNΦpOBoro CnHana, npeBbIshaOuei 48 KU.
1A CENTER (peKIM ueHTpaJbHoi KOJOHKn)
Pn D6abHn CHTpaBHO K OLOHKn AkyCTNuecko CNTeMe, DaHHb annapaT MOXET Lyuwe npOn3BONDt b IOKaJINaIIO dJaIORA dInr HeCKOJIbKnx CnyWaTeNei N yCOBepSeHCTBOBaT cINHXPOHN3aUIO BOCIpON3BeDeHn 3ByaHn IN KapTHKN. Onu: LRG (6oIbwa), SML (maa), NON (OTcyTCTByet)
LRG
Bb6epTe daHHb napaMeTp dIy ceHTpaJbHOJ KOHKn 60nbWoro pa3Mepa. AnnapaT HnpaBnre TONHb Dnana3OH CnHaIOB ceHTpaJbHOrKaHaJa Ha cHTpaJbHyIO KOHOK.
SML
Bb6epnte daHHbI npaMeTp dIra ceHTpaJIbHOI KOLOHKn MaIoro pa3Mepa. AnnapaT HnPaBnReT Hn3KoUacToTHbIe CnHaJIbI (90 TcN HnXe) CEHTpaJIbHOr KaHAnHa Ha KOLOHKn, Bb6paHHbIE MeHIO "1D BASS".
NON
BbI6epnte daHHbI npaMeTp npn OTCyTCTBnU ΒeHTpaHbHOKoLOHKn. Annapat HappaBnReT BCE CnIRHaJIbI eHTpaHbHO KaHana Ha φpoHTaJIbHbIe JIeByIO nIpaByIO KOLOHKn.
■1B FRONT (peKIM φpoHTaJIbHbIX KOJHOK)
Onu:LRG (6oIbwa),SML (mana)
LRG
Bb6epnte daHHbI npaMeTp dIra fpoHTaNbHbIX KOHOK 60JIbWOrO pa3Mepa. Annapat HnpaBnHET nonHbI dnaNa3OH cHrHaIOB fpoHTaNbHbIX JEBORI n npaBOrO KaHaIOB Ha fpoHTaNbHbIE JEBYIO npaByIO KONOHKn.
SML
Bb6epnte daHHn napameTp dna fpoHTaIbHbIX KOHOK MaIoro pa3mepa. Annapat HanpaBnHeT Hn3KOyacToTHbIe CnHaJIb (90 Tc n HxKe) fpoHTaJIbHO rO KaHJa Ha KOLOHKn, Bb6paHHbIe B MeHIO "1D BASS".
1C SURROUND LR (peKIM KOJIOHOK OKpykaIooero 3ByaHnA)
Onu: LRG (6oIbua), SML (MaHa), NON (otcyTCTByeT)
LRG
Bb6epnte daHHb napaMeTp dna neBOu npaBOKoHOK OKpykaIOUero 3ByuHaHn 60nbUoro pa3Mepa.Annapat HanpaBnEeT nonHb nnana3OH cnHaIOB KaHana OKpykaIOUero 3ByuHaHn Ha neByIO npaBYIO KOLOHKOkpykaIOUero 3ByuHaHn.
SML
BbI6epnte daHHbI npaMeTp dIra neBoI npaBOI KOHOK OKpykaIOUeO 3ByuHaHMaIOro pa3Mepa. AnnapaT HnPaBnre Tn3KOyAcToTHbIe CnHaJIbI (90 Iu n Hxke) KaHaJaOkpyKaIOUeO 3ByuHaHn Ha KOJOnHK, Bbl6paHHbIE B MeHIO "1D BASS".
NON
BbI6epnte daHHbI npaMeTp npoOTcyTCTBn KOnOHOK OKpykaIOUeO 3ByuHn. Pnp BbI6pe npaMeTp a NON B MeHIO "1C SURROUND LR", daHHbI annapaT yCTaHaBInBaeTcR B BnPtyaJIbHbI peKm CINEMA DSP.
■1D BASS (pexim Bocnpo3BeDeHn Hn3Knx YactOT)
CnHaNbLFE, coepkaune Hn3KoacToTHbIe 3ΦΦeKtbl, BbIOBdTc npn BOCnpO3BeDeHnn DaHHbIM annapaTOM CnHaHaBΦopMaTe Dolby Digital nnn DTS. Hn3KoacToTHbIe CnHaNbMoYr T NaPabJIaTbcra Ha o6e pOHTaJIbHbIe JEByIO n npaByIO KOJOnHKn, n Ha ca6ByΦep (ca6ByΦep MOxET NcNoJIb30BaTbCRA KAK dIa CTpeoΦoHnueCKoro BOCpO3BeDeHn, TaK n dIa nporpaMMbl 3ByKOBOrO noJIH). Onu: SWFR (ca6Bypep), FRONT, BOTH
SWFR
Bb6epnte napametp SWFR npn noKlouehn ca6byepa. Annapat HanpaBnreT cHnbl LFE n Hn3KOuactOThble CnHaNbl dpynx KaHaNoB Ha ca6byep, B COOTBeTCTBnC hAcTpoiKaAMn KOHOHOK.
FRONT
Bb6epnte npaMeTp FRONT npn OTCyTCTBnncabBypepa. Annapat HanpaBnreT cnHaIbI LFE nHn3KoYacToTHbI cHrHaIbI pyRnx KaHaIOB HaΦpoHTaJIbHbI KOJOhKn, B COOTBeTCTBnC HAcTpOJaMn KOJOhOK (daXe ecnn paHbIeΦpoHTaJIbHbI KoJOhKn 6blN yCTaHOBJeHbI HaSMALL).
BOTH
Bb6epnte napameTp BOTH, ecn Bbl noKluOuHn ca6Bypep n XOTnTe BBIOBnTb CnHaJIbI Hn3KOaCTOTNbIE CnHaJIbI fpoHTaJbHbIX KaHaNoB Ha o6e fpoHTaJbHbIe KOLOHKn I ca6Bypep. CnHaJIbI LFE n Hn3KOaCTOTNbIE CnHaJIbI dpyrnx KaHaNoB HnPaBnIOTcH a Ca6Bypep, B COOTBETCTBmC HAcTPOuKaMn KONOHOK. DaHHa FyHKun PpeHa3HaYeHa DnA yCUNHeHn Hn3KOaCTOTNbIX CnHaJOB C NcNOb3OBAHNem Ca6Bypepa BO BpEM BAocPOn3BeDeEHn TaKIN NCTOCHIKOB KAK CD-DnCKn.
PnmeuHne
-Пи Вьборе napametpa FRONT B MeHIO "1D BASS", annapat HanpaBJIeT Hn3KoYAcToTHbIe CnHaNbI (90 Tn HNKe) ФpoNTaJbHOrO KaHaNa Ha ФpoNTaJbHbIe KOJOhKn,ДаЖe ecn peXIM ФpoHTaJbHbIX KOJOhOK yCTaHOBNeH Na SMALL.
SOUND 2 SP DISTANCE
(pacctoHne KOJohok)
JaHHa FyHKnI npeHa3HaueHa InB BbOa paCtOHN KaKdoi KOHOKN BpyHyIO N DnI peryIuropOBKn 3aepkKn 3ByaHNI COOTBeCTBvIOUeO KaHAn. VDeaIbHo, KKaJdA KoHOHa DOJXHa 6bITb paCNOLOXeHa Ha OINHAKOBOM paCCTOHm OT OCHOBHOro MeCTa CnyuataJI. Ondako, B 60nbunHCTBE CnyaEB 3TOr HEBO3MOxHO Do6ntbCS n3-3a DomauHnx ycNobn. TaKIM o6pa3OM Heo6xoJIMO npImeHHTb HEKOTopy 3aepkKy 3ByaHnO T KaKdoi KOHOKN dIra TORO, QTObl 3ByKObIe CnHAlbl BCex KaHAnOB ONDOBpemHeNo DOCTTARl MecTA CNYuataJI. 1 Haxmam KhoNky / ,BbI6epnt MeHIO "UNIT". 2 Haxmam KhoNky - / + ,BbIbepnte npaMeTp "meters" nnn "feet" kak ednHcy n3Mepenna dny hactpoiKn. 3 Haxmmah KhoNky / , BbI6epnte KOJohKy. 4 Haxmam KhoNky-/+,yctaHOBnTe paCCToHHe. HaxmaiTe KhoNky+Ira BbOpa 60JIbXx 3HaueHni, n KhoNky -Ira BbOpa MeHbXx 3HaueHni. 
Hactpoika B metpax, "meters
Диаэн HabtpoKn: 0.3-24.00 M (Дя фpoHTaJIbHbIX JIeBOi N npABOi, цENTpaJIbHOI KOJIOHK, IJIeBOI N правОI KOLOHOK OkpykaIOJIeO 3ByuHaHЯ) IcxoHbIe yCTaHOBKn: 3.00 M (IINI pOHTaJIbHbIX JIeBOI IN IpaBOI, UeHTpAlbHOI KOIOHKn, IN IeBOI IN IpaBOI KOIOHOK OKpyKaIOUeO 3ByaHnI)
Hactpoika B cyTax, "feet"
ДиаэннactpoКИ: 1-80ФуTOB(ДЯ ФpoHTaJIbHbIX JIeBOI N InpaBOI, UeHTpaJIbHOI KOJIOHK, N IeBOI N InpaBOI KJIOHOK OKpykaIOJIero 3ByuHaHnI) IcxoHbIe yCTaHOBKn: 10.0 cyTOB (dIy pOHTaJIbHbIX neBOu n npAOB, cHTpAIBHOI KOHOKN, n neBOu n npAOB KOHOK OKpyKaIOUe 3ByaHnA)
PnmeaHne
- YctaHOBKa 3aepKKn HeBO3MOXHa npu yCTaHOBKe OndHaKOBOrO paccToHnA DnI CpOHTaNbHbIX NcBoN nPapBo, nCHTpaNBHO KOHOKN, INN NEBO NpApBO KcIOHOK OkpyKaUoJero 3ByaHnA.
SOUND 3 LFE LEVEL
DaHHaФyHKUH NcNoJIb3YeTCdIpeRyIuPObKu YPOBHa BbIBOda KaHAna LFE (Hn3KOaCTOTHbI 3ΦΦeKT) B COOTBeTCTBn C MoUHOCTbIO caBByΦepa HnI HayuHnKOB. KaHAn LFE coJepXHT OC6Ble Hn3KOaCTOTHbIE 3ΦΦeKTbl, KOToPbIE DobABJIaTOJbKO dIg ONpeDeJeHHbIX CuEH. DaHHa HaCTpOka DeIcTBtBHe TOnbKO BO BpEma DeKOdIpOBaHn DaHHbIM aIInpaTOM CINHAIOB BΦopMaTe Dolby Digital nIIT DTS. ДиаэнНастpoКN: SPEAKER.....-20-0ДБ HEADPHONE....-20-0ДБ UcxOHaHa yCTaHOBKa:0D6 1 Haxnma KhoNky 一 / 一 BBbepnte npaMeTp dna HacrpoKn. 2 Haxmam KhoNky-, oTperynnpyTe ypoBeHb LFE.
PnmeaHne
- OTPeryIpyyte ypoBeHb LFE B COOTBeTCTBnC MOIOCTbIO Ca6Bypepa nn HauHHKOB.
OPTION 1 DISPLAY SET
DIMMER
JaHHaHnacTpoKa npEHa3HaueHa nIpyuNipOBKn npKocTn dncnpe pOHTaBHO naHeJI. Дианаэн HabстpoКn: -4-0
Bb6epTe ON nIaunTbI: - NapaMeTpoB nporpaMMbI 3ByKOBOrO NOJr - Bcex napametpoB MeHIO SET MENU - YpOBHeB BCEX KOJHOHK Pn yctaHOBKe npametpa MEMORY GUARD Ha ON, Bbl He CMOXeTe NcNoB3OBAbT TeCToBbI ToHaJIbHbI CNHAI INN Bbl6paTb IIO6bI eDpyrne npametpbMeHIO SET MENU.
OPTION 3 AUDIO MUTE
JaHHaФyHKUH npEHa3HaueHa dIpyrJINPOBKN yPOBHN yMeHbWeHn rPOMKoCTN3ByaHn pN aKTtBu3aUNФyHKuN npRrnyWeHn3ByeHn. Onu: MUTE, -50dB, -20dB
MUTE
PonHoe npnRnyuSeHne 3ByaHa.
-50dB
YMeHbShaet rPOMKoCTb 3ByaHnA, BOCpON3BOJaUeOcR B daHHbIMoMeHT, Ha 50 dE.
-20dB
YMeHbShaet rPOMKocTb 3ByaHnA, BOCpON3BOJAAUeOcR B DaHHbIM MOMET, Ha 20 dB.
HACTPOIKA UPOBHEI rPOMKOCTN KOJIOHOK
PerynpoBka ypOBHei rpOMKoCTN KOJHOK BO BpeMa BocnpOn3BeDeHnA
Bbl mojkeTe oTpereylnipoBaT ypoBNI rpoMKoCTN KaKdoi KOLOHKn BO BpeMa IpocnyuINBaHn 3ByuHaHn.  1 NOBTOPOH HAXIMAR KONKY LEVEL, BbI6epnte JKeJaEMyO KOLOHky dIa NaCTPOnK. C KaXDbIM HaKaTneM KHOPIKNI LEVEL, INDnKauNHa DaNCnlee nepeKJIIOuAeTCa BCJeDyUoE M UIKJNUeCKOM NOpRdKe: FRONT L CENTER FRONT R SUR R.(npabar OkpykaIoUero 3ByuHaN) SUR L.(JIeBaN OkpykaIoUero 3ByuHaN) SWFR (ca6Bypep) .... - OДно habkaTne KhoNkI LEVEL oTKpbIbAe TINcJIeJypoBHa rPOMKoCTn. B 3TOT MOMENT, Haxmam KhoNkY / BB6epnte KOJOhKy. 2 Haxmam KhoNky-/+,OTpeynpuTe ypoBeHb rPOMKoCTn KOJOHKn. - LcHTpaIbHnKoONKa n KOnOHKn OkpykaIOeero 3ByaHnMOryT perynipOBaTbcB npeJeIax OT -10d5do +10d5. -ФpoHTaHbIe KOLOHKn Cu6Bypep MoryT perynipoBaTbcn B npedeJax ot -20d do 0d5.
PnmeaHna
- PerynpoBka ypOBHeI rPOMKocTn KOHOK HeBO3MOxHa, ecIn npaMeTp "SOUND 1 SPEAKER SET" B MeHIO HAcTpoKn ycTaHOBneH Ha NON. - PerylnoBka ypOBHr rpoMocTn ca6Bypepa HeBO3MOxHa, ecn napameTp "1D BASS"napameTp a "SOUND 1 SPEAKER SET" B MeHIO HAcTpoiKn ycTaHOBJeH ha FRONT. -Пи ИСпОЛьЗOBAHИ KНОПКI LEVEL ДЯРЕЧИРОВКИ уровни ГомКоCTN KOLOHOK, уровни ГомКоCTN KOLOHOK, ут
NcnoB30BaHne TECTOBORO TOHaJIbHOrO CnHaJa
No3BOJAEHACPTOb yPOBHN rPOMKoCTN KOLOHOK nIpyocnyuBaHn 3ByaHnOT KaXDoN KOLOHKn CMeCTa
CnyuataeHa OOnHaKObOM yPOBHe rPOMKoCTN.
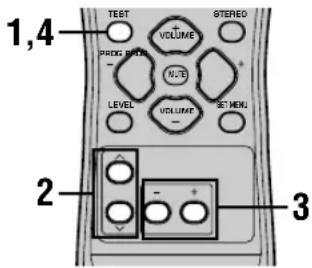
1 HaKMMTe KONky TEST.
AnnapaT NaHET BOCnpon3BeJeHne TECTOBORO TOHaJIbHOrO CnIHana.
2 IOBTOPO HAXIMAR KHONKy 一 / 一 BB6epnte KOJOhky dJa HAcTpOKn.
C KaKbIM HaKaTHeM KHOKN ,HINaKuaNHa DnCnIee nepeKIOHaTeB CNEyIOSeM LKNIueCKOM NOpAKe: TEST LEFT (pOHTaNbHaJ NeBa) TEST CENTER (ueHTpaIbHa) TEST RIGHT (pOHTaNbHaJ npBa) TEST SUR R. (npBaJ OkpykaIOseO 3ByaHn) TEST SUR L. (JeBa JOkpykaIOseO 3ByaHn) TEST SUBWOOFER (ca6Bypep) ....(ДЯ nepeKIOUeHn B O6paTHom NopAKe, HaxmaiTe KHOKnY A.)
3 Haxmam KhoNky -/+, OTPerynpyuTe ypoBeHr pOMKoCTn KOJIOHN.
4ПиЗавершENHACTPOIN,HAXMITEKHONKYTEST. TeCTOBBI TOHaJIbHbI CNrHaJIpecTaET BOCnpoU3BOJNTbcra.
PnmuMeaHn
BbHe MoXeTe BOITN B pexIM TcTobOro ToHaJIbHOrO CnHaJa, ecIn HayuHKnIOaKIOueHbI K rHe3dY PHONES.OTcoeDuHInTe HayuHKnOt rHe3da PHONES.
- PerylnpoBka ypOBHeI rPOMKocTn KOHOHKeBO3MOxHa,ecn npaMeTp "SOUND 1 SPEAKER SET" B MeHIO HAcTpoKn ycTaHOBJeH Ha NON.
- PeryinopBka ypOBH rPOMKocTN ca6Bypepa HeBO3MOxHa, ecn npametpr "1D BASS" npametpra "SOUND 1 SPEAKER SET" B MeHIO HAcTpoiKN ycTaHOBneH Ha FRONT.
- EcIn, BbI6paB npaMetp "BASIC 1 SETUP" B MeHIO HacTpoIKn, Bbl Bbl6epnte "SET", yPOBHN rPoMkOCTN KOLOHOK I3MeHATC KaK CneICTBHeJIIO6bIX N3MeHEN, pON3BeDEHHbIX B "BASIC 1 SETUP".

B 3aBnHmocTn OT nCTOHHKa, BOCpOn3BODmOro annapaTom, yPOBHN rPOMKoCTN KOHOHOK, yCTaHOBHeHbE C NOMOUsBO TECTOBOR TOHaJIbHOrCnHaJa, MOrY NT3MeHHTBCa PnP BOCpON3BeDeHn pa3IINHbIX nCTOHHKOB. B TaKOM cIyae, OTPeryUNpyTe yPOBHN rPOMKoCTN KOHOHOK BO BpEMA PnOcLyuBaHn ICTOHHKa.
PEDAKTIPOBAHNEIAPAMETPOB 3BYKOBOTO NOJA
N3meHHe NaCTpoeK napaMeTPOB
IcxOhbIe HAcTPOkNn POrpamMbI 3ByKOBOrO NOJ
camn no ce6e npeocTaBnIOT BO3MOXHOCTb
PpeKpachoro npocnyuBaHn. Ho, n3MeHnB
HEKOTOpbIE HAcTPOkN, Bbl MoXeTe CO3DaTb
OpunHaNbHyO CpeNy IpocnyuBaHn.
PnmeuHne
B 3aBnCmOCTn OT BbIbpaemOn npOrpamMbI 3ByKOBOrO nOJI,napaMeTpblpeJaKTnpoBaHnMoRyT N3MeHArTbcra. H3yuHTe onncahne napaMeTpob.
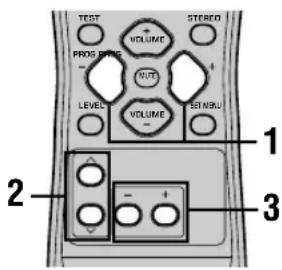
1 BbI6epnte XeJaaemyo nporpamMy 3ByKOBOrO NOJa dJa peRyInpOBKn.

2 HaxmMaTe KhONky / Дя BbI6opa napaMeTpOB.


3 HaxmajTe KhONky -/ +ДЯ n3MeHnna 3HaYeHnnapaMetpa.

4 NOBTOPaIe 1-3 nJnHmHeHHn Dpynx npaMeTPOB.
PnmeaHne
-Изменихе Зашил паметров НевOSTMOЖН, ecлпапаметр "OPTION 2 MEM. GUARD" утановлен Ha "ON". Ecлв BiXOTte OТруларOBaTь 3HAчEHн паметров, утановпгпп ламаметр "OPTION 2 MEM. GUARD" Ha "OFF" (смOTрпс стр.44).
Описné napаметров 3ByKoboro поя
Bb mokeTe OtperyIipOBaTb 3HaueHnO nppeJeIeHHbIX LcIpPoBBx npaMeTpOB 3ByKOBOrO nJRA nn AkkypaTHOro BocIpOn3BeIeHnR 3ByKObBx IJIeB KOMHaTe IIOpcIyUWBaHn. He BCE nporpaMMbl coepKAT Bce CneDyIOUIne npaMeTpbl.
DSP LEVEL
Функця: Perулровka урвг Гомков BCex 3byaHЯ DSP B y3kom Dnaana3OHe.
OncaHne: B 3aBcIMoCTn OT akyCTnK KOMHaTbI DJI rnoClyuINBaHnR, MoKET nOTpe6OBaTbcr yBeNueHne IIn yMeHbSeHne ypoBH rPOMKOCTn 3ΦΦeKtA DSP OTHocntelbHo yPOBHR rPOMKOCTn npAmoro 3ByaHnR.
Диаэзн Настpoи: -6ДБ - +3ДБ
■DELAY
Функця: ИзмehнeMHIMORo paCCTOHaHЯ OTИСTOUHnka 3ByaHnЯpyTeInpOBKn BpemeHn 3aДePJKM MekJy IprMbIM 3ByaHnem INepBOHaJaBHBIM OtpaxKeHnEM, CJbIshMbIM CnySATAEneM.
Onncahne: Yem Mehbe 3haeHne, Tem 6nXe BocpHmaeTc nToCHK 3ByaHn CnywateNem. N, Yem 60nbwe 3haeHne, Tem DaJIbwe 3ByaHne. IJRA KOMHaTbI MaIbIX pa3MepOB, yCTaHOBNTe MaIyIO BeINuHy. I JRA KOMHaTbI 60nbux pa3MepOB - 60nbWyo BEINuHy.
Hnana3OH HactpoiK:1-99 MceK
d7 5ch Stereo
Функця: Perулровka уровг Гомков STBчанн Kaждого KaHаьа B 5-KaHaJIbHOM CTepeofoHnueckOM peXmme.
Диапазоннассторк:0-100%
CT LEVEL (YpOBeHb rPOMKocTn ceHTpaNbHOKOJOnHKU)
■SL LEVEL (уровень громковся leвой колонк Okружkaюцero 3ByaHA)
■SR LEVEL (уровень громковсяnpавой колонки okружаюцero 3ычаня)
Для PRO LOGIC II Music
PANorama
Функця: Pacширене ФpoHTaNbHоI CTpeoOfoHnueCKo CcEhblДЯ BKIOUeHn KJIOHOK OKpykaIoUeO 3ByaHn IJI BOCpON3BeDEHn 3ΦΦeKt a NlHOrO OkpyxeHn.
Onu:OFF/ON,ncxoHaHaHaCTpoKa OFF.
DIMENSION
Функця:пocтeneHHoe cTЯнBaHne 3ByKOBOr noJa BnpeДиИн Ha3a.Д.
Дианаэнн Habctpoikn: -3 (Ha3aД) +3 (BnepeД), nCxOДнay yCtahOBka STD (CTAHdapTHaH).
CTWIDTH(山nHa ceHTpa)
Функця: Perулровka ueHtpaIbHOn cUeHbI OT BCex Tpex fpoHTaIbHbIX KOLOHOKdo pa3nHyoro yPoBHa. Bolshaar BeNunHa CTaRnBaET ueHTpaIbHyIO CcEHy B HappaBJIeHne fpoHTaIbHbIX JIEBOI n IpaBOI KOLOHOK.
Диаэн HabtpoKn: 0 (3ByaHne ueHTpaJbHoro KaHana BbIBOДNTcT OToJbKO OT ueHTpaJbHOK KOJIOHK) - 7 (3ByaHne ueHTpaJbHoro KaHana BbIBOДNTcT OToJbKO OT φpoHTaJIbHbIX JIEBOI npaBoi KONOHOK), nCxOДHaY yCTaHOBKa 3.
BO3MOXHbIE HENCINPABHOCTN IN CNOCObI INX YCTPAHEHn
EcIyBAC 03HnKIn IIO6bIe N3 CLEyUOxNt PpyHOCTe BO BpEM 3KcTlPyATAuIM DaHHOro aPiapata, BOCNoJIb3yITecb TabIeHnKe IINKe IyCTpaHeHnO uOHN6Kn. B clyae, ecn HeNCnpaBnHOCTb He yka3aHa B TaBNIue HIN Bbl He CMOrn INCnpaBnTB OUn6Ky, CLEyH NHTpyKUHM TaBNIb, YCTaHOBNT daHHbI aPiapat B pexmM OxNiDaHn, oTOcoEunHte CINOB KabeN, N o6paTncBc K 6nnKaJWemy OfmuA hOMy Dnepy nIi cepBnC ueTpYAMAHA.
067aJacTb
| Henschnpabnoctb | Прична | Способ устраенья | Смогитестр. |
| Данный anecdot в BKлочаетс рinnahжати кондь STANDBY/ON (иликинpower), пли установливаeted наразжим ожIDsанучеськшппань. | He bly nocklquen cnilobov kaib ly nii Bvlnka He nohlnoctbvo BCTablenha In pozeetky. | Поdkлочite сnilobov kaib ly cootbetctbyuozim mbopa3om. | - |
| Быla aktnibnizipobova h cxeMa 3auzntbI. | Убадиесь,чTo 此првodны coeDINHЯ KOLOHok BvlnIOHnebl COOTBETCTBYUOIM MBAP3OM KAK Na DAnHOM annapate, tak И на camix KOLOHkax, a TackxeВ TOM,чTo NBPODAДЯ coeDINHЯ He copKacAOTcR N C Yem,КROMe TOCHNДЯ COOTBECTBYUOIE OeDINHEN. | 15 - 16 | |
| Данный anecdat noadberpcr cnilbHOMy 3NeKTPUHECKOMy Haprajehmo ot BheuHINIX NCTOCHNKOB (Haprimep,MOHNI IN CMILBOE CTATMNECKOE 3NeKTPUHECTBO). | UstahOBITE daHnBiy anppatВ repxm OJXDanHry, OTKLIOHTe cnilobov KaibI, noDknIOHTe erO KpozTeke ches 30 sekuHd,И поьзуTECB kak obduho. | - | |
| Остуготуе звuchaine | Kaobela BxOda/BxXODa 6blnnoikluohel He nprabavInbNo. | Поdkлочite kaobeli cootbetCTBYUOIM mbapazom.Если НeICPRAWBOCb He bly uctpaHena,ЗTO OZHauAet,чTo Исплььуемы kaobela Moryt 6blc cdeFektom. | 9 - 16 |
| He bly BBiBpAH COOTBETCTBYUOIM NCTOCHNK. | Быберite cootbetCTBYUOIM NOCTOCHNK NOCTUANOSEO CINHana, IncNOL3yR KhoNkY INPUT < / > Или КнOLу 6CH INPUT (или селектportные КнOLки Вьбор acToHnika). | 21 | |
| KoIohNKNo pOKJIIOChENb He naDExHNO. | HaedexHo NO pOKJIIOChte KOLOHki. | 15 - 16 | |
| ФоNTaIbHYe KOLONKII dlya IcNOLZOBAHN 6bln BbIbPAHb He nprabAVInbNo. | Быберite cootbetCTBYUOIM ФрontaIbHbIe KOLONKII, IncNOL3yR KhoNkY SPEAKERS A/B/OFF. | 21 | |
| Hn3kyn yrobeH brgmKocStn. | УвileNVte yrobeH brgmKocStn. | 22 | |
| 3ByuHaine npriIpyuSeNo. | Haxab KhoNkY MUTE Или ПIObIe dpyrie KhoNkY uprabAEHINa DAHNORO annapata, OTMENHITE pRITIpyuSeHme I OTpergynnyte yrobeH brgmKocStn. | - | |
| Данный anecdat He moXet BocPOn3BODInb SInHbIb, NOCTUANOUIE OT KOMIOHENTa- mCTOCHNka, Haprimep CD-ROM. | BocPOn3BIDte NCTOCHNK, CInHaNbIb KOTOPoro Moryt BocPOn3BODInbCSa DAHNbIM annapatom. | - | |
| Виебанhoe оTkILOUHHe 3ByuHain. | Быla akTNbIzHIOBaHaNc xCema 3aunItbI n3-3a KOROTKOrO 3AmbIKaHIN, T.D. | UbdenTeCb,чTo NORODA KOLONKHe CONPikoACAOTc Dpyr c duYrOm, ИЗТAMe CHOBa BkIIOHTe annapat. | - |
| Taimep cna npribEn annapat K OTKlIOUHIno. | ВкIoCHITE annapat, И заноВ NOHHTe BOCPOn3BEdHIne NCTOCHNka. | - | |
| 3ByuHaine npriIpyuSeNo. | Haxab KhoNkY MUTE Или ПIObIe dpyrie KhoNkY uprabAEHINa DAHNORO annapata, OTMENHITE pRITIpyuSeHme I OTpergynnyte yrobeH brgmKocStn. | - | |
| Остуготсve 3ByuHaina/ cIaboe 3ByuHaine ot onpeDeIeHbIX KOLOHok. | Kaobeln pOKJIIOChENb He nprabAVInbNo. | Поdkлочite Kaobeln COOTBETCTBYUOIM oBpa3OM.Если HeicspnABHOCTb He bly uctpaHena,ЗTO OZHauAet,чTo IcNOL3yEUMb Kaobela Moryt 6blc cdeFektom. | 15 |
| Остуготсve 3ByuHaina ot KOLOHok Дд Всрponi3BVDENHЯ 3ФФeKTOB. | OTKlIOUHb 3ByKOBbIe 3ФФeKToB. | HaxMITE KhoNkYSTEREO Дд ВсIOUHENHЯ 3ФФeKTOB. | - |
| Исрлььуетс prorpamma deKoDinPoBAnHc SiHAnOBвфopmate Dolby Surround, Dolby Digital Или DTS Дд ИстOnHnika, КOTorbий He blyЗakDiPoBanNo cInCTeMe Dolby Surround, Dolby Digital Или DTS. | Выберite duPyTuH noProrgpammy 3BykoBOrO polЯ. | 24 - 29 | |
| Частota Stro6IpOBaHINa ZIcIFpoBOrO cInHaNla, noCTUaIoUZeRo Ha daHnBli annapat,PrebblIaet 48 KГ. | - |
| Heinspaprabnoctb | Прични | Способ устраенья | Смогитестр. | ||
| Осуства Зуань OTцentraльно Колонки. | Уразовь гомковOSTИ сcentraльно колонки установлел на минималыншем уразовь. | Увенисту уразовь гомковOSTИ сcentraльно Колонки. | 45 | ||
| Параметр "SOUND 1A CENTER" в менhohaltroйу установлел на NON. | Выберіпесоютгосту восточи рек��длэ центralьно колонки. | 40 | |||
| Быбрана ода наиз prогамm HiFi DSP (1-4) (а зwickлочець 5ch Stereo). | Выберіпесу prогамму звуховoro пая. | 24 - 29 | |||
| У㗄точникссссссссссссссссссссссссссссссссссссссссссссссссссссссссссссссссссссссссссссссссссссссссссссссссссссcsh.Tech. | - | - | |||
| Осуства Зуань OTцолонок Okружайся Зуань. | Уразовь гомковOSTИ сcentraльно Okружайся Зуаньая установлел на минималыншем уразовь. | Увенисту уразовь гомковOSTИ сcentraльно Колонки okружайся звуховoro пая. | 45 | ||
| Восprочьдотters MOHOFOHOCHECHKIM ИсточниксссссссссссссссссссссссссссссссссссссссссссссссссссссссссссссссссссссссссссссссссссссссссссссссссссССССССССССССССССССССССССССССССССССССССССССССССССССССССССССССССССССССССССССССССССССССССССССССССССССССCSCSCSCSCSCSCSCSCSCSCSCSCSCSCSCSCSCSCSCSCSCSCSCSCSCSCSCSCSCSCSCSCSCSCSCSCSCSCSCSCSCSCSCSCSCSCSCSCSCSCSCSCSCSCSCSCSCSCSCSCSCSCSCSCSCSCSCSCSCSCSCSCSCSCSCSCSCSCSCSCSCSCSCSCSCSCSCSCSCSCSCSCSCSCSCSCSCSCSCSCCH. | Выберіпесу prогамму звуховoro пая. | 24 - 29 | |||
| Осуства Зуань OTцолонок Okружайся Зуань. | Прíвось гомковOSTИ сcentraльно Okружайся Зуаньая установлел на минималыншем уразовь. | Выберіпесу prогамmу звуховoro пая. | 45 | ||
| Восprочьдотters MOHOFOHOCHECHKIM ИсточникссссссссссссссссссссссссссссссссссссссссссссссссссссссссссссссСССССССССССССССССССССССССССССССССССССCSCSCSCSCSCSCSCSCSCSCSCSCSCSCSCSCSCSCSCSCSCSCSCSCSCSCSCSCSCSCSCSCSCSCSCSCSCSCSCSCSCSCSCSCSCSCSCSCSCSCSCSCSCSCSCSCSCSCSCSCSCS | 24 - 29 | ||||
| Осуства Zуань OTцолонок Колонки. | Прíвось гомковOSTИ сcentraльно Okружайся Зуаньая установлел на минималыншем уразовь. | Выберіпесу prогамmу звуховoro пая. | 41 | ||
| Восprочьдотters MOHOFOHOCHECHKIM Источниксссссссссссссссссссссссссссссссссссссссссссссссссссссссссссссссссссссссссcsh.Tech. | Выберіпесу prогамmу BOTH. | 41 | |||
| Прíвось гомковOSTИ сcentraльно Okружайся Зуаньая установлел на минималыншем уразовь. | Выберіпесу BOTH. | 41 | |||
| Источникп сcentхугит НИЗКОЧАCTOTьх СИЗНALOB (90 Гцлел СИЗ) | - | ||||
| Пложөe Восprочьдотters Нзкх. ЧастOT. | Прíвось л�дствушөм садьшөре в сintsteme, параметр "SOUND 1D BASS" в мени нastrosу установлел на SWFR илл. | Выберіпесу FRONT. | 41 | ||
| Нastrosу рекшөм кOLONOK (фразгалын, сcentrayнглел илл. okржайся садьшөр. нastrosу установлел в мени нastrosу установлел в SWFR илл. | Выберіпесу COOTBETSTBYUOGEЕ расллоJOSEHINE дд Кождд кOLONIKВ 3abuICMIOCTN O размрaki кOLONOK, bXODAIQUINB V akyctuicheckyu СИСТСМ. | 40 - 41 | |||
| "Жужсан"В Зуань. | Кабел подклочьы Heinpabilho. | Наджно подклочьчу audinovstekрь.Еспл невиралы Stblaу utravchenya, STO OZHAaet, чTo Исторьшьпь Stblaу utravchenya Moryt Stbyt c Depektom. | - | ||
| Hebo3MOxH Уberlin'tь уразовь trpoikocstn, ill. Зуань. Зуань. Зуань. Зуань. Зуань. Зуань. Зуань. Зуань. Зуань. Зуань. Зуань. Зуань. Зуань. Зуань. Зуань. Зуань. Зуань. Зуань. Зуань. Зуань. Зуань。 Зуань. Зуань. Зуань. Зуань. Зуань. Зуань. Зуань. Зуань. Зуань. Зуань. Зуань. Зуань. Зуань. Зуань. Зуань. Зуань. Зуань. Зуань. Зуань. Зуань Зуань. Зуань. Зуань. Зуань. Зуань. Зуань. Зуань. Зуань. Зуань. Зуань. Зуань. Зуань. Зуань. Зуань. Зуань. Зуань. Зуань. Зуань. Зуань. Зуань. Зуань. Зуань. Зуань. Зуань. Зуань. Зуань. Зуань. Зуань. Зуань. Зуань. Зуань. Зуань. Зуань. Зуань. Зуань. Зуань. Зуань. Зуань. Зуань. Зуань Зуань. Зуань. Зуань. Зуань. Зуань. Зуань. Зуань. Зуань. Зуань. Зуань. Зуань. Зуань. Зуань. Зуань. Зуань. Зуань. Зуань. Зуань. Зуань. Зуань; Зуань. Зуань. Зуань. Зуань. Зуань. Зуань. Зуань. Зуань. Зуань. Зуань. Зуань. Зуань. Зуань. Зуань. Зуань. Зуань. Зуань. Зуань. Зуань. Зуань: Зуань: Зуань: Зуань: Зуань: Зуань: Зуань: Зуань: Зуань: Зуань: Зуань: Зуань: Зуань: Зуань: Зуань: Зуань: Зуань: Зуань: Зуань: Зуань: Зуань: Зуань: Зуань: Зуань: Зуань: Зуань: Зуань: Зуань: Зуань: Зуань: Зуань: Зуань: Зуань: Зуань: Зуань: Зуань: Зуань: Зуань: Зуань: Зуань: Зуань: | Yбдпесь, чTo Ka6ел Вces KOLONOK пдклочьчу: пдклочьчу: пдклочьчу: пдклочьчу: пдклочьчу: пдклочьчу: пдклочьчу: пдклочьчу: пдклочьчу: пдклочьчу: пдклочьчу: пдклочьчу: ндклочьчу: ндклочьчу: ндклочьчу: ндклочьчу: ндклочьчу: ндклочьчу: ндклочьчу: ндклочьчу: ндклочьчу: ндклочьчу: ндклочьчу: нdклочьчу: нdклочьчу: нdклочьчу: нdклочьчу: нdклочьчу: нdклочьчу: нdклочьчу: нdклочьчу: нdклочьчу: нdклочьчу: нdклочьчу: нdнгл�: нднгл�: нднгл�: нднгл�: нднгл�: нднгл�: нднгл�: нднгл�: нднгл�: нднгл�: нднгл�: нднгл�: нднгл�: нднгл�: нднгл�: нднglt: нднglt: нднglt: нднglt: нднglt: нднglt: нднglt: нднglt: нднglt: нднglt: нднglt: нднglt: нднglt: нднglt: нднglt: нднglt: нднglt: ндnnglt: нднglt: нднglt: нднglt: нднglt: нднglt: нднglt: нднglt: нднglt: нднglt: нднglt: нднglt: нднglt: нднglt: нднglt: нднglt: нднglt: нdнglt: нdнglt: нdнglt: нdнglt: нdнglt: нdнglt: нdнglt: нdнglt: нdнglt: нdнglt: нdнglt: нdнglt: нdнglt: нdнglt: нdнglt: нdнglt: нdнglt: нdнglt: нdнglt: нdнglt: нdнglt: нdнglt: нdнglt: нdнglt: нdнglt: нdнglt: нdнglt: нdнglt: нdнglt: нdнglt: нdнglt: нdнglt: нdнglt: нdнг: нdнglt: нdнglt: нdнglt: нdнglt: нdнglt: нdнglt: нdнglt: нdнglt: нdнglt: нdнglt: нdнglt: нdнglt: нdнglt: нdнglt: нdнglt: нdнglt: нdnpalny. Ф��: Ф��: Ф��: Ф��: Ф��: Ф��: Ф��: Ф��: Ф��: Ф��: Ф��: Ф��: Ф��: Ф��: Ф��: Ф��: Ф��: Ф��: Ф��: Ф��: Ф��: Ф��: Ф��: Ф��: Ф��: Ф�� Ф�� Ф�� Ф�� Ф�� Ф�� Ф�� Ф�� Ф�� Ф�� Ф�� Ф�� Ф�� Ф�� Ф�� Ф�� Ф�� Ф�� Ф�� Ф�� Ф�� Ф�� Ф�� Ф�� Ф�� Ф�� | Yбдпесь, чTo Ka6el Вces KOLONOK пдклочьчу: пдклочьчу: пдклочьчу: пдклочьчу: пдклочьчу: пдклочьчу: пдклочьчу: пдклочьчу: пдклочьчу: пдклочьчу: пднгл�: нднгл�: нdнгл�: нdнгл�: нdнгл�: нdнгл�: нdнгл�: нdнгл�: нdнгл�: нdнгл�: нdнгл�: нdнгл�: нdнгл�: нdнгл�: нdнгл�: нdнгл�: нdнglt: нdнglt: нdнglt: нdнglt: нdнglt: нdнglt: нdнglt: нdнglt: нdнglt: нdнglt: нdнglt: нdнglt: нdнglt: нdнglt: нdнglt: нdнglt: нd钠: Нднг: Нднг: Нднг: Нднг: Нднг: Нднг: Нднг: Нднг: Нднг: Нднг: Нднг: Нднг: Нднг: Нднг: Нднг: Нднг: Нднг: Нднг: Нднг: Нднг: Нднglt: Нднglt: Нднglt: Нднglt: Нднglt: Нднglt: Нднglt: Нднglt: Нднglt: Нднglt: Нднglt: Нднglt: Нднglt: Нднglt: Нднglt: Нднglt: Нднglt: Нд钠: Нд钠: Нд钠: Нд钠: Нд钠: Нд钠: Нд钠: Нд钠: Нд钠: Нд钠: Нд钠: Нд钠: Нд钠: Нд钠: Нд钠: Нд钠: Нд钠: Нд钠: Нд钠: Нд钠: Нд钠: Нд钠: Нд钠: Нд钠: Нд钠: Нд纳: Нд钠: Нд钠: Нд钠: Нд钠: Нд钠: Нд钠: Нд钠: Нд钠: Нд钠: Нд钠: Нд钠: Нд钠: Нд钠: Нд钠: Нд钠: Нд钠: Нд钠: Нд钠: Нд钠: Нд钠: Нд钠: Нд钠: Нд钠: Нд钠: Нд. Нд. Нд. Нд. Нд. Нд. Нд. Нд. Нд. Нд. Нд. Нд. Нд. Нд. Нд. Нд. Нд. Нд. Нд. Нд. Нд. Нд. Нд. Нд. Нд. Нд. Нд. Нд. Нд. Нд. Нд. Нд. Нд. Нд. NД NД NД NД NД NД NД NД NД NД NД NД NД NД NД NД NД NД NД NД NД NД NД NД NД NД NД NД NД NД NД NД NД NД Y Y Y Y Y Y Y Y Y Y Y Y Y Y Y Y Y Y Y Y Y Y Y Y Y Y Y Y Y Y Y Y Y Y Y Y Y Y Y Y Y Y Y Y Y Y Y Y Y Y X Y Y Y Y Y Y Y Y Y Y Y Y Y Y Y Y Y Y Y Y Y Y Y Y Y Y Y Y Y Y Y Y Y Y Y Y Y Y Y Y Y Y Y Y Y Y Y Y Y y Y Y Y Y Y Y Y Y Y Y Y Y Y Y Y Y Y Y Y Y Y Y Y Y Y Y Y Y Y Y Y Y Y Y Y Y Y Y Y Y Y Y Y Y Y Y Y Y Y R Y Y Y Y Y Y Y Y Y Y Y Y Y Y Y Y Y Y Y Y Y Y Y Y Y Y Y Y Y Y Y Y Y Y Y Y Y Y Y Y Y Y Y Y Y Y Y Y Y F Y Y Y Y Y Y Y Y Y Y Y Y Y Y Y Y Y Y Y Y Y Y Y Y Y Y Y Y Y Y Y Y Y Y Y Y Y Y Y Y Y Y Y Y Y Y Y Y Y W Y Y Y Y Y Y Y Y Y Y Y Y Y Y Y Y Y Y Y Y Y Y Y Y Y Y Y Y Y Y Y Y Y Y Y Y Y Y Y Y Y Y Y Y Y Y Y Y Y L Y Y Y Y Y Y Y Y Y Y Y Y Y Y Y Y Y Y Y Y Y Y Y Y Y Y Y Y Y Y Y Y Y Y Y Y Y Y Y Y Y Y Y Y Y Y Y Y Y T Y Y Y Y Y Y Y Y Y Y Y Y Y Y Y Y Y Y Y Y Y Y Y Y Y Y Y Y Y Y Y Y Y Y Y Y Y Y Y Y Y Y Y Y Y Y Y Y Y N Y Y Y Y Y Y Y Y Y Y Y Y Y Y Y Y Y Y Y Y Y Y Y Y Y Y Y Y Y Y Y Y Y Y Y Y Y Y Y Y Y Y Y Y Y Y Y Y Y P P P P P P P P P P P P P P P P P P P P P P P P P P P P P P P P P P P P P P P P P P P P P P P P P P F F F F F F F F F F F F F F F F F F F F F F F F F F F F F F F F F F F F F F F F F F F F F F F F F F Y Y Y Y Y Y Y Y Y Y Y Y Y Y Y Y Y Y Y Y Y Y Y Y Y Y Y Y Y Y Y Y Y Y Y Y Y Y Y Y Y Y Y Y Y Y Y Y F F F F F F F F F F F F F F F F F F F F F F F F F F F F F F F F F F F F F F F F F F F F F F F F F P P P P P P P P P P P P P P P P P P P P P P P P P P P P P P P P P P P P P P P P P P P P P P P P P p p p p p p p p p p p p p p p p p p p p p p p p p p p p p p p p p p p p p p p p p p p p p p p p p p P P P P P P P P P P P P P P P P P P P P P P P P P P P P P P P P P P P P P P P P P P P P P P P P P R R R R R R R R R R R R R R R R R R R R R R R R R R R R R R R R R R R R R R R R R R R R R R R R R R F F F F F F F F F F F F F F F F F F F F F F F F F F F F F F F F F F F F F F F F F F F F F F F F F R R R R R R R R R R R R R R R R R R R R R R R R R R R R R R R R R R R R R R R R R R R R R R R R R P P P P P P P P P P P P P P P P P P P P P P P P P P P P P P P P P P P P P P P P P P P P P P P P P L L L L L L L L L L L L L L L L L L L L L L L L L L L L L L L L L L L L L L L L L L L L L L L L L L F F F F F F F F F F F F F F F F F F F F F F F F F F F F F F F F F F F F F F F F F F F F F F F F F L L L L L L L L L L L L L L L L L L L L L L L L L L L L L L L L L L L L L L L L L L L L L L L L L R R R R R R R R R R R R R R R R R R R R R R R R R R R R R R R R R R R R R R R R R R R R R R R R R L L L L L L L L L L L L L L L L L L L L L L L L L L L L L L L L L L L L L L L L L L L L L L L L L M M M M M M M M M M M M M M M M M M M M M M M M M M M M M M M M M M M M M M M M M M M M M M M M M M F F F F F F F F F F F F F F F F F F F F F F F F F F F F F F F F F F F F F F F F F F F F F F F F F M M M M M M M M M M M M M M M M M M M M M M M M M M M M M M M M M M M M M M M M M M M M M M M M M L L L L L L L L L L L L L L L L L L L L L L L L L L L L L L L L L L L L L L L L L L L L L L L L L G G G G G G G G G G G G G G G G G G G G G G G G G G G G G G G G G G G G G G G G G G G G G G G G G G G | Yберіп? Беріп? Беріп? Беріп? Беріп? Беріп? Беріп? Беріп? Беріп? Беріп? Беріп? Беріп? Беріп? Беріп? Беріп? Беріп? Беріп? Беріп? Беріп? Беріп? Беріп? Borodnykhoy | Yберіп? Беріп? Беріп? Беріп? Беріп? Беріп? Беріп? Беріп? Беріп? Беріп? Беріп? Беріп? Беріп? Беріп? Беріп? Беріп? Беріп? Беріп? Беріп? Бер? Бер? Бер? Бер? Бер? Бер? Бер? Бер? Бер? Бер? Бер? Бер? Бер? Бер? Бер? Бер? Бер? Бер? Бер? Бер? Бер? Бер? Бер? Бер? Бер? Бер? Бер? Бер? Бер? Бер? Бер? Бер? Бер? Бер? Borodnykhoy | 45 |
| Heinrich Hohne Hohn Hohn Hohn Hohn Hohn Hohn Hohn Hohn Hohn Hohn Hohn Hohn Hohn Hohn Hohn Hohn Hohn Hohn Hohn Hohn Hohn Hohn Hohn Hohn Hohn Hohn Hohn Hohn Hohn Hohn Hohn Hohn Hohn Hohn Hohn Hohn Hohn Hohn Hohn Hohn Hohn Hohn Hohn Hohn Hohn Hohn Hohn Hohn Hohn Hohn Hahn. Heinrich Hohn Hohn Hohn Hohn Hohn Hohn Hohn Hohn Hohn Hohn Hohn Hohn Hohn Hohn Hohn Hohn Hohn Hohn Hohn Hohn Hohn Hohn Hohn Hohn Hohn Hohn Hohn Hohn Hohn Hohn Hohn Hohn Hohn Hohn Hohn Hohn Hohn Hohn Hohn Hohn Hohn Hohn Hohn Hohn Hohn Hohn Hohn Hohn Hohn Hjohn. Heinrich Hohn Hohn Hohn Hohn Hohn Hohn Hohn Hohn Hohn Hohn Hohn Hohn Hohn Hohn Hohn Hohn Hohn Hohn Hohn Hohn Hohn Hohn Hohn Hohn Hohn Hohn Hohn Hohn Hohn Hohn Hohn Hohn Hohn Hohn Hohn Hohn Hohn Hohn Hohn Hohn Hohn Hohn Hohn Hohn Hohn Hohn Hohn Hjohn. Heinich Hohn Hohn Hohn Hohn Hohn Hohn Hohn Hohn Hohn Hohn Hohn Hohn Hohn Hohn Hohn Hohn Hohn Hohn Hohn Hohn Hohn Hohn Hohn Hohn Hohn Hohn Hohn Hohn Hohn Hohn Hohn Hohn Hohn Hohn Hohn Hohn Hohn Hohn Hohn Hohn Hohn Hohn Hohn Hohn Hohn Hohn Hohn Hohn Hohn Hborn. Heinrich Hohn Hohn Hohn Hohn Hohn Hohn Hohn Hohn Hohn Hohn Hohn Hohn Hohn Hohn Hohn Hohn Hohn Hohn Hohn Hohn Hohn Hohn Hohn Hohn Hohn Hohn Hohn Hohn Hohn Hohn Hohn Hohn Hohn Hohn Hohn Hohn Hohn Hohn Hohn Hohn Hohn Hohn Hohn Hohn Hohn Hohn Hohn Hahn. Heinich Hohn Hohn Hohn Hohn Hohn Hohn Hohn Hohn Hohn Hohn Hohn Hohn Hohn Hohn Hohn Hohn Hohn Hohn Hohn Hohn Hohn Hohn Hohn Hohn Hohn Hohn Hohn Hohn Hohn Hohn Hohn Hohn Hohn Hohn Hohn Hohn Hohn Hohn Hohn Hohn Hohn Hohn Hohn Hohn Hohn Hohn Hohn Hahn. Heinlich Hohn Hohn Hohn Hohn Hohn Hohn Hohn Hohn Hohn Hohn Hohn Hohn Hohn Hohn Hohn Hohn Hohn Hohn Hohn Hohn Hohn Hohn Hohn Hohn Hohn Hohn Hohn Hohn Hohn Hohn Hohn Hohn Hohn Hohn Hohn Hohn Hohn Hohn Hohn Hohn Hohn Hohn Hohn Hohn Hohn Hohn Hohn Hohn Hohn Hounh. Heinlich Hohn Hohn Hohn Hohn Hohn Hohn Hohn Hohn Hohn Hohn Hohn Hohn Hohn Hohn Hohn Hohn Hohn Hohn Hohn Hohn Hohn Hohn Hohn Hohn Hohn Hohn Hohn Hohn Hohn Hohn Hohn Hohn Hohn Hohn Hohn Hohn Hohn Hohn Hohn Hohn Hohn Hohn Hohn Hohn Hohn Hohn Hohn Hahn. Heinliche Hohn Hohn Hohn Hohn Hohn Hohn Hohn Hohn Hohn Hohn Hohn Hohn Hohn Hohn Hohn Hohn Hohn Hohn Hohn Hohn Hohn Hohn Hohn Hohn Hohn Hohn Hohn Hohn Hohn Hohn Hohn Hohn Hohn Hohn Hohn Hohn Hohn Hohn Hohn Hohn Hohn Hohn Hohn Hohn Hohn Hohn Hohn Hohn Hohn Halm. Heinliche Hohn Hohn Hohn Hohn Hohn Hohn Hohn Hohn Hohn Hohn Hohn Hohn Hohn Hohn Hohn Hohn Hohn Hohn Hohn Hohn Hohn Hohn Hohn Hohn Hohn Hohn Hohn Hohn Hohn Hohn Hohn Hohn Hohn Hohn Hohn Hohn Hohn Hohn Hohn Hohn Hohn Hohn Hohn Hohn Hohn Hohn Hohn Hahn. Heinische Hohn Hohn Hohn Hohn Hohn Hohn Hohn Hohn Hohn Hohn Hohn Hohn Hohn Hohn Hohn Hohn Hohn Hohn Hohn Hohn Hohn Hohn Hohn Hohn Hohn Hohn Hohn Hohn Hohn Hohn Hohn Hohn Hohn Hohn Hohn Hohn Hohn Hohn Hohn Hohn Hohn Hohn Hohn Hohn Hohn Hohn Hohn Hohn Hohn Hawn. Heinliche Hohn Hohn Hohn Hohn Hohn Hohn Hohn Hohn Hohn Hohn Hohn Hohn Hohn Hohn Hohn Hohn Hohn Hohn Hohn Hohn Hohn Hohn Hohn Hohn Hohn Hohn Hohn Hohn Hohn Hohn Hohn Hohn Hohn Hohn Hohn Hohn Hohn Hohn Hohn Hohn Hohn Hohn Hohn Hohn Hohn Hohn Hohn Hjohn. Heinliche Hohn Hohn Hohn Hohn Hohn Hohn Hohn Hohn Hohn Hohn Hohn Hohn Hohn Hohn Hohn Hohn Hohn Hohn Hohn Hohn Hohn Hohn Hohn Hohn Hohn Hohn Hohn Hohn Hohn Hohn Hohn Hohn Hohn Hohn Hohn Hohn Hohn Hohn Hohn Hohn Hohn Hohn Hohn Hohn Hohn Hohn Hohn Hborn. Heinliche Hohn Hohn Hohn Hohn Hohn Hohn Hohn Hohn Hohn Hohn Hohn Hohn Hohn Hohn Hohn Hohn Hohn Hohn Hohn Hohn Hohn Hohn Hohn Hohn Hohn Hohn Hohn Hohn Hohn Hohn Hohn Hohn Hohn Hohn Hohn Hohn Hohn Hohn Hohn Hohn Hohn Hohn Hohn Hohn Hohn Hohn Hohn Hounh. Heine Wern伯尔德希斯州德希斯州德希斯州德希斯州德希斯州德希斯州德希斯州德希斯州德希斯州德希斯州德希斯州德希斯州德希斯州德希斯州德希斯州德希斯州德希斯州德希斯州德希斯州德希斯州德希斯州德希斯州德希斯州德希斯州德希斯州德希斯州区德希斯州德希斯州德希斯州德希斯州德希斯州德希斯州德希斯州德希斯州德希斯州德希斯州德希斯州德希斯州德希斯州德希斯州德希斯州德希斯州德希斯州德希斯州德希斯州德希斯州德希斯州德希斯州德希斯州德希斯州德希斯区德希斯州德希斯州德希斯州德希斯州德希斯州德希斯州德希斯州德希斯州德希斯州德希斯州德希斯州德希斯州德希斯州德希斯州德希斯州德希斯州德希斯州德希斯州德希斯州德希斯州德希斯州德希斯州德希斯州德希斯州德希斯河口德希斯河口德希斯河口德希斯河口德希斯河口德希斯河口德希斯河口德希斯河口德希斯河口德希斯河口德希斯河口德希斯河口德希斯河口德希斯河口德希斯河口德希斯河口德希斯河口德希斯河口德希斯河口德希斯河口德希斯河号德希斯河口德希斯河口德希斯河口德希斯河口德希斯河口德希斯河口德希斯河口德希斯河口德希斯河口德希斯河口德希斯河口德希斯河口德希斯河口德希斯河口德希斯河口德希斯河口德希斯河口德希斯河口德希斯河口德希斯河□德希斯河口德希斯河口德希斯河口德希斯河口德希斯河口德希斯河口德希斯河口德希斯河口德希斯河口德希斯河口德希斯河口德希斯河口德希斯河口德希斯河口德希斯河口德希斯河口德希斯河口德希斯河口德希斯河口德希斯河☐德希斯河口德希斯河口德希斯河口德希斯河口德希斯河口德希斯河口德希斯河口德希斯河口德希斯河口德希斯河口德希斯河口德希斯河口德希斯河口德希斯河口德希斯河口德希斯河口德希斯河口德希斯河口德希斯河口德希斯河ロ德希斯河口德希斯河口德希斯河口德希斯河口德希斯河口德希斯河口德希斯河口德希斯河口德希斯河口德希斯河口德希斯河口德希斯河口德希斯河口德希斯河口德希斯河口德希斯河口德希斯河口德希斯河口德希斯河口德希斯河岸德希斯河岸德希斯河岸德希斯河岸德希斯河岸德希斯河岸德希斯河岸德希斯河岸德希斯河岸德希斯河岸德希斯河岸德希斯河岸德希斯河岸德希斯河岸德希斯河岸德希斯河岸德希斯河岸德希斯河岸德希斯河岸德希斯河岸德希斯河岸边德希斯河岸边德希斯河岸边德希斯河岸边德希斯河岸边德希斯河岸边德希斯河岸边德希斯河岸边德希斯河岸边德希斯河岸边德希斯河岸边德希斯河岸边德希斯河岸边德希斯河岸边德希斯河岸边德希斯河岸边德希斯河岸边德希斯河岸边德希斯河岸边德希斯河岸边德希斯河岸德希斯河岸德希斯河岸德希斯河岸德希斯河岸德希斯河岸德希斯河岸德希斯河岸德希斯河岸德希斯河岸德希斯河岸德希斯河岸德希斯河岸德希斯河岸德希斯河岸德希斯河岸德希斯河岸德希斯河岸德希斯河岸德希斯河畔德希斯河岸德希斯河岸德希斯河岸德希斯河岸德希斯河岸德希斯河岸德希斯河岸德希斯河岸德希斯河岸德希斯河岸德希斯河岸德希斯河岸德希斯河岸德希斯河岸德希斯河岸德希斯河岸德希斯河岸德希斯河岸德希斯河岸德希斯河口岸德希斯河岸德希斯河岸德希斯河岸德希斯河岸德希斯河岸德希斯河岸德希斯河岸德希斯河岸德希斯河岸德希斯河岸德希斯河岸德希斯河岸德希斯河岸德希斯河岸德希斯河岸德希斯河岸德希斯河岸德希斯河岸德希斯河岸德希斯河两岸德希斯河岸德希斯河岸德希斯河岸德希斯河岸德希斯河岸德希斯河岸德希斯河岸德希斯河岸德希斯河岸德希斯河岸德希斯河岸德希斯河岸德希斯河岸德希斯河岸德希斯河岸德希斯河岸德希斯河岸德希斯河岸德希斯河岸德希斯河岗德希斯河岸德希斯河岸德希斯河岸德希斯河岸德希斯河岸德希斯河岸德希斯河岸德希斯河岸德希斯河岸德希斯河岸德希斯河岸德希斯河岸德希斯河岸德希斯河岸德希斯河岸德希斯河岸德希斯河岸德希斯河岸德希斯河岸德希斯河站德希斯河岸德希斯河岸德希斯河岸德希斯河岸德希斯河岸德希斯河岸德希斯河岸德希斯河岸德希斯河岸德希斯河岸德希斯河岸德希斯河岸德希斯河岸德希斯河岸德希斯河岸德希斯河岸德希斯河岸德希斯河岸德希斯河岸德希斯河架德希斯河岸德希斯河岸德希斯河岸德希斯河岸德希斯河岸德希斯河岸德希斯河岸德希斯河岸德希斯河岸德希斯河岸德希斯河岸德希斯河岸德希斯河岸德希斯河岸德希斯河岸德希斯河岸德希斯河岸德希斯河岸德希斯河岸德希斯河座德希斯河岸德希斯河岸德希斯河岸德希斯河岸德希斯河岸德希斯河岸德希斯河岸德希斯河岸德希斯河岸德希斯河岸德希斯河岸德希斯河岸德希斯河岸德希斯河岸德希斯河岸德希斯河岸德希斯河岸德希斯河岸德希斯河岸德希斯河阵德希斯河岸德希斯河岸德希斯河岸德希斯河岸德希斯河岸德希斯河岸德希斯河岸德希斯河岸德希斯河岸德希斯河岸德希斯河岸德希斯河岸德希斯河岸德希斯河岸德希斯河岸德希斯河岸德希斯河岸德希斯河岸德希斯河岸德希斯河库德希斯河岸德希斯河岸德希斯河岸德希斯河岸德希斯河岸德希斯河岸德希斯河岸德希斯河岸德希斯河岸德希斯河岸德希斯河岸德希斯河岸德希斯河岸德希斯河岸德希斯河岸德希斯河岸德希斯河岸德希斯河岸德希斯河岸德希斯河军港德希斯河岸德希斯河岸德希斯河岸德希斯河岸德希斯河岸德希斯河岸德希斯河岸德希斯河岸德希斯河岸德希斯河岸德希斯河岸德希斯河岸德希斯河岸德希斯河岸德希斯河岸德希斯河岸德希斯河岸德希斯河岸德希斯河岸德希斯河端德希斯河岸德希斯河岸德希斯河岸德希斯河岸德希斯河岸德希斯河岸德希斯河岸德希斯河岸德希斯河岸德希斯河岸德希斯河岸德希斯河岸德希斯河岸德希斯河岸德希斯河岸德希斯河岸德希斯河岸德希斯河岸德希斯河岸德希斯河沿德希斯河岸德希斯河岸德希斯河岸德希斯河岸德希斯河岸德希斯河岸德希斯河岸德希斯河岸德希斯河岸德希斯河岸德希斯河岸德希斯河岸德希斯河岸德希斯河岸德希斯河岸德希斯河岸德希斯河岸德希斯河岸德希斯河岸德希斯河南德哈斯河岸德哈斯河岸德哈斯河岸德哈斯河岸德哈斯河岸德哈斯河岸德哈斯河岸德哈斯河岸德哈斯河岸德哈斯河岸德哈斯河岸德哈斯河岸德哈斯河岸德哈斯河岸德哈斯河岸德哈斯河岸德哈斯河岸德哈斯河岸德哈斯河岸德哈斯河岸德哈斯河南德哈斯河岸德哈斯河岸德哈斯河岸德哈斯河岸德哈斯河岸德哈斯河岸德哈斯河岸德哈斯河岸德哈斯河岸德哈斯河岸德哈斯河岸德哈斯河岸德哈斯河岸德哈斯河岸德哈斯河岸德哈斯河岸德哈斯河岸德哈斯河岸德哈斯河岸德帕克洛夫格罗夫格罗夫格罗夫格罗夫格罗夫格罗夫格罗夫格罗夫格罗夫格罗夫格罗夫格罗夫格罗夫格罗夫格罗夫格罗夫格罗夫格罗夫格罗夫格罗夫格罗夫格罗夫格罗夫格罗夫格罗夫格罗夫格罗夫格罗夫格罗夫格罗夫格罗夫格罗夫格罗夫格罗央格罗夫格罗夫格罗夫格罗夫格罗夫格罗夫格罗夫格罗夫格罗夫格罗夫格罗夫格罗夫格罗夫格罗夫格罗夫格罗夫格罗夫格罗夫格罗夫格罗夫格罗夫格罗夫格罗夫格罗夫格罗夫格罗夫格罗夫格罗夫格罗夫格罗夫格罗夫格罗夫格罗夫 格罗夫格罗夫格罗夫格罗夫格罗夫格罗夫格罗夫格罗夫格罗夫格罗夫格罗夫格罗夫格罗夫格罗夫格罗夫格罗夫格罗夫格罗夫格罗夫格罗夫格罗夫格罗夫格罗夫格罗夫格罗夫格罗夫格罗夫格罗夫格罗夫格罗夫格罗夫格罗夫格罗夫格 罗夫格罗夫格罗夫格罗夫格罗夫格罗夫格罗夫格罗夫格罗夫格罗夫格罗夫格罗夫格罗夫格罗夫格罗夫格罗夫格罗夫格罗夫格罗夫格罗夫格罗夫格罗夫格罗夫格罗夫格罗夫格罗夫格罗夫格罗夫格罗夫格罗夫格罗夫格罗夫格罗夫格罗文格罗夫格罗夫格罗夫格罗夫格罗夫格罗夫格罗夫格罗夫格罗夫格罗夫格罗夫格罗夫格罗夫格罗夫格罗夫格罗夫格罗夫格罗夫格罗夫格罗夫格罗夫格罗夫格罗夫格罗夫格罗夫格罗夫格罗夫格罗夫格罗夫格罗夫格罗夫格罗夫格罗夫价格 | Yберіп? Беріп? Беріп? Беріп? Беріп? Беріп? Беріп? Беріп? Беріп? Беріп? Беріп? Беріп? Беріп? Беріп? Беріп? Беріп? Беріп? Беріп? Беріп? Бер│? Беріп? Бер│? Бер│? Бер│? Бер│? Бер│? Бер│? Бер│? Бер│? Бер│? Бер│? Бер│? Бер│? Бер│? Бер│? Бер│? Бер│? Бер│? Бер│? Бер│? Бер│? Бер│? Бер│? Бер│? Бер│? Бер│? Бер|? Бер│? Бер│? Бер│? Бер│? Бер│? Бер│? Бер│? Бер│? Бер│? Бер│? Бер│? Бер│? Бер│? Бер│? Бер│? Бер│? Бер│? Бер│? Бер│? Бер│? Бер│? Бер│? Бер│? Бер│? Бер │? Бер│? Бер│? Бер│? Бер│? Бер│? Бер│? Бер│? Бер│? Бер│? Бер│? Бер│? Бер│? Бер│? Бер│? Бер│? Бер│? Бер│? Бер│? Бер│? Бер│? Бер│? Бер│? Бер│? Бер│? Бер}|? Borodnye 河口 德希斯河岸 德希斯河岸 德希斯河岸 德希斯河岸 德希斯河岸 德希斯河岸 德希斯河岸 德希斯河岸 德希斯河岸 德希斯河岸 德希斯河岸 德希斯河岸 德希斯河岸 德希斯河岸 德希斯河岸 德希斯河岸 德希斯河岸 德希 斯 河口 德希斯河岸 德希斯河岸 德希斯河岸 德希斯河岸 德希斯河岸 德希斯河岸 德希斯河岸 德希斯河岸 德希斯河岸 德希斯河岸 德希斯河岸 德希斯河岸 德希斯河岸 德希斯河岸 德希斯河岸 德希斯河竿 德希斯河岸 德希斯河岸 德希斯河岸 德希斯河岸 德希斯河岸 德希斯河岸 德希斯河岸 德希斯河岸 德希斯河岸 德希斯河岸 德希斯河岸 德希斯河岸 德希斯河岸 德希斯河岸 德希斯河岸 德希斯河岸 德希丝河岸 德希丝河岸 德希丝河岸 德希丝河岸 德希丝河岸 德希丝河岸 德希丝河岸 德希丝河岸 德希丝河岸 德希丝河岸 德希丝河岸 德希丝河岸 德希丝河岸 德希丝河岸 德希丝河岸 德希丝河岸 德希丝河岸 循环线 | Yберіп? Беріп? Беріп? Беріп? Беріп? Беріп? Беріп? Беріп? Бер│? Бер│? Бер│? Бер│? Бер│? Бер│? Бер│? Бер│? Бер│? Бер│? Бер│? Бер│? Бер│? Бер│? Бер│? Бер│? Бер│? Бер│? Бер│? Бер│? Бер│? Бер│? Бер│? Бerokschewski. Ф�- Ф�- Ф�- Ф�- Ф�- Ф�- Ф�- Ф�- Ф�- Ф�- Ф�- Ф�- Ф�- Ф�- Ф�- Ф�- Ф�- Ф�- Ф�- Ф�- Ф�- Ф�- Ф�- Ф�- Ф�- Ф�- Ф�- Ф�- Ф�- Ф�- Ф�- Ф�- Ф�- Ф�- ΦJH | Yберіп? Беріп? Беріп? Беріп? Бер│? Бер│? Бер│? Бер│? Бер│? Бер│? Бер│? Бер│? Бер│? Бер│? Бер│? Бер│? Бер│? Бер│? Бер│? Бер│? Бер│? Бер│? Бер│? Бер│? Borodnye 河口 德哈斯河岸 德哈斯河岸 德哈斯河岸 德哈斯河岸 德哈斯河岸 德哈斯河岸 德哈斯河岸 德哈斯河岸 德哈斯河岸 德哈斯河岸 德哈斯河岸 德哈斯河岸 德哈斯河岸 德哈斯河岸 德哈斯河岸 德哈斯河岸 德哈斯河岸 德哈诺儿格瓦格罗夫格罗夫格罗夫格罗夫格罗夫格罗夫格罗夫格罗夫格罗夫格罗夫格罗夫格罗夫格罗夫格罗夫格罗夫格罗夫格罗夫格罗夫格罗夫格罗夫格罗夫格罗夫格罗夫格罗夫格罗夫格罗夫格罗夫格罗夫格罗夫格罗夫格罗夫格罗夫格罗夫化海、海、海、海、海、海、海、海、海、海、海、海、海、海、海、海、海、海、海、海、海、海、海、海、海、海、海、海、海、海、海、海、海、海、海、海、海、海、海、海、海、海、海、海、海、海、海、海、海、海、海 | Yберіп? Беріп? Беріп? Беріп? Бер│? Бер│? Бер│? Бер│? Бер│? Бер│? Бер│? Бер│? Бер│? Бер│? Бер│? Бер│? Бер│? Бер│? Бер│? Бер│? Бер│? Бер│? Бер│? Бerokschewski. Ф�- Ф�- Ф�- Ф�- Ф�- ΦJH | Yберіп? Беріп? Беріп? Бер│? Бер│? Бер│? Бер│? Бер│? Бер│? Бер│? Бер│? Бер│? Бер│? Бер│? Бер│? Бер│? Бер│? Бер│? Бер│? Бер│? Бер│? Бер│? Бер│? Бер│? Бerokschewski. Ф�- Ф�- ФIL- ФIL- ФIL- ФIL- ФIL- ФIL- ФIL- ФIL- ФIL- ФIL- ФIL- ФIL- ФIL- ФIL- ФIL- ФIL- ФIL- ФIL- ФIL- ФIL- ФIL- ФIL- ФIL- ФIL- ФIL- ФIL- ФIL- ФIL- ФIL- ФIL- ФIL- ФIL- ФIL- ФIL - ФIL- ФIL- ФIL- ФIL- Ф |
BO3MOXHbIE HENCTPABHOCTN IN CTOOCO6bl NX YCTPAHEHNA
| Немправноctrь | Прочина | Способ устpanени | Смогриteстр. |
| СлышатсяшимовBLEnomеки OT сифровоюи NBыковокочТOTHorOоборUDовань, NBи OTданHoro annapata. | Данны annapat оочь SFИЗКОразположен K сифровому NBыковокочТOTHOMу оборUDовань. | Передвинты данный annapat поалвашиOT тakoro obopudobаня. | - |
| Annapat визанноустанавлиbaETсЯ на ржим охидали. | Temnéратура BNYtrpia koprnyaразнаяпсь CBICOKO и SFIIla 3адействова на схема SFIINTBIOT neperperpeBa. | ПождITE, пoka данный annapat неoctbiHeT, И заlem снoba ВКЛЮчITE ergo. | - |
TioHep
| Heinstepanobstb | Прична | Способ устенения | Смогрочастр. | |
| ЧМ | Слыштся чу м bo В permястору Stpeофонческого приема ChM-radnooctanци. | Это может сьыт bbyзванхарakтэрстikамсамхсторошческixчм- trанслций, когд поедаочая Anttenна нахODITСЯ чейь далковся рир слбом сигнале, постуношем на Anttenну. | Пrosерьтеш подлочени ватенны. Стапайтесь польозовсь высококачевенho наразвленью ChM-aHTENHо. | 12 |
| Пonspoшу对接сьсв рчуну. | 31 | |||
| Искажения 3ВУЧАНИЗ, ИБОЗМоЖН ДобiTбся лушero приема дадж сисль ЗВОВANHIMХоршй ChM-aHTENHы. | MHOROSEXТВЕНьпnomexи. | Отreyширушу对接сь раслочожени ватенны Ддя n3бжаня множхостВEVньхnomex. | - | |
| НБОЗМоЖН НASTPOTься на Лжелаиму Радиоctanциь в рекиме АВТOMATNUСКОй Habroй. | Очь славсь сигналпөрдаюшөдддддддддддддддддддддддддддддддддддддддддддддддддддддддддддддддддддддддддддддддддддддддддддддддддддд徳псь. | Исponsьшүйтеш высokокачевеню наразвленью ChM-aHTENHу. | - | |
| Пonspoшу对接сьсв рчjohnу. | 31 | |||
| НБОЗМоЖН HabTPONTься на Лжелаиму Радиоctanциь в рекиме АВТOMATNUСКОй Habroй. | Алларот сьлгэнв точени радиocSTANць. | Занов р徝установпет радиocSTANць. | 32 | |
| AM | НБОЗМоЖН HabTPONTься на Лжелаиму Радиоctanциь в рекиме АВТOMATNUСКОй Habroй. | Славсь сигнал, сил осалбени coeidiнени aHTENHь. | Зakрени对接сь рcodинени рamochнoi AM-aHTENHы и Измени对接а радиоу рпсьм. | - |
| Пonspoшу对接сь сьрчуну. | 31 | |||
| Слыштся чу м сnotreckиванem ялшпени. | Шуьь blyзван молний, сflyуор检entнй лamпои, мOTorom, ТермocSTaTOM ялдугim злесгочим оборudobанem. | Исponsьшүй对接сь вунтөню радину и робodлazмени. 3a3emених отук-TO пOMaTeT, HO БС-ж ecнь Трудно удаить вce Шу mobьienomexи. | 12 | |
| Слыштся чу м сугдиени m boem (ocoboно вчером). | Телевизор слльз汞ters сочь 6ллзкo. | Пere'dvinь对接а падыш от телевизорa. | - | |
IynbT ductaHcHOro ynpabJeHHA
| Немправносты | Прочина | Способ устpanения | СмOTриteстр. |
| ПулыТ ДУ не павotasов надожаших образим. | Слишков далеко яни поравильный угл. | ПулыТ ДУ павotasов при максимальом длиалазою расстянй до 6 м угл в breeозево оTKLOненя OT Фpondынов поrelи, не певышюцero 30 гадусов. | 7 |
| Прямoe nonадане солочных лучey яни освешени (ot Инberгтой слуорoscentноги лamпь, Т.d.) пожайет сеньор ДУ дан Horo попapа. | Изменite мосторасложенie дан Horo попapа. | - | |
| Слабoe наразженье в батарейкax. | ПоменятЕ РБ сбатарейки. | 3 |
C6poc HacTpoeK B nCxOДнbIe yCTaHOBKn
Ecn, no pa3nHbIM npuHnAM, Bbl XOTnte c6pocntb BCE npaMeTpbl annapata B nCXoHbIe ycTaHOBKn, BblONHnTE cneDyIOOee. DaHHaI npoueDpya npuBOdNT K cbpocy BCEX npaMeTpOB B nCXoHbIe ycTaHOBKn, BKIOUaY npaMeTpbl MeHIO HacTPOkN SET MENU, npaMeTpOB ypOBHei n PpeDyCTaHOBNeHHbIe paAnOCtAHmN.
Y6eIntecb, YTO daHHbI annapaT haoDNTcBpeKIMe OxuHaHn.
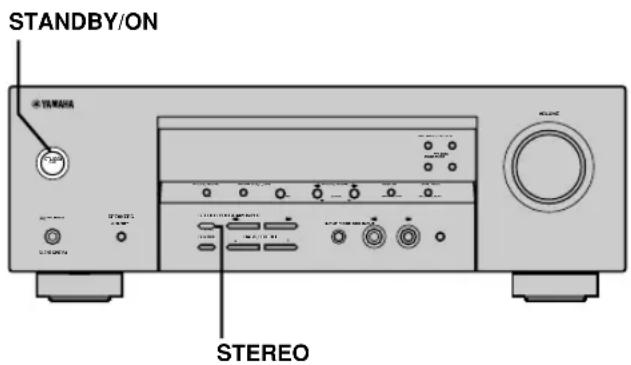
1 YdepxnBaHaxaToKhONkySTEREOHa 0 pOHTaIbHOI naHei, HAXMITE KhONKy STANDBY/ON. Ha dncnlee pOHTaIbHOI naHei nOBITc HINDAkaun "FACTORY PRESET".
IITnOtMeHbI npoueDpybI c6poca 6e3 BblOnHeHH HnKaKnx n3MeHeHn, haxMnte KhoNky STANDBY/ ON.
2 Haxab KhoNky STEREO, BbI6epnte KeJaembl npaMeTp.
Reset. YcTaHOBka annpaTa B nCXoHbIe yCTaHOBKn.
Cancel OTMeHa 6e3 BbINoNHeHn HnKaKnx n3MeHeHn.
3 Haxmnte KhoNky STANDBY/ON nI npTBeXeHnBb6opa.
PnBbIope"Reset",annapat c6paCbIBaETcB INCXOHNbIe yCTaHOBKn I nepeKJIIOUaETcHa peXIM OxNJaHn.
Pn BbIbope "Cancel", annapaT nepeKJIIOUaTeCn Ha peXIM OxNJaHn 6e3 BbINOnHeHn C6pOca.
CπPABOчнК
CINEMA DSP
Tak kak cncTeMb Dolby Surround n DTS 6bln nepBOHaaybHO pa3pa6oTaHbI dnn HCNOB3OBaHH B KINHOteATpax, OH npOn3BOJrT HAnlyuHni 3ΦΦeKT B KINHOteATpax, CNPOeKTHnpOBaHHbIX dNn aKyCTNuCeCKNX 3ΦΦeKTOB n O6OpyDoBaHHbIX 60lb7mM KOJInuEcTBOM KOLOHOK. I3-3a pa3NIuHnB DOMaunx YcNoBnX, 3aBnCraUx OT pa3Mepa KOMHaTbI, MaTePnAna CTeh, KOJInuEcTBa KOLOHOK n T.D., TaKKe Heu36ExHo N I3MeHeHne B KaYeCTBe 3ByuHnA. OChOBbIBaRcB Ha co6paHno INΦopMaun, CnCTema YAMAHA CINEMA DSP NCNoB3yET OpnInHaJIbHyTO TexHOJOrIO 3ByKOBOrO nOJa, pa3pa6oTaHHyO YAMAHA, dnn KOM6HNrpOBaHH CnCTem Dolby Pro Logic, Dolby Digital n DTS, n TaKIM o6pa3om npedocTabJeB O3MOxHOCt b NOUYBCTBOBaTb BN3yaJIbHbIe n ayDINO3ΦΦeKtBi, pncytCTBYUOuNe npn npocmotpe B KINHOteATpax, B BaWei KOMHaTe DnI npocnyuBaHH.
Dolby Digital
LcnpoBaH CnCTema OKpykaIOUeero 3ByuAHIN Dolby Digital no3BOJAEr HacnaIITbcr NOHOCTBHO He3aBNCMbIM MHOROKaHAJIbHBiM 3ByuHHeM. CnCTema Dolby Digital no3BOJAEr BOCpOuN3BOJtB 5NoHOnaHaNa3OHbIX ayDnOKaHaNoB c 3 fpoHTaJIbHbIMKaHaJaAMn (JeBbI,ZeHTpaJIbHbI, nIpaBbI), u2 CtepeofoHueCKmKHaJaAMn OKpykaIOUeero 3ByuAHIn. BKIOUaH DOnONHHTeJIbHbI KaHaI, CneuaJIbHO npEJaHa3HaueHHbI dJa Hn3KOyAcTOThBX 3ΦΦeKToB uN3BeCTHbIKak LFE (HN3KOyAcTOTHbI 3ΦΦeKT), DaHHa CnCTema BVTORE o6laaet 5.1 KaHaJaAMn (KaHaI LFE cnTaeTcR K0.1).
IcnoJb3OBAHne 2-KaHaJIbHO rTepeofoHNueckoro
peKIma dIy KOJIOHOK OKpyKaIOUeRO 3ByuHnI
No3BOJnEe 60one aKKypaTHO BOCpON3BOIDITb
DBNIXUINECr 3BYKOBIIe 3ΦΦeKTbI n CpeDy
OKpyKaIOUeO 3ByUaHnI NO cpaBHeHIO C
CnCTeMoI Dolby Surround. UInpOKn
DINHAMUeCKn DnApa3OH (OT MaKcIMaJIbHO rDO
MHNIMaJIbHO rPOBHe rPOMKOCTn),
BOcPON3BOIDMbI 5 NOnHOdAna3OHHbIMN
KaHaIaMn, I ToHoe HAnpaBLeHne 3ByaHnI,
CREHeepiPoBaHHOe C NcNOJb3OBAHHeM UcΦpOBoi
O6pa6OTKn 3ByaHnI, N03BOJIAOT CnyuataTEn
BnEPBbIE NCbITaTB YUBCTBO peAUN3Ma I BOJIHeHnI.
DaHHbI aannapat No3BOJAEram CB06OHDHO
BbIPaTb IIO6yIO cpeDy 3ByaHnI, OT
MOHOPOHnueeCKoI Do 5.1-KaHaJIbHOI
KOHΦnrypaun, B 3aBNCmOcTN OT BaUnx
NOTpe6HoCTeI.
■Dolby Pro Logic II
CnCTema Dolby Pro Logic II YBJIeTcYJyUeHHoH TexHOIOrne, KOtopa NcNoJIb3YeTcA JIr DeKOIpOBAHnIO 6bIupHoro Kpyra CyuEcTByUOxN IporpaMM B cOpMaTe Dolby Surround. DaHna HOBaI TexHOIOrnIO No3BOJAEr TpON3BOIDITb DnCKpeTHoe 5-KaHaNbHoe BOCnpOu3BeDeHne C 2 fpoHTaJIbHbIMN JeBBIM N npaBBIM KaHaIaMn, 1 CEHTpaNBbIM KaHaIOM, N 2 JeBBIM N npaBBIM KaHaIaMn OKpykaIOSeO 3ByuAHn (NO CpABHeHIO TOIbKO C 1 KaHaIOM OKpykaIOSeO 3ByuAHn npi NCNoJIb3OBAHmN TpaDnIOHNOI TexHOIOrn Pro Logic).B DoONJIeHNeK pexkMy KInHOΦpINbMa, TaKke IMeETcRA My3bIKaNBbI peKIM dIa 2-KaHaNbHbIX NCTOCHNKOB.
■Dolby Surround
CnCTema Dolby Surround, nCnoNb3y4-kaHaIbHyIO aHaIorOByIO CnCTeMy 3aHNCu, BOCnpOIN3BOoNT peAInCTnUHbIE u DnHaMnueCKne 3ByKOBbIE 3ΦΦeKTbI: 2ΦpoHTaJbHbIX neBbIX n npabBX KaHaJa (CTpeoOphuYeCKn), CEHTpaJIbHbIK KaHaJ DnI BOCpOIN3BeDeHNr DnAIONoR (MOHOFOHNeCKn), IN KaHaI OKpyXaIOUeero 3ByaHnI DAIO6bIX 3ByKObIX 3ΦΦeKTOB (MOHOFOHNeCKn). KaHaI OKpyXaIOUeero 3ByaHnI BOCpOIN3BOOITcRA B y3KOM YAcTOTHom DnAna3OHe. CnCTema Dolby Surround uipoko NcNoJb3yeTcNOHTB OBCex BNdeOKacCeTAX I Na3epHBIX DnCKax, a TAKKe BO MHorix TpaHCnIurx TeleBnDEHnI KabeIbHoro TeneBnDEHnI BCTpoEHnI DeKOeDp Dolby Pro Logic DaHHoro annapaTa nCnoNb3yeT CnCTeMy 6pb0TK nCfpoBOrO CnIRHaIa, TaKIM oBa3OM ABTomatueckn CTaBUNIN3iPyR yPoBEh rPOMKocTN KaKdORo KaHaJa dJIyUCInEHHre NpeEdBURAIOUXxCs 3ByKObIX 3ΦΦeKTOB IN HApBaNLHooCTN.
DTS (CnCTembluΦpOBOTeaTpa)
Digital Surround
LcnpoBaCnCTema OKpykaOuero 3ByuHaHnDTS 6bIpa3pa60TaHa DnI 3aMeUeHHN aHaIOrOBbIX 3BYKOBbIX CnIHAIIOB KINHOΦmNBMOB 6-KaHaJIbHBIM LcnpoBBIM 3BYKOBbIM CnIHAIOM, IN BaHHOE BpEMr CTAHOBITcR BCE 6OJIe NOnyJIaPHOJ DnI NCNoIb3OBaHHN B KINHOTeaTpax BO BCEM MInpe. CnCTema DomaUHero KINHOteaTpa, pa3pa60TaHHaH Digital Theater Systems Inc., no3BOJIaET Bam HacnaIHTBCr ITy6HNOH 3ByuHaHHN I npocTpaHCTBeHHbIM 3ByuHaHHem LcnpoBOi CnCTembl OKpykaOuero 3ByuHaHHN DTS B BaWem DOME. DaHHa CnCTema 3ΦΦeKTINBO BOCpON3BOiNT CBO6OHDHe OT NOMEX 6-KaHaJIbHOE 3ByuHHe (ROBOPa TEXHueCKM 3bIKOB, BCERO Ha 5.1 KaHaIIOB, BKIIouaJeBbI, npaBbI n CEHTpaNbHbIX KaHaJIbI, 2 KaHaIa OKpykaOuero 3ByuHaHHN, IN KaHaI LFE 0.1 DnI ca6Bypepa).
Kahan LFE 0.1
JaHHbI KaHJI npEHa3HaueH DnB BOCpON3BeDEHn HN3KOaCTOTHBIX CnHAnOB. DaHHbI KaHJI O6JIaDaET YAcTOTHBIM DnAna3OHom 20 Tc-120 Tc. DaHHbI KaHJI CnHTaETCn KAc 0.1, TaK KaOH N03BOJReT TOJBKO YCNINTB HN3KOaCTOTHbI DnAna3OH, NO CpABHeHIO C PONHOJNA3OHbIM BOCpON3BeDeHnEM DpyrIX 5 KaHANOB B 5.1-KaHJIbHBIX CnCTeMax Dolby Digital nnn DTS.
Matrix 6.1
JaHbI annapaT ochaueH deKoepom Matrix 6.1
JnMHorOKaHaJIbHbIX nporpaMM B cOpMaTe
Dolby Digital n DTS, n no3BoJareT npOn3Bodetb
6.1-KaHaJIbHoe BOCpOu3BeDeHne nyTem
doabHeHHn DONoHNHTeJIbHO TblIOBOr KOHaHa
OkpyKaIOUeO 3ByaHn K cyueCTByIOUeMy
5.1-KaHaJIbHOMy fOpMaTy. (TblIOBOn KaHaN
OKpyKaIOUeO 3ByaHn BOCpON3BOIDTCa OT
JeBOH n npAOB KOLOHOK OkpyKaIOUeO 3ByaHn,
NBIBODNTC8 OT BnPTyAJIbHO TblIOBON KOLOHK
OkpyKaIOUeO 3ByaHn.) NcNoIb3yra DaHHbI
DONoHNHTeJIbHbIK KaHAp, Bbl MoKeTe HaCnaDITbcR
BoJee DInHaMNHybIM n peaINCTNUHbIM DBNXyUIMcRA
3ByaHHeM, OCObeHNO BO BpeM CcEH C
3ΦΦeKTamn "Poneta" nn "ObTeA".
PCM(JIHHeHbI PCM)
JIInHeHbIMPCM-3TOΦOpMaTcRHaJa,
I03BOJIOUINPpeO6pa3OBbIBaTb aHaIIOROBbie
ayDIOOCIRHaJIbBIuNcPOBoBIEΦOpMaT,IN3aIINCbIBaTb
nIpeEJaBaTbIX6e3DOnONHTeJIbHOrCxATnJ.
DaHHbMeToIDNCIOJIb3yETcA INaYdIO3aIINcHa CD-DnCKax n DVD-DnCKax.CnCTema PCM
nCNOBJ3yETTexHOJOrIO npOn3BOIDCTBa OT6opa
pa3Mepa aHaIOROBOro CnHJaHa HOeHb KOPOTkyO
eDNHnCy BpemeHN. N3BeCTHbKak MOdyJau
HMnylbCHOrKOJa", aHaIIOROBbI CNrHaI
KODnpyETCBVIDEmNpybcOB 3aTeM
MOdyNJpyETc DnRA 3aNNiCn.
Yactota cTpo6npoBaHn N KOJIuYeCTBO KBAHTOBaHHbIX 6NTOB
Pn npoe6pa30BaHn aHaIIOROBO ayDnOcnHnAaB uΦpOBoo φOpMaT, yactOTOn CTpObnpOBaHn HA3bIBaOT KOJInueCTBO pa3 CTpObnpOBaHn CnHaJb B CeKYHdy, B TO BpeM KaK KOJInueCTBO KBaHTOBaHHbIX 6bTOB ONpeDeJIeTcKaK ypoBeHb YNCTOTbl pR npoe6pa30BaHn yPOBHe 3Byka B cΦpOBoe 3NaueHne. Dnana30AmPTUyIDHO-IMNylbCHO MoUlaCIN DnBocPON3BODEHn 3aBNCNT OT YactOTbl amPTUyHO-IMNylbCHO MOUlaCIN, B TO BpeM KaK DnHAMuCeCKn DnAa3OH, PpeCTaBnIouzni CObo pa3HnCu yPOBHe 3ByuHn, ONpeDeJIeTcR KOJInueCTBOM KBAHTOBaHHbIX 6bTOB. B npHcUne, Yem BblSe YactOTA amPTUyHO-IMNylbCHO MDoYrau, TEM UnPte Dnana3OH YactOT dnn BOCPON3BeDEHn, N Yem BoJIbSe KOJInueCTBO KBaHTOBaHHbIX 6bTOB, TEm YNuE BOCPON3BeDEHne yPOBHe 3ByuHn.
■SILENT CINEMA
YAMAHA pa3pa60taIa anrOpNTM 3ByKOBbIX
3ΦΦeKTOB DSP nIe cTeCTBeHHoro,
peaJIncTnHOrO BOCpON3BeJeHnI dIyHayuHKnOB.
PapamETpbI dIy HayuHKnOB yCTaHOBJIeHbIB
KaJDOM 3ByKOBOM NONE, N03BOJRA aKKypaTHO
BOcPOn3BOJNTb BCE nporpaMMbl 3ByKOBbIX NOJIeN
dIy npocnyuWbAHnI C IcNoIb3OBAHHeM
HayuHKnOB.
■Virtual CINEMA DSP
YAMAHA pa3pa6o7ana anrOpTm BnrtyabHoro CINEMA DSP, nCnoB3yOuIe BnrtyAubHbIe KOLOHKn OKpykaIOUeO 3ByaHn, I N03BOJIHOUcN npocnyuBaTb 3ΦΦeKtbl OkpykaIOUeO 3ByaHn 3BykOBOro noHa DSP daKe 6e3 nCnoJb3OBAHn KONOHK OkpykaIOUeO 3ByaHn. BbIMoKeTe daKe BOCnpOn3BOIDNb BnrtyAubHbIe 3ΦΦeKtbl CINEMA DSP daKe c nCnoJb3OBAHnEM MNHMajlbHoN 2-KOLOHOUHcNCTEmbl, KOTopar He BKJIQUaET ueHTpaJIbHyIO KOLOHKy.
TEXHUNCHECKNE XAPAKTEPNUCTUKN
AUYINOPA3DEJI
MHHMaJIbHOe 3NEKtpnueckoe HaprJKeHne RMS dIa fpoHTaJIbHOro, cHTpANbHOro KaHana N KaHanoB OKpyKaIOUeO 3ByuHnI
1 KΓι, 0.1% THD (οὐζε ένηλησην Μεύκαχεην), 6 OM
[MoDJII nCLJIA u KaHab] 100 BaTT
[Дугные мodyп] 90 BaTT
1 KΓι, 0.7% THD (οὐζε ένηλησην Μεύκαχεην), 6ΟΜ
[MoDenn nIa CLJa n KaHaIbI] 103 BaTT
[Дугп модени] 93 BaTT
CTaHapTHoe 3JKeTpueckoe HnpanjKeHne DIN [MdoJIb dIe EbpOnbl]
1 KГU, 0.7% THD (обочee Heинhoe Искжени), 4 OM . 105 BaTT
- М akсимальhoe Hanpяжени
[OCHOBHaM MoeJIb N MoeJIn dNn KuTaN KOpEn]
1 KГч, 10% THD (оьшee Heинhoe Иckажэн), 6 OM 110 BaTT
-ДиHamuueckoe HanpaxeHne (IHF,6/4/2 OM)
[MoJennncllaNkaHaIb] 110/140/170 BaTT
[Дугп модени] 105/135/165 BaTT
- YactoTnHaXapaKTepeNCTnKa
CD,T.D.ДлЯфpoHTaIbHbIXNeBOrOиnpaBOro KaHaNoB 10Γu-100KΓu,-3D5
- ΜύCEE HeJIeHHeHoe NcKaXeHne
1KΓU,50BaTT,6OM,ΦpOHTaJIbHbIeJIeBbIu npaBbI 0.06%
- CoOTHOseHHe CnHAn/7yM (CeTb IHF-A)
CD (250 MB, ykopoeHHbI) nra ppoHTaJIbHbIX JeBOrO npaboro KaHaNoB, 3ΦΦeKtBI OKIIoueHbl ...100 d6
- OctaToUHbIy WM (CeTb IHF-A)
ΦoHTaHbI JEBbI IN paBbI 150MB nIN MeHbIe
Pa3deneHne KaHaoB(1K7/10Kt)
CD,dpyroe(5,1KOM,npepbaHHbI)ДЯфpoHTaNbHbIXJIeBOrO n npaBoro KaHaNoB 60d5/≥45dB
ToHaNbHbI KOHTpoJIb (ΦpOHTaHbIe IeBbI IN npaBbI) BASS Do6aBOHoe HAnpXKeHne/
Pa3deneHne 10 d6/100
TREBLE Dobaohoe HapxkeHne/
Pazdelenne 1065/20Ku
BbIXoHnMa MOuHocTb Ha KOJIOHKn 400 MB/470 OM
-HyBCTBNTeJIbHOCTb npHema
CD, T.Д. 200 MB/47 KOM
6CH INPUT 200 MB/47 KOM
- BbIXoHnA MoUHOCtB
OUT (REC) 200 MB/1.2 KOM
OUTPUT SUBWOOFER 4 B/1.2 KOM
BnDEOPA3dEJI
TnBnDoeocnHana NTSCnn PAL
-
YpOBeHb KOMnO3nTHOro BnDeocnHaHa 1 Vp-p/75 Om
-
CoOTHOWeHHe cInHaJI/7uM. 50
-
YACTOTHbIOTBET (MONITOR OUT)
5Γu-10MΓu,-3dB
PA3DEJFM
-Дианадоннсгоркn [MоделлднCLlaAиКанады] 87,5-107,9 MФ [Дугпe модел] 87,50-108,00 MФ
50 Φ 54 Φ Φ Φ Φ Φ Φ Φ Φ Φ Φ Φ Φ Φ Φ Φ Φ Φ Φ Φ Φ Φ Φ Φ Φ Φ Φ Φ Φ Φ Φ Φ Φ Φ Φ Φ Φ Φ Φ Φ Φ Φ Φ Φ Φ Φ Φ Φ Φ Φ Φ Ψ (IHF, 100% mod.) MoHo/CTepeo 2,0 MB (17,3 dBf) /25 MB (39,2 dBf)
CeneKTHBHOCTb (400 KfU) 70 d6
- CoOTHOSeHHe CnRHaJ/Um (IHF) MoHo/CTepeo 76 d5/70 d5
- HeinHeinHoe nckaeHne (1Kt) MoHo/Ctepeo 0,2%/0,3%
- CTepeofoHueckoe pa3dJeHne (1 kT) 42 dB
- YacToTHaXapaKTepeNCTnKa . 20 T - 15 K T +0,5,-2 D
PA3ДЕЛ AM
-ДианэзнНастpoКи 530/531-1710/1611K
- Icnoj3yemaayBCTBNTeHbHOCTb 300 MB/M
OBsNI PA3dEJI
- 3JIeKtpoNTaHne
[MoDJII dJIa CJIa I KaHaIbI]
120B nepemehnro Toka/60 T
[MoDnB dIy ABCTpaIIIN] .. 240 B nepemehHoro ToKa/50 Tc
[MoJEnI DnI CoeHHeHOro KOpJeBcTaBeNko6pntAHmN n CeBepHOI npAHHn EByPOnbl] 230 B nepeMeHHoro ToKa/50 T
[MoJeB IaKopEn] 220 B nepeMeHHoro ToKa/60 Tc
[MoIeJIb Ia KITaI] 220 B nepeMeHHoro ToKa/50 Tc
[MoIeIb IaA3nn n o6ua MoIeJIb] 110-120 B/220-240 B nepeMeHHoro Toka, 50/60 T
3NeKtpoNoTppe6IeHne
[MoJen nIa CIIA u KaHaIbI] 240 BaTT/320 BA
[Дугные мodyп] 240 BaTT - 3neKtpnoTpe6neneBpeXmmeOxuHaHn
[MoJIeI nJIa N KaHaIbI] 0,5 BaTT
[Дугные мodyп] 0,7 BaTT
-Γa6apntb(UxBxΓ) 435×151×315MM
Bec 9kr
*TexHnueckne xapaKTepeuCTNk MoIyT 6bITb N3MeHehbl 6e3 yBeDOMJIeHNr.

YAMAHA
©2004 YAMAGHSOCORPORATION


