
MW70269 - Television GRUNDIG - Free user manual and instructions
Find the device manual for free MW70269 GRUNDIG in PDF.
| Product type | Television |
| Brand | Grundig |
| Model | MW70269 |
| Mains voltage | 220-240 V, 50/60 Hz |
| Power consumption (operation) | 155 W |
| Standby power consumption | 6 W |
| Audio power | 2 x 10 W + 20 W (40 W total) |
| Reception bands | Channels C01 to C99, special channels S01 to S41 |
| Video standards | PAL, SECAM, NTSC 4.43 MHz, NTSC 3.58 MHz via AV |
| Tuning system | ATS Euro Plus (automatic) |
| Help system | Easy Dialog System with Dialogcenter |
| Technology | MEGALOGIC (for Grundig VCRs) |
| Additional functions | PIP (picture-in-picture), Dolby Surround Pro Logic, PC input |
| Screen cleaning | Soft damp cloth, clean water only |
| Safety | Do not open, do not expose to water, unplug during thunderstorms |
| Repairability | Refer to an authorized specialist |
| Mains cable | Ref. GWN 9.22 / 8290.991-316 |
| Compliance | Directives 73/23/EEC and 89/336/EEC, standards EN 60065, EN 55013, EN 55020 |
| Available languages | French, German, English, Spanish, etc. |
Frequently Asked Questions - MW70269 GRUNDIG
User questions about MW70269 GRUNDIG
0 question about this device. Answer the ones you know or ask your own.
Ask a new question about this device
Download the instructions for your Television in PDF format for free! Find your manual MW70269 - GRUNDIG and take your electronic device back in hand. On this page are published all the documents necessary for the use of your device. MW70269 by GRUNDIG.
USER MANUAL MW70269 GRUNDIG
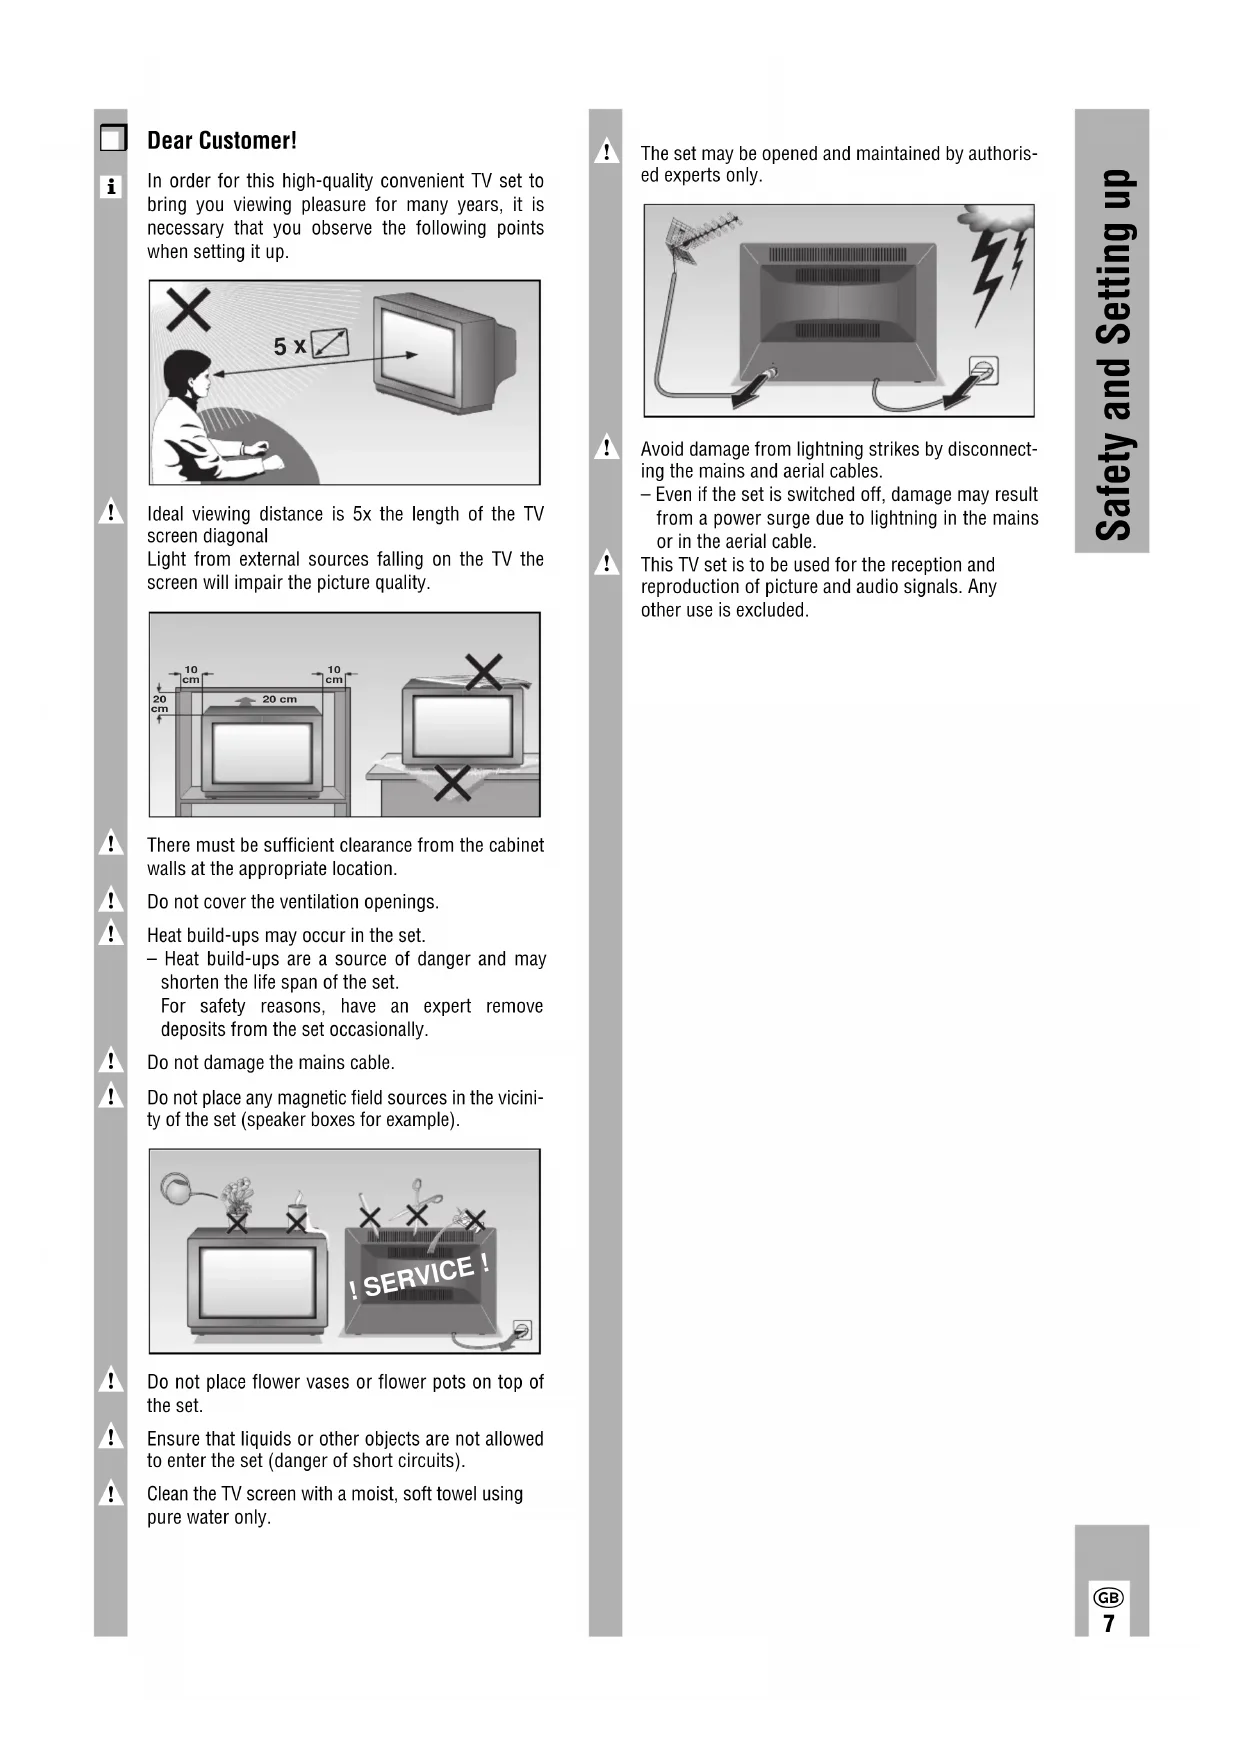
In order for this high-quality convenient TV set to bring you viewing pleasure for many years, it is necessary that you observe the following points when setting it up.
Ideal viewing distance is 5x the length of the TV screen diagonal
Light from external sources falling on the TV the screen will impair the picture quality.

There must be sufficient clearance from the cabinet walls at the appropriate location.
Do not cover the ventilation openings.
Heat build-ups may occur in the set.
- Heat build-ups are a source of danger and may shorten the life span of the set.
For safety reasons, have an expert remove deposits from the set occasionally.
Do not damage the mains cable.
Do not place any magnetic field sources in the vicinity of the set (speaker boxes for example).

Do not place flower vases or flower pots on top of the set.
Ensure that liquids or other objects are not allowed to enter the set (danger of short circuits).
Clean the TV screen with a moist, soft towel using pure water only.
!
The set may be opened and maintained by authorised experts only.

!
Avoid damage from lightning strikes by disconnecting the mains and aerial cables.
- Even if the set is switched off, damage may result from a power surge due to lightning in the mains or in the aerial cable.
This TV set is to be used for the reception and reproduction of picture and audio signals. Any other use is excluded.
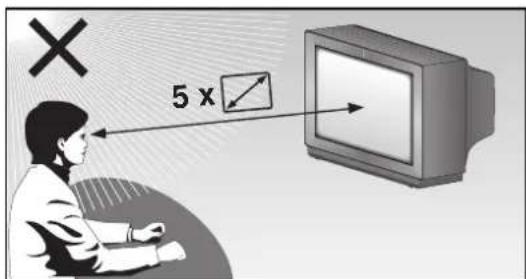
Connection example (TV set, SAT receiver and Video recorder)


This highly digitalised TV set offers you optimum picture and sound quality.
The essential prerequisites for this are:
An aerial system and aerial connection cable in perfect working order with a high degree of shielding (85dB) as a connection between the TV set and aerial socket or between the TV set and video recorder.
Avoid wear to the cable near the set.
You will find further information on connecting various external units (e.g. SAT receiver, decoder) in the dialog center menu section Audio-/video connections
The GRUNDIG MEGALOGIC System
The TV set is equipped MEGALOGIC System.
If you connect a GRUNDIG video recorder to the MEGALOGIC System using the supplied Megalogic-EURO/AV (Scart) cable, terrestrial TV channels (and all channel position related information) are automatically transferred to the video recorder (VCR) with each "Reprogramming of the TV channel".
"Setting the TV channel on the video recorder" is no longer necessary.

Switching the set on/off
Press the button on the set.

If the LED in the mains button is now illuminated, then the unit is in stand-by mode. Switch the unit on using the remote control by pressing the ① button.

Assigning programme positions
This set is equipped with the automatic tuning system ATS euro plus which performs the programme assignment for you.

After switching on the set, confirm the «English« dialogue language by pressing the OK button.
If the «Select dialog language« page does not appear, press the (i) button and then the OK button.
The dialogcenter appears on the screen. Use the or button to select the Automatic programming< menu line. Press the OK button. Use the or button to select the Completely new programming< line and then press the OK button.

Confirm your country with the OK button.
When the automatic programme allocation is completed, hints to the Easy Dialog System are displayed.

The Easy Dialog System
Your television is provided with the »Easy Dialog System«.
With this system, all hints on operating the TV set are no longer to be found in a printed instructions manual but in dialog boxes which can be displayed on the picture screen.

The Dialogcenter
The Dialogcenter is the control centre of your TV set. It is called up by pressing the ① and then the OK button. Via the displayed menu, you can make settings, call up information and select precise help for operating your TV set (for example an explanation of the remote control handset, an index, tips and tricks, etc.).
Simply try it out. You can do no harm!

Basic operation
The dialogue symbols indicate for each operating step with which buttons the different functions can be carried out.
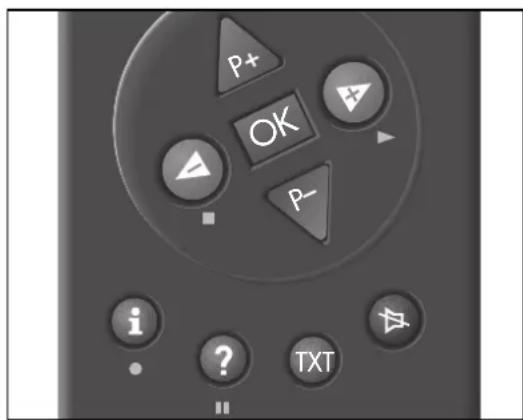

Yellow bar up/down
In two-page menus, selection of the second page.

Set values.

Confirm selected function.

Return to TV picture.

Help.
This is a brief explanation of the remote control buttons.
All functions will be explained in detail under
Remote control in the Dialogcentre.
Simply try out the functions.

Mains voltage:
220-240V,50/60Hz
(control range of the power supply unit 190 ... 264V)
Power consumption:
| Set in Set in Sound output Sound output operation standby Music power Sine power | ||
| approx. 155 W | 6 W | 80 W 2 x 10 W + 20 W |
Channels:
C01...C99
Special channels S01 ... S41
Norm:
PAL; SECAM; NTSC 4.43 MHz; BG, NTSC 3.58 MHz via AV
Service hint for the specialist:
The set may only be operated supplied power cable set. It prevents interference from the mains and is an integral component for the set's approval. For a replacement, consult your nearest customer service centre and order only the power supply cable set with the following designation GWN 9.22/ number 8290.991-316
The product fulfils the requirements of the following EU guidelines:
73/23/EEC Guideline concerning electrical operating units within certain voltage limits.
89/336/EEC guideline on electro-magnetic compatibility.
The unit is accordance with the norms: EN 60065, EN 55013, EN 55020
Additional equipment:
The set has been prepared for satellite reception, Dolby Surround Pro Logic, connecting a PC and PIP (Picture in Picture). With the built-in PIP function, another TV programme or an AV picture (e.g. from a video cassette recorder or a video camera) can be superimposed as a small picture. Ask your dealer.
Subject to alterations.
E. and O.E.

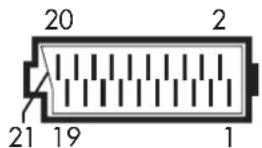
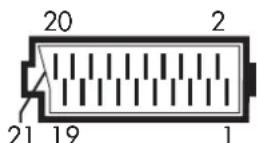
Pin assignment of EURO-AV socket
If you want to connect other devices to your television (for example, a computer or amplifier), your dealer can provide you with a normed standard connection by means of the following table:
Pin Signal
1 = Audio output, right
2 = Audio input, right
3 = Audio output, left
4 = Audio, earth
5 = Blue, earth
6 = Audio input left
7 = RGB blue input
8 = Switching voltage
9 = Green, earth
10 = Data line (MEGALOGIC)
11 = RGB green input
12=-
13 = Red, earth
14 = Earth
15 = RGB red input
$$ (S - V i d e o = C h r o m a) $$
16 = RGB switching voltage
17 = Video, earth
18 = RGB switching voltage, earth
19 = Video output
20 = Video input
$$ (S - V i d e o = L u m i n a n z) $$
21 Shielding/earth
Additional Information for Units sold in Great Britain
Units sold in GB are suitable for operation from a 240 V AC, 50 Hz mains supply.
In case this appliance is supplied with a Safety Standard Approved mains lead fitted with a non-rewireable 13 Amp mains plug which, if unsuitable for your socket, should be cut off and an appropriate plug fitted by a qualified electrician. The fuse and fuse holder must be removed from the plug as accidental insertion of the redundant plug into a 13 Amp socket is likely to cause an electrical hazard.
Note: The severed plug must be destroyed to avoid a possible shock hazard should it be inserted into a 13 Amp socket elsewhere.
If it is necessary to change the fuse in the non-rewireable plug, the correct type and rating (5 Amp ASTA or BSI approved BS 1362) must be used and the fuse cover must be refitted. If the fuse cover is lost or damaged the lead and plug must not be used until a replacement is obtained. Replacement fuse covers should be obtained from your dealer.
If a non-rewireable plug or a rewireable 13 Amp (BS 1363) plug is used, it must be fitted with a 5 Amp ASTA or BSI approved BS 1362 fuse. If any other type of
plug is used it must be protected by a 5 Amp fuse either in the plug or at the distribution board.
Important:
The wires in the mains lead are coloured in accordance with the following code:
As the colours of the wires in the mains lead of your appliance may not correspond with the coloured marking identifying the terminals in your plug, proceed as follows:
Connect the BLUE coloured wire to plug terminal marked with the letter 'N' or coloured black.
Connect the BROWN coloured wire to the plug terminal marked with a letter 'L' or coloured red.
In no circumstance must any of the wires be connected to the terminal marked with a letter 'E', earth symbol 1一 coloured green or green and yellow.
Replacement mains lead can be obtained from your dealer.

Cher client, chere clientele!
6 = Audio ingang links
7 = RGB blauw ingang
8 = Schakelspanning
9 = Groen massa
10 = Dataline (MEGALOGIC)
11 = RGB groen ingang
12=-
13 = Rood massa
14 = Massa
15 = RGB rood ingang
(S-Video = Chroma)
16 = RGB schakelspanning
17 = Video massa
18 = RGB schakelspanning massa
19 = Video uitgang
20 = Video ingang
(S-Video = Luminanz)
21 = Afscherming/massa
10 = Data line (MEGALOGIC)
14 = Jord
15 = RGB r0d inngang
(S-Video = Chroma)
16 = RGB styrespensing
17 = Video jord
18 = RGB styrespensing jord
19 = Video utgang
20 = Video ingang
(S-Video = Luminanz)