
Aspire One AOD257 - Laptop ACER - Free user manual and instructions
Find the device manual for free Aspire One AOD257 ACER in PDF.
| Product Type | Netbook (laptop) |
| Brand | ACER |
| Model | Aspire One AOD257 |
| Screen Size | 25.6 cm (10.1 inches) |
| Processor | Intel Atom (varies by model) |
| RAM | 1 GB (varies by model) |
| Hard Drive | 250 GB (varies by model) |
| Operating System | Windows (varies by version) |
| Weight | Approximately 1.1 kg |
| Dimensions (W x D x H) | 25.5 x 18.5 x 2.5 cm |
| Power Supply | 19V AC adapter, rechargeable Lithium-ion battery |
| Battery Life | Up to 8 hours (varies by usage) |
| Connectivity | Wi-Fi 802.11 b/g/n, Ethernet 10/100, Bluetooth (varies by model) |
| Ports | 3 x USB 2.0, VGA, headphone/mic, card reader |
| Main Features | Built-in webcam, multi-touch touchpad, stereo speakers |
| Maintenance | Clean with a soft, damp cloth; do not use liquid |
| Security | Kensington lock, BIOS passwords, auto shutdown on low battery |
| Spare Parts and Repairability | Battery, AC adapter, keyboard available. Repair only by authorized technician. |
| General Information | ENERGY STAR certified, compliant with Canada NMB-003 standard |
Frequently Asked Questions - Aspire One AOD257 ACER
User questions about Aspire One AOD257 ACER
0 question about this device. Answer the ones you know or ask your own.
Ask a new question about this device
Download the instructions for your Laptop in PDF format for free! Find your manual Aspire One AOD257 - ACER and take your electronic device back in hand. On this page are published all the documents necessary for the use of your device. Aspire One AOD257 by ACER.
USER MANUAL Aspire One AOD257 ACER
© 2010 All Rights Reserved
Aspire One Series Generic User Guide
Original Issue: 12/2010
Model number:
Serial number:
Date of purchase:
Place of purchase:
Information for your safety and comfort
Safety instructions
Read these instructions carefully. Keep this document for future reference. Follow all warnings and instructions marked on the product.
Turning the product off before cleaning
Unplug this product from the wall outlet before cleaning. Do not use liquid cleaners or aerosol cleaners. Use a damp cloth for cleaning.
CAUTION for plug as disconnecting device
Observe the following guidelines when connecting and disconnecting power to the power supply unit:
Install the power supply unit before connecting the power cord to the AC power outlet.
Unplug the power cord before removing the power supply unit from the computer.
If the system has multiple sources of power, disconnect power from the system by unplugging all power cords from the power supplies.
CAUTION for Accessibility
Be sure that the power outlet you plug the power cord into is easily accessible and located as close to the equipment operator as possible. When you need to disconnect power to the equipment, be sure to unplug the power cord from the electrical outlet.
CAUTION for bundled dummy cards (only for certain models)
Your computer shipped with plastic dummies installed in the card slots. Dummies protect unused slots from dust, metal objects or other particles. Save the dummies for use when no cards are in the slots.
CAUTION for Listening
To protect your hearing, follow these instructions.
- Increase the volume gradually until you can hear clearly and comfortably.
- Do not increase the volume level after your ears have adjusted.
- Do not listen to music at high volumes for extended periods.
- Do not increase the volume to block out noisy surroundings.
Decrease the volume if you can't hear people speaking near you.
iv
Warnings
- Do not use this product near water.
-
Do not place this product on an unstable cart, stand or table. If the product falls, it could be seriously damaged.
-
Slots and openings are provided for ventilation to ensure reliable operation of the product and to protect it from overheating. These openings must not be blocked or covered. The openings should never be blocked by placing the product on a bed, sofa, rug or other similar surface. This product should never be placed near or over a radiator or heat register, or in a built-in installation unless proper ventilation is provided.
- Never push objects of any kind into this product through cabinet slots as they may touch dangerous voltage points or short-out parts that could result in a fire or electric shock. Never spill liquid of any kind onto or into the product.
- To avoid damage of internal components and to prevent battery leakage, do not place the product on a vibrating surface.
- Never use it under sporting, exercising, or any vibrating environment which will probably cause unexpected short current or damage rotor devices, HDD, optical drive, and even exposure risk from lithium battery pack.
- The bottom surface, areas around ventilation openings and AC adapter may get hot. To avoid injury, ensure they do not come in contact with your skin or body.

Note: Reduce the risk of heat-induced injury or fire by adhering to the following:
1) Do not place the computer or AC adapter on a soft surface, such as a bed.
2) Do not rest the computer or AC adapter on your lap for extended periods.
3) Use the computer on a flat, hard surface, such as a desk.
4) Ensure that the ventilation is not obstructed.
- Your device and its enhancements may contain small parts. Keep them out of the reach of children.
Using electrical power
- This product should be operated from the type of power indicated on the marking label. If you are not sure of the type of power available, consult your dealer or local power company.
- Do not allow anything to rest on the power cord. Do not locate this product where people will walk on the cord.
- If an extension cord is used with this product, make sure that the total ampere rating of the equipment plugged into the extension cord does not exceed the extension cord ampere rating. Also, make sure that the total rating of all products plugged into the wall outlet does not exceed the fuse
rating.
- Do not overload a power outlet, strip or receptacle by plugging in too many devices. The overall system load must not exceed 80% of the branch circuit rating. If power strips are used, the load should not exceed 80% of the power strip's input rating.
- This product's AC adapter is equipped with a three-wire grounded plug. The plug only fits in a grounded power outlet. Make sure the power outlet is properly grounded before inserting the AC adapter plug. Do not insert the plug into a non-grounded power outlet. Contact your electrician for details.

Warning! The grounding pin is a safety feature. Using a power outlet that is not properly grounded may result in electric shock and/or injury.

Note: The grounding pin also provides good protection from unexpected noise produced by other nearby electrical devices that may interfere with the performance of this product.
- The system can be powered using a wide range of voltages: 100 to 120 or 220 to 240 V AC. The power cord included with the system meets the requirements for use in the country/region where the system was purchased. Power cords for use in other countries/regions must meet the requirements for that country/region. For more information on power cord requirements, contact an authorized reseller or service provider.
Product servicing
Do not attempt to service this product yourself, as opening or removing covers may expose you to dangerous voltage points or other risks. Refer all servicing to qualified service personnel.
Unplug this product from the wall outlet and refer servicing to qualified service personnel when:
The power cord or plug is damaged, cut or frayed.
Liquid was spilled into the product.
The product was exposed to rain or water.
The product has been dropped or the case has been damaged.
- The product exhibits a distinct change in performance, indicating a need for service.
- The product does not operate normally after following the operating instructions.

Note: Adjust only those controls that are covered by the operating instructions, since improper adjustment of other controls may
vi
result in damage and will often require extensive work by a qualified technician to restore the product to normal condition.
Guidelines for safe battery usage
This notebook uses a Lithium-ion battery. Do not use it in a humid, wet or corrosive environment. Do not put, store or leave your product in or near a heat source, in a high temperature location, in strong direct sunlight, in a microwave oven or in a pressurized container, and do not expose it to temperatures over 60^ C (140^ F). Failure to follow these guidelines may cause the battery to leak acid, become hot, explode or ignite and cause injury and/or damage. Do not pierce, open or disassemble the battery. If the battery leaks and you come into contact with the leaked fluids, rinse thoroughly with water and seek medical attention immediately. For safety reasons, and to prolong the lifetime of the battery, charging will not occur at temperatures below 0^ C (32^ F) or above 40^ C (104^ F).
The full performance of a new battery is achieved only after two or three complete charge and discharge cycles. The battery can be charged and discharged hundreds of times, but it will eventually wear out. When the operation time becomes noticeably shorter than normal, buy a new battery. Use only the approved batteries, and recharge your battery only with the approved chargers designated for this device.
Use the battery only for its intended purpose. Never use any charger or battery that is damaged. Do not short-circuit the battery. Accidental short-circuiting can occur when a metallic object such as a coin, clip or pen causes direct connection of the positive (+) and negative (-) terminals of the battery. (These look like metal strips on the battery.) This might happen, for example, when you carry a spare battery in your pocket or purse. Short-circuiting the terminals may damage the battery or the connecting object.
The capacity and lifetime of the battery will be reduced if the battery is left in hot or cold places, such as in a closed car in summer or winter. Always try to keep the battery between 15^ and 25^ (59°F and 77°F). A device with a hot or cold battery may not work temporarily, even when the battery is fully charged. Battery performance is especially limited in temperatures well below freezing.
Do not dispose of batteries in a fire as they may explode. Batteries may also explode if damaged. Dispose of batteries according to local regulations. Please recycle when possible. Do not dispose as household waste.
Wireless devices may be susceptible to interference from the battery, which could affect performance.
Replacing the battery pack
The notebook uses lithium batteries. Replace the battery with the same type as that which came bundled with your product. Use of another battery may present a risk of fire or explosion.

Warning! Batteries may explode if not handled properly. Do not disassemble or dispose of them in fire. Keep them away from
children. Follow local regulations when disposing of used batteries.
Operating environment

Warning! For safety reasons, turn off all wireless or radio transmitting devices when using your laptop under the following conditions. These devices may include, but are not limited to: wireless LAN (WLAN), Bluetooth and/or 3G.
Remember to follow any special regulations in force in any area, and always switch off your device when its use is prohibited or when it may cause interference or danger. Use the device only in its normal operating positions. This device meets RF exposure guidelines when used normally, and it and its antenna are positioned at least 1.5 centimeters (5/8 inches) away from your body. It should not contain metal and you should position the device the above-stated distance from your body. To successfully transmit data files or messages, this device requires a good quality connection to the network. In some cases, transmission of data files or messages may be delayed until such a connection is available. Ensure that the above separation distance instructions are followed until the transmission is completed. Parts of the device are magnetic. Metallic materials may be attracted to the device, and persons with hearing aids should not hold the device to the ear with the hearing aid. Do not place credit cards or other magnetic storage media near the device, because information stored on them may be erased.
Medical devices
Operation of any radio transmitting equipment, including wireless phones, may interfere with the functionality of inadequately protected medical devices. Consult a physician or the manufacturer of the medical device to determine if they are adequately shielded from external RF energy or if you have any questions. Switch off your device in health care facilities when any regulations posted in these areas instruct you to do so. Hospitals or health care facilities may be using equipment that could be sensitive to external RF transmissions.
Pacemakers. Pacemaker manufacturers recommend that a minimum separation of 15.3 centimeters (6 inches) be maintained between wireless devices and a pacemaker to avoid potential interference with the pacemaker. These recommendations are consistent with the independent research by and recommendations of Wireless Technology Research. Persons with pacemakers should do the following:
- Always keep the device more than 15.3 centimeters (6 inches) from the pacemaker
- Not carry the device near your pacemaker when the device is switched on. If you suspect interference, switch off your device, and move it.
Hearing aids. Some digital wireless devices may interfere with some hearing aids. If interference occurs, consult your service provider.
Vehicles
RF signals may affect improperly installed or inadequately shielded electronic systems in motor vehicles such as electronic fuel injection systems, electronic anti-skid (anti-lock) braking systems, electronic speed control systems, and air bag systems. For more information, check with the manufacturer, or its representative, of your vehicle or any equipment that has been added. Only qualified personnel should service the device, or install the device in a vehicle. Faulty installation or service may be dangerous and may invalidate any warranty that may apply to the device. Check regularly that all wireless equipment in your vehicle is mounted and operating properly. Do not store or carry flammable liquids, gases, or explosive materials in the same compartment as the device, its parts, or enhancements. For vehicles equipped with an air bag, remember that air bags inflate with great force. Do not place objects, including installed or portable wireless equipment in the area over the air bag or in the air bag deployment area. If in-vehicle wireless equipment is improperly installed, and the air bag inflates, serious injury could result. Using your device while flying in aircraft is prohibited. Switch off your device before boarding an aircraft. The use of wireless teledevices in an aircraft may be dangerous to the operation of the aircraft, disrupt the wireless telephone network, and may be illegal.
Potentially explosive environments
Switch off your device when in any area with a potentially explosive atmosphere and obey all signs and instructions. Potentially explosive atmospheres include areas where you would normally be advised to turn off your vehicle engine. Sparks in such areas could cause an explosion or fire resulting in bodily injury or even death. Switch off the device at refueling points such as near gas pumps at service stations. Observe restrictions on the use of radio equipment in fuel depots, storage, and distribution areas; chemical plants; or where blasting operations are in progress. Areas with a potentially explosive atmosphere are often, but not always, clearly marked. They include below deck on boats, chemical transfer or storage facilities, vehicles using liquefied petroleum gas (such as propane or butane), and areas where the air contains chemicals or particles such as grain, dust or metal powders. Do not switch the notebook on when wireless phone use is prohibited or when it may cause interference or danger.
Emergency calls
Warning: You cannot make emergency calls through this device. To make an emergency call you shall dial out through your mobile phone or other telephone call system.
Disposal instructions
Do not throw this electronic device into the trash when discarding. To minimize pollution and ensure utmost protection of the global environment, please recycle. For more information on the Waste from Electrical and Electronics Equipment (WEEE) regulations, visit www.acer-group.com/public/Sustainability/sustainability01.htm.
Mercury advisory

For bulb-inside projectors or electronic products containing a non-LED-backlit-LCD/CRT monitor or display: Lamp(s) inside this product contain mercury and must be recycled or disposed of according to local, state or federal laws. For more information, contact the Electronic Industries Alliance at www.eiae.org. For lamp-specific disposal information, check www.lamprecycle.org.
ENERGY STAR

Acer's ENERGY STAR qualified products save your money by reducing energy cost and protecting the environment without sacrificing features or performance. Acer is proud to offer our customers products with the ENERGY STAR mark.
What is ENERGY STAR?
Products that are ENERGY STAR qualified use less energy and prevent greenhouse gas emissions by meeting strict energy efficiency guidelines set by the U.S. Environmental Protection Agency. Acer is committed to offering products and services worldwide that help customers save money, conserve energy and improve the quality of our environment. The more energy we can save through higher energy efficiency, the more we reduce greenhouse gases and the risks of climate change. More information refers to www.energystar.gov or www.energystar.gov/powermanagement.
Acer ENERGY STAR qualified products: (only for certain models)
- Produce less heat and reduce cooling loads, and warmer climates.
- Automatically go into "display sleep" and "computer sleep" mode after 10 and 30 minutes of inactivity respectively.
- Wake the computer from sleep mode by push ing keyboard or moving mouse.
Computers will save more than 80% energy at "sleep" mode.
ENERGY STAR is only available for certain models and have the ENERGY STAR certification mark on the palm rest.
ENERGY STAR and the ENERGY STAR mark are registered U.S. marks
X
Tips and information for comfortable use
Computer users may complain of eyestrain and headaches after prolonged use. Users are also at risk of physical injury after long hours of working in front of a computer. Long work periods, bad posture, poor work habits, stress, inadequate working conditions, personal health and other factors greatly increase the risk of physical injury.
Incorrect computer usage may lead to carpal tunnel syndrome, tendonitis, tenosynovitis or other musculoskeletal disorders. The following symptoms may appear in the hands, wrists, arms, shoulders, neck or back:
- Numbness, or a burning or tingling sensation.
- Aching, soreness or tenderness.
-Pain, swelling or throbbing. - Stiffness or tightness.
Coldness or weakness.
If you have these symptoms, or any other recurring or persistent discomfort and/or pain related to computer use, consult a physician immediately and inform your company's health and safety department.
The following section provides tips for more comfortable computer use.
Finding your comfort zone
Find your comfort zone by adjusting the viewing angle of the monitor, using a footrest, or raising your sitting height to achieve maximum comfort. Observe the following tips:
- Refrain from staying too long in one fixed posture.
- Avoid slouching forward and/or leaning backward.
- Stand up and walk around regularly to remove the strain on your leg muscles.
Take short rests to relax your neck and shoulders. - Avoid tensing your muscles or shrugging your shoulders.
Install the external display, keyboard and mouse properly and within comfortable reach.
If you view your monitor more than your documents, place the display at the center of your desk to minimize neck strain.
Taking care of your vision
Long viewing hours, wearing incorrect glasses or contact lenses, glare, excessive room lighting, poorly focused screens, very small typefaces and low-contrast displays could stress your eyes. The following sections provide suggestions on how to reduce eyestrain.
Eyes
- Rest your eyes frequently.
- Give your eyes regular breaks by looking away from the monitor and focusing on a distant point.
- Blink frequently to keep your eyes from drying out.
Display
- Keep your display clean.
- Keep your head at a higher level than the top edge of the display so your eyes point downward when looking at the middle of the display.
- Adjust the display brightness and/or contrast to a comfortable level for enhanced text readability and graphics clarity.
-
Eliminate glare and reflections by:
-
placing your display in such a way that the side faces the window or any light source
- minimizing room light by using drapes, shades or blinds
- using a task light
- changing the display's viewing angle
- using a glare-reduction filter
-
using a display visor, such as a piece of cardboard extended from the display's top front edge
-
Avoid adjusting your display to an awkward viewing angle.
- Avoid looking at bright light sources for extended periods of time.
Developing good work habits
The following work habits make computer use more relaxing and productive:
Take short breaks regularly and often.
- Perform some stretching exercises.
- Breathe fresh air as often as possible.
Exercise regularly and maintain a healthy body.

Warning! We do not recommend using the computer on a couch or bed. If this is unavoidable, work for only short periods, take breaks regularly, and do some stretching exercises.

Note: For more information, please refer to "Regulations and safety notices" on page 36.
XII
First things first
We would like to thank you for making an Acer notebook your choice for meeting your mobile computing needs.
Product Registration
When using your computer for the first time, it is recommended that you immediately register it. This will give you access to some useful benefits, such as:
- Faster service from our trained representatives
Membership in the Acer community: receive promotions and participate in customer surveys
The latest news from Acer
Hurry and register, as other advantages await you!
How to Register
During the initial startup of your notebook or desktop, a window will invite you to register. Please fill in the mandatory fields and click Next. The second window you'll see contains optional fields that will help us to provide you with a more personable customer service experience.
Another Option
Another way to register your Acer product is to visit our website at http://registration.acer.com. Choose your country and follow the simple instructions.
After we receive your product registration, you will be sent a confirmation email with important data that you should keep in a safe place.
Your guides
To help you use your Acer notebook, we have designed a set of guides:
First off, the setup poster helps you get started with setting up your computer.
The Aspire One Series User Guide contains useful information applying to all models in the Aspire One product range. It covers basic topics such as AcerRecovery Management, using the keyboard, audio, etc. Please understand that due to its nature, the Generic User Guide as well as the AcerSystem User Guide will occasionally refer to functions or features which are only contained in certain models, but not necessarily in the model you have purchased. Such instances are marked in the text with language such as "only for certain models".
The Quick Guide introduces you to the basic features and functions of your new computer. For more on how your computer can help you to be more productive, please refer to the AcerSystem User Guide, which contains detailed information
on such subjects as system utilities, data recovery, expansion options and troubleshooting. In addition it contains warranty information and the general regulations and safety notices for your notebook. It is available in Portable Document Format (PDF) and comes preloaded on your notebook. Follow these steps to access it:
1 Click Start > All Programs > AcerSystem.
2 Click AcerSystem User Guide.

Note: Viewing the file requires Adobe Reader. If Adobe Reader is not installed on your computer, clicking on AcerSystem User Guide will run the Adobe Reader setup program first. Follow the instructions on the screen to complete the installation. For instructions on how to use Adobe Reader, access the Help and Support menu.
Basic care and tips for using your computer
Turning your computer on and off
To turn on the computer, simply press and release the power button below the LCD screen. Please refer to "Quick Guide" for the location of the power button.
To turn the power off, do any of the following:
Use the Windows shutdown command: click Start then Click Shut Down.
- Use the power button.
You can also put the computer in sleep mode by pressing the sleep hotkey < Fn > + < F4 > .

Note: If you cannot power off the computer normally, press and hold the power button for more than four seconds to shut down the computer. If you turn off the computer and want to turn it on again, wait at least two seconds before powering up.
Taking care of your computer
Your computer will serve you well if you take care of it.
- Do not expose the computer to direct sunlight. Do not place it near sources of heat, such as a radiator.
- Do not expose the computer to temperatures below 0^ C (32^ F) or above 50^ C (122^ F).
- Do not subject the computer to magnetic fields.
- Do not expose the computer to rain or moisture.
- Do not spill water or any liquid on the computer.
xiv
- Do not subject the computer to heavy shock or vibration.
- Do not expose the computer to dust or dirt.
- Never place objects on top of the computer.
- Do not slam the computer display when you close it.
- Never place the computer on uneven surfaces.
Taking care of your AC adapter
Here are some ways to take care of your AC adapter:
- Do not connect the adapter to any other device.
- Do not step on the power cord or place heavy objects on top of it. Carefully route the power cord and any cables away from foot traffic.
- When unplugging the power cord, do not pull on the cord itself but pull on the plug.
- The total ampere ratings of the equipment plugged in should not exceed the ampere rating of the cord if you are using an extension cord. Also, the total current rating of all equipment plugged into a single wall outlet should not exceed the fuse rating.
Taking care of your battery pack
Here are some ways to take care of your battery pack:
- Use only batteries of the same kind as replacements. Turn the power off before removing or replacing batteries.
- Do not tamper with batteries. Keep them away from children.
- Dispose of used batteries according to local regulations. Recycle if possible.
Cleaning and servicing
When cleaning the computer, follow these steps:
1 Turn off the computer and remove the battery pack.
2 Disconnect the AC adapter.
3 Use a soft, moist cloth. Do not use liquid or aerosol cleaners.
If either of the following occurs:
The computer has been dropped or the body has been damaged;
The computer does not operate normally
Please refer to "Frequently asked questions" on page 19.
Information for your safety and comfort iii
Safety instructions iii
Operating environment vii
Medical devices vii
Vehicles viii
Potentially explosive environments viii
Emergency calls viii
Disposal instructions ix
Mercury advisory ix
ENERGY STAR ix
Tips and information for comfortable use x
First things first xii
Product Registration xii
How to Register xii
Another Option xii
Your guides xii
Basic care and tips for using your computer xiii
Turning your computer on and off xiii
Taking care of your computer xiii
Taking care of your AC adapter xiv
Taking care of your battery pack xiv
Cleaning and servicing xiv
Acer eRecovery Management 1
Creating a recovery backup (Optical drive) 2
Creating a recovery backup (USB flash drive) 4
Recovering your system (Optical drive) 6
To recover your system 6
Types of recovery 6
Recovering pre-installed software and drivers 6
Returning to a previous system condition 7
Returning your system to its factory condition 8
Recovering your system (USB flash drive) 10
To recover your system 10
Types of recovery 10
Recovering pre-installed software and drivers 10
Returning to a previous system condition 11
Returning your system to its factory condition 12
Touchpad 14
Touchpad basics (with two buttons) 14
Using a computer security lock 15
Using the keyboard 16
Lock keys and embedded numeric keypad 16
Windows keys 17
Special keys (only for certain models) 18
Frequently asked questions 19
Requesting service 21
Before you call 21
Battery pack 22
Battery pack characteristics 22
Maximizing the battery's life 22
Installing and removing the battery pack 23
Charging the battery 24
Checking the battery level 24
Optimizing battery life 24
Battery-low warning 24
Taking your notebook PC with you 26
Disconnecting from the desktop 26
Moving around 26
Preparing the computer 26
What to bring to meetings 27
Taking the computer home
Preparing the computer 27
What to take with you 27
Special considerations 28
Setting up a home office 28
Traveling with the computer
Preparing the computer 28
What to take with you 28
Special considerations 29
Traveling internationally with the computer
Preparing the computer 29
What to take with you 29
Special considerations 29
Securing your computer
Using a computer security lock 30
Using passwords 30
Entering passwords 31
Setting passwords 31
Expanding through options
Connectivity options 32
Built-in network feature 32
Universal Serial Bus (USB) 33
BIOS utility 33
Boot sequence 33
Enable disk-to-disk recovery 33
Password 34
Power management
Troubleshooting
Troubleshooting tips 35
Error messages 35
Regulations and safety notices 36
FCC notice 36
LCD pixel statement 37
Radio device regulatory notice 37
General 37
European Union (EU) 38
The FCC RF safety requirement 38
Canada — Low-power license-exempt
radio communication devices (RSS-210) 40
LCD panel ergonomic specifications 40
Acer eRecovery Management
If your computer experiences problems that are not recoverable by other methods, you may need to reinstall the Windows operating system and factory-loaded software and drivers. To ensure you can recover your computer when needed, you should create a recovery backup as soon as possible.

Note: The following content is for general reference only. Actual product specifications may vary.
Acer eRecovery Management consists of the following functions:
1 Backup:
- Create Factory Default Backup
- Create Drivers and Applications Backup

Note: Models that do not have a built-in ODD will allow you to make backup copies to a USB drive or an external ODD.
2 Restore:
- Restore Operating System to Factory Defaults
- Restore Operating System and Retain User Data
- Reinstall Drivers or Applications
This chapter will guide you through each process.
To use the password protection feature of Acer eRecovery Management, you must first set the password. The password is set by launching Acer eRecovery Management and clicking Settings.

Creating a recovery backup (Optical drive)
To reinstall using a backup on optical discs, you must create the recovery disc beforehand. Throughout the process, you will be guided by onscreen instructions. Please read them carefully!
1 Click St art > All Programs > Acer, then click Acer eRecovery Management.

2 To create recovery discs for the hard drive's entire original contents, including Windows and all factory-loaded software and drivers, click Create Factory Default Backup.
-OR
To create a recovery disc for only the factory-loaded software and drivers, click Create Drivers and Applications Backup.

Important: We recommend that you create each type of recovery backup as soon as possible.
The Create Factory Default Backup dialog box tells you the number of blank, recordable discs you will need to complete the recovery discs. Make sure that you have the required number of identical, blank discs ready before continuing.


Note: The number of blank DVDs required varies depending on the operating system installed.
3 Insert a blank disc into the drive indicated in the Backup to list, then click Next. You will be shown the backup progress on the screen.

The drive ejects each disc as it completes burning it.
4 Remove the disc from the drive and mark it with a permanent marker.

Important: Write a unique, descriptive label on each disc, such as 'Windows Recovery Disc 1 of 2^ or 'Apps/Drivers Recovery disc'. Make sure you keep the discs in a safe place that you will remember.
5 If multiple discs are required, insert a new disc when prompted, then click OK. Continue recording discs until the process is complete.
Creating a recovery backup (USB flash drive)
To reinstall using a backup on a USB flash drive, you must create the recovery backup beforehand. Throughout the process, you will be guided by onscreen instructions. Please read them carefully!

Important: If you are using a USB flash drive, ensure it is at least 12 GB and does not contain any previous data.
1 Click Start > All Programs > Acer, then click Acer eRecovery Management.

2 To create recovery backup for the hard drive's entire original contents, including Windows and all factory-loaded software and drivers, click Create Factory Default Backup.
-OR-
To create a recovery backup for only the factory-loaded software and drivers, click Create Driver and Applications Backup.

Important: We recommend that you create each type of recovery backup as soon as possible.
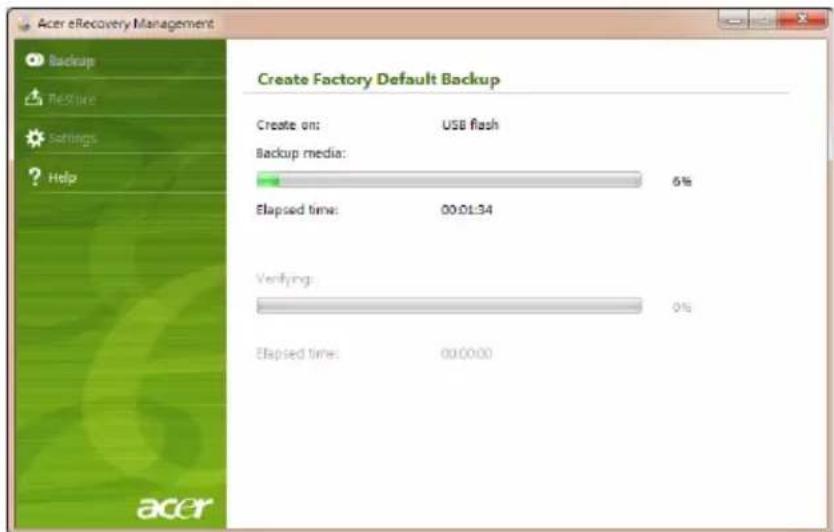
The Create Factory Default Backup dialog box opens. This dialog box tells you the estimated size of the backup file on your USB flash drive.

3 Plug in the USB disk, then click Start. You will be shown the backup progress on the screen.
4 Unplug the USB flash drive and mark it with a permanent marker.

Important: Write a unique, descriptive label on each backup, such as 'Windows Recovery Backup' or 'Apps/Drivers Recovery Backup'. Make sure you keep the USB flash drive in a safe place that you will remember.
Recovering your system (Optical drive)
If calling Acer support did not help fix your problem, you can use the Acer eRecovery Management program. This will restore your computer to the same state as when you purchased it, while giving you an option to retain all settings and personal data for later retrieval.
To recover your system
1 Perform minor fixes.
If only one or two items of software or hardware have stopped working correctly, the problem may be solved by reinstalling the software or the device drivers. To recover software and drivers that were pre-installed at the factory, see "Recovering pre-installed software and drivers" on page 6. For instructions on reinstalling software and drivers that were not pre-installed, see that product's documentation or technical support Web site.
2 Revert to a previous system condition.
If reinstalling software or drivers does not help, then the problem may be solved by returning your system to a previous state when everything was working correctly. For instructions, see "Returning to a previous system condition" on page 7.
3 Reset your system to its factory condition.
If nothing else has solved the problem and you want to reset your system to factory condition, see "Returning your system to its factory condition" on page 8.
Types of recovery
Recovering pre-installed software and drivers
As a troubleshooting step, you may need to reinstall the software and device drivers that came pre-installed on your computer from the factory. You can recover using either your hard drive or the recovery discs you have created.
-
New software: If you need to recover software that did not come pre-installed on your computer, you need to follow that software's installation instructions.
-
New device drivers: If you need to recover device drivers that did not come pre-installed on your computer, follow the instructions provided with the device.
To recover your pre-installed software and drivers:
1 Click Start > All Programs > Acer, then click Acer eRecovery Management. - OR -
If you are recovering from your driver and application recovery disc, insert it into the disc drive, then go to Step 3 after the Acer Application Recovery main menu opens.
2 Click the Restore t ab, then click Reinstall Drivers or Applications to display the Acer Application Recovery main menu.

3 Click Contents to show a list of software and device drivers.
4 Click the install icon for the item you want to install, then follow the onscreen prompts to complete the installation. Repeat this step for each item you want to reinstall.
Returning to a previous system condition
Microsoft System Restore periodically takes 'snapshots' of your system settings and saves them as restore points. In most cases of hard-to-resolve software problems, you can return to one of these restore points to get your system running again.
Windows automatically creates an additional restore point each day, and also each time you install software or device drivers.

Tip: For more information about using Microsoft System Restore, click Start, then click Help and Support. Type windows system restore in the Search Help box, then press Enter.
To return to a restore point:
1 Click Start > Control Panel > System and Security > Action Center, then click Recovery.
2 Click Open System Restore, then Next.
3 Select the restore point you want, click Next, then Finish. A confirmation message box will appear.
4 Click Yes. Your system is restored using the restore point you specified. This process may take several minutes, and may restart your computer.
Returning your system to its factory condition
If your computer experiences problems that are not recoverable by other methods, you may need to reinstall everything to return your system to its factory condition. You can reinstall using either your hard drive or the recovery discs you have created.

Warning: This complete recovery deletes everything on your hard drive, then reinstalls Windows and all software and drivers that were pre-installed on your system. If you can access important files on your hard drive, back them up now.
If you can still run Windows, see "Recovering from within Windows" on page 8.
If you cannot run Windows and your original hard drive is still working, see "Recovering from the hard drive during startup" on page 9.
If you cannot run Windows and your original hard drive has been completely reformatted or you have installed a replacement hard drive, see "Recovering from your recovery discs" on page 9.
Recovering from within Windows
To reinstall Windows and all pre-installed software and drivers:
Click Start > All Programs > Acer, then click Acer eRecovery Management.
Click the Restore tab, then Restore Operating System to Factory Defaults.
Click Yes, then Start. A dialog box will display information about the hard drive that the operating system will be recovered to.

Warning: Continuing the process will erase all files on your hard drive.
Click OK. The recovery process begins by restarting your computer, then continues by copying files to your hard drive. This process may take a while, the Acer eRecovery Management screen displays the progress.
When the recovery has finished, a dialog box will prompt you to restart your computer.
Click OK to restart your computer.
Follow the onscreen prompts for first-time system setup.
Recovering from the hard drive during startup
To reinstall Windows and all pre-installed software and drivers:
1 Turn on your computer, then press <Alt> + <F10> during startup to open Acer eRecovery Management.
2 Click Restore Operating System to Factory Defaults.

Warning: Continuing the process will erase all files on your hard drive.
3 Click Next. Your hard drive's original, factory-loaded contents will be recovered. This process will take several minutes.
Recovering from your recovery discs
To reinstall Windows and all pre-installed software and drivers:
1 Turn on your computer, insert the first system recovery disc into your optical disc drive, then restart your computer.

Warning: Continuing the process will erase all files on your hard drive.
If it is not already enabled, you must enable the F12 Boot Menu:
Press <F2> when starting your computer.
Use the left or right arrow keys to select the Main menu.
Press the down key until F12 Boot Menu is selected, press <F5> to change this setting to Enabled.
Use the left or right arrow keys to select the Exit menu.
Select Save Changes and Exit and press Enter. Select OK to confirm.
Your computer will restart.
2 During startup, press
3 Use your arrow keys to select the line CDROM/DVD (this line may start with 'IDE 1...'), then press
4 Insert the second recovery disc when prompted, then follow the onscreen prompts to complete the recovery.
Recovering your system (USB flash drive)
If calling Acer support did not help fix your problem, you can use the Acer eRecovery Management program. This will restore your computer to the same state as when you purchased it, while giving you an option to retain all settings and personal data for later retrieval.
To recover your system
1 Perform minor fixes.
If only one or two items of software or hardware have stopped working correctly, the problem may be solved by reinstalling the software or the device drivers. To recover software and drivers that were pre-installed at the factory, see "Recovering pre-installed software and drivers" on page 10. For instructions on reinstalling software and drivers that were not pre-installed, see that product's documentation or technical support Web site.
2 Revert to a previous system condition.
If reinstalling software or drivers does not help, then the problem may be solved by returning your system to a previous state when everything was working correctly. For instructions, see "Returning to a previous system condition" on page 11.
3 Reset your system to its factory condition.
If nothing else has solved the problem and you want to reset your system to factory condition, see "Returning your system to its factory condition" on page 12.
Types of recovery
Recovering pre-installed software and drivers
As a troubleshooting step, you may need to reinstall the software and device drivers that came pre-installed on your computer from the factory. You can recover using either your hard drive or the backup you have created.
-
New software: If you need to recover software that did not come pre-installed on your computer, you need to follow that software's installation instructions.
-
New device drivers: If you need to recover device drivers that did not come pre-installed on your computer, follow the instructions provided with the device.
To recover your pre-installed software and drivers:
1 Click Start > All Programs > Acer, then click Acer eRecovery Management. - OR -
If you are recovering from your driver and application recovery backup, insert the USB flash drive into a USB port. Open the USB flash drive in Windows Explorer and double-click Recovery.
2 Click Reinstall Drivers or Application from a USB device.

3 Click Contents to show a list of software and device drivers.
4 Click the install icon for the item you want to install, then follow the onscreen prompts to complete the installation. Repeat this step for each item you want to reinstall.
Returning to a previous system condition
Microsoft System Restore periodically takes 'snapshots' of your system settings and saves them as restore points. In most cases of hard-to-resolve software problems, you can return to one of these restore points to get your system running again.
Windows automatically creates an additional restore point each day, and also each time you install software or device drivers.

Tip: For more information about using Microsoft System Restore, click Start, then click Help and Support. Type windows system restore in the Search Help box, then press Enter.
To return to a restore point:
1 Click Start > Control Panel > System and Security > Action Center, then click Recovery.
2 Click O pen System Restore, then Next.
3 Select the restore point you want, click Ne xt, then Finish. A confirmation message box will appear.
4 Click Yes. Your system is restored using the restore point you specified. This process may take several minutes, and may restart your computer.
Returning your system to its factory condition
If your computer experiences problems that are not recoverable by other methods, you may need to reinstall everything to return your system to its factory condition. You can reinstall using either your hard drive or the recovery backup you have created.

Warning: This complete recovery deletes everything on your hard drive, then reinstalls Windows and all software and drivers that were pre-installed on your system. If you can access important files on your hard drive, back them up now.
If you can still run Windows, see "Recovering from within Windows" on page 12.
If you cannot run Windows and your original hard drive is still working, see "Recovering from the hard drive during startup" on page 13.
If you cannot run Windows and your original hard drive has been completely re-formatted or you have installed a replacement hard drive, see "Recovering from your recovery backup" on page 13.
Recovering from within Windows
To reinstall Windows and all pre-installed software and drivers:
Click Start > All Programs > Acer, then click Acer eRecovery Management.
Click the Restore tab, then Restore Operating System to Factory Defaults to open the Confirm Restoration dialog box.
Click Yes, then Start. A dialog box will display information about the hard drive that the operating system will be recovered to.

Warning: Continuing the process will erase all files on your hard drive.
Click OK. The recovery process begins by restarting your computer, then continues by copying files to your hard drive. This process may take a while, the Acer eRecovery Management screen displays the progress.
When the recovery has finished, a dialog box prompts you to restart your computer.
Click OK to restart your computer.
Follow the onscreen prompts for first-time system setup.
Recovering from the hard drive during startup
To reinstall Windows and all pre-installed software and drivers:
1 Turn on your computer, then press <Alt> + <F10> during startup to open Acer eRecovery Management.
2 Click Restore Operating System to Factory Defaults.

Warning: Continuing the process will erase all files on your hard drive.
3 Click Next. Your hard drive's original, factory-loaded contents will be recovered. This process will take several minutes.
Recovering from your recovery backup
To reinstall Windows and all pre-installed software and drivers:
1 Plug in the USB flash drive and turn on your computer.

Warning: Continuing the process will erase all files on your hard drive.
If it is not already enabled, you must enable the F12 Boot Menu:
Press <F2> when starting your computer.
Use the left or right arrow keys to select the Main menu.
Press the down key until F12 Boot Menu is selected, press <F5> to change this setting to Enabled.
Use the left or right arrow keys to select the Exit menu.
Select Save Changes and Exit and press Enter. Select OK to confirm.
Your computer will restart.
2 During startup, press
3 Use your arrow keys to select the line USB HDD, then press
4 Follow the onscreen prompts to complete the recovery.
Touchpad
The built-in touchpad is a pointing device that senses movement on its surface. This means the cursor responds as you move your finger across the surface of the touchpad. The central location on the palmrest provides optimum comfort and support.
Touchpad basics (with two buttons)

The following items show you how to use the touchpad with two buttons.
- Move your finger across the touchpad to move the cursor.
- Press the left and right buttons located beneath the touchpad to perform selection and execution functions. These two buttons are similar to the left and right buttons on a mouse. Tapping on the touchpad is the same as clicking the left button.
| Function Left button (2) | Right button (3) | Main touchpad (1) |
| Execute Quickly click twice. | Tap twice (at the same speed as double-clicking a mouse button). | |
| Select Click once. Tap once. | ||
| Drag Click and hold, then use finger on the touchpad to drag the cursor. | Tap twice (at the same speed as double-clicking a mouse button); rest your finger on the touchpad on the second tap and drag the cursor. | |
| Access context menu | Click once. |

Note: When using the touchpad, keep it - and your fingers - dry and clean. The touchpad is sensitive to finger movement; hence, the lighter the touch, the better the response. Tapping harder will not increase the touchpad's responsiveness.

Note: By default, vertical and horizontal scrolling is enabled on your touchpad. It can be disabled under Mouse settings in Windows Control Panel.
Using a computer security lock
The notebook comes with a Kensington-compatible security slot for a security lock.

Wrap the computer security lock cable around an immovable object such as a table or handle of a locked drawer. Insert the lock into the notch and turn the key to secure the lock. Some keyless models are also available.
Using the keyboard
The keyboard has full-sized keys and an embedded numeric keypad, separate cursor, lock, Windows, function and special keys.
Lock keys and embedded numeric keypad
The keyboard has three lock keys which you can toggle on and off.
| Lock key Description | |
| Caps Lock When Caps Lock is on, all alphabetic characters typed are in uppercase. | |
| Num Lock+Fn> + <F11> | When Num Lock is on, the embedded keypad is in numeric mode. The keys function as a calculator (complete with the arithmetic operators +, -, *, and /). Use this mode when you need to do a lot of numeric data entry. A better solution would be to connect an external keypad. Note: <Fn> + <F11> only for certain models. |
| Scroll Lock+Fn> + <F12> | When Scroll Lock is on, the screen moves one line up or down when you press the up or down arrow keys respectively. Scroll Lock does not work with some applications. |
The embedded numeric keypad functions like a desktop numeric keypad. It is indicated by small characters located on the upper right corner of the keycaps. To simplify the keyboard legend, cursor-control key symbols are not printed on the keys.
| Desired access Num Lock on Num Lock off | ||
| Number keys on embedded keypad | Type numbers in a normal manner. | |
| Cursor-control keys on embedded keypad | Hold <Shift> while using cursor-control keys. | Hold <Fn> while using cursor-control keys. |
| Main keyboard keys | Hold <Fn> while typing letters on embedded keypad. | Type the letters in a normal manner. |
Windows keys
The keyboard has two keys that perform Windows-specific functions.
Key Description

Windows key Pressed alone it launches the Start menu. It can also be used with other keys for other functions:
<>: Open or close the Start menu
< < 品 > + < D> : Display the desktop
<> +
< > + < F> : Search for a file or folder
< 心 > + < G> : Cycle through Sidebar gadgets
< > + < L> : Lock your computer (if you are connected to a network domain), or switch users (if you're not connected to a network domain)
< M > + < M> : Minimizes all windows
< > + < R> : Open the Run dialog box
< M> + < T> : Cycle through programs on the taskbar
<> + : Open Ease of Access Center
< X > + < X> : Open Windows Mobility Center
<> +
<> +
< 空 > + < SPACEBAR> : Bring all gadgets to the front and select Windows Sidebar

Note: Depending on your edition of Windows, some shortcuts may not function as described.

Application key
This key has the same effect as clicking the right mouse button; it opens the application's context menu.
Special keys (only for certain models)
You can locate the Euro symbol and the US dollar sign at the upper-center of your keyboard.
The Euro symbol
1 Open a text editor or word processor.
2 Hold <Alt Gr> and then press the <5> key at the upper-center of the keyboard.

Note: Some fonts and software do not support the Euro symbol. Please refer to www.microsoft.com/typography/faq/faq12.htm for more information.
The US dollar sign
1 Open a text editor or word processor.
2 Hold

Note: This function varies according to the language settings.
Frequently asked questions
The following is a list of possible situations that may arise during the use of your computer. Easy solutions are provided for each one.
I turned the power on, but the computer does not start or boot up.
Look at the power indicator:
-
If it is not lit, n o power is being supplied to the computer. Check the following:
-
If you are using on the battery, it may be low and unable to power the computer. Connect the AC adapter to recharge the battery pack.
- Make sure that the AC adapter is properly plugged into the computer and to the power outlet.
If it is lit, check the following:
- Is a non-bootable (non-system) disk in the external USB floppy drive? Remove or replace it with a system disk and press <Ctrl> + <Alt> + <Del> to restart the system.
Nothing appears on the screen.
The computer's power management system automatically blanks the screen to save power. Press any key to turn the display back on.
If pressing a key does not turn the display back on, three things might be the cause:
- The b rightness level might be too low. Press <Fn> + <> (increase) to adjust the brightness level.
- The display device might be set to an external monitor. Press the display toggle hotkey <Fn> + <F5> to toggle the display back to the computer.
- If the Sleep in indicator is lit, the computer is in Sleep mode. Press and release the power button to resume.
No audio is heard from the computer.
Check the following:
- The volume may be muted. In Windows, look at the volume control (speaker) icon on the taskbar. If it is crossed-out, click the icon and deselect the Mute all option.
- The volume level may be too low. In Windows, look at the volume control icon on the taskbar. You can also use the volume control buttons to adjust the volume.
- If head phones, earphones or external speakers are connected to the line-out port on the computer, the internal speakers automatically turn off.
The keyboard does not respond.
Try attaching an external keyboard to a USB port on the computer. If it works, contact your dealer or an authorized service center as the internal keyboard cable may be loose.
The printer does not work.
Check the following:
- Make sure that the printer is connected to a power outlet and that it is turned on.
- Make sure that the printer cable is connected securely to a USB port and the corresponding port on the printer.
I want to restore my computer to its original settings without recovery CDs.

Note: D2D Recovery is only available in notebook models fitted with a hard drive.

Note: If your system is the multilingual version, the operating system and language you choose when you first turn on the system will be the only option for future recovery operations.
This recovery process helps you restore the C: drive with the original software content that is installed when you purchase your notebook. Follow the steps below to rebuild your C: drive. (Your C: drive will be reformatted and all data will be erased.) It is important to back up all data files before using this option.
Before performing a restore operation, please check the BIOS settings by pressing <F2> during POST.
1 Check to see if Acer disk-to-disk recovery is enabled or not.
2 Make sure the D2D Recovery setting in Main is Enabled.
3 Exit the BIOS utility and save changes. The system will reboot.
To start the recovery process:
1 Restart the system.
2 While the Acer logo is showing, press <Alt> + <F10> at the same time to enter the recovery process.
3 Refer to the onscreen instructions to perform system recovery.
Requesting service
Before you call
Please have the following information available when you call Acer for online service, and please be at your computer when you call. With your support, we can reduce the amount of time a call takes and help solve your problems efficiently. If there are error messages or beeps reported by your computer, write them down as they appear on the screen (or the number and sequence in the case of beeps).
You are required to provide the following information:
Name:
Address:
Telephone number:
Machine and model type:
Serial number:
Date of purchase:
Battery pack
The computer uses a battery pack that gives you long use between charges.
Battery pack characteristics
The battery pack has the following characteristics:
- Employs current battery technology standards.
- Delivers a battery-low warning.
The battery is recharged whenever you connect the computer to the AC adapter. Your computer supports charge-in-use, enabling you to recharge the battery while you continue to operate the computer. However, recharging with the computer turned off results in a significantly faster charge time.
The battery will come in handy when you travel or during a power failure. It is advisable to have an extra fully charged battery pack available as backup. Contact your dealer for details on ordering a spare battery pack.
Maximizing the battery's life
Like all other batteries, your computer's battery will degrade over time. This means that the battery's performance will diminish with time and use. To maximize your battery's life, you are advised to adhere to the recommendations set out below.
Conditioning a new battery pack
Before you use a battery pack for the first time, there is a conditioning process that you should follow:
1 Insert the new battery without turning the computer on.
2 Connect the AC adapter and fully charge the battery.
3 Disconnect the AC adapter.
4 Turn on the computer and operate using battery power.
5 Fully deplete the battery until the battery-low warning appears.
6 Reconnect the AC adapter and fully charge the battery again.
Follow these steps again until the battery has been charged and discharged three times.
Use this conditioning process for all new batteries, or if a battery hasn't been used for a long time. If the computer is to be stored for more than two weeks, you are advised to remove the battery pack from the unit.

Warning: Do not expose battery packs to temperatures below 0^ C (32^ F) or above 45^ C (113^ F). Extreme temperatures may adversely affect the battery pack.
By following the battery conditioning process you condition your battery to accept the maximum possible charge. Failure to follow this procedure will prevent you from obtaining the maximum battery charge, and will also shorten the effective lifespan of the battery.
In addition, the useful lifespan of the battery is adversely affected by the following usage patterns:
- Using the computer on constant AC power with the battery inserted. If you want to use constant AC power, you are advised to remove the battery pack after it is fully charged.
- Not discharging and recharging the battery to its extremes, as described above.
- Frequent use; the more you use the battery, the faster it will reach the end of its effective life. A standard computer battery has a life span of about 300 charges.
Installing and removing the battery pack

Important! Before removing the battery from the unit, connect the AC adapter if you want to continue using your computer. Otherwise, turn off the computer first.
To install a battery pack:
- Align the battery with the open battery bay; make sure that the end with the contacts will enter first, and that the top surface of the battery is facing up.
2 Slide the battery into the battery bay and gently push until the battery locks in place.
To remove a battery pack:
1 Slide the battery release latch to release the battery.
2 Pull the battery from the battery bay.
Charging the battery
To charge the battery, first make sure that it is correctly installed in the battery bay. Plug the AC adapter into the computer, and connect to a mains power outlet. You can continue to operate your computer on AC power while your battery is charging. However, charging the battery with the computer turned off results in a significantly faster charge time.

Note: You are advised to charge the battery before retiring for the day. Charging the battery overnight before traveling enables you to start the next day with a fully charged battery.
Checking the battery level
The Windows power meter indicates the current battery level. Rest the cursor over the battery/power icon on the taskbar to see the battery's present charge level.
Optimizing battery life
Optimizing battery life helps you get the most out of battery operation, prolonging the charge/recharge cycle and improving recharging efficiency. You are advised to follow the suggestions set out below:
Purchase an extra battery pack.
Use AC power whenever possible, reserving battery for on-the-go use.
- Eject a PC Card if it is not being used, as it will continue to draw power (for selected models).
- Store the battery pack in a cool, dry place. The recommended temperature is 10^ ( 50^ ) to 30^ ( 86^ ). Higher temperatures cause the battery to self-discharge faster.
- Excessive recharging decreases the battery life.
- Look after your AC adapter and battery.
Battery-low warning
When using battery power pay attention to the Windows power meter.

Warning: Connect the AC adapter as soon as possible after the battery-low warning appears. Data will be lost if the battery to become fully depleted and the computer shuts down.
When the battery-low warning appears, the recommended course of action depends on your situation:
| Situation Recommended Action | |
| The AC adapter and a power outlet are available. | 1. Plug the AC adapter into the computer, and then connect to the mains power supply. 2. Save all necessary files. 3. Resume work. Turn off the computer if you want to recharge the battery rapidly. |
| An extra fully charged battery pack is available. | 1. Save all necessary files. 2. Close all applications. 3. Turn off the computer. 4. Replace the battery pack. 5. Turn on the computer and resume work. |
| The AC adapter or a power outlet is unavailable. You have no spare battery pack. | 1. Save all necessary files. 2. Close all applications. 3. Turn off the computer. |
Taking your notebook PC with you
This section gives you tips and hints to consider when moving around or traveling with your computer.
Disconnecting from the desktop
Follow these steps to disconnect your computer from external accessories:
1 Save any open files.
2 Remove any media, floppy disks or compact disks from the drive(s).
3 Shut down the computer.
4 Close the display cover.
5 Disconnect the cord from the AC adapter.
6 Disconnect the keyboard, pointing device, printer, external monitor and other external devices.
7 Disconnect the Kensington lock if you are using one to secure the computer.
Moving around
When you are just moving within short distances, for example, from your office desk to a meeting room.
Preparing the computer
Before moving the computer, close and latch the display cover to place it in Sleep mode. You can now safely take the computer anywhere you go within the building. To bring the computer out of Sleep mode, open the display; then press and release the power button.
If you are taking the computer to a client's office or a different building, you may choose to shut down the computer:
Click Start then click Shut Down.
Or:
You can put the computer in Sleep mode by pressing Fn + F4 . Then close and latch the display.
When you are ready to use the computer again, unlatch and open the display; then press and release the power button.

Note: If the Sleep indicator is off, the computer has entered Hibernation mode and is turned off. If the power indicator is off but the Sleep indicator is on, the computer has entered Sleep mode. In both cases, press and release the power button to turn the computer back on. Note that the computer may enter Hibernation mode after being in Sleep mode for a period of time.
What to bring to meetings
If your meeting is relatively short, you probably do not need to bring anything with you other than your computer. If your meeting will be longer, or if your battery is not fully charged, you may want to bring the AC adapter with you to plug in your computer in the meeting room.
If the meeting room does not have an electrical outlet, reduce the drain on the battery by putting the computer in Sleep mode. Press <Fn> + <F4> or close the display cover whenever you are not actively using the computer. To resume, open the display (if closed), then press and release the power button.
Taking the computer home
When you are moving from your office to your home or vice versa.
Preparing the computer
After disconnecting the computer from your desktop, follow these steps to prepare the computer for the trip home:
- Check that you have removed all media and compact discs from the drive(s). Failure to remove the media can damage the drive head.
- Pack the computer in a protective case that can prevent the computer from sliding around and cushion it if it should fall.


Caution: Avoid packing items next to the top cover of the computer. Pressure against the top cover can damage the screen.
What to take with you
Unless you have some items at home, take the following items with you:
- AC adapter and power cord.
The printed User's Guide.
Special considerations
Follow these guidelines to protect your computer while traveling to and from work:
- Minimize the effects of temperature changes by keeping the computer with you.
If you need to stop for an extended period of time and cannot carry the computer with you, leave the computer in the trunk of the car to avoid exposing the computer to excessive heat. - Changes in temperature and humidity can cause condensation. Allow the computer to return to room temperature, and inspect the screen for condensation before turning on the computer. If the temperature change is greater than 10^ ( 18^ ), allow the computer to come to room temperature slowly. If possible, leave the computer for 30 minutes in an environment with a temperature between outside and room temperature.
Setting up a home office
If you frequently work on your computer at home, you may want to purchase a second AC adapter for use at home. With a second AC adapter, you can avoid carrying the extra weight to and from home.
If you use your computer at home for significant periods of time, you might also want to add an external keyboard, monitor or mouse.
Traveling with the computer
When you are moving within a larger distance, for instance, from your office building to a client's office building or traveling locally.
Preparing the computer
Prepare the computer as if you were taking it home. Make sure that the battery in the computer is charged. Airport security may require you to turn on your computer when carrying it into the gate area.
What to take with you
Take the following items with you:
-AC adapter
- Spare, fully-charged battery pack(s)
Additional printer driver files if you plan to use another printer
Special considerations
In addition to the guidelines for taking the computer home, follow these guidelines to protect your computer while traveling:
- Always take the computer as carry-on luggage.
- If possible, have the computer inspected by hand. Airport security X-ray machines are safe, but do not put the computer through a metal detector.
- Avoid exposing floppy disks to hand-held metal detectors.
Traveling internationally with the computer
When you are moving from country to country.
Preparing the computer
Prepare the computer as you would normally prepare it for traveling.
What to take with you
Take the following items with you:
-AC adapter
Power cords that are appropriate for the country to which you are traveling
- Spare, fully-charged battery packs
Additional printer driver files if you plan to use another printer
Proof of purchase, in case you need to show it to customs officials
International Travelers Warranty passport
Special considerations
Follow the same special considerations as when traveling with the computer. In addition, these tips are useful when traveling internationally:
- When traveling in another country, check that the local AC voltage and the AC adapter power cord specifications are compatible. If not, purchase a power cord that is compatible with the local AC voltage. Do not use converter kits sold for appliances to power the computer.
- If you are using the modem, check if the modem and connector are compatible with the telecommunications system of the country you are traveling in.
Securing your computer
Your computer is a valuable investment that you need to take care of. Learn how to protect and take care of your computer.
Security features include hardware and software locks — a security notch and passwords.
Using a computer security lock
The notebook comes with a Kensington-compatible security slot for a security lock.
Wrap a computer security lock cable around an immovable object such as a table or handle of a locked drawer. Insert the lock into the notch and turn the key to secure the lock. Some keyless models are also available.
Using passwords
Passwords protect your computer from unauthorized access. Setting these passwords creates several different levels of protection for your computer and data:
- Supervisor Password prevents unauthorized entry into the BIOS utility. Once set, you must enter this password to gain access to the BIOS utility. See "BIOS utility" on page 33.
- User Password secures your computer against unauthorized use. Combine the use of this password with password checkpoints on boot-up and resume from Hibernation for maximum security.
- Password on Boot secures your computer against unauthorized use. Combine the use of this password with password checkpoints on boot-up and resume from Hibernation for maximum security.

Important! Do not forget your Supervisor Password! If you forget your password, please get in touch with your dealer or an authorized service center.
Entering passwords
When a password is set, a password prompt appears in the center of the display screen.
- When the Supervisor Password is set, a prompt appears when you press < F2 > to enter the BIOS utility at boot-up.
- Type the Supervisor Password and press
to access the BIOS utility. If you enter the password incorrectly, a warning message appears. Try again and press . - When the User Password is set and the password on boot parameter is enabled, a prompt appears at boot-up.
- Type the User Password and press
to use the computer. If you enter the password incorrectly, a warning message appears. Try again and press .

Important! You have three chances to enter a password. If you fail to enter the password correctly after three tries, the system halts. Press and hold the power button for four seconds to shut down the computer. Then turn on the computer again, and try again.
Setting passwords
You can set passwords using the BIOS utility.
Expanding through options
Your notebook PC offers you a complete mobile computing experience.
Connectivity options
Ports allow you to connect peripheral devices to your computer as you would with a desktop PC. For instructions on how to connect different external devices to the computer, read the following section.
Built-in network feature
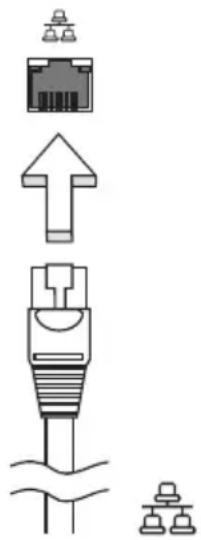
The built-in network feature allows you to connect your computer to an Ethernet-based network.
To use the network feature, connect an Ethernet cable from the Ethernet (RJ-45) port on the chassis of the computer to a network jack or hub on your network.
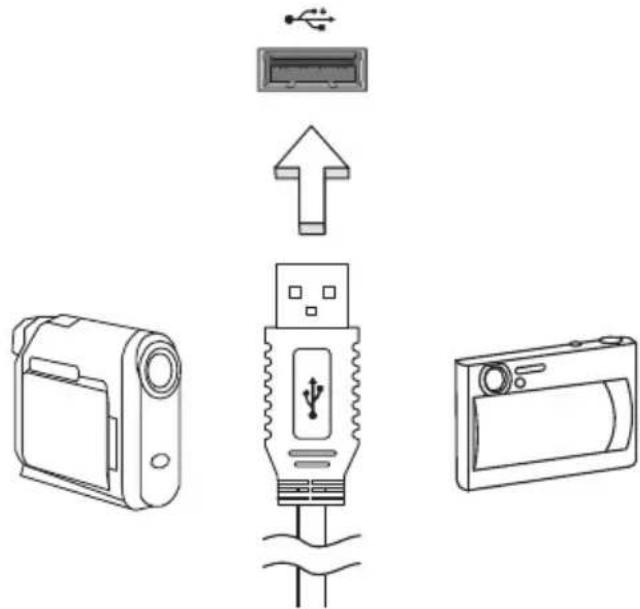
Universal Serial Bus (USB)
The USB 2.0 port is a high-speed serial bus which allows you to connect USB peripherals without taking up precious system resources.
BIOS utility
The BIOS utility is a hardware configuration program built into your computer's BIOS.
Your computer is already properly configured and optimized, and you do not need to run this utility. However, if you encounter configuration problems, you may need to run it.
To activate the BIOS utility, press <F2> during the POST while the notebook PC logo is being displayed.
Boot sequence
To set the boot sequence in the BIOS utility, activate the BIOS utility, then select Boot from the categories listed at the top of the screen.
Enable disk-to-disk recovery
To enable disk-to-disk recovery (hard disk recovery), activate the BIOS utility, then select Main from the categories listed at the top of the screen. Find D2D Recovery at the bottom of the screen and use the <F5> and <F6> keys to set this value to Enabled.
Password
To set a password on boot, activate the BIOS utility, then select Security from the categories listed at the top of the screen. Find Password on boot: and use the <F5> and <F6> keys to enable this feature.
Power management
This computer has a built-in power management unit that monitors system activity. System activity refers to any activity involving one or more of the following devices: keyboard, mouse, hard disk, peripherals connected to the computer, and video memory. If no activity is detected for a period of time (called an inactivity timeout), the computer stops some or all of these devices in order to conserve energy.
This computer employs a power management scheme that supports the advanced configuration and power interface (ACPI), which allows for maximum power conservation and maximum performance at the same time. Windows handles all power-saving chores for your computer.
Troubleshooting
This chapter shows you how to deal with common system problems. Read it before calling a technician if a problem occurs. Solutions to more serious problems require opening up the computer. Do not attempt to open the computer yourself; contact your dealer or authorized service center for assistance.
Troubleshooting tips
This notebook PC incorporates an advanced design that delivers onscreen error message reports to help you solve problems.
If the system reports an error message or an error symptom occurs, see "Error messages" below. If the problem cannot be resolved, contact your dealer. See "Requesting service" on page 21.
Error messages
If you receive an error message, note the message and take the corrective action. The following table lists the error messages in alphabetical order together with the recommended course of action.
| Error messages Corrective action | |
| CMOS battery bad Contact your dealer or an authorized service center. | |
| CMOS checksum error Contact your dealer or an authorized service center. | |
| Disk boot failure | Insert a system (bootable) disk, then press <Enter> to reboot. |
| Equipment configuration error | Press <F2> (during POST) to enter the BIOS utility, then press Exit in the BIOS utility to reboot. |
| Hard disk 0 error Contact your dealer or an authorized service center. | |
| Hard disk 0 extended type error | Contact your dealer or an authorized service center. |
| I/O parity error Contact your dealer or an authorized service center. | |
| Keyboard error or no keyboard connected | Contact your dealer or an authorized service center. |
| Keyboard interface error | Contact your dealer or an authorized service center. |
| Memory size mismatch | Press <F2> (during POST) to enter the BIOS utility, then press Exit in the BIOS utility to reboot. |
If you still encounter problems after going through the corrective measures, please contact your dealer or an authorized service center for assistance.
Regulations and safety notices
FCC notice
This device has been tested and found to comply with the limits for a Class B digital device pursuant to Part 15 of the FCC rules. These limits are designed to provide reasonable protection against harmful interference in a residential installation. This device generates, uses, and can radiate radio frequency energy and, if not installed and used in accordance with the instructions, may cause harmful interference to radio communications.
However, there is no guarantee that interference will not occur in a particular installation. If this device does cause harmful interference to radio or television reception, which can be determined by turning the device off and on, the user is encouraged to try to correct the interference by one or more of the following measures:
- Reorient or relocate the receiving antenna.
- Increase the separation between the device and receiver.
- Connect the device into an outlet on a circuit different from that to which the receiver is connected.
- Consult the dealer or an experienced radio/television technician for help.
Notice: Shielded cables
All connections to other computing devices must be made using shielded cables to maintain compliance with FCC regulations.
Notice: Peripheral devices
Only peripherals (input/output devices, terminals, printers, etc.) certified to comply with the Class B limits may be attached to this equipment. Operation with non-certified peripherals is likely to result in interference to radio and TV reception.
Caution
Changes or modifications not expressly approved by the manufacturer could void the user's authority, which is granted by the Federal Communications Commission, to operate this computer.
Operation conditions
This device complies with Part 15 of the FCC Rules. Operation is subject to the following two conditions: (1) this device may not cause harmful interference, and (2) this device must accept any interference received, including interference that may cause undesired operation.
Notice: Canadian users
This Class B digital apparatus complies with Canadian ICES-003.
Declaration of Conformity for EU countries
Hereby, Acer, declares that this notebook PC series is in compliance with the essential requirements and other relevant provisions of Directive 1999/5/EC.
Compliant with Russian regulatory certification


ME61
LCD pixel statement
The LCD unit is produced with high-precision manufacturing techniques. Nevertheless, some pixels may occasionally misfire or appear as black or red dots. This has no effect on the recorded image and does not constitute a malfunction.
Radio device regulatory notice

Note: Below regulatory information is for models with wireless LAN and / or Bluetooth only.
General
To prevent radio interference to the licensed service, this device is intended to be operated indoors.
This product complies with the radio frequency and safety standards of any country or region in which it has been approved for wireless use. Depending on configurations, this product may or may not contain wireless radio devices (such as wireless LAN and/or Bluetooth modules). Below information is for products with such devices.
European Union (EU)
R&TTE Directive 1999/5/EC as attested by conformity with the following harmonized standard:
Article 3.1(a) Health and Safety
EN60950-1
EN62311
Article 3.1(b) EMC
EN301489-1
- EN301 489-3 (Applicable to non-bluetooth wireless keyboard mouse set)
EN301489-7
EN301489-17
EN301489-24
Article 3.2 Spectrum Usages
- EN300 440-2 (Applicable to non-bluetooth wireless keyboard mouse set)
EN300328
EN301511
EN301 893 (Applicable to 5 GHz high performance RLAN)
EN301 908-1
EN301908-2

List of applicable countries
EU member states as of July 2009 are: Belgium, Denmark, Germany, Greece, Spain, France, Ireland, Italy, Luxembourg, the Netherlands, Austria, Portugal, Finland, Sweden, United Kingdom, Estonia, Latvia, Lithuania, Poland, Hungary, Czech Republic, Slovak Republic, Slovenia, Cyprus, Malta, Bulgaria and Romania. Usage is allowed in the countries of European Union, as well as Norway, Switzerland, Iceland and Liechtenstein. This device must be used in strict accordance with the regulations and constraints in the country of use. For further information, please contact local office in the country of use. Please see ec.europa.eu/enterprise/rtte/implem.htm for the latest country list.
The FCC RF safety requirement
The radiated output power of the wireless LAN Mini PCI Card and Bluetooth card is far below the FCC radio frequency exposure limits. Nevertheless, the
notebook PC series shall be used in such a manner that the potential for human contact during normal operation is minimized as follows:
1 Users are requested to follow the RF safety instructions on wireless option devices that are included in the user's manual of each RF option device.

Caution: To comply with FCC RF exposure compliance requirements, a separation distance of at least 20~cm (8 inches) must be maintained between the antenna for the integrated wireless LAN Mini PCI Card built in to the screen section and all persons.


Note: The wireless Mini PCI adapter implements a transmission diversity function. The function does not emit radio frequencies simultaneously from both antennas. One of the antennas is selected automatically or manually (by users) to ensure good quality radiocommunication.
2 An improper installation or unauthorized use may cause harmful interference to radio communications. Also any tampering of the internal antenna will void the FCC certification and your warranty.
Canada — Low-power license-exempt radio communication devices (RSS-210)
a Common information
Operation is subject to the following two conditions:
- This device may not cause interference, and
- This device must accept any interference, including interference that may cause undesired operation of the device.
b Operation in 2.4 GHz band
To prevent radio interference to the licensed service, this device is intended to be operated indoors and installation outdoors is subject to licensing.
LCD panel ergonomic specifications
| Design viewing distance 500 mm | |
| Design inclination angle 0.0° | |
| Design azimuth angle 90.0° | |
| Viewing direction range class Class IV | |
| Screen tilt angle 85.0° | |
| Design screen illuminance | ·Illuminance level: [250 + (250cosα)] lx where α = 85° ·Color: Source D65 |
| Reflection class of LCD panel (positive and negative polarity) | ·Ordinary LCD: Class I ·Protective or Acer LCD: Class III |
| Image polarity Both | |
| Reference white: Pre-setting of luminance and color temperature @ 6500K (tested under BM7) | ·Yn ·u'n ·v'n |
| Pixel fault class Class II | |
Gammu Aspire One
Acer eRecovery Management 1
Considerations speciales 31
LCD panel ergonomic specifications 45
Acer eRecovery Management
This Class B digital apparatus complies with Canadian ICES-003.
LCD panel ergonomic specifications
| Design viewing distance 500 mm | |
| Design inclination angle 0.0° | |
| Design azimuth angle 90.0° | |
| Viewing direction range class Class IV | |
| Screen tilt angle 85.0° | |
| Design screen illuminance •Illuminance level: [250 + (250cosα)] lx where α = 85° •Color: Source D65 | |
| Reflection class of LCD panel (positive and negative polarity) | •Ordinary LCD: Class I •Protective or Acer LCD: Class III |
| Image polarity Both | |
| Reference white: | •Yn |
| Pre-setting of luminance and color temperature @ 6500K (tested under BM7) | •u'n •v'n |
| Pixel fault class Class II | |
Aspire One Serie
Acer eRecovery Management 1
(disk-to-disk recovery) 37
Kennwort 37
LCD panel ergonomic specifications 45
Acer eRecovery Management
This Class B digital apparatus complies with Canadian ICES-003.
LCD panel ergonomic specifications
| Design viewing distance 500 mm | |
| Design inclination angle 0.0° | |
| Design azimuth angle 90.0° | |
| Viewing direction range class Class IV | |
| Screen tilt angle 85.0° | |
| Design screen illuminance • Illuminance level: [250 + (250cosα)] lx where α = 85° • Color: Source D65 | |
| Reflection class of LCD panel (positive and negative polarity) | • Ordinary LCD: Class I • Protective or Acer LCD: Class III |
| Image polarity Both | |
| Reference white: | • Yn |
| Pre-setting of luminance and color temperature @ 6500K (tested under BM7) | • u'n • v'n |
| Pixel fault class Class II | |
Serie Aspire One
Acer eRecovery Management 1
LCD panel ergonomic specifications 42
Acer eRecovery Management
This Class B digital apparatus complies with Canadian ICES-003.
LCD panel ergonomic specifications
| Design viewing distance 500 mm | |
| Design inclination angle 0.0° | |
| Design azimuth angle 90.0° | |
| Viewing direction range class IV | |
| Screen tilt angle 85.0° | |
| Design screen illuminance •Illuminance level: [250 + (250cosα)] lx where α = 85° •Color: Source D65 | |
| Reflection class of LCD panel (positive and negative polarity) | •Ordinary LCD: Class I •Protective or Acer LCD: Class III |
| Image polarity Both | |
| Reference white: | •Yn |
| Pre-setting of luminance and color temperature @ 6500K (tested under BM7) | •u'n •v'n |
| Pixel fault class Class II | |
Serie Aspire One
www.acer-group.com/public/Sustainability/sustainability01.htm.

Los)."Losylvania. Losylvania. Losylvania. Losylvania. Losylvania. Losylvania. Losylvania. Losylvania. Losylvania. Losylvania. Losylvania. Losylvania. Losylvania. Losylvania. Losylvania. Losylvania. Losylvania. Losylvania. Losylvania. Losylvania. Losylvania. Losylvania. Losylvania. Losylvania. Losylvania. Losylvania. Losylvania. Losylvania. Losylvania. Losylvania. Losylvania. Losylvania. Losylvania. Losylvania. Los霸王's Palace. Los霸王's City. Los霸王's City of the Gods. Los霸王's City of the Gods of the Gods of the Gods of the Gods of the Gods of the Gods of the Gods of the Gods of the Gods of the Gods of the Gods of the Gods of the Gods of the Gods of the Gods of the Gods of the Gods of the Gods of the Gods of the Gods of the Gods of the Gods of the Gods of the Gods of the Gods of the Gods of the Gods of the Gods of the Gods of the Gods of the Gods of the Gods of the Gods of the Gods Of The Gods Of The Gods Of The Gods OF THE GODS OF THE GODS OF THE GODS OF THE GODS OF THE GODS OF THE GODS OF THE GODS OF THE GODS OF THE GODS OF THE GODS OF THE GODS OF THE GODS OF THE GODS OF THE GODS OF THE GODS OF THE GODS OF THE GODS OF THE GODS OF THE GODS OF THE GODS OF THE GODS OF THE GODS OF THE GODS OF THE GODS OF THE GODS OF THE GOD SINGING IN A NEW YORK STATE.
Acer eRecovery Management 1
LCD panel ergonomic specifications 46
Acer eRecovery Management
El",[6] El,[7] El,[8] El,[9] El,[10] El,[11] El,[12] El,[13] El,[14] El,[15] El,[16] El,[17] El,[18] El,[19] El,[20] El,[21] El,[22] El,[23] El,[24] El,[25] El,[26] El,[27] El,[28] El,[29] El,[30] El,[31] El,[32] El,[33] El,[34] El,[35] El,[36] El,[37] El,[38] El,[39] El,[40] El,[41] El,[42] El,[43] El,[44] El,[45] El,[46] El,[47] El,[48] El,[49] El,[50] El,[51] El,[52] El,[53] El,[54] El,[55] El,[56] El,[57] El,[58] El,[59] El,[60] El,[61] El,[62] El,[63] El,[64] El,[65] El,[66] El,[67] El,[68] El,[69] El,[70] El,[71] El,[72] El,[73] El,[74] El,[75] El,[76] El,[77] El,[78] El,[79] El,[80] El,[81] El,[82] El,[83] El,[84] El,[85] El,[86] El,[87] El,[88] El.[89]
Aviso: Canadian users
This Class B digital apparatus complies with Canadian ICES-003.
LCD panel ergonomic specifications
| Design viewing distance 500 mm | |
| Design inclination angle 0.0° | |
| Design azimuth angle 90.0° | |
| Viewing direction range class Class IV | |
| Screen tilt angle 85.0° | |
| Design screen illuminance •Illuminance level: [250 + (250cosα)] lx where α = 85° •Color: Source D65 | |
| Reflection class of LCD panel (positive and negative polarity) | •Ordinary LCD: Class I •Protective or Acer LCD: Class III |
| Image polarity Both | |
| Reference white: | •Yn |
| Pre-setting of luminance and color temperature @ 6500K (tested under BM7) | •u'n •v'n |
| Pixel fault class Class II | |
Série Aspire One
Manual Generico do utiliser
Acer eRecovery Management 1
LCD panel ergonomic specifications 44
Acer eRecovery Management
Aviso: Canadian users
This Class B digital apparatus complies with Canadian ICES-003.
LCD panel ergonomic specifications
| Design viewing distance 500 mm | |
| Design inclination angle 0.0° | |
| Design azimuth angle 90.0° | |
| Viewing direction range class Class IV | |
| Screen tilt angle 85.0° | |
| Design screen illuminance •Illuminance level: [250 + (250cosα)] lx where α = 85° •Color: Source D65 | |
| Reflection class of LCD panel (positive and negative polarity) | •Ordinary LCD: Class I •Protective or Acer LCD: Class III |
| Image polarity Both | |
| Reference white: | •Yn |
| Pre-setting of luminance and color temperature @ 6500K (tested under BM7) | •u'n •v'n |
| Pixel fault class Class II | |
Aspire One Serie
Acer eRecovery Management 1
LCD panel ergonomic specifications 43
Acer eRecovery Management
This Class B digital apparatus complies with Canadian ICES-003.
LCD panel ergonomic specifications
| Design viewing distance 500 mm | |
| Design inclination angle 0.0° | |
| Design azimuth angle 90.0° | |
| Viewing direction range class IV | |
| Screen tilt angle 85.0° | |
| Design screen illuminance •Illuminance level: [250 + (250cosα)] lx where α = 85° •Color: Source D65 | |
| Reflection class of LCD panel (positive and negative polarity) | •Ordinary LCD: Class I •Protective or Acer LCD: Class III |
| Image polarity Both | |
| Reference white: | •Yn |
| Pre-setting of luminance and color temperature @ 6500K (tested under BM7) | •u'n •v'n |
| Pixel fault class Class II | |
Aspire One-serien
www.acer-group.com/public/Sustainability/sustainability01.htm.

Acer eRecovery Management 1
LCD panel ergonomic specifications 41
Acer eRecovery Management
Hvis det oppstår problemer på datamaskinen som ikke kan løses på andere@mær, kan det hende at du ma installere Windows-operativsystemet og fabrikinstallert programvare og drivere på nytt. Hvis du vil sikre at du kan gjenopprette datamaskinen när du har behov for det, bør du lage en sikkerhetskopi sö snart som mulig.

Merk: Folgende innhold er kun for generelle referanseformål. De faktiskeprodukspesifikasjonene kan variere.
: Apne Ease of Access Center
X>: Apne Windows Mobility Center
This Class B digital apparatus complies with Canadian ICES-003.
LCD panel ergonomic specifications
| Design viewing distance 500 mm | |
| Design inclination angle 0.0° | |
| Design azimuth angle 90.0° | |
| Viewing direction range class IV | |
| Screen tilt angle 85.0° | |
| Design screen illuminance • Illuminance level: [250 + (250cosα)] lx where α = 85° • Color: Source D65 | |
| Reflection class of LCD panel (positive and negative polarity) | • Ordinary LCD: Class I • Protective or Acer LCD: Class III |
| Image polarity Both | |
| Reference white: | • Yn |
| Pre-setting of luminance and color temperature @ 6500K (tested under BM7) | • u'n • v'n |
| Pixel fault class Class II | |
Aspire One Seriens
Acer eRecovery Management 1
LCD panel ergonomic specifications 42
Acer eRecovery Management
1 Taend for computeren, tryk pa <Alt> + <F10> under starten for at abne Acer eRecovery Management.
2 Klik på Gendan operativsystemet til fabriksstandarderne.

for at genstarte systemet.
This Class B digital apparatus complies with Canadian ICES-003.
LCD panel ergonomic specifications
| Design viewing distance 500 mm | |
| Design inclination angle 0.0° | |
| Design azimuth angle 90.0° | |
| Viewing direction range class Class IV | |
| Screen tilt angle 85.0° | |
| Design screen illuminance •Illuminance level: [250 + (250cosα)] lx where α = 85° •Color: Source D65 | |
| Reflection class of LCD panel (positive and negative polarity) | •Ordinary LCD: Class I •Protective or Acer LCD: Class III |
| Image polarity Both | |
| Reference white: | •Yn |
| Pre-setting of luminance and color temperature @ 6500K (tested under BM7) | •u'n •v'n |
| Pixel fault class Class II | |
Aspire One-serien
Allman anecdarguide
© 2010 Med ensamratt
Aspire One-serien Allman anecdarguide
Acer eRecovery Management
Aktivera disk-to-disk recovery
Lösenord
LCD panel ergonomic specifications 42
Acer eRecovery Management
Aktivera disk-to-disk recovery
This Class B digital apparatus complies with Canadian ICES-003.
LCD panel ergonomic specifications
| Design viewing distance 500 mm | |
| Design inclination angle 0.0° | |
| Design azimuth angle 90.0° | |
| Viewing direction range class IV | |
| Screen tilt angle 85.0° | |
| Design screen illuminance •Illuminance level: [250 + (250cosα)] lx where α = 85° •Color: Source D65 | |
| Reflection class of LCD panel (positive and negative polarity) | •Ordinary LCD: Class I •Protective or Acer LCD: Class III |
| Image polarity Both | |
| Reference white: | •Yn |
| Pre-setting of luminance and color temperature @ 6500K (tested under BM7) | •u'n •v'n |
| Pixel fault class Class II | |
Aspire One -sarja
Peruskëyttäjan opas
Acer eRecovery Management 1
LCD panel ergonomic specifications 42
Acer eRecovery Management
www.microsoft.com/typography/faq/faq12.htm.
US-dollar in merkki
This Class B digital apparatus complies with Canadian ICES-003.
LCD panel ergonomic specifications
| Design viewing distance 500 mm | |
| Design inclination angle 0.0° | |
| Design azimuth angle 90.0° | |
| Viewing direction range class IV | |
| Screen tilt angle 85.0° | |
| Design screen illuminance •Illuminance level: [250 + (250cosα)] lx where α = 85° •Color: Source D65 | |
| Reflection class of LCD panel (positive and negative polarity) | •Ordinary LCD: Class I •Protective or Acer LCD: Class III |
| Image polarity Both | |
| Reference white: | •Yn |
| Pre-setting of luminance and color temperature @ 6500K (tested under BM7) | •u'n •v'n |
| Pixel fault class Class II | |
Cepnia Aspire One
TnIOBOe pyKOBODCTBO NOIb3OBaTeJIa
© 2010 Bce npaba coxpaHebl
Tunoboe pykoBOcTBo noJIb3OBATeIa KOMnbIOTepa cepu Aspire One
PepBbIy Bblnyck: 12/2010
Homep moedien:
CepnHbI Homep:
Даразokунки:
MecTo nokyn:
HΦopMaçnЯ dIЯ BaIeIe 6e3OpaChOCTn I yDObCTBa pa6oTbI
ПразвILA Тхнки 6e3oNaChocTN
BHHMaTeJIbHO 03HaKOMbTecb C 3TmN INHCTpyKcIyMn. CoXpaHIne 3TOT DOkymENT dIra HaBeDeHnC npaBok B 6dyuIeM. CJeDuYte BCem INHCTpyKcIyM n InpdUnpexKdEHNrM, HAnHeceHHbIM Ha N3deIIe.
BbIKIIOUeHHe yCTpOJcTbA nepeI YnCTKOI
Ipepe ero uCTKO OTKIOUaTe 3TO n3dene OT HAcTeHHO p03eTKn NHTAHN. He nCnoJIb3yIte KNDKne nJIn aApO3OJBHbIe YNC7AUIe cpeCDTa. JnayuCTKN IcNoJIb3yIte BIAJKHyIO TKAHb.
IPEdUYPEXKDEHNE no NOdkNIOueHNO NOTKJIIOueHNO yctpoiCTBa
Pn noKIOueHn n OTKIOueHn nTaHn oT nCTOHNka HnprXeHn coBIOaTe cJeDyUoune INcTpyKuIN:
YcTaHOBnTe NCTOChNK PHTaHnI, IpexJe Yem NODKlOuHaTb UHyp PNTaHnK p03eTke CTeBOrO 3JIeKTPoPntAHnI.
OTKJIIOUaIte 5Hyp NITaHnI nepeI OTCOeINHeHnEM ICTOCHNka NITaHnI OT KOMNbIoTepa.
Ecni CnCTema 3aNTbIBAeTcOr HeCKoJIbKIX NCTOCHNKOB NITAHN,TO OTKNIouHTe NITAHne OTCNTeMbI,OTCoEINHNB BCE UHpybl NITAHN O T 6NOKOB NITAHN.
PPEyIeHNE B OTHoWeHn DOCTynHOCTN
IocTyK CeteBoi PO3eTKe, B KOTOpyU BCTaBnIeTcH Hyp NITaHnI, He DOJxHe 6bITb 3aTpUdHen, 3Ta PO3eTKa DOJXHa HaxOuTbcra MAKCmuaJIbHO 6JN3KO K NOJb3OBaTeIIo O6OpyIOBaHnI. Ppi Heo6xoDMOCtN OTKJIIOHTb NITaHne OT O6OpyIOBaHnI O63aTeJIbHo BbIHMaIte UHyp NITaHnI n3 PO3eTKI 3JIeKTPOPiTuHnI.
ПЕДУПЕЖДЕНЕВ OТношени пилaraembix kapT-3aflnyш (TOlbko Дя ONpeDEJIeHHbIX MObelne)
B KOMnneKT NocTaBKn BaWero KOMnbIOTepa BxOJaT PIIaCTNkoBbIe 3aRJyUkn DJI rHe3d KapT. 3aRnyuKn 3aunuaIoT HeNCnoNb3yEmbIe rHe3Da OT nonaDaHnY NBIN, MeTaJInuYeCKNX PpeDMetOB IN dpyrnx NocToPOHHnx YacTHc. CoXpaHInTe 3TN 3aRnyuKn, YTO6bl BCTaBJIaTb IN X B rHe3Da, KOJa He NCNoNb3yeTe KapTbI.
iv
BAKHBIE PEKOMEHDAUIN no npocnyuBaHnIO
YTo6bI 3aunTntb cBoi Cnyx, npndepknaBaTeCb CneDyUOuNX peKoMeHdaucn:
- YBENUBAIte yPOBEHb rPOMKOCn NOCTeNEHNO, Do TEX NOp, NOKa 3ByK He CTaHet YETKIM N KOMΦOPTHbIM DnRA BOCNpNtTu.
He yBeIuHBaIte yPoBeHb rPOMKoCTn nocJe peRyJInpOBKn HayUHNKOB.
He cnyuatae My3bky Ha BbICOKOM ypOBHe rPOMKocTn dNITeJIbHbI nepNoB BpeMeHN.
He yBelenuBaIte ypoBeHb rPOMKocTn, YTO6bl 3aRnyUHTb TaKIM o6pa3OM MeShaIOUe 3ByKN N3BHe. - Ecnn Bbl He cnblnte roBopraux pIaOM IIOJe, yMeHbIte ypoBeHb rPOMKoCTn.
IpeDynpexKdEHHa
He nCnoIb3yIte 3TO n3dJIne no6n3OCTN K BOJe.
He pacnonarate 3to n3deJnne Ha HeycTouHBOI TeJeKke, noCTaBKe nn cTone. PaDeHne n3denn MOKeT npUHHt b Emy cepbe3HbIe NobpeXdHnA.
-ДЯ BEHTNIAUIMMeKOTcCneuaJIbHO npedHa3HaueHHbIe na3bI N OTBepCTnA, OHIOBEcNEuBAIoT HAdExKHoe cyHKUNOHIpOBaHHe n3DeJInaI 3aUnuAIOTe erO OT NepeRpeBa.3TN OTBepCTnA He DOJXHbI 6NoKINPOBaTbcS IIN 3aKpbBaTbcy EEM-Ni6o.3TN OTBepCTnHIKOrda He DoJXHbI 6NoKIPoBaTbcS, YTO MOrILO 6bl Ipn030Itn Iprn pa3MeueHn H3DeJIna Ha KPOBaTu, DnBaHe, KOBrnke IIN INHOI NOO6HOI NOBepxHOCTn.3To n3DeJIne HNKOrda He CneDyET pa3MeuTaB IO6NtOCTn IIN IOBepx padNaTopa OTOnJIeHn IIN KOHBekTOpa IIN BCTPOEHbIM B O6OpUdoBaHne, ecNI He oBecneuBaETcRa HndJeXaUaB ABEHTNIAU.
HnKOrda He nbTaIteCb npOnnxHyTb KaKe-Im6o npEmdTeB H3dJIne uepe3 Na3bI B Kopnyce, TaK KaK OHN MOrYT COpNKOCHyTcB C ToyKaMn ONaCHORO HanpJxHeH NIN 3aMKHyTb HApOPOTKO DeTaN, YTO MoKET npNBecTN K BocPnAmHeHnIO NIN NopaxKeHnIO 3JeKTPnueckm TokOM. HnKOrda He npONBaIe HnKaKNX XnDkoCTe Ha KOMNbIoTeP.
Bo n36exaHne NOBpeXdEHNbHyTpeHHNX DeTaJe N npedOTbpaueHn yTeKn 3JIeKTpOInTa n3 aKKyMyJrTopa He ycTaHaBnBaIte yCTpoNCTBO Ha Bn6pnpuyouei nobepxHOCTn.
HnkOrda He nCnoB3yIe KOMnbIOTe Ha cNoptNBbIX TpeHaKepaX Hn Ha Bn6pnpUoSei NOBepxHOCTN BO N36exKaHne CnyaHORO KOpOTKoro 3aMbkaHn IIN IOBpeJdeHn yCTpoIcTB C BpaAIOUIMMCY aCtTm, JecTKoro DnCKa, npNbOda ONTNuecknx DnCKOB iDn IpeDoTbpaUeHn ONaCHOCTN OblyeHn OT NITHeBOr oAKyMyJrTopa.
-Дииse,уаCTKIN BOKpyr BeHTnIaIauHOHHbIX OTBepCTN n aIanTeP nepMeHHoro TOka MoryT HarpeBaTbcR. He npikacaiTecb K Hm, YTO6bl He nOlyuHtB OXoR IIN TpaBMy.

IprnmeaHne:UTo6bI yMeHbWNTb pNCK TeNIOBOJ deOpMaun HnBIO3ropaHnra,co6JIoDaaiTe cNeDuOuJe yKa3aHnra:
1) He KlaaTe KOMNbIepeu nn CeTeBO aAnTepe Ha MrgkyIO NOBepXHOCTb, HApnIMep, Ha KpOBA Tb.
2) He ČeρχιTe KOMπbIoTeρ έΠη ΑεTeBOι aΔaπTep Ha KOJIeHαx CπιχΚΟ M DΩΙΓΟ.
3)Пользуйтесь кOMпьЮтepOM,пОLOжИВ erO Ha poBHyU,ЖecTKуH O nobepxHocTb,Ha npIMeP,Ha cToI.
4) CneIte 3a Tem, yTO6bI BeHTnIaHNoHHbIe OTBepCTnI He 6blnn 3aRopoxKeHbI.
B BaWeM yCtPoIcTBe I npHaIeXHocTAX K HeMy MOryT HaxOITbcr MeJIKeIe DeTaII. DepKInTe IV B HeIOCTynHOCTn OT MaIeHbKnx DeTei.
3JIeKTpOpiTuHHe
3To n3dJIne doJXHO noJyauTb 3HeprnIO ToIbKO OT nCTOCHNka 3Heprn, yKa3aHHoro Ha 3TNKeTke MapKnipOBKn. Ecnn Bbl He yBepeHb I Tom, KaKo IMeHNO y Bac nCTOuHNK nITAHN, o6paTnTEcb K CBOemy dInepy nn MeCTHO 3HeprTeuYeCKo KOMNaHN.
He donyckaIte, yTo6bI kakoi-Jn6o npedMeT pacnoIaranCnOBepx Ka6eIaHTAHII. He paonolaraIte 3TO n3dJIne B TOM MeCTe, rJe Ha Ka6eJIb NITaHNIaMOryt HAcTyNITb.
Ecnn BmecTe C 3TnM n3dennem nCNOb3yeTcra yDJIINHNTeB, y6eINTeCB TOM, qTO o6uaa HOMHaJIbHa a cIIa TOka o6OpydoBaHna, NOkKnOueHHoro K yDInHnteJbHomy Ka6eIIO, He npEbbIaAet DOnyCTUmbl HOMHaI CNbl TOka yDInHnteJbHO rKa6eIa. TaKke yDOCTOBepTeCB TOM, YTO o6uH HOMHaI n3deIi, NODKNUChENbIX K cTeBOI PO3ETKe 3JeKTPoNITAHnR He npEbbIaEt HOMHaI PnabKOrO npedoxpaHnteJI.
- UTo6bI He npebBicntb DOnyctmmyo Harpy3ky Ha po3eTKn CeTeBOrO 3JIeKTPoNTaHnra, pa3BeTBnTeNn Nn WTeNCeNBhIe KONoDkn, He NOdkNoHaTKe K HnM CInuKOM MHOrO yCTpoiCTB. O6uaJ Harpy3ka CnCTeMbI He DoJnxHa npebBiaTaB 80% HomHaIa napaIIeNbHoi ceni. Ppi nCpONb3OBaHnn pa3BeTBnTeN pHTaHn (yDlnHnTeJ) Harpy3Ka He DoJnxHa npebBbIaTaB 80% erO HomHaIa.
- Y 3TOTO yCTPOIcTBa aadantep nepemehHoro TOKa NMeet TpexkoHTaKTHyIO BnIKy C 3a3eMJIeHNEM. 3Ty BnIKy MOxHO NOdkNIOUaTb TOJbKO K 3a3eMJIeHHbIM 3NeKTpopo3ETkAM. PpeXde Yem BCTABNtB BnIKy ceTeBOr o adanTepa B 3NeKTpopo3ETky, y6eINTecb, yTO 3NeKTpopo3ETka 3a3eMJIeHa HaJIeXaUM 06pa3OM. He BCTabNraTe BnIKy B He3a3eMJIeHNHyO 3NeKTpopo3ETky. O6patNTecb 3a cnpaBkoK K KBaIIuΦnIupOBaHHomy 3NeKTpNKy.

BHHMaHHe! 3a3eMnIoum KOHTaKT cIyKNT dIg 6e3OnacHOCTn. IcnoIb3OBaHHe 3NeKTPopo3eTKN, He 3a3eMJIeHHoH NaIpeJXaUM o6pa3OM, MoXeT npNBecTN K NopaxeHNIO 3NeKTPuYeCKIM TOKOM n/IIIN K TpaBMe.
Примechанe: 3a3eMЛЯоши КОТаКТ ТАСКе обecпeунБаeТ Xopoшую 3aИntу OT HeNPeДВиДeHHbIX NOMEX OT ДPyгИX 3ЛЕКТрИчecнix yCtpoIcTB, ИСПОЛьЗУЕмblIX NO COCEДСТВY, KOTOpblE MOryT Meшаь pa6Ote 3TORO yCtpoIcTBA.
- Донусяает сптуни системы OT се te boro habржени pa3ньх HOMnHaIOB: 100-120 nnn 220-240 B nepem. Toka. Пилагаимшур птуни OTbeuaet Tpeбованям,празьглЯимВ тои CTpaH/periNoHe,гдсntema Быla npodaHa. Shypblптуни дя Испьзованяв Дpyгnx CTpaHax/pernohaxdoJxbl OTbeuATb рeДяВЯEMbIM B HIX Tpe6obAHnM.Дононтельbie CbeDEHnO O Tpe6obAHnX K shHypamптуни моЖHo y3HaTb y abTopu3OBaHHOrO ppoDaBaц nnn B cepBvCHOM ueHTpe.
TexHnueckoe 6cnyKbAHne yCTpoiCTBa
He nbitaTeCb Camn npOn3BODntb TexHnueCKoe 6cbnyxuBaHne n3denn, NocKoIbky OTBepCTn IIN CbeMHbIe KpbIiMk MOrY T OTKpbITb Bam DoCTyn K ToUkam OnaCHO HAnpJxHn IIN NOBvepRHyTb Bac INHOI ONaCHOCtN. 3a TexHnueckm ObcnyxuBaHNem ObpaauaTeCb K KBaIIuΦnIupOBaHHOMy ObcnyxuBaIOUeMy nepcoHaNo.
OTKJIIOHTe 3TO n3dEIne OT hAcTeHHoP o3eTKI 3JIeKTpOITAHnI N 6paTITecb K KBaIIINΦHIpOBaHHOMy OBCnykBaIOUeMy NepcoHaNy PnB 03HNIKHOBeHN cJeDyIOxYcNOBn:
Korda ka6enb nItaHnI NOBpeXeH nn N3HOWeH.
- Ecnn B n3dene npoJnlaoc JnkocTb.
- Ecnn n3dene noDBepranoB Bo3deCTBIO DOxJa nn BOdbI.
- Ecnn n3dene ypoHnI nn KOpnyc KOMnbIOTepa 6bln NOBpeKDeH.
- Ecni n3dJIeNHe OTHeTINBO DeMOHcTpnpyET N3MeHeHHe CBOx TexHNueCKNX xapaKTePncTnK, yka3bIbAIOUee Ha Notpe6HoCTb B TexHNueCKOM 06cnykBaHIn.
- Ecnn n3dene He cyHKnOHNpyeT HopMaJIbHbIM 6pa3OM npn BblnoHeHHu cNoBn INcTpyKcuN NO 3KcIpyaTuN.
IprnmeaHne: IrapeynpOBKINoJIb3yTecToJbKO Temn OprHaMn ynpaBHeHna,peynpOBKa KOtOpbIX npedycmOTpeHa HNCTpyKzmaNIO 3KcPnyatauN, TAK KaK He npabNbHOe NcNoJIb3OBAHne dpyrNX oprAHOB ynpaBHeHna MOKeT npNBecTNI K NOBpeJdeHIO yCTpoiCtBa N, Ckopee Bcero, Notpe6yeT OT CNeuaHnCTOB cepBnCHOrO ueHTpa BoIbux ycInn no BOCCTaHOBHeHIO erO pa6OTocNo6HoCTN.
Ppabnna no 6e3oNaChomy nCnoJb3OBaHnO aKKyMnyrTOPOB
B 3TOM HOY6yKe IcNoIb3yETcJI NTn-IOHna 6aTape. He nOJb3yITeCb eN B yCNOBnX CbIPOCTn, BBICOKoB BlaXHOCTn ININ B MeCTax, CnOCO6CTByUOuNX Koppo3nn. He nOMEuaTe, He xpaHnte IN He oCTabnIe HOY6yK PAnOM C NCTOCHNKOM TeNla, B MecTaX C BbICOKo TEMpePaTyPoN, NOd npAIMN LyuAMN COHnca, B MNKPOBOHOBON Neu ININ B KOHTeHHepe NOD daBNeHEm, He NODBePraTe erO BO3deNCTBnIO TempePaTypbI Bbiue 60^ (140^) . Heco6nIoJeHne 3TNx npaBNI MOKe TnpBEcT N YTeUKe IN3 aKKymJrTopa KncIoTbI, ee nepeRpeBy, B3pBiBY ININ BOCIIaMeHENIO, YTO MOKe TnpBEcT N TpaBMam IN/INM MaTePnAIBHomy uIep6y. He npOTbKaIte, He OTkpBaIte IN He pa3bnpaTe aKKymJrTop. Ecn IN3 aKKymJrTopa npon3oUHa yTeUka JnIDKOCTN, IN OHa nOnaHa KOKy, CMOIte XnIDKOCTb BODo IN HeMeDInEHNO ObpaTIeCB 3a MednUHCKoN NOMOsbIO. IIO COOpaJaeHNm 6e3ONaChOCTN IN YTo6bl IpOdNtB cPOK cLyXkbI aKKymJrTopa erO 3apJd NE pOn3BODITcN pRi Tempepatye Hnke 0^ (32^) IN Bbiue 40^ (104^)
IcnoJb3OBaHne noHOne EMKocTH HoBOro aKKymJrTopa DoCTnraeTcNoCNe DByx
Hn Tpex cIKIOB noHoro 3apJa n pa3paJa. AkymJrTop MoKHO 3apKaTb n
pa3PjXaTb COTHn pa3, OHaKO npn 3TOM erO emKocTb NaJaet. EcN BpeM pa60TbI
OT aKKymJrTopa CyueCTBeHHo COKpatuIoCb NO CpABHeHIO C obiUHbIM
CoCTOAHmE, Heo6XoDIMO npno6peCTn HObI aKKymJrTop. CneDuYET
ICNOJb3OBaTb TOJIbKO peKOMeHNDoBaHHbIe aKKymJrTopb I 3apXaTb IN ToJIbKO
3apJdHbIM yCTPOICTBOM, peKOMeHNDoBAHHbIM dnn 3TOrO yCTPOICTBa.
AkkymyIaTOp cIeDyET hCNoIb3OBAbToIbKO nO Ha3HaueHIO. HIKoRda He IcNoIb3yIte IOBpeKdEHHoe 3apJdHoe yCTpOiCTBO nJIu AKKymyIaTOp. He 3aMbIaIe KOHTaKTbI aKKymyIaTOpa. PnI cOnpIKoCHOBeHm MTeaJInuCeCKNX npEdMeTOB, TaIX KAK MOHeTbI, CKePKN NJIu ABTOpyKU, C NOLOXHTeHBHIM OTPNuCaTeNbHbIM BbIBoDAmN aKKymyIaTOpa, MoKet npON3OITn KOPOTKoe 3aMbIkaHne. (BbIBoDbI aKKymyIaTOpa BbIRJaT kAk MTeaJInuCeCKNe nOLOCKn Ha erO Kopnyce.) 3To MOKET npON3OITn pni nepeHocke 3apJxehHORo AKKymyIaTOpa B KapMaHe nIIcymke. KOpOTKoe 3aMbIkaHne KOHTaKTOB MoKet npINBeCTn K NOBpeXDeHHO aKKymyIaTOpB nJIu npEdMeTa, n3-3a KOTOPoro OHO npON3OULIO.
EMKOCbI cPOK cIyJ6bl aKKymJrTOpa CHNkaOTc npn xpaHeHn 6aTapeB VycIOBnX BbICOKo HnH3KOI TempeatpybI,HaNPmep B 3aKpbITOM aBTOMO6JIe 3IMOn HnI NeTOM. Ctpemntecb DepKaTa b aKKymJrTOp B MeCTax C Tempeatypo1 15-25°C (59-77°F). YcTpoiCTBO, B KOTopom yCTaHOBLeH HarpeTbI Nn XoNoHbI aKKymJrTOp, MoKeT BpeMeHHO He pa60TaB, DaJke ecnn aKKymJrTOp nonHOCTbIO 3apJxHc. 3ΦΦeKTnBHOCTb pa60TaI aKKymJrTOp Oco6eHNO 3NaHTeNbHO nadaet IIpi Tempeatypax 3NaHTeNbHO HnKe Hny.
He 6pocaiTe aKKymjIaTOpbI B OROHb - OHN MOrTy B3PbIBaTbcra. OHN TaKKe MOrTy B3OpBaTbcra npn noBpeJdeHnn. AKKymjIaTOpbI cJeDyET yTINn3InpoBaTb B COOTBeTcTBnC MeCTHBIMn PpaBnAmn. EcNI BO3MOxHO, CdaBaTIe INx Ha nepepaBoTky. He Bbl6pacBbAaTe aKKymjIaTOpbI BMeCTe C 6bITOBbIMN OTXoJamn.
Pa6oTaIoUaN aKKyMylTOp MoKet BbI3bIBaTb NOMExn B pa6Ote 6ecnpoBOHbIX yCTpOICTB, YTO NOBIIaET Ha IX npOu3BOJNTeJIbHOCTb.
viii
3ameHa aKKymyTopa
IopTaINBHyBI KOMNbIOTe PIK TUNa "HoYt6yK" cepHn IcNoJIb3yET JNTHeBbI aKKymJrTOp.ДЯЗAMeHbI NcNoJIb3yIte aKKymJrTOp TAKORe JTe TUNa, KaK y aKKymJrTOpA, KOToPbI BXoIIT B KOMNJIeKT NOCTaBKn BaUero YcTPOIcTBA. IVcNoJIb30BaHne dpyrOro aKKymJrTOpa MoXeT NOBNeH 3a CO6OJ OnaCHOCTb BO3rOpAHNA INN B3pIBa.

Ipeynpexdene! B cnyae he npabnblhoro o6paueHna aKKymyIaTOpHbIe 6aTapeu MoYr B3OpBaTbc. He pa3bnpaTe nx n He 6pocaiTe B pIamr. DePKeTIe nx noaJIbwe ot deTei 6bICtpo H36aBnIaTEcB OT NcNoJIb3OBAHHbIX 6aTapei. Ppr yTNJIN3aUIn Otpa6oTaHHORo aKKymyIaTopa co6IIOJaTe MeCTHbIe npabNla.
YcnoBna 3KcPnyatau

BHHMaHHe! B ueJx 6e30nacHocTn BbIKIouaTe BCE 6ecnpoBOdHbIe nJn paJnopepaOuIne ycTpoiCTBa npn IcNoJIb3OBAHN HOyT6yka B cJeDyUOuNX ycNOBIAx. B YncIo TaKnx yCtpoiCTB MOrY TBXODITb, 6e3 orpaHnueHryKa3aHHbIM: aJaANTepbl 6ecnpoBOdHoi JokalbHoN ceTn (WLAN), Bluetooth n/nn 3G.
Co6nIouaTe Bce cneuaIbHbIe npabuHa, DeiCTByIOUme B BaWeJ CTpaHe, I BCerDa BblKlIoUaIe BaWe yCTpoIcTBO, KOrda erO nCnONb3OBaHHe 3anpeUeHO nn KOrda OHO MOKeT Bbl3BaTb NOMEX NII ONaCHOCb. IcNoJIb3yIte yCTPOIcTBO TOJIbKO B HOpMaIbHbIX dIra Hero pa6oUHX NOLOXeHNx. 3TO yCTPOIcTBO OTBeuaET Tpe6oBaHnM HopMaTHOB no P4-N3nyeHIO npn HopMaIbHO 3KcnNyaTaUIN; OHO Iero aHTeHHa DOJXHbI HaxoINTbcr He 6JIxke 1,5 caHTmEePoB OT BaWero TeNa. Ha BaWeM TeNe He DoJNXo 6bITb MeaIINuCecknx npedMeTOB, a yCTPOIcTBO DOnJXHO HaxoINTbcr He 6JIxke Yka3aHHORo BblSe pacCTOAHNrO rT Bala. JIy UcNeuHoi nepeAauN faiNOB daHHbx INN COo6UeHNI Heo6XoIMo oBeCneHTb BBICOKokaeCTBeHHoe NOkJIIOUeHne 3TORO yCTPOIcTBA K CETN. B HeKOTopbIX Cnyuayx nepeDAuA faiNOB daHHbx INN COo6UeHNI MoKeT 6bITb 3aepjXaHa do Tex nop, noka He 6yDet yCTaHOBNeHO TakoE NOkJIIOUeHne. Co6nIoaTe npNBedeHHbIe BblSe yKa3aHnR NO MInHMaIbHOMy pacCTOARHIO Do 3aBepUeHn IpeEauH. Detaln 3TORO yCTPOIcTBA ABJIAOTc MaHHTbIMN. YCTPOIcTBO MOKeT npNTaRbAtb K Ce6e MeaIINuCeckne npedMeTbI, PO3tOMy IIOdN, INCnONb3YIOUne CNYXOBbIe annapatbl, He DoJXHbI IODHocNTb 3TO yCTPOIcTBO K Uxy, B KOToPoe BCTABNeH clyXOBov annapat. He KnaDnTe KpeiHTbIE KapTOUKN IINI MaHHTbIE HOCHTeJI N DaHHbIX PAnOM C yCTPOIcTBM, TaK KaK n3-3a 3TORO 3aNNcaHHa Ha HNX IHΦopMaunr MoKeT 6bltb CtePa.
MeiHcKne yctpoCTBa
3Kcnpnyataa npadnonepeadaooho obopyobAHn, B TOM uCne 6ecnpoBnHbIX TepeOHOB, MoKET BbI3bIBaTb NOMEXN B pa6ote He 3aunuehhix HaJIeKaum O6pa3OM MeUNHCKNX yCTPOINCTB. PocOBetyntecc C bpaOH mnn n3rotOBtJeM MeUNHCKO YoCTPOINCTBa, YTObI y3HaTb, HAdEJHO IIN OHO ekpanpoBaHO n 3aunuetoN3nyeHn BHeUHe N PCHepn. BbIKNoaTe BaWE yCTpOInCTBO, KOrDa HaxOnTECb MMeUNHCKNX yPexdEHNx, rDe BBBeUeHbI COOTBeTCTByIOuNe INCTpyKUn. B 60nbHuaX mMeUNHcknx yPexdEHNx MOKe T cNOIb3OBaTbcr O6OpyOBAHn, YvBCTBNTelbHOe K BHeUHeMy 3nPyHeHIO PCHepn.
KapdnoctmmylTopbI. N3ROTOBNTeJI NKAPDNOCTMMyIATOPOB peKOMeHdyOT, YTO6bl
pacCTOAHne MEXy KAPDIOCTMMyIATOPOM I 6ecnpoBOhBM yCTpOJCTBOM 6blNO He
MeNbIe 15,3 caHTmEtpOB, BO n36ekaHne CO3daHnRA BO3MOxHBIX NOMEx B pa60Te
kapdnoCTmmyIATOPa. 3TN peKOMeHdaaun COBnaJaOT C pe3yIbTaTAMN
He3aBNCMbIX NCCLeIDOBaHn I peKOMeHdaaunrMn OprAHn3aUnn Wireless
Technology Research, npOBoDAuSeN NCCLeIDOBaHnR 6ecnpoBOhBX TexHOJOrn.
JIoDN, INcNoB3yUoUne KAPDIOCTMMyIATOpBI, DOJXHbI CO6LIoDaTb CNeDuOuune
Mepbl PpeOCTOPOXHOCTH:
Bcerda depkaTb ycToBHO ha paCCToHn He MeHee 15,3 caHTmEtpOB ot KAPINOCUMVJATOPA
He Hocntb BkIIOueHHoe yCTPOINCTBO pAOM C KAPDIOCTMMyJATOPOM. EcNn Bam NOKaKeTc, YTO B pa6Ote KAPDIOCTMMyJATOPa BO3HNI NOMEXN, BBIKIOUHTe VCTPOINCTBO u V6epNTe eO.
Cnyxobbie annapatbI. HeKOTOpBie cHΦpOBbie 6ecnpoBOHbIE yCTpoiCTBa MOryt Bbl3bIBaTb NOMEXN B pa6ote CnyxOBbIX annapaTOB. B clyuae BO3HKnHOBeHnI NOMex O6paTITecb 3a COBeTOM K BaUeMy NOCTABUKNy ycnyr.
ABTOMO6nJIH
PCHHbMOrT BnraTb Ha pa6Otu He npabunbHO yCTaHOBHeHX IIN HnnpabunbHO 3KpaHnPOBaHHbIX 3JIeKTPoHHbIX CnCTem B aBTOMo6nIax, HApnpimep, 3JIeKTPoHHbIX CNCTeM BnpyckA TOIIIBA, TOpMO3bIX CNCTeM nPoTUBOCKJXKeHn (npOTuBO3aKnHnBAHn), nepeKIOUeHn nepeDaU ynpabJeHn BO3duWNbIMn POyHKAMn 6e3OnaNACHO. DOnoHNTeNbHbIE CBeDEHn MOxHO y3HaTb Y PpeCTaBHTeJIa3AOda-N3rOToBNTeJIa BAweo aBTOMo6nI INn dpyrO OOnONHtBHO UcTAHOBNeHHOROBHEm OBOpUDOBAHN. PpOBODITb TEXHnueCKoe 06ClyjKBaHHe yCTpoiCTBa IIN yCTaHaBnBaTb ERO B aBTOMo6nIe DOJXHbI TOJIbKO KBaINΦuNPoBaHHbIe CneuaJIncTb.I. HnpabUNbHnay cTahOBKa IIN 06ClyjKBaHHe MOrTy CO3dATb ONaCHOCTb N CdEJaTB HeDeiCTBnHOI rapaHTNI Ho hTO yCTpoiCTBO.PeyIrpHo npOBepRte npabUNbHOCTb MOHTaKa I pa6OtBu BCero pAdNoOBOpDobAHn B BaWeM aBTOMo6nIe. He xpaHtE n He nepeBo3nte TropOHne JNDKOCTI, RaOBoIe 6aIIIOhBI INN B3PbIBOONaChBiE MaTePnaJIb I ODHOM OTCeke C 3TNM yCTpoiCTBOM, eO DeTaJIaMI INN DoONJHNTeNBHIMn PpIHADJIeXHOCTMy K Hemy. EcIn BaW aBTOMo6nIb O6OpUDOBAN BO3DuShbIMn IOyPkAMn 6e3OnaNACHOCTN, To NOMHtE, qTO OHn packpbIBaIOTc R oChEB 6oJIbShoI CInIo. He NOMEsaIte PpeMeTb, B TOM YNCNE CMOHTnpoBaHHbIe INN PepeHOChBiE paINOyctpoiCTBa, NaB BO3DuShbIMn IOyPkAMn 6e3OnaNACHOCTN INN Ha PyTu INx packpbItY. B clyuae HnpabUNbHOY cTaHOBKn 6ecIpoBOHOro OBOpUDOBAHN B CaIOHe aBTOMo6nIpaCKpItNe BO3DuSHoN IOdyuKIN 6e3OnaNACHOCTN MOKeT
npiBecTn K cepBe3HOn TpaBMe. IcnoJb3ObaHne ycTpoiCTBa Ha 60py caMoneta BO BpeMnIeTa 3aIpeSeHNo. BbIKnUoAaTe BaIe ycTPOiCTBO nepei nocaikoi B camOJeT. IcnoJb3ObaHne 6ecnpoBODhIX ycTPOiCTB C amOJeTe MoKET Bbl3BaTb ONaChbIe NOMEXN B pa6Ote CnCTem caMoneta, HapuWntb paadinOTeneΦOHHyIO CBra3b N, KpOME TORO, MOKET 6bITb 3aIpeSeHNo 3aKOHOM.
B3pbboOnaChbIe ycNoBnA
BbIKIIOaHTe yCTPOINCTBO B MeCTAX C NOBbIeHHoB 3PbIBOONACHOCTbIO N CJIeDyIte BCEM INHCTpykUIM N Yka3AHnIM Ha 3HaKax. K B3PbIBOONacHBIM MeCTAM OTHOCTC R O6NaCTN, rDe MOrYT nonpocNTb BbIKIIOHTb DBrATeNB abTOMoBnIA. Bo3HKnHOBeHne NCKpbI B TAKNX MeCTAX MOKeT npINBeCTN K B3PbIBY IIN NOXAPY, YTO MOKeT Bbl3BaTb TpaBMbl IIN DaXe CMePTb. BbIKIIOaHTe HOYt6yK PAnOM c Ra3OBbIMn HAcOCAMN I 6eH3OKOJOnHKAMn HA cepBcNbIX CTaHcNIX. O3HaKOMbTEcB C ORpaHNeHnMn HA NCIOJIb3OBaHHe paINOOBOpUDOBaHnR B MeCTAX XpaHEHnR I pAcnpedeHnR TOIIIBa, XIMNUeCKNX 3ABODax IIN MeCTAX, rDe BeUYTCB B3PbIBHBle pa60Tb. B3PbIBOONACHbIE MeCTA O6bUHO (Ho He O6r3aTeNbHO) OTMeueHbI CNEuAlhBIMN 3HaKAMn. K TAKIM MeCTAM OTHCNTCA IOdIaNy6Hoe IpocTpaHCTBO KOPa6IeN, MeCTa XpaHEHn I pAcnpedeHnR XIMNKaTOB, ABTOMO6NJn Ha CxNIXeHHOM ra3e (IpONaHE IIN ByTaHe), a TaIOke O6NaCTN, rDe B BO3dyXe CoDEPKATcX IMNUeCKNe BeJeCTBa IIN qACTNuBi, TAKNE KaK MyKa, PbIb IIN MeTAJIInuecka NyDpa. He BKIOuaIte HOYt6yK B MeCTAX, rDe 3aIPpeHNO IONb3OBaTBcRA Mo6NJbHbIMN TeJIeFOHaMn IIN IX INCIOJIb3OBaHHe MOKeT Bbl3BaTb IOMEXN IIN ONACHYU CNTyaCNIHO.
ÖKCTpeHHbIe Bbl3OBbl
BHHMaHHe! BbIOJHHeHHe 3KCTpeHHbIX BbI3OBBC NOMOuBIO 3TOrO yCTPOiCTBa HeBO3MOxHOb. 3KCTpeHHbI BbI3OB HxHOb CdeJaTb C BaUeRO MO6NtBHO TJIeΦoHa IINC NOMOuBIO dpyroTneΦoHOn CNCTeMbI.
IHctpyKznn no yTnJIn3aZnn
He BbIbpaBbIaIe 3TO 3JIeKTPoHHO yCTpOcTBO B MycOpHoe BeIpo. TTo6bI cokpaTITb DO MmHIMyMa 3arpy3HeHne OkpyKaHooJe Cpebl I oBeCneHTb ee MaKcImMaJIbHyIO 3aUHTy, NOXaLyNcTa, CdAbaTe erO Ha nepepa6OTKy. DOnoHNtEJbHbIe CBeDeHnO npaBnJax yTINn3aun OTCnyXHBWeO 3JIeKTPoTEXHueCKOrO n 3JIeKTPoHHO o6OpyDobAHn (Waste from Electrical and Electronics Equipment, WEEE) MoxHo y3HaTb Ha Be6-CTpaHnCe www.acer-group.com/public/Sustainability/sustainability01.htm.
PpeDynpexJeHne o coepkaHn pTuTn
JaMnOBbIe npoeKTopbI nIN 3JIeKtpoHna npOdyKcua c KK/3JT MOHTOpAMn 6e3 CBeTOnIOHOH NOcBcTKN:JaMpa(bI) BHyTpN 3TOO yCTPOiCTBa CoepXaT pTyb I DOJXHbI 6bITb Nepepa6OtaHbI nIN JIKBnIDnpOBaHbI B COOTBeTCTBmC NOKaJIbHbIMN, WTAHTbIMN INI IN FepepaJIbHbIMN 3aKOHAm. BoIee NoDpO6HyU INΦopMaCuH O Bbl

MOKTe HaHTn Ha caTte 0eepaunn 3JeKtpoHHbIX OTPacnei www.eiae.org.
IHHOpMaUHO O IINKBuaCn KOHKpeTHbIX BnO8 NaMn Bbl MOKeTe HaHTn Ha caTte www.lamprecycle.org.
ENERGY STAR

PpOdyKzAcer,coOTBcTCTByUoAa Tpe6oBaHnA m ENERGY STAR,3koHOMIT BaIi CpeDCTBa,CnIXa3atpaTbI Ha 3JeKtpo3HeprnIO, n 3aunuaeT OkpykaIoU cyEy 6e3 cokpaueHnaFyHKUHOHaJIbHbIX BO3MOXHoCTeN IIN CHNXeHn 6bICTpoDeEChTBn. KomNaHnA Cer pada npdeIOxNTb CBOIM NOKyNaTeJAm PpOdyKzUc INorOtInom ENERGY STAR.
UTo TaKoe ENERGY STAR?
CoOTBcTByIOUne cTaHdApTy ENERGY STAR n3dennia notpe6bIOT MehIe 3JIeKTPo3HeprnN IN PpeIoTbpaAaOT BbIbPoCbI yIJIeKNCLOrO r3a, OTBeaY aCTpOrIM Tpe6OBaHnM, yCTaHOBNeHHbIM AmePnKaHckm areHTCTBOM NO OXpAHe OKpykaIOSe CpeDbI. KomnaHnA Cer cHTaet CBOe 3aDauey INpeDnAratb IPOdyKcNIO u ycLyR, NOMORAIOUINE NOTpe6bTeJMaB BO BCEM MInpe 3KOHOmITb DeHbR, COxpaHraTb 3HeprnIO u IyUyWaTb COCTOHNe OKpykaHOuSe CpeDbI. Yem BoNbIe 3HeprnMbICMOXEM C3KOHOmITb NyTem paUNOHaNBHorO ee IcNOJb3OBaHn, Tem 6OJIbSe MbI CHIN3M BbIbPoCbI yIJIeKNCLOrO r3a N COKpaTIm PnCK n3MeHEnRA KINMaTaN. DOnONHtENbHbIe CBeDeHnA CM. Ha Be6-caITax www.energystar.gov nnn www.energystar.gov/powermanagement.
OTBeuAnaTcAndapTy ENERGY STAR npOdyKUaKOMnAHN Acer: (ToIbKO dJa onpeJeHbIX MoJeNe)
- POn3BODNT MeHbWe TeTnIaN Tpe6yET MeHbWe 3HePro3aTpat Ha OXJaXKeHne.
- ABTomatnueckn nepeBODNT dncnnei NKOMnbIOTep B cnaHn peXMM uepe3 10 n 30 MNHyT OTCyTCTBnA kTNBHOCTN COOTBeTCTBeHHO.
TO6bI BBIBECTN KOMNbIOTeP N3 CnAeeropeKIMa,HaKMITEJIIO6yKOJIaBNUH Ya KJIaBNaType NIN NOUeBeJIteMbIUBHO.
B cnpaem pexime kOMnbItepbI 3KOHOMr60nee 80% 3Heprn.
3M6Iema cepTnФkaun Ha cooTBeTCTBne KpITepnEM ENERGY STAR haHocntc H aynope dny pyk TOnbKO B onpeDeJIeHHbIX MOneJx HOyT6yKOB.
ENERGY STAR and Energy STAR are in the Netherlands 3Haakamn CUSA.
CbeHnI coBtI dIyO6CTBa pa60tI
HOrda noIb3OBaTeN, npOBoJaUne MHO BpeMeHN 3a KOMNbIOTePOM, JaNyOTcHa Ype3MepHoe HapJxKeHne rna3 n roNoBHyIO 6oJIb. IOnb3OBaTeN TaKke cAcTo pNCKyIOT NOyHTb fN3NUeCKyIO TpaBMy, ecNI 6ydyT MHO YacOB NOpRd CnDEtB 3a KOMNbIOTePOM. IpoDOnXkntBHO BpeMa pa6Obl, HeyDo6Na No3a, HeNPaBnIbHaj OprAn3aun pa6Oyeo MeCTa, CTpeCC, HEnoXoJaUne ycNOBn pa6Obl, CoCToHne JInHoro 3doPoBBn i Dpyrue faKTOpbl 3NaChuNTbHo yBeJIuHBAIoT pNCK NOyEHHa Fm3NuEeCKo TpaBMbl.
XII
HenpaBnIbHa na 3a KOMnbIOTePOM MoKeT npNBecTu K NOABLeHNO 3aNCTHO cyXoxKnIbHO CnHApOMa, TeHNHTy, BocnaIeHNo cyXoxKnIu N CnHOBaHOBnHO cmKn IIN dpYnx CkeNETHO-MblSeUHbIX 3abOJeBaHn. B KcCTax pyk, 3aNCTbAx, Pneueax, PpeDnEbyx, Wee INn CnHHe MOrTy NpOBNTbcra CJeDuOuNe CmMTombi:
OHemHeH, XKeHne NIN NOKaJIbIbAHne
JOMOTA,60JIe3HeHHoe OUsyueHne nn Cna6oCTb
60nb, onyxonb nn nybcacna
OueneHeNoctb HnHa npJxKeHne
cyxoctb nnn cna6ocTB
Пи НИЧИТAKINС CMNTOMOB, NOBTOPЯUOxCSI INI NOCTOHHbIX OUyueHnIX DnCKOMФOPTa N/IIIN 60JIe3HeHbIX OUsyueHnIX Ipr pa6ote 3a KOMNbIOTepom HemeДпEHNO OБРATITcB 3a KOHCyIbTaцNeI K BpauY n COo6uIte 6 OtOM B OTdEJI TEXHKn 6e3OpacHocTn I OxpaHbI 3dOpOBbBy BaWeI KOMNaHIn.
B cneyuouem pa3dene npuBoaTcra coBeTbI, KaK cdeJaTa pa6Oty 3a KOMnbIoTePOM 6oJee ydo6Hoi.
Ponck ydo6Horo pa6oeryo noJoxeHHa
HaIInTe IJIe Ce6MaKcImaJIbHO yOIO6Hoe IIOJOKeHne 3a KOMNbIOTepOM, MeHra yron o630pa MoHITopa, INcNoJIb3yI NOCTaBky IINr HO rnn peRyInpy BbICOTy kpcna. BocnoJIb3yITeCb cIeDyUoIIMn COBeTaMn:
He cnndte noDOnry B ONDH No3e
HeCKIHOHnTEcB Hn3KO 3a CTOJOM He OTKnDbIBaHTecb DaJIeKO Ha cINHKy KpeCna
-пернодунески BCTаВайт e И похжИВайТecь,чTOбI ChЯТь habржЕнe В Myckулax Hor
- DeJaTe KopoTKe nepepbBbl, YTo6bl ocna6ntb HanpJxHeHne B Wee n PJIeayax
He HanpraIte MyckyIbI He NOdHMaTe BbICOKO IIeHu
yCTaHOBnte BHeuHn DIncPnei, KnaBnAtpy N MbIb Ha pa6Ooh MeCte TaK, yTo6bl Do Hux 6blno Ierko DotraHyTbcra
ecnBbICMOTpnteHaMOHHTOpyAue,EmHaOKymeHTbl,TOpa3MeCTtTe DncnneI NO CEHTpy CTOna,YTO6bi IeR HapraIacb KaK MoXHO MeHbWe
3a6ota o 3peHn
EcnnooJry cmOTpeb Ha MOHtOp, Hocntb He npabnBHO nOobpaHHbIe OcKn nn KOHTaKTHbIe IIN3bl, INCNOJIb3OBaTb JRPkn CBET nn pa60TaTb 3a CTOnOM C 6NeCTaIeN IOBepxHOCTbIO, PINOxo OTpeyIuPObaTb pe3KoCTb 3kPaHa, INCNOJIb3OBaTb MeJKN UpnpT nn MaIOKOHTpactHbI dncnne, To rna3a 6ydt cIbHo yctBaTb. B cJeDyUox pa3DeIax npNbOaTc8OBeTbl, KaYMeHbUnTb Ype3MepHoe HapRjKeHne rna3.
Tna3a
- DaaBaiTe Ipa3am YacTbI OToBIX.
- PernoDnueckn OTbOndTe rna3a OT MOHNTopa n CMOTpnte Ha KaKoH-NbUdb ydaJIeHHbI ppeDMeT.
- Yacto MnaIte, yTo6bl Ipa3a He 3acbIXaII.
Ducnnne
- Depknte nucnne B uHCTOTE.
Ba7a roIoba doJxHa haoiNbBc8 BbIe HxHHei KpOMKn DnCnJIe, YTO6bl npIn npocMOTpe n3O6paXeHnB CEHTpe DnCnJIe rna3a CMOTpeIN CBepxu BHN3. - OTPerynpyte npKoCTb n/nn KOHTpact dncnpe TaK, YTO6bl TeKCT 6blno Ierko uTAtb, a rpaФнka oTo6paXaJnacb YeTko.
-ymeHbIte MepuaHne n OtpaxHe:
yctahOBHTe dncnneTak, yTO6bI erO bokOBa KpOMka 6bla o6paueHa K OKHy nIN nCTOCHNY OCBeueHn
- yMeHbIHTe CBET B NOMEUeHn, INcNoJIb3yra NOpTbePbI, UToPbI IIN JkAIIO3N
BKNIOaTe OCBeIeHHe Ha pa6OcH MeCTe
- OTPerynpyte yron ob3opa dincnpeer
- nCNoJb3yIte aHTn6NkOBbl ΦnJbTp
yCTaHOBnte Ha BepxHei KpOMKe DnCnIeA COnHcE3aUHTbI Ko3bIpEK, HAnpIMep, KapToHHyIO NOLOCKy
He cmOtpnte Ha dinCnneu3 Heydo6Horo noNoxehna.
He cmoTpnte noDoJry Ha nCTouHnK npKO CBeta.
Bbipapotka npabnHoro cTnna pa6oTbi
Bbipabotate y c6e cnedyuonne npnbbyknpa6oTb 3a KOMnbOTepom, KOtOpble n03BOJr MeHwe ycTaBaTn pa6oTaTb 6Onee npOdyKTNBHO:
-ДелайтКОРOTКИЕЧТБЕперьВьВ paBoTe.
- DenaIe KaKne-Hn6yNb ynpaXHeHna IJa pa3MnHKn.
KaMKoXHOaIe BbIXOINTe NIObIiTaB YnCTbIM, CBEXIM BO3dyXOM.
- Perynapno DeJaTe fN3uYeCKyU 3apAky, yKpePnIooTyU TeNo.

IpeynpexdHne! He noJb3yTeCb KOMNbIOTePOM Ha DnBaHe nnB NoCTeJI. Ecnn 3TOrO HeJb3aN36ExKaTb, To pa6oTaIte TOnbKO KOpOTKIMN nepHOaMn, YacTo DeJaIe Te nepepbIBbl N BblONHraTe ynpaxHeHna dJa pa3MNKn.

Mbl pa3pa6oTaII pIa pyKOBoIDcTB, KOToPbIe NOMOryT Bam B IcNoJIb3OBaHIn HOyT6yka Acer:
TOT Nnakat NOMOXET BbINOJHHTb NepBOHaJIbHyIO HAcTpOky KOMnbITopea.
PykoBoDCTBO noIb3oBaTeJI NK cepIN Aspire One cOePKeNT NOJIe3HyU HOpMaUH, npIMeHmYIO KO BcEM MoJeM cepIN Aspire One. B HeM OINcBiAOTc8 OCHOBHe TAKHe TEMbl, KaK TexHOJrA Acer eRecovery Management, pa60a C KnaBnAtypoi, 3ByKOM n T.D. YUHTe, YTO TInOBoe pyKOBoDCTBO noIb3oBaTeJI NPykoBoDCTBO noIb3oBaTeJI CnCTeMbAcER AEBJIOTc8 OOb6uHbIMN, PO3OMy B HIX INHOJa 6ydyT OINcBiBaTc8 cyHKUnn IINI CBOIcTBa, peAIIN3OBAHHbIe He B KynPeHHoB BamM MoJeN, a NIIuB B ONpeJeHHbIX MOeJx 3ToI cepIN. B Taknx Cnyuayx B TeKCTe DaETcN NOMeTKa "TOnbKO dJIa ONpeJeHHbIX MoJeNe".
KpaTkoe pyKOBoDCTBO 3HaKOMNT BAC C OCHOBbIMN XapakTePnCTNKamN I Функцям BAшero HOBOrO KOMNbIOTepa. YTo6bl y3HaTb, KaK C nOMoCbIO KOMNbIOTepa NOBbICNTb Ipon3BOdINTeJIbHOCTb pa60Tb, CM. PyKOBoDCTBO NoJb3OBaTeJIg CnCTeMbl Acer, Coedpkaaee IOndpo6HbIe CBeDeHnRA NO TaKIM TemAm, KAK CNCTeMHbIe yTuJIITbI, BOCCTaHOBJIeHne DaHHbIX, CnOCo6bl HapaUZBaHnRA CnCTeMHbIX peCypcoBи yctpaHEnHe HencnpaBHocTei. B hem TAKKe npINBeDeHa INΦopMaunr O rapaHTmHOM o6cnjxuBaHN, a TAKKe O6Ue NpeDncaHnRA IN IpaBnla 6e3OpacHoCTn Prn pa6Ote c HOyT6yKom. 3TO pyKOBoDCTBO B VIne PhaIIa PDF n3HaayalbHo 3arpyXeHO B KOMNbIOTep. ДЯ erO OTkpblrA BblONHInTe cNeDyUoSeE:
B3pbBOonachbIe ycNoBnX
3KCTpeHHbIe Bbl3OBbl X
Hnctpykunno ytnnn3aunx
PpeDynpexKeHne o coepKaHn pTytn X
ENERGY STAR xi
CbeHn n coBtI Iyio6CTBa pa60tbi xi
Bhauane o rnaBHOM
Pernctpaun npoynkta xiv
Iopraok pernctpaunxiv
Btopo cnoc6 xiv
Baun pykoBocTba xiv
OchOBhble cBeHnna 6 yXoJe 3a KOMNbIOTepom n COBeTbI
NO INPONb3OBaHNU XV
BkIIOUeHne N BBKJIIOUeHne KOMNbIoTepa XV
Yxo3aKoMnIbIOTepOM xvi
Yxod 3a aadantepom nepemehHoro Toka xvi
YxoD3aakKymyIaTOPOM Xvi
YnCTka n o6cnykBaHne XVii
Acer eRecovery Management 1
Co3dahne pe3epBHOI KOINI DJIY BOCCTaHOBJEHNI (npBOID
ONTNUeCKNX INCKOB) 2
Co3dHHe pe3epBHOI KOINI DJIY BOCCTaHOBJIeHNI
IopraOK BOCCTaHOBJeHnCnCTeMbI: 7
Tunbi BOCCTaHOBneHn7
BocctaHOBHeHne npedyctaHOBHeHHbIX nporpaMM
I npaBepOB 7
Bo3BpaK npeIbIyUeMy COCTOHNIO CNTEmbl 8
BocctaHOBHeHne cncTeMbI do nepBOHaaybHoro
COCTOHH. 9
BocctaHOBJIeHne cncTeMbI
TINbI BOCCTaHOBJIeHnI 12
BocctaHOBHeHne npedyctaHOBHeHHbIX nporpaMM
i npaBepob 12
Bo3BpaK npeIbIyUeMy COCTOHNIO CNTEmbl 13
BocctaHOBHeHne cncTeMbI do nepBOHaaybHorO
COCTOHH 14
CehcopnaheIb 17
OCHOBblncnoJb3OBaHncaHCOPHOHaHeJIi
(CДБМКHONKAMN)
IcnoJb3ObaHne 3aMka 6e3oNaCHOCTN
KOMNbIOTepa 18
IcnoJb3ObaHne KnaBnaTypbl 19
KnaBnI 6JIOKIpOBKn I BCTpOeHHa cHΦpoBa KnaBnAtypa 19
KlambuWindows20
Cneunbna KlaBnna (ToIbKO dny onpeJeHhbix
moden) 2
Yacto 3aDaBaemble BOpocbl 22
O6paueHne 3aTexnuecko noDepKko 24
Ipejde, yem obaaTaBcra 3a nOoBb2 24
AkkymyTopna 6aTape 25
XapakTepeNCTnKn aKKyMnyTOpHoB 6aTapeu 25
YBeJIuHHeHcPoka cIyK6bl aKKymyTOpHoB 6aTapei 25
YcTaHOBka nI3BJIeHHe aKkMyJrTOpHOb 6aTapeu 27
3apd akkymnytohpno 6atapeu 27
PpOBePKa yPoBnHa 3apJa aKKymyIaTOpHoi 6aTapei 28
OnTmN3aUncnOJIb3OBaHn6aTapeu 28
PpeDynpexKeHne O Hn3KoM yPoBHe 3apra aKKymyTApHO
6atapen 28
(BocctaHOBHeHne "c dNcKa Ha dNck") 38
Papojb 38
YnpaBJIeHne nHTaHHeM 38
YcTpaHHe HEnoJaOk KOMNbIOTepa 39
CobetbI no noncky uycpaHEnHKeHCnpaBHOCTe 39
CoobseHnO6 oun6kax 39
ПравILAиЗамechаняпо6e3oNaChocTN 41
3ameuHne FeepaBHO Komnccn no 3JeKtpocB3N 41
3aBHeHne o nIKceJax XnKoKpncTaJInueckoro 3KpaHa 42
HopmatNBHOe yBeIDomJIeHne B OTHoIeHHn paIIOyCTpoIcTB 43
06aayactb 43
Ebponeckn coo3 (EC) 43
Tpe6oBaHn 6e3OpacHocTn ΦeepaIbHoi Komnccn no 3JIeKTPoCBA3N B OTHOWeHn BBICOKnx YAcTOT 44
KaHaJa-Hn3KOMOuHocThbIe,OCBO6oJcEHbIeOTJIuCeH3nn paAnIOKOMMyHnKaUHOHHbIe yCTpOJcTbA (RSS-210) 45
LCD panel ergonomic specifications 46
Acer eRecovery Management
Ecni c KOMnbIOTepom BO3HnKIn npo6JIembl, KOtOpbIe He ydaetcpeWntb dpyIMN cnoc6amn,TO,BO3MOxHO,POHaIO6ITcnepeyCTaHOBNTb ONEpaCIOHNHyO CNCTeMy Windows,a TaKke ycTaHOBNeHHbIe n3rOToBHTeMe IporpAMMbI IN daPABepbl. 706bl Pn HEO6XODIMOCTH MoXHO 6blIO BOCCTaHOBNTb KOMNbIOTep,KaK MOxHO Ckopee CO3daiTe pe3epBHyIO KOnHIO CNCTeMbI DnRA BOCCTaHOBLeHnA.

PpmeHne: CnedyuOaI HOpMaIg npBedeHa NCKHouHTeJIbHO B cnpaBOHyIX cIeJx. PeaJIbHbIe xapaKTepcntIKU yCTPOICTB MOrYT OTNIuHaTbcra OYka3aHHbIX.
B npiloxeHn Acer eRecovery Management peaIIN3OBAhbl cneIyIOUne fynKcN:
1 Pe3epBHOe KOINPOBaHHe:
Co3daTb pe3epBHyIO KOIIIO 3aBOcknx HAcTpoek
Co3daTb pe3epBHyIO KOIIIO dpaIBePOB IN npJIIOKeHNI

PpimmeaHne:B moeJx 6e3 BCTpoEHoro npnBOda ONTuecknx DNCKOB pe3epBhIe KOINMOXHO 3aNNcBiBaTb Ha USB-HakONITeJIb IIN HA BHeuHNI pnpBOd ONTueckNX DNCKOB.
2 BocctaHOBntb:
BocctaHOBTb onepaunOHyu cnCTemy co cTaHapTHbIMn HacTpOHKAMN
BocctaHOBTb onepauonHHyIO cnCTemy n coxpaHTb NOlb3OBaTeJIbckne daHHbIe
- IpeyectaHOBtB dpaBepbI nn npnIOKeHn
B 3ToI rIaBe Iopro6Ho OINCbIbAeTcKaKdA I3 3TNx npOeDyp.
UTo6bI NcNoJIb3OBAbT bФyHKcIIO 3aIITbI npoJIeM, peaII3OBaHHyIO B nporpaMMe Acer eRecovery Management, HxKHO cHauJa yCTaHOBtB npoJIb. UTo6bl YCTaHOBtB npoJIb, 3aNcTe yTnHTy Acer eRecovery Management n HaxMnte HAcTpoKa.

C03dahne pe3epBHOJ KOHnДЯ BOCCTaHOBJIeHnI (PpNBOJ ONTNUeCKNX DnCKOB)
Для поусятайсь сnomошью pe3epBHOJ KОПИHA ONTNUeCKINДNCKAX HUXH0 3apaHee co3aTb ДИСК BOCCTAHOBJIeHЯ.В TeueHne BCero npoceca pyKOBODCTByITeCb ЭкраHHbIMn ИНСТPyKlIЯM.ЧИТаTe INx BHIMATEЛьHo!
1 HaxmTe NycK > Bce nporpaMMbl > Acer, 3aTeM BbIepePte Acer eRecovery Management.

2 UTo6bI Co3daTb DNCKn DnB BOCCTaHOBNEHn BCEx DaHHbIX JecTKoro DnCKa, BKIOUay OC Windows n BCE npedyctaHOBnEHhIe nporpaMMbl n dpaiBepbl, HaxMnte Co3daTb pe3epBHyO konNIO 3aBOdcknx HacTpoek.
NIM
HaXMMTe KHONKy Co3daTb pe3epBHyIO KOHHO dpaBepOB n npNJoxeHN, YTO6bl CO3daTb INCKN IINRA BOCCTaHOBNeHn TOJbKO ppeDyCTaHOBNEHHbIX N3ROTOBNTeEM IporpAMM IN dpaiBepOB.

Baxho: CoBeTyem KaK MoXHo cKOpee CO3daTb KaXdbI TIN DnCKOB Cpe3epBHBIM KONNMAI JIJI BOCCTaHOBJIeHNI.
B 3TOM DnAIOROBOM OKHe "Co3daTb apxNB CO CTaHdapTHbIMN 3aBOIDCKMn HAcTpoiKaMn" yka3aHO, CkOJIbKO YnCTbIX 3aINcblBaEMbIX INCKOB HuxHOДЯ CO3DAHnI DAckOB DnI BOCCTaHOBNeHnI. PpIroTOBbTe Ix NepeI HaayIOM npoueDypbl.


PnmeHne: Tpe6yemoe KOJIInueCTBO YIcTBIX INCKOB DVD 3aBNCNT OT yCTaHOBNeHHoY BAC ONepaCIOHHO CnCTeMbI.
3 BCTaBbTe YnCTbI DnCK B npNBoD, yKa3aHHbI B CnNcKe ApxNBpOBA Tb Ha, n HaxMnte DaJe. Ha 3KpaHe 6yDet OTo6paXaTbcr XoD BBInONHeHnpe3epBHOro KOnnpOBaHn.

IIO OKOHuaHn npoxnra KaJDoRo DnCKa IIOToK npNbOda 6yJeT OTkpBaTbcra.
4 N3BJIeKInTe DnCK n3 npINBOda n NOMeTbTe ero nepMaHeHTbIM MapKePOM.

Baxho: MapknpoBka Ha KaJdOM dNcKe DoJXHa 6bITb yHnKaJIbHOu IIOHAHO, HApPImep, "Dnck 1 n3 2 dJa BOCCTaHOBHeHr NWindows" IIN "Dnck dJa BOCCTaHOBHeHr npIIOKeHm I dpaIBePoB".
CoXpaHnTe 3Tu DNCKB 6e3OanChOM MeCTe N 3aONMHnTE 3TO MeCTO.
5 EcHn HxKHO 3aHncaTb HeCKoJIbKO DnCKOB, TO, yBnDEB npeIIOXeHne Ha 3kpaHe, BCTaBbTe CNeDyUOuN dNcK n HaxMnte OK. PpOdoJkaTte 3aHNCbIBaTb DnCKN, NOKa PPOceCC He 3aBepuNTcra.
C03dahne pe3epBHOJ KOHNДЯ BOCCTaHOBJIeHnA (ФЛэш-нakОпNTeJB USB)
Дя nepeyctaHOBc n NOMOsbIO φn3w-HaKoNTeJy USB hyxHo 3apaHee co3daTb pe3epBHyIO KOnIO DЯ BOCCTaHOBJIeHn. B TeueHne BCero npOcecca pyKOBOdCTByITeCb 3kpaHHbIMn INHCTpyKUmaM. YHTaIte IN BX BHMaTeJIbHo!

Baxho: Hyxho nCnoJb3ObaTb 0nHaKoNtIb USB eMKocTbIO He MeHee 12 I6, Ha KOTOpOM He 3aNcAHO HnKaKIX daHHbIX.
1 HaxmTe PycK > Bce nporpaMMbl > Acer, 3aTeM BbIepePte Acer eRecovery Management.

2 2 TTo6bI Co3daTb DnCKn DnI BOCCTaHOBJIeHnBCEX DaHHbIX JeCtKOrO DnCKa, BKIOUcA O C Windows n BCE npEynCTaHOBJIeHnBIE nporpaMMbl n dpaiBepbl, HaxMITE KhoNkY Co3daTb pe3epBHyO KOIIIO 3aBOdcknx HAcTpoek.
NIN
HaXMMTe Co3aTb pe3epBHyIO KOHIO dpaBepOB IN npNJoxeHN, YTO6bl CO3aTb DnCKI DnRA BOCCTaHOBJEHHN TOIbKO IpeDyCTaHOBJEHbIX N3ROTOBNTeJIem nporpAMM n dpaBepOB.

Baxho: CoBeTyem KaK MoXHo cKOpee co3aTb KaKdbI TnДИCKOB pe3epBHBIM KONNIM ДЯ BOCCTaHOBNeHnI.
OTKpoetcI dnaIoroBOe OKHO "Co3daTb pe3epBHyIO KOJIIO 3aBODCKNX HAcTPOEK". B 3TOM dnaIoroBOM OKHe 6ydet yka3aH opneHTnpoBOHbI pa3Mep faiJa pe3epBHOJ KOII HA BaIeM n3u-HakONITe USB.
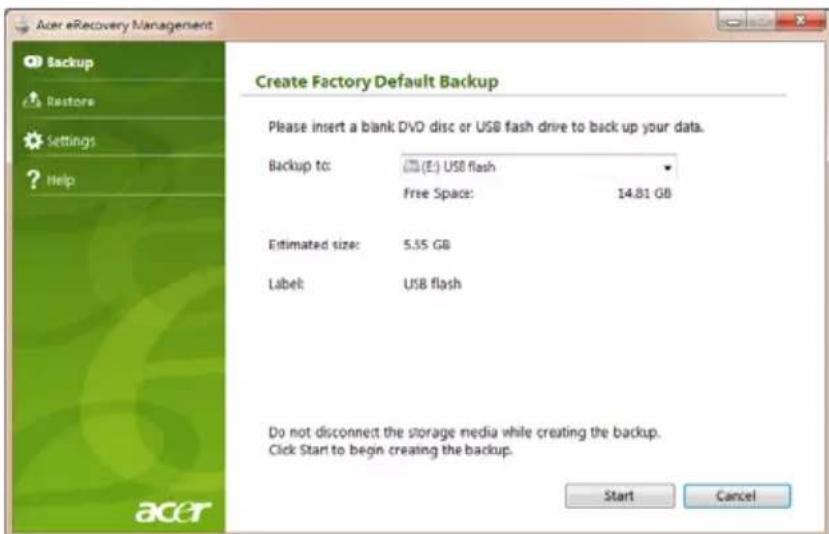
3 IopKnIOuHTe USB-haKoNTeIb n HaxMITE Nyck. Ha 3kpAHe 6ydet OTo6paKaTbcx XOD BblONHeHnpe3epBHorO KOINPOBaHn.

4 OTKIouHTe pIaHakOnITb USB n nometbe ero nepMaHeHTbIM MapKepor.

Baxho: MapknpoBka Ha KaXdOM apxNBOM dNcKe DOJXHa 6bITb yHnKaJIbHOI nOHTHO, HApPmep, "Dnck 1 n3 2 dJa BOCCTaHOBHeHrna Windows" nnn "Pe3epBHa KOnnA dJa BOCCTaHOBHeHr npInIOXeHn I dpaiBepOB". CoXpaHnte 3TOT fJl3uHaKoONTeNb USB B 6e30nachOM MeCe n 3anomHnte 3TO MeCTO.
BocstahOBJIeHne cNCTeMbI (pnpBOID ONTNUeCKNX DnCKOB)
Ecni OcbpaueHne B cnyk6y noDepxKn Acer He NOMOKeT yCTpaHNT npo6JeMy, TOnCNoJIb3yIe nporpamMy Acer eRecovery Management. OHa BOCCTaHOBNT KOMNbOTep Do COCTOHN Ha MOMENT NOKyPKN. Ppi 3Tom OCTaHETc BO3MOXHOCTb COxpaHNTb BCE HAcTPOIKN IINHbIe DaHHBe DJIa BOCCTaHOBJIeHNA DaJIbHeM.
TINbI BOCCTaHOBJIeHnIa
BocctaHOBJIeHne IpeDyCTaHOBJIeHHbIX IpOgpaMM I dpaiBepoB
B kaueCTBe oJHoi n3 Mep yctpaHeHn HeNCpabHocTee MoKet noHaObHTbcr
IpeyeCTaHOBka nporpaMM n dpaBepOB yCTpoiCTB, n3HaayalbHO yCTaHO BHeHHbIX BV KOMNbHOtepe npEero n3rotobHeHn.ДЯ BOCCTaHOBHeHn CnCTeMbI MOxHO
IVcNoJIb30BaTb JIn6o JeCTKn DnCK, JIn6o Co3daHHbIe BamN DnCKn C pe3epBbIMN KOIIyAMN.
Hoboe nporpaMMHOe oecneHHe: np Heo6xOIMOCn BocCTaHOBtB nporpAMMy, n3HaayalbHo He yCTaHOBJIeHHyIO B KOMNbIOTpe, Bam 6yDet HuxHO BblONHHTb INCHtpKcnn Ioo yCTaHOBKe TAKo nporpaMMbl.
Hobbie npaBepy yctpoiCTB: npn Heo6xOIMOCTN BOCCTaHOBTb dpaBepby cTPOIcTB, n3HaayalbHO He yCTaHOBJIeHHbIX B KOMNbIOTepe, Bam 6yDeT HxKHO BblONHtB IHCTpyKcNn N3 pyKOBOCTBa Ha 3TO yCTPOIcBO.
Iopraok BOCCTaHOBnHn npedyctaHOBnHbIX nporpamM n dpaBepoB:
1 HaxmTe PycK > Bce nporpaMMbl > Acer N BbIepeNTe Acer eRecovery Management.
N
EcnBbI BbIOJHReTe BOCCTaHOBHeHne C DnCKa BOCCTaHOBHeHna DpaBepOB N npINOxKeHn, To BCTaBBte erO B npINoD, a 3aTeM, nocNe TORO, KaK OTKpoETcra rnaBHOe MeHIO Acer Application Recovery, nepeiDnte K wary 3.
2 OTKpoTe BknaIky BocCTaHOBNTb, 3aTeM HaxMMTe BOCCTaHOBNTb DpaBepblnn npnloKeHnry, yTo6bl OTkpblrNaBHe MeHIO Acer Application Recovery.

3 HaxmTe Coepxahanne, TTo6bI NOKa3aTb Cnncok nporpaMM n dpaBepOB yctpoiCTB.
4 HaKMTe 3HaOyK yCTaHOBKn 3JIeMeHtA, KOToPbI XOTnTe yCTaHOBnTb, 3aTEM CNeDyIte 3KpaHHbIM NODcKa3kAM NO BbINOJIHeHnO yCTaHOBKn. NOBTOpIte 3TN DeIcTBnI DnRA BCEx 3JIeMeHToB, KOTOpBIE XOTnTe IpeyeCTaHOBnTb.
Bo3BpaT K npedbIyUeMy COCTOHNIO CNTEmbl
Функця "BocctahOBJIeHne cnCTembl Microsoft® Windows" nepnoDnueckn deJaet "MOMeHTaIbHbIe CHIMKn" napamETPOB n HAcTpoE BaIeN CNCTeMbI n COxpaHReT IX KAK TOUKN BOCCTAHOBJIeHn. B 6OJIbUnHCTBe ClyuAeB CNoXHbIX npo6Jem C IporpaMMAMn IЯ BOCCTaHOBJIeHn pa6OTocNOcBOHcTn CNCTeMbI MoXHO BEpyTbcr Ha OdHy IIN HeCKOJIbKO 3Tnx TOUeK BOCCTaHOBJIeHn Ha3aI.
CnCTema Windows aBOMaTnueckn CO3daet DOONHITeNBHyTOuKy BOCCTaHOBJIeHnI He TOnbKO eKeDHeBHO, HO I npN yCTaHOBKe KaKdoN HOBOI npOrpaMMbl INI dpaaiBepa ycTroPcTBa.

Cobet:ДяпocmOTpa ДОПONHITeNBbIX CBeDEHn O6 ИСПОЛБ3OBaHnФункцIN "BocCTaHOВЛeHne CnCTeMbI Microsoft® Windows"нжмITE ПиСКИ ВьБерпTe pyнKT "Справka И подерЖКа". В OkHe NonCKOBOrO 3a npoca Справки ВвЕДITE eOCCmaHOBEnHue cucmemebl windows ИнжмITE Клавишу Enter.
IopraOK Bo3Bpata K TOTKe BOCCTaHOBJeHnA:
1 HaxmTe Nysck > Panaelb ynpaBneHnra > Cnctema n 6e3onacHOCTb > UeHTp noDaeppKKn, 3aTEM Bbl6epnte BocctaHOBneHne.
2 HaxmTe 3anyck BOCCTaHOBneHnCnCTembl, 3aTeM Daane.
3 BbIbepnte HxKHyTOUky BocCTaHOBHeHna, HaxMnTe Danee n 3aTeM ToTOb. OTKpoETcO KHO C 3anpOCOM Ha noDTBePxxDeHne.
4 Haxmnte Da. Nocne 3Toro CnCTema 6ydet BOCCTaHOBHeHa C NcNoIb3OBAHnem yka3aHHo BamN ToKn BOCCTaHOBHeHn. 3TOT Ipouecc MoKeT 3aHrTb HeCKoJIbKO MInHyT nOTpe6OBaTb nepe3arpy3Kn KOMNbIOTepa.
BocctaHOBJIeHne cnCTembldo nepBOHaayalbHoro COCTOHHJ.
EcnB KOMNbIOTpe BO3HKnHyT npo6IeMbl, KOToPbIe He ydaCTcYcTpaHnTB dpyHMn CnoCo6aMn, TO, BO3MOxHO, NOHaIObNTcI nepeyCTaHOBtB CnCTeMy ueJIKOM, YTO6bl BOCCTaHOBtB ee n3HaayalbHoe COCTOHNHe. JIa nepeyCTaHOBKn CnCTeMbI MOxHO NcNoJIb3OBaTb IIn6o JeCTKm DnCK, IIn6o Co3DaHHbIe Bamn pe3epBHbIe KOnnn.

BHHMaHHe: B pe3yIbTaTe TaKOro nonHoro BocCTaHOBJeHn 6yDyT ydaJIeHbI BCE daHHbIe C JecTKoro DnCKa, NocJIe 3TOrO 6yDyT nepeYCTaHOBJeHbI cnCTema Windows n BCE npedycTaHOBJeHHbIe B KOMNbIOTepe nporpaMMbl I dpaiBepbl. EcIn eUe moXHo OTkpblBaxHbIe paJbI Ha JecTKOM DnCKe, To npraMo ceuac co3DaJIte Hx pe3epBHbIe KOHN.
EcnncTeMa Windows eue 3anyckaetcra, To cm. pa3den "BocctaHOBJIeHne n3 cnCTembl Windows" Ha cTp. 10.
EcnncTeMa Windows He 3anyckaetcra, Ho kectkn Dnck eue pa6oTaet, To cm. pa3deJ "BocctahOBHeHne C kectkoro Dncka BO BpeM 3arpy3Kn" Ha cTp. 10.
Ecni CnCTema Windows He 3anyckaetc, a JecTKn DnCK NOnHOCTbIO nepeopmatnpoBAn nIi Bbl yCTaHOBNi CMeHbI JecTKn DnCK, TO CM. pa3JeI "BocctaHOBneHne c DnCKOB BOCCTaHOBHeHna" Ha cTp. 11.
BocctaHOBHeHne n3 cnCTembl Windows
Iopraok nepeycTaHOBKn Windows n Bcex npedyctaHOBneHHbIX nporpaMM n Dpaibepob:
HaxmTe PycK > Bce nporpaMMbI > Acer n Bbl6epuTe Acer eRecovery Management.
OTKpoIte BkIaIky BocCTaHOBt b n HaxMITE BocCTaHOBt b onepauOnHHyIO cnCTemy co cTaNdapTHbIMn HacTPOiKaMn.
HaKMMTe Da, 3aTem Nyck. OTKpoetc dnaIanoROBoe OKHO CO CBeDeHnMaO XeCTKOM DnCKe, Ha KOTOpbI bUdET BOCCTaHOBHeHa OepaCIOHHa CnCTema.

BHHMaHHe: B pe3yIbTaTe npoOJXeHn 3TOro npoUecca 6yDuT CTePbI BCE paIbI Ha XecTKOM DnCKe.
Haxmte OK. B npoecce BocctaHOBneHn CHaJana npon3oJeT nepe3arpy3ka KOMbIOTepa, a 3aTeM HaHHeTcK OONpOBaHne faiIOB Ha JecTkN DnCK. 3ToT npoecc MoKeT 3aHrTB HeKOtOpoe Bpem, B TeueHne KOtOPO Ho 3kpaHe Acer eRecovery Management 6yDet OTo6paXaTbcx XoD BBInOnHeHn.
IIO OKOHuaHn BOCCTaHOBJIeHn IHaIOrOBoE OKHO npeJIoXnT Bam nepe3arpy3ntb KOMNbIOTep.
UTo6bI nepe3arpy3ntb KOMnbiOTep, HaxMNTe OK.
BbINOHNHe OTo6paXaEMbIe Ha 3KpaHe yKa3aHnNo nepBOHaJaIbHOH HAcTpoKe CnCTEmbl.
BocTaHOBnEHHcKecTKOroDnCKaBOBpeMa3arpy3Kn
Iopraok nepeycTaHOBKn Windows n Bcex npedyctaHOBneHHbIX nporpaMM n dpaiBepOB:
1 BknHouHTe KOMNbIOTep, 3aTeM BO BpeM 3arpy3Kn HaxMMte
2 Haxmte BocTaHOBt b onepaunOHHyo cnCTemy co cTaNapTHbIMn Hactponkamn.

BHHMaHHe: B pe3yIbTaTe npoOJXeHnra 3TOrO npoCecca 6yDuT CTePbI BCE aNbl Ha XeCTKOM DnCKe.
3 Haxmnte Danee. Byet BocctaHOBneHo cOepxHMOe, n3HaayabHO yCTaHOBJIeHHOE Ha JecTKn DnCK npn ero n3rTOBHeHN. 3TOT npocecc 3aIMET HeCKONbKO MNHyT.
BocCTaHOBHeHne C INCKOB BOCCTaHOBJIeHnI
Iopraok nepeycTaHOBKn Windows n Bcex npedyctaHOBJIeHHbIX nporpaMM n dpaibepob:
1 BkIIOHTe KOMNbIoTeP, BCTaBbTe B npNBOd ONTnuecknx DnCKOB nepBbIM nCK dIy BOCCTaHOBJIeHnCnCTeMbI INpe3arpy3nte KOMNbIoTeP.

BHHMaHHe: B pe3yIbTaTe npoJOnJKeHnra 3TOrO npoUecca 6yDyT cTeptbI BCE aJNbHa JecTKOM DnCKe.
Ecnn OH eue He BkIIOueH, To BkIIOUHTe ero B MeHIO 3aRpy3Kn F12:
BoBpem3aRpy3KnKOMnbIOTepaHaxMnTe KnaBnUy
HaxkataHem KnaBnUc O cTpeNkamn BJIeBO NnBnPaBO BbIbepTe TnaBHOe MeHIO.
Haxmaite knaBny, noka He BbI6epnte MeHIO 3arpy3Kn F12, 3aTeM haxmnte KnaBny < F5> , yTo6bl dIra 3Toro npaMeTp a BbI6paTb 3HaueHne BkIooHeo.
HakatneM KnaBnC co CtepeKAMn BneBO nnn BnpaBO Bb6epnte MeHIO BbIXoI.
BbI6epnte CoxpaHnTb n3MeHeHn N BbIHTn n HaxMnte KnaBnSy Enter. IJIy NOdTBePjXdEHHaXMnte OK.
KomnbToTepe3arpy3ntc.
2 BoBpeM3arpy3KnHaXMMTe KnaBnUyF12>,YTo6bIOTKpbITb MeHIO 3arpy3KN. BMeHIO 3arpy3Kn MoXHO Bbl6paTb yCTpOietBO, C KOtOporo CneDyET 3arpykaTbcra, HApPImep, C XecTKoro DnCKa NIn C npNBOda ONTHecknx DnCKOB.
3 HaxkataHem KnaBnUc Co CTePJIKamN BbIbepnte CToPOky CDROM/DVD (3Ta CToPOka MoKeT HaunHaTbcra c "IDE 1..."),3aTeM Haxmnte KnaBnUsy
4 YBnDeB npnrnaeHne, BCTaBbTe BTOPOI DNCK BOCCTaHOBNeHnA, 3aTEM nJy Ka3aHn.
BocctaHOBJIeHne cnCTeMbI (ФЛэш-нakОпТeЛb USB)
Ecni obpaueHne B cnyk6y noDepKKn Acer He nomoxet ycTpaHntb npo6JeMy, TOnCnoJIb3yIe nporpammy Acer eRecovery Management. OHa BOCCTaHOBNT KOMNbOTep Do COCTOJHn Ha MOMENT NOKyn. Ppi 3Tom OCTaHEcRBO3MOxHocTb COXpaHHTb BCE HAcTPOJKN IINHbIe DaHHbIe DJIra BOCCTaHOBJeHn B daJIbHeNWeM.
TINbI BOCCTaHOBJIeHnIa
BocctaHOBJIeHne IpeDyCTaHOBJIeHHbIX IporpaMM I dpaiBepoB
B kaueCTBe OndHou n3 Mep yctpaHeHn HeNCpabBHOCTe MoKet NOHaO6ntbcr
peyeCTaHObKa IporpaMM n dpaBepoB yCTpoiCTB, N3HaayalbHO yCTaHO BHeHHbIX BV KOMNbHOtepe npEero H3ROTOBHeHn. JIy BOCCTaHOBHeHn MOxHO NcNoB3OBaTb
JINo6 JeCTKn DnCK, Nl60 Co3DaHHbIe Bam Pe3epBbIe KOHN.
HOBoe nporpaMMHOe oecneueHne: npn Heo6xOIMOCTN BOCCTaHOBtB nporpaMMy, n3HaayalbHo He yCTaHOBJIeHHyIO B KOMnbIOTepe, Bam 6yDeT HUXHO BblONHHT b INcTpyKcUN No yCTaHOBKe TAKO nporpaMMbl.
HOBbIe npaBepbI yCTpoiCTB: npn Heo6xOIMOCn BOCCTaHOBnTb dpaBepbI yCTPOIcTB, n3HaayalbHo He yCTaHOBJIeHHbIX B KOMNbIOTpe, Bam 6yDeT HxKHO BblONIHHTb INHCTpyKcNn I3 pyKOBoIDCTBa Ha 3TO yCTPOIcTBO.
Iopraok BocctaHOBHeHn npedyctaHOBHeHHbIX nporpamM n dpaBepoB:
1 HaxmTe Pync > Bce nporpaMMbl > Acer n BbIepeTc Acer eRecovery Management.
UIN
EcnBbIOJHReTe BOCCTaHOBJeHne Cpe3epBHOKoNN DJIa BOCCTaHOBJeHnApaIBePOB IN npInOKeHn, To BcTaBBte 0nH-NAKOHTeJB USB B pa3bEm USB. OTKpoTte 0nH-HaKOnITeJB USB B npOBODHKe Windows n DBaxDbI 0eIKNHTe BocCTaHOBJeHne.
2 HaxmTe "IpeyeCTaHOBka dpaBepoB nII npINOKeHn c yctpoiCTBa USB"
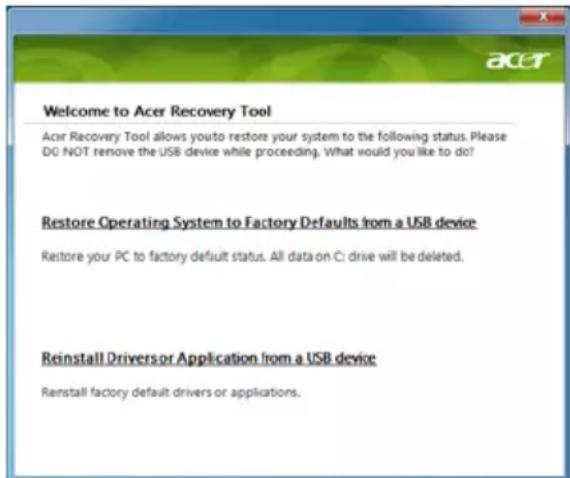
3 Haxmte Coepxahne, TTo6bI noka3aTb Cnncok nporpaMM n dpaBepOB yCTPOINCTB.
4 HaxMnTe 3HaOyK yCTaHOBKn 3JeMeHtA, KOTOpbI XOTnTe yCTaHOBnTb, 3aTeM CNeDyIe 3KpaHHbIM NOcka3KaM N O BblIOJIHeHnIO yCTaHOBKn. NOBTOpIte 3TN DeINCTBnI DnRA BCEx 3JeMeHToB, KOTOpbI XOTnTe nepeyCTaHOBnTb.
Bo3BpaT K npedbIyUeMy COCTOHNIO CNTEmbl
Функя"BOcTaHOBJIeHne CnCTeMbI Microsoft®Windows" nepnoDnueckn DeJaet "MOMeHTaJIbHbIe CHIMKIn"napaMeTpoB n HAcTpoE BaSei CNCTeMbI n COxpaHReT IN KAK TOOKN BOCCTaHOBJIeHn. B 6OJIbUHnCtBe CnyaEi CLOXHbIX npo6JIem C nporpaMMam N IЯ BOcCTaHOBJIeHn pa6OTocNOco6HOCTn CNCTeMbI MOxHO BepHyTBcRa Ha OdHy IIN HeCKOJIbKO 3TNX TOUYE KBOcCTaHOBJIeHn Ha3aI.
CnCTema Windows aBToMaTnueckn CO3daeT DONoHInTeNbHyIO TOkY BOCCTaHOBJIeHnI He ToJIbKO exKeIHeBHO, HO I npu YcTaHOBKe KaJdoN HOBOI npOrpAMMbI nII dpaBepa ycPoIcTba.

Cobet:ДяпocmOTpa ДОЛHNTeNBbIX CBeDEHn O6 ИСПЛБЗOBAHи Функи "BocctaHOВнeHne CnCTeMbI Microsoft® Windows"нжмITE Пусь И ВьбepиТе pyнт "СпразКИ nnoДерЖКа". В Okне NonCKOBOrO 3anpoca Сравки BBeДиTe BOCMaHOBNeHue cucmemebl windows ИнжмITE Клавишу Enter.
IopraOK BO3Bpata K TOUke BOCCTaHOBneHnA:
1 HaxmTe Nysck > Panaelb ynpablenna > Cnctema n 6e3onacnoctb > LcHtp noDepkKn, 3aTeM Bbl6epnte BocctaHOBneHne.
2 HaxmTe 3anyck BocctaHOBneHn CnCTembl, 3aTeM Daane.
3 BbIePeNTe HxKHyTOy KBy BocCTaHOBnEHHa, HaxMITE Daee N 3aTeM FToBO. OTKpoETcra OKHO C 3anPoCOM Ha NOdTBePckdHne.
4 Haxmnte a. Iocne 3Toro cncema 6ydet BOCCTaHOBHeHa C NcNoIb3OBaHnEM yka3aHHoB Bamn ToKn BOCCTaHOBHeHn. 3TOT IpOceCC MoXeT 3aHrTb HeCKoJIbKO MInHyT nOTpe6OBaTb nepe3arpy3Kn KOMNbHTope.
BocctaHOBJIeHne cIcTeMbI Do nepBOHaJaIbHOro COCTOHHNIA
EcnB KOMNbIOTepe BO3HKnHyT npo6nembl, KOtOpblc He ydaCTcYcTpaHnTB dpyHMn CnOCo6amn,TO,BO3MOxHNOHAHOCTCnpeyeCTaHOBnTB CnCTeMy ceNIKOM, YTO6bl BOCCTaHOBnTB ee n3HaayalbHoe COCTOHNHe. IJIa nepeyeCTaHOBKN CnCTeMbIOXHO NcNoJb3OBaTb JIn6o JeCTKm DnCK, JIn6o Co3DaHHbIe Bamn pe3epBhble KOnnn.

BHHMaHHe: B pe3yIbTaTe TaKOro nOJIHO BOCCTaHOBJeHn6yDyT ydaJIeHbI BCE daHHbIe C JecTKoro DnCKa, NocIe 3TOrO 6yDyT nepeYCTaHOBJIeHbI cnCTema Windows n BCE npedyctaHOBJIeHHbIe B KOMNbIOTepe nporpaMMbl I dpaIbEPbl. EcIIe eIe MoXHo OTKpbITb BaxHbIe faiJIbI Ha JecTKOM DnCKe, To npraMo ceuac co3DaIte Hx pe3epBHbIe KOnnn.
EcnncTeMa Windows eue 3anyckaetc, To cm. pa3den "BocctaHOBHeHne n3 cnCTeMbI Windows" Ha cTp. 15.
Ecnn cnctema Windows He 3anyckaetcra, Ho kectkn dNCK eue pa6oTaET, To cm. pa3dien "BocctaHOBHeHne c kectkoro dNcKa BO BpeMa 3arpy3Kn" Ha cTp. 15.
EcnncTeMaWindows He 3anyckaetc, a JecTKn DNCK NOJHOCTbIO nepeopmatnpobAH NII Bbl yCTaHOBUN CMeHHbI JecTKN DNCK, TO CM. pa3dJI "BocctaHOBLeHne n3 pe3epBHOJ KOnnn dJa BOCCTaHOBHeHna" Ha cTp. 16.
BocctaHOBJIeHne n3 cncTeMbI Windows
Iopraok nepeycTaHOBKn Windows n Bcex npedyctaHOBneHHbIX nporpaMM n dpaiBepoB:
Hajmte Nyck > Bce nporpaMMbl > Acer n BBi6epnte Acer eRecovery Management.
OTKpoTe BknaIky BocCTaHOBtB, 3aTEM HaxMITE BocCTaHOBtB onepaHOnHyO cnCTeMy co cTaHdapTHbIMn HacTpoiKaMn, YTO6bl OTKpbITb DnaJIOROBOE OKHO PoTBePdnte BOCCTaHOBJIeHne.
HaKMnTe Da, 3aTeM Nyck. OTKpoEtca DnaIanoROoe OKHO CO CBeDeHnMaO XeCTKOM DNCKe, Ha KOTOpbI 6yDet BOCCTaHOBHeHa OepaCIOHHa CNCTema.


BHHMaHHe: B pe3yIbTaTe npoJOnXeHn 3TOrO npoUecca 6yDyT CTePbI BCE aJIbI Ha JecTKOM DnCKe.
HaxmTe OK. B npoecce BOCCTaHOBHeHn CHaJa npOn3OJeT nepe3arpy3Ka KOMbIOTepa, a 3aTeM HaHHeTcKoNpOBaHne paJIOB Ha JxEcTkM dNcK. 3ToT npoecc MoKeT 3aHrTb HeKOtOpoe BpeM, B TeUeHne KOtOporo Ha 3kpaHe Acer eRecovery Management 6yDet OTO6paXaTbcS XOD BBInONHeHn.
IIO OKOHuaHn BOCCTaHOBneHn IdaIaIorOBoe OKHO npedNoXnT Bam nepe3arpy3ntb KOMNbIOTeP.
YTo6bI nepe3arpy3ntb KOMnBIOTe, HaxMnTe OK.
BbIOnHnTe OTo6paXaEMbIe Ha 3KpaHe yKa3aHnI No nepBOHaJaIbHOJ HAcTpoKe cnCTEmbl.
BocctaHOBHeHc XeCTKOrO DnCKa BO BpeM 3arpy3Kn
Iopraok nepeycTaHOBKn Windows n Bcex npedyctaHOBneHHbIX nporpaMM n dpaiBepoB:
1 BkIIOUHTe KOMNbHOTeP, 3aTeM BO BpeM 3aRpy3Kn HaXMMTe
2 Haxmte BocstaHOBtB onepaunOHHyo cnCTemy co cTaHapTHbIMn HacTpoKamn.


BHHMaHHe: B pe3yIbTaTe npoOJxKeHn 3TOro npoCecca 6yDyT CTeptbI BCE aIJbI Ha JecTKOM DnCKe.
3 Haxmnte Danee. Byet BocctaHOBneHo COepxHMOe, n3HaayalbHO yCTaHOBHeHHoe Ha kecTKn DNCK npn erO n3rOToBHeHN. 3TOT npocecc 3aIMET HeCKoJIbKO MInHyT.
BocctaHOBHeHne n3 pe3epBHOJ KOHN dJa BOCCTaHOBJIeHnA
Iopraok nepeycTaHOBKn Windows n Bcex npedyctaHOBneHHbIX nporpaMM n dpaiBepoB:
1 BcTaBbTe -HaKoONTeJb USB n BkJIIOuHTe KOMNbIoTeP.

BHHMaHHe: B pe3yIbTaTe npoOJXeHnE 3TOrO npoUecca 6yDyT CTePbI BCE aIIbHa JecTKOM DnCKe.
Ecnn OH eue He BkIIOueH, To BkIIOuHTe ero B MeHIO 3aRpy3kn F12:
Bo Bpem 3aRpy3KN KOMnbIOTepa HaxMnTe KJIabNlSy < F2>
HaxaTneM KJIabuIc oCTpeJkAmn BJIeBO IIN BnpaBO BbI6epTe TnaBHOe MeHIO.
Haxmaite knaBnu, noka He BbIepnte MeH0 3arpy3Kn F12, 3aTe m HaxmTe knaBnuy < F5> , yTo6bl dny 3Toro npaMeTpba BbIpaTb 3HaueHne BkIoUeHo.
HaKaTnem KnaBnW co CTepeIkAmu BneBO nII BnpaBO bI6epnte MeHIO BbIXoJ.
BbI6epnte CoXpaHnTb n3MeHeHn BbIHTn n HaxMNTe KnaBnSy Enter. IJIa NOdTBePjKeHnHaXMNTe OK.
KomnbIOpTe npe3arpy3ntcra
2 BoBpMa 3aRpy3Kn HaxMnte KnaBnUy
3 Haxatne KnaBnCo CTePknam BbIeJIte CTPOky USB HDD, 3aTeM HaKmTe KnaBnSy
4 ⅡЯЗвершени yctaHOBK nCneDyIte yka3aHnM, OTo6paXaembIM Ha 3KpaHe.
Cechopnay naHeJIb
BcTpoEHNa ceHCOPHa nAHeIb - 3TO yKa3bIbAUOe yCTpOiCTBO, OuYuaIOoee DnHexHn no ero NOBepXHOCTn. 3TO 03NaUaET, YTO KypCop OTBeUaET Ha DnHexHn nAJIbueB no NOBepXHOCTn ceHCOPHo nAHeI. LcHTpaJIbHOe paCNOJoxHe nE ynpa Idny puk npedocTabIaeT MaKcImaJIbHOe yDObCTBO n POnDePkKy.
OCHOBbI nCNoJIb3OBaHnA CeHCOPHO NaHeN (cDByMa KHOJaMn)

CneIyIOUe 3nEmeHTbI NOKa3bIBaIOT, KaK IcNoJIb30BaTb CeHCOPHyIO NaHeJIb C DByM KHOKNAMN.
- TTo6bI DnraTb KypcOpOM, BOnTe NaJIbUeM No ceHcOpHoi naHeJI.
Haxab Ha nebyu npabyu KnaBnui, HaxoJusecr no KpaM ceHCOPHO naHei, cMOxete oBeCneHTb yHKun BB6opa n NcNoJIHeHn. 3TN dBe KnaBnIIO6hbl npaBoN I NeBOI KnaBnUAMMbIu. NocTyKINBaHne no ceHCOPHO naHei anlOrnHo HaxaTIO JbeO KNOpKN MbIu.
Iocne HaxaTnKHOKN NHTAHN KOMNbIOTeP He 3aNyCKaeTcN He 3arpykaetc.
B3rIaHnTe Ha nHdNkaTop Power (PiTaHne):
Ecni OH He CBeTITcA, NITaHHe HA KOMNbIOpTe He nOdaHo. IpoBepbTe cNe dyUouee:
- EcIn Bbl pa60taete O T aKKymyIaTopa, 3TO MoXeT O3Haayatb, YTO erO 3apRn Hn3Km n HeCnOCo6eH nITaTb KOMMbIOTep. POnkIIOHTe aAnTep nepemEHNO TOka, YTO6bl 3apRdNt b aKKymyIaTOp.
- Y6eIntecb, yTo aanTep nepemehHoro ToKa DoJxHbIM o6pa3oM noDKIIOueH K KOMNbIoTepy N K cETN.
Ecnn HndkaTop cbetntcra, npOBepbte cneyuouee:
HaxoNTcTaN He npedHa3NaHeHHa DnA 3arpy3Kn (He CnCTeMHa) DnCKeTa BO BHeuHem USB-npNbOe r6Knx DnCKOB? BbInbTe 3Ty DnCKeTy IIN BCTaBbTe BmecTo Hee 3arpy3OHyU (CnCTeMHyU) DnCKeTy, 3aTeM DnIpe3anycka CNCTeMbI OndHOBpeMeHHO HaxMMTe KnaBnI IN .
Hertn3o6paXeHHa 3KpaHe.
CnCTema ynpabJIeHnI NHTaHHeM KOMNbIOTepa aBTOMaTUnCeKN OTKJIIOuAeT DnCnJIeN DnE3KOHOMn 3JIeKTPo3HepRn. Haxmnte JIO6yIO KnaBnUy, YTO6bI BkJIIOuHTb DnCnJIeN.
EcnnaKnne KnaBnHn He Bo3Bpaaet Dncnne B pa6oyn peXm, BO3MOXHbI DBe npuHHbl:
- YpOBeHb JpKocTn MoKet 6bItb CInuKOM Hn3ok. HaKmTe
+ <→>, qTo6bl IOBbICntb ypOBeHb JpKocTn.
B kaueCTBe yctpoiCTBa OTo6paXeHnMa MOr 6bItb Bbl6paH BHeuHm MOHTOp. HaxMnte "TopaYne KnaBn"pepeKnUoyeHn DaCnpee < Fn> + < F5> ,yTO6bI nOdkNIOHTb 06paTHo DInCnJeKOMNbIoTepa.
EcHrOpHT HndKaTOp pexkma CHa (Sleep), To 3TO 3HaHT, YTO KOMNbIOTep HaxoINTcB peXkme CHa. JIra BO3O6HOBJeHnpa60tBI O6bIuHOM peXkme HaxMITE u OTnyCTnte KHONKY NITAHN.
KOMnIbIOTeP He BOCpON3BOJNT 3ByK.
PpOBepbTe cneyuOuuee:
-
Гомковов может 6ьть оTKиоча.В Windows,ВЗгланITE Ha 3нayok peуларopa Гомкови (ДиHamИК) Ha naHeJI 3адauch. EcIи on nepeuepkHyT, habmte Ha 3HaOKи OTMeHITe onцИв БыкЛ. Bce.
-
YpOBeHb rPOMKoCTn MoKeT 6bItb CnIuKOM Hn3Ok. IpoBepbTe noIooKeHne nOJIyHka 3HaUka peRyJrTopa rPOMKoCTn Ha naHeJN 3aDaY Windows.
IpyrnynpOBKn rpoMkoCTn MoXHO TaKKe NcNoJIb3OBAtB KOJecNKO npOKpyTKN, He ImeIOoee OrpaHNUTeJIa, INI KNOpKN pyrnynpOBKn rpoMkoCTn.
EcnnrnoOBhble TelefoHbI, HayuHKn IIN BHeuHne DNHaMKn NOKluOyeHbIK pa3beMy JInHeHOro BixOda nepeDHeN KOMnbIOTepa, TO BHyTpEHHne DInHAMKn ABToMaTuCheKn OTKlUOaIOTc.
KlaBnAtypa He pearnpyeT.
IopcoeHnTe BHeuHIO KnaBnAtpy K npTy USB cnpaBa nn CneBa nanei KOMnbIoTepa. Ecn OHa 6ydt pa6oTab, o6paTntecb K BaWemy DInepy nn B aBTOIN3OBaHHbI CepBnCHbI UeHTp - BO3MOxHO, He NOdKnHoyen BHyTpEnn KaBeNb KNaBnAtypbl.
PpHTepepa6oTaet.
BbInonHnTe cJeDyUoune DeIeCTBnA:
- YdoctOBepbTecb, yTo npHTe pNoDKJIIOueH K cETn IyTO erO nITaHne BKJIOUeHO.
- Y6eIntecb, yTO OINH pa3bem Ka6eI npHTepa HAdexHo NODcoEINHeK pa3bemy USB kOMIbIOTepa, a dpyro - K COOTBeTCTByUOeMy pa3bemy npHTepa.
ЯхочьOCCTaHOBNTbпрBOHaayHbHbIe HacTpoKIMoero KOMNbIOTepa, He ICNoJIb3yR KOMNaKT-ДИСКИ BOCCTaHOBJIeHnY.

PnmuueHne: FyHKuN D2D Recovery doCTynHa TOnbko B MoJeJx HOyT6yKOB, OCHAeHHbIX JecTKIM DNCKOM.

PpmeHn: EcnB BaWei CnCTe Me 3aRpyKeHa MHOra3bUHae Bepn OnpaunOHn CnTeMbI, TO npn nocJeDyOuXn Onpaunx BOCCTaHOBHeHn 6dyT nCNOJb3ObaTbcr TOnbKO Te BapnaHTbI OC n Ra3bka, KOTOpBle Bbl BblpaPi npn nepBOM BKIOueHnn NITAHn CnCTeMbI.
C NOMOuI DaHHOI pOueDpyI BOCCTaHOBJIeHnI MOxHO BOCCTaHOBNTb DnCK C:c opunHaIbHbIM nporpaMMhIM oEeNeHEm, KOtOpoe 6blIO yCTaHOBHeHO, KOrDa BBy npno6peTANI HOYt6yK. IJRA BOCCTaHOBJIeHnI DaNcKa C: BblONHITe npoceDpy, npnbEdEHHyO HnXke. (Dnck C: 6ydt nepeΦopMaTHPOBaH, N BCE DaHHbIe 6ydyT ydaJIeHbI). Nepei BblONHHeHem 3ToI npoceDpybl O6raTeJIbHO Co3dAitpe3epBHBie KOnnn BCex paINOB.
Ipeq3anyckOM BOCCTaHOBJIeHnI npOBepbTe HacTpoiKn BIOS, HaxkAB F2> BO Bpem npoueDypbI POST.
1 PpOBeBpTe, BkJIuOeHa JI NФункиЯ Acer disk-to-disk recovery.
2 Y6eIntecb, yTO qyHKnra D2D Recovery B MeHIO Main yCTaHOBneHa B Enabled.
3 BbIynte n3 yTnIITbI BIOS, coxpaHNB n3MeHeHna.
3anyc npoceDpybI BocCTaHOBJIeHnIa:
1 Ipepe3arpy3nTe cncTeMy.
2 Ioka oTo6paxaetcI norotn Acer. IJy3anycka npoueDpybI BocCTaHOBneHn HAKMnte OndHOBpeMeHHo
3 InpoBeHnBocCTaHOBHeHnCnCTeMbI CneDyTe yKa3aHnM, OTo6paXaEMbIM Ha 3KpaHe.

Baxho! 3Ta yTuInTa 3aHmaeT OT 6 Γ6aHT B cKpbITOM pa3dene Ha JXECTKOM DNCKE.
O6paueHne 3a TeXnueckoI pndepKkoI
Ipejde, yem o6paatabca 3a nOmoBHO
Ipn o6paueHn B Acer 3a INTEpakTbHOn NOdepKko, IPOcH MIOdROBtB CJIeDyUOuy HOpopMaunu HaxoDITbcra PdOM C CBOUM KOMNbTePOM. C BaWei NMOouMbI CMOXeM COKpaTtB dNITeJbHocTb nepeROBOPOB NO TeNeΦohy N OΦΦeKTNBHO NOMOypeWntb BaUn npOBeMbl.Pn HAInuH coo6eHn o6 OUI6kax NN 3ByKObIX CNHaNoB, IPOIN3BOIDMbIX BaUNM KOMNbOTepOM, 3aNNHTe IX Prn POABHeHH Ha 3KpaHe (NJN KOJIInueCTBO N OcJIeDoBaTeJIbHoCTb B CInyae 3ByKObIX CNHaNoB).
Bam Heo6xOIMo COo6uNTb cneDyIOUIO INΦopMaζIIO:
IMRA:
AДпес:
TelefoHHbI HOMep:
TnI MoJeJIb KOMNbIoTepa:
CepnHbI HOMep:
Даразпокурки:
AkkymyjTopna 6aTape
B KOMNbHTope nCNoIb3yEtcAaKKMyJIaTOPHa 6aTape, oBeceNeuBaIOUaJ npoDoJIxHTeJIbHOe Bpem aBOtOHMOHoi pa6Obl.
XapakTepeNCTnKn aKKymyIaTPOHoi 6aTaPei
IcnoIb3yeMaayakKymyIaTOpHa86aTapeyOblaAet cJeDyUoIIMN XapaKTepnCTnKaM:
CoOTBeCTBHe TeKyuIIM TexHOIOnIuYeCKIM cTaHJaapTaM.
-Функци npednpexKdeHnO Hn3kOM ypoBHe 3apya.
3apd akymyIaTOPHO 6aTapeN BbIOJHReTcR npn NOKJIooHeH N K nepeHochOMy KOMNbIoTepy aadantepa 3JeKTPoINTaHnI nepMeHHORTo Toka. 3apd 6aTapeN BO3MOKeH N B npoceCE NcNoJb3OBAHnI KOMNbIoTepa, PO3BOJRA He nppeBbATb pa60Ty npn 3apdE akymyIaTopa. Tem He MeHee, 3apd akymyIaTOPHO 6aTapeN npn BBIKIOUeHHOM KOMNbIoTepe 3aHIMaeT 3HaHTeNbHO MeHbSe BpeMeHN.
3apxhenha 6aTapen n03BnIT nCNOJb3OBAbKOMNbIOTep B noe3dKe nn npn c6oax 3neKtpoNTaHn. PekomeHdyetc nMeTb B pe3epBe dONJIHTeNBHyIO nONHOCTbIO 3apxhenhyio 6aTapeIO. CBeJeHn o npno6pTeHn pe3epBHOJ aKKymyTAHOH 6aTapen MoXHO nOlyuHTb y npoDaBa na nepeHOCHOr KOMNbIOTepa.
YBeJIuHHe cPoka cIyXbI aKKymJrTopHO bTapei
Kak n IIO6bIe dpyrHe 6bTapeN, aKKymyTAOPHa8 6bTape NpeHoCHOro KOMnBIOTePa CO BpeMeHem TepReT EMKoCTb. 3TO 3HaHT, YTO BpeMpa6Otbl OT 6bTapeN CO BpeMeHem COKpaUaTcra.ДЯ npOJIeHnA cPoka cnJx6bl aKKymyTAOpHO8 6bTapeN peKOMeHdyETcra CJeIDOBaTB npINBeDEHHbIM HIXe peKOMeHDaUcYAM.
IodroTOBka HOBOAkkymyTOpHoi 6aTapeN K IcNoJIb3OBAHIO
Ipeed hauaIOM nCnoB3OBAHnA HOBOAkkymyIaTOPHO 6aTapei peKomeHdyETcra npOBecTI npocecc "NoDroTOBKn" ee K pa6ote:
1 BcTaBbTe HOByo aKKymyIaTOpHyO 6aTapeo B BBkJIIOueHHbIKOMNbIoTeP IN He BKIOUaIe ero.
2 POKIIOHTe aIaITepe 3JIeKTPoNTaHnI IN IIOHOCbIO 3apAITe 6aTapeIO.
3 OtklnuHTe aanTep 3neKtpoNTaHnra.
4 BkIIOUHTe KOMNbIoTe np pa6OtaIte, nCNoJIb3yra 3NeKTpOnuTahnra OT aKKymyIaTOPHO batapei.
5 IcnoIb3yIte KOMnbIOTep Do noIHOro pa3praDa 6aTapeu I NOBHeNn npdeUnpexKdEHHo O Hn3KoM yPoBHe 3apJa.
6 IopKIOUHTe aIaITepe 3JIeKTPoNTaHnN IN BHOBb NOnHOCTbIO 3apAITe 6aTapeIO.
NoBToPraTe OINcAHbIe BblIe DeIcTBnA DnB BblIOHHeHn Tpex UIKJIOB NoHoro pa3pa n 3apda 6aTapei.
BbIIOJIHnIe 3Ty npOeDpy NOIroTOBKn IJRA BCEx HOBbIX 6aTapei n 6aTapei, KOtOpbIe He IcNoJIb3OBaJIncsB dJIITeJIbHOe BpeM. EcII N KOMNIOTeP He IIaHnpyeTcra IcNoJIb3OBaTb B TeUeHne DByX HeJeJIb IJI N 6oJIee, peKOMeHNyETcra I3BNeKaTb aKKymIyTopHyIO 6aTapeIo.

BHMaHHe: He noDBepraTe aKKymyIaTOPHyIO 6aTapeIO BO3deIcTBnIO TEMpeApTy p HnKe 0^ (32^) n BbIe 45^ (113^) . Bo3deIcTBnE BbICOKnx u Hn3Knx TEMpeApTy moKet He6laoropnTHO NOBmTb Ha pa6oTOcNOC6HoCTb aKKymyIaTOPHO 6aTapEn.
IpoeDpya NOIroTOBKn aKKyMnyTPhoH 6aTapeN K IcNoIb3OBAHIO yBeIINuBaET eMKocTb (MaKcIMaJIbHbI yPoBeHb 3apJa) 6aTapeN. EcNI He npOBODnTb IpoeDpy NOIroTOBKn, 6aTapeN He CMOKeT 3apJxKaTbcra Do MaKcIMaJIbHOrO yPoBHra, a cPOK ee CnyX6bl COKpaTITcra.
POMMBOBbIepeueHcJIeHHoroHa cpoK cnyk6bl 6aTapeu cyueCTBeHHOBnIAOT CLeDyUOUIne akTopbl.
Pa6ota KOMnbIOTepa OT aDAnTepa NITaHnA CO BCTaBNeHHoN 6batapee. Ipr pa6ote OT aDAnTepa NITaHnA peKOMeHnyetcN 3BLeKaTb 6batapeo nocne dOCTnJKeHnMaKcImaJIbHOrO ypOBHn 3apJa.
HeBbIIOJIHHe IpoUeIpybI NOIROTOBKn 6aTapeN K IcNoJIb3OBaHnO, OINcAHHO BblSe.
- INTEHNCBOHOe nCNoJb3OBAHne; Yem yaIe nCNoJb3yETcra 6aTape, Tem 6bICTpee cOKpaUaETCra ee pecypc. Pecypc cTaHdapTHoI aKKymJIaTOPHOJ 6aTapeN dJa nepeHoCHoro KOMNbHTepa - OKIo 300 ZIKIOB 3apJa/pa3Pja.
YcTaHOBka N n3BNeueHne aKKymyJIaTOpHOJ 6aTapen

BnMaHne! Ecnn Heo6xOJMo npoJoxHTb pa6Oty c KOMNbIOTepom, nepei n3BLeueHHeM 6aTapei noKJIIOUHTe aAdanTeP 3NeKTPOpNTAHn. B npouBHOM cnUaet nepei n3BLeueHHeM 6aTapei KOMNbIOTep Heo6xOJMo BblKIIIOHTb.
YctaHOBka aKKyMnyTpHoi 6aTapei.
1 CoBmecHTe Kpa8 6aTapeN C KpaMn 6aTapeHoro OTCeKa, y6eINBwncb, YTO rpaHb 6aTapeN C KOHTaKtAmn HAnpaBJeHa BOBHypb, a BepxHra NOBepXHOCTb 6aTapeN - BBepx.
2 BCTaBbTe 6aTapeIO B 6aTapeHbI OTcEK N CJIeRka HaxMnTe Ha Hee dIaФNKcauIN B OTcKe.
IV3BneueHne aKKyMyJrTopHoN 6aTapei:
1 CdbnHbTeΦnkCaTOp aKKymyIaTHoI 6aTapei.
2 BbITaHInTe 6aTapeIOn 0rCeKa.
3apayakymyTopno6atapen
Ipeed 3apydom y6eintecb, yTo 6aTapey cTaHOBnHa B 6aTapeHOM oTceke. POnKlIOUHTe aadantep 3JeKtpoNTAHnK KOMNbIoTepy n K cETn 3JeKtpoNTAHnR. B npOecce pa3ra pMOxHO npOJnxKaTb pa6Oty c KOMNbIoTePOM. Tem He MeHee, 3apd akKymyIaTOPHoB 6aTapei npi BbIKIOUeHHOM KOMNbIoTepe 3aHIMae THaUNTeJIbHO MeHbWe BpeMeHN.

PpmeaHne: PeKomeHdyeTc3apJxTaB 6atapeo B hauane KaXdoRo dHa. 3apJd 6atapeu HocbIIOpeE nauanom Noe3IK N03BOJNT yTpOM HaataB pa6Otu C nonHOCT b 3apJxehHOh 6atapeen.
CobetbI NO NONCKy I yCTpaHHeHIO HeNCpPaBHOCTeI
3TOT nOpTaTHBbI KOMnblTeP COepeKNT COBpeMeHHbIe pa3pa60TKN, N03BOJHouNe BbIOdHT coo6uEHNr O6 oUHkax Ha 3KpaH dJa 6bnErHnra NNCKa HEnCnpaBHOCTN.
Ecnncntema coo6aet o6 own6ke nnn npoBnIOTc cMNTOMbl Own6Kn, cm. "Co06eHna 6Own6kax". Ecnn HenoJaKa He MoXeT 6bItb yCTpaHeHa, CBxNITecb C npOdaBcuom. Cm. "ObpaueHne 3a TeXnuecko NopdepKko" Ha cTp.24.
CoobueHna 6 own6kax
Ecni ciCTema BbIaET COOeHne 6 OoN6Ke, 3aIIuNTe erO I npIMTe Mepbl dJa yctpaHnra HeNCpabHocTn. B cIeIyUoSe TAbIue nepeuCJIeHb COO6eHna 6 OoN6kax B aIΦaBHTOM NopJKe, a TaKke peKOMeHdyEmbIe DeIcTBnR NO INx yctpaHnIO.
This Class B digital apparatus complies with Canadian ICES-003.
- CtaTb3.2 "HcnoJb3yeMbIe cneKtpbl"
LCD panel ergonomic specifications
| Design viewing distance 500 mm | |
| Design inclination angle 0.0° | |
| Design azimuth angle 90.0° | |
| Viewing direction range class IV | |
| Screen tilt angle 85.0° | |
| Design screen illuminance •Illuminance level: [250 + (250cosa)] lx where a = 85° •Color: Source D65 | |
| Reflection class of LCD panel (positive and negative polarity) | •Ordinary LCD: Class I •Protective or Acer LCD: Class III |
| Image polarity Both | |
| Reference white: | •Yn |
| Pre-setting of luminance and color temperature @ 6500K (tested under BM7) | •u'n •v'n |
| Pixel fault class Class II | |
Ko mputer seri i Aspire One
Acer eRecovery Management
(disk-to-disk recovery) 37
Haslo 37
Zarzadzanie energia 37
LCD panel ergonomic specifications 45
Acer eRecovery Management
www.microsoft.com/typography/faq/faq12.htm.
Znak dolara USA
LCD panel ergonomic specifications
| Design viewing distance 500 mm | |
| Design inclination angle 0.0° | |
| Design azimuth angle 90.0° | |
| Viewing direction range class IV | |
| Screen tilt angle 85.0° | |
| Design screen illuminance •Illuminance level: [250 + (250cosα)] lx where α = 85° •Color: Source D65 | |
| Reflection class of LCD panel (positive and negative polarity) | •Ordinary LCD: Class I •Protective or Acer LCD: Class III |
| Image polarity Both | |
| Reference white: | •Yn |
| Pre-setting of luminance and color temperature @ 6500K (tested under BM7) | •u'n •v'n |
| Pixel fault class Class II | |
Aspire One sorozat
Acer eRecovery Management
LCD panel ergonomic specifications 44
Acer eRecovery Management
This Class B digital apparatus complies with Canadian ICES-003.
LCD panel ergonomic specifications
| Design viewing distance 500 mm | |
| Design inclination angle 0.0° | |
| Design azimuth angle 90.0° | |
| Viewing direction range class Class IV | |
| Screen tilt angle 85.0° | |
| Design screen illuminance •Illuminance level: [250 + (250cosα)] lx where α = 85° •Color: Source D65 | |
| Reflection class of LCD panel (positive and negative polarity) | •Ordinary LCD: Class I •Protective or Acer LCD: Class III |
| Image polarity Both | |
| Reference white: | •Yn |
| Pre-setting of luminance and color temperature @ 6500K (tested under BM7) | •u'n •v'n |
| Pixel fault class Class II | |
Rada Aspire One
Acer eRecovery Management
LCD panel ergonomic specifications 41
Acer eRecovery Management
This Class B digital apparatus complies with Canadian ICES-003.
LCD panel ergonomic specifications
| Design viewing distance 500 mm | |
| Design inclination angle 0.0° | |
| Design azimuth angle 90.0° | |
| Viewing direction range class IV | |
| Screen tilt angle 85.0° | |
| Design screen illuminance •Illuminance level: [250 + (250cosα)] lx where α = 85° •Color: Source D65 | |
| Reflection class of LCD panel (positive and negative polarity) | •Ordinary LCD: Class I •Protective or Acer LCD: Class III |
| Image polarity Both | |
| Reference white: | •Yn |
| Pre-setting of luminance and color temperature @ 6500K (tested under BM7) | •u'n •v'n |
| Pixel fault class Class II | |
Séria Aspire One
Acer eRecovery Management 1
LCD panel ergonomic specifications 41
Acer eRecovery Management
Ak sa na počitači vyskytnú problémy, ktoré nie je možné vyriešit' ostatnými spôsobmi, možno bude potrebné preinstalovat' operacný systém Windows a pri vyrobe nainstalovaný softér a ovládače. Zaistite, aby bolno možné počitač v pripeade potreby opravit' - vytvorte co najskör zálohu pre opravu.

Poznamka: Vsetky nasledujuce informacia su len vseobecne. Parametre aktualneho vyrobku mozu byt' odlišné.
Acer eRecovery Management obsahuje nasledujuce funkcie:
1 Záloha: