
SAF11 - Loudspeaker SONY - Free user manual and instructions
Find the device manual for free SAF11 SONY in PDF.

| Product Type | 2.1-channel active speaker system |
| Brand | Sony |
| Model | SA-F11 |
| Front speakers | SS-MS11 (2 speakers) |
| Subwoofer | SA-WMS11 (active) |
| Output power | Front: 20 W × 2, Subwoofer: 20 W + 20 W |
| Sensitivity (front) | 86 dB (1 W, 1 m) |
| Frequency response (front) | 90 Hz – 20,000 Hz |
| Frequency response (subwoofer) | 40 Hz – 200 Hz |
| Power supply | Mains, 220-240 V AC, 50/60 Hz |
| Power consumption | 42 W |
| Dimensions (front speakers) | 68 × 151 × 135 mm (W × H × D) |
| Dimensions (subwoofer) | 145 × 237 × 373 mm (W × H × D) |
| Weight (front speakers) | 790 g each |
| Weight (subwoofer) | 6.3 kg |
| Inputs | DVD IN (RCA), AUX IN (RCA) |
| Outputs | Front speaker terminals |
| Supplied accessories | Audio cable (1.5 m), speaker cables (2.5 m × 2), remote control, R6 (AA) batteries × 2, cushions × 12 |
| Main functions | Auto power on/off, volume/treble/bass adjustment, film/music mode, mute, VES virtual surround sound |
| Remote control | Yes, with functions for TV, VCR, DVD player |
| Cleaning | Soft cloth slightly dampened with neutral detergent |
| Safety | Unplug before cleaning, avoid humidity and heat sources, ensure good ventilation |
| Repairability | Have it checked by a qualified technician in case of problems |
Frequently Asked Questions - SAF11 SONY
User questions about SAF11 SONY
0 question about this device. Answer the ones you know or ask your own.
Ask a new question about this device
Download the instructions for your Loudspeaker in PDF format for free! Find your manual SAF11 - SONY and take your electronic device back in hand. On this page are published all the documents necessary for the use of your device. SAF11 by SONY.
USER MANUAL SAF11 SONY
Active Speaker System
Operating Instructions ____ GB
Mode d'emploi FR
Bedienungsanleitung DE
Manual de instrucciones ____ ES
Gebruiksaanwijzing ____ NL
Bruksanvisning SE
Istruzioni per l'uso IT
Manual de instruções PT
Bruksanvisning ____ NO
Betjeningsvejledning ____ DK
Käyttöohjeet FI
SA-F11
WARNING
To prevent fire or shock hazard, do not expose the unit to rain or moisture.
Precautions
On safety
Should any solid object or liquid fall into the cabinet, unplug the speaker system and have it checked by qualified personnel before operating it any further.
On power sources
- AC power cord must be changed only at the qualified service shop.
- Before operating the speakers, check that the operating voltage is identical with your local power supply. The operating voltage is indicated on the nameplate on the rear of the speakers.
- The unit is not disconnected from the AC power source (mains) as long as it is connected to the wall outlet, even if the unit itself has been turned off.
- If you are not going to use the speakers for a long time, be sure to disconnect the speakers from the wall outlet. To disconnect the AC power cord, grasp the plug itself; never pull the cord.
On placement
- Do not install the appliance in a confined space, such as a bookcase or built-in cabinet.
- Do not place the speakers near heat sources, or in a place subject to direct sunlight, excessive dust or mechanical shock.
- Good ventilation is essential to prevent internal heat buildup. Place the speakers in a location with adequate air circulation, and in a way that does not block the rear ventilation holes.
- Do not drag the unit along the floor on installment.
On cleaning
Clean the cabinet, panel and controls with a soft cloth slightly moistened with a mild detergent solution. Do not use any type of abrasive pad, scouring powder or solvent such as alcohol or benzine.
If you have any question or problem concerning your speaker system, please consult your nearest Sony dealer.
Welcome!
Thank you for purchasing the Sony speaker system SA-F11.
The SA-F11 is an active speaker system incorporating two front speakers and a subwoofer.
When you connect this system to the Sony CD/DVD player, DVP-F11, you can enjoy 2.1-channel surround sound even if you don't have a receiver (amplifier).
Using the "VES (Virtual Enhanced Surround)" mode in the on-screen menu of the DVP-F11 allows you to enjoy virtual 3D sound even without rear speakers. For details on the virtual 3D sound, refer to the instructions supplied with the DVP-F11.
Other components you can connect this speaker system to:
- A DVD player equipped with a 5.1-channel output jacks and on which you can select whether the speakers are connected to the unit or not.
- A DVD player equipped with a 2.1-channel (2 front speakers and a subwoofer) outputs.
About This Manual
Before operating the unit, please read this manual thoroughly and retain it for future reference.
Convention
The following icons are used in this manual:

Indicates that you can use the remote to do the task.
Indicates hints and tips for making the task easier.
TABLE OF CONTENTS
Getting Started
Unpacking 3
Hooking Up the System 4
Basic Operations
Listening to the Sound 6
Adjusting the Sound 7
Operating Other Sony Components 8
Additional Information
Troubleshooting 9
Specifications 9
Unpacking
Check that you received the following items with your speaker system:
• Audio connecting cord, 1.5 m (1)
- Speaker connecting cords, 2.5 m (2)
- Remote commander (remote) (1)
• Sony R6 (size AA) batteries (2)
- Foot pads (12)
Inserting batteries into the remote
Insert two R6 (size AA) batteries with the polarity matched to the + and - marks on the battery compartment. When using the remote, point it at the remote sensor on the subwoofer.

natural_image
Diagram showing a device being processed into a mobile phone socket (no text or symbols present)
When to replace batteries
Under normal use, the batteries should last for about 6 months. When the remote no longer operates the speakers, replace both batteries with new ones.
Notes
- Do not leave the remote in an extremely hot or humid place.
- Do not use a new battery with an old one.
- Do not expose the remote sensor to direct sunlight or lighting apparatuses. Doing so may cause a malfunction.
- If you do not use the remote for an extended period of time, remove the batteries to avoid possible damage from battery leakage and corrosion.
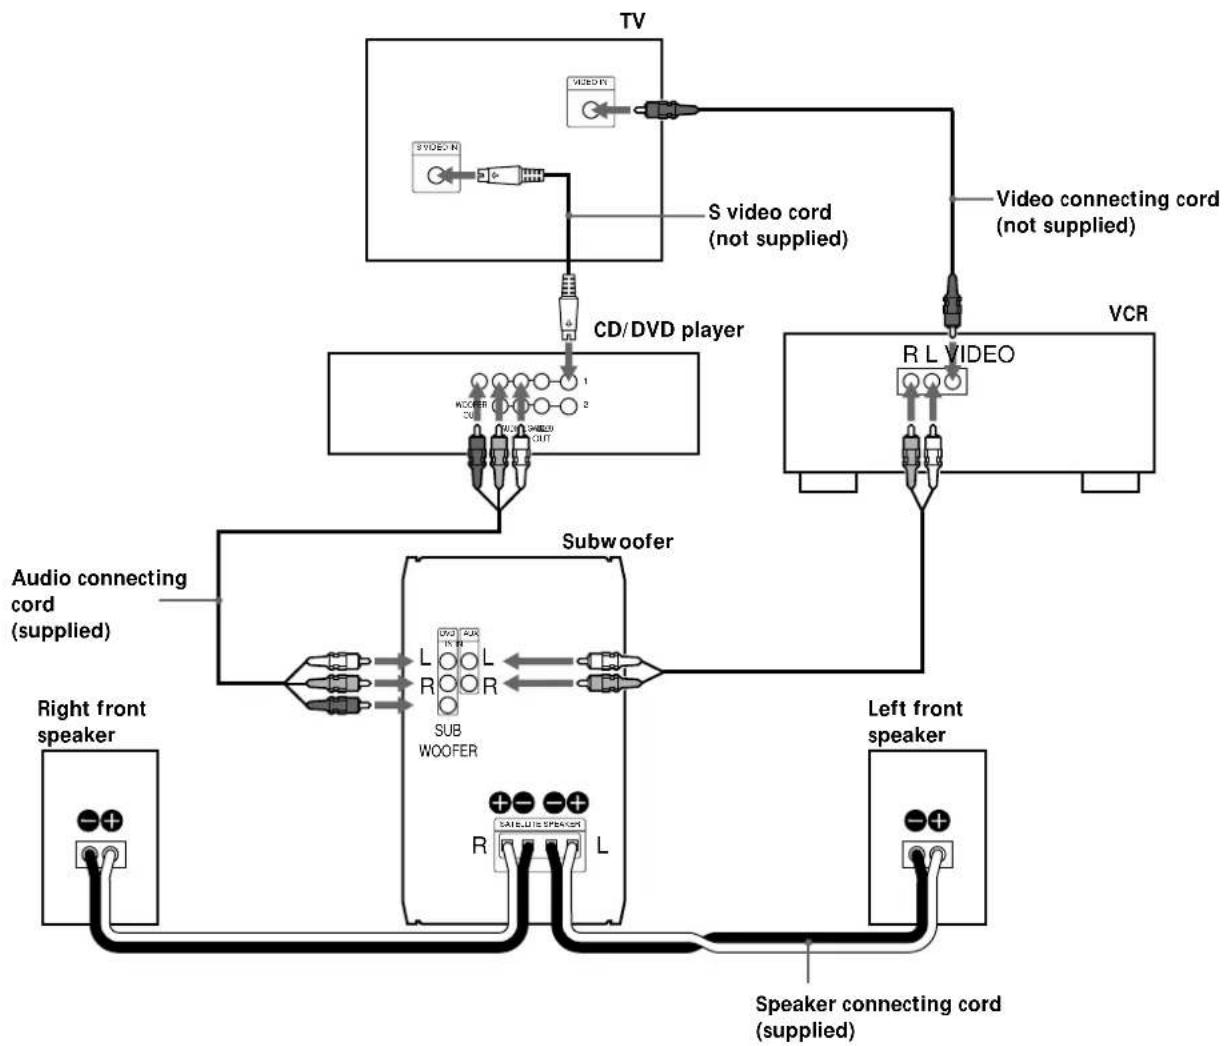
Hooking Up the System
You can connect the SA-F11 directly to the CD/DVD player without the receiver (amplifier).
Note that the connection described in the instruction manual supplied with the DVP-F11 is different from the one described in this manual.
Make sure power to all components (including the subwoofer) is turned off before connecting.
Connecting to the DVP-F11
This configuration is used when you use the DVP-F11.
flowchart
graph TD
    TV["TV"] --> SVideoC["+"]
    SVideoC --> SVideoN["+"]
    SVideoN --> CD/DVD_Player["CD/DVD player"]
    CD/DVD Player --> Subwoofer1["Subwoofer"]
    CD/DVD Player --> Subwoofer2["Subwoofer"]
    Subwoofer1 --> AudioConnectingCord["Audio connecting cord (supplied)"]
    Subwoofer2 --> AudioConnectingCord
    AudioConnectingCord --> RightFrontSpeaker["Right front speaker"]
    AudioConnectingCord --> LeftFrontSpeaker["Left front speaker"]
    VCR["VCR"] --> VideoConnectingCord["Video connecting cord (not supplied)"]
    VideoConnectingCord --> RLVIDEO["R L VIDEO"]
    RLVIDEO --> AudioConnectingCord
    AudioConnectingCord --> Subwoofer3["Subwoofer"]
    Subwoofer3 --> AudioConnectingCord
    AudioConnectingCord --> RightFrontSpeaker
    AudioConnectingCord --> LeftFrontSpeaker
    AudioConnectingCord --> RightFrontSpeaker
    AudioConnectingCord --> LeftFrontSpeaker
    AudioConnectingCord --> RightFrontSpeaker
    AudioConnectingCord --> LeftFrontSpeaker
    AudioConnectingCord --> RightFrontSpeaker
Required cords
Audio connecting cord (1) (supplied)
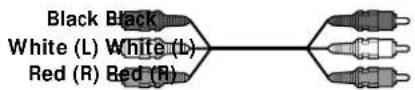
When connecting the cords, be sure to match the color-coded cord to the appropriate jacks on the components: Black to Black, Red (right) to Red, and White (left) to White. Be sure to make connections firmly to avoid hum and noise.
Speaker connecting cords (2) (supplied)

Be sure to connect matching speaker terminals. If the connections are reversed (+ to -), the sound will lack bass.
Connecting to a component other than the DVP-F11
- If your DVD player is equipped with a 2.1-channel output jacks, connect the SA-F11 in the same way as the DVP-F11.
-
If your DVD player is equipped with a 5.1-channel output jacks, connect the SA-F11 in the following way:
-
Connect the FRONT L/R of the DVD player to the DVD IN L/R of the subwoofer.
- Connect the WOOFER OUT of the DVD player to the SUBWOOFER IN of the subwoofer.
When you finish connecting, set the rear and center speakers setup to "NONE." If you cannot make this setting, connect the DVD player to the AUX IN jacks.
- If your DVD player is equipped with a 2-channel output jacks, connect it to the AUX IN jacks of the SA-F11.
- If you connect a VCR to the SA-F11, connect it to the AUX IN jack of the SA-F11.
Setting up for the DVD player
Some steps are necessary for the DVD player depending on the TV or other components to be connected.
Use the setup display to change the various settings. For details on the setup display and TV setting, see "Setting and Adjustments" in the instruction manual equipped with the DVP-F11.
- To connect the player to a wide-screen TV In the setup display, set "TV TYPE" in "SCREEN SETUP" to "16:9" (default setting).
- To connect the player to a conventional TV In the setup display, set "TV TYPE" in "SCREEN SETUP" to "4:3 LETTER BOX" or "4:3 PAN SCAN."
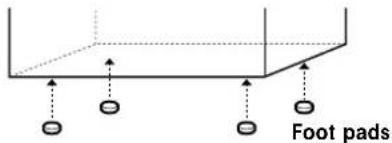
Setting up the speakers
Attach the supplied foot pads to the bottom of the subwoofer and the speakers.
You can hang or install the front speakers on a wall using hooks or nuts (commercially available).
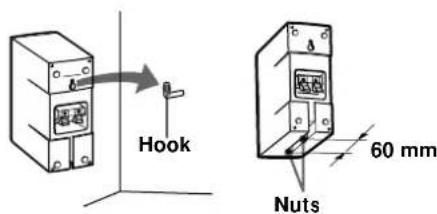
Note
You are responsible for the proper selection and use of mounting hardware purchased at a hardware store, and for the proper and safe mounting of the speakers.
Listening to the Sound
1 Turn on the DVD player and insert the disc.
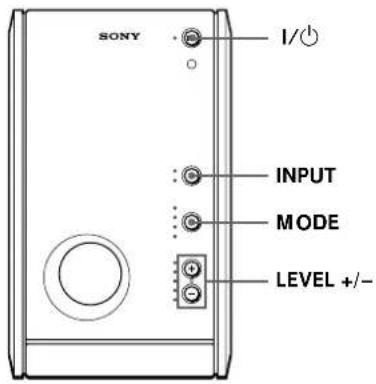
2 Press I/⏻ to turn on the subwoofer.
The indicator of the I/⏻ button changes from red (standby mode) to green.
3 Press INPUT repeatedly until the DVD indicator lights up.
4 Press MODE repeatedly until the MASTER VOLUME indicator lights up in green, then press and hold LEVEL - to set the volume level to minimum.
5 Press ▷ on the DVD player to start playing.
Press LEVEL + or - to adjust the volume level.

You can adjust the volume selecting the tone level
Press MODE repeatedly until the sound level indicator (SW VOL/BASS/TREBLE) you want to change lights up, then press LEVEL + or - to adjust the volume of the tone level you select.

You can reset the tone level to the factory setting
Press and while holding the LEVEL + and -, press I/∅.

The subwoofer turns on and off automatically according to whether the audio signal is input or not (Auto Power Function)
If no audio signal is input for three minutes, the subwoofer switches to standby mode and the I/○ indicator changes to red (Auto Power Off). When an audio signal is input, the subwoofer turn on automatically and the I/○ indicator changes to green (Auto Power On).
Note
If you press the I/⏻ button while listening to the subwoofer, the subwoofer switches to standby mode. Press the I/⏻ button again to turn it on. If the button is not pressed again within three minutes, the Auto Power On function activates the subwoofer automatically.
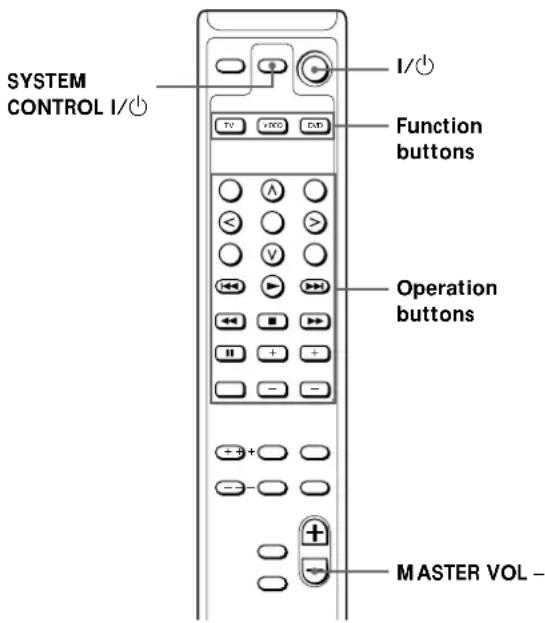
Operating using the remote
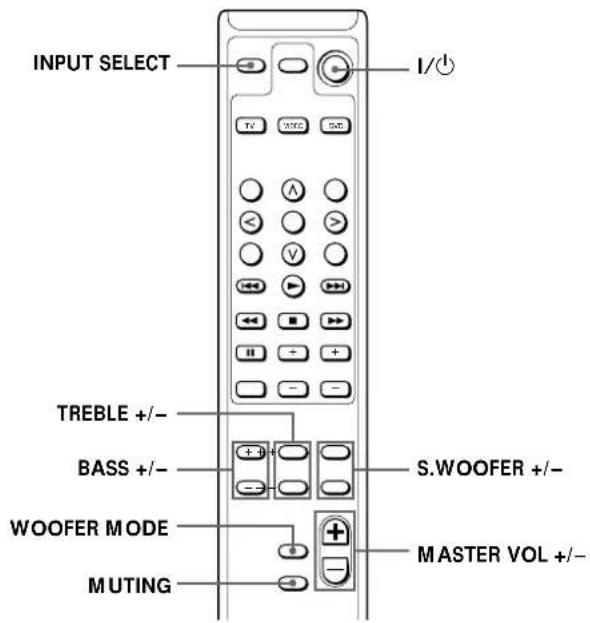
The table below shows the operations you can do by using the remote.
| To | Press |
| Turn on/off the power | I/ |
| Adjust the volume | MASTER VOL + or - |
| Select the component | INPUT SELECT |
Adjust the volume of each tone
| LFE * | S.WOOFER + or - |
| Bass | BASS + or - |
| Treble | TREBLE + or - |
* Low Frequency Effect
Note
The tone level indicator of the subwoofer changes automatically when you adjust the volume of each tone using the remote.

You can change the woofer mode according to the source
Press WOOFER MODE on the remote (or press LEVEL + and - on the subwoofer at the same time). When the SW VOL indicator on the subwoofer lights up in green, the mode changes to movie mode (factory setting). When the indicator lights up in red, the mode changes to music mode. You can listen to the most suitable audio mix, depending on the source.

You can mute the sound
Press MUTING on the remote.
To restore the sound, press MASTER VOL + (or MUTING on the remote again).
Adjusting the Sound

You can enjoy virtual 3D sound even without rear speakers when you use the "VES (Virtual Enhanced Surround)" mode in the on-screen menu of the DVP-F11.
Some Sony DVD players other than the DVP-F11 also have the VES mode option. If you cannot hear the sound from the subwoofer even if you select VES mode, connect your DVD player to the AUX IN jacks of the subwoofer.
Refer to the instructions supplied with your DVD player for details.

1 Turn on your TV, DVP-F11, and the subwoofer.
2 Press DVD on the remote.
The DVD button lights up and you can control the DVD player using the remote of the subwoofer (see page 8).
3 Press DISPLAY on the remote.
The Control Menu display appears on the TV screen.
4 Select "VES" by pressing the cursor buttons (</>/√) on the remote, then press or ENTER/EXECUTE.
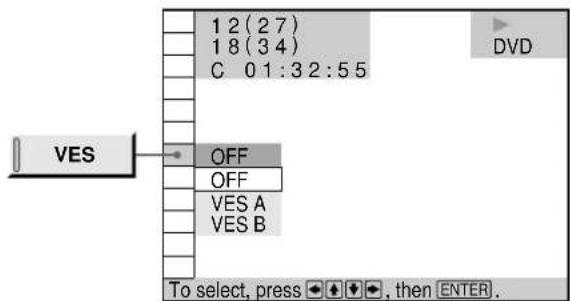
5 Select "VES A" or "VES B" and press ENTER/EXECUTE.
Effects of each item
OFF
Outputs 2-channel signals for stereo sound for CDs. The 5-channel signals of Dolby Digital sound for DVDs are mixed down into 2-channels to be output.
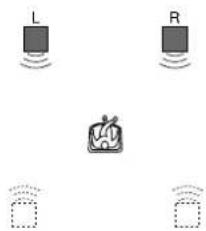
VES (Virtual Enhanced Surround) A
Uses 3D sound imaging to create virtual rear speakers from the sound of the front speakers (L, R) without using actual rear speakers. The virtual speakers are reproduced as shown in the illustration below.

VES (Virtual Enhanced Surround) B
Uses 3D sound imaging to create virtual rear speakers from the sound of the front speakers (L, R) without using actual rear speakers. The virtual speakers are reproduced as shown in the illustration below.
Notes
- You cannot select "VES" when "DOLBY DIGITAL" is set to "DOLBY DIGITAL" in "AUDIO SETUP."
- In case that the player outputs the signal from OPTICAL and COAXIAL, the surround effect will be heard only when you set "MPEG" to "PCM" in "AUDIO SETUP."
- Some discs do not have rear sound. In this case, you cannot get the 3D surround effect.
- When you select an item, the sound cuts off for a moment.
- When the playing signal does not contain the surround component, the effects may be difficult to hear even if you select "VES A" or "VES B."
- Set the front speakers to form an equilateral triangle with the listening position, or the effects may be difficult to hear even if you select "VES A" or "VES B."
- When you select "VES A" or "VES B," set the surround settings of the connected units, such as the amplifier, to OFF.
Operating Other Sony Components
You can use the supplied remote to operate Sony components, such as TV sets, VCRs, and DVD players.
Before using the remote for your Sony component
The table below shows the components that the remote supports.
Function button Selectable component(s)
TV TV (set)
VIDEO VTR 1 (Beta deck), VTR 2 (8 mm deck), VTR 3 (VHS deck)
DVD DVD (player)
The TV button selects only the TV set and the DVD button only the DVD player.
Use the VIDEO button to select any other Sony components. The VIDEO button is factory-set to VTR 3 (VHS deck).
To reassign these buttons, press the VIDEO button at the same time you press the button indicated in the table below.
Press VIDEO and To select
TITLE VTR 1 (Beta)
∧ (upward cursor button) VTR 2 (8 mm)
MENU VTR 3 (VHS)
To restore all settings to their factory-settings
Press both I/⏻ buttons on top of the remote together with the MASTER VOL -.
All parameters saved in the remote are cleared and restored to their factory settings.
Operating other Sony components
Do the procedure below to operate other Sony components that you may own.
1 Press the function button on the remote of the component to be used (TV, VIDEO, or DVD).
The component that you selected is activated.
2 Operate the components with the operation buttons.
Each operation button on the remote corresponds to a basic operation on the Sony component.
For details on how to use each operation button, refer to the operating instructions of the respective Sony component.
When you press an operation button
The function button of the respective component (TV, VIDEO, or DVD) flashes to let you know what is being operated. If you press an operation button that has no corresponding operation on the Sony component being used, none of the function buttons will flash.
Turning off other Sony components
1 Press the function button of the Sony component you want to turn off.
2 Press SYSTEM CONTROL I/☐.
The selected component enters standby mode.
Troubleshooting
Should you encounter a problem with your speaker system, check the following list and follow the indicated measures. If the problem persists, consult your nearest Sony dealer.
There is no sound from the speaker system.
→Make sure all the connections are correct.
→ Adjust the volume pressing the LEVEL +/- (or MASTER VOL +/- on the remote).
→Make sure the program source selector on the subwoofer is set to the proper source.
There is no sound from the subwoofer.
→When you connect the subwoofer to the DVP-F11, make sure the subwoofer setting is "YES."
→When you connect the subwoofer to a component other than the DVP-F11, connect it to the AUX IN jacks of the subwoofer.
There is hum or noise in the speaker output.
→Make sure all the connections are correct.
The sound has suddenly stopped.
→Make sure all the connections are correct. Contact between bare speaker wires at the speaker terminals may cause a short-circuit.
Specifications
SS-MS11 (front speakers)
Speaker system Full range, magnetically shielded
Speaker units 5 · 9 cm, cone type
Enclosure type Bass reflex
Rated impedance 6 ohms
Power handling capacity
Maximum input power:100 watts
Sensitivity level 86 dB (1 W, 1 m)
Frequency range 90 Hz - 20,000 Hz
Dimensions (w/h/d) Approx. 68 · 151 · 135 mm, including front grille
Mass Approx. 790 g each
Speaker system Active subwoofer, magnetically shielded
Speaker unit Woofer: 13 cm, cone type, dual voice coil
Enclosure type SAW type
Reproduction frequency range 40 Hz - 200 Hz
Power output
Front 20 W · 2
Subwoofer 20 W + 20 W
Inputs
DVD IN (input pin jacks)
AUX IN (input pin jacks)
Outputs
SPEAKER OUT (output terminals)
General
Power requirements 220 - 230 V AC, 50/60 Hz
Power consumptions 42 W
Dimensions (w/h/d) Approx. 145 · 237 · 373 mm
Mass Approx. 6.3 kg
Supplied accessories
See page 3.
Design and specifications are subject to change without notice.
AVERTISSEMENT
natural_image
Diagram showing a device being inserted into a housing, with arrows indicating the process (no text or symbols present)VES (Virtual Enhanced Surround) A
VES (Virtual Enhanced Surround) B
SPEAKER OUT (bornes de sortie)
Généralités
Puissance de raccordement 220 - 230 V AC, 50/60 Hz
natural_image
Diagram showing a device being inserted into a housing, with arrows indicating the process (no text or symbols present)
flowchart
graph LR
    A["Schwarz Schwarz"] --> B["Weiß (L)"]
    A --> C["Rot (R) Rot (R)"]
    B --> D["Weiß (L)"]
    C --> D
* Low Frequency Effect
Hinweis
VES (Virtual Enhanced Surround) A
VES (Virtual Enhanced Surround) B
natural_image
Diagram showing a device being inserted into a mobile phone, with no visible text or symbolsVES (Virtual Enhanced Surround) A
VES (Virtual Enhanced Surround) B
natural_image
Diagram showing a device being inserted into a device with a hand holding a switch (no text or symbols present)
VES (Virtual Enhanced Surround) A
VES (Virtual Enhanced Surround) B
| TV TV |
| VIDEO Videorecorder 1 (Beta deck),Videorecorder 2 (8 mm deck),Videorecorder 3 (VHS deck) |
| DVD DVD (speler) |
natural_image
Diagram showing a device being inserted into a housing, with arrows indicating the process (no text or symbols present)
VES A (Virtual Enhanced Surround)
VES B (Virtual Enhanced Surround)
natural_image
Diagram showing a device being inserted into a mobile phone, with no visible text or symbolsVES (Virtual Enhanced Surround-surround virtuale amplificato) B
Enclosure Bass reflex
Colocar as pilhas no telecomando
natural_image
Diagram showing a device being inserted into a mobile phone socket (no text or symbols present)
VES (Virtual Enhanced Surround) A
VES (Virtual Enhanced Surround) B
natural_image
Diagram showing a device being inserted into a clip, with arrows indicating the process (no text or symbols present)
VES (Virtual Enhanced Surround) A
VES (Virtual Enhanced Surround) B
natural_image
Diagram showing a device being inserted into a housing, with arrows indicating the process (no text or symbols present)
VES (Virtual Enhanced Surround) A
VES (Virtual Enhanced Surround) B
natural_image
Diagram showing a device being inserted into a mobile phone socket (no text or symbols present)
VES (Virtual Enhanced Surround) A
VES (Virtual Enhanced Surround) B
- Active Speaker System
- WARNING
- Precautions
- On safety
- On power sources
- On placement
- On cleaning
- Welcome!
- About This Manual
- Convention
- TABLE OF CONTENTS
- Getting Started
- Basic Operations
- Additional Information
- Unpacking
- Inserting batteries into the remote
- When to replace batteries
- Notes
- Hooking Up the System
- Connecting to the DVP-F11
- Required cords
- Audio connecting cord (1) (supplied)
- Speaker connecting cords (2) (supplied)
- Connecting to a component other than the DVP-F11
- Setting up for the DVD player
- Setting up the speakers
- Note
- Listening to the Sound
- You can adjust the volume selecting the tone level
- You can reset the tone level to the factory setting
- The subwoofer turns on and off automatically according to whether the audio signal is input or not (Auto Power Function)
- Operating using the remote
- You can change the woofer mode according to the source
- You can mute the sound
- Adjusting the Sound
- Effects of each item
- OFF
- VES (Virtual Enhanced Surround) A
- VES (Virtual Enhanced Surround) B
- Operating Other Sony Components
- Before using the remote for your Sony component
- To restore all settings to their factory-settings
- When you press an operation button
- Turning off other Sony components
- Troubleshooting
- There is no sound from the speaker system.
- There is no sound from the subwoofer.
- There is hum or noise in the speaker output.
- The sound has suddenly stopped.
- Specifications
- SS-MS11 (front speakers)
- Power output
- Inputs
- Outputs
- General
- Supplied accessories
- AVERTISSEMENT
- Généralités
- Hinweis
- VES A (Virtual Enhanced Surround)
- VES B (Virtual Enhanced Surround)
- VES (Virtual Enhanced Surround-surround virtuale amplificato) B
- Colocar as pilhas no telecomando
Brand : SONY
Model : SAF11
Category : Loudspeaker