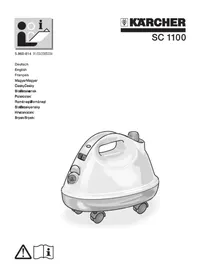
USER MANUAL SC 1100 Kärcher
5.960-814 01/03/2005034
German
English
French
Hungarian
Czech
Slovak
Polish
Romanian
Slovenian
Croatian
Serbian

German
Please read these operating instructions before starting and strictly observe the "Safety Instructions".
French
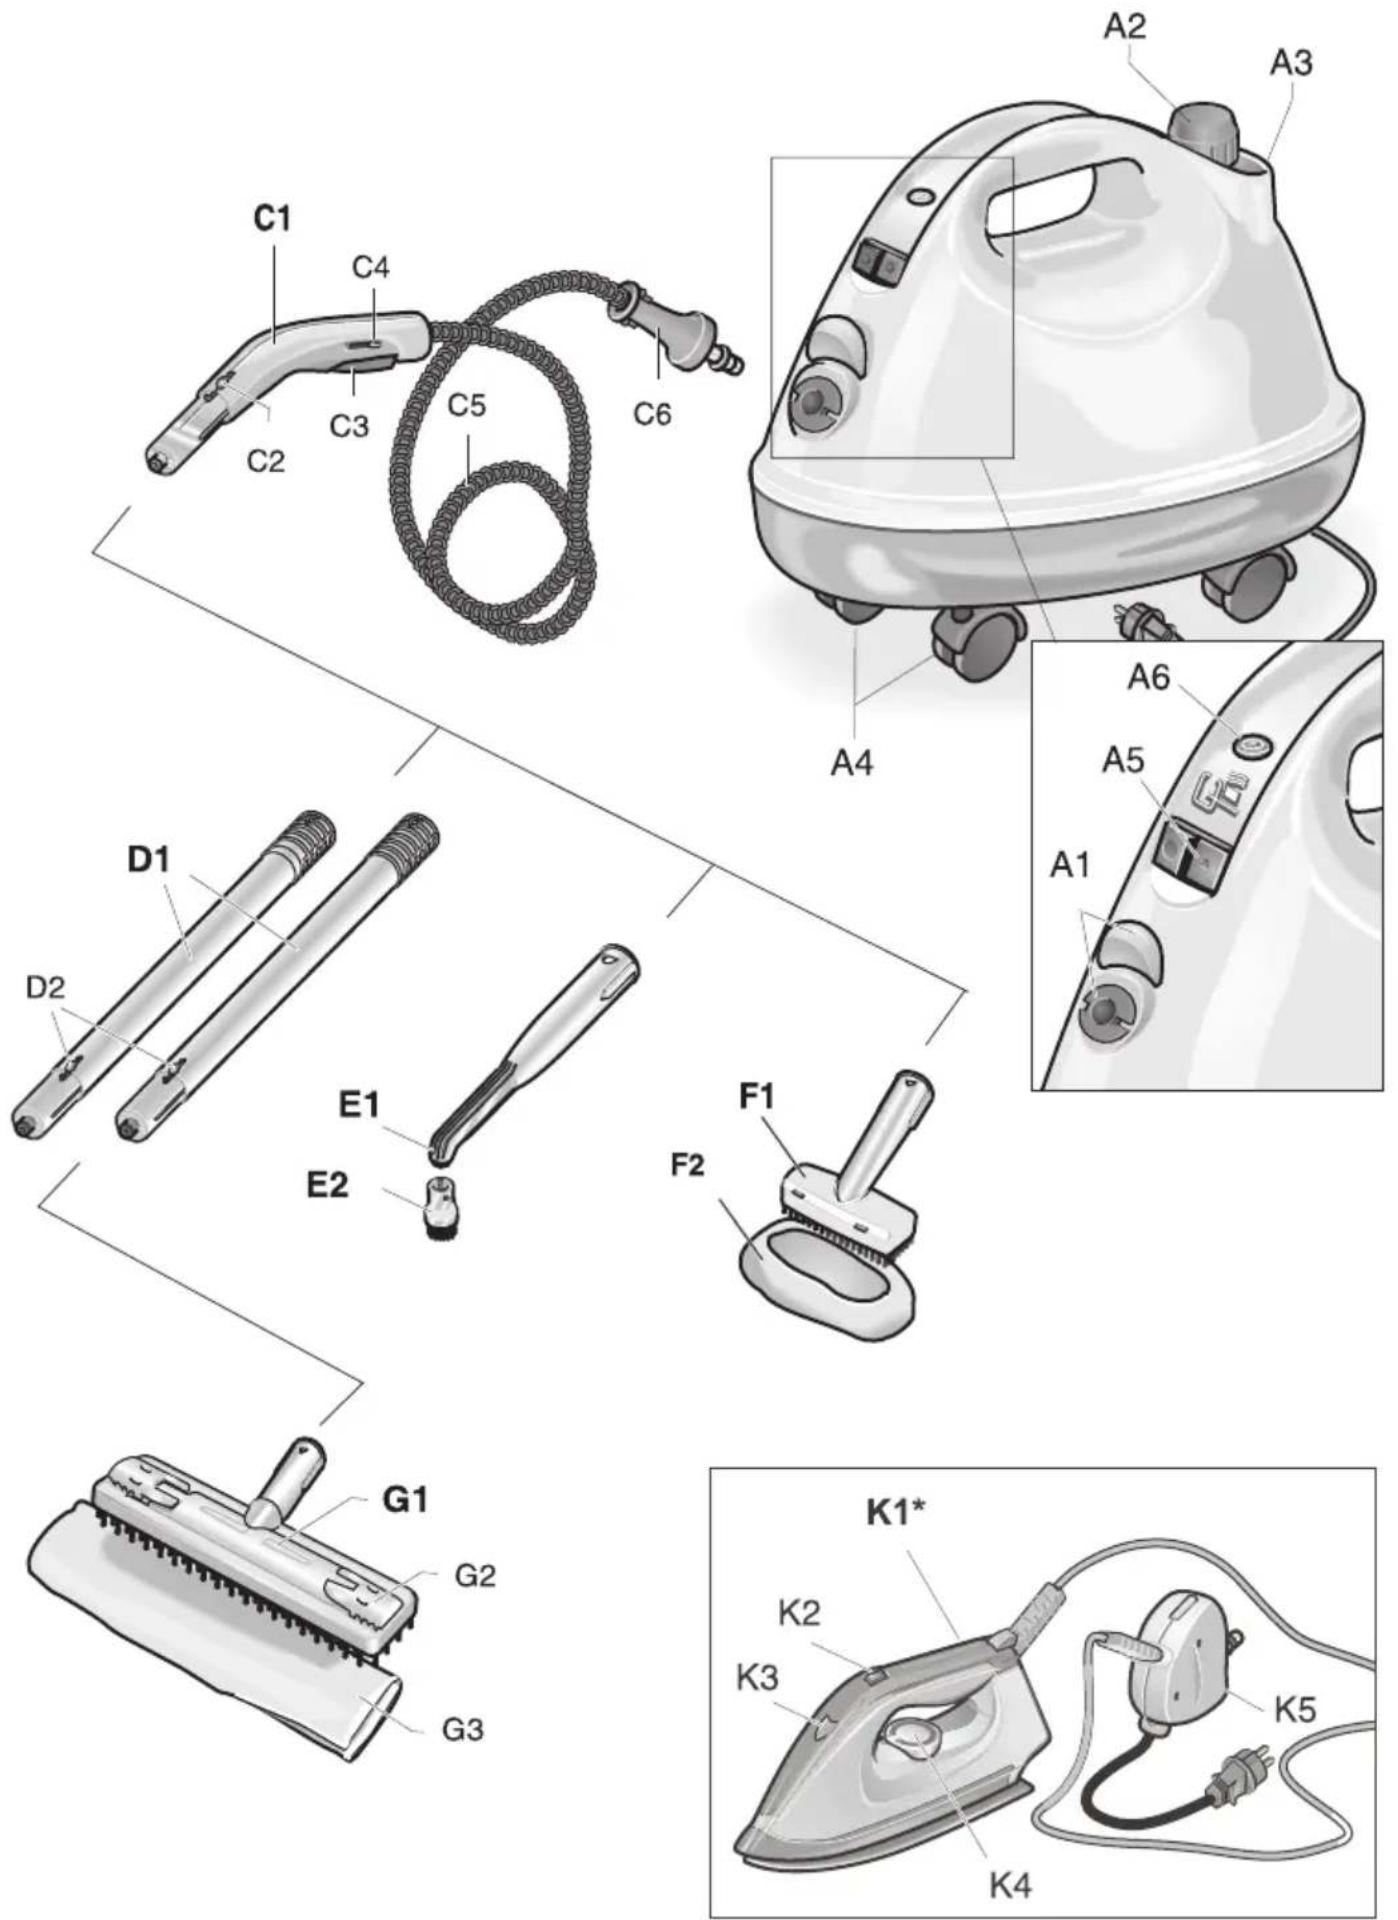
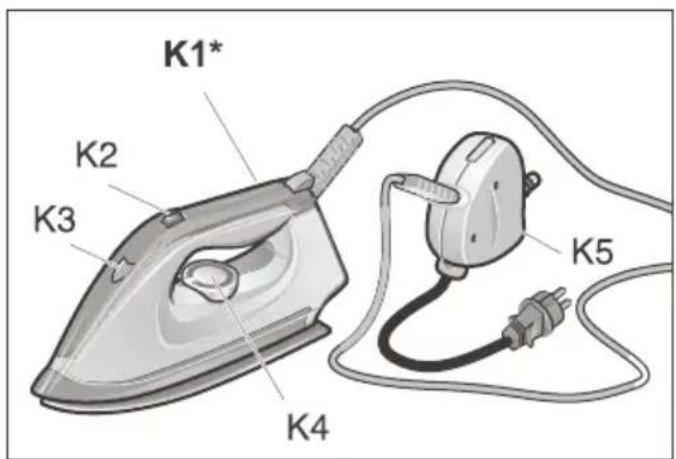
Table of contents
Page
5.3 Malfunction, what to do?
Page 1. Equipment features 11 2. Getting started 11 3. Information on usage 13 4. How to use the accessories 13 5. Maintenance 15 6. Safety devices 16 7. General information 16 8. Accessories and replacement parts 17 9. Technical specifications 17 10. Replacement parts numbers 85
1. Equipment features
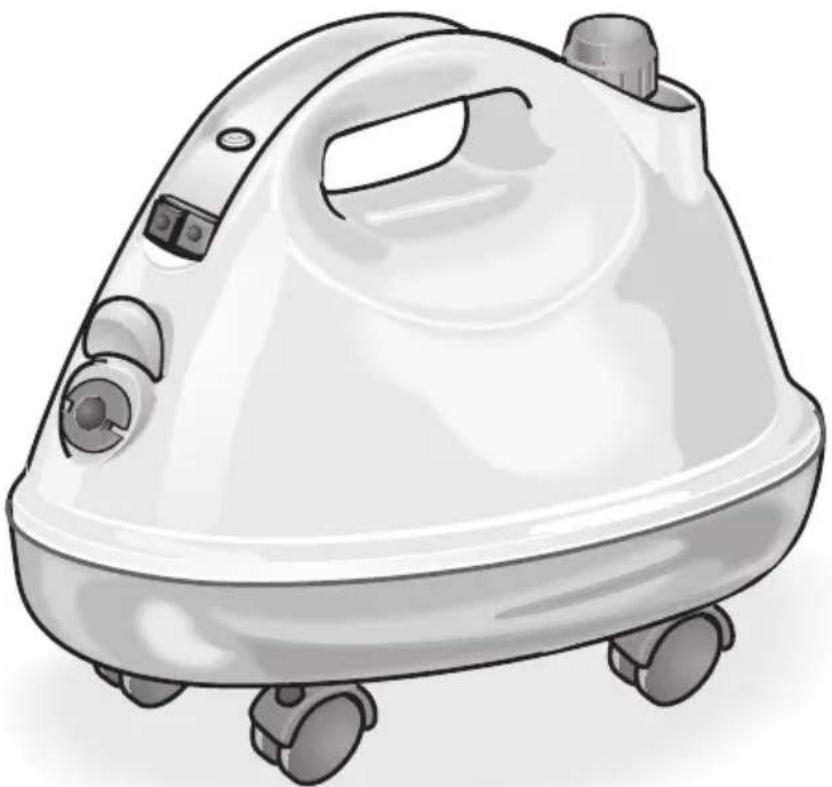
A1 Unit socket A2 Safety cap A3 Funnel inlet for filling boiler A4 Steering rollers A5 Heater switch A6 Indicator lamp – low water warning C1 Steam gun C2 Release button C3 Steam switch C4 Steam control C5 Steam hose C6 Accessory plug D1 Extension tube D2 Release button E1 Spot nozzle E2 Circular brush F1 Hand nozzle F2 Terry-towelling slip-on G1 Floor nozzle G2 Retaining clips G3 Large floor cloth K1* Household iron K2 Steam-ironing switch K3 Indicator lamp – heater for household iron K4 Temperature control K5 Accessory plug on household iron
* Available as an optional accessory
2. Getting started
2.1 Unpacking the cleaner
While you are unpacking the cleaner, check that all accessories have been included. If any items are missing, please contact your dealer.
If you notice any damage that has been caused in transit, please inform your dealer immediately. Do not dispose of the packaging materials as domestic refuse. They can be recovered for use again. Take the packaging to an official collection point for recycling.
2.2 Attaching the accessories
- Turn the container over, and press the swivel casters into the holes provided until they lock into place
- Firmly insert the accessory plug (C6) into the socket (A1).
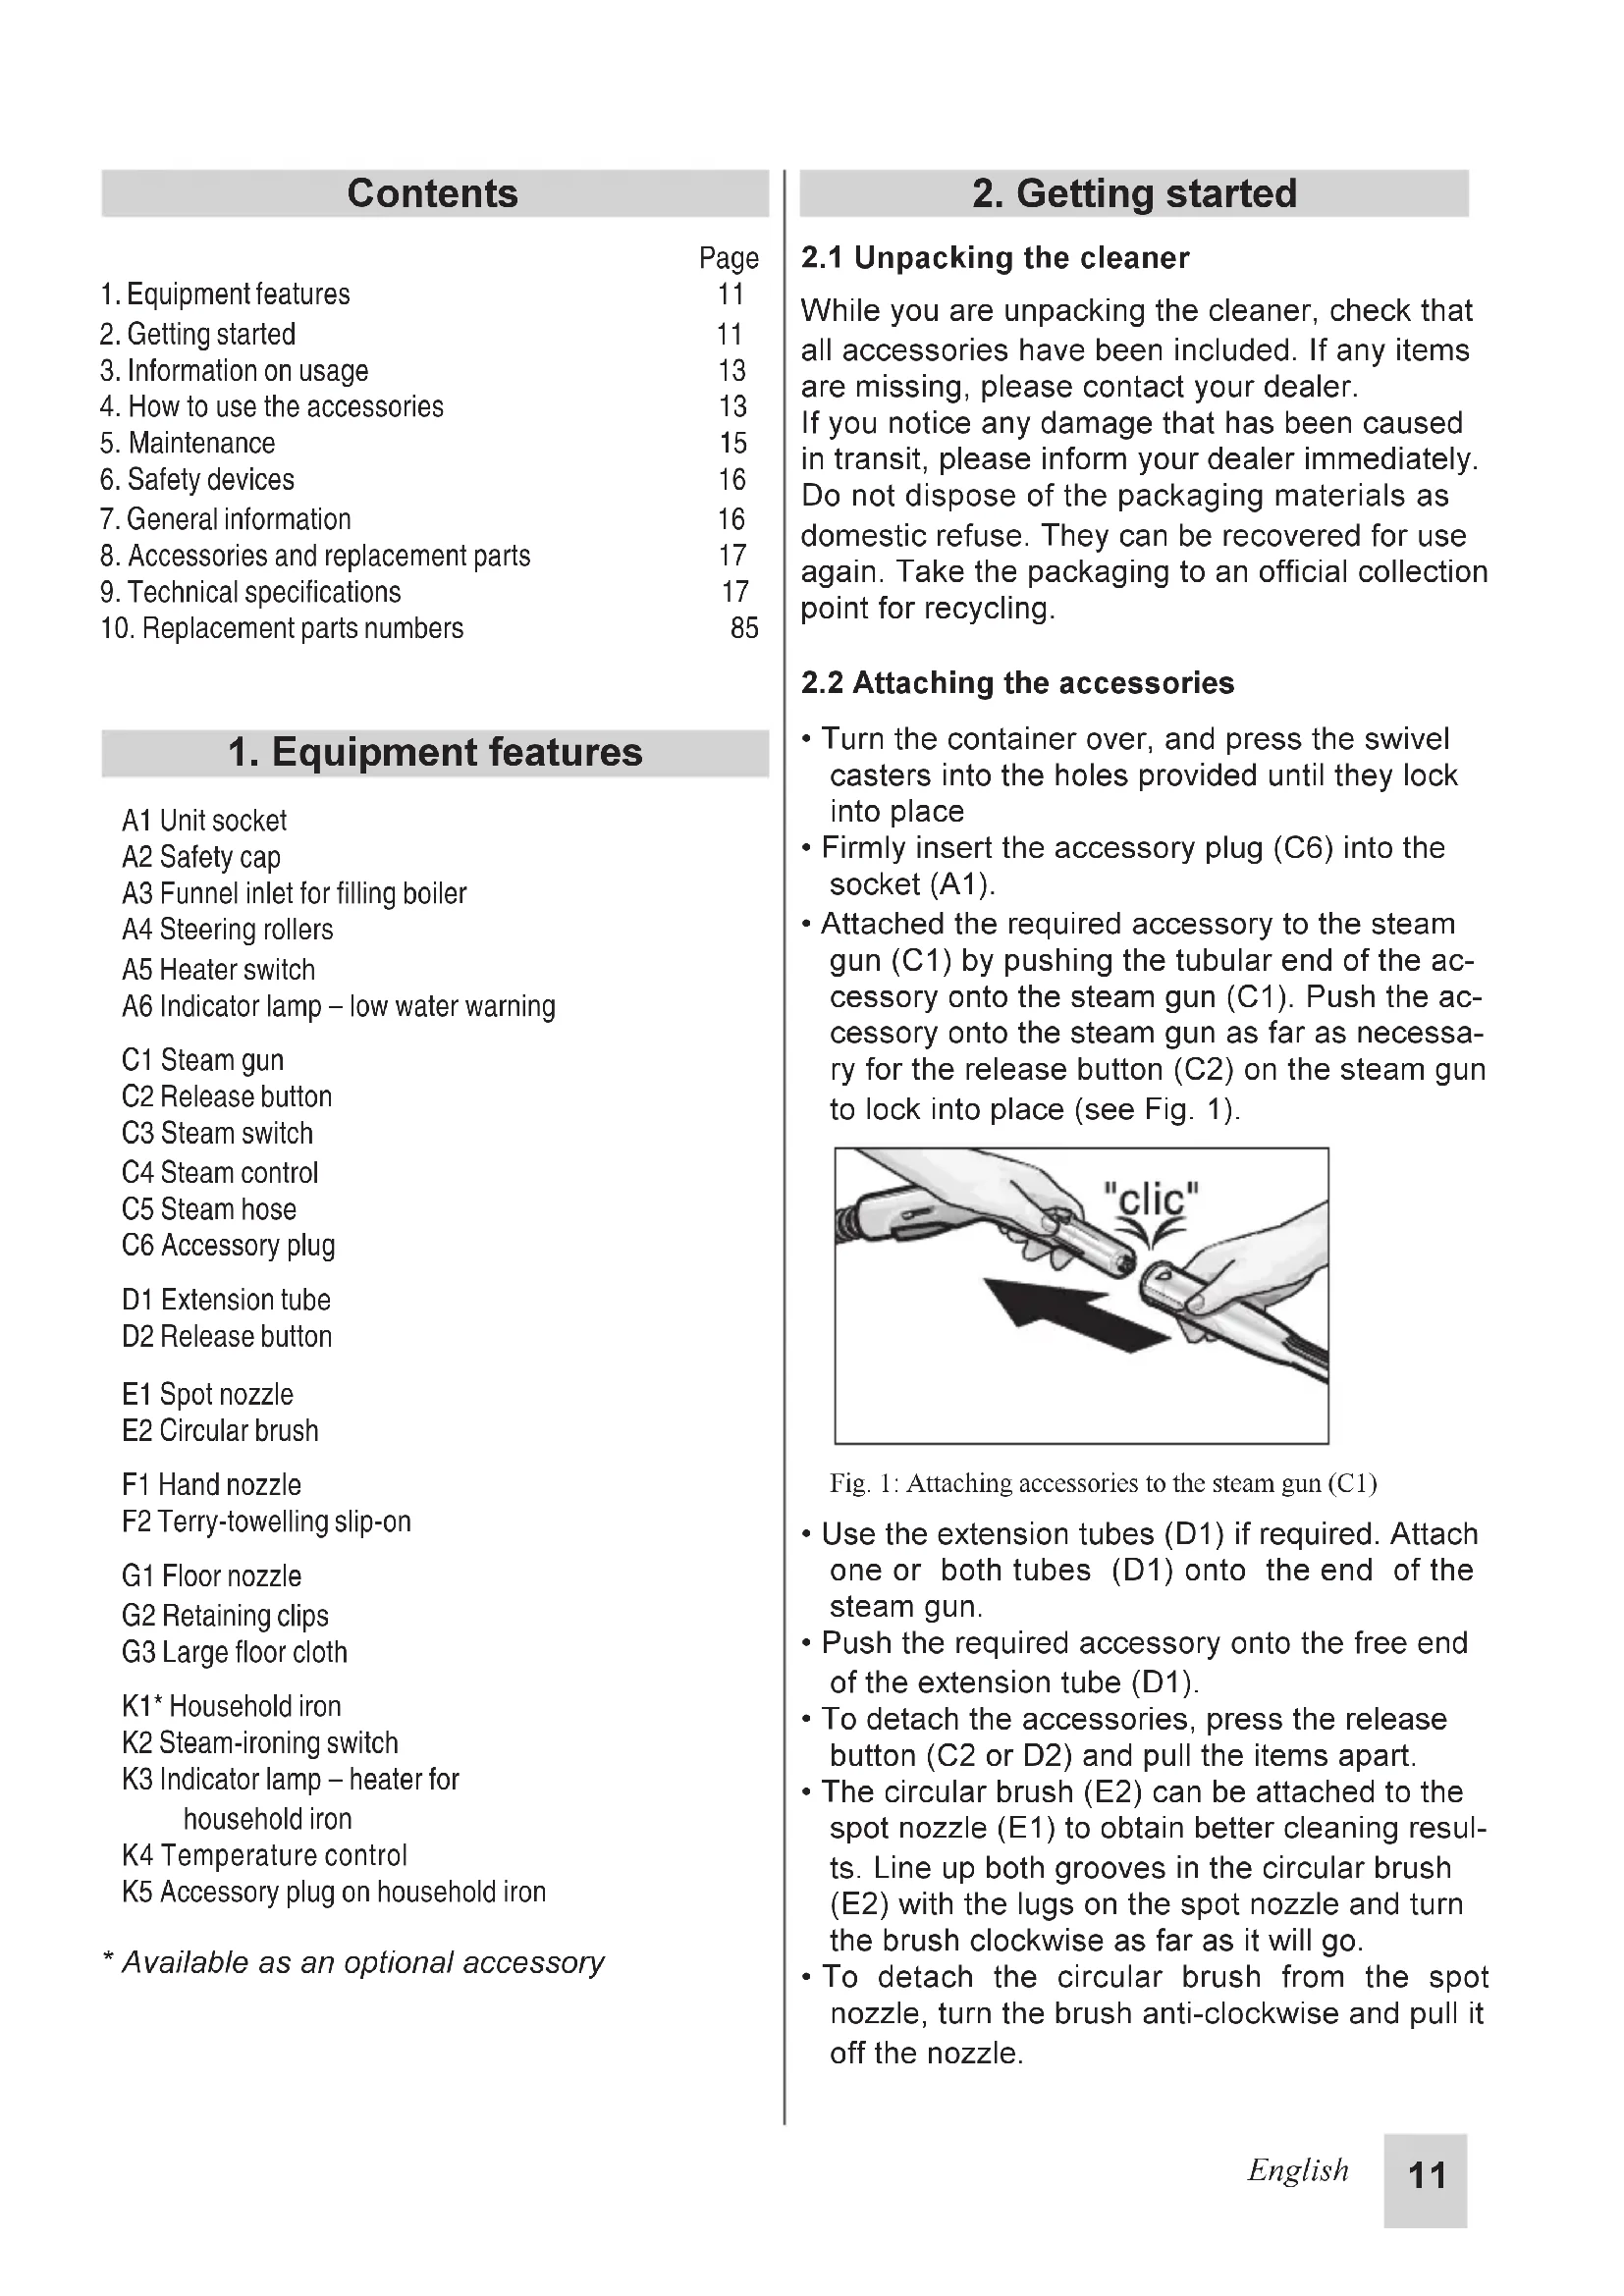
- Attach the required accessory to the steam gun (C1) by pushing the tubular end of the accessory onto the steam gun (C1). Push the accessory onto the steam gun as far as necessary for the release button (C2) on the steam gun to lock into place (see Fig. 1).
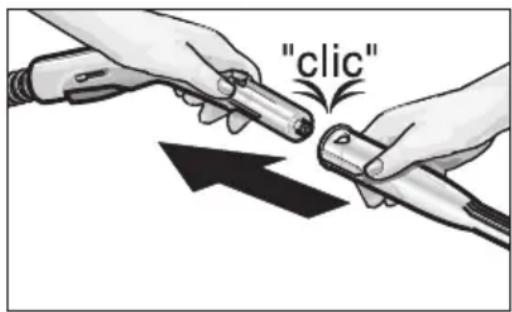
Fig. 1: Attaching accessories to the steam gun (C1)
- Use the extension tubes (D1) if required. Attach one or both tubes (D1) onto the end of the steam gun.
- Push the required accessory onto the free end of the extension tube (D1).
- To detach the accessories, press the release button (C2 or D2) and pull the items apart.
- The circular brush (E2) can be attached to the spot nozzle (E1) to obtain better cleaning results. Line up both grooves in the circular brush (E2) with the lugs on the spot nozzle and turn the brush clockwise as far as it will go.
- To detach the circular brush from the spot nozzle, turn the brush anti-clockwise and pull it off the nozzle.
Hot water can drip out of accessories while you are detaching them. Do not detach accessories while steam is being discharged – danger of scalding!
2.3 Filling up with water
- Unscrew the safety cap (A2) on the main unit.
- Pour a maximum of 1.2 litres of tap water into the boiler. The boiler can be filled up to approx 2 cm below the edge of the filler neck. Heating-up time can be shortened by using hot water.
Do not add pour any detergents or other additives into the boiler.
- Screw the safety cap back onto the cleaner (A2).
2.4 Switching the cleaner ON
- Plug the cleaner into a mains socket.
Do not switch the cleaner on if there is no water in the boiler, otherwise it could overheat. As a safety measure, the cleaner's heater switches off automatically and the low-water warning lamp (A6) illuminates. In order to be able to use the cleaner again, wait approx. 10 minutes for it to cool down and then fill the boiler with water (see 2.6 "Filling up with water").
- Switch the heater switch (A5) to ON. The indicator light is on.
• After approx. 7 minutes, the cleaner is ready for use.
- Switch off the heater (A5) before moving the cleaner.
- When you press the steam switch, steam is discharged from the nozzle. Begin by pointing the steam gun at a cloth until a steady flow of steam comes out of the nozzle.
2.5 Regulating the volume of steam
- The amount of steam can be regulated according to requirement by adjusting the steam switch (C3) on the steam gun.
- The steam control (C4) can be set to the following positions:
front – no steam
middle – half volume of steam
back – max. volume of steam
2.6 Refilling with water
Note: When the water in the boiler has been used up, the low-water warning lamp (A6) will illuminate. The safety cap (A2) cannot be opened while there is any pressure at all in the boiler.
- Turn off the heater switch (A5).
- Press the steam switch (C3) on the steam gun (C1) and hold it pressed until steam is no longer discharged from the nozzle. There will then be no pressure inside the boiler.
- Unscrew the safety cap (A2) from the cleaner.
If the cleaner has been in continuous use for a long time, the safety cap (A2) may be hot!
- Pour a maximum of 1.2 litres of tap water into the boiler.
If the boiler is still hot, there is a risk that water will be squirted back while it is being poured into the boiler and cause scalding.
- Firmly screw the safety cap (A2) back onto the cleaner. Turn on the heater switch (A5) again.
2.7 Switching the cleaner OFF
- Switch off the heater (A5) switch.
- Unplug the cleaner from the mains.
- Pull out the accessory plug by pressing the release button (see fig. 2).
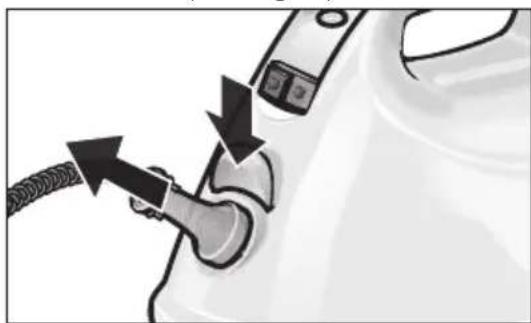
Fig. 2: Pull out the accessory plug
- Any remaining water can be left inside the cleaner.
3.1 Cleaning textiles
Before you use the steam cleaner on textiles including delicate fabrics like Dralon, velvet, leather and items protected by Scotch Guard or any similar substance, you should always test that the material is resistant to steam by applying it to a section not normally visible.
Apply steam to the concealed section and then leave it to dry. Check to see that the colour and shape have not been affected before moving to a visible area. In case of doubt it is always better to consult your steam cleaner dealer.
Use only the steam gun without attachments to apply steam from 30-45cm on these delicate fabrics, then wipe off with a cotton cloth.
3.2 Cleaning hard surfaces

Do not direct steam onto glued edges of objects otherwise the edge strip could become detached. Do not use the steam cleaner on wood or parquet floors that have not been sealed.
Some surfaces can change colour and texture when treated with steam. Consult the manufacturers recommendations first, and always test in a non visible place and then let it dry, to see whether changes in colour or textures occur. In case of doubt and on sensitive materials like coated or painted surfaces, wood, waxed marble etc. it is always better to ask your steam cleaner dealer for advice.
If steam is applied for too long, wax, furniture polish, plastic coating or paint could be lifted off or marks could be caused. You should therefore clean these types of surface with a separate cloth to which steam has been applied or very briefly with a double layer of cloth attached to the nozzle.
3.3 Cleaning glass surfaces

Do not apply steam jet directly to the sealed parts of the window round the frame, otherwise the seal could be damaged.
When the outside temperature is low, especially in winter, warm the window pane by applying a small amount of steam across the whole surface of the glass. This will even out any differences in temperature and avoid stresses in the glass. This is important because glass surfaces that are heated by varying amounts can shatter.
4. How to use the accessories
4.1 Steam gun (C1)
The steam gun can be used without any additional accessories.
Typical applications:
- eliminating odours and creases in clothing: hang the item of clothing up and apply steam from a distance of 10–20 cm.
- removing dust from plants: maintain a distance of 20–40 cm.
- dusting objects with a damp cloth: apply a small amount of steam to a cloth and wipe over the furniture.
4.2 Spot nozzle (E1)
The closer you hold the nozzle to the object being cleaned, the easier it is to remove the dirt. Temperature and pressure are at their greatest immediately the steam is discharged from the nozzle.
Typical applications:
- locations that are difficult to access, such as corners and joints
- taps, drains, wash-basins, WC, shower cabins
- blinds, radiators
- stainless steel, enamel surfaces
- dissolve stains
Apply vinegar to stubborn stains caused by scale and leave it to soak for approx. 5 min.
4.3 Floor nozzle (G1)
- Attach the floor cloth (G3) to the floor nozzle (G1). Fold the cloth lengthways and place the floor nozzle on top. Pull the ends of the cloth one after the other under the retaining clips (G2) (see Fig. 3).
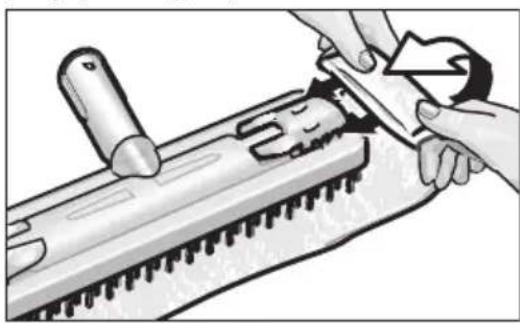
Fig. 3: Attaching the floor cloth
• To remove the cloth, press down on the retaining clips (G2) and pull it out. - Turn the floor cloth over or replace it regularly. This will enable you to wipe up more dirt. • Work on heavily soiled areas at a slower speed so that the steam has more time to act on the dirt. - If there are traces of detergent or polish on the surface that you are cleaning (e.g. wax, liquid polish, etc.), this could result in streaks. As a rule these streaks disappear after the steam cleaner has been used several times.
Typical applications:
– all washable wall and floor coverings, e.g. stone floors, tiles and PVC floors.
4.4 Hand nozzle
Typical applications:
– smaller, washable areas, such as kitchen surfaces made from plastic, tiled walls - windows, mirrors - furniture fabrics - vehicle interiors, windscreens - bath-tubs
4.5 Household iron
The household iron is available as a special accessory (see page 17 for order number).
- Plug the mains cable of the iron into the socket.
- Firmly insert the accessory plug on the iron connecting cable (K5) into the socket (A1) on the main unit.
Steam ironing:
- We recommend that you use the Kärcher Ironing Board with active steam extraction. The ironing board has been designed to match your new cleaner and it makes ironing considerably easier and faster to do. In any case, you should use an ironing board which is covered with a mesh-type underlay that enables steam to pass through.
- The temperature control (K4) should be set to at least ••• (steam mode) for ironing all types of material. The steam that is then discharged prevents the material from becoming too hot.
- The iron is ready for use as soon as the indicator lamp (K3) goes out. The face of the iron must be hot so that the steam does not condense to water and drip onto the item being ironed.
- When you press the switch on the iron, steam is discharged out of holes in the face of the iron. To set the iron so that steam is discharged continuously, push the switch towards the rear until it locks in place. If you briefly push the switch forwards, a shot of steam is discharged from the iron.
- Begin by directing the steam onto a piece of cloth until there is a regular flow of steam out of the iron.
- The iron can be held upright to apply steam to curtains, dresses, etc.
Dry ironing:
- If you wish to iron without using steam, switch the heater switch (A5) to OFF.
- Set the temperature control according to the type of fabric that you are going to iron. The symbols on the control have the following meanings: - Synthetic fibres: •
- Wool: ••
4.6 Window nozzle
The window nozzle is available as a special accessory (see page 17 for order number).
- Before you clean a glass surface with the window nozzle for the first time, go over it with the hand nozzle (F1) and terry-towelling slip-on (F2) to remove any traces of grease.
- Apply steam evenly to the glass surface from a distance of approx. 20 cm. When you have done this, push the locking mechanism on the steam gun towards the rear (child lock) (C4) so that the steam switch (C3) cannot be pressed inadvertently. Squeegee the glass surface in straight lines from top to bottom. Wipe the rubber lip and the bottom edge of the window dry after each pass.
Typical applications:
- windows
- mirrors
- other glass surfaces
4.7 Wallpaper remover
The wallpaper remover is available as a special accessory (see page 17 for order number).
- Place the entire face of the wallpaper remover along the edge of a sheet of wallpaper. Switch on the steam supply (C3) and allow the steam to penetrate the wallpaper until it is soaked through (approx. 10 seconds).
- Move the wallpaper remover to the next section to be removed, keeping the steam switch (C3) pressed. Use a putty knife to lift the loosened wallpaper and pull it off the wall. Move the wallpaper across the wall a section at a time and pull the paper off in strips.
- The steam may not be able to readily penetrate woodchip wallpaper that has been painted over several times. In this case we recommend that you go over the wallpaper with a spiked roller before steam is applied.
5. Maintenance
5.1 Cleaning the boiler
Note: If you always use demineralised or distilled water, it will not be necessary to clean the boiler.
Rinsing out the boiler:
Rinse out the steam generator at most after every 5th fill-up if the hardness of water proves to be more than 1.8 mmol/l. You can enquire about the hardness of water in your area from your water supply company or municipal public works.
- Fill the boiler with water and shake the cleaner vigorously. This will loosen any scale that has settled at the bottom of the boiler. Tilt the cleaner towards the corner with the funnel inlet (A3) and pour out the water (see Fig. 4).
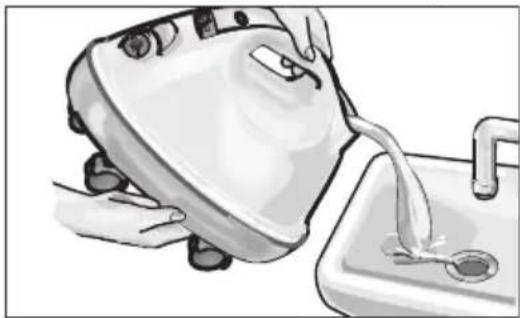
Fig. 4: Cleaning the boiler
Descaling the boiler:
- As limescale is deposited in the steam generator, we recommend descaling the tank at the following intervals.
Remove lime-scale deposits after the given number of tank fillings (TF).
| FT | f ssendrah | ° dH | oeren/mol/l |
| 100 | I | soft | 0–7 | 0–1.3 |
| 90 | II | medium | 7–14 | 1.3–2.5 |
| 75 | III | hard | 14–21 | 2.5–3.8 |
| 50 | IV | very hard | >21 | >3.8 |
Table 1: Descaling the boiler
- Unplug the cleaner from the mains electricity supply before you descale the boiler.
- Make sure that all traces of water are drained from the boiler (see Fig. 4).
- We recommend you use Kärcher Biological Decalcifier RM 511 to descale the boiler. This biological decalcifying agent is based on citric acid and is therefore entirely biologically degradable.
In order to avoid damage to the cleaner, only use products that have been approved by Kärcher.
- Fully dissolve the contents of one bag of Kärcher Biological Decalcifier RM 511 in one litre of warm water.
- Pour this solution into the boiler and leave it to react for approx. 8 hours.
Do not screw the safety cap (A2) onto the cleaner while you are descaling the boiler. Do not use the cleaner if there is any descaling liquid left inside the boiler.
• After the period of soaking, pour the descaling solution out of the boiler. A small amount will remain inside, therefore you should flush the boiler out with cold water two or three times in order to remove all traces of the decalcifying agent.
• The steam cleaner is now ready for use again.
5.2 Care of accessories
- Allow all accessories to dry out thoroughly before you store them for use another time.
- Do not stand the floor nozzle (G1) and circular brush (E2) on their bristles while they are cooling down and drying out, otherwise they could become deformed.
- Dirty floor cloths can be placed in a washing machine at 60 °C and dried in a tumble dryer. Do not use a liquid softener as this would impair the ability of the cloths to pick up dirt.
5.3 What to do if a problem occurs
- If a problem occurs with your steam cleaner, contact your local Kärcher service agent (see enclosed address list).
6. Safety devices
This steam cleaner is equipped with several safety devices which provide multiple levels of safety. The most important safety devices are described below.
6.1 Pressure controller
The pressure controller maintains the level of pressure inside the boiler as constant as possible. When the maximum operating pressure inside the boiler is reached, the heater is switched off. When steam is drawn off and the pressure drops, the heater is switched on again.
6.2 Low-water thermostat
As the water in the boiler is used up, the temperature of the heater increases. The low-water thermostat switches the heater off and the red low-water warning lamp (A6) illuminates. The heater is prevented from switching on again until the boiler has either cooled down or has been refilled with water.
6.3 Safety thermostat
If the low-water thermostat fails and the cleaner overheats, the safety thermostat will switch off the cleaner. Contact your local Kärcher service agent so that the safety thermostat can be reset.
6.4 Safety cap
The safety cap seals in the steam pressure as it builds up inside the boiler. If the pressure controller is defective and the steam pressure inside the boiler rises above 4.0 bar, an overpressure valve opens inside the safety cap and steam is discharged into the open. Contact your local Kärcher service agent before you attempt to use the cleaner again.
7.1 Warranty
The applicable warranty conditions in different countries are issued by the respective national distributor of KÄRCHER products. During the warranty period, any malfunctions of the unit caused by a material or manufacturing defect will be repaired free of charge.
In the event of a warranty claim, please take the cleaner and accessories, with proof of purchase, to your original dealer or to the nearest authorised customer service centre. We will not be liable for damages occurring as a consequence of improper handling of the cleaner or of failure to observe the information contained in the operating instructions.
This appliance has been manufactured in accordance with VDI Directive 2243 concerning recycling. When the cleaner is no longer required for use, the materials used in its manufacture can be recovered for re-use.
We hereby declare that the equipment described below conforms to the relevant fundamental safety and health requirements of the appropriate EU Directives, both in its basic design and construction as well as in the version marketed by us.
This declaration will cease to be valid if any modifications are made to the machine without our express approval.
Product: Steam Cleaner Model: 1.204-xxx
Relevant EU Directives:
EU Machinery Directive (98/37/EEC)
EU Low-Voltage Equipment Directive (73/23/EEC), amended by 93/68/EEC
EU Directive on Electromagnetic Compatibility (89/336/EEC), amended by 91/263/EEC, 92/31/EEC, 93/68/EEC
Harmonised standards applied:
National standards applied: TRD 801
Appropriate internal measures have been taken to ensure that series-production units conform at all times to the requirements of current EU Directives and relevant standards.
The signatories are empowered to represent and act on behalf of the company management.
8. Accessories and replacement parts
Only accessories and replacement parts approved by the manufacturer may be used with this cleaner. Original accessories and original replacement parts guarantee that the cleaner remains safe and reliable to operate.
On the last page of these operating instructions there is a picture of the cleaner with the order numbers for the individual parts.
| Special accessories | Order no. |
| Steam rotary nozzle | 2.863-094 |
| Hand nozzle | 4.130-111 |
| Window nozzle | 4.130-115 |
| Squeegee strip | 6.273-140 |
| Wallpaper remover | 2.863-062 |
| Circular brush set(4 pcs.) for spot nozzle | 2.863-058 |
| Circular brass-wire brush set(3 pcs.)for spot nozzle: with brass-wire bristlesfor removing particularly stubborn dirt | 2.863-061 |
| Cloth set I:2 large wiping cloths,3 terry-towelling slip-ons | 6.960-019 |
| Cloth set II:5 terry-towelling slip-ons | 6.370-990 |
| Cloth set III:3 large wiping cloth | 6.369-357 |
| Microfibre cloth set:1 large wiping cloth,1 terry-towelling slip-on that are highlyabsorbent and able to pick up largeamounts of dirt | 6.905-921 |
| Biological decalcifier RM 511:3 bags of 100 g each | 6.290-239 |
| Household iron | * |
| Ironing board with active steamextraction: for excellent ironing results withconsiderable time-saving | * |
* call
9. Technical specifications
Electrical connection
Voltage 220-240 V
Type of current ...... single phase, 50 Hz
Voltage in hand-gun 0 V
Heater power consumption ..... 1500 W
Max. operating pressure 2.5 bar
Permissible operating pressure ..... 4.0 bar
Heating time (per litre of water) approx. 6 min
Max. steam volume 60 g/min
Dimensions
Weight without accessories .... 2.9 kg
Max. water capacity 1.2 L
Boiler capacity 1.5 L
Width 350 mm
Length 235 mm
Height 290 mm
9.1 Circuit diagram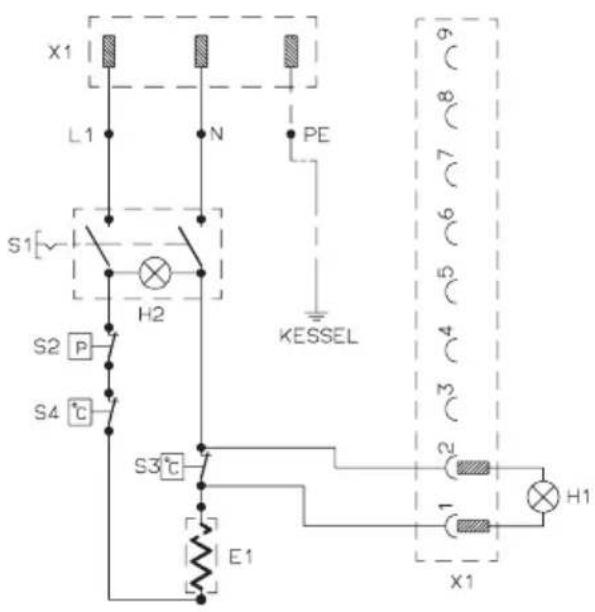
E1 Heating element, 1500 W
H1 Indicator lamp, low-water warning
H2 Indicator lamp – heater switch
S1 Heater switch
S2 Pressure switch
S3 Low-water thermostat
S4 Safety thermostat
X1 Internal plug
Heating coil ....1500 W
Maximum working pressure 2.5 bars
Admissible working pressure .... 4.0 bars
73/23/EEC + 93/68/EEC
89/336/EEC + 91/263/EEC, +92/31/EEC,
+93/68/EEC
Fig. 2: Pulling out the plug (C6)
73/23/EEC + 93/68/EEC
89/336/EEC (+ 91/263/EEC, +92/31/EEC, +93/68/EEC)
E1 Heater 1500 W
K4 Temperature regulator
Fig. 2: Pulling out the plug (C6)
Fig. 3: Tension of the wiper cloth
4.1 Pull out the plug (C1)
Applicable EC Directives:
98/37/EC
73/23/EEC + 93/68/EEC
89/336/EEC + 91/263/EEC + 92/31/EEC + 93/68/EEC
Harmonized standards applied:
Fig. 3: Stretching the wiper cloth
Fig. 4: Cleaning the boiler
89/336/EEC + 91/263/EEC + 92/31/EEC + 93/68/EEC.
Fig. 2: Disconnecting the plug (C6)
Fig. 4: Cleaning the tank
Descaling the tank:
- Since limescale accumulates on the steam generator, we recommend descaling at the following intervals. Descaling should be performed according to the indicated numbers of tank fillings (PS).
| PS | Područje tvrdoće | °dH | mmol/l |
| 75 | I | mekano | 0-7 | 0-1,3 |
| 50 | II | srednje | 7-14 | 1,3-2,5 |
| 30 | III | tvrdo | 14-21 | 2,5-3,8 |
| 25 | IV | jako tvrdo | >21 | >3,8 |
Operating pressure ....4.0 bar
Heating time (per liter of water) ...... approx. 6 min
Fig. 2: Disconnecting the plug (C6)
• Place the iron on a stable surface.
3. Instructions for use
3.1 Ironing
Before ironing textiles with the steam iron on an ironing board, you should test the fabric's resistance to steam. For this purpose, steam a small area and let it dry. Then check if there have been any changes in color or shape.
3.2 Cleaning ironed or delicate surfaces

Do not use the steam iron on zippers, buttons, or metal accessories, as they may damage the soleplate. Do not use the steam iron on waxed or oiled surfaces.
Fig. 3: Filling the water tank
- Place the device on a stable surface (G2) and insert the plug.
- Before cleaning, remove the device and accessories. They may be damaged by improper cleaning.
- On heavily soiled surfaces, work with the steam cleaner slowly to allow the steam to act longer. If the surface is coated with a substance that needs to be removed with a cleaning agent (e.g., polish, wax), the steam may dissolve it. This residue may remain if the steam cleaner is used without a cleaning agent.
Fig. 4: Cleaning the device
Maintenance of the device and accessories:
- If the device is used for a long time, it is recommended to clean the device in the following intervals.
The device must be cleaned after every use (see).
CZ
Kärcher spol. s r.o.
Za Mototechnou
Banbury, Oxon, OX16 1TB
01295 / 752000; 09066 / 800632
GR
Karcher Cleaning Systems A.E.Ä
31-33 Nikitara Str. &
Konstantinoupoleos Str.
136 71 Acharnes
010/23 16 153
H
Kärcher Hungaria KFT
Tormásrét ut 2.
2051 Biatorbagy
23/5300
HK
Karcher Limited
Unit 10, 17/F., APEC Plaza
49 Hoi Yuen Road,
Kwun Tong, Kowloon,
Hong Kong
23 57 58 63
|
Kärcher S.p.A.
Via Elvezia 4
21050 Cantello (VA)
848 - 99 88 77
IRL
Karcher Limited (Ireland)
12 Willow Business Park
Nangor Road
Clondalkin
Dublin 12
01 / 409 77 77
J
Kärcher (Japan) Co., Ltd.
Irene Kärcher Building
No.2, Matsusaka-Daira 3-chome
Taiwa-cho, Kurokawa-gun
Miyagi, 981-3408
022/344 31 40
MAL
Karcher Cleaning Systems Sdn Bhd
No.8 Jalan Serindit 2
Bandar Puchong Jaya
47100 Puchong, Selangor
03 / 5882 1148
MEX
Karcher México, SA de CV
East Tamaki, Auckland
09/274 46 03
P
Neoparts-Comércio
Kärcher Poland Ltd. Sp. z o.o.
Ul. Stawowa 140
31-346 Kraków
012/6397222
PRC
BKC Equipment Co., Ltd.
No 16, Hong Da Bei Lu
Economic & Technological Dev. Area
Beijing 100176
010/67881653
S
Kärcher AB
Tagenevägen 31
42502 Hisings-Kärra
031/577300
SGP
Karcher Asia Pacific Pte. Ltd.
30 Toh Guan Road, #07-05
Singapore 608840
065/68971811
TR
Kärcher Servis Ticaret A.S.
9 Eylül Mahallesi
307 Sokak No. 6
Gaziemir / Izmir
0232 / 252 07 08
TWN
Karcher Limited
5F/6. No. 7
Wu-Chuan 1st Road
Taipei County, ROC
02/22 99 96 26
UAE
Karcher FZE
Jebel Ali Free Zone
RA 8, XB 1, Jebel Ali, Dubai
04/8836776
USA
Alfred Karcher, Inc
2170 Satellite Blvd, Suite 350
Duluth, GA 30097
678-935-4545; 877-527-2437
ZA
Kärcher (Pty) Ltd.
P.O. Box 11818
Vorna Valley 1686
011/4662434
102002


http://www.karcher.com