4556 - Alarm clock radio ELTA - Free user manual and instructions
Find the device manual for free 4556 ELTA in PDF.
| Product type | Clock radio |
| Brand | ELTA |
| Model | 4556 |
| Power supply | 230 V~, 50 Hz, 5 W |
| Backup battery | 1 Lithium 3 V flat battery (CR2032, not included) |
| Radio frequencies | AM 525 – 1615 kHz, FM 87,5 – 108 MHz |
| Output power | 280 mW |
| Speaker impedance | 8 ohms |
| Display | LCD with digital and analog mode |
| Main functions | Clock, alarm (1 or 2), AM/FM radio, sleep, snooze, auxiliary audio input |
| Number of alarms | 2 (Alarm 1 and Alarm 2, individually selectable) |
| Alarm type | Buzzer or radio, programmable by day |
| Sleep function | Adjustable timer from 90 to 0 minutes in 2-second steps |
| Snooze function | Fixed duration of 9 minutes |
| FM antenna | Unrollable wire antenna |
| AM antenna | Internal directional antenna (rotate the device) |
| Audio input | 3.5 mm jack socket (auxiliary) |
| Wall mounting | Possible (wall mount included) |
| Cleaning | Soft, clean cloth with mild soap; do not use abrasive products |
| Repair | No user-serviceable parts; opening only by a professional |
| Dimensions (approx.) | Approximately 25 cm x 15 cm x 10 cm |
| Weight (approx.) | Approximately 500 g |
Frequently Asked Questions - 4556 ELTA
User questions about 4556 ELTA
0 question about this device. Answer the ones you know or ask your own.
Ask a new question about this device
Download the instructions for your Alarm clock radio in PDF format for free! Find your manual 4556 - ELTA and take your electronic device back in hand. On this page are published all the documents necessary for the use of your device. 4556 by ELTA.
USER MANUAL 4556 ELTA
text_image
elta® Germanyelta
4556
natural_image
Two modern digital music devices with analog dials and control buttons, no visible text or symbols on the devices themselves.DESIGN UHRENRADIO MIT FLIP-FLOP Ⓓ DISPLAY
DESIGN CLOCK RADIO WITH FLIP FLOP ⑥ DISPLAY
RADIO-RÉVEIL DESIGN AVEC ÉCRAN FR BASCULANT
FORMATERVEZETT ÉBRESZTŐÓRÁS Ⓗ RÁDIÓ FLIP-FLOP KIJELZŐVEL
RADIOSVEGLIA CON DISPLAY FLIP-FLOP ①
RADIO-RELOJ DE DISEÑO CON PANTALLA Ⓔ GIRATORIA
RÁDIO COM RELÓGIO DE DESIGN Ⓓ COM VISOR FLIP-FLOP
RADIO Z ZEGAREM I BISTABILNYM Ⓜ WYŚWIETLACZEM
DESIGN WEKKERRADIO MET NL FLIPFLOP-DISPLAY
RADIOBUDÍK S OTOČNÝM DISPLEJEM CZ
DESIGN FLIP-FLOP EKRANL1 SAATLI RADYO TR
text_image
SUN AL 1 00 SATtext_image
ALARM 1 WECKEN DURCH KLINGEL ALARM 2 WECKEN DURCH RADIO TUE 8:30text_image
PFEIL OBEN SCHRAUBE SCHRAUBE SCHRAUBE SCHRAUBE
The triangular symbol with the lightning Bolt wams the user to the presence of dangerous non-isolated voltage on the inside of this device which may cause an electric shock.
WARNING
DANGER OF A HAZARDOUS ELECTRIC SHOCK. DO NOT OPEN
WARNING: TO REDUCE THE RISK OF AN ELECTRIC SHOCK, DO NOT REMOVE THE FRONT OR BACK COVER. INSIDE THE UNIT, THERE ARE NO PARTS THAT CAN BE REPAIRED OR ADJUSTED BY THE USER. PLEASE REFER TO QUALIFIED TECHNICIANS.

The triangular symbol with the exclamation highlights important points of which the user should refer to the manual regarding maintenance and repair.
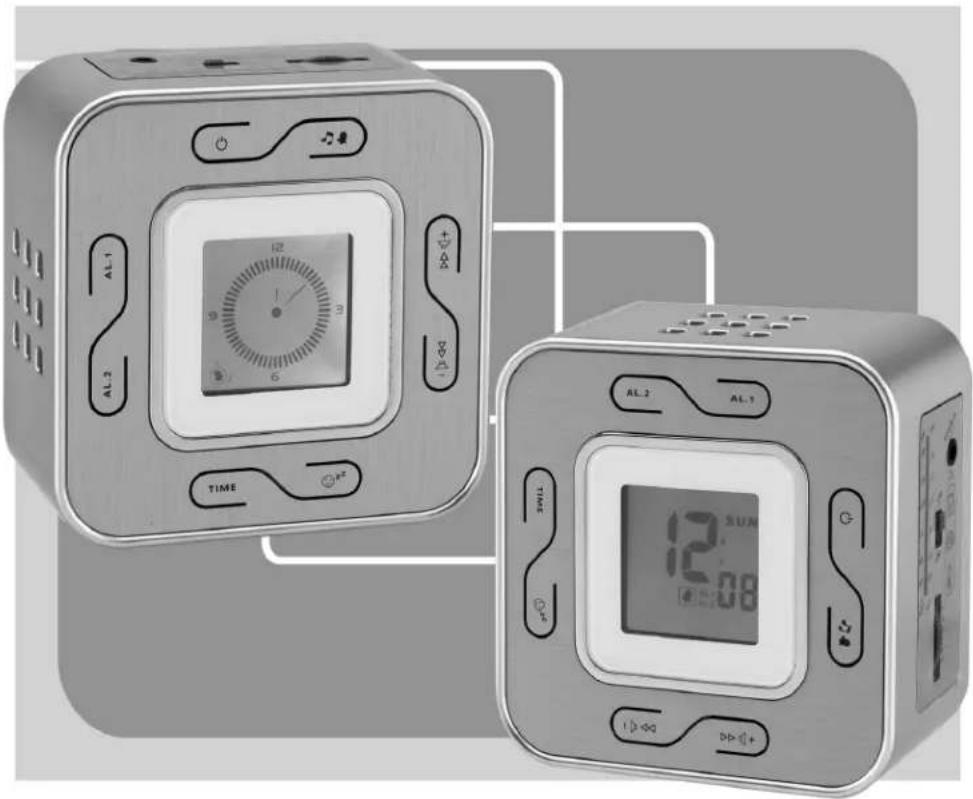
OPERATING INSTRUCTIONS
text_image
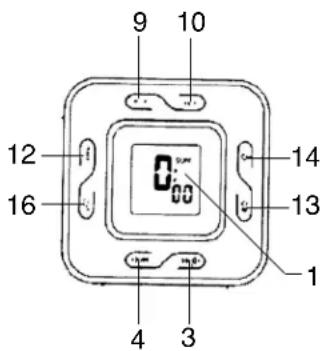
9 10 12 14 16 13 1 1 4 3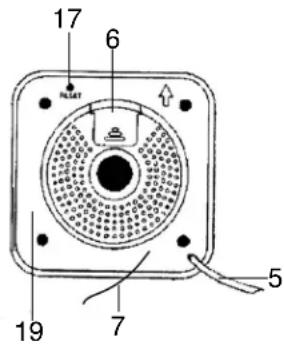
text_image
17 6 PILLAT 19 7 5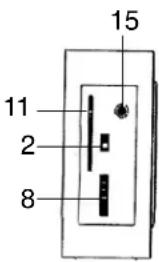
text_image
15 11 2 8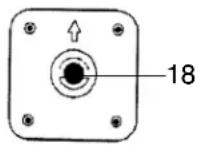
- LCD DISPLAY 11. DIAL SCALE AND POINTER
- BAND (FM/AM) SWITCH 12. TIME SET BUTTON
- VOLUME UP CONTROL 13. ALARM 1 / ALARM 2 / ALARM 1+2 SELECT BUTTON
- VOLUME DOWN CONTROL 14. POWER ON/OFF ALARM OFF BUTTON
- AC CORD 15. AUDIO IN JACK
- BATTERY COMPARTMENT 16. SNOOZE / SLEEP BUTTON
- FM ANTENNA WIRE 17. RESETZ BUTTON
- TUNING CONTROL 18. UNIT BRACKET
- ALARM 2 SET BUTTON
- RATING LABEL (AFFIXED ON THE BACK OF THE UNIT)
- ALARM 1 SET BUTTON
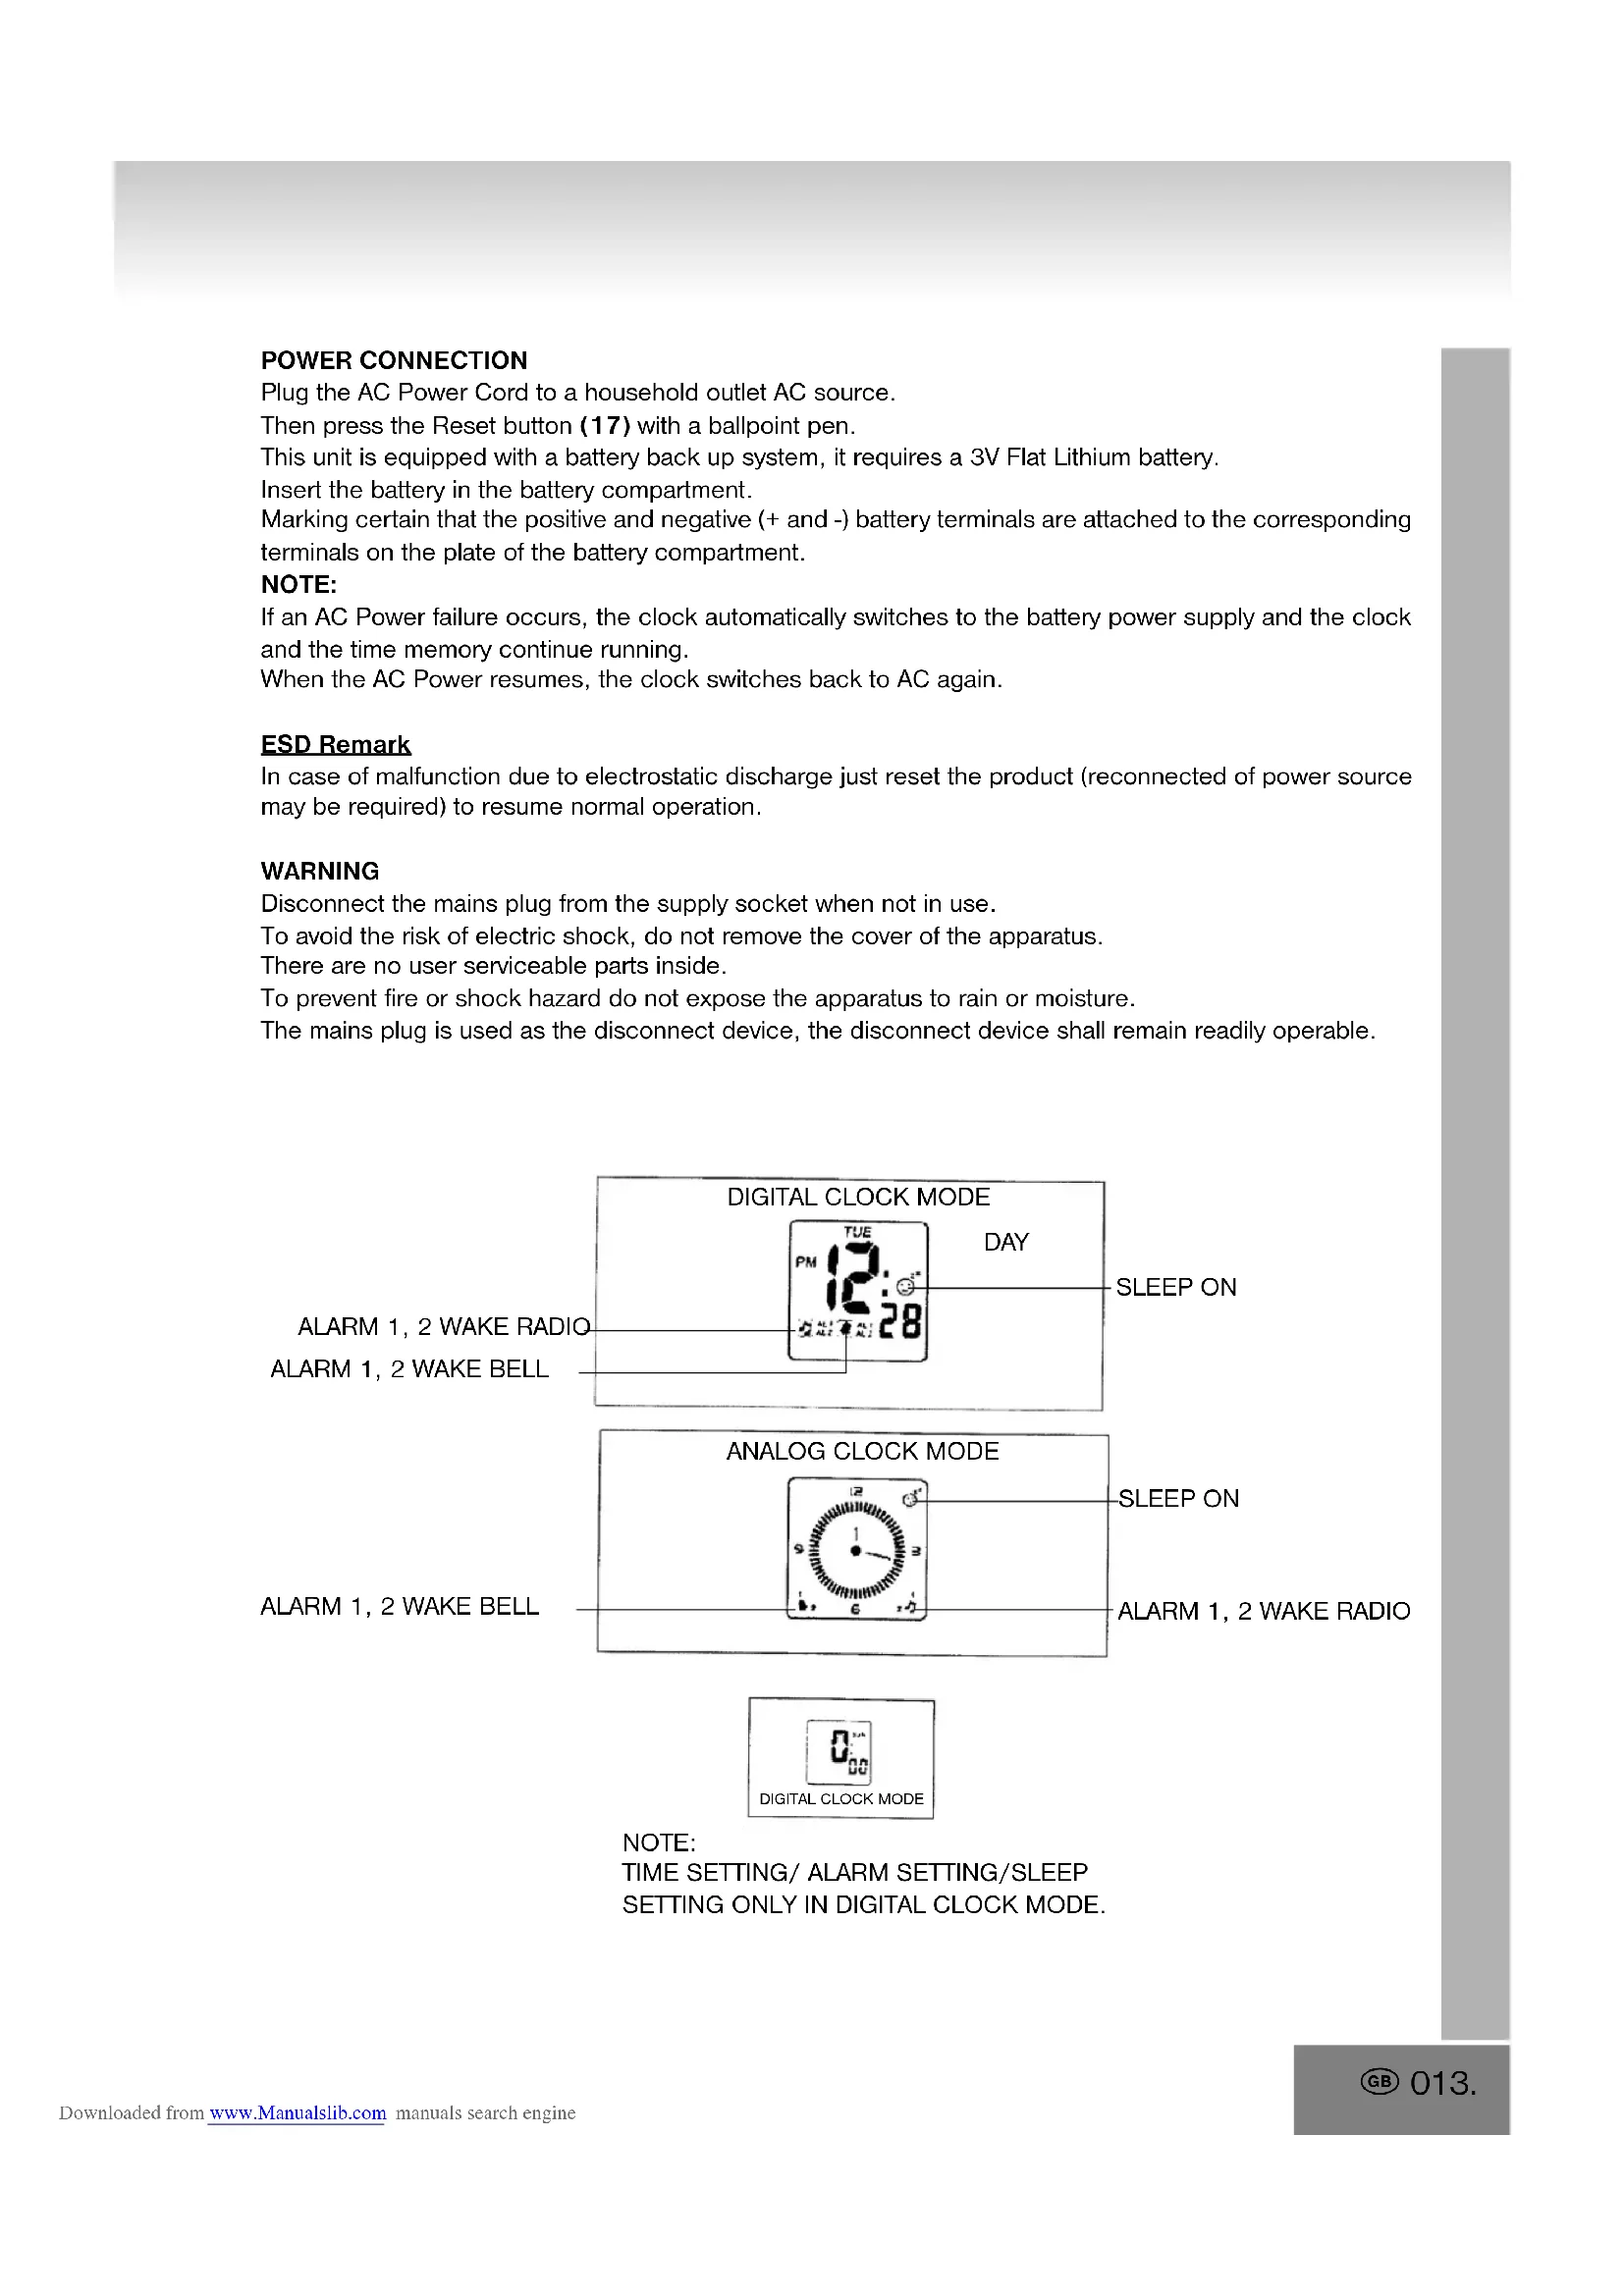
POWER CONNECTION
Plug the AC Power Cord to a household outlet AC source.
Then press the Reset button (17) with a ballpoint pen.
This unit is equipped with a battery back up system, it requires a 3V Flat Lithium battery.
Insert the battery in the battery compartment.
Marking certain that the positive and negative (+ and -) battery terminals are attached to the corresponding terminals on the plate of the battery compartment.
NOTE:
If an AC Power failure occurs, the clock automatically switches to the battery power supply and the clock and the time memory continue running.
When the AC Power resumes, the clock switches back to AC again.
ESD Remark
In case of malfunction due to electrostatic discharge just reset the product (reconnected of power source may be required) to resume normal operation.
WARNING
Disconnect the mains plug from the supply socket when not in use.
To avoid the risk of electric shock, do not remove the cover of the apparatus.
There are no user serviceable parts inside.
To prevent fire or shock hazard do not expose the apparatus to rain or moisture.
The mains plug is used as the disconnect device, the disconnect device shall remain readily operable.
text_image
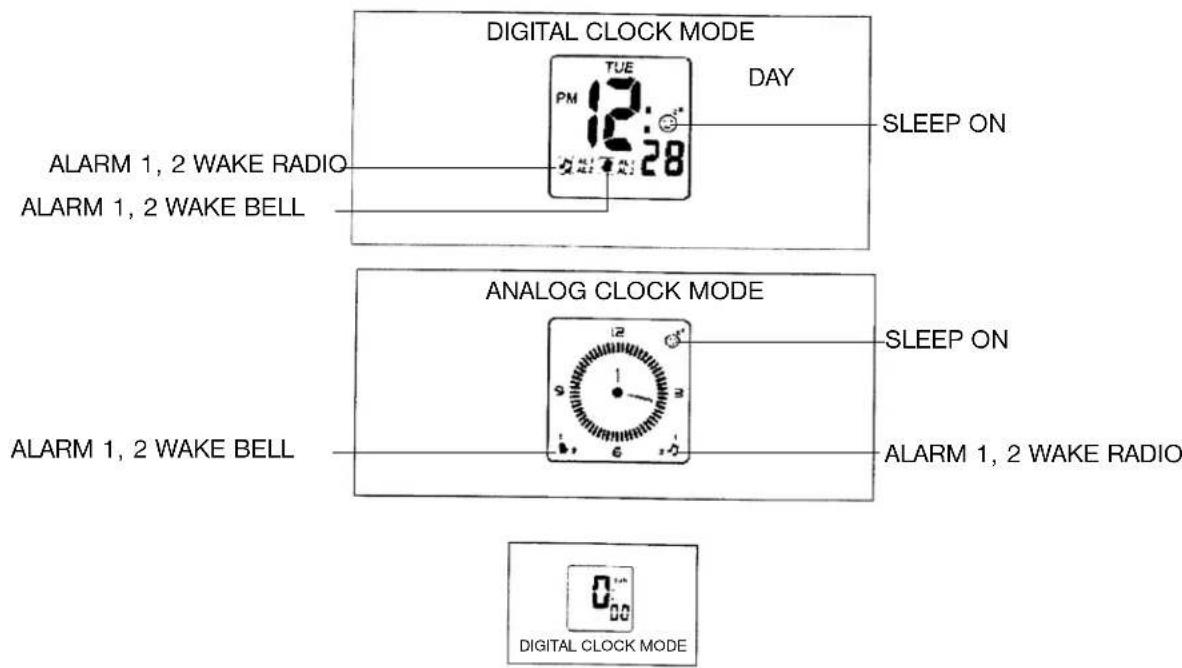
DIGITAL CLOCK MODE DAY SLEEP ON ALARM 1, 2 WAKE RADIO ALARM 1, 2 WAKE BELL ANALOG CLOCK MODE SLEEP ON ALARM 1, 2 WAKE BELL ALARM 1, 2 WAKE RADIO DIGITAL CLOCK MODENOTE:
TIME SETTING/ ALARM SETTING/SLEEP
SETTING ONLY IN DIGITAL CLOCK MODE.
TO SET OR RESET THE ACTUAL TIME

text_image
1 2 3 SUN 0:00 CLOCK SET MODE- Press and hold time set button (12) (position 1) 2 seconds, day blinking.
- Press volume up control button ▶▶◀+ (3) and volume down control button ▶◀◀ (4) (position 2) and volume down control button ▶◀◀ (4) (position 2) to set day.
- Press time set button (12) (position 1), 24 hour / 12 hour blinking.
- Press volume up control button ▶▶◀+ (3) (position 3) and volume down control button ▶◀◀(4) (position 2), hour blinking.
- Press time set button (12) (position 1), hour blinking.
- Press volume up control button ▶▶◀+ (3) (position 3) and volume down control button ▶◀◀ (4) (position 2) to set hour.
- Press time set button (12) (position 1), minute blinking.
- Press volume up control button ▶▶◀+ (3) (position 3) and volume down control button ▶◀◀ (4) (position 2) to set minute.
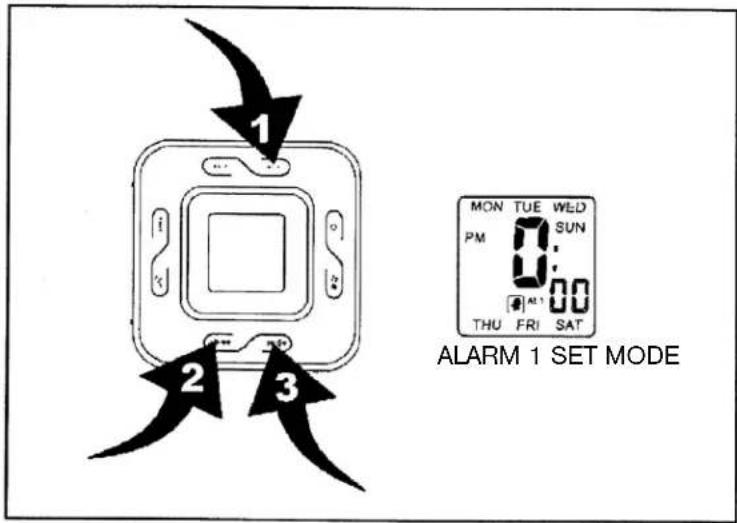
ALARM 1 SETTING
text_image
1 2 3 MON TUE WED PM SUN THU FRI SAT ALARM 1 SET MODE- Press alarm 1 set button (10) (position 1) to enter into alarm 1 set mode.
- Press and hold alarm 1 set button (10) (position 1) 2 seconds, day blinking. (Diagram 1)
- Press volume up control button ▶▶◀+ (3) (position 3) and volume down control button ▶◀◀ (4) (position 2) to set day.
- Press alarm 1 set button (10) (position 1) hour blinking.
Press volume up control button ▶▶◀+ (3) (position 3) and volume down control button ▶◀◀ (4) (position 2) to set hour.
- Press alarm 1 set button (10) (position 1) minute blinking.
Press volume up control button ▶▶◀+ (3) (position 3) and volume down control button ▶◀◀ (4) (position 2) to set minute.
- Press alarm set 1 button (10) (position 1) alarm 1 bell blinking.
Press volume up control button ▶▶◀+ (3) (position 3) and volume down control button ▶◀◀ (4) (position 2) to select alarm 1 ▶ bell and ▶ alarm radio.
DIAGRAM 1
text_image
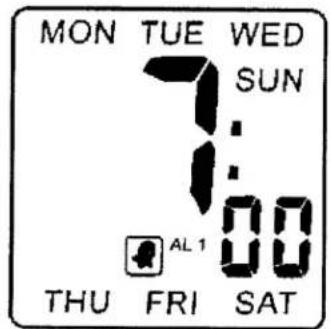
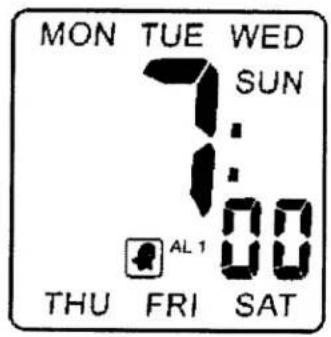
MON TUE WED SUN 1:00 AL 1 THU FRI SATWEEKED ALARM 1 SET MODE (MON TO SUN)
text_image
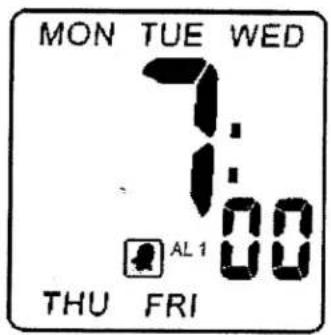
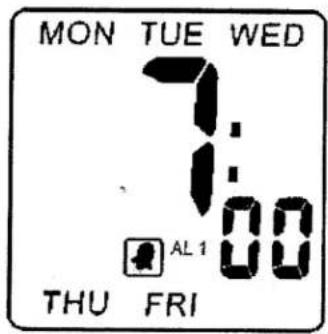
MON TUE WED 1:00 AL1 THU FRIWEEKED ALARM 1 SET MODE (MON TO FRI)
text_image
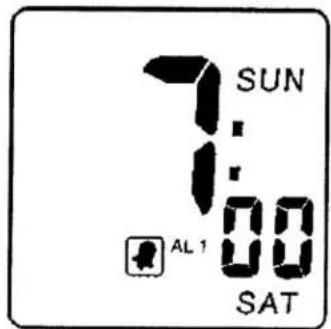
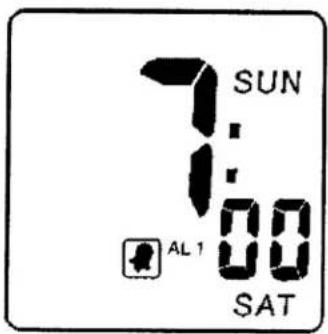
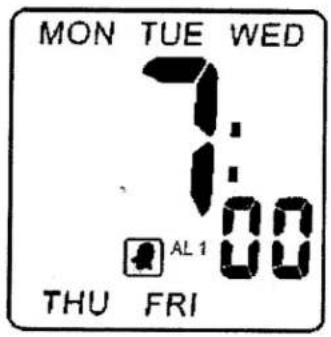
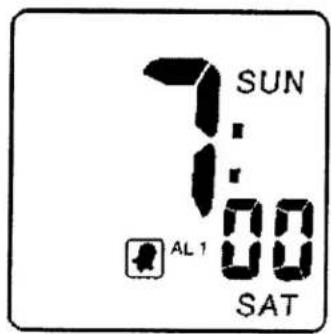
SUN 7:00 AL 1 SATWEEKED ALARM 1 SET MODE (SAT TO SUN)
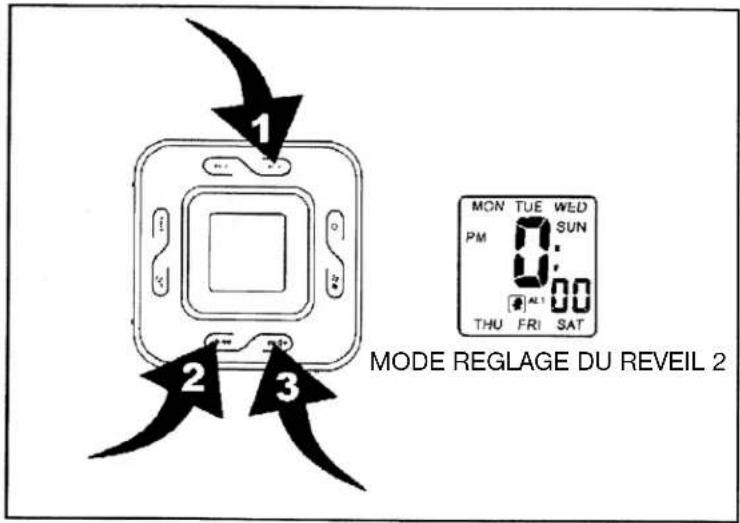
ALARM 2 SETTING
text_image
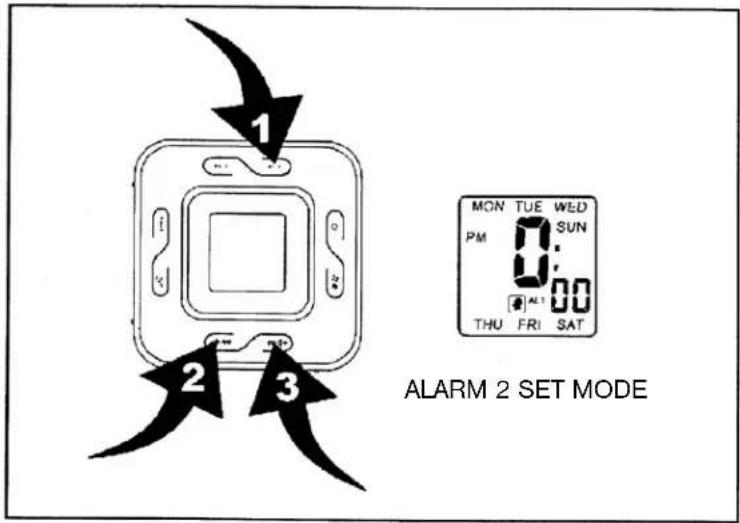
1 2 3 MON TUE WED PM SUN 0 0 0 THU FRI SAT ALARM 2 SET MODE- Press alarm 2 set button (9) (position 1) to enter into alarm 2 set mode.
- Press and hold alarm 2 set button (9) 2 seconds, day blinking. (Diagram 2)
- Press volume up control button ▶▶◀+ (3) (position 3) and volume down control button ▶◀◀(4) (position 2) to set day.
- Press alarm 2 set button (9) (position 1) hour blinking. Press volume up control button ▶+ (3) (position
3) and volume down control button ▶◀◀ (4) (position 2) to set hour. - Press alarm 2 set button (9) (position 1) minute blinking. Press volume up control button ▶▶◀+ (3) (position
3) and volume down control button ▶◀◀(4) (position 2) to set minute. - Press alarm 2 set button (9) (position 1) alarm 2 bell blinking. Press volume up control button ▶+ (3) (position 3) and volume down control button ▶ (4) (position 2) to select alarm 2 bell and alarm radio.
DIAGRAM 2
text_image
MON TUE WED SUN 1:00 AL 1 THU FRI SATWEEKED ALARM 2 SET MODE (MON TO SUN)
text_image
MON TUE WED 1:00 AL1 THU FRIWEEKED ALARM 2 SET MODE (MON TO FRI)
text_image
SUN 7:00 AL 1 SATWEEKED ALARM 2 SET MODE (SAT TO SUN)
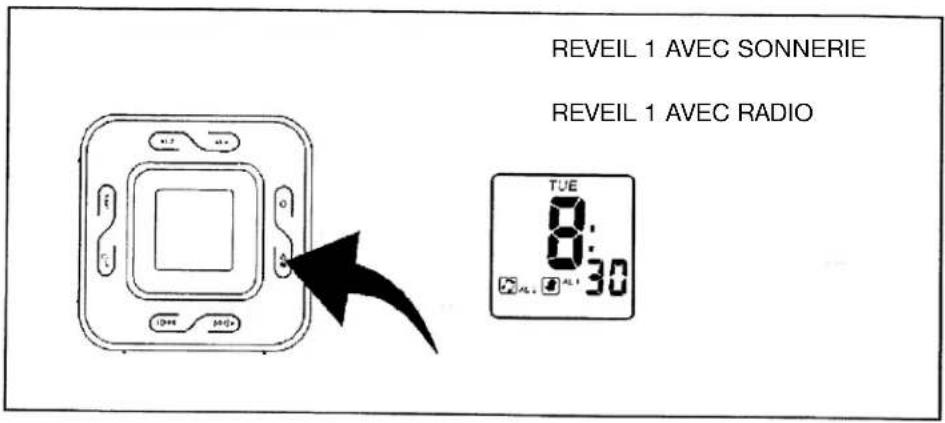
DIAGRAM 3
text_image
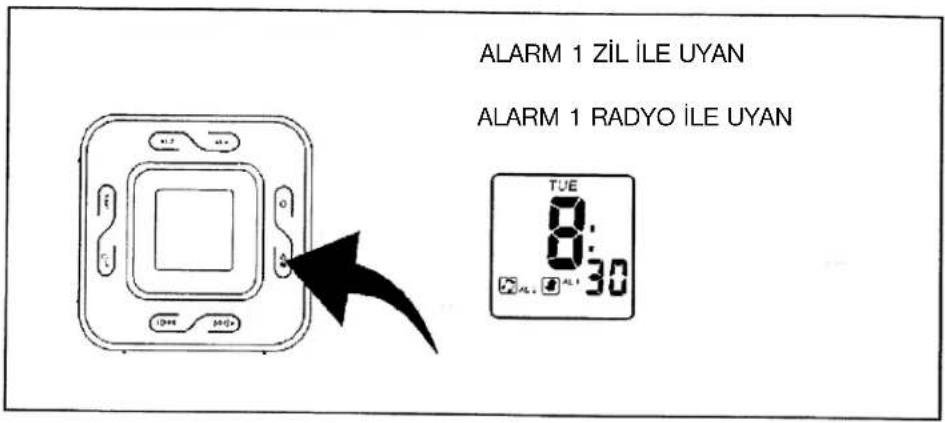
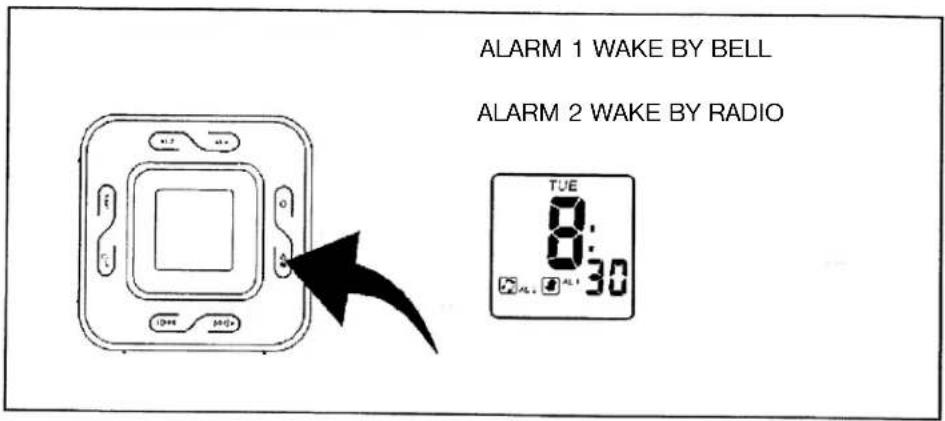
ALARM 1 WAKE BY BELL ALARM 2 WAKE BY RADIO TUE 8:30 SAL. SAL. 30Alarm output setting and alarm on/off
Press alarm 1 / alarm 2 / alarm 1+2 select button (13) to select alarm wake up by bell and radio. (Diagram 3)
ALARM DURATION
Bell alarm or radio alarm will continue output for 1 hour if no key is pressed. Alarm will stop automatically and restart at the same alarm set time on next day.
STOP THE ALARM
Press power button (14) to stop the current alarm and will cancel the snooze function as well.
DIAGRAM 4
text_image
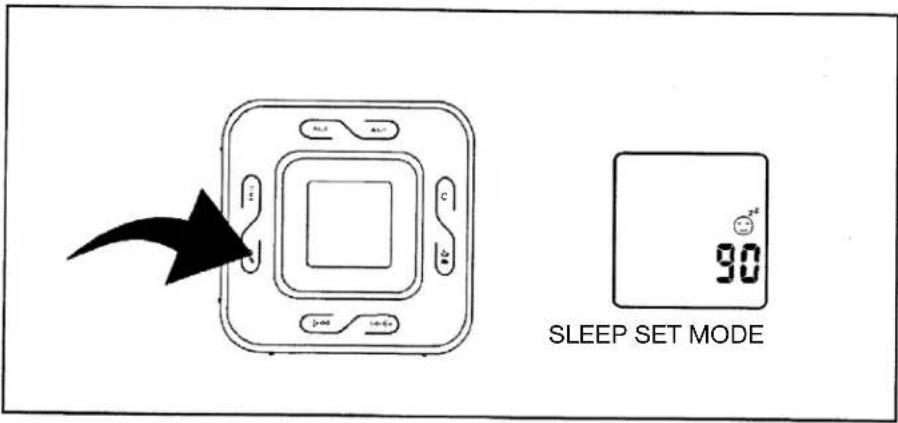
SLEEP SET MODE 90°To activate the sleep function
When radio on press snooze/sleep button (16), sleep "90" show on display with 2 second decrease sleep timer 90 minute-off by press snooze/sleep button (16) each. (Diagram 4)
NOTE: Press power on/off button (14) to off sleep function.
Snooze function:
-
Press snooze / sleep button (16) to activate snooze function (bell alarm or radio alarm will stop) when alarming.
-
Snooze interval is 9 minutes.
WORKING WITH AUDIO SOURCE
-
Use connective wire to join the audio source and the main unit together.
-
Adjust volume of the audio source in order to get a better amplifying effect.
REMARK: DO NOT set the audio source to too high volume to avoid overloading.
The output sound of the main unit will be eliminated and replaced once the "AUDIO IN" JACK (15) has connected to other audio source.
The sound will resume once the connective wire is removed from jack.
If "audio in" function is in use and broadcasting music, the alarm sound will insert into the music at the pre-set wake up time.
To stop the sound, simply press the power on/off alarm off button (14).
RADIO OPERATION
- Press the power on/off button (14) to turn radio on.
- Select AM or FM band using the wave band switch (2).
- Select the station using the tuning control (8).
- Press the volume control button (3)/(4) to adjust volume as required.
- Press the power on/off button (14) to turn radio off.
Note:
- The AM band use an internal directional aerial. Rotate the radio for best reception.
- Ensure that FM cord antenna (7) is completely unrolled and extended for FM reception.
RESET
- The reset button (17) is located on the bottom of unit.
- Use a ballpoin pen to press it whenever you change batteries, or unit is not performing as expected.
- This will return all settings to default value, and you will lose any stored data (alarm and clock settings).
CAUTION
- No naked flame sources, such as lighted candles, should be placed on the apparatus.
- Do not place the unit in closed bookcases or racks without proper ventilation.
- To prevent Fire or shock hazard, do not expose unit to rain or any type of moisture.
- The unit should not be exposed to direct sunlight, very high or low temperatures, moisture, vibrations or placed in a dusty environment.
- Do not use abrasive, benzene, thinner or other solvents to clean the surfaces of the unit. To clean, wipe it with mild non-abrasive detergent solution and clean soft cloth.
- Never attempt to insert wire, pins or other such object onto the vents or openings or the unit.
SPECIFICATION
Frequency range: AM 525 - 1615 kHz FM 87,5 - 108 MHz
Output Power: 280 mW
Speaker Impedance: 8 ohm
Battery backup: 1 x CR2032, 3V Flat Lithium (not included)
Power source: AC 230V \~ 50 Hz, 5 watts
ATTENTION: FOR SAFETY USAGE
Please select the correct voltage before plug in the AC power cord to a Household outlet. Otherwise, it may cause damage to the unit.
Dripping warning:
The prouduct shall not be exposed to dripping or splashing and that no objects filled with liquids, such as vases, shall be placed on the product.
Ventilation warning:
The normal ventilation of the product shall not be impeded for intended use.
DIAGRAM 1 DIAGRAM 2
text_image
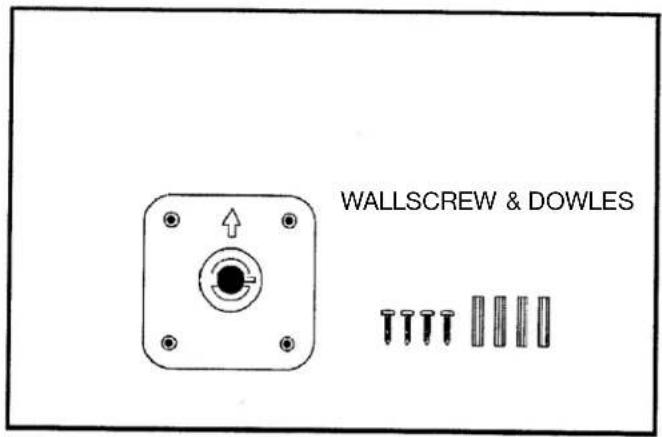
WALLSCREW & DOWLES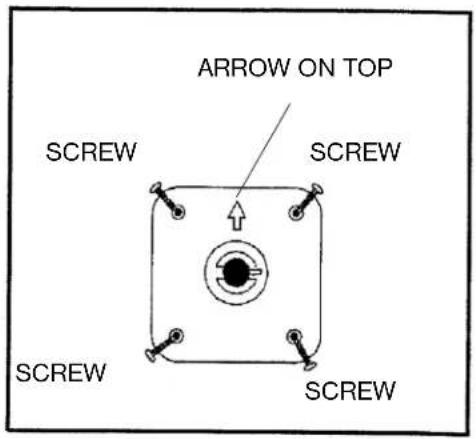
text_image
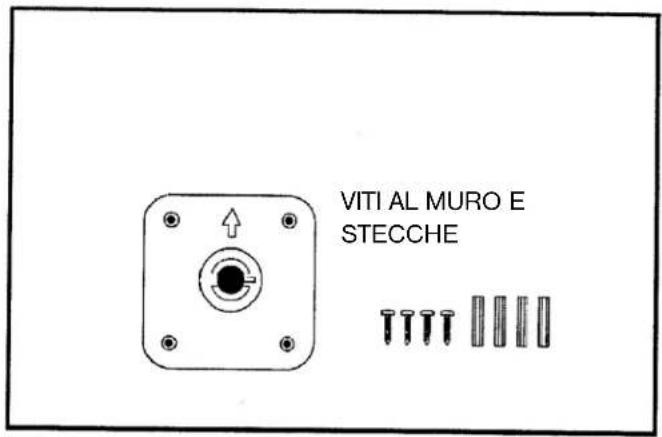
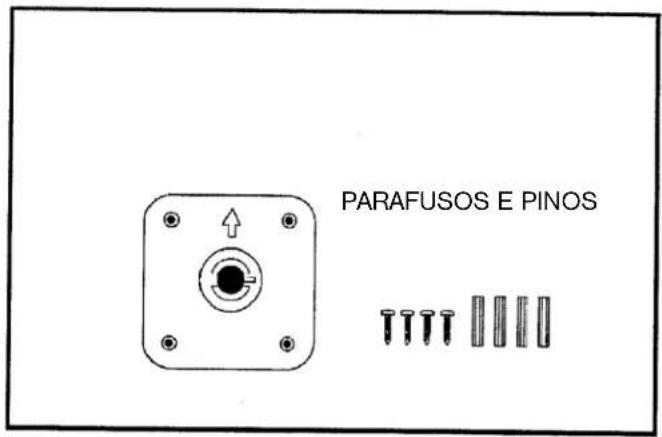
ARROW ON TOP SCREW SCREW SCREW SCREW- Desire the wall position to hang the clock radio.
- Hang the wall bracket by fixing 4 screw with the dowles tightly on wall (Diagram 2)
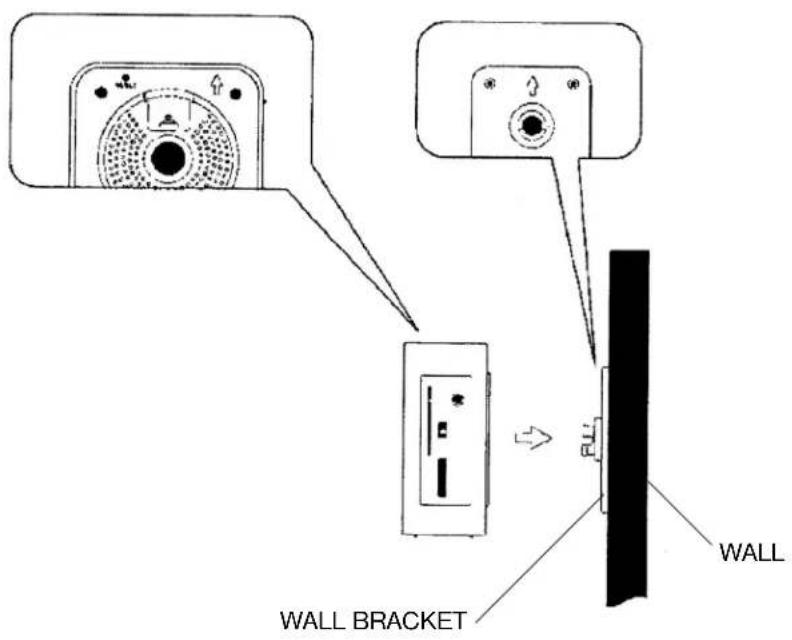
- Put the unit on the bracket and make sure the AC cord and FM antenna is separately outside of bracket.
- Tighten the bracket screw into the bottom of unit (Diagram 3)
- Re-check again the all bracket and unit is strongly hanging on the wall.
DIAGRAM 3
text_image
WALL BRACKET WALLMORE INFORMATION

Beware of small pieces and batteries, do not swallow them. It may be hazardous to your health and lead into suffocation. Please, Make sure to keep small devices and batteries out of the reach of children.

Important advice regarding hearing protection
Caution:
You care for your hearing, and so do we.
Therefore, use caution while using this appliance.
Our recommendation: Avoid high volumes.
Children should be supervised while using headphones; make sure that the appliance is not set to high volume.
Caution!
High volumes may cause irreparable damage to children's ears.

NEVER let allow anyone, especially children, to put objects into the holes, slots or openings on this devise. This may lead into death due to electric shock. The device must only be opened by a qualified assistant.

Only use the appliance for its intended purpose.
This device may only be used in housings and business premises.

Please keep this instruction manual for further reference.

MORE INFORMATION
Instructions on environment protection
Do not dispose of this product in the usual household garbage at the end of its life cycle; hand it over at a collection point for the recycling of electrical and electronic appliances. The symbol on the product, the instructions for use or the packing will inform about the methods for disposal.
The materials are recyclable as mentioned in its marking. By recycling, material recycling or other forms of re-utilization of old appliances, you are making an important contribution to protect our environment.
Please inquire at the community administration for the authorized disposal location.

Do not obstruct the ventilation of the device. Make sure, that no curtains, newspapers, furniture or any other type of object are blocking the ventilation system of the apparatus. The ventilation system must be clear of objects at all times! Overheating may lead into serious damage of the device and reduce its performance and lifespan.

Heat and warmth
Do not expose the appliance to direct sunlight. Make sure that the appliance is not subject to direct heat sources such as heaters or open fire. Make sure that the ventilation slots of the appliance are not covered.

Moisture and cleaning
This appliance is not waterproof! Do not immerse player in water. Do not allow player to come in contact with water. If water gets inside the player it may cause serious damage. Do not use cleaning agents that contain alcohol, ammoniac, benzene or abrasives as these could damage the player. For cleaning, use a soft, moistened cloth.
MODELL 4556
REVEIL-RADIO AM/FM AVEC AFFICHEUR ET OPTION D'ANNULATION LE WEEK-END
RISQUE D'ELECTROCUTION. NE PAS OUVRIR
ATTENTION: AFIN DE REDUIRE LES RISQUES D'ELECTROCUTION, NE PAS RETIRER LE COUVERCLE (OU LE DOS). AUCUNE PIECE A L'INTERIEUR N'EST UTILE AU CONSOMMATEUR. POUR UN DEPANNAGE, SE REFERER AU PERSONNEL QUALIFIE.
text_image
SUN 7:00 AL1 00 SATMODE REVEIL 1 EN WEEK-END (SAMEDI AU DIMANCHE)
REGLAGE DU REVEIL 2
text_image
MODE REGLAGE DU REVEIL 2MODE REVEIL 1 EN WEEK-END (SAMEDI AU DIMANCHE)
DIAGRAMME 3
text_image
REVEIL 1 AVEC SONNERIE REVEIL 1 AVEC RADIO TUE 8: 30Notre recommandations: Evitez les volumes forts.
text_image
SUN 7:00 AL 1 00 SATtext_image
1 2 3 MODALITÀ OROLOGIO 0: SUN 0: 00text_image
1 2 3 MON TUE WED PM SUN 0 0 0 THU FRI SAT MODALITA ALLARME 2DIAGRAMMA 1 DIAGRAMMA 2
text_image
VITI AL MURO E STECCHE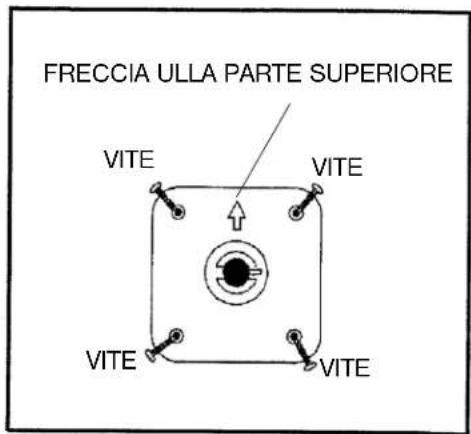
text_image
FRECCIA ULLA PARTE SUPERIORE VITE VITE VITE VITE
The triangular symbol with the lightning Bolt wams the user to the presence of dangerous non-isolated voltage on the inside of this device which may cause an electric shock.
WARNING
DANGER OF A HAZARDOUS ELECTRIC SHOCK. DO NOT OPEN
WARNING: TO REDUCE THE RISK OF AN ELECTRIC SHOCK, DO NOT REMOVE THE FRONT OR BACK COVER. INSIDE THE UNIT, THERE ARE NO PARTS THAT CAN BE REPAIRED OR ADJUSTED BY THE USER. PLEASE REFER TO QUALIFIED TECHNICIANS.

The triangular symbol with the exclamation highlights important points of which the user should refer to the manual regarding maintenance and repair.
DIAGRAMA 1 DIAGRAMA 2
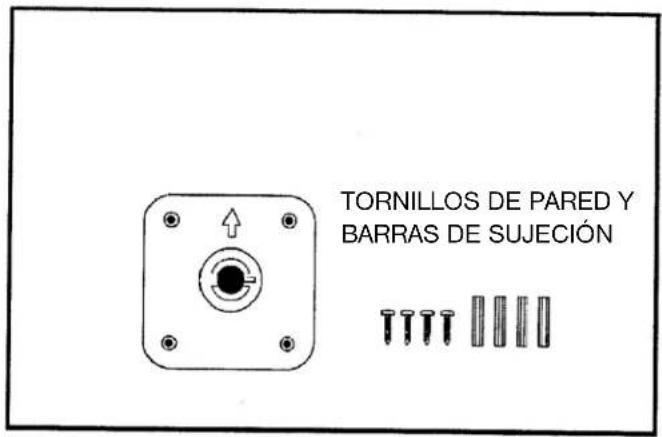
DIAGRAMA 1 DIAGRAMA 2
text_image
PARAFUSOS E PINOS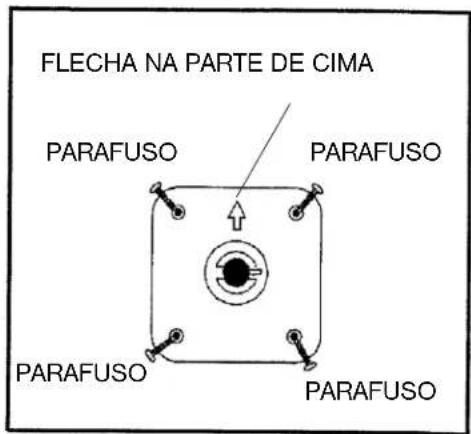
text_image
FLECHA NA PARTE DE CIMA PARAFUSO PARAFUSO PARAFUSO PARAFUSO PARAFUSO(VOLUME UP) ALARM 2 / ALARM 1+2
- ZMNIEJSZANIE NATEŻENIA DŻWIĘKU 14. PRZYCISK ON/OFF (WŁ./ WYŁ.)
(VOLUME DOWN)ALARM OFF (ALARM
WYŁACZONY)
- PRZEWÓD PRADU ZMIENNEGO (AC) 15. GNIAZDKO AUDIO IN
- PRZEGRÓDKA NA BATERIE 16. PRZYCISK SNOOZE / SLEEP (DRZEMKA/SEN)
- ANTENA TRYBU FM 17. PRZYCISK RESET (PONOWNYCH
USTAWIEN)
- POTENCJOMETR STROJENIA
- PRZYCISK PROGRAMUJACY ALARM 2
-
PRZYCISK PROGRAMUJACY ALARM 1
-
WIESZAK URZĄDZENIA
- NALEPKA ZE WSKAŻNIKAMI
(PRZYLEPIONA Z TYŁU URZĄDZENIA)
PODŁĄCZANIE DO ŻRÓDŁA PRĄDU
text_image
1 2 3 MON TUE WED PM SUN THU FRI SAT TRYB USTAWIEN ALARM 1text_image
1 MON TUE WED PM SUN 0 0 0 THU FRI SAT 2 3 TRYB USTAWIEN ALARM 2text_image
FUNKCJA SLEEP (SPANIE)text_image
SUN 7:00 AL1 00 SATWEEKEND WEKKER 1 INSTELLINGSMODUS (ZA - ZO)
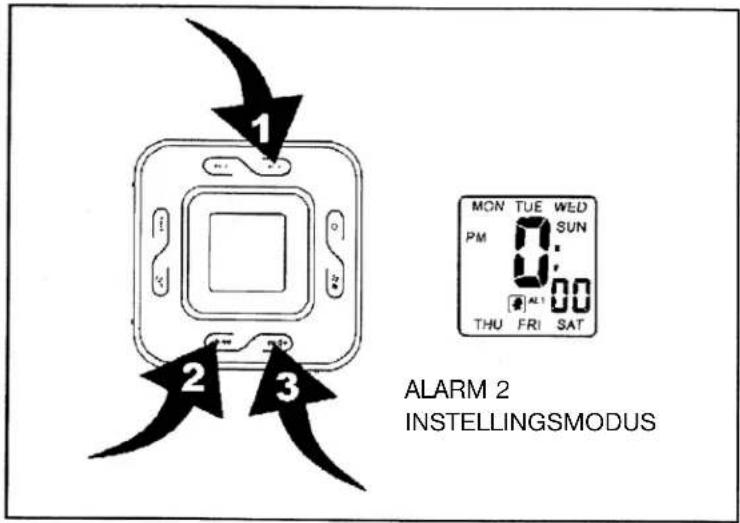
WEKKER 2 INSTELLING
text_image
1 2 3 MON TUE WED PM SUN 0 0 ALT 00 THU FRI SAT ALARM 2 INSTELLINGSMODUS- Druk wekker 2 instellingsknop (9) (positie 1) in om in het wekker 2 instellingsmenu te komen.
- Druk de wekker 2 instellingsknop (9) 2 seconden in, dag knippert. (Diagram 2)
- Druk de volumeverhoging knop ▶◀◀ + (3) (positie 3) en de volumeverlaging knop ▶◀◀ (4) (positie 2) in om de dag in te stellen.
- Druk de wekker 2 instellingsknop (9) (positie 1) in, uren knipperen. Druk de volumeverhoging knop ▶▶◀+ (3) (positie 3) en de volumeverlaging knop ▶◀◀ (4) (positie 2) in om de uren in te stellen.
- Druk de wekker 2 instellingsknop (9) (positie 1) in, minuten knipperen. Druk de volumeverhoging knop ▶▶◀+ (3) (positie 3) en volumeverlaging knop ▶◀◀ (4) (positie 2) in om de minuten in te stellen.
- Druk de wekker 2 instellingsknop (9) (positie 1) in, wekker 2 bel knippert. Druk volumeverhoging knop ▶+ (3) (positie 3) en volumeverlaging knop ▶◀ (4) (positie 2) in om de wekker 2 bel en wekkerradio te selecteren.
DIAGRAM 2

text_image
MON TUE WED SUN 1:00 AL 1 THU FRI SATWEEKEND WEKKER 2 INSTELLINGSMODUS (MA - ZO)

text_image
MON TUE WED 1:00 AL1 THU FRIWEEKEND WEKKER 2 INSTELLINGSMODUS (MA - VR)

text_image
SUN 7:10 AL 1 SATWEEKEND WEKKER 2 INSTELLINGSMODUS (ZA - ZO)
DIAGRAM 3
text_image
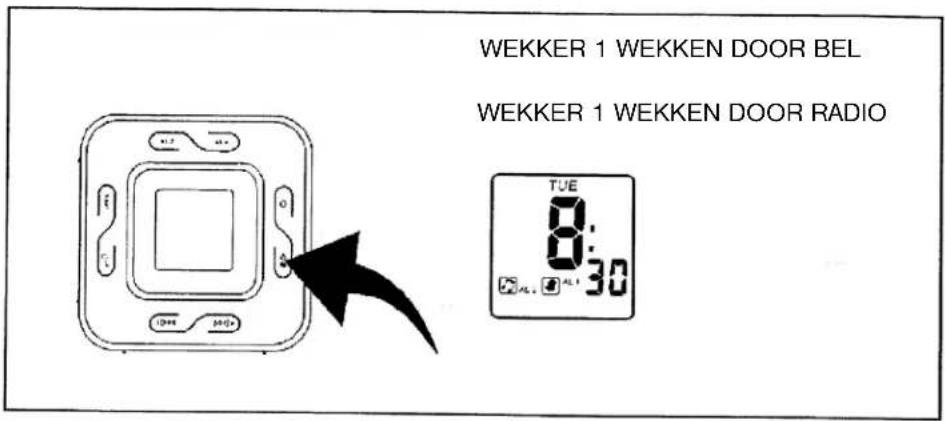
WEKKER 1 WEKKEN DOOR BEL WEKKER 1 WEKKEN DOOR RADIOtext_image
PIJL BOVENAAN SCHROEF SCHROEF SCHROEF SCHROEFDOPLŇUJÍCÍ INFORMACE

DOPLŇUJÍCÍ INFORMACE
text_image
1 2 3 MON TUE WED PM SUN 0 THU FRI SAT ALARM 1 MODUtext_image
1 2 3 MON TUE WED PM SUN 0 0 0 THU FRI SAT ALARM 2 AYAR MODUHAFTA SONU ALARMI 2 AYAR MODU (PT DEN PA)
text_image
MON TUE WED 7:10 AL1 THU FRIHAFTA SONU ALARMI 2 AYAR MODU (PT DEN CM)
text_image
SUN 7:00 AL1 SATHAFTA SONU ALARMI 2 AYAR MODU (CT DEN PA)
DIAGRAM 3