
CL1563 - Alarm Clock AudioSonic - Free user manual and instructions
Find the device manual for free CL1563 AudioSonic in PDF.
| Product type | Clock radio |
| Brand | AudioSonic |
| Model | CL1563 |
| Dimensions | 23 x 16 x 8 cm (L x W x H) |
| Weight | Approximately 1.2 kg |
| Main power supply | AC 230 V ~ 50 Hz |
| Power consumption | 12 W |
| Backup battery | 2 AAA (UM-4) 1.5 V batteries (not included) |
| Radio bands | FM 88-108 MHz, AM 540-1600 kHz |
| FM antenna | Unwinding antenna wire |
| AM antenna | Built-in ferrite antenna |
| CD player | Standard audio CD |
| Main functions | AM/FM radio, CD player, dual alarm, sleep function, repeat/random, CD programming |
| Headphone output | 3.5 mm stereo mini-jack |
| Display | LED with indicators ALARM, POWER, RANDOM, PM, SNOOZE, REPEAT, PROGRAM, SLEEP |
| Cleaning | Soft damp cloth, without abrasive products |
| Safety | Do not open the device, avoid water, follow safety instructions |
| Repairability | Entrust repairs to a qualified technician |
| Package contents | Device, power cable, instruction manual |
Frequently Asked Questions - CL1563 AudioSonic
User questions about CL1563 AudioSonic
0 question about this device. Answer the ones you know or ask your own.
Ask a new question about this device
Download the instructions for your Alarm Clock in PDF format for free! Find your manual CL1563 - AudioSonic and take your electronic device back in hand. On this page are published all the documents necessary for the use of your device. CL1563 by AudioSonic.
USER MANUAL CL1563 AudioSonic
WARNING: TO REDUCE THE RISK OF FIRE OR ELECTRIC SHOCK, DO NOT EXPOSE THIS ANTENNA TO RAIN OR MOISTURE.

A triangle with a lightning symbol draws the user's attention to "dangerous voltage" without insulation in the cabinet which may be high enough to entail a risk of electric shock.
WARNING RISK OF ELECTRIC SHOCK DO NOT OPEN
CAUTION: TO REDUCE THE RISK OF ELECTRIC SHOCK. DO NOT REMOVE COVER (OR BACK). THERE ARE NO USER SERVICEABLE PART INSIDE. REFER SERVICING TO QUALIFIED SERVICE PERSONNEL.

A triangle with an exclamation mark draws the user's attention to important instructions for use and maintenance in the accompanying manual, which should be studied.
FURTHER INFORMATION

Beware of small pieces and batteries, do not swallow them. It may be hazardous to your health and lead into suffocation. Please, Make sure to keep small devices and batteries out of the reach of children.

Important advice regarding hearing protection
Caution:
You care for your hearing, and so do we.
Therefore, use caution while using this appliance.
Our recommendation: Avoid high volumes.
Children should be supervised while using headphones; make sure that the appliance is not set to high volume.
Caution!
High volumes may cause irreparable damage to children's ears.

NEVER let allow anyone, especially children, to put objects into the holes, slots or openings on this devise. This may lead into death due to electric shock. The device must only be opened by a qualified assistant.

Only use the appliance for its intended purpose.
This device may only be used in housings and business premises.

Please keep this instruction manual for further reference.
Instructions on environment protection
Do not dispose of this product in the usual household garbage at the end of its life cycle; hand it over at a collection point for the recycling of electrical and electronic appliances. The symbol on the product, the instructions for use or the packing will inform about the methods for disposal.
The materials are recyclable as mentioned in its marking. By recycling, material recycling or other forms of reutilization of old appliances, you are making an important contribution to protect our environment.
Please inquire at the community administration for the authorized disposal location.

Do not obstruct the ventilation of the device. Make sure, that no curtains, newspapers, furniture or any other type of object are blocking the ventilation system of the apparatus. The ventilation system must be clear of objects at all times! Overheating may lead into serious damage of the device and reduce its performance and lifespan.

Heat and warmth
Do not expose the appliance to direct sunlight. Make sure that the appliance is not subject to direct heat sources such as heaters or open fire. Make sure that the ventilation slots of the appliance are not covered.

Moisture and cleaning
This appliance is not waterproof! Do not immerse the device in water. Do not allow player to come in contact with water. If water gets inside the device it may cause serious damage. Do not use cleaning agents that contain alcohol, ammoniac, benzene or abrasives as these could damage the device. For cleaning, use a soft, moistened cloth.

Professional recycling
Batteries and packaging should not be disposed of in the trash. Batteries must be handed over to a collection centre for used batteries. Separating disposable packaging materials is ecologically friendly.
IMPORTANT SAFETY INSTRUCTIONS
For best achievement please read carefully the operating instructions before the first start-up, in order that a problem-free operation are guaranteed for many years.
- READ INSTRUCTIONS - All the safety and operating instructions should be read before the unit is operated.
- RETAIN INSTRUCTIONS - The safety and operating instruction should be retained for future reference.
- HEED WARNINGS - All warnings on the unit and in the operating instructions should be adhered to.
- FOLLOW INSTRUCTIONS - All operating instructions should be followed.
- WATER AND MOISTURE - The appliance should not be used near water, for example, near a bathtub, washbowl, kitchen sink, laundry tub, swimming pool or in a wet basement.
- VENTILATION – Openings in the device serve its proper ventilation, are necessary for the operation and prevent overheating. The unit should be situated so that its location or position does not interfere with its proper ventilation. Do not place on bed, sofa, rug or similar surface that may block the ventilation openings, in a built-in installation, such as a bookcase or cabinet that may impede the flow of air through the ventilation openings.
- HEAT - The unit should be situated away from heat sources such as radiators, stoves, or other appliances (including amplifiers) that produce heat.
- POWER SOURCE - The unit should be connected to power supply only of the type described in the operating instructions or as marked on the unit.
- POWER CORD PROTECTION - Power supply cords should be routed so that they are not likely to be walked on or pinched by items placed upon or against them.
- NON-USE - During longer periods of non-use please disconnect from mains power supply and antenna.
- OBJECT and LIQUID ENTRY - Care should be taken so that objects do not fall and liquids are not spilled into the enclosure through openings.
- DAMAGE REQUIRING SERVICE - The unit should be serviced by qualified service personnel when:
a. The power-supply cord or plug has been damaged.
b. Objects have fallen into, or liquid has been spilled into the unit enclosure.
c. The unit has been exposed to rain or moisture.
d. The appliance has been dropped, or the enclosure damaged. Only use controls and adjustments as specified in the manual.
e. The unit does not appear to operate normally.
f. The device displays serious changes in its performance
- SERVICING - The user should not attempt to service the unit beyond that described in the user operating instructions. All other servicing should be referred to qualified service personnel.
- CLEANING - Disconnect from mains power supply before cleaning. Do not use liquid or spray cleaners, only use a damp cloth. Follow the care and maintenance instructions in this manual.
- LIGHTNING - During lightning and longer periods of non-use please disconnect from mains power supply and antenna.
- SAFETY CHECK - After servicing the unit ask the customer service for a safety check.
- OVERLOAD - To avoid fire and electric shock do not overload wall outlets and convenience receptacles.
- ELECTROSTATIC DISCHARGE - Disconnect from mains power supply and remove batteries if unit malfunctions. Reconnect after a short time.
CAUTION:

THIS CD PLAYER IS A CLASS I LASER PRODUCT. HOWEVER, THIS CD PLAYER USES A VISIBLE/INVISIBLE LASER BEAM, WHICH COULD CAUSE HAZARDOUS RADIATION EXPOSURE IF DIRECTED. BE SURE TO OPERATE THE CD PLAYER CORRECTLY AS INSTRUCTED.
USE OF CONTROLS OR ADJUSTMENTS OR PERFORMANCE OF PROCEDURES OTHER THAN THOSE SPECIFIED HEREIN MAY RESULT IN HAZARDOUS RADIATION EXPOSURE. DO NOT OPEN COVERS AND DO NOT REPAIR THE DEVICE YOURSELF.
TO REDUCE THE RISK OF FIRE OR ELECTRIC SHOCK AND ANNOYING INTERFERENCE USE ONLY THE RECOMMENDED ACCESSORIES.
NOTES ABOUT THIS INSTRUCTION MANUAL:
- This instruction manual is published by the manufacturer without any warranty. Corrections and changes of this instruction manual for the removal of typographic mistakes and editorial inaccuracies as well as due to (technical) improvements (changes) of the devices can be done by the manufacturer at any time without announcement. Changes of this kind are considered in future versions of this user manual. All rights reserved.
- All figures are only for illustration and do not always show the exact representation of the product.
- This unit is not intended for use by persons (including children) with reduced physical, sensory, or mental capacities, or lack of experience and knowledge, unless they have been given supervision or instruction concerning use of the appliance by a person responsible for their safety. Children should be supervised to ensure that they do not play with the unit.
FURTHER NOTES ON THE DEVICE
Setting a safe volume level
- If you continually listen to loud music, your hearing gradually adapts to it and gives you the impression that the volume is lower.
• What seems normal to you can be already for long time too loud and unhealthy.
• To protect yourself from this, set the volume to a low level. - Increase the volume slowly.
- Damage to your hearing can be extensive and cannot be reversed.
• If you notice a hearing problem, please consult a doctor.
Condensation:
- Condensation may occur when moving the device from a cold to a warm environment. If there is moisture inside the player, it may not operate properly. Don't turn on the device and wait about one hour for the moisture to evaporate.
Saving energy
- During nonuse of the unit it is advisable to turn off the player with the power switch.
- If the unit is not used for a long period of time, it should be unplugged from the AC socket.
Unpacking:
• Take out carefully the unit from the packing. Please keep the packing for further use.
- Carefully remove possible protection cardboards and slipcovers.
LOCATION OF CONTROLS AND FUNCTIONS
Front view 1. CLOCK ADJ: Clock adjust
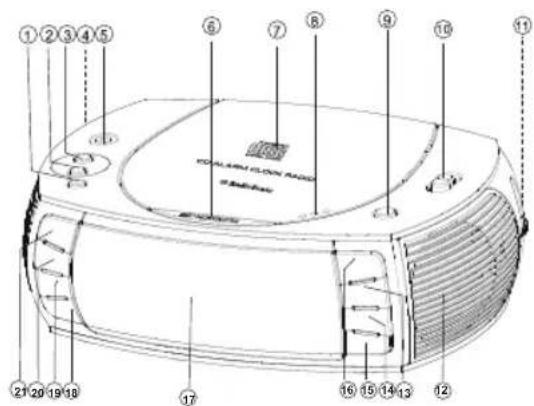
Bottom view
- ALARM 2: Alarm 2
- ALARM 1: Alarm 1
- VOLUME: Volume control
- PHONES: Headphone jack
- SNOOZE: Snooze
- CD door
- OPEN: Open the CD door
- ON/OFF: On/Off
- BUZZER/AM/FM/CD: Function selector
- TUNING: Tuning control (Frequency is shown on the rotary knob)
- Speaker
- STOP: Stop CD playback
-
I / HOUR: Next track/search track forward/set hours
- I<< / MINUTE: Previous track/search track backward/set minutes
- PLAY/PAUSE: Start/pause playback
- Display
- SLEEP: Sleep function
- DISPLAY: Track indication during CD play-back
- REPEAT/RANDOM: Repeat tracks/random playback
- PROGRAM: Program tracks
- Power cord
- Battery compartment
Indication LEDs
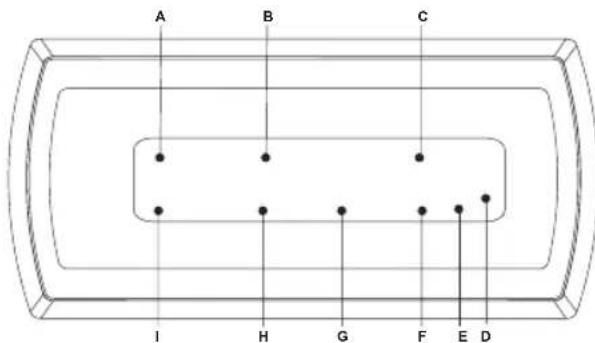
LED indications:
A. ALARM 1: Alarm 1 activated
B. POWER: Turned on
C. RANDOM: Random playback activated
D. PM: 12 hours time format activated
E. SNOOZE: Snooze activated
F. REPEAT: Repeat function activated
G. PROGRAM: Program function activated
H. SLEEP: Sleep function activated
I. ALARM 2: Alarm 2 activated
POWER SUPPLY
- The unit is designed for mains power supply AC 230V\~50Hz.
- Do not connect the unit to any other power supply to avoid damage that is not covered by your warranty.
- Disconnect from mains when not in use.
BACK-UP BATTERIES
Insert two batteries type "AAA, UM - 4", 1.5 V. Please observe the correct polarity marked inside the battery compartment ("+" and "-"). Preferably use alkaline batteries. In case of power failure the battery will keep the alarm and time settings without displaying them. In the event of a power failure the radio and CD operation will stop. The life time of the batteries is about 12 month.
TIME SETTING
- Connect the power plug to a wall socket.
- On the display flashes 12:00 after connecting to the mains the first time.
- Press and hold the button >>I / HOUR for fast setting or tap it briefly to increase the setting by one hour.
- Press and hold the button I<< / MINUTE for fast setting or tap it briefly to increase the setting by one minute.
- Press the CLOCK ADJ button once to confirm. The time indication stops flashing.
- To adjust the 12 or 24 hours time format press and hold the CLOCK ADJ button for 2 seconds. The display shows either 12H or 24H.
Note: If the clock was set before press the CLOCK ADJ button once. The adjusted time flashes on the display; continue now with step 3.
HEADPHONES
On top of the device a 3.5 mm mini stereo plug PHONES is provided for private listening. Connect here your headphones (not included) with a 3.5 mm mini stereo plug. When connecting the headphones the speakers are automatically muted.
GENERAL OPERATING INSTRUCTIONS
RADIO
- Press the ON/OFF button to turn on the device.
- Select the desired radio frequency band AM or FM with the function selector BUZZER/AM/FM/CD.
- Select the desired station with the TUNING rotary knob. The adjusted frequency for the corresponding frequency band will be shown on the TUNING rotary knob.
-
Adjust the volume with the VOLUME control.
-
Press the ON/OFF button to turn off the device.
Tips for better reception
FM: For best reception fully unwind the FM wire antenna at the rear of the unit.
AM: The unit comes with a built-in ferrite antenna. For best reception change the direction of the unit.
CD
- Press the ON/OFF button to turn on the device. The indication POWER turns on.
- Slide the function selector to the CD position.
- Open the door of the CD drive by pressing the OPEN button. Place a CD with the label facing upwards on the CD compartment and close it again. The total number of tracks will be shown for 2 seconds. Afterwards the current time will be displayed again.
- Start the playback by pressing the PLAY/PAUSE button.
Track indication
Press during playback of a CD the DISPLAY button to show the current track number (for a few seconds). In the stop mode the total number of track is shown.
Playback/Pause
- If the PLAY/PAUSE button is pressed in the stop mode, the playback of the first track starts.
- If the PLAY/PAUSE button is pressed in the playback mode, the playback is paused and the track number flashes for 2 seconds on the display.
Stop playback
If the STOP button is pressed in the playback or pause mode, the playback is stopped and the total number of tracks will be shown on the display.
Selection of a different track
- Press I<< / MINUTE or >>I / HOUR, until the desired track number is shown on the display.
- Press shortly I<< / MINUTE to return to the beginning of the current track.
- Press I<< / MINUTE again (within 1 second after the first key stroke) to skip back one track at a time.
- Press >>I / HOUR to skip to the next track.
Search for a certain position (only during playback)
Press and hold I<< / MINUTE or >>I / HOUR to search for the desired position within the track. Normal playback continues if the button is released. In search mode the volume is reduced.
Repeat mode
Press the REPEAT/RANDOM button during playback and the current played track or the whole CD can be repeated. Each press switches the repeat mode:
1. Repeat current track
The REPEAT indicator flashes
2. Repeat all tracks
The REPEAT indicator is steadily on.
3. Random play-back
The RANDOM indicator is steadily on.
4. Turn off repeat mode/random playback
The indicators for REPEAT and RANDOM are turned off.
Programming
Up to 20 tracks at an Audio and CD can be programmed in a specific sequence.
-
Press the ON/OFF button to turn on the device. The indication POWER turns on.
-
Slide the function selector to the CD position.
-
During the stop mode press the PROGRAM button. On the display PROG P01 is shown briefly and then .00 flashes.
- Select the desired track number with the I<< / MINUTE or >>I / HOUR search buttons.
- Save the selected track by pressing PROGRAM in the memory.
- Now on the display PROG P02 is indicated.
- Repeat steps 4 and 5, until all 20 tracks are programmed. After inserting 20 tracks in the memory press the PLAY/PAUSE button to start the playback of the first title.
Checking of the program:
In the stop mode press the PROGRAM button. The programmed track numbers will be shown in the programmed order each time you press the PROGRAM button.
Delete the programmed tracks
Press STOP twice or open the CD door to cancel the programmed playback.
ALARM FUNCTION
This unit allows you to set two different wake up times with the ALARM 1 and ALARM 2 buttons.
Adjusting the Alarm Time
1st Alarm (ALARM 1)
- Press the ON/OFF button once to turn off the device.
- Press the ALARM 1 button once. The LED ALARM1 lights up and on the display flashes the indication 0:00.
- Then press the >>I / HOUR button to adjust hour (1-24).
- Afterwards press the I<< / MINUTE button to adjust minutes.
- Conclusive press the ALARM 1 button again.
2nd Alarm (ALARM 2)
- Press the ON/OFF button once to turn off the device.
- Press the ALARM 2 button once. The LED ALARM2 lights up and on the display flashes the indication 0:00.
- Then press the >>1 / HOUR button to adjust hour (1-24).
- Afterwards press the I<< / MINUTE button to adjust minutes.
- Conclusive press the ALARM 2 button again.
Wake Up to the Buzzer Sound
Select with the function selector BUZZER/AM/FM/CD the option BUZZER after set wake up time.
Wake Up to the Radio
- Follow procedures under Radio to select your desired radio station.
- Press the ON/OFF button once to turn off the device.
- Select the desired radio frequency band AM or FM with the function selector BUZZER/AM/FM/CD.
- Follow procedures under Adjusting the Alarm Time to set the wake up time.
Wake up to CD music
- Follow procedures under CD.
- Press the ON/OFF button once to turn off the device.
- Select with the function selector BUZZER/AM/FM/CD the option CD.
- Follow procedures under Adjusting the Alarm Time to set the wake up time.
Notes: If the alarm sound is not stopped manually by the button SNOOZE or ON/OFF the system will turn off the alarm sound after 60 minutes.
Stopping the Alarm
The alarm is programmed to run for 60 minutes.
- Press the SNOOZE button to stop the alarm temporarily, the alarm will stop and ring again automatically after 6 minutes.
- Press the ON/OFF button to stop the alarm temporarily, the alarm will sound again 24 hours later.
- To turn off the alarm permanently by ALARM 1 or ALARM 2 button, the alarm LED indicators will turn off.
Sleep to Music
- Select your desired mode to be used by the sleep function.
- Press SLEEP button, the LED SLEEP lights up and the device will go to the sleep mode.
- Press SLEEP button again to select the desired sleep time (4 possibilities: 90 - 60 - 30 - 15 minutes).
- Turn off the sleep function by pressing SLEEP, until the LED indicator SLEEP turns off.
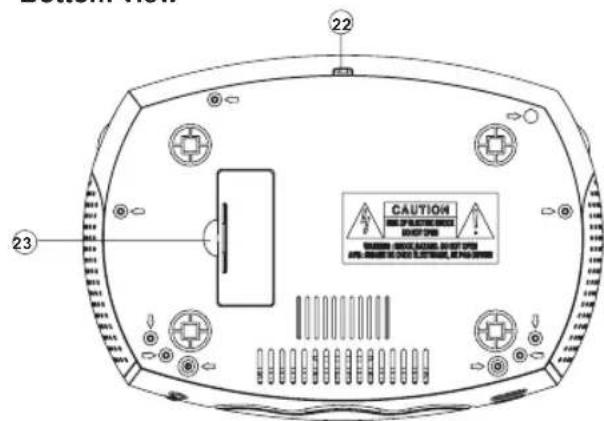
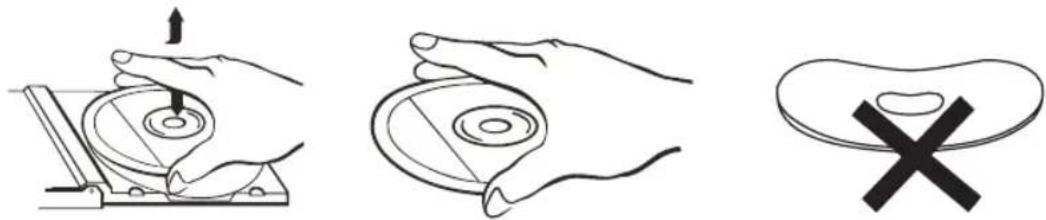
DISC CLEANING AND MAINTENANCE
Handling of CDs
* Remove the CD from its cover.
* Do not touch the surfaces.
* Do not attach stickers to CDs and do not write on them.
* Do not bend CDs.
Storage
* Always store CDs in their cover.
* Do not subject discs to direct sunlight, dirty, dusty and damp areas or car heaters.
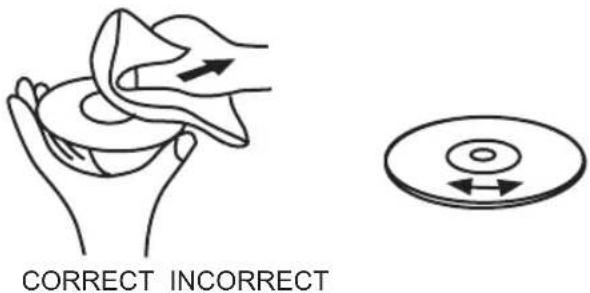
Cleaning
* Clean CDs with a soft cloth.
* Clean CDs from the center to the edge.
FROM THE CENTRE TO THE EDGE
TROUBLESHOOTING
To solve the common problems, read and follow the troubleshooting list. If you still cannot solve the problem, consult your nearest service dealer.
| PROBLEM POSSIBLE CAUSE SOLUTION | ||
| GeneralNo sound | Volume is set too low.Mains cable not connected. | Adjust the volume.Connect mains cable correctly. |
| No key function Electrostatic charge. Pull the power plug for a few seconds,then re-connect it and turn on the device again. | ||
| RadioPoor reception The (AM or FM) radio station not tuned properly.FM: the wire antenna is not directed properly.AM: the device is not directed properly.Interferences by other appliances (TV sets, VCRs, computers, etc.) | Tune to the radio station again.FM: adjust wire antenna.AM: adjust the unit.Keep distance to other electric appliances. | |
| CDNo playbackFaulty playback | The CD is inserted upside down.The CD is dirty or damaged.The CD is steamy.The CD is dirty or damaged. | Reinsert CD with label side facing up.Replace or clean the CD.Wipe with a soft cloth.Replace or clean the CD. |
TECHNICAL SPECIFICATIONS
General
Power supply: AC 230V\~50Hz
Power consumption: 12 W
Back-up battery: DC 3V (2x UM-4/AAA battery 1.5V) (not included)
Radio
Frequency band: FM 88 - 108 MHz
AM 540 – 1600 kHz
Antenna: FM wire antenna
AM: build in ferrite antenna
CD player
Playback system: Compact Disc Digital Audio System
Dimensions: 23 x 16 x 8 cm (L x W x H)
Weight: approx. 1.2 kg
SUBJECT TO CHANGE WITHOUT PRIOR NOTICE.
GEBRUIKERSHANDLEIDING
WAARSCHUWING: STEL, OM HET RISICO VAN VUUR OF EEN ELEKTROSHOCK TE VERMINDEREN, DEZE ANTENNE NIET AAN REGEN OF VOCHTIGHEID BLOOT.

1ste Alarm (ALARM 1)
natural_image
Three-step diagram showing hand positioning: press, disc, and pad (no text or symbols)Opslag
Problemen Oplossen
LED-Anzeigen:
natural_image
Line drawing of a hand holding a cloth or towel, with an arrow indicating motion (no text or symbols)RICHTIG FALSCH

STÖRUNGSBEHEBUNG
REMARQUES SUR CE MANUEL D'INSTRUCTION:
Lecture/Pause (Playback/Pause)
natural_image
Hand holding a mechanical component with an arrow indicating upward motion (no text or symbols)
natural_image
Line drawing of a hand holding a circular object with a ring (no text or symbols)
Rangement
natural_image
Illustration of hands performing a medical or therapeutic procedure on a patient's abdomen (no text or symbols present)CORRECT

INCORRECT
DEPANNAGE
Vista inferior

Indicaciones LED:
A. ALARM 1: Alarma 1 activada
natural_image
Line drawing of a hand holding a folded paper or cloth, with an arrow indicating motion (no text or symbols)CORRECTO

INCORRECTO
Indicações LED:
Apagar as faixas programadas
Ajustar as horas do alarme
1.° Alarme (ALARM 1)
natural_image
Three-step diagram showing hand positioning: press, disc, and padlock (no text or symbols)Armazenamento
natural_image
Line drawing of a hand holding a piece of dough with an arrow indicating force (no text or symbols)CORRECTO

INCORRECTO
INFORMACJE DODATKOWE

1szy Alarm (ALARM 1)
natural_image
Hand holding a mechanical component with an arrow indicating upward motion (no text or symbols)
natural_image
Line drawing of a hand holding a circular object with a ring (no text or symbols)
Przechowywanie
natural_image
Illustration of a hand holding a piece of paper or cloth, with an arrow indicating direction (no text or symbols present)PRAWIDŁOWO

NIEPRAWIDŁOWO
USUWANIE USTEREK

- FURTHER INFORMATION
- Important advice regarding hearing protection
- Caution:
- Caution!
- Instructions on environment protection
- Heat and warmth
- Moisture and cleaning
- Professional recycling
- IMPORTANT SAFETY INSTRUCTIONS
- NOTES ABOUT THIS INSTRUCTION MANUAL:
- FURTHER NOTES ON THE DEVICE
- Setting a safe volume level
- Condensation:
- Saving energy
- Unpacking:
- LOCATION OF CONTROLS AND FUNCTIONS
- LED indications:
- POWER SUPPLY
- BACK-UP BATTERIES
- TIME SETTING
- HEADPHONES
- GENERAL OPERATING INSTRUCTIONS
- RADIO
- Tips for better reception
- CD
- Track indication
- Playback/Pause
- Stop playback
- Selection of a different track
- Search for a certain position (only during playback)
- Repeat mode
- Repeat current track
- Repeat all tracks
- Random play-back
- Turn off repeat mode/random playback
- Programming
- Checking of the program:
- Delete the programmed tracks
- ALARM FUNCTION
- Adjusting the Alarm Time
- 1st Alarm (ALARM 1)
- 2nd Alarm (ALARM 2)
- Wake Up to the Buzzer Sound
- Wake Up to the Radio
- Wake up to CD music
- Stopping the Alarm
- Sleep to Music
- DISC CLEANING AND MAINTENANCE
- Handling of CDs
- Storage
- Cleaning
- TROUBLESHOOTING
- TECHNICAL SPECIFICATIONS
- General
- CD player
- GEBRUIKERSHANDLEIDING
- 1ste Alarm (ALARM 1)
- Opslag
- Problemen Oplossen
- LED-Anzeigen:
- STÖRUNGSBEHEBUNG
- REMARQUES SUR CE MANUEL D'INSTRUCTION:
- Lecture/Pause (Playback/Pause)
- Rangement
- DEPANNAGE
- Indicaciones LED:
- Indicações LED:
- Apagar as faixas programadas
- Ajustar as horas do alarme
- 1.° Alarme (ALARM 1)
- Armazenamento
- INFORMACJE DODATKOWE
- 1szy Alarm (ALARM 1)
- Przechowywanie
- USUWANIE USTEREK
Brand : AudioSonic
Model : CL1563
Category : Alarm Clock