
IR3000DAB - Radio Soundmaster - Free user manual and instructions
Find the device manual for free IR3000DAB Soundmaster in PDF.
User questions about IR3000DAB Soundmaster
0 question about this device. Answer the ones you know or ask your own.
Ask a new question about this device
Download the instructions for your Radio in PDF format for free! Find your manual IR3000DAB - Soundmaster and take your electronic device back in hand. On this page are published all the documents necessary for the use of your device. IR3000DAB by Soundmaster.
USER MANUAL IR3000DAB Soundmaster
text_image
Internet Radio INTERNÉ BAYERN Tuning/Select Internet Radio Internet Radio Tuning/SelectDEUTSCH
ENGLISH
FRANÇAIS
NEDERLANDS
ESPAÑOL
PORTUGUÊS
NORSK
SVENSK
SUOMI
DANSK
Hersteller
text_image
Tuning/Select On/Off Sleep Menu Mode Back 1 2 3 4 5 6 7 8 9 10 Vol- Vol+ Info Preset Alarm soundmaster® hightext_image
soundmaster®text_image
Bass Bass 0 dB -14 0 144.2 Netzwerk
text_image
FRONTIER SILICON Radio Portal Access global stations Personalise favourites Search. Stations Podcasts Browse Stations By location By genre By language New stations Most popular Browse Podcasts By location By genre My account My favourites My added stations My preferences English Dansk Português Español Norsk Italiano Français Svensk Nederlands Deutsch Suomi About us Contact us Logout © Frontier Silicon 2008 | Legal Mark's radio Station name Location Genre Stream 2 Ten FM Reading United Kingdom Electronica WMA 128K BBC Radio 2 London United Kingdom Variety RealPlayer 44K Capital Radio London United Kingdom Top 40 WMA 128K Virgin Radio London United Kingdom Pop MP3 128K On Air Power Internet Only World Asia MP3 128K Antenna Uno Catania Italy Dance MP3 96K BBC Radio 1 London United Kingdom Top 40/Dance/Rock RealPlayer 16K Radio Dzair Internet Only World Middle East MP3 128K 108 Xtra United Kingdom Electronica MP3 256K Capital FM 98.4 Nairobi Kenya Pop WMA 20K BBC R5LiveSportX International London United Kingdom Sports WMA 48K Classic FM London United Kingdom Classical WMA 128Ktext_image
Meine Playlist Dazed and Confused Bird On The Wire Birdcall Morning Here We Go Againtext_image
Media Sharing Share music, pictures, and video on your network. Learn more about sharing. Sharing settings ✓ Share my media to: Settings... RD1363DAB 00226109aa30 Allow Deny Customize... How does sharing change firewall settings? OK Cancel Applytext_image
DAB 12:36PM BBC Radio 6Music Now Playing: BAD GIRLS by M.I.A.Dynamic range compression
text_image
FM 4:29PM BBC R4 Arts B-D-Stext_image
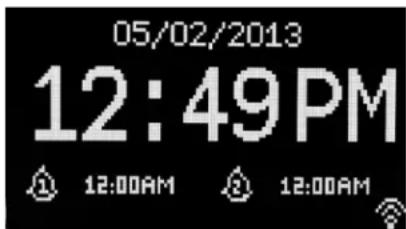
05/02/2013 12:49PM 12:00AM 12:00AMDAB Digital Audio Broadcasting
FM Frequency Modulation
RDS Radio Data System
UI User Interface
UPnP Universal Plug and Play
WLAN Wireless Local Area Network
14. Hersteller
Wörlein GmbH
Gewerbestraße 12
D 90556 Cadolzburg
Deutschland
Tel.: +49 9103 71 67 0
Fax.: +49 9103 71 67 12
Email.: service@woerlein.com
Do not dispose of this product with the normal household waste at the end of its life cycle. Return it to a collection point for the recycling of electrical and electronic devices. This is indicated by the symbol on the product, user manual or packaging.
The materials are reusable according to their markings. By reusing, recycling or other forms of utilization of old devices you make an important contribution to the protection of our environment.
Please contact your local authorities for details about collection points.

WARNING
Risk of electric shock Do not open!

Caution: To reduce the risk of electric shock, do not remove the cover (or back). There are no user serviceable parts inside. Refer servicing to qualified service personnel.

This symbol indicates the presence of dangerous voltage inside the enclosure, sufficient enough to cause electric shock.

This symbol indicates the presence of important operating and maintenance instructions for the device.
Safety, Environmental and Setup Instructions
- Use the device in dry indoor environments only.
- Protect the device from humidity.
• Do not open the device. RISK OF ELECTRIC SHOCK! Refer opening and servicing to qualified personnel. - Connect this device to a properly installed and earthed wall outlet only. Make sure the mains voltage corresponds with the specifications on the rating plate.
• Make sure the mains cable stays dry during operation. Do not pinch or damage the mains cable in any way.
• A damaged mains cable or plug must immediately be replaced by an authorized service center.
• In case of lightning, immediately disconnect the device from the mains supply. - Children should be supervised by parents when using the device.
- Clean the device with a dry cloth only.
Do NOT use CLEANING AGENTS or ABRASIVE CLOTHS!
- Do not expose the device to direct sunlight or other heat sources.
• Install the device at a location with sufficient ventilation in order to prevent heat accumulation. - Do not cover the ventilation openings!
• Install the device at a safe and vibration-free location. - Install the device as far away as possible from computers and microwave units; otherwise radio reception may be disturbed.
- Do not open or repair the enclosure. It is not safe to do so and will void your warranty. Repairs only by authorized service/ customer center.
- Only use mercury and cadmium-free batteries.
- Used batteries are hazardous waste and NOT to be disposed of with the household waste!!! Return the batteries to your dealer or to collection points in your community.
- Keep batteries away from children. Children might swallow batteries. Contact a physician immediately if a battery was swallowed.
- Check your batteries regularly to avoid battery leakage.
- Batteries shall not be exposed to excessive heat such as sunshine, fire or the like.
- CAUTION: Danger of explosion if battery is incorrectly replaced Replace only with the same or equivalent type

Used batteries are hazardous waste and NOT to be disposed of with the household waste! As a consumer you are legally obligated to return all batteries for environmentally responsible recycling - no matter whether or not the batteries contain harmful substances *).
Return batteries free of charge to public collection points in your community or to shops selling batteries of the respective kind
Only return fully discharged batteries.
*) marked Cd = cadmium, Hg = mercury, Pb = lead
Contents
1. Main Control Key List .... 1
1.1. Remote Control Key List 2
2. Getting Started/Set up .... 3
2.1. Setup Wizard 3
3. Operation 4
3.1. Menu Navigation 4
3.2. Presets 6
4. Settings 7
4.1. Equaliser 7
4.2. Network 7
4.2.1. Network Wizard 8
4.2.2. PBC Setup (WiFi Protected Setup) 9
4.2.3.View Settings 10
4.2.4. Wlan region 10
4.2.5. Manual Settings 10
4.2.6. Network profile 10
4.3.Time/Date 10
4.3.1. Set Time/Date (wizard) 11
4.3.2. Auto update (From DAB, FM or network) (wizard) 11
4.3.3. Set Format (wizard) 11
4.4.
4.5. Language 12
4.6. Factory Reset 12
4.7. Software update 12
4.8. Setup Wizard 12
4.9. Info 13
4.10. Backlight 13
5. Internet radio mode 13
5.1. Last listened 14
5.2.Favourites 14
5.3.Browse 14
5.4. Search 15
5.5.My added stations 15
5.6.Now playing information 15
5.7.Internet radio portal registration 16
6. Music player mode (Network) 17
6.1.Shared media 18
6.1.1. Wake-on-LAN 19
6.1.2. Prune servers 19
6.2. My Playlist 19
6.3. Repeat/shuffle 19
6.4. Now playing information 19
6.5. Setting up a music server 20
6.6. Sharing media with Windows Media Player 20
6.7. Using the "Play To" feature in Windows 7 to stream media.... 21
6.8. Use "Play To" in Windows Media Player 21
6.9. Use "Play To" elsewhere in Windows 7 22
6.10. Now playing information 22
7. DAB+ Radio Mode 22
7.1. Scanning for stations 22
7.2. Selecting stations 23
7.3. Now playing information 23
7.4. Settings 23
8. FM Radio Mode 24
8.1. Selecting stations 24
8.2. Now playing information 24
8.3. Settings 25
9. Aux in mode 25
10. Alarms and Sleep 25
10.1. Alarms 25
10.2. Sleep 26
11. Troubleshooting and error messages 27
11.1. Error messages 27
11.2. Troubleshooting 28
12. Technical Data 30
13. Glossary 30
IR3000DAB Internet Radio
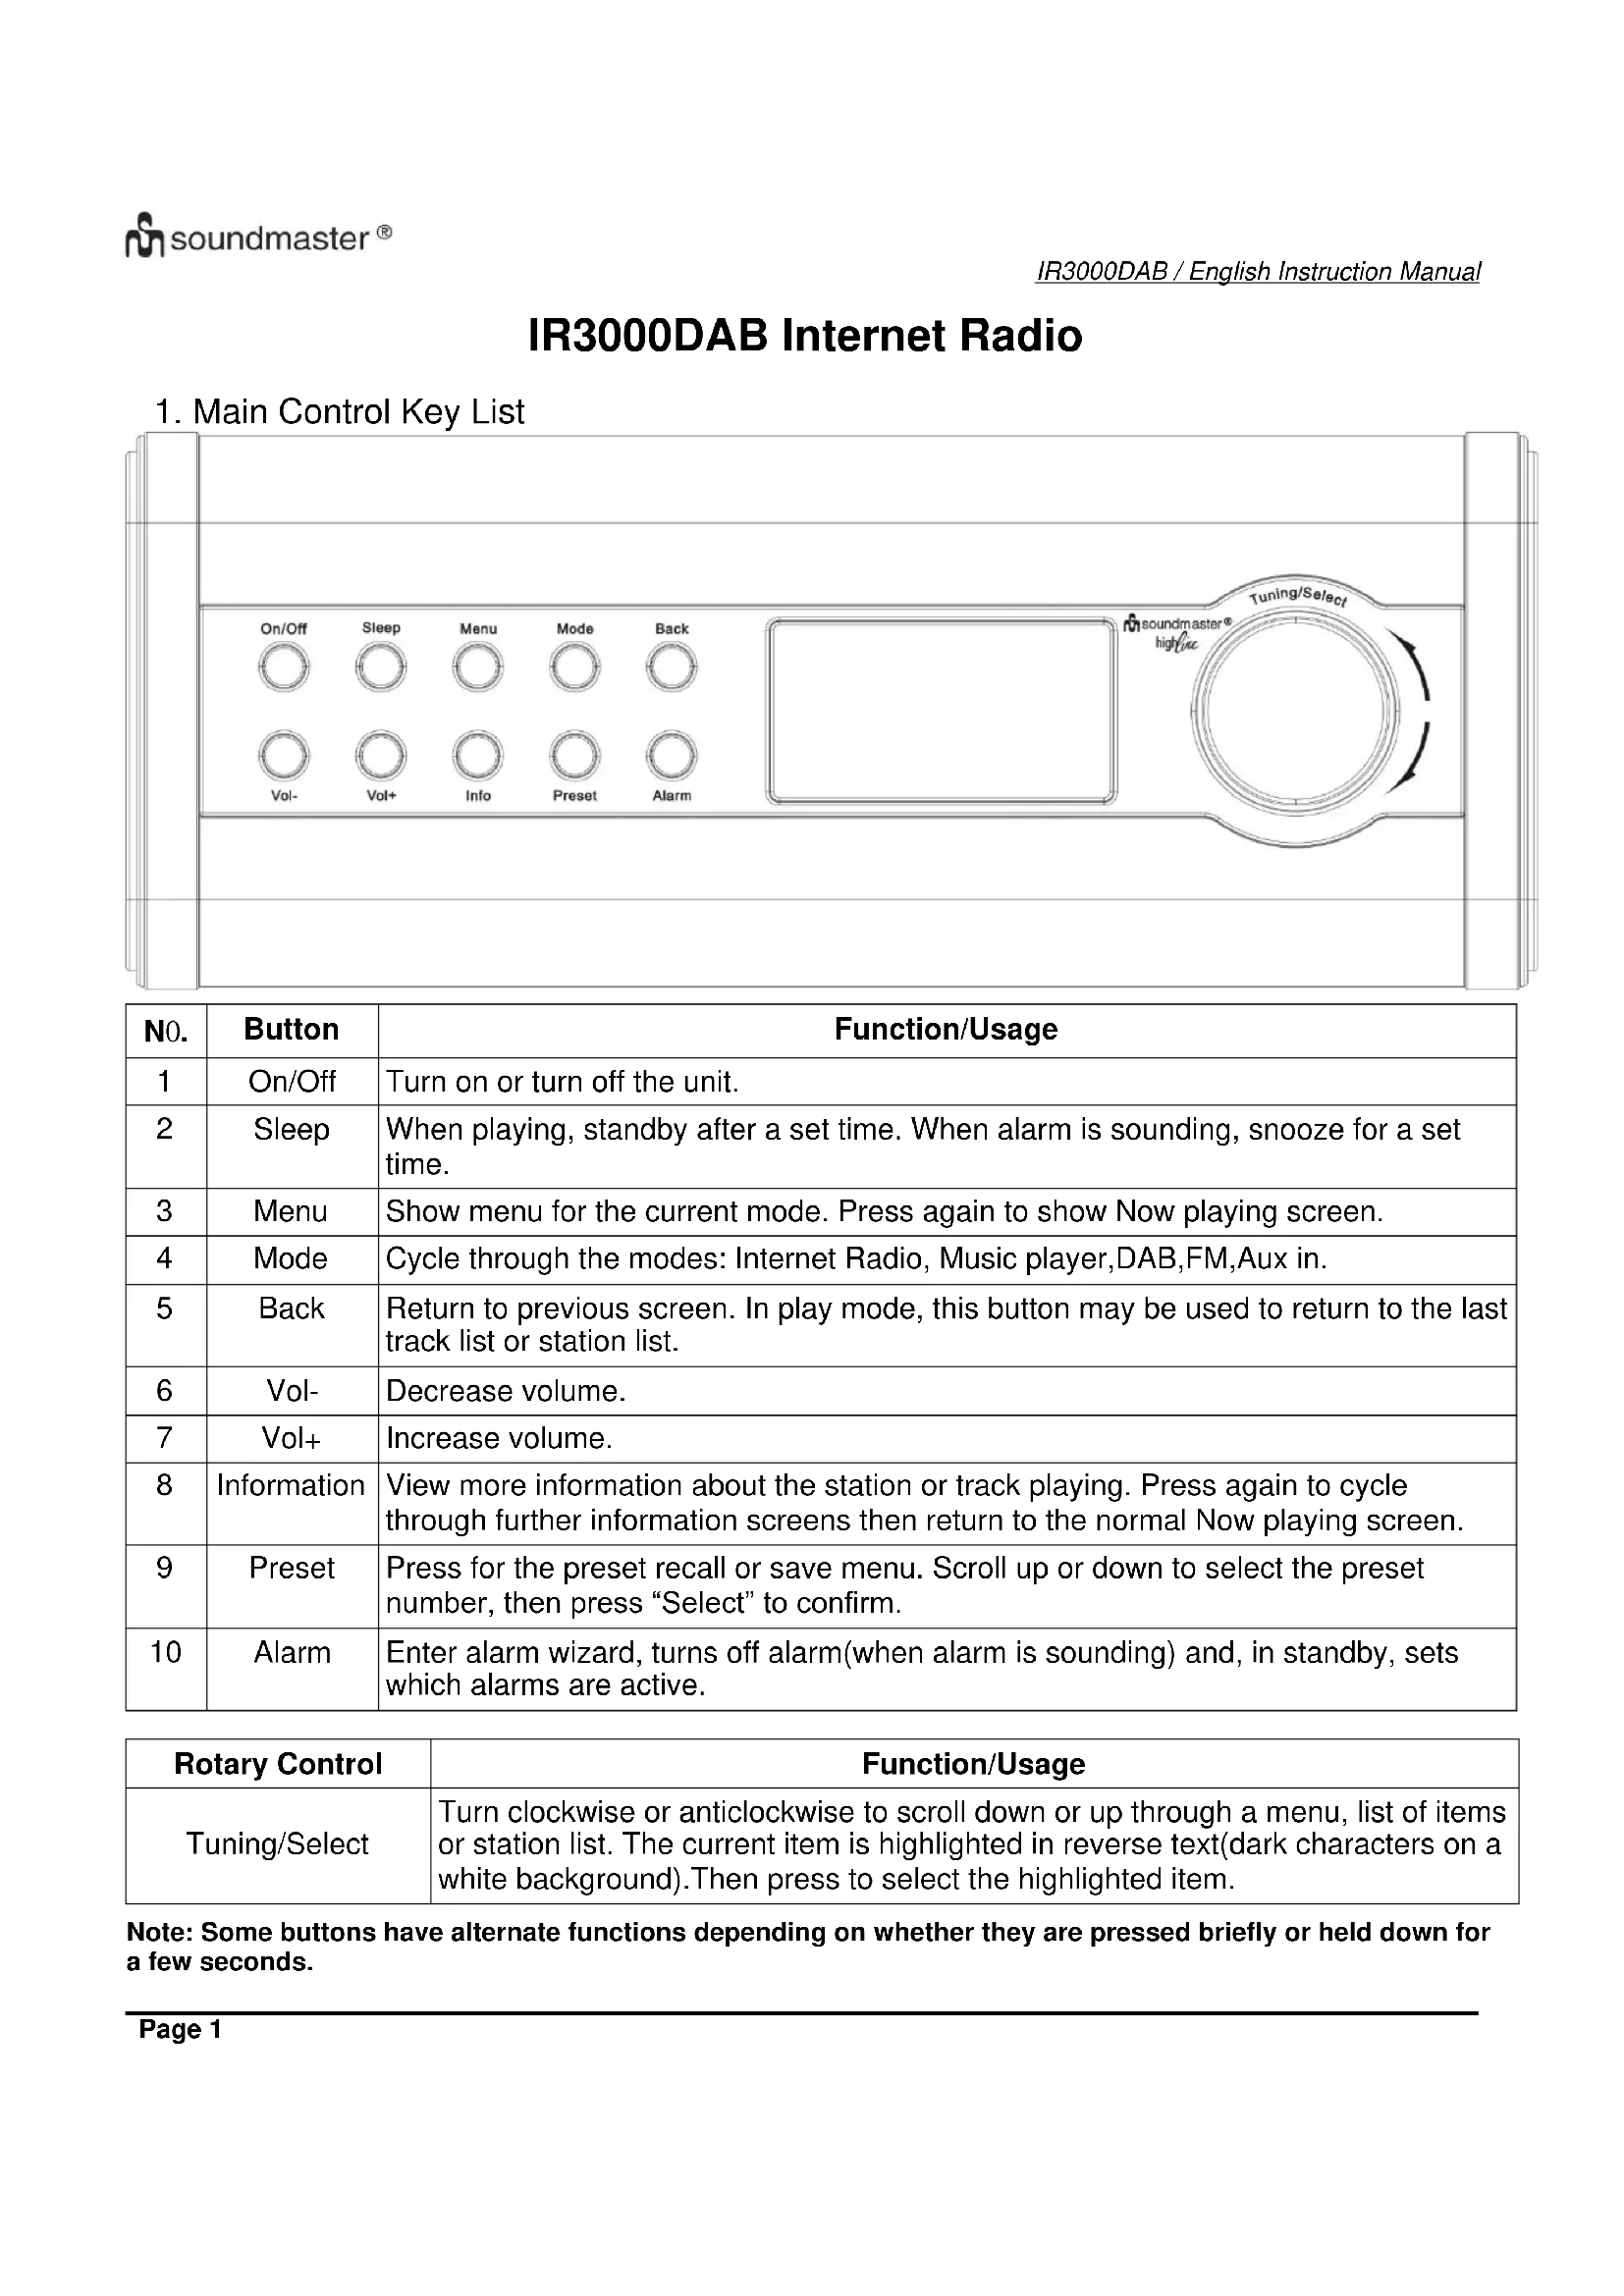
1. Main Control Key List
text_image
On/Off Sleep Menu Mode Back Vol- Vol+ Info Preset Alarm soundmaster® highInc Tuning/Select| No. | Button | Function/Usage |
| 1 | On/Off | Turn on or turn off the unit. |
| 2 | Sleep | When playing, standby after a set time. When alarm is sounding, snooze for a set time. |
| 3 | Menu | Show menu for the current mode. Press again to show Now playing screen. |
| 4 | Mode | Cycle through the modes: Internet Radio, Music player,DAB,FM,Aux in. |
| 5 | Back | Return to previous screen. In play mode, this button may be used to return to the last track list or station list. |
| 6 | Vol- | Decrease volume. |
| 7 | Vol+ | Increase volume. |
| 8 | Information | View more information about the station or track playing. Press again to cycle through further information screens then return to the normal Now playing screen. |
| 9 | Preset | Press for the preset recall or save menu. Scroll up or down to select the preset number, then press “Select” to confirm. |
| 10 | Alarm | Enter alarm wizard, turns off alarm(when alarm is sounding) and, in standby, sets which alarms are active. |
| Rotary Control | Function/Usage |
| Tuning/Select | Turn clockwise or anticlockwise to scroll down or up through a menu, list of items or station list. The current item is highlighted in reverse text(dark characters on a white background). Then press to select the highlighted item. |
Note: Some buttons have alternate functions depending on whether they are pressed briefly or held down for a few seconds.
Remote Control Key List
The remote control operates in a similar way to the main unit control keys.
| Button | Function | Remote Control Photo |
| Standby: Turn on or back to standby mode(showing clock and date).Cancel sleep function. | ||
| Mode | Cycle through the modes: Internet Radio, Music player,DAB,FM,Aux in. | |
| Sleep | Sleep/Snooze: When playing, standby after a set time. When alarm is sounding, snooze for a set time. | |
| Mute. | ||
| Vol+ | Increase volume. | |
| Menu | Menu: Show menu for the current mode. Press again to show Now playing screen. | |
| I◄◄Dow | Tune up station and skip back. | |
| ►►|Up | Tune down station and skip forward. | |
| Info | Info:View more information about the station or track playing. Repeat press to cycle through further information screens. | |
| Select | Press to select the highlighted item. | |
| Alarm | Enter alarm wizard, turns off alarm(when alarm is sounding) and, in standby, sets which alarms are active. | |
| Preset | Press for the Preset recall or save menu. Scroll up or down to select the preset number then press" Select to confirm". | |
| Vol- | Decrease volume. | |
| Back | Return to previous screen. In play mode, this button may be used to return to the last track list or station list. | |
| Shift | Shift: Music player or Radio preset shift songs. | |
| 5 | Set or recall preset 5 or 10. | |
| 4 | Set or recall preset 4 or 9. | |
| 3 | Set or recall preset 3 or 8. | |
| 2 | Set or recall preset 2 or 7. | |
| 1 | Set or recall preset 1 or 6. |
2. Getting Started/Set up
The various listening modes have different requirements:
- Internet Radio requires a suitable internet broadband connection (usually via a local wired or wireless network).
● Music Player requires connection to a wired or wireless network.
● DAB/FM requires a DAB/FM broadcast signal via the built in antenna. - Aux-In requires connection via the Aux-In socket.
Connect the unit to a suitable power source using the power supply provided. After showing a starting screen, it will enter the last used listening mode. When the unit is started for the first time, the setup is launched automatically.
2.1 Setup Wizard
When the unit is started for the first time, it runs through a setup wizard to configure settings for date/time and net work. Once this has finished, the system is ready to use in most modes.

text_image
soundmaster®Note: To change these settings later, select Menu>System settings >and select the required settings option(s)(see section 4 settings for further detail(s).

text_image
Setup wizard Start now? YES NOTo run the setup wizard again, select Menu > System settings > Setup Wizard.
Select Yes to start the setup wizard.
If you choose NO, the next screen asks if you would like to run the wizard next time the unit is started. The system then starts without configuring time/date and network settings and enters the Main Menu.
Note: If power is removed while the wizard is in progress, the wizard will run again next time the unit is started.
The Setup wizard guides you through the basic setup parameters for time/Date and Network connection. For details see the relevant settings in section 4 Settings. To change any settings later all setting functions are accessible from the Settings Menu.
3. Operation
To select a Mode, press Mode repeatedly until the required Mode splash screen is displayer. After a brief moment the unit switches to that mode. The last station or track previously used in that mode is selected. If this is not possible, the unit scans for relevant stations, networks, or prompts the user for appropriate input. See the relevant Mode section for details of how to use each listening mode.
3.1 Menu Navigation
The primary control for moving through menus and options is the Select Control. Rotate the control to move up or down a menu. Once the required option or value is highlighted press the Select Control. All menus and lists act as loops such that turning the control to go beyond the first or last entry in a menu or list takes you to the opposite end of the menu or list. So going up from the first entry in a menu will take you to the last option in the menu, etc.
A scroll bar appears on the right of the screen if there are more options above or below those visible
To enter the menu tree in a particular mode press Menu. To move back a menu level press Back. To exit the menu system, press Menu again.
Each mode has a Mode menu, with options specific to that mode. For example, the FM mode menu has two mode specific options: Scan setting and Audio setting.
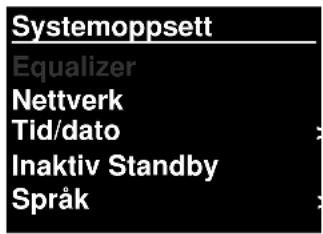
In addition, each mode menu has two final options: System settings and Main menu>. The >indicates options lead to further menus.
The System settings menu present system setting functions to allow the user to setup how the unit behaves. This includes network, time, language and software parameters.
The Main menu presents and alternative method for selecting listening Modes plus sleep and alarm functions.

text_image
FM Scan setting Audio setting System settings > Main menu >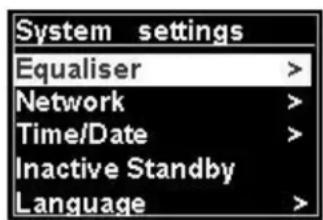
text_image
System settings Equaliser > Network > Time/Date > Inactive Standby Language >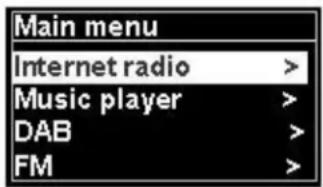
text_image
Main menu Internet radio > Music player > DAB > FM >Some menus, for example the System settings menu, have several submenus.
A menu map for the various listening modes and the System Settings and Main menu shown on the following page.
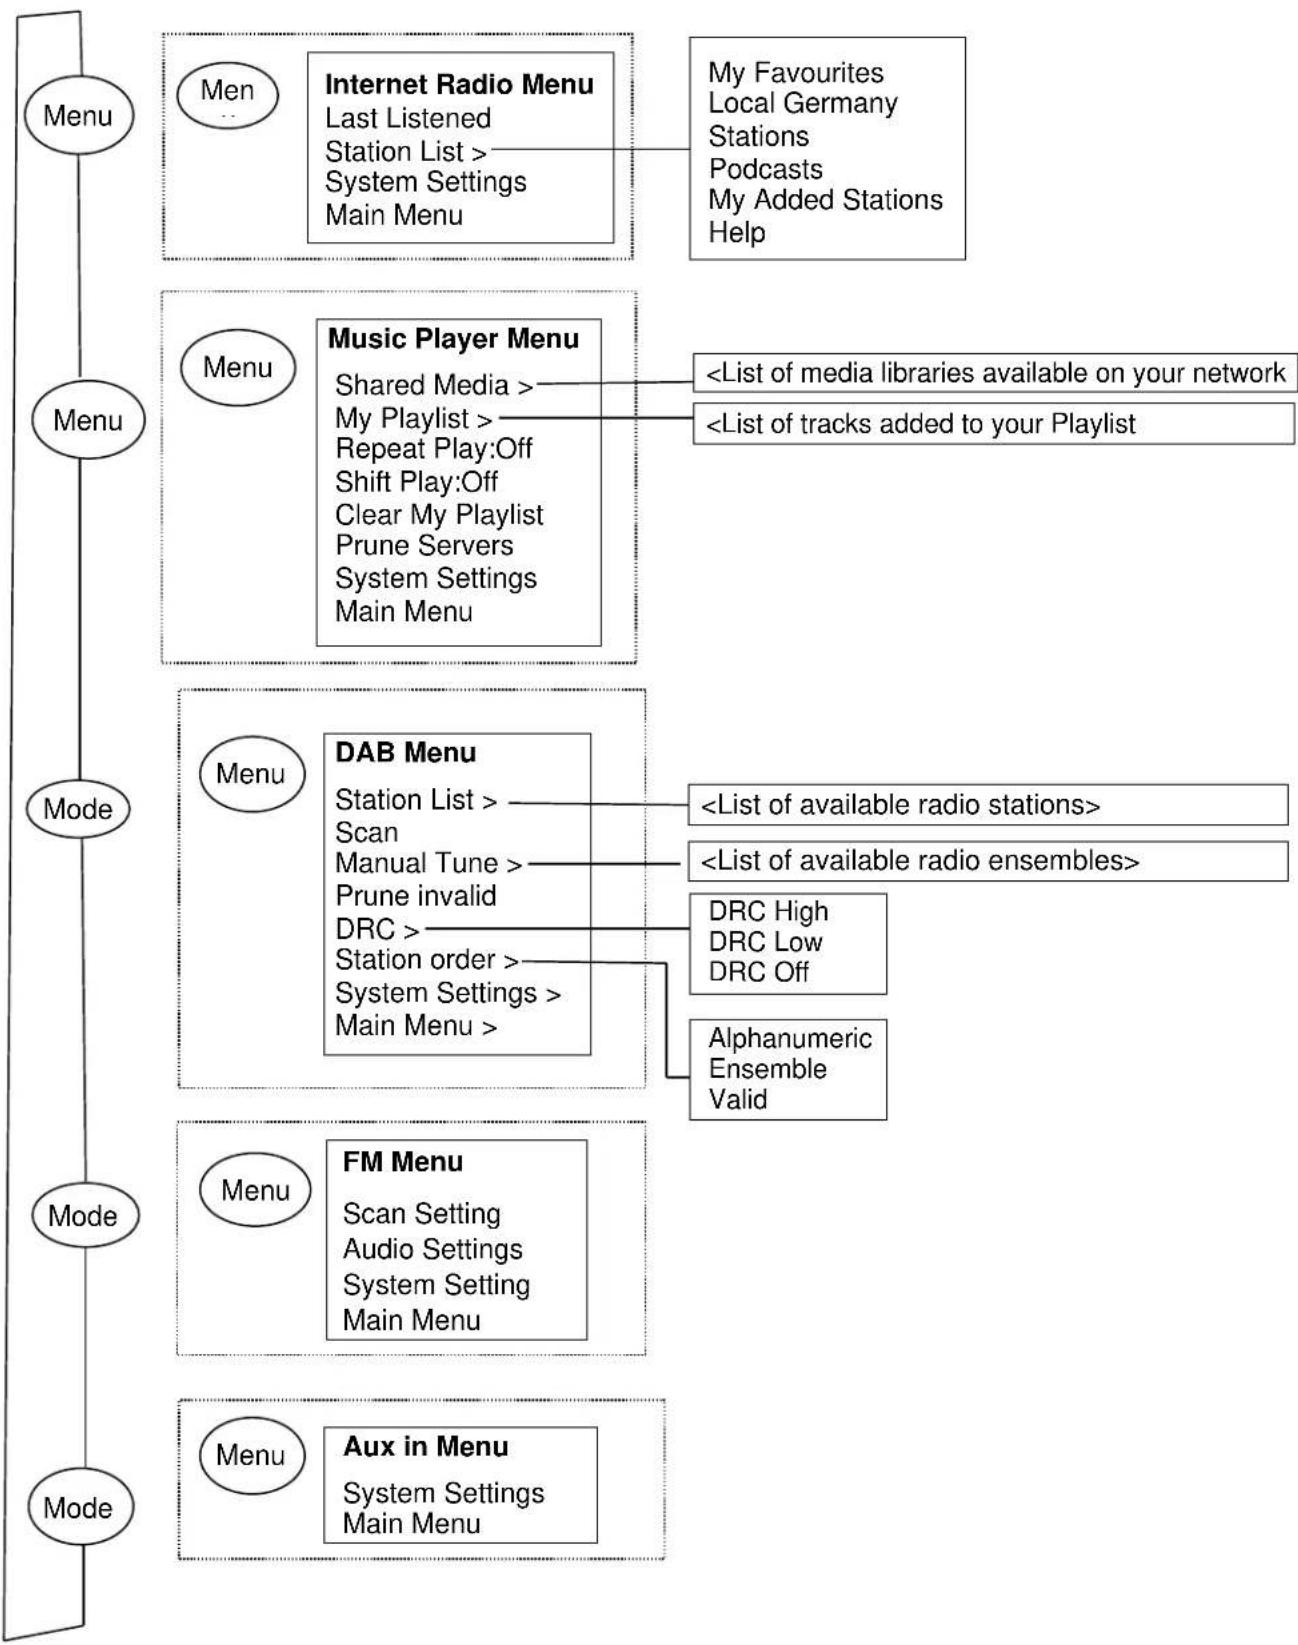
flowchart
graph TD
    A["Menu"] --> B["Men"]
    B --> C["Internet Radio Menu<br>Last Listened<br>Station List ><br>System Settings<br>Main Menu"]
    C --> D["My Favourites<br>Local Germany<br>Stations<br>Podcasts<br>My Added Stations<br>Help"]
    E["Menu"] --> F["Music Player Menu<br>Shared Media ><br>My Playlist ><br>Repeat Play:Off<br>Shift Play:Off<br>Clear My Playlist<br>Prune Servers<br>System Settings<br>Main Menu"]
    F --> G["<List of media libraries available on your network"]
    F --> H["<List of tracks added to your Playlist"]
    I["Mode"] --> J["Menu"]
    J --> K["DAB Menu<br>Station List ><br>Scan<br>Manual Tune ><br>Prune invalid<br>DRC ><br>Station order ><br>System Settings ><br>Main Menu"]
    K --> L["<List of available radio stations>"]
    K --> M["<List of available radio ensembles>"]
    K --> N["DRC High<br>DRC Low<br>DRC Off"]
    K --> O["Alphanumeric Ensemble Valid"]
    P["Mode"] --> Q["Menu"]
    Q --> R["FM Menu<br>Scan Setting<br>Audio Settings<br>System Setting<br>Main Menu"]
    R --> S["Aux in Menu<br>System Settings<br>Main Menu"]
Figure 1 Mode Menu Structure
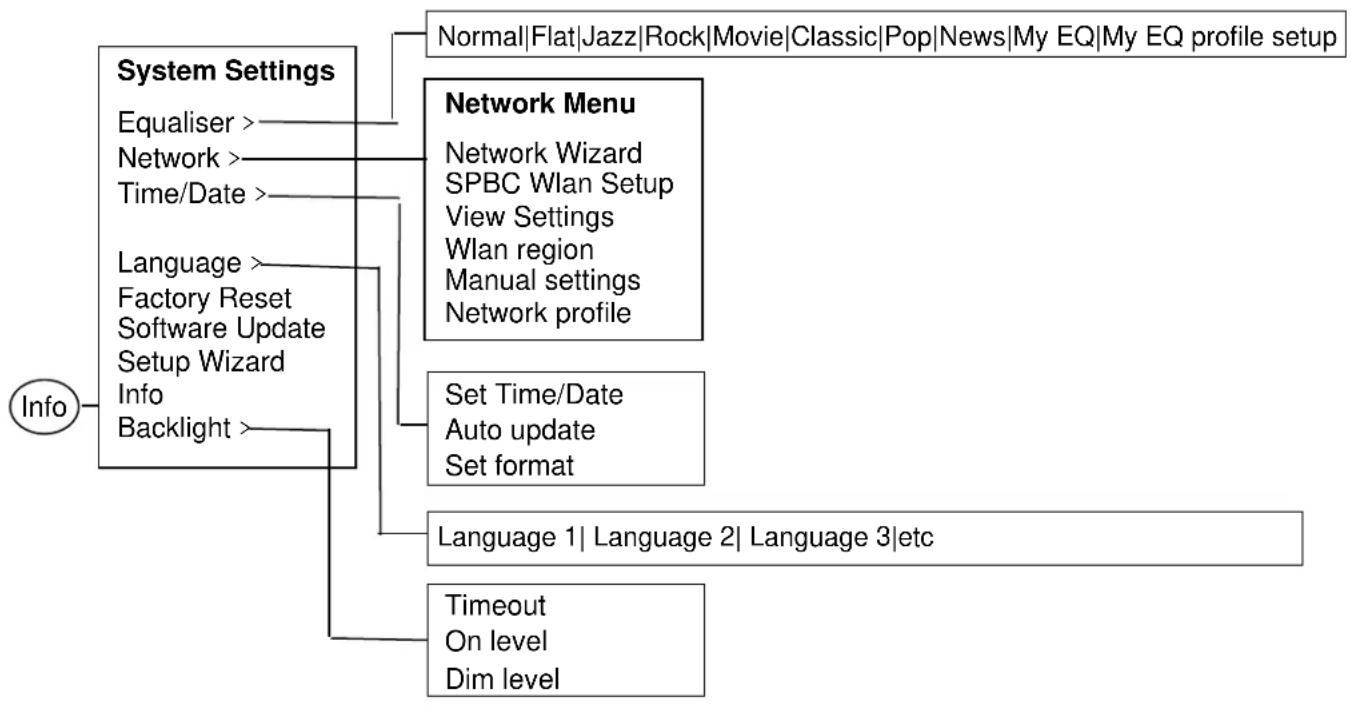
flowchart
graph TD
    A["Info"] --> B["System Settings"]
    B --> C["Equaliser >"]
    B --> D["Network >"]
    B --> E["Time/Date >"]
    B --> F["Language >"]
    F --> G["Factory Reset"]
    F --> H["Software Update"]
    F --> I["Setup Wizard"]
    F --> J["Info"]
    F --> K["Backlight >"]

    B --> L["Network Menu"]
    L --> M["Network Wizard"]
    L --> N["SPBC Wlan Setup"]
    L --> O["View Settings"]
    L --> P["Wlan region"]
    L --> Q["Manual settings"]
    L --> R["Network profile"]

    B --> S["Set Time/Date"]
    B --> T["Auto update"]
    B --> U["Set format"]

    B --> V["Language 1| Language 2| Language 3|etc"]

    B --> W["Timeout"]
    W --> X["On level"]
    W --> Y["Dim level"]
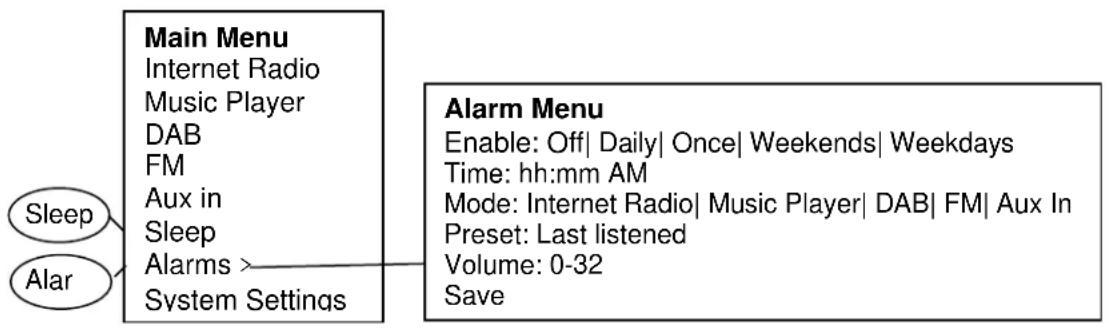
flowchart
graph LR
    A["Main Menu\nInternet Radio\nMusic Player\nDAB\nFM\nAux in\nSleep\nAlarms >\nSystem Settings"] --> B["Alarm Menu\nEnable: Off| Daily| Once| Weekends| Weekdays\nTime: hh:mm AM\nMode: Internet Radio| Music Player| DAB| FM| Aux In\nPreset: Last listened\nVolume: 0-32\nSave"]
    A --> C["Sleep"]
    A --> D["Alar"]
Figure 2 System Settings and Main Menu
3.2 Presets
In Internet Radio, DAB and FM modes, up to ten preset stations can be stored and recalled.
Presets are stored in the radio and cannot be accessed from other radios.
To store the current radio station as a preset, press and hold Preset until the display shows the Save preset screen. Select one of the 10 presets to save the currently playing station.
To select a preset, press Preset briefly, then select one of the listed preset stations. When a preset station is playing, its preset store number Pn(P1, P2 etc) is shown in the bottom of the screen.
4.Settings
All the settings parameters for the unit are available on the Settings menu.
Note: Settings included in the Setup Wizard are indicated w "wizard".
Settings menu options:
Equaliser
Network-wizard
Time/Date-wizard
Language
Factory Reset
Software update
Setup Wizard
Info
Backlight
4.1 Equaliser
Several preset EQ modes are available; also a user defined setting(My EQ)
To choose an EQ setting, select Menu > System Settings> Equaliser.
You can then choose from a variety of preset modes My EQ.
The last option (My EQ profile setup) allows you to define your own settings for the "My EQ" option, with custom bass and treble settings.
4.2 Network
● Network Wizard-wizard
- WPS Setup
- View Settings
- Wlan region-wizard
- Manual Settings
- Network profile

text_image
Equaliser Normal Flat Jazz Rock Movie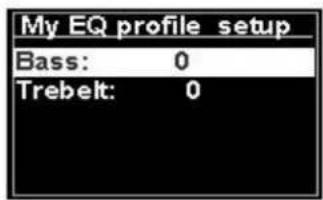
text_image
My EQ profile setup Bass: 0 Trebelt: 0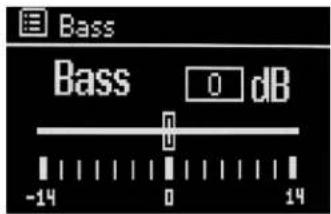
text_image
Bass Bass 0 dB -14 0 14This unit is compatible with all common network protocols and encryption methods, including WiFi Protected Setup (WPS).
To connect this unit to your network, you need one of the following:
● A wired router and an Ethernet (RJ45 network) cable.
● A WiFi wireless router, together with passphrase key if set.
To select a network use either the Network wizard or Manual settings.
4.2.1 Network Wizard
This guides you through the necessary steps to join a network. This is also automatically run as part of the Setup wizard. The screens and options presented will depend on the type of network and network protection used.
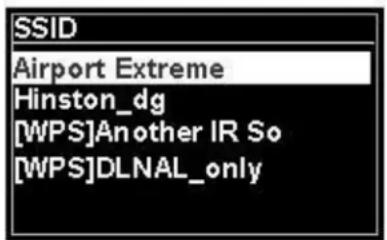
Selecting a network
When the Network wizard is chosen this unit automatically scans for available wireless networks and presents a list of SSID's (Service Set Identifier for the networks. Those options starting with WPS in brackets indicates encrypted networks offering WiFi Protected Setup (WPS) options, for further details ee under section 4.2.2 PBC Setup (WiFi Protected Setup).
This unit remembers login details for the last four wireless network it has connected to and will automatically connect to them when they are available. If connection to a network is temporarily lost, the unit will automatically reconnect.
WiFi network (SSID), select a network from the list.
To connect to a wired network, select [Wired], after ensuring that the Ethernet cable from the wired router is connected to the Ethernet socket of the unit.
text_image
SSID Airport Extreme Hinston_dg [WPS]Another IR So [WPS]DLNAL_onlyOpen Network
If the network is open (non-encrypted), the unit connects and no further details are require ; see Completion below..
Standard encrypted network
If the wireless network is protected the next screen presents options to enter the network key or passphrase.
Note: The default passphrase for most wireless routers is printed on a label on the router..
To enter the network's key (passphrase), use the
Select control to highlight the next relevant character and press to select each character in turn As each character is selected, the key is built up and displayed in the field at the top of the display.
The three options -Backspace OK and Cancel are included in the selection loop. These can be accessed just using the Select control, or a short cut is available pressing the Info key, which moves the selection highlight to the BackSpace option.

text_image
Key: 0 1 2 3 4 5 6 7 8 9 . _ - @ , a b c d e f g h i j k l m n o p q r s BKSP OK CANCELOn Completion
The unit connects to the selected network.
If connecting fails, the unit returns to a previous screen to try again. To exit the process use the Back/Menu button
If the network connection is lost, the unit automatically reconnects.
4.2.2 PBC Setup (WiFi Protected Setup)
WPS encrypted networks are identified by 'WPS' at the start of the network name, and have two methods of connection. Select one and follow the prompts When using the network wizard an additional option to Skip WPS is available.
Push Button
The unit prompts you to press the connect button on the router and then press the select control
Pin> (code number) this unit generates at an 8-digit code number which you enter into the wireless router.
Skip WPS>
Enter key as for a standard encrypted network, above.
The unit connects to the network; see 'On completion above.
For more information on setting up a WPS encrypted network, see your WPS router's instructions.

text_image
SSID Please wait Connecting.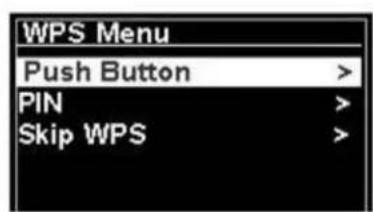
text_image
WPS Menu Push Button > PIN > Skip WPS >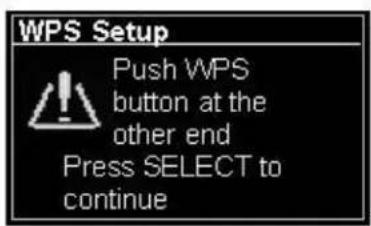
text_image
WPS Setup Push WPS button at the other end Press SELECT to continue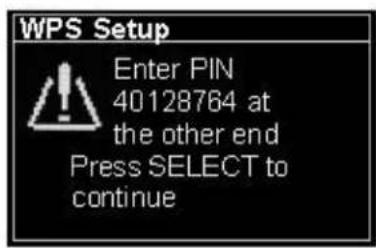
text_image
WPS Setup Enter PIN 40128764 at the other end Press SELECT to continue4.2.3 View Settings
Displays the settings details for the current network setup, including:
● Active connections
- MAC Address
- Wlan region
- DHCP
- SSID
- IP Address
- Subnet mask
- Gateway address
- Primary DNS
- Secondary DNS
4.2.4 Wlan region
Presents a list of regions to configure the appropriate wlan behavior of the unit Select the appropriate region for the location in which the unit will be used.
4.2.5 Manual Settings
There are also other options for viewing and manually altering network settings from Menu > System settings> Network >(for example setting up a wired network).
Users experienced with networking may find these options useful for diagnosing and fixing network problems.
Wired/Wireless
DHCP enabled/disabled
SSIP
Authentication
Encryption type
Passphrase/key
4.2.6 Network profile
This displays a list of the networks remembered by the unit (up to a maximum of 4). You can see the list of registered networks through Menu> System settings> Network > Network profile>From here you can delete unwanted networks by turning and pressing Select then confirming delete Yes.
4.2.7 Keep Network connected
This function helps to keep active the WiFi connection, once the device will be switched into Standby, so that the Internet connecting going quicker after reboot. You can choose to activate or deactivate this function from Menu> System settings> Network >Keep network connected ? YES or NO Default setting is being in YES.
4.3. Time/Date
- Set Time/Date
- Auto Update
- Set Format
4.3.1 Set Time/Date (wizard)
The date and time are displayed as dd-mm-yyyy and hh:mm AM/PM with the first value, dd, active (flashing).
Adjust each value with the Select control. As each value is set by pressing the Select control, the next value becomes active ready for adjustment
Set Time/Date
05-02-2013
1:15 PM
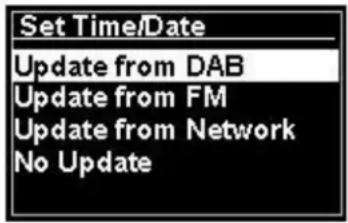
4.3.2 Auto update (from DAB, FM or Network) (wizard)
Auto-update works with data sent over DAB, FM or the Internet. The clock is only updated when in a corresponding mode, so it is best to select a mode you use regularly.
DAB and FM use time signals broadcast with radio transmissions.
text_image
Set Time/Date Update from DAB Update from FM Update from Network No UpdateNetwork uses a time signal sent from the Frontier Silicon Internet radio portal when in any network connected mode.
- Select Update from DAB, Update from FM, Update from Network or No update.
- If you are updating from the network, set your time zone.
- If your country uses daylight saving, the automatically updated time from the network may be wrong by one hour. When daylight savings are in effect (during the winter), turn on the Daylight savings option to rectify this.
Note that if you are updating the time from DAB or FM, the Daylight savings option has no effect on the clock's time.
The unit will auto update from the selected source when time information is available.
4.3.3 Set Format (wizard)
Allows you to change between 12 and 24 hour display,
4.5. Language
The default language is English. To change, select Menu > System settings > Language > then select your language.
List of Language
| No. | Language | No. | Language | No. | Language | No. | Language | No. | Language |
| 1 | English | 4 | Finish | 7 | Italian | 10 | Spanish | 13 | Turkish |
| 2 | Danish | 5 | French | 8 | Norwegian | 11 | Portuguese | ||
| 3 | Dutch | 6 | German | 9 | Polish | 12 | Swedish |
4.6 Factory Reset
A factory reset resets all user settings to default values, so time/date, network configuration and presets are lost. However, the radio's current software version is maintained, as is registration with the Internet radio portal. Internet radio favorites therefore remain unless you re-register your radio with another account on the portal website.
To perform a factory reset, select Menu > System settings> Factory reset Proceed> Yes,
4.7 Software update
From time to time, Frontier Silicon may make software upgrades available with bug fixes and/or additional features. You can either check manually, or set the unit to check periodically automatically (this is the default). If the unit detects that newer software is available, it asks if you want to go ahead with an update. If you agree, the new software is then downloaded and installed. After a software upgrade, all user settings are maintained.
CAUTION: Before starting a software upgrade, ensure that the unit is plugged into a stable mains power connection. Disconnecting power during a software update may permanently damage the unit.
To turn automatic checking on or off, select Menu > System settings> Software update> Auto check setting.
4.8 Setup Wizard
This allows you to run the Setup wizard at any time. Guides you through the essential settings in the following order:
- Date/Time -Set format
- Auto update-select clock update source or No Update.
- Set Time/Date (this step is only needed if the 'No Update' option is selected in Auto update).
- Network wizard automatically runs (see section 4.2.1 Network Wizard).
Once you are connected to a network the wizard is completed.
4.9 Info
Shows details of the current system including:
- SW Version: Software version number
● Radio ID: Unique code used to identify this particular radio device. - Friendly name: (name by which the radio is identified on a network.
4.10 Backlight
The unit display can be set to dim, when in Standby, after a Timeout period. This option allows you to set the timeout period and the brightness settings before (On level) and after (Dim level) the timeout period..
For the On level High, Medium and Low, plus an Auto setting are available. For the Dim level, Medium, Low and Off, plus an Auto setting are available.
5. Internet radio mode
The unit can play thousands of radio stations and podcasts from around the world though a broadband Internet connection.
When you select Internet radio mode, the unit contacts Internet radio portal to get a list of stations, organised into different categories like Country Most popular and Genre Once you select a station, the unit connects directly to that station.
The portal also enables multiple lists of favorite station that you can personalise, for example Andy's stations Jo's favourites Talkshows. To use the favorites feature, register your radio with the portal website as described in Section 5.7 Internet radio portal registration. If you have several Frontier Silicon radios, you can register them all on the same account so that each radio has access to your favorites lists. It is possible to add favourites either directly through the unit or through any computer with a web browser.
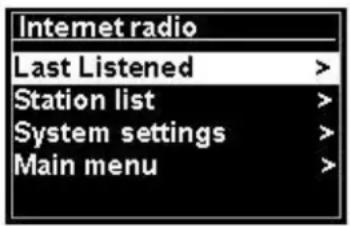
To enter Internet Radio mode, either press Mode until the display shows Internet Radio or select Menu> Main menu >Internet Radio.
Note: The station list menu is provided from the Internet radio portal, so it is only accessible when the unit is connected to the Inter net. Station lists and submenus may change from time to time.
There are several ways of selecting stations.
Directly from the radio:
- Last listened
- Presets
From the portal through the Menu > Station list >menu:
- Location-find a radio station based on its location in the world.
- Genre-Search for stations broadcasting the type of music you like.
- Search Stations -Search for a station name.
- Popular Stations -lists the most popular, listened to stations on the internet.
- New stations-lists the latest stations broadcasting.
text_image
Internet radio Last Listened > Station list > System settings > Main menu >5.1 Last listened
When Internet radio mode restarts, the last-listened station is selected. To select another recently used station, select Menu > Last listened then one of the stations listed. Most recent stations appear at the top of the list.
5.2 Favourites
Favourites are stored on the Internet radio portal. Before you set up an account on the portal from its Web interface (www.wifiradio-frontier.com), the favourites are associated solely with the radio on which you set them. After you set up a portal account, all the favourites from your different radios are merged into a combined favourites list .This combined list is available to all the radios on your account.
To store a playing station as a favourite, press and hold Select until the display shows 'Favourite added'. The station appears in the default favourites list Stations.
To select a favourite, select Menu >Station list > My favourites > [Favourites list] >> [Station].
5.3. Browse
To browse Internet broadcasts, select Menu > Station list >Browse through the menus to find appropriate broadcasts. For example: Select Stations:
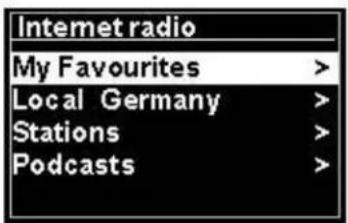
text_image
Internet radio My Favourites > Local Germany > Stations > Podcasts >And the Stations menu is displayed, select Genre:
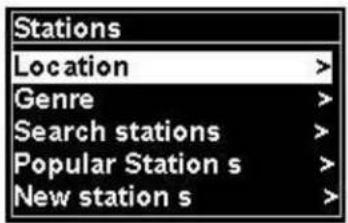
text_image
Stations Location > Genre > Search stations > Popular Station s > New station s >To see the Genre menu, Select Blues:

text_image
Genre Alternative > Ambient > Big Band > Bulgarass > Blues >And the Blues menu allows you to select a station from a complete list or from specific countries.
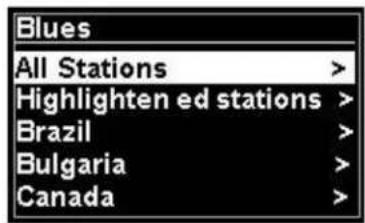
text_image
Blues All Stations > Highlighten ed stations > Brazil > Bulgaria > Canada >Choose a radio station from the list to tune to that station.
5.4 Search
You can also search through Internet broadcasts for stations or podcasts with particular keywords in their title.
To search, select Menu > Station list>then either Search Stations >
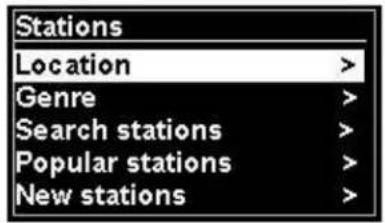
text_image
Stations Location > Genre > Search stations > Popular stations > New stations >Enter a keyword by selecting characters then OK
The search entry screens are similar in operation to the Wi-Fi passphrase entry screen.
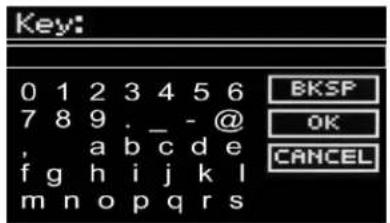
text_image
Key: 0 1 2 3 4 5 6 7 8 9 . _ - @ , a b c d e f g h i j k l m n o p q r s BKSP OK CANCELSelect a broadcast from the list.
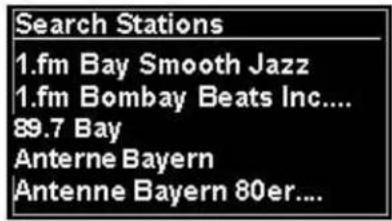
text_image
Search Stations 1.fm Bay Smooth Jazz 1.fm Bombay Beats Inc.... 89.7 Bay Anterne Bayern Antenne Bayern 80er...For podcasts, you may be able to select a particular episode.
5.5 My added stations
Even though the Internet radio portal contains thousands of stations, you may want to listen to stations not listed. You can add your own stations via the portal. These added stations are accessible from unit by selecting Menu> Station list >
5.6 Now playing information
While the stream is playing, the screen shows its name and description. If artist and track information is available, this is also shown. To view further information, press Info.
Each time you press Info, another set of information is displayed, cycling through the following details:
Artist and track name (default; where available)
Station description
Station genre and location
Signal reliability
Codec and sampling rate
Playback buffer
Today's date
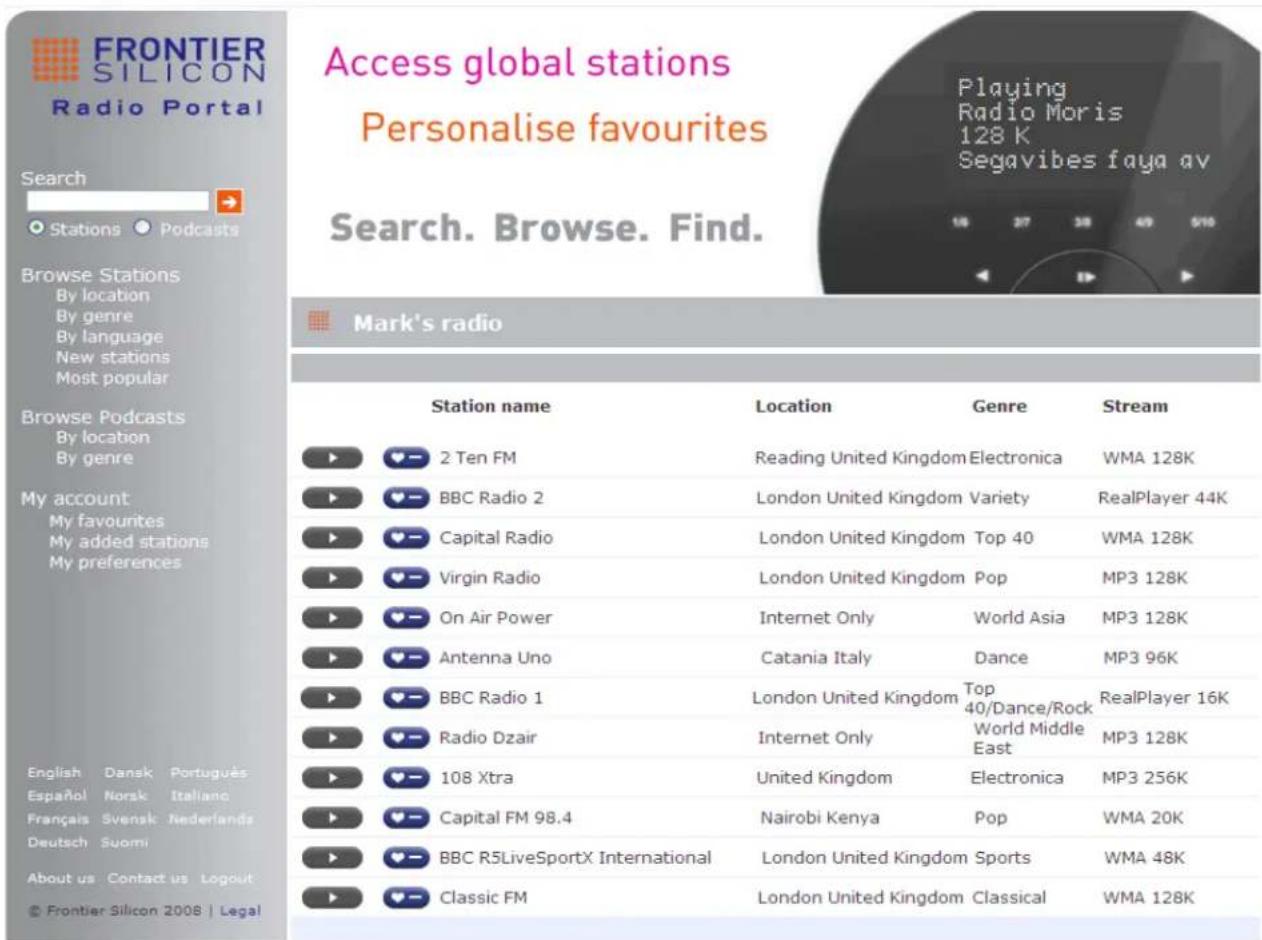
5.7 Internet radio portal registration
The Frontier Silicon Internet radio portal website allows you to organise your favourites lists and also listen to Internet radio on a computer.
text_image
FRONTIER SILICON Radio Portal Access global stations Personalise favourites Search. Browse. Find. Playing Radio Moris 128 K Segavibes faya av 16 27 38 49 510 Browse Stations By location By genre By language New stations Most popular Mark's radio Station name Location Genre Stream ► ♥- 2 Ten FM Reading United Kingdom Electronica WMA 128K ► ♥- BBC Radio 2 London United Kingdom Variety RealPlayer 44K ► ♥- Capital Radio London United Kingdom Top 40 WMA 128K ► ♥- Virgin Radio London United Kingdom Pop MP3 128K ► ♥- On Air Power Internet Only World Asia MP3 128K ► ♥- Antenna Uno Catania Italy Dance MP3 96K ► ♥- BBC Radio 1 London United Kingdom Top 40/Dance/Rock RealPlayer 16K ► ♥- Radio Dzair Internet Only World Middle East MP3 128K ► ♥- 108 Xtra United Kingdom Electronica MP3 256K ► ♥- Capital FM 98.4 Nairobi Kenya Pop WMA 20K ► ♥- BBC R5LiveSportX International London United Kingdom Sports WMA 48K ► ♥- Classic FM London United Kingdom Classical WMA 128K English Dansk Português Español Norsk Italiano Français Svensk Nederlands Deutsch Suomi About us Contact us Logout © Frontier Silicon 2008 | Legal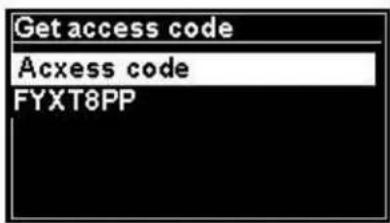
text_image
Get access code Access code FYXT8PPTo register your unit with the portal, switch to Internet radio mode as described in Section, and then obtain your radio's unique portal access code by selecting Menu >Station list >Help >Get access code>Write down the access code.
Note: The displayed access code is only valid for a few minutes. If you fail to register your radio within the time window you will need to repeat the above step to get a new access code and try again.
Do not confuse the portal access code with the Radio ID (from)
Visit the portal website at www.wifiradio-frontier.com.
If this is your first visit to the portal, register for a new account, entering the following information: access code,
your e-mail address,
passphrase
radio model (RD1363DAB).
If you already have an account and wish to add an additional radio, log in to your account and select My preferences>Add another Wi-Fi radio.
Once your radio is registered with the portal, you can immediately use the Internet radio favourites and added stations features.
6. Music player mode(Network)
Music player mode plays audio files such as MP3s, AACs, WMAs or FLACs from a computer on the local network, or a hard drive.
To enter Music player mode, either press Mode until the display shows Music player or select Menu
Main menu >Music player.
Once in music player mode, press Menu, then select Shared media.
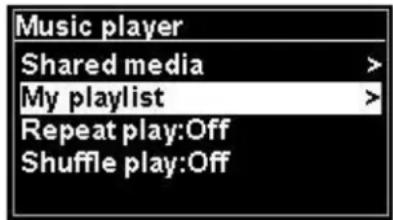
text_image
Music player Shared media > My playlist > Repeat play:Off Shuffle play:OffIf you are already playing a music file, you can press Back rather than Menu to quickly return to the last visited branch of the menu tree. For example, listening to the track 1 of an album through browsing shared media as described in section 6.1 below.
- Pressing Back would return you to the track listing for the album.
- Pressing Back again would list all available albums by the same artist.
- Pressing Back again would list all album artists, and so on.
6.1 Shared media
Select Menu > Shared media
If you have set up shared media (see section 6.5 Setting up a music server for details), You should see an entry consisting of
From this point on, the menus are generated from the shared media server (typically Windows Media Player). The first menu shows a list of media types, for example Music, Video, Pictures and Playlists The unit can only play music and playlists.
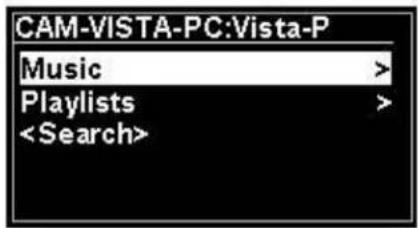
text_image
CAM-VISTA-PC:Vista-P Music > Playlists >There is also a search function, which finds tracks in a similar way to Internet radio search, as described on page 13

text_image
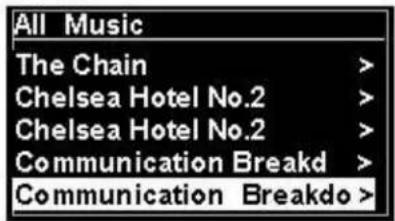
Music All Music > Genre > All Artists > Contributing Artists > Album Artists >In the Music menu there are numerous options for selecting tracks .Select one of the options to find the music you want to listen to.
text_image
All Music The Chain > Chelsea Hotel No.2 > Chelsea Hotel No.2 > Communication Breakd > Communication Breakdo >Once you have found a track you want to play, press Select A short press plays the track immediately and a long press adds the track to “My Playlist” .. You can also add entire albums to “My Playlist”.
Playlists you have created on your shared media server can be accessed and played via the Playlists option in the Shared media menu.
6.1.1 Wake-on-LAN
When shared media is selected a list of available music servers is displayed.
If a question mark appears before the server name, this indicates that the server has been seen before and supports Wake-on-LAN functionality, but cannot currently be found on the network. If a server with a question mark is selected by the user, the device will try to wake the server up and connect to it. In some instances this may not be possible as the server may not be connected to the network any more or may be switched off.
6.1.2 Prune servers
From time to time it may be necessary to remove servers displaying question marks in front of the server name from the server list. For example, if the device is moved to a new network or if a Wake-on-LAN server is removed from your current network.
To perform this function go to Menu > Prune servers > Yes.
6.2 My Playlist
The unit holds a queue of up to 500 tracks in My playlist. Playlist tracks can be a mixture from multiple (available) UPnP servers .. To manage the playlist, select Menu > My playlist.

text_image
My Playlist Dazed and Confused Bird On The Wire Birdcall Morning Here We Go Again- To view the playlist, scroll though it by turning Select .UPnP tracks show their track name.
- To play the playlist from a certain track, quick Select.
- To erase a track from the playlist, long Select. then confirm YES.
If you select a track/album/folder for instant playback (without using the playlist), the playlist is preserved. The playlist is also preserved during standby.
6.3 Repeat/shuffle
You can repeat tracks or play them in random order by selecting Menu > Repeat play or Menu> Shuffle play
6.4 Now playing information
While a track is playing, the screen shows its track and artist (UPnP). There is also a progress bar with figures for elapsed and total track time. At the bottom of the screen, an icon indicates UpnP. To view further information, press Info.
Each time you press Info, another set of information is displayed, cycling through:.
- UPnP: playback progress bar (default), artist, album, codec/sampling rate, playback buffer bar, today's date.
6.5 Setting up a music server
In order for the unit to play music files from a computer, the computer must be set up to share files or media.
UPnP media sharing allows devices like RD1363DAB to play music from a shared media library, navigating through tag menus such as Artist Album or Genre. If you are running a suitable server system such as a PC with Windows Media Player 10 or later (WMP), and your music library is well-tagged, then it is recommended to use media sharing Only the UPnP server needs to be set up.
Note: Tunes does not currently work as a UPnP media server, but there are add-ons available to work with an iTunes library.
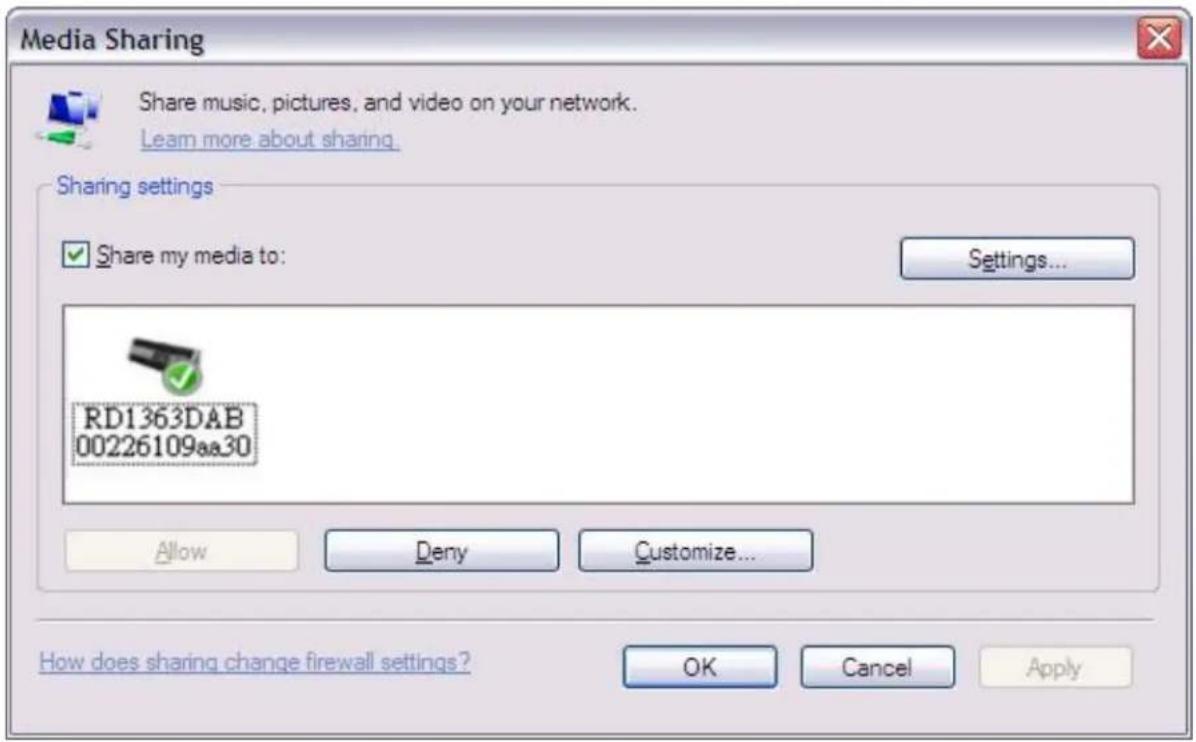
6.6 Sharing media with Windows Media Player
The most common UPnP server is Windows Media Player (10 or later). Alternatively, other UPnP platforms and servers may be used. To set up WMP for media sharing, perform the following steps:
- Ensure that the PC is connected to the network.
- Ensure that the radio is powered on and connected to the same network.
- In WMP, add to the media library the audio files and folders you want to share with the unit (Library> Add to library.).
- In WMP, enable media sharing (Library> Media sharing--).
Make sure that the radio has access to the shared media by selecting it and clicking Allow. You can also set a name for the shared media in Settings Click OK to close the dialogue boxes.
The PC is now ready to stream the music to the radio. The WMP UPnP service runs in the background; there is no need to start WMP explicitly.
text_image
Media Sharing Share music, pictures, and video on your network. Learn more about sharing. Sharing settings ✓ Share my media to: Settings... RD1363DAB 00226109aa30 Allow DenyCustomize... How does sharing change firewall settings? OK Cancel Apply6.7 Using the "Play To" feature in Windows 7 to stream media
One of the new Windows 7 features include a feature called “Play To” and this lets your PC running Windows 7 control the unit to push media and use as a universal remote control for your media collection.
This unit supports the industry standard DLNA (Digital Living Network Alliance) 1.5 digital media renderer. This allows you to "Play To" other devices around your home and combine media streaming with controlling a connected media receiver while streaming content to it from another Windows 7 PC on a home network.
6.8 Use "Play To" in Windows Media Player
Windows Media Player makes it easy to manage your media, find items that you want to play, and open Play To
. To select items that you want to play, follow these steps:.
- Click the Start button, click All Programs, and then click Windows Media Player.
If the Player is currently open and you're in Now Playing mode, click the Switch to Library button in the upper-right corner of the Player.. - If the list pane is closed or if the Burn or Sync tabs are exposed, click the Play tab.
- Find the items that you want to play in the Player Library, and then drag those items from the details pane into the list pane.
- Click the Play To button at the top of the list pane; click the device on your network that will receive the media.
- In the Play To dialog box, use the playback controls to play, pause, or stop the media stream, and to change to the next or previous item in the list.
6.9 Use "Play To" elsewhere in Windows 7
Outside of Windows Media Player, you can stream media to this unit with "Play To" by right -clicking music files. To select music files and stream them to this unit, follow these steps:
- Click the files you want to stream to this unit.
- Right-click the selected files, point to "Play To", and then click the device on the network that will receive the media..
- In the Play To dialog box, use the playback controls to play, pause, or stop the media stream, and to change to the next or previous item in the list.
6.10 Now playing information
While a track is playing, the screen shows its track name (UpnP) There is also a progress bar with figures for elapsed and total track time. At the bottom of the screen, an icon indicates UPnP. To view further information, press Info.
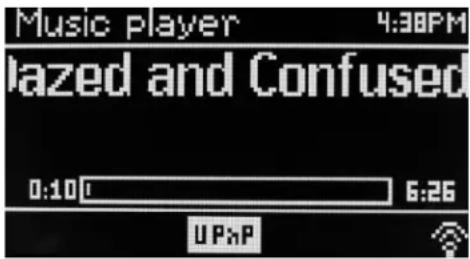
text_image
Music player 4:30PM Blazed and Confused 0:10:0 6:26 UPxPEach time you press Info, another set of information is displayed, cycling through the following
● Artist, album, codec/sampling rate, playback buffer
7. DAB radio mode
DAB radio mode receives DAB/DAB+ digital radio and displays information about the station, stream and track playing.
To enter DAB mode, either press Mode until the display shows DAB Radio or select Menu > Main menu > DAB.
text_image
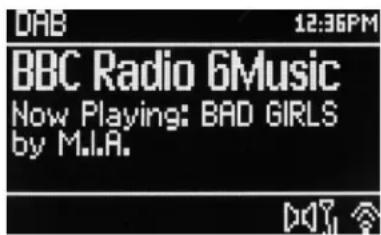
DAB 12:36PM BBC Radio 6Music Now Playing: BAD GIRLS by M.I.A.7.1 Scanning for stations
The first time you select DAB radio mode, or if the station list is empty, the unit automatically performs a full scan to see what stations are available. You may also need to start a scan manually to update the list of stations for one of the following reasons:
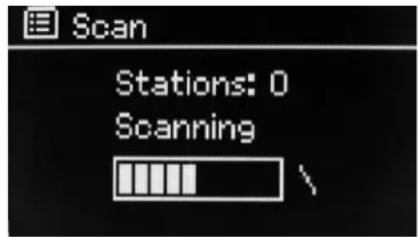
text_image
Scan Stations: 0 Scanning● Available stations change from time to time..
- If reception was not good for the original scan (for example the antenna was not up), this may result in an empty or incomplete list of available stations.
- If you have poor reception of some stations (burbling), you may wish to list only stations with good signal strength.
To start a scan manually, select Menu > Scan.
Once the scan is complete, the radio shows a list of available stations.
A question mark before a station in a list indicates that the station is currently unavailable Depending on the cause of the loss of signal this may be only temporary.
Stations that are unlikely to be available again (for example you have moved out of the broadcast range of a station), can be removed from the station list.
To remove stations that are listed but unavailable, select Menu > Prune invalid.
7.2 Selecting stations
To listen to or change a station, turn the Select control a list of stations from which you can select is presented. Stations listed with a ? question mark in front of them are not available.. Once selected, the station plays and the screen shows information about the station, track or show broadcast by the station.
Alternatively, pressing either the Fast Forward or Rewind keys, jumps to the next station up or down in the station list.
Preset stations can be stored and recalled as described in Presets.
7.3 Now playing information
While the stream is playing, the screen shows its name and DLS Dynamic Label Segment information broadcast by the station giving real-time information such as programme name, track title and contact details. Stereo broadcasts are indicated with an icon at the top of the screen. To view further information, press Info.
Each time you press Info, another set of information is displayed, cycling through DLS text programme type, ensemble name/frequency, signal strength/error rate, bit rate/codec/channels today's date and DL Plus (if available).
7.4 Settings
Dynamic range compression
Some DAB broadcasts offer dynamic range compression (DRC). This feature allows adios to compress the dynamic range of the output audio stream, so that the volume of quiet sounds is increased, and the volume of loud sounds is reduced is reduced useful if you are listening to music with a high dynamic range in a noisy environment (for example, classical music while cooking).
To change the DRC of this unit, select Menu >DRC and then DRC high DRC low or DRC off.
Note: This unit 's DRC setting does not have any effect if DRC data is not included in the broadcast.
Station order
You can choose the order of the DAB station list to be either Alphanumeric, Ensemble or Valid.
Ensemble lists groups of stations that are broadcast together on the same ensemble, for example BBC or South Wales local Valid lists valid stations first, alphanumerically, then off-air stations..
To change station order, select Menu> Station order >then Alphanumeric Ensemble or Valid.
8. FM radio mode
FM radio mode receives analogue radio from the FM band and displays RDS (Radio Data System) information about the station and show (where broadcast).
To enter FM mode, either press Mode until the display shows FM Radio select Menu > Main menu > FM.
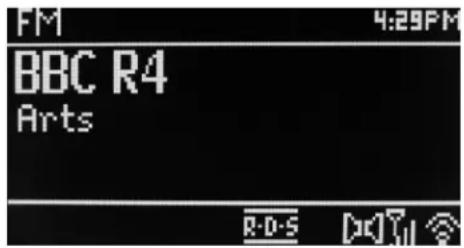
text_image
FM 4:29PM BBC R4 Arts R:D-S8.1 Selecting stations
To find a station, pres Select. The frequency display starts to run up as this unit scans the FM band. Alternatively, you can scan up or down by tune manually with quick presses, or by turning the Select control.
Note: Scanning can be set to search for strong signals only, (see 8.3 Settings below).
Preset stations can be stored and recalled as described in Presets.
8.2 Now playing information
While an FM station is playing, the screen shows one of the two following sets data:
- If RDS information is available, by default the service name (i.e. station name) is displayed. You can cycle through further RDS information by pressing Info. Each time you press Info, another set of information is displayed, cycling through RDS radio text, RDS programme type, frequency and today's date.
- If no RDS information is available, the currently tuned frequency is shown.
8.3 Settings
Scan settings
By default, FM scans stop at any available station. This may result in a poor signal noise ratio (hiss) from weak stations. To change the scan settings to stop only at stations with good signal strength, select Menu > Scan setting > Strong stations only?> Yes.
Audio settings
By default, all stereo stations are reproduced in stereo. For weak stations, this may result in a poor signal-to-noise ratio (hiss). To play weak stations in mono, select Menu > Audio setting >FM weak reception: Listen in mono only> Yes.
9. Aux in mode
Aux in mode plays audio from an external source such as an MP3 player.
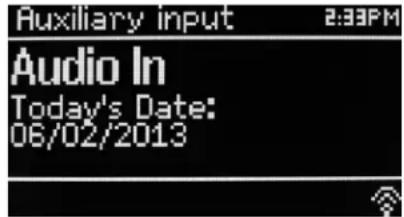
text_image
Auxiliary input 2:33PM Audio In Today's Date: 06/02/2013To play audio with Aux in mode,
- Turn the volume low on both this unit and, if adjustable, the audio source device.
- Connect the external audio source to the Aux In 3.5 mm stereo socket.
- Either press Mode until the display shows AUX or select Menu> Main menu > AUX in.
- Adjust the volume of this unit, (and, if necessary, the audio source device) as required.
10. Alarms and Sleep
As well as a clock/calendar, there are two versatile wake up alarms with snooze facility, and a sleep function to turn the system off after set period. Each alarm can be set to start in a particular mode.
text_image
05/02/2013 12:49PM 12:00AM 12:00AMTo set the clock/calendar, see Getting started/setup on page 3.
10.1 Alarms
To set or change an alarm, either press Alarm or select Menu >.
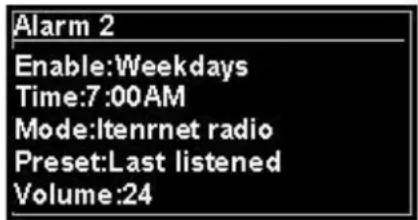
Select the alarm number (1 or 2) then configure the following parameters:
text_image
Alarm 2 Enable:Weekdays Time:7:00AM Mode:ltenrnet radio Preset:Last listened Volume:24● Enable Off, Daily, Once, Weekends or Weekdays,
● Time: 12:00AM (adjust as necessary)
- Date:01-01-2007(adjust as necessary -this option is usually hidden and only required if "Once" is selected in the Enable field).
- Mode:: Buzzer, Internet radio, DAB or FM.
- Preset:: Last listened or 1-10.
- Volume:: 0 \~32
To save these settings and set the alarm, scroll down and select Save.
Note: If you press Back or Menu to exit the Alarm settings without saving, a dialogue screen is displayed asking if you wish to save the changes or not. The Now Playing, screen shows active set alarms with an icon at the bottom left. The Standby screen shows active set alarms with an icon and the alarm time.
At the set time, the alarm will sound. To temporarily silence it, press Snooze.
Pressing Snooze repeatedly cycles through the available snooze periods:
5 Mins, 10 Mins, 15 Mins, 30 Mins
The radio returns to standby for the set period, with the silenced alarm icon flashing and a countdown of the remaining snooze period After the set snooze time the alarm will sound again.
Note: During a snooze period, to change the snooze time press Snooze to select a new snooze time. Any remaining snooze time is reset to the selected time period.
To cancel a sounding alarm, or an alarm in snooze, press Standby or Alarm.
10.2 Sleep
To set the sleep timer, press the Sleep key repeatedly to cycle through the sleep time options:
Sleep OFF,15 MINS,30 MINS,45 MINS or 60 MINS.
Stop when the required time is displayed, after a brief moment the screen returns to the screen being used before the sleep function was selected.
On the Now Playing screens the remaining sleep time is displayed at the bottom of the screen.

text_image
Set sleep time 30 minutesAlternatively select Menu>Main menu > Sleep and select from the sleep time options.Once youselect a sleep period, the system returns to the main menu. Press Menu to return to the Now playing screen.
To cancel a sleep time, select Sleep OFF from the sleep options using either of the above methods.
Note: A sleep time is automatically cancelled if this unit is put into Standby.
11 Troubleshooting and error messages
11.1 Error messages
| Problem | Cause | Solutions |
| Failed to connect | Correct key entered, but router rejects request | MAC filtering enabled on router |
| Format error | Cannot recognise file format independent of network | Received .wma, but found that the stream wasn't WMA when trying to decode |
| Network error | Problem past router- incorrect data being received from network | Data obtained from server is unreadable. |
| Network not ready | Problem with connection to router | Router switched off |
| Network timeout | Problem past router no response being received from network | Streaming IR station and suddenly station becomes unavailable |
| No UPnP media found | No UPnP servers found | |
| Service not available (DAB) | No DAB reception | |
| Unauthorised | Access not granted by UPnP server | Allow access for RD1363DAB in UPnP server settings |
| Update failed | Software upgrade failed |
11.2 Troubleshooting
| Problem | Cause | Solutions |
| FM: HissDAB: burbling/intermittent cut-out | Low signal strength | Check/move antennaMove radioRescan local (high-strength)stations onlyFor DAB, check local coverage at www.ukdigitalradio.com/coverage |
| DAB: “No stations available” message | Low signal strength | As above then rescan stations. |
| Cannot connect to network | Network down | Check that network is working between a computer and the router |
| Router restricts access to listed MAC addresses | Obtain the RD1363DAB MAC address from Menu>System settings>Network>View settings and add to router list.Note:RD1363DAB has separate MAC addresses for wired and wireless networks; only the current network adaptor method address is displayed, but the other address can be obtained by changing the first pair of digits between “00” (wireless) and “02” (wired) | |
| Insufficient Wi-Fi signal strength | Check distance to router; see if a computer can connect to the network in this location | |
| Unknown encryption method | Change encryption method on router.RD1363DAB supports WEP, WPA and WPA2 | |
| Unusual network configuration | Setup network manually through Menu>System settings>Network>Manual settings | |
| Firewall preventing access | Check the following ports are open on the router : UDP and TCP ports 80 and 123;DNS port 53.Windows shares: ports 135–139 and 445.Windows Media Player: varies Non-Microsoft firewalls may require configuration for UPnP. | |
| Cannot connect to Internet | Internet connection down | Check that Internet is working for a computer connected to the same network |
| Firewall preventing access | Check the following ports are open: UDP and TCP ports 80 and 123; DNS port 53. Some Internet radio stations may require additional ports to be opened. | |
| Cannot play particular Internet radio station | Station not broadcasting, overloaded or insufficient bandwidth. Station broadcasting using unknown codec. Link out of date. | Try other stations; try listening on computer via Internet radio portal website; try later |
Technical Data
● Input voltage, current : 12V 1.5A
● Power consumption: max. 15W
● Radio Frequency range: FM 87.50MHz – 108.00MHz 50KHz/step
DAB Band III, 174.928MHz – 239.200MHz
- Store temperature::-10 \~ +60 °C
● Operating temperature: +5 \~ +40 °C
Glossary
DAB Digital Audio Broadcasting
DLS Dynamic Label Segment -short text information broadcast with DAB audio
FM Frequency Modulation
RDS Radio Data System
UI User Interface
UPnP Universal Plug and Play
WLAN Wireless Local Area Network
PROTECTION DE L'ENVIRONNEMENT

4.3. Heure/date.... 12
text_image
On/Off Sleep Menu Mode Back Vol- Vol+ Info Preset Alarm soundmaster® highsec Tuning/Selecttext_image
soundmaster®Assistant heure/date
Langue
Réglages d'origine
text_image
Basses - Basses 0 dB -14 0 144.2 Réseau
4.3.3 Réglage format (assistant)
text_image
Media Sharing Share music, pictures, and video on your network. Learn more about sharing. Sharing settings ✓ Share my media to: Settings... RD1363DAB 00226109aa30 Allow DenyCustomize... How does sharing change firewall settings? OK Cancel Applytext_image
DAB 12:36PM BBC Radio 6Music Now Playing: BAD GIRLS by M.I.A.text_image
FM 4:29PM BBC R4 Arts R:D-Stext_image
05/02/2013 12:49PM 12:00AM 12:00AM8. FM radio stand....27
text_image
On/Off Sleep Menu Mode Back Vol- Vol+ Info Preset Alarm nsoundmaster® highline Tuning/Selecttext_image
soundmaster®text_image
Bass: Bass: ]dB -14 0 14text_image
SSID Airport extreme Hinston_dg [WPS]Another IR3000 [WPS]DLNAL_onlyOnbeveiligd netwerk
text_image
FRONTIER SILICON Radio Portal Access global stations Personalise favourites Search. Stations Podcasts Browse Stations By location By genre By language New stations Most popular Browse Podcasts By location By genre My account My favourites My added stations My preferences English Dansk Português Español Norsk Italiano Français Svensk Nederlands Deutsch Suomi About us Contact us Logout © Frontier Silicon 2008 | Legal Mark's radio Station name Location Genre Stream 2 Ten FM Reading United Kingdom Electronica WMA 128K BBC Radio 2 London United Kingdom Variety RealPlayer 44K Capital Radio London United Kingdom Top 40 WMA 128K Virgin Radio London United Kingdom Pop MP3 128K On Air Power Internet Only World Asia MP3 128K Antenna Uno Catania Italy Dance MP3 96K BBC Radio 1 London United Kingdom Top 40/Dance/Rock RealPlayer 16K Radio Dzair Internet Only World Middle East MP3 128K 108 Xtra United Kingdom Electronica MP3 256K Capital FM 98.4 Nairobi Kenya Pop WMA 20K BBC R5LiveSportX International London United Kingdom Sports WMA 48K Classic FM London United Kingdom Classical WMA 128K
text_image
Media Sharing Share music, pictures, and video on your network. Learn more about sharing. Sharing settings ✓ Share my media to: Settings... RD1363DAB 00226109aa30 Allow DenyCustomize... How does sharing change firewall settings? OK Cancel Applytext_image
DAB 12:36PM BBC Radio 6Music Now Playing: BAD GIRLS by M.I.A.text_image
05/02/2013 12:49PM 12:00AM 12:00AM10.1 Wekkers
5 MIN, 10 MIN, 15 MIN, 30 MIN
Slaapstand UIT, 15 MIN, 30 MIN, 45 MIN of 60 MIN.
DAB Digital Audio Broadcasting
WLAN Wireless Local Area Network
text_image
On/Off Sleep Menu Mode Back Vol- Vol+ Info Preset Alarm soundmaster® Tuning/Select highlinetext_image
soundmaster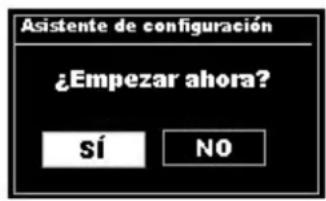
text_image
Grave Grave 0 dB -14 0 144.2 Red
text_image
SSID Airport Extreme Hinston_dg [WPS]Another IR3000 [WPS]DLNAL_onlyTo turn automatic checking on or off, select Menu > System settings> Software update> Auto check setting.
text_image
FRONTIER SILICON Radio Portal Access global stations Personalise favourites Playing Radio Moris 128 K Segavibes faya av Search. Stations Podcasts Browse Stations By location By genre By language New stations Most popular Browse Podcasts By location By genre My account My favourites My added stations My preferences English Dansk Português Español Norsk Italiano Français Svensk Nederlands Deutsch Suomi About us Contact us Logout © Frontier Silicon 2008 | Legal Access global stations Personalise favourites Search. Browse. Find. Mark's radio Station name Location Genre Stream 2 Ten FM Reading United Kingdom Electronica WMA 128K BBC Radio 2 London United Kingdom Variety RealPlayer 44K Capital Radio London United Kingdom Top 40 WMA 128K Virgin Radio London United Kingdom Pop MP3 128K On Air Power Internet Only World Asia MP3 128K Antenna Uno Catania Italy Dance MP3 96K BBC Radio 1 London United Kingdom Top 40/Dance/Rock RealPlayer 16K Radio Dzair Internet Only World Middle East MP3 128K 108 Xtra United Kingdom Electronica MP3 256K Capital FM 98.4 Nairobi Kenya Pop WMA 20K BBC R5LiveSportX International London United Kingdom Sports WMA 48K Classic FM London United Kingdom Classical WMA 128KIn order for the unit to play music files from a computer, the computer must be set up to share files or media.
text_image
Media Sharing (Compartir medios) Share music, pictures, and video on your network. Learn more about sharing. Sharing settings ✓ Share my media to: (Compartir multimedia con:) Settings... RD1363DAB 00226109aa30 Allow Deny Customize... How does sharing change firewall settings? OK Cancel Apply (Aceptar) (Cancelar)text_image
FM 4:29PM BBC R4 Artes R-D-Stext_image
05/02/2013 12:49PM 12:00AM 12:00AM10.1 Alarmas
5 Mins, 10 Mins, 15 Mins, 30 Mins
text_image
Def. hora sleep 30 minutostext_image
On/Off Sleep Menu Mode Back Vol- Vol+ Info Preset Alarm Tuning/Select On soundmaster® high/lowtext_image
soundmaster®
Minha lista reprod. Dazed and Confused Bird On The Wire Birdcall Morning Here We Go Again
text_image
Media Sharing Share music, pictures, and video on your network. Learn more about sharing. Sharing settings ✓ Share my media to: Settings... RD1363DAB 00226109aa30 Allow DenyCustomize... How does sharing change firewall settings? OK Cancel Applytext_image
DAB 12:36PM BBC Radio 6Music Now Playing: BAD GIRLS by M.I.A.text_image
FM 4:29PM BBC R4 Arts R-D-S [+]?text_image
05/02/2013 12:49PM 12:00AM 12:00AM10.1 Despertadores
text_image
Def. hora 'sleep 30 minutostext_image
On/Off Sleep Menu Mode Back Vol- Vol+ Info Preset Alarm soundmaster® highline Tuning/Selecttext_image
soundmaster®text_image
FM Søkeinnstilling Lydinnstilling Systemoppsett > Hovedmeny >Itillegg har hver modusmeny to avsluttende alternativ: Systemoppsett og Hovedmeny>. > indikerer alternativer som fører til flere menyer.
text_image
Systemoppsett Equalizer Nettverk Tid/dato Inaktiv Standby Språktext_image
Bass Bass 0 dB -14 0 144.2 Nettverk
text_image
SSID Airport Extreme Hinston_dg [WPS]Annet IR3000 [WPS]DLNAL_kunÅpent nettverk
| All musikk | |
| The Chain | |
| Chelsea Hotel No.2 | > |
| Chelsea Hotel No.2 | > |
| Communication Breakd | > |
| Communication Breakdo | > |
text_image
Media Sharing Share music, pictures, and video on your network. Learn more about sharing. Sharing settings ✓ Share my media to: Settings... RD1363DAB 00226109aa30 Allow DenyCustomize... How does sharing change firewall settings? OK Cancel Applytext_image
DAB 12:36PM BBC Radio 6Music Now Playing: BAD GIRLS by M.I.A.text_image
05/02/2013 12:49PM 12:00AM 12:00AM10.1 Alarmer
*) markerade Cd = kadmium, Hg = kvicksilver, Pb = bly
Innehåll
text_image
On/Off Sleep Menu Mode Back Vol- Vol+ Info Preset Alarm nsoundmaster® Tuning/Select highlinetext_image
soundmaster®text_image
SSID Airport Extreme Hinston_dg [WPS]Another IR3000 [WPS]DLNAL_onlyÖppet nätverk
text_image
Genre Alternative > Ambient > Big Band Bluegrass Blues >text_image
Media Sharing Share music, pictures, and video on your network. Learn more about sharing. Sharing settings ✓ Share my media to: Settings... RD1363DAB 00226109aa30 Allow DenyCustomize... How does sharing change firewall settings? OK Cancel Applytext_image
DAB 12:36PM BBC Radio 6Music Now Playing: BAD GIRLS by M.I.A.Dynamic range compression
text_image
FM 4:29PM BBC R4 Arts R:D-S8.1 Välja stationer
text_image
05/02/2013 12:49PM 12:00AM 12:00AM10.1 Alarm
Sleep AV, 15 MIN, 30 MIN, 45 MIN eller 60 MIN.
DAB Digital Audio Broadcasting
FM Frequency Modulation
RDS Radio Data System
UI User Interface
UPnP Universal Plug and Play
WLAN Wireless Local Area Network
YMPÄRISTÖNSUOJELU

text_image
On/Off Sleep Menu Mode Back Vol- Vol+ Info Preset Alarm m̂1soundmaster® highinc Tuning/Selecttext_image
soundmaster®text_image
SSID Airport Extreme Hinston_dg [WPS]Toinen IR3000 [WPS]DLNAL_onlyAvoin verkko
| Painike | > |
| PIN koodi | > |
| Ohita WPS | > |
WPS-asetukset

Paina WPS-
text_image
Media Sharing Share music, pictures, and video on your network. Learn more about sharing. Sharing settings ✓ Share my media to: Settings... RD1363DAB 00226109aa30 Allow DenyCustomize... How does sharing change firewall settings? OK Cancel Applytext_image
DAB 12:36PM BBC Radio 6Music Now Playing: BAD GIRLS by M.I.A.text_image
05/02/2013 12:49PM 12:00AM 12:00AMRDS Radio Data System
UI Käyttöliittymä
UPnP Universal Plug and Play
WLAN Wireless Local Area Network
MILJ∅BESKYTTELSE

text_image
On/Off Sleep Menu Mode Back Vol- Vol+ Info Preset Alarm soundmaster® lightsec Tuning/Selecttext_image
soundmaster®text_image
WPS-menu Trykknap > PIN > Spring over WPS >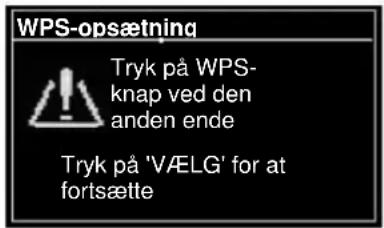
text_image
Media Sharing Share music, pictures, and video on your network. Learn more about sharing. Sharing settings ✓ Share my media to: Settings... RD1363DAB 00226109aa30 Allow DenyCustomize... How does sharing change firewall settings? OK Cancel Apply6.7 Sådan bruges "Play To" i Windows 7 til at streame medie
text_image
05/02/2013 12:49PM 12:00AM 12:00AM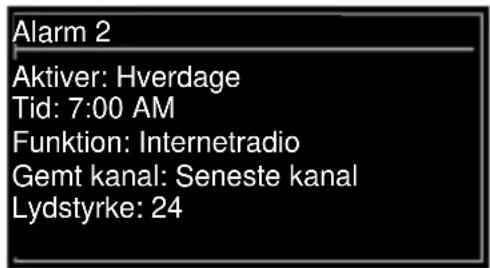
text_image
Alarm 2 Aktiver: Hverdage Tid: 7:00 AM Funktion: Internetradio Gemt kanal: Seneste kanal Lydstyrke: 24DAB Digital Audio Broadcasting
WLAN Wireless Local Area Network
Hereby, Wörlein GmbH declares that this device is in compliance with the essential requirements and other relevant provisions of Directive 1999/5/EC.
A copy of the Declaration of Conformity may be obtained at the following location: Wörlein GmbH, Gewerbestrasse 12, D 90556 Cadolzburg, Germany
soundmaster® highline
Version 1.2
Copyright by Wörlein GmbH
