Subwoofer 525 - Speaker LOEWE - Free user manual and instructions
Find the device manual for free Subwoofer 525 LOEWE in PDF.
User questions about Subwoofer 525 LOEWE
0 question about this device. Answer the ones you know or ask your own.
Ask a new question about this device
Download the instructions for your Speaker in PDF format for free! Find your manual Subwoofer 525 - LOEWE and take your electronic device back in hand. On this page are published all the documents necessary for the use of your device. Subwoofer 525 by LOEWE.
USER MANUAL Subwoofer 525 LOEWE
natural_image
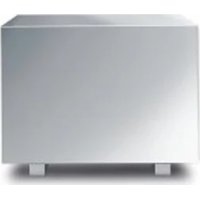
White rectangular electronic device with four metallic legs, isolated on white background (no text or symbols)Bedienungsanleitung, Operating instructions, Mode d'emploi, Istruzioni per l'uso, Instrucciones de manejo, Gebruiksaanwijzing, Botjeningsvejledning, Käyttöohje, Bruksanvisning
LOEWE.
natural_image
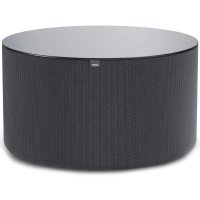
White rectangular electronic device with four metallic legs, isolated on white background (no text or symbols)Subwoofer
text_image
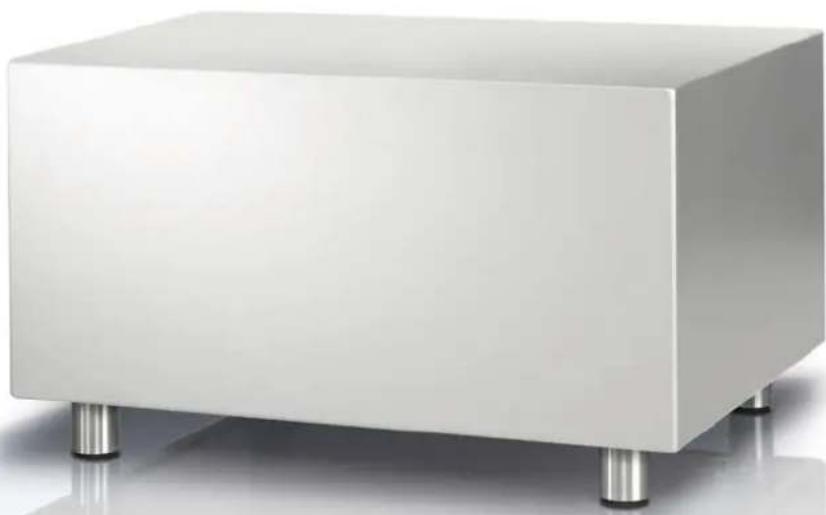
AUDIO LINK Line IN Left Sub Right Surr. Front Left Center Right ON OFF Standby OUTPER PLATE ASSEMBL, RPG at right end. RPG at left end. RPG at center. RPG at left end. RPG at right end. RPG at left end. RPG at right end. RPG at left end. RPG at right end. RPG at left end. Speaker Out (4-8 Ω) Wireless ON OFF Wireless Pinning 330-200V 300-50Hz ① ② ③ ④ ⑤ ⑥ ⑦ ⑧ ⑨Herzlich willkommen
Vielen Dank,
for choosing a Loewe product. We are happy to welcome you as our customer. At Loewe, we combine the highest standards of technology, design and user-friendliness. This is true of all our TVs, DVD/Blu-ray products, audio products and accessories.
Neither technology nor design is an end in itself, but both are intended to provide our customers with the best possible audio and visual experience.
Our design is not influenced by short-term, fashionable trends. You have, after all, purchased a high-quality piece of equipment which you do not want to tire of tomorrow or the day after.
The Loewe subwoofer is fine-tuned for use with Loewe TV sets (from chassis L27xx/SL1xx/SL2xx) as well as with Loewe loudspeaker systems.
Loewe TV sets (from chassis L27xx/SL1xx/SL2xx) with an integrated digital multi-channel audio decoder transfer the audio signals to the subwoofer via an Audiolink cable or via a Digital Audiolink cable. The Loewe subwoofer then switches itself on and off with the Loewe TV set.
The audio settings can be selected conveniently using the menus of the Loewe TV set.
You can also use the Loewe subwoofer along with an external audio source. However, you then lose the Loewe system advantages (e.g. automatic on/off switching). In this case, see your decoder (e.g. AV receiver) for operating instructions.
Scope of delivery
Loewe Subwoofer 525, Catalogue no. 69211T/U/W10 - 30
• Loewe Subwoofer 525
- Mains cable
• Audiolink cable (6 m) (only at variant 10/20)
- Converter Digital Audiolink / Audiolink (only at variant 30)
• Network cable (only at variant 30)
- Electronic cover
- Operating instructions
Accessories
Floor stand for the subwoofer Catalogue no. 71135B00
Wireless Audiolink module Catalogue no. 71223080
Converter Digital Audiolink / Audiolink Catalogue no. 71600080
Audiolink cable (1.5 m) Catalogue no. 89952001
Audiolink cable (3 m) Catalogue no. 89952004
Audiolink cable (10 m) Catalogue no. 89952003
Safety
For your safety
For your safety and to avoid unnecessary damage to your TV set, please read and observe the following safety instructions:
• The unit is intended exclusively for the playback of audio signals.
• Always switch off the unit before connecting or disconnecting other devices or speakers.
- Do not allow the unit to run when it is unattended. If the unit is not to be used for an extended period, switch off the mains switch ⑪ or unplug the mains plug.
Protect the unit from:
• Damp, moisture, steam, dripping water or sprayed water
• Knocks and mechanical stress
• Magnetic and electrical fields
• Higher electrical power than specified
• Cold, heat, direct sunlight and high temperature fluctuations
- Dust
• Covers that obstruct air circulation
• Interventions inside the unit

Do not place objects containing liquids on top of the unit.

Candles and other open flames must be kept away from the unit at all times to prevent the spread of fire.
This unit has been built exclusively for private use in domestic environments. Warranty services cover this intended use of the unit.
WARNING: TO PREVENT ELECTRICAL SHOCK, DO NOT OPEN THE UNIT. THERE ARE NO PARTS INSIDE THE UNIT THAT CAN BE REPAIRED BY THE USER. REPAIRS SHOULD ONLY BE CARRIED OUT BY A LOEWE DEALER.
If you have moved the unit out of the cold into a warm environment, leave it switched off for about an hour to avoid condensation forming. Do not switch the unit on until it has reached room temperature. This prevents serious damage to the components.
Care / Setup
Cleaning
Only clean the unit with a damp, soft and clean cloth (without using any kind of harsh cleaning agent).
Setting up the subwoofer
Basic information
- Place the unit on a stable, even surface.
- Do not set up the unit near strong heat sources or in direct sunlight.
- When installing in a cabinet or closed shelf, leave about 10cm free around the unit to allow the air to circulate freely, thereby avoiding a build-up of heat and sound pressure.
- Disconnect the mains plug during thunderstorms. Surge voltages caused by lightning strikes can damage the unit through the antenna system and the mains.
- If the unit is not to be used for an extended period, the plug should also be disconnected from the mains.
- The mains plug must be easily accessible so that the unit can be disconnected from the mains at any time.
- Lay the speaker and power cables in such a way that they cannot be damaged. The power cable may not be kinked or laid over sharp edges, stood on or exposed to chemicals; the latter also applies to the system as a whole. A power cable with damaged insulation can cause electric shocks and poses a fire risk. As such, it must be changed before the unit is used again.
- When unplugging the unit from the mains, pull the plug housing and not the cable. The cables in the mains plug could otherwise be damaged and could cause a short-circuit when being plugged in again.
- The speakers generate stray magnetic fields which act in the vicinity of the housing. We recommend a minimum distance of >0.5m from magnetically sensitive equipment such as CRT TV sets, magnetic data media, etc.
Subwoofer
You can position the subwoofer anywhere on the floor.
We recommend the front area of the room in a way that the basses can freely flow to the sides and downwards.
Important: Never obstruct the air vents on the back of the subwoofer. Make sure it is far enough away (> 10 cm) from the floor or wall.
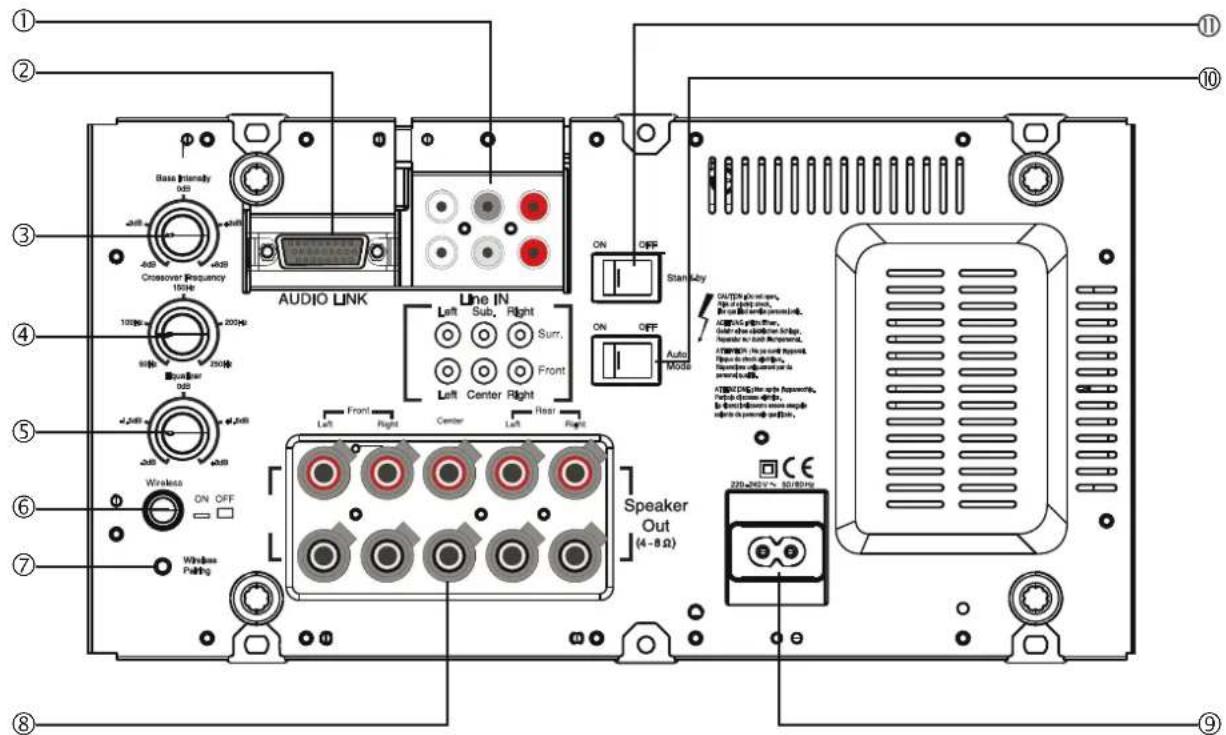
Suggested setup solution for Surround 5.1
text_image
Front left Loewe TV set Center Front right Loewe subwoofer English Rear left Rear rightConnection
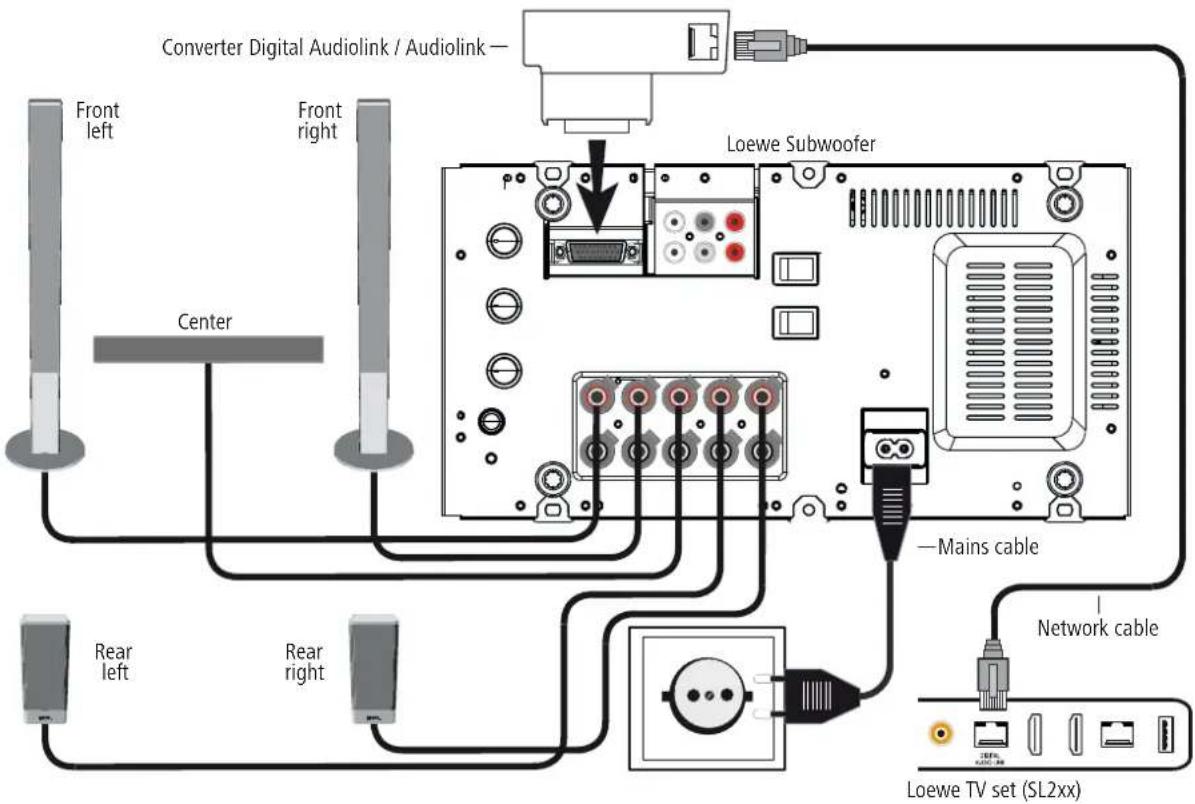
Cabling for Loewe TV set (SL2xx) - Loewe subwoofer - loudspeaker
The TV set must be equipped with a Digital Audiolink.
You can either connect the subwoofer via a network cable (Cat. 5e or higher) and the Converter Digital Audiolink / Audiolink (included with the Loewe Subwoofer 525, order no. 69211T/U/W30) or you can connect it wirelessly to a compatible audio source via the Module Wireless AudioLink which can be optionally retrofitted.
If you wish to connect the subwoofer using the network cable, connect the Converter Digital Audiolink / Audiolink to the 25-pin Audiolink socket of the subwoofer. Use the network cable to connect the Digital Audiolink of the TV set to the socket of the Converter Digital Audiolink / Audiolink.
Connect the speaker cable to the speaker according to the appropriate installation instructions. One of the two wires of the speaker cables is usual marked black. Connect this black marked cable to the black screw terminal on the subwoofer ⑧ (connection diagram, see figure below) and the black terminal on the speaker. Turn the screw connection of the respective terminal on the subwoofer anticlockwise about 5 turns. Feed the wire end into the screw terminal (top right-hand side) and close the screw terminal by turning it clockwise. Connect the unmarked wires to the red terminals.
Use the mains cable supplied to connect the 220-240 V socket ⑨ of the subwoofer to a 220-240V 50/60 Hz socket.
text_image
Converter Digital Audiolink / Audiolink — Front left Front right Center Loewe Subwoofer —Mains cable Rear left Rear right Network cable Loewe TV set (SL2xx)Connection
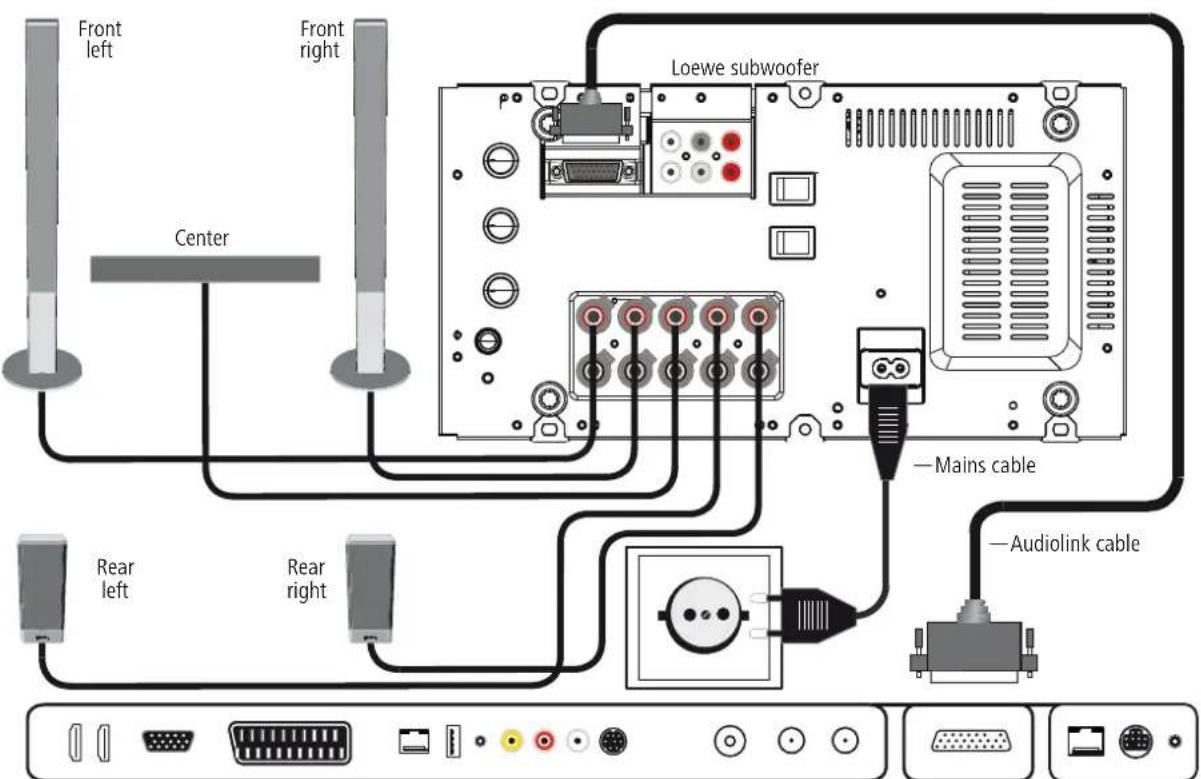
Cabling for Loewe TV set (L27xx/SL1xx) - Loewe subwoofer - loudspeaker
The TV set must be equipped with an integrated digital multi-channel audio decoder. If this has not been done at the factory, please consult your dealer and ask them for the suitable Loewe upgrade kit.
You can connect the subwoofer either via an optional Audiolink cable or via the optional upgrade module Wireless AudioLink wirelessly with a compatible audio source.
If you connect the subwoofer via the Audiolink cable, install it with the 25-pole connector at the Loewe TV set and at the subwoofer (socket Audiolink ②).
Connect the speaker cable to the speaker according to the appropriate installation instructions. One of the two wires of the speaker cables is usual marked black. Connect this black marked cable to the black screw terminal on the subwoofer ⑧ (connection diagram, see figure below) and the black terminal on the speaker. Turn the screw connection of the respective terminal on the subwoofer anticlockwise about 5 turns. Feed the wire end into the screw terminal (top right-hand side) and close the screw terminal by turning it clockwise. Connect the unmarked wires to the red terminals.
Use the mains cable supplied to connect the 220-240 V socket ⑨ of the subwoofer to a 220-240V 50/60 Hz socket.
text_image
Front left Front right Center Loewe subwoofer —Mains cable —Audiolink cable Rear left Rear rightLoewe TV set (L27xx - SL1xx)
Start-up and settings
Before beginning with the start-up and settings, make sure that all the cables are connected correctly.
Switching the subwoofer on/off
Use the mains switch ⑪ to switch the subwoofer to the ON position.
Mode with Loewe TV sets
If the subwoofer is connected as described on side 12 or 13 and the Auto Mode switch ⑩ is in the OFF position, you no longer need to switch the subwoofer on and off separately. After switching on the subwoofer for the first time it is switched on and off automatically with the Loewe TV set.
Automatic mode with other audio sources
If the Auto Mode switch ⑩ is in the ON position and audio signals are present at the cinch sockets Line IN Front Left/Center/Front Right, then the subwoofer switches itself on automatically. If no audio signals are present at these sockets for a duration of 10 minutes, then the subwoofer switches itself off automatically.
The subwoofer can switch itself on automatically if any interfering signals are present on the audio cables. In this case, switch the unit off at the mains ⑪.
The subwoofer can switch itself off automatically during long, very quiet passages in the playback. You will then need to turn up the volume.
Settings on the Loewe TV set
Make the necessary settings to your subwoofer as described in your Loewe TV set's operating instructions in the "Operating additional devices" / "External devices" chapters.
Setting the equalizer
Using the Equalizer knob ⑤ you can set the lowest frequency ranges (20 Hz - 50 Hz) for bass reproduction to be raised or lowered.
- If the subwoofer is near the corner of the room, turn the Equalizer knob ⑤ more in the -3 dB direction.
- If the subwoofer is near a wall, then turn the Equalizer knob more to the middle position.
- If the subwoofer is freely positioned in the room, turn the Equalizer knob ⑤ more in the +3 dB direction.
Bass intensity
Using the Bass Intensity controller ③ you can set the basic bass volume to suit you.
Setting the crossover frequency
You can use the Crossover Frequency ④ knob to set the crossover frequency for bass reproduction between 50 Hz and 250 Hz depending on which speakers you have connected.
As described on side 12 or 13, for Loewe audio systems the knob should be set to 250 Hz because the crossover frequency is set to this in the Loewe audio sources (TV set).
Wireless
Set the wireless switch ⑥ to the OFF position once you have attached the subwoofer to an audio source via a cable, otherwise you will not hear any sound.
Move the Wireless ⑥ switch to the ON position if you wish to connect the subwoofer wirelessly to a compatible audio source.
Activate Coupling mode, as described in the instruction manual of the relevant audio source. Use the Wireless Pairing ⑦ button on the subwoofer using a sharp object. A message appears on the display of the audio source if the registration was successful. If the registration was not successful, please try again and reduce the distance of the subwoofer to the audio source.
Cover on the subwoofer
After you have made the settings described in "Start-up and settings", mount the cover on the rear of the subwoofer.
Technical data
Loewe subwoofer
Operating temperature [°C] 5 ... 40
Humidity [%] (no condensation) 30 ... 90
Dimensions [W x H x D in cm] 43 x 24.4 x 35.5
Mass [kg] 12.6
Digital output stages 6 channels
Principle 1 way bass reflex, active
Equipment 1 x bass 200 mm
Load capacity of the subwoofer channel 150 (sine) / 225 watt (max. music)
Load capacity of other channels 5x 75 (sine) / 100 watt (max. music)
Mains voltage [volt 50/60 Hz] 220 - 240V
Maximum power consumption [watt] 400
Nominal power consumption [watt] 110
Power consumption on standby [watt] < 0.5
Bass intensity [dB] ±6
Transmission range of the subwoofer (acoustic) 36 Hz - 250 Hz - 3dB
Transmission range of other channels 20 Hz - 22 kHz - 3dB
Loudspeaker impedance [Ohm] 4
Mains switch yes
Mode switch yes
Line In RCA socket 6x: FL, Center, FR, RL, Subw, RR
System link Audiolink 25-pin D-Sub
Masthead
All rights reserved, including those of the translation.
Design and technical specifications are subject to change without notice.
Disposal
Cardboard box and packaging
In line with national regulations regarding the disposal of packaging materials, we pay a fee to authorised recyclers who collect packaging from dealers. Nevertheless, we recommend that you keep the original cardboard box and the rest of the packaging materials so that the unit can, if necessary, be transported in the safest possible conditions.
The unit
Attention: The EU Directive 2002/96/EC governs the proper return, handling and recycling of used electronic appliances. Old electronic appliances must therefore be disposed of separately. Never dispose of this unit in the normal domestic waste! You can hand in your old unit free of charge at identified collection points or to your dealer if you buy a similar new unit. Other details on collection (also for non-EU countries) are available from your local authorities.
Bienvenue
Line In Prise RCA 6x: FL, Center, FR, RL, Subw, RR
Spina Line In RCA 6x: FL, Center, FR, RL, Subw, RR
Link sistema Audiolink 25 poli D-Sub
Line In Conector RCA 6x: FL, Center, FR, RL, Subw, RR
Systemlink Audiolink 25 pol D-Sub
Pie de imprenta
Uitrusting 1x bass 200 mm
Line in RCA bøsning 6x FL, Center, FR RL, Subw, RR
Systemlink Audiolink 25 pol D-Sub
Kolofon
Line In RCA-uttag 6x: FL, Center, FR, RL, Subw, RR
Systemlink Audiolink 25-pol D-Sub
Impressum
No.8 Jinghu Rd. Xinhua St. Huadu
Reg. GZ, PRC
Tel +86-(0)20-22675666
Fax +86-(0)20-22675777
E-mail: service@loewe-mg.com
Xiamen Tenote Investment Co. Ltd
26F 3# Xinglin Bay Operation
Center,
No.478 xinglinwan Avenue,
Jimei District, Xiamen, Fujian, PRC
Tel +86-400 088 1566
E-mail: service@loewe-tnt.com
CY
Hadjikyriakos & Sons Ltd.
121 Prodromos Str., P.O Box 21587
1511 Nicosia, Cyprus
Tel +357 - 22 87 21 11
Fax +357 - 22 66 33 91
E-mail: savvas@hadjikyriakos.
com.cy
CZ
BaSys CS s.r.o.
Sodomkova 1478/8
10200 Praha 10 - Hostivar,
Česká republika
Tel +420 234 706 700
Fax +420 234 706 701
Customer Care Center
Industriestraße 11
1st Floor, 237A Kensington High St
London
W8 65A, UK
Tel +44 - (0) 207 368 1100
Fax +44 - (0) 207 368 1101
E-mail: enquiries@loewe-uk.com
GR ARO AL
Clear electronic entertainment Ltd
13 Noah Mozes St.
Agish Ravad Building
Tel Aviv 67442, Israe
Tel +972 - 3 - 6091100
Fax +972 - 3 - 6092200
E-mail: info@loewe.co.il
IND
Nonplus Ultra Home Automation
Pvt Ltd
First Floor, No. 615, Second Main
Road
Indiranagar Stage I, Indiranagar
Bangalore 560038
India
Tel +91 80 41114599
E-mail: jimmy@nplusultra.in
IR
Pars Royal Taramesh
LOEWE Gallery
3 Shariati St. Opp. Soheil St.
P.O Box 1914965537
Tehran, Iran
Tel + 98 21-22391661
E-Mail: info@tarameshgroup.com
JOR
ACCU-TECH Solutions Co.
1-Kharija Al-Ashja'i Street
Jabal Al-Weibdeh
P.O.Box 9668 Amman 11191,
Jordan
Tel: +962-6-465-9985
Fax: +962-6-465-0119
E-Mail: info@accutech-solutions.net
KSA
LOEWE Show Room
Olaya Street, Near Kingdom
Center
RIYADH, SAUDI ARABIA
P.O Box 92831 Riyadh 11663
Tel +966-11-4640927
Fax +966-11-4640759
E-mail: hkkurkjian@gmail.com
LV
Kpartners, SIA
A.Čaka iela 80
Building 328 1st Floor Beirut,
Lebanon
Tel+961 1 446777/1 587446
Fax +961 1 582446
E-mail: info@icontrol-leb.com
RUS
Service Center Loewe
Aptekarsky per.4 podjezd 5A
105005 Moscow, Russia
Tel +7 - 499 940 42 32 (ext. 454)
Fax +7 - 495 730 78 01
E-mail: service@loewe-cis.ru
S
EET Europarts AB
Loewe Sweden
Box 4124
11 changi south street 3
03-01 builders centre
Singapore 486122
Tel+65-67452028
Fax +65 - 6546 7861
E-mail: service@atlas-sv.com
TR
ENKAY GROUP
SERVISPLUS MUSTERI HIZMETLERİ
Volco Enterprise Close Corporation
Unit 8
7 on Mastiff (Road)
Longlake Ext 1, Lingbro Business
Park
2165 Johannesburg
Tel+27 11 608 1228
Fax +27 11 608 1740
E-mail: v63@mweb.co.za
© by Loewe Technologies 01.09.15
LOEWE.