
DVRS150 - Home cinema amp YAMAHA - Free user manual and instructions
Find the device manual for free DVRS150 YAMAHA in PDF.

| Product type | Home theater amplifier (DVD receiver/player) |
| Brand | YAMAHA |
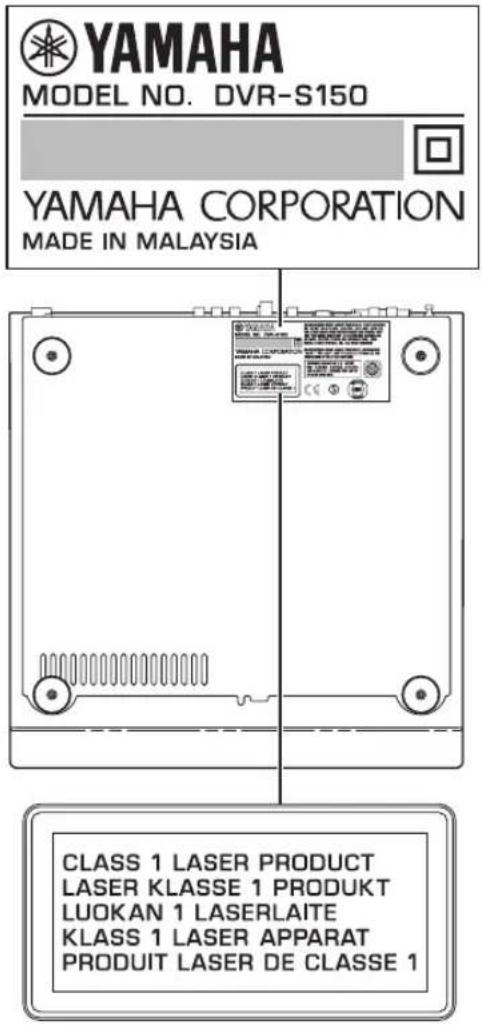
| Model | DVRS150 |
| Dimensions (W x H x D) | 360 x 75 x 360 mm |
| Weight | 6.4 kg |
| Power supply | 220-240 V, 50 Hz (Europe models) / 120 V, 60 Hz (US models) |
| Power consumption | 85 W (max), 0.4 W standby |
| Output power | 45 W per channel (6 Ω, 0.9% THD, 20 Hz-20 kHz) |
| Audio formats | Dolby Digital, DTS, Dolby Pro Logic II, Linear PCM |
| DSP functions | YPAO, CINEMA DSP, Virtual CINEMA DSP, SILENT CINEMA, Matrix 6.1 |
| Audio inputs | 2x analog (VIDEO, VCR), 1x optical digital |
| Audio outputs | VCR OUT, OPTICAL OUT, headphone jack |
| Video inputs | Composite, S-video, component (Y/Pb/Pr), SCART (depending on model) |
| Tuner | FM/AM with 30 presets |
| Compatible discs | DVD Video, Video CD, Audio CD, MP3, JPEG (CD-R/RW) |
| Included accessories | Remote control, YPAO microphone, indoor FM antenna, speaker cables (5m x3, 15m x2), video cable |
| Maintenance and cleaning | Dry, clean cloth; do not use chemical solvents |
| Safety | Class 1 laser, auto power-off, surge protection; do not open |
| Temperature range | +5°C to +35°C |
| Operating humidity | 5% to 90% (without condensation) |
Frequently Asked Questions - DVRS150 YAMAHA
User questions about DVRS150 YAMAHA
0 question about this device. Answer the ones you know or ask your own.
Ask a new question about this device
Download the instructions for your Home cinema amp in PDF format for free! Find your manual DVRS150 - YAMAHA and take your electronic device back in hand. On this page are published all the documents necessary for the use of your device. DVRS150 by YAMAHA.
USER MANUAL DVRS150 YAMAHA
1 To assure the finest performance, please read this manual carefully. Keep it in a safe place for future reference.
2 Install this sound system in a well ventilated, cool, dry, clean place with at least 10cm on the top, 10cm on the left and right, and 10cm at the back of DVR-S150 — away from direct sunlight, heat sources, vibration, dust, moisture, and/or cold.
3. Locate this unit away from other electrical appliances, motors, or transformers to avoid humming sounds.
4 Do not expose this unit to sudden temperature changes from cold to hot, and do not locate this unit in an environment with high humidity (i.e. a room with a humidifier) to prevent condensation inside this unit, which may cause an electrical shock, fire, damage to this unit, and/or personal injury.
5 Avoid installing this unit where foreign object may fall onto this unit and/or this unit may be exposed to liquid dripping or splashing. On the top of this unit, do not place:
- Other components, as they may cause damage and/or discoloration on the surface of this unit.
- Burning objects (i.e. candles), as they may cause fire, damage to this unit, and/or personal injury.
- Containers with liquid in them, as they may fall and liquid may cause electrical shock to the user and/or damage to this unit.
6 Do not cover this unit with a newspaper, tablecloth, curtain, etc. in order not to obstruct heat radiation. If the temperature inside this unit rises, it may cause fire, damage to this unit, and/or personal injury.
7 Do not plug in this unit to a wall outlet until all connections are complete.
8 Do not operate this unit upside-down. It may overheat, possibly causing damage.
9 Do not use force on switches, knobs and/or cords.
10 When disconnecting the power cable from the wall outlet, grasp the plug; do not pull the cable.
11 Do not clean this unit with chemical solvents; this might damage the finish. Use a clean, dry cloth.
12 Only voltage specified on this unit must be used. Using this unit with a higher voltage than specified is dangerous and may cause fire, damage to this unit, and/or personal injury. YAMAHA will not be held responsible for any damage resulting from use of this unit with a voltage other than specified.
13 To prevent damage by lightning, disconnect the power cable from the wall outlet during an electrical storm.
14 Do not attempt to modify or fix this unit. Contact qualified YAMAHA service personnel when any service is needed. The cabinet should never be opened for any reasons.
15 When not planning to use this unit for long periods of time (i.e. vacation), disconnect the AC power plug from the wall outlet.
16 Be sure to read the "Troubleshooting" section on common operating errors before concluding that this unit is faulty.
17 Before moving this unit, press STANDBY/ON to set this unit in standby mode, and disconnect the AC power plug from the wall outlet.
18 Condensation will form when the surrounding temperature changes suddenly. Disconnect the power cable from the outlet, then leave the unit alone.
19 When using the unit for a long time, the unit may become warm. Turn the power off, then leave the unit alone for cooling.
This unit is not disconnected from the AC power source as long as it is connected to the wall outlet, even if this unit itself is turned off. This state is called the standby mode. In this state, this unit is designed to consume a very small quantity of power.
FOR CANADIAN CUSTOMERS
To prevent electric shock, match wide blade of plug to wide slot and fully insert.
This Class B digital apparatus complies with Canadian ICES-003.
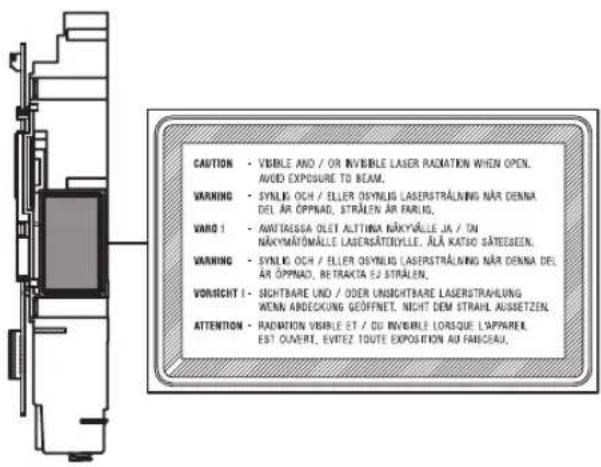
DANGER
When this unit is plugged to the wall outlet, do not place your eyes close to the opening of the disc tray and other openings to look into inside.
The laser component in this product is capable of emitting radiation exceeding the limit for Class 1.
WARNING
TO REDUCE THE RISK OF FIRE OR ELECTRIC SHOCK, DO NOT EXPOSE THIS APPLIANCE TO RAIN OR MOISTURE.
■ For U.K. customers
If the socket outlets in the home are not suitable for the plug supplied with this appliance, it should be cut off and an appropriate 3 pin plug fitted. For details, refer to the instructions described below.
Note
The plug severed from the mains lead must be destroyed, as a plug with bared flexible cord is hazardous if engaged in a live socket outlet.
Special Instructions for U.K. Model
IMPORTANT
THE WIRES IN MAINS LEAD ARE COLOURED IN ACCORDANCE WITH THE FOLLOWING CODE:
Blue: NEUTRAL
Brown: LIVE
As the colours of the wires in the mains lead of this apparatus may not correspond with the coloured markings identifying the terminals in your plug, proceed as follows: The wire which is coloured BLUE must be connected to the terminal which is marked with the letter N or coloured BLACK. The wire which is coloured BROWN must be connected to the terminal which is marked with the letter L or coloured RED.
Making sure that neither core is connected to the earth terminal of the three pin plug.
CAUTION
Use of controls or adjustments or performance of procedures other than those specified herein may result in hazardous radiation exposure.
The name plate is located on the bottom of the unit.
Contents
INTRODUCTION
Introduction 3
About this manual. 3
Supplied Accessories 3
Controls and Functions. 4
Top and front panels 4
Display. 5
Remote control. 6
PREPARATION
Connecting Speakers 9
Connecting speakers (Front/Surround/Center) 10
Connecting a subwoofer 10
Using commercially available speakers or cables ... 11
Connecting a TV 12
Connecting Antennas 13
Connecting the FM antenna. 13
Connecting the AM loop antenna 13
Connecting External AV Components 14
Connecting a VCR. 15
Connecting a game console 16
Connecting a CD recorder or MD recorder 17
Connecting the Power Cables. 17
Installing Batteries in the Remote Control 18
Using the Remote Control. 18
BASIC OPERATION
Turning the Power to On/Standby. 19
Selecting an Input Source 19
Adjusting the Volume Level 20
Muting the Sound (Mute) 20
Auto Speaker Setup (YPAO). 21
Enjoying Sound Field Programs (DSP Programs) 26
Setting the Sleep Timer 28
Changing DVD Settings on the TV (On-Screen Menu) 29
Operating the On-Screen Menu 29
On-Screen Menu guide. 30
ENJOYING MOVIE AND MUSIC DISCS
Supported Disc Types 32
BasicPlaybackOperations. 33
UsefulPlaybackOperations. 34
Specifying an elapsed time for playback (Time Search) 34
Customizing playback order (Program Play) 35
Repeating playback (Repeat Play) 37
Operating disc menus (DVD menu/Video CD)
Playback Control) 39
Selecting Audio and Subtitle Languages 40
Selecting a Viewing Angle 41
Zooming Images 42
Restricting Playback (Parental Control) 43 Setting the Parental Control level. 43
Locking discs 44
Playing locked discs 44
Changing the password. 45
Enjoying High-Quality Video (NTSC/Progressive Scan) 46
Enjoying JPEG Images 47
ENJOYING RADIO
Tuning Radio Stations 48
Tuning radio stations automatically (Auto Tuning). 48
Tuning radio stations manually (Manual Tuning)... 48
Selecting preset radio stations (Preset Tuning) 49
Receiving FM RDS stations (U.K. and Europe models only). 49
Presetting Radio Stations 51
Presetting FM stations automatically (Auto Preset). 51
Presetting radio stations manually (Manual Preset) 52
Changing the order of preset radio stations 52
ENJOYING EXTERNAL AV SOURCES
Playing Back External Sources. 53
TV playback 53
VCR playback. 53
Game console playback 54
Recording AV Sources With External AV Components 55
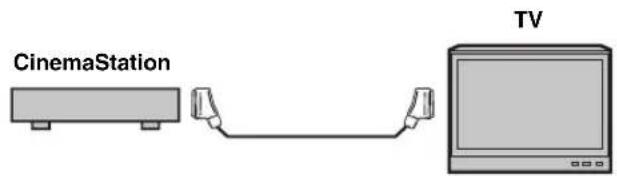
Recording audio sources with CinemaStation..... 55
Copying video component sources to a video cassette. 56
SOUND OPTIONS
Enjoying Sound with Specific Speakers. 57
Enjoying 6.1/5.1ch sources with all speakers including a virtual speaker (Matrix 6.1) 57
Enjoying 2ch sources with all speakers (Dolby Pro Logic II). 58
Enjoying DSP programs with the front speakers only (Virtual CINEMA DSP) 59
Enjoying DSP Programs in a Variety of Ways. 60
Listening with headphones ("SILENT CINEMA") 60
Listening at low volume (Night Listening) 61
Enjoying High-Quality Sound 62
Enjoying original Dolby and DTS sounds.. 62
Enjoying original 2ch sound (Stereo). 63
Adjusting the Speaker Balance During Playback. 64
Adjusting the speaker balance with test tones 64
Adjusting the speaker balance during playback 65
Configuring Dolby Pro Logic II Music Settings. 67
DSP Program Delay Time Settings 68
Configuring the Audio Input Signal Setting. 70
Checking the Audio Input Signal Type. 71
Controlling External Components 72
Setting remote control codes 72
Available operations. 73
Configuring Various Parameters (Set Menu) ..... 75 Operating the Set Menu ..... 76
APPENDIX
Troubleshooting 80
General. 80
Remote control 83
Disc playback 84
Radio reception. 85
Additional Information 86
Disc Information 86
Handling a disc 87
Glossary 88
Audio formats. 88
Sound field programs. 89
Audio information 89
Video signal information 90
Copyright and logo marks 91
Specifications. 92
Introduction
The YAMAHA Cinema Station "DVR-S150" is a slimline DVD receiver equipped with a digital amplifier. This product provides you with the best sound possible, allowing you to enjoy not just DVDs and CDs, but various other AV sources as well. We hope the "DVR-S150" brings you great listening pleasure and satisfaction.
About this manual
This manual provides information relevant only to the YAMAHA CinemaStation "DVR-S150". For information on speakers or other AV equipment, refer to the manual for that product.
In this manual, operations that can be performed using either the DVD receiver or its remote control are explained using the remote control.
- Remote control descriptions and illustrations in this manual are based on the U.K. and Europe models unless otherwise specified.
- indicates a tip for your operation.
- Notes contain important information about safety and operating instructions.
This manual is printed prior to production. Design and specifications are subject to change in part as a result of improvements, etc. In case of differences between the manual and the product, the product has priority.
Supplied Accessories
This product includes the following accessories. Before connecting speakers or a TV to this product, make sure you received all of the following parts.
Batteries (2) (AA, R06, UM-3)

AM loop antenna

Optimizer microphone

Indoor FM antenna
(U.S.A., Canada, China, Asia and General models)

(Europe, U.K., Australia and Korea models)

Video pin cable

Speaker cables
Surround 15m (2)

Front, Center 5m (3)
Controls and Functions
Top and front panels
Buttons indicated with an asterisk (*) perform different functions depending on the selected mode of operation.

STANDBY/ON
Turn this unit on. Press to set the unit in the standby mode. (page 19)

Opens and closes the disc tray.
PROGRESSIVE (MEMORY)
[MEMORY (for U.K. and Europe models)]
(DVD/CD mode)
Switches DVD playback between progressive scan and interlace outputs. (page 46)
(Tunermode)
Stores the current radio station for Preset Tuning. (page 52)
4 / , / (PRESET/TUNING A)
(DVD/CD mode)
Selects the previous/next track or chapter. Press and hold to fast forward or fast reverse.
(Tunermode)
Selects a preset number or adjusts the frequency. (page 51)
B/C/D/E
(DVD/CD mode)
Stops disc playback.
(Tunermode)
Selects a preset group. (page 52)
( PRESET/BAND)
(DVD/CD mode)
Pauses disc playback.
(Tunermode)
Switches between FM and AM. (page 48)
7INPUT
Selects an input source or sets the priority level for the audio input signals (if any equipment is connected to both OPTICAL IN and AUDIO IN jacks).
VOLUME
Adjusts the overall volume level.
Disc tray
Holds a disc to be played.
Display
Displays playback information or settings. (page 5)
11 (ALTO/MAN'L)
(DVD/CD mode)
Starts disc playback.
(Tunermode)
Switches between Auto Tuning and Manual Tuning modes. (page 48)
DSP
Switches the DSP programs in the selected DSP program group. Press and hold to switch the DSP program groups. (page 26)
18 SILENT CINEMA jack
Connects headphones.
Remote control sensor
Receives signals from the remote control.
15YPAO MIC jack
Connects the optimizer microphone.
Display
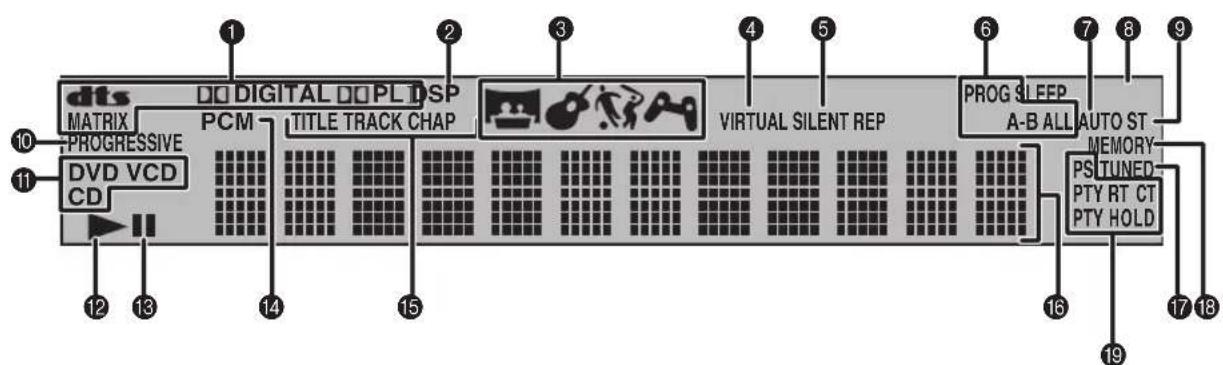
(U.K. and Europe models only)
1Decoder indicator
Displays the icon for the selected internal decoder.
DSP
Lights up when a DSP program is selected.
DSP program indicator
Displays the icon for the selected DSP program.
4VIRTUAL
Lights up when Virtual CINEMA DSP is activated.
SILENT CINEMA indicator
Lights up when the Silent Cinema mode is activated.
⑥Playback mode indicator
Displays the icon for the selected playback mode.
7 AUTO
Lights up when using the Auto Tuning or Auto Preset mode.
SLEEP
Lights up when the Sleep Timer is on.
ST
Lights up when receiving a strong FM radio signal in the Auto Tuning or Auto Preset mode.
PROGRESSIVE
Lights up when the progressive scan function is activated.
1Disc indicator
Displays the icon for the disc.
②Playback icon
Lights up during disc playback.
18Pause icon
Lights up when disc playback is paused.
PCM
Lights up when playing PCM signals such as CDs.
Display mode indicator
Displays the indicator for the information type shown in the CinemaStation display.
Display
Displays various information such as a title, chapter or track number, or elapsed playing time.
TUNED
Lights up when receiving an FM/AM broadcast.
18 MEMORY
Blinks when presetting an FM/AM radio station.
U.K. and Europe models only
RDS indicators
Light up when receiving an RDS signal. "PTY HOLD" lights up when the PTY SEEK mode is activated. (page 50)
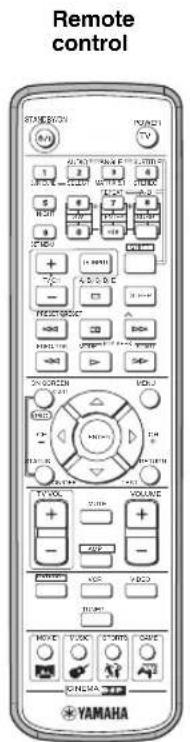
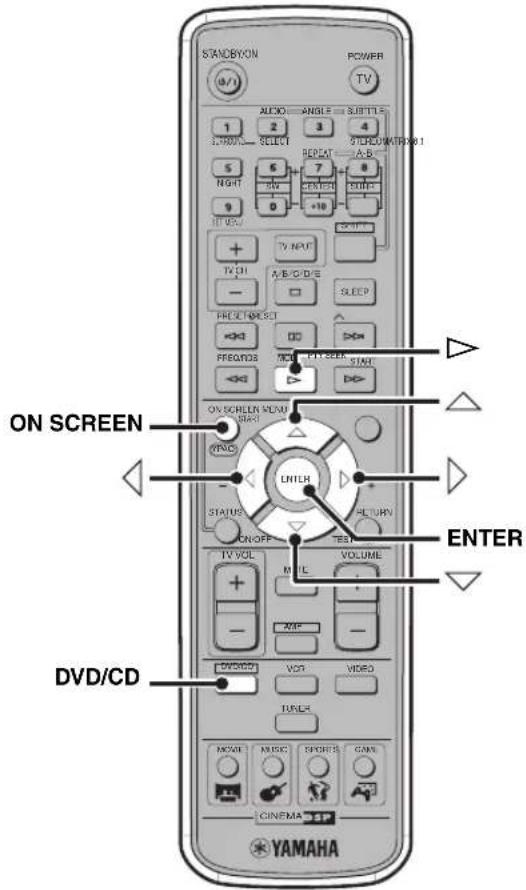
Remote control
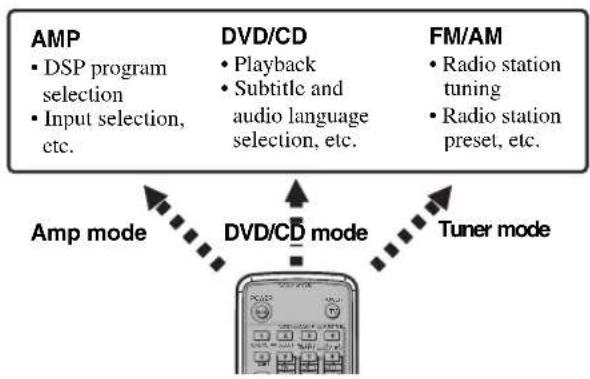
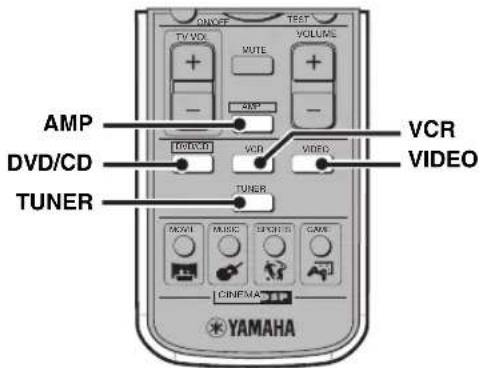
Common functions
CinemaStation has three main operation modes. Before operating functions in each mode, you need to select a mode to change the remote control button assignments.
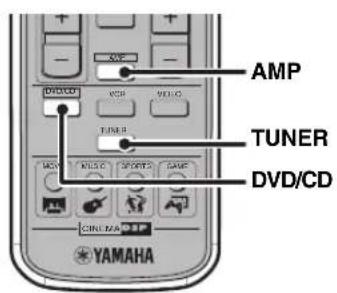
To switch the operation mode
- Amp mode: Press AMP. (page 7)
DVD/CD mode: Press DVD/CD. (page 8) - Tuner mode: Press TUNER. For details on tuner operations, refer to "Tuning Radio Stations" (page 48).
You can also operate the TV or VCR connected to the CinemaStation using the remote control. For details, refer to "Controlling External Components" (page 72).
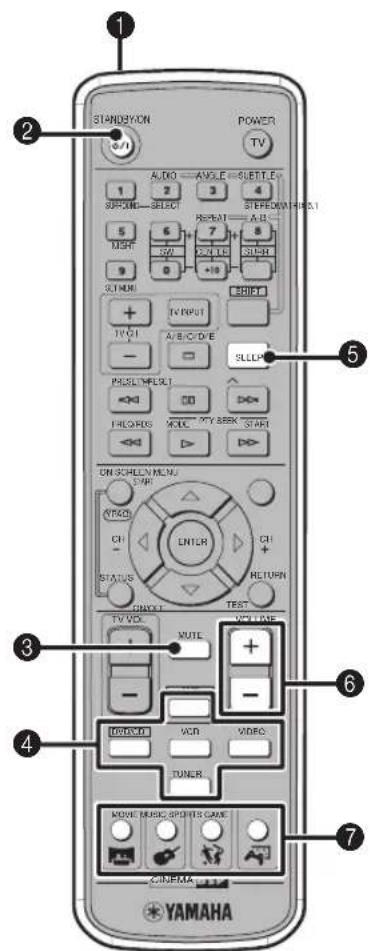
Operations common to all modes
1Infrared signal transmitter
Sends signals to the CinemaStation.
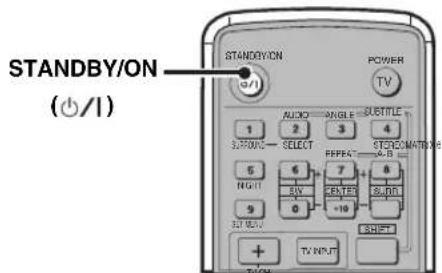
STANDBY/ON()
Turn the CinemaStation on, or set it to the standby mode. (page 19)
MUTE
Turns off the volume. Press again to resume the volume.
4Input selection buttons
Select an input source to operate. (page 19)
SLEEP
Sets the Sleep Timer. (page 28)
6VOLUME+/-
Adjusts the overall volume level.
DSP program buttons
Selects a DSP program. (page 26)
■ Amp mode Operations available only in amp mode
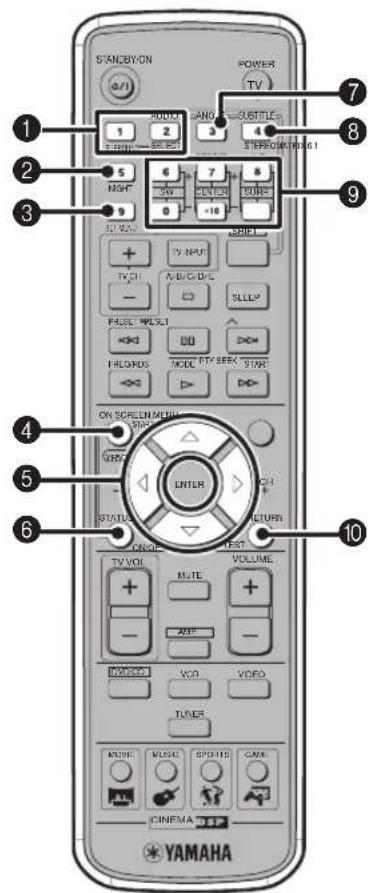
1SURROUND, SELECT
Sets Dolby Digital or DTS. Press SURROUND and then SELECT to set Dolby Pro Logic II for 2ch sources. (page 58)
2NIGHT
Sets the CinemaStation to the Night Listening mode. (page 61)
SET MENU
Enters the Set Menu. (page 76)
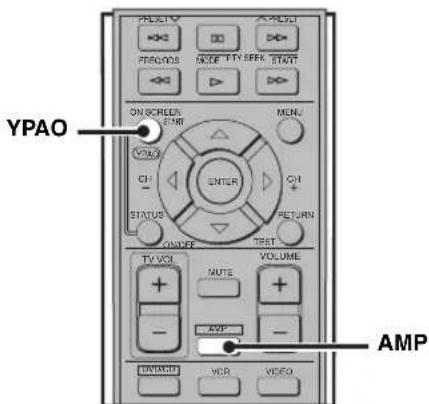
4YPAO
Starts the YPAO function. (page 21)

Adjusts the test tone (page 64) or Set Menu (page 76).
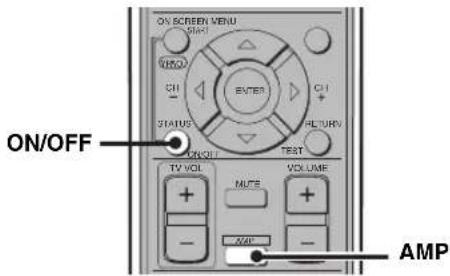
ON/OFF
Turns the YPAO mode on/off. (page 23)
7 MATRIX 6.1
Sets the Matrix 6.1 decoder. (page 57)
3STEREO
Switches between normal stereo sound and audio with a sound field effect. (page 63)
Speaker volume buttons
Adjusts the speaker balance (volume level of each speaker). (page 65)
SW + / - Adjusts the subwoofer volume.
CENTER + / - Adjusts the center speaker volume.
SURR + / - Adjusts the surround speaker volume.
TEST
Outputs a test tone. (page 64)
Amp mode operations are indicated in purple on the remote control.
DVD/CD mode Operations available only in DVD/CD mode
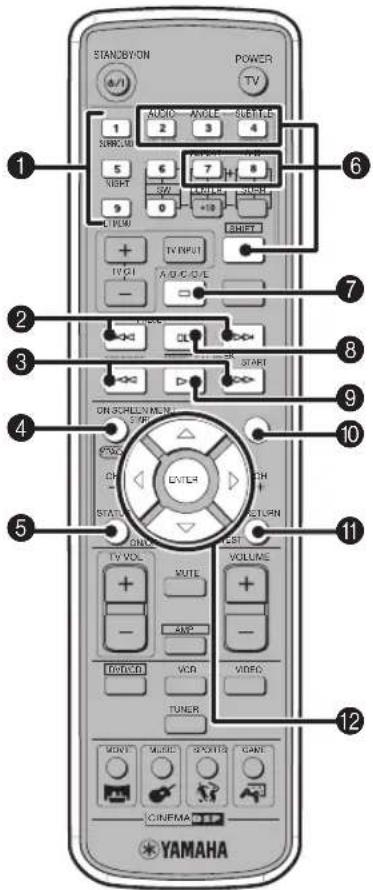
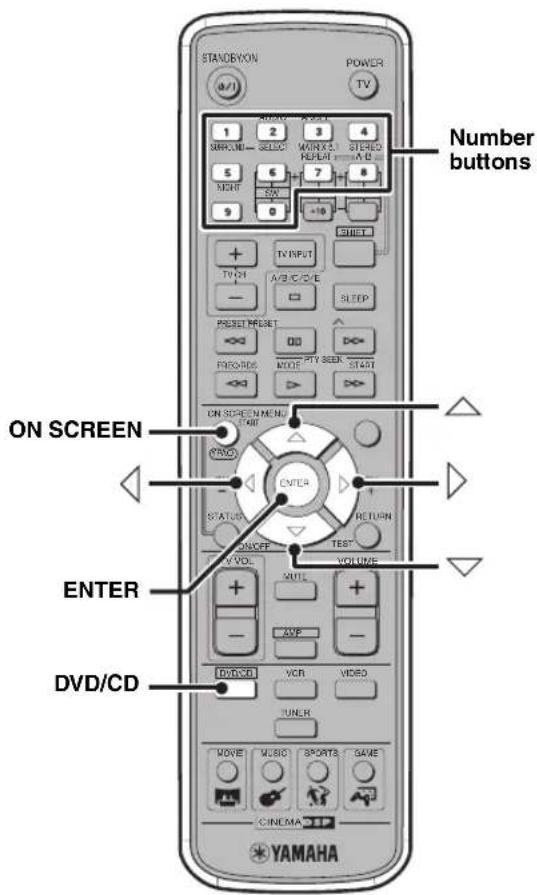
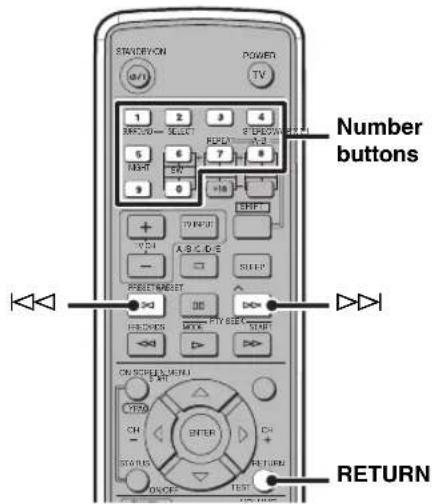
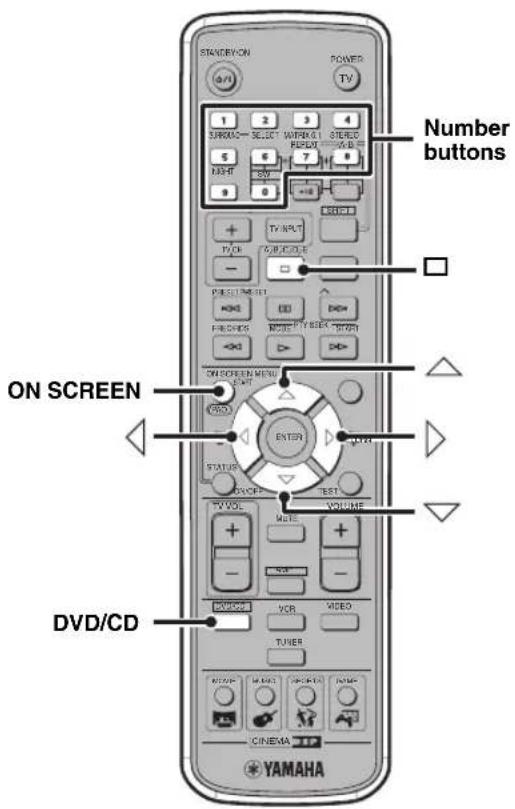
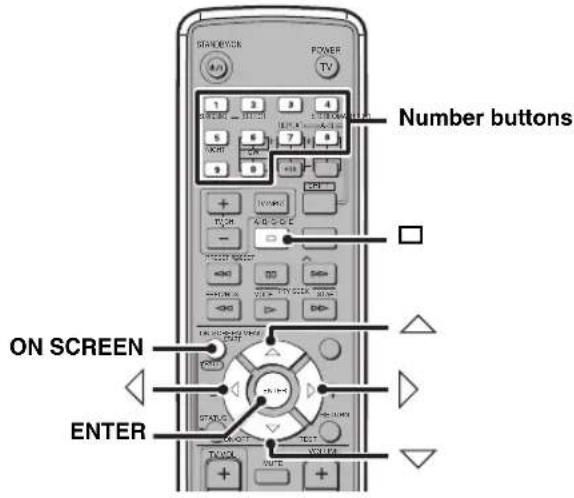
Number buttons (1 to 9, 0)
Inputs numerals to specify parameters such as track or chapter numbers.
2
Skips to the start of current track or next track.
3
Fast forwards/fast reverses.
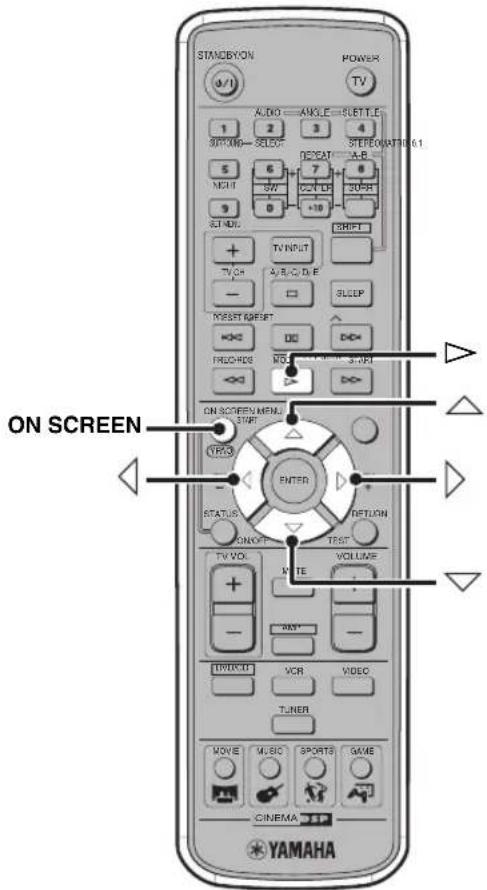
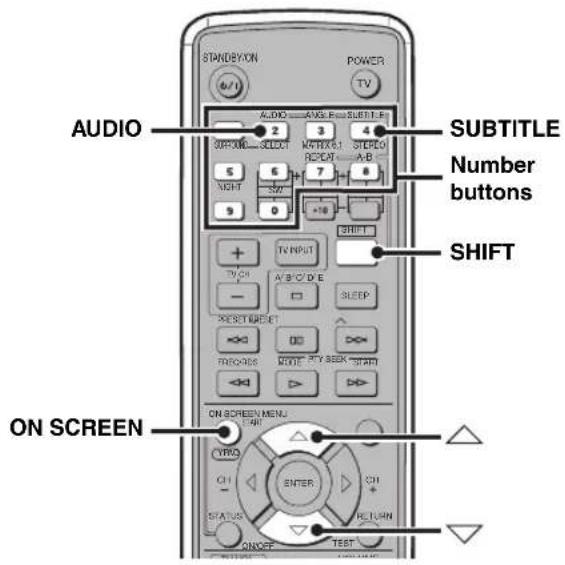
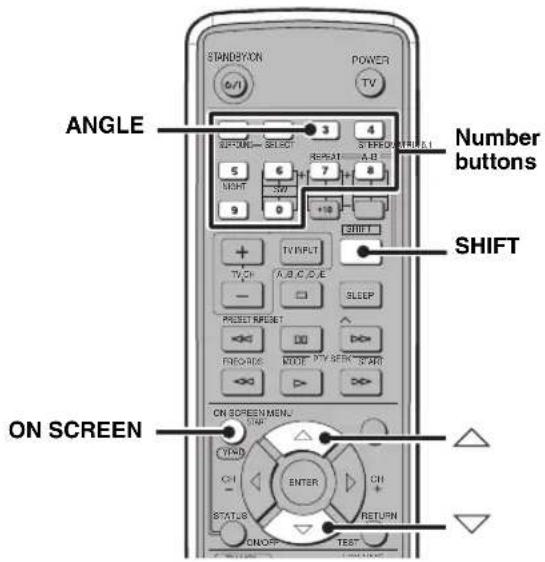
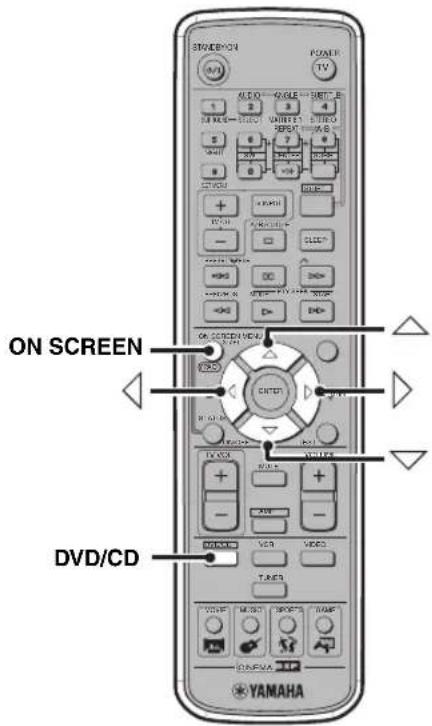
4ON SCREEN
Displays the On-Screen Menu on the TV screen. (page 29)
STATUS
Displays the status information such as disc type, total time or elapsed time of current track/chapter on the TV screen. To display the status information, the "Status window" setting in the On-Screen Menu (page 29) should be set to "On".
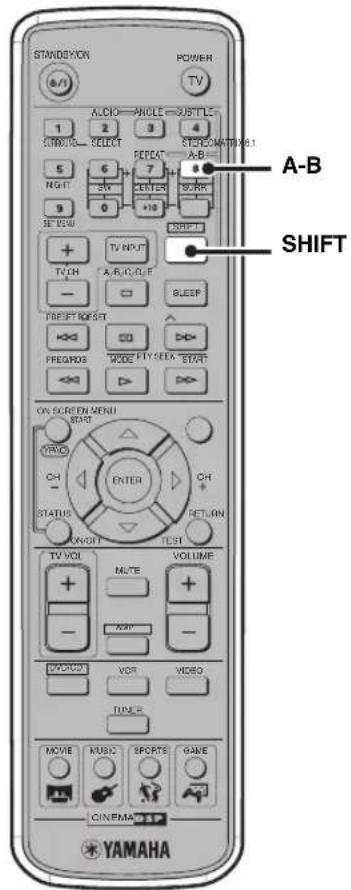
Settings buttons
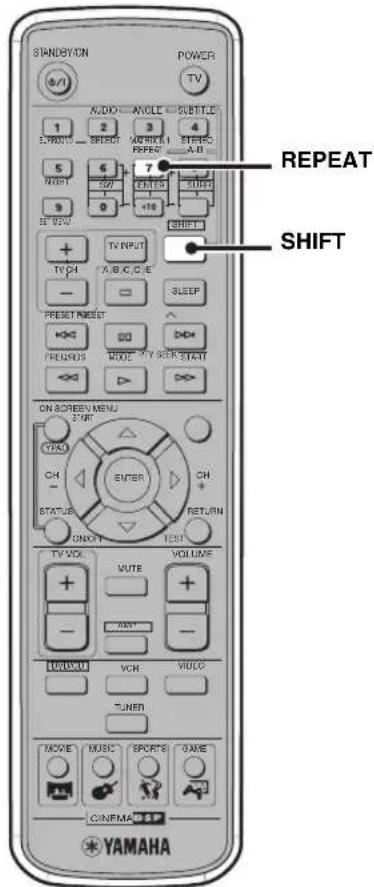
While holding down SHIFT, press a button below to enable the corresponding operation.
REPEAT: Enables the Repeat Play mode. (page 37)
A-B: Enables the A-B Repeat mode. (page 38)
AUDIO: Selects the audio language of the DVD video. (page 40)
ANGLE: Selects the disc viewing angle. (page 41)
SUBTITLE: Selects the subtitle language of the DVD video. (page 40)
7
Stops disc playback.
80
Pauses disc playback or advances to the next frame.
9
Starts disc playback.
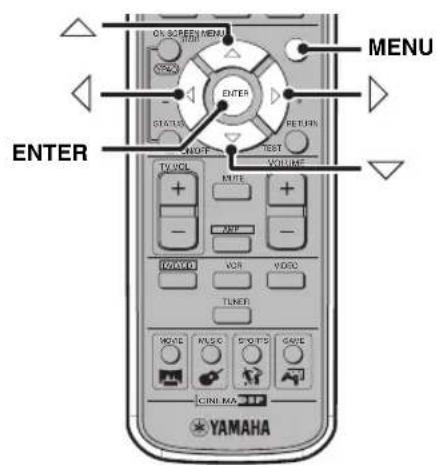
10 MENU
Displays the DVD menu on the TV screen. (page 39)
1RETURN
Returns the DVD menu to the previous screen. (page 39)
12


/ENTER
Operates the On-Screen Menu (page 29) or specify various parameters.
#
DVD/CD mode operations are indicated in green on the remote control.
Connecting Speakers
Follow the procedure below to connect speakers to the CinemaStation. Here, the connection example uses the YAMAHA NX-P150 (consisting of four satellite speakers, a center speaker and a subwoofer) and its supplied cables. For information on your speakers, refer to the owner's manual for the speakers.
You can also use commercially available speakers and cables (see page 11).
Note
Do not connect the power cable of the CinemaStation until all cable connections are completed.
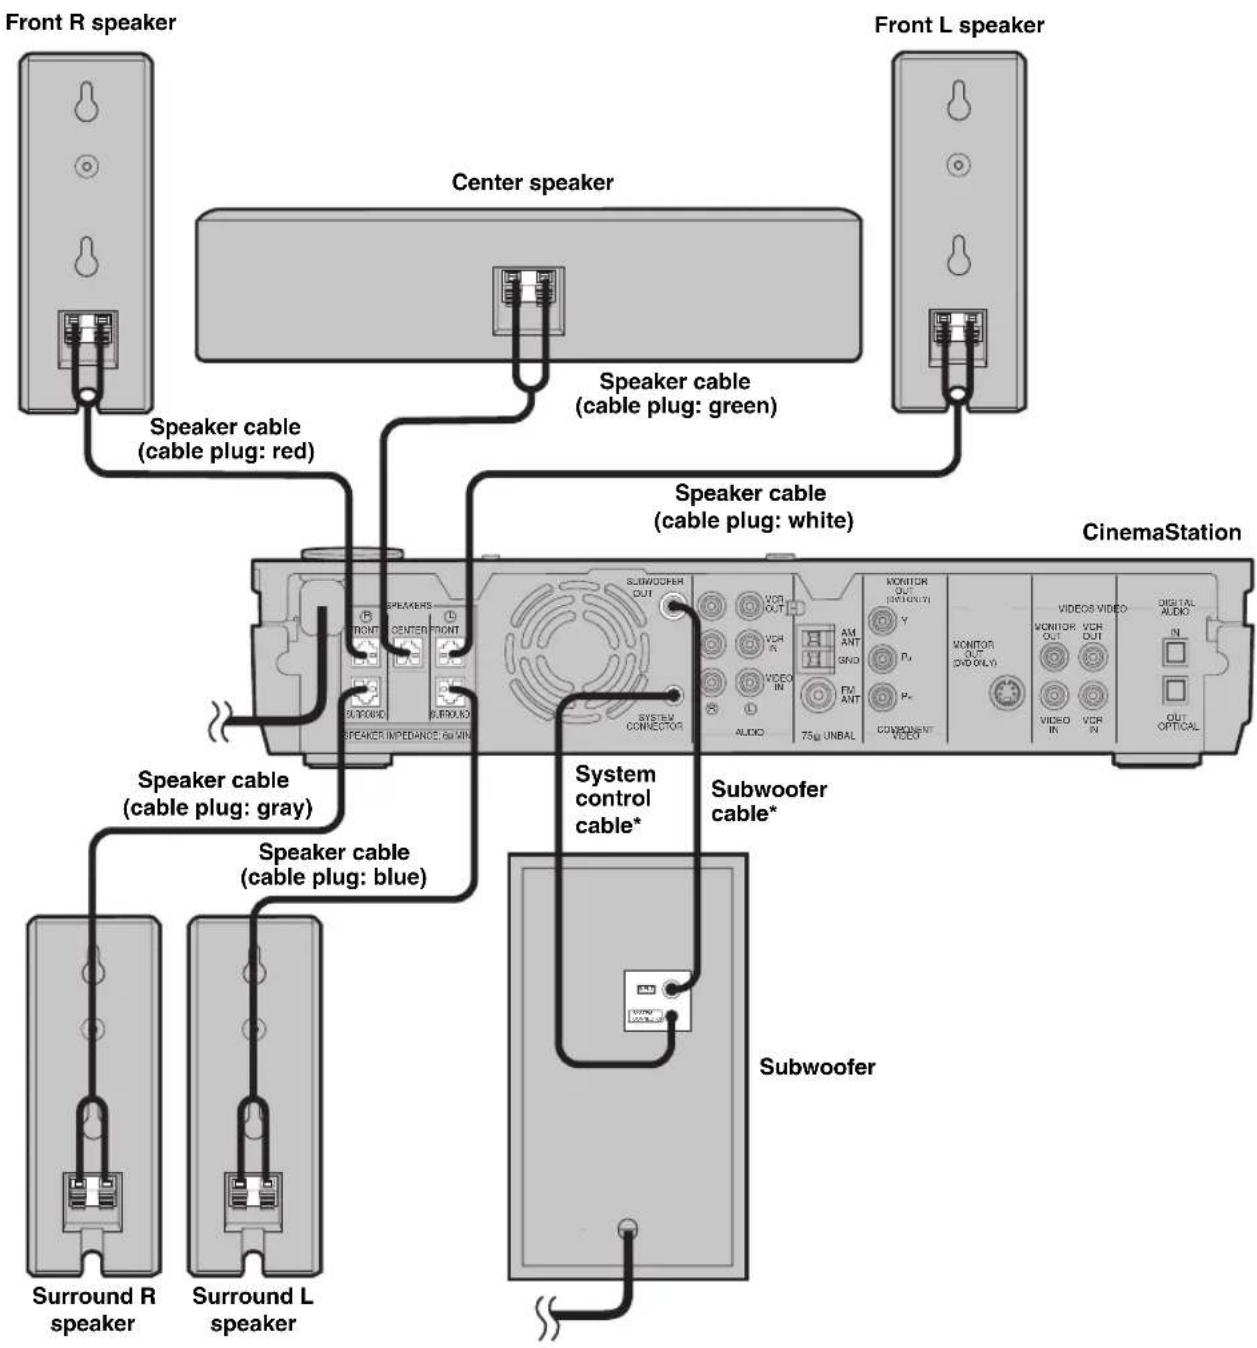
* Supplied with the subwoofer.
Connecting speakers (Front/Surround/Center)
1 Insert the cable plug of the speaker cable into the speaker jack of the same color until you hear it click into place.
- FRONT R (Red), CENTER (Green), FRONT L (White): Insert the cable plug facing the tub upwards.
- SURROUND R (Gray), SURROUND L (Blue): Insert the cable plug facing the tub downwards.

Note
Do not use excessive force when inserting the cable plug. Doing so may damage the cable plug or speaker jack.
2 Connect the cable core of the speaker cable with the color band to the ^+ connector on the speaker and other cable core to the - connector.

Notes
- Do not allow the cable cores to touch each other or any metal part. Doing so may damage the unit or speakers.
- Make sure you connect the cable cores to the correct connectors. Reversed connections may produce unnatural sounds during playback.
Connecting a subwoofer
Note
Do not connect the power cable of the CinemaStation or subwoofer until all cable connections are completed.

1 Connect the SUBWOOFER OUT jack on the CinemaStation to the INPUT jack on the subwoofer using the subwoofer cable.
2 Connect the SYSTEM CONNECTOR jack on the CinemaStation to the SYSTEM CONNECTOR jack on the subwoofer using the system control cable.
Using commercially available speakers or cables
When using speakers or cables other than those of the YAMAHA NX-P150 (consisting of four satellite speakers, a center speaker and a subwoofer) and its supplied cables, be careful of the following. When using a commercially available speaker cable, remove the cable plug from one of the supplied speaker cables and attach it to the cable you are using.
When using commercially available speakers
- Use speakers with 6-ohm impedance or more. If a speaker with less than 6-ohm impedance is used, the protective circuit may trip or the speaker may malfunction.
- Use magnetically shielded speakers to prevent interferences with a TV. If these speakers still interfere with a TV, move the speakers a little away from the TV.
- We recommend using speakers of the same manufacturer that have identical sound qualities. If they are mixed, certain sounds may be heard unnaturally.
- Use speaker cables that are the same thickness as the supplied cables.
When using commercially available speaker cables
- Use speaker cables that are the same thickness as the supplied cables.
To replace speaker cables
1 Press and hold the release button and remove the supplied speaker cable from the cable plug.

2 Peel away about 10mm (10/32") of covering from the tip of the new cable and twist the cable core firmly in a clockwise direction.
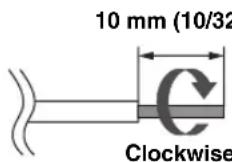
Note
Be sure to twist the cable core firmly in a clockwise direction. Twisting loosely may cause a short.
3 Press and hold the release button, insert the cable core into the cable plug, then release the button.
Match the speaker cable polarity (+ / - ) with the polarity mark (+ / - ) of the cable plug.

Connecting a TV
Follow the procedure below to connect your TV to CinemaStation using the supplied video pin cable. If you want to output sound from the speakers connected to CinemaStation, prepare a commercially available audio pin cable to connect them. Also, you can enjoy high-quality pictures with the component video, S-Video, or SCART (U.K. and Europe models only) connection. For information about your TV, refer to the supplied manual.
Notes
- Do not connect the power cable of the CinemaStation until all cable connections are completed.
- Turn off the TV before connecting it to the CinemaStation.

1 Connect the MONITOR OUT (VIDEO) jack on the CinemaStation to the video input jack on your TV using the supplied video pin cable.
2 To output sound from the speakers connected to CinemaStation, connect the VIDEO IN L/R (AUDIO) jacks on the CinemaStation to the audio output L/R jacks on your TV using the commercially available audio pin cable.
Other connection methods
To make a component video, S-Video, or SCART (U.K. and Europe models only) connection, a corresponding cable is required.
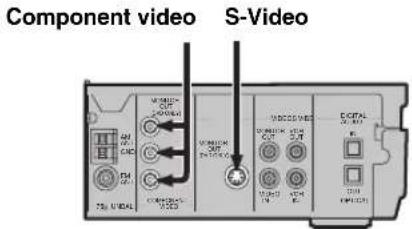
Component video
Connect the MONITOR OUT Y / P_B / P_R (COMPONENT VIDEO) jacks on the CinemaStation to the component video input Y / P_B / P_R jacks on your TV using a commercially available component video cable.
S-Video
Connect the MONITOR OUT (SVIDEO) jack on the CinemaStation to the S-Video input jack on your TV using a commercially available S-Video cable.
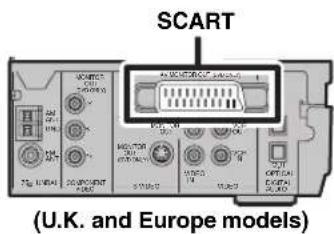
SCART (for U.K. and Europe models)
Connect the AV MONITOR OUT jack on the CinemaStation to the SCART input jack on your TV using a commercially available SCART video cable.
Note
(For U.K. and Europe models)
If you set the Video Output setting to "RGB" in the On-Screen Menu (page 29), the MONITOR OUT (SVIDEO) jack cannot output video signals.
Connecting Antennas
To enjoy radio on the CinemaStation, you need to connect AM and FM antennas to the CinemaStation. This product includes an AM loop antenna and indoor FM antenna. If there is a problem of weak radio wave reception in your area or you want to improve radio reception, we recommend that you use optional outdoor antennas. For details, consult the nearest authorized YAMAHA dealer or service center.

About grounding
For maximum safety and minimum interference, connect the antenna GND terminal to a good earth ground. A good earth ground is a metal stake driven into moist earth.
Connecting the FM antenna
1 Connect the supplied indoor FM antenna to the FM ANT jack on the CinemaStation.
2 Place the antenna away from the CinemaStation and speaker cables.
Connecting the AM loop antenna
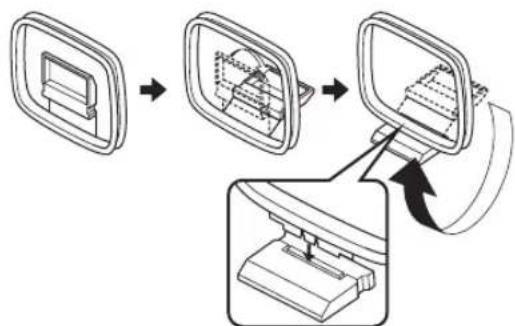
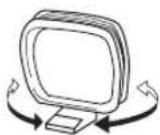
1 Attach the antenna stand to the antenna.
When attaching the antenna to the wall, you do not need to use the antenna stand.
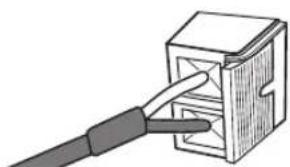
2 Open the lever to the right and insert the antenna's cord cores into the AM ANT and GND terminals.
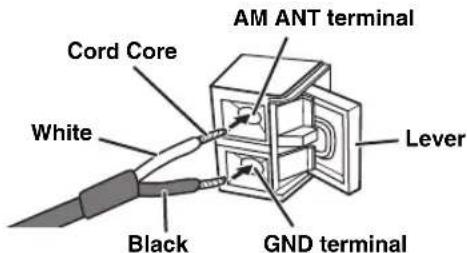
3 Close the lever and then pull the cord lightly to make sure it is fastened properly.
4 Place the antenna away from the CinemaStation and speaker cables.
While listening to the radio, rotate the antenna head to find the best angle for reception.
Connecting External AV Components
If you connect external AV equipment such as a VCR, video camera, or game console to the following AV jacks on the CinemaStation, you can enjoy those AV sources with the CinemaStation. Also, you can record AV sources played on the CinemaStation using the recording equipment. This section provides some examples of other AV equipment connections. For information on your AV equipment, refer to the manual for it.
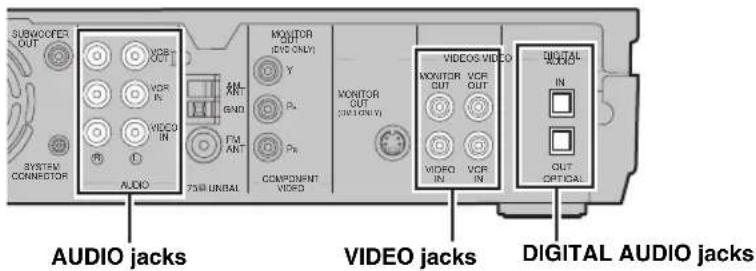
About the AUDIO jacks
- You cannot use both IN and OUT jacks for a same category simultaneously. For example, the signal input from the VCR IN jack does not output from the VCR OUT jack.
- CinemaStation's digital and analog signal circuits are independent of each other. Analog input signals can only output from analog output jacks and digital input signals can only output from digital output jacks.
About the DIGITAL AUDIO jacks
- The digital jacks are compatible with PCM, Dolby Digital and DTS signals.
- The digital jacks are designed based on EIA standards. To make a digital connection, use an optical cable that meets EIA standards.
The OPTICAL IN jack is compatible with a digital signal that has a 96kHz or less sampling frequency. - You can use "Input Assign" in the Set Menu (page 78) to assign VIDEO or VCR to the OPTICAL IN jack. The default setting is "VIDEO".
- Connecting a TV to an audio input
Enjoy TV sound with CinemaStation by connecting the TV audio output jack to the AUDIO IN jack using a commercially available audio cable. Press VIDEO on the remote control to input TV sound.
Connecting a VCR
If you connect a VCR to the CinemaStation using commercially available audio/video cables, you can enjoy videos with the CinemaStation and record AV sources played on the CinemaStation on the VCR. For information on your VCR, refer to the owner's manual for the VCR.
Notes
- Do not connect the power cable of the CinemaStation until all cable connections are completed.
- Turn off the AV equipment before connecting it to the CinemaStation.
- Use commercially available audio/video cables (shown below) to connect a VCR to the CinemaStation or a TV. To make all connections, three audio/video cables are required.
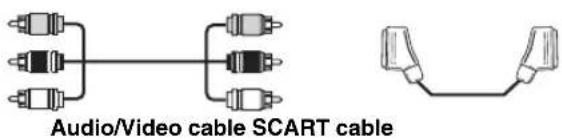
- For U.K. and Europe models only: Do not connect a TV to CinemaStation via a VCR using SCART connections. The copyright protection technology incorporated in the CinemaStation may not allow the VCR to play.
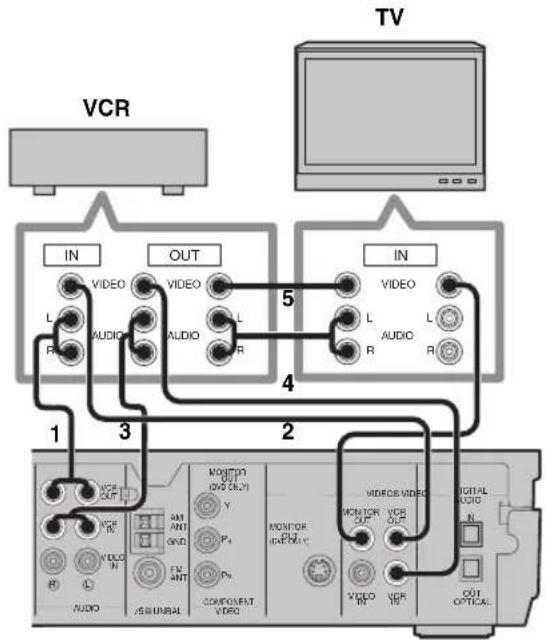
1 Connect the VCR OUT L/R (AUDIO) jacks on the CinemaStation to the audio input L/R jacks on your VCR using a commercially available audio/video cable.
2 Connect the VCR OUT (VIDEO) jack on the CinemaStation to the video input jack on your VCR using the audio/video cable (used in step 1).
3 Connect the VIDEO IN L/R (AUDIO) jacks on the CinemaStation to the audio output L/R jacks on your VCR using another audio/video cable.
4 Connect the VIDEO IN (VIDEO) jack on the CinemaStation to the video output jack on your VCR using the audio/video cable (used in step 3).
5 To watch videos when the CinemaStation is turned off, connect the audio and video output jacks on your VCR to the audio and video input jacks on your TV using another audio/video cable.
For information on how to connect a TV to CinemaStation, refer to "Connecting a TV" (page 12).
Connecting a game console
If you connect a game console to the CinemaStation using a commercially available audio/video cable (for analog connections) or a video cable and optical cable (for digital connections), you can enjoy games or videos with the CinemaStation. For information, refer to the manual supplied with your game console.
Notes
- Do not connect the power cable of the CinemaStation until all cable connections are completed.
- Turn off the AV equipment before connecting it to the CinemaStation.
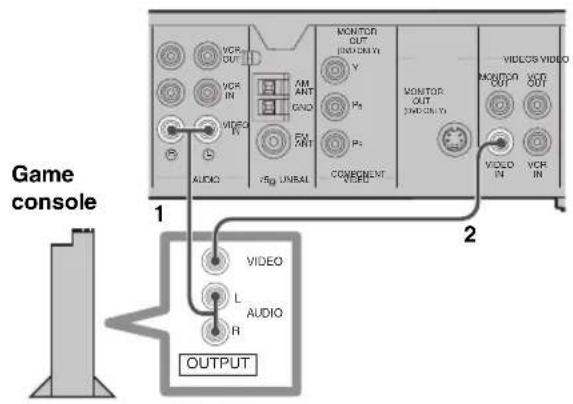
■ Analog connections
Follow the procedure below to connect a game console or with an analog connection. If you are using VIDEO IN (AUDIO) jacks for connecting your TV (page 12), connect a game console or video camera using digital connections.
Note
Use a commercially available audio/video cable (shown below) to connect your game console to the CinemaStation using analog connections.
1 Connect the VIDEO IN L/R (AUDIO) jacks on the CinemaStation to the audio output L/R jacks on your game console using a commercially available audio/video cable.
2 Connect the VIDEO IN (VIDEO) jack on the CinemaStation to the video output jack on your game console using the audio/video cable (used in step 1).
Digital connections
Follow the procedure below to connect a game console using digital connections.

Note
Use a commercially available video pin cable and an optical cable (shown below) to connect your game console to the CinemaStation with a digital connection.

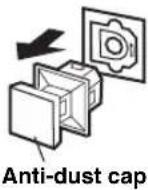
1 Remove the anti-dust cap from the OPTICAL IN (DIGITAL AUDIO) jack on the CinemaStation.
Keep the cap to re-attach it when the jack is not in use.
2 Connect the VIDEO IN (VIDEO) jack on the CinemaStation to the video output jack on your game console using a commercially available video pin cable.
3 Connect the OPTICAL IN (DIGITAL AUDIO) jack on the CinemaStation to the optical digital output jack on your game console using a commercially available optical cable.
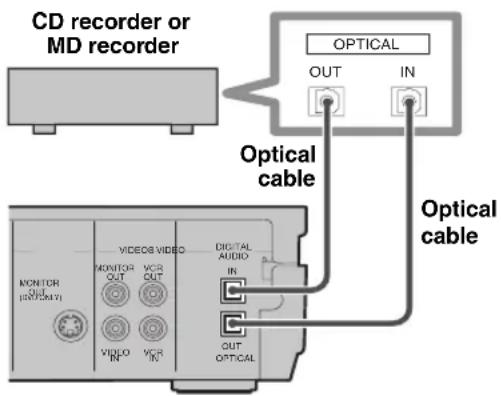
Connecting a CD recorder or MD recorder
If you connect a CD recorder or MD recorder to the CinemaStation using commercially available optical cables, you can record audio sources played on the CinemaStation. Also, you can enjoy audio sources played on the recorder with the CinemaStation. For information on your CD recorder or MD recorder, refer to the manual for it.
中
- Use a commercially available optical cable (shown below) to connect your CD recorder or MD recorder to the CinemaStation. To make all connections, two optical cables are required.


Optical cable
- AM/FM broadcasts cannot be output from this unit's OPTICAL OUT (DIGITAL AUDIO) jack. To record AM/FM broadcasts, use a commercially available audio cable to connect the VCR OUT jack on the CinemaStation to the analog input jack on your recorder (see page 55).
Notes
- Do not connect the power cable of the CinemaStation until all cable connections are completed.
- Turn off the AV component before connecting it to the CinemaStation.
1 Remove the anti-dust caps from the OPTICAL (DIGITAL AUDIO) jacks on the CinemaStation.
Keep the cap to re-attach it when the jack is not in use.
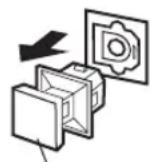
Anti-dust cap
2 Connect the OPTICAL OUT (DIGITAL AUDIO) jack on the CinemaStation to the optical digital input jack on your recorder using a commercially available optical cable.
3 To listen to audio sources played on the recorder with the CinemaStation, connect the OPTICAL IN (DIGITAL AUDIO) jack on the CinemaStation to the optical digital output jack on your recorder using another optical cable.
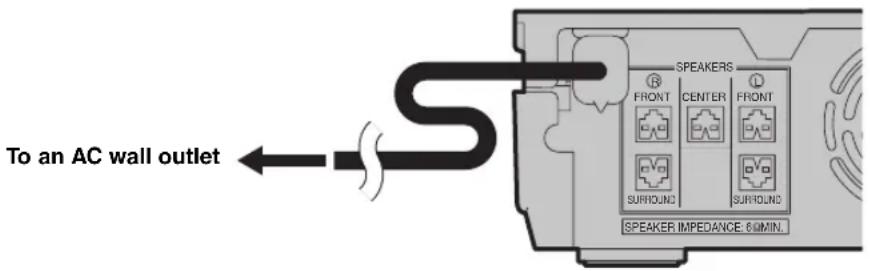
Connecting the Power Cables
After you made all connections, connect the power cables of the CinemaStation and subwoofer.
Installing Batteries in the Remote Control
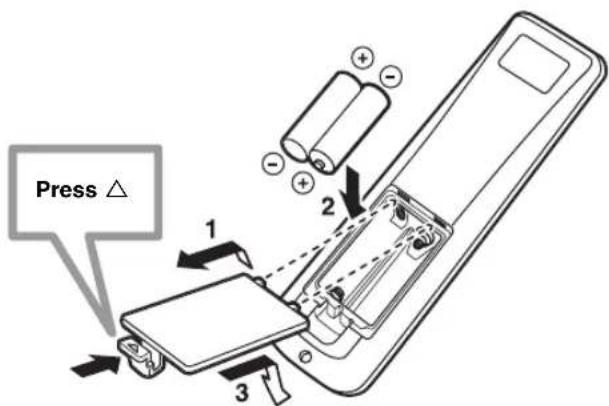
To replace the batteries
If the batteries grow old, the effective operation distance of the remote control decreases considerably. If this happens, replace the batteries with two new ones as soon as possible.
Notes
Do not use an old battery together with new one.
- Do not use different types of batteries (for example, alkaline and manganese) together. Each type of battery has its own characteristics even if they are similar in shape.
- If the batteries run out, immediately remove them from the remote control to prevent an explosion or acid leak.
- Dispose of the batteries according to the regional regulations.
- If a battery starts leaking, dispose of it immediately. Be careful not to let leaking battery acid come into contact with your skin or clothing. Before inserting new batteries, wipe the compartment clean.
- Replace the batteries within two minutes to preserve the memory in the remote control.
1 Press the mark on the battery cover and slide off the cover.
2 Insert the two supplied batteries (AA, R06, UM-3) into the battery compartment. Make sure you insert the batteries according to the polarity markings (+ and -).
3 Close the battery cover.
Using the Remote Control
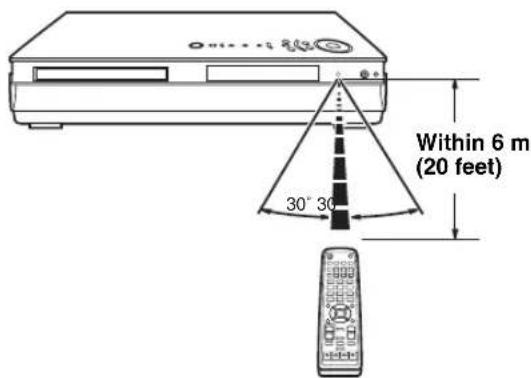
Use the remote control within 6m (20 feet) of the CinemaStation and point it toward the remote control sensor (page 4).
Notes
- Be careful not to spill liquid on the remote control.
- Be careful not to drop the remote control.
- Do not leave the remote control in the following places: - hot or humid places, such as near a heater or in a bathroom
extremely cold places
-dusty places
Turning the Power to On/Standby
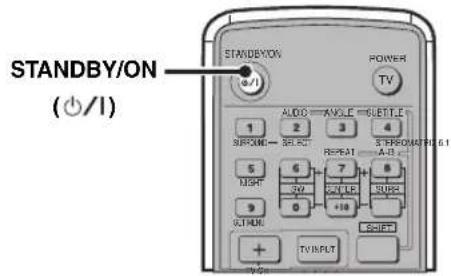
Press STANDBY/ON ()once to turn on the CinemaStation. Press STANDBY/ON ()/1 once more to place the CinemaStation in standby mode.
Selecting an Input Source
You can enjoy various AV sources with the CinemaStation. After connecting the TV, speakers, antennas, or other AV equipment, follow the procedure below to select an input source you want to play on the CinemaStation. For information on connection methods, refer to pages 9 to 17.
Perform one of the following operations
To switch to the CinemaStation amp mode functions (page 7):
Press AMP.
To switch to DVD/CD input:
Press DVD/CD.
To switch to tuner input (AM/FM radio):
Press TUNER.
To switch to VCR source input (your VCR connected to the CinemaStation):
Press VCR.
To switch to video source input (your game console connected to the CinemaStation):
PressVIDEO.
Note
The CinemaStation itself does not provide video playback or game features. To play videotapes or games, you need to connect a VCR or game console to the CinemaStation. For details, refer to "Connecting External AV Components" (page 14).
Adjusting the Volume Level
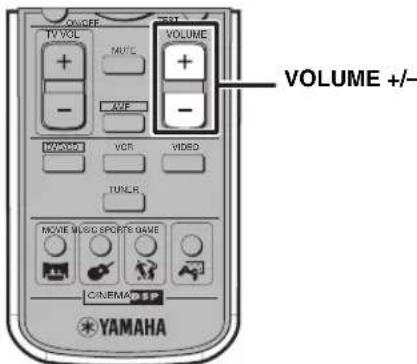
Press VOLUME + to increase the volume level and VOLUME - to decrease.
Muting the Sound (Mute)
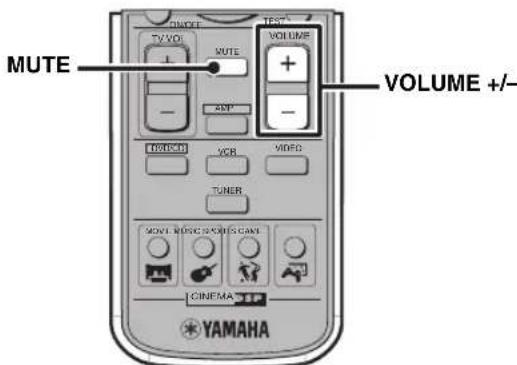
Press MUTE to mute the sound.
To restore audio output to the previous volume level, press MUTE again or press VOLUME + / -
Auto Speaker Setup (YPAO)
With the YAMAHA Parametric Room Acoustic Optimizer (YPAO) feature, you can avoid troublesome speaker setup and achieve highly accurate sound adjustments. The supplied optimizer microphone collects and analyzes the sound that the speakers produce in your actual listening environment. We recommend that you perform YPAO each time when you change the speaker layout or listening position. To configure the speaker settings manually, refer to "Adjusting the Speaker Balance During Playback" (page 64).
YPAO performs the following adjustments:
YPAO performs the following checks and makes appropriate adjustments to give you the best possible sound from your system.
Wiring/Polarity
Checks which speakers are connected and the polarity of each speaker. Also checks and adjusts the sound level (volume) of each speaker so that the sound level of each speaker is the same when heard from the listening position.
- Distance/Phase
Checks the distance of each speaker from the listening position and adjusts the delay of each channel so that the sound from each speaker reaches the listening position at the same time. Also checks the phase of each speaker.
Size
Checks the speakers frequency response and sets the crossover/high cut frequency for the subwoofer to improve the sound relationship between the speakers and the subwoofer.
#
The CinemaStation stores speaker settings configured by YPAO and manual setup individually. You can switch between them by turning on/off the YPAO mode (page 23).
Notes
- Since loud test tones will be output during the setup procedure, be sure to keep small children out of the room.
- For the best results, make sure the room is as quiet as possible during the setup procedure. If there is too much noise, the results may not be satisfactory.
- Disconnect the headphones from the SILENT CINEMA jack on the CinemaStation before starting the setup procedure.
- Be sure to disconnect the optimizer microphone when you have completed the setup procedure.
- The optimizer microphone is sensitive to heat. Do not place it on top of the CinemaStation or in direct sunlight.
1 Make sure the CinemaStation and subwoofer are turned off (in standby mode).
2 Connect the supplied optimizer microphone to the YPAO MIC jack on the CinemaStation.
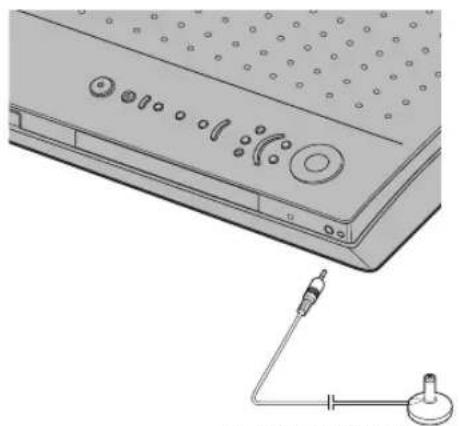
Optimizer microphone
3 Place the optimizer microphone on a flat level surface with the omni-directional microphone head upward, at your normal listening position.
If possible, use a stand such as a tripod to affix the optimizer microphone at the same height as your ears would be when you are seated in your listening position.
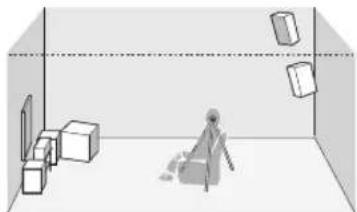
Optimizer microphone position
中
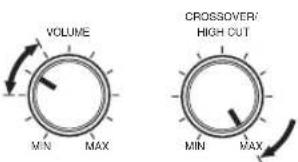
If your subwoofer has adjustable volume and crossover/high cut frequency controls, set the volume low but not minimum (as shown below) and set the crossover/high cut frequency to the maximum.
Subwoofer
4 Press STANDBY/ON to turn on the CinemaStation.
5 Press AMP, then press YPAO to start the setup procedure.
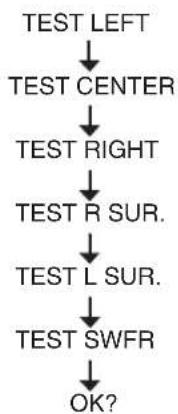
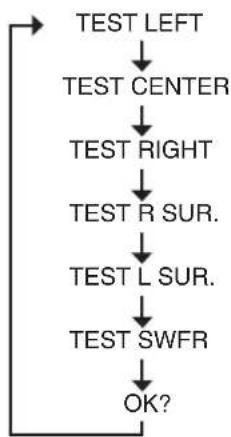
Test tones (the volume is adjustable) are output from each speaker, and the display changes as follows. Check that the speaker from which the test tone is being output and the name of the speaker appearing in the display are the same.
6 Press YPAO once more to continue the setup procedure.
"AUTO SETUP" appears in the display, and measurement begins. Test tones are output from each speaker in turn, and the display changes as follows.
The progress status appears in the display as a percentage (normally, it takes about two minutes). If the setup procedure is successful, "YPAO ON" and the speaker connection status appear alternately in the display. For more information on the speaker connection status, refer to "Speaker wiring indications" below. If a warning is detected, "WARNING" and the speaker connection status appear alternately in the display. For details, refer to "Error and warning messages" (page 24).
Speaker wiring indications
2.0 F- - - : Front speakers only
2.1 F--SW:Front speakers and the subwoofer
3.0 F C - - : Front speakers and the center speaker
3.1 FC - SW: Front speakers, center speaker and the subwoofer
4.0 F - SR - : Front speakers and surround speakers
4.1 F - SR SW: Front speakers, surround speakers and the subwoofer
5.0 F C SR -: Front speakers, center speaker and surround speakers
5.1 F C SR SW: Front speakers, center speaker, surround speakers and the subwoofer
To cancel YPAO mode during setup.
Press ON/OFF during the setup procedure.

To turn the YPAO mode on/off
You can switch between speaker settings configured by YPAO and manual setup by turning on/off the YPAO mode.
1 Press AMP.
2 Press ON/OFF to display the currently selected mode, then press ON/OFF again to select "YPAO ON" or "YPAO OFF".
- YPAO ON: The CinemaStation uses speaker settings configured by YPAO. If an error occurs during testing, this changes to "W YPAO ON".
- YPAO OFF: The CinemaStation uses speaker settings configured by manual setup.
#
- If a warning occurs during the YPAO measurement process, "W YPAO ON" appears in the display. If this happens, use or switch the display.
If you select "YPAO OFF", settings are returned to their previously set values.
Notes
- In the YPAO mode, you can make fine adjustments for YPAO speaker settings such as level and distance, etc.
- If you make fine adjustments to your YPAO speaker settings, these are reflected whenever you select the YPAO mode.
■ Error and warning messages
If an error or warning message appears, check the cause and follow the remedy corresponding to the message, then carry out the setup procedure once more (page 21).
Error messages before setup
| Error message Cause | Use Remedy | |
| Connect MIC | Optimizer microphone is not connected. • Connect the supply | supplied optimizer microphone to the YPAO MIC jack on the front panel. |
| Unplug HP | Headphones are connected. • Unplug the headphones. |
Error and warning messages during setup
| Message Cause | Remedy | |
| NO FRONT L | The front left channel signal is not detected. • Select the | front speakers with SPEAKER A or B. • Check the front left speaker connection. |
| NO FRONT R | The front right channel signal is not detected. • Select the | front speakers with SPEAKER A or B. • Check the front right speaker connection. |
| NO SURR L | The left surround channel signal is not detected. • Check | the left surround speaker connection. |
| NO SURR R | The right surround channel signal is not detected. • Check | the right surround speaker connection. |
| NO SIGNAL | The optimizer microphone does not detect test tones. | • Check the microphone setting. • Check the speaker connections and placement. |
| CANCEL | • The setup procedure was cancelled due to user activity. • The setup procedure was cancelled because YPAO ON/OFF was pressed. | • Perform the setup procedure again. Do not adjust VOLUME (etc.) during the auto setup procedure. |
Error messages after setup
If "WARNING" appears in the display after measurement is complete:
Press or .
The error message appears. If multiple errors are detected, press or to switch between them.
| Message Cause | Remedy | |
| W PHASE L | The speaker polarity (+/-) for the front left channel is incorrect. This message may appear even if the speaker is connected correctly. | ·Check the speaker connection for the proper polarity (+ or -). |
| W PHASE R | The speaker polarity (+/-) for the front right channel is incorrect. This message may appear even if the speaker is connected correctly. | ·Check the speaker connection for the proper polarity (+ or -). |
| W PHASE C | The speaker polarity (+/-) for the center channel is incorrect. This message may appear even if the speaker is connected correctly. | ·Check the speaker connection for the proper polarity (+ or -). |
| W PHASE SR L | The speaker polarity (+/-) for the surround left channel is incorrect. This message may appear even if the speaker is connected correctly. | ·Check the speaker connection for the proper polarity (+ or -). |
| W PHASE SR R | The speaker polarity (+/-) for the surround right channel is incorrect. This message may appear even if the speaker is connected correctly. | ·Check the speaker connection for the proper polarity (+ or -). |
| W LEVEL L | The volume level of the front left speaker is outside the specified range. (No level correction is made.) | ·Readjust the speaker installation so that all speakers are set in locations with similar conditions. ·Check the speaker connections. ·Use speakers of similar quality and efficiency. |
| W LEVEL R | The volume level of the front right speaker is outside the specified range. (No level correction is made.) | ·Readjust the speaker installation so that all speakers are set in locations with similar conditions. ·Check the speaker connections. ·Use speakers of similar quality and efficiency. |
| W LEVEL C | The volume level of the center speaker is outside the specified range. (No level correction is made.) | ·Readjust the speaker installation so that all speakers are set in locations with similar conditions. ·Check the speaker connections. ·Use speakers of similar quality and efficiency. |
| W LEVEL SR L | The volume level of the surround left speaker is outside the specified range. (No level correction is made.) | ·Readjust the speaker installation so that all speakers are set in locations with similar conditions. ·Check the speaker connections. ·Use speakers of similar quality and efficiency. |
| W LEVEL SR R | The volume level of the surround right speaker is outside the specified range. (No level correction is made.) | ·Readjust the speaker installation so that all speakers are set in locations with similar conditions. ·Check the speaker connections. ·Use speakers of similar quality and efficiency. |
| W LEVEL SW | The volume level of the subwoofer is outside the specified range. (No level correction is made.) | ·Readjust the speaker installation so that all speakers are set in locations with similar conditions. ·Check the speaker connections. ·Use speakers of similar quality and efficiency. ·Adjust the output volume of the subwoofer. |
| W DIST L | The front left speaker is placed too far away from the listening position. | ·Bring the speaker closer to the listening position. |
| W DIST R | The front right speaker is placed too far away from the listening position. | ·Bring the speaker closer to the listening position. |
| W DIST C | The center speaker is placed too far away from the listening position. | ·Bring the speaker closer to the listening position. |
| W DIST SR L | The surround left speaker is placed too far away from the listening position. | ·Bring the speaker closer to the listening position. |
| W DIST SR R | The surround right speaker is placed too far away from the listening position. | ·Bring the speaker closer to the listening position. |
| W DIST SW | The subwoofer is placed too far away from the listening position. | ·Bring the subwoofer closer to the listening position. |
| W NOISY | Background noise is too loud. ·Try the setup procedure | in a quiet environment. ·Turn off noisy electric equipment like air conditioners etc., or move them away from the optimizer microphone. |
Notes
- If a phase warning appears, adjustments are made, but they may not be optimal. In this case, follow the remedy and carry out the setup procedure again (page 21).
If a level warning appears, no adjustments are made. In this case, follow the remedy and carry out the setup procedure again (page 21).
Enjoying Sound Field Programs (DSP Programs)
Digital Sound Field Processor (DSP) programs feature a variety of sound fields that allow you to enjoy movies and music. At the touch of a button, the DSP program automatically sets your speaker settings, such as reflected sound, reverberant sound and the delay time for each channel to match your audio source.
#
- You can change the delay time for each DSP program as necessary. For information on the default delay time and how to change it, refer to "DSP Program Delay Time Settings" (page 68).
- The CinemaStation has other sound field effects not listed below. Also, you can enjoy DSP programs with headphones or low volume. For details, refer to "Enjoying DSP Programs in a Variety of Ways" (page 60).
Feel free to choose a sound field program based on your listening preference, and not purely on the name of the program itself.
To play back 2ch sources such as CDs faithful to the original sound, turn off the DSP program feature. For details, refer to "Enjoying 2ch sources with all speakers (Dolby Pro Logic II)" (page 58). - Experiment with different sound field effects until you find the DSP program that you feel best matches your source. For details, refer to "Enjoying Sound with Specific Speakers" (page 57).
Movie programs
| Each time you press the MOVIE button, the program changes as follows: MOVIE Action ↓ Drama ↓ Sci-Fi ↓ Spectacle ↓ Theater | Action Enhances the stereoscopic effect for a thrilling sense of presence only found in an action movie. |
| Drama Expresses surround sounds softly so that voice and dialog are clear and crisp. | |
| Sci-Fi (Science Fiction) Fills the space with music and sound that have an eerie sense of reality. Suitable for serious science fiction that has a good story line. | |
| Spectacle Expresses super-wide spaces. Suitable for a movie that has a powerful visual impact. | |
| Theater Preserves the power of Dolby or DTS Surround for experiencing the rich acoustical presence of a movie theater. |
Music programs
| Each time you press the MUSIC button, the program changes as follows: | Music Video Magnifies the feeling of listening to live rock or jazz in a concert hall. The screen image and sound field space stretch out to the fullest, engulfing you in an atmosphere of excitement. |
| Classic Hall (The Munich Philharmonic Hall) Puts you in a front row seat at the Munich Philharmonic Hall, surrounded in calm, veluptuous sound. | |
| Jazz Club (The Bottom Line) Reproduces the acoustics of sitting right in front of the stage at The Bottom Line, a popular New York City jazz club. Experience the lively, realistic throb of a wide stage. | |
| Rock Concert (The Roxy Theater) Recreates the acoustic personality of a nightclub seating for an audience of about 460. | |
| 5ch Stereo Fills the space with sound and allows all listeners to enjoy the same high-quality sound no matter where they are sitting or standing in the room. A DSP program that is especially suitable for home parties. |
Sports program
| Press the SPORTS button. Live SportsSPORTS | In a live stereo sports broadcast, announcer voices are central, engulfed in the cheers and emotional whirl of the stadium. |
Game program
| Press the GAME button. Game | Gives TV games extra depth and surround. You can enjoy TV games with monaural or stereo sound. |
Setting the Sleep Timer
If you set the Sleep Timer, the CinemaStation automatically turns to the Standby mode after the specified time.
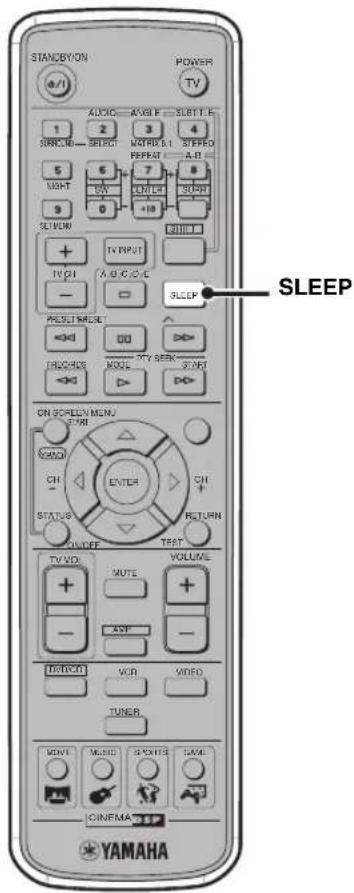
Press SLEEP to select the time setting.
Each time you press the SLEEP button, the time setting changes as follows:
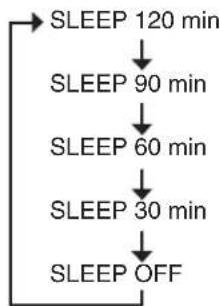
The "SLEEP" indicator lights up in the CinemaStation display.

- The Sleep Timer only works for the CinemaStation. It does not turn off other equipment connected to the CinemaStation.
- The Sleep Timer cancels if you turn the CinemaStation to the Standby mode.
- The CinemaStation stores the mode or playback settings in its memory when it automatically turns to the Standby mode. You can use those settings when you turn on the CinemaStation next time.
■ To cancel the Sleep Timer
Press SLEEP repeatedly to select "SLEEP OFF".
Changing DVD Settings on the TV (On-Screen Menu)
You can change the various settings for DVD playback using the menu displayed on the TV screen (On-Screen Menu) connected to the CinemaStation. For details on the available menu items, refer to "On-Screen Menu guide" (page 30).
Operating the On-Screen Menu
In this procedure, we adjust the color saturation for example. The actual screen may differ depending on the selected menu.
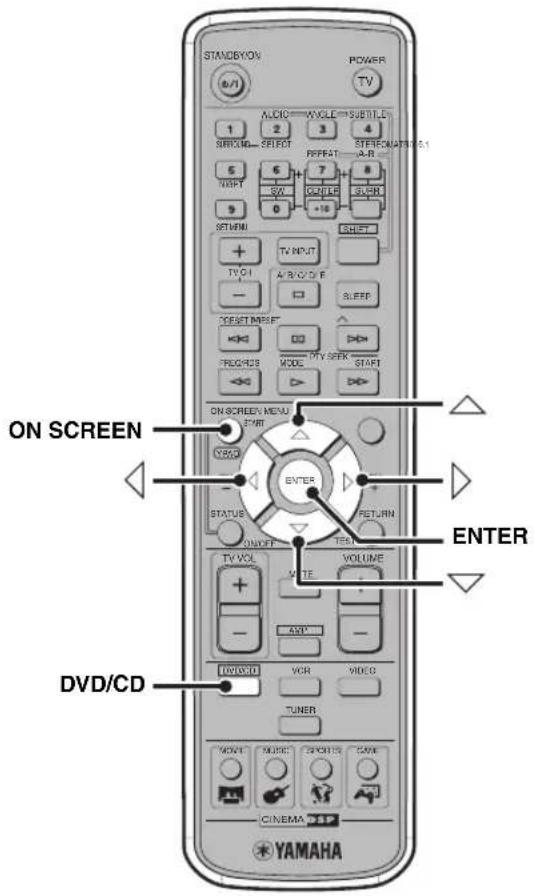
1 Press DVD/CD, then press ON SCREEN to display the On-Screen Menu on your TV.
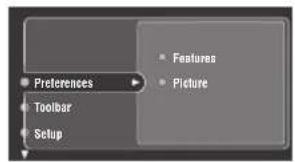
2 Press or to select a main menu item (Preferences), then press
3 Press or to select a submenu item (Picture), then press
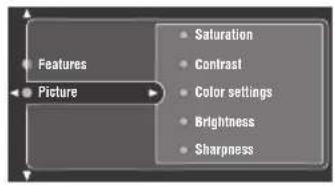
4 Press or to select a setting item (Saturation).
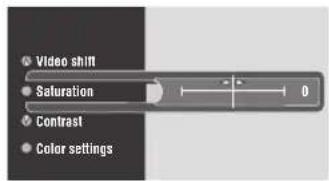
5 Press or to adjust the setting for the selected item.
You can also use or depending on the selected item.
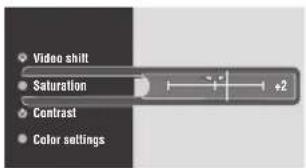
6 Press ENTER.
7 To exit the On-Screen Menu, press ON SCREEN.
On-Screen Menu guide
| Main Menu Submenu Setting | Item Function | ||
| Preferences Features Status window | Sets the status information display to “On” or “Off”. On: You can display or hide status information using the STATUS button on the remote control. Status information includes disc type and total time or elapsed time of the current track/chapter. Off: Status information does not appear. | ||
| Main Menu | Submenu | Setting Item | Function |
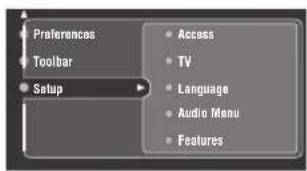
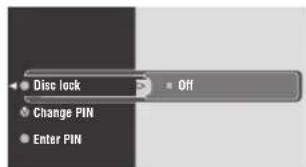
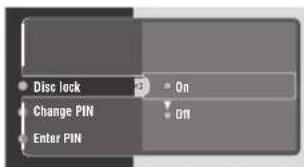
| Setup Access Disc lock | Sets Disc lock to “On” or “Off”. (page 44) | ||
| Change PIN | Changes the password. (page 45) | ||
| Enter PIN | Enters the password. (page 44) | ||
| Parental level | Sets the Parental Control level (0 to +8). (page 43) | ||
| Country | Selects the country in which you are using the CinemaStation. | ||
| TV *1 | TV shape | Sets the screen aspect of your TV to “4:3 panscan”, “4:3 letterbox”, or “Wide-screen (Widescreen)”. | |
| TV system | Sets the video signal system of your TV to “NTSC”, “PAL”, or “AUTO”. When using a TV compatible with both NTSC and PAL, set this to “AUTO”. When using Progressive Scan (page 46), set this to “NTSC” or “PAL” that matches to your TV. | ||
| Video Output (For U.K. and Europe models: When connecting the TV to the AV MONITOR OUT jack, press □ again to display “YUV←->RGB”. Otherwise, skip this step.) | Sets the output signal of the AV MONITOR OUT jack to “YUV” or “RGB”. When connecting your TV to the MONITOR OUT (S VIDEO) jack, set this to “YUV”. | ||
| Language Default Sub-title (Default Subtitle) | Selects a default subtitle language. When playing a disc, the CinemaStation automatically uses the selected language for the subtitle. If you play a disc that is not compatible with the selected language, another language will be selected automatically. | ||
| Select the language for the On-Screen Menu. | |||
| Default Audio | |||
| Audio Menu Digital output | Sets the output signal of the OPTICAL OUT jack to “All” or “PCM Only”. All: Outputs all types of digital signals that the CinemaStation can reproduce. PCM Only: Converts the signal to PCM before outputting it (except for DTS sources). (When “PCM Only” is selected, signals will not be output from the speakers, VCR OUT jack or OPTICAL OUT jack during DTS playback.) | ||
| Features PBC | Sets video CD playback control to “On” or “Off”. On: Playback control is activated, and you can display or hide a disc menu using the MENU button on the remote control (page 39). Off: Disc menus do not appear on the TV screen. | ||
*1 Before configuring items in this menu, refer to the manual for your TV to make sure of the correct settings. Incorrect settings may disable TV functions. If this happens and you cannot operate the On-Screen Menu due to the failure, carry out the procedure below.
To recover TV settings from a failure
1) Press DVD/CD.
2) Press (for about 5 seconds) until "NTSC<->PAL" appears in the CinemaStation Display.
3) For U.K. and Europe models: When connecting the TV to the AV MONITOR OUT jack, press again to display "YUV<-RGB".
For all other models: Skip this step.
4) Press to switch the settings.
(5) If "NTSC/PAL SET" or "YUV/RGB SET" appears in the CinemaStation display, the recovery procedure is complete.
Supported Disc Types
You can enjoy movie or music discs with CinemaStation. Since some CinemaStation disc operations are limited to specific disc types, the supported disc types are indicated using the icons shown below. Each icon means that the operation is limited to the corresponding disc type. For information on supported disc standards and disc usage notes, refer to "Disc Information" (page 86) and "Handling a disc" (page 87). Operations with no icon indicated are available for all disc types.
| DVD video Video CD Music CD | ||
| DVD-V | VCD | CD |
About MP3 and JPEG picture discs
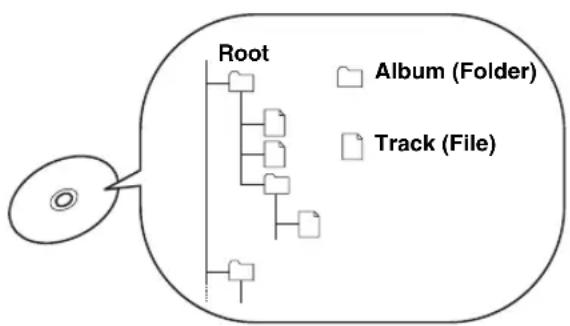
You can play MP3 files recorded on a CD-R or CD-RW with similar uses as a music CD. The CinemaStation regards folders in the MP3 disc as albums, and files as tracks (as shown on the left). Also you can play JPEG picture files recorded on a CD-R or CD-RW. For details about how to play JPEG picture discs, refer to "Enjoying JPEG Images" (page 47).
What is MP3?
"MP3 (MPEG-1 Audio Layer-3)" is a standard technology and format for compressing an audio sequence into a small-sized file. However it preserves the original level of sound quality when it is played.
Notes
- Depending on recording conditions such as recording software settings, the CinemaStation may not be able to play the disc or play tracks in the order they were recorded.
- The CinemaStation is compatible with a bit rate range of 32, 64, 96, 128, 192, or 256 kbps and variable bit encoded MP3 files.
- The CinemaStation is compatible with a sampling frequency of 32, 44.1, or 48kHz .
What is JPEG?
"JPEG" is a compression format for still images. With only a slight drop in image quality (part of the data is removed), still image data can be compressed to approximately 1/10 to 1/100 of its original size.
Notes
- The Program Play feature is not available for JPEG images.
- This unit does not support the progressive JPEG format.
BasicPlaybackOperations
Follow the procedures below to carry out basic disc playback operations. The CinemaStation also provides various useful functions for disc playback. For details, refer to "UsefulPlaybackOperations" (page 34).

To start playback
Press
To stop playback
Press
Whenever you stop playback, the CinemaStation automatically memorizes the stopping position, and the message "To start playback from the beginning, press once more. To resume playback from where it was stopped, press ." appears. If you press , playback resumes from where it left off.
To pause playback
Press.
To return to normal playback, press
To advance frame-by-frame
DVD-V VCD
Press to pause playback, then press repeatedly. Each time you press, playback advances one frame at a time. To return to normal playback, press
To fast reverse or fast forward
To fast reverse, press. To fast forward, press. Each time you press the button, the speed changes (reverse: -4, -8, or -32x, forward: 4, 8, or 32x).
Notes
-32 and 32x are not available for music CD playback.
- The speakers do not produces any sounds if you fast forward/ reverse while playing a Dolby Digital or DTS disc.
To slow reverse and slow forward
DVD-V VCD
Press to pause playback, then press to slow reverse or press to slow forward.
Each time you press or , the speed changes (reverse: -1 / 8, - 1 / 4, or -1 / 2x forward: 1 / 8,1 / 4, or 1 / 2x) To return to normal playback, press
Note
The slow reverse feature is not available for video CD playback.
To skip chapters (tracks)
To skip to the start of the current chapter (track), press
To skip to the next chapter (track), press
To skip to the previous chapter (track), quickly press twice.
Note
The Skip feature may not work properly when using Playback Control (page 39) to play a video CD.
To specify a track for playback
VCD CD
Use the Number buttons to enter the truck number you want to play.
To enter 2-digit number, press a number button for the second digit place, then press a number button for the first digit place.
You can also use the On-Screen Menu (page 29) to advance frame-by-frame, fast or slow reverse/forward. Reversing frame-by-frame is available only with the On-Screen Menu.
UsefulPlaybackOperations
You can enjoy movie or music discs with various useful features on the CinemaStation. For information on basic disc playback operations, refer to "BasicPlayback Operations" (page 33).
Specifying an elapsed time for playback (Time Search)
You can specify an elapsed time where you want playback to start. The Time Search feature is only available with the On-Screen Menu (page 29).
Notes
- This feature is not available during Program Play of a video CD.
The Time Search feature is not available during Program Play of a video CD.
1 Press DVD/CD, then press ON SCREEN to display the On-Screen Menu on your TV.
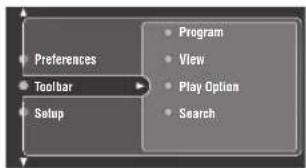
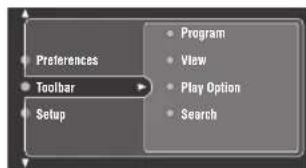
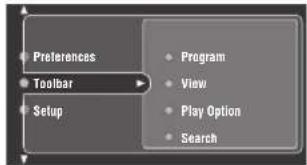
2 Press or to select "ToolBar", then press.
3 Press or to select "Search", then press.
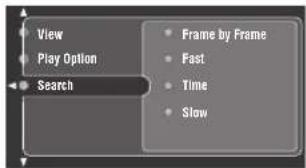
4 Press or to select "Time", then press.
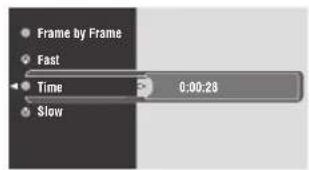
5 Press or to select a parameter (hour, minute, or second), then use the number buttons to enter the time where you want to start playback.
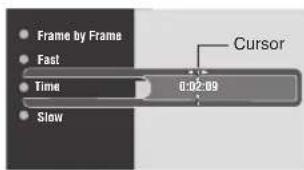
6 Press ENTER to start playback from the specified position.
7 To exit the On-Screen Menu, press ON SCREEN.
Customizing playback order (Program Play)
You can customize the playback order for chapters or tracks stored in the disc. Also, you can display the playback order, disable the Program Play feature, or clear all Program Play contents after customizing the playback order. The Program Play feature is available only with the On-Screen Menu (page 29).
Notes
- In this procedure, we use the DVD disc for example. The actual screen may differ depending on the disc type you use.
The Playback Control feature (page 39) is not available during Program Play of a video CD.
1 Press DVD/CD, then press ON SCREEN to display the On-Screen Menu on your TV.
2 Press or to select "ToolBar", then press .
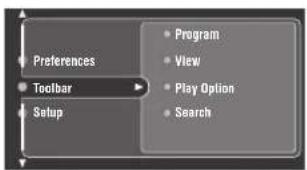
3 Press or to select "Program", then press.
4 Press or to select "Tracks", then press .
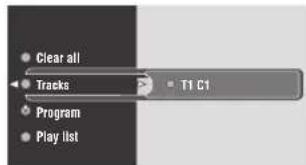
5 When using a DVD or video CD, press or to select the title and press then press or to select the chapter you want to store as a Program Play content and press ENTER.
When using a music CD, press or to select the track you want to store as a Program Play content, then press ENTER.
Repeat this step until you store all desired chapters (tracks). To select chapters in another title, press
6 Press to return to the screen in step 3, then press ON SCREEN to exit the On-Screen Menu.
The Playback mode indicator ("PROG") lights up in the CinemaStation display and Program Play starts automatically. If playback does not start automatically, press
To check Program Play contents
You can check the chapters (tracks) you stored as Program Play contents.
1 Carry out steps 1 to 3 in the "Customizing playback order (Program Play)" procedure (page 35).
2 Press or to select "Play list" (" Playlist"), then press
3 Press or to scoll the list of chapters (tracks).
To enable/disable Program Play
The CinemaStation automatically enables Program Play if you customize playback order. This playback order remains even after playback of all chapters (tracks) stored as the Program Play contents are finished. To return to normal playback, follow the procedure below to disable Program Play. Even if you disable it, the playback order remains in the memory until you clear it, so you can use the playback order again by enabling Program Play and pressing
1 Carry out steps 1 to 3 in the "Customizing playback order (Program Play)" procedure (page 35).
2 Press or to select "Program", then press.
3 Press or to select "On" or "Off".
Note
If you press and remove the disc you made Program Play settings for, the settings are cancelled.
To clear Program Play contents
Follow the procedure below to clear all Program Play contents.
1 Carry out steps 1 to 3 in the "Customizing playback order (Program Play)" procedure (page 35).
2 Press or to select "Clear All", then press.
The message "Cleared" appears on the TV screen and all Program Play contents are cleared.
Repeating playback (Repeat Play)
You can repeat single chapter (track), single title, or entire disc. Also, you can set two points (start and end points) to repeat the specified section of a title (track) with A-B Repeat (page 38).
Notes
- Repeat Play may not work depending on DVD disc types.
- Repeat Play does not work while playing back a video CD using the Playback Control feature (page 39).
1 Play back the disc, title, or chapter (track) you want to repeat.
For details, refer to "BasicPlayback Operations" (page 33).
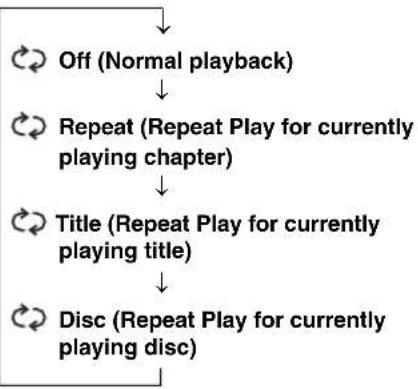
2 While holding down SHIFT, press REPEAT to select the Repeat Play mode.
Every time you press the button, the display on the TV screen changes as follows:
DVD Video
Video CD/Music CD
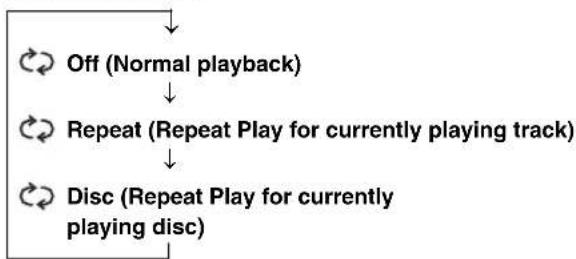
Repeat Play starts and the following playback mode indicator lights up in the CinemaStation display.
REP: Repeats the title, chapter or track.
REP ALL: Repeats the disc.
To cancel Repeat Play
While holding down SHIFT, press REPEAT to select "Off".
To repeat between two points (A-B Repeat)
You can repeat the specified section of a title (track) by setting two points (start and end points).
Notes
- Repeat Play may not work depending on DVD disc types.
- You can use A-B Repeat only within one title (track).
1 Play back the title or track that includes the section you want to repeat.
For details, refer to "BasicPlayback Operations" (page 33).
2 At the position where you want to set as the start point of the repeat section, hold down SHIFT and press A-B.
"Repeat A" appears on the TV screen and the playback mode indicator ("REP A-" lights up in the CinemaStation display).
3 At the position where you want to set as the end point of the repeat section, hold down SHIFT and press A-B again.
A-B Repeat starts.
"AB" appears on the TV screen and the playback mode indicator ("REP A-B" lights up in the CinemaStation display).
To cancel A-B Repeat
While holding down SHIFT, press A-B.
"AB Off" appears on the TV screen, and A-B Repeat is cancelled.
Operating disc menus (DVD menu/ Video CD Playback Control)
Many DVDs and video CDs include original navigational menus called "DVD menus" and "video CD Playback Control menus". These menus provide a convenient way to operate the disc. Follow the procedure below to use a DVD menu or video CD Playback Control with the CinemaStation.
Note
Menu contents or operation method of each disc may vary. For information about the disc you are using, refer to the operating instructions in the disc's menu or on its jacket.
To operate the DVD menu DVD-V
1 Press MENU.
The DVD menu appears on the TV screen.
中
Depending on the disc, the DVD menu may automatically appear after the disc is loaded.
2 Press / / / to select a menu item, then press ENTER.
To operate the video CD Playback Control menu VCD
If you play back a video CD that includes thePlayback Control feature, the menu automatically appears on the TV screen. To operate the Playback Control feature with the CinemaStation remote control, use the following buttons.
Number buttons: Selects an item.
:Moves to thenext screen.
or RETURN: Returns to the previous screen.
Note
The Playback Control feature does not work during Program Play (page 35).
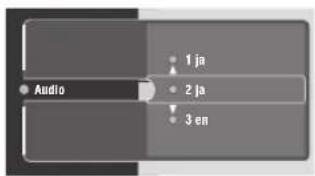
Selecting Audio and Subtitle Languages DVD-V
You can select audio and subtitle languages for DVD playback. Also, you can set default languages for DVD playback with the On-Screen Menu. For details on setting default languages, refer to "On-Screen Menu guide" (page 30).
Note
This selection is available only with multi-language compatible discs. Also, languages available for each disc may vary. For information about the disc you are using, refer to the operating instructions in the disc's menu or on its jacket.
1 While playing a disc or pausing, hold down SHIFT and press AUDIO or SUBTITLE.
The audio language selection screen or subtitle language selection screen appears on the TV screen.
Audio language selection screen
Subtitle language selection screen
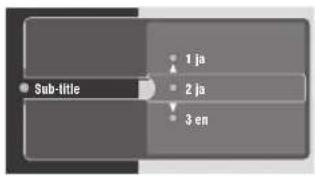
2 Press or or the number buttons to select the language you want to use for audio or subtitle.

You can also select a language by pressing AUDIO or SUBTITLE while holding down SHIFT.
3 To exit the language selection screen, press ON SCREEN.
To turn off the subtitle
Select "None" in step 2 above.
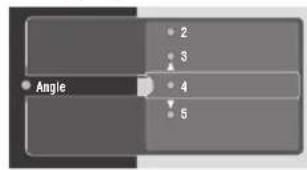
Selecting a Viewing Angle DVD-V
You can select a viewing angle for DVD playback.
Note
This selection is available only with multi-angle compatible discs. Also, viewing angles available for each disc may vary. For information on your disc, refer to the operating instructions in the DVD menu or on its jacket.
1 While playing a disc or pausing, hold down SHIFT and press ANGLE.
The viewing angle selection screen appears on the TV screen.
Viewing angle selection screen
2 Press or or the number buttons to select the viewing angle.
中
You can also select a viewing angle by pressing ANGLE while holding down SHIFT.
3 To exit the viewing angle selection screen, press ON SCREEN.
Zooming Images

You can zoom in a specified part of picture during DVD playback. The Zoom feature is available only with the On-Screen menu (page 29).
1 Press DVD/CD, then press ON SCREEN to display the On-Screen Menu on your TV.
2 Press or to select "ToolBar", then press.
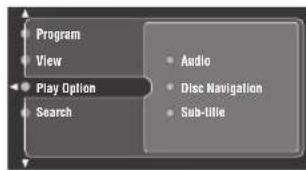
3 Press or to select "View", then press.


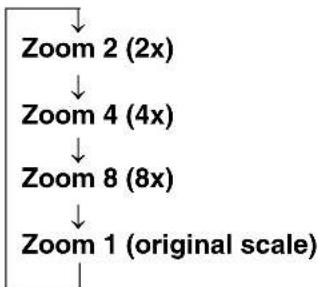
5 Press / / / to specify the center of a zooming part (+ mark position), then press ENTER.
Each time you press ENTER, the zooming scale changes as follows:

6 To exit the On-Screen Menu, press ON SCREEN.
To return to the original scale
Select "Zoom 1" in step 5 above.
Restricting Playback (Parental Control) DVD-V
You can set playback restrictions for certain discs using Parental Control. Only users who know the password can access the locked discs.
Setting the Parental Control level
You can restrict playback according to a predetermined level (Parental Control level). For information on the Parental Control level of each disc, refer to the instruction on its jacket.
1 Press DVD/CD, then press ON SCREEN to display the On-Screen Menu on your TV.
2 Press or to select "Setup", then press.
3 Press or to select "Access", then press .
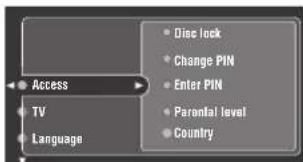
4 Press or to select "Enter PIN", then press.

5 Press the number buttons to enter the password (4 digits).

Notes
- The default password is "0000". To change the password, carry out the "Changing the password" procedure (page 45).
- If you forget your password, press four times instead of entering the password. The restricted icon appears. If you press another four times, "Enter the new PIN" appears.
6 Press or to select "Parental level", then press
7 Press or to adjust the Parental Control level, then press ENTER.
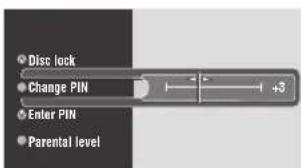
0: Parental Control is off. (Users can play all discs without entering the password.)
1 to 7: Users cannot play a disc that is rated above the level without entering the password. (The smaller the number, the stricter the Parental Control level.)
8: Users can play all discs without entering the password.
8 To exit the On-Screen Menu, press ON SCREEN.
Locking discs
You can use this function to lock all video discs to restrict playback. Only those discs you select to unlock in "Playing locked discs" are available for access.
1 Carry out steps 1 to 5 in the "Setting the Parental Control level" procedure (page 43).
2 Press or to select "Disc lock", then press.
3 Press or to select "On", then press ENTER.
4 To exit the On-Screen Menu, press ON SCREEN.
To disable a lock applied to a disc
Select "Off" in step 3.
Playing locked discs
Follow the procedure below to access a locked disc by entering the password.
1 Load a disc into the disc tray.
If the disc is locked, the password input screen appears on the TV screen.
2 Press or to select "Play once" or "Play always", then press
Play once: Requires that the password be entered when playing the disc next time.
Play always: Does not require that the password be entered when playing the disc next time.
3 Use the number buttons to enter the password (4 digits).
Playback starts.

- Even if you select "Play always", you can change the setting to "Play once" by pressing within 10 seconds after the icon appears on the TV screen.
- The CinemaStation automatically memorizes disc information for up to 120 discs. If you load the 121st disc, the CinemaStation automatically deletes the disc information for the first (oldest) one.
Notes
- The default password is "0000". To change the password, carry out the "Changing the password" procedure.
- If you forget your password, press four times instead of entering the password. The restricted icon appears. If you press another four times, "Enter the new PIN" appears.
Changing the password
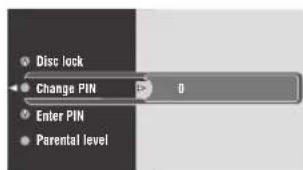
Follow the procedure below to change the password to access locked disc.
1 Carry out steps 1 to 5 in the "Setting the Parental Control level" procedure (page 43).
2 Press or to select "Change PIN", then press
3 Use the number buttons to enter the current password (4 digits).
Notes
- The default password is "0000".
- If you forget your password, press four times instead of entering the password. The restricted icon appears. If you press another four times, "Enter the new PIN" appears.
4 Use the number buttons to enter the new password (4 digits).
5 Use the number buttons to re-enter the new password (4 digits) for confirmation.
6 To exit the On-Screen Menu, press ON SCREEN.
Enjoying High-Quality Video (NTSC/Progressive Scan)
DVD-V
Progressive Scan is video that represents a frame with one pass of sequential scan lines whereas interlace output video, which is usually adopted for most TVs, represents a frame with two passes. Progressive Scan provides better video quality by reducing picture noises. To enjoy DVDs with Progressive Scan, you need to connect the CinemaStation to a TV that has component video input jacks compatible with Progressive Scan. For details on connections, refer to "Other connection methods" (page 12). Also, Progressive Scan is available only for NTSC signal output. You can set the video signal system of your TV to "NTSC" with the On-Screen Menu (page 29).
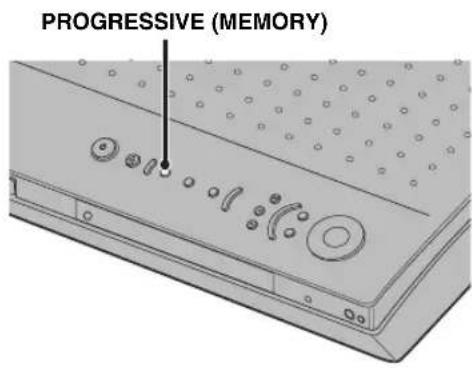
To turn on the Progressive Scan mode While disc playback is stopped, press and hold PROGRESSIVE (MEMORY) on the CinemaStation for 2 seconds or longer. The Progressive Scan mode is activated and the "PROGRESSIVE" indicator lights up in the CinemaStation display.
To turn off the Progressive Scan mode While disc playback is stopped, press and hold PROGRESSIVE (MEMORY) on the CinemaStation for 2 seconds or longer.
#
- When the Progressive Scan mode is off, the CinemaStation provides video with interlace output mode.
- During playback, you cannot switch between the Progressive Scan mode and the interlace output mode.
Notes
- If you play video with a 4:3 aspect ratio on a 16:9 wide television screen, Progressive Scan may fill the screen top to bottom. In this case, change the screen aspect setting of your TV with the On-Screen Menu (page 29). If you cannot adjust the ratio, press PROGRESSIVE (MEMORY) to turn off the Progressive Scan mode (use the interlace output mode).
- When the Progressive Scan mode is activated, a video signal will only output from the COMPONENT Video jacks. Since the COMPONENT VIDEO jack and Progressive Scan are available only for DVD playback, you cannot enjoy sources other than DVDs with the Progressive Scan mode.
- CONSUMERS SHOULD NOTE THAT NOT ALL HIGH DEFINITION TELEVISION SETS ARE FULLY COMPATIBLE WITH THIS PRODUCT AND MAY CAUSE ARTIFACTS TO BE DISPLAYED IN THE PICTURE. IN CASE OF 525 PROGRESSIVE SCAN PICTURE PROBLEMS, IT IS RECOMMENDED THAT YOU SWITCH THE CONNECTION TO THE "STANDARD DEFINITION" OUTPUT. IF THERE ARE QUESTIONS REGARDING YOUR VIDEO MONITOR COMPATIBILITY WITH THIS UNIT, PLEASE CONTACT OUR CUSTOMER SERVICE CENTER. This unit is compatible with the complete line of YAMAHA projectors (including the DPX-1, DPX-1000, DPX-1100, LPX-500 and LPX-510), and YAMAHA plasma displays (including the PDM-1, PDM-4210 and PDM-4210E).
For U.K. and Europe models only
- When "Video Output" is set to an item other than "YUV", Progressive Scan is not available.
- When this unit is connected to a PAL monitor and you are playing back a PAL disc, if "TV system" is set to "AUTO" in the On-Screen Menu (page 29), Progressive Scan is not available.
- When "TV system" is set to "NTSC" in the On-Screen Menu (page 29), Progressive Scan is available only with NTSC signals (PAL signals are converted into NTSC signals).
Enjoying JPEG Images
You can view JPEG pictures in a commercial JPEG CD or personally recorded on a CD-R or CD-RW disc on the TV screen.
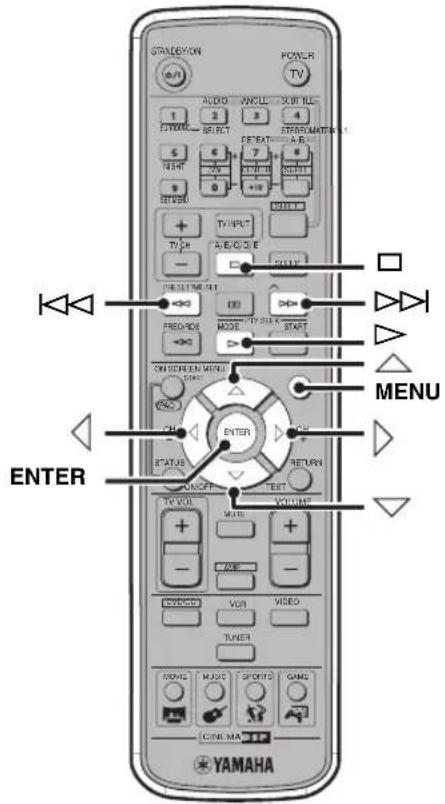
1 Load a disc in the disc tray.
Playback starts automatically and thumbnails appear on the TV screen.
To move through the list of thumbnails, press or
2 Press / / / to select the thumbnail, then press ENTER.
To return to the thumbnail screen, press MENU.
3 Press to start the slide show.
To stop the slide show, press .
To return to the thumbnail screen, press MENU.
中
You can configure the slide show setting or rotate pictures with the On-Screen Menu. For details, refer to "On-Screen Menu guide" (page 30).
Tuning Radio Stations
The CinemaStation provides several methods for tuning AM/FM radio stations, such as Auto Tuning (FM only), Manual Tuning (AM/FM) and Preset Tuning (AM/FM). Follow the procedure below to tune your favorite radio stations.
About the display
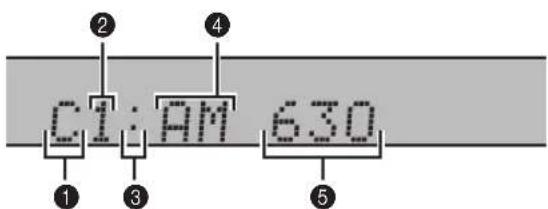
Preset group
Displays the preset group (page 51).
Preset number
Displays the preset number (page 51).
Mode indicator
Preset mode: Displays a colon.
Tuning mode: No colon is displayed.
4 Band
Displays the band (AM or FM).
5 Frequency
Displays the frequency.
Tuning radio stations automatically (Auto Tuning)
If the radio wave reception is strong in your area, Auto Tuning is a quick and useful way to tune radio stations.
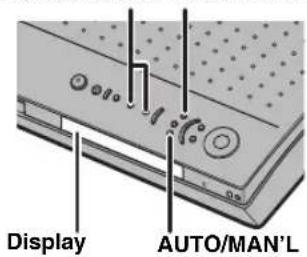
PRESET/TUNING PRESET/BAND
Tuning radio stations manually (Manual Tuning)
If the radio wave reception is weak in your area, tune radio stations manually.
1 Press PRESET/BAND on the CinemaStation to select FM (Tuning mode) or AM (Tuning mode).
Each time you press the button, the mode changes as follows:
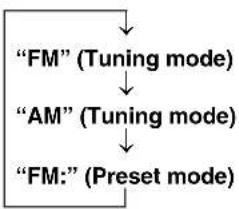
1 Press PRESET/BAND on the CinemaStation to select FM (Tuning mode) or AM (Tuning mode).
Each time you press the button, the mode changes as follows:

2 Press AUTO/MAN'L to select Auto Tuning mode. Make sure "AUTO" lights up in the CinemaStation display.

3 Press PRESET/TUNING or to select the radio station you want to receive.
The CinemaStation automatically detects radio stations that have strong signals for your selection.
2 Press AUTO/MAN'L to select Manual Tuning mode.
Make sure "AUTO" disappears from the CinemaStation display.

3 Press PRESET/TUNING or to adjust the frequency.
#
If you use Manual Tuning for FM stations, the CinemaStation's radio wave reception mode automatically changes to the monaural mode to increase the signal quality.
Selecting preset radio stations (Preset Tuning)
If you preset your favorite radio stations with Auto Preset (page 51) or Manual Preset (page 52) on the CinemaStation, you can tune the radio stations simply by selecting the preset group and number.

1 Press A/B/C/D/E to select the preset group of the radio station you want to listen to.
Each time you press the button, the preset group changes.
2 Press PRESET/TUNING to select the preset number of the radio station you want to listen to.
"TUNED" lights up in the CinemaStation display and the radio plays.
中
You can also select preset radio stations by pressing A/B/C/D/E and PRESET/TUNING on the CinemaStation.
Receiving FM RDS stations (U.K. and Europe models only)
RDS (Radio Data System) is a transmission system for FM stations used mainly in the U.K. and Europe. RDS transmissions include various types of information such as PS (Program Service), PTY (Program Type), RT (Radio Text), and CT (Clock Time). Follow the procedure below to receive FM stations by the RDS transmissions on the CinemaStation.
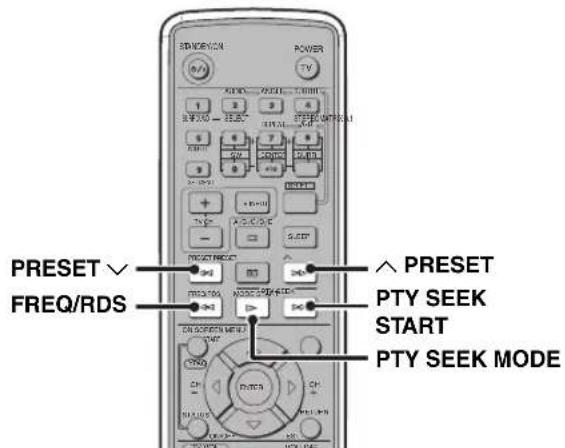
To switch frequency and RDS modes
While receiving an FM RDS station (an RDS indicator lights up), press FREQ/RDS.

Each time you press the button, the mode changes as follows:
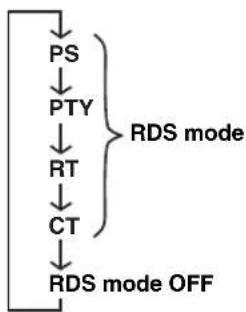
About information type
RDS includes the following types of information.
- PS (Program Service)
Displays the station name.
- PTY (Program Type)
Displays the program type (genre). For details, refer to the "Program Type (genre)" list (page 50).
- RT (Radio Text)
Displays text information related to the RDS broadcast. (Shows an under bar for a non-identifiable character.)
- CT (Clock Time)
Displays the current time. (Shows the message "CT WAIT" when time data cannot be received properly.)
Notes
- The available RDS information types vary depending on the station.
- If the FM RDS station's signal transmission is too weak, the CinemaStation may not be able to receive RDS information completely. In particular, RT (Radio Text) information uses a lot of bandwidth, so it may not be available even when other modes are selectable.
- RDS information may not transmit under weak radio wave conditions. In this case, press AUTO/MAN'L on the CinemaStation to let the CinemaStation's radio wave reception mode automatically change to the monaural mode to increase the signal quality.
- If radio wave interference occurs, the message "...WAIT" appears in the CinemaStation display. In this case, the CinemaStation cannot receive RDS information.
To select stations by program type (genre)
You can tune FM RDS stations by selecting a program type (genre). Once you select a program type, the CinemaStation automatically searches for FM RDS stations currently broadcasting the corresponding programs.
1 Press PTY SEEK MODE.
The program type you selected last time appears in the CinemaStation display.
2 Press PRESET or to select the program type you want to listen to.
The available program types are as follows:
Program Type (genre)
| NEWS News | |
| AFFAIR Current Affairs | |
| INFO General Information | |
| SPORT Sports | |
| EDUCATE Education | |
| DRAMA Drama | |
| CULTURE Culture | |
| SCIENCE Science | |
| VARIED Light Entertainment | |
| POP M Pops | |
| ROCK M Rock | |
| M.O.R. M Middle-Of-the-Road Music (easy-listening) | |
| LIGHT M Light Classics | |
| CLASSICS | Serious Classics |
| OTHER M Other Music | |
3 Press PTY SEEK START to start searching stations.
"PTY HOLD" lights up in the CinemaStation display during a search.

If the CinemaStation finds a FM RDS station that matches the program type you selected, the radio plays.
4 Repeat step 3 until the CinemaStation finds your favorite FM RDS station.
To cancel steps 1 or 2
Press PTY SEEK MODE twice.
Presetting Radio Stations
You can preset your favorite radio stations automatically (FM stations only) or manually to tune the stations simply by selecting the preset group and number. The CinemaStation can store up to 40 stations (5 groups x 8 stations) in its memory.
Presetting FM stations automatically (Auto Preset)
If the FM radio wave reception is strong in your area, Auto Preset is a quick and useful way to preset FM radio stations. If you want to preset AM stations or the FM radio wave reception is weak in your area, preset stations manually (page 52).
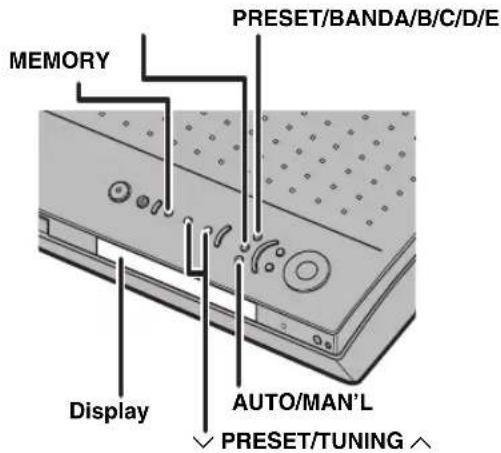
1 Press PRESET/BAND on the CinemaStation to select FM (Preset mode).
Each time you press the button, the mode changes as follows:
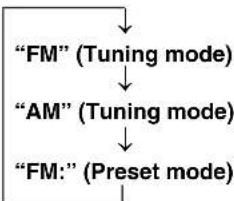
2 Press AUTO/MAN'L to select Auto Preset mode.
Make sure "AUTO" lights up in the CinemaStation display.

3 Press and hold MEMORY for about three seconds.
"MEMORY" and "AUTO" blinks in the CinemaStation display, then Auto Preset starts at the frequency currently selected toward higher frequency in a few seconds. When Auto Preset finishes, "MEMORY" and "AUTO" turns off and the CinemaStation automatically applies a preset group and number to each detected FM station.
To specify a starting group and number
You can specify a preset group and number that store the first detected FM station. Also, you can start Auto Preset at the frequency currently selected toward higher or lower frequency.
1 Carry out steps 1 and 2 in the "Presetting FM stations automatically (Auto Preset)" procedure on this page.
2 Press and hold MEMORY for about three seconds.
The MEMORY indicator blinks in the display.
3 While MEMORY is blinking, press A/B/C/D/E to select the starting preset group, then press PRESET/TUNING or to select the preset start number.
4 Press PRESET/BAND to turn off the colon (:), then press PRESET/TUNING or .

When you press PRESET/TUNING , Auto Preset starts at the frequency currently displayed and tunes toward the lower frequencies, and when you press PRESET/TUNING , Auto Preset tunes toward the higher frequencies.
中
- When presetting a radio station, the CinemaStation automatically sets the reception mode (stereo or monaural) at the same time.
- Auto Preset automatically stops after searching the whole frequency range or detecting 40 stations.
- If you select a preset number that has been already applied to other station, it will be replaced with the new station.
- If the MEMORY indicator stops blinking before you perform step 3 above, Auto Preset is cancelled and you must start the procedure again.
Presetting radio stations manually (Manual Preset)
If you want to preset AM stations or FM radio wave reception is weak in your area, follow the procedure below to preset radio stations manually.
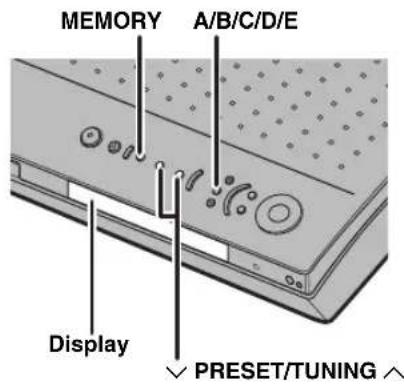
1 Tune the radio station you want to preset.
For details, refer to "Tuning Radio Stations" (page 48).
2 Press MEMORY.
"MEMORY" blinks in the CinemaStation display for about five seconds.
3 Press A/B/C/D/E to select the preset group (A to E) to where you want to store the currently selected station.
Make sure the colon (: ) appears in the CinemaStation display.
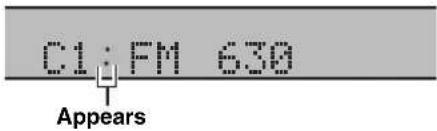
4 Press PRESET/TUNING to select the preset number (1 to 8) to where you want to store the currently selected station.
5 Press MEMORY.
The CinemaStation applies the selected preset group and number to the station.
中
- When presetting a radio station, the CinemaStation automatically sets the reception mode (stereo or monaural) at the same time.
- If you select a preset number that has been already applied to other station, it will be replaced with the new station.
- If the MEMORY indicator stops blinking before you perform step 3 above, Auto Preset is cancelled and you must start the procedure again.
Changing the order of preset radio stations
Follow the procedure below to change the order of preset radio stations. In this procedure, we switch the radio stations preset to E1 and A5 for example.

1 Select the radio station preset to E1.
For details, refer to "Selecting preset radio stations (Precset Tuning)" (page 49).
2 Press and hold PRESET/BAND for about three seconds.
"E1" and "MEMORY" blink in the CinemaStation display.
3 While MEMORY is blinking, press A/B/C/D/E to select the preset group "A", then press PRESET/TUNING to select the preset number "5".
"A5" and "MEMORY" blink in the CinemaStation display.
4 Press PRESET/BAND.
"EDIT E1-A5" appears in the CinemaStation display and the order of the stations changes.
#
- If the MEMORY indicator stops blinking before you perform step 3 above, Auto Preset is cancelled and you must start the procedure again.
- If the MEMORY indicator stops blinking before you perform step 3 above, Auto Preset is cancelled and you must start the procedure again.
Playing Back External Sources
If you connect an external AV component to CinemaStation, you can enjoy AV sources played back on that component with CinemaStation. For details on connection methods, refer to "Connecting External AV Components" (pages 14 to 17). Also, you can operate the component using the CinemaStation remote control by setting a remote control code (page 72).
Note
Make sure you read the owner's manual for your external AV component before making any connections or operating it.
TV playback
If you connect the VIDEO IN L/R (AUDIO) jacks on the CinemaStation to the audio output L/R jacks on your TV using an audio pin cable (page 12), you can enjoy TV sounds with the CinemaStation.
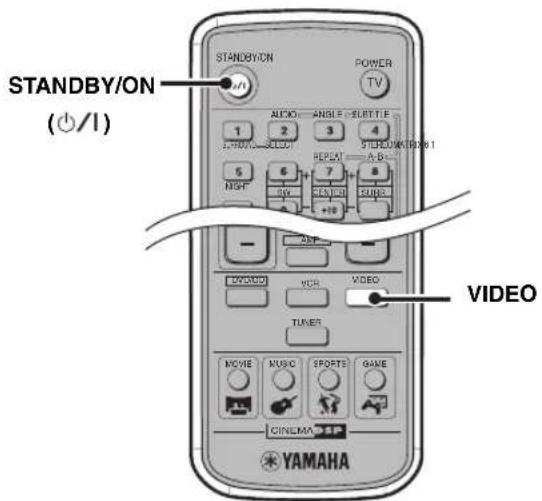
1 Turn on the TV, then press STANDBY/ON ( ) to turn on the CinemaStation.
2 PressVIDEO.
VCR playback
If you connect the VCR IN L/R (AUDIO VIDEO) jacks on the CinemaStation to the audio/video output L/R jacks on your VCR using an audio/video cable (page 15), you can enjoy VCR sounds with the CinemaStation.
Note
When you set the "Input Assign" to "VCR" (page 78) and "Input Mode" to "AUTO" (page 79) in the Set Menu, the CinemaStation outputs the source from the OPTICAL IN jack if any source is input from it. To listen to the source input from the VCR IN jacks, stop playback on the equipment connected to the OPTICAL IN jack.
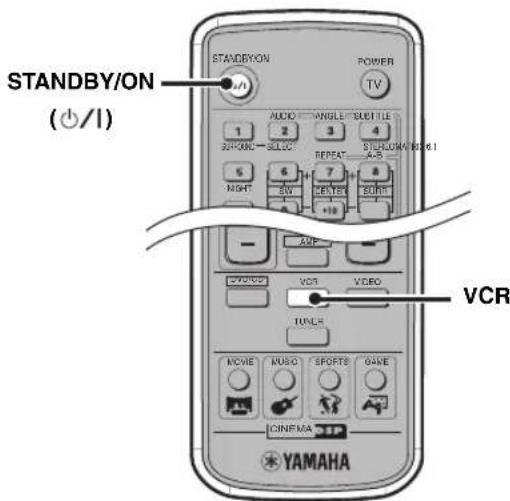
1 Turn on the TV and VCR, then switch the TV input to which the CinemaStation is connected.
2 Press STANDBY/ON () to turn on the CinemaStation.
3 Press VCR.
4 Start playback on the VCR.
Game console playback
If you connect the VIDEO IN L/R (AUDIO/VIDEO) jacks on the CinemaStation to the audio/video output L/R jacks on your game console using an audio/video cable (page 16), you can enjoy game sounds with the CinemaStation.

You can also connect the CinemaStation and a game console with the digital connection (page 16).
Note
When you set the "Input Assign" to "VIDEO" (page 78) and "Input Mode" to "AUTO" (page 79) in the Set Menu, the CinemaStation outputs the source from the OPTICAL IN jack if any source is input from it. To listen to the source input from the VIDEO IN jacks, stop playback on the equipment connected to the OPTICAL IN jack.
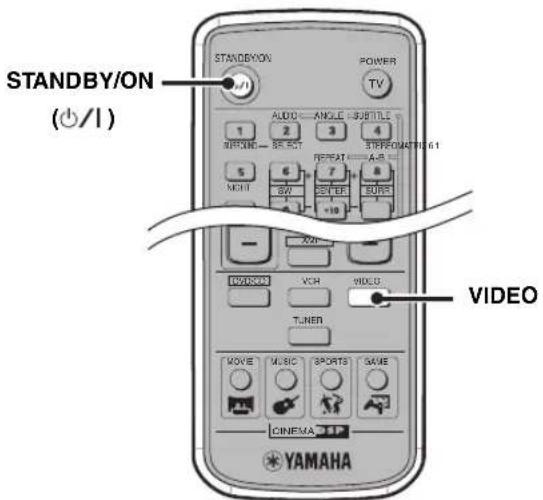
1 Turn on the TV and game console, then switch the TV input to which the CinemaStation is connected.
2 Press STANDBY/ON () to turn on the CinemaStation.
3 PressVIDEO.
4 Start playing a game.
Recording AV Sources With External AV Components
If you connect an external recorder to the CinemaStation, you can record AV sources played back on the CinemaStation or external AV equipment. For details on the connection methods, refer to "Connecting External AV Components" (pages 14 to 17). Also, you can operate those equipment with the CinemaStation remote control by setting the remote control codes (page 72).
Note
Make sure you read the manuals for your equipment to operate them.
Recording audio sources with CinemaStation
If you connect the OPTICAL OUT (DIGITAL AUDIO) jack on the CinemaStation to the optical digital input jack on an external recorder such as a CD recorder or MD recorder using optical cables (page 17), you can record audio sources from the CinemaStation.
Notes
- Radio stations are not output from the OPTICAL OUT jack. To record AM/FM broadcasts, use a commercially available audio cable to connect the VCR OUT jack on the CinemaStation to the analog input jack on your recorder.
- Be sure to perform a test recording before an actual recording.
- Sound field effects on the CinemaStation cannot be recorded with external recorders.
- Turning off the external recorder connected to the CinemaStation may distort playback sounds or reduce the volume. In this case, turn on external recorder.
-
The volume level, audio quality, and sound field effect settings have no effect on the recorded sound during recording. However, in the DVD/CD mode, the output sound for recording may cut off if any of the operations below are performed.
-
Output a test tone.
- Change a DSP program.
-
Connect/disconnect the headphones.
-
Depending on the recorder, some DTS software audio signals may not record properly.
- The CinemaStation outputs a signal from the DIGITAL IN jack only to the DIGITAL OUT jack. The signal input from the DIGITAL IN jack is not output from the analog output jacks, and the signal input from the analog input jacks is not output from the DIGITAL OUT jacks.
- Audio recordings that you make cannot be used for any purpose other than private enjoyment without the consent of the copyright holder.
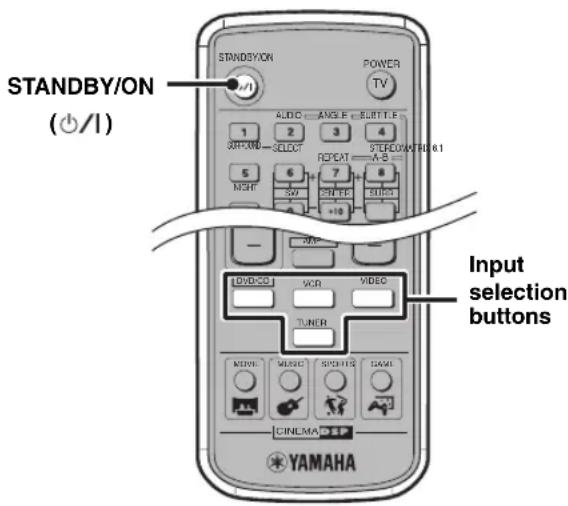
1 Turn on the recorder, then press STANDBY/ON ( ) turn on the CinemaStation.
2 Use the Input selection buttons to select the input source, then start playback.
3 Start recording on the recorder.
■ About timer playback/recording
You can use a commercially available audio timer for playback and recordings. Since available operations vary depending on the product, read the manual for it.
#
- When the CinemaStation is in the standby mode, the timer automatically recalls the CinemaStation's memory contents (e.g. input source, AM/FM frequency) for playback or recording.
- If you want to perform timer recording without hearing sounds, reduce the volume level before timer recording starts. The volume level has no effect on the recorded sound.
Copying video component sources to a video cassette
If you use analog connections to connect a VCR and video component to the CinemaStation (pages 15 to 16), you can copy video component sources to a video cassette on the VCR.
Note
Copying video sources guarded by copy protection may result in picture distortion of the recording due to copy protection signals.

1 Turn on the TV, video component and VCR, then switch the TV input to the input connected to the CinemaStation.
2 Press STANDBY/ON () to turn on the CinemaStation.
3 Press VIDEO.
4 Prepare to record with the VCR.
For example, insert a video cassette into the VCR and switch the VCR input to external.
For details on VCR operations, refer to the manual for your VCR.
5 Start playback on the video component and start recording on the VCR.
For details on VCR operations, refer to the manual for your VCR.
Enjoying Sound with Specific Speakers
You can enjoy movies or music with various sound effects produced by the specified speakers.
Enjoying 6.1/5.1ch sources with all speakers including a virtual speaker (Matrix 6.1)
You can use Matrix 6.1 to produce virtual surround back sound from your left and right surround speakers, creating a realistic sense of surround back sound (sound that travels from directly in front of the listening position to directly in back of it). When you play a 6.1ch source such as a Dolby Digital Surround EX or DTS-ES disc, you can enjoy Dolby Digital plus Matrix 6.1 or DTS plus Matrix 6.1 sounds without adjusting any settings. Also, you can enjoy 5.1 channel sources with Matrix 6.1.
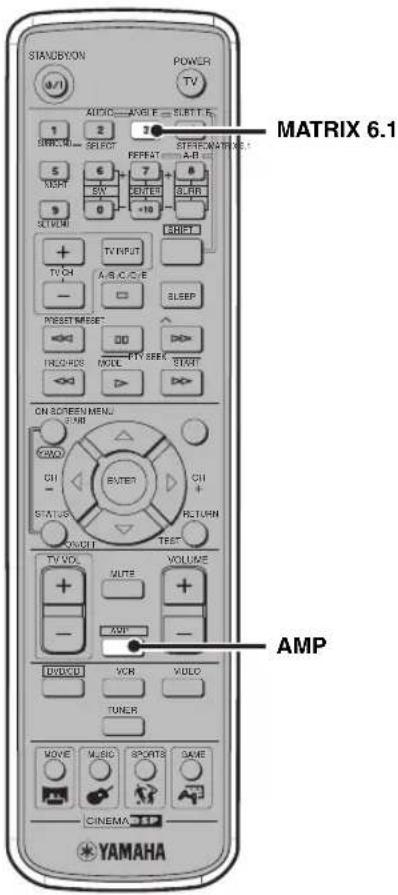
1 Press AMP.
2 Press MATRIX 6.1 to select the mode.
Each time you press the button, the mode changes as follows:
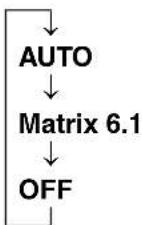
- AUTO
When playing back a 6.1 channel source (Dolby Digital Surround EX or DTS-ES), the sound is automatically switched either to Dolby Digital plus Matrix 6.1 or DTS plus Matrix 6.1 audio. If you play a 5.1 channel source with this mode, a virtual surround back speaker is not created.
- Matrix 6.1
Select this mode to play a 5.1 channel source with Matrix 6.1. Sound outputs from a virtual surround back speaker.
OFF
The Matrix 6.1 decoder is not enabled. Even if you play a Dolby Digital Surround EX or DTS-ES disc, no sound outputs from the virtual surround back speaker.
中
When the Matrix 6.1 decoder is working, "MATRIX" lights up in the CinemaStation display and "6.1" appears beside the DSP program name (e.g., "Action 6.1").
Notes
- Some Dolby Digital Surround EX or DTS-ES discs do not contain a signal (flag) that CinemaStation cannot recognize automatically. To play this type of disc with 6.1ch sound, press MATRIX 6.1 to select "Matrix 6.1".
- Turning on the CinemaStation automatically sets the parameter to "AUTO".
- In the following cases, 6.1ch sound playback is not available.
- "SUR." is set to "NON" in the Set Menu (page 77).
- Stereo playback is selected (no sound field effect) (page 63).
- Headphones are connected to the SILENT CINEMA jack on the CinemaStation.
- A Dolby Digital KARAOKE source is being played.
- The DSP program is set to "5ch Stereo" (page 26).
-Dolby Digital or DTS is set to "SUR.STANDARD" (page 62).
Enjoying 2ch sources with all speakers (Dolby Pro Logic II)
Dolby Pro Logic II converts a 2ch source into virtual multi-channel source for enjoying 2ch sounds with all speakers.
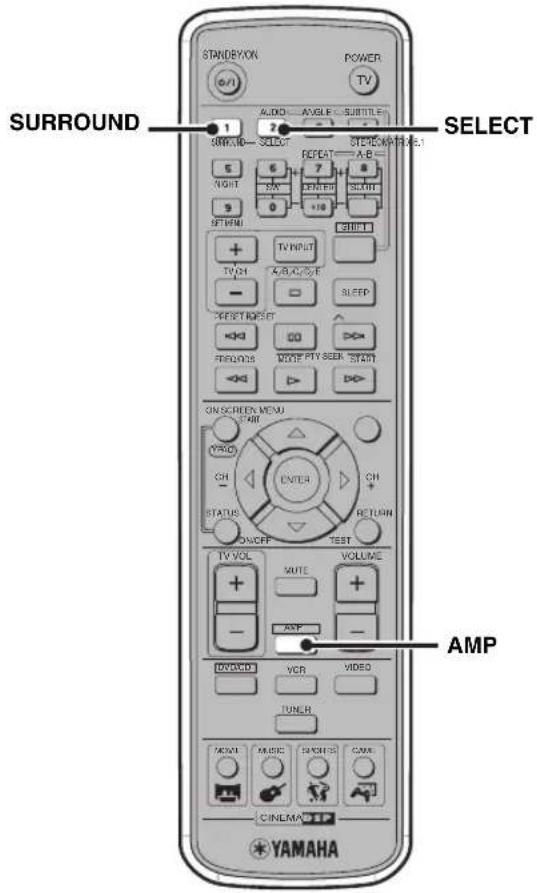
1 Play the 2ch source (e.g. music) you want to listen to.
2 Press AMP.
3 Press SURROUND.
4 Press SELECT to select "PL II".
5 Press SURROUND to select "PL II" mode.
Each time you press the button, the mode changes as follows:
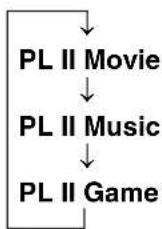
- PL II Movie: Suited for movie audio sources.
- PL II Music: Suited for music audio sources.
- PL II Game: Suited for game audio sources.

- You can also switch the mode by pressing the DSP buttons on the CinemaStation.
- You can make detailed settings for PL II Music. For details, refer to "Configuring Dolby Pro Logic II Music Settings" (page 67).
Note
When a monaural source is being played, Dolby Pro Logic II is not available.
Enjoying DSP programs with the front speakers only (Virtual CINEMA DSP)
Since Virtual CINEMA DSP processes an audio input source to reproduce virtual surround speakers, you can enjoy DSP program only with the front speakers.
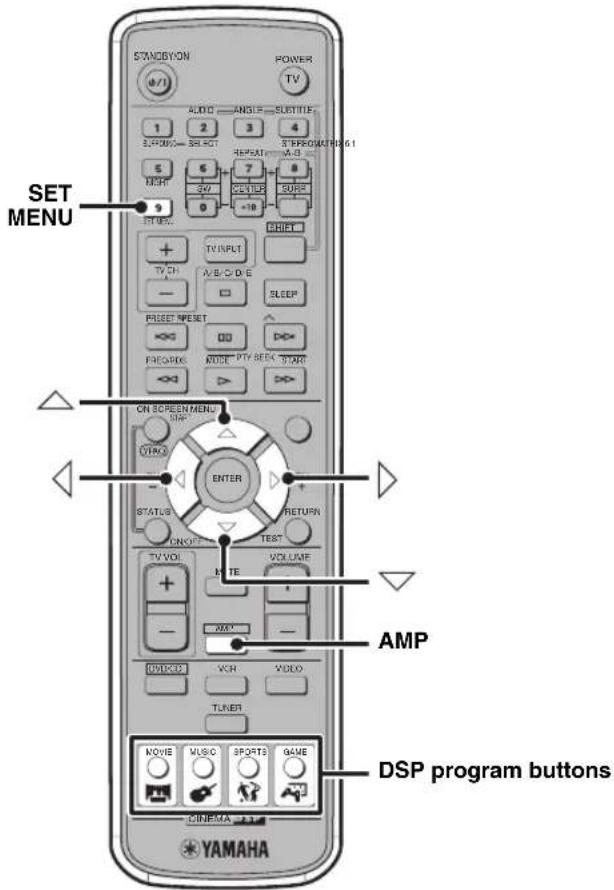
1 Play the source you want to listen to.
2 Press AMP.
3 Press the DSP program button to select the DSP program you want to use.
For details, refer to "Enjoying Sound Field Programs (DSP Programs)" (page 26).
4 Set "SUR" to "NON" in the Set Menu.
For details, refer to "Configuring Various Parameters (Set Menu)" (page 75).
中
When Virtual CINEMA DSP is activated, "VIRTUAL" lights up in the CinemaStation display.
Note
Virtual CINEMA DSP playback is not available in the following cases.
- During stereo playback (no sound field effects are applied).
- When headphones are connected to the SILENT CINEMA jack on the CinemaStation.
- When a Dolby Digital KARAOKE source is being played.
- When the DSP program is set to "5ch Stereo", "PRO LOGIC", "SUR. STANDARD", "PLII Movie", "PLII Music", or "PL II Game".
While test tones are being output.
Enjoying DSP Programs in a Variety of Ways
You can enjoy the presence of sound effects with DSP programs even when you use headphones or reduce the volume level.
Listening with headphones ("SILENT CINEMA")
"Silent CinEMA" allows you to enjoy multi-speaker simulation sounds with headphones.
* "SILENT CINEMA" is a registered trademark of YAMAHA CORPORATION.
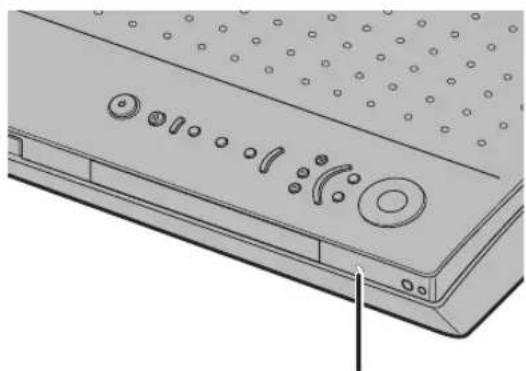
SILENT CINEMA jack
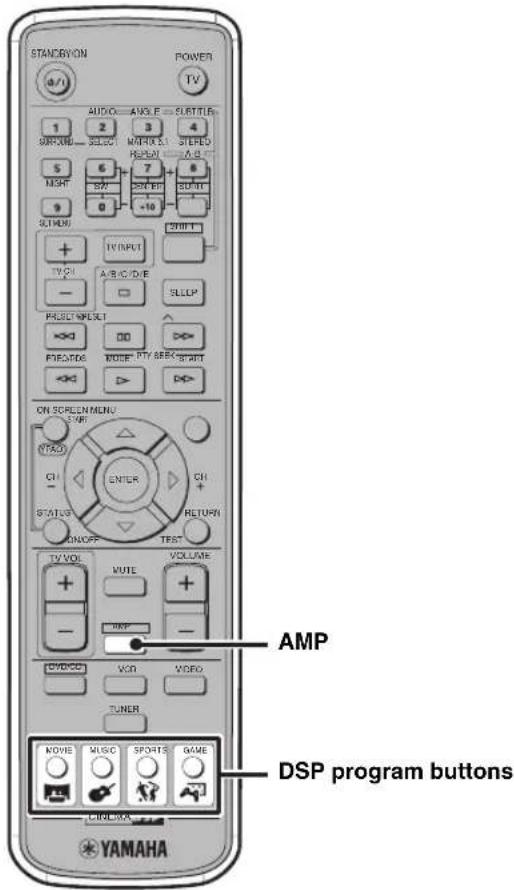
1 Connect the headphones to the SILENT CINEMA jack on the CinemaStation.
2 Play the source you want to listen to.
3 Press AMP.
4 Press a DSP program button to select the DSP program you want to use.
For details, refer to "Enjoying Sound Field Programs (DSP Programs)" (page 26).
- When "SILENT CINEMA" is activated, the SILENT CINEMA indicator lights up in the CinemaStation display.
- The CinemaStation mixes LFE channel audio and other channel audio.
- If you do not select a DSP program, the headphone produces normal stereo sound (see "Enjoying original Dolby and DTS sounds" on page 62).
- When headphones are connected to the SILENT CINEMA jack on the CinemaStation, sound does not output from any speaker regardless of whether sound field effect is on or off.
Listening at low volume (Night Listening)
Since Night Listening tones down large sound effect and clears speech or vocal sounds, you can enjoy DSP programs even at low volume.
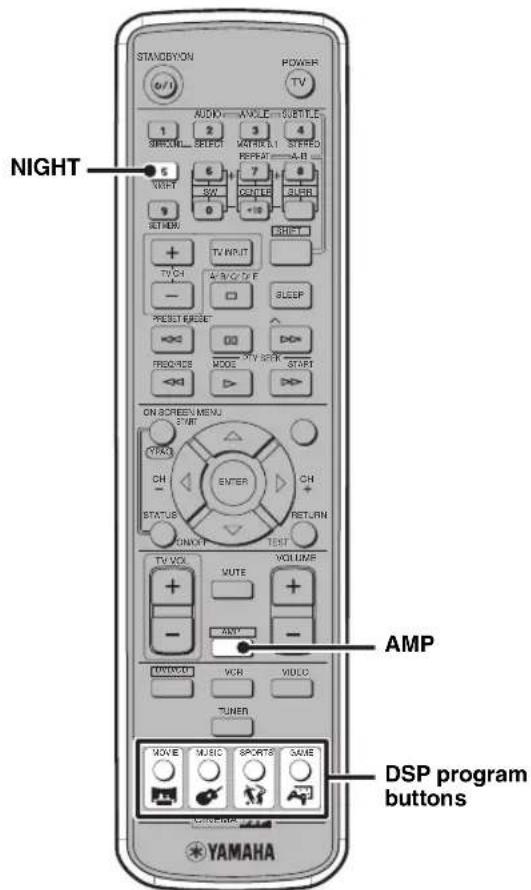
1 Play the source you want to listen to.
2 Press AMP.
3 Press a DSP program button to select the DSP program you want to use.
For details, refer to "Enjoying Sound Field Programs (DSP Programs)" (page 26).
4 Press NIGHT.
When Night Listening is working, "Night L. ON" appears in the CinemaStation display.
To return to normal playback
Press NIGHT again.
Night L. OFF appears in the CinemaStation display.
Note
When headphones are connected to the SILENT CINEMA jack on the CinemaStation, Night Listening is not available.
Enjoying High-Quality Sound
You can play back Dolby, DTS, and 2ch sources true to the original sound.
Enjoying original Dolby and DTS sounds
You can play back original sounds processed with Dolby Digital, Dolby Pro Logic or DTS.
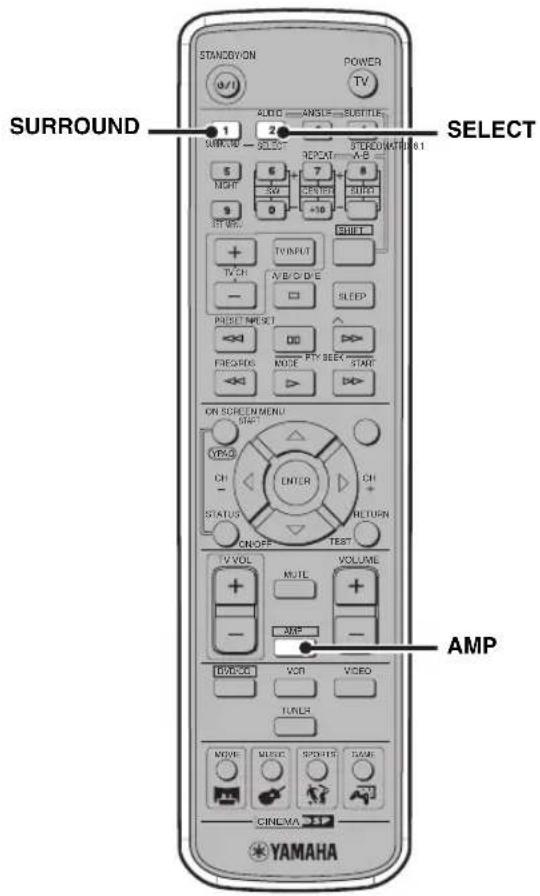
1 Play the source you want to listen to.
2 Press AMP.
3 When playing a 2ch source, press SURROUND, then press SELECT to select "PRO LOGIC". When playing a source other than a 2ch source, press SURROUND.
The CinemaStation automatically selects one of the following modes depending on the input source.
- Dolby Digital: "PRO LOGIC" appears and DIGITAL lights up in the CinemaStation display.
- DTS: "SUR. STANDARD" appears and lights up in the CinemaStation display.
Enjoying original 2ch sound (Stereo)
You can play back original stereo sounds such as music CDs with the front speakers.
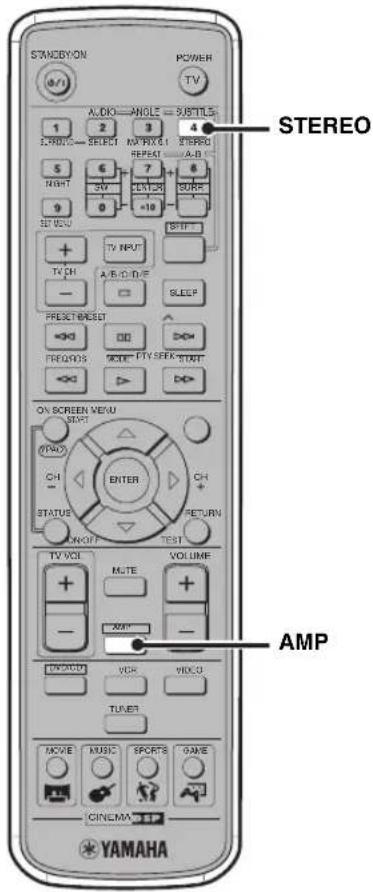
1 Play the 2ch source you want to listen to.
2 Press AMP.
3 Press STEREO.
The sound field effect turns off and Stereo playback starts.
If Stereo is activated, "STEREO" appears in the CinemaStation display.
To turn off Stereo playback (turn on the sound field effect)
Press STEREO again.
中
- Either front speakers or subwoofer produce(s) LFE channel sounds depending on the "BASS" setting in the Set Menu (page 77).
- If "BASS" is set to "BOTH" or "FRONT" is set to "SML" in the Set Menu (page 77), the subwoofer produces low tones.
Notes
- If Stereo playback is selected (no sound field effect), either center speaker or surround speakers produce(s) no sound.
- If Stereo playback is selected (no sound field effect) and "D. Range" is set to "MIN" in the Set Menu (page 78), the volume may become very low. In this case, turn off Stereo playback.
- If you play a Dolby Digital or DTS sound when Stereo playback is selected (no sound field effect), the volume balance of the front speakers may be disturbed because the compressed dynamic range mixes the front speaker's channel sounds. In this case, turn off Stereo playback.
Adjusting the Speaker Balance During Playback
The speaker settings configured by YPAO (page 21) are suitable for most conditions. However, depending on room conditions or listening position, you may need to adjust the speaker balance manually. This adjustment is important because it brings out the maximum effect of the DSP program, and faithfully reproduces the acoustic characteristics of Dolby Pro Logic, Dolby Pro Logic II, Dolby Digital and DTS. You can adjust the speaker balance using test tones or playback source.
中
Since the following procedures base on the volume level of the front speakers, you cannot adjust the front speaker's L/R balance with these procedures. To adjust the L/R balance of the front speakers, refer to "Configuring Various Parameters (Set Menu)" (page 75).
Notes
- Disconnect the headphones from the SILENT CINEMA jack on the CinemaStation before starting the setup procedure.
- Adjust the speaker balance at your listening position with the remote control.
Adjusting the speaker balance with test tones
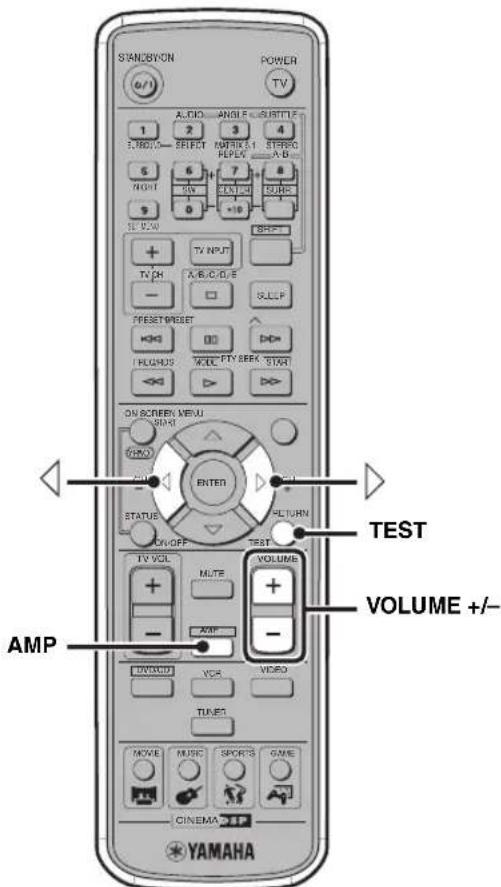
1 Press AMP.
2 Press TEST.
The CinemaStation starts to output test tones.
3 While a test tone is output from the front left speaker, press VOLUME + / - to adjust the volume to appropriate level.
4 While a test tone is output from the speaker you want to adjust, press or to adjust it to the same volume level as the front left speaker.
The name of the speaker currently outputting a test tone appears in the CinemaStation display. Test tones are output in the following order:
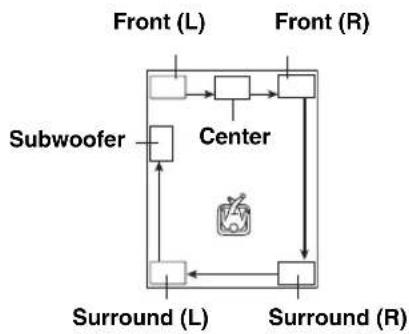
5 When you finished the adjustment, press TEST.

The volume level adjustment range is -10 to +10dB
- If you raise the volume level of the center and/or surround L/R speakers to +10 dB and this is still less than the front speaker, set "F. Level" to -10 dB in the Set Menu (page 77) and carry out this procedure again.
Notes
- If "CENTER" is set to "NON" in the Set Menu (page 77), you cannot adjust the center speaker volume.
- If "SUR." is set to "NON" in the Set Menu (page 77), you cannot adjust the surround speaker volume.
- If "BASS" is set to "FRONT" in the Set Menu (page 77), you cannot adjust the subwoofer volume.
- The test tone output from the subwoofer is different from the others, but this is not a defect.
Adjusting the speaker balance during playback
If you feel the speaker balance is not proper during audio playback, follow the procedure below.
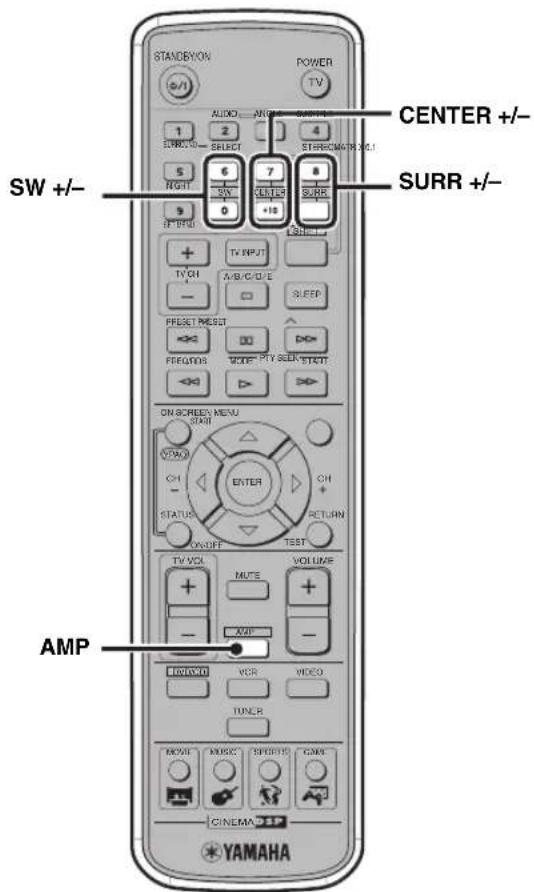
1 Press AMP.
2 Adjust the volume level of each speaker.
To adjust the center speaker volume, press CENTER + / -
To adjust the surround speaker volume, press SURR +/-
To adjust the subwoofer volume, press SW +/-
中
- We recommend that you first adjust the speaker balance with test tones. For details, refer to "Adjusting the speaker balance with test tones" (page 64).
The volume level adjustment range is -10 to +10dB - You cannot adjust the left and right surround speakers individually with this procedure. To adjust them individually, carry out the "Adjusting the speaker balance with test tones" procedure (page 64).
- If you set one of the surround speakers to max (+10dB) or min level (-10dB) , you cannot raise or reduce the volume level of another surround speaker with this procedure.
Notes
- If "CENTER" is set to "NON" in the Set Menu (page 77), you cannot adjust the center speaker volume.
- If "SUR." is set to "NON" in the Set Menu (page 77), you cannot adjust the surround speaker volume.
- If "BASS" is set to "FRONT" in the Set Menu (page 77), you cannot adjust the subwoofer volume.
To adjust the speaker balance for 5ch Stereo DSP programs
You can adjust the speaker balance applied to "5ch Stereo" DSP programs.
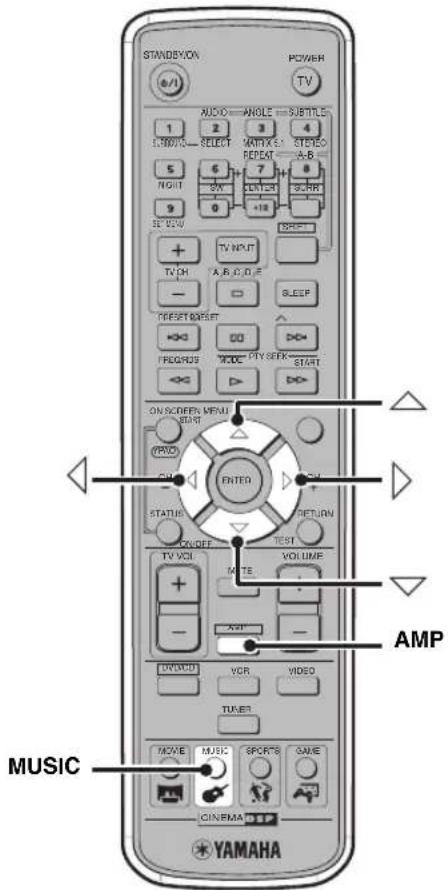
1 Play a source.
2 Press AMP.
3 Press MUSIC to select "5ch Stereo".
For details, refer to "Enjoying Sound Field Programs (DSP Programs)" (page 26).
4 Press or to select the speaker of which you want to adjust the volume level.
Each time you press the button, the speaker changes as follows:
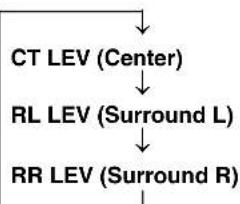
5 Press on to adjust the speaker volume level.
Specify the speaker volume level (e.g. 100: Max., 50: Half, 0: Min.). The factory setting is 100.
Notes
- The volume level adjusted with this procedure replaces the volume adjusted with the CENTER button, SURR button or test tones while using "5ch Stereo" DSP programs. Although the CinemaStation display does not show the change in level, the actual volume level changes according to the settings you made in step 5 you specified.
- If "CENTER" is set to "NON" in the Set Menu (page 77), you cannot adjust the center speaker volume.
- If "SUR." is set to "NON" in the Set Menu (page 77), you cannot adjust the surround speaker volume.
Configuring Dolby Pro Logic II Music Settings
You can configure the parameters for Dolby Pro Logic II Music to fine-tune the sound field effect.
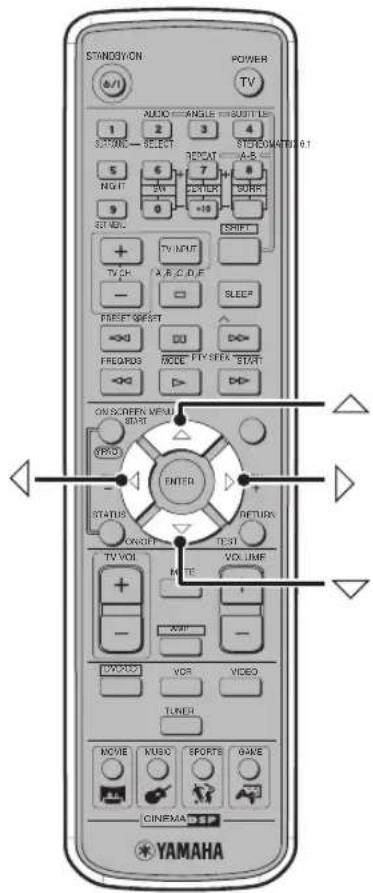
1 Carry out the "Enjoying 2ch sources with all speakers (Dolby Pro Logic II)" procedure (page 58) and select "PL II Music".
2 Press or to select "PANorama", "DIM." or "CT WIDTH".
For details on each parameter, refer to "About the Dolby Pro Logic II Music parameters" below.
3 Press or to configure the parameter.
4 To configure other parameters, repeat steps 2 and 3.
■ About the Dolby Pro Logic II Music parameters
PANorama
Gives front L/R channel sound a wraparound effect, distributed throughout the entire surround sound field, for an expansive feeling.
Function: Expands the front sound field of Dolby Pro Logic II.
Selection item: OFF/ON
Default setting: OFF
DIM. (Dimension)
Adjusts the difference in volume between front and surround channels to the volume balance you desire.
Function: Adjusts the difference between front surround sound field and surround volume.
Variable range: -3 (stronger toward the surround direction) to +3 (stronger toward the front direction)
Default setting: STD (Standard)
CTWIDTH
Distributes the center channel sound to the left and right.
Function: Expands audio from the front sound field to the left and right.
Variable range: 0 to 7
If set to 0 center channel sound will only output from the center speaker. As the value rises center channel sound is incrementally distributed to the L/R speakers. When set to 7, sound will only output from the L/R speakers.
Default setting: 3
DSP Program Delay Time Settings
Each DSP program is designed to draw out the maximum effect from the source audio. The CinemaStation provides the DSP programs with optimum value of parameters including reflected sound, reverberant sound and delay time. Among these parameters, you can change the delay time to match to your speaker positions. Delay time is the time gap in playback between front speaker audio and surround speaker audio. The bigger the value becomes the later the surround audio plays back, and the larger the sound space feels. Since delay time is preset at an optimum value for each DSP program, the default value (page 69) will work well for your listening enjoyment. However, depending on the audio source or listening environment, you can adjust each DSP program the way you like.
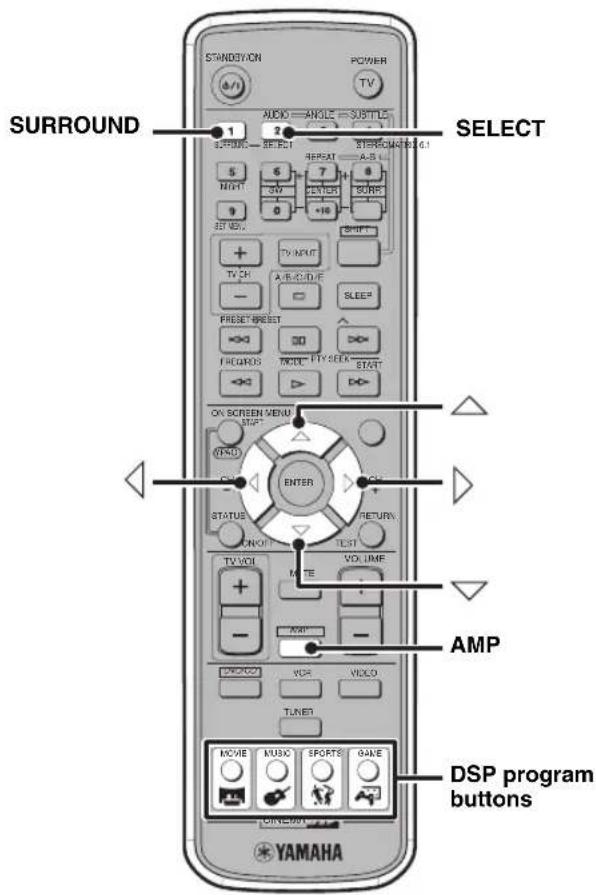
1 Play a source.
2 Press AMP.
3 Select the DSP program for which you want to adjust the delay time.
To select a Movie, Music, Sports, or Game DSP program, press the corresponding DSP program button (MOVIE, MUSIC, SPORTS or GAME). To select Dolby Digital or DTS, press SURROUND. To select Dolby Pro Logic (PRO LOGIC), press SURROUND, then press SELECT to select "PRO LOGIC". To select Dolby Pro Logic II, press SURROUND, press SELECT to select "PL II", then press SURROUND to select the PL II mode (Movie, Music, or Game).
4 Press or
"DELAY" appears in the CinemaStation display.
5 Press or to adjust the delay time of the selected DSP program.
- You can also adjust the delay time of Matrix 6.1.
- With "SP Distance" in the Set Menu (page 78), you can adjust the delay time of the center speaker.
Notes
- Depending on the input source, unnatural sound effects may be produced if you raise the delay time too much. In this case, reduce the delay time.
While adjusting the delay time, you hear no sound temporarily.
■ Program default settings
| Program Group | Program Name | Default Setting (ms) | |
| MOVIE 1 Action* 20 | Action 6.1** 15 | ||
| 2 | D r a m | a * 2 | |
| Drama 6.1** 15 | |||
| 3 | S c i - F | i * 2 | |
| Sci-Fi 6.1** 15 | |||
| 4 Spectacle* 23 | |||
| Spectacle 6.1** 15 | |||
| 5 Theater* 20 | |||
| Theater 6.1** 5 | |||
| MUSIC | 1 Music Video | 21 | |
| 2 Classic Hall | 30 | ||
| 3 Jazz Club | 30 | ||
| 4 Rock Concert | 15 | ||
| SPORTS | 1 Live Sports | 10 | |
| GAME | 1 Game | 36 | |
| Program Name | Default Setting (ms) |
| PRO LOGIC* (Dolby Pro Logic) | 10 |
| SUR. STANDARD** (Dolby Digital, DTS) | 0 |
| PL II Movie* (Dolby Pro Logic II Movie) | 10 |
| PL II Music* (Dolby Pro Logic II Music) | 0 |
| PL II Game* (Dolby Pro Logic II Game) | 10 |
- 2ch source
Multi-channel source
Items without an asterisk (^* / ^) appearing next to them can be either 2ch or multi-channel sources.
Configuring the Audio Input Signal Setting
You can play back most audio sources without a problem with the factory audio input signal setting (AUTO). However, depending on your needs, you can configure the audio input mode to specify an input signal type that can be used on the CinemaStation. Also, you can check the type of the audio signal currently input into the CinemaStation (page 71) with the CinemaStation display.
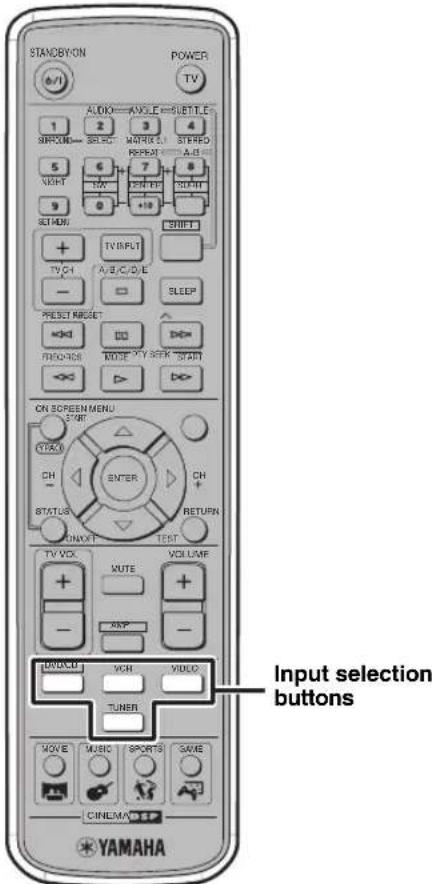
1 Press and hold the Input selection button for the current input source until the input mode you want to select appears in the CinemaStation display.
While holding down the button, the input mode changes as follows:
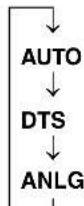
AUTO: Plays a source according digital signals priority over analog signals.
DTS: Plays only DTS signals.
ANLG: Plays only analog signals.

- You can also switch input modes for the currently selected input by pressing and holding INPUT on the CinemaStation.
- If a Dolby Digital or DTS signal is input while the input mode is set to "AUTO", the CinemaStation automatically select the most suitable decoder for the signal.
- With "Input Mode" in the Set Menu (page 79), you can set the mode that the CinemaStation automatically selects when it is turned on.
Notes
- You cannot set "ANLG" for the DVD/CD input selection button.
- You cannot switch input mode for the button if no external AV equipment is connected to the corresponding input jacks.
To play back a DTS signal, be sure to set the input mode to "AUTO" or "DTS". Setting the mode to "ANLG" may produce noises or no sounds.
The following conditions may happen if a DTS signal is input while the input mode is set to "AUTO". - If the CinemaStation detects a DTS signal, it automatically switches to DTS mode (dt's lights up). Once DTS audio playback finishes, the dt's blinks for a while. While it is blinking, you cannot play back audio source other than DTS signals. If you want to play normal PCM audio soon after DTS playback, set the input mode to "AUTO" again.
- If the DTS signal is interrupted when you perform Search or Skip, the dts may blink. If this condition continues for over 30 seconds, the Input mode automatically changes from DTS to normal digital (PCM) and the dts goes out.
Checking the Audio Input Signal Type
You can check the information on the audio input signal currently played back on the CinemaStation.
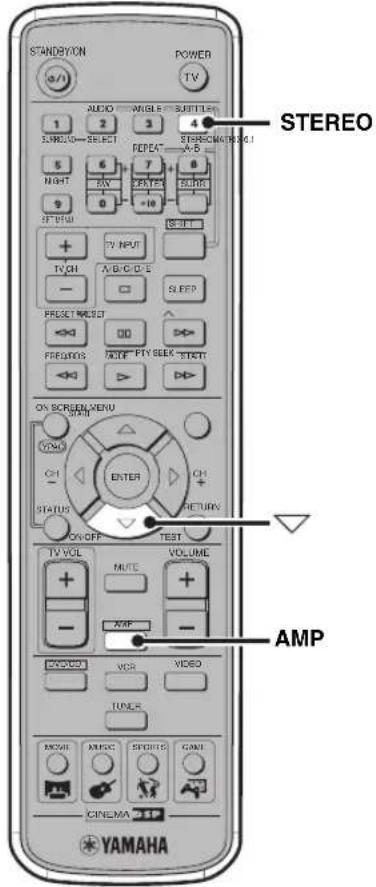
1 Play the source of which you want to check the audio input signal type.
2 Press AMP.
3 Press STEREO
Stereo playback starts.
4 Press

Audio input signal information appears on the
CinemaStation display.
Each time you press the button, information changes
depending on the input source.
Audio input signal type
Shows the format of the audio signal. When the digital audio input cannot be recognized, the mode is automatically set to analog audio input.
Audio channels (only for Dolby Digital and DTS)
Shows the number of audio channels the input signal contains. For example, "in: 3/2/LFE"
indicates 3 front channels, 2 surround channels, and LFE. "1+1" indicates main/sub audio in bilingual broadcasts or other 2-channel audio, and MLT indicates audio with 3 channels or more.
- Frequency (fs) (only for digital signals)
Shows the frequency sampling of the input signal. If the sampling frequency cannot be measured, "unknown" appears.
- Bit rate (rate) (only for Dolby Digital and DTS)
Shows the amount of data the input signal contains per second. If the bit rate cannot be measured, "unknown" appears.
- Flag (flg) (only for Dolby Digital and DTS)
Shows the recognition signal (flag) the input signal contains. If the flag cannot be recognized, "None" appears.
■ About digital signals that exceed 48 kHz
CinemaStation's digital input jack supports a sampling frequency up to 96kHz . Before connecting an AV equipment to the digital input jack, read the manual for it to check the sampling frequency. Also, be sure to the following notes when inputting a digital signal that exceeds 48kHz .
- DSP Programs are not selectable. You can only listen to normal 2ch stereo from the front speakers.
- During playback, you cannot adjust the volume level of center and surround L/R speakers.
- Depending on the "Setting speaker sizes (Speaker Set)" settings in the Set Menu (page 77), the Subwoofer may output sound.
Controlling External Components
In addition to controlling this unit, you can operate your TV, VCR, CD recorder or MD recorder with the CinemaStation remote control by selecting the appropriate remote control code (refer to "LIST OF REMOTE CONTROL CODES" at the end of this manual).
Note
Depending on the product, the CinemaStation remote control may not be able to operate the external component. In this case, use the remote control supplied with the product.
Setting remote control codes
The TV button selects a remote control code for a TV. The VCR button selects a remote control code for a VCR, CD recorder, or MD recorder.
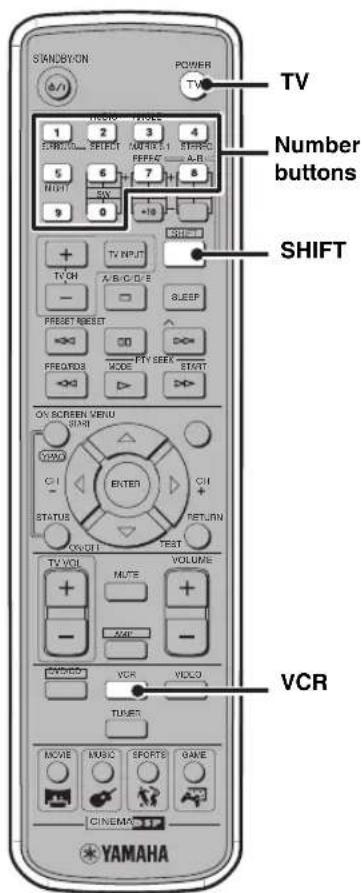
1 While holding down SHIFT, press TV or VCR, then while still holding down SHIFT, press the number buttons to enter the three-digit remote control code (refer to "LIST OF REMOTE CONTROL CODES" at the end of this manual) for the manufacturer of your component.
If the setting is successful, the message "Code Set OK" appears in the CinemaStation display. If the setting fails, the message "Code Set NG" appears. In this case, perform this step again. The factory settings are "299" (YAMAHA TV) for TV and "399" (YAMAHA VCR) for VCR.
2 Refer to "Available operations" (page 73) and try one of the button operations for your component to check that the setting is working properly.
If the button operation does not work properly, the remote control code may be incorrect. In this case, perform step 1 again.
Notes
- Even if you set a remote control code, it will be cleared about two minutes after the remote control batteries ran out. In this case, store remote control codes again after replacing the batteries. (Be careful not to press the remote control buttons while replacing the batteries. Doing so may clear the settings.)
- Depending on the product, the CinemaStation remote control may not be able to operate the external component. In this case, use the remote control supplied with the product.
- If the manufacturer of your component has more than one code, try each of them until you find the correct one.
Available operations
By carrying out step 1 in "Setting remote control codes" (page 72), you can operate the following functions on your external component using the CinemaStation remote control.
TV operations
Press TV (POWER) for TV operations.
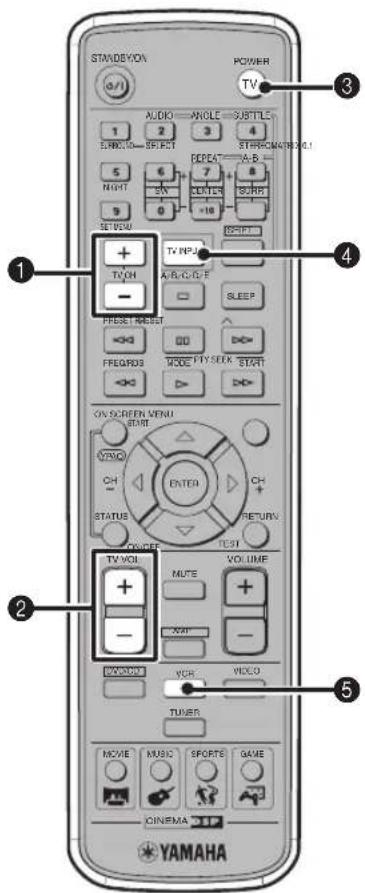
Functions for TV operation
1TV CH +/-
Switches the TV channels.
2TV VOLUME + / -
Adjusts the TV volume level.
3TV (POWER)
Turn the TV on, or set it to the standby mode.
4TV INPUT
Switches the TV inputs.
5VCR
Sets the remote control to the VCR, CD recorder, or MD recorder operation mode.
VCR operations
Press VCR for VCR operations.
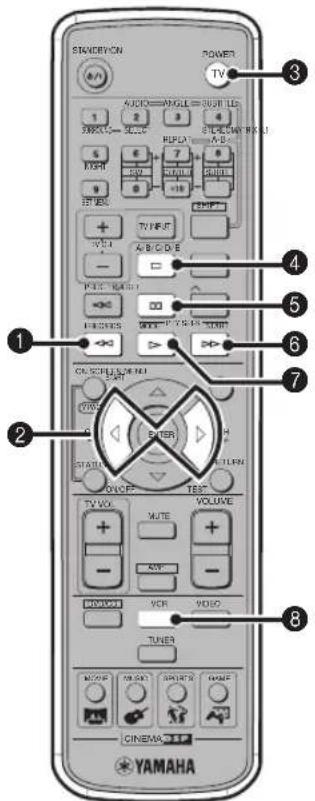
CD recorder and MD recorder operations
Press VCR for CD recorder or MD recorder operations.
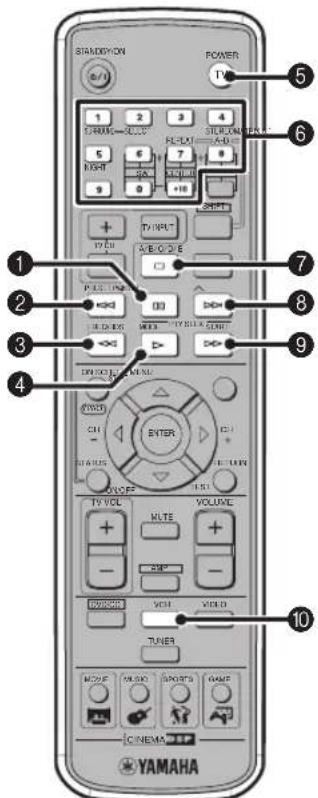
Functions for VCR operation
0
Rewinds.
2/CH-/CH+)
Switches the video channels.
3TV (POWER)
Sets the remote control to the TV operation mode.
4
Stops video playback.
50
Pauses video playback.
6
Fast forwards.
7
Starts video playback.
8VCR
Sets the remote control to the VCR, CD recorder, or MD recorder operation mode.
Functions for CD recorder and MD recorder operation
10
Pauses disc playback.
2
Skips to the start of the current track.
3
Reverses.
4
Starts disc playback.
5TV (POWER)
Sets the remote control to the TV operation mode.
Number buttons (1 to 9, 0, +10)
Inputs numerals to specify parameters such as track numbers or elapsed time.
7
Stops disc playback.
8
Skipping to the start of the next track.
9
Fast forwards.
VCR
Sets the remote control to the VCR, CD recorder, or MD recorder operation mode.
Configuring Various Parameters (Set Menu)
In the Set Menu, you can configure various parameters for your CinemaStation system. In most cases, you can enjoy AV sources on the CinemaStation with the default settings. However, depending on the speakers or listening environment, you need to configure parameters for your system.
Set Menu list
You can configure the following parameters by carrying out the "Operating the Set Menu" procedure (page 76).
| Main menu Submenu Default setting | ||
| Speaker Set (page 77) CENTER SML | ||
| FRONT SML | ||
| SUR. SML | ||
| BASS SWFR | ||
| F. Level Nm | ||
| LFE Level (page 78) SP LFE 0 dB | ||
| HP LFE 0 dB | ||
| SP Distance (page 78) UNIT | U.S.A. and Canada: feet (ft)Other models: meters (m) | |
| FRONT L | 10 ft3.0 m | |
| FRONT R | 10 ft3.0 m | |
| CENTER 10 ft | 3.0 m | |
| SURR L | 10 ft3.0 m | |
| SURR R | 10 ft3.0 m | |
| SWFR | 10 ft3.0 m | |
| D. Range (page 78) | SP D.R | MAX |
| HP D.R MAX | ||
| L/R Balance (page 78) | - | Center |
| Input Assign (page 78) | - | VIDEO |
| Input Mode (page 79) MODE | AUTO | |
| Display set (page 79) | DIMMER | 0 |
| Tuner Step (page 79)(Asia, Korea, China and General models only) | - | AM9/FM50 |
Operating the Set Menu
Follow the procedure below to operate the Set Menu to configure parameters. For details on menu items and parameters, refer to pages 77 to 79.
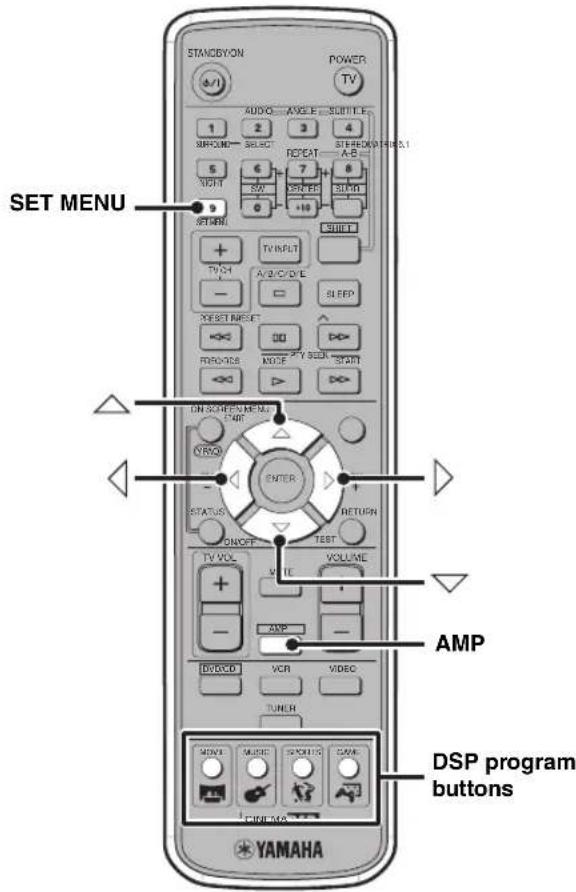
1 Press AMP, then press SET MENU.
2 Press or to select a main menu item in the CinemaStation display, then press or.
3 If the selected menu item contains two or more submenu items, press to select a submenu item in the CinemaStation display, then press Otherwise, skip this step. The current setting appear in the CinemaStation display.
4 Press or to change the setting.
5 To exit the Set Menu, press SET MENU or one of the DSP program buttons.
Setting speaker sizes (Speaker Set)
Submenu:CENTER
Sets whether the center speaker is present or not, and sets the size of the center speaker.
Selection items: LRG (Large), SML (Small), NON (None)
Default setting: SML
LRG: Select this setting when using a large center speaker. The entire frequency band of the center channel signal is output as it is from the center speaker.
SML: Select this setting when using a small center speaker. A center channel signal with a low tone is output from the speaker set to "BASS".
NON: Select this setting when not using a center speaker. The center channel signal distributes the same volume level to the front L/R speakers.
Submenu:FRONT
Sets the size of the front speakers.
Selection items: LRG (Large), SML (Small)
Default setting: SML
LRG: Select this setting when using large front speakers. The entire frequency band of the front L/R channel signal is output as it is from the front L/R speakers.
SML: Select this setting when using small front Speakers. A front L/R channel signal with a low tone of is output from the speaker set to "BASS".
Submenu: SUR.
Sets whether the surround L/R speakers are present or not, and sets the size of the surround L/R speakers.
Selection items: LRG (Large), SML (Small), NON (None)
Default setting: SML
LRG: Select this setting when using large surround L/R speakers or when using surround L/R Speakers with surround subwoofoers connected by speaker cables. The entire frequency band of the surround L/R channel signal is output as it is from the surround speakers.
SML: Select this setting when using small surround L/R speakers. A surround L/R channel signal with a low tone is output from the speaker set to "BASS".
NON: Select this setting when not using surround L/R speakers. The surround L/R channel signal distributes the same volume level to the front L/R speakers (page 59).
Submenu: BASS
Selects the speaker to output a LFE/bass (low tone) signal. LFE stands for Low Frequency Effect and it is used to output bands of 90Hz and below when Dolby Digital or DTS is active.
Selection items: SWFR (Subwoofer), FRONT, BOTH
Default setting: SWFR
SWFR: Select this setting when using a subwoofer. The LFE and low tone sound from other channels, depending on "CENTER", "FRONT" and "SUR." settings, are output from the subwoofer.
FRONT: Select this setting when not using a subwoofer. The LFE and low tone sound from other channels, depending on "CENTER", "FRONT" and "SUR." settings, are output from the front L/R speakers.
BOTH: Select this item to mix a low tone with a LFE channel when using a subwoofer and independent of the front speaker sound mode setting. The entire frequency band of the front L/R channel is output from both the front L/R speakers and subwoofer. Sounds can be output from the subwoofer during 2ch or Dolby Surround playback.
Submenu: F. Level
Selects the front speaker level. When the front speaker volume level is extremely high and out of alignment with that of other speakers, you can lower the volume level and adjust the balance.
Selection items: Nrm (Normal), -10 dB
Default setting: Nrm
Nrm: Usually this setting is selected.
-10 dB: Use this setting if the output level of the center or surround speakers is out of alignment with the front speakers. The volume level of the front speakers decreases 10 dB (about 1/3).
#
-
Even if "FRONT" is set to "SML" while "BASS" is set to "FRONT", low tones of the front L/R channel signal will be output from the front speakers.
-
If you select any DSP Program when "SUR." is set to "NON", the CinemaStation automatically enters Virtual CINEMA DSP mode (page 59).
-
These settings are not reflected when connecting headphones.
Note
When a sampling digital signal over 48kHz is input, some settings may not be reflected in the playback sound.
Adjusting the playback level of the LFE signal (LFE Level)
You can adjust the LFE channel output level while playing a Dolby Digital or DTS signal. Adjust the LFE level to match the performance of the subwoofer and headphones.
Submenu: SP LFE, HP LFE
Variable range: -20 to 0 dB
Default setting: 0 dB
Adjusting the delay time of each speaker (SP Distance)
Use this feature to manually input the distance of each speaker and adjust the delay applied to respective channel. Ideally, each speaker should be the same distance from the main listening position. However, this is not possible in most home situations. Thus, a certain amount of delay must be applied to the sound from each speaker so that all sound will arrive at the listening position at the same time.
Submenu: UNIT
Selection items: meters (m), feet (ft)
Default setting:
U.S.A. and Canada models: feet (ft)
Other models: meters (m)
- Select meters to input speaker distances in meters.
- Select feet to input speaker distances in feet.
Speaker distances
Choices: 0.3 to 24.00m (1 to 80 ft)
- FRONT L adjusts the distance of the front left speaker. Initial setting: 3.0m (10.0 ft)
- FRONT R adjusts the distance of the front right speaker. Initial setting: 3.0m (10.0 ft)
- CENTER adjusts the distance of the center speaker.
Initial setting: 3.0m (10.0 ft) - SURR L adjusts the distance of the surround left speaker. Initial setting: 3.0m (10.0 ft)
- SURR R adjusts the distance of the surround right speaker. Initial setting: 3.0m (10.0 ft)
- SWFR adjusts the distance of the subwoofer. Initial setting: 3.0m (10.0 ft)
Setting the dynamic range during Dolby Digital playback (D. Range)
You can select the dynamic range (spread between the max. and min. volume) of Dolby Digital playback from three levels.
Submenu:SP D.R,HP D.R
Selection items: MAX (Maximum), STD (Standard), MIN (Minimum)
Default setting: MAX
MAX: Plays back the dynamic range of the source at the maximum limit.
STD: Recommended by software manufacturers for home use.
MIN: Easy to hear even at a low volume, dynamic range suitable for evening listening.
Note
Depending on the Dolby Digital playback source, "MIN" may not work and result in an extremely low volume. In this case, set the dynamic range to "MAX" or "STD".
Adjusting the volume balance of the front speakers (L/R Balance)
You can set the volume balance of the front L/R speakers. This setting also applies to the headphones.
Variable range: L/R 10 levels
Default setting: Center
Press to make the sound smaller in the front L speaker, and press to make the sound smaller in the front R speaker. You cannot turn off the sound for either one of the front speakers.
Changing the optical input jack assignment (Input Assign)
You can assign CinemaStation's OPTICAL IN jack to "VIDEO" or "VCR". When set to "VIDEO", press the VIDEO button to operate the device connected to the OPTICAL IN jack and the input source name will appear as "VIDEO". When set to "VCR", press the VCR button to operate the device connected to the OPTICAL IN jack and the input source name will appear as "VCR".
Selection items:VIDEO, VCR
Default setting:VIDEO
Setting the input mode when powering on (Input Mode)
Sets the input mode (page 70) for powering on when playback devices are connected to both digital and analog jacks.
Selection items: AUTO, LAST
Default setting: AUTO
AUTO: When CinemaStation is turned on, the input mode (page 70) automatically sets to "AUTO".
LAST: The last selected input mode is applied.
Adjusting the CinemaStation display brightness (Display set)
Dimmer
You can adjust the CinemaStation display brightness.
Variable range: -4 to 0
Default setting: 0
Press to increase the brightness and to decrease.
Setting frequency step (Tuner Step) (Asia, Korea, China and General models only)
The inter-station frequency spacing differs depending on the areas. Set the frequency step according to the frequency spacing in your area.
Selection items: AM9/FM50, AM10/FM100
Default setting: AM9/FM50
Notes
- Be sure to turn off (standby) the CinemaStation after you change the frequency step setting. The new setting becomes effective after restarting the CinemaStation.
The frequency spacing setting for North, Central and South America is AM10/FM100 and for other areas is AM9/FM50.
Troubleshooting
If there is any problem with your CinemaStation system, check the following items. If you cannot solve your problem with the following remedies or if your problem is not listed below, turn off and unplug the CinemaStation, then consult the nearest authorized YAMAHA dealer or service center.
General
| Problem Cause Solution | ||
| Power turns on but immediately shuts off | The system cable may be connected improperly. | Make sure the system cable is connected properly. (page 10) |
| The power cable may be connected improperly. | Make sure the power cable is plugged into the outlet firmly. (page 17) | |
| The speaker cable may be shorted. Make sure all speaker cables are connected properly. (page 10) | ||
| The CinemaStation may receive a strong electrical shock such as from a lightening bolt or excessive static electricity. | Set the CinemaStation to the Standby mode, then disconnect the power cable. Wait for about 30 seconds, then connect the power cable and turn on the CinemaStation. | |
| The speakers make no sound | The volume may be set to minimum level. | Adjust the volume level. (page 20) |
| The Mute function may be enabled. Cancel the Mute function. (page 20) | ||
| The input source or input setting may be incorrect. | Select the correct input source or input setting. (pages 19 and 70) | |
| The cables may be connected improperly. | Make sure all cables are connected properly. (page 9) | |
| The disc loaded into the CinemaStation may be not compatible. | Make sure you use a disc supported by the CinemaStation. (page 32) | |
| You are playing a DTS source and “PCM Only” is selected for “Digital output” in the On-Screen Menu. | Select “All” for “Digital output” in the On-Screen Menu. (page 30) | |
| The TV shows no picture The cables may be connected improperly. | Make sure all cables are connected properly. (page 12) | |
| Sound suddenly turns off The Sleep Timer (page 28) might be set. | Turn on the CinemaStation and play the source again. | |
| Sound is too low on one side The cables may be connected improperly. | Make sure all cables are connected properly. (page 9) | |
| Speakers other than the front ones make no sound You may be listening to stereo sounds without the sound field effect. | Press STEREO to enable the sound field effect. (page 63) Select another DSP program. (page 26) | |
| You may be listening to an audio source (Dolby Digital or DTS) that does not contain any special effect signal. | ||
| The center speaker makes no sound | The volume of the center speaker may be set to minimum level. | Adjust the volume level of the center speaker. (page 65) |
| You may be listening to a Dolby Digital or DTS audio source. | Dolby Digital and DTS audio sources do not contain a center speaker signal. | |
| One of the DSP program in the Music group (other than 5ch Stereo) may be selected. | Select another DSP program. (page 26) | |
| In the Set Menu, “CENTER” may be set to “NON”. | Configure the Set Menu properly. (page 77) | |
| The surround speakers make no sound | The volume of the surround speakers may be set to minimum level. | Adjust the volume level of the surround speakers. (page 65) |
| You may be listening to a monaural source with the Theater DSP Program (page 26). | Select another DSP program. (page 26) | |
| The subwoofer makes no sound | The volume of the subwoofer may be set to minimum level. | Adjust the volume level of the subwoofer. (page 65) |
| You may be listening to an audio source that does not contain any low tone signal such as LFE. | The subwoofer does not support signals outside the specified range. | |
| The subwoofer makes strange sounds | The subwoofer may be placed improperly. | Place the subwoofer in the correct position. For details, refer to the manual for the subwoofer. |
| The subwoofer cable may be connected improperly. | Make sure the subwoofer cable is connected properly. (page 10) | |
| The speaker does not output low tones properly | The speaker setting may be improper. | Make sure you configure the speaker settings properly. (page 77) |
| The volume does not increase or sounds are distorted | The power of the equipment connected to a CinemaStation's output jack may be turned off. | Turn on the power of the equipment connected to a CinemaStation's output jack. |
| Recording sounds does not reflect the sound field effect settings | The sound field effects are not available for recording. | |
| A source being played back on CinemaStation (DVD, CD, AM/FM broadcast, etc.) does not record when using an external component | You may be trying to make a digital recording of an AM/FM broadcast. | Use the analog recording method. (pages 17 and 55) |
| You may be trying to make a recording of a DTS source. | Depending on the recorder, DTS sources may not record properly. For further information, refer to the owner's manual supplied with the recorder you are using. | |
| A source being played back on an AV component connected to the CinemaStation (MD recorder, etc.) does not record when using an external recorder | You may be trying to make a digital recording of an analog source, or analog recording of a digital source. | Use the proper audio source. |
| The CinemaStation does not operate properly | The CinemaStation may receive a strong electrical shock, such as from a lightening bolt or excessive static electricity, or drop in power supply. | Set the CinemaStation to the Standby mode, then disconnect the power cable. Wait for about 30 seconds, then connect the power cable and turn on the CinemaStation. |
Troubleshooting
| Problem Cause Solution | ||
| A digital equipment or high-frequency equipment produces noises | The CinemaStation may be placed close to the digital equipment or high-frequency equipment. | Place the CinemaStation further away from such equipment. |
| The Set Menu configurations have been cleared | The power to the CinemaStation may be lost more than a week. | Make sure the power cable is plugged into the outlet firmly, then configure the Set Menu settings again. (page 75) |
| The volume does not increase or sounds are distorted | The power of the component connected to a CinemaStation's output jack may be turned off. | Turn on the power of the component connected to a CinemaStation's output jack. |
| Recording sounds does not reflect the sound field effect settings | The sound field effects are not available for recording. | |
| Sound played on the CinemaStation cannot be recorded with an external recorder | You may be trying to make digital recording with an analog source, or analog recording with a digital source. | Use proper audio sources. |
| The recording equipment may be connected to the CinemaStation with an analog connection. | Connect them with a digital connection. (page 16) | |
| Sounds played on the AV equipment connected to the CinemaStation cannot be recorded with external recording equipment | Either the AV equipment or recording equipment may be connected to the CinemaStation with a digital connection. | Connect those equipment to the CinemaStation with analog connections. (page 16) |
| The CinemaStation does not operate properly | The CinemaStation may receive a strong electrical shock, such as from a lightening bolt or excessive static electricity, or drop in power supply. | Set the CinemaStation to the Standby mode, then disconnect the power cable. Wait for about 30 seconds, then connect the power cable and turn on the CinemaStation. |
| A digital equipment or high-frequency equipment produces noises | The CinemaStation may be placed close to the digital equipment or high-frequency equipment. | Place the CinemaStation further away from such equipment. |
| The Set Menu configurations have been cleared | The power to the CinemaStation may be lost more than a week. | Make sure the power cable is plugged into the outlet firmly, then configure the Set Menu settings again. (page 75) |
Remote control
| Problem Cause Solution | ||
| The remote control does not work for operating the CinemaStation | The remote control may be operated outside the remote control operation range. | For information on the remote control operation range, refer to the “Using the Remote Control” (page 18). |
| The remote control sensor on the CinemaStation may be exposed to direct sunlight or lighting (inverted fluorescent lamps). | Change the lighting or CinemaStation’s orientation. | |
| The remote control mode selection may be improper. | Select the mode that suits your purpose. (page 6) | |
| The batteries may be worn out. Replace the batteries with new ones. (page 18) | ||
| The remote control does not work for operating other AV equipment | You may be trying to operate a system component. | You cannot operate a system component with the CinemaStation remote control. Use the remote control supplied with the product. |
| The remote control code may be incorrect. | Set the correct remote control code. (page 72) Depending on the model and year of the product, the CinemaStation remote control may not be able to operate it partly or wholly. In this case, use the remote control supplied with each product. | |
Disc playback
| Problem Cause Solution | ||
| Some button operations do not work | Some discs do not support certain CinemaStation functions. | |
| Playback does not start or stops immediately when pressing▶ | The disc may not be set in the disc tray properly. | Set the disc in the disc tray properly. |
| The disc may be dirty. Wipe the disc clean. | ||
| The disc loaded into the CinemaStation may be not compatible. | Make sure you use a disc supported by the CinemaStation. (page 32) | |
| When moved the CinemaStation from a cold place to warm one, condensation may be form on the disc reading lens. | Wait for one to two hours, then try again. | |
| An audio or subtitle language does not switch | The disc may not support the multi-language feature. | Make sure you use a disc that supports the multi-language feature. |
| No subtitles appear | The subtitle may be set to “None”. | Select a subtitle language you want to display. (page 40) |
| The disc may not contain subtitle data. | Make sure you use a disc with subtitle data. | |
| When using the A-B Repeat function, the subtitle may not appear at the parts other than the selected section. | Cancel the A-B Repeat function. (page 38) | |
| A viewing angle does not switch | The disc may not support the multi-angle feature. | Make sure you use a disc that supports the multi-angle feature. |
| DVD videos cannot be copied with the VCR | You may be trying to copy a copy-protected DVD. | Most commercially available DVDs include copy protect features. You cannot make a copy of these DVDs. |
| Picture looks poor | In some cases, picture may look poor while fast forwarding or reversing, but this is not a defect. | |
| The TV shows no picture or its screen size looks strange | In the On-Screen Menu, the Picture settings may be improper. | Adjust the Picture settings in the On-Screen Menu. (page 29) |
| The Progressive Scan mode may be used with a TV that does not support it. | Turn off the Progressive Scan mode. (page 46) | |
| The TV shows overlapped picture partly | The disc content does not match the Progressive Scan mode due to the editing method or other conditions. | Turn off the Progressive Scan mode. (page 46) |
| Status information does not appear | In the On-Screen Menu, the Status window may be set to “Off”. | Set the Status window to “On” in the On-Screen Menu. (page 29) |
| The disc is ejected without an operation | The disc loaded into the CinemaStation may be not compatible. | Make sure you use a disc supported by the CinemaStation. (page 32) |
| The message “No Disc” appears in the CinemaStation display even though a disc is inserted | The disc may not be set in the disc tray. | Set the disc in the disc tray properly. |
Radio reception
FM/AM
| Problem Cause Solution | ||
| The Preset Tuning function (page 49) does not work | The preset (memory) may have been erased. | Preset radio stations again. (page 51) |
FM
| Problem Cause Solution | ||
| Too much noise is generated during stereo broadcast | The FM antenna may be connected improperly. | Make sure the FM antenna is connected properly. (page 13) |
| The radio station you selected may be far away from your area or radio wave reception is weak in your area. | Try Manual Tuning to increase the signal quality (page 48) or use a multi-channel outdoor antenna. | |
| Even with an outdoor antenna, radio wave reception is weak (audio is distorted) | Multipath reflection or other radio interferences may occur. | Change the antenna's height, direction, or placement. |
| The Auto Tuning function (page 48) does not work | The radio station you selected may be far away from your area or radio wave reception is weak in your area. | Try Manual Tuning to increase the signal quality (page 48) or use a multi-channel outdoor antenna. |
AM
| Problem Cause Solution | ||
| The Auto Tuning function (page 48) does not work | The AM loop antenna may be connected improperly. | Make sure the AM loop antenna is connected properly. (page 13) |
| The radio station you selected may be far away from your area or radio wave reception is weak in your area. | Try Manual Tuning to increase the signal quality (page 48). | |
| Too much noise is generated | The noises may be generated from atmospheric electricity, lightening, fluorescent lights, motors, or thermostat electric devices. | Connect an outdoor antenna and establish better grounding to decrease noises. However, it is difficult to eliminate these types of noises. |
| If too much noise is generated especially in the evening, the CinemaStation may be placed close to a TV. | Place the CinemaStation further away from a TV. | |
Additional Information
Disc Information
The following tables explain the disc types supported by the CinemaStation.
Video Discs
| Type of Disc Disc Logo Mark | |
| DVD Video | DVD VIDEO |
| SVCD (Super Video CD) | COMPACT DISC DIGITAL VIDEO |
| Video CD | COMPACT DISC DIGITAL VIDEO |
| COMPACT DISC DIGITAL AUDIO Recordable ReWritable | |
| Video CDs made by copying an MPEG movie file onto a CD-R or CD-RW | |
JPEG still image playback
CinemaStation supports playback of JPEG still images contained on CD-R and CD-RW media.
DVD region codes
The region code (an ID number assigned to each market region) is set for normal DVD players and DVD video discs. The CinemaStation supports the discs with the region codes shown in the right table. For details, read the information on the disc jacket.
| Destination | Region code of Cinema Station | Playable discs |
| U.S.A. Canada | 1 | 1 ALL |
| U.K. Europe | 2 | 2 ALL |
| Australia | 4 | 4 ALL |
| Korea General Asia | 3 | 3 ALL |
Music Discs
| Type of Disc Disc Logo | Mark | ||
| Music CD (Compact disc digital audio) | COMPACT DISC DIGITAL AUDIO | ||
| COMPACT DISC DIGITAL AUDIO Recordable | COMPACT DISC DIGITAL AUDIO ReWritable | Music CDs made by copying onto a CD-R or CD-RW (including MP3 format files) | |
Disc logo marks are printed on the disc and the disc jacket.
Notes
- The following discs cannot be played on the CinemaStation. CD-ROM, DVD-ROM, DVD-RAM, CDV. (This product can play some types of DVD-R (Video format only), DVD-RW (Video format only), DVD+R or DVD+RW discs.)
- The CinemaStation cannot play a CD-R, CD-RW, DVD-R, DVD-RW, DVD+R or DVD+RW disc that has not been finalized. Finalizing is a process that prepares a disc for playback on a compatible device.
- Only use discs from a reputable manufacturer. Some discs cannot be played back, depending on recording conditions and disc characteristics.
- Do not use discs with non-standard shapes or sizes.

- Some DVD video or video CD discs may operate and function differently than noted in this manual. That is by manufacturer design and not a defect in this unit. For details read the information on the disc jacket.
- This unit can play the disc types associated with the logos shown on page 86. (Do not attempt to load any other type of disc into the unit, or the unit may be damaged.)
- Some discs cannot be played depending on the recording conditions such as PC environment and application software. Failure can also result from disc characteristics and condition, like material quality, scratches or curvature.
Handling a disc
- Do not touch the surface of the disc. Hold a disc by its edge and center hole.
- Do not leave a disc in the tray when you are not playing it.
- Do not write on the disc with a pencil or other marker.
- Do not stick tape, seals or other attachments to a disc, and do not bring into contact with glue.
- Do not use a protective cover to prevent scratches.
- Do not use a disc whose surface can be printed with a commercially available label printer.
- Do not put a disc in a place with direct sunlight, high temperature, high humidity or a lot of dust.
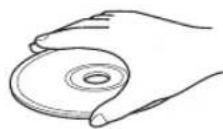
Caution

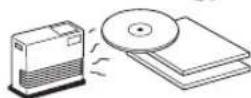
- If a disc becomes dirty, wipe it with a clean, dry cloth from the center out to the edge. Do not use record cleaner or paint thinner.
- To avoid malfunction, do not use a commercially available lens cleaner.
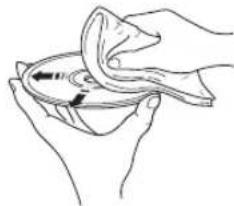
Glossary
Audio formats
Dolby Digital
Dolby Digital is a digital surround sound system that gives you completely independent multi-channel audio. With 3 front channels (left, center, and right), and 2 surround stereo channels, Dolby Digital provides 5 full-range audio channels. With an additional channel especially for bass effects, called LFE (low frequency effect), the system has a total of 5.1-channels (LFE is counted as 0.1 channel). By using 2-channel stereo for the surround speakers, more accurate moving sound effects and surround sound environment are possible than with Dolby Surround.
Dolby Pro Logic
A surround system that takes a 4-channel signal and records it as a 2-channel signal, then by way of some arithmetic processing converts back to an independent 4-channel signal for playback.
Dolby Pro Logic II
Dolby Pro Logic II is an improved technique used to decode vast numbers of existing Dolby Surround software. This new technology enables a discrete 5-channel playback with 2 front left and right channels, 1 center channel, and 2 surround left and right channels (instead of only 1 surround channel for conventional Pro Logic technology). Music and Game modes are also available for 2-channel sources in addition to the Movie mode.
DTS (Digital Theater Systems)
The 5.1-channel surround system adopted by most movie theaters. With an abundance of audio data, it is able to provide authentic-sounding effects.
Linear PCM (LPCM)
A signal that is changed to digital format without compression. A CD is recorded with 16-bit sound at 44.1 kHz, while DVD recording is anywhere from 16 bits at 48 kHz to 24 bits at 192kHz which makes it a higher quality sound than CD. This signal also has a type called Packed PCM (P.PCM) that can be compressed without any loss of data.
Matrix 6.1
CinemaStation incorporates a Matrix 6.1 decoder for Dolby Digital and DTS multi-channel software that enables 6.1-channel reproduction by adding the surround back channel to existing 5.1-channel format. (The surround back channel is created from surround left and right channels, and output from a virtual surround back speaker.) With this additional channel, you can experience more dynamic and realistic moving sound especially scenes with "fly-over" and "fly-around" effects.
Sound field programs Audio information
CINEMA DSP (Digital Sound Field Processor)
Since the Dolby Surround and DTS systems were originally designed for use in movie theaters, their effect is best felt in a theater having many speakers and designed for acoustic effects. Since home conditions, such as room size, wall material, number of speakers, and so on, can differ so widely, it's inevitable that there are differences in the sound heard as well. Based on a wealth of actually measured data, YAMAHA CINEMA DSP uses YAMAHA original sound field technology to combine Dolby Pro Logic, Dolby Digital and DTS systems to provide the visual and audio experience of movie theater in the listening room of your own home.
■ “SILENT CINEMA”
"Silent CinEMA" was developed by YAMAHA as a natural, realistic sound effect DSP algorithm for headphones.
Parameters for headphones have been set for each sound field so that accurate representations of all the sound field programs can be enjoyed on headphones.
Virtual CINEMA DSP
YAMAHA has developed a Virtual CINEMA DSP algorithm that allows you to enjoy DSP sound field surround effects even without any surround speakers by using virtual surround speakers.
It is even possible to enjoy Virtual CINEMA DSP using a minimal two-speaker system that does not include a center speaker.
Bit stream
A signal that is compressed and changed into digital format. Then depending on the decoder it can be processed as 5.1 multi-channel audio.
Channel (ch)
A channel is an audio type that has been divided based on range and other characteristics.
Ex. 5.1 channel
- Front speakers, Left (1ch), Right (1ch)
- Center speaker (1 ch)
- Surround speakers, Left (1ch), Right (1ch)
- Subwoofer (1 ch x 0.1 * = 0.1 ch)
- In contrast to a full 1-channel band, a component designed to enhance low frequency sound for added effect.
Dynamic range
The difference between the smallest sound that can be heard above the equipment noise and the biggest sound that can be heard without distortion is the dynamic range.
LFE (Low Frequency Effect) 0.1 channel
This channel is for the reproduction of low bass signals. The frequency range for this channel is 20Hz to 120Hz . This channel is counted as 0.1 because it only enforces a low frequency range compared to the full-range reproduced by the other 5/6 channels in Dolby Digital or DTS 5.1/6.1-channel systems.
Sampling frequency and quantized bit rate
When converting an analog signal to digital, the number of times the signal is sampled per second is called the sampling frequency, while the degree of fineness when converting the sound level into a numeric value is called the quantized bit rate.
The frequency band that can be played back is determined by the sampling rate, while the dynamic range expressing the difference in sound level is determined by the quantized bit rate. In principle, the higher the sampling rate, the wider the frequency range that can be played back, and the higher the quantized bit rate, the finer the sound that can be reproduced.
Glossary
Track (CD/Video CD)
A CD or Video CD can be divided into a number of segments (tracks). Each division is called a title number.
YPAO (YAMAHA Parametric Room Acoustic Optimizer)
YPAO is an original YAMAHA system that configures speaker settings such as speaker balance (volume level of each speaker), delay time of each channel, and crossover/ high cut frequency for the subwoofer automatically. YPAO uses the supplied optimizer microphone to collect and analyze sounds output from the speakers in the actual listening environment.
Video signal information
■ Component video signal
With the component video signal system, the video signal is separated into the Y signal for the luminance and the P_B and Pr signals for the chrominance. Color can be reproduced more faithfully with this system because each of these signals is independent. The component signal is also called the "color difference signal" because the luminance signal is subtracted from the color signal.
Decoder
A device that converts encoded data on DVD and other media back to its original audio or video signal.
■ Film and video data
In general, DVD media can be classified into the 2 types below.
- Film Data
Video recorded at 24 frames/second. (The film used for shooting movies is recorded at 24 frames/second.) Recently 30 frames/second progressive video has made its debut.
Video Data
Video recorded at 30 frames/second.
CinemaStation will automatically recognize whether the source recorded on DVD is film or video, then select the best method to convert it into progressive output.
■ Interlace and progressive outputs
Up to now the standard video signal has been NTSC with 525i (i: interlaced) scan lines. In contrast, 525p (p: progressive) is a high-density signal with double the number of scan lines.
NTSC
NTSC is a video signal system (525 lines, 30 frames per second) used in North America, Central America, a number of South American countries, and some Asian countries, including Japan.
PAL
PAL is a video signal system (625 lines, 25 frames per second) used in the United Kingdom, much of the rest of western Europe, several South American countries, some Middle East and Asian countries, several African countries, Australia, New Zealand, and other Pacific island countries.
Pan & Scan and Letterbox
In general, DVD Video is produced for viewing on a wide television screen with an aspect ratio of 16:9. This means you can now view most material with the intended aspect ratio on a wide-screen television.
This ratio will not fit on a standard television that has an aspect ratio of 4:3. Two picture styles, Pan & Scan and Letterbox, deal with this problem.
- Pan & Scan cuts off the left and right portions of the picture to fill the screen.
- Letterbox inserts black bands at the top and bottom of the picture to reproduce an aspect ratio of 16:9.
S-Video signal
With the S-Video signal system, the video signal normally transmitted using a pin cable is separated and transmitted as the Y signal for the luminance and the C signal for the chrominance through the S-Video cable. Using the SVIDEO jack eliminates video signal transmission loss and allows recording and playback of even more beautiful images.
Title, Chapter (DVD Video)
DVD video lets you divide a disc in a big way by titles or a small way by chapters. Each division is either called a title number or a chapter number.
Copyright and logo marks
This product incorporates copyright protection technology that is protected by method claims of certain U.S. patents and other intellectual property rights owned by Macrovision Corporation and other rights owners. Use of this copyright protection technology must be authorized by Macrovision Corporation, and is intended for home and other limited viewing uses only unless otherwise authorized by Macrovision Corporation. Reverse engineering or disassembly is prohibited.
"Silent CinEMA" is a registered trademark of YAMAHA CORPORATION.

Manufactured under license from Dolby Laboratories. "Dolby", "Pro Logic", and the double-D symbol are trademarks of Dolby Laboratories.

"DTS" and "DTS Digital Surround" are registered trademarks of Digital Theater Systems, Inc.
MPEG Layer-3 audio decoding technology licensed from Fraunhofer IIS and Thomson multimedia.
Specifications
AUDIO SECTION
- Front L/R, Center, Surround L/R
Min RMS output power
(1 kHz, 0.9% THD, 6 Ω) 45 W
Min RMS output power (U.S.A. and Canada models)
(20 Hz to 20 kHz, 0.9% THD, 6 Ω) 45 W
Max power-EIAJ-(Asia, Korea, China, and General models)
(1 kHz, 10% THD, 6 Ω) 55 W
Total harmonic distortion (FRONT L/R) less than 0.05%
Signal to Noise Ratio (IHF-A Network, shorted) 90 dB
Input Sensitivity
IDEO, VCR 200 mV/47 kΩ
Output Level (when 200mV is input)
EC OUT. 200mV / 1.2k
Phones Output 200 mV/100 Ω
VIDEO SECTION
Video Signal Level
Video 1 Vp-p/75Ω
S-Video (Y/C) 1 Vp-p/0.286 Vp-p/75 Ω
Component (Y/PB, PR). 1 Vp-p/0.7 Vp-p/75 Ω
Signal to Noise Ratio 50 dB
TUNER SECTION
FM Tuning Range
U.S.A. and Canada models .87.5 to 107.9 MHz
Other Models. 87.5 to 108.0 MHz
AM Tuning Range
U.S.A. and Canada models 530 to 1710kHz
U.K., Europe, Australia and Korea models. 531 to 1611 kHz
Asia and General models 530/531 to 1710/1611 kHz
GENERAL
Power Supply
U.S.A. and Canada models.. AC 120 V, 60 Hz
Australia model AC 240 V, 50 Hz
U.K. and Europe models AC 230 V, 50 Hz
Korea model.. AC 220 V, 60 Hz
Asia model.. AC 220-240 V, 50 Hz
General model AC 110-120 V, 50 Hz
Power consumption .85 W
- Standby power consumption
Asia and General models. 0.5 W
Other models .0.4 W
- Laser Pickup
Type Semiconductor laser GaAlAs
Wave length .650 nm (DVD), 790 nm (VCD/CD)
Output Power. 1.45 mW (DVD), 1.31 mW (VCD/CD)
- Dimensions (W x H x D) 360 x 75 x 360 mm
(Approx. 14 3/16 x 2 15/16 x 14 13/16 in.)
Weight.
6.4 kg
-
Operating Temperature Range. +5 to +35^ (41 to 95^ )
-
Operating Humidity Range. 5 to 90% (No Condensation)
Specifications are subject to change without notice.
ATTENTION: VEUILLEZ LIRE CE QUI SUIT AVANT D'UTILISER L'APPAREIL.
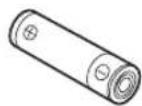
Piles (2) (AA, R06, UM-3)
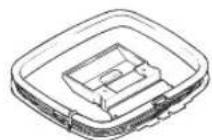
Antenne cadre AM
La lecture commence.
#
Valeurs possibles: metres (m) pieds (ft)
Valeur par défaut:
Valeurs possibles: MAX (Maximum), STD
(Standard), MIN (Minimum)
CINEMA DSP (Digital Sound Field Processor)
Avant G/D, Centre, Ambiance G/D

Front, Center 5 m (3)
Ovriga modeller: meters (m)
THIbI IopJepKHBaembIX HcKOB 32
OchOBhIe OhepaHn BocpOn3BeJeHna. 33
Iooe3hble Oepaunn Bocpon3BedeHna.34
YKa3aHHe IpoIeIeTeo BpeMeHH BocIpOIN3BeIeHnra (Time Search). 34
HacTpoNkaIopAIIKaBocIIpoIN3BeIeHn (Program Play) 35
IIOBTOPOHBOCIIPOH3BeJeHHe (Repeat Play) ... 37
YupabJIeHHe MmHIO JnCKa (MeHIO DVD/ Video CD Playback Control) 39
Bb16opЯ3bIKOB 3ByaHHH N Cy6HTTpOB ....40
Bb6op Yr.Ia Ipocmotpa 41
H3meneHHe MacHTa6a H3o6paKeHHa. 42
OrpahnueHne Bocnpn3BeJeHHa (Parental Control) 43
YcraIOBka ypOIBpa Parental Control. 43
BJOKHpOBaHHe INcKOB 44
BocnpoH3BeDHeHc 6JIOKHPoBaHHbIX HcKOB....44
H3MeHeHHe IapoJra. 45
IIpocMToP BbICOKKaueCTBeHHoro BnJeOn3o6paJKeHn (NTSC/IIporpeccBHaa Pa3BepTka).46
IpocMOrp H3o6paXeHHBΦOpMaTe JPEG...47
ПОСЛУШВАНЕ РДИО
Hactpoika Ha Paadnoctaunu. 48
ABTOMaTHuecKaHaCTpoiKaHa paHocTaHn (Auto Tuning). 48
Hactpoika Ha paiaocTaHcHbpyHyIO (Manual Tuning) 48
Bb6opIpeJyctraHOBJIeHHbIXpaJIOcTaHIN (Preset Tuning) 49
IpiHemYMpaIOHOCTaHIcHcTeMbRDS (ToJIbKO MoJeJIN IIJa CoeIHHeHHOro KopOJIeBCTBa BeJINKOBpHTaHHN CeBepHOI npHaHnH, H EBpONbI) 49
IpeynctahOBka PaHnocTahnn. 51 ABToMaTHHecka IpeyncTaHOBka YM paHnocTahnn (Auto Preset). 51
IIpeDyCtAHOBKa paAnocTaHnBpyHyIO (Manual Tuning) 52
3aMeHa MeCT coXpaHeHHn IpeIyctaHOBJIeHHbIX paJIOcTaHHn 52
PONITPBIBAHNE BHEUHINX
AUYNO-BN3VAJbHbIX NCTOCHNKOB
BocpoH3BeDeHHe BHeHHx HcToHHKOB ....53
Bocnpon3BeJeHne TeJIeBu3Opa. 53
BocpoH3BeHeHHe BHeOMaHHTofoHa. 53
IpoHrpBbAHHe Ha HrPoBOI KOHcOJIH 54
3aHHcB AyHIO-BH3yaJIbHbIX HcToOHKNOB c
Hcno.1b30BaHHem BheHHnx
AyHNO-BH3yaJIbHbIX KOMIOHeHTOB.55
3aHHc b ayHIOHcTOHKnOB Yepe3 CinemaStation 55
KoIIHPOBaHHe c BnIeOKOMIOHeHTOB Ha BnIEcOKaccctry. 56
3BYKObIe ONLIMN
IpocJyuHbAnHe 3ByaHaHnaOt
OnpeJeIeHbIX KoIOHok 57
BocpoH3BeHeHne 6.1/5.1-KaHaJbHbIX HcToHHKOB Yepe3 Bce KOIOHKN, BKJIIOua BHPTuJbHyIO KOJOHKy (Matrix 6.1). 57
IpocJyHHBaHHe 2-KaHaJIbHbIX HcToYHHKOB co BceX KoJIOHOK (Dolby Pro Logic II) 58
IpocJyHHBaHHe npoPpaMM DSP ToJIbKO c HIOJIb3OBAHHem pOHTaJIbHbIX KOJOHOK (Virtual CINEMA DSP) 59
IpocayHHBaHHe IporpaMM DSP
IIo-pa3Homy 60
PpocJyHHBaHHe cHayHHKaAMN ("SILENT CINEMA") 60
IpocJyHHBaHHe Ha Hn3KoM ypoBHe rpomKocTH (Night Listening) 61
IpocJyHHBaHHe BbICOKKaYeCTBeHHoro
3ByuHaHn.. 62
IpocIyIIINBaHHe HcxOJHOro 3ByaHn
Dolby I DTS. 62
IIpocIyIHHBaHHe HcXoIHORO 2-KaHaJIbHORO 3ByuHaHn (Ctepeo) 63
DONOHINHbHbIE ONEPALUN
Pery.IHpOBKa BaIaHaCca KoIOHOK Bo BpEmr
Bocnpn3BeDenn 64
PeryHPOBka 6aJIaHcKa KOJIIOHOK c HIOJIb3OBAHHeM TecTOBOrTOHaJIbHO rHaJIa. 64
PeryIINPOBka 6aJIaHca KOIOHOK BO BpEmBOcIIPON3BcDEHH. 65
KoHpyauny YcTaHOBOK
Dolby Pro Logic II Music. 67
YcTaHOBKa BpeMeHH 3aIepKKn
Iporpammbi DSP 68
KoHpyaunHaCTpoKn NocTynaIoIero
Aydnochra.70
PpOBcPKa TIIHa IIOCTyIaIOIeero ayHocnHaJa 71
YnpaBJIeHHe BHeuHHMn KomnoheHTamH....72
YcTaHOBKa KOIOB IINCTaHIOHOHOrO ynpaJIeHHra 72 IocTyIbIe OIIepaIIH 73
KoHpyaPnPa3.1uHbIX IapametpoB
(Set Menu) 75
YIIpaJIeHHe MEHIO yCTaHOBKn Set Menu 76
ПИДLOXЕНЕ
Bo3MOxHbIe HEnCnpaBHOCTN CnOco6bI Nx
YcTpaHEnn 80
OmbaYacTb 80
PnIbT IY 83
Bocipon3BeJeHne Hncka. 84
IIpHem paHOBOJH 85
DIOHOHTcJIbHaI HΦopMaIIa. 86
HOpMaunOJnKc 86
O6paIeHHe c IINcKOM. 87
CnpaBoUHHK 88
AydnoΦopMaTbI 88
PporpaMMbI 3ByKOBOrO IIOJI. 89
AynnoHHopMaIIH 89
HopmaIIOBHeOeOHHaJIe 90
JIoRoTHIIbI H 3HaKn O6 aBToPcKHX IpaBax .91
TexHHueckne XapaKTepeHCTHKn. 92
BVeDHeHne
CinemaStation "DVR-S150" IpoHBOIDCTBa YAMAHA JIIEETcY3KHM DVD-peCHBepOM, o6opyIOBAHHbIM IIHfPOBBIM ychInTeJIeM. NaHHoe HJElne OBeCEHnBaET HAnBOJIeE JyUHHe 3ByuHHe, IO3BOJIaBAM IOJyAaTb yIOBOJIbCTBHe HE ToJIbKO ot DVD-ⅡncOB and CD-ⅡncOB, HO TaKke H OT IpyTHx ayHNO-BH3yaJIbHbIX HcToIHNKOB. HaJeemc, TTO Bbl IOnyHTe IpeKpaCHOe yIOBOJIbCTBHe n yIOBJIeTBopeHne OT IpcOJIyHHBaHHa "DVR-S150".
O hactoam pykooboctbe
B DAHOM pyKOBOCTBC coIEpKHTc HnFOopMaIIu TOnIbKO K CinemaStation "DVR-S150" IPOU3BOCTBa YAMAHA. JINIIOJyueHHN INHOFOPMAuHN O KOJOHOKAX NIN JpyROM ayINO-BaJbHOM 6OpyIOBAHH, H3yHTe pyKOBOCTBO K TAKOMY KOMIOHeHTy.
B JAHOM pyKOBODCTBC, OHcpaHIN HO yIpaBJIeHHIO, KOtOpbIC MOrYr BbIIIOJIHHrTbcra HcHIOJIb3OBAHHem opraHOB yIpaBJIeHHHa DVD pecHBpe Hn IIyte DY, OHcaHbI c HcIOJIb3OBAHHem IyIbTa IY.
- OHHaHH H NJIIOCTpaHH NyIbTa IY B daHOM pyKOBOCTBC oCHOBa H Ma MOeJIax JIN CoeHNHeHHoro KopoJIeBcTBA BcJHKo6pHTAHHH N CeBepHOH IpHaHH, H EBPOIIb, cJH HET npyHX orOBOPOK.
-03HaTaETcOBeTIIJrO6JIeTHeHnYIpaJIeHn.
B II pHmCuaHHx coepKHTc BaxHa HIIΦopMaHn IIO 6e3OiaacHOCTn HIICTpyKIIHm IIO yIpaBJIcHHIO.
JaHHe pyKOBoCTBO OTHeYaTaHO IO npOn3BOJcTBA. H3aHH TeXHHeckHe XapaKTePncTHKn MOrTy TAcTHIO H3MeHrTBc cIeJIbTO yUyIeHn KaTeCtBa H.T.I.B Clyuae, ecH NMeIOTc pa3JIHm MeKJy pyKOBoCTBOM n aIInapaTOM, pnpHTET OTdAcTc aIInapaTy.
NocTabJIaEmbIe Akceccyapbl
K DaHHOMy aHnapaty npHaIaraiOTcraJeIyoIuHc akcccccayapbI. Y6eIHTecb B IIOJyuHeHH Bcex cJeIyuOuHX JeTaJIeI IO NOJKIOUeHH KOJOHOK HIN TeJIeBn3Opa K DaHHOMy aHnapaty.
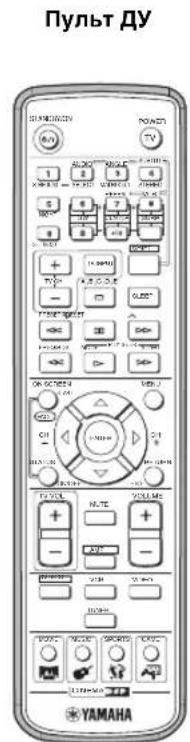
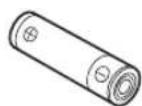
Batapek (2) (AA, R06, UM-3)
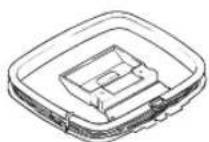
Pamouha AM-aHTehHa
MnKpOfoH ONTMMn3aTopa
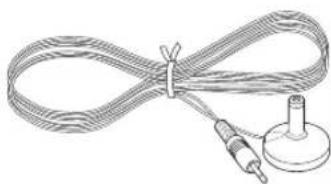
UtbpeboB Bndeokaebn
BHyTppeHHH YAHTeHHa
(MoJen nCwA, KaHadbl, KtTAn, A3nn o6uaa moeIb)
(MoJEN DnE EBPOBbl, CoeINHeHOrO KoponeBCTBa BeJIHKo6pntaHH N CeBepHOI UpnaHnn, ABcTpaNN n Kopen)

Ka6eJn KOJOHOK

OkpykaIoUeRo 3ByuHaHn 15M(2)
ΦpoHTaJIbHbIX, ζeHTpaJIbHoI 5 M (3)

OprahbI YnpaBneHnI Nx FyHKcnn
BepxHn npoHTaNbHa paHeJI
KHOHN,06O3NaeHHbIe 3BcEIOOH ( 念 ), BbIOHnHOT pa3JINHbIe cyHKINn B 3aBCHMOCTN OT Bb6paHHORo peKIMa ynpabTeHH.
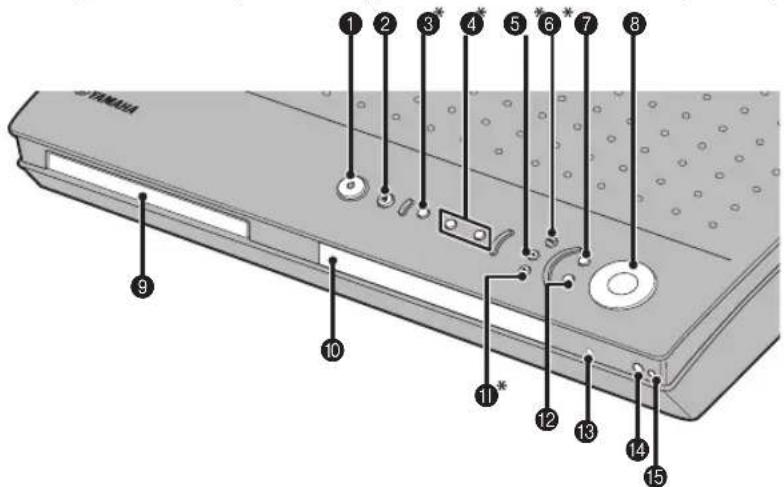
1STANDBY/ON
BkHouenHe TaHHoTo aHapapa.HaKmTe JnYcTaHOKBn aHapapaBpeKM OxHaHHy, yepKbBaHTe HaxaTOI pHMePBO TceHEnCekyhbl. (ctp. 19)

OTkpbltnn 3aKpbItne JOTka ncka.
3 PROGRESSIVE (MEMORY)
[MEMORY (Длma moidele Дд СоeHHeHHoro KopoJIeBCTBa BeNKobpHTaHm N CeBepHou IpJaHn, n EbpOnbI)] (peXIM DVD/CD)
IpeKIOUeHHe peXHMOB BbIBOa c IporpceCnBHO pa3BepTKoH HHTepJeCHOro BbIOa dIa IIpoHrpBaHHaDVD-ncka. (cTp. 46) (Pexm Tiohepa)
CoxpaHReT pInHHMaemyoB DAHHbIM MoneHT paHocTaHIOI DJIa
fHKnHN HAcTPOHKn HA IpeDyCTaHOBJIeHHbIe paHocTaHIN. (cTp.52)
4 K/△,D/D(√ PRESET/TUNING A) (pexum DVD/CD)
Bb6opIpeIbIyuee/cJeIyIOuee foHOrpaMbI HnPa3JIa.HaKMHTe n yIepKHaBte HaKaToI JIn yCkOpEHoI IpeMOTKn BIIpeJn HnHa3aJ.
(PeXmTioHepa)
BbI6Op HOMepa IpeynCtAHOBKn HIN HAcTPOKa YAcTObI. (cTp. 51)
B/C/D/E
(pexm DVD/CD)
OcTaHOBka Bocpon3BeJeHnI ncka.
(PeXmTioHepa)
Bb6op rpynnbl npdeYcTaHOBKn. (cTp. 52)
(RESET/BAND)
(pexum DVD/CD)
Pay3a BocPon3BeneHnIhcka.
(Pexm Tiohepa)
IpekeKJIIOueHHe UM n AM IINaIIa3OHOB. (cTp. 48)
7INPUT
Bb6op nToHnKa Hn yTaHOBA ypoBHn
IphOpHTeTHOCTn IJIaIOTuIOnx ayHocnHaJIOB
(IIpN IOKJIIOHeHH JIOBO O6OpUOBaHn K THe3JaM OPTICAL IN n AUDIO IN oHOBpeMeHo).
3VOLUME
PeryIINpOBKa o6IeO yPOBn rPOMKoCTH.
9ItoKdNcKa
YJepKHNBaHnC INCKa IINBOCIIPOIN3BcJeHHN.
1Ducnnei
OTo6paXeHHe HhOpMaunn HIn HacTpoeK BocIpOn3BeJeHHa. (cTp. 5)
11 (UTO/MAN'L)
(pexum DVD/CD)
HaayaoBocnpoH3BeJeHHaNcKa.
(Pexm Tiohepa)
IpeekJIIOueHHe peKHMOB aBTOMaTHueCKoN npyHOHaCTpOeK. (cTp. 48)
DSP
IpekeKIOueHne IporpaMM DSP B BB6paHNO rpyIIe IporpaMM DSP.HaKMnTe H ydePKHBaHTe HaKaToI IJIIEpeKIOueHnraPpMM DSP. (ctp.26)
18Γhe3do SILENT CINEMA
CoeHHeHnE JnHaYnHKnOB.
4CeHcOp dNCTaHcUNHO ynpabJIeHnA
IIpHem CnHraJIOB OT IIyJBTa IY.
15THe3do YPAO MIC
CoeHHHeHHe MHKpOoHa OITHM3aTopa.
Ducnnnei
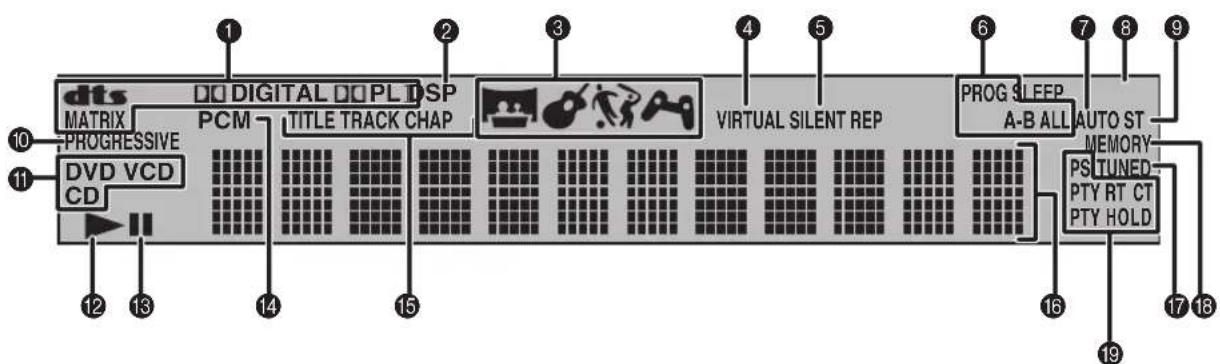
(Tonbko mo mode n dna CoeHHeHHoro KopoJIeBcTBa BeIkuKo6puTahnnn N CeBepHoN Uplanu, n EbpOnbl)
HnDkaTop deKoepa
OTo6paXeHHe HOKHNIIY BbI6paHHORBCTpoEHNOJeKOJIepa.
DSP
BbCBeuHbAeTcI np H Bb6ope IporpaMMb DSP.
3HndkaTop nporpaMMbl DSP
OTo6paXeHHe HKOHN JINY BbI6paHHoN IporpaMMbI DSP.
VIRTUAL
3aropaetcBOBpempaobtbpHKnHnVirtual CINEMA DSP.
⑤ИндikaTop SILENT CINEMA
BbICBeYnBaEcTcBO Bpempa60tbpckmAsilent Cinema.
6HndkaToppeKIma BocnpOn3BeDeHnA
OTo6paKeHHe HKOHN IIJI BbI6paHHOro peKHMa BOCIIPOH3BeJeHH.
AUTO
BbICBeYnBaTeCBO BpeMnHIOJIb3OBaHHpeXHM aBTOMaTHueCKo HAcTPOkN HJIn aBTOMaTHueCKo IIpeYcTaHOBKn.
SLEEP
3aropaetcnpn BKIOUeHHN TaHmepa cHa.
ST
3aropaetcBO BpemIipHemaIOCTaTOHO CHJbHOro paHocnHaJaYM dHaHa3OHa BpeKHe aBTOMaTHueCKo HAcTPOKN HIN ABOTMATHueCKOn IIpeYctaHOBKn.
10 PROGRESSIVE
BbCBeYnBaETcBO BpEmpa6oTbI cyHKHH npOrpeccHBHO pa3BepTK.
HnDnKaTOp DaCKa
OTo6paXeHHe NKoHKn JIA NcKa.
12IKOKKa BOCnpOn3BeDeHnA
3aropaetcBOBpeMBOCpON3BeEHHnIhka.
1KoHka nay3bl
3aropaetcBO BpeMa IIay3bI BOCIpOn3BeJeHnI INCKa.
PCM
3aropaetcBO BpeM BOcPON3BeCENH CnHaJIOB HmIyJIbCHO-KoIOBOO MOyJIaIIH, HApHMeP, ot CD- IIACKOB.
15HndkaToppeXnmaOTo6paXeHH
OTo6paKeHHe HnDnKaTopa IJIa TnIIa HnΦopMaIIN, OTo6paKaemOn Ha nCnJIecc CinemaStation.
16Ducnnei
OTo6paXeHc pa3Hoo6pa3HO HhOpMaHH, HaIPmep, HAMHeHOBaHne, HOMep pa3JeJa HIN FOHOrpaMMbI, HIN IPOWeJWee BpeM BOCIpON3BeHn.
TUNED
BbICBeHbAcTcBO BpeMa IIpHema Iepaun YM/AM JnHaIa3OHa.
18 MEMORY
Mnrae TB Bpem IpeynctaHOBKn paHIOCTaHINN UM/AM nnaHa3OHa.
ToIbko MoJeN dJa CoeHHeHHoro KoponeBCTBa BeJIKo6pTuHn n CeBepHoI npHaDn, n EBponbl
1HAnKaTopbiRDS
3aropaOTcBbBpeMaIpHemaRDS. HnKaTOp "PTY HOLD" 3aropaeTcBbBpeMa pa60tbyfynKnnnPTYSEEK.(ctp.50)
NyIbT dY
AMP
Bb6op IporpaMbRDS
BbIop HcTouHHKa, np.
DVD/CD
Bocnpn3BeHHe Bb6Op cyTHTPOB H3bKa 3ByaHH, np.
FM/AM
HacptponkaHa paJIOcTaHINHO IIpeYCTaHObKa paJIOcTaHHIN,II
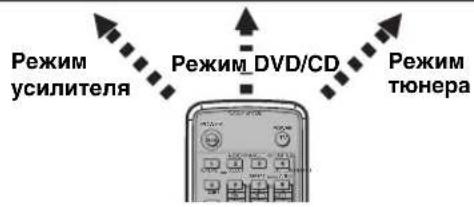
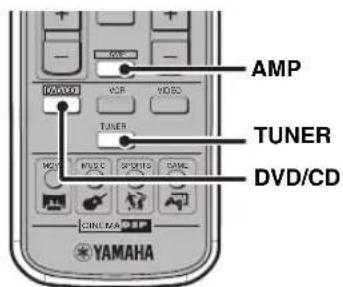
CinemaStation o6laaet TpeMa OCHOBHbIMn peKIMAMN yipabJIeHNr. IOn hauJa yipabJIeHNr yHKIIINM KAKJOrO peKHM, CJeIyET BbIpaTb peKHM JII IN3MeHeHNr Ha3HaueHIn KHOIOK IIyJIbTa IY.
IpeeknueHne pexmua ynpabJeHHA
- Pexm ycnnte: Hxmte KIOKy AMP. (ctp. 7)
- PeXMM DVD/CD: HaxMMTe KhoIky DVD/CD. (ctp. 8)
PexnM THepa:HaXmTe KHOIky TUNER BoJee IIOpO6Ho 06 yIpaBJIeHnn TIOhepom, cmOTpIte "HaCtpoKa Ha PaIIOCTaHIIIN" (cTp.48).

HIOJIb3yIyIbT IY, BbI TaKx MoKcTe yIpaJIaTb TeBnOpor HIN BIIeOMaHHToFOHOM, IOIKIOyeHHBM K CinemaStation. BoIEe IIpo6Ho, CMOTpHe "YIpaJIeHHe BHeHHM KomHOHCTaMH" (ctp. 72).
ObuIe yHKUIN
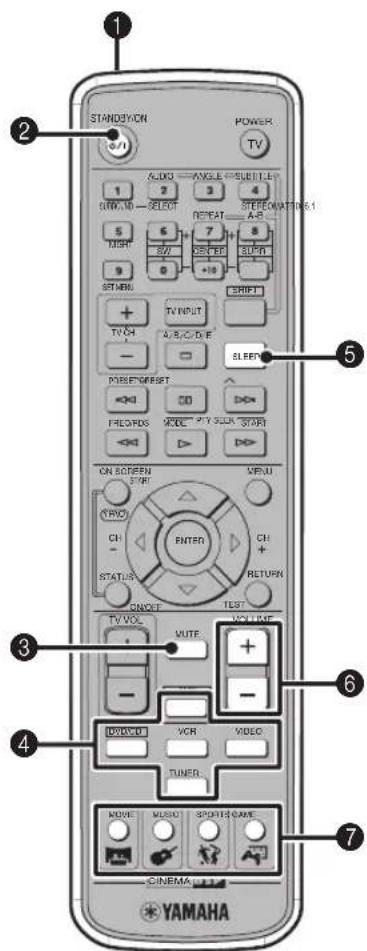
Oe ne onepaunI Iy Bcex peXmOB
1pepeaTnK HΦpaKaPacHoro CnHa
IpepaetnHaJIbHa CinemaStation.
STANDBY/ON()
BkIIOueHHe HInyCtAHOBKa CinemaStation BpeKHM OxHuaHH. (cTp. 19)
MUTE
OTKJIIOYHeHNE 3ByuHaHHa. JIa BO3O6HOBJeHHa 3ByuHaHHa, HaxMMTe CHOBa.
4KhoIKN BbIbopa nCTOuHnKa
Bb6op hctouHHka Iy npabIeHHa. (cTp. 19)
SLEEP
YcTaHOBka TaHMepa Cha. (cTp. 28)
6VOLUME + / -
PerynpoBka o6Iero ypOBnI rPOMKoCTH.
7KhoNKn nporpaMM DSP
Bb6op nporpaMMb DSP.(cTp.26)
Pexm ycnlnteOnepaun,doctynbte Tolbko B pexme
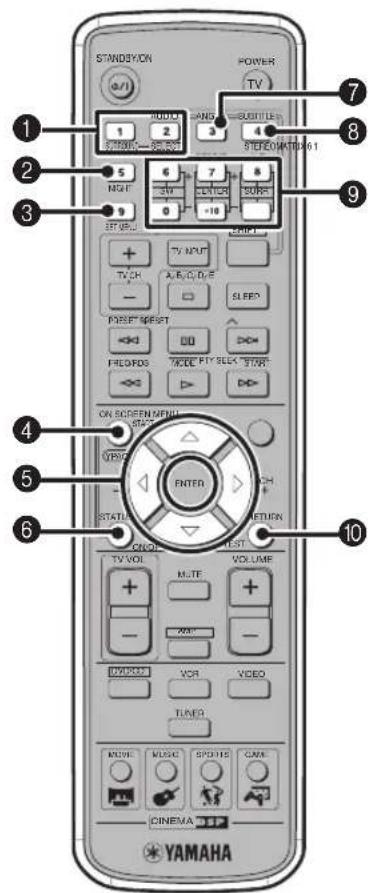
ycnntela
1SURROUND, SELECT
YcTaHOBkaФyHKiINn Dolby Digital nIN DTS.
HaXMMTe KHOIIKy SURROUND n 3aTeM KHOIIKy
SELECT nJa YcTaHOBKnФyHKiINn Dolby Pro Logic
II nJa 2-KaHaJIbIbIX nCTOuHHKOB.(cTp.58)
2 NIGHT
YcraHOBka CinemaStation BpeXIM HOHORIO npocIyHHBaHn. (ctp. 61)
SET MENU
BXoI B MeHIO yCTaHOBKn. (cTp. 76)
YPAO
3aIyck yHKuY YPAO. (cTp. 21)
5△/V/
HactpoKa TecTOBOrToHaJIbHOrO cHraJa(cTp.64) HJIMeHHO yCTaHOBKn (cTp.76).
6ON/OFF
BkJIOueHHe HJN BbIKJIIOueHHe pexnMa YPAO. (cTp. 23)
7 MATRIX 6.1
YcTaHOBkaIeKOJIepa Matrix 6.1.(ctp.57)
STEREO
IpeckJIOUcHHepeKHMOB O6bIuHOrO cTepecoOHueCKoro 3ByaHaNn H 3ByaHaNn C 3ΦΦeKToM 3ByKOBOrO IIOJI. (Ctp. 63)
KhoNk ypOBH rPOMKOCTn KOHOK
PeryIINPOBka 6aJIaHcA KOJOHOK (ypOBeHb rPOMKOCTN KaJIOI KOJOHKN). (cTp. 65)
SW+:/:PeryIInpOBka ypoBHa rPOMKocTH ca6Bypepa.
CENTER + / - : PeryJInpOBKa ypoBra rPOMKocTHIeHTpaJIbHOI KOJOHKN.
SURR+:/:PeryJINpOBka yPOBn rPOMKocTN KOJIOHKn OKpyKaIOIeO 3ByaHn.
10TEST
BbBOJ TECTOBORO TOHaJIbHOrO CnTHaJIa. (cTp. 64)
中
OepanBpeKmC yHJHTeJI OTMeChbI pHOJIeTOBbIM 1CBETOM Ha IIyIbTe JY.
Pexm DVD/CD Oepaun, doctynbte ToIbko B peXnme
DVD/CD
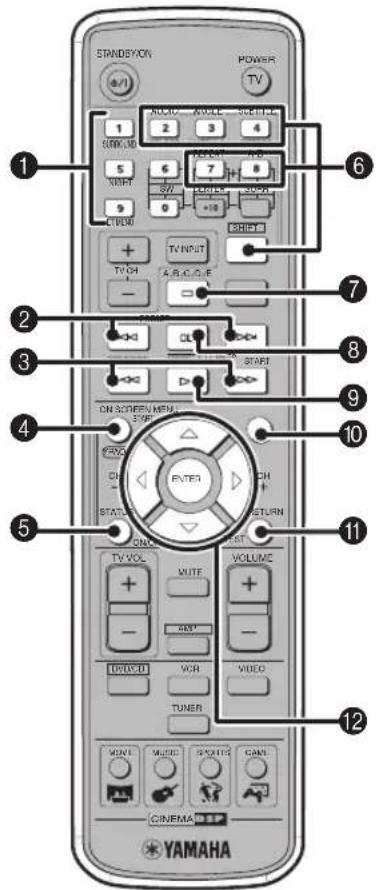
LUnpOboBie KhoNKn (1-9,0)
BBOI nHpOBbIX 3HaueHHN JyKa3aHHraKHX npapMeTPOB KaK HOMepa OOHOrpaMM NJIN pa3JeJIOB.
2K1, D
IepexoHa hauaHn HactoHne Hn cJeynooe HOHOpaMMbl.
3
YckopeHHa IIepemOTka BIIepeJ/Ha3aJ.
ON SCREEN
OTo6paKeHHe 3KpaIIIOIeMIIIOHaTeJIeKpIe.(cTp.29)
STATUS
OTo6paKeHHe Ha TeJIeKpAne HnΦopMaIIIN O COCTOAHN, HAnPmep,TIIa IINCKa,O6IeRo BpeMeHN IIIN IPOIIIEIero BpeMeHN BOCIpOn3BeJeHHN HAcT0AIeH FOhOrpAMMbI/pa3IeJa.IIr OTo6paKeHn HnΦopMaIIIN O coCTOAHN,InapaMeTp "Status window"Ha 3KpaHOM MeHIO (cTp.29) IOJIkeH 6bITb yCTaHOBJIeH Ha "On".
6KhoNKnHacTpoek
YJepKHBaHaKaToH KHOIkySHIFT,HaKMHTe OndHy H3 KHOIIOK,yKa3aHHbIX HnXc,JIa 3aNycka COOTBcTcTByIOIIe ONcpaHH.
REPEAT: 3aIyckpeKHaMa IOBTOphoro BocIpOn3BcJeHn. (ctp. 37)
A-B:3aIyckpcxKImaIOBTOpHOroBOcIpOn3BeJeHHA-B.(ctp.38)
AUDIO: Bb6op 3bika 3ByuHaHHa IIHbIeOIIporpamMbHa DVD-dHcKe. (cTp.40)
ANGLE: Bb6op yrIa npocmTopa ncka. (ctp. 41)
SUBTITLE: BbI6Op 3bIka cy6THTPOB IIJI BnIeONPiOprpAmMbHa DVD-HeKe. (cTp.40)
7
OctaHOBka BocpoH3BeHeHHncka.
80
Pay3a Bocnpon3BeneHna HnKa HnI npexoHa cnJeynnn KAp.
9
HauaIO BOCnpoIN3BeIeHHaNcKa.
10 MENU
OTo6paKeHHe MeHIO DVD Ha TeJIeKpaHe. (cTp. 39)
RETURN
Bo3BpaIeHHe MeHIO DVD Ha IIpeIbIyIuIe IKpaH. (cTp. 39)
12 △/△/△/ENTER
YIIpaABJIeHHe 3KpaAHHbIM MeHIO (cTp.29)IyKa3aHHe pa3JINHbIX IapAmETpOB.
中
OeepaHnBpeKHMcDVD/CDOTMeueHbI3JIeHbIMIIBcTOM HaIyIbTe IY.
Подклоченье Колонok
CJIeIy IIpoIeIype HnJke, IIOKJIIOHTe KOJOHKn K CinemaStation. 3Iecb, B KaueCTBe IIpIMepa IIINIOCTpaIIHH, HcIOJIb3yeTcY YAMAHA NX-P150 (coCTOIIaIgN 34 caTeJIINTHbIX KOJOHOK, IeHTpaJIbHOI KOJOHKn n ca6Bypepa) I COOTBeTcTBYIOIIne IOCTaBJIeMbIE Ka6JIH. BoJIee IIOJPO6HO O KOJOHkax, CMOTPHTe pyKOBOIDCTBO IIO 3KCIJIyATAIIN K KOJOIHKaM.
BbTaKKe MoKeTe HcIOJIb3OBAt b KoIOHKn Ka6eJIn, HMeIOIIHeec B IIpoJaKe (CMOTpHTe cTp.11).
PnmeaHne
He IIOKIOUaIre cnIOBOI npOBd mrrnna CinemaStaion doTex nOp, Ioka He BbIOJIeHb BCE Ka6CbHbIe IOIKJIOUeyHn.
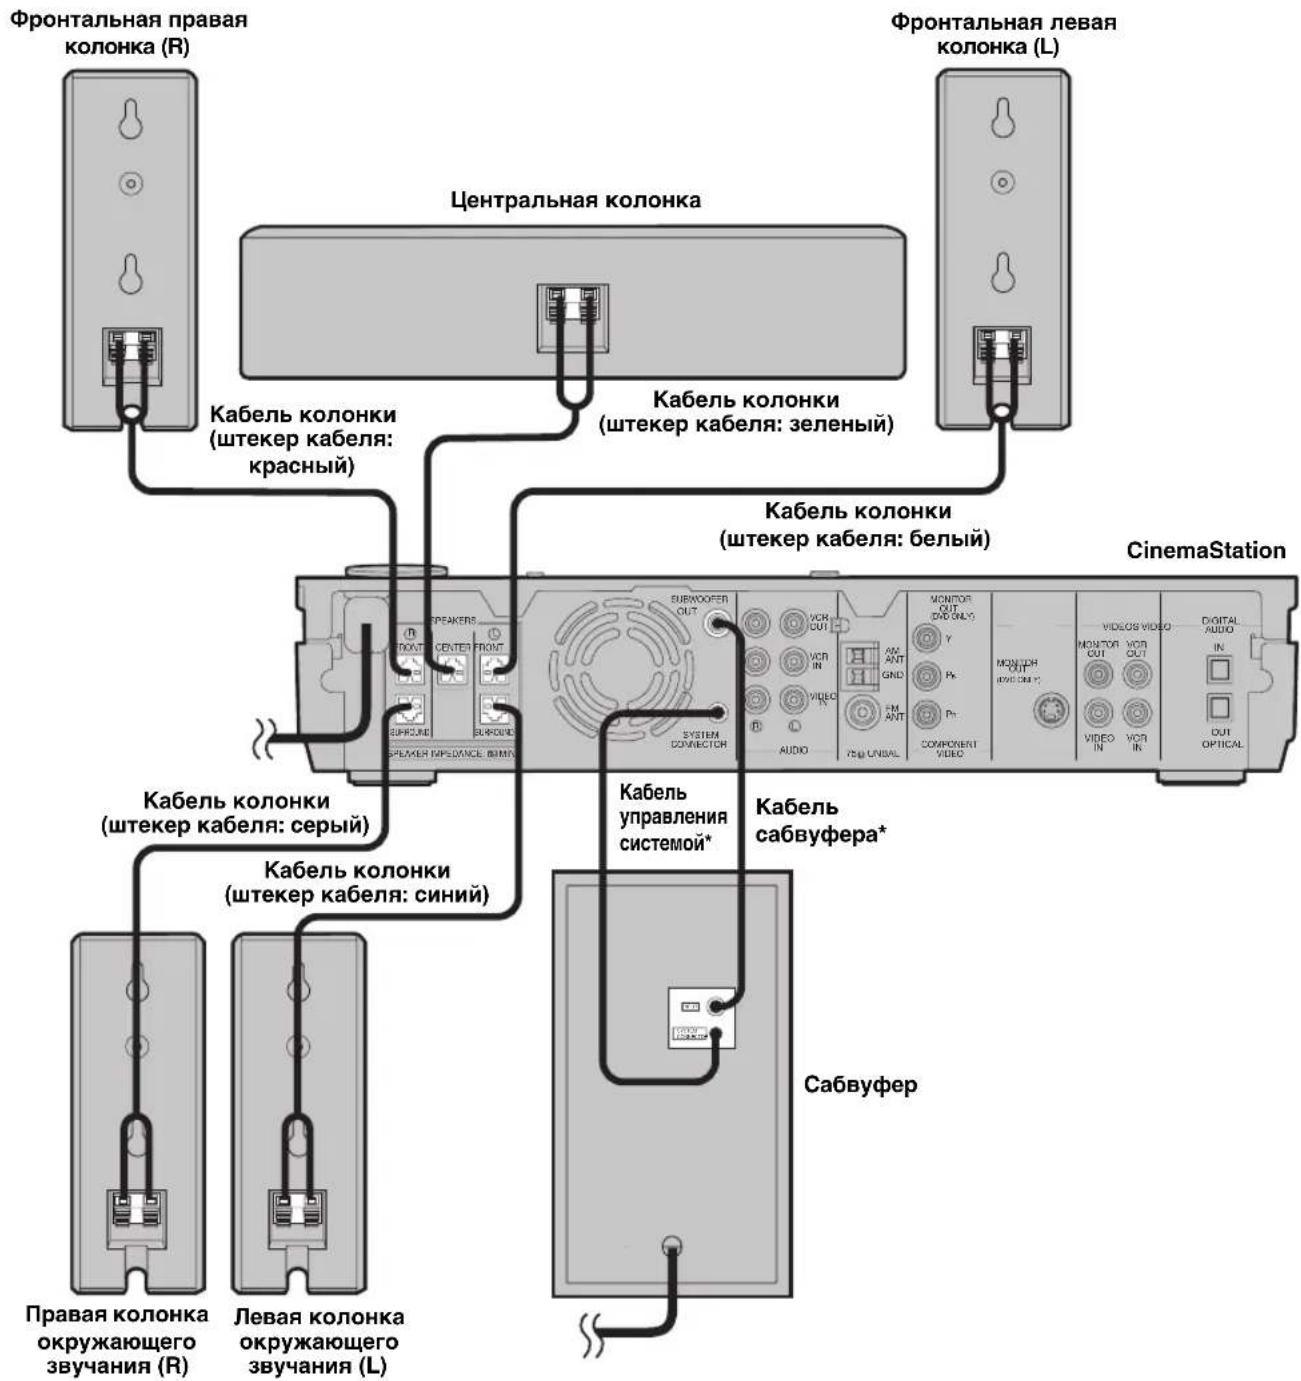
* NocTabJIeTcnc caBByepom.
Ipn 3aKpeHnEHHn anTeHHbHa cTHe,IOCTabKa IJIa anTeHHb He Tpe6yeTc.
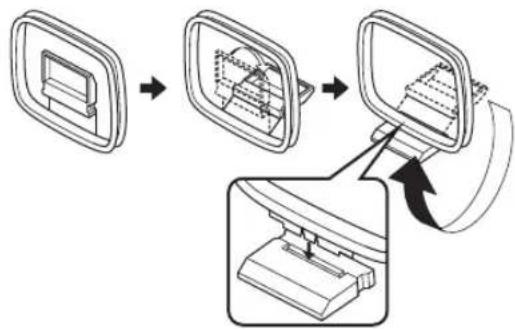
2 OToBnHbTe pbIaXoK BnpaBO N BCTaBbTe KOHcbl npOBoOB Ka6eJra aHTehHbIB TepMaHaJIb AM ANT n GND.
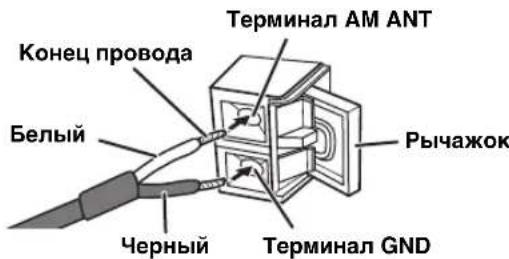
3 3aKpoIte pbHaxok n 3aTe m cIerKa notHnTe 3a Ka6eB dIra HadeXHO r 3akpenJIeHnI.
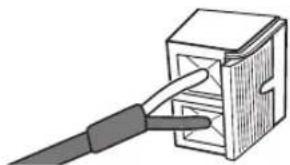
4 PacnoJoxKte aHTeHHy Ha HeKOTOpom pacCTOaHm or CinemaStation u KaBeJeN KOHOK.
Bo Bpem npocjIyHbAHn paIIO,IOBopaHbA roJIOBky aHTeHHb, onpeJIHrTe HauIyHm yroJI npHeMa.
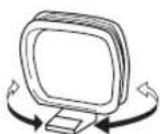
AHaIorOBoBie NOkJIIOUeHnE
CJIpyIpoIeIype HJKe, IcnoIb3y aHaIorOBoe
IOJKIOUeHHe, IOKIOUHTe IrpoByIO KOHCoJB. IIpr
HCIOJB3OBaHH rHe3VIDEO IN (AUDIO) IJIa IIOKJIIOUeHH
Te.IeBn3opa (CTp.12),IOKIOUHTe IrpoByIO KOHCOJBII
BHeOkaMepy, IcIOIb3y uIcpPobBe IIOKJIIOUeHH.
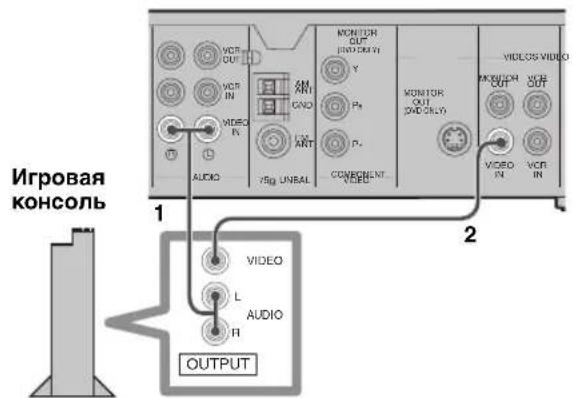
Pnmeuahne
IIpH aHaIIOBOM IOIKJIIOyeHH HrpoBOH KOHCJIN K CinemaStation, HIOJIb3yIte ayHO/BNIEOka6JIb (IOKA3aHO HHKe), HMeIOIHNC B IPOJaXe.

Ayno/Bndeokab
1 IcnoIb3yaydno/BndeokabeIb, mHeounnCBA npOdaKe, nOdkIIOUHTe rHe3daVIDEOINL/R(AUDIO)Ha CinemaStationKaydnoBbIXoHbIM L/R rHe3dAmHaIrpoBoi KOHC0JI.
2 IcnoIb3yayaDIO/BnDeOka6eB (ncnoIb3oBaHHbHaWare1),noDKlIOHTe rHe3doVIDEOIN(VIDEO)HaCinemaStationK BnDeOBbIXoHOMyrHe3dyHaIrpoBoKOHcoJI.
UcfoPoBbIe NOckJIIOueHnA
CneIpy IpoIeIype HnKe, nIOJIb3y IIHpOBoE IOIKJIOUeHHe, IIOKJIIOHTe INrPOBYIO KOHCOJIb.
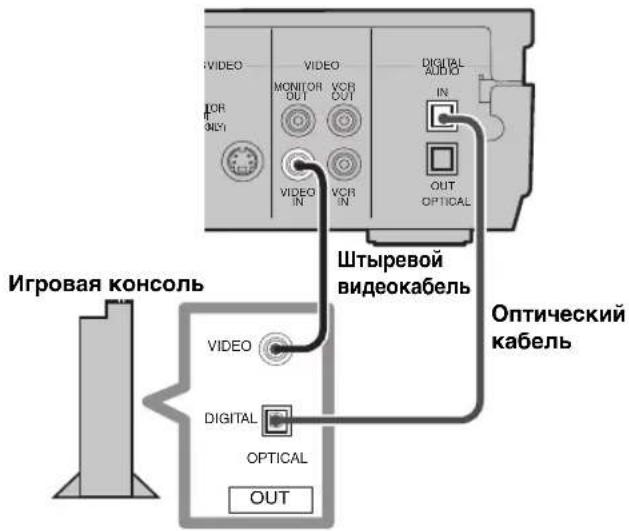
PpmeaHne
IpiH HPOBOM IOKJIIOHeHH HrPoBOH KOHCOJHK
CinemaStation, HcIOJIb3yIte IITbIpeBOH BnDCKa6eJIb H
OHTNIECKHI Ka6eJIb (IOKA3aHO HIXKe), HMeIOIIneCe B
IpoJaXe.

UtbipeBOB BndeoKa6eNb
Ontnueckn ka6ebn
1 ɪnɜːbʌkɪte nɒblæ3aʊnthɒk oʊnnaʊk OT rhe3da OPTICAL IN (DIGITAL AUDIO) Ha CinemaStation.
XpaHHTe KOJIINaYOK IIJy yCTaHOBKN Ha MecTO B TO BpeM, KOrIgA rHe3IO He HcNOJIb3yeTc.
4 Haxaub KhoIky STANDBY/ON, BkIouHTe CinemaStation.

5 Haxmte KhoNky AMP, 3aTe m haxmte KhoNky YPAO dna haayana npoceypbi HacTpoKn.
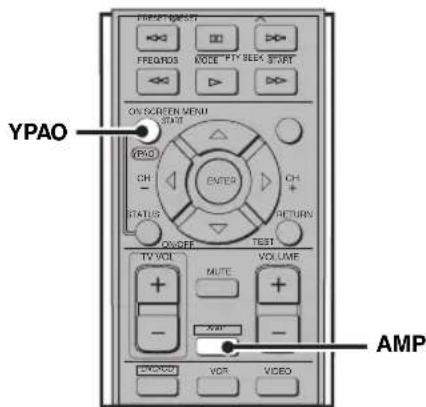
TeCTOBbI ToHaJIbHbI CNrHaJI (ypoBeHb
rpOMKocTH peTyJnpyeTcR) BOCIpON3BOJNTcR H3
KaJIO K0JOHKn, N IINCIJIeN IpeKJIIOaETcR
CJeYKOIIIM 06pa3OM. Y6eINTecB, YTO KOJIOHKA,
BOCIpON3BOJIIaIa TECOBbI TOHaJIbHbI CNrHaJI,
H Ha3BaHHe KOJIOHKn OINHaKOBO OTo6paKeHbI Ha
HNCHJIee.
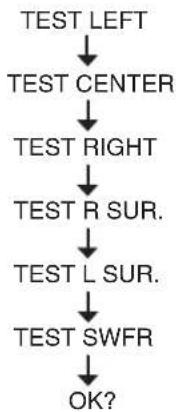
6ДЯ npoDoJxHnI npOeDypbI HacTpoKn, HaxMnte KhoNky YPAO eue pa3.
HaHnCIIIe IIOBIIeTc HINHkAaIIa "AUTO SETUP" H3MepeHHe HaUNHaeTc. TecroBbI ToHaJIbHbI CHHAI BbIBOJNTc HOOUpeEHO H3 KaKJIO KJOIOHN, H INCHIIe H3MeHReTc CJJeDyIOIH M Opa3OM.
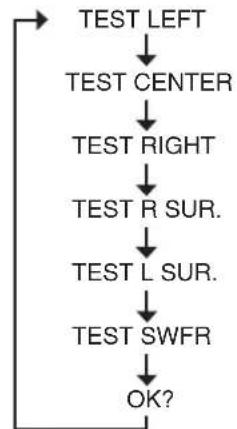
HaIHCJIeB IIpoueHTax OTo6paKaetc CoCTOHHne Ipoceca (ObbHNO 3TO 3aHnMaet OKOIO DByx MHyT). EclI IIpoeDpya HAcTPOKNI POIIa ycEHIHO, Ha IIcHJIeE IOBJIeTcN INIIHKaIIIN "YPAO ON" N COCTOHHNE IOIKIOUeyHHN KOIOHOK. IIOpOBHe C OCoTOrHHN IOIKIOUeyHHN KOIOHOK. CMOTPHe "IHINKauHN IPOBOKN KOIOHOK" HIXKe. Ipn OBnapyKeHHN IpeDyIPeXJDeHHN, Ha IIcHJIeC IOBJIeTcN INIIHKaIIIN "WARNING" N COCTOHHne IOIKIOUeyHHN KOIOHOK. BoIee IOIpOboH, CMOTPHe "COo6uHHe N ob OIIHbKaX N IpDeIyIPeXJDeHHN" (ctp.24).
Hndkaun npoBODKn KOJHOK
2.0F---:ToJbKOΦpoHTaJIbHbIe KOJIOHKN
2.1 F--SW: ΦροHTaJIbHbIe KOJIoHKn H ca6ByΦep
3.0FC-: ΦροHTaJIbHbIe KOJOHOHH IeHTpaJIbHaJ KOJOHOKa
3.1FC-SW:ΦpoHTaJIbHbIe KOJIOHKn, IeHTpaJIbHaKoJIOHKa n ca6Byep
4.0F-SR-:ΦpoHTaJIbHbIe KOJIOnHKN KOJIOnHKN OKpyKaIOUeRO 3ByuHaHH
4.1 F-SR SW: ΦροHTaJIbHbIe KOJIOHKn, KOJIOHKn OKpyKaIOUeRo 3ByaHn H ca6Bypep
5.0FCSR-: ΦpoHTaJIbHbIe KOJOHOHN,IeHTpaJIbHaN KOJOHKa H KOJOHOKN OKpyKaIOIIeO 3ByaHHN
5.1FCSR SW :ΦoHTaJIbHbIe KOJOIOHKn,IIeHTpaJIbHaKoJOIOHKa, KOJOIOHKN OKpykaIOIeO 3BvuaHn H caBbyep
OTMeHa pexnMa YPAO Bo BpeMa HacTpoNKn HaXmTe KIOIky ON/OFF Bo BpeMa IpoJeypbI NaCTpOnKn.
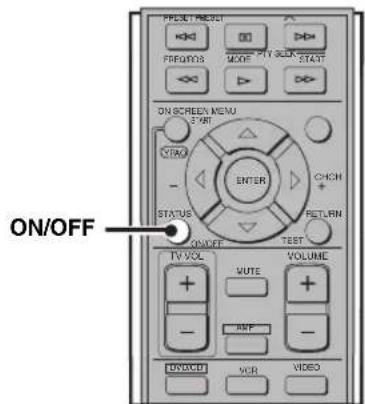
BkIIOueHne/BbIKIOueHnepeXnMa YPAO
BbMOKeTe IepeKJIIOuTaH HAcTPOIKN KOJIOHOK, BbIIIOJIHeHHbIE ΦyHKINeY PAO NIN BpyHyIO, BKJIIOINB/BBIKJIOINB peXIM YPAO.
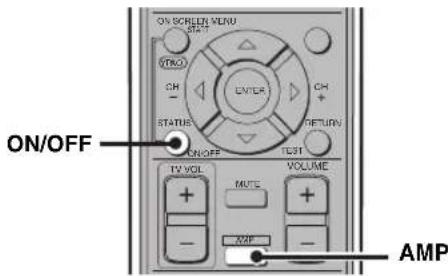
1 HaXMMTe KONKy AMP.
2 Haxmte KhoNky ON/OFF dIa OTo6paKeHbBb6paHHoro peKIma, 3aTeM, CHOba HaxKaB KhoNky ON/OFF, Bb6epnTe npametp "YPAO ON" nIi "YPAO OFF".
-
YPAO ON: Ha CinemaStation IncIOJIb3yOTcHAcTPOIN KOJIOHOK, BbIIIOJIHeHHbIeФyHKIIeYPAO. IIpN BO3HNKHOIIIIOII6KN BO BpeM TeCTHpOBaHH, IIOBJIaeTCNIIHKaIIH "W YPAO ON".
-
YPAO OFF: Ha CinemaStation HcnoJb3yIOTcHacTpoiKN KOIOHOK, BblIOJIHeHHbIe BpyHyIO.
#
IpnnoJyueHHn CnHraHa IpeioocrepekeHHBO Bpemnpoiecca H3MepcHHN YPAO,Ha IIncIIee oTo6paKaCTeHHIIKAIIIN "W YPAO ON".EcIn TaK npOn3oiIO,IpeekJIIOHTe HHIIKAaIHHO Ha IIncIIee,HCIOJIb3yRA KHOIIKN
IIpH BbIbOpe "YPAO OFF", HacTpOHH yCTaHaBJIHBAIOTe ha IIpeIbIyIuIe 3HaueHn.
PnmeuHn
BpeKHe YPAO,MOxHO IIPOH3BeCTN TOUHbIe HAcTPOHN HApamCTPOB KOJIOHOK YPAO,HaIIpHMep.yPOBcHbI paCCToHHeKOJOHKnT.I.
IIpn BbIOJIHeHH ToIbIX HAcTpoeK IIaIpaMaTePOb KOIOHOK YPAO, OHN OTO6paKaIOTc IIpn KaXJOM BbIOpe peXIMa YPAO.
Coo6eHnO6 own6kax n npedynpejxdeHn
Pn BO3HKnOBcHnn COo6HHe Hn 06 OH6Ke Hn PpeDyIpeKJHeHH, PPOBepbTe PpHuHny H cJeYrTe IIIa ry NO yCTpaHEHHIO OHH6KN, COOTBeTcTBYIOHMeMy COo6HHeHHO, 3aTeM CHOBA BbHIOHNHTe PpoIeDpy HacTpOKn (ctp. 21).
Co06eHnO6 own6kax Do NaCTpOKn
YctaHObKa TaMepa Cha
Ptp ycraHOBKe TaHmepa cHa, Ype3 onpeJeHHoe BpeM CyemaStaion aBTOMaTHueckn IpeKJIouaTcH apeKIM OxuHaH.

Haximam KhoNky SLEEP, BbI6epuTe yctaHOBky BpeMeHN.
IIpnKaJOM HaKATNN KHOKN SLEEP, yCTaHOBKa BpeMeHH IepeKJIIOUaETcIeNyIOUHM 06pa3OM:
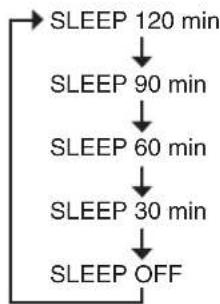
Ha HcPiEe CinemaStation 3aropaetc HnHkAToP "SLEEP".

Taimep cHa JeHCTBHTeJH ToJIbKO JINr CinemaStation. OH He BbIKIOuAcT dpyroc o6OpOBAHHc, IIOJKIIOueHHoe K CinemaStation.
-ФункинТаимета ChA OTMehReTcII npH yTaHOBKe CinemaStation B pCxHM OxHuaHH.
- PnabTOMaTHueckOyycTaHOBKe Ha pexHM OxHJaHHpeXHM Hn HacTpOoKn BocPOn3BeHeHH CoXpaHaHTcB HAMrTH CinemaStation. Bb MoKeTe HCIOJb3OBaTB TaKHe HAcTpOoKn IIpN BKIOUeHHn CinemaStation B cIeDyIOHN pa3.
OTmeHa Taumepa cha
IIOBTOPOHaXHMaK HONKy SLEEP, BbI6epHTe "SLEEP OFF".
Haayano Bocnpn3BedeHna
HaKMMTe KHOIIKy D.
OctaHOBka BocnpOn3BeDeHnA
HaKMHTe KHOIIky
中
При КадиоocTaHOBKe BOCIIpon3BcdeHnI, CinemaStation ABTOMaTHueCKN 3aIIOMHHaeT MeCTO OCTaHOBKN, INIOBJIeTc coo6HHe "To start playback from the beginning, press once more. To resume playback from where it was stopped, press>. EcINn Bbl HaxMeTe KHOIIKy D, BOCIIpon3BcdeHne BO306HOBJIeTc C MeCTa OCTaHOBKN.
Pay3a BocnpOn3BedeHnA
HaKMMTe KHOIIKy 00.
IIIBO306HOBJIeHHpeXHMA O6bIuHOrO BOCIIPOUN3BEJHeHH, HAXMITE KHOINKY>
Iokaapoboe Bocnpoun3BedeHne
DVD-V VCD
HaKab KHOIIKy 00, ycraHOBHTe IIay3y BOCIpOu3BeJeHnIaTeM IOBTOpHO HaXKMITE KHOIIKy 00.
IIpn KaKIOm HaKaTIN KHOIKN Ⅲ, BOCIPOIN3BOJNTcR OINH KaIp 3a pa3. IJIy BO3O6HOBJIeHHpeXIMa ObIYHOBOCIPON3BeJeHH, HAXMITE KHOIKY>.
БыICTpaЯ nepemOTka Ha3aДиИн ВпeрED
IIa6bIcTPOINepEMOTKNHa3aI,HAXMHTe KHOIKy<
IIa6bIcTPOINepEMOTKNBHepeI,HAXMHTe KHOIKy>
CKOpocTB H3MeHReTcIpiN KaXJOM HaXaTHN KHOIKN(Ha3aI:-4,-8,HJIn-32x,BHepeI:4,8,HJIn 32x).
PnmeaHn
- Ckopoctn -32H 32x HeIOcTynbI BO BpemBocpon3BcIeHHMy3bIkaJIbIbIX CD-JHCKOB.
BoBpMaBOcPnON3BeDHeHnIcka Dolby Digital HIN DTS, npn 6bIcTpoi IepcmOTKe BnepCn/na3a,I, 3ByaHHe OT KOJIOHOK OTCyTCTByeT.
3aMeJleHnA NepeMoTka Ha3aN BnepeD DVD-V VCD
HaKaB KHOKNy 00, yCTaHOBNTe NAY3y BOcPON3BeDEHnA,3aTeM HAAKMTe KHOKNy <12IIa3aMeJINeHHoI IpePMOTKn Ha3aI INH HAAKMTe KHOKNy >12IIa3aMeJINeHHoI IpePMOTKn BIEpeI. CKOpOCTb H3MeHnETCs IIpH KaXIOm HaaKaTHN KHOIKN <12IIH > (Ha3aI: -1/8, -1/4, INH -1/2x, BIEpeI: 1/8, 1/4, INH 1/2x) IIIA BO3O6HOBJEHNPeKIMa OObUHOrO BOCIPON3BeJEHnA, HAAKMTe KHOKNy
PnmeaHne
ФункияЗamEJIeHHOIIHepMOTKNHa3aJI HeIOCTYINHA BO BpemBOCIPnOuN3BeIeHHBHeo CD-ДИСКOB.
Pponyck pa3dienob (pOHorpaMM)
IIIa IIepeXoHa HaHaJIO HAcToHrero pa3JeJa
(foHOrrpaMMbI),HaXMITE KHOIIKy.
IIIa IIepeXoHa Ha cJIeIyIOIIHH pa3JeI (foHOrrpaMMy),
HaXMITE KHOIIKy.
IIIa IIepeXoHa IpEiBHyIHH pa3JeI (foHOrrpaMMy),
IbAaKbIb 6bICTPO HaXMITE KHOIIKy
PpmeuHne
2 YdepxnBaHaxKaToH KHOkKy SHIFT, HAXMITE KHOkKy REPEAT u BbIepeTe pexm Repeat Play.
IIpn KaXIOm HaxKaTHN KHOIIKN, HIIHKaIIN Ha IIHCIIe Ha 3KpaIe TeJIeBn3Opa MeHrIOTcra CJIeIyIOIIM O6pa3OM:
DVD BndeoAnck
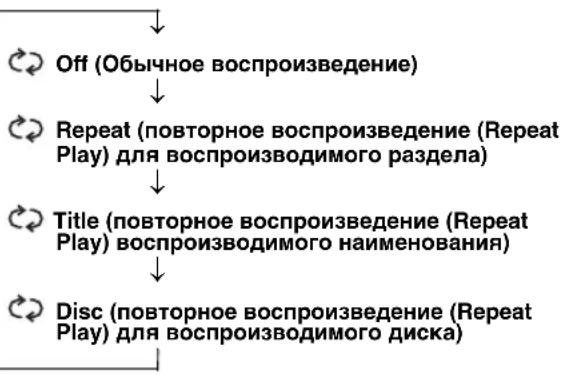
Bndeo CD-ncKn/My3bikalhbe CD-dnckn
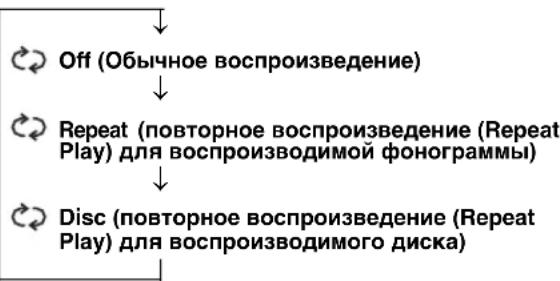
3aynyckaetc4yHKiuraRepeatPlayHcJeIyOuIINHHJKAtOppeKImaBOcIpOn3BeJeHn3aropaeTcHaJncJIeeCinemaStation.
REP: TOBTOpeHne HAnMeHOBaHHa, pa3JeJa NJIH FOHOHorpaMMbI.
REP ALL:Повтоpeпнда.
OTmHaФyHKuNRepeatPlay
YdepKnBaHkaToN KHOIIkySHIFT,HaXkMnte KHOIIky REPEAT N BbI6epHTe "Off".
■Повтор отpeзka мекду дымТочкамN(A-BRepeat)
YCTAHOBHB JBE TOUKN (HaJIO H KOHEII), BbMOKTe IOBTOPOHO BOCIPON3BecTH OIIpeJIeHHbI OTpe3OK HAHMeHOBAHHa (FOHOrpaMMbI).
PnmeuHaH
B 3aBnCHMOCTHINDAVD-1uCKa,pyHKIIRepeat Play MOKeT He cpa6aTBiBaTb.
-ФункиA-BRepeatIOcTyrHnToJIbKOJINOJHOHaHMeHOBaHH(foHorpaMMbl).

1 Haunthe Bocnpo3BeDeHne HauMeHOBaHHn nn foOHorpaMMbl, coepkaaee OTe3OK dIra NOBTOphoro BOCpO3BeDEHHN.
Boie IOIpo6Ho,CMOTpHTe "OChOBHbIe Oepaunn BocnpOn3BeJeHn" (ctp. 33).
2 B MecTe, rTe Tpe6yeTc8 yCTaHOBnTb TOUky Haayala dIa OTpe3Ka NOBTOpeHnY, yDepxuBaHaXaToi KhONKy SHIFT, HaxMnte KhONKy A-B.
Ha 3KpaHe TeJIeBn3Opa IIOBHTcI HIIINKaIINa "Repeat A" II ININKaTOp pexHMa BOCIIPOH3BeIeHHra (Ha IInCIIeee CinemaStation IIOBHTcI HINkauIINa "REP A-").
3 B MeCTe, rIe Tpe6yeTcY cTaHOBnTb TOkY KOHua dIa OTpe3Ka NOBTOpeHna, yDepXnBa HaxaToN KhONKy SHIFT, ChOba HaxMnte KhONKy A-B.
Функин A-B Repeat haunHaet IOBTOphoe BOCIIPOH3BeJeHHe.
Ha ekpahe TeIeBn3Opa IIOBHTcH INIKaIIIN "Repeat A/B" H INIKaTOp peXnMa BocIpOn3BcEHN (Ha INCJIpe CinemaStation IIOBHTcH INIKaIIIN "REP A-B").
OTMeHaФункциA-BRepeat
YIepKINBaHaxaToH KHOInKy SHIFT, Haxmnte KHOInKy A-B.
Ha 3KpaHcTeJIeBn3Opa IIOBJIaeTcHIIINKaIINaN "C/B Off", H cyHKIIIN A-B Repeat OTMcHaeTc.
YnpaBneHne MeHIO nscKa (MeHIO DVD/Video CD Playback Control)
HaMHOrHxDVD-ncKax n CD-dnckkac coepkaTcR opHHaJIbIbIe HABraHIOHIIbIe MeHIO, H3BeCTIIbIe KAKMeHIO DVD" HMeHIO Video CD Playback Control".JaHHbIe MeHIO oBecneuHBAIoT yIO6HOe ynpabJIeHHe IINCKOM. JIA HcNOJIb3OBAHIIaMeHIO DVD HJN Video CD Playback Control Ha CinemaStation, cJeNyIte npoueDype HnKe.
PnmuMeaHne
CoepkaHHe MeHIO H MeTOI yIpaJIeHHaKaJIOrO JNcKa MoYr pa3JIITaTbC. BoJee IIOIpo6HO 06 HcIOJIb3yeMOM JINCKC, cMOTpHTc HlCTpyKUHN, IIpeIOCTaJIeHHbIC B MeHIO JINCKA HIN HA cRO yIIaKOBKC.
YnpabJeHne MeHIO DVD DVD-V
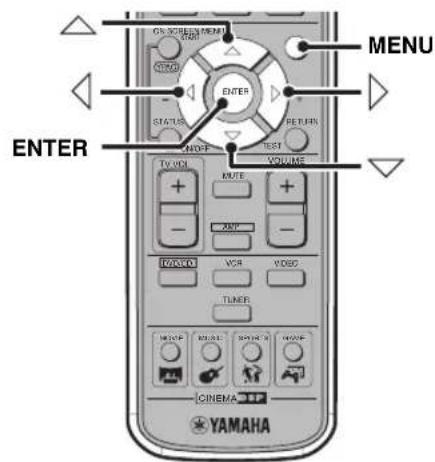
1 Haxmnte KhoNky MENU.
Ha əkpahe TeJIeBn3opa IIoRbHTcMa MeHIO DVD.
中
B 3aBnMoCTH OT JnCKa, MeHIO DVD MOryT aBTOMaTHueckn BBiCeHbTaBcI pH 3aRpy3Ke JnCKa.
2 Haxmam KhoNky △/V/
BbI6epnTe npaMeTp MeHIO, 3aTeM HaXMMTe KhoNky ENTER.
■Управленье Meю Video CD Playback Control VCD
PnBocpon3BeHnHN BHeo CD-ncKa, coepkaero yHKnIO Playback Control, MeHO aBTOMaTHueckn BCJIbIbAcT Ha 3KpaHe TeJIeBN3Opa. Iy npabJcHn yHKnE Playback Control c nyIbTa DY CinemaStation HcnoJIb3yIOTc rJeDyIOIIne KHOIIKN.
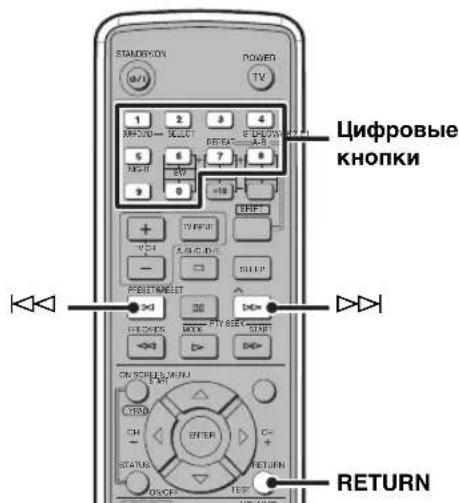
UHPOBbE KHOKn: Bb6op npaMeTpa.
D: IepexoHa cIeNyUoHn 3KpaH.
RETURN: Bo3Bpar Ha npceIbIyIuIeKpaH.
PnmuMeaHne
Функи Playback Control HeIoocTyHa IIpy HcNoJIb3OBaHHI Функи Program Play (ctp. 35).
BbI6OpЯ3bIKOB 3ByuHaHnI Cy6THTPOB DVDV
BbMOxKeTe Bb6paTb 3bIKN 3ByaHn H cy6THPTOB IJI BOCIPOUN3BeJeHHr DVD-INcKa. TaKke, Ha eKpaHOM MeHIO, Bbl MOxKeTe yCTaHOBHT b3bIKN IIO yMOJIuaHnIO IJI BOCIPOUN3BeJeHHr DVD-INcKa. BoJee IOnpO6Ho 06 UcTaHOBKe 3bIKOB IIO yMOJIuaHnIO, CMOTpHTe "PyKOBOJCTBO IIO 3KpaHOMy MeHIO" (ctp. 30).
PnmeaHne
BbMOKeTe BbIpaTb Y3bIKH ToJIbKO IIIN HCIOJIb3OBAHH INCKOB, IIOIIePJKBaIOIH MHOOR3bIKOBH peKHM. TaKKe, IOCTyIHbE Y3bIKH JUN KAJIOI ONGa MOYr pa3InuATbC. BoIEe IIOIpO6HO 06 HcIOJIb3yEMOM JINCKE, CMOTpHTe HHCTpyKIIHN, IIpeIOCTaJIbeHHBe B MeHIO INCKa HIN Ha erO yNAKOBE.
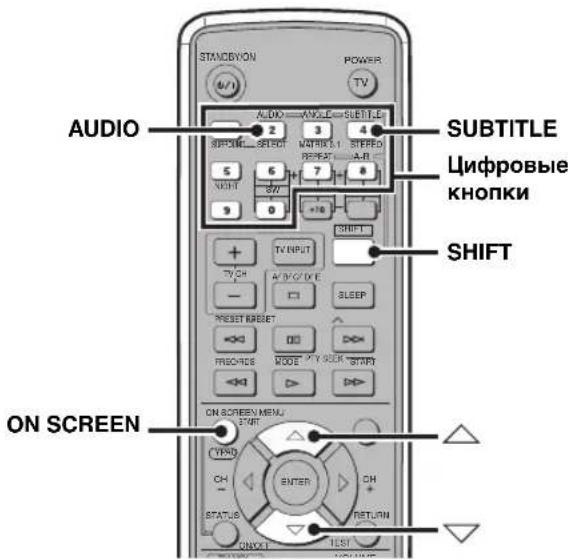
1 Bo BpemB BocnpOn3BeDeHn Hn nay3bl
DnCKa, ydePKNBaHaxaToH KhONKy SHIFT,
HaxMnte KhONky AUDIO nnn SUBTITLE.
Ha 3KpaIe TeJIeBN3opa IIOBNTcR 3KpaII BbIOpa
3bIka 3ByaHH NII 3KpaII BbIOpa 3bIka
cy6THTPOB.
3KpaH Bb6opa Ra3bika 3ByaHa
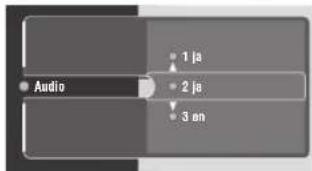
3KpaH Bb6opa Ra3bKa cy6TnTPOB
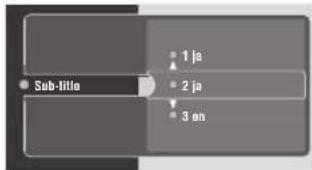
2 Haxmam KhoNky nn nn Ucnpobyo KhoNky, BbI6epnte XeJaembl 3bIK 3ByaHn nn cy6TnTPOB.
中
3bIK TaKKe MoXHO BbIbpaTb, HaxKaB KhoIky AUDIO HIN SUBTITLE, yIepxHbAa HaxaToH KhoIky SHIFT.
3ДЯ ВьIxOda n3 эКрана ВьI6opaЯЗыka, HaxмTe KhoNky ON SCREEN.
OTKJIIOUeHHe cy6TnTpOB
BbIbepeHTe npaMeTp "None" Ha Iaare 2 BbIe.
BbI6op Yrna PpocmOTpa DVD-V
BbMOKeTe Bb6paTb yroJI npocMOTpa IJI BA BOCnpoH3BeJeHnRA DVD-нсka.
PpimueaHne
BbMOKeTe BB6paTb 3bIKN TOIbKO IIpH NcIOJIb3OBaHH INCKOB, IIOIIepKHBaOHINx MHOKeCTBO yTIOB IIPOCMOTpa. TaKKe, IOCTyIHbIe yIbI IIPOCMOTpa JnKaJIOrO INCKa MOrY pa3INuHaTbc. BoJee IIOIpO6HO O INcKe, CMOTPHTe HnCTrpyKnn, coIepKaIIHeec B MeHIO DVD-IIIcKa Hn Ha erO yNaKOBke.
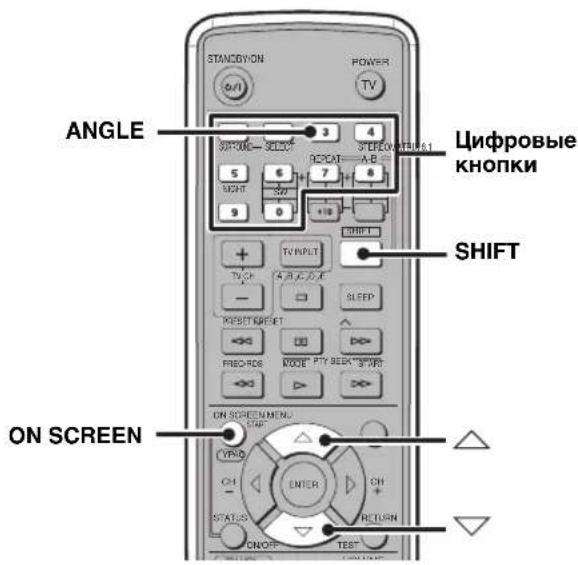
1 Bo BpemBocnpo3BeDeHnI nn nay3bl DnCKa, ydepXnBaHaxaToN KhONky SHIFT, HaxMnte KhONky ANGLE.
Ha 3KpaHrTeJIeBn3Opa IIOABHTcR MeHIO BbI6opa yTla IIPOCMOTpa.
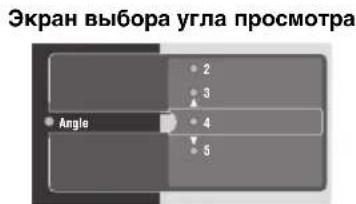
2 Haxmam KhoNky Wn nn CpObIe KHOKN, BbIbepTe yroI npocMToPa.
YTOJI IPOCMOTpa TaKKe MOXHO BbI6paTb, HaxaB KHOIIKy ANGLE npHaxaToi KhoIIke SHIFT.
3ДлвьхобиЗкранььбopaугп npocmoTpa,нжмTeКноку ON SCREEN.
OTMeHa 3aKpbITnIaOCTyNa K DnCKy
Bb6epnTe npaMeTp "Off" Ha 3.
Bocnpon3BedeHne 6JOKnpoBaHHbIX DmCKOB
IIIOCTyNA K 6JIOKINPOBAHHOMY NHCky IyTeM BBOJa IIAPoJI, BBIOJIHNTE IPOUeIpy HNKe.
1 UCTaHOBnte DnCK B IOTOK dIa DnCKOB. IJIg 6JIOKInPOBaHHOrO DnCKa IIa 3KpaIe TeJIeBN3Opa IIOBHTcR 3KpaH BBOJa IapOJIa.
2 Haxab KhoNky nIM , BbIepuTe napameTp "Play once" nn "Play always", 3aTEM HaXMITE KhoNky
Play once: Tpe6yeTcBBeCTH npoJIb IIBA BOCIpOHN3BeIeHHN IINcKa B CJIeIyIOIIpa3. Play always: He HxKHO BBOINTb npoJIb IIBA BOCIpOHN3BeIeHHN IINcKa B CJIeIyIOIIpa3.
3 HaxmamauΦpoBbIe KhoNk, BBeInte napoIb (4-3HaHbI).
HaHnHaetcBocIpOn3BeJeHHe.
中
Дажп npи Вьборе пapametpa "Play always", yctaHOBka MOKCT 6bITb H3McHeHa Ha "Play once", ecJn, IIocJIe IONBJIeHnHa 3KpaHe TeJIeBn3Opa HHKOHKn TBeTeHHe 10cekyHn HaxKaTb KHOIIKy.
CinemaStation aBTOMaTHueckn 3aIOMHHaet IIcKOByIO HhOpMaHIO Ha 120 hCKOB. PpN 3aIpy3ke 121- ro IncKa, CinemaStation aBTOMaTHueckn yJaJIeT IIcKOByIO HhOpMaHIO IJIIE NepBoro (CTapeIIIEr) IIcKa.
PnmuMeaHna
Iapoiem IO yMOJIaHHIO RAJIeTcR "0000".IIJnH3MeHeHHnIAPoJI, BbIOJIHHTe IpoJIeIpy "N3MeHeHHnIAPoJI".
- Ecin Bbl 3abbln Iapolb, BmecTo npoJIO qeTbipe pa3a HaxMMTe KHOIIky. IONBHTcN KOHka ORpaHHueHH. Ecin Bbl HaxMeTe KHOIIky eIe qeTbipe pa3a, IONBHTc
HnKaun "Enter the new PIN".
I3meHeHne napOJIa
Ipoueypa HnKe BbIOJIHReTc IJIa H3MeHeHHa npOJI IOCTyIIa K 6IOKInPOBaHHOMY INCKY.
1 BbInonHnTe 7aRn 1-5 n3 npoceDpybl "YcTaHOBka yPoBHa Parental Control" (cTp.43).
2 Haxab KhoNky MIn BBbIepeHnnapaMeTp "Change PIN", 3aTeM haxMHTe KhoNky
3 Haxmamu cnpobbie KhoNk, BBeDnte Hactoan npoB (4-3NaHbI).
PnmeaHna
- Iapoiem IO yMOJIaHIO RaJIeTeTcO "0000".
- Ecln Bbl 3abbln Iapolb, BmecTo IapojIIO qTeBIppe pa3a HaKMNTe KHOIIKy. IIOBHTcra IKOHka OppaHHteHH. Ecln Bbl HaKMCTc KHOIIKy cIeC qTeBIppe pa3a, IIOBHTcra HHIIKaIIH "Enter the new PIN".
4 HaxmamznpobbkehONK, BBeDHTe HOBbI npoJIb (4-3HaHbI).
5 HaxmamuΦpOBbIe KHOKN, 3aHOBO dIa IoTBePxDeHnB BBeDnTe HOBbI napOJb (4-3HaHbI).
6ДлЯ Выхобаи3Зкразного MeHIO,нжмITE KhoNKy ON SCREEN.
OTo6paKeHHe NaCToTbI.
HacrtpoiKaHa paAnocTaHcnn BpyHyIO (Manual Tuning)
Pn cIa6om IipHeMe paHIOBOJIN B BaIIeM peHNoHe, HAcTPOITecb Ha paAnOCTaHIIIN BpyHyIO.
1 Haxab KhoNky PRESET/BAND Ha CinemaStation, BbIbepnTe FM (Pexm Hactpoyn) nAm (Pexm Hactpoyn).
PnKaKJOM HaKaTHN KHOIIKN,peKHMbl HepeKJIIOUaOTcCJeIyIOuIMo6pa3OM:

2 Haximam KhoNky AUTO/MAN'L, Bbl6epuTe pexm Manual Tuning.
Y6eHITecb,HTOHaIINcIIJee CinemaStation OKJIIOHJIac HHHKaIIHRA "AUTO".

3 Haxmam KhoNky PRESET/TUNING ANV, HAcTPOINTECb Ha YacToTy.
#
Pn HcHIOJIb3OBaHHn peKHMa Manual Tuning nHaCTPOINKa YM paHocTaHHn,peKHM npHeMa paHIOBOJIN CinemaStation aBtOMaTHueCKN IepckJIOuAcTcHa MOHOFOHHueCKn IyIyUHeHH KaYecTBA CHHaJa.
BbI6Op npedyctaHOBJIeHHbIX paIIOCTaHcN (Preset Tuning)
EcIN Bbl, HcnoIb3y4 yHKuHIO Auto Preset (ctp. 51) HIn Manual Preset (ctp. 52), IpeNyCTaHOBHTe cBOH IIIObHMbIe paHocTaHH Ha CinemaStation, IO3Ke Bbl CMOKeTe 6bICrpo HAcTPOHHTbcra Ha paHocTaHH, IpoCtO Bbl6paB HOMep H rpyIIy IpeNyCTaHOBKn.

1 Haxkab KhoNky A/B/C/D/E, BbI6epHte rpynny npedyctaHOBKn padnoctaHcIM, KOtopyo Bbl XOTHe npocLywaTb.
IpyiIbI IpeNyctaHOBKn IepeKIOuHaOTc IIpN KaJOM HaKaTHN KHOIIKN.
2 Haxab KhoNky PRESET/TUNINGA, BbI6epnte HOMep npedyctaHOBHeHHo paHocTaHcnn, KOtOpyu Bbl XOTnTe pOcnyuatab.
Ha nncnnee CinemaStation BbCBeuHbAeTc HnHkauHn "TUNED" npaHno HaunHaet npOnHrpBbAtbc.
中
BbTaKaKe MoKeTe Bb6paTb IIpeIyCTaHOJIeHHbIe paIIOcTAHIN,HaKaB KhoIKy A/B/C/D/E H PRESET/TUNINGA CinemaStation.
Ipnem 4M paanoctaun cinTeMbRDS (ToIbko Moeenn dnn CoednHoro KoponeBCTBa BeNko6pntahnn n CeBepno HpnaHnn, n EbpOnbl)
RDS (Radio Data System) -это снстema педач NM paДиocтани,В OCSHOBOM HcIOIb3yemaj B CoeIHHeHHOM KopoJIeBCTBe BeIHKo6pHTaHH N CebepHOИрлaHIN, И EBpOIE. TpaHcJIaIIH ChTeMbRDS coIepKAT pa3IINHbIe TINbI HfOpMaIIH KaK PS (Пограмная уciуra), PTY (TINI IIpOriPamMbI), RT (PaIIOteKCT), n CT (TekyuIee BpeM).ДЯпгема NM paДиoctahIN Ha CinemaStation, пepeJaBaEMbIX IIO chSCTeMe RDS, bblIOJIInHTe cIeIyIOIyIO IIpoIeIpy.
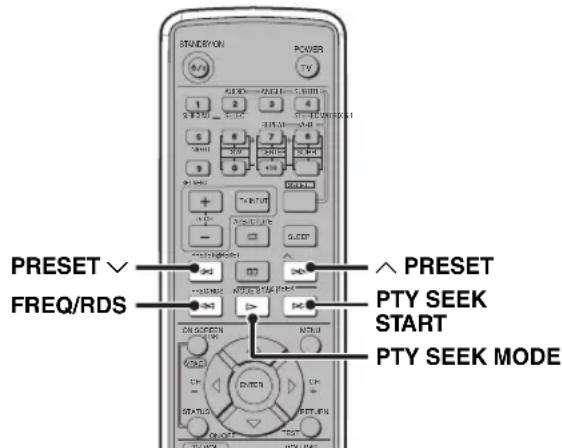
RDS coepknt CJeIyOuIne TnIIb IHHΦopMaIIH.
OTo6paXeHHe HAnMeHOBaHHpaHocTaHIN.
- PTY (TиnporpaMMbl)
OTo6paKeHHe TnIa IIporpaMMbI (XaHp).BoJIee IIOIpO6Ho,CMOTpHTe cIHcOK "TII IIporpaMMbI (XaHp)" (CTp. 50).
- RT (PádnotekeCT)
OTo6paXeHnE TeKCTOBOn HnHΦOpMaIIHH, CB3aHHoC TpAHCJIaIcH RDS. (JIa HEoIpeIcJIeHHbIX 3HaKOB BBiCBeYHBaCTcR 3HaK IIIOupeKINBaHH.)
CT (Tekyüee Bpemr)
OTo6paKeHHe TeKyuIeRo BpeMeHH. (PiH TPyHocT8X B IIpHeme BpeMeHHoI HnΦOpMaIIHN, IIOBJIeTcR HnJHKaIIIN “CT WAIT".)
PnmeaHn
TINbIOCTYHHOH HHPOpMaHIN RDS BapbHpyIOTB 3aBHCHMOCTH OT paHNOCTaHHN.
IIpn OteHb Cia6om IprHeMe YM paHIOCTaHHn CHCTeMBI RDS.CinemaStaion MoKet HEOJIHOCTbIO IIpHHMaTb HHOpMaIHIO RDS.BOCo6eHHOCTH,HHOpMaIHRA RT (PaHOTcKT) 3aHHMaTc 60JIbIHINCTBO dHaIIa3OHa, HJaKe cJIn JpyrncpeXMMbpa6OtaIOT,daHHa HhOpMaIHn MOKeT 6bITb HeIOCTyHn.
- Ipepa HOpmaH RDS np cIa6o paIOBOJIe MoKet 6bIb HeBO3MOXHa. B TaKOM cIyae, HaKMHTe KHOIIky AUTO/MAN'La HcinaMaStation, TTo6bl peKHM IIpcMa paIOHOHraJa Ha CinemaStation aBtOMaTHueckn IpeKJIIOHJcH Ma MOHOPOHHueckH JIyYIIHeHH KaeeCTBa CHHaJa.
- IIpn IOMexax paIINocHrHaJa, Ha IIINcIIe CinemaStation oTo6paKaaeTcH NIDHKaIIH “...WAIT”. B TaKOM cIyAe, CinemaStation He MoKeT IIpHHMaTb HIIΦopMaIIHO RDS.
BbI6op paHocTaHcHn no TnHy npOrpaMMbl (XaHpy)
BbMoKTe HaCTpaHbTaBcHa YM paJIOocTaHIN CNCTeMBI RDS, Bb6paTnII IporpamMbI (kaHp).PnBbIOpe TnIIa IporpamMbI,CinemaStation ABTomAtuueckN HIEETYM paJIOctaHIN CNCTeMBI RDS, IIpeJaIOIIne COOTBeTCTByIOIIne IporpamMbI Ha DaHHbIMOMEHT.
1 HaXMMTe KHonKy PTY SEEK MODE.
Ha nucnuee CinemaStation oTo6paKaetc TnI IporpamMbI, Bb6paHHbI B IIpoUJIbI pa3.
2 Haxkab KhoNky PRESET AN Nn V, Bbl6epute TIN nporpaMMbl IJI npocnyuBaHn.
CyIeCTByIOT CJIeIyIOIIne IOCTYIIHbI TEIIbI IUPORpAMM:
Tun nporpaMMbl (XaHp)
| NEWS HoBocThi |
| AFFAIR TeKy έиne akTyaJIbHbIe BOIIpOcbl |
| INFO O6IIaŋ HnΦopMaIIηa |
| SPORT CInopt |
| EDUCATE O6pa3OBaHnE |
| DRAMAДраMa |
| CULTURE KуЛьТура |
| SCIENCE Hayka |
| VARIED Pa3БЛeчЕнЯ |
| POP M ПОП-MуЗыкa |
| ROCK M Pok-узыкa |
| M.O.R.M My3ыka BpyTN (ДЯ ЛeгКоTO IIproSnyuINBaHnI) |
| LIGHT M ЛeгКая KJIaCCNueckaЯ My3ыka |
| CLASSICS KJIaCCNueckaЯ My3ыka ДЯ 3HaTOKOB |
| OTHER M ДPyrgHe BИДы My3ыкn |
3ДЯн haayana nomcka paadnoctaHn, HaxmTe KhoNky PTY SEEK START.
Bo Bpemnnonka,Ha nncnnee CinemaStation BBICBeuHbAeTcHnHkaua "PTY HOLD".

EcIn CinemaStation haoiHT M paHocTaHnIO cnCTeMbI RDS, IOxOaHn IpyIIIE BbI6paHHoro TIIa IIporpamMbI, paHIO HaHT pa6oTaTb.
4 NOBTOPRAte war 3, noka CinemaStation He NaIeT yM paAnocTaHcNIO cNCTeMbI RDS.
OTmeHa 1n2
Двждынжмпс коньу PTY SEEK MODE.
PpeDyctaHOBKa PaIIOCTaHcN
Bb moke TpeyctaHOHT bIOHmbe paHocTaHIN ABOMATHeCKN (TOJIbKO JIM PAHOCtAHIN) HIN BpyHyO, H3aTeM JIERKO HAcTpaHBcA HnHX, IPOCTo Bb6pab rpyHIny H HomeP PteyctaHOBKn. B nAmrTH CineMaStation MoKHO xpaHHT JIO 40 paHocTaHIN (5 rpyHH x 8 paHocTaHIN).
A B T O M A T N U C E C K A N p e d y c t a H O B K A U M p a d n o c t a H C N (A u t o P r e s e t)
IIpHIOCTaTOHNO XOPOIeM IIpHEMe paIHBOJIN IHaIIa3OHa YM B BAIIeM perHOHe, c IIOMOIbIo fYHKIIu Auto Preset, bbl MoKeTe JERKO H 6bICTpo IIpeyCTaHOBHTb YM paIHOCtAHIIu. EcJIb Bbl XOTHTe IIpeyCTaHOBHTb AM paIHOCtAHIIu HJI IN IIpH CJIa6OM CHHaJIe YM paIHOCtAHIIu B BAIIeM perHOHe, IIpeyCTaHOBHTe CTAHIIH BpyHyIO (cTp.52).
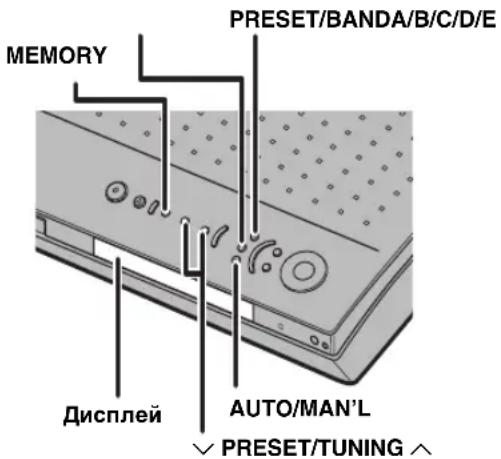
1 Haxaub KhoNky PRESET/BAND Ha CinemaStation, BbI6epnte FM (Pexn m npeducTaHOBKn).
Pn KaKJOM HaKaTHN KHOINK,peKHMbl HepeKJIIOUaIOTc CJeNyIOHm 6pa30M:

2 Haxmam KhoNky AUTO/MAN'L, BbI6epnte pexnM Auto Preset. Y6eINTecb, YTO Ha IncIIee CinemaStation BbICBeTJIcHINIKaTOP "AUTO".

3 HaxmTe uyepKnBaIe B TeueHne npImepHo Tpex cekyhd haxaToi KhoNky MEMORY.
HaIHCIIee CinemaStation MHraHOT HINKauHH “MEMORY” H “AUTO”, 3aTeM, Ype3 HeckoJIbKOceKYHa, fYHKua Auto Preset HaYHaaet IIOHCK paHIOCTaHnIH OT HactOJIeH JaCTOBy B HAnPaJIeHHBbCOHX YaCTOT. IIO 3aBePHeHHo paObTy fYHKuaHH Auto Preset, HINKaun “MEMORY” H “AUTO” OTKIOUaHTc, H CinemaStation ABTomaTHueckn IIpNCBaHbaET rpyHbI N Homepa IIpeyctaHOBKn OhapuyKeHHbIM YM paHIOCTaHHm.
Yka3aHne HauJIbHOI rpynnbln HOMepa
Mokno yka3aTb rpynny HOMep npeynctaHOBN, IIOI KOtOpO 6yTe coXpaHHeHa IepBaI oHApyeHHa YMa paHocTaHn. TaKke, Bbl MoKeTe 3aIyCTnB cyHKnIO Auto Preset ot BBipAHHO B HAcTOHIM MmEHT qACTOTBI B HAIIpaBJIeHN HBCOKHX HIN HN3KNX qACTOT.
1 BbInonHnTe 7aRn 1 n2 npOeDpybl "ABTomatNuecka npedyctaHOBka YM padnoctaHcni (Auto Preset)"Ha daHHoI cTpaHnCe.
2 Haxmnte u ydepKnBaTe B TeueHne npimepHo Tpex cekynd hkaToh KhoNky MEMORY. Hnikatop MEMORY mHaet Ha nciIee.
3 Bo BpemM mHaHnI nHdNkaun MEMORY, haxkab KhoNky A/B/C/D/E,Bb16epnte HaaybHyIO rpynny npeducTaHOBKn, 3aTeM, haxmam KhoNky PREsT/TUNINGAII N, BB6epnte HauaIbHbI Homep npeducTaHOBKn.
4 Haxab KhoNky PRESET/BAND,OTKIOUHTe DBOEToHne(:),3aTeM HaXMaIte KHOINy PRESET/TUNING nnnv.
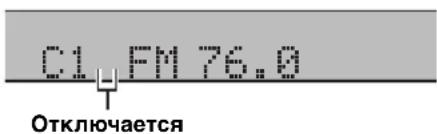
IIpn HauKaTHN KHOJIKN PRESET/TUNINGV,dyHKIIAuto Preset HaunHaet HactpoKy OT YAcTOTbI,OTpaKeHHoB BJaHHbIMOMeHT,BHaIIpaJIeHHHnH3KNXaCTOT,a IIpn HauKaTHN KHOJIKN PRESET/TUNINGA-BHaIIpaJIeHHH BICOKHXaCTOT.
#
- Pn nppeyucTaHOBKe paHocTaHH, CinemaStation aBTOMaTHueckn 3aIOMHHaeT TaKke peXHM IIpHeMa (ctpcocfoHHueckn HJIM MOHOOHueckn).
-Функинг Auto Preset abToMaTHueckn IPhoHcTaHaBJIbBaTeIocJIe IOnHcKa Bcero YaCTOTHO rHaIIa3OHa HIN HaxOxJcHn40 paHnoctAHH.
IIpH BbIbOpe HOMepa IIpeIyucTaHOBKe, KOtOpBiyKe IIpyrOpaIIOCTaIHH, cTapaia PaIOCTaIIIN6 6yET 3aMeHcHa IIA HOByIO. - Ecln, JIO BbIIOJIHeHII IaRa 3 Bblne, MrrAeT HnHKnAqHIMEMORY, 3TO O3HaaycT, TTO cyHKIIHA Auto Preset 6blnaOTMeHeHa HxKHO HaTaB IIpoIeDpy ChauJa.
Пре ductаноьк paадиocтанчи врууну (Manual Tuning)
EcHn BxOHTe IpeyctaHOBtB AM paHocTaHHn Hn npn cIabom cnHaJe CM paHocTaHHn B BaHem peHone, cJeYra IpOueDype HnKe, IpeyctaHOBtE CTAHnn BpyHyIO.
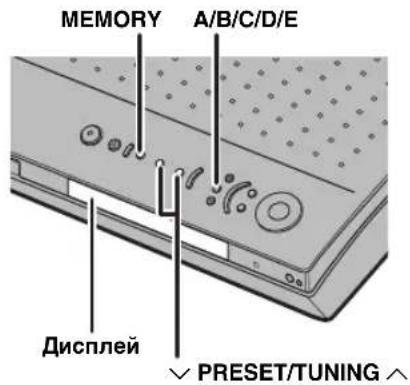
1 HactpoItecB ha paHIOCTaHIO dIra npEduCTaHOBKn. BoJIee IIOJPO6HO, CMOTpHTe "HAcTPOJa Ha PaHIOCTaHIIIN" (ctp. 48).
2 HaXMMTe KhONky MEMORY.
Ha dnciiee CinemaStation B TeueHne Iprimepeho IIaTH cekyHd Mnraet HnHnKaun "MEMORY".
3 HaxaB KhoNky A/B/C/D/E, BbI6epnte rpynnny npedyctaHOBKn (A-E), rde 6ydt coxpaneha paAnocTaHnra, BbI6paHHa B daHHbIM MOpHT. Y6eHtecb, yTo IBOeToUne (:) oTO6paKeHo Ha nnCIIee CinemaStation.
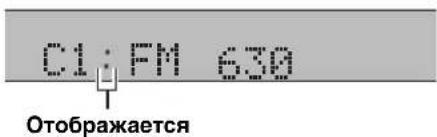
4 Haxmam KhoNky PRESET/TUNING A, BbI6epnte Homep npedycTaHOBKN (1-8),rnde 6ydt coXpaHeHa padnocTaNUn, BbI6paHHaB DaHHbIM MOMHT.
5 HaXMMTe KhONKy MEMORY.
Ha CinemaStation pao paiooctaHn 6yIeT npimeheHa BbipaaHHbe IpyIIH N HOMep IpeIycTaHOBKn.
中
-IIpnIpeNyuctaHOBKe paHIOcTaHH,CinemaStation ABTOMaTHYeCK3aIOMHaeTe TaKKe peXHM IpiHeMa (ctpccofoHHUcckn HJIMMOHOFOHUcckn).
- IIpn BbIbope HOMepa IpeIyuctaHOBke, KOTOpbI yKe IppHMeHReTcraIpyrOpaIINocTaHIIHH,CTapar paIIOCTaIIHH 6yIcT 3AMCHHa Ha HOByIO.
- EcIN, IO BbIIOJIHeHII IIIa 3 BbIIIE, MIRaET HINKAIIMEMORY, ETO O3Haayact, YTO cyHKIIIA Auto Presct6bIIa OTMeHeHa HUxHHO HAaTb IPOeIpy cHaJaIa.
3aMeHa MeCT COxpaHeHnI ppeDyuctaHOBJIeHHbIX paAdnoctaHcN
JI3aMeHbI MeCT COxpaHeHHI IpeJyCTaHOBJeHHbIX paHocTaHIN, BbIOJIHNTE cJeIyIOUYIO IpoIeDpy. B daHIOI IIpoIeIype IIpHBeEN IIpIMep 3aMeHbI MeCTaMIIpeJyCTaHOBJeHHbIX paHocTaHIN E1 H A5.
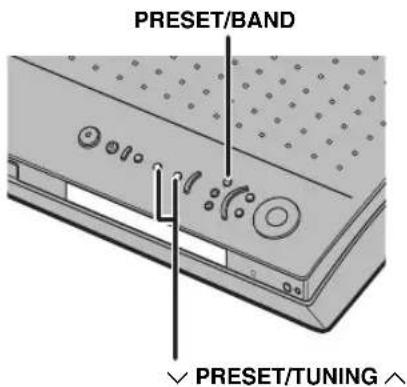
1 BbI6epNTe paAnocTaHcHIO, coXpaHeHHyIO kaE1.
BoJee IOIOPO6HO,CMOTpHTe "BbI6Op IpeIyCTaHOBJEHHbIX paIINOCTaHn (Preset Tuning)" (cTp. 49).
2 HaxmTe u depXnBaTc B TeueHne npMepHo Tpex cekynd HaxaToK HONKY PRESET/BAND.
HINKaIIIN “E1” H“MEMORY" MIRaIOT Ha IINJIeC CinemaStation.
3 Bo Bpema MmraHn HndnKaun MEMORY, haxab KhoNky A/B/C/D/E, BbI6epnte rpynny npedyctaHOBKn "A", 3aTeM, haxumar KhoNky PRESET/TUNING , BbI6epnte Homep npedyctaHOBKn "5".
HINKaUN “A5” H“MEMORY" MIRaOT Ha IINcIIee CinemaStation.
4 HaXMMTe KHonky PRESET/BAND.
Ha nncnnee CinemaStation noBnIeTc HnHkauHna "EDIT E1-A5", npaHocTaHn 3aMeHIOCTc MeCTaH.
#
- EcII, IO BbIIOJIHeHII IIIa 3 BbIIe, MIRaet HINKaiIMEMORY, 3TO O3Haayact, YTO cyHKIIIA Auto Presct6bIIa OTMeHeHa II HYKHO HAaTb IPOIeIpy cHaJaIa.
- EcII, IO BbIIOJIHeHII IIIa 3 BbIIe, MIRaet HINKAIIMEMORY, 3TO O3Haayact, YTO cyHKIIIA Auto Presct6bIIa OTMeHeHa II HYKHO HAaTb IPOIeIpy cHaJaIa.
Bocnpon3BeDene BHeuHnx NcToHnKOB
При ПОДКЛIOUHeHIN BHEIIIErO ayIINO-BN3yaJIbHOrO KOMIOHeHTa K CinemaStation, BBI MOXKeTe HacJaKJAtbCra ayIHOBn3yaJIbHbIMn IcTOYHNKAMn Yepe3 CinemaStation, IIPOHTpbIbAeMbIMn Ha TaKOM BHEIIHem KOMIOHeHTe. BoJIee IOIpo6HO O MeTOJax PONIKJIIOUeHIn, CMOTpIte “POnIKJIIOUeHIne BHEIIHHx AyINO-BN3yaJIbHbIX KOMIOHeHTOB” (cTp. 14-17). TAKKe, BBI MOXKeTe yIpaBIAITb KOMIOHeHTom Yepe3 IIy CinemaStation, yctaIOBbN KoJ dY (cTp. 72).
PnmeaHne
IO BbIIIOJIHeHHIIO6bIX IOKIOJEHH ITHyIpaBJIeHHBHEIHMM ayHIO-BH3yaJbHBIM KOMIOHeHTOM, o6aTeJIbHO H3yHTHeHcTpYKIIIOK HeMy.
Bocnpon3BeDeHne TeJeBu30pa
Ipi nIOKJIIOueHn rHe3I VIDEO IN L/R (AUDIO) Ha CinemaStation n ayINOBbIXoINbIX rHe3I L/R Ha TeJIeBn3OpE uepe3 IITbIpeBOH ayINOKa6JIb (ctp.12), Bbl MoKeTe IIPOCJIyINBaTb 3ByKOBOe COIIPOBOXJdHnE TeJIeBn3Opa uepe3 CinemaStation.

1 BkIIOUHTe TeJIeBn3Op, 3aTeM, HaxKaB KhoNky STANDBY/ON (I)/BkIOUHTe CinemaStation.
2 Haxmnte KhoNky VIDEO.
Bocnpo3BeDeHne BndeomarHnToOfoHa
IpnnoKIOueHnVCRIN L/R (AUDIO VIDEO)HaCinemaStation HbIXoIHbIXayINO/BNIEO rHe3L/R Ha BnEOMaHHTofohe yepe3 ayINO/ BNIEOKa6JIb (ctp.15),Bbl MoKeTe npocnyuHBaTb 3ByaHne OT BnEOMaHHTofoHayepe3 CinemaStation.
PnmeaHne
IpyctaHOBKe "Input Assign" Ha "VCR" (ctp. 78) H "Input Mode" Ha "AUTO" (ctp. 79) B MeHIO yctaHOBKn Set Menu, CinemaStation BbIOHT HCTOHHK OT Hc3Ja OPTICAL IN IIpi HIOCTyIHHeHH Ha Heo CnHaJIoT JIO6Oro HCTOHHKa. IIN IIPOCSUYINBAHH HCTOHHKa, IIOCTyIIAOJIeero Ycepe3 Hc3Ja VCR IN, oCTaHOBHe BOCIIPOH3BeJIeHHe HA KOMIIIOHeHTE, IIOIKJIOUeHHOM K Hc3Iy OPTICAL IN.
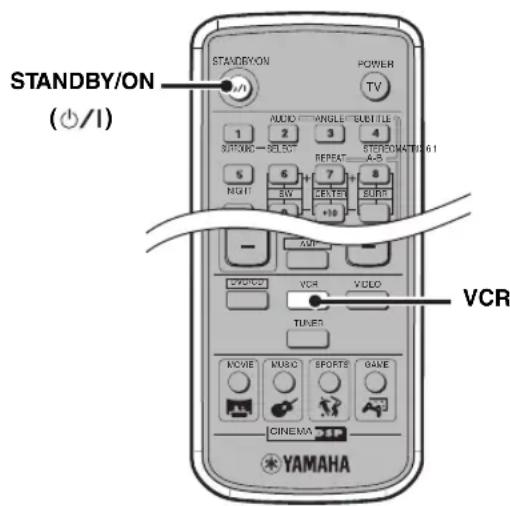
1 BkIIOUHTe TeJIeBn3Op IN BnIDEOMaHHToΦOH, 3aTeM nepeKJIIOHTe ΦyHKcIIO npHeMa TeJIeBn3Opa Ha BXoJ, K KOtOpOMy NOdKlIOueH CinemaStation.
2 Haxab KhoNky STANDBY/ON ()/1 BKJIOUHTe CinemaStation.
3 HaxmTe KhONky VCR.
4 Haunthe Bocnpon3BedeHne Ha BndeomarHHTOfoHe.
Прогрваиме на有很大�юй KOнсоли
IIpnIOKJIIOUeHHnIHe3IN L/R (AUDIO/VIDEO)Ha CinemaStation IN BbIXOINbIX ayHNO/BHJeO rHe3L/R Ha HrpoBOn KOHcOJN Ype3 ayHNo/ BHJeOKa6eJIb (ctp.16), Bbl MoKeTe InpocJyINBaTb 3ByuAHne Hrp Ype3 CinemaStation.
BbTaKcMoKcTe BbHIOJIHTb HcPOBOe IOKJIIOUChHe MExJy CinemaStation HrpoBOH KOHCOJIbHO (cTp.16).
PpmeaHne
IpyyctaHOBKe "Input Assign" Ha "VIDEO" (ctp. 78) n "Input Modc" Ha "AUTO" (ctp. 79) B MCHNO yCTaHOBKn Set Menu, CinemaStation BBIOHIT HcTOHHK OT rHe3Ja OPTICAL IN IIpn IIOCTyIIJIeHHn Ha Iero CHHaJIa OT JIO6Oro HcTOYHHKa.ДЯ IIpocIyIHHBaHHN HcTOYHHKa, IOCTyIIaIOIIeRo Ype3 rHe3Ja VIDEO IN, ocTaHOBHTe BOcIIPOH3BcDEHHc Ha KOMIOHHTe, IIOIKIIOUChHOM K rHe3dY OPTICAL IN.
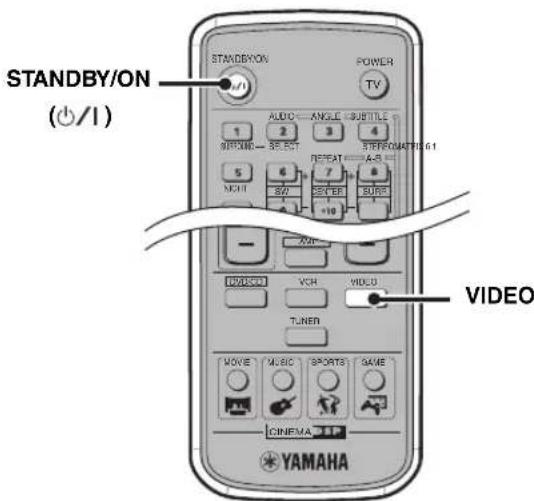
1 BkIIOHTe TeJIeBn3Op INrpoBvIO KOHcOJIb, 3aTeM BKJIIOHTe FyHKUIO npneMa TeJIeBn3Opa Ha BXoD, K KOtOpOMy NODKIIIOueh CinemaStation.
2 Haxab KhoNky STANDBY/ON ()/1 BkIouHte CinemaStation.
3 HaXMMTe KNONky VIDEO.
4 HaHnTe Bocnpon3BeHeNe nrpbl.
3a\Pncb Aydno-Bn3yaJIbHbIX NcToUHNKOB C IcNoJIb3OBAHHeM BHeuHnx Aydno-Bn3yaJIbHbIX KomNoHErTOB
IIpnIOJIIOUeHINBHeIIIErO3aIINcIBaIOIOero yctpoCtBaK CinemaStation, Bbl MoKeTe 3aIIINcIBaTb ayINO-BN3yaJIbHbIe HCTOYHNK, BOCIpON3BOJIMbIe Ha CinemaStation IIIN BHeIIHEm ayINO-BN3yaJIbHOM KOMIOHOHTe. BoJIee IOIpO6HO O MeTOJAX IOIKJIIOUeHnE, CMOTpHTe “IOIKJIIOUeHne BHeIIHHx AyINO-BN3yaJIbHbIX KomIOHeHToB" (cTp.14-17). TaKKe, Bbl MoKeTe yIpaBJrB KOMIOHeHtOM uepe3 IyJIbT D'Y CinemaStation, ycTaIHOBB KOI dV (cTp.72).
PnmeuHne
IpeynynpaBHeHemKOMIOHeHTa,083aTeJIbHO H3yHITe HHCTpyKIIHOK HeMy.
3aHncb aydnonctOuHnKOB uepe3 CinemaStation
IIpnIOdkJIIOueHnIrHe3Ja OPTICAL OUT (DIGITAL AUDIO)Ha CinemaStation n OINTNuecKOrO IINpOBOrO BXoIHOrO rHe3Ja Ha BHeIIIHeM 3aINCbIAIOIIeM ycTPOINCTBe KaC CDMaHTNoTOOH INM MD-MaHTNOToOpOH Ype3 OINTNueckNe Ka6JIH (ctp.17),BbIMoKeTe 3aINCbIBaTB ayINHOCTOuHNKn OT CinemaStation.
PnmeuHn
CnHaJIb paHocTaHn He BbIOBraTc H3 rHe3Ja OPTICAL OUT. 3aHnCH AM/IM TpaHcJIaHn, HIOJIb3yay aynoka6JIb, HmeOIIuHc B IpoJaKe, IOIKIIOHTe rHe3IO VCR OUT Ha CinemaStation KaHAIOROBOMy BXoIHOMy rHe3Jy Ha MaHHTofoHe.
-ⅠOHaJaIa3aHnCn,063aTeJIbHO IpON3BeIHrTe TcToBvIO 3aHHcL.
3aINCB 3ByKOBBIX 9ΦΦeKTOB Ha CinemaStation uepe3 BHeIIHHHe 3aINcBIBaIOUINE yCTPOIcTBa HeBO3MOxHa.
OTKIOHHeBHEIHERo3aINHCbBAIOIOero ycTpoNCTBa, HOIKIOUeHHOROKCinemaStaion,MOKeT HCKa3HTB BOCIPON3BOIDHMoe 3ByaHHe HJIMyMeHBIIHTB TpOMKOCTB. TBAKOMCIYae,BKIOHTReBHEIHHe 3aINCBIAIOOE ycTPOINCTBO.
- yPOBHeI rPOMKoCTH, KaYeCTBO 3ByuHaHH, H eΦeKtB1 3ByKOBoI IOJIr He OTpKaIOTe Ha 3aIIINcMbAeMOM 3ByuHaHH. OIIHaKO, B pexHMe DVD/CD, HcxOJaIIee 3ByuHaHne JlIra 3aIIINc MoKeT IIpepbBaTcR IIpH BBIOJIHeHH JIO60I IOnepaIHH HIXke.
-BbIBOITECTOBOROTOHJIbHOROCnHaJa.
-13MeHeHHe IpoPpaMMbI DSP.
-ⅡoⅡKJIIOHHeH/eOTcoeIIHHHeHHe HayIHHKOB.
B 3aBHCMOCTH OT MaHHHToPOHa, HeKOTOpbI ayHIOCHHaJIb IporpamMBI DTS MOrY T6bITb 3aIIHcaHbI HCCOOTBCCTBYIOIMM O6pa3OM.
HaCinemStation,CHHAIOTRHe3JaDIGITALINBbIBOHTbcTcTOJIbKOHaTHe3IO DIGITALOUT.CHHAIIOCTyIaIOIIINB RHe3IO DIGITAL IN,HC BbIBoHTbcrOT aHaJIOROBbIX BbIXOJIbIX RHe3I,INCHHAI,IOCTyIaIOIIINBAHAJIOROBbIEBXOINbIErHe3Ia, HcBBIOHTcOrTtHc3IDIGITAL OUT.
IIPOH3BOHMAR BAMn ayHO3aHNCb MOXc HcIOJIb3OBaTbCg TOJIbKO JINJTHOHOIIOJIb3OBaHH6e3 COJIacnJIuca, BJaDCIOUeero ABTOPCKHM IIpaBAMH.

1 BkIIOUHTe 3aINcBbIAIOOee yCTpOietBO, 3aTeM, Haxab KHOJky STANDBY/ON (I)/I BkIIOHTe CinemaStation.
2 NcnoJb3yra ceneKTopHbIe KhoNk HfHKuHN, Bbl6epnte nctOuHnK crHaJa, 3aTeM HaHHTe BocnpOn3BeDeHne.
3 Haunte 3aHcB Ha 3aHcBbIbOuEmyctpoiCTBe.
Bocnpoun3BepeHne/3aHncb no TaMepy
JIIBOCIIPOH3BEHeHHI 3aIHNC, BblMOKeTe HCIOJIb3OBaTb ayINOTaHMeP, HMEIOIHNCB IIpoJaXe. TaK KaK HxФyHKIIH 3aBnCt OT MOJIH, H3yHTe COOTBeTCTBYIOIIee pyKOBOJCTBO.
#
- Korda CinemaStation HaxoHITcB peXHMe OxHuaHHaTAMc pABTomATuCckn BOCIpOH3BOUHT coIepKaHINcNAMrTH CinemaStation (HaPmEep, HCTOHTHKfYHKHH,AM/UMtAcToTy) IJIb BOCIpOH3BeJeHHH HIN 3aHInch.
EcH BbXOTHe BbIOJIHHb 3aIHc bIO TaHcpey 6c3 IIPOCJYINIBaHHa 3ByaHHa,ymeHBIIHTe yPoBeHb rPOMKocTH IO Haayla 3aIHcN IO TaHcpey. YPoBeHb rPOMKocTH He OTPaKaetcHa KaVecTBe 3aIHcN.
KoNiPoBaHne c BnDeOKOMNoHErTOB Ha BnDeOKaccety
Pn BbIOJIHeHH aHaJIOTOBbIX IOIKJIOUeHH NJIa IIOKJIIOUeHH BAIOEOMaHTOΦoHa H BnDEOKOMIOHHeTc K CinemaStation (ctp. 15-16), Bbl MOKeTe IIPOH3BOINtB KOIIHPOBaHne OT BnDEOKOMIOHHeHTOB Ha BnDEOKacCeTy, ycTaHOBJeHHyO B bIeOMaHTOΦOH.
PnmeaHne
KoHnPOBaHHc BUNCOHCTOHHKOB, 3aHHHCHHHbIX TexHOJOrHeN 3aIHHTBI OT KOIIHPOBaHHa, MOKeT IIpHBecTH K HcKaKeHHIO KapTHHKN 3aIHCh I3-3a CHHaJIOB 3aIHHTBI OT KOIIHPOBaHHa.
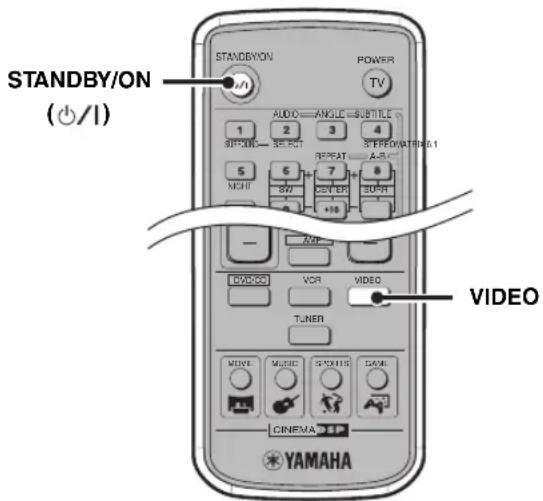
1 BkIIOHTe TeJIeBn3Op, BnDEOKOMHOHeH N BnDEOMaHnTOΦOH, 3aTeM BkIIOHTe ΦyHKUIO npneMa TeJIeBn3Opa Ha BXoD, K KOtOpOMy nOdkJIIOueH CinemaStation.
2 Haxab KhoNky STANDBY/ON ()/I BKNIOUHTe CinemaStation.
3 HaXMMTe KHonky VIDEO.
4 NodrotobbTecb K 3aHnHa
BUNeOMarHHTOoH.
Haipmep, BCTabBte BNdeOKaccety B
BNeOMaHRHTOoH IN BKJIIOHTe BHeIHIN IIpHem
Ha BNdeOMaHRHTOoHE.
BoJee IIOpO6HO o6 OIEpaIIHX
BNeOMaHRHTOoHa, H3yHTe pyKOBOCTBO K
BNeOMaHRHTOoHy.
5 Haunite Bocnpon3BepeHne Ha BndeOKOMNoHEHe N HaunTe 3aIncB Ha BndeomarHHTofoHe.
BoJee nOIOPO6HO 06 OIepaunx BnEOMaHHTofoHa, H3yUHTe pyKOBOCTBO K BnEOMaHHTofoHy.
Послuyшваиме 3ByuaHЯ OT OnpeДeЛeHHbIX KoLoHOK
BbMOxKTe IPOCMATPnBaTb KINHOΦHJMBI HJIN IIPOCJYIIHBaTb My3bIKy C pa3JIHbIMN 3BYKOBBIMN ΦΦeKTAMH, BOCIPON3BOJIMBMIM ONpeJEHHBM KOJOHKAMN.
Bocnpo3BeDeHne 6.1/5.1- KaHaJIbHbIX NCTOCHNKOB uepe3 Bce KOJIOHKN, BKJIIOUaY BnptyaJIbHyIO KOJIOHKy (Matrix 6.1)
IIJI BOCIPOH3BSeHnBnPTyaJIbHOrO TblIOBOrO OKpyKaIOIeRO 3ByaHnH3 JIeBOH IIpaBOH KOIOHOK OKpyKaIOIeRO 3ByaHnH, BBI MOKeTe BOCIOJIb3OBaTbcFyHKIIeH N Mtrix 6.1, YTO co3JaET peaJIncTHUHe OUIyIeHne TblIOBOrO OKpyKaIOIeRO 3ByuHn (3ByuHaHne IepemEuaetc IprMo OT IpePHeN CTOpOHbI MeCTa ClyIaTeJHa erO TBIOBYO CTOpOHy). IIpi BOCIPOH3BeHnH 6.1- KaHaJIbHOrO HCTOnHnKa KAK Dolby Digital Surround EX IND DTS-ES INCK, BBI MOKeTe IpocJYINHBaTb 3ByuHnDE Dolby Digital IIIOc Matrix 6.1 ININ DTS IIIOc Matrix 6.1 6e3 BblIOJIeHn HnKaKnx HacTpoek. TaKke, BBI MOKeTe IpocJYINHBaTb 5.1-KaHaJIbHbIe HCTOHN K c IOMOUsbIO Matrix 6.1.
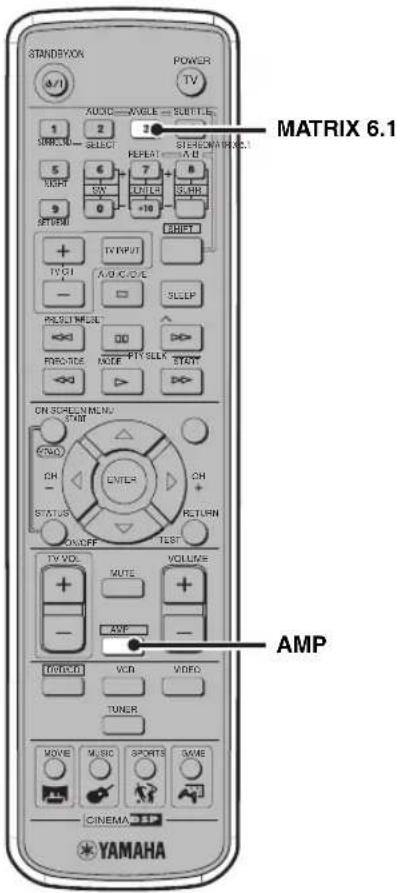
1 HaxmTe KhoNky AMP.
2 Haxab KhoNky MATRIx 6.1, BbI6epnte peXm. Ipn KaJIOm HaKaTHN KHOIN, peXmbl HepeKJIouaOTc cJeNyOIOUM o6pa3OM:
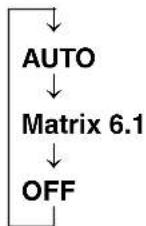
- AUTO
IpnBocnpon3BeeHn6.1-KaHaJIbHOrHOCTOuHHKa(Dolby Digital Surround EX HIN DTS-ES),3ByaHHe ABTOMATueckn HepeKIOaETcHa Dolby Digital IIIOc Matrix 6.1 HIN DTS IIIOc Matrix 6.1 3ByaHHe.IpnBocnpo3BeDeHHN5.1 KaHaJIbHOrHO CTOUYHKa B DAHHOM pexHMe, BHPTuJIbHA TbIOBa KaIOHKA OKpykaIOeero 3ByaHHNe CO3JaETc.
- Matrix 6.1
IIIBBOCINPOH3BeHeHH5.1-KaHaJIbHOrHOCTOHHKa c HcIOJIb3OBaHHem Matrix 6.1, BbI6epHTe DaHHbI pexHM. 3ByuHHe 6yJeT HcxOJITb I3 TBJIIOB0B BnPTyaJIbHOH KOJOHKn OKpykaONIErO 3ByuaHH.
OFF
IeKoep Matrix 6.1 OTKIOUeye.3BvuaHneOTbIIOBOI BnpyaJIbHOI KOIOHN OKpykaIOSeO 3BvauHn OTCyTCTByET IaKe IIpn BOCpON3BeHEnN Dolby Digital Surround EX HIN DTS-ES nnca.
#
Bo Bpempa6oIeKoepaMatrix6.1,HaHcHIIeeCinemaStation bIbceuHbAcTeCHnHnKaIINa“MATRIX"HBO3JIe HsBaHHaIPOrpaMMb DSPIOBBAETcHnHkAINa"6.1"(HaNPIMep,"Action6.1").
PnmeuHn
CinemaStation He MoKeT ATROMaTHueckn pachO3NaBaTbHeKOTOpBc Dolby Digital Surround EX HIN DTS-ES IIeKn, He coIepKaIIHx CnHaJa (P1ara). IJ6.1-KaHaJIbHORO BocIpOn3BeJeHHN JnCKa TaKOro TnHa, Haxkab KhoIky MATRiX 6.1, BbI6epurE "Matrix 6.1".
IIpN BKNIOHeHH CinemaStation,napaMeTp aBTOMaTHUcckn yCTaHbJIINBaCTcHa "AUTO".
6.1-KaHaJIbHoe BOCIIPOHHBeHeHEB03MOKHO BcIeYIOJHXCJyuaX.
-B MeHIO yCTaHOBKn Set Menu, npapMeTp "SUR." ycTaHOBJIH HA "NON" (cIp. 77).
- BbI6paH peXHM cTepeofoHNHeCKORO BOCIIPOH3BeJeHHA (6c3 3ykoBOrO IOJIa) (ctp. 63).
-KrHe3ny SILENT CINEMA Ha CinemaStation IIOJIJIIOJeHbI HayHHNK.
- BocnpoH3BODHTcHcToHnK Dolby Digital KARAOKE.
-ПорогамmaDSPусановлесна "5ch Stereo" (crt.26).
-HaKaB KHOIIKy Dolby Digital IIN DTS, BbIepeHrte npapMeTp "SUR. STANDARD" HIN (ctp. 62).
Прослuyшваиме 2-KaHaJIbHbIX NCTOчнКOB CO BCEx KOJOHOK (Dolby Pro Logic II)
IIIPOCJIYINHBAHH2-KaHaJIbHOrO 3ByuHnH N3 BcEx KOJIOHOK,JeKOJIep Dolby Pro Logic II Ipeo6pa3OBbIBaET 2-KaHaJIbHbI HCTOHTHKN B BHPTyajbHbMIHOKaHaJIbHbI HCTOHTHK.
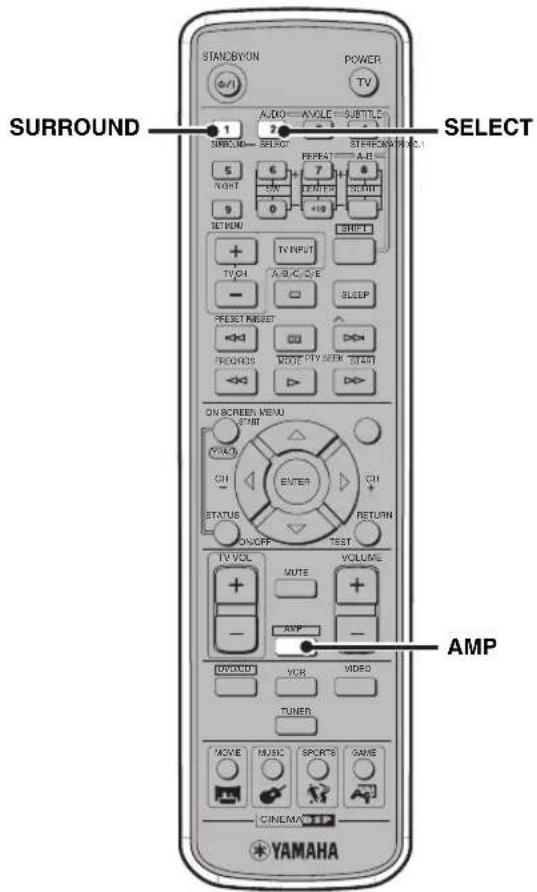
1 NaHnTe BocnpOn3BeDeHne 2-KaHaJIbHOro nCTOuHnKa (Ha npImep, My3bIka) dIpynBuHn.
2 HaxmTe KhONky AMP.
3 HaXMMTe KhoNky SURROUND.
4 Haxmam KhoNky SELECT, BbIbepuTe pexm "PL II".
5 Haxmam KhoNky SURROUND, BbI6epTepekm "PL II". Ipn KaJOM HaXaTHN KHOIIKN, peXHMbl IpeekJIIOyAOTcCJeIyIOHm O6pa3OM:
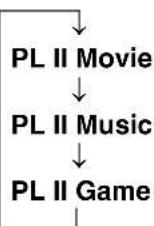
-PL II Movie:ПОДХОДТДИЗBYKOBOrO COIIPOBOKДЕНHA KINHOФнIbMOB.
-PL II Music:ПОДХОДТДЯ My3ыКаЛьнБИx ayINHONCTOчнКOB.
-PL II Game:ПОДХОДИТДЛЯ 3БУКOBОС coNpOBoXJeHnI HrP.
中
BbI TaKKe MoKeTe IepeKIOHouaTb peKIM, HauHMaa KhoIIKN DSP Ha CinemaStation.
BbMOKeTe BbIOJIHHb 60Jee JeTaIbHbIe HaCTpoIKn IJIa KeOJIepa PL II Music. BoJee IOIpa6Ho, CMOTpHTe "KoHpypanHa YcTaHOBok Dolby Pro Logic II Music" (ctp. 67).
PnmuMeaHne
Функину Dolby Pro Logic II HeIoocTyHa npn BOCIpOn3BcEHeHH MOHOΦoHHueCKOrO HcToHnKa.
YcTaHOBKa no yMOnuHaHnIO: STD (CraHJaPThbI)
CTWIDTH
PacnpoctpaHeHHe 3ByuHaHHIeITpAJIbHorO KaHaJa HaJIeBO HnHaPaBO.
ФункиЯ: PacHnpeHHe 3ByaHnHфpoHTaJIbHorO 3ByKOBOrO IIOJHaJIeBO HHaIIpaBO.
Dnana3OH HactpoKu:0-7
yctaHOBKe Ha 0,3ByuHaHne IeHTpaIbHOrO KaHaJa BbIBoHNTc ToJIbKO H3 IeHTpaJIbHOJ KOIOHK. IIO Mepe yBeJIuHueHH 3HaueHH, 3ByuHaHne IeHTpaJIbHOrO KaHaJa Bce 6OJIbHe BBIOHNTcHa JIeByIO/IIpaByIO KOIOHK. Ipn yCTaHOBKe Ha 7, 3ByuHaHne BBIOHNTcToJIbKO OT JeBOH/IIpaBOJ KOIOHOK.
YcTaHOBKaNo yMOnuHaHnU:3
YcTaHOBKa BpeMeHn 3aAepxKn PpOrpamMbI DSP
KaJJa IpoIpaMa DSP pa3pa6oTaHa JJIa H3BJeueHn MaKcHMaJIbHO rOΦfKeTAOT HCxOJHO 3ByaHHa. IpoIpaMMbl DSP, yCTaHOBJeHHbIE Ha CinemaStation, oJIaJAIOT OITHMajbHbIMN 3HaueHHmI IapamETPOB, BKIOUay aTpaKeHHoe 3ByuAHne, OTpaKaIOIIeecr 3ByuAHne H BpEm 3aepKKn. NcIOJIb3yra JaHHbIe IapameTpbl, BBI MOKeTe H3MeHHT bФyIKIIIO 3aepKKn BpeMeHN IIJIa COOTBeTCTBnC pacIOJIOXeHHem KOJIOHOK. Bpe 3aepKKn - 3TO BpeMeHIOIpa3pbIB BBOcIpON3BeDEHHM MeKdy 3ByuAHmE fpoNTaJIbHO K0JOHKn H KOJOHKn OKpykaIOeTo 3ByuAHn. Yem 6OJIbIIe 3HaueHHe, Yem MeJIeIHHe BOCIpON3BeDeHHe 3ByuAHn, H 6OJIbIK OUISeHHN 3ByKOBORO IpoCTpaHCTBa. BpeM 3aepKKn yCTaHOBJeHO Ha OITHMajlbHom ypOBHE IIIA KaJIOI IpoIpaMMbl DSP, IO3BOJIA BpeMeHN 3aepKKn XopoIIIO pa6oTaTB CpeIe IipocJUYINBAHn (ctp. 69). OJHaKO, B 3aBNCIMoCTh OT hCTouHHka 3ByuAHn HIn CpeIbI IipocJUYINBAHn, Bbl MoKeTe OTperyJIInPobAtb KaJIOI IpoIpaMMy DSP B COOTBeTCTBnC IIOTpe6HOCTAMN.
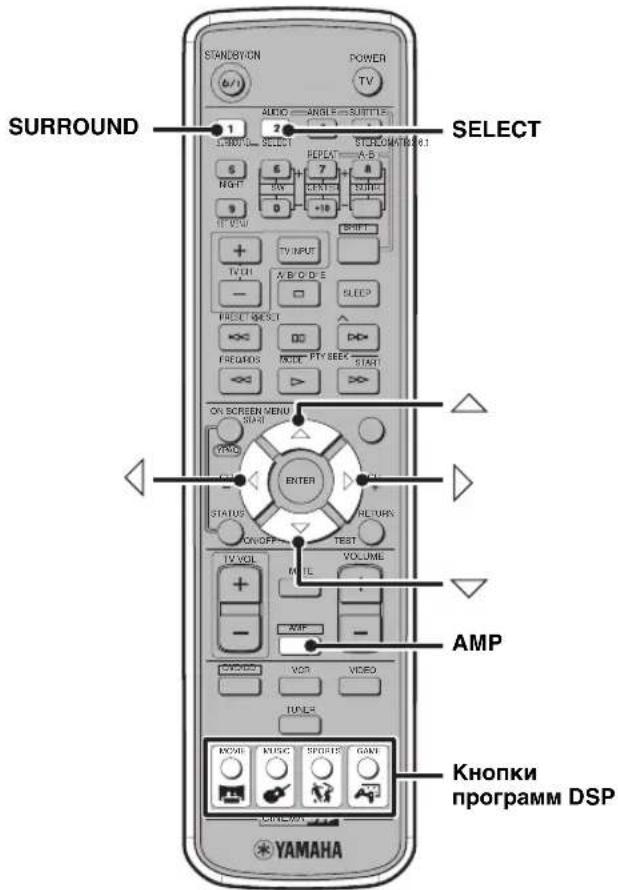
1 Hauchnite Bocnpon3BedeHne nCToHHka.
2 HaXmTe KhONky AMP.
3 BbI6epnte nporpammy DSP,ДЯ KOtopoHyKHO OTpeRyIInpoBaTb BpeM 3aIepKKN.
IIIByIbOpa IIporpammbi DSP IIIA KINHOΦHJIbMa, My3bIKN, cIopTa, ININ Hrpa, HAXMHTe COOTBcTCTByIOHUYKHOIKY IIporpammbi DSP (MOVIE,MUSIC,SPORTS ININ GAME).
BkIIOUeHHe TeJIeBn3Opa, HJN eO yCTaHOBka BpeKIM OXuHaHH.
4TV INPUT
IpeekJIOueHne NocTyNaIOUnx CnHaJIOB Ha TeJIeBN3ope.
VCR
YCTAHOBKa IIyIbTa IY HapeXHM yIpaBJIeHnBAHeOMaHTofoHOM, CD-MaHTofoHOM, HJIM MDMaHTofoHOM.
UnpaBHeHne BnDeomarHHTOFOHOM
JyipabJeHHBHeOMaHToHOM,HaxMnTe KHOIIKy VCR.
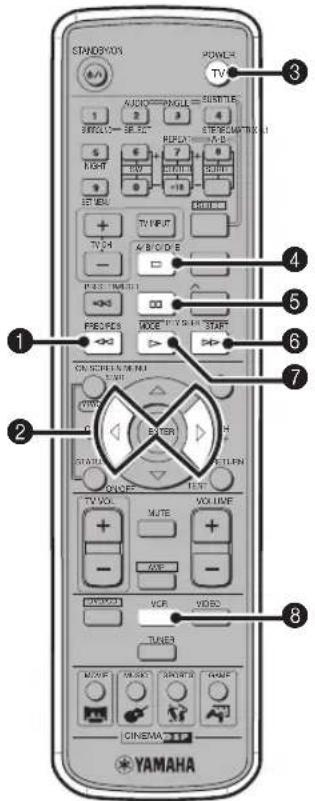
UnpaBJIeHne CD-MarHnTOΦoHOM MDMaHnTOΦoHOM
Iy npabJIeHn CD-MaHTTOFOHOM HJIM MDMaHTHOHOM,HaKMITE KHOIIKy VCR.
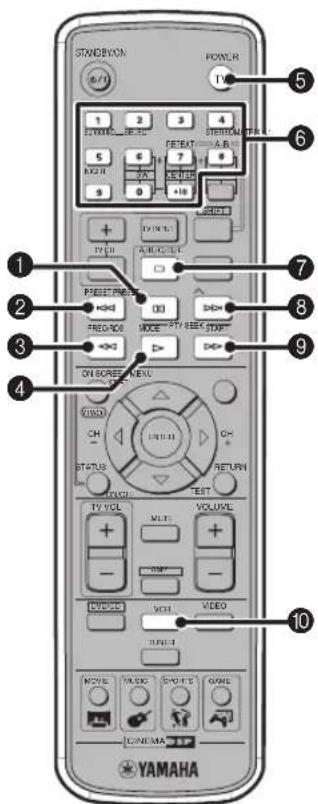
Haayao Bocnpo3BeJeHnna
5TV (POWER)
YcTaHOBkaIyJIbTaIyHapeKm ynpaBHeHnTeJIeBH3OpOM.
⑥LünpobbIe KhONKn (1-9,0,+10)
BBOI HnfoBbIX 3NaueHHN Iyka3aHH TaKHX npaMeTpOB KaK HOMepa fOHOrpamM HIN IpOIIIEJIiEE BpemR BOCIpON3BeJeHH.
7
OcTaHOBKa BocPon3BeJeHnIaHcKa.
8
IepexoHa hauaJIO cJeIyOIIe foHOrpaMMbl.
9
Ipeemotka Bnepen.
VCR
YcTaHOBkaIy.bTaIyHapeKHMyipabJIeHHN BHeOMAHHTOΦOHOM, CD-MaHHToΦOHOM,HIMMD-MaHHTOΦOHOM.
KoHΦnrgupaIGN Pa3JIuHbIX NapaMeTpOB (Set Menu)
HcIOJIb3y Set Menu, MoKHO OTpeRyJInpoBaTb pa3JIuHbIe IapameTpbl cHCTEmbl CinemaStation. B 6OJIbIIHHCTBe cIyuaeb, Ha CinemaStation bbl MoKTe HcIOJIb3OBaTb ayINO-Bn3yaJIbHbIe HcTOUHN C yCTaHOBkAMN IO yMOJIuaHnIO. OJHaKO, B 3aBnCmOCTn OT KOJOHOK n CpeJIbI IIPOcJIYINBaHnI, Heo6XoJIMo cKOHfHpynpoBaTb IapameTpbl dIa cHCTEmbl.
Cnncok MeHIO yctaHObKn Set Menu
Bb moKeTe cKoHΦnHyprpOBaTb CJIeIyIOUHe IapaMeTpbl, BbIOJIHHB IpoIeIpy "YIIpaBJIeHHe MeHIO yCTaHOBKn Set Menu" (ctp. 76).
| Осноные мени по лodeменho | Установka по умолчимо | |
| Speaker Set (ст. 77) CENTER SML | ||
| FRONT SML | ||
| SUR. SML | ||
| BASS SWFR | ||
| F. LevelNrm | ||
| LFE Level (ст. 78) SP LFE 0 dB | ||
| HP LFE 0 dB | ||
| SP Distance (ст. 78) UNIT | СШа и Канада | фунь (ft) Дуг刑事案件: мостры (M) |
| FRONT L | 10 ft 3,0 M | |
| FRONT R | 10 ft 3,0 M | |
| CENTER 10 ft | 3,0 M | |
| SURR L | 10 ft 3,0 M | |
| SURR R | 10 ft 3,0 M | |
| SWFR | 10 ft 3,0 M | |
| D. Range (ст. 78) | SP D.R | MAX |
| HP D.R | MAX | |
| L/R Balance (ст. 78) | - | Center |
| Input Assign (ст. 78) | - | VIDEO |
| Input Modc (ст. 79) MODE | AUTO | |
| Display set (ст. 79) | DIMMER | 0 |
| Tuner Step (ст. 79) (Tожко мondenция Азши, Корс, Китая и общая мondenь) | - | AM9/FM50 |
YcTaHObKa pa3MePoB KOJIOHOK (Speaker Set)
Побименo:CENTER
YcTaHOBka npHcyTCTBnIeHTpaJIbHOJ KOJOHKn I ycTaHOBKa pa3Mepa IeHTpaJIbHOJ KOJOHKn.
BbIbIpaemblie napaMeTpbl: LRG (BoIbwa), SML (MaIa), NON (OToCyTCTByeT)
YctahOBka no yMOJuaHnI: SML
LRG: Bb6epHTe daHHyIO ycTaHOBky npn HcNOIb3OBAHH IeHTpaJIbHOI KOJIOHN 60JIbIHoro pa3Mepa. Becb YacToTHb INHaIIa3OH cHrHa.Ia IeHTpaJIbHOI KOJOINK BBIOIDTCN H3 IeHTpaJIbHOI KOJOHN.
SML: BbI6epHTe IaHHyIO yCTaHOBky IIpH HcNOJIb3ObaHHIeHTpaJIbHO KIOJHOH MaIIO pa3Mepa.CnHaJI eHTpaJIbHOro KaHaJa C H3KOI TOHaJIbHOCTbIO BBIOINTCI H3 aKycTHeCKOH cHTeMbI Ha "BASS".
NON: Bb6epHte daHHyO yctaHOBky IIpH OTCyTCTBHN IeHTpaJIbHOI KOIOHKn. CnHaJI IeHTpaJIbHOrO KaHaJa BbIOHITcH a ODiHaKOBOM yPOBHe rPOMKoCTH H3 IpoHTaJIbHbIX JIeBOH/IIpaBOI KOJOHOK.
Повмени:FRONT
YcTaHOBka pa3Mepa poHTaJIbHbIX KOJIOHOK.
Bb6paemble napameTpbl: LRG (BoIbwa), SML (Maan) YctahOBka no ymoJuaHnO: SML
LRG: Bb6epnte TaHHyO yCTaHOBky npn HcIOJIb3OBaHHI pOHTaJIbHbIX KOIOHOK 60JIbIIOrO pa3Mepa. BeCb YactOTHbIN IHaIIaOH cHrHaJa pOHTaJIbHbIX JeBOH/IIpaBOI KOIOHOK BBIOHITcN3 pOHTaJIbHbIX JeBOH/IIpaBOI KOIOHOK.
SML: BbIbepHTe DaHHyU yCTaHOBky Iprn HcIOJIb3OBaHH
fpoHTaJIbHbIX KOIOHOK MaIOrO pa3Mepa. CnHaJI
fpoHTaJIbHOrO JIEBOrO/IIpaBOrO KaHaJa C HN3KO ToHaJIbHOcTBIO
BbIBOnITcH 3akCyTHeCCKo ChCTeMbI Ha "BASS".
IopMeHIO: SUR.
YcTaHOBKa IIpncytCTBnJIEBOI/IIpaBOI KOJOHOK OKpykaIOIeO 3ByaHnI, NycTaHOBKa pa3Mepa JIEBOI/IIpaBOI KOJOHOK OKpykaIOIeO 3ByaHnI.
BbIbIpaemblie napameTpbl: LRG (BoIbIaI), SML (Manar), NON (OToCyTCTByeT)
YctaHOBka no yMOJuaHHIO: SML
LRG:Bb6epHrTe DaHHyIO yCTaHOBky Iprn HcNOJIb3OBAHH NbeOH/IIpaBOI KOIOHOK OKpykaIOIOero 3ByaHHN 60.IbIoro pa3Mepa HIN IIpH HCIOJIb3OBAHH JBeOH/IIpaBOI KOIOHOK OKpykaIOIOero 3ByaHHN BMeTe C caBpyePAmH OKpykaIOIOero 3ByaHHN, IIOIKIOueHHbIMN Ka6JIAMH KOIOHOK. Becb TactoTHbI dHaHa3OH. IbeBOr/IIpaBOr KAnaIOB OKpykaIOIOero 3ByaHHN BBIOBHTCn H3 KOIOHOK OKpykaIOIOero 3ByaHHN.
SML:Bb6epHTeHaHHyO yCTaHOBky IIpH HCIOJb3OBAHNJIeBOI/ IpaBOH KOIOHOK OKpykaIOIeRO 3ByuHnMaTOro pa3Mepa.CTHaJIeBOrO/IpaBOrO KaHaJa OKpykaIOIeRO 3ByuHnC HIN3KOI TOHaJIbHOCTbIO BbIOJNTcH3akYCTHueckOH CHTeMbI Ha "BASS".
NON: BbI6epHte JaHHyIO yCTaHOBky IIINOTcYCTBHN JIeBOI/IIpaBOI KOJIIOHOK OKpykaIOUeRO 3ByuHnH.CrHaJI JIeBOrO/IIpaBOrO KaHaJa OKpykaIOUeRO 3ByuHnH.BbIOJNTcRA H OINHAKOBOm YpOBHe IpOMKoCTH N3 pOHTaJIbHbIX JIeBOI/IIpaBOI KOJIIOHOK (cTp.59).
Повимень: BASS
Bb6op KOJIOHOK JIb BbIBOda cHrHaJa LFE/6acOB (Hn3KoTOnaJIbHocTH).LFE 03Naayet Low Frequency Effect (Hn3KOuACTOTbIy 3eKT) HcHIOJIb3yeTeCJIb BBIOda JnHaIIa3OHOB YactOTOn 90 Tn HnKe BO BpEmnHcIOJIb3OBAHHaФyHKINn Dolby Digital nIN DTS.
BbIbnpaemble npaMeTpbl: SWFR (Ca6Bypep), FRONT, BOTH
YcTaHOBkaNo yMOnuHaHIO: SWFR
SWFR: BbI6epHrTe JaHHyIO ycTaHOBky IIpr HcNOJIb3OBAHH ca6ByΦepa. B 3aBnHmOCTH OT yCTaHOBOK "CENTER", "FRONT" H "SUR.", cHraJI LFE I 3ByaHne Hn3KoJ TOHaJIbHOCTH OT IpyrHX KaHaIOB BBIOBHTcR OT ca6ByΦepa.
FRONT:BbI6epHTeJaHHyU yCTaHOBky IPh OTCyTcTBHN ca6Bypepa.B3aBnCHMOCTH OT yCTaHOBOK“CENTER”,“FRONT" H“SUR."CHrHaJI LFE H3ByaHHe HH3KoToHaJIbHOCTH OTIpYTHK KaHaIOB BBIOJATCROT pOHTaJIbHbIX JIEBOH/IIpaBOH KOJOHOK.
BOTH: IIpn HcnoJIb3ObaHH ca6Byepepa H yctaHOBN peKHMa 3ByuHaHn, He3aBHCIMORo OT φpoHTaJIbHOJ KOIOHN, Bbl6epHe JaHHbI IapamET pII MHKIIIPOBaHn 3ByuHaHn HN3KOI TOHaJIbHOCTn C KaHaIOM LFE. BeCb YactOTbHIn DnaIIa3OH φpoHTaJIbHOrO JIEBOrO/IIpaBOrO KaHaIIOB BBIOHITcH 3 O6eHX φpoHTaJIbHbIX JIEBOH/IIpaBOH KOIOHOK II ca6Byepepa. Bo BPemr 2-KaHaJIbHorO HIN Dolby Surround BOCIpOn3BeJeHH, 3ByuHaHne MoXeT bIBOHTbcr O T c6Byepepa.
Повмен: F. Level
Bb6op ypoBn 3ByuHaHn fpoHTaJbHO KoIOHKn.
PpN IpeJeJbHO BbICOKOM ypoBHe rPOMKoCTn
fpoHTaJbHO KOJOHKn H cTo OTKIOHcHNN OT
rPOMKOCTn dpyrHX KOJOHOK, MoXHO yMeHbIHTb
ypoBeHb rPOMKOCTn HaCTpOHTb 6aJIaHC.
BbIbpaemblenapaMeTpbl:Nrm(O6bIuHbI),-10dB YcTaHOBkaNoymoJIuaHIO:Nrm
Nrm:O6bIuHO BbIbIpaTcJaHHa YcTaHOBka.
-10 dB: EcJIn ypoBeHb BOCnpoH3BcEHeHHN IeHTpaJIbHOI KOIOHK INK KOIOHOK OKpykaHOIeTO 3ByaHIN He COBIIaJaET CypOBHEm fpoHTaJIbHbIX KOIOHOK, HcIOJIb3yIte DaHHYIO yCTaHOBky. YpoBeHb 3ByaHIN fpoHTaJIbHbIX KOIOHOK IOHHXaETcHa 10 dB (IpHMepHo 1/3).
#
JaKe npH yTaHOBe npaMeTppaFRONTHaSML npH npaMaTepe“BASS”,ycTaHOBJEHOM Ha“FRONT”, 3ByuHHe HN3KOJ ToHaJIbHOCTH,CoDEpKaIeecB CnHrHaJe pOHTaJIbHOTo JEBORo/IIpaBOTo KaHaIOB,6yJeT BBIOHNtBCnH pOHTaJIbHbIX KOJOHOK.
- IIpn BbIbope JIO60I nporpaMMb DSP II npn npaMeTppe "SUR." yctaiHOJIcHOM Ha "NON",CinemaStation ABTOMaTHUcCKn IepexOHTBpeKIM Virtual CINEMA DSP (ctp. 59).
JaHHbIe HAcTpoKn HeJeHCTBHTeJIbHbI IpnIOIKJIOUeHHN HayuHKnOB.
PpmeaHne
IIpH IIpHMe IINΦpOBOr CnHaJa C TaCToTOn CTpo6HPOBaHHBbIe 48 KII, HcKOTOpbIc HAcTpOKn MOryT Hc BJIHTb Ha BOCIIpOH3BOJIMoc 3ByaHInc.
PerynpoBka ypOBH BocnpOn3BeDeHnca Hana LFE (LFE Level)
Bo BpemBocnpOn3BeHnna CnHaJa Dolby Digital HJIN DTS,MOxHO OTpeRyJIHpOBaTb ypoBeHb BBIOda KaHaJa LFE. OtperyJHyPnyTe ypoBeHb LFE JIA COOTBEcTBnC ca6ByΦepOM n HayHHKamn.
Повмени: SP LFE, HP LFE
Dnana30H HAcTpoiKn: -20-0 d5 YcTaHOBka no yMOJuaHmU: 0 dB
P erynipobKa BpeMeHn 3aepKKn 3ByaHn KaKdoi KoloHKn (SP Distance)
IaHHaФyHKnIIpEHa3HaueHaIIIBOJa
pacCToHnKaKJIOK KOJIOKN IIJIpeRyJINPOBKn
3aJepKKn 3ByuHaHn COOTBeTcTBYIOIeRO KaHaJa
BpyHyIO. IeAJIbHO, KaJIAra KOJIOHKA IOJIIXHa 6bITb
pacNOJIOKeHa Ha OINHAKOBOm pacCToHnHn OT
OCHOBHO MeCTa CJIyuaTeJI. OdHaKO, B
6OJIbIHNCtBE CJIyaeB 3TOrO HeBO3MOxHO IO6HTbcra
H3-3a IOMaIHnx ycIOBn. TaKIM o6pa3OM,
Heo6XoIMMo IIpHMeHnTb HeKOTOpYIO 3aJepKky
3ByuHaHn OT KaKJIOK KOJIOHN JIJIr TORO, YTO6bl
3BYKOBbIC CNHaJIbI BCCx KaHaJIOB OINHOBpcMeHHO
IOCTHraJIH MeCTa CJIyIIaTeJI.
Повмени: UNIT
BbIbIpaEMbIe IIapAmEtPbI:MeTpbl (m), y_TB (ft)
YcTaHOBKa no yMOnJyHaHnI:
MoJeINIJIa CIIIA u KaHaIbI: yTbI (ft) IpyrHe MoJeIN: MeTpbl (m)
BbI6epHTe meters IIIBBBOJa paCCToHnKoJIOHOK B Metpax.
BbI6epHTe feet IIIA BBOJa paCCTOHnKoJOHOK B cyTax.
PacctoHne KOJOHOK
Bb6op:0,3-24,00M
FRONTLIO3BOJIAEOTpepyIINpOBAtbpacCToHHe pOHTaJIbHOJIeBOKOLOHKn. IcxOHaYyCTaHOBka:3,0M
FRONT RIO3BOJIEETOTpeRyJINPOBaTb pacctoHnE pOHTaJIbHOI PaBOI KOJOHN. HcxoHaA yCTaHOBKa:3,0M
CENTERIO3BOJIAeOTpepyJIHPOBaTbpacCTOHHne IeHTpaJIbHOI KOJOHN. IcxOHaYyCTaHOBka:3,0M
SURLIO3BOJIEOTpepyJINPObaTbpacCTOHHne JIeBOI KOJIOnHKN OKpyKaIOUeRO 3ByuHaHn. HcxoHaHa yctaHOBka:3,0M
- SURR R IO3BOJIEr OTpeYJHnPOBaTb paCCrOHHne IpaBOn KOJIOHKN OKpyKaIOIIeTO 3ByuHaHn. HcxoJna yCTaHOBka:3,0M
SWFR IO3BOJIAe OTpeRyJIHPOBaTb paCCToHHe ca6ByΦepa. HcxOJaHa yCTaHOBKa: 3,0 M
YCTaHOBka DnHaMnueCKOro DnAna3OHa BO BpeMa BocnpOn3BeDeHnR Dolby Digital (D. Range)
BbMOxKeTe BbIpaTb TpN yPOBn IINHaMHueCKOTo
IIHaIIa3OHa (MeKny MaKc. H MmH. yPOBHe m rPOMKoCTH) BO BpeMa BocIpOn3BeDeHnA Dolby Digital.
ПОДмени: SP D.R, HP D.R
Bb6npaemble napameTpbl: MAX (MaKcHMaJIbHbI), STD (CtAHApTbI), MIN (MHHMaJIbHbI)
YctaHOBKa no yMOnJuaHnIO: MAX
MAX: BocnpOn3BeJeHHe INHaAMHueCKOrO IHaIa3OHa HCTOHHKa Ha MaKcHMaJIbHOM yPOBHe.
STD: PeKOMeHnyeTcH 3rTOBHTeJIMn IIpOprMaMnHO o6ecHeueHH JIOMaIIHHeo HcIOJIb3OBaHH.
MIN:JIerKoyIaBJIHbAeMbI JaXe Ha Hn3KOM ypOBHe rpOMKoCTn IHHaMHeCKH IHaIIa3OH,IOJXoJNT IIJI BWeepHero IIpOcIyIiINBaHH.
PnmuMeaHne
B 3aBHCMOCTH OT HcTOUHNKa BOCIIPOH3BcIeHHa Dolby Digital, yctAHOBka "MIN" MoKcT He pa6oTaB h IIpHBcCTN K OueHb Hn3KOMy ypoBHIO rPOMKOCTH. B TaKOM cIyuae, ycTAHOBHTe IINHAMueCKH INHaIIa3OH Ha "MAX" HIn "STD".
PeryunpoBka 6aHaHca ypoBHa3ByaHnA fpoHTaIbHbIX KOJHOK (L/R Balance)
BbMOKeTe yCTaHOBHTb 6aJaHC rPoMKoCTH
ΦpoHTaJIbHbIX JcBOI/IIpaBOI KOJOHOK. JaHHa
yCTaHOBKa TaKke MOKeT IIpHMeHrTbcR K HayuHNkAm.
Dnana3oH nactpOKn: 10 ypoBHe L/R
YcTaHOBKa no yMOnJauHHIO: IeHTpaJIbHa
JIy yMeHbIIeHnYyPOBHH 3ByuHaHH qPOHTaJIbHOJIEBOI KOJOHKn, HaxmMaIte KHOIIKy a JIpy POHTaJIbHOI IIpaBOI KOJOHKn -KHOIIKy
OTKJIIOUeHHe 3ByuHaHHI JIIaIO6Of pOHTaJIbHOI KOJIOHKn HeBO3MOxHO.
■Изменине наз nauseю ONTNUeCKOROBXODHOro rHe3da (Input Assign)
BbMoKeTe yCTaHOBHTb IHe3IO OPTICAL IN Ha
CinemaStation Ha "VIDEO" HIN "VCR".PiH yCTaHOBKe Ha "VIDEO",HaXMMTe KHOKNY VIDEO IIyIpaBJIeHHN KOMIOHEnT,IIOKJIIOUeHHORKIIHe3Iy OPTICAL IN, H
HaHMeHOBaHN HeTOOHnKa 6yJeT OTo6paKeHo KaK "VIDEO".PiH yCTaHOBKe Ha "VCR",HaXMMTe KHOINK YCR IIyIypABJIeHHN KOMIOHEnTA,IIOKJIIOUeHHORK IHe3Iy OPTICAL IN, HHaHMeHOBaHN HeTOOHnKa 6yJeT OTo6paKeHo KaK "VCR".
BbIbpaemblnnapaMeTpbl:VIDEO,VCR
YcTaHOBKaNo yMOJIyAHnIO:VIDE0
YcTaHOBkapeKIma npnema npn BkIoueHn (Input Mode)
YcTaHaBJIHbAeTpeKHM IIpHema (CTp.70)ДЛBAKIIIOUeHnI IIPOIKJIIOUeHnI KOMIOHeHTOBBOCIIPOm3BeJeHnI OJHOBpeMeHHO K IINΦpOBbIM naHaJIOTOBbIM THe3JaM.
BbIbpaemblnapaMeTpbl: AUTO, LAST
YcTaHOBka no yMOnyauHnIO: AUTO
AUTO: IIpn BkJIOueHIN CinemaStation, pexHM IIpHema (ctp. 70) aBTOMaTHueckn ycTaHaBJIINBaETca Ha "AUTO".
LAST: PpHmHeTcpeKHM IIpnema, HIOJIb3OBAHHB B IIOCLJeHN pa3
PerynpoBka npKocTn 3KpaHa CinemaStation (Display set)
ApKocTb
BbMOKeTe OtperyJInpOBA Tb npKocTb JnCIIe
CinemaStation.
CINEMA DSP (Digital Sound Field Processor)
Tak KaCnCTemBolby Surround n DTS 6bJIN
H3HaJaJIbHO pa3pa6OtaHb IJIa NcIOJIb3OBaHHaBn B
KHHOTeaTpax, OH IIPOH3BOJrT HAnJIyUHHInIeΦΦeKT B
KHHOTeaTpax, CIIPOEeKTHPOBAHHbIX IJIa AkyCTNuCeCKHX
eΦΦeKTOB n OobpyIOBaHHbIX 6OJIbIHIM
KOHueCTBOM KOJIOnOH.KI3-3a pa3JIuYHn B IOMaIIHHX
ycIOBHX, 3aBHCsIHX OT pa3Mepa KOMHaTbI,
MaTePnaJIa CTeH, KOJIInueCTBa KOJIIOHOK n T.I., TaKKe
HEN36eKHO n I3MeHeHne B KaueCTBe 3ByuaHHn.
OCHOBiBaIc b Ha co6paHHo INHΦopMaIIHH, cNCTema
YAMAHA CINEMA DSP NcIOJIb3yeT
OpHTHnHaJIbHyIO TexHOJOrHIo 3ByKOBOrO IIOJIa,
pa3pa6OtaHHyIO YAMAHA, IJIa KOM6HHnpOBaHHn
cnCTeM Dolby Pro Logic, Dolby Digital n DTS, n
TaKHM o6pa3OM IIpeIOCTaBJraET BO3MOxHOCTb
IIOUYBCTBOBaTB Bu3yaJIbHbIe I ayIHOeΦeKTbI,
IIPNCytCTByIOUHe IIpH IIPOCMOTpe B KHHOTeaTpax, B
BaIeKOMHaTe IJIa IIPOCJyUHHBaHHn.
■“SILENT CINEMA”
"SILENT CINEMA" 6bIpa3pa6oTana YAMAHA Ka aITropHTM 3ByKObIX 3ΦΦeKTOB DSP IIra cTeCtBeHHoro, pcaJIHCTHUnHO 3ByUaHHra IIra HayIIHNKOB. IapameTpblIyHayIIHNKOB yCTaHOBJIeHbIB KaJIOm 3ByKObOM IIJIe, II03BOJIaAkkypaTHO BOCIIPOH3BOIMTB BCE IIporpamMbI 3ByKObIX IIJIe IJIa IIPOClIyIIHNBaHHc HcIOJIb3OBAHHeM HayIIHNKOB.
Virtual CINEMA DSP
YAMAHA pa3pa6oTaJa aJIropHTM Virtual CINEMA DSP, HcIOJIb3yIOII INBnTyaJIbHbIe KOJIOHKN OKpykaIOIIeO 3ByuHaHH, HIO3BOJIaIOIIIN IPOcLIINBaT bΦΦeKTB1 OKpykaIOIIeO 3ByuHaHH 3ByKOBOrO IOJIa DSP daKe 6e3 HcIOJIb3OBaHHN KIOHOK OKpykaIOIIeO 3ByuHaHH. Bbl MoXkeTe JaXe BOCIpOn3BOIDtB BnTpYaJIbHbIe aΦΦeKTB1 Virtual CINEMA DSP daKe c HcIOJIb3OBAHNEM MmHIMaJIbHOI 2-KOJOHOUHOI CNCTeMbI, KOTopAa He BKJIIOvaaET IeHTpaJIbHyO KOJIOHKy.
BntObblnTOK
CkaTbIN CHHaJI, KOHBepTnpoBAHHbI INHΦpOBOI φopMaT. 3aTeM, B 3aBnCHMOCTN OT JeKOJIepa, OH MOKeT O6pa6aTBIBaTBcA C BbIXOJOM Ha 5.1 MHOROKaHaJIbHOe 3ByaHHe.
KaHaJ
KaHaJI-THIN 3ByaHHn,pa3JeJIeHHbI Ha OCHOB
HaIIa3OHa Hpyrnx xapaKTePncTHK.
PiPmep 5,1 KaHaIOB
-ΦpoHTaJIbHbIe KOJIOHKn,JIeBaIa(1KaHaJI),IIpaBaIa(1 KaHaJI)
- LcHTpaJIbHnaKoJIOHka (1 kaHaJI)
- KoJIOHKn OkpykaIoiIero 3ByuHaIIa,JIeBaI (1 kaHaJI), IIpaBaI (1 kaHaJI)
- Ca6ByΦeρ (1 ch x 0,1 * = 0.1 kHaπ)
*B O TJIHnue OT IIJHOrO 1-KaHaJIbHOrO dHaHa3OHa, KOMIOHcHT 6bl pa3pa6oTaN IJIy YCHJIeHHN Hn3KoYAcTOrTHOrO 3ByaHHN IJI IOIOJIHHTeJIbHOrO əΦΦeKtA.
DnHaMnueckn Dnana3OH
Pa3Hnua MeKJy HAMMeHbIIM 3ByuHaHem, CJIbIIMMbIM Yepe3 IyM KOMIOHeHTa, HAn6OJIbIM 3ByuHaHcM, CJbIIMMbIM 6c3 NCKaXCHN, Ha3bIbAcTcI INHaMHueckHM dHaIIa3OHOM.
Kahan 0.1 LFE (Low Frequency Effect)
JaHHbI KaHaJI PpCnHa3HaueH JIa BOCIIPOIN3BcIeHN HN3KOuAcTOTHbIX CnIHaJIOB. JaHHbI KaHaJI O6JIaIaET YAcTOTHBIM HaIIa3OHOM 20 T-120 T. JaHHbI KaHaJI CHTaeTcK aK 0.1, TaK KaK OH IO3BOJIaET TOJIbKO yCHJIHTb HN3KOuAcTOTHbI JIHaIIa3OH, IIO cPaBHeHIO C IOJIHOIIaIIa3OHbIM BOCIIPOIN3BeJeHHeM IpyrHex 5/6 KaHaJIoB B 5.1/6.1-KaHaJIbHbIX CnCTeMax Dolby Digital IIN DTS.
YacToTa CToPoBupOBaHHN N CKOpocTb KBAHTOBAHHbIX 6HtOB
Ipi npippeo6pa30BAHHaHaJIOROBOCrHnAIBaB
IIINpOBOHΦopMaT, YactOTOn CTpObnpOBAHn
Ha3bIAOT KOJIHueCTBO pa3 CTpObnpOBAHn CnHnAIBa
BcekyHny,B TO BpEm KaK CKOpocTB KBaHTOBAHhIX
6HTOB ONpeJAEteCk KaK yPOBEH YCHcTOTb Ipn
Ipeo6pa30BAHHn YPOBHn 3ByaHHN B INpOBOE
3NaYeHne.
BOcIPON3BOIMMbI YactOTHBn DnAIIa3OH 3aBnCt OT
YactOTbI aMIJIHTUHO-IMIIyJBChOH MOyJIaIHn, BTO
BpEm KaK IIHNAMHyeCKN IIHaIIa3OH,
IpeCTabJIaIOIHn CObO pa3HHuY yPOBHe 3ByaHHn,
ONpeJIaeTeCkOPOCTbIO KBAHTOBAHhIX 6HTOB.B
IIpNHIIHNe, Yem BBIIIE YactOTa AMIIHTUHO-
HMIIyJIbCHO MOnyJIaIHn, TEm IIInpe IHaIIa3OH YactOT
IIJBAOCIIPOH3BeJeHHN, H Yem BoJIbIe cKOPOCTb
KBaHTOBaHHbIX 6HTOB, TEM YNuIe BOcIIPOH3BeJeHne
ypOBHe 3ByaHHN.
Dopokka (CD/Video CD)
CD HIN Video CD INCK MOKHO pa3JeJHTb Ha HeckoJIbKO cerMeHToB (IOPOKe).KaXIOe pa3JeJEHHe H3BeCTHO KaH OHomep HAnMeHOBaHH.
YPAO (YAMAHA Parametric Room Acoustic Optimizer)
YPAO-3TO OPIHINHAJIbHa CnCTeMa IIPOIN3BOJCTBa YAMAHA IJIa aBTOMaTHueCKo KOIHpyaIIHHacTpoE KOIHOK, HApHMeP, 6aJIaHC KOIIOHOK (yPoBeHb TpOMKOCTN KaXIOI KOIOHNK), BpeM 3aIepKKn KaXIOrO KaHaJa, H NaCTOTa KpOcCOBepa/ IIbTpA Hn3KNx YactOT IJIa ca6fypoepa. CnCTema YPAO HCIOJIb3yET IOCTaJIHeMbI MHKpOfoIJIra c6opAp H aHaJIIN3a 3ByaHnRA OT KOJOHOK B HEIOCPeIcTBeHHoCpeI IpocJyINBaHHa.
HnΦopMaun O BnDeOcnHaJIe
KOMNOHEHTbI BnDeOcHHaJI
CnCTema KOMIOHHTHO BUNEOCHHaJa pa3JElJeT BUNEOCHHaJI Ha CnHaJI Y JIIa npKOCTn n CnHaJIbIPB IN PR JIA HAcBIIeHHoCTn.CnCTema BOCIpON3BOJNT IEBET 6OJIee IIpaBDOIOIO6HO, TaK KaK 3TN CnHaJIbI He3aBNCMbI. KOMIOHHTBI CNHaJI TaKKe HA3bIBaEtCra "CNHAAJOM pa3JIuYra IBeTa", TaK KaCnHaJI npKOCTn OTJeJIeH OT CHHaJI ZaBETA.
■Дековер
YcTPOINCTBOIJIIpeo6pa3OBaHnna 3aKOINpOBAHHo HΦopMaun Ha DVD-Ⅱnckax IIpyTHX HocHTeJHX HaayINO HJIN BHeOCHHaJI BHCXODHOM BHe.
HΦopMaζη O KInHOnJIeHKe I BnDeO
TOBOPBBOO6Hc, DVD HocHTeJN KJIaccnHnnpyIOTcHa 2 TnHa, yka3aHHbIe HnXe.
- INHOpMaIIaO KHNHOJIeHKe BnIOeONrHaJI, 3aINcaHHbI c YaCTOTOn 24 KaJpa/ cek. (KnHOJIeHka, HcIOJIb3OBaHHa BO BpeMc bEmKn KInHOfHbMa, 3aINCbIbAEtC r YaCTOTOn 24 KaJpa/ceK.) C HeJaABHeRo BpeMeHn HcIOJIb3yETcФopMaT IIporpeccHBHO RnDEo C YaCTOTOn 30 KaJpOB/ceK.
- INΦopMaIIHЯ O BnIeO BnIeocnHaJI, 3aIIncAHbI c TaCTOToT 30 KaIpa/ cck.
CinemaStation aBTOMaTHueckn pacNo3HaeT 3aHcAHyIO Ha DVD HhΦopMaunIO KHHoHJIeHKn H BHeO, 3aTeM BbIbHpaeT HAnIyUHm MeToI IIpeo6pa3OBaHHa CnHaJa Ha IporpeccNBbIbBOID.
InTepJeic nporpeccnB
IocnHIOp cTaHApTHbIM BnIEOCHTHaJOM ABJIICN NTSCc525i (i: INTepJIeic) cTPOKaMH pa3BepTKN. BOTJINHE OT OTO, 525p (p: IporpeccNB) RBJIeTCB BbICOKOIIOTbIM CHTHaJOM, COJIepXaIIHM BJBBOE 6oJIbIe cTPOk pa3BepTKN.
NTSC
NTSC-3TO cHcTeMa BnIeOCHHaJa (525 cTpoK, 30 KaIPOB BcekyHny), HcIOJIb3yEma B CeBepHOJ AMepHKe, IIeHTpaJIbHOJ AMepHKe, pJe cTpaH IOxHOJ AMepHKn, IN B HeKOTOpbIX A3NaTcKNX cTpaHax, BKJIIOUqA JIOHOHIO.
PAL
PAL-9TO cHCTeMa BUNIEOCINHaJa (625 CTPOK, 25 KaIPOB B cekyHny), HcIOJIb3yEmaB CoeHNHeHHOM KopoJIeBCTBe BeJIHKo6pHTaHHN H CeBepHOI NpJAAHH, 6OJIbIIHHCTBe CtpAH BocToOH EByPONbl, HeCKOJIbKHX CtpaHx IOXHOI AmePHKN, HeKOtOpbIX CtpaHx BJIHXHeRo BocToKa n A3NaTcKHX CtpaHax, HeCKOJIbKHX AΦpHKaHcKHX CtpaHax, ABCTpaJIHH, HoBOI 3eJIaHHn, IIpyrHx CtpaHax THXORO OKeaHa.
(NTSC/Progressieve Scan). 46
WEERGAVE-MOGELIKHEDEN
Submenu: SP LFE, HP LFE
Instelbereik: -20 t/m 0 dB
Standaardinstalling: 0 dB
CINEMA DSP (Digitale Geluidsveld Processor)
LFE (Low Frequency Effect) 0.1 kanaal
L/R Voor, Midden, L/R Surround
(20 Hz t/m 20 kHz, 0.9% THV, 6 Ω) 45 W
(1 kHz, 10% THV, 6 Ω) 55 W
Totale harmonische verrorming (FRONT L/R)
minder dan 0,05%
JC Penny 293/297/234/237/
286
JVC (Victor) 296/246/247
Kendo 298
Kenwood 297
KTV 297/239/285
Loewe 298/248
LXI 293/297/225/226/
233
Magnavox 297/225/239/286
Marantz 286/297
Matsui 295
MGA 286/297
Mitsubishi 299/297/259
MTC 286/297
Multitec 285
NEC 297/292/282/286
Nikko 286/287/297
Nokia 244/245
Nokia Oceanic 245
Nordmende 265/266
NTC 287
Onwa 296/285
Panasonic 234/235/236/253
Philco 297/225/239/286
Philips 225
Pilot
Pioneer 226/235/254/255/
268
Portland 297/256/287
Quasar 238/235
Radio Shack 299/293/297/285/
296
RCA 293/297/234/256/
257/258
Realistic 299/293/297/285/
286
SABA 223/269/265/266
Sampo 286/297
Samsung 297/239/248/262/
275/286
Sanyo 295/233/279/272/
273/274
Schneider 296
Scott 297/285
Sharp 292/239/232/284
Shogun 297
Siemens 229
Signature 292
Sony 263
Sounddesign 285
SSS 285/297
Starlite 285
Sylvania 297/225/286
Teknika 297/285/287
Telefunken 269/264/265/266
Thomson 223/266
Toshiba 292/226/267
Videch 297/242
Wards 297/239/232/286
VCR
YAMAHA 399/392/393/394
Admiral 395
Aiwa 396/397/398/329/
339
Akai 322/323/324
Asha 363
Audio Dynamic 392/394
Audiovox 396
Beaumark 363
Bell & Howell 393
Blaupunkt 325/326
Brocsonic 327
Bush 322
Calix 396
Candle 335/363/396
Canon 325/328
CGM 396/332
Citizen 396
Curtis Mathis 397/328/333/392
Cybernex 363
Daewood 328/334/335
DBX 392/394
Dimensia 333
Dynatech 397
Electrohome 396
Electrophonic 396
Emerson 327/334/396/397
Fisher 393/336
Garrard 397
GE 328/333/387/363
LG/Goldstar 396/388/392
Goodmans 334/337
Grandiente 397
Grundig 332/338
Hitachi 325/333/349/342
343
Harman Kardon 392
Instant Replay 325/328
Itt/Nokia 393
JCL 328
JC Penny 392/393/394/328/
333/349/363/396
JVC (Victor) 392/394/344/345/
346/347
Kendo 396
Kenwood 392/394/396
Kodak 396
Lyold 397
Loewe 396/337
Luxor 395
LXI 393/396/397/336/
349
Magnavox 325/326/328
Magnin 363
Marantz 392/394328
Marta 396
Matsui 396
MEI 328
Memorex 328/336/363/396/
397
Minolta 333/349/342
Mitsubishi 399/344/348
352/353
MTC 363/397
Multitech 397/348/354
NEC 392/384/344/383
Nikko 396
Noblex 363
Nokia 393/395
Nokia Oceanic 395
Okano 323
Olympic 325/328
Orion 327
Panasonic 325/328/355/378/
384/385
Pentax 333/349/342
Philco 325/328
Philips 325/326/328/337/
356/357
Phonola 337
Pilot 396
Pioneer 325
Quasar 325/328
Radio Shack 396/397
Radix 396
RCA/PROSCAN 325/326/328/333/
335/349/358/369/
363/342
Realistic 393/397/328/336/
359/362/396
Samsung 354/358/363/364/
365/366/335
Sansui 394
Sanyo 393336/367/363
Schneider 337
Scott 399/335/336/348/
359/352/354/358
Sears 328/342/396
Seleco 322
Sharp 395/362/382
Siemens 393
Signature 2000 393
Sony 368/379/372/373/
374/375
Sylvania 397/325/326/328
Symphonic 397
Tandberg 334
Tashiro 396
Tatung 392/394
Teac 392/394/397
Technics 325/328
Teknika 328/396/397
Telefunken 376/377
Thorn 393/396
Toshiba 335/369/383
Totevision 363/396
Universam 396/327/376
Vector Research 392
Videosonic 363
W.WHouse 396
Wards 395/396/336/362/
328/342/363/397
CD recorder
YAMAHA 499
DENON 422/423
Hitachi 424
JVC (Victor) 425/428
Kenwood 422
Marantz 422
Philips 422
Pioneer 426
Sony 427
Teac 429
MD recorder
YAMAHA 599/522/598
Denon 523/524
JVC (Victor) 525
Kenwood 526
Onkyo 592
Pioneer 527
Sharp 528
Sony 522
Teac 593

YAMAHA
© 2004 YAMAHA CORPORATION All rights reserved.


