JBY 96 - Baby monitors BEURER - Free user manual and instructions
Find the device manual for free JBY 96 BEURER in PDF.

User questions about JBY 96 BEURER
0 question about this device. Answer the ones you know or ask your own.
Ask a new question about this device
Download the instructions for your Baby monitors in PDF format for free! Find your manual JBY 96 - BEURER and take your electronic device back in hand. On this page are published all the documents necessary for the use of your device. JBY 96 by BEURER.
USER MANUAL JBY 96 BEURER
1 Getting to know your instrument ....21
2 Signs and symbols 21
3 Intended use 22
4 Notes 22
5 Unit description 25
6 Initial use 27
7 Settings 29
8 Useful information about the baby monitor 32
9 Replacing/charging the batteries ..32
10 Storage and maintenance 33
11 Disposal 33
12 Technical data 34
13 What if there are problems? 35
Included in delivery
- Baby monitor consisting of baby unit and parent unit
- 2 power supply units
- 2 x AAA batteries for the parent unit
- Janosch sticker
These instructions for use
Dear customer,
Thank you for choosing one of our products. Our name stands for high-quality, thoroughly tested products for applications in the areas of heat, weight, blood pressure, body temperature, pulse, gentle therapy, massage and air. Please read these instructions for use carefully and keep them for later use, be sure to make them accessible to other users and observe the notes they contain.
With kind regards,
Your Beurer team
1 Getting to know your instrument
Functions of the baby monitor
This baby monitor enables you to monitor your baby at all times whilst you pursue activities in other rooms or in the garden. The FHSS technology ensures an interference-free connection.
The device has the following functions:
- Eco ^+ mode for reduced transmission power
- Two-way communication
- 300 m range with a clear view
- Warning when the range is exceeded or if there are interferences to the connection
- 5 lullabies that can be played as needed
Night light for baby - Mobile handset search - paging function
Volume control - Sensitivity setting
2 Signs and symbols
The following symbols appear in these instructions:

Warning Warning instruction indicating a risk of injury or damage to health

Important Safety note indicating possible damage to the unit/ accessory.

Note Note on important information
3 Intended use
- Only use the device to monitor your baby when you cannot mind your baby directly. It is not a substitute for your own personal, responsible supervision!
- The device is only intended for domestic/private use, not for commercial use.
- This device is not intended for use by people (including children) with restricted physical, sensory or mental skills or a lack of experience and/or a lack of knowledge, unless they are supervised by a person who has responsibility for their safety or are instructed by him in how to use the device.
- Children should be supervised around the device to ensure they do not play with it.
- Improper use can be dangerous.
4 Notes
Notes for the Eco+ mode
With Eco ^+ mode you can completely turn off the radiation between the baby and parent units when the baby is quiet. This ensures the safety of your baby as he is not exposed to any unnecessary radiation. The device automatically switches to Eco ^+ mode, as soon as no noise is being transmitted.
Safety notes

Warning:
- Always position the device and power cord out of the reach of children. The power cord may cause strangulation or injury to children.
- Keep small parts out of the reach of children (risk of swallowing).

- Keep packaging material away from children (risk of suffocation).
- Never place the baby unit in the cot or within the reach of your child.
- Place the baby unit 1.5m away from your baby, in order to minimize the possibility of electrosmog pollution and noise pollution.
- Make sure that cables are out of the reach of your child (risk of electric shock).
- Always make sure that the devices are fully functioning before use and check that the devices have sufficiently charged batteries when on battery operation.
- Only use the power supply units included with the delivery (risk of fire and electric shock).

Important: To avoid damage to the device, please observe the following:
- Never submerge the devices in water. Never rinse it in running water.
- Never use the devices in a damp environment.
- Do not use the cable to pull the adapter plug out of the socket.
- Disconnect the adapter plug from the mains when the device is not in use.
- The device and the power supply unit should not come into contact with hot surfaces or sharp-edged objects.
- Do not use any additional parts that are not recommended by the manufacturer or offered as equipment.
Notes on handling batteries

Warning:
- Swallowing batteries can be extremely dangerous. Keep batteries out of the reach of small children. Should a battery be swallowed, seek medical assistance immediately.
- Batteries must not be recharged, taken apart, thrown into an open fire or short circuited.
- Batteries can contain toxins that are harmful to health and the environment. Always dispose of batteries in accordance with applicable legal regulations. Do not dispose of batteries with the normal household waste.
- Do not expose the batteries to excessive heat such as sunlight, fire, etc.

Important:
- Replace weak batteries before they discharge completely.
- Leaking batteries may damage the device. If you do not intend to use the device for longer periods, remove the batteries from the battery compartment.
- If a battery has leaked, put on protective gloves and clean the battery compartment with a dry cloth.
General notes

- Repairs must only be carried out by Customer Services or authorized suppliers. Under no circumstances should you open or repair the device yourself, as faultless functionality could no longer be guaranteed thereafter. Failure to comply will invalidate the warranty.
- If you should have any questions about using our devices, please contact either your retailer or Customer Services.
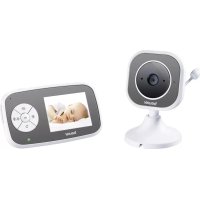
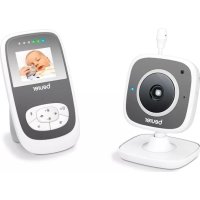
5 Unit description
Overview
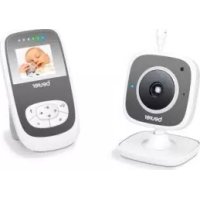
Parent unit
1 Display
2 TALK button
3 Lullaby button
4LINK/POWERLED
5 Microphone
6 button
7 button/MENU
8 button
9 Power supply jack
10 Noise level light display
11 Speaker
12 Belt clip /stand
13 Battery compartment
14 Screw for closing / opening the battery compartment
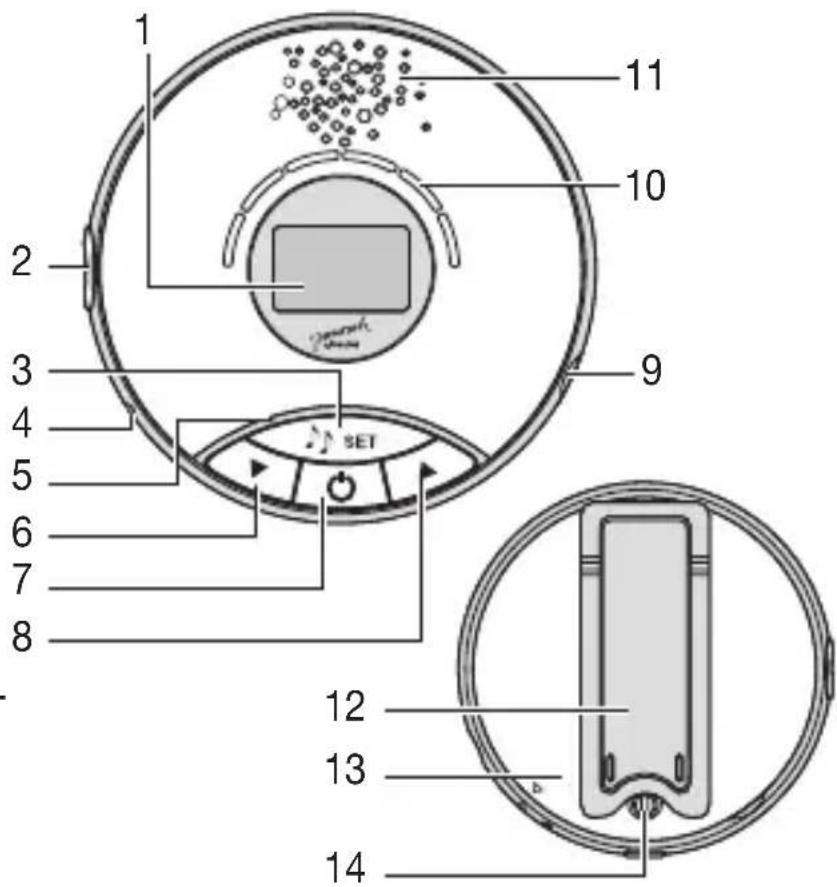
Baby unit
1 Temperature sensor
2 Power supply jack
3 Songs and night light
4 LINK/POWER LED
5 Microphone
6 button
7 button
8 button
9 Sensitivity setting: low high
0 Display
11 Speaker
12 Battery compartment
13 Bracket
14 Screw for closing / opening the battery compartment
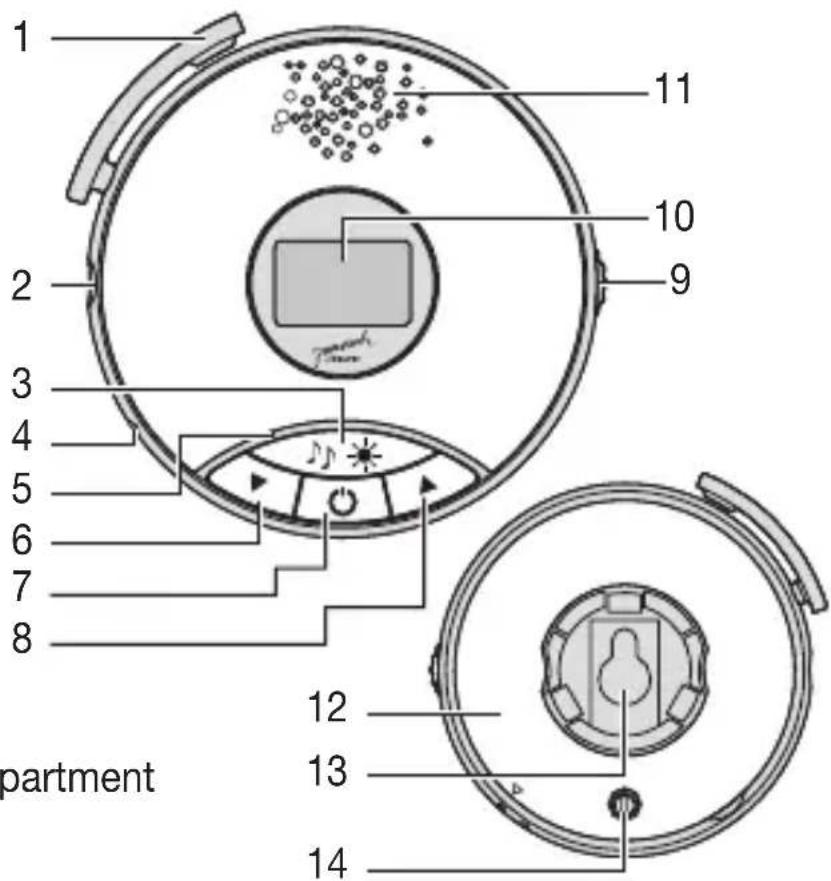
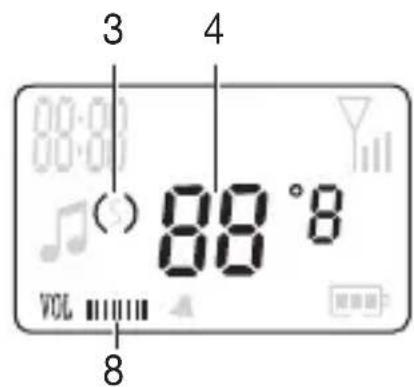
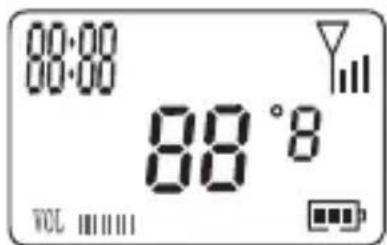
Display
1 Time
2 Transmission strength
3 Night light
4 Temperature
5 Lullaby
6 Alarm function
7 Battery status display
8 Volume
6 Initial use
Baby unit
You can either use the baby unit with batteries or with the supplied power supply unit.
Battery operation
- Loosen the screw on the battery compartment lid and gently turn the housing anti-clockwise to remove the battery compartment lid.
- Insert three high-quality 1.5 V AAA batteries the correct way round.
- Close the battery compartment lid and screw it back on.

- The screw is a child safety feature.
- Batteries cannot be charged in the baby unit.
Mains operation
Using the power supply unit, connect the baby unit to a socket.

If no batteries were inserted in the baby unit, it switches off in the event of a power cut and there is an acoustic warning on parent unit.
Parent unit
Battery operation - charging

To ensure optimal safety, the parent unit is designed so that it can only be operated with batteries inserted.
The battery must be charged for at least 12 hours before the device can be first used independently of the mains; you may use the device during this period. Whilst charging, the LED is red (device off) or fl ashes red and green alternately (device on). The battery status display on the display indicates the charge status.
When the battery is fully charged, the LED lights up yellow.
If the parent unit battery is low the unit will beep twice and the LED will flash red. If the device is not connected to a socket, it will switch off automatically after a short period.
If the devices are operated using the power supply unit and there is a power cut, the parent unit switches to battery operation. For this reason, the standby time is dependent on the battery charge status.

Discharging the parent unit
The battery should be discharged after being charged 300 times. To do so, leave the unit switched on until it switches itself off automatically.
- Position the baby unit so that it is in an elevated position and is not in proximity to any other devices that may cause interference. Switch on the baby unit with the button. The power LED of the baby unit lights up red.
- Set up the parent unit in the room where you are going to be, or clip it to your belt using the belt clip.
- Switch on the parent unit with the button. The power LED of the parent unit lights up green when the baby and parent units are ready to receive.

If there is no connection between the devices (baby unit not switched on or out of range), an acoustic warning will sound on the parent unit and the power LED will light up red.

Transmission mode
Both power LEDs permanently light up green.

Eco+mode
The power LEDs fl ash green every 6 seconds (see 4. Notes). Press the SET button on the parent unit to change to Eco+ mode.
7 Settings
Adjusting the volume
You can adjust the volume in 8 levels on the parent or baby unit by pressing the or button. A high-pitched beep sounds when the maximum volume is reached; a low-pitched beep sounds when the minimum volume is reached.
Sensitivity on the baby unit
Turn the volume control up or down to adjust the sensitivity on the parent unit.

The sound intensity is also pictured using an LED light band so that the device can also be used by those hard of hearing or deaf people.
Songs
Eco^+ mode must be activated on the devices in order to play songs. To do this, briefly press the SET button.
The device has 5 songs. You can switch these on or off from either the parent or baby unit by pressing and holding the button for 2 seconds. Press the or button for 2 seconds to select a song. The music switches off automatically after 15 minutes.
To change the song, press and hold the or button.
Talk function
Press the TALK button and keep it pressed while you talk to your baby. This function is restricted to transmission mode only.
Mobile handset search - Paging function
If you have misplaced or accidentally hidden the parent unit, you can locate it via an acoustic signal by pressing the button on the baby unit. Press any button on the parent unit to end the acoustic signal.

This function is available only if the parent unit is switched on.
Night light
Press the button on the baby unit to switch on the night light. Press the button again to turn off the night light.
Menu settings sequence on the parent unit
In order to set the individual functions, the device must be in transmission mode.
Briefly press the SET button to change from Eco mode to transmission mode. The LED glows green permanently.

Note:
VCL is displayed in transmission mode.
is not displayed in Eco ^+ mode.

Setting the time
- Press and hold the button until the hour setting flashes (fi g. 1). Set the hours using the or buttons.
- Press the button until the minutes display flashes. Proceed as described before.
- Press SET to confirm or to switch to the next menu item.
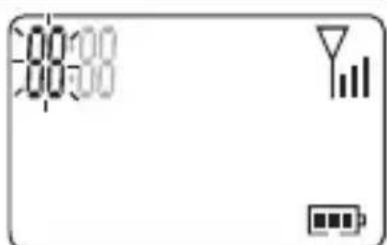
Fig. 1
Switching the alarm clock on or off
Press and hold the button until 4 flashes (fi g.2).
- Switch-on: Press and hold the button until appears.
- Switch-off: Press and hold the button until appears.
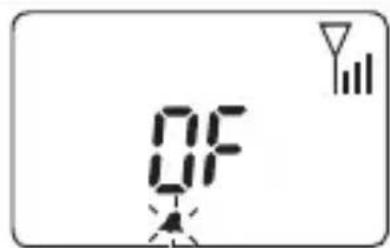
Fig. 2
Setting the wake-up time
- Press and hold the button until the hour setting and ashes. Set the hours and minutes by pressing the or buttons (fi g. 3). If you press and hold the button, the display jumps in 5-hour or 5-minute blocks.
- Press SET to confirm. The display returns to the basic display, as shown (fig. 4).
- In the event of an alarm, the time display blinks and an audible signal can be heard.
- Press any button to switch off the alarm.
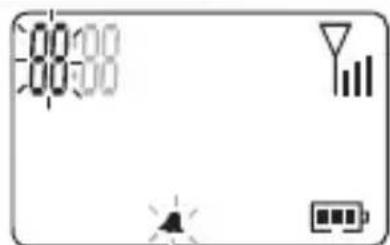
Fig. 3
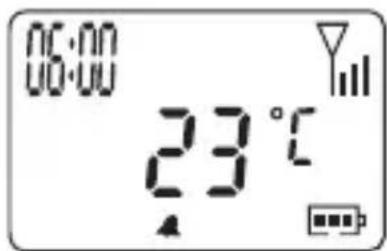
Fig. 4
Setting the temperature ^ C / ^ F
- Press and hold the button until ^ fl ashes. Pressing the or buttons allows you to choose between and (fig. 5).
- Press SET to confirm or to switch to the next menu item.
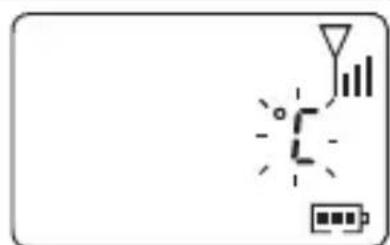
Fig. 5

Note:
The set time and ^ C / ^ F pre-selection are automatically transferred to the baby unit. These data are transmitted as soon as the baby monitor is switched to transmission mode.
8 Useful information about the baby monitor
- Battery operation of the baby monitor minimizes electrosmog from electrical and magnetic alternating fi elds.
- You can increase the range of the baby monitor by positioning the baby unit as high up as possible near a door or window and ensuring that the batteries are not too weak.
- Other radio waves may interfere with the transmission of the baby monitor. Therefore, do not position the baby monitor near devices such as microwaves, WLAN, etc.
- The following other factors can interfere with the baby monitor's transmission or shorten its range: covering the units, furniture, walls, houses, trees, environmental factors (such as fog, rain).
9 Replacing/charging the batteries
If the batteries are too fl at, then the units will switch off automatically. The batteries must then be replaced or recharged (see Initial use).

- When changing the batteries, use batteries of the same type, make and capacity.
Always replace all batteries at the same time. - Use batteries free from heavy metals.
10 Storage and maintenance
The service life of the devices depends on careful use:

Important:
- Remove the batteries from the baby unit if the unit is not in use for an extended period.
- You will get the maximum capacity from your battery if you run down the battery at least once every 6 months. To do this, disconnect the device from the mains and run the battery down through normal use. Then fully charge the battery up again.
- The maximum battery capacity can only be reached after it has been charged several times and is dependent on many factors (battery state, ambient temperature, means and frequency of charging, etc.).
- Protect the devices from knocks, damp, dust, chemicals, drastic changes in temperature, electromagnetic fi elds and nearby sources of heat (ovens, heaters).
- If dirty, wipe the device with a soft, dry cloth.
- Clean the device with a dry cloth. Do not use any abrasive cleaning products.
11 Disposal
For environmental reasons, do not dispose of the devices in the household waste at the end of their useful life. Dispose of the unit at a suitable local collection or recycling point. Observe the local regulations for material disposal.
Dispose of the device in accordance with EC Directive 2002/96/EC - WEEE (Waste Electrical and Electronic Equipment).
If you have any questions, please contact the local authorities responsible for waste disposal.
12 Technical data
- FHSS technology
1.8 GHz frequency
10 digital channels - Two-way communication
- Dimensions: Baby unit: 0.95 × 36 ~mm , Parent unit: 0.90 × 45 ~mm
- Weight: Baby unit: 80g , Parent unit: 90g , Adapter: 70g
- Range: 300 m range with a clear view
| Operation Baby unit: 3 batteries | .2 V / 600 mAh type AAA or power supply unit (5 V DC/400 mA) Parent unit: NiMH battery (2 x 1.2 V / 600 mAh) or power supply unit (5 V DC / 400 mA) |
| Battery life (dependent on ba- teries used) | Baby unit: 1- 2 days (with alkaline batteries) |
| Rechargeable battery life (deependent on battery state, ambient temperature, means and frequency of charging, etc.) | Parent unit: 1- 2 days |
We hereby guarantee that this product complies with the European R&TTE Directive 1999/5/EC. Please contact the specified service address to obtain further information, such as the CE Declaration of Conformity.
13 What if there are problems?
| Faults Actions | |
| Power LED does not light up after switch-on. | Check whether ·the relevant adapter plug is properly plugged in, ·the batteries are full or the rechargeable battery needs charging or is damaged. |
| An acoustic signal sounds from the parent unit. | Check whether ·the maximum range has been exceeded ·the power supply unit for the baby unit is correctly connected ·the baby unit is switched on ·the batteries are full or the rechargeable battery needs charging or is damaged. |
| The signal is weak, the connection keeps breaking up or there is interference. | ·If another technical device such as a micro-wave is in the area between the parent and baby units, remove the device or switch it off. ·Check whether other factors, such as trees etc. are in the path of the two devices, and change the position of the devices until the parent unit signals a connection. ·Check whether the baby and parent units are inside the respective receiving range. |
| No acoustic signal sounds from the parent unit. | ·Adjust the volume on the parent unit. |
| A device switches itself off. | ·Change the batteries or recharge the battery. |
Français
Sommaire
Chere cliente, cher client,
Ha cnyuanyuep6a, Bbl3BaHHoro He npabnIbHbIM nCNoIb3OBaHnEM,
- Ha 6bICTpon3HaWNBaIOUneCyaCTn (6aTapeiKN, aKKyMylTopbl),
Ha depeKtbl, O KOToPbIX NOKynaTeIb 3HaJI B MOMeHT NOKynKN,
Ha CnyuAn CO6CTBeHHoB BnHbI NOKyNaTeJra.
ToBap cepTnΦnUPOBaH: BnDeO-, paIIOHn IJRA KOHTpOJIa 3a DeTbMn - "BCU MIPATEKC
No POCC DE.AB 02.B04117 cpoK deiCtBnA c 11.02.2011 no 10.02.2014rr.
Cpok 3Kcnpnyatau nn 3delen: ot 3 do 5 let.
Фирma n3roTOBNTeIb: Boipep Tm6x, CoofnHrep uTpacce 218, 89077-UM, TepMaHnA