KXNT321 - Cordless phone PANASONIC - Free user manual and instructions
Find the device manual for free KXNT321 PANASONIC in PDF.
User questions about KXNT321 PANASONIC
0 question about this device. Answer the ones you know or ask your own.
Ask a new question about this device
Download the instructions for your Cordless phone in PDF format for free! Find your manual KXNT321 - PANASONIC and take your electronic device back in hand. On this page are published all the documents necessary for the use of your device. KXNT321 by PANASONIC.
USER MANUAL KXNT321 PANASONIC
NT321NE_GQ.book Page 3 Thursday, September 11, 2008 6:57 PM


Panasonic
Quick Reference Guide
IP Proprietary Telephone
Model No. KX-NT321
Accessories (included)
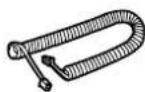
Handset Handset Cord
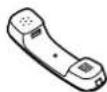
One One
- Wall Mounting Adaptor Screws
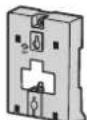
One Two
Stand
One


Note: In this manual, the suffix of each model number is omitted unless necessary.


NT321NE_GQ.book Page 5 Thursday, September 11, 2008 6:57 PM
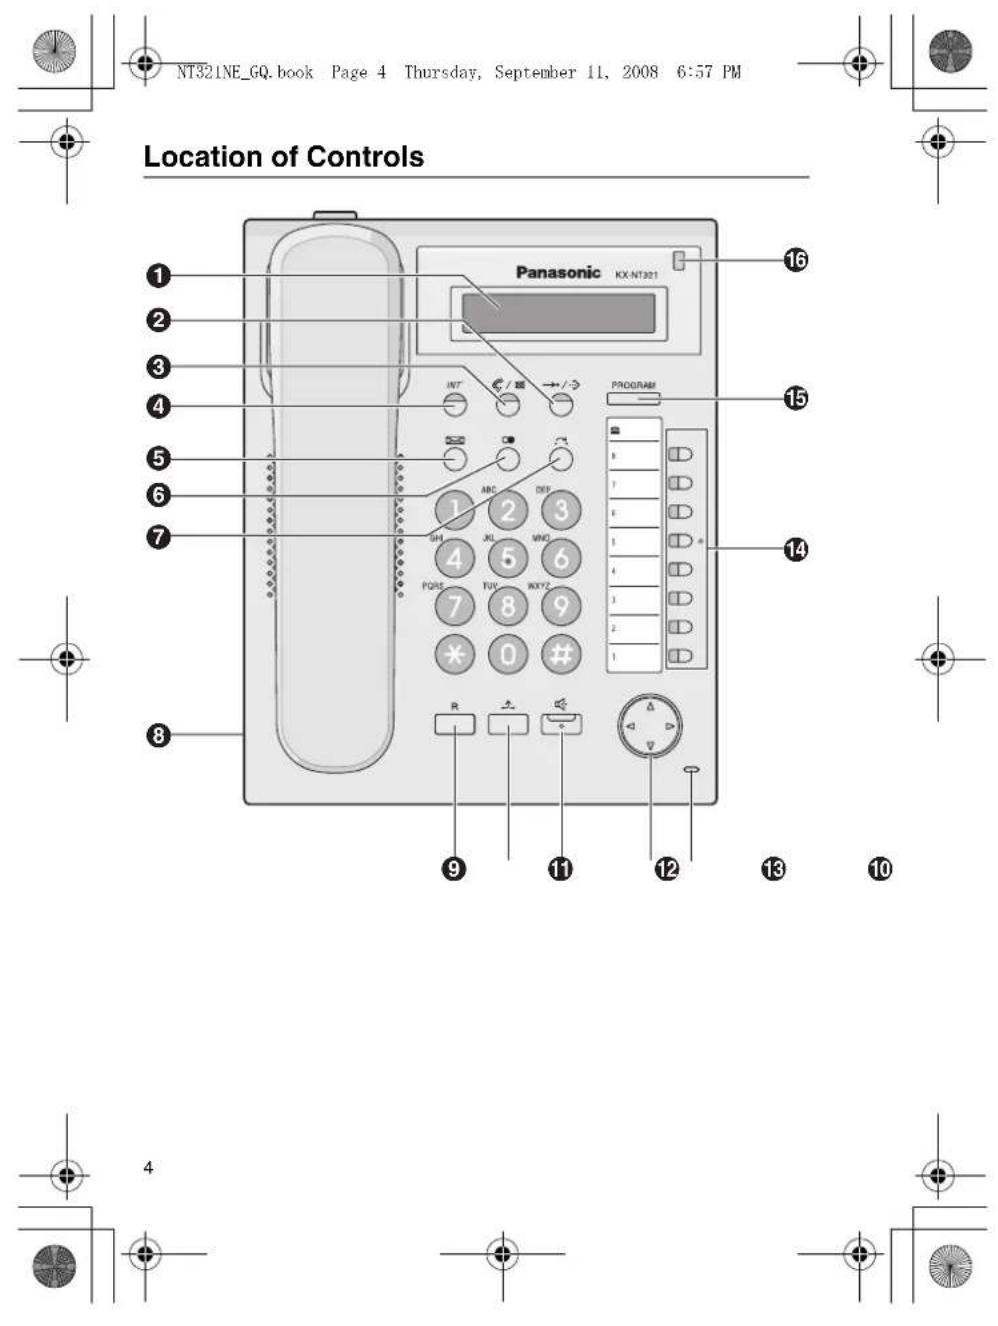
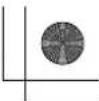
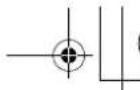
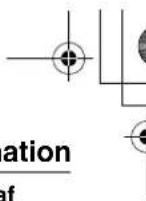
Location of Controls
LCD (Liquid Crystal Display)
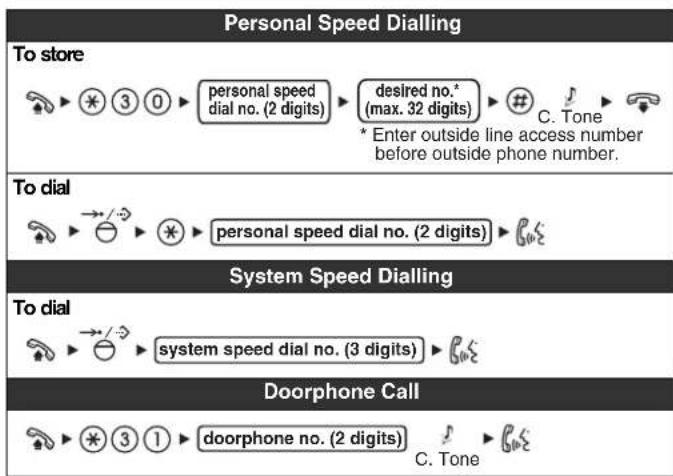
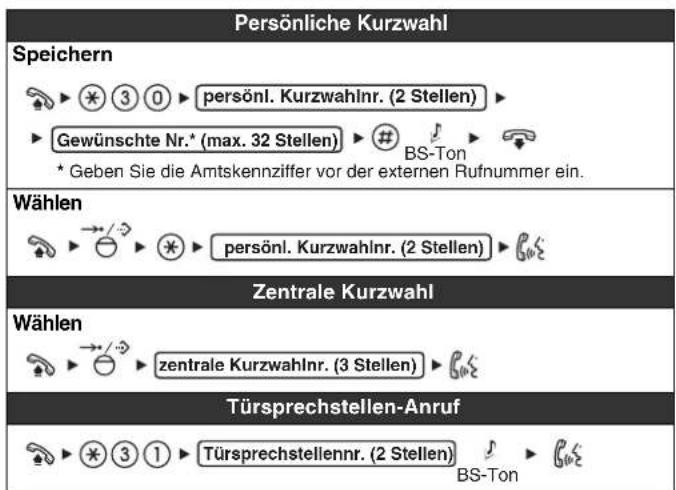
2 AUTO DIAL/STORE: Used for System/Personal Speed Dialling or storing programme changes.
3 AUTO ANS (Auto Answer)/ MUTE: Used to receive an incoming call in hands-free mode or mute the microphone/handset during a conversation.
INTERCOM: Used to make or receive intercom calls.
MESSAGE: Used to leave a message waiting indication or call back the party who left the message waiting indication.
REDIAL: Used to radial the last dialled number.
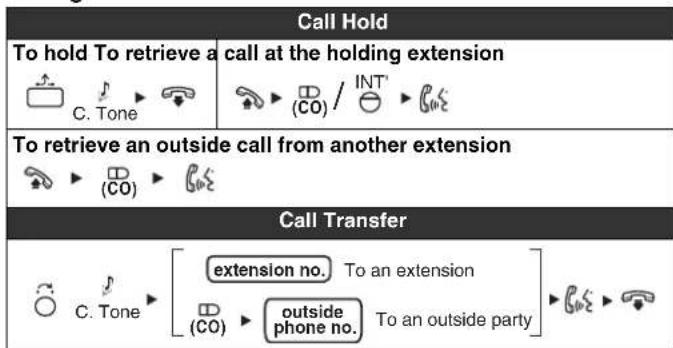
7 TRANSFER: Used to transfer a call to another party.
Headset Jack
FLASH/RECALL: Used to disconnect the current call and make another call without hanging up.
HOLD: Used to place a call on hold.
1SP-PHONE (Speakerphone): Used for performing hands-free operations.
Navigator Key: Used to adjust the volume and the display contrast or select desired items.
Microphone: Used for hands-free conversations.
14 Flexible CO Buttons: Used to seize an outside line or perform a feature that has been assigned to the key.
15PROGRAM: Used to enter and exit the personal programming mode.
Message/Ringer Lamp: When you receive a call, the lamp flashes red. When someone has left you a message, the lamp stays on red.


NT321NE_GQ.book Page 6 Thursday, September 11, 2008 6:57 PM
Settings
| Speaker volume | While in a hands-free conversation | Press Up to increase or Down to decrease the volume. |
| Handset/Headset volume*1 | While using the handset or headset | |
| Ringer volume | While on-hook or receiving a call | |
| LCD Contrast While on-hook PROGRAM▶①→/→▶PROGRAM | ||
| Ring Tone PROGRAM▶(CO) OR INT ▶(①+2) 0⑧→▶PROGRAM Press 2 times. | ||
If you hear your own voice through the handset or headset, decrease the volume.
2 The ring tone pattern of patterns 09 to 30 is the same as pattern 01.


NT321NE_GQ.book Page 8 Thursday, September 11, 2008 6:57 PM
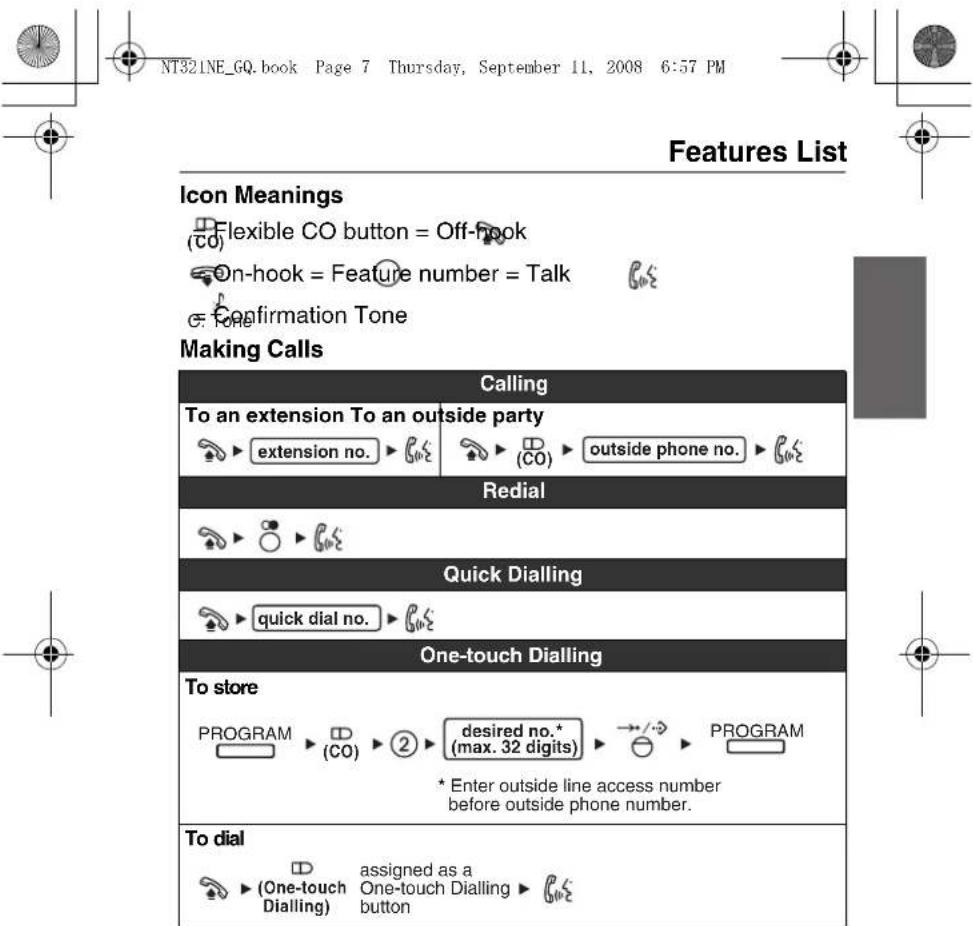
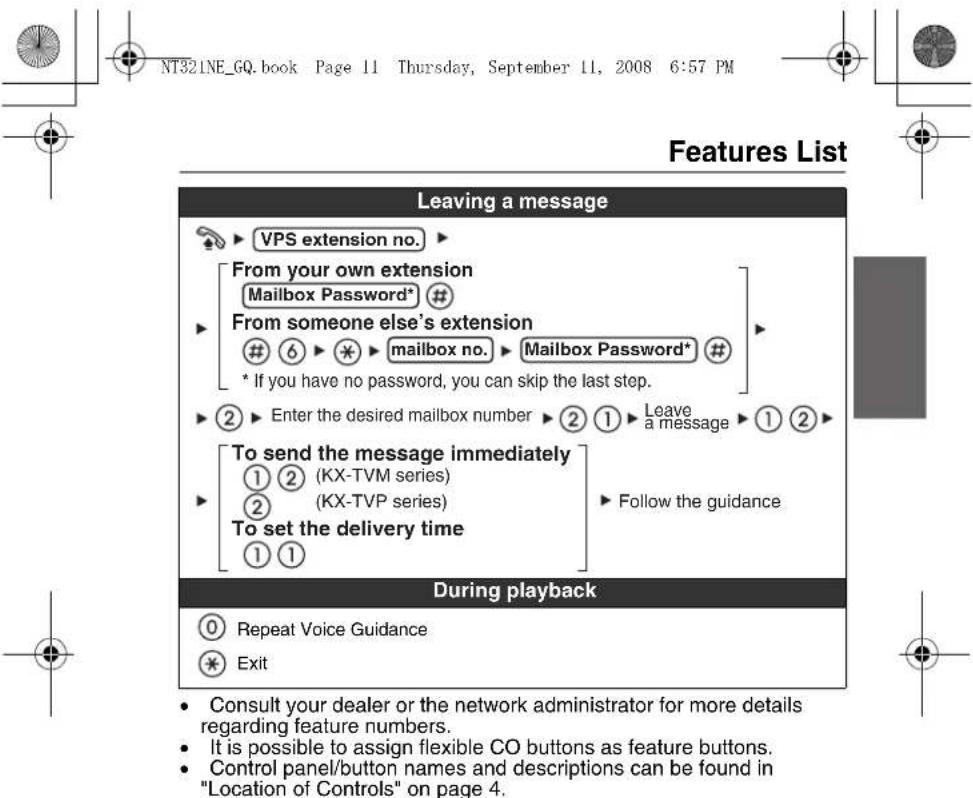
Features List
During a Conversation
8


NT321NE_GQ.book Page 9 Thursday, September 11, 2008 6:57 PM

Features List
Useful Features
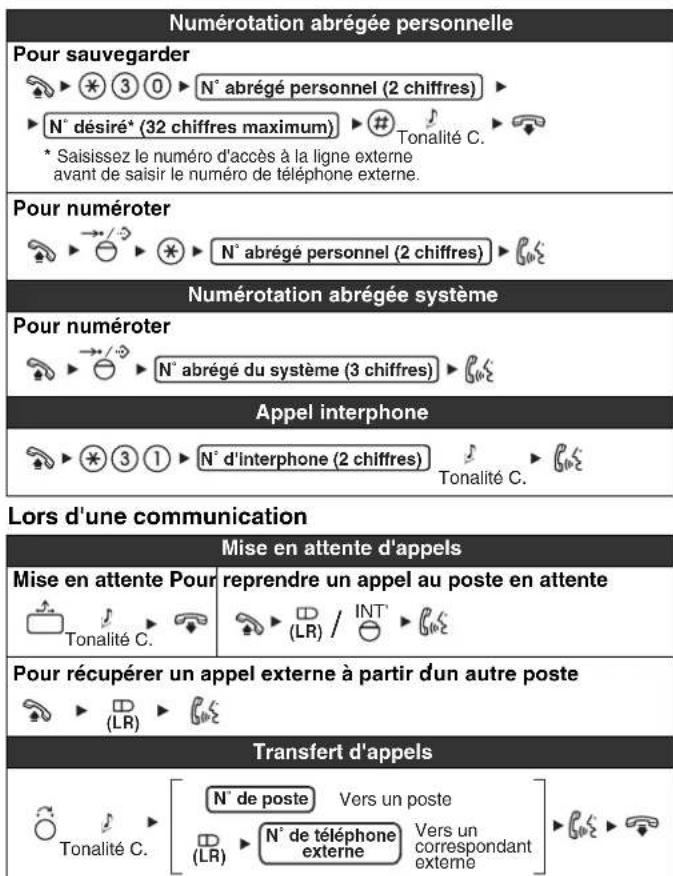
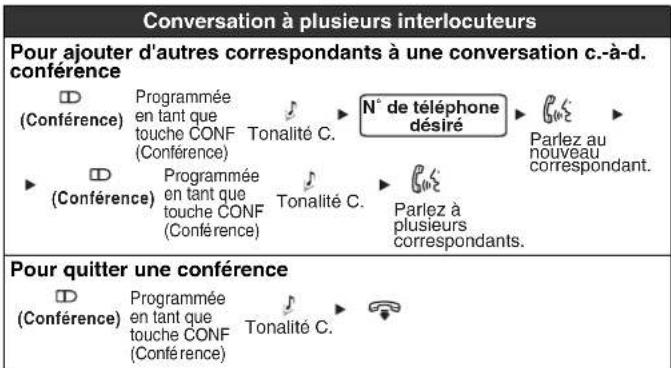
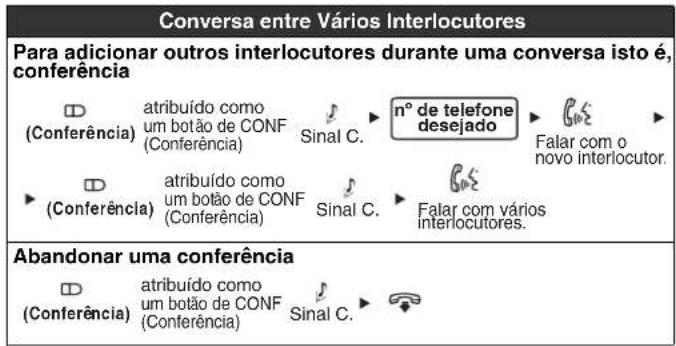
To add other parties during a conversation (i.e., conference)
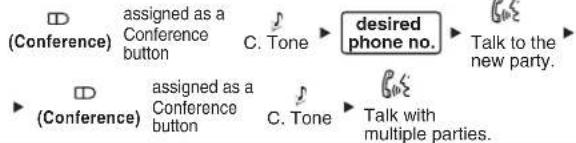
Multiple Party Conversation
To leave a conference

Setting the Telephone According to Your Needs

Do Not Disturb
Timed Reminder
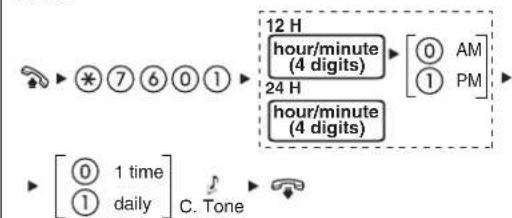
To set
To cancel To stop or answer the ring


NT321NE_GQ.book Page 10 Thursday, September 11, 2008 6:57 PM
Features List
Before Leaving Your Desk
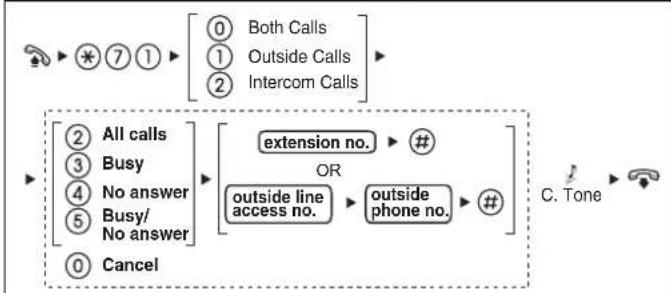
Call Forwarding
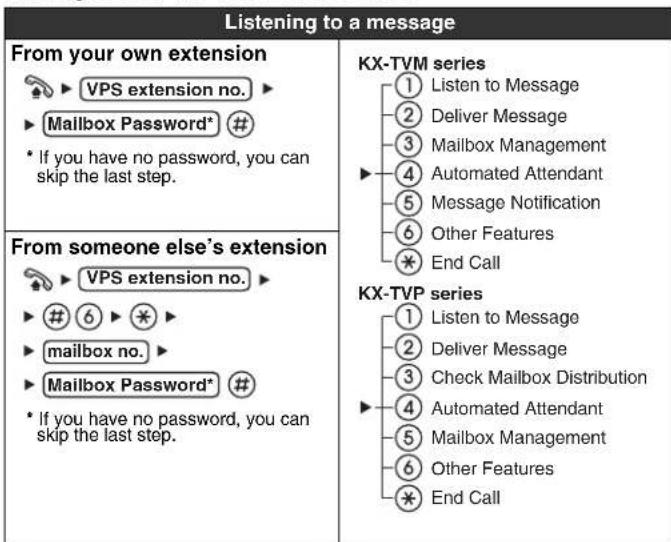
Making Use of the Voice Mail Service

10


NT321NE_GQ.book Page 12 Thursday, September 11, 2008 6:57 PM
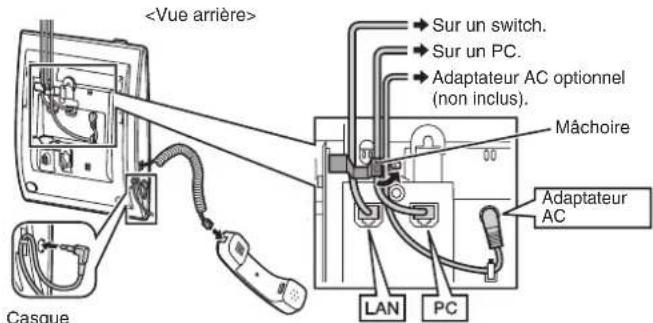
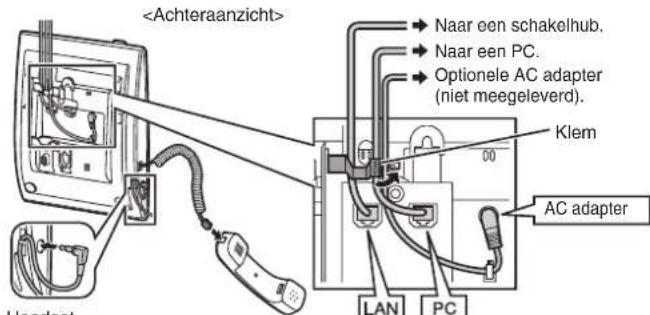
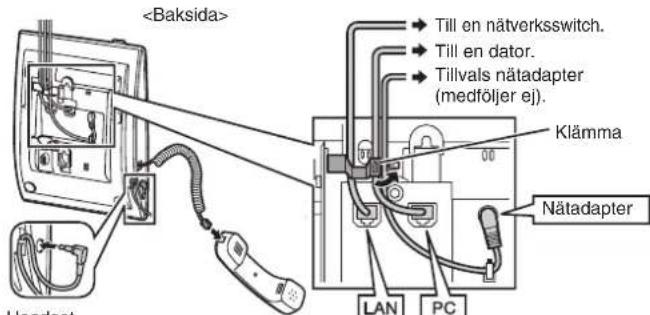
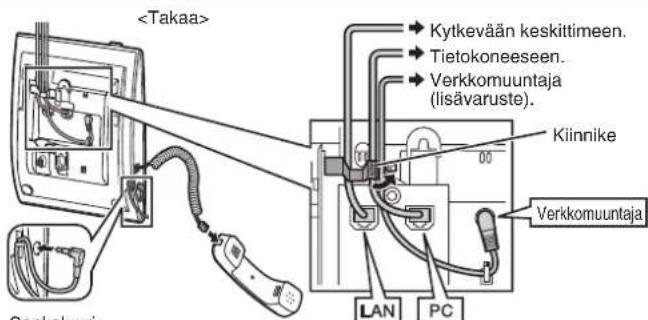
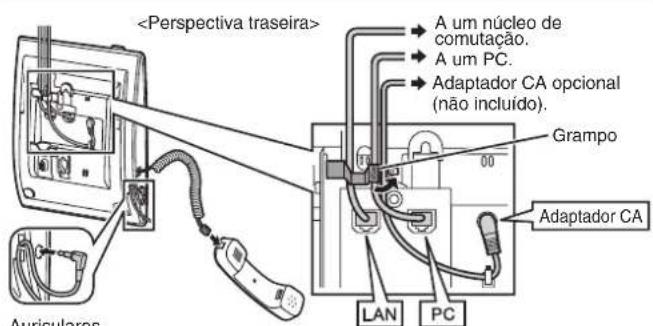
Connection
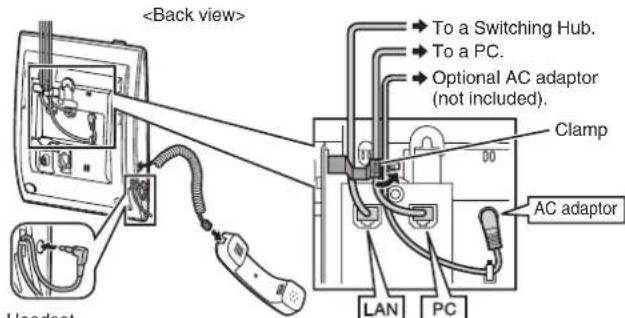
Headset Recommended: KX-TCA89
PC connection/Switching Hub connection
- Use a straight CAT 5 (or higher) Ethernet cable (not included) that is 6.5mm in diameter or less.
- For further information on the connection to a PC, refer to the documentation provided for the PBX.
AC adaptor
- Use a Panasonic AC adaptor KX-A239CE (PQLV206CE).
- The AC adaptor is used as the main disconnect device. Ensure that the AC outlet is located near the unit and is easily accessible.
CAUTION:
When selecting Ethernet cables
- Use flexible, high-quality, snagless (without strain relief) cables. Do not use cables with coating that may tear or crack when bent.
When connecting cables
- Ensure that the Ethernet cables and the AC adaptor cord are clamped to prevent damage to the connectors.
- Cables may be routed upwards by using the appropriate cable clamp located on the back of the unit.
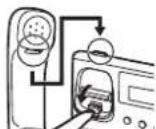
When connecting a headset and AC adaptor
- Ensure that the headset cord and the AC adaptor cord are wound around the hook to prevent damage to the connectors.
12

NT321NE_GQ.book Page 13 Thursday, September 11, 2008 6:57 PM
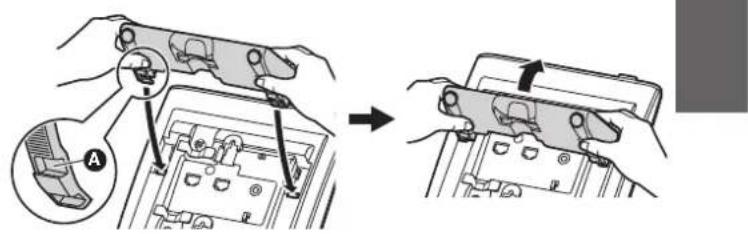
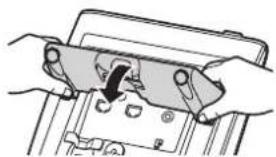
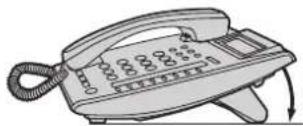
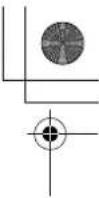
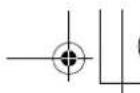
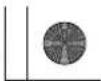
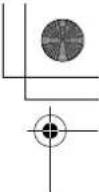
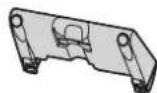
Stand Usage
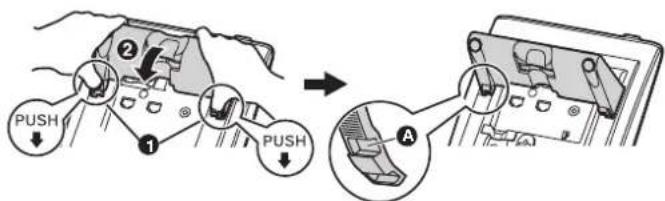
Attaching the Stand
Place the catches (A) of the stand into hooks located in the unit.
Gently push the stand in the direction indicated until it locks into place. The stand will be mounted in the high position.
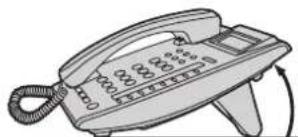
Removing the Stand
Hold the stand with both hands.
Gently rotate the stand in the direction indicated until it is released.
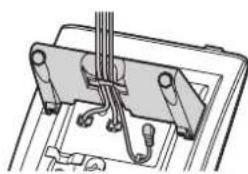
Cabling
When using the stand, ensure that the cables are clamped as shown.


NT321NE_GQ.book Page 14 Thursday, September 11, 2008 6:57 PM
Stand Usage
Adjusting from High to Low Position
Hold the stand with both hands as shown and rotate the stand in the direction indicated until it locks into the low position (3)

Adjusting from Low to High Position
Hold the stand with both hands as shown and rotate the stand in the direction indicated until it locks into the high position (A
14


NT321NE_GQ.book Page 15 Thursday, September 11, 2008 6:57 PM
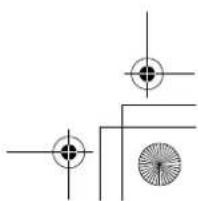
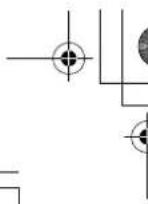
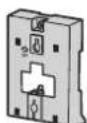
Wall Mounting
- Remove the stand if it is attached. For information on removing the stand, refer to page 13.
- Attach the wall mounting adaptor as shown.
Make sure the cables are not pinched by the wall mounting adaptor. When running the cables from the top of the unit, look through the opening in the wall mounting adaptor to confirm that the cables are not being pinched.
- Slide the wall mounting adaptor in the direction indicated until it locks into place.
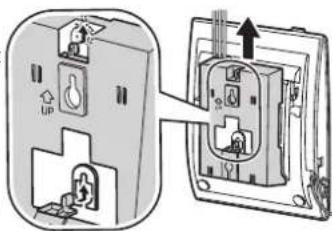

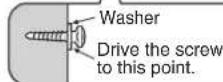
3.Drive the 2 screws into the wall either 83mm or 100 mm apart, and mount the unit on the wall.
- You can find a wall mounting template on page 183.
Make sure that the wall that the unit will be attached to is strong enough to support the unit (approx. 1.5kg
Make sure the cables are securely fastened to the wall. - When this unit is no longer in use, make sure to detach it from the wall.


NT32NE_GQ.book Page 16 Thursday, September 11, 2008 6:57 PM


Wall Mounting
Locking the Handset Hook
Pull down the handset hook until it locks to prevent the handset from falling off the handset cradle when the unit is mounted to a wall or set at a high angle. To temporarily place the handset down during a conversation, hook it over the top edge of the unit as shown.


16


NT32INE_GQ.book Page 17 Thursday, September 11, 2008 6:57 PM
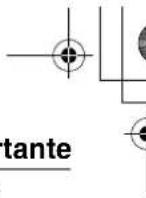
Important Information
When using a KX-NT321 IP-PT, keep the following conditions in mind.
If the unit does not operate properly, disconnect the unit from the Ethernet cable and then connect again.
- If you are having problems making calls, disconnect the Ethernet cable and connect a known working IP-PT. If the known working IP-PT operates properly, have the defective IP-PT repaired by an authorised Panasonic factory service centre. If the known working IP-PT does not operate properly, check the PBX and the Ethernet cable.
- Wipe the unit with a soft cloth. Do not clean the unit with abrasive powders or with chemical agents such as benzene or thinner.
- Use only the correct Panasonic handset.
- Do not disassemble this unit. Dangerous electrical shock could result. The unit must only be disassembled and repaired by qualified service technicians.
- If damage to the unit exposes any internal parts, immediately disconnect the cable or cord. If the power is supplied from the network to the IP-PT [Power-over-Ethernet], disconnect the Ethernet cable. Otherwise, disconnect the AC adaptor cord. Then return this unit to a service centre.
- Never attempt to insert wires, pins, etc. into the vents or other holes of this unit.
Take special care to follow the safety suggestions listed below.
Safety
1) The unit should only be connected to a power supply of the type described in the Quick Reference Guide or as shown on the label on the unit.
2) When left unused for a long period of time, the optional AC adaptor should be unplugged from the AC outlet, if you are using Power-over-Ethernet, disconnect the Ethernet cable.
Installation Environm
1) Do not use this unit near water, for example, near a bathtub, washbowl or sink. Damp basements should also be avoided.
2) Keep the unit away from heating appliances and devices that generate electrical noise, such as fluorescent lamps, motors and televisions. These noise sources can interfere with the performance of the unit. It also should not be placed in rooms where the temperature is less than 5^ or greater than 40^ .


NT321NE_GQ.book Page 18 Thursday, September 11, 2008 6:57 PM
Important Information
Placement
1) Do not place heavy objects on top of this unit.
2) Care should be taken so that objects do not fall onto, and liquids are not spilled into, the unit. Do not subject this unit to excessive smoke, dust, moisture, mechanical vibration, shock or direct sunlight.
3) Place the unit on a flat surface.
WARNING:
TO PREVENT POSSIBLE FIRE OR ELECTRIC SHOCK,DO NOT EXPOSE THIS UNIT TO RAIN OR MOISTURE. THIS HANDSET EARPIECE IS MAGNETISED AND MAY RETAIN SMALL FERROUS OBJECTS.
THE USE OF EXCESSIVE SOUND VOLUME THROUGH EARPHONES, HEADPHONES, OR HEADSETS MAY CAUSE HEARING LOSS.
DISCONNECT THIS UNIT FROM POWER OUTLET/THETIME RHERNET CABLE IF IT EMITS SMOKE, AN ABNORMAL SMELL OR MAKES UNUSUAL NOISE. THESE CONDITIONS CAN CAUSE FIRE OR ELECTRIC SHOCK. CONFIRM THAT SMOKE HAS STOPPED AND CONTACT AN AUTHORISED SERVICE CENTRE.
IMPORTANT NOTICE:
- Under power failure conditions, the IP-PT may not operate. Please ensure that a separate telephone, not dependent on local power, is available for use in remote sites in case of emergency.
- For information regarding network setup of the IP-PT such as IP addresses, please refer to the Installation Manual for the Panasonic PBX.
If an error message is shown on your display, consult your dealer or the network administrator. - The firmware of the KX-NT321 is protected by copyright laws and international treaty provisions, and all other applicable laws. It cannot be reverse engineered, decomposed or disassembled.

18


NT32INE_GQ.book Page 19 Thursday, September 11, 2008 6:57 PM
Important Information
Information for Users on Collection and Disposal of Old Equipment and used Batteries
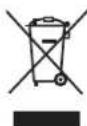
These symbols on the products, packaging, and/or accompanying documents mean that used electrical and electronic products and batteries should not be mixed with general household waste.
For proper treatment, recovery and recycling of old products and used batteries, please take them to applicable collection points, in accordance with your national legislation and the Directives 2002/96/EC and 2006/66/EC.
By disposing of these products and batteries correctly, you will help to save valuable resources and prevent any potential negative effects on human health and the environment which could otherwise arise from inappropriate waste handling.
For more information about collection and recycling of old products and batteries, please contact your local municipality, your waste disposal service or the point of sale where you purchased the items.
Penalties may be applicable for incorrect disposal of this waste, in accordance with national legislation.
For business users in the European Union If you wish to discard electrical and electronic equipment, please contact your dealer or supplier for further information.
Information on Disposal in other Countries outside the European Union
These symbols are only valid in the European Union. If you wish to discard these items, please contact your local authorities or dealer and ask for the correct method of disposal.
Note for the battery symbol (bottom two symbol examples):
This symbol might be used in combination with a chemical symbol. In this case it complies with the requirement set by the Directive for the chemical involved.


NT321NE_GQ.book Page 20 Thursday, September 11, 2008 6:57 PM
Important Information
C E
This product is intended to be connected to a Panasonic PBX only. Panasonic Communications Company (U.K.) Ltd. declares that this equipment is in compliance with the essential requirements and other relevant provisions of Radio & Telecommunications Terminal Equipment (R&TTE) Directive 1999/5/EC. Declarations of Conformity for the relevant Panasonic products described in this manual are available for download by visiting: http://www.doc.panasonic.de
Contact to Authorised Representative:
Panasonic Testing Centre
Panasonic Marketing Europe GmbH
Winsberging 15, 22525 Hamburg, Germany


NT32NE_GQ.book Page 21 Thursday, September 11, 2008 6:57 PM


Panasonic
Kurzanleitung
IP-Systemtelefon
Modell-Nr. KX-NT321
NT321NE_GQ.book Page 23 Thursday, September 11, 2008 6:57 PM
NT321NE_GQ.book Page 24 Thursday, September 11, 2008 6:57 PM
Einstellungen
| Lautsprecher-Lautstärke | Im Freisprechbetrieb | Zum Lauterstellen Auf, zum Leiserstellen Ab drucken. |
| Lautstärke Hörer/Headset*1 | Bei Verwendung von Hörer oder Headset | |
| Tonruflautstärke | Bei aufgelegtem Hörer oder Tätigen eines Anrufs | |
| LCD-Kontrast Bei aufgelegtem HörerPROGRAM→①→/→→→→→→→→→→→→→→→→→→→→→→→→→→→→→→→→→→→→→→→→→→→→→→→→→→→→→→→→→→→→→→→→→→→→→→→→→→→→→→→→→→→→→→→→→→→→→→→→→→→→> | ||
| Rufton ändernPROGRAM→(IDL)ODERINT(Zeimal drucken.→→→→→→→→→→→→→→→→→→→→→→→→→→→→→→→→→→→→→→→→→→→→→→→→→→→→→→→→→→→→→→→→→→→→→→→→→→→→→→→→→→→→→→→→→→→→→→→→→→→≥ | ||
NT321NE_GQ.book Page 25 Thursday, September 11, 2008 6:57 PM

Listeder Funktionen
NT321NE_GQ.book Page 26 Thursday, September 11, 2008 6:57 PM
LiTe der Funktionen
NT32NE_GQ.book Page 27 Thursday, September 11, 2008 6:57 PM

Listeder Funktionen
NT321NE_GQ.book Page 28 Thursday, September 11, 2008 6:57 PM
LiTe der Funktionen
NT32NE_GQ.book Page 29 Thursday, September 11, 2008 6:57 PM


Listeder Funktionen
NT321NE_GQ.book Page 30 Thursday, September 11, 2008 6:57 PM
Anschluss
NT32INE_GQ.book Page 31 Thursday, September 11, 2008 6:57 PM
NT32INE_GQ.book Page 32 Thursday, September 11, 2008 6:57 PM
NT32NE_GQ.book Page 33 Thursday, September 11, 2008 6:57 PM
Wandmontage
NT32INE_GQ.book Page 34 Thursday, September 11, 2008 6:57 PM
Wandmontage
NT32NE_GQ.book Page 35 Thursday, September 11, 2008 6:57 PM
NT32NE_GQ.book Page 36 Thursday, September 11, 2008 6:57 PM
NT32INE_GQ.book Page 37 Thursday, September 11, 2008 6:57 PM
NT321NE_GQ.book Page 38 Thursday, September 11, 2008 6:57 PM

Winsberging 15, 22525 Hamburg, Germany


NT321NE_GQ.book Page 39 Thursday, September 11, 2008 6:57 PM
Panasonic
NT321NE_GQ.book Page 41 Thursday, September 11, 2008 6:57 PM

NT321NE_GQ.book Page 42 Thursday, September 11, 2008 6:57 PM
Ajustes
| Volumen del altavoz | En una conversación con manos libres | Pulse Arriba para subir el volumen o pulse Abajo para bajo lo. |
| Volumen del microtelefono / auriculares1 | Al utilizar el microtelefono o los auriculares | |
| Volumen del timbre | Con el Telefono colgado o al recibir una llamada | |
| Contraste de la LCD Con el Telefono colgado PROGRAM→①→/→→→→→→→→→→→→→→→→→→→→→→→→→→→→→→→→→→→→→→→→→→→→→→→→→→→→→→→→→→→→→→→→→→→→→→→→→→→→→→→→→→→→→→→→→→→→→→→→→→→→ | →/→→→/→→→→→→→→→→→→→→→→→→→→→→→→→→→→→→→→→→→→→→→→→→→→→→→→→→→→→→→→→→→→→→→→→→→→→→→→→→→→→→→→→→→→→→→→→→→→→→→→→ | |
| Tono de llamada PROGRAM→(LN) ○INT ○Pulse 2 vezes. | (01)→(0)1*2 ○INT ○Pulse 2 vezes. | →/→→→→→→→→→→→→→→→→→→→→→→→→→→→→→→→→→→→→→→→→→→→→→→→→→→→→→→→→→→→→→→→→→→→→→→→→→→→→→→→→→→→→→→→→→→→→→→→→→> |
NT321NE_GQ.book Page 43 Thursday, September 11, 2008 6:57 PM

Lista de sistemas
NT321NE_GQ.book Page 44 Thursday, September 11, 2008 6:57 PM
Lista de sistemas


NT32NE_GQ.book Page 45 Thursday, September 11, 2008 6:57 PM

Lista de sistemas
Funciones utiles
NT321NE_GQ.book Page 46 Thursday, September 11, 2008 6:57 PM
Lista de sistemas
NT321NE_GQ.book Page 47 Thursday, September 11, 2008 6:57 PM
Lista de sistemas
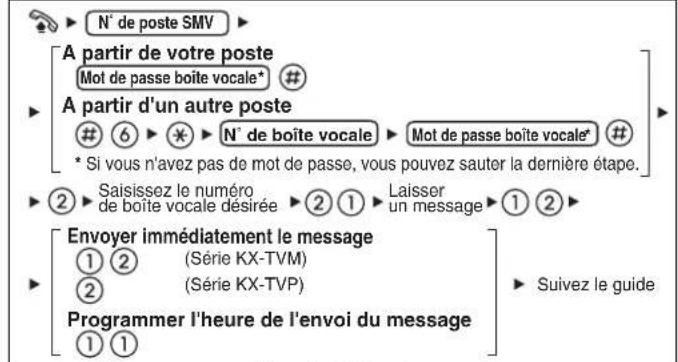
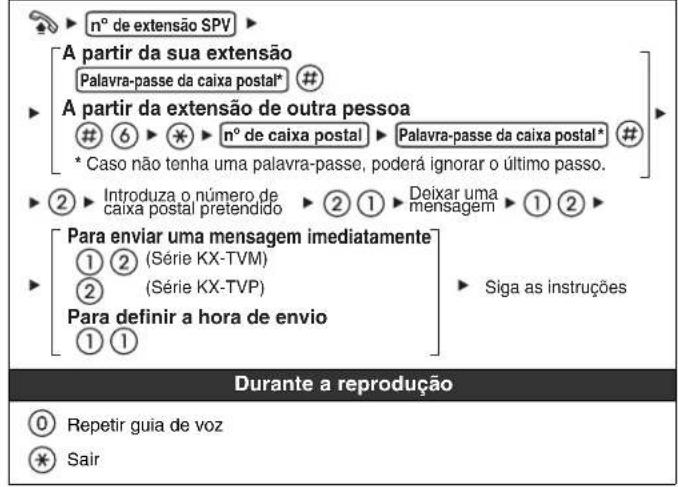
Dejar un mensaje
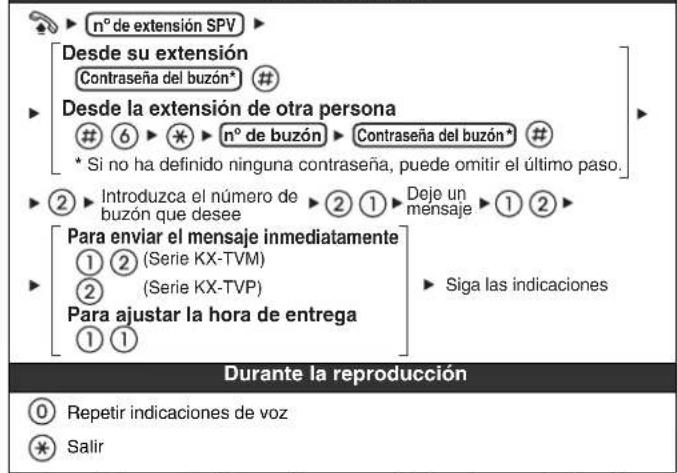
NT321NE_GQ.book Page 48 Thursday, September 11, 2008 6:57 PM
Conexión
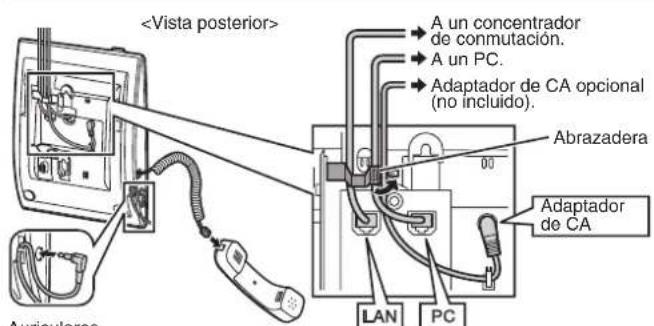
Auriculares Recomrado: KX-TCA89
NT32NE_GQ.book Page 49 Thursday, September 11, 2008 6:57 PM
Uso del soporte
Instalar el soporte
NT321NE_GQ.book Page 50 Thursday, September 11, 2008 6:57 PM
Uso del所提供e
NT32NE_GQ.book Page 51 Thursday, September 11, 2008 6:57 PM
NT321NE_GQ.book Page 52 Thursday, September 11, 2008 6:57 PM
NT32NE_GQ.book Page 53 Thursday, September 11, 2008 6:57 PM
NT321NE_GQ.book Page 54 Thursday, September 11, 2008 6:57 PM
NT32INE_GQ.book Page 55 Thursday, September 11, 2008 6:57 PM
NT321NE_GQ.book Page 56 Thursday, September 11, 2008 6:57 PM
Panasonic Testing Centre
Panasonic Marketing Europe GmbH
Winsberging 15, 22525 Hamburg, Alemania

56


NT32NE_GQ.book Page 57 Thursday, September 11, 2008 6:57 PM


Panasonic
Mémo utiliser

Accessoires (inclus)
NT321NE_GQ.book Page 59 Thursday, September 11, 2008 6:57 PM
NT321NE_GQ.book Page 60 Thursday, September 11, 2008 6:57 PM
Paramètres
NT321NE_GQ.book Page 61 Thursday, September 11, 2008 6:57 PM

Listedes fonctions
Signification des icones
Touches LR programmables = Decochez
NT321NE_GQ.book Page 62 Thursday, September 11, 2008 6:57 PM
Listedes fonctions


NT32NE_GQ.book Page 63 Thursday, September 11, 2008 6:57 PM


Listedes fonctions
Fonctions utiles
NT321NE_GQ.book Page 64 Thursday, September 11, 2008 6:57 PM
Listedes fonctions
NT32NE_GQ.book Page 65 Thursday, September 11, 2008 6:57 PM


Listedes fonctions
Laisser un message
Pendant l'ecoute
NT321NE_GQ.book Page 66 Thursday, September 11, 2008 6:57 PM
Connexion
Casque
Recommende: KX-TCA89
NT321NE_GQ.book Page 67 Thursday, September 11, 2008 6:57 PM


NT321NE_GQ.book Page 68 Thursday, September 11, 2008 6:57 PM
NT32NE_GQ.book Page 69 Thursday, September 11, 2008 6:57 PM
Fixation murale
NT32NE_GQ.book Page 70 Thursday, September 11, 2008 6:57 PM


Fixation murale
NT32NE_GQ.book Page 71 Thursday, September 11, 2008 6:57 PM
Informations importantes
NT32INE_GQ.book Page 72 Thursday, September 11, 2008 6:57 PM
Informations importantes
NT32INE_GQ.book Page 73 Thursday, September 11, 2008 6:57 PM
Informations importantes
NT321NE_GQ.book Page 74 Thursday, September 11, 2008 6:57 PM

Informations importantes
C E
NT32NE_GQ.book Page 75 Thursday, September 11, 2008 6:57 PM


Panasonic
NT321NE_GQ.book Page 77 Thursday, September 11, 2008 6:57 PM

NT321NE_GQ.book Page 78 Thursday, September 11, 2008 6:57 PM
Impostazioni
NT32NE_GQ.book Page 79 Thursday, September 11, 2008 6:57 PM

NT321NE_GQ.book Page 80 Thursday, September 11, 2008 6:57 PM
NT32NE_GQ.book Page 81 Thursday, September 11, 2008 6:57 PM

NT321NE_GQ.book Page 82 Thursday, September 11, 2008 6:57 PM
NT32NE_GQ.book Page 83 Thursday, September 11, 2008 6:57 PM


NT321NE_GQ.book Page 84 Thursday, September 11, 2008 6:57 PM
Collegamento
NT321NE_GQ.book Page 85 Thursday, September 11, 2008 6:57 PM
NT321NE_GQ.book Page 86 Thursday, September 11, 2008 6:57 PM
NT32NE_GQ.book Page 87 Thursday, September 11, 2008 6:57 PM
Montaggio a muro
NT32NE_GQ.book Page 88 Thursday, September 11, 2008 6:57 PM

Montaggio a muro
NT321NE_GQ.book Page 89 Thursday, September 11, 2008 6:57 PM
NT32INE_GQ.book Page 90 Thursday, September 11, 2008 6:57 PM
NT32INE_GQ.book Page 91 Thursday, September 11, 2008 6:57 PM
NT321NE_GQ.book Page 92 Thursday, September 11, 2008 6:57 PM
Panasonic Testing Centre
Panasonic Marketing Europe GmbH
Winsbergring 15, 22525 Hamburg, La Germania

NT321NE_GQ.book Page 93 Thursday, September 11, 2008 6:57 PM

Panasonic
NT321NE_GQ.book Page 95 Thursday, September 11, 2008 6:57 PM
NT321NE_GQ.book Page 96 Thursday, September 11, 2008 6:57 PM
Installingen
| Luidspreker volume | Tijdens handen-vrij telefoneren | Druk op Omhoog om het volume te verhogen of op Omlaag tom het te verlagen. |
| Volume van Hoorn/headset*1 | Tijdens gebruik van de hoorn of headset | |
| Bel volume | Terwijl de hoorn op de haak ligt of een gesprek ontvangen worden | |
| Displaycontrast Terwijl de hoorn op de haak ligt | ||
| PROGRAM | →○①→○→○→○→○→○→○→○→○→○→○→○→○→○→○→○→○→○→○→○→○→○→○→○→○→○→○→○→○→○→○→○→○→○→○→○→○→○→○→○→○→○→○→○→○→○→○→○→○→○→○→×→○→○→○→○→○→○→○→○→○→○→○→○→○→○→○→○→○→○→○→○→○→○→○→○→○→○→○→○→○→○→○→○→○→○→○→○→○→○→○→○→○→○→○→○→○→○→○→○→○→ ○→○→○→○→○→○→○→○→○→○→○→○→○→○→○→○→○→○→○→○→○→○→○→○→○→○→○→○→○→○→○→○→○→○→○→○→○→○→○→○→○→○→○→○→○→○→○→○→○→○→←○→○→○→○→○→○→○→○→○→○→○→○→○→○→○→○→○→○→○→○→○→○→○→○→○→○→○→○→○→○→○→○→○→○→○→○→○→○→○→○→○→○→○→○→○→○→○→○→○→○←○→○→○→○→○→○→○→○→○→○→○→○→○→○→○→○→○→○→○→○→○→○→○→○→○→○→○→○→○→○→○→○→○→○→○→○→○→○→○→○→○→○→○→○→○→○→○→○→○→×←○→○→○→○→○→○→○→○→○→○→○→○→○→○→○→○→○→○→○→○→○→○→○→○→○→○→○→○→○→○→○→○→○→○→○→○→○→○→○→○→○→○→○→○→○→○→○→○→○→←×←○→○→○→○→○→○→○→○→○→○→○→○→○→○→○→○→○→○→○→○→○→○→○→○→○→○→○→○→○→○→○→○→○→○→○→○→○→○→○→○→○→○→○→○→○→○→○→○→○←×←○→○→○→○→○→○→○→○→○→○→○→○→○→○→○→○→○→○→○→○→○→○→○→○→○→○→○→○→○→○→○→○→○→○→○→○→○→○→○→○→○→○→○→○→○→○→○→○→×←○←○→○←○→○←○→○←○→○←○→○←○→○←○←○→○←○←○←○←○←○←○←○←○←○←○←○←○←○←○←○←○←○←○←○←○←○←○←○←○←○←○←○←○←○←○←○←○←○←○←○←○←○←○←○←○←○←○←○←○←○←○←○←○←○←○ ←×←○←○←○←○←○←○←○←○←○←○←○←○←○←○←○←○←○←○←○←○←○←○←○←○←○←○←○←○←○←○←○←○←○←○←○←○←○←○←○←○←○←○←○←○←○←○←○←○←○←×←○←○←○←○←○←○←○←○←○←○←○←○←○←○←○←○←○←○←○←○←○←○←○←○←○←○←○←○←○←○←○←○←○←○←○←○←○←○←○←○←○←○←○←○←○←○←○←○←○ ← ×←×←○←○←○←○←○←○←○←○←○←○←○←○←○←○←○←○←○←○←○←○←○←○←○←○←○←○←○←○←○←○←○←○←○←○←○←○←○←○←○←○←○←○←○←○←○←○←○←○←×←×←○←○←○←○←○←○←○←○←○←○←○←○←○←○←○←○←○←○←○←○←○←○←○←○←○←○←○←○←○←○←○←○←○←○←○←○←○←○←○←○←○←○←○←○←○←○←○←○← ○←×←○←○←○←○←○←○←○←○←○←○←○←○←○←○←○←○←○←○←○←○←○←○←○←○←○←○←○←○←○←○←○←○←○←○←○←○←○←○←○←○←○←○←○←○←○←○←○←○← | |
| Beltoon | ||
| PROGRAM | ( CO) OF INT | ( 0 1 *2 ) ( 1 0 8 ) → × / √ × → PROGRAM |
| Tweemaal indrukken. | ||
NT32NE_GQ.book Page 97 Thursday, September 11, 2008 6:57 PM

NT321NE_GQ.book Page 98 Thursday, September 11, 2008 6:57 PM
Eigenschappen
NT32NE_GQ.book Page 99 Thursday, September 11, 2008 6:57 PM

Eigenschappen
NT321NE_GQ.book Page 100 Thursday, September 11, 2008 6:57 PM
Eigenschappen
NT321NE_GQ.book Page 102 Thursday, September 11, 2008 6:57 PM
Aansluiting
Headset Aanbevolon: KX-TCA89
NT321NE_GQ.book Page 103 Thursday, September 11, 2008 6:57 PM


NT321NE_GQ.book Page 104 Thursday, September 11, 2008 6:57 PM
NT321NE_GQ.book Page 105 Thursday, September 11, 2008 6:57 PM
Murbevestiging
NT321NE_GQ.book Page 106 Thursday, September 11, 2008 6:57 PM


Murbevestiging
NT321NE_GQ.book Page 107 Thursday, September 11, 2008 6:57 PM
NT321NE_GQ.book Page 108 Thursday, September 11, 2008 6:57 PM
NT321NE_GQ.book Page 109 Thursday, September 11, 2008 6:57 PM

NT321NE_GQ.book Page 110 Thursday, September 11, 2008 6:57 PM


Panasonic Testing Centre
Panasonic Marketing Europe GmbH
NT321NE_GQ.book Page 111 Thursday, September 11, 2008 6:57 PM


Panasonic
Snabbguide
IP-systemtelefoner
Modellr KX-NT321
NT32INE_GQ.book Page 113 Thursday, September 11, 2008 6:57 PM

Knapparnas placering
LCD-display
2AUTOUPPR/LAGRA:
NT321NE_GQ.book Page 114 Thursday, September 11, 2008 6:57 PM
Inställningar
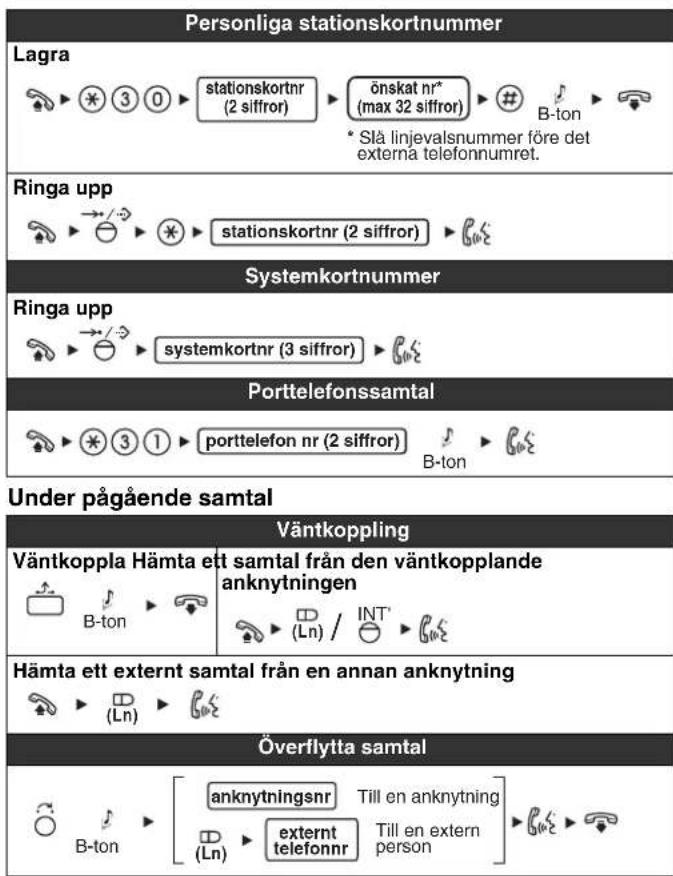
NT32INE_GQ.book Page 115 Thursday, September 11, 2008 6:57 PM


Lista over Funktioner
Ikonförklaringar
Programmerbara Ln-knappar = Lureav
Luren pa = Funktionsummer = Tala

B-ton = Bekräftelseton
Ringasamtal
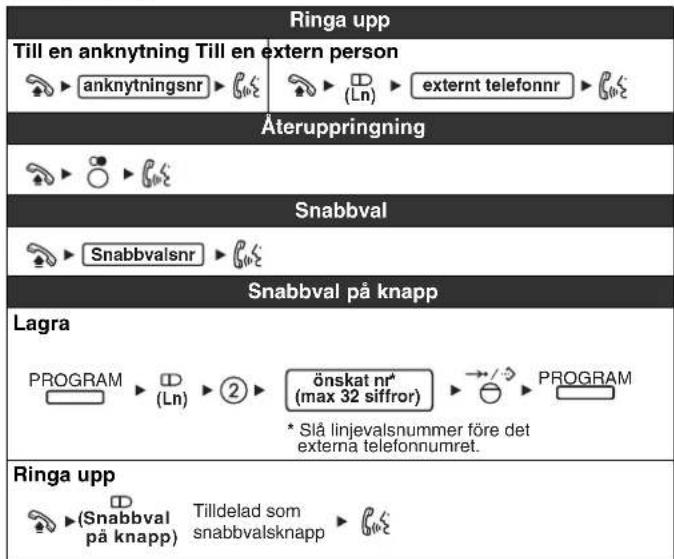


NT321NE_GQ.book Page 116 Thursday, September 11, 2008 6:57 PM
Lista over Funktioner


116


NT321NE_GQ.book Page 117 Thursday, September 11, 2008 6:57 PM


Lista over Funktioner
NT321NE_GQ.book Page 118 Thursday, September 11, 2008 6:57 PM
Lista over Funktioner
NT321NE_GQ.book Page 120 Thursday, September 11, 2008 6:57 PM
Inkoppling
Headset Rekommenderas: KX-TCA89
Datoranslutting/Natverksswitchanslutting
Närettheadsetochennatadapteransluts
NT321NE_GQ.book Page 121 Thursday, September 11, 2008 6:57 PM
Anvanda stativet
Montera stativet
NT321NE_GQ.book Page 122 Thursday, September 11, 2008 6:57 PM
Anvanda stativet
NT321NE_GQ.book Page 123 Thursday, September 11, 2008 6:57 PM
NT321NE_GQ.book Page 124 Thursday, September 11, 2008 6:57 PM


NT321NE_GQ.book Page 125 Thursday, September 11, 2008 6:57 PM
Viktig information
NT321NE_GQ.book Page 126 Thursday, September 11, 2008 6:57 PM
Viktig information
Placering
NT321NE_GQ.book Page 127 Thursday, September 11, 2008 6:57 PM

Viktig information
NT321NE_GQ.book Page 128 Thursday, September 11, 2008 6:57 PM
Viktig information
C E
Panasonic Communications Company (U.K.) Ltd. tillkannager attenna
ustrustning uppyller de erforderlga krav och andra relevanta bestammelser som anges i direktivet 1999/5/EC for Radio & Telecommunications Terminal Equipment (R&TTE).
Panasonic Testing Centre
Panasonic Marketing Europe GmbH
Winsbergring 15, 22525 Hamburg, Tyskland
128


NT321NE_GQ.book Page 129 Thursday, September 11, 2008 6:57 PM


Panasonic
Pikaopas
NT321NE_GQ.book Page 131 Thursday, September 11, 2008 6:57 PM
NT321NE_GQ.book Page 132 Thursday, September 11, 2008 6:57 PM
Asetukset
| Kaiuttimen äänenvoimakkuus | Käytettäessä kaiutinkeskustelua: | Voit lisätä äänenvoimakkuutta painamalla Ylös ja piennentää äänenvoimakkuutta painamalla Alas. |
| Lurin/sankaluurin äänenvoimakkuus1 | Käytettäessä luuria tai sankaluuria: | |
| Hälytysänen voimakkuus | Lurin ollesa alhaalla tai puhelun soidessa: | |
| LCD:n kontrasti Lurin ollesa alhaalla: PROGRAM→①→/→→→→→→→→→→→→→→→→→→→→→→→→→→→→→→→→→→→→→→→→→→→→→→→→→→→→→→→→→→→→→→→→→→→→→→→→→→→→→→→→→→→→→→→→→→→→→→→→→→→→ | PROGRAM→①→/→→→→→→→→→→→→→→→→→→→→→→→→→→→→→→→→→→→→→→→→→→→→→→→→→→→→→→→→→→→→→→→→→→→→→→→→→→→→→→→→→→→→→→→→→→→→→→ | |
| Soittoäni PROGRAM→(KJ) TAI INT Paina 2 kertaa. | →/→→→→→→→→→→→→→→→→→→→→→→→→→→→→→→→→→→→→→→→→→→→→→→→→→→→→→→→→→→→→→→→→→→→→→→→→→→→→→→→→→→→→→→→→→→→→→→→→→ | |
NT321NE_GQ.book Page 133 Thursday, September 11, 2008 6:57 PM


Ominausuudet
NT321NE_GQ.book Page 134 Thursday, September 11, 2008 6:57 PM
Ominausuudet
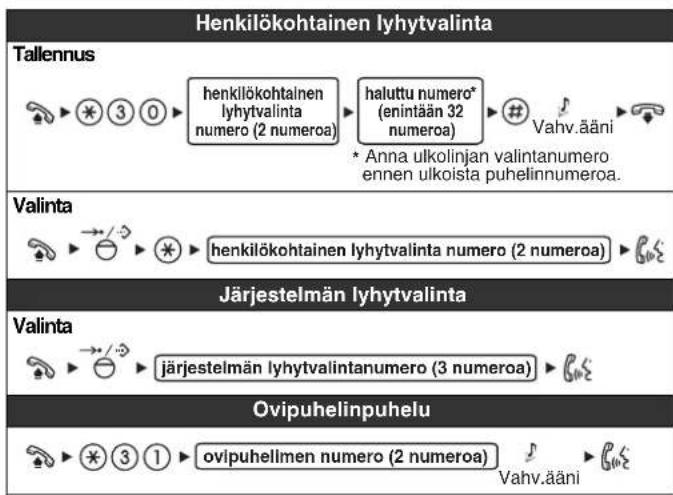
Keskustelun aikana
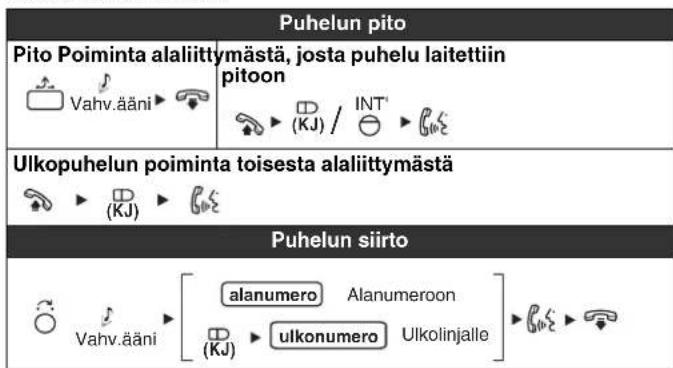


NT321NE_GQ.book Page 135 Thursday, September 11, 2008 6:57 PM
Ominausuudet
NT321NE_GQ.book Page 136 Thursday, September 11, 2008 6:57 PM
Ominaisuudet
NT321NE_GQ.book Page 137 Thursday, September 11, 2008 6:57 PM


Ominausuudet
Viestin jattaminen
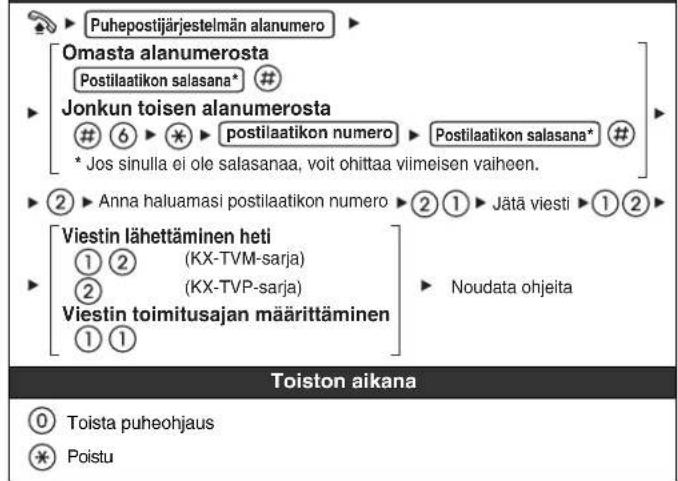
NT321NE_GQ.book Page 138 Thursday, September 11, 2008 6:57 PM
Kytkenta
NT321NE_GQ.book Page 139 Thursday, September 11, 2008 6:57 PM

Telinekaytto
Telineen kiinnitys
NT321NE_GQ.book Page 140 Thursday, September 11, 2008 6:57 PM
Telinekaytto
NT32INE_GQ.book Page 141 Thursday, September 11, 2008 6:57 PM

NT321NE_GQ.book Page 142 Thursday, September 11, 2008 6:57 PM
NT321NE_GQ.book Page 143 Thursday, September 11, 2008 6:57 PM
Tärkeää tietoa
NT321NE_GQ.book Page 144 Thursday, September 11, 2008 6:57 PM
Tärkeä tietoa
Sijoittaminen
NT321NE_GQ.book Page 145 Thursday, September 11, 2008 6:57 PM

Tärkeää tietoa
NT321NE_GQ.book Page 146 Thursday, September 11, 2008 6:57 PM
Tärkeä tietoa

Panasonic Testing Centre
Panasonic Marketing Europe GmbH
Winsbergring 15, 22525 Hamburg, Saksa


146


NT321NE_GQ.book Page 147 Thursday, September 11, 2008 6:57 PM


Panasonic
Quick guide
IP Panasonic-telefon
Modelnr. KX-NT321
Vaegmentingsadapter Skruer
Et To
□ Fod
Et


NT321NE_GQ.book Page 149 Thursday, September 11, 2008 6:57 PM


Kontrolpositioner
NT321NE_GQ.book Page 150 Thursday, September 11, 2008 6:57 PM
Opsætning
NT321NE_GQ.book Page 151 Thursday, September 11, 2008 6:57 PM

NT321NE_GQ.book Page 152 Thursday, September 11, 2008 6:57 PM
NT321NE_GQ.book Page 153 Thursday, September 11, 2008 6:57 PM


NT321NE_GQ.book Page 154 Thursday, September 11, 2008 6:57 PM
NT321NE_GQ.book Page 155 Thursday, September 11, 2008 6:57 PM


NT321NE_GQ.book Page 156 Thursday, September 11, 2008 6:57 PM
Tilslutning
NT321NE_GQ.book Page 157 Thursday, September 11, 2008 6:57 PM


Brug af foden
Montering af foden
NT321NE_GQ.book Page 158 Thursday, September 11, 2008 6:57 PM
Brug af foden
NT321NE_GQ.book Page 159 Thursday, September 11, 2008 6:57 PM
Vaegemontering
NT321NE_GQ.book Page 160 Thursday, September 11, 2008 6:57 PM
Vægmontering
NT321NE_GQ.book Page 161 Thursday, September 11, 2008 6:57 PM
Vigtig information
NT321NE_GQ.book Page 162 Thursday, September 11, 2008 6:57 PM
Vigtig information
Placering
NT321NE_GQ.book Page 163 Thursday, September 11, 2008 6:57 PM
Vigtig information
NT321NE_GQ.book Page 164 Thursday, September 11, 2008 6:57 PM

Vigtig information
C E
NT321NE_GQ.book Page 165 Thursday, September 11, 2008 6:57 PM


Panasonic
NT321NE_GQ.book Page 167 Thursday, September 11, 2008 6:57 PM
NT321NE_GQ.book Page 168 Thursday, September 11, 2008 6:57 PM
Configurações
NT321NE_GQ.book Page 169 Thursday, September 11, 2008 6:57 PM


Lista das caractésticas
Significados dos icones
Teclas LR flexiveis = Fordo descanso
No descanso = NUmepo de funcao Falar
sinal de confirmacao
Fazer Chamadas
NT321NE_GQ.book Page 170 Thursday, September 11, 2008 6:57 PM
Lista das caractésticas
NT321NE_GQ.book Page 171 Thursday, September 11, 2008 6:57 PM

Lista das caractésticas
\section*{Characteristicas Uteis}
NT321NE_GQ.book Page 172 Thursday, September 11, 2008 6:57 PM


Lista das caractésticas
NT321NE_GQ.book Page 173 Thursday, September 11, 2008 6:57 PM


Lista das caractésticas
Deixar uma mensagem
NT321NE_GQ.book Page 174 Thursday, September 11, 2008 6:57 PM
Ligação
Auriculares Recomrado: KX-TCA89
NT321NE_GQ.book Page 175 Thursday, September 11, 2008 6:57 PM
NT32INE_GQ.book Page 176 Thursday, September 11, 2008 6:57 PM
NT321NE_GQ.book Page 177 Thursday, September 11, 2008 6:57 PM
Instalacao na parede
NT321NE_GQ.book Page 178 Thursday, September 11, 2008 6:57 PM
Instalacao na parede
NT321NE_GQ.book Page 179 Thursday, September 11, 2008 6:57 PM
NT321NE_GQ.book Page 180 Thursday, September 11, 2008 6:57 PM
NT321NE_GQ.book Page 181 Thursday, September 11, 2008 6:57 PM
NT321NE_GQ.book Page 182 Thursday, September 11, 2008 6:57 PM
Panasonic Communications Company (U.K.) Ltd.
Pencarn Way, Duffryn, Newport, South Wales, NP10 8YE, United Kingdom
Copyright:
This material is copyrighted by Panasonic Communications Co., Ltd., and may be reproduced for internal use only. All other reproduction, in whole or in part, is prohibited without the written consent of Panasonic Communications Co., Ltd.
© Panasonic Communications Co., Ltd. 2008