
KX-TG1093E - Cordless phone PANASONIC - Free user manual and instructions
Find the device manual for free KX-TG1093E PANASONIC in PDF.


| Product Type | Digital Cordless Phone with Answering System |
| Model Number | KX-TG1093E |
| Number of Handsets | 3 |
| Standard | DECT (Digital Enhanced Cordless Telecommunications) |
| Frequency Range | 1.88 GHz to 1.9 GHz |
| Duplex Procedure | TDMA (Time Division Multiple Access) |
| Channel Spacing | 1,728 kHz |
| Bit Rate | 1,152 kbit/s |
| Modulation | GFSK (Gaussian Frequency Shift Keying) |
| RF Transmission Power | Approx. 250 mW |
| Power Source | 220–240 V, 50 Hz AC |
| Power Consumption (Base Unit) | Standby: Approx. 3.5 W; Maximum: Approx. 9.2 W |
| Power Consumption (Charger) | Standby: Approx. 0.6 W; Maximum: Approx. 5.0 W |
| Battery Type | AAA (R03) Ni-MH rechargeable, 2 per handset |
| Battery Part Number | HHR-55AAAB or HHR-4EPT |
| Battery Charge Time (Initial) | Approx. 10 hours |
| Battery Talk Time | Up to 10 hours continuous use |
| Battery Standby Time | Up to 120 hours |
| Dimensions (Base Unit) | Approx. 47 mm × 116 mm × 107 mm |
| Dimensions (Handset) | Approx. 142 mm × 34 mm × 47 mm |
| Dimensions (Charger) | Approx. 45 mm × 88 mm × 79 mm |
| Weight (Base Unit) | Approx. 120 g |
| Weight (Handset) | Approx. 120 g |
| Weight (Charger, incl. AC adaptor) | Approx. 250 g |
| Answering System Recording Capacity | Approx. 8 minutes total |
| Phonebook Capacity | 10 entries per handset |
| Caller ID | Compatible (requires subscription) |
| Call Log Capacity | 10 most recent callers |
| Redial List Capacity | 4 numbers (max 20 digits each) |
| Intercom | Between handsets |
| Conference Call | Yes (1 outside call + 2 handsets) |
| Speakerphone | Yes (handset-based) |
| Key Lock | Yes (prevents accidental dialing) |
| Silent Mode | Yes (press and hold [off] key) |
| Wall Mountable | Yes (base unit) |
| Operating Temperature | 5 °C to 40 °C |
| Humidity | 20% to 80% relative (dry) |
| Included Accessories | Base unit, 3 handsets, 2 chargers, 6 AAA Ni-MH batteries, 3 handset covers, 1 AC adaptor, 1 telephone line cord |
| Spare Parts Availability | Batteries (HHR-55AAAB), AC adaptor (PQWATG1070E), charger (PQWETGA107E), handset cover (8060094500), telephone line cord (PQJA87S) |
| Maintenance | Clean charge contacts with dry cloth; wipe battery ends |
| Safety Notes | Use only included AC adaptor; keep away from water, heat sources; do not open unit; battery disposal per local regulations |
| Warranty | 12 months (UK and ROI) |
Frequently Asked Questions - KX-TG1093E PANASONIC
User questions about KX-TG1093E PANASONIC
0 question about this device. Answer the ones you know or ask your own.
Ask a new question about this device
Download the instructions for your Cordless phone in PDF format for free! Find your manual KX-TG1093E - PANASONIC and take your electronic device back in hand. On this page are published all the documents necessary for the use of your device. KX-TG1093E by PANASONIC.
USER MANUAL KX-TG1093E PANASONIC
natural_image
Line drawing of a classic mobile phone with keypad and base (no text or symbols)KX-TG1070
Charge the batteries for about 10 hours before initial use.
Operating Instructions
Digital Cordless Phone
Model No. KX-TG1070E
KX-TG1072E
KX-TG1073E
KX-TG1074E
Digital Cordless Answering System
Model No. KX-TG1090E
KX-TG1092E
KX-TG1093E
KX-TG1094E
Table of Contents
Introduction 2
Preparation 4
Useful Telephone Settings .... 10
Making / Answering Calls 12
Phonebook 14
Caller ID Service 15
Answering System Feature...... 16
Multi-unit Operation 19
Useful Information.... 20

You must subscribe to Caller ID service to use this feature.
Caller ID
Please read these operating instructions before using the unit and save them for future reference.
Thank you for purchasing a new Panasonic digital cordless phone.
For your future reference
Attach or keep original receipt to assist with any repair under warranty.
Serial No. (found on the bottom of the unit)
Date of purchase
Name and address of dealer
Note:
- This equipment is designed for use on the UK and Republic of Ireland analogue telephone network.
- In the event of problems, you should contact your equipment supplier in the first instance.
Declaration of Conformity:
Panasonic Communications Co., Ltd. declares that this equipment is in compliance with the essential requirements and other relevant provisions of Radio & Telecommunications Terminal Equipment (R&TTE) Directive 1999/5/EC. Declarations of Conformity for the relevant Panasonic products described in this manual are available for download by visiting: http://www.doc.panasonic.de
Contact:
Panasonic Services Europe, a Division of Panasonic Marketing Europe GmbH Panasonic Testing Centre, Winsbergring 15, 22525 Hamburg, Germany
Your phone
KX-TG1070 / KX-TG1090 KX-TG1072 / KX-TG

The pictured model is KX-TG1070.
092

natural_image
Line drawing of a classic wireless telephone with keypad and base (no text or symbols)
The pictured model is KX-TG1072.
KX-TG1073 / KX-TG1093 KX-TG1074 / KX-TG1094


The pictured model is KX-TG1073. The pictured model is KX-TG1074.

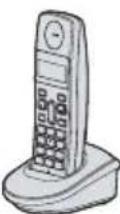
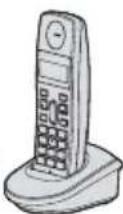

Included accessories
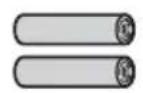
| No. | Accessory items | Quantity | |||
| KX-TG1070KX-TG1090 | KX-TG1072KX-TG1092 | KX-TG1073KX-TG1093 | KX-TG1074KX-TG1094 | ||
| 1. | AC adaptor for base unitPart No. PQWATG1070E | 1 | 1 | 1 | 1 |
| 2. | Telephone line cordPart No. PQJA87S or 460015600200(for UK) | 1 | 1 | 1 | 1 |
| 3. | Rechargeable batteriesAAA (R03) sizePart No. HHR-55AAAB or HHR-4EPT(Order No. P03P) | 2 | 4 | 6 | 8 |
| 4. | Handset cover*Part No.8060094500 | 1 | 2 | 3 | 4 |
| 5. | ChargerPart No. PQWETGA107E | - | 1 | 2 | 3 |
* The handset cover comes attached to the handset.



natural_image
Simple line drawing of a bell-shaped object with a tag, labeled with numbers 4 and 5 (no text or symbols on the object itself)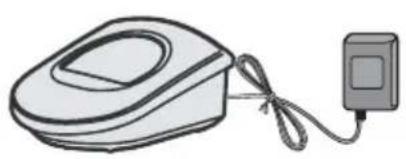
natural_image
Illustration of a portable electronic device connected to a power outlet (no text or symbols)Important information
General
- Use only the AC adaptor included with this product, noted on page 3.
- Do not connect the AC adaptor to any AC outlet other than a standard 220-240 V AC outlet.
-
This product is unable to make calls when:
-
The portable handset battery(ies) need recharging or have failed.
- There is a power failure.
-
The key lock feature is turned on.
-
Do not open the base unit, charger or handset other than to replace the battery(ies).
- This product should not be used near emergency/intensive care medical equipment and should not be used by people with pacemakers.
- Care should be taken that objects do not fall onto, and liquids are not spilled into, the unit. Do not subject this product to excessive smoke, dust, mechanical vibration or shock.
- Only the included handset can be used with the base unit. No other handsets can be registered or used.
Environment
- Do not use this product near water.
- This product should be kept away from heat sources such as radiators, cookers, etc. It should also not be placed in rooms where the temperature is less than 5 °C or greater than 40 °C.
- The AC adaptor is used as the main disconnect device. Ensure that the AC outlet is installed near the unit and is easily accessible.
Warning:
- To prevent the risk of electrical shock, do not expose this product to rain or any other type of moisture.
- Unplug this unit from power outlets if it emits smoke, an abnormal smell or makes unusual noise. These conditions can cause fire or electric shock. Confirm that smoke has stopped and contact an authorised service centre.
Battery caution
- We recommend using the battery(ies) noted on page 3. Use only rechargeable battery(ies).
- Do not mix old and new batteries.
- Do not dispose of the battery(ies) in a fire, as they may explode. Check local waste management codes for special disposal instructions.
- Do not open or mutilate the battery(ies). Released electrolyte from the battery(ies) is corrosive and may cause burns or injury to the eyes or skin. The electrolyte may be toxic if swallowed.
- Exercise care when handling the battery(ies). Do not allow conductive materials such as rings, bracelets or keys to touch the battery(ies), otherwise a short circuit may cause the battery(ies) and/or the conductive material to overheat and cause burns.
- Charge the battery(ies) in accordance with the information provided in these operating instructions.
- Only use the included base unit (or charger) to charge the battery(ies). Do not tamper with the base unit (or charger). Failure to follow these instructions may cause the battery(ies) to swell or explode.
Information on Disposal for Users of Waste Electrical & Electronic Equipment (private households)

This symbol on the products and/or accompanying documents means that used electrical and electronic products should not be mixed with general household waste.
For proper treatment, recovery and recycling, please take these products to designated collection points, where they will be accepted on a free of charge basis.
Alternatively, in some countries you may be able to return your products to your local retailer upon the purchase of an equivalent new product.
Disposing of this product correctly will help to save valuable resources and prevent any potential negative effects on human health and the environment which could otherwise arise from inappropriate waste handling.
Please contact your local authority for further details of your nearest designated collection point.
Penalties may be applicable for incorrect disposal of this waste, in accordance with national legislation.
For business users in the European Union
If you wish to discard electrical and electronic equipment, please contact your dealer or supplier for further information.
Information on Disposal in other Countries outside the European Union
This symbol is only valid in the European Union.
If you wish to discard this product, please contact your local authorities or dealer and ask for the correct method of disposal.
Connections
Base unit
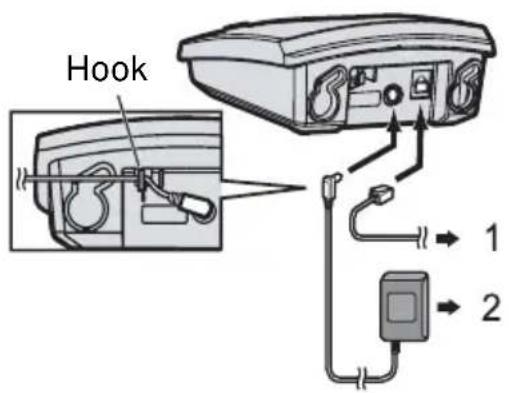
-
To telephone network
-
220-240 V, 50 Hz
Note:
- Use only the included AC adaptor and telephone line cord.
- Connect the AC adaptor securely to the AC outlet.
• To mount the base unit to the wall, see page 24.
Charger
KX-TG1072/KX-TG1073/KX-TG1074
KX-TG1092/KX-TG1093/KX-TG1094
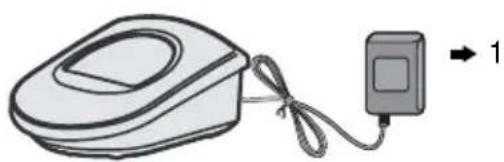
natural_image
Illustration of a medical device connected to a device with a cable, labeled '1' (no text or symbols on the device itself)- 220-240 V, 50 Hz
Note:
- Never install telephone wiring during a lightning storm.
- Do not connect the AC adaptor to a ceiling-mounted AC outlet, as the weight of the adaptor may cause it to become disconnected.
• The unit will not work during a power failure. We therefore recommend you also connect a corded-type telephone
(without AC adaptor) to the same telephone line using a T-adaptor. Your Panasonic sales shop can offer you more information about connection possibilities.
Location
For maximum distance and noise-free operation, place your base unit:
- Away from electrical appliances such as TVs, radios, personal computers or other phones.
• In a convenient, high and central location.
Battery installation
Important:
- Wipe the battery ends (+,-) with a dry cloth.
• Install the batteries without touching the battery ends (+,-) or the unit contacts.
1 Press the notch of the handset cover firmly and slide it in the direction of the arrow.

natural_image
Illustration of a remote control device with a curved handle and arrow indicating direction (no text or symbols)2 Insert the batteries negative (−) terminal first. Close the handset cover.

natural_image
Diagram of a remote control device showing internal components and a separate mouse (no text or symbols present)Note:
- Use only the included rechargeable batteries.
Battery charge
Place the handset on the base unit or charger for about 10 hours before initial use.
When charging, □ and □re alternately shown on the display. When the batteries are highly charged, □ remains on the display.
Battery strength
| Battery icon | Meaning |
 | The handset can be used. |
 | Needs to be charged. |
Panasonic Ni-MH battery performance
When you charge the batteries for 10 hours from the battery empty status, the following performance is available.
| Operation | Operation time |
| In continuous use | 10 hours max.* |
| In continuous standby mode | 120 hours max.* |
* When operation temperature is 25 °C.
Note:
- It takes 10 hours to fully charge the batteries, however, you can use the handset if ☐ remains on the display while charging.
- It is normal for batteries not to reach full capacity at the initial charge. Maximum battery performance is reached after a few complete cycles of charge/discharge (use).
• Actual battery performance depends on a combination of how often the handset is in use and how often it is
not in use (standby).
- Even after the handset is fully charged, the handset can be left on the base unit or charger without any ill effect on the batteries.
- The battery strength may not be displayed correctly after you replace the batteries. In this case, place the handset on the base unit or charger and charge for at least 10 hours.
Controls
Handset
KX-TG1070/KX-TG1072/KX-TG1073/KX-TG1074
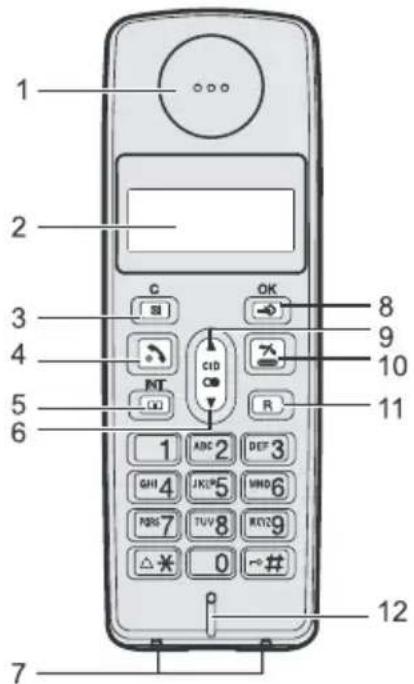
- Receiver
- Display
- [ ✉C] Mute / Clear
- [ ] Talk
- [INT] Phonebook / Intercom
- [/▼] Volume down / Redial list
- Charge contacts
- [/OK] Setting / OK
- [▲/CID] Volume up / Call log
- [×] Off
- [R] Recall
- Microphone
Handset
KX-TG1090/KX-TG1092/KX-TG1093/
KX-TG1094
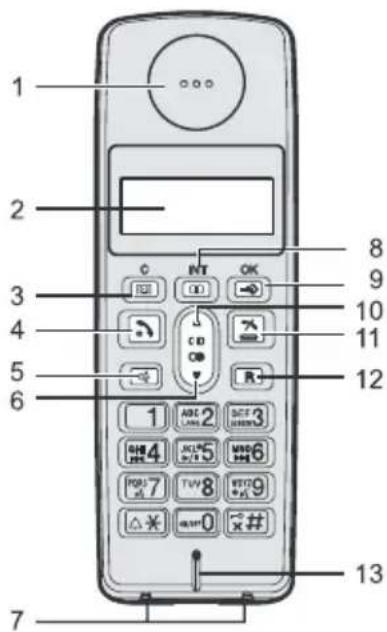
- Receiver
- Display
- [oo/C] Answering system / Clear / Mute
- [ ] Talk
- [ ] Speakerphone
- [/▼] Volume down / Redial list
- Charge contacts
- [INT] Phonebook / Intercom
- [→/OK] Setting/OK
10.[ /CID] Volume up / Call log - [×] Off
12.[R] Recall
13.Microphone
Base unit
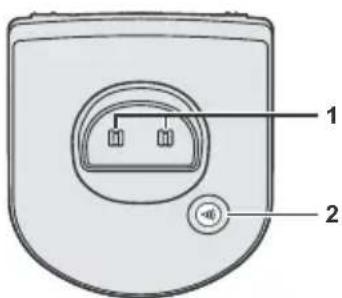
- Charge contacts
- [•] Page
Charger
KX-TG1072/KX-TG1073/KX-TG1074
KX-TG1092/KX-TG1093/KX-TG1094
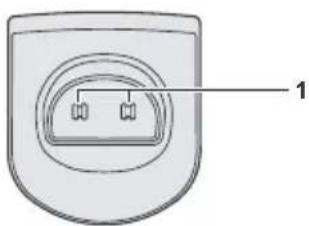
natural_image
Diagram of a device interior with two internal components, labeled with number 1 (no text or symbols on the diagram itself)- Charge contacts
Displays
| Icons | Meaning |
 | Handset within range of base unitWhen this icon is not displayed: out of range, no registration or no power on base unit |
 | Setting mode |
 | Making or answering a call |
 | Incoming call |
 | Intercom call in progress |
 | Ringer volume is off |
 | Key lock is on |
 | Microphone is muted |
 | Phonebook |
 | The handset can be used. |
 | Needs to be charged. |
| Displayed when you press [★] | |
| Displayed when you press [#] | |
| Displayed when you press [R] | |
| Displayed when you long press [0] | |
| If the current handset number is 2, “[2]” is displayed | |
| Displayed when you press and hold [INT]. |
For KX-TG1090/KX-TG1092/KX-TG1093/KX-TG1094 only
| Icons | Meaning |
 | Speakerphone is on |
| [SYT6] | Answer system is on |
 | Answer system setting mode is selected |
 | New message in message box |
 | Answering system answers a call or new message is being recorded. |
 | Answering system memory is full |
Symbols used in these operating instructions
| Symbol | Meaning |
| [→/OK] | Press [→/OK] |
| > | Proceed to the next operation |
Guide to telephone settings
For your reference, a chart of all items which can be customized for the telephone is printed below.
| Items | Default setting | Page |
| Date and time | - | Page 10 |
| 12 and 24-hour display format | 24-hour | Page 10 |
| Handset ringer tone | 1 | Page 10 |
| Handset ringer volume | 5 | Page 11 |
| Handset key tone | On | Page 11 |
| Dial mode * | Tone | Page 11 |
| Auto talk | Off | Page 11 |
| Recall time * | 100ms | Page 11 |
| PIN * | 0000 | Page 11 |
* You do not need to program the same item using another handset (for models with 2 or more handsets included).
Date and time
1 [→/OK] > [1]
2 Enter the current hour and minute (in the 24-hour format).
3 [ → /OK]
4 Enter the current day, month, and year (dd-mm-yy).
5 [ →/OK] to save the setting.
Note:
- (KX-TG1072/KX-TG1073/KX-TG1074/KX-TG1092/KX-TG1093/KX-TG1094 only) If you set the date and time with handset 1, press [ ] and [ ] on another handset to show the time on that handset.
- The date and time may be incorrect after a power failure. In this case, set the date and time again.
12 and 24-hour display format
1 [→/OK] > [2]
2 Press [▲] or [▼] to select between "12" and "24"-hour display format.
3 [ →/OK] to save the setting.
Note:
- When 12-hour format is selected, “A” or “P” shows next to the current time to indicate AM or PM time.
Handset ringer tone
1 [→/OK] > [4]
2 Press [▲] or [▼] to select a tone.
- 6 tones are available.
3 [ →/OK] to save the setting.
Handset ringer volume
1 [→/OK] > [5]
2 Press [ ] or [ ] to select handset ringer volume.
- 5 levels are available.
- The handset plays the selected tone at that volume while selecting.
3 [ →/OK] to save the setting.
Handset key tone (On/Off)
1 [→/OK] > [6]
2 Press [ ] or [ ] to select handset key tone "On" or "OFF".
3 [ →/OK] to save the setting.
Dial mode (Tone/Pulse)
1 [→/OK] > [7]
2 Press [▲] or [▼] to select between tone "1" and pulse "2" dial modes.
3 [ →/OK] to save the setting.
Note:
- Consult your service provider/telephone company for details of this setting.
Auto talk
Auto talk feature allows you to answer calls simply by lifting the handset off the base unit or charger. You do not need to press [] key.
1 [ →/OK] > [8]
2 Press [ ▲ ] or [ ▼ ] to select between "On" and "OFF".
3 [ →/OK] to save the setting.
Recall time
8 recall time values are available for selection.
1 [ →/OK] > [R]
2 Press [▲] or [▼] to select a value (options: 80, 100, 120, 180, 250, 300, 600 and 800ms) (factory setting: 100ms).
3 [ →/OK] to save the setting.
Note:
- Consult your service provider/telephone company for details of this setting.
Setting PIN
Set the PIN to prevent others from accidentally resetting the telephone settings.
- Factory setting is "0000".
Changing to a new PIN
If you change the PIN, please write down your new PIN as the unit will not reveal the PIN to you.
1 [ →/OK] > [ ]
2 Enter the current 4 digit PIN > [→/OK]
- If a wrong PIN is entered, a long beep will be heard.
3 Create a PIN (4 digits).
4 [ →/OK]
5 Enter the newly created PIN again for confirmation.
6 [ →/OK] to save PIN.
- If a wrong PIN is entered, a long beep will be heard.
Resetting to default settings
Telephone settings (page 10) and answering system settings (page 16 -18) are reset to default settings.
1 [ →/OK] > [9]
2 Enter the PIN (4 digits).
3 Press [ →/OK] again to reset to default settings.
Note:
- If a wrong PIN is entered, a long beep will be heard.
- Date and time will not be reset.
- The following items will be deleted:
-Redial list
-Phonebook entries
-Call log
-Recordings, including your greeting message and caller messages
Making calls
1 Predial the phone number > [ ]
- If you make a mistake while predialling a phone number, press [C] to clear it. Press and hold [C] to clear all inputs.
2 When finished talking, press [ ] or place the handset on the base unit or charger.
Adjusting the receiver volume
Press [▲] or [▼] while on a call. 5 levels are available.
Speakerphone
(KX-TG1090/KX-TG1092/KX-TG1093/KX-TG1094 only)
The handset features a digital speakerphone, which allows you to have hands-free conversations.
1 During a conversation, press [ ] to turn on the speakerphone.
2 When finished talking, press [ ] or place the handset on the base unit or charger.
Note:
- For best performance, use the speakerphone in a quiet environment.
• To switch back to the receiver, press

Adjusting the speaker volume
Press [ ] or [ ] during the call. 5 levels are available.
Answering calls
1 Press [ ] to answer the call.
2 When finished talking, press [ ] or place the handset on the base unit or charger.
Note:
- With Auto Talk function switched on, you can talk directly when the handset is picked up from the base unit or charger during incoming call (page 10).
Handset locator
1 Press [ ] on the base unit.
- While paging the handset, the time and handset number displays will temporarily disappear from the handset screen.
2 To stop paging, press [ ] on the base unit again or press [ ] on each handset.
- The handset beeps for 1 minute.
Pause button (for PBX/long distance service users)
A pause is sometimes required when making calls using a PBX or long distance service. Press and hold [0] for about 2 seconds to create one pause.
Temporary tone dialling (for rotary or pulse service users)
You can temporarily switch the dialling mode to tone when you need to access touch tone services (e.g., telephone banking services).
1 Make a call.
2 Press [ ] when prompted to enter your code or PIN, then press the appropriate dial keys.
- The dialling mode will return to pulse when you hang up.
Redialling
The last 4 numbers dialled (each 20 digits max.) are stored in the redial list.
1 [▼/○●] > Press [▲] or [▼] to select a desired number.
2 Press [ ] to start redialling.
Note:
- If the number is more than 12-digit long, only the last 11 digits will be displayed preceded by a “_”.
Deleting a number in the redial list
1 [ ▼ / ○● ] > Press [ ▲ ] or [ ▼ ] to check the numbers.
2 [C] to delete the selected number.
Deleting the whole redial list
1 [→/OK] > [0] > [▼/○●]
2 [/OK] to confirm deletion.
Key lock
The handset can be locked to prevent accidental key activation. Incoming calls can be answered, but all other functions (except making emergency calls) are disabled while key lock is on.
To turn key lock on, press [#] for about 2 seconds.
- To turn key lock off, press [ # ] for about 2 seconds again.
Note:
- shows on the display while key lock is on.
- Emergency numbers are prestored as "112" and "999". The users cannot program them.
Silent mode
To switch off ringer, press and hold [✗ until “✗” shows on the display.
- When an incoming call is received, only “✗” flashes on the display to indicate an incoming call.
To switch on ringer, press and hold [✗] until “∅” disappears from the display.
Note:
- Even if the silent mode is set, the handset will ring for paging at the maximum volume.
Muting
1 During a call, press [☒] for KX-TG1070/KX-TG1072/KX-TG1073/KX-TG1074 or [☐] for KX-TG1090/KX-TG1092/KX-TG1093/KX-TG1094 to mute handset.
• The other party cannot hear you.
- When muting is on, “☒” shows on the display.
2 Press [ ☒] for KX-TG1070/KX-TG1072/KX-TG1073/KX-TG1074 or [ ☐] for KX-TG1090/KX-TG1092/KX-TG1093/KX-TG1094 to cancel muting.
Call waiting - [R] button
If a second call is received while in conversation with the first caller, a beep tone will be heard. Press [R] button to switch between callers.
This service requires a subscription.
Consult your service provider/telephone company for details.
Note:
- You can change the recall time (page 11).
Adding entries to the phonebook
The phonebook allows you to make calls without having to dial manually. You can add 10 phone numbers to the phonebook.
1 [ →/OK] > []
2 Press [ ] or [ ] to select a phonebook location (0-9).
3 Enter the party's phone number (20 digits max.).
4 [ →/OK] to save the phone number in the phonebook.
Making calls
1 [□□] > Press [ ▲ ] or [ ▼ ] to display the desired entry.
2[]
Note:
- ( KX-TG1090/KX-TG1092/KX-TG1093/KX-TG1094) - Press [ ] to talk through the earpiece. If you want to use the speaker instead, press [ ]
Editing numbers
1 [→/OK] > [□□]
2 Press [ ] or [ ] to select a phonebook location (0-9).
3 Press [C] to erase a digit backward, or press and hold [C] to erase all digits.
4 Enter new phone number.
5 [ →/OK] to save the edited phone number in the phonebook.
Deleting the whole phonebook
1 [→/OK] > [0] > [□]
2 [ →/OK] to confirm deletion.
Using Caller ID service Important:
- This unit is Caller ID compatible. To use Caller ID features (such as displaying caller phone numbers), you must subscribe to Caller ID service. Consult your service provider/telephone company for details.
Caller ID features
When new calls have been received, the display will show the number of new calls. If a call is not answered, phone numbers of the last 10 different callers will be listed in the call log and "-CALL-" is shown on the display.
- The following will not be left in the call log:
- "-O-" (Out of area): The caller dialled from an area which does not provide Caller ID service.
- "-P-" (Private caller): The caller requested not to send caller information.
- Caller information for the answered calls.
Checking call log
[▲/CID] > Press [▲] or [▼] to check the numbers.
- If the date and time is set or caller information includes the date and time, you can display it by pressing [#]. If you want to return to the phone number, press [#] again.
Note:
- Press [ ] to start calling the selected number.
- If a call number in the log has never been read, “n-” shows prior to the number.
- If the number is more than 10-digit long, only the last 10 digits will be displayed preceded by a “_”.
- When calls are received with the date and time information, Caller ID will automatically adjust the date and time.
Deleting a number in the call log
1 [ ▲ /CID] > Press [ ▲ ] or [ ▼ ] to check the numbers.
2 [C] to delete the selected number.
Deleting the whole call log
1 [ →/OK] > [0] > [ ▲ /CID]
2 [ →/OK] to confirm deletion.
Call Waiting Caller ID
This is a service of your service provider/telephone company and will only operate if you have subscribed to this service. When you hear a call waiting tone during a conversation, the display will show the second caller's information. You can answer the second call by pressing [R]. The first caller will be placed on hold. Press [R] again to switch back to the first caller. Consult your service provider/telephone company for details of this service.
Note:
- You can change the recall time (page 11).
Answering system
The unit contains an answering system which can answer and record calls for you when you are unavailable to answer the phone. The total recording capacity (including your greeting message and caller messages) is about 8 minutes.
Important:
- Only 1 handset can access the answering system (listen to messages, record a greeting message, etc.) at a time.
- When callers leave messages, the unit records the date and time of each message. Make sure the date and time have been set (page 10).
- Messages are retained even if a power failure occurs.
- For the following settings, you do not need to program the same item using another handset (for models with 2 or more handsets included):
- answering system on/off
- language setting for prerecorded greeting message
- remote access code
Turning the answering system on or off
1 [ ]
- "oo" flashes on the display.
2 [0 ON/OFF]
3 Press [▲] or [▼] to select between "On" and "OFF".
4 [ →/OK] to save the setting >[]
- When the answering system is turned on, " ☐ " is displayed.
Greeting message
When the unit answers a call, callers are greeted by a greeting message. You can record your own greeting message or use a prerecorded greeting message.
Prerecorded greeting message will be used if there is no user's recorded message. Prerecorded greeting message cannot be deleted.
Selecting language for prerecorded greeting message
4 language versions are available for your selection.
1 [ ]
- "∞" flashes on the display.
2 [2 LANG]
3 Press [▲] or [▼] to select a language version "1" (English), "2" (German), "3" (Greek) or "4" (Italian).
4 [→/OK] to save the setting >[✗]
Recording your own greeting message
1 [ ]
- "∞" flashes on the display.
2 [9 •]
3 Start recording your own greeting after a tone. Hold the handset about 20cm away and speak clearly into the microphone. The maximum length of the greeting message is 60 seconds (minimum 1 second) with counter counting down from 60 while recording.
4 [oo] to save the recording.
• The greeting message is played back.
5 [×]
Playing back the greeting message
1 [∞]
- "∞" flashes on the display.
2 [7 10 2 ]
- The user's (if available) or prerecorded greeting message will be played through the speaker.
3 After playing back, press [ ×].
Deleting the greeting message
1 [ ]
- "∞" flashes on the display.
2 [7]
3 Press [#x] to delete user's greeting message while listening to the greeting message. Prerecorded greeting message cannot be deleted. After you have erased your own greeting message, the unit will play a prerecorded greeting message.
4 [×]
Recording incoming messages
After the answering system is turned on, it will pick up incoming calls after 4 rings without user's answering. Callers can leave their voice message after the greeting message and then a tone. The maximum length of the message is 60 seconds (minimum 1 second).
Message full
When the message box is full, callers cannot leave messages after listening to the greeting message and then 6 beep tones before the line is cut. "F" flashes on the display to indicate the message box is full. You can still control the TAM remotely even the message box is full.
Deleting all messages in the message box
1 [ → /OK] > [0] > [#x]
2 [ →/OK] to delete.
Listening to messages
Messages are stored and played back in chronological order (new message first).
1 [ ]
- "∞" flashes on the display.
2 [5 ▶/■]
- New messages start to be played back through the speaker.
- If there are no new messages, all messages will be played back after a beep.
• Refer to the following table and press keys for corresponding operation.
Direct commands
| Keys | Functions |
| 5▶/■ | Starts and stops message playback |
| 4 ◀◀ | Repeats the current message * |
| 6 ▶▶ | Skips forward a message |
| #x | Deletes the current message |
* If you press [4] again, the previous message is played.
Note:
• Message information display

"01" – the message's sequential number "n" – the current message is new
"12-33P" – the message recorded time (12:33 PM)
"23" – the message recorded date
- New and old messages are separated by a long beep sound. It can also be heard at the end of all messages.
Call screening (handset number 1 only)
While a caller is leaving a message, user can screen the call through the handset speaker on handset number 1.
Turning call screening on / off (handset number 1 only)
1 [ ]
- "∞" flashes on the display.
2 [3 SCREEN]
3 Press [▲] or [▼] to select between "On" and "OFF".
4 [→/OK] to save the setting. >[✗]
Screening calls (handset number 1 only)
While a caller is leaving a message, you can listen to the call through the handset speaker. To adjust the speaker volume, press [▲] or [▼] repeatedly. You can answer the call by pressing [↘] on the handset.
Remote accessing
Using a touch tone phone, you can call your phone number from outside and access the unit to listen to the voice messages.
Important:
- In order to operate the answering system remotely, you must first set a remote code. This code must be entered each time you operate the answering system remotely.
Remote access code
A remote access code must be entered when operating the answering system remotely. This code prevents unauthorised parties from listening to your messages remotely. The factory setting is "0000".
Changing remote access code
If you change the access code, please write down your new access code as the unit will not reveal the access code to you.
1 [ ]
- "∞" flashes on the display.
2 Press [ ] and enter the previous access code then press [ => /OK] to confirm.
- If a wrong access code is entered, a long beep will be heard.
3 Input a new access code (4 digits) then press [→/OK] key.
4 Input this new access code once again for confirmation. >[→ /OK] - If a wrong access code is entered, a long beep will be heard.
5 [ ]
Using the answering system remotely
1 Use a touch tone phone and call your phone number from outside.
2 Press [ ] after you hear the greeting, the greeting will be stopped.
3 Enter the remote access code.
- New messages start to be played back.
- If there are no new messages, all messages will be played back after a long beep.
4 Refer to following table and press keys for corresponding operation.
Note:
- You can hang up at any time.
Remote commands
| Keys | Functions |
| 5 | Starts and stops message playback |
| 4 | Repeats the current message |
| 6 | Skips forward a message |
| # | Deletes the current message |
Note:
- Error tones (2 long beeps) will sound if a wrong remote access code is entered. You can enter the remote access code again. If this fails again, the phone will release the line.
Intercom between handsets
Intercom calls can be made between handsets.
Example: When handset 1 calls handset 2
1 Handset 1:
Press and hold [INT] until “•”)” shows on the display. Press [2] (desired handset number).
2 Handset 2:
Press [] to answer.
3 When finished talking, press [ ]. ✗ Note:
- If phonebook is shown when you press [INT], press [C], then press and hold [INT].
Switching calls between outside call and intercom with a handset
Example: When handset 1 switches between an outside call and handset 2
1 Handset 1:
During an outside call, press and hold [INT] until “•”)” shows on the display. Press [2] (desired handset number).
- The outside call will be put on hold. If there is no answer, press [ ] to return to the outside call.
2 Handset 2:
Press [] to answer the call.
- Handset 2 can talk with handset 1.
3 Handset 1:
Press and hold [INT] to return to the outside call.
Handset 2:
Press [✗] to end the call.
Transferring an outside call to handsets
Example: When handset 1 transfers an outside call to handset 2
1 Handset 1:
During an outside call, press and hold [INT] until “•”) shows on the display. Press [2] (desired handset number).
- The outside call will be put on hold. If there is no answer, press [ ] to return to the outside call.
2 Handset 2:
Press [] to answer the call.
- Handset 2 can talk with handset 1.
3 Handset 1:
Press [] to transfer the outside call to handset 2.
Note:
- The external call can only be transferred when the intercom is established successfully.
Conference call with an outside call and a handset
Example: When handset 1 talks with an outside call and handset 2
1 Handset 1:
During an outside call, press and hold [INT] until “•”)” shows on the display. Press [2] (desired handset number).
- The outside call will be put on hold. If there is no answer, press [→] to return to the outside call.
2 Handset 2:
Press [] to answer the call.
- Handset 2 can talk with handset 1.
3 Handset 1:
Press [ ] to establish a conference call with the outside call and handset 2.
Troubleshooting
If you still have difficulties after following the instructions in this section, disconnect the base unit's AC adaptor and remove the handset batteries. Then reconnect the AC adaptor and install the batteries.
| Problem | Cause & Solution |
| disappears. | The handset is too far from the base unit. Move closer.The AC adaptor is not connected. Check the connections.You are using the handset or base unit in an area with high electrical interference. Place the handset and base unit away from interference sources, such as antennas and mobile phones.The handset registration is cancelled. Register the handset to the base unit (page 23). |
| flashes. | You pressed [or [when your handset was not linked to the base unit (is not displayed). Refer to the solutions for disappears.You pressed [when another handset was on a telephone call. Wait for the other user to finish.You pressed [when another handset was setting the answering system. Wait for the other user to finish. |
| I cannot make or receive calls. | The AC adaptor or telephone line cord is not connected. Check the connections.The key lock feature is turned on. Turn it off (page 13). |
| The unit does not ring. | The ringer volume is turned off. Adjust the ringer volume (page 11). |
| The handset will not turn on. | Make sure that the batteries are installed correctly (page 6).Charge the batteries for 10 hours (page 7). |
| Static, sound cuts in/out, fades. Interference from other electrical units. | Place the handset and the base unit away from other electrical appliances.Move closer to the base unit.Your unit is connected to a telephone line with DSL service. We recommend connecting a filter (contact your DSL service provider) to the telephone line between the base unit and the telephone line jack. |
| Noise is heard during a call. | You are using the handset or base unit in an area with high electrical interference. Place the handset and base unit away from interference sources, such as antennas and mobile phones. |
| Pressing [ ] does not display/dial the last number dialled. | The redialed number was more than 20 digits long. Redial the number manually. |
| I tried to charge the batteries, but they do not charge at all. | Make sure the charge contacts are not dirty and the AC adaptor is connected properly, then try again. |
| I charged the batteries for 10 hours, but still flashes. | Clean the charge contacts and charge again (page 7,8).It is time to replace the batteries (page 6). |
| I charged the batteries for 10 hours, but the operating time seems to be short. | Wipe the battery ends (+,-) and the unit contacts with a dry cloth. |
| Caller information is not displayed. | You must subscribe to Caller ID service.Your unit is connected to a telephone line with DSL service. We recommend connecting a filter (contact your DSL service provider) to the telephone line between the base unit and the telephone line jack.When you answer the calls, the caller information will not be left in the call log. |
| I reset the handset but a long beep is heard and the display returns to telephone setting mode. | Reset has failed. Please try again (page 11). |
| I found the numbers stored in the phonebook and in the redial list are cleared. | If you reset to default, the numbers in the phonebook and redial list are cleared. |
| I cannot enter the PIN. | If you have changed PIN but forgot it, please contact your nearest Panasonic Service Centre for help. |
| -CALL- is displayed. | Caller information has been received (page 15). |
Answering system (KX-TG1090/KX-TG1092/KX-TG1093/KX-TG1094)
| Problem | Cause & Solution |
| The unit does not record new messages. | · The answering system is turned off. Turn it on (page 16). |
| The other party complains that they cannot leave a message. | · The answering system is turned off. Turn it on (page 16).· Message memory is full. Erase unnecessary messages (page 17). |
| I cannot operate the answering system with the handset. | · Another handset is being used. Wait for the other user to finish.· A caller is leaving a message. Wait for the caller to finish.· The handset is too far from the base unit. Move closer. |
| I cannot operate the answering system remotely. | · You are entering the wrong remote access code. If you forget the remote access code, reset to the default settings (page 11,18).· You are pressing the dial keys too quickly. Press each key firmly.· The answering system is turned off. Turn it on (page 16).· You are using a pulse telephone. Try again using a touch tone phone. |
| While recording a greeting message or listening to messages, the unit rings and recording stops. | · A call is being received. Answering the call and try again later. |
Handset registration
The included handset and base unit are preregistered. If ☑ is not shown on the handset display when the unit is turned on, the handset is not registered to the base unit. Register the handset.
1 Base unit:
Press and hold page button [•]) for about 10 seconds to go to registration mode.
- If all registered handsets start ringing in step 1, press [•] to stop and try again.
2 Handset:
[→/OK] > [ ]▶ Input PIN (factory setting "0000", page 11) > [→/OK]
- “-Sub-” flashes on the display.
- Handset will search base unit for registration.
- When the registration is completed, lights and a beep sounds.

Specifications
- Standard: DECT (Digital Enhanced Cordless Telecommunications)
• Number of channels: 120 Duplex Channels
• Frequency range: 1.88 GHz to 1.9 GHz
- Duplex procedure: TDMA (Time Division Multiple Access)
• Channel spacing: 1,728 kHz
- Bit rate: 1,152 kbit/s
- Modulation: GFSK (Gaussian Frequency Shift Keying)
• RF transmission power: Approx. 250mW
• Power source: 220–240 V, 50 Hz
• Voice coding: ADPCM 32 kbit/s
• Power consumption:
Base unit:
Standby: Approx. 3.5 W
Maximum: Approx. 9.2 W
Charger ^*1 :
Standby: Approx. 0.6 W
Maximum: Approx. 5.0 W
- Operating conditions: 5 °C–40 °C, 20%–80 % relative air humidity (dry)
- Dimensions:
Base unit: Approx. 47 mm × 116 mm × 107 mm
Handset: Approx. 142 mm × 34 mm × 47 mm
Charger ^*1 : Approx. 45 mm × 88 mm × 79 mm
- Mass (weight):
Base unit: Approx. 120 g
Handset: Approx. 120 g
Charger ^1*2 : Approx. 250 g
*1 KX-TG1072, KX-TG1073, KX-TG1074, KX-TG1092, KX-TG1093, KX-TG1094
*2 Includes the AC adaptor.
Note:
- Specifications are subject to change.
- The illustrations used in these operating instructions may differ slightly from the actual product.
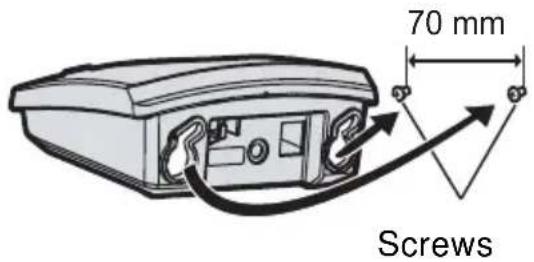
Wall mounting
Base unit
Conditions of guarantee
This guarantee is in addition to and does not in any way affect any statutory or other rights of consumer purchasers. If within the applicable guarantee period, the appliance proves to be defective by reason of faulty design, workmanship or materials, we undertake subject to the following conditions to have the defective appliance (or any part or parts there of) repaired or replaced free of charge.
- The appliance shall have been purchased and used solely within either the UK or ROI and in accordance with standard operating instructions and the technical and/or Safety Standards required in the UK.
- The appliance should be returned together with this guarantee and proof of date of purchase promptly on being found defective at the purchaser's risk and expense to the authorised dealer from whom the appliance was purchased or to the nearest authorised dealer. All enquires must be through such dealers.
- This guarantee shall not apply to damage caused through fire, accident, lightning, misuse, wear and tear, neglect, incorrect adjustment or repair, to damage caused through installation, adaption, modification or use in an improper manner or inconsistent with the technical and/or safety standards required in the country where this appliance is used, or to damage occurred during transit to or from the purchaser.
- If at any time during the guarantee period any part or parts of the appliance are replaced with a part or parts not supplied or approved by us or of an objective quality safe and suitable for the appliance, or the appliance has been dismantled or repaired by any person not authorised by us, we shall have the right to terminate this guarantee in whole or in part immediately without further notice.
- The purchaser's sole and exclusive remedy under this guarantee against us is for the repair or replacement of the appliance or any defective part or parts and no other remedy, including, but not limited to, incidental or consequential damage or loss of whatsoever nature shall be available to the purchaser.
- This guarantee shall not apply to batteries and any other items of limited natural life.
- Our decision on all matters relating to complaints shall be final. Any appliance or defective part which has been replaced shall become our property.
- The guarantee period applicable to this product shall be 12 months.
Please keep these operating instructions with your receipt.
Panasonic Business Systems U.K.
Receipt No. Model No.
Date of purchase Serial No.
Sales and support information
Customer Care Centre
For customers within the UK: 08700 100 076
For customers within the Republic of Ireland: 01289 8333
Visit our website for product information: www.panasonic.co.uk
E-mail: customer.care@panasonic.co.uk
Direct Sales at Panasonic UK
- Order accessory and consumable items for your product with ease and confidence by phoning our Customer Care Centre Monday - Thursday 9:00am - 5:30pm, Friday 9:30am - 5:30pm (Excluding public holidays).
- Or go on line through our Internet Accessory ordering application at www.panasonic.co.uk
- Most major credit and debit cards accepted.
- All enquiries transactions and distribution facilities are provided directly by Panasonic UK Ltd.
- It couldn't be simpler!
- Also available through our Internet is direct shopping for a wide range of finished products, take a browse on our website for further details.
Customer Care Helpline Tel. No.: U.K. 08700 100 076 / R.O.I. 01289 8333
CE0682
1999/5/EC
Sales Department:
Panasonic Business Systems U.K.
Panasonic House, Willoughby Road, Bracknell, Berkshire, RG12 8FP
Panasonic Communications Zhuhai Co., Ltd.
3 Ping Xi 8 Lu, Nanping Keji Gongye Yuan, Zhuhai, Guangdong, China 519060
Copyright:
This material is copyrighted by Panasonic Communications Co., Ltd., and may be reproduced for internal use only. All other reproduction, in whole or in part, is prohibited without the written consent of Panasonic Communications Co., Ltd.
© 2006 Panasonic Communications Co., Ltd. All Rights Reserved.


- Operating Instructions
- Digital Cordless Answering System
- Table of Contents
- You must subscribe to Caller ID service to use this feature.
- Caller ID
- Thank you for purchasing a new Panasonic digital cordless phone.
- For your future reference
- Note:
- Declaration of Conformity:
- Contact:
- Your phone
- Important information
- General
- Environment
- Warning:
- Battery caution
- Information on Disposal for Users of Waste Electrical & Electronic Equipment (private households)
- For business users in the European Union
- Information on Disposal in other Countries outside the European Union
- Connections
- Base unit
- Charger
- Location
- Battery installation
- Important:
- Battery charge
- Panasonic Ni-MH battery performance
- Controls
- Handset
- Guide to telephone settings
- Date and time
- and 24-hour display format
- Handset ringer tone
- Handset ringer volume
- Handset key tone (On/Off)
- Dial mode (Tone/Pulse)
- Auto talk
- Recall time
- Setting PIN
- Changing to a new PIN
- Resetting to default settings
- Making calls
- Adjusting the receiver volume
- Speakerphone
- (KX-TG1090/KX-TG1092/KX-TG1093/KX-TG1094 only)
- Adjusting the speaker volume
- Answering calls
- Handset locator
- Pause button (for PBX/long distance service users)
- Temporary tone dialling (for rotary or pulse service users)
- Redialling
- Deleting a number in the redial list
- Deleting the whole redial list
- Key lock
- Silent mode
- Muting
- Call waiting - [R] button
- Adding entries to the phonebook
- Editing numbers
- Deleting the whole phonebook
- Using Caller ID service Important:
- Caller ID features
- Checking call log
- Deleting a number in the call log
- Deleting the whole call log
- Call Waiting Caller ID
- Answering system
- Turning the answering system on or off
- Greeting message
- Selecting language for prerecorded greeting message
- Recording your own greeting message
- Playing back the greeting message
- Deleting the greeting message
- Recording incoming messages
- Message full
- Deleting all messages in the message box
- Listening to messages
- Call screening (handset number 1 only)
- Turning call screening on / off (handset number 1 only)
- Screening calls (handset number 1 only)
- Remote accessing
- Remote access code
- Changing remote access code
- Using the answering system remotely
- Intercom between handsets
- Handset 1:
- Handset 2:
- Switching calls between outside call and intercom with a handset
- Handset 1:
- Handset 2:
- Transferring an outside call to handsets
- Conference call with an outside call and a handset
- Troubleshooting
- Handset registration
- Base unit:
- Handset:
- Specifications
- Base unit:
- Charger *1 :
- Wall mounting
- Conditions of guarantee
- Panasonic Business Systems U.K.
- Sales and support information
- Customer Care Centre
- Direct Sales at Panasonic UK
- CE0682
- Sales Department:
- Panasonic Communications Zhuhai Co., Ltd.
- Copyright:
Brand : PANASONIC
Model : KX-TG1093E
Category : Cordless phone