
Pro Perfect DG8820 - Iron ROWENTA - Free user manual and instructions
Find the device manual for free Pro Perfect DG8820 ROWENTA in PDF.
| Product Type | Steam generator / Iron |
| Brand | Rowenta |
| Model | Pro Perfect DG8820 |
| Water tank capacity | 1.4 L (removable) |
| Anti-scale system | Calc-Away System (integrated scale collector) |
| Turbo steam function | Yes (2-3 bursts) |
| Vertical steaming function | Yes |
| ECO mode | Yes (energy saving) |
| Temperature adjustment | Thermostat dial (synthetic, silk/wool, linen/cotton) |
| Steam flow adjustment | Dial on dashboard (min to max, including ECO segment) |
| Power supply | 220-240 V, grounded plug |
| Safety | Pressure relief valve and thermal fuse |
| Soleplate cleaning | Damp cloth or non-abrasive sponge (cool soleplate) |
| Scale collector cleaning | Rinse under running water |
| Periodic boiler maintenance | Full rinse every 6 months or 25 uses |
| Warranty | 1 year on appliance, 2 years on boiler |
| Weight | Not specified |
| Dimensions | Not specified |
Frequently Asked Questions - Pro Perfect DG8820 ROWENTA
User questions about Pro Perfect DG8820 ROWENTA
0 question about this device. Answer the ones you know or ask your own.
Ask a new question about this device
Download the instructions for your Iron in PDF format for free! Find your manual Pro Perfect DG8820 - ROWENTA and take your electronic device back in hand. On this page are published all the documents necessary for the use of your device. Pro Perfect DG8820 by ROWENTA.
USER MANUAL Pro Perfect DG8820 ROWENTA
natural_image
Technical diagram showing a mechanical component with a labeled part '13' (no text or symbols beyond label)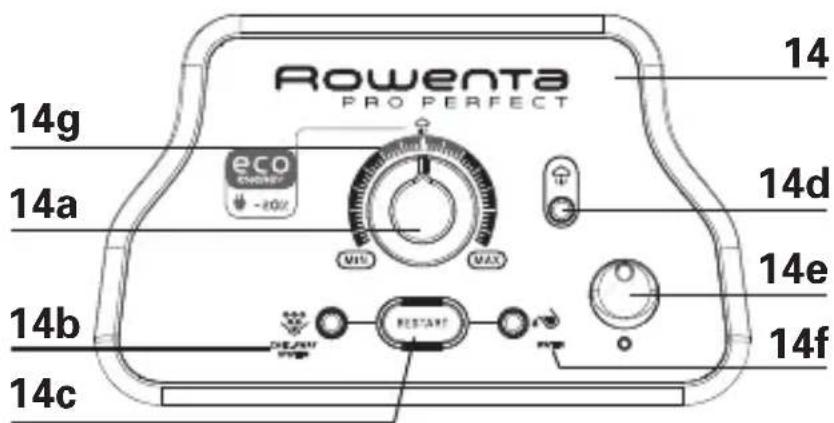
* depending on model
PREPARATION • VORBEREITUNG • PREPARAZIONE • PRÉPARATION • VOORBEREIDING • PREPARACIÓN • PREPARAÇÃO • ПРОЕТОИМАЗІА • HAZIRLAMA • PRZYGOTOWANIE • ПОДГОТОВКА • PRÍPRAVA • PRIPREMA • ELOKÉSZÍTÉS • PREGÁTIREA • PRÍPRAVA • PRIPRAVA • PRIPREMA
natural_image
Illustration of a medical or laboratory setup with a stand and tubing, no visible text or symbols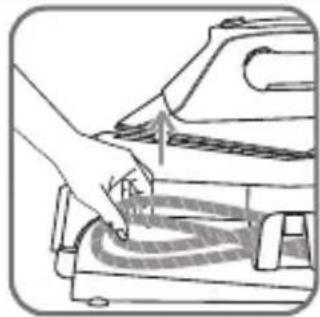
natural_image
Illustration of a hand pressing down on a mechanical component (no text or symbols visible)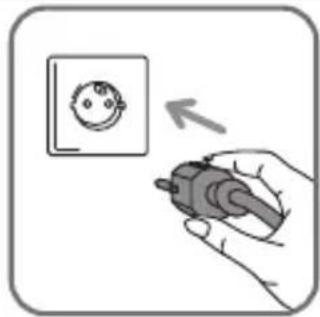
natural_image
Hand holding a plug inserted into an electrical outlet socket (no text or symbols visible)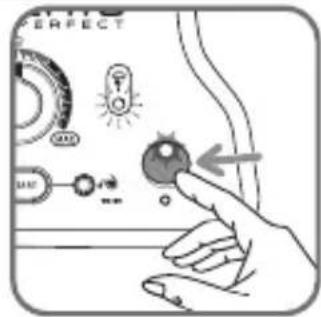
fig.1 fig.4fig.3fig.2
USE • GEBRAUCH • UTILIZZO • UTILISATION • GEBRUIK • UTILIZACIÓN • UTILIZAÇÃO • XPHSH • KULLANIM • UŻYTKOWANIE • УПОТРЕБА • POUŽITÍ • UPORABA • HASZNÁLAT • UTILIZAREA • POUŽIVANIE • UPORABA • KORIŚCENJE
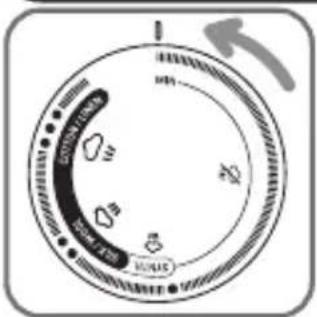
fig.5
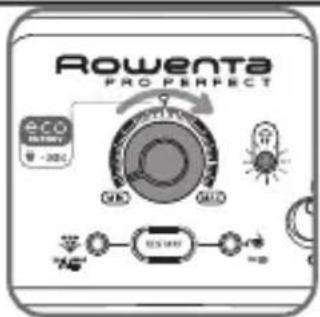
fig.6 fig.7 fig.8
natural_image
Illustration of a hand using a tool to clean or brush the surface of a surface, with no visible text or symbols.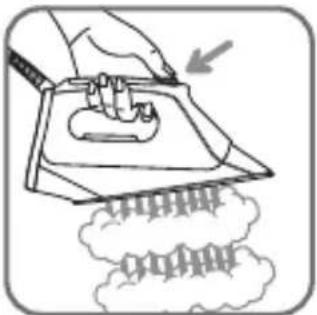
natural_image
Illustration of a hand using a tool to clean or store food items on a tray, with a downward arrow indicating the process (no text or symbols present)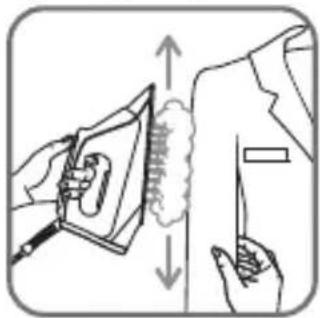
natural_image
Illustration of a hand using a power tool to press down a wall, showing mechanical components and motion arrows (no text or symbols)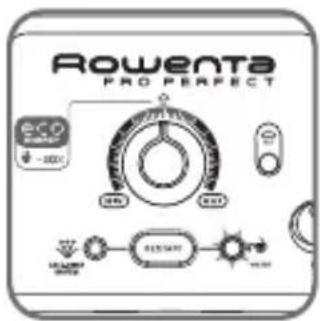
natural_image
Diagram of a mechanical component with an arrow indicating motion (no text or symbols present)fig.9 fig.10 fig.11 fig.12
MAINTENANCE • INSTANDHALTUNG • MANUTENZIONE • ENTRETIEN • ONDERHOUD • MANTENIMIENTO • MANUTENÇÃO • SYNTHPHSH • BAKIM • KONSERWACJA I CZYSZCZENIE • ПОДДРЬЖКА • ÚDRŽBA • ODRŽAVANJE • KARBANTARTÁS • INTRETINEREA • ÚDRŽBA • VZDRŽEVANJE • ODRŽAVANJE
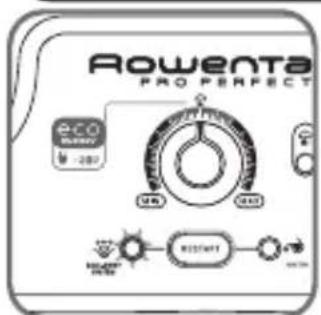
fig.13 fig.16 fig.14 fig.15

natural_image
Illustration of a hand using a tool to tighten or adjust a cable or wire (no text or symbols present)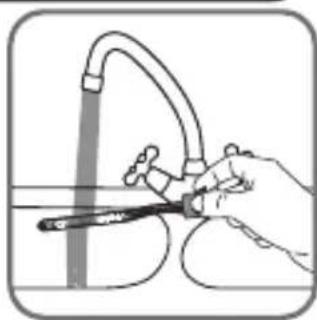
natural_image
Illustration of a hand using a tool to clean or wash a surface with a pipe (no text or symbols)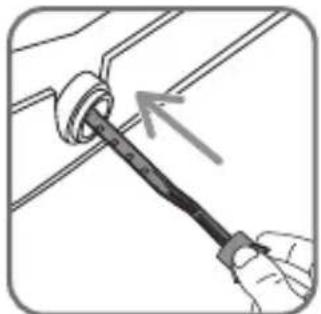
natural_image
Illustration of a hand using a tool to adjust a mechanical component (no text or symbols visible)fig.17 fig.18
Important recommendations
Safety instructions
- Please read these instructions carefully before first use. This product has been designed for domestic use only. Any commercial use, inappropriate use or failure to comply with the instructions, the manufacturer accepts no responsibility and the guarantee will not apply.
-
Never unplug the appliance by pulling the power cord. Always unplug your appliance:
-
before filling the water tank or rinsing the boiler,
- before cleaning the appliance,
-
after each use,
-
The appliance must be used and placed on a flat, stable, heat-resistant surface. When you place the iron on the iron rest, make sure that the surface on which you place it is stable.
- This appliance is not intended to be used by persons (including children) with reduced or impaired physical, sensory or mental capacities or persons lacking appropriate knowledge or experience, unless a person responsible for their safety provides either supervision or appropriate instructions concerning use of the appliance prior to its use.
- Children should be supervised to ensure they do not play with the appliance.
- This appliance may be used by children aged 8 or over and persons lacking appropriate knowledge or experience or persons with reduced or impaired physical, sensory or mental capacities provided that they have been thoroughly instructed regarding use of the appliance, are supervised, and understand the risks involved. Children must not be allowed to play with the appliance. Cleaning and maintenance must not be carried out by children unless they are aged 8 or over and are supervised. Keep the appliance and power cord out of the reach of children under 8 years of age.
- The surfaces of your appliance can reach very high temperatures when functioning, which may cause burns. Do not touch the hot surfaces of the appliance (accessible metal parts and plastic parts adjacent to the metallic parts).
- Never leave the appliance unattended: - when it is connected to the mains, - until it has cooled down (around 1 hour).
- Before rinsing the boiler/rinsing the anti-scale valve (depending on the model), wait until the appliance is completely cold and has been unplugged for at least 2 hours before unscrewing the boiler rinse cap/ the scale collector cover.
- Be careful: if the boiler cap or the boiler rince cap (depending on the model), is dropped or severely knocked, have it replaced by an Approved Service Centre, as it may be damaged.
- When rinsing the boiler, never fill it directly from the tap.
- The boiler cap musn’t be opened during use.
- The appliance must not be used if it has been dropped, if it has any visible damage, if it leaks, or if it functions abnormally in any way. Do not attempt to dismantle your appliance: have it examined at an Approved Service Centre to avoid any danger.
- Check the electrical power and steam cords for signs of wear or damage prior to use. If the electrical power cord or the steam cord is damaged, it must be replaced at an Approved Service Centre to avoid any danger.
- For your safety, this appliance conforms to all applicable regulations (Low Voltage Directive, Electromagnetic Compatibility, Environment, etc).
- Your steam generator iron is an electrical appliance: it must be used under normal conditions of use. It is designed for domestic use only.
- It is equipped with 2 safety systems: - a pressure release valve designed to avoid excessive pressure. In the event of malfunction, the valve releases excess steam. - a thermal fuse to avoid overheating.
- Always plug your steam generator iron: - into a mains circuit with voltage between 220 V and 240 V, - into an earthed electrical socket.
Connecting to the wrong voltage may cause irreparable damage to the appliance and will invalidate your guarantee.
If you are using a mains extension lead, ensure that it is correctly rated (16A) with an earth, and is fully extended
- Completely unwind the power cord before plugging into an earthed socket.
- The sole plate of your iron and the iron rest on the base unit can reach extremely high temperatures, and can cause burns: do not touch them. Never touch the electrical power cords with the sole plate of the iron.
- Always use a vented/mesh ironing board and be careful of hot steam when ironing close to the edges of the board.
- Your appliance emits steam, which can cause burns. Always handle the iron with care, especially when ironing vertically. Never direct the steam towards people or animals.
- Never immerse your steam generator iron in water or any other liquid. Never place it under a running tap.
PLEASE RETAIN THIS INSTRUCTION BOOKLET FOR FUTURE REFERENCE
TENTO NÁVOD K POUŽITÍ SI PROSÍM USCHOVEJTE
Važne preporuke
Sigurnosni savjeti
- Prije prve uporabe uređaja pozorno pročitajte upute za uporabu: ako se uređaj ne rabi sukladno uputama za uporabu, proizvođač se oslobađa svake odgovornosti.
- Nikad ne isključujte uređaj iz mreže povlačenjem za priključni vod.
DENKEN SIE AN DEN SCHUTZ IHRER UMWELT !
- Iron handle
- TURBO steam button (depending on model)
- Steam control button
- Temperature control dial for iron soleplate
- Iron rest
- Removable 1.4 L water tank
- Scale collector cover
- Electric cord storage (Velcro)
- Iron temperature control light
- Iron positioning system
PREPARATION
1 • Water recommendations Tap water :
Rowenta irons are designed to be used with UNTREATED TAP WATER. If your water is very hard, Rowenta recommends mixing half untreated tap water with half distilled water which reduces the hardness.
Softened water :
There are many types of household water softeners and the water from many of them is perfectly acceptable for use in the steam generator. However, some types of softeners, particularly those that use chemicals such as salt, can cause the appliance to leak or spit during use, this is notably the case with filtering jugs. Therefore we would not recommend using this type of water. If you experience this type of problem, we recommend that you try using untreated tap water or store-bought distilled water which can be mixed 50% distilled with 50% untreated tap water. Once you have changed water it will take several uses to correct the problem. Rowenta recommends trying the steam function for the first time on an old towel or cloth that can be discarded to avoid potentially damaging your clothes.
Always remember :
Heat concentrates the elements in water during evaporation. The types of water listed below may contain organic waste, mineral or chemical elements that that can cause spitting, brown staining or premature wear of the appliance: water from
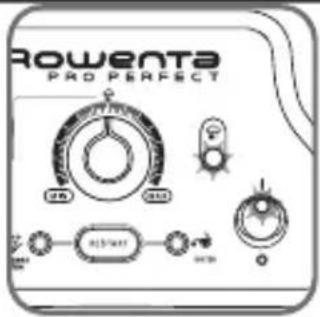
- Steam cord
- Steam cord storage clip
- "Calc-Away System" scale collector
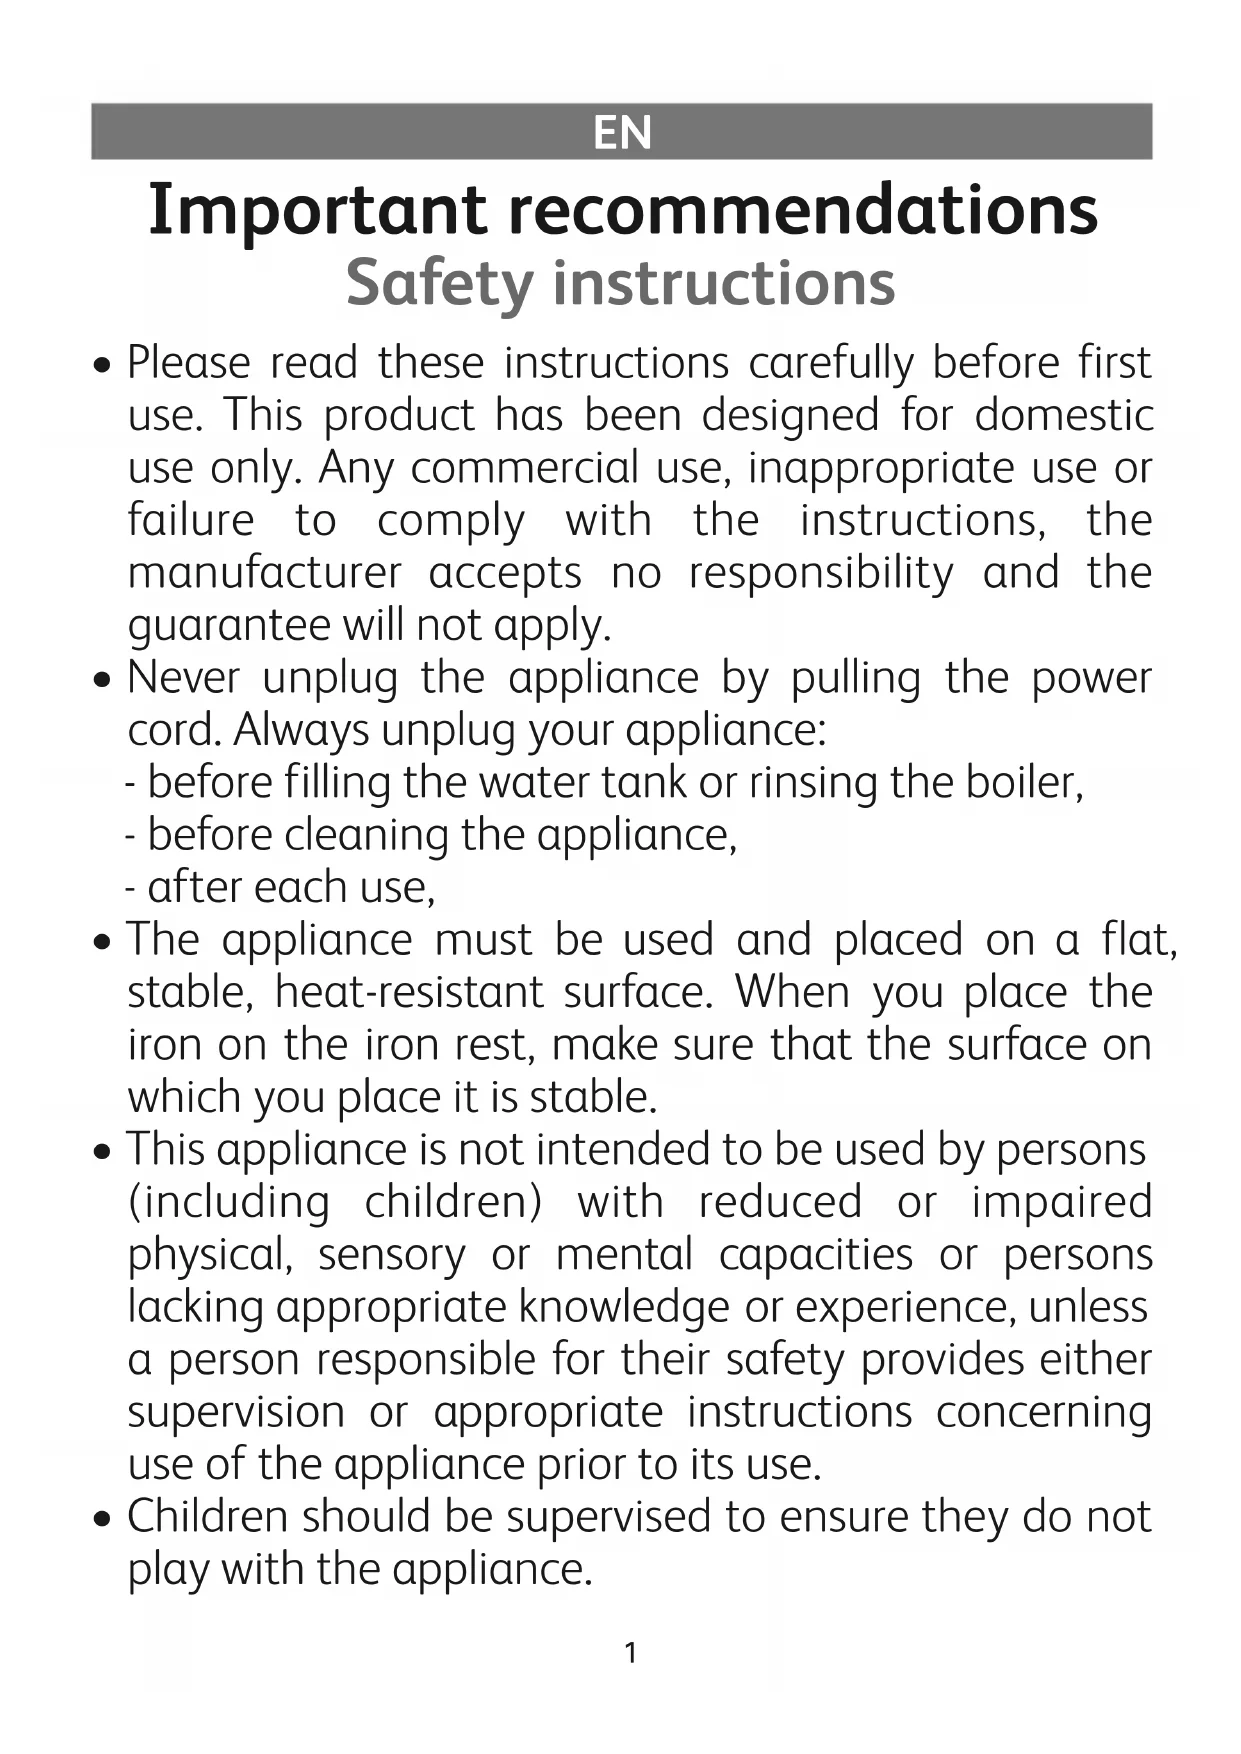
- Control panel
a. Steam output control dial
b. "Calc-Away System" indicator
c. "Restart" button
d. "Steam ready" light
e. Illuminated on / off switch
f. "Water tank empty" light
g. ECO mode
clothes dryers, scented or softened water, water from refrigerators, batteries, air conditioners, rain water, boiled, filtered or bottled water. These types of water should not be used in your ROWENTA iron.
2 • Preparing your steam generator
Place the steam generator on a flat, stable, horizontal and heat-resistant surface. Remove the water tank using the handle (on the front of the steam generator).
Fill the tank with water, taking care not to exceed the maximum level - fig.1.
Slide the tank back into its housing until its "clicks" into place.
Unwind the electrical power cord completely and remove the steam cord from its housing - fig.2.
Plug your steam generator into a mains socket with an earth pin - fig.3.
Ironing Boards:
Due to the powerful steam output, a mesh type ironing board must be used to allow any excess steam to escape and to avoid steam venting sideways.
USE
3 • Switching on your steam generator
Press on the on / off switch - fig.4, it begins flashing. The green light (located on the control panel) flashes and the boiler heats up.
When starting, and regularly while it is
being used, your steam generator's electric pump injects water into the boiler. It makes a noise but this is quite normal. The steam generator and the iron are ready for use when the steam indicator light is on and the iron light goes out.
The first time the appliance is used, there may be some fumes and smell but this is not harmful. They will not affect use and will disappear quickly.
4 • Operating the control panel
- Flashing green light - fig.6 : the water is heating up in the boiler.
- Continuous green light - fig.7 : steam is ready for use.
- Continuous red light - fig.11 : the water tank is empty.
- The "Calc-Away System" orange indicator flashes - fig. 13: the collector needs to be rinsed.
5 • Using your steam generator
Place the iron's temperature control - fig.5 to the type of fabric to be ironed and set the steam output - fig.6. The iron temperature control light turns on. Important: whenever you start using your iron and whenever you reduce the temperature during use, the iron is ready for use when its indicator light goes out and when the green light located on the control panel comes on and remains on. During use, when you increase the temperature of the iron, you can start ironing immediately, but make sure you only increase your steam flow once the iron's light has gone out.
| TYPE OF FABRIC | SETTING TEMPERATURE CONTROL | SETTING STEAM CONTROL |
| SYNTHETICS (Polyester, Acetate, Acrylic, Polyamide) | ● | |
| SILK / WOOL | ●● | |
| COTTON / LINEN | ●●● |

ECO Mode: Your steam generator iron has an ECO mode function which uses less power whilst still guaranteeing a sufficient steam flow for you to iron your garments properly. In order to use this function, once the thermostat of your iron has been correctly set (see table above), position the steam flow setting on the ECO segment. The ECO mode can be used on all types of fabrics, nevertheless for very thick or very creased fabrics, we recommend that you use the maximum steam flow for best results.
While ironing, the light on top of the iron and the steam ready light turn on and off, as the temperature adjusts without interrupting ironing. To obtain steam, press on the steam control button beneath the iron handle and keep it pressed - fig.8. The steam will stop when you release the button.
Always spray starch on the reverse side of the fabric to be ironed.
Recommendations: To prime the steam circuit, either before using the iron for the first time, or if you have not used the steam function for a few minutes, press the steam control button several times in a row - fig.8, holding the iron away from your clothes. This will enable any cold water to be removed from the steam circuit.
Iron temperature control setting: Start with fabrics to be ironed at a low temperature and finish with those which need higher temperatures. Mixed fibre fabrics: set the ironing temperature to the setting for the most delicate fabric. Steam output control dial setting: Thick fabric: increase the steam setting. At a low temperature: set the steam output control dial to the low position. For delicate fabrics(•), press the steam control button (under the handle of the iron) intermittently to avoid possible water droplets appearing with the steam.
Do not place the iron on a metal support. When taking a break from ironing, always place the iron on the iron rest plate of the unit. It is equipped with non-slip pads and has been designed to withstand high temperatures.
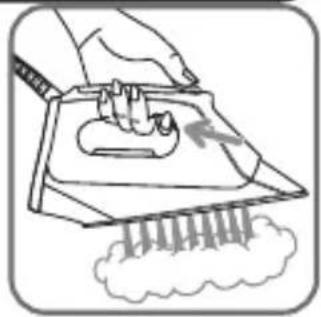
6. Use the steam turbo
Press 2 or 3 times briefly on the turbo steam control - fig. 9 to get an occasional burst of steam iron for ironing heavy fabrics, eliminating creases or for more powerful vertical steaming.
ATTENTION! Use the steam turbo function with great care because the extraordinary power of the steam can cause burns.
7 • Vertical steam ironing
Set the iron temperature control and the steam output control dial (located on the control panel) to the maximum position. Hang the garment on a coat hanger and hold the fabric slightly taut with one hand. Press repeatedly on the steam - fig.8 control button (beneath the iron handle) moving the iron from top to bottom - fig.10.
Examples of how to use the vertical steaming function:
- Removing creases directly on hangers from delicate fabrics that you do not want to bring into contact with the hot iron.
- Refreshing a shirt or a suit just before putting it on.
As steam is very hot: never attempt to remove creases from a garment while it is being worn, always hang garments on a coat hanger. For fabrics other than linen or cotton, hold the iron a few centimetres from the garment to avoid burning the fabric.
8 • Dry ironing
Do not press on the steam control button.
9 • Fill the water tank again
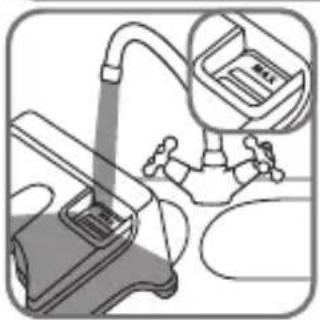
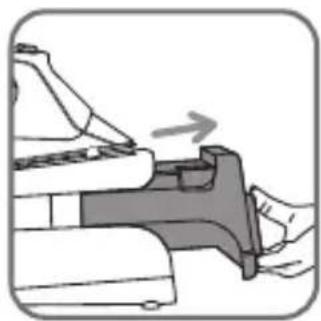
When there is no more steam and the "Water tank empty" light flashes - fig.11: water tank is empty.
Remove the water tank using the handle (on the front of the steam generator) - fig. 12 and fill it - fig. 1 do not fill above the Max. level.
If this occurs, remove the excess water.
Push the water tank into position until it "clicks" into place. Press the Restart button underneath the control panel. The steam generator and the iron are ready for use when the steam indicator light is on and the iron indicator goes out.
10 • Storing the steam generator
Press the illuminated on/off switch O/I and unplug the generator. Place the iron on the iron rest on the steam generator. Fold the steam cord in two and place it in its housing. Leave the steam generator to cool for at least one hour before putting it away if it is to be stored in a cupboard or confined space. You can store the steam generator in complete safety.
MAINTENANCE AND CLEANING
11 • Cleaning the generator
Do not use any cleaning or descaling products for cleaning the soleplate or the base-unit. Never hold the iron or the base unit under the tap.
The Iron soleplate: clean the soleplate of your iron when it is cool with a damp cloth or a non-abrasive sponge.
The base unit: Clean the plastic parts of the appliance occasionally with a soft cloth.
12 • Easy descaling of your steam generator
Do not use any descaling substances (vinegar, industrial descaling products, etc.) when rinsing the scale collector: they could damage it. Before emptying your steam generator, it must always be left to cool for 2 hours to avoid any risks of scalding.
To extend the life of your steam generator and avoid scale on your ironing, your steam generator is equipped with a built-in scale collector. This collector, located in the tank, automatically removes the scale that forms inside.
Operation:
An orange "Calc-Away System" light located - fig.13 on the control panel starts flashing to tell you that the scale collector needs rinsing. Once the steam generator has cooled down completely, remove the scale collector cover - fig.14.
IMPORTANT! This operation must not be carried out unless the steam generator has been unplugged for at least two hours and has cooled down completely.
To carry out this operation, the steam generator must be close to a sink as water may come out of the tank when it is opened.
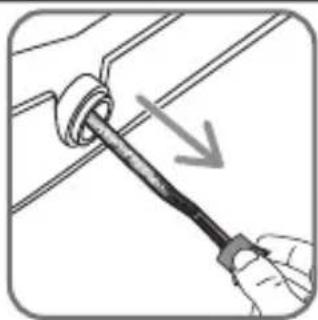
Unscrew the scale collector valve and remove it from the housing; it contains the scale that has built up in the tank - fig.15.
To clean the collector properly, just rinse it under running water to remove the scale it contains - fig.16.
Put the the collector back into its housing and screw it in completely to keep it watertight - fig.17.
Put the scale collector cover back on - fig.18.
The next time you use your iron, press the "Restart" button on the control panel to turn off the orange "Calc-Away System" light.
In addition to this regular maintenance, we recommend complete rinsing of the tank every six months or after every 25 uses.
To do this:
- Check that the steam generator is cold and has been unplugged for more than 2 hours.
-
Place the steam generator on the edge of the sink and put the iron standing upright alongside it.
-
Remove the collector cover and unscrew the scale collector.
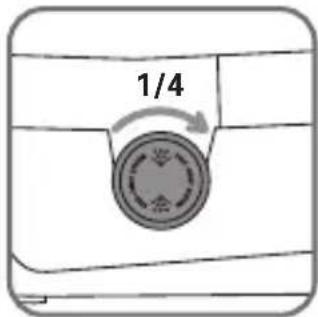
- Hold your steam generator at an angle and use a jug to fill the boiler with with 1/4 litre of tap water.
- Shake the case for a few seconds then empty it completely into the sink.
- Fit the collector back in its housing and screw it on tightly to ensure it is watertight.
- Put the scale collector cover back in place.
IS THERE A PROBLEM?
| Problems Possible causes Solutions | ||
| The steam generator does not switch on or the iron indicator and ON/OFF indicator do not switch on. | The appliance is not switched on. | Check that your appliance is correctly plugged in and press the illuminated on/off switch (on the front of the base-unit). |
| Water runs through the holes in the soleplate. | You are using the steam control button before the iron is hot enough. | Decrease the steam output while ironing at low temperature (steam output control dial on the control panel).Wait for the thermostat light to go out before activating the steam control button. |
| You are using the TURBO steam control too often. | Press the TURBO steam control 2 or 3 times. | |
| Water has condensed in the pipes because you are using steam for the first time or you have not used it for some time. | Press the steam control on the iron away from the ironing board until steam comes out of the iron. | |
| White streaks come through the holes in the soleplate. | Your boiler has a build-up of scale because it has not been rinsed out regularly. | Rinse the collector when the "Calc-Away System" indicator flashes. If your water is very hard, rinse it more often. |
| Brown streaks come through the holes in the soleplate and stain the linen. | You are using chemical descaling agents or additives in the water for ironing. | Never add this type of product in the water tank or in the boiler (see our recommendations regarding water to be used). |
| Your linen is not rinsed sufficiently or you have ironed a new garment before washing it. | Ensure linen is rinsed thoroughly to remove any soap deposits or chemicals on new garments which have been sucked up by the iron. | |
| The soleplate is dirty or brown and my stain the linen. | You are ironing at too high temperature. | See our recommendations regarding temperature control setting. |
| You're linen is not rinsed sufficiently or you are using starch. | Ensure linen is rinsed thoroughly and always spray starch on the reverse side of the fabric to be ironed. | |
| There is no steam. The water tank is empty (water tank empty light (f) is lit). | Fill the water tank and press the "Restart" button on the control panel. | |
| There is little steam. | The steam output control dial is set at minimum. | Increase the steam output (control dial on the control panel). |
| The soleplate temperature is set to the maximum. | The generator is working but steam is very hot and dry. As a consequence, it is less visible. | |
| Water streaks appear on the linen. | When taking a break from ironing, if your ironing board cover is soaked with water it is not suited to the power of a steam generator. | Check that your ironing board is suitable. A mesh type ironing board must be used to allow any excess steam to escape and to avoid steam venting sideways. |
| The red "removable water tank empty" light is on. | You have not pressed the "Restart" button. | Check there is water in the water tank.Press the "Restart" button on the control panel. |
| The water tank is not correctly fitted into position. | Push it into position until it "clicks" into place. | |
| Steam escapes from the scale collector valve. | The scale collector valve has not been tightened correctly. | Tighten the scale collector correctly. |
| The scale collector valve is damaged. | Contact an Approved Service Centre to order a new scale collector valve. | |
| The generator is faulty. | Do not use the steam generator and contact an Approved Service Centre. | |
| Steam escapes under the appliance. | The generator is faulty. Do not use the steam generator and contact an Approved Service Centre. | |
| The scale collector light stays on. | You have not pressed the restart button after descaling. | Press the restart button on the control panel. |
HELPLINE
If you have any product problems or queries with your product, please telephone our
Customer Relations team on:
0845 602 1454 (UK) - (01) 677 4003 (Ireland)
Consult our web site: www.rowenta.co.uk
ENVIRONMENT PROTECTION FIRST !
①Your appliance contains valuable materials which can be recovered or recycled.
Leave it at a local civic waste disposal centre.
DESCRIPTION
PROBLEM SA VAŠIM GENERATOROM
| Problemi Uzroci Rešenja | ||
| Generator pare neće da se uključi ili indikator na pegli i svetlosni prekidač rad/prekid rada nisu uključeni. | Aparat nije pod naponom. Proverite da li je aparat uključen u ispravnu utičnicu i da li je pod naponom (svetlosni prekidač rad/prekid rada). | |
| Voda curi kroz rupe na grejnoj ploči. | Koristite dugme za paru kada pegla nije dovoljno zagrejana. | Smanjite jačinu pare kada peglate na niskoj temperaturi (dugme za podešavanje se nalazi na komandnoj tabli). Sačekajte da se indikator na pegli isključi pre nego što pritisnete dugme za paru. |
| Previše često koristite dugme za vlažnu paru. | Kratko pritisnite 2 ili 3 puta dugme za vlažnu paru. | |
| Voda se kondenzovala u cevima zato što prvi put koristite paru ili zato što je duže vreme niste koristili. | Pritisnite dugme za paru dok je pegla udaljena od daske za peglanje, sve dok pegla ne počne da izbacuje paru. | |
| Bela tečnost curi iz rupa na grejnoj ploči. | Bojler izbacuje kamenac zato što nije pravilno očišćen. | Isperite kolektor kada pokazivač „Calc-Away System” treperi. Ako voda koju koristite ima puno kamenca, ispirajte češće. |
| Braon tečnost izlazi iz rupa na grejnoj ploči i pravi fleke na vešu. | Koristite hemijske proizvode za uklanjanje kamenca ili aditive u vodi za peglanje. | Nikada nemojte dodavati bilo koji proizvod u vodu ili u bojler (videti § 1). |
| Grejna ploča je prljava ili braon ispušta braon tečnost koja može isflekati tkaninu. | Koristite preveliku temperaturu pegle. | Vratite se na paragraf o podešavanju temperature (videti § 5). |
| Vaš veš nije dovoljno ispran ukoliko koristite sredstvo za štirkanje. | Uvek prskajte sredstvo za štirkanje na suprotnoj strani od one koju peglate. | |
| Nema više pare. Rezervoar sa vodom je prazan (indikator svetli). | Napunite rezervoar vodom i pritisnite dugme „Restart“ koje se nalazi na komandnoj tabli. | |
| Ima premalo pare. | Jačina pare je podešena na minimalnu vrednost. | Povećajte jačinu ispuštanja pare (dugme za podešavanje na komandnoj tabli). |
| Temperatura grejne ploče je podešena na maksimum. | Veoma vruća para je suva, dakle slabo uočljiva. | |
| Pojavljuju se tragovi vode na vešu. | Vaš prekrivač je natopljen vodom zato što nije predviđen za jačinu generatora pare. | Nabavite adaptiran sto (mrežasto postolje koje nije podložno kondenzaciji). |
| Indikator „prazan rezervoar” svetli. | Niste pritisnuli dugme „Restart“ za ponovno pokretanje funkcija pegle. | Pritisnite dugme „Restart“ koje se nalazi na komandnoj tabli. |
| Rezervoar niste dobro namestili. Pažljivo ga vratite na mesto i gurnite sve dok ne čujete „klik“. | ||
| Para izlazi oko kolektora. | Kolektor nije dobro pričvršćen. Dobro zašrafite kolektor. | |
| Spojnica kolektora je oštećena. Kontaktrajte ovlašćeni servis. | ||
| Aparat je pokvaren. | Nemojte koristiti generator pare i kontaktirajte ovlašćeni servis. | |
| Para izlazi ispod kutije. | Aparat je pokvaren. Nemojte koristiti generator pare i kontaktirajte ovlašćeni servis. | |
| Pokazivač „Calc-Away System“ je uključen. | Niste pritisnuli dugme „Restart“ za ponovno pokretanje funkcija pegle. | Pritisnite dugme „Restart“ koje se nalazi na komandnoj tabli. |
Akoje nemoguće utvrditi uzrok kvara, obratite se ovlašćenom ROWENTA servisu. Rowenta aje garanciju od dve godine na aparat, od dana kupovine „ osim uk ol ko to nije u skladu sa zakon ima zemlje u kojoj se aparat koristi.
UČESTVUJMO U ZAŠTITI ŽIVOTNE SREDINE!
① Vaš aparat sadrži brojne materijale koji mogu biti ponovo upotrebljeni ili reciklirani.
Odnesite aparat u centar koji se bavi recikliranjem takvih proizvoda.
ОПИСАНИЕ
MAINTENANCE AND CLEANING
- Important recommendations
- Safety instructions
- PLEASE RETAIN THIS INSTRUCTION BOOKLET FOR FUTURE REFERENCE
- TENTO NÁVOD K POUŽITÍ SI PROSÍM USCHOVEJTE
- Važne preporuke
- Sigurnosni savjeti
- DENKEN SIE AN DEN SCHUTZ IHRER UMWELT !
- PREPARATION
- • Water recommendations Tap water :
- Softened water :
- Always remember :
- • Preparing your steam generator
- USE
- • Switching on your steam generator
- • Operating the control panel
- • Using your steam generator
- Use the steam turbo
- • Vertical steam ironing
- • Dry ironing
- • Fill the water tank again
- • Storing the steam generator
- MAINTENANCE AND CLEANING
- • Cleaning the generator
- • Easy descaling of your steam generator
- Operation:
- ENVIRONMENT PROTECTION FIRST !
- DESCRIPTION
- UČESTVUJMO U ZAŠTITI ŽIVOTNE SREDINE!
- ОПИСАНИЕ
Brand : ROWENTA
Model : Pro Perfect DG8820
Category : Iron