
PocketCinema T15 - Projector AIPTEK - Free user manual and instructions
Find the device manual for free PocketCinema T15 AIPTEK in PDF.
| Product type | Pocket projector |
| Brand | Aiptek |
| Model | PocketCinema T15 |
| Image technology | LCoS |
| Native resolution | 640 x 360 pixels |
| Brightness | 8 lumens |
| Contrast ratio | 100:1 |
| Aspect ratio | 16:9 |
| Light source | White LED |
| Projected image size (diagonal) | 6 to 50 inches (15 to 127 cm) |
| Projection distance | 25 to 182 cm |
| Video input | A/V Composite (via supplied cable) |
| Speaker | Built-in stereo |
| Video compatibility | NTSC/PAL |
| Power supply | 5V 2A AC adapter or Li-ion NP120 battery |
| Battery life | Video: 1.5 h; Image: 2 h |
| Charging time | At least 3 hours for first charge |
| Operating temperature | 0°C to 35°C |
| Dimensions (L x W x H) | 125 x 59 x 25 mm |
| Weight (without battery) | 125 g |
| Included accessories | Li-ion battery, AC adapter, AV cable, iPod/iPhone cable (depending on version) |
| Maintenance and cleaning | Wipe with a soft, dry cloth. Do not use chemicals. |
| Safety | Do not expose to water, high temperatures, or disassembly. Keep out of reach of children. |
| Spare parts and repairability | Replaceable battery. Other parts: contact manufacturer. |
Frequently Asked Questions - PocketCinema T15 AIPTEK
User questions about PocketCinema T15 AIPTEK
0 question about this device. Answer the ones you know or ask your own.
Ask a new question about this device
Download the instructions for your Projector in PDF format for free! Find your manual PocketCinema T15 - AIPTEK and take your electronic device back in hand. On this page are published all the documents necessary for the use of your device. PocketCinema T15 by AIPTEK.
USER MANUAL PocketCinema T15 AIPTEK
Before using this projector, you are highly recommended to read this document first for some important notice and information.
- The temperature of this projector can become hot on top cover area. It is not suggested to keep holding the projector on hand when you feel projector is hot. You are suggested to use tripod to fix it on the surface.
To avoid the heating on projector, please ventilate the projector and operate it in room temperature (around 26^ C). Please also be noted that do NOT put the projector near the place that is hot or easy to be reached by children.
- The heating on projector will influence the image quality after operating for more than 2 hours. You are recommended to power off the projector for a short break in order to keep the projector in the best performance.
- Projector parts


* Brightness switch: If projecting in a dark environment, setting brightness level (●) at normal position is recommended. Please switch to brighter level (●) if the projecting environment is lighter, but be aware that it will consume more battery power and generate more heat.
- Reading LED indicators
The Power LED is lighting green when projector is turned on.
The Battery LED is flashing orange when battery life level is low.
The Battery LED is lighting orange when projector is being charged.
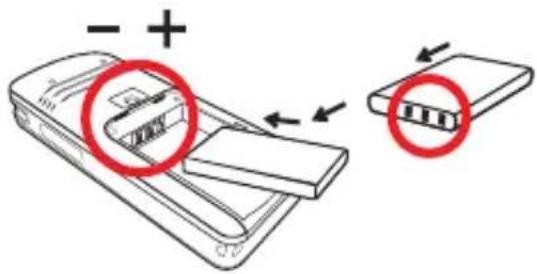
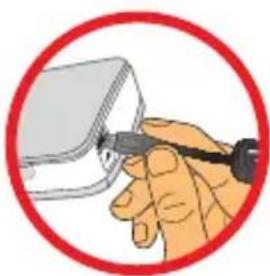
Installing the battery
- Slide the battery cover open.
- Place the included Li-Ion battery into the compartment. Note that the metallic contacts must be aligned with the contacts in the compartment.
- After the battery is properly installed, replace the battery cover.
Charging the battery
Please charge the battery at least 3 hours prior to its first use.
-
Connect the cable. Connect one end of the supplied AC adapter to the DC IN jack (mini USB type) of the projector and the other end to a wall outlet.
-
The Battery LED turns orange and the charge starts.
-
When the charging is interrupted or the battery pack is fully charged, the Battery LED will turn off.
natural_image
Hand holding a small object with a pen, enclosed in a red circle (no text or symbols visible)Turning on/off your projector
Press and hold down the Power button for 2 seconds to turn on the projector.
To turn off the projector, press and hold down the Power button for 2 seconds.
- Without inputting any video signals into this projector, there is a blue projection screen with battery status icon if powered by battery.
If there is no signals found for 2 minutes, the projector will automatically turn off for saving power.
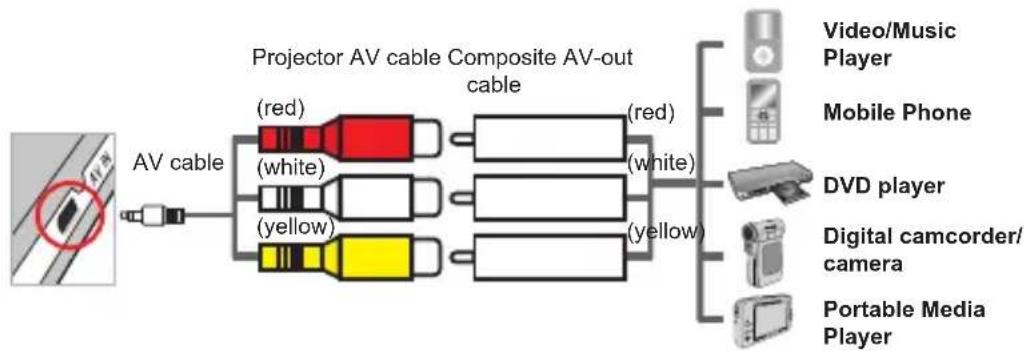
Connecting the projector to your media players
Before connecting your media player to projector, you need to have media player dedicated composite AV-out cable and projector AV cable ready.
flowchart
graph LR
    A["AV cable"] --> B["Projector AV cable Composite AV-out cable"]
    B --> C["Video/Music Player"]
    B --> D["Mobile Phone"]
    B --> E["DVD player"]
    B --> F["Digital camcorder/camera"]
    B --> G["Portable Media Player"]
- Connect Composite AV-out cable to media player.
- Connect the projector AC cable with the composite AV-out cable (Yellow to Yellow, white to white and red to red).
- Now you can project image and audio from projector.
- Adjust the Focus Ring to have a better view.
How to connect with external devices
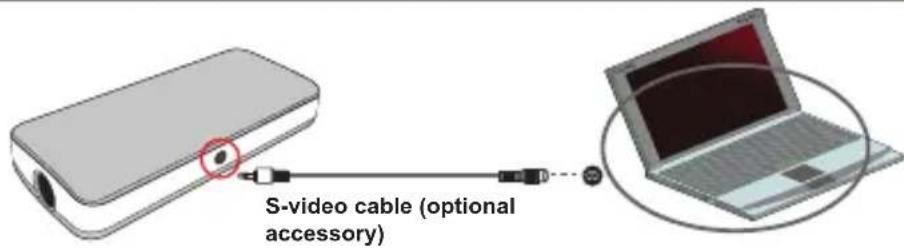
Connecting the Projector to your laptop PC
Please make sure that your laptop PC is equipped with S-video port.
Connecting the Projector with Aiptek Digital Camcorder
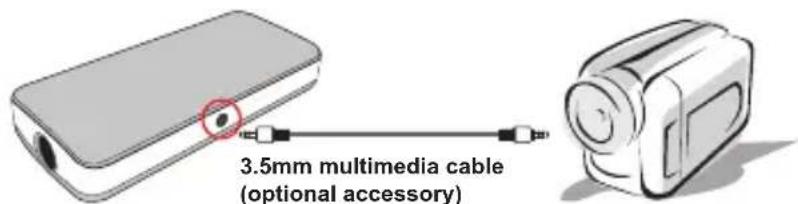
Aiptek Digital Camcorder
Connecting the Projector with iPod/iPhone
Please make sure that your iPod/iPhone is enabled with TV-out function.
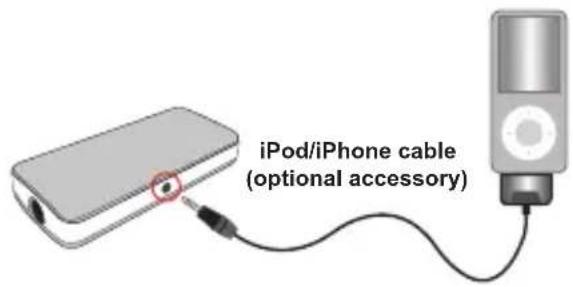
- Connect one end of the iPod/iPhone cable to the iPod/iPhone and the other end to the AV jack of projector.
- Select the video clip or images from iPod/iPhone and press the "play" button, and then you can project video and slideshow from projector.
- Adjust the Focus Ring to have a better view.
- Compatible with:
iPhone: iPhone (4GB, 8GB, 16GB), iPhone 3G (8GB, 16GB), iPhone 3GS iPod: iPod touch (8GB, 16GB, 32GB), iPod touch 2nd generation (8GB, 16GB, 32GB), iPod nano 3rd generation (4GB, 8GB), iPod nano 4th generation (8GB, 16GB), iPod nano 5th generation (8GB, 16GB), iPod classic (80GB, 160GB), iPod 5th generation (30GB, 60GB, 80GB)
Not compatible with iPod shuffle, iPod G1, G2, G3, G4, iPod nano G1, G2


Warning Indicators
| Icon | Description | Action |
 | Low battery | 1. To avoid sudden outage of power supply, you are recommended to plug AC power adapter first then take off the battery when this icon appears.2. When “Battery Low” message appeared on the screen, the orange LED will flash for a while and the projector will be powered off automatically anytime. |
 | Overheat | As this icon appears, the projector will be turned off automatically in 4 seconds. |
Specifications
| Item Description | |
| Image technology LCoS | |
| Resolution 640 x 360 | |
| Brightness 8 Lumens | |
| Contrast ratio 100:1 | |
| Image aspect ratio 16:9 | |
| Light source White LED | |
| Projection image size 6" ~ 50" (15cm ~ 127cm) (Diagonal) | |
| Projection distance 25cm ~ 182cm | |
| Projection source Composite A/V | |
| Audio speaker Stereo | |
| Video compatibility NTSC/PAL | |
| Power Supply 5V, 2A AC power adapter or NP120 Li-ion battery | |
| Battery Life Video-1.5 hours, Image only)-2 hours | |
| Operation temperature 0°C ~ 35°C | |
| Dimension 125mm x 59mm x 25mm | |
| Weight 125g (without battery) | |
| Optional accessory | Pouch, S-video cable, AV cable (mini jack to mini jack), iPod/ iPhone cable |
Note: Specification are subject to change without notification.
Akku laden
natural_image
Illustration of a hand using a tool to inspect or inspect a small object, enclosed in a red circle (no text or symbols)natural_image
Illustration of a hand using a tool to connect a device to a screen, enclosed in a red circle (no text or symbols)natural_image
Hand holding a small object with a pen, enclosed in a red circle (no text or symbols visible)natural_image
Hand holding a small electronic device with a red circular background (no text or symbols visible)natural_image
Hand holding a small electronic device with a cable, enclosed in a red circle (no text or symbols visible)Ligar/desligar o projector
Câmara digital Aiptek
iPhone: iPhone (4GB, 8GB, 16GB), iPhone 3G (8GB, 16GB), iPhone 3GS iPod: iPod touch (8GB, 16GB, 32GB), iPod touch 2^a geração (8GB, 16GB, 32GB), iPod nano 3^a geração (4GB, 8GB), iPod nano 4^a geração (8GB, 16GB), iPod nano 5^a geração (8GB, 16GB), iPod classic (80GB, 160GB), iPod 5^a geração (30GB, 60GB, 80GB)
natural_image
Illustration of a hand using a tool to examine a small object, enclosed in a red circle (no text or symbols)iPhone: iPhone (4GB, 8GB, 16GB), iPhone 3G (8GB, 16GB), iPhone 3GS
iPod: iPod touch (8GB, 16GB, 32GB), iPod touch 2de generatie (8GB, 16GB, 32GB), iPod nano 3de generatie (4GB, 8GB), iPod nano 4de generatie (8GB, 16GB), iPod nano 5de generatie (8GB, 16GB), iPod classic (80GB, 160GB), iPod 5de generatie (30GB, 60GB, 80GB)
Niet compatibel met iPod shuffle, iPod G1, G2, G3, G4, iPod nano G1, G2


natural_image
Illustration of a hand holding a medical or surgical tool near a device, enclosed in a red circle (no text or symbols)iPhone: iPhone (4GB, 8GB, 16GB), iPhone 3G (8GB, 16GB), iPhone 3GS iPod: iPod touch (8GB, 16GB, 32GB), iPod touch 2nd generation (8GB, 16GB, 32GB), iPod nano 3rd generation (4GB, 8GB), iPod nano 4th generation (8GB, 16GB), iPod nano 5th generation (8GB, 16GB), iPod classic (80GB, 160GB), iPod 5th generation (30GB, 60GB, 80GB)
! Inte kompatibel med iPod shuffle, iPod G1, G2, G3, G4, iPod nano G1, G2


Varningsindikatorer
natural_image
Hand holding a medical or laboratory device with a tool, enclosed in a red circle (no text or symbols visible)
Slå projektoren på/av
Trykk ned og hold Strømknappen inne i 2 sekunder for å slå på projektoren.
- Koble den ene enden av iPod/iPhone-kabelen til iPod/iPhone og den andre enden til projektorens AV-kontakt.
- Velg videoklipp eller bilder fra iPod/iPhone og trykk på «play»-knappen, så kan du projisere film eller lysbildeframvisning fra projektoren.
- Juster fokusringen for et bedre bilde.
• Kompatibel med:
iPhone: iPhone (4GB, 8GB, 16GB), iPhone 3G (8GB, 16GB), iPhone 3GS
natural_image
Hand holding a small electronic device with a red circular background (no text or symbols visible)
natural_image
Hand holding a small electronic device with a red circular background (no text or symbols visible)natural_image
Hand holding a small electronic device with a red circular background (no text or symbols visible)開/關投影機
natural_image
Hand holding a small electronic device with a red circular background (no text or symbols visible)打开/关闭投影机电源
按住电源按钮2秒,打开投影机的电源。
iPhone: iPhone (4GB, 8GB, 16GB)、iPhone 3G (8GB, 16GB)、iPhone 3GS
natural_image
Illustration of a hand using a tool to connect a device (no text or symbols visible)iPhone: iPhone (4GB, 8GB, 16GB), iPhone 3G (8GB, 16GB), iPhone 3GS
تركيب البطارية
natural_image
Hand holding a medical or diagnostic device with a tool, enclosed in a red circle (no text or symbols visible)
- - Projector parts
- - Reading LED indicators
- Installing the battery
- Charging the battery
- Turning on/off your projector
- Connecting the projector to your media players
- How to connect with external devices
- Connecting the Projector to your laptop PC
- Connecting the Projector with Aiptek Digital Camcorder
- Connecting the Projector with iPod/iPhone
- - Compatible with:
- Warning Indicators
- Specifications
- Akku laden
- Ligar/desligar o projector
- Varningsindikatorer
- Slå projektoren på/av
- • Kompatibel med:
- 開/關投影機
- 打开/关闭投影机电源
- تركيب البطارية
Brand : AIPTEK
Model : PocketCinema T15
Category : Projector