
A211 - Media player AVERMEDIA - Free user manual and instructions
Find the device manual for free A211 AVERMEDIA in PDF.
| Product Type | HD media player with built-in DTT tuner |
| Brand | AVerMedia |
| Model | A211 (AVerLife HD Theater) |
| Power supply | External power adapter (input 100-240 V, 50/60 Hz) |
| Power consumption | Approximately 15 W (estimated) |
| Dimensions (approx.) | 280 x 180 x 50 mm (W x D x H) |
| Weight (approx.) | 1.2 kg |
| Supported video formats | MPEG-1/2/4, H.264, DivX 3.x/4/5/6, XviD, RMVB (SD), AVI, FLV, MKV, MP4, MPEG, TS |
| Supported audio formats | MP3, AC3 |
| Supported photo formats | JPEG, BMP, PNG, GIF |
| Maximum video resolution | 1080i (1920 x 1080 interlaced) |
| Video outputs | HDMI, YPbPr component, composite (CVBS), S-video |
| Audio outputs | Optical digital (S/PDIF), analog stereo (RCA) |
| Network | Ethernet RJ-45 10/100 Mbps |
| External storage | 1 USB 2.0 port (USB flash drive, external hard drive) |
| Supported file systems | FAT16, FAT32, NTFS |
| Recording | Scheduled or immediate recording to USB device (up to 6 hours) |
| Electronic Program Guide (EPG) | Yes (depending on regional availability) |
| Teletext | Yes |
| Subtitles | Yes |
| Sleep function | Adjustable sleep timer (30 to 180 minutes) |
| Menu languages | Multilingual (French, English, German, etc.) |
| Included accessories | Remote control (batteries included), power adapter, component cable, composite cable, user guide |
Frequently Asked Questions - A211 AVERMEDIA
User questions about A211 AVERMEDIA
0 question about this device. Answer the ones you know or ask your own.
Ask a new question about this device
Download the instructions for your Media player in PDF format for free! Find your manual A211 - AVERMEDIA and take your electronic device back in hand. On this page are published all the documents necessary for the use of your device. A211 by AVERMEDIA.
USER MANUAL A211 AVERMEDIA
- Read Instructions - All the safety and operating instructions should be read when connecting and operating your TV Tuner to help ensure your own personal safety and to protect your product from potential damage.
- Retain Instructions - The safety and operating instructions should be retained for future reference.
HeedWarnings-All warnings on the product and the operating instructions should be adhered to. - Grounding - For continued protection against risk of electric shock and fire, this accessory should be installed only to the products (such as, computer) equipped with a three-wire grounding plug, a plug having a third (grounding) pin. This plug will only fit into a grounding-type power outlet. This is a safety feature. If you are unable to insert the plug into the outlet, contact your electrician to replace the obsolete outlet. Do not defeat the safety purpose of the grounding-type plug.
- Lightning - For added protection for this product during a lightning storm, or when it is left unattended and unused for long periods of time, unplug the host system (Ex. computer) from the wall power outlet, and disconnect the antenna or cable system. This will prevent damage to the product due to lightning and power-line surges.
- Never insert anything metallic into the TV Tuner openings. Doing so may create the danger of electric shock.
- Openings in the TV Tuner cabinet are provided for ventilation. To prevent overheating, these openings should not be blocked or covered. Avoid using the TV Tuner on a bed, sofa, rug, or other soft surface, as doing so may block the ventilation openings in the cabinet. If you place the TV Tuner in a bookcase or an enclosed space, be sure to provide adequate ventilation and air flow.
Power Lines - An outside antenna system should not be located in the vicinity of overhead power lines or other light or power circuits, or where it can fall into such power lines or circuits. - Antenna Installation - When installing an outside antenna system, extreme care should be taken to keep it from touching such power lines or circuits, as contact with them may be fatal.
- Outdoor Antenna Grounding - If an outside antenna is connected to the product, be sure that the antenna system is grounded so as to provide some protection against voltage surges and built up static charges. Article 810.21 of the National Electric Code, ANSI/NFPA No.70, provides information with regard to proper grounding of the mast and supporting structure, grounding of the lead-in wire to the antenna discharge unit, size of grounding conductors, location of antenna-discharge unit, connection of grounding electrodes, and requirements for the grounding electrode.
NOTE to CATV System Installer-This reminder is provided to call the CATV systems installer's attention to Section 820.93 of the National Electric Code, ANSI/NFPA 70:2005 (for US/Canada) and/or EN60728-11:2005 standard (for Europe), which provide guidelines for proper grounding and, in particular, specify that the Coaxial cable shield shall be connected to the grounding system of the building, as close to the point of cable entry as practical.
Battery Safety Information:
- Store the batteries in a cool dry place.
- Do not dispose of used batteries in domestic waste. Dispos of batteries at special collection points or return to point of sale if applies.
- Remove the batteries during long periods of non-use. Always remove exhausted batteries from the remote control. Battery leakage and corrosion can damage this remote control, dispose of batteries safely.
- Do not mix old and new batteries.
- Do not mix different types of batteries: alkaline, standard (carbon-zinc) or rechargeable (nickel-cadmium).
-
Do not dispose of batteries in a fire. The batteries may explode or leak.
-
Never short circuit the battery terminals.
Specification
| Product Name AVerLife HD Theater | |
| Model No. A211 | |
| Power | |
| Input Rating DC 12V 1.5A | |
| Power Consumption < 10W (not include USB device) | |
| Standby Power Consumption | < 1W |
| Adapter Rating | Input: AC 100-240V 50-60Hz 0.5A Output: DC 12V 1.5A |
| Dimension | |
| Size | 218 mm x 152 mm x 56.8 mm |
| Weight | 460 g |
| Environmental | |
| Operating Temperature | 0~40°C |
EUROPEAN COMMUNITY COMPLIANCE STATEMENT
CE Class B (EMC) This product is herewith confirmed to comply with the requirements set out in the Council Directives on the Approximation of the laws of the Member States relating to Electromagnetic Compatibility Directive 2004/108/EC. Safety- Low Voltage Directive 2006/95/EC ErP Directive- 2009/125/EC THE MARK OF CROSSED-OUT WHEELED BIN INDICATES THAT THIS PRODUCT MUST NOT BE DISPOSED OF WITH YOUR OTHER HOUSEHOLD WASTE. INSTEAD, YOU NEED TO DISPOSE OF THE WASTE EQUIPMENT BY HANDING IT OVER TO A DESIGNATED COLLECTION POINT FOR THE RECYCLING OF WASTE ELECTRICAL AND ELECTRONIC EQUIPMENT, FOR MORE INFORMATION ABOUT WHERE TO DROP OFF YOUR WASTE EQUIPMENT FOR RECYCLING, PLEASE CONTACT YOUR HOUSEHOLD WASTE DISPOSAL SERVICE OR THE SHOP WHERE YOU PURCHASED THE PRODUCT.
DISCLAIMER
All the screen shots in this documentation are only example images. The images may vary depending on the product and software version. Information presented in this documentation has been carefully checked for reliability; however, no responsibility is assumed for inaccuracies. The information contained in this documentation is subject to change without notice.
TRADEMARKS
"AVerMedia" is a trademark (or registered trademark) of AVerMedia Technologies, Inc. Other trademarks used herein for description purpose only belong to each of their companies.
COPYRIGHT
©2010 by AVerMedia Technologies, Inc. All right reserved.No part of this document may be reproduced or transmitted in any form, or by any means without the prior written permission of AVerMedia Technologies Inc. AVerMedia Technologies Inc. reserves the right to modify its models, including their characteristics, specifications, accessories and any other information stated herein without notice. The official printout of any information shall prevail should there be any discrepancy between the information contained herein and the information contained in that printout.
TAIWAN HEADQUATER OFFICE
Address No. 135, Jian-Yi Road, Chung-Ho City, Taipei County 235, Taiwan (R.O.C.)
Website www.avermedia.com/avertv/
Tel +886-2-2226-3630
Table of Content
Chapter 1 What's in the Package 2
Chapter 2 The Unit Parts 3
2.1 Touch Button Control Panel 3
2.2 Infrared Sensor 3
2.3 Connection Ports 4
Chapter 3 Installation and Setup 4
3.1 First time Launch 5
3.2 The Remote Control 5
3.3 Teletext Control Buttons 7
3.4 Electronic Program Guide (EPG) & Recording Function 7
3.5 HDMI/YPbPr Resolutions 8
Chapter 4 OSD Menu Settings 8
4.1 Calling Up a Menu Display 8
4.2 Menu 8
4.3 Record Management 9
4.4 TV 9
4.5 Playback 10
4.6 Settings 11
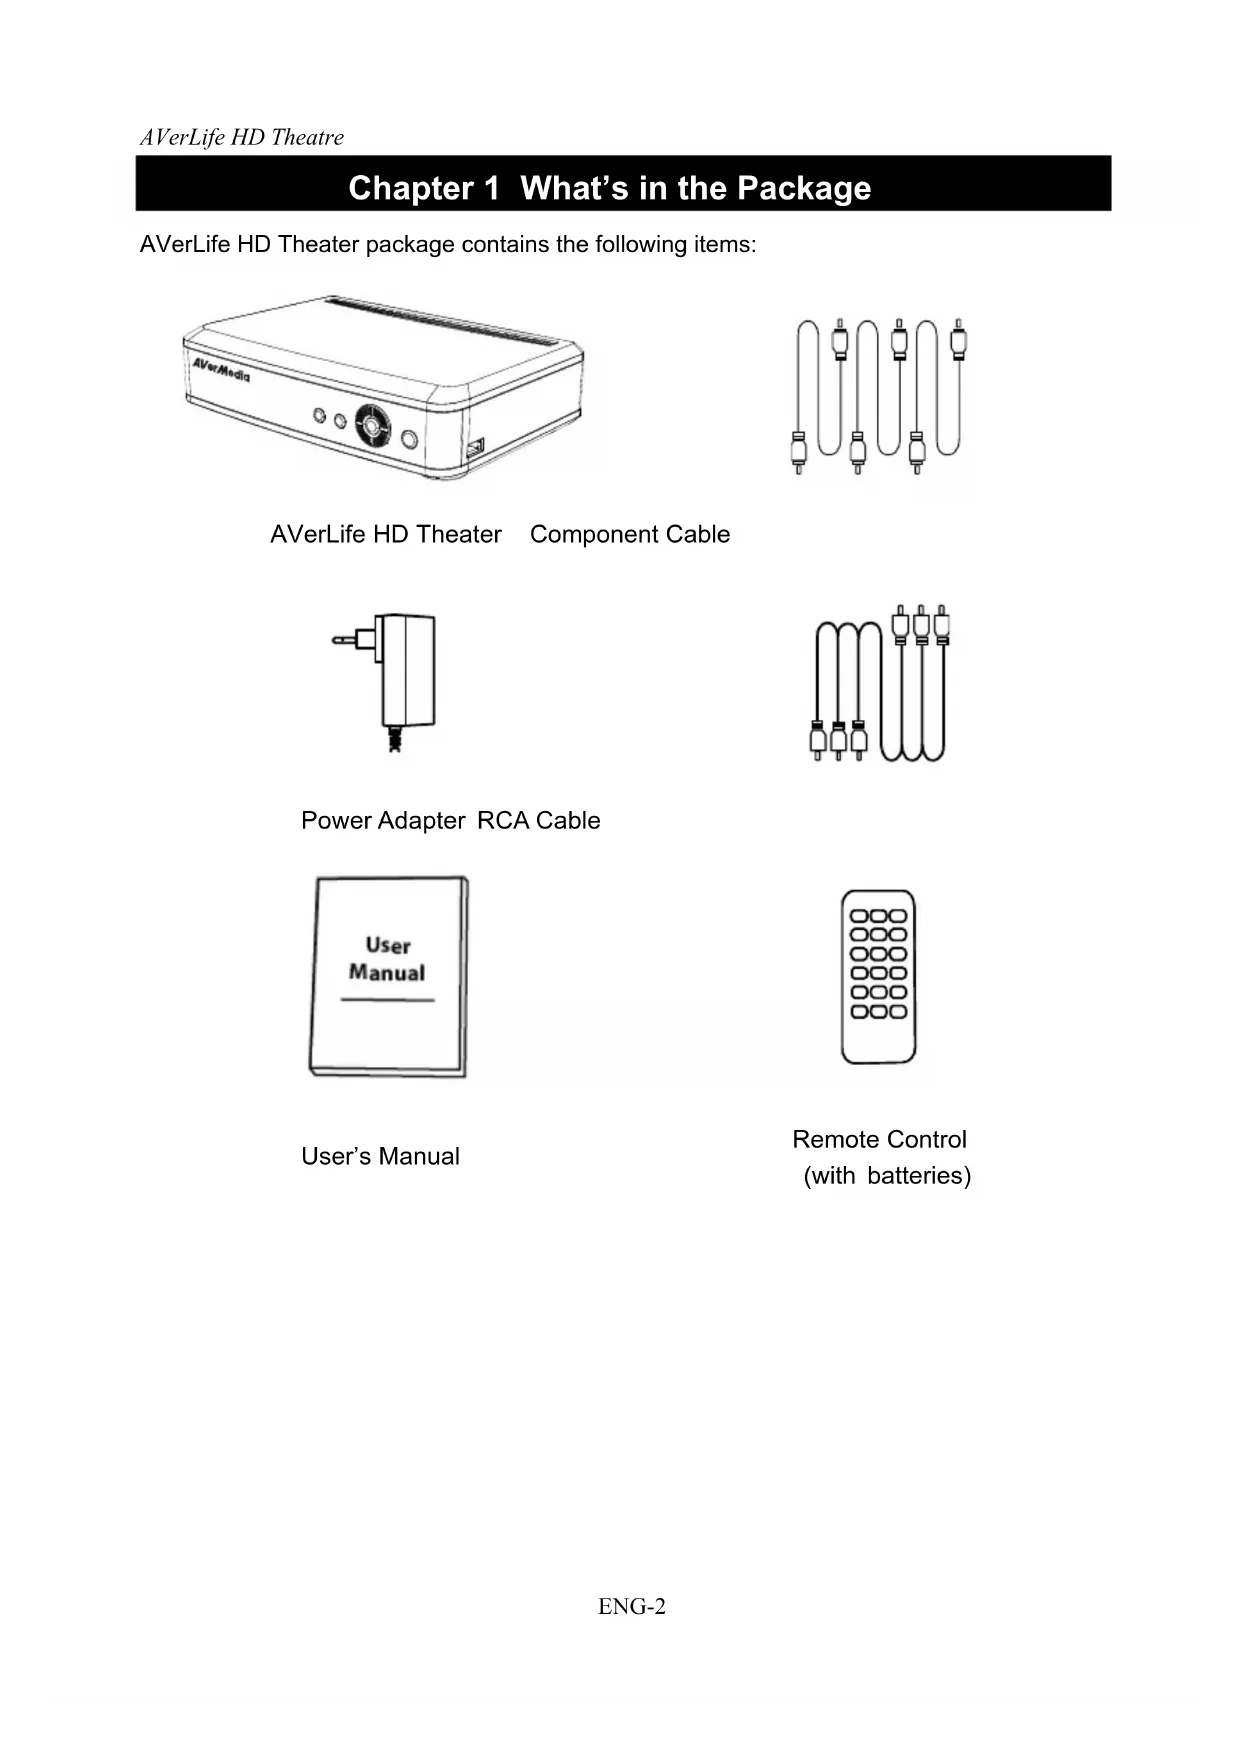
Chapter 1 What's in the Package
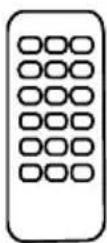
AVerLife HD Theater package contains the following items:
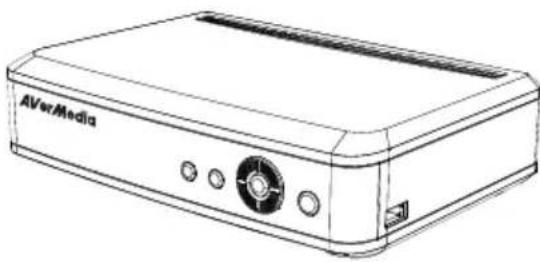
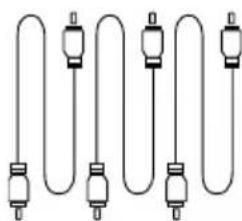
AVerLife HD Theater Component Cable
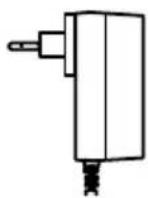
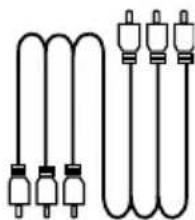
Power Adapter RCA Cable
User's Manual
Remote Control (with batteries)
Chapter 2 The Unit Parts
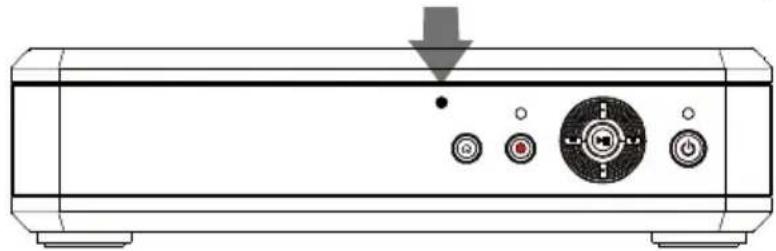
2.1 Touch Button Control Panel
The Touch Button Panel found on the top side of the unit provides quick access to commonly used functions.
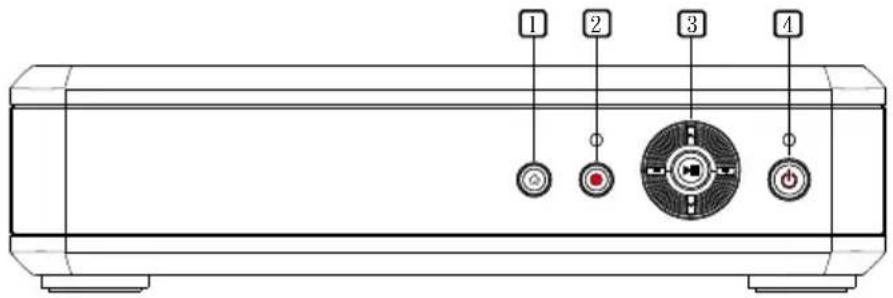


MENU
To call up the menu display / go back to the upper menu.


RECORD (optional)
Start Recording/Stop Recording (DTV only).


PLAY/PAUSE
- Play the selected file.
- Temporarily freeze the playback.
- Enter the menu


CHANNEL CHANNEL
- Press Channel + to go up and Channel - to go down to the next active TV channel.
- Use these buttons to make the selection in the menu or picture setting


VOLUME - / VOLUME +
- Press Volume + to increase and Volume - to decrease the volume level .
- Use these button to adjust the menu or picture setting.


POWER
Turn the unit on / into stand-by mode
- Press to turn on the model; press again to turn into stand-by mode.
2.2 Infrared Sensor
When using the remote control, aim it at the Infrared Sensor which is located at the front panel of the unit.
2.3 Connection Ports
The port connectors allow connection of your TV antenna, LCD projector, external Pen-drive, HDD, speakers, video, or s-video source etc.
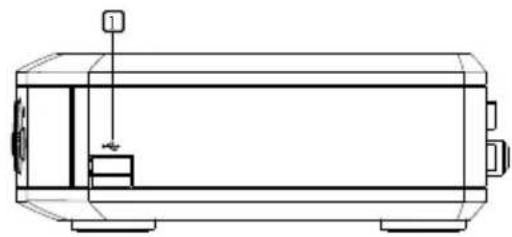
Left Panel
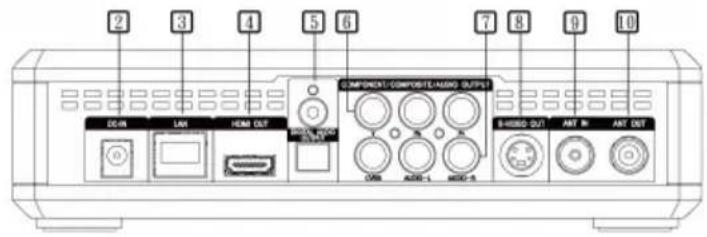
Back Panel
| 1. USB port (USB hub not supported) 7 Composite video output | ||
| 2 Power adapter 8 S-video output | ||
| 3 Ethernet port 9 TV signal input | ||
| 4 HDMI output 10 TV signal output | ||
| 5 Digital audio output | ||
| 6 Component video output | ||
The Installation and Setup section provides more information on cable connections.
Chapter 3 Installation and Setup
The figure below shows the proper cable connections for installing AVerLife HD Theatre and connecting it to your audio/video equipment. Use either one of the (A) (B) (C) (D) connections to output the signal to your TV. The (A) (B) (C) (D) connections serve the same purpose; use only one at a time.

| 1 | Power adapter | Digital | audio cable (not supplied) |
| 2 | LAN cable (not supplied) | HDMI | cable (not supplied) |
| 3 | Component cable | 7 | Composite cable |
| 4 | TV Antenna (75Ω) (not supplied) | 8 | S-video cable (not supplied) |
3.1 First time Launch
The first time you power on the AVerLife HD Theatre unit, it will automatically display the Setup Wizard:

Press OK.

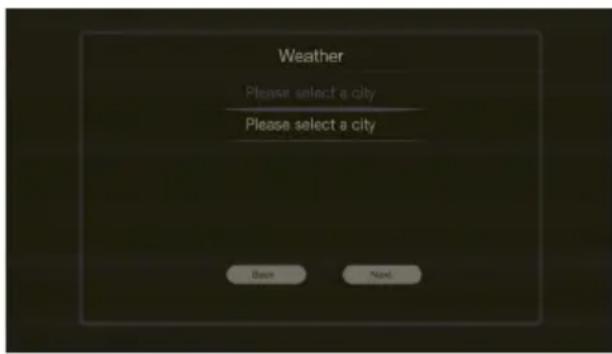
Press OK to select a country and city for weather information display.
* Please set up City at first if you want to show the "RSS weather". Otherwise, there will be no information shown in RSS weather.
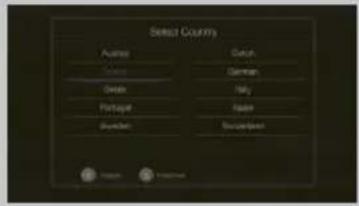
Select a country and press OK. Press Next to continue the setting.
Then the AVerLife HD Theater will start to scan the channels in your area. After scanning for available channels, you can start to watch TV.
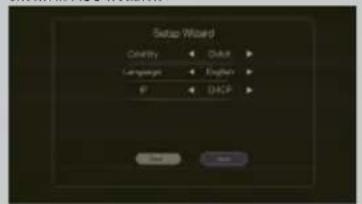
Choose your country and menu language. In "IP", choose "Static" to customize the IP settings or "DHCP" to automatically configure the available IP address. Then press Next.
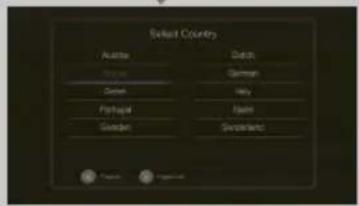
Select a city and press OK.
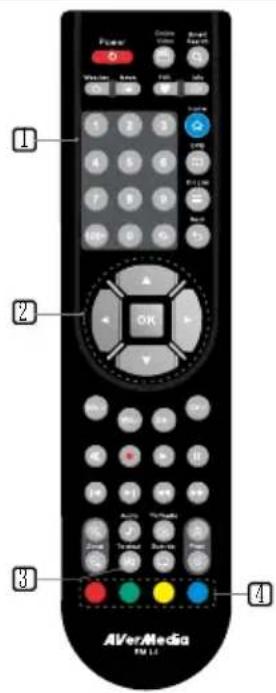
3.2 The Remote Control
The diagram below shows the remote control unit layout.
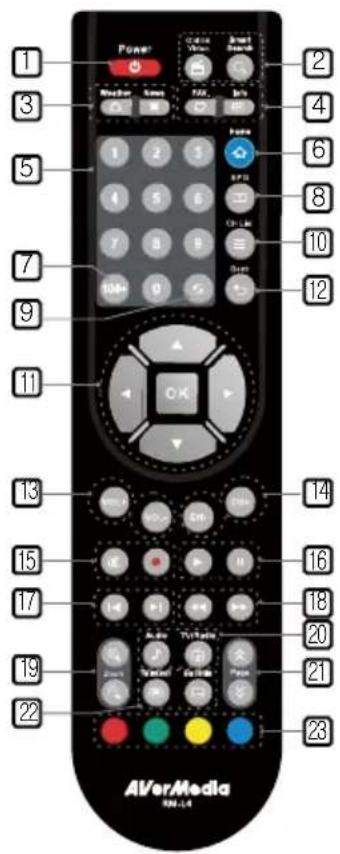
1.

Turn the unit on/stand-by
*Press Power button to turn on the model; press again to turn into stand-by mode.
① Stand-by mode: Power-saving sleep mode
- (This%action is not supported)

(This function is not supported)

- Launch Weather widget

(This function is not supported)

- (This function is not supported)

Display the current program information. (DTV)
only)
-
Numeric Buttons To select a TV channel
-
Go to the home menu.
- Choose a channel number over 100.
- View EPG information.
- Go to the previously selected channel
- Open the channel list.
- Use the arrow button to navigate all
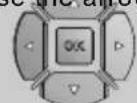
on-screen items. Use OK to confirm the selection.
| 12. Go back to the upper menu or exit to the menu. | ||||
| 13. Increase / Decrease the volume | ||||
| 14. Go to the next or previous TV channel line-up. | ||||
| 15. Turn off /on the sound Start recording / Stop recording *6 Hours Limited | ||||
| 16. | Play the selected file | 20. | Change between available audio modes. | |
| 17. | Press to temporarily freeze the playback *Only functions in playback mode | Toggle between live TV and Radio broadcasts. | ||
| Go to the previous item in the playlist when playing photo, music, video. | 21. | Go to previous page. | ||
| 18. | Go to the next item in the playlist when playing photo, music, video. | Go to next page. | ||
| Fast backward (press this button one time, 30 seconds skip) | 22. | Press to view Teletext. | ||
| 19. | Fast forward (press this button one time, 30 seconds skip) | Enable Subtitle feature. | ||
| Zoom in the screen. | 23. For the function of each colour button, please follow the on-screen instruction. *Jump to the teletext page of the corresponding colour according to this button. *To safely remove the USB, press the yellow button under main menu. | |||
| Zoom out the screen. | ||||
3.3 Teletext Control Buttons
The figure and descriptions in this section show how to use the teletext function using the remote control.
| 1 NUMBER BUTTONS | Select a teletext page |
| 2 ▲/▼ | Use the▲ and▼ buttons to go to the next upper or lower teletext page. |
| 3 TELETEXT | Press to view teletext, overlay text over video and disable teletext |
| 4 FASTEXT LINK | Jump to the teletext page of the corresponding colour according to this button. |
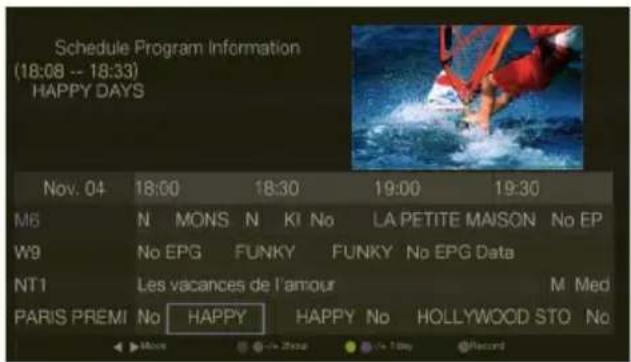
3.4 Electronic Program Guide (EPG) & Recording Function
Electronic Program Guide (EPG) is a service that allows you to check the next succeeding program schedule and even the program schedules of the whole week. Please note the EPG service depends on your regional channel providers.
If you want to view EPG information, press the EPG button on the remote. Or go to Program Guide in the TV menu.
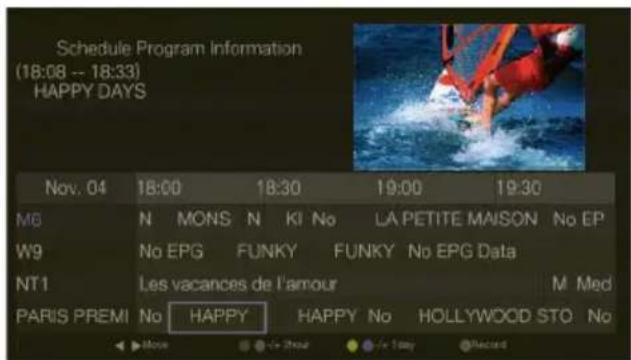
- Press to select a program. The program information will be displayed in the upper left box.
① If "No EPG" appears, move to the column and press OK to view the program information. - Press red/green buttons to jump to "2 hours after" or "2 hours before" the selected time. Press the yellow/blue buttons to jump to "1 day after" or "1 day before" the selected date.
- Press button to preset recording for the selected program. Recording will be automatically started at specified time. To cancel the recording, select the program and press button again.
3.5 HDMI/YPbPr Resolutions
| Resolution 4:3 / 16:9 support Refresh Rate (Hz) | ||
| 576i | O | 50 |
| 576p | O | 50 |
| 720p | O | 50 |
| 1080i | O | 50 |
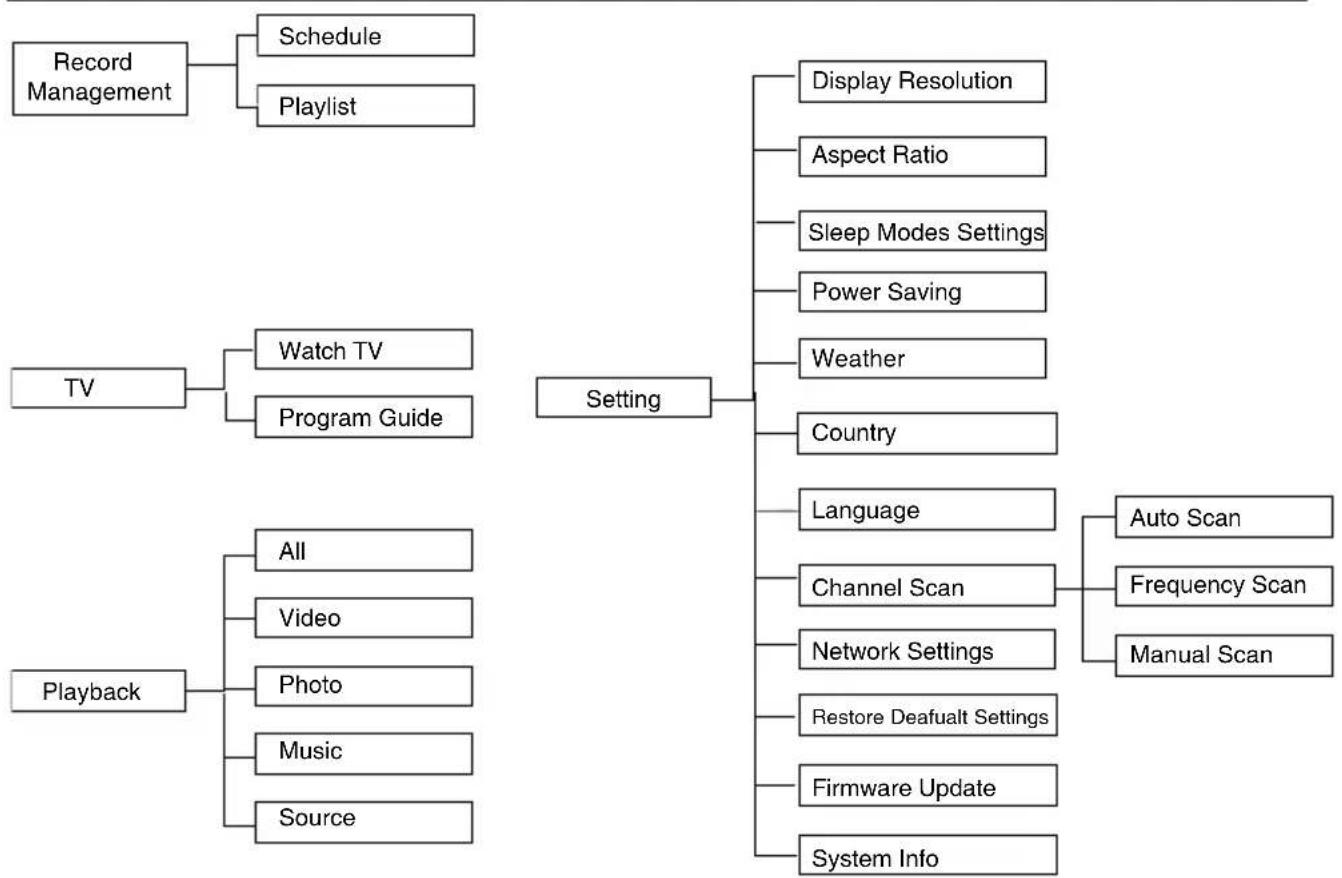
Chapter 4 OSD Menu Settings
4.1 Calling Up a Menu Display
Press the HOME button on the remote control to call up and exit to the main menu or submenu display. Use or to toggle between different menus. Then, you can use the or buttons to select the item in the menu list. Then press OK to make a selection. The table below lists the different functions you will find in the menu.
4.2 Menu
ENG-8
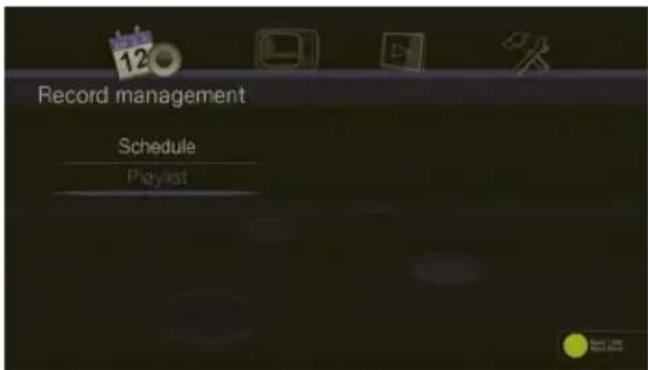
4.3 Record Management
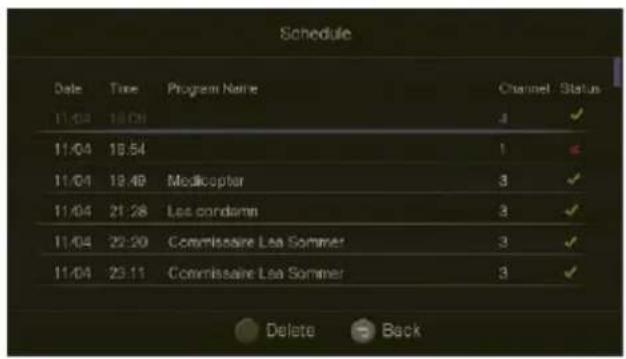
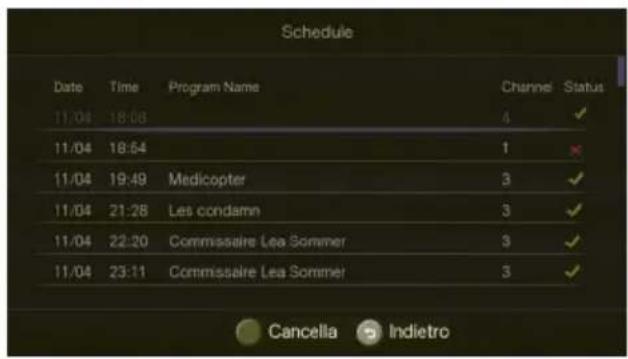
Schedule
In the Schedule menu, you can see all the preset recording programs. Press the red button to delete the selected item from the recording schedule. Press button to exit.
*icon indicates that the program is successfully recorded; icon indicates that the recording task was failed.
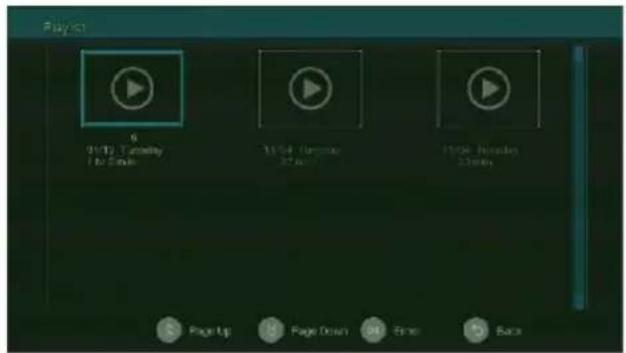
Playlist
The Playlist menu shows the recording playlist. Use or to scroll the page up or down. Use the arrow keys to select the program that you want to watch. Then press OK to start playing. Press to stop the playback and go back to the list.
4.4 TV

In the TV menu, use or to select Watch TV to start watching live TV. Or select Program Guide to check the next succeeding program schedule and even the program schedules of the whole week.
Under TV mode, press to go to the next or previous TV channel line-up. Use to increase or decrease the volume. Press CH List to call up the channel list and use / or OK to quickly select and switch into a channel. For more TV remote control functions, please refer to The Remote Control section.
① Please follow the on-screen instruction. ① For the recording format, only FAT16/FAT32are supported.
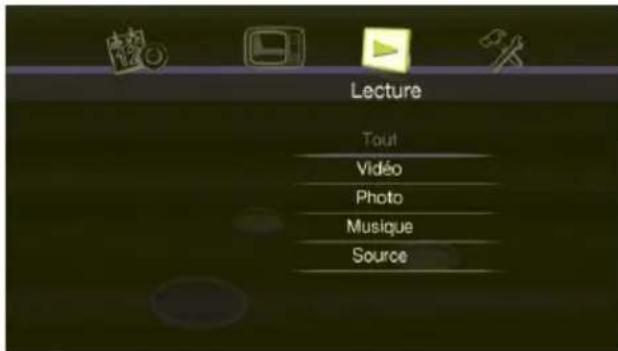
4.5Playback
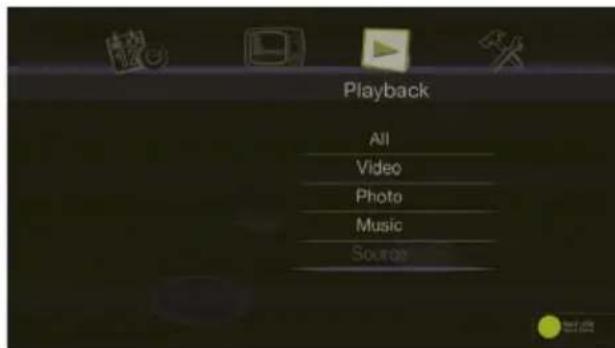
In the Playback menu, you can play multimedia files.
Use or to select a category in the menu list; then press OK to make a selection.
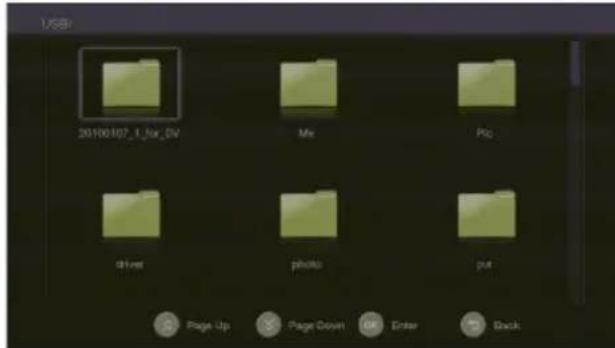
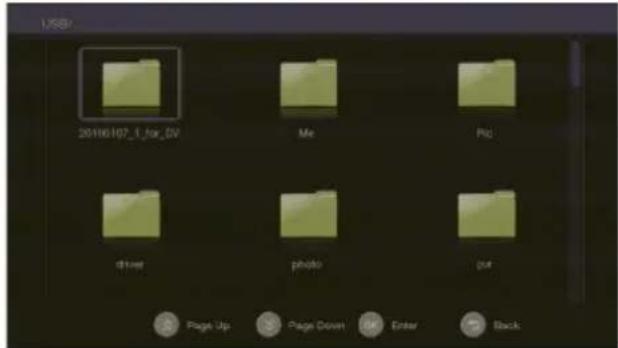
Before playing, please select Source to choose a source from the USB storage device or Ethernet port.
The screen will display the thumbnails images in the selected category. Use / / / to select the item you want to play. Then press OK to start playing. If you want to play background music, use or to select All. Then press OK to enter the folder. Select the item you want to play and press the red button on the remote to start playing.
Before enter the submenu, insert the external storage device first (USB 2.0 storage*.Only FAT/NTFS file systems are available. AVerLife HD Theater supports below media format:
*USB hub not supported
| Video Codec | Video File |
| rm/rmvb (SD),mpeg 1/2 (SD),mpeg 2 (1080i),mpeg 4 (1080i),H.264 (1080i),DivX 3.x,XviD | *.avi,*.flv,*.mkv,*.mp4,*.mpeg,*.mpg,*.rmvb,*.ts |
| Audio Codec | Audio File |
| mp3, ac3 | *.mp3 |
| Picture | |
| *.jpeg,*.bmp,*.png,*.gif | |
| Note: AVerLife HD Theater supports high definition (HD) video format. For RMVB format file,only standard definition (SD) video format is supported. USB MP3 player and USB card reader are not supported. | |
Then press OK to start playing. Press

Back to stop
the playback and go back to the list.
4.6 Settings
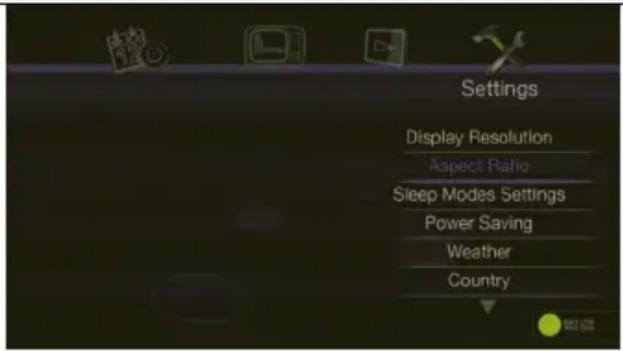
Display Resolution:
Use or buttons to choose from display resolution settings then press OK.
Aspect Ratio
In some resolution settings, you can switch between 16:9 and 4:3 display modes. Press OK to enter the mode.
① If the program or video image is not made in 16:9 format, you might not tell the difference of these display aspect ratios.
Sleep Mode
The Sleep modes settings allow you to set the time interval for the TV's sleep timer.
Press or to select a time interval, and then press OK to confirm your selection. AVeLife HD Theatre will automatically switch to sleep mode when it has been left idle for the specified time interval. (By default, the timer is 180 mins.)
Power Saving
Select either Green Power or Fast Boot way for power saving.
① If you choose the Green Power setting, it may spend more time to turn on the device.
Weather
Select a country and city for weather information display when watching TV. To add or change a city, press the red button. Press the Weather button on the remote control to toggle between different displays of weather info.
Language
Use or to select from different languages then press OK.
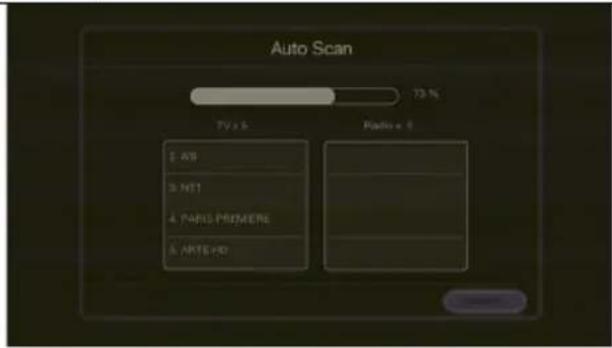
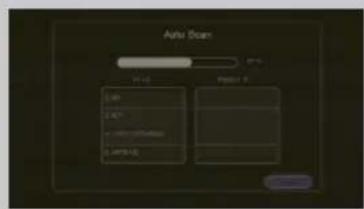
Channel Scan
Use the Auto Scan function first. If there are channels missing after you perform Auto Scan, use Frequency Scan function and repeat the searching process. The "Auto Scan" box will appear, indicating the scanning percentage, Channel Number and Frequency. When scanning, active TV/Radio programs will be listed inside the box. After channels are scanned, the system will return to the real-time program automatically. To terminate the scanning, press "Cancel".
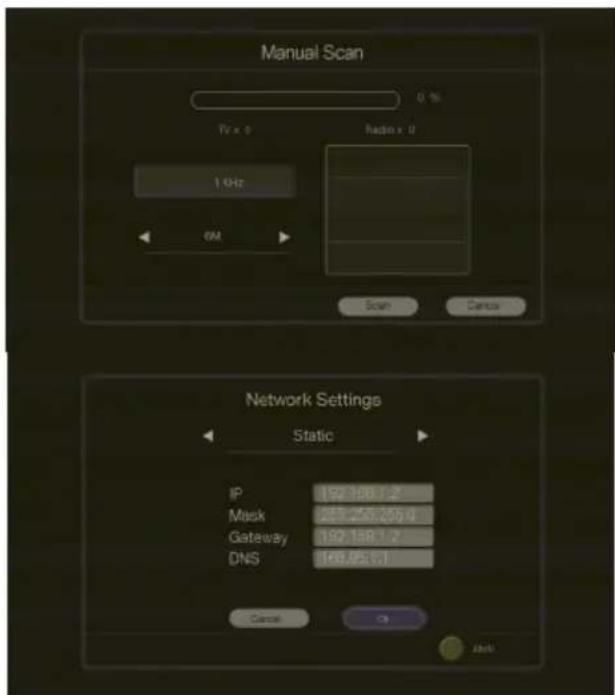
Select Manual Scan for specific frequency scan. Use or to toggle between adjustable options. Use number buttons to input the frequency and or to change the band width value. Press Scan to start scan.
Network Settings
In "IP", choose "Static" to customize the IP settings or "DHCP" to automatically configure the available IP address. Press OK to confirm.
*Press red button on the remote to input. (dot).
If you do want to revert to the factory settings, choose "YES".
A confirmation dialog will appear. Select "OK" and press OK to confirm the operation, or select "CANCEL" and press OK.
Firmware Update
Use this function to update the firmware via USB storage or the Internet.
System Info.
Provide the information about this product, such as the product name and firmware version etc.
Inhalt
Schedule (Planification)
[ \text{Playlist (Selections)} ]
4.5Playback (Lecture)
4.3 Record Management (Gestione)
Select Manual Scan (Pesquisa manual) for specific frequency scan. Use or to toggle between adjustable options. Use number buttons to input the frequency and or to change the band width value. Press Scan to start scan.
Network Settings


- Battery Safety Information:
- EUROPEAN COMMUNITY COMPLIANCE STATEMENT
- DISCLAIMER
- TRADEMARKS
- COPYRIGHT
- TAIWAN HEADQUATER OFFICE
- Table of Content
- Chapter 1 What's in the Package 2
- Chapter 2 The Unit Parts 3
- Chapter 3 Installation and Setup 4
- Chapter 4 OSD Menu Settings 8
- Chapter 1 What's in the Package
- Chapter 2 The Unit Parts
- Touch Button Control Panel
- MENU
- RECORD (optional)
- PLAY/PAUSE
- CHANNEL CHANNEL
- VOLUME - / VOLUME +
- POWER
- Infrared Sensor
- Connection Ports
- Chapter 3 Installation and Setup
- First time Launch
- The Remote Control
- Teletext Control Buttons
- Electronic Program Guide (EPG) & Recording Function
- HDMI/YPbPr Resolutions
- Chapter 4 OSD Menu Settings
- Calling Up a Menu Display
- Menu
- Record Management
- Schedule
- Playlist
- TV
- 4.5Playback
- Settings
- Display Resolution:
- Aspect Ratio
- Sleep Mode
- Power Saving
- Weather
- Language
- Channel Scan
- Network Settings
- Firmware Update
- System Info.
- Inhalt
- Schedule (Planification)
- [ \text{Playlist (Selections)} ]
- 4.5Playback (Lecture)
- Record Management (Gestione)
Brand : AVERMEDIA
Model : A211
Category : Media player