
Chill RB 7025 - Vacuum Cleaner SEVERIN - Free user manual and instructions
Find the device manual for free Chill RB 7025 SEVERIN in PDF.
| Product type | Robot vacuum cleaner |
| Brand | SEVERIN |
| Model | Chill RB 7025 |
| Use | Domestic |
| Power supply | Mains power adapter |
| Battery type | Rechargeable lithium-ion |
| Charging time | Approximately 6.5 hours |
| Runtime | Varies depending on floor type and dirt level |
| Dust container | Removable, capacity not specified |
| Filter | Washable, spare included |
| Anti-fall sensors | 3 adjustable sensors depending on floor type |
| Brushes | 2 removable round brushes, spare included |
| Compatible floors | Hard floors and short-pile carpets |
| Included accessories | Round brushes (x2), spare brushes (x2), battery, cleaning brush, power adapter, spare filter |
| Manufacturer warranty | 2 years |
| Safety | Automatic shutdown, anti-fall sensors, overload protection |
| Maintenance | Empty the container, clean the filter and brushes, clean the sensors |
| Spare parts available | Round brushes, filter, cleaning brush |
Frequently Asked Questions - Chill RB 7025 SEVERIN
User questions about Chill RB 7025 SEVERIN
0 question about this device. Answer the ones you know or ask your own.
Ask a new question about this device
Download the instructions for your Vacuum Cleaner in PDF format for free! Find your manual Chill RB 7025 - SEVERIN and take your electronic device back in hand. On this page are published all the documents necessary for the use of your device. Chill RB 7025 by SEVERIN.
USER MANUAL Chill RB 7025 SEVERIN
natural_image
Line drawing of a robotic vacuum cleaner with control panel and legs (no text or symbols on the device itself)GB Robotic vacuum • Instruction manual 20
SI Robotski sesalnik • Navodila za uporabo 37
natural_image
Illustration showing a hand inserting electrical outlets into a car seat, with a magnified inset highlighting the device (no text or symbols present)natural_image
Illustration showing a hand inserting a socket into a car electrical socket, with no visible text or symbols.natural_image
Close-up of a finger pressing a button on a device (no text or symbols visible)natural_image
Illustration of a robotic vacuum cleaner being placed on its back panel, showing the handle and control panel (no text or symbols present)natural_image
Illustration showing two steps of a robotic vacuum cleaner's internal structure, with arrows indicating the process (no text or symbols present)natural_image
Illustration of a hand using a tool to adjust or install a mechanical component (no text or symbols visible)natural_image
Illustration of hands assembling a mechanical component with a black arrow indicating assembly direction (no text or symbols)natural_image
Symbol of a trash bin crossed with no text or numbers, representing waste sorting or disposal (no text present)We wish you great joy with your high-quality SEVERIN product and we thank you for placing your trust in us.
About this instruction manual
This instruction manual includes important hints for your safety and the use of the appliance. If the instruction manual is not heeded, there can be injuries to people or damage to the appliance. Keep the instruction manual safe. If you give or sell the appliance to somebody else, give this person the instruction manual.
Read this instruction manual completely before using the appliance for the first time.
Table of contents
Thank you very much 20
Safety guidelines 21
Unpacking 25
Recharging the rechargeable battery ..... 26
Adjusting appliance for floor 27
Cleaning a room 28
Emptying the dust container 29
Cleaning the appliance 31
Troubleshooting 32
Accessories and warranty 35
Disposal 36
Safety of particular groups of people
- This appliance may only be used by children over the age of 8 and by persons with reduced physical, sensory or mental capacities or a lack of experience and/or knowledge when they are supervised or if they have been instructed about the safe use of the appliance and have understood the risks resulting from the use of the appliance.
- Children may not play with the appliance or stand or sit on the appliance. Cleaning and user maintenance may not be performed by children without supervision.
- Keep children younger than 8 away from the appliance and adapter cord.
- Keep packaging materials out of the reach of children and dispose of them. Otherwise they present a suffocation risk.
Connect the appliance safely
Since the appliance is operated with electrical current, there is a danger of electric shock. Therefore, heed the following:
- Only connect the mains adapter to outlets that correspond to the details on the type plate of the mains adapter.
- Check the appliance and mains adapter for possible damage before use. Never operate a defective appliance or an appliance with a defective mains adapter.
-
Never try to repair the appliance or its mains adapter yourself. To prevent hazards, repairs to the appliance and the mains adapter may only be made by our customer service. Give a defective appliance to a dealer or SEVERIN customer service for repair.
-
Do not immerse appliance or mains adapter in water or other liquids. Keep appliance and mains adapter away from rain and wet conditions. Do not operate the appliance outdoors or in rooms with high humidity.
- Do not handle the mains adapter with wet hands. When unplugging the mains adapter from the outlet, always pull directly on the plug.
- Make sure that the adapter cord is not kinked, crushed or run over and that it does not come into contact with sources of heat, humidity and sharp edges. Make sure that the adapter cord does not become a stumbling hazard.
- Before cleaning or maintaining the appliance, as well as before changing accessories, switch off the appliance and unplug the mains adapter from the outlet.
Safety when handling rechargeable batteries
With improper handling of rechargeable batteries, there is a danger of injury and explosion.
- Should it be necessary to replace the rechargeable battery, contact a dealer or SEVERIN customer service. Never replace the rechargeable battery yourself. Never replace with other rechargeable batteries or other batteries.
- Before removing the rechargeable battery, make sure that the mains adapter is unplugged from the outlet.
- Never take rechargeable batteries apart, expose them to high temperatures or throw them in the fire.
-
Never subject rechargeable batteries to direct sunlight.
-
With a storage duration of up to 3 months, adhere to the following temperatures: -20 — +45 °C.
- With a storage duration of more than 1 year, adhere to the following temperatures: -20 — +20 °C.
Safety guidelines
- Never short-circuit rechargeable batteries, that is, never touch both poles at the same time, especially not with objects that conduct electricity. Store rechargeable batteries so that they cannot be short-circuited by other rechargeable batteries or metal objects during storage.
- Only use the included mains adapter to charge the rechargeable battery. Never charge the rechargeable battery with another mains adapter. Only use the included mains adapter to charge the rechargeable battery for this appliance.
- At the end of its life span, remove the rechargeable as described. Then take the rechargeable battery to an appropriate collection point nearby, thus ensuring safe and environmentally-appropriate disposal. Never throw rechargeable batteries away in household garbage!
- In case of improper handling, liquid can escape from the rechargeable battery. Do not use rechargeable battery if it is damaged or if liquid escapes from it.
- If liquid has escaped, avoid contact with the liquid.
- If there is contact with the liquid, rinse immediately with a lot of water. In case of follow-up symptoms (regardless of what kind), seek a physician's advice.
Intended use
The appliance may only be used in households. The appliance may only be used for cleaning on level, normally-soiled hard floors. The best cleaning results are obtained in small and enclosed rooms.
If the round brushes are not mounted, it can also be used on short-piled carpeting.
Any other use is improper and is forbidden.
Safety guidelines
In order to prevent injuries, fires and damage, the appliance may not be used to vacuum:
- People, animals and plants. Always keep vacuum openings away from all body parts, hair and clothing.
- Glowing or burning particles (such as ash, coals, charcoal, cigarettes, matches).
- Explosively or flammable materials or toner.
– Water and other liquids, e.g. damp carpet cleaners. - Pointy objects such as glass splinters, needles or construction waste.
Also forbidden:
- Independent alteration or repair of the appliance or its mains adapter.
- Use without the correct insertion of the dust container, filter and cover.
- Use in rooms where there are breakable object or objects that can tip over easily. Prepare rooms so that the use of the appliance will not cause damage.
– Use, storage or charging outdoors.
– The storage of objects on the appliance.
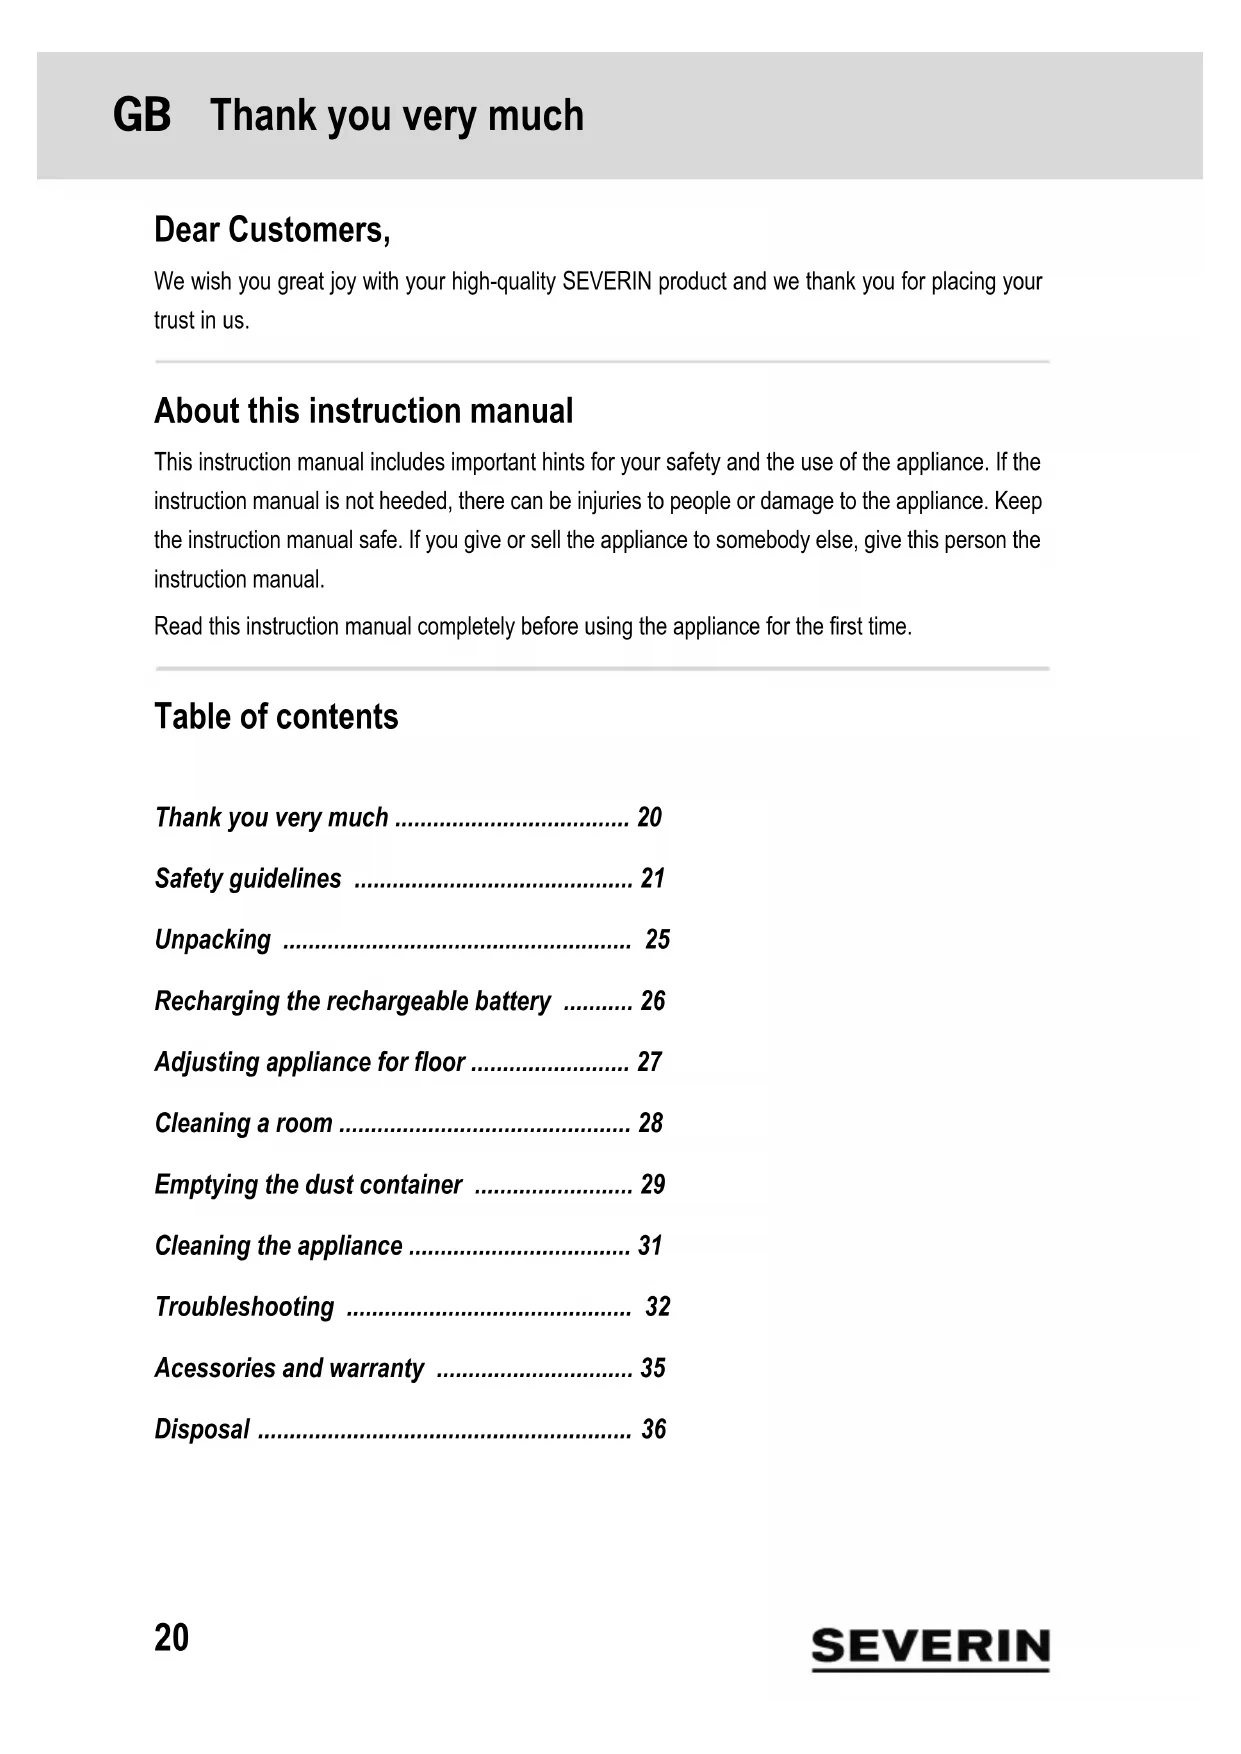
Unpacking
- Unpack the appliance and accessories.
- Check to ensure that delivery is complete (see figure).
1 CHILL robotic vacuum
2 Round brushes
3 Replacement round brushes
4 Rechargeable battery
5 Cleaning brush
6 Mains adapter
7 Replacement filter
– not depicted: Instruction manual
Recharging the rechargeable battery
Note:
Prior to using the device for the first time, carefully remove the transparent protective cover from the on/off switch. To this end, do not use any pointed objects that could damage the device.
It is best to charge the rechargeable battery before each use, especially after the appliance has not been used for a while.
This increases the life span of the rechargeable battery and ensures the longest cleaning cycles.
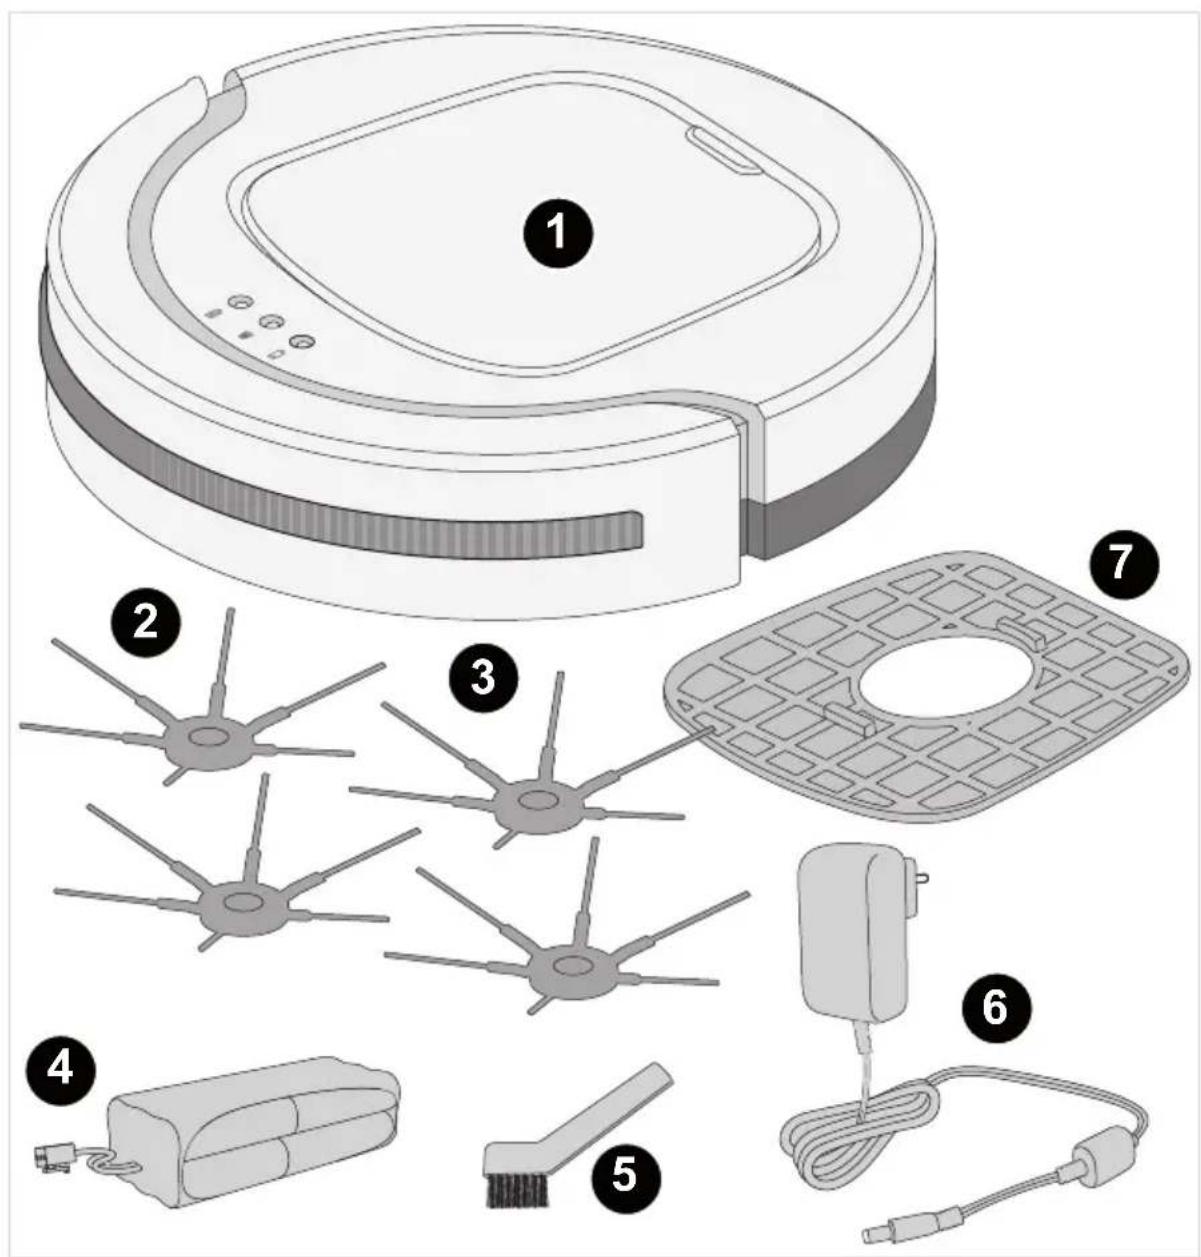
- Make sure that the appliance is switched off.
- Connect the mains adapter to the appliance (see figure).
natural_image
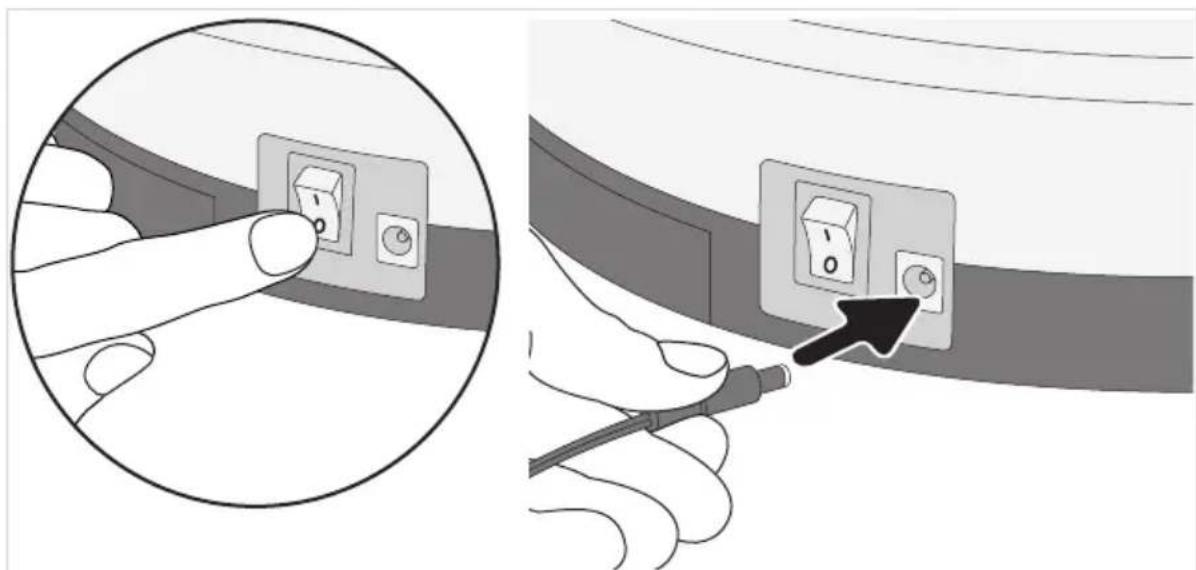
Illustration showing a hand inserting electrical socket into a cable, with a magnified inset highlighting the socket (no text or symbols present)- Connect the mains adapter to the outlet (see detail).
- The LED blinks. Wait approx. 6.5 hours until the LED lights up permanently.
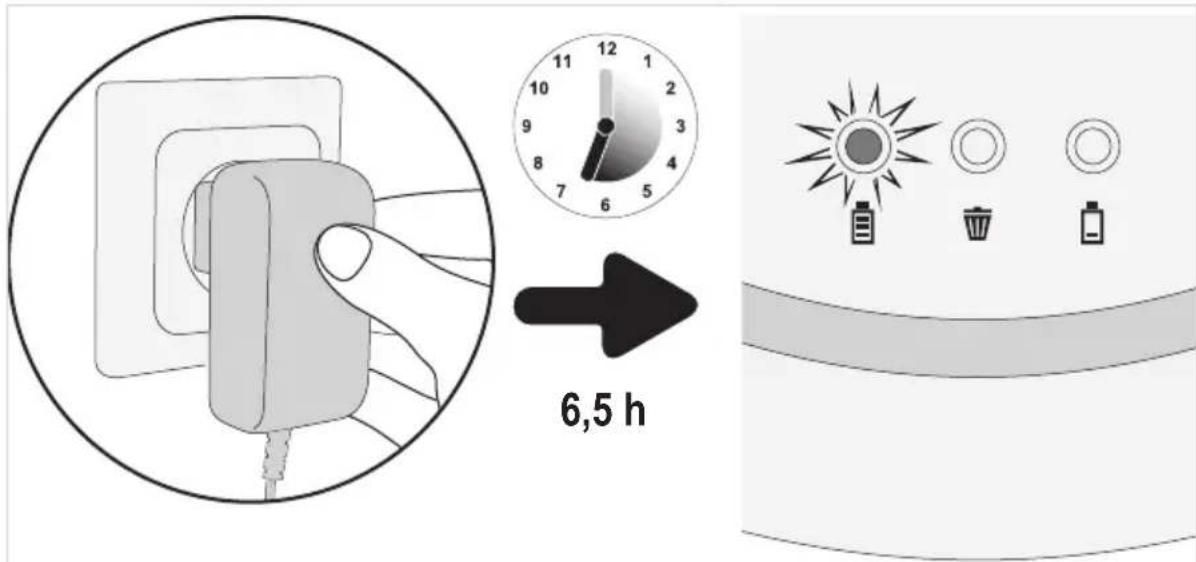
- Unplug the mains adapter from the outlet and appliance.
Prepare appliance for use, ▷ page 27, "Adjusting appliance for floor".
Adjusting appliance for floor
- Make sure that the appliance is switched off.
-
Depending on the floor, attach or remove brushes:
-
If you want to clean hard floors, attach the round brushes (see figure).
- If you want to clean short-pile carpeting, remove the brushes (see figure).
natural_image
Illustration showing a hand inserting a switch into an electrical socket, with no visible text or symbols.-
Put all 3 sensors in the correct position:
-
For light floors and flat steps, position 0 to 1.
- For dark floors and higher steps, position 2 to 3.
TIP: If the drop sensors are not set correctly, the LED lights up on the top of the appliance.
TIP: If the robot always moves backwards on dark floors, select position "3".
Cleaning a room
Prepare room as follows:
- Remove loose objects that the robot could push in front of itself.
- Remove cables, draperies, and everything that could get entangled in the brushes.
- Remove breakable objects or objects that can tip over easily.
Switch the appliance on as follows:
natural_image
Close-up of a finger pressing a button on a device (no text or symbols visible)- Place appliance in the middle of the room to be cleaned.
- Switch appliance on using the on/off switch (position "I" - see detail).
The appliance will now clean the room according to the following pattern:
flowchart
graph TD
    A["Initial State"] --> B["Converging Spiral"]
    B --> C["Converging Square"]
    C --> D["Converging Spiral"]
    D --> E["Final State"]
The appliance will now clean until
- the dust container is full and the LED lights up, ▷ page 29, "Emptying the dust container".
- or until the rechargeable battery must be charged and the LED lights up, ▷page 26, "Re-charging the rechargeable battery".
In both cases, the appliance stops after a while.
It will then emit a peep tone every minute
- until you switch it off using the on/off switch (position "0")
- or the rechargeable battery is discharged completely.
If you do not intend to use the appliance any longer,
then remove the rechargeable battery, ▷ page 36, "Removing the rechargeable battery".
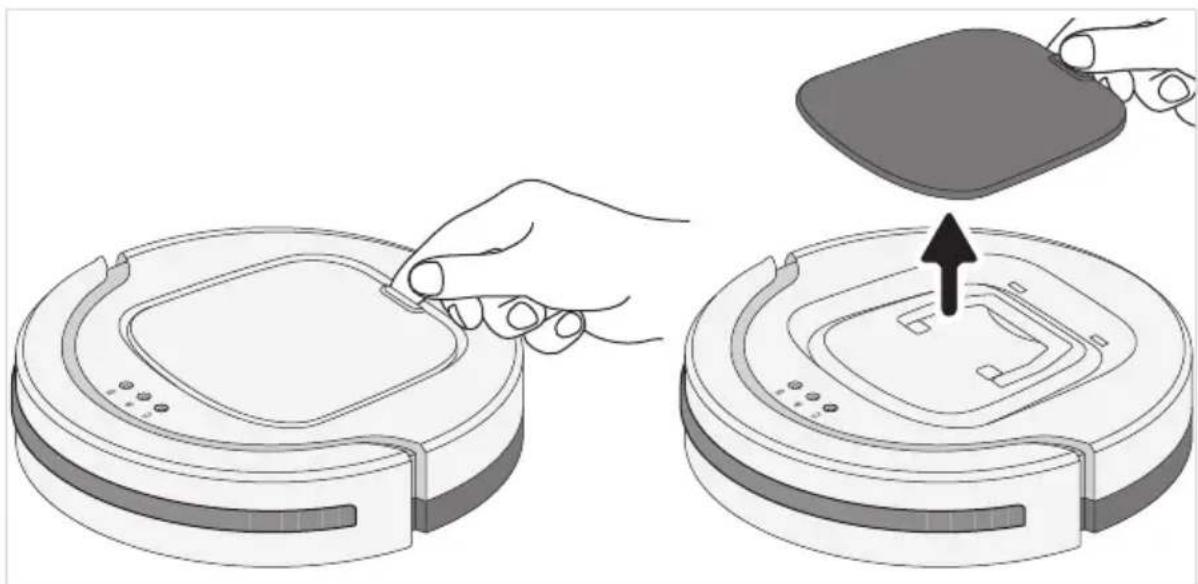
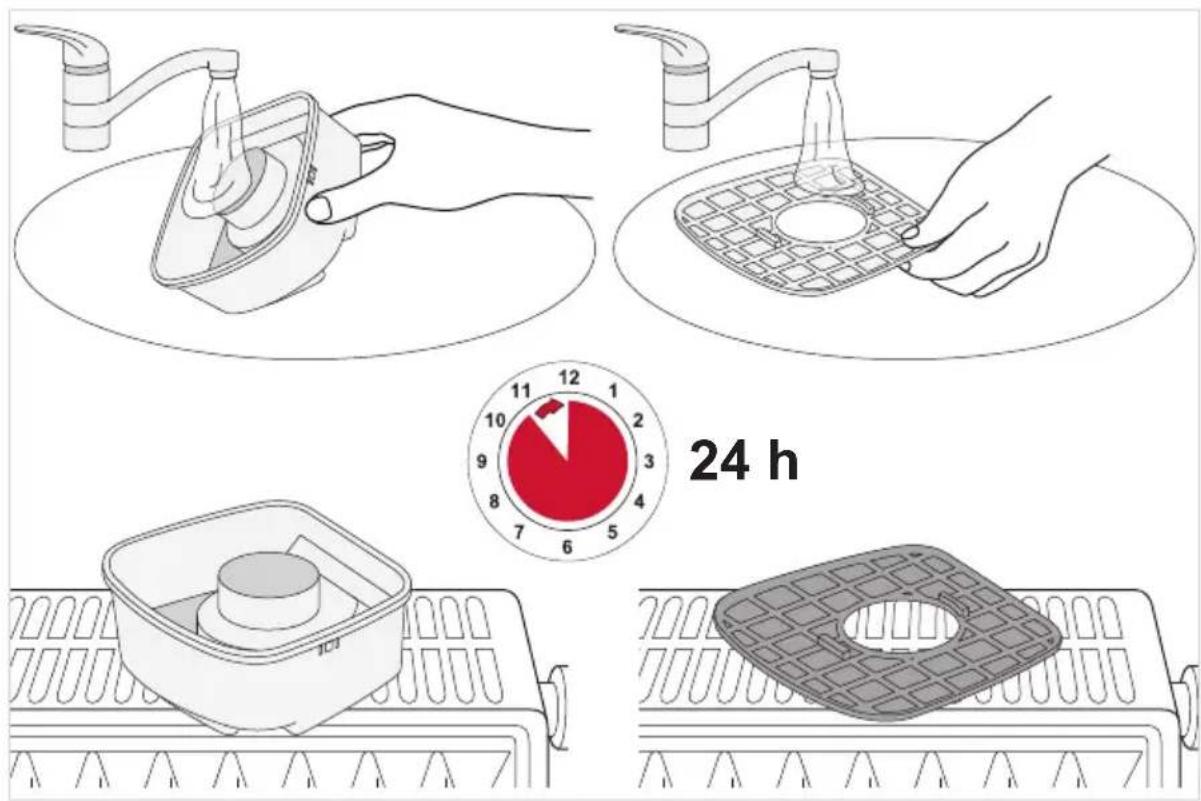
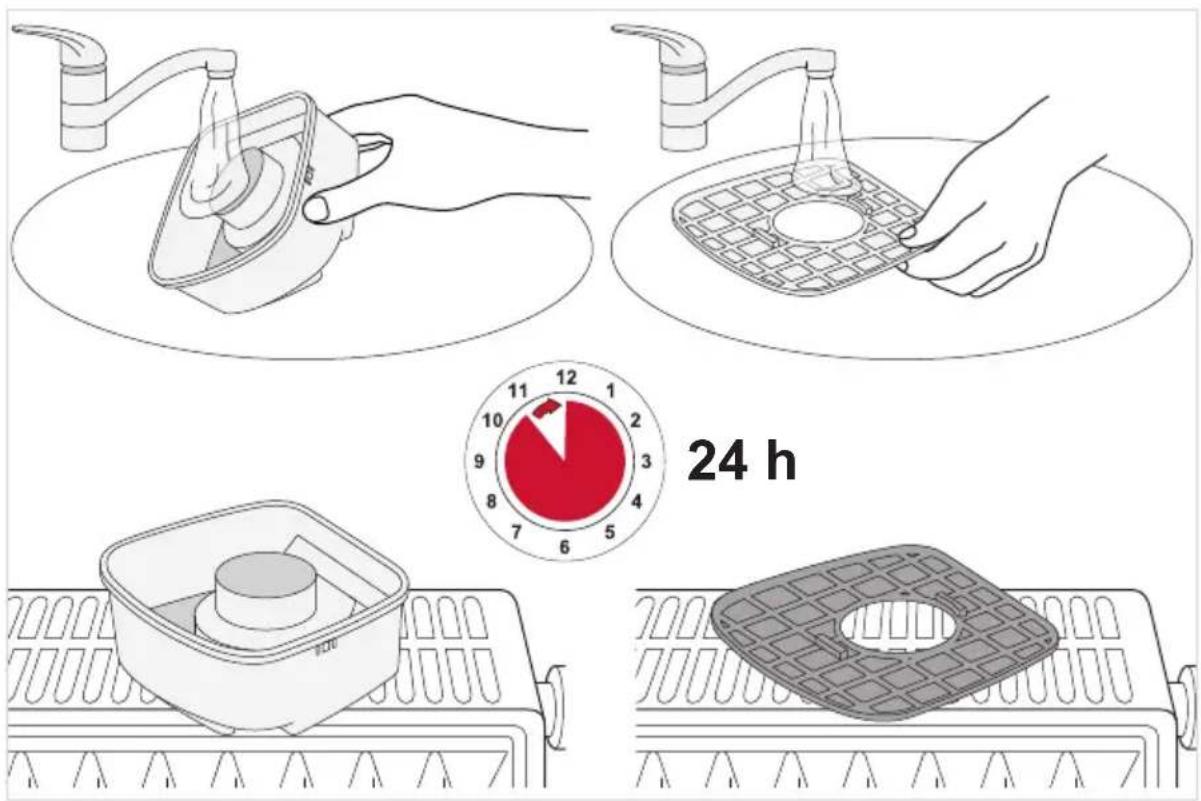
Emptying the dust container
- Make sure that the appliance is switched off and the mains adapter is not connected.
- Remove the cover (see figure).
natural_image
Illustration of a robotic vacuum cleaner being placed on its back panel, showing the handle and mode (no text or symbols present)- Use the handle to lift the dust container out of the appliance (see figure left).
- Remove the dust container cover (see figure right).
natural_image
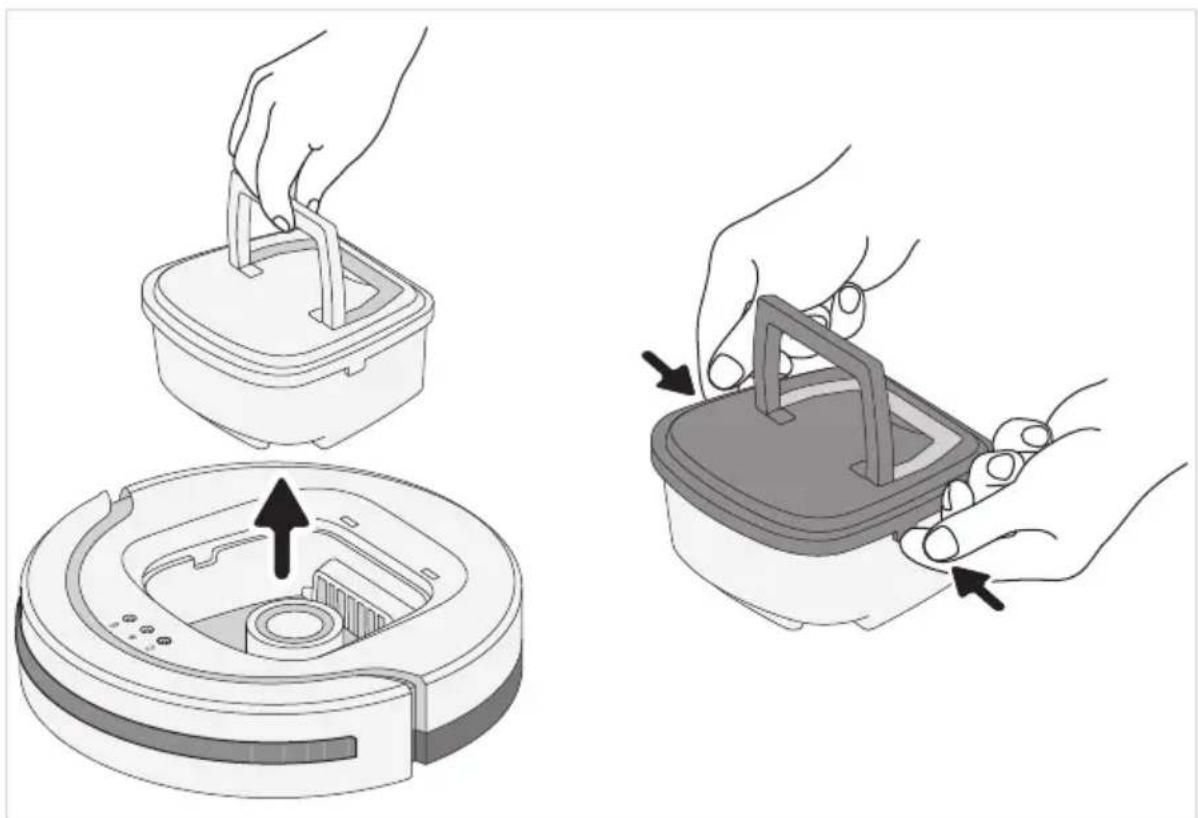
Illustration showing two steps of a robotic vacuum cleaner's internal structure, with arrows indicating the process (no text or symbols present)Emptying the dust container
- Remove the filter upwards from the dust container (see figure left).
TIP: It is recommended that you use a vacuum cleaner for this.
The vacuum cleaner will take up any escaping dust directly and also clean the filter efficiently.
- Empty the dust container and clean of coarse dust together with the filter (see details).
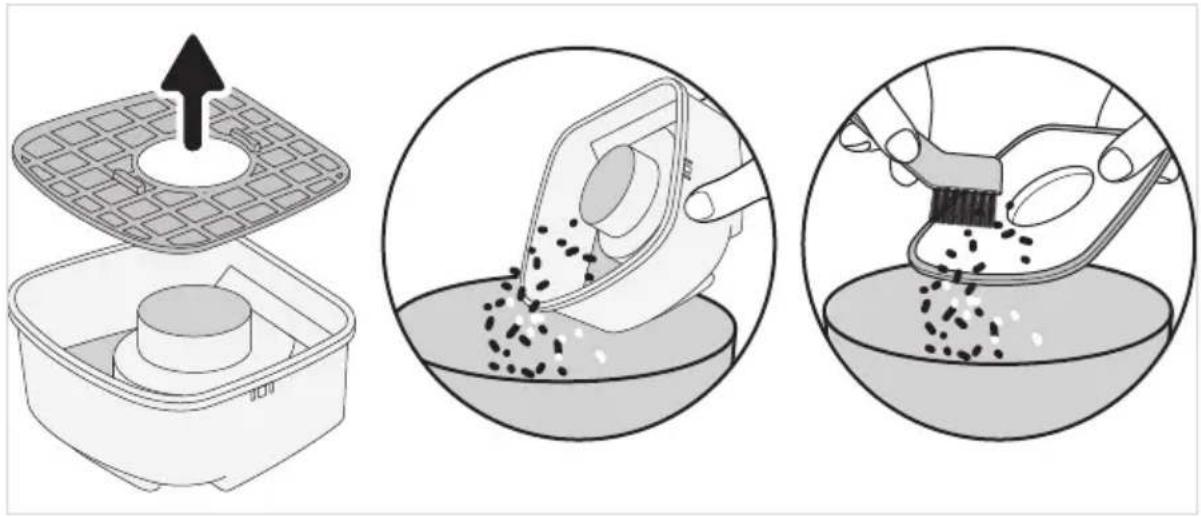
If necessary, wet-clean the dust container and filter:

Cleaning the appliance
Cleaning the drop sensors
In the event of severe contamination, the drop sensors on the bottom of the appliance need to be cleaned.
- Make sure that the appliance is switched off and the mains adapter is not connected.
- Turn the appliance around.
- Wipe down all three drop sensors with a clean, lint-free cloth (see figure).
natural_image
Illustration of a hand using a tool to adjust or install a mechanical component (no text or symbols visible)Cleaning the round brushes
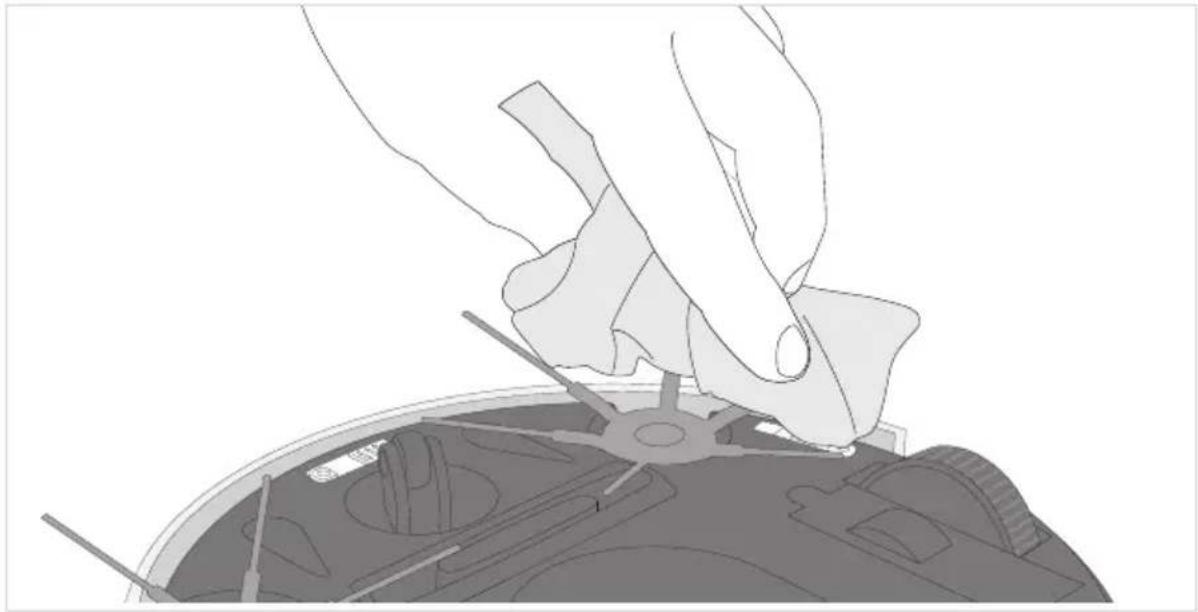
If the round brushes no longer turn correctly, they need to be cleaned.
- Make sure that the appliance is switched off and the mains adapter is not connected.
- Turn the appliance around.
- Remove the round brushes.

natural_image
Illustration of hands using a tool to adjust or install a mechanical component, with an upward arrow indicating the process (no text or symbols present)- Free the round brushes of dirt. If necessary, carefully use tweezers for this.
Using the table below, check whether you can remedy the problem:
| Problem Possible cause/Remedy | |
| Appliance cannot be switched on. | Rechargeable battery is completely discharged.Switch off the appliance (position "0") and charge rechargeable battery, ▷page 26, “Recharging the rechargeable battery”. |
| Appliance was switched on during charging (position "I").Use the on/off switch to switch the appliance off (position "0") and then on again (position "I"). The appliance then starts up. | |
| Cover was removed while the appliance was still switched on.Use the on/off switch to switch the appliance off (position "0") and then on again (position "I"). The appliance then starts up. | |
| Cover is not fitted correctly. Switch off the appliance (position "0") and put the cover on again. | |
| LED " lights up red. | Rechargeable battery must be charged.Switch off the appliance (position "0") and charge rechargeable battery, ▷page 26, “Recharging the rechargeable battery”. |
| The drop sensors are set unevenly.Set all 3 drop sensors to the same level, ▷page 27, “Adjusting appliance for floor”. | |
| Drop sensors are not set correctly.Adjust the drop sensors to the brightness of the floor and step height, ▷page 27, “Adjusting appliance for floor”. | |
| Drop sensors are contaminated.Clean the drop sensors, ▷page 31, “Cleaning the drop sensors”. | |
| Appliance is not in contact with the floor.Place appliance on the floor. It now begins to clean right away. | |
| LED " lights up red. | Dust container is too full or filter is soiled.Switch off the appliance (position "0") and ▷page 29, "Emptying the dust con-tainer". |
| In the suction inlet (on the underside of the device) there are 2 sensors which respond when the suction inlet is heavily soiled.If this is the case, clean the suction inlet, for example, with a vacuum cleaner. | |
| The cover (over the dust bin, see ▷page 29, "Emptying the dust container") has not been fitted or has not been fitted correctly.Make sure that the cover is refitted properly again, for example, after emptying the dust bin. | |
| The cover may be slightly damaged, preventing a full contact between the cov-er and the device.If this is the case, contact customer service department (▷page 207, "Service Centres"). | |
| Appliance switches on but only moves backwards. | The slider for setting the sensitivity of the sensors is on a setting for light floors, while the appliance is being used on a dark floor.Adjust setting of the slider for the setting of the sensitivity of the sensors, ▷page 27, "Adjusting appliance for floor". |
| Appliance stops of its own accord. | Rechargeable battery must be charged.Switch off the appliance (position "0") and charge rechargeable battery, ▷page 26, "Recharging the rechargeable battery". |
| Appliance is stuck. | Help the appliance manually by giving it a push. |
| Appliance does not move in straight lines directly after it is switched on. | It is possible that dirt is preventing one of the wheels from moving freely.Free wheel of dirt. If necessary, carefully use a scissors or tweezers for this. |
| One of the round brushes no longer turns. | It is possible that dirt is preventing this round brush from moving freely.Clean the round brushes, ▷page 31, "Cleaning the round brushes". |
| Appliance can-not be charged. | Mains adapter is not plugged in correctly.Check whether the mains adapter or adapter plug is seated properly in the out-let (▷page 26, "Recharging the rechargeable battery"). |
Troubleshooting
Problem Possible cause/Remedy
Operating duration is becoming ever shorter.
It is possible that dirt is preventing the wheels from moving freely. Free wheels of dirt. If necessary, carefully use a scissors or tweezers for this.
If you cannot solve the problem using the table above, call our Service hotline (see appendix to this instruction manual).
Together with our trained service employees, we are sure to find a solution.
Acessories and warranty
Ordering spare parts and accessories
For spare parts and accessories, please contact our customer service department. Contact details can be found in the appendix to this instruction manual and on our homepage.
Item number Content
6232048 Round brushes, set of 4
5248048 Cleaning set (filter + cleaning brush)
Warranty
The legal warranty rights with respect to the seller and any seller warranties are unaffected by the following warranty conditions.
If repair should be necessary, contact our customer service via telephone or mail. The contact data is in the appendix to this instruction manual. In case of warranty claim, contact the dealer directly. In addition, SEVERIN grants a manufacturer's warranty of two years from the purchase date. In this period, we will eliminate all defects due to material or manufacturing errors and which compromise the function. Other claims are excluded.
Excepted from the warranty are: Damage that is due to non-observance of the instruction manual, improper handling or normal wear; also easily-breakable parts such as glass, plastic or LEDs. Excepted from the warranty are also the batteries and rechargeable batteries, which as a consequence of normal wear or improper handling have become defective or whose run-time has shortened.
Intervention of people not authorised by SEVERIN voids the warranty.
Disposal
Removing the rechargeable battery
- Make sure that the appliance is switched off and the mains adapter is not connected.
- Turn appliance carefully upside down so that the underside is accessible.
- Remove the rechargeable battery cover.
- Disconnect rechargeable battery as shown (see detail).

- Remove rechargeable battery from compartment (see figure).
- Push rechargeable battery cover on forcefully until it audibly snaps in.
The rechargeable battery and appliance must now be disposed of separately from one another,
▶ chapter „Disposing of the appliance and rechargeable battery“.
Disposing of the appliance and rechargeable battery
natural_image
Symbol of a trash bin crossed with no text or labels, representing waste sorting or disposal (no text present)Appliances and rechargeable batteries that are marked with this symbol must be disposed of separately from household garbage. Appliances and rechargeable batteries contain valuable raw materials that can be recycled. Proper disposal protects the environment and the health of your fellow men. Dispose of the appliance and the removed rechargeable battery separately in the appropriate collection locations.
Spoštovani kupec,
1 Robotski sesalnik CHILL
2 Okrogle krtače
3 Nadomestne okrogle krtače
4 Akumulatorska baterija
5 Čistilna ščetka
6 Napajalnik
7 Nadomestni filter
– Ni prikazano na sliki: navodila za uporabo
Polnjenje akumulatorske baterije
Napotek:
natural_image
Illustration showing a hand inserting electrical socket into a cable, with a magnified inset highlighting the component (no text or symbols present)natural_image
Illustration showing a hand inserting a switch into an electrical socket, with no visible text or symbols.NAPOTEK: Če robot na temnem podu neprekinjeno vozi nazaj, izberite položaj „3“.
Čiščenje prostora
natural_image
Close-up of a finger pressing a button on a wall-mounted device (no text or symbols visible)- Napravo postavite na sredino prostora, ki ga želite očistiti.
- Napravo vključite s stikalom za vklop/izklop (položaj „l“ – glejte podrobnost).
natural_image
Illustration of a robotic vacuum cleaner being placed on top, showing the device's interior and base (no text or symbols present)- Posodo za prah privzdignite iz naprave s prijemom za ročaj (glejte sliko na levi).
- Snemite pokrov posode za prah (glejte sliko na desni).

natural_image
Illustration showing two steps of a robotic vacuum cleaner's internal structure, with arrows indicating the process (no text or symbols present)natural_image
Three-step illustration showing a food preparation procedure: adding a grid plate, pouring granular material into a bowl, and using a brush to remove granular material in a bowl (no text or symbols)Posodo za prah in filter po potrebi zmočite:
Čiščenje naprave
natural_image
Illustration of a hand using a tool to adjust or install a mechanical component, with no visible text or symbols.natural_image
Illustration of hands assembling a mechanical component with a black arrow indicating the process (no text or symbols present)- Odstranite umazanijo z okroglih krtač. Po potrebi previdno uporabite pinceto.
natural_image
Symbol of a trash bin crossed with no text or numbers, representing waste sorting or disposal (no text present)natural_image
Illustration showing a hand inserting electrical socket into a cable, with a magnified inset highlighting the component (no text or symbols present)natural_image
Illustration showing a hand inserting a switch into an electrical socket, with no visible text or symbols.natural_image
Close-up of a finger pressing a button on a device (no text or symbols visible)natural_image
Illustration of a robotic vacuum cleaner being placed on top of its base, with a hand adjusting the component (no text or symbols present)natural_image
Illustration of two hands installing a vacuum cleaner into a circular device, showing internal components and mounting mechanism (no text or symbols)natural_image
Illustration of a hand using a tool to adjust or install a mechanical component, with no visible text or symbols.natural_image
Illustration of hands using a tool to adjust a mechanical component, with an upward arrow indicating motion (no text or symbols present)natural_image
Symbol of a trash bin crossed with no visible text or labelsnatural_image
Illustration showing a hand inserting electrical outlets into a cable, with a magnified inset highlighting the connection (no text or symbols present)natural_image
Illustration showing a hand inserting a switch into an electrical socket, with no visible text or symbols.natural_image
Close-up of a finger pressing a button on a device (no text or symbols visible)flowchart
graph TD
    A["Square with directional arrows and arrows"] --> B["Converging Spiral"]
    B --> C["Converging Square with Arrow"]
    C --> D["Converging Spiral with Arrow"]
    D --> E["Converging Spiral with Arrow"]
natural_image
Illustration of a robotic vacuum cleaner being placed on top, showing the device's interior and base (no text or symbols present)natural_image
Illustration showing two steps of a robotic vacuum cleaner's internal structure, with arrows indicating the process (no text or symbols present)Portartály ürítése
natural_image
Illustration of a hand using a tool to adjust or install a mechanical component, with no visible text or symbols.Körkefék tisztítása
natural_image
Illustration of hands assembling a mechanical component with a black arrow indicating the process (no text or symbols present)natural_image
Symbol of a trash bin crossed with diagonal lines and a blank rectangular block below (no text or labels)1 Vysávací robot CHILL
2 Okrúhle kefy
3 Náhradné okrúhle kefy
4 Akumulátor
natural_image
Illustration showing a hand inserting electrical socket into a cable, with a magnified inset highlighting the socket connection (no text or symbols present)natural_image
Illustration showing a hand inserting a socket into an electrical outlet, with no visible text or symbols.TIP: Ked' robot trvalo cúva na tmavých podlahách, zvol'te nastavenie „3“.
natural_image
Close-up of a finger pressing a button on a device (no text or symbols visible)natural_image
Illustration of a robotic vacuum cleaner being placed on its back panel, showing the handle and mode (no text or symbols present)natural_image
Illustration of two hands installing a robotic vacuum cleaner into a circular device (no text or symbols present)natural_image
Illustration of a hand using a tool to adjust or install a mechanical component, with no visible text or symbols.Čistenie okrúhlych kief
natural_image
Illustration of hands using a tool to adjust a mechanical component (no text or symbols visible)natural_image
Symbol of a trash bin crossed with no text or labels, representing waste sorting or disposal (no text present)natural_image
Illustration showing a hand inserting a wall socket into a cable, with an arrow pointing to the socket (no text or symbols present)natural_image
Illustration showing a hand inserting a power socket into a device, with no visible text or symbols.natural_image
Close-up of a finger pressing a button on a device (no text or symbols visible)flowchart
graph TD
    A["Initial State with Arrows and Dashed Path"] --> B["Repeating Spiral"]
    B --> C["Repeating Square with Arrow"]
    C --> D["Repeating Spiral with Arrow"]
natural_image
Illustration of a robotic vacuum cleaner being placed on its back panel, showing the handle and control panel (no text or symbols present)natural_image
Illustration showing two steps of a robotic vacuum cleaner's internal structure, with arrows indicating the process (no text or symbols present)natural_image
Illustration of a hand using a tool to cut or mark a mechanical component, no text or symbols presentnatural_image
Illustration of hands holding a small mechanical component with an arrow indicating upward motion (no text or symbols)natural_image
Symbol of a trash bin crossed with no text or labels, representing waste sorting or disposal (no text present)1 Robot za usisavanje CHILL
2 Kružne četke
3 Rezervne kružne četke
4 Punjiva baterija
natural_image
Illustration showing a hand inserting electrical socket into a cable, with a magnified inset highlighting the component (no text or symbols present)natural_image
Illustration showing a hand inserting an electrical outlet into a device, with no visible text or symbols.- Postavite u isti položaj sva 3 senzora pada istovremeno:
SAVJET: Ako se robot na tamnim podovima stalno kreće unatrag, odaberite postavku „3”
Čišćenje prostorije
natural_image
Close-up of a finger pressing a button on a device (no text or symbols visible)natural_image
Illustration of a robotic vacuum cleaner being placed on its back panel, showing the handle and mode (no text or symbols present)- Podignite spremnik za prašinu iz uređaja držeći ga za ručku (pogledajte sliku lijevo).
- Skinite poklopac spremnika za prašinu (pogledajte sliku desno).

natural_image
Illustration of two hands installing a robotic vacuum cleaner into a circular device (no text or symbols present)Pražnjenje spremnika za prašinu
- Izvadite filtar prema gore iz spremnika za prašinu (pogledajte sliku lijevo).
Po potrebi mokro očistite spremnik za prašinu i filtar:
Čišćenje uređaja
natural_image
Illustration of a hand using a tool to adjust or install a mechanical component, with no visible text or symbols.natural_image
Illustration of hands using a tool to adjust a mechanical component, with an upward arrow indicating the process (no text or symbols present)- Uklonite prljavštinu s kružne četke. U tu svrhu po potrebi oprezno koristite pincetu.
- Izvadite punjivu bateriju iz pretinca za punjivu bateriju (pogledajte sliku).
- Snažnim potezom ponovno postavite poklopac pretinca za punjivu bateriju tako da se čujno i osjetno aretira.
natural_image
Symbol of a trash bin crossed with a diagonal line and a horizontal bar below (no text or labels)Uređaje i punjive baterije označene ovim simbolom potrebno je zbrinjavati odvojeno od kućanskog otpada! Uređaji i punjive baterije sadrže vrijedne sirovine koje se mogu reciklirati. Propisno zbrinjavanje štiti okoliš i zdravlje Vaših bližnjih. Uređaj i izvađenu punjivu bateriju zasebno predajte na zbrinjavanje na odgovarajućim prikupljalištima.
Gentile cliente,
natural_image
Illustration showing a hand inserting electrical outlets into a cable, with a magnified inset highlighting the junction (no text or symbols present)natural_image
Illustration showing a hand inserting a socket into a device, with no visible text or symbols.natural_image
Close-up of a finger pressing a button on a device (no text or symbols visible)natural_image
Illustration of a robotic vacuum cleaner being placed on its back panel, showing the handle and mode shift (no text or symbols present)natural_image
Illustration of two hands installing a robotic vacuum cleaner into a circular device (no text or symbols present)natural_image
Illustration of a hand using a tool to adjust or install a mechanical component (no text or symbols visible)natural_image
Illustration of hands assembling a mechanical component with a black arrow indicating the process (no text or symbols present)natural_image
Symbol of a trash bin crossed with no visible text or labelsnatural_image
Illustration showing a hand inserting electrical socket into a cable, with a magnified inset highlighting the component (no text or symbols present)natural_image
Illustration showing a hand inserting a switch into an electrical socket, and a close-up of hands using a tool to adjust the circuit (no text or symbols present)natural_image
Close-up of a finger pressing a button on a device (no text or symbols visible)natural_image
Illustration of a robotic vacuum cleaner being placed on its back panel, showing the handle and mode (no text or symbols present)natural_image
Illustration of two robotic vacuum cleaner steps: adding a component to a circular base and inserting a tray into a container (no text or symbols)natural_image
Illustration of a hand using a tool to adjust or install a mechanical component, with no visible text or symbols.natural_image
Illustration of hands using a tool to adjust a mechanical component, with an upward arrow indicating motion (no text or symbols present)natural_image
Symbol of a trash bin crossed with a diagonal line and a horizontal bar below (no text or labels)natural_image
Illustration showing a hand inserting electrical socket into a cable, with a magnified inset highlighting the component (no text or symbols present)natural_image
Illustration showing a hand inserting a switch into an electrical socket, with no visible text or symbols.natural_image
Close-up of a finger pressing a button on a device (no text or symbols visible)natural_image
Illustration of a robotic vacuum cleaner being placed on its back panel, showing the handle and control panel (no text or symbols present)natural_image
Illustration showing two steps of a robotic vacuum cleaner's internal structure, with arrows indicating the process (no text or symbols present)natural_image
Illustration of a hand using a tool to adjust or install a mechanical component, with no visible text or symbols.natural_image
Illustration of hands assembling a mechanical component with a black arrow indicating the process (no text or symbols present)natural_image
Symbol of a trash bin crossed with no visible text or labels1 Zuigrobot CHILL
2 Ronde borstels
3 Ronde borstels (reserve)
4 Accu
natural_image
Illustration showing a hand inserting electrical socket into a cable, with a magnified inset highlighting the component (no text or symbols present)natural_image
Illustration showing a hand inserting a socket into a device, with no visible text or symbols.natural_image
Close-up of a finger pressing a button on a device (no text or symbols visible)natural_image
Illustration of a robotic vacuum cleaner being placed on its back panel, showing the handle and mode (no text or symbols present)natural_image
Illustration of two hands installing a robotic vacuum cleaner into a circular device (no text or symbols present)Stofreservoir legen
Indien nodig stofreservoir en filter nat reinigen:

Apparaat reinigen
Valsensoren reinigen
natural_image
Illustration of a hand using a tool to adjust or install a mechanical component, with no visible text or symbols.Ronde borstels reinigen
natural_image
Illustration of hands using a tool to adjust a mechanical component, with an upward arrow indicating the process (no text or symbols present)natural_image
Symbol of a trash bin crossed with no text or labels, representing environmental restriction (no text present)1 Angel Kanchev, 5th floor
1000 Sofia, Bulgaria
Tel.: +359 2 973 11 31, 973 55 33
Fax: +359 2 944 96 49
E-Mail: vihra.koleva@pirita.bg
Danmark
F&H of Scandinavia A/S
Gl. Skivevej 70
DK-8800 Viborg
Tel.: +45 8928 1300
Fax: +45 8928 1301