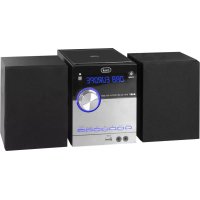
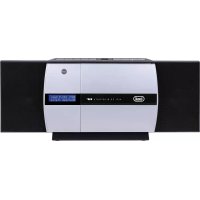
MCX 1021 USB - Hi-fi system Trevi - Free user manual and instructions
Find the device manual for free MCX 1021 USB Trevi in PDF.
| Product type | Stereo system with USB/SD player and AUX input |
| Brand | Trevi |
| Model | MCX 1021 USB |
| Power supply | 230V AC, 50 Hz |
| Maximum output power | 8 W + 8 W |
| Main unit dimensions | 111 x 160 x 200 mm |
| Speaker dimensions | 100 x 160 x 200 mm |
| FM radio | Yes, band 87.5 - 108 MHz |
| USB/SD card player | Yes, MP3 and WMA formats |
| Auxiliary input (AUX IN) | Yes, 3.5 mm jack socket |
| Sound settings | Bass, treble, equalizer with 11 presets |
| Remote control | Yes, with AAA batteries (not included) |
| Playback functions | Repeat (ONE/ALL), intro, random, pause, stop |
| Radio station search | Automatic (memory up to 30 stations) and manual |
| Maintenance and cleaning | Soft slightly damp cloth, avoid solvents and abrasives |
| Safety | Do not expose to heat, humidity, dust, vibrations; leave 5 cm ventilation space |
| Repairability | TREVI authorized service center |
| Number of pages of the manual | 28 |
| Available languages | FR, DE, EN, ES, IT, PT, and others |
Frequently Asked Questions - MCX 1021 USB Trevi
User questions about MCX 1021 USB Trevi
0 question about this device. Answer the ones you know or ask your own.
Ask a new question about this device
Download the instructions for your Hi-fi system in PDF format for free! Find your manual MCX 1021 USB - Trevi and take your electronic device back in hand. On this page are published all the documents necessary for the use of your device. MCX 1021 USB by Trevi.
USER MANUAL MCX 1021 USB Trevi
STEREO SYSTEM WITH USB/SD/AUX IN Instruction manual
This is a precision electronic appliance; avoid using it in the following cases:
- Near strong heat sources, such as central heating plants or stoves.
- In very humid places such as bathrooms, swimming pools, etc.
- In very dusty places.
- In places subject to strong vibrations.
- Position the appliance in such a way that there is always enough room for free air circulation (at least 5 cm).
- Do not block the air inlets.
If any liquid enters the appliance, unplug it immediately from the socket and take it to the nearest TREVI authorised service centre. - Before switching on the appliance, always check that the power cable and the connection cable are properly installed.
CARE AND MAINTENANCE
Use a slightly damp soft cloth for cleaning. Do not use solvents and abrasive substances.
IMPORTANT
This appliance has been carefully built to ensure long-lasting perfect performance. However, should any inconvenience occur, please contact your local authorised TREVI Service Centre.
TREVI follows a policy of ongoing research and development. Therefore products may have different features from those described.
DESCRIPTION OF CONTROLS
- MUTE key
2.AUX-IN input - VOLUME selector
- SD/MMC card slot
- FUNCTION key
- USB port
- SCAN- key
- SCAN+ key
- / -key
- CH+ key
- / PLAY/PAUSE key, playback/pause
- Speakers
- Power-on key
- Display
- FM antenna input
- Right speaker output
- Left speaker output
REMOTE CONTROL DESCRIPTION
- POWER key
- Numeric keypad
- MUTE function key
- 5/CH+key
- / SEEK-key
- /II PLAY/PAUSEkey
- PREV key
- STOP key
- AUTO key
- BASS key
- TREBLE key
- MODE key
- EQ key
- REPEAT key
- / SEEK+ key
- / CH -key
- NEXT key
- SAVE key
- VOL- key
- VOL+ key
USING THE REMOTE CONTROL
- Insert 2 AAA batteries (not supplied) making sure you respect the polarity and the indications inside the battery compartment.
- The remote control must be pointed at the infrared signal receiver at a maximum radius of 60^ within a maximum distance of 5 metres.
In order to prevent leakage of liquids from the batteries and subsequent damages to the remote control, ensure that the batteries are installed correctly and that you do not use different kinds of batteries (old with new, alkaline with zinc-carbon, etc.).
Remove the batteries from the remote control if it is not used for long periods of time.
INSTALLATION AND CONNECTION
Connect the RCA plug of the speakers cable to the output socket of the right (16) and left (17) speaker.
Plug the FM antenna into the FM antenna input socket (15).
POWER SUPPLY
CONNECTING TO THE MAINS SUPPLY
Fit the plug into an AC 230V - 50Hz socket. Do not plug the appliance to different power.
Unless otherwise specified, the controls description applies to both the appliance and the remote control.
ON/OFF SWITCHING
- Press the main ON/OFF key (13).
- Press the main ON/OFF key again to switch the appliance off.
STANDBY
- When the appliance is on, press the POWER key (1) of the remote control to activate the standby function.
- Press the POWER key (1) again to resume the appliance from the standby mode.
VOLUME CONTROL AND MUTE FUNCTION
It is possible to control the volume from the appliance by using the volume control (3) or from the remote control with the VOL+ (20) e VOL- (19) keys, with a range of 0 to 36. While adjusting the volume, the display will show the level of the selected volume. MUTE function: it is possible to activate the audio off function with the MUTE key (1) or with the MUTE key (3) on the remote control. To switch the audio on, press the MUTE key again.
RADIO FUNCTION
- Switch the appliance on and press the FUNCTION key (5) on the appliance or the MODE key (12) on the remote control until the FM icon is displayed.
- In order to tune and store automatically, use the / (11) key on the appliance or the AUTO key (9) on the remote control. The appliance will automatically scan all the available radio stations and will store up to a maximum of 30 stations; in order to recall the stored stations, press the CH + (10) or CH- (9) keys.
- Adjust the volume using the VOLUME control (3) or using the VOL+ (20) and VOL- (19) keys on the remote control.
- In order to perform a manual search, use the SCAN+ (8) and SCAN- (7) keys, holding them will cause the appliance to tune on the first strong signal, pressing them once will allow you to perform a step by step tuning, with frequency variations of 0.10MHz. You can perform the same actions by using the SEEK+ (15) and SEEK- (5) keys on the remote control.
You can save the radio station by using the SAVE key (18):
- Press the SAVE key (18). A number will start blinking on the display.
- With the CH + (4) and CH- (16) keys on the remote control, select the memory number that you want to use to store the station.
- Press the SAVE key (18) again.
NOTES
To obtain the best reception in FM, extend and orient the antenna. If the reception is bad, try adjusting the length and orientation of the antenna. However, the reception quality depends very much on where the appliance is placed.
- Make sure that an SD memory card is inserted in the SD/MMC slot (4) or a USB device is inserted in the USB port (6).
- Switch the appliance on and press the FUNCTION key (5) on the appliance or the MODE key (12) on the remote control until the CARD icon is displayed if you want to read the SD card or the USB icon if you want to read from a USB device.
- After a few seconds the reader will automatically start playing the detected audio tracks (MP3 or WMA).
- Press the / key (11) to pause.
- To disable the pause, press once again the / II key (11).
- To stop playback using the remote control, press the STOP key (8).
DIRECT TRACK SELECTION
In order to directly select a track, use the numeric keypad of the remote control (2):
- Press the number of the desired track.
- The reader will automatically play the selected track.
TRACKSKIP
- Pressing the key (10) during playback to skip to the next track, while the key (9) will allow you to go back to the previous track.
- Press and hold the key (10) or the key (9) during playback for a fast search for a special section of the track.
- Release the key to return to normal playback mode.
REPLAY A SINGLE TRACK, ALL THE TRACKS, INTRO AND RANDOM FUNCTIONS
By pressing the REPEAT key (14) more than once on the remote control, you can activate the following functions:
- ONE: continuous playback of a single track (the icon is displayed).
- INTRO: playback of the first few seconds of each track (the message "int" is displayed for few seconds).
- ALL: continuous playback of all tracks (the message ALL is displayed).
- RANDOM: random playback of all tracks (the RAN icon is displayed).
By default, the appliance is set on ALL.
TREBLE AND BASS CONTROL AND EQUALISATIONS
It is possible to adjust bass and treble in the tracks you play:
- Treble: press the TREBLE key (11), the message "t" with a number that shows the level of the treble is displayed. With the VOL- (19) and VOL+ (20) keys adjust to the desired level (0 to 14 with 7 as default).
- Bass: press the BASS key (10), the message "b" with a number that shows the level of the bass is displayed. With the VOL- (19) and VOL + (20) keys adjust to the desired level (0 to 14 with 7 as default).
Different kinds of equalisation are also available:
- Press the EQ key (13) more than once to select AOC, POP, CLA, JAS, BLE, HAL, BAS, SOF, CON, OPE, NOA in this order. The default equalisation is NOA (Normal).
AUX-IN INPUT
- Connect any unit with an audio output with the specific cable to the AUX-IN input (2).
- Switch the appliance on and press the FUNCTION key (5) on the appliance or the MODE key (12) on the remote control until LINE is displayed.
- Control the external unit with its controls.
TECHNICAL FEATURES
GENERAL FEATURES
Power supply: AC 230V - 50Hz
Maximum output power: 8W + 8W
Central unit size: 111x160x200mm
Speakers size: 100x160x200mm
RADIO SECTION
Frequency bands: FM 87.5 - 108 MHz
NOTES D'EMPLOI
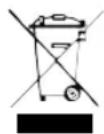
Precautions for correct disposal of the product.
The symbol shown on the equipment indicates that waste must be disposed of in "separate collection" and so the product must not be disposed of together with urban waste.
The user must take the product to special "separate waste collection centres" provided by local government, or deliver it to the retailer against the purchase of a new product.
Separate collection of waste and subsequent treatment, recycling and disposal operations promotes the production of equipment with recycled materials and limits negative effects on the environment and on health caused by improper handling of waste. Illegal disposal of the product leads to the enforcement of administrative penalties.

WARNING: DO NOT OPEN THE SET. NEITHER CONTROLS OR SPARE PARTS TO BE USED BY THE USER ARE TO BE FOUND INSIDE IT. APPLY TO AUTHORISED TREVI CENTERS FOR SERVICE OPERATIONS.
ATTENTION: NE PAS OUVRIR L'APPAREIL, A L'INTERIEUR IL N'Y A PAS DE COMMANDES AMIPULER PAR L'UTILISATEUR OU DE PIECES DE RECHANGE. POUR TOUTES LES OPÉRATIONS DE SERVICE IL FAUT S'ADRESSER A UN SERVICE D'ASSISTANCE AUTORISE TREVI.
ACHTUNG: DAS GERAT NICT ÖFFNEN. IM INNERN BEFINDEN SICH KEINE VOM BENUTZ SERIALBIST INSTANSETZBAREN TEILE UND AUCH KEINE ERSATZTEILE. FÜR JEGLICHE SERVICEARBEITEN, WENDEN SIE SICH BITTE AN EINE TREVI AUTORISIERTEM KUNDENDIENSTSTELLE.
Rimini, 29 November 2010
TREVI S.p.A.
Strada Consolare Rimini-SanMarino, 62
47924 Rimini (Rn) Italia
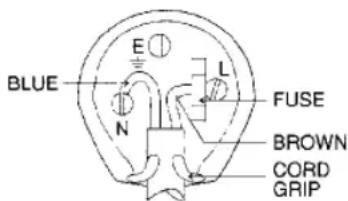
UK PLUG ONLY
WIRES CONNECTIONS TO A UK THREE-PIN PLUG
The wires in this mains lead are coloured in accordance with the following wiring codes:
Blue: Neutral
Brown: Live
The wires in this mains lead must be connected to the terminals in the plug as follows:
Blue wire: N or Black
Brown wire: L or Red
Neither wire is to be connected to the earth
(E or W) terminal of three-pin plug.
Should the fuse fail in the plug remove the plug form the wall socket and replace the fuse with a 3 Amp. ASTA approved BS 1362 fuse.


Made in CHINA