IPD 8450 T - Docking station Trevi - Free user manual and instructions
Find the device manual for free IPD 8450 T Trevi in PDF.
| Product Type | Docking station with amplified speakers, FM radio, iPod/iPhone dock, AUX input |
| Brand | Trevi |
| Model | IPD 8450 T |
| Power supply | AC 110~240V 50/60Hz |
| Maximum power consumption | 60 W |
| Standby power consumption | < 2 W |
| Maximum output power | 50 W (10 W x 2 + 30 W built-in woofer) |
| Weight | 4.3 kg |
| FM frequency band | 87.5 - 108 MHz |
| Audio inputs | LINE IN (3.5 mm jack), A/V (RCA) |
| Video outputs | Composite (RCA), Component Y/Pb/Pr |
| Subwoofer output | Yes (RCA) |
| iPod/iPhone compatibility | Most models (see included compatibility chart) |
| Main features | FM radio with 20 presets, iPod/iPhone dock with charging, shuffle and repeat playback, clock with iPod sync, sleep timer, treble and bass adjustment, remote control |
| Display | LCD with brightness adjustment (DIMMER) |
| Included accessories | 3.5 mm audio cable, 5 iPod/iPhone adapters, remote control (batteries not included) |
| Maintenance and cleaning | Soft cloth slightly damp, avoid solvents and abrasives |
| Safety | Avoid heat, moisture, dust, vibrations; leave 5 cm ventilation space; do not block slots |
Frequently Asked Questions - IPD 8450 T Trevi
User questions about IPD 8450 T Trevi
0 question about this device. Answer the ones you know or ask your own.
Ask a new question about this device
Download the instructions for your Docking station in PDF format for free! Find your manual IPD 8450 T - Trevi and take your electronic device back in hand. On this page are published all the documents necessary for the use of your device. IPD 8450 T by Trevi.
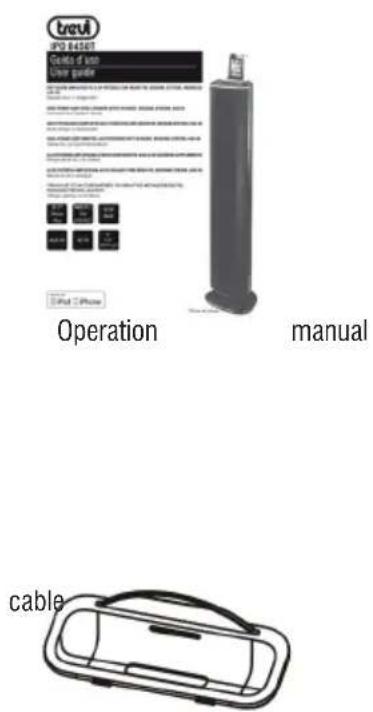
USER MANUAL IPD 8450 T Trevi
DIFFUSORE AMPLIFICATO ALTA POTENZA CON RADIO FM, DOCKING STATION, INGRESSO AUX-IN
Manuale d'uso e collegamento
HIGH POWER AMPLIFIED SPEAKER WITH FM RADIO, DOCKING STATION, AUX-IN Connection and Operation Manual
iPhone non incluso iPhone not included
NOTE D'USO
1st + 2nd generation
5GB 10GB 20GB

Made for iPod
4th generation 20GB

Made for iPod
4th generation 40GB

Made for iPod
4th generation
(color display)
20GB 30GB

Made for iPod classic 80GB 160GB (2007)

Made for iPod classic 160GB (2009)

Made for iPod nano
1st generation
1GB 2GB 4GB

Made for iPod nano
2nd generation
(aluminum)
2GB 4GB 8GB

Made for iPod touch
1st generation
8GB 16GB 32GB

Made for iPod touch
2nd generation
8GB 16GB 32GB

Made for iPod touch
3rd generation
32GB 64GB

Made for iPod touch
4th generation
8GB 32GB 64GB

Made for iPod
4th generation
(color display)
40GB 60GB

Made for iPod
5th generation
(video)
30GB

Made for iPod
5th generation
(video)
60GB 80GB

Made for iPod mini
4GB 6GB

Made for iPod nano
3rd generation
(video)
4GB 8GB

Made for iPod nano
4th generation
(video)
8GB 16GB

Made for iPod nano
5th generation
(video camera)
8GB 16GB

Made for iPod nano
6th generation
8GB 16GB

Made for iPhone
4GB 8GB 16GB

Made for iPhone 3G
8GB 16GB

Made for iPhone 3GS
8GB 16GB 32GB

Made for iPhone 4
16GB 32GB
LABELLA DI COMPATIBILITA DEI SUPPORTI
| MODELLO CAPACITÀ RIPRODUZIONE E CARICA USCITA VIDEO SUPPORTO | ||||
| iPad | ||||
| iPad | 8GB 16GB 32GB | |||
| iPhone | ||||
| iPhone 4 | 16GB 32GB | • | • | |
| iPhone 3GS | 8GB 16GB 32GB | • | • | 12 |
| iPhone 3G | 8GB 16GB | • | • | 12 |
| iPhone | 4GB 8GB 16GB | • | • | 12 |
| iPod touch | ||||
| iPod touch 4th generation | 8GB 32GB 64GB | • | • | |
| iPod touch 3rd generation | 32GB 64GB | • | • | 14 |
| iPod touch 2nd generation | 8GB 16GB 32GB 64GB | • | • | 14 |
| iPod touch 1st generation | 8GB 16GB 32GB | • | • | 14 |
| iPod nano | ||||
| iPod nano 6th generation | 8GB 16GB | • | • | |
| iPod nano 5th generation (video camera) | 8GB 16GB | • | • | 8 |
| iPod nano 4th generation (video) | 8GB 16GB | • | • | 8 |
| iPod nano 3rd generation (video) | 4GB 8GB | • | • | 13 |
| iPod nano 2nd generation (aluminum) | 2GB 4GB 8GB | • | 8 | |
| iPod nano 1st generation | 1GB 2GB 4GB | • | 8 | |
| iPod and iPod mini | ||||
| iPod classic (2009) | 120GB 160GB | • | • | 10 |
| iPod classic (2007) | 160GB | • | • | 10 |
| iPod classic | 80GB | • | • | 10 |
| iPod 5th generation (video) | 60GB 80GB | • | • | 10 |
| iPod 5th generation (video) | 30GB | • | • | 10 |
| iPod 4th generation (color display) | 40GB 60GB | • | • | |
| iPod 4th generation (color display) | 20GB 30GB | • | • | 10 |
| iPod 4th generation | 40GB | • | 10 | |
| iPod 4th generation | 20GB | • | 10 | |
| iPod mini | 4GB 6GB | • | ||
FUNZIONE RADIO
Consumo elettrico in stand-by: <2W
This is a precision electronic appliance; avoid using it in the following cases:
Near heat sources such as radiators and stoves.
- In damp areas such as bathrooms, swimming pools, etc.
In dusty areas.
In places subject to strong vibrations.
- Place the device leaving at least 5cm of clearance on each side to allow air circulation.
- Do not block air vents.
If any liquid should penetrate inside the device, immediately disconnect the power supply and bring the device to the nearest authorised TREVI service centre.
Before turning the device on, always check that the supply and connection cables have been installed correctly.
CARE AND MAINTENANCE
Clean with a slightly damp soft cloth. Do not use solvents and abrasive substances.
IMPORTANT
This appliance has been carefully built to ensure long-lasting perfect performance. However, should any inconvenience occur, please contact your local authorised TREVI Service Centre.
TREVI pursuits a constant R&D policy. Therefore, products may have different features from those described.
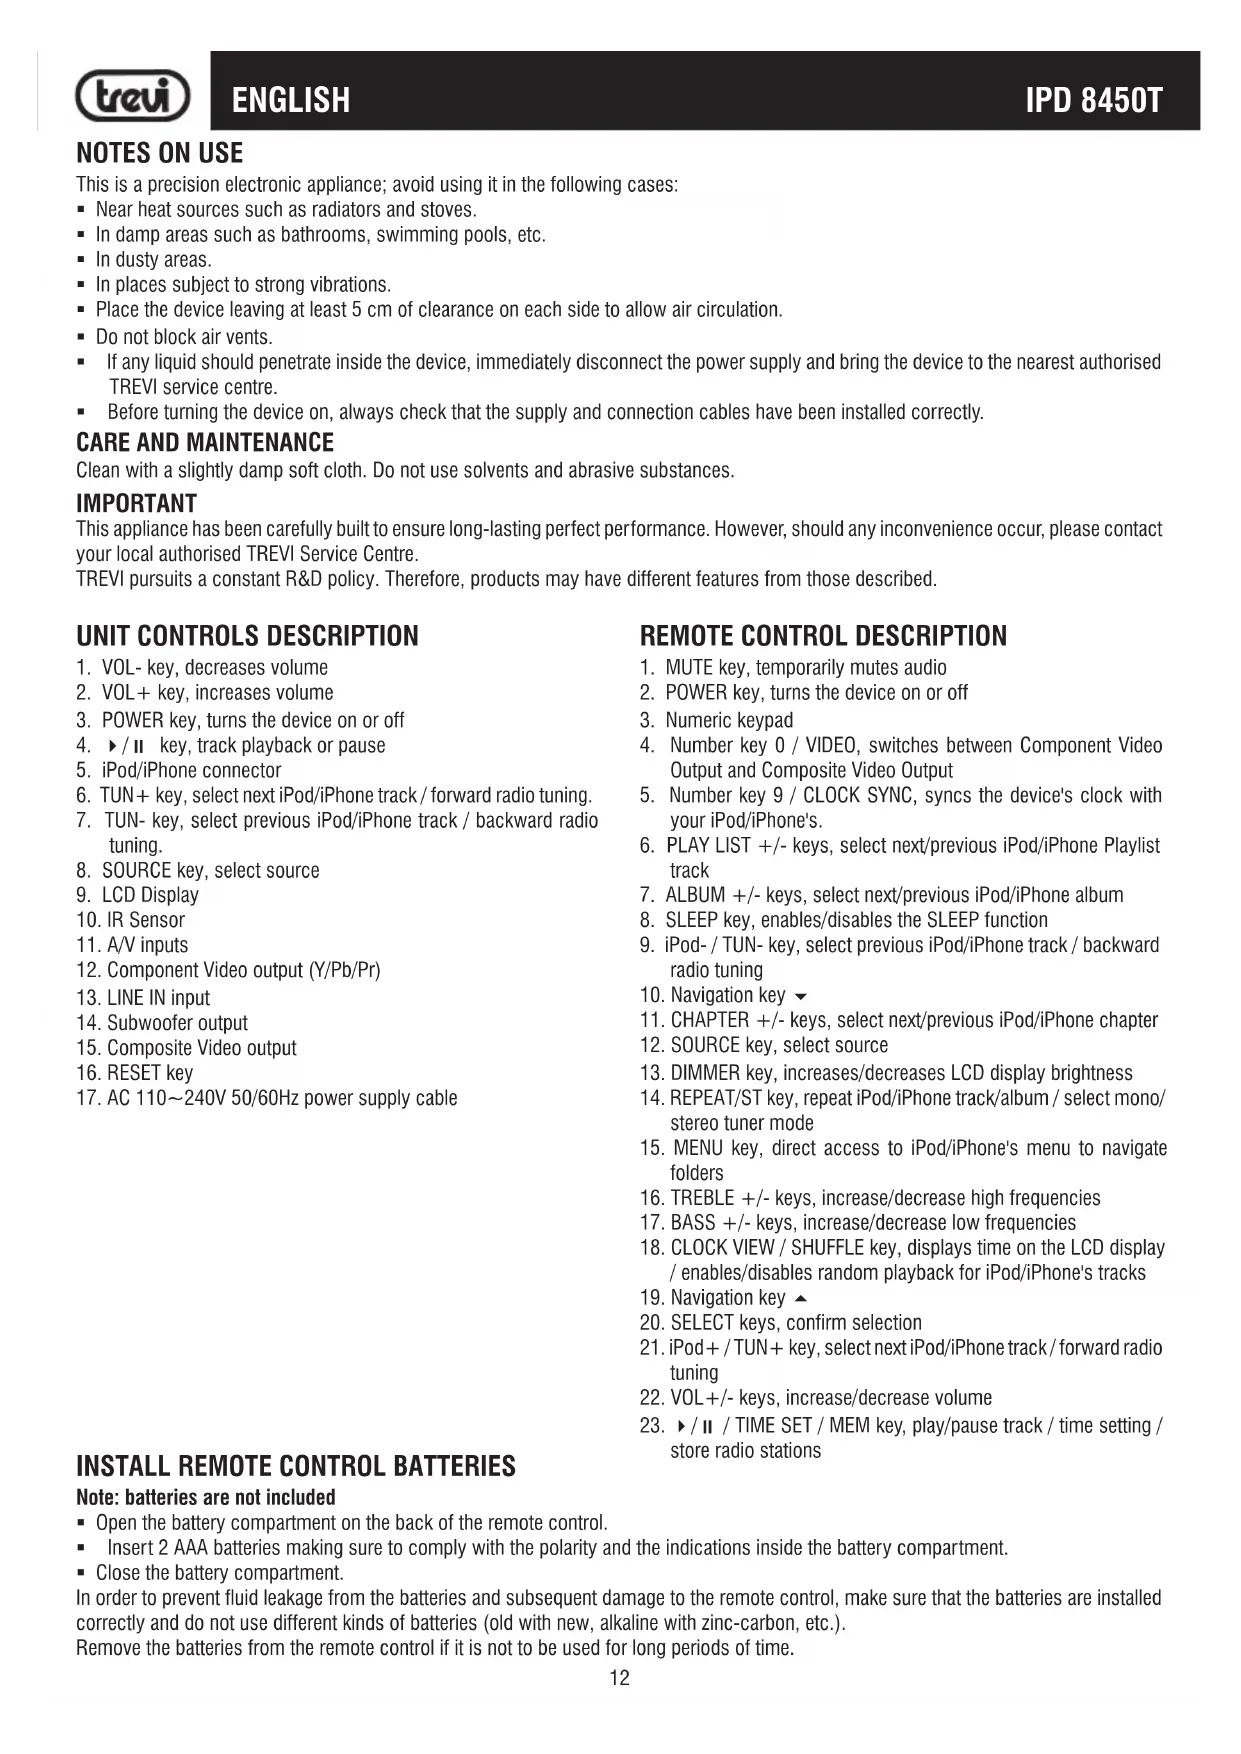
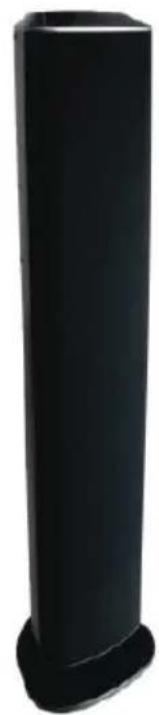
UNIT CONTROLS DESCRIPTION
- VOL- key, decreases volume
- VOL+ key, increases volume
- POWER key, turns the device on or off
- / key, track playback or pause
- iPod/iPhone connector
- TUN+ key, select next iPod/Phone track/ forward radio tuning.
- TUN- key, select previous iPod/iPhone track / backward radio tuning.
- SOURCE key, select source
- LCD Display
- IR Sensor
- A/V inputs
- Component Video output (Y/Pb/Pr)
- LINE IN input
- Subwoofer output
- Composite Video output
- RESET key
- AC 110~240V 50/60Hz power supply cable
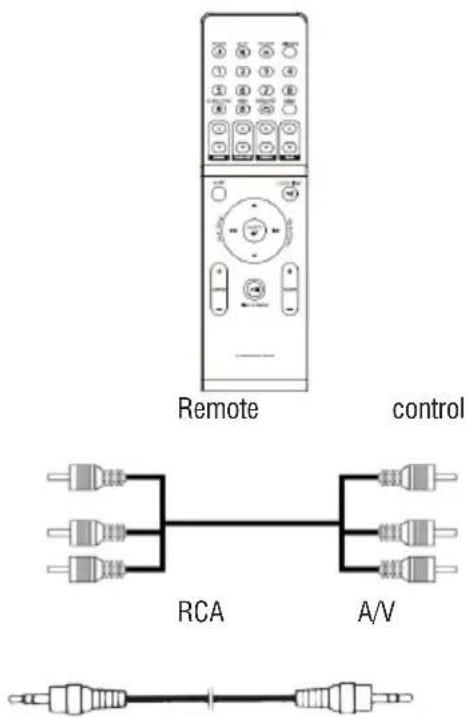
REMOTE CONTROL DESCRIPTION
- MUTE key, temporarily mutes audio
- POWER key, turns the device on or off
- Numeric keypad
- Number key 0 /VIDEO, switches between Component Video Output and Composite Video Output
- Number key 9 / CLOCK SYNC, syncs the device's clock with your iPod/iPhone's.
- PLAY LIST +/- keys, select next/previous iPod/iPhone Playlist track
- ALBUM +/- keys, select next/previous iPod/iPhone album
- SLEEP key, enables/disables the SLEEP function
- iPod-/ TUN- key, select previous iPod/iPhone track / backward radio tuning
- Navigation key
- CHAPTER +/- keys, select next/previous iPod/iPhone chapter
- SOURCE key, select source
- DIMMER key, increases/decreases LCD display brightness
- REPEAT/ST key, repeat iPod/iPhone track/album / select mono/stereo tuner mode
- MENU key, direct access to iPod/iPhone's menu to navigate folders
- TREBLE +/- keys, increase/decrease high frequencies
- BASS +/- keys, increase/decrease low frequencies
- CLOCK VIEW / SHUFFLE key, displays time on the LCD display / enables/disables random playback for iPod/iPhone's tracks
- Navigation key
- SELECT keys, confirm selection
- iPod + / TUN + key, select next iPod/iPhone track/ forward radio tuning
- VOL+/- keys, increase/decrease volume
- / / TIME SET / MEM key, play/pause track / time setting / store radio stations
INSTALL REMOTE CONTROL BATTERIES
Note: batteries are not included
- Open the battery compartment on the back of the remote control.
- Insert 2 AAA batteries making sure to comply with the polarity and the indications inside the battery compartment.
- Close the battery compartment.
In order to prevent fluid leakage from the batteries and subsequent damage to the remote control, make sure that the batteries are installed correctly and do not use different kinds of batteries (old with new, alkaline with zinc-carbon, etc.).
Remove the batteries from the remote control if it is not to be used for long periods of time.
INSTALLATION AND CONNECTIONS
LINE-IN INPUT CONNECTION
- Connect the LINE IN input (13) on the back of the speaker unit with the provided stereo jack audio cable to the stereo jack audio output of any device (MP3 player, portable CD player, ...).
AUDIO/VIDEO INPUT CONNECTION
- Connect A/V inputs (11) on the back of the speaker unit with the provided RCA cables to the A/V output of any device (Mpeg4-DVD player, Video recorder, Camera, ...). Make sure to comply with the source colour scheme: yellow for video, white for left audio output and red for right audio output.
COMPOSITEVIDEO OUTPUT CONNECTION
- Connect the Composite Video output (15) on the back of the speaker unit with a Composite Video cable (not provided) to the Composite Video input of a TV device.
COMPONENTVIDEOOUTPUT(Y/Pb/Pr)CONNECTION
- Connect the Component Video output (Y/Pb/Pr) (12) on the back of the speaker unit with a Y/Pb/Pr cable (not provided) to the Y/Pb/Pr input of a TV device. Make sure to comply with the video outputs colour scheme: green for Y, blue for Pb, red for Pr.
SUBWOOFER OUTPUT CONNECTION
- Use an RCA cable (not provided) to connect the Subwoofer output on the back of the speaker unit to the input of a powered Subwoofer or of an amplifier connected with a Subwoofer.
Unless otherwise specified, control descriptions apply both to the appliance and the remote control.
BASIC OPERATION
TURNING ON
- Connect the power supply cable (17) to an AC 110~240V 50/60Hz socket.
- Stand-by mode activates automatically (clock is displayed)
- Press the POWER key (2) to turn the speaker unit on.
- Press the POWER key again (2) to re-enter the standby mode.
VOLUME CONTROL AND MUTE FUNCTION
- Press VOL + and VOL- (22) keys to increase/decrease the speaker unit's volume.
- Press MUTE (1) to temporarily turn the audio off. Press it again to restore it.
TREBLE AND BASS CONTROL
- Press TREBLE +/- (16) to increase/decrease the high frequencies of the speaker unit.
Press BASS + / - (17) to increase/decrease the low frequencies of the speaker unit.
SOURCE SELECTION
- Press the SOURCE key (12) repeatedly to select the source: TUNER (radio), AV (A/V inputs), LINE (LINE IN input), IPOD (iPod/iPhone).
DIMMER ADJUSTMENT
- Press the DIMMER key (13) to adjust the brightness of the LCD display.
RESET
- Press the RESET key (16) to restore the factory settings in case of malfunction.
SLEEP FUNCTION
Press in sequence the SLEEP key (8) to activate automatic speaker unit's power-off. The auto power-off timer can be set on 90, 80, 70, 60, 50, 40, 30, 20, 10 minutes, otherwise select OFF to disable it. When enabled the SLEEP sign will be displayed.
CLOCK SETTING
MANUAL ADJUSTMENT
- In stand-by mode press and hold / (4) on the speaker unit or TIME SET(23) on the remote control to activate clock setting; the hours figure will start flashing.
- Using the TUN+ (6) and TUN- (7) keys on the speaker unit or TUN+ (21) and TUN- (9) on the remote control, select the hours figure and then press /II (4) on the speaker unit or TIME SET(23) on the remote control to confirm; the minutes figure will start flashing.
- Using the TUN+ (6) and TUN- (7) keys on the speaker unit or TUN+ (21) and TUN- (9) on the remote control, select the minutes figure and then press /II (4) on the speaker unit or TIME SET(23) on the remote control to confirm.
AUTOMATIC ADJUSTMENT
Once an iPod/iPhone is connected, the unit's clock will sync with the iPod/iPhone's automatically. Subsequent docking long press CLOCK SYNC (5) to sync the clock.
iPod/iPhone FUNCTION
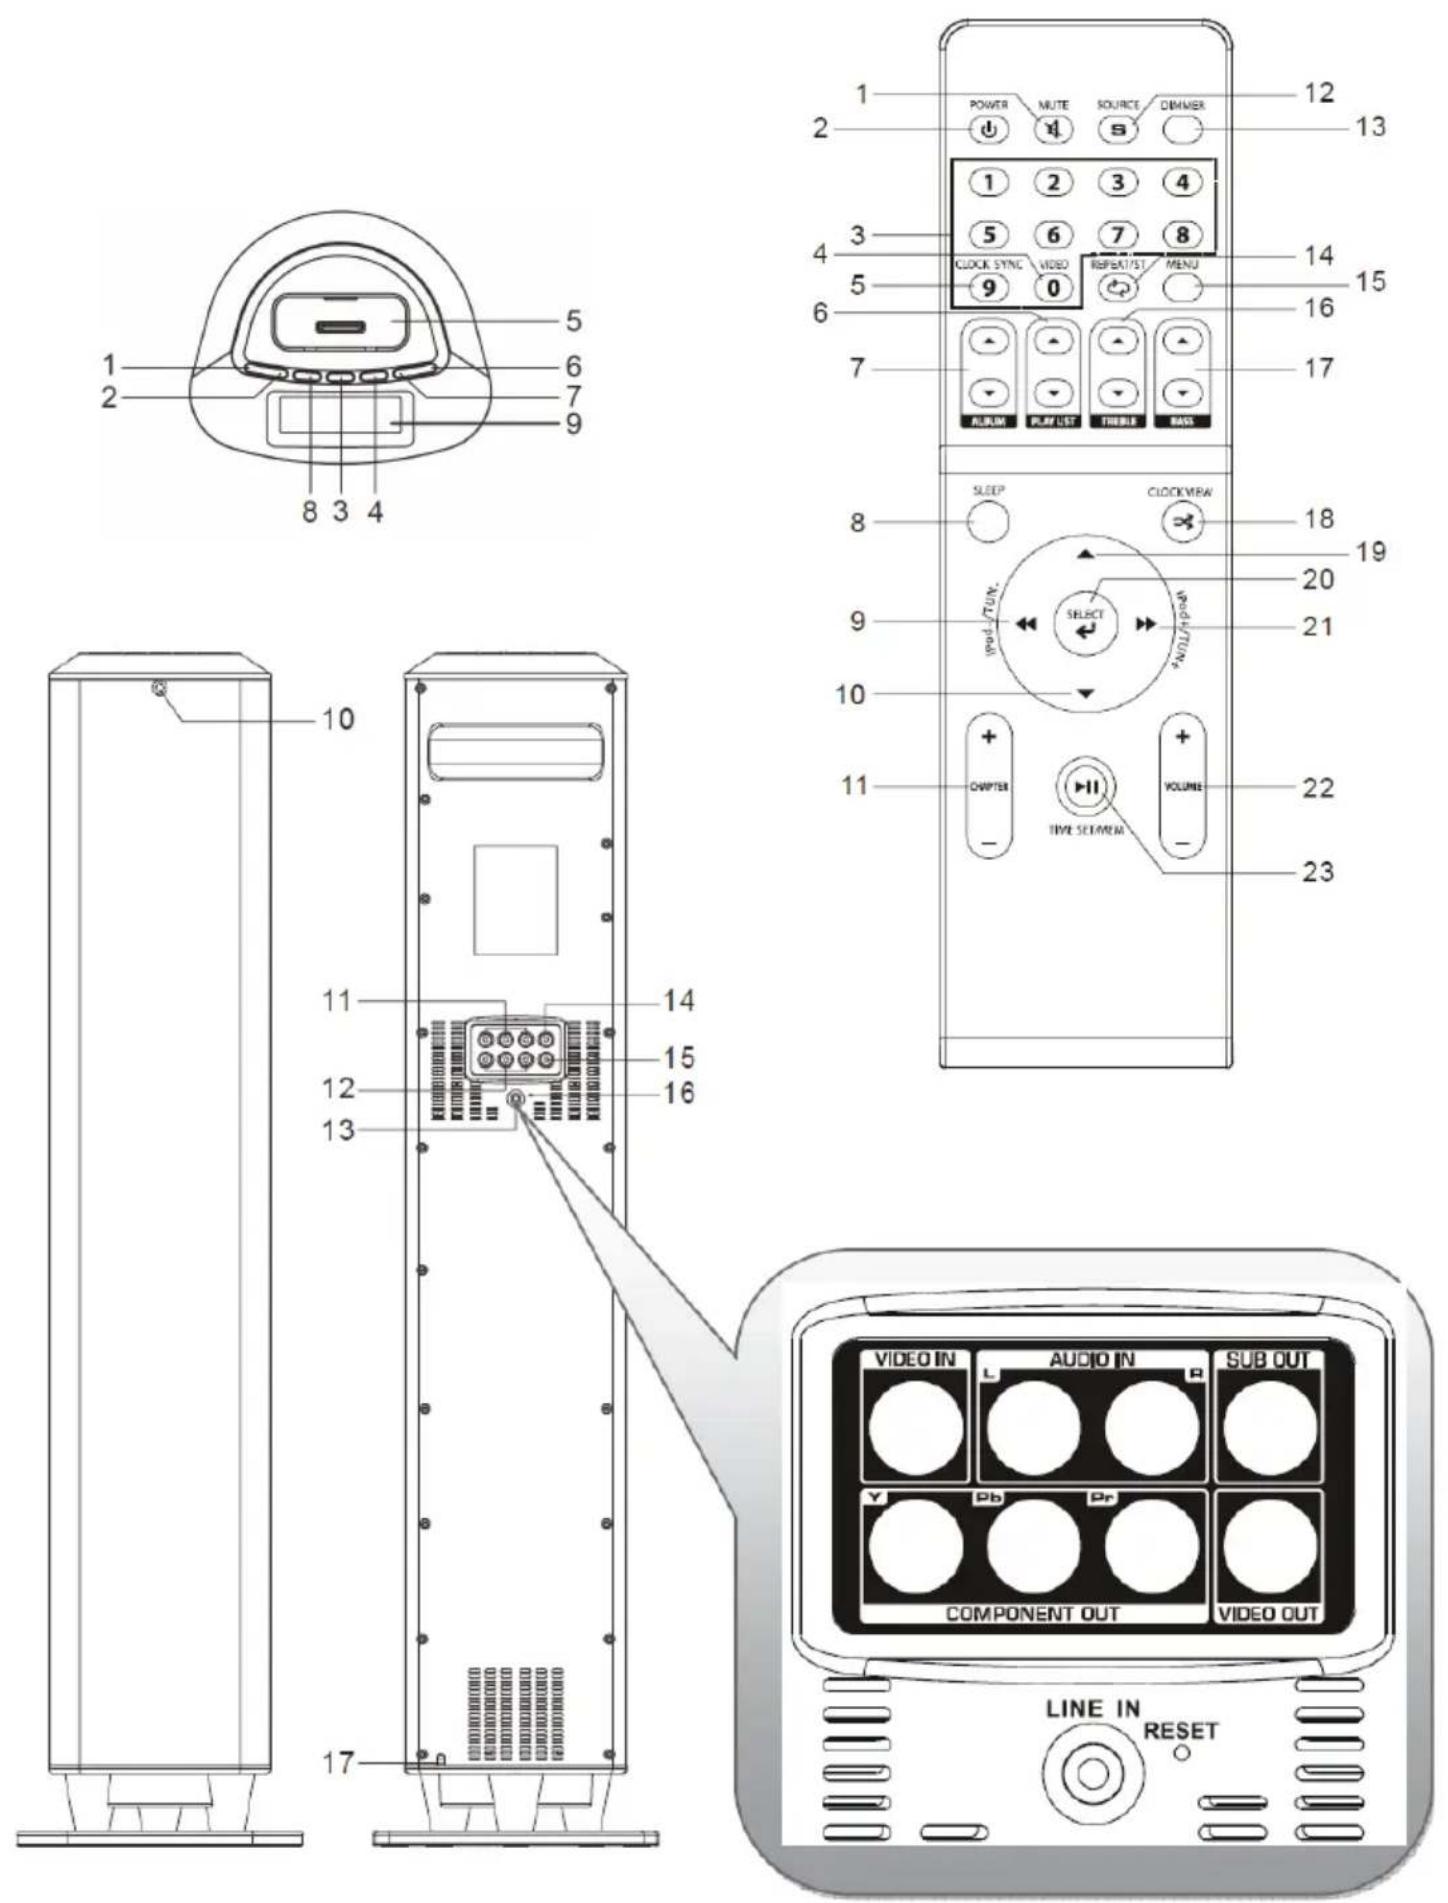
iPod/iPhone PLUG-IN
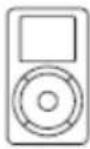
IPD 8450T is compatible with the majority of iPod/iPhone models. To check compatibility, please refer to the "iPod/iPhone COMPATIBILITY TABLE".
IPD 8450T comes with 5 different stands to fit any iPod/iPhone model. Each stand is marked with a number. To check the right stand for your iPod/iPhone, refer to the "STAND COMPATIBILITY TABLE".
- Use the suitable stand according to the aforementioned table.
- Put it in its housing.
- Plug your iPod/iPhone in the suitable iPod/iPhone connector (5) on the speaker unit.
NOTE
Once your iPod/iPhone is plugged-in, its battery will start charging automatically when connecting the power supply cable.
iPod/iPhone PLAYBACK
- Turn on the speaker unit.
- Plug-in your iPod/iPhone.
- Press the SOURCE key (12) until IPOD is displayed on the LCD display. Playback starts automatically.
- Press the / key (23) to temporarily interrupt playback. Press it again to resume it.
- Press TUN+ (6) on the speaker unit or iPod+/TUN+ (21) on the remote control to skip to the next track. Press and hold it to fast forward.
- Press TUN- (7) on the speaker unit or iPod-/TUN- (9) on the remote control to skip to the previous track. Press and hold it to rewind.
- Press the MENU key (15) to view your iPod/iPhone's menu. Use the / navigation keys (19/10) to select the track you want to play.
- Press PLAY LIST +/- (6) to select the tracks in your iPod/iPhone's Playlist you want to play.
- Press the ALBUM +/- keys (7) to select the Albums in your iPod/iPhone you want to play.
- Press the CHAPTER +/- keys (11) to select the Chapters in your iPod/iPhone you want to play.
- Press and hold the SHUFFLE key (18) to enable random playback. Press and hold it again to disable it.
- Press the REPEAT key (14) repeatedly to enable the repeat options. You can repeat a single track (the REPEAT sign flashes on the display) or the whole album (the REPEAT sign appears still on the display). Keep pressing the key until the REPEAT sign disappears to disable this function.
iPod/iPhone COMPATIBILITY TABLE
Made for iPod
1st + 2nd generation
5GB 10GB 20GB

Made for iPod
4th generation 20GB

Made for iPod
4th generation 40GB

Made for iPod
4th generation
(color display)
20GB 30GB

Made for iPod classic 80GB 160GB (2007)

Made for iPod classic 160GB (2009)

Made for iPod nano
1st generation
1GB 2GB 4GB

Made for iPod nano
2nd generation
(aluminum)
2GB 4GB 8GB

Made for iPod touch
1st generation
8GB 16GB 32GB

Made for iPod touch
2nd generation
8GB 16GB 32GB

Made for iPod touch
3rd generation
32GB 64GB

Made for iPod touch
4th generation
8GB 32GB 64GB

Made for iPod
4th generation
(color display)
40GB 60GB

Made for iPod
5th generation
(video)
30GB

Made for iPod
5th generation
(video)
60GB 80GB

Made for iPod mini
4GB 6GB

Made for iPod nano
3rd generation
(video)
4GB 8GB

Made for iPod nano
4th generation
(video)
8GB 16GB

Made for iPod nano
5th generation
(video camera)
8GB 16GB

Made for iPod nano
6th generation
8GB 16GB

Made for iPhone
4GB 8GB 16GB

Made for iPhone 3G
8GB 16GB

Made for iPhone 3GS
8GB 16GB 32GB

Made for iPhone 4
16GB 32GB
STAND COMPATIBILITY TABLE
| MODEL CAPACITY PLAYBACK AND CHARGE VIDEO OUTPUT STAND | ||||
| iPad | ||||
| iPad | 8GB 16GB 32GB | |||
| iPhone | ||||
| iPhone 4 | 16GB 32GB | ● | ● | |
| iPhone 3GS | 8GB 16GB 32GB | ● | ● | 12 |
| iPhone 3G | 8GB 16GB | ● | ● | 12 |
| iPhone | 4GB 8GB 16GB | ● | ● | 12 |
| iPod touch | ||||
| iPod touch 4th generation | 8GB 32GB 64GB | ● | ● | |
| iPod touch 3rd generation | 32GB 64GB | ● | ● | 14 |
| iPod touch 2nd generation | 8GB 16GB 32GB 64GB | ● | ● | 14 |
| iPod touch 1st generation | 8GB 16GB 32GB | ● | ● | 14 |
| iPod nano | ||||
| iPod nano 6th generation | 8GB 16GB | ● | ● | |
| iPod nano 5th generation (video camera) | 8GB 16GB | ● | ● | 8 |
| iPod nano 4th generation (video) | 8GB 16GB | ● | ● | 8 |
| iPod nano 3rd generation (video) | 4GB 8GB | ● | ● | 13 |
| iPod nano 2nd generation (aluminum) | 2GB 4GB 8GB | ● | 8 | |
| iPod nano 1st generation | 1GB 2GB 4GB | ● | 8 | |
| iPod and iPod mini | ||||
| iPod classic (2009) | 120GB 160GB | ● | ● | 10 |
| iPod classic (2007) | 160GB | ● | ● | 10 |
| iPod classic | 80GB | ● | ● | 10 |
| iPod 5th generation (video) | 60GB 80GB | ● | ● | 10 |
| iPod 5th generation (video) | 30GB | ● | ● | 10 |
| iPod 4th generation (color display) | 40GB 60GB | ● | ● | |
| iPod 4th generation (color display) | 20GB 30GB | ● | ● | 10 |
| iPod 4th generation | 40GB | ● | 10 | |
| iPod 4th generation | 20GB | ● | 10 | |
| iPod mini | 4GB 6GB | ● | ||
RADIO FUNCTION
TUNING RADIO STATIONS
- Turn on the speaker unit.
- Press the source key (12) until TUNER is displayed on the LCD display.
- Press TUN + (6) on the speaker unit or iPod +/TUN + (21) on the remote control to move forward between radio stations with a 0.05MHz increase for each pressure. Press and hold it to automatically tune it to the following station.
- Press TUN- (7) on the speaker unit or iPod-/TUN- (9) on the remote control to move backwards between radio stations with a 0.05MHz decrease for each pressure. Press and hold it to automatically tune it to the previous station.
- If you know the frequency you want to listen to, you can enter it using the numeric keypad (3) on the remote control. For instance, if you want to listen to the radio station on 93.10 MHz, enter the numbers 9, 3, 1, and 0 in sequence. If the bandwidth is exceeded, the ERROR message will be displayed.
- Press the ST key (14) to switch from STEREO to MONO and vice-versa.
- Tune in to a radio station.
- Press and hold the / II key (4) on the speaker unit or MEM (23) on the remote control. The "P01" sign will start flashing.
- Press the TUN +/- keys (6/7) on the speaker unit or TUN +/- (21/9) on the remote control to select where you want to store the radio station. There are 20 available positions: from P01 to P20.
- Press the / ii key (4) on the speaker unit or MEM (23) on the remote control to confirm the position.
- Repeat steps from 2 to 4 to save the remaining positions.
- During playback, press the / II key (4) on the speaker unit or MEM (23) on the remote control to go through the stored stations.
LINE IN INPUT
The LINE IN input allows to play music from any external device with an audio output.
- Connect the external device to the LINE IN input as described in INSTALLATION AND CONNECTIONS on page 13.
- Turn on the speaker unit.
- Turn on the external device.
- Press the SOURCE key (12) until LINE is displayed.
- Adjust volume and tones as described in BASIC OPERATION on page 13. If the volume is too low, adjust it from the external device.
AUDIO/VIDEO INPUTS - COMPOSITE VIDEO OUTPUT
By using A/V inputs you can play from any audio or audio/video source.
- Connect the external device to the A/V inputs and a TV/Monitor to the Composite Video output as described in INSTALLATION AND CONNECTIONS on page 13.
- Turn on the speaker unit.
- Turn on the external device.
- Press the SOURCE key (12) until AV is displayed.
- Adjust volume and tones as described in BASIC OPERATION on page 13.
- If the external device has a video signal (e.g. a DVD player), press the Video key (4) to switch to Composite Video output (Y/Pb/Pr) if it is necessary.
NOTE
Check that the TV/monitor connected to the Composite Video output is set on the respective input. Refer to your TV/monitor's user manual.
COMPONENTVIDEOOUTPUT(Y/Pb/Pr)
By using the Component Video output (Y/Pb/Pr) you can play the videos saved on your iPod/Phone.
- Connect a TV/Monitor to the Component Video output (Y/Pb/Pr) described in INSTALLATION AND CONNECTIONS on page 13.
- Turn on the speaker unit.
- Plug-in your iPod/iPhone.
- Press the SOURCE key (12) until IPOD is displayed on the LCD display.
- Launch a video on your iPod/iPhone.
- Press the Video key (4) on the remote control to switch to Component Video output (Y/Pb/Pr).
NOTES
Check that the TV/monitor connected to the Component Video output (Y/Pb/Pr) is set on the respective input. Refer to your TV/monitor's user manual.
SUBWOOFER OUTPUT
By using the SUBWOOFER output you can integrate the audio from the speaker with a powered Subwoofer or a Subwoofer connected to an amplifier.
- Connect the powered Subwoofer or the amplifier connected to the Subwoofer to the SUBWOOFER output as described in INSTALLATION AND CONNECTIONS on page 13.
- Turn on the speaker unit.
- Turn on the powered Subwoofer or the amplifier.
- The sound from any source will be integrated with the connected Subwoofer.
TROUBLESHOOTING
If the IPD 8450T does not work properly, check this short list before taking it to an authorised TREVI service centre.
In any case, do not try to repair the device, this will void the warranty. Only TREVI service centres are authorised to perform service operations on this device.
Radio sound is distorted
- Look for the right frequency using manual tuning.
- Change the speaker unit's location to allow a better signal reception.
- Restore speaker unit's factory settings.
No sound coming from the radio
- Check that the source is set on TUNER.
Volume is too low. Turn up the volume - MUTE is enabled. Disable MUTE.
- Restore speaker unit's factory settings.
iPod/iPhone does not communicate / has no sound
- Check that the source is set on IPOD.
- Unplug the iPod/iPhone from the connector and check the connector for dirt or obstructions.
- Check that the iPod/iPhone works correctly before placing it into its housing.
Volume is too low. Turn up the volume - MUTE is enabled. Disable MUTE.
- Restore speaker unit's factory settings.
The remote control does not work
- Replace batteries
THE BUNDLE INCLUDES
Speaker unit
3.5 mm Jack/Jack audio cable
5 iPod/Phone stands
TECHNICAL SPECIFICATIONS
GENERAL FEATURES
Power supply: AC 110~240V 50/60Hz
Maximum power consumption: 60W
Stand-by power consumption: < 2W
Maximum output power: 50W (10Wx2 + 30W integrated woofer)
Inputs: LINE IN
AV
Outputs: Component Y/Pb/Pr
Composite Video
Subwoofer
Weight: 4.3kg
Size:
(L) 199mm× (H) 828mm× (D) 172mm
SPEAKERS
Woofer:
3.5"
Tweeter:
2.5"x2
RADIO SECTION
Frequency band:
FM 87.5 - 108MHz
"Made for iPod" and "Made for iPhone" mean that an electronic accessory has been designed to connect specifically to iPod or iPhone, respectively, and has been certified by the developer to meet Apple performance standards. Apple is not responsible for the operations of this device or its compliance with safety and regulatory standards. Please note that the use of this accessory with iPod or iPhone may affect wireless performance.
iPhone, iPod, iPod classic, iPod nano, and iPod touch are trademarks of Apple Inc. registered in the U.S. and other countries.
NOTES D'EMPLOI
1st + 2nd generation
5GB 10GB 20GB

Made for iPod
4th generation 20GB

Made for iPod
4th generation 40GB

Made for iPod
4th generation
(color display)
20GB 30GB

Made for iPod classic 80GB 160GB (2007)

Made for iPod classic 160GB (2009)

Made for iPod nano
1st generation
1GB 2GB 4GB

Made for iPod nano
2nd generation
(aluminum)
2GB 4GB 8GB

Made for iPod touch
1st generation
8GB 16GB 32GB

Made for iPod touch
2nd generation
8GB 16GB 32GB

Made for iPod touch
3rd generation
32GB 64GB

Made for iPod touch
4th generation
8GB 32GB 64GB

Made for iPod
4th generation
(color display)
40GB 60GB

Made for iPod
5th generation
(video)
30GB

Made for iPod
5th generation
(video)
60GB 80GB

Made for iPod mini
4GB 6GB

Made for iPod nano
3rd generation
(video)
4GB 8GB

Made for iPod nano
4th generation
(video)
8GB 16GB

Made for iPod nano
5th generation
(video camera)
8GB 16GB

Made for iPod nano
6th generation
8GB 16GB

Made for iPhone
4GB 8GB 16GB

Made for iPhone 3G
8GB 16GB

Made for iPhone 3GS
8GB 16GB 32GB

Made for iPhone 4
16GB 32GB
TABLE DE COMPATIBILITÉ DES SUPPORTS
| MODELE CAPACITÉ LECTURE ET CHARGE SORTIE VIDEO SUPPORTS | ||||
| iPad | ||||
| iPad | 8GB 16GB 32GB | |||
| iPhone | ||||
| iPhone 4 | 16GB 32GB | • | • | |
| iPhone 3GS | 8GB 16GB 32GB | • | • | 12 |
| iPhone 3G | 8GB 16GB | • | • | 12 |
| iPhone | 4GB 8GB 16GB | • | • | 12 |
| iPod touch | ||||
| iPod touch 4th generation | 8GB 32GB 64GB | • | • | |
| iPod touch 3rd generation | 32GB 64GB | • | • | 14 |
| iPod touch 2nd generation | 8GB 16GB 32GB 64GB | • | • | 14 |
| iPod touch 1st generation | 8GB 16GB 32GB | • | • | 14 |
| iPod nano | ||||
| iPod nano 6th generation | 8GB 16GB | • | • | |
| iPod nano 5th generation (video camera) | 8GB 16GB | • | • | 8 |
| iPod nano 4th generation (video) | 8GB 16GB | • | • | 8 |
| iPod nano 3rd generation (video) | 4GB 8GB | • | • | 13 |
| iPod nano 2nd generation (aluminum) | 2GB 4GB 8GB | • | 8 | |
| iPod nano 1st generation | 1GB 2GB 4GB | • | 8 | |
| iPod and iPod mini | ||||
| iPod classic (2009) | 120GB 160GB | • | • | 10 |
| iPod classic (2007) | 160GB | • | • | 10 |
| iPod classic | 80GB | • | • | 10 |
| iPod 5th generation (video) | 60GB 80GB | • | • | 10 |
| iPod 5th generation (video) | 30GB | • | • | 10 |
| iPod 4th generation (color display) | 40GB 60GB | • | • | |
| iPod 4th generation (color display) | 20GB 30GB | • | • | 10 |
| iPod 4th generation | 40GB | • | 10 | |
| iPod 4th generation | 20GB | • | 10 | |
| iPod mini | 4GB 6GB | • | ||
FUNCTION RADIO
SYNTONISATION DES STATIONS RADIO
199 (L) x828 (A)x172 (P) mm
HAUT-PARLEURS
Woofer :
3.5"
Tweeter :
2,5"×2
SECTION RADIO
1st + 2nd generation
5GB 10GB 20GB

Made for iPod
4th generation 20GB

Made for iPod
4th generation 40GB

Made for iPod
4th generation
(color display)
20GB 30GB

Made for iPod classic 80GB 160GB (2007)

Made for iPod classic 160GB (2009)

Made for iPod nano
1st generation
1GB 2GB 4GB

Made for iPod nano
2nd generation
(aluminum)
2GB 4GB 8GB

Made for iPod touch
1st generation
8GB 16GB 32GB

Made for iPod touch
2nd generation
8GB 16GB 32GB

Made for iPod touch
3rd generation
32GB 64GB

Made for iPod touch
4th generation
8GB 32GB 64GB

Made for iPod
4th generation
(color display)
40GB 60GB

Made for iPod
5th generation
(video)
30GB

Made for iPod
5th generation
(video)
60GB 80GB

Made for iPod mini
4GB 6GB

Made for iPod nano
3rd generation
(video)
4GB 8GB

Made for iPod nano
4th generation
(video)
8GB 16GB

Made for iPod nano
5th generation
(video camera)
8GB 16GB

Made for iPod nano
6th generation
8GB 16GB

Made for iPhone
4GB 8GB 16GB

Made for iPhone 3G
8GB 16GB

Made for iPhone 3GS
8GB 16GB 32GB

Made for iPhone 4
16GB 32GB
| MODELL KAPAZITÄT | WIEDERGABE UND KOSTENLOS | VIDEO-AUSGANG HALTERUNGEN | ||
| iPad | ||||
| iPad | 8GB 16GB 32GB | |||
| iPhone | ||||
| iPhone 4 | 16GB 32GB | ● | ● | |
| iPhone 3GS | 8GB 16GB 32GB | ● | ● | 12 |
| iPhone 3G | 8GB 16GB | ● | ● | 12 |
| iPhone | 4GB 8GB 16GB | ● | ● | 12 |
| iPod touch | ||||
| iPod touch 4th generation | 8GB 32GB 64GB | ● | ● | |
| iPod touch 3rd generation | 32GB 64GB | ● | ● | 14 |
| iPod touch 2nd generation | 8GB 16GB 32GB 64GB | ● | ● | 14 |
| iPod touch 1st generation | 8GB 16GB 32GB | ● | ● | 14 |
| iPod nano | ||||
| iPod nano 6th generation | 8GB 16GB | ● | ● | |
| iPod nano 5th generation (video camera) | 8GB 16GB | ● | ● | 8 |
| iPod nano 4th generation (video) | 8GB 16GB | ● | ● | 8 |
| iPod nano 3rd generation (video) | 4GB 8GB | ● | ● | 13 |
| iPod nano 2nd generation (aluminum) | 2GB 4GB 8GB | ● | 8 | |
| iPod nano 1st generation | 1GB 2GB 4GB | ● | 8 | |
| iPod and iPod mini | ||||
| iPod classic (2009) | 120GB 160GB | ● | ● | 10 |
| iPod classic (2007) | 160GB | ● | ● | 10 |
| iPod classic | 80GB | ● | ● | 10 |
| iPod 5th generation (video) | 60GB 80GB | ● | ● | 10 |
| iPod 5th generation (video) | 30GB | ● | ● | 10 |
| iPod 4th generation (color display) | 40GB 60GB | ● | ● | |
| iPod 4th generation (color display) | 20GB 30GB | ● | ● | 10 |
| iPod 4th generation | 40GB | ● | 10 | |
| iPod 4th generation | 20GB | ● | 10 | |
| iPod mini | 4GB 6GB | ● | ||
FUNKTION RADIO
Tweeter: 2.5^ 2
RADIOTEIL
Frequenzband: FM 87.5 - 108MHz
CONEXION SALIDA SUBWOOFER
1st + 2nd generation
5GB 10GB 20GB

Made for iPod
4th generation 20GB

Made for iPod
4th generation 40GB

Made for iPod
4th generation
(color display)
20GB 30GB

Made for iPod classic 80GB 160GB (2007)

Made for iPod classic 160GB (2009)

Made for iPod nano
1st generation
1GB 2GB 4GB

Made for iPod nano
2nd generation
(aluminum)
2GB 4GB 8GB

Made for iPod touch
1st generation
8GB 16GB 32GB

Made for iPod touch
2nd generation
8GB 16GB 32GB

Made for iPod touch
3rd generation
32GB 64GB

Made for iPod touch
4th generation
8GB 32GB 64GB

Made for iPod
4th generation
(color display)
40GB 60GB

Made for iPod
5th generation
(video)
30GB

Made for iPod
5th generation
(video)
60GB 80GB

Made for iPod mini
4GB 6GB

Made for iPod nano
3rd generation
(video)
4GB 8GB

Made for iPod nano
4th generation
(video)
8GB 16GB

Made for iPod nano
5th generation
(video camera)
8GB 16GB

Made for iPod nano
6th generation
8GB 16GB

Made for iPhone
4GB 8GB 16GB

Made for iPhone 3G
8GB 16GB

Made for iPhone 3GS
8GB 16GB 32GB

Made for iPhone 4
16GB 32GB
Tweeter: 2,5^ 2
SECCION RADIO
CONSERVACAO E MANUTENCAO
LIGACAO SAIDA SUBWOOFER
1st + 2nd generation
5GB 10GB 20GB

Made for iPod
4th generation 20GB

Made for iPod
4th generation 40GB

Made for iPod
4th generation
(color display)
20GB 30GB

Made for iPod classic 80GB 160GB (2007)

Made for iPod classic 160GB (2009)

Made for iPod nano
1st generation
1GB 2GB 4GB

Made for iPod nano
2nd generation
(aluminum)
2GB 4GB 8GB

Made for iPod touch
1st generation
8GB 16GB 32GB

Made for iPod touch
2nd generation
8GB 16GB 32GB

Made for iPod touch
3rd generation
32GB 64GB

Made for iPod touch
4th generation
8GB 32GB 64GB

Made for iPod
4th generation
(color display)
40GB 60GB

Made for iPod
5th generation
(video)
30GB

Made for iPod
5th generation
(video)
60GB 80GB

Made for iPod mini
4GB 6GB

Made for iPod nano
3rd generation
(video)
4GB 8GB

Made for iPod nano
4th generation
(video)
8GB 16GB

Made for iPod nano
5th generation
(video camera)
8GB 16GB

Made for iPod nano
6th generation
8GB 16GB

Made for iPhone
4GB 8GB 16GB

Made for iPhone 3G
8GB 16GB

Made for iPhone 3GS
8GB 16GB 32GB

Made for iPhone 4
16GB 32GB
| MODELO | CAPACIDADE | REPRODUÇÃO E CARGA SAIDA DE VÍDEO SUPORTES | ||
| iPad | ||||
| iPad | 8GB 16GB 32GB | |||
| iPhone | ||||
| iPhone 4 | 16GB 32GB | ● | ● | |
| iPhone 3GS | 8GB 16GB 32GB | ● | ● | 12 |
| iPhone 3G | 8GB 16GB | ● | ● | 12 |
| iPhone | 4GB 8GB 16GB | ● | ● | 12 |
| iPod touch | ||||
| iPod touch 4th generation | 8GB 32GB 64GB | ● | ● | |
| iPod touch 3rd generation | 32GB 64GB | ● | ● | 14 |
| iPod touch 2nd generation | 8GB 16GB 32GB 64GB | ● | ● | 14 |
| iPod touch 1st generation | 8GB 16GB 32GB | ● | ● | 14 |
| iPod nano | ||||
| iPod nano 6th generation | 8GB 16GB | ● | ● | |
| iPod nano 5th generation (video camera) | 8GB 16GB | ● | ● | 8 |
| iPod nano 4th generation (video) | 8GB 16GB | ● | ● | 8 |
| iPod nano 3rd generation (video) | 4GB 8GB | ● | ● | 13 |
| iPod nano 2nd generation (aluminum) | 2GB 4GB 8GB | ● | 8 | |
| iPod nano 1st generation | 1GB 2GB 4GB | ● | 8 | |
| iPod and iPod mini | ||||
| iPod classic (2009) | 120GB 160GB | ● | ● | 10 |
| iPod classic (2007) | 160GB | ● | ● | 10 |
| iPod classic | 80GB | ● | ● | 10 |
| iPod 5th generation (video) | 60GB 80GB | ● | ● | 10 |
| iPod 5th generation (video) | 30GB | ● | ● | 10 |
| iPod 4th generation (color display) | 40GB 60GB | ● | ● | |
| iPod 4th generation (color display) | 20GB 30GB | ● | ● | 10 |
| iPod 4th generation | 40GB | ● | 10 | |
| iPod 4th generation | 20GB | ● | 10 | |
| iPod mini | 4GB 6GB | ● | ||
FUNÇAÑO RÁDIO
Tweeter: 2.5^ 2
SECCAO RÁDIO
1st + 2nd generation
5GB 10GB 20GB

Made for iPod
4th generation 20GB

Made for iPod
4th generation 40GB

Made for iPod
4th generation
(color display)
20GB 30GB

Made for iPod classic 80GB 160GB (2007)

Made for iPod classic 160GB (2009)

Made for iPod nano
1st generation
1GB 2GB 4GB

Made for iPod nano
2nd generation
(aluminum)
2GB 4GB 8GB

Made for iPod touch
1st generation
8GB 16GB 32GB

Made for iPod touch
2nd generation
8GB 16GB 32GB

Made for iPod touch
3rd generation
32GB 64GB

Made for iPod touch
4th generation
8GB 32GB 64GB

Made for iPod
4th generation
(color display)
40GB 60GB

Made for iPod
5th generation
(video)
30GB

Made for iPod
5th generation
(video)
60GB 80GB

Made for iPod mini
4GB 6GB

Made for iPod nano
3rd generation
(video)
4GB 8GB

Made for iPod nano
4th generation
(video)
8GB 16GB

Made for iPod nano
5th generation
(video camera)
8GB 16GB

Made for iPod nano
6th generation
8GB 16GB

Made for iPhone
4GB 8GB 16GB

Made for iPhone 3G
8GB 16GB

Made for iPhone 3GS
8GB 16GB 32GB

Made for iPhone 4
16GB 32GB
Precautions for correct disposal of the product.
The symbol shown on the equipment indicates that waste must be disposed of in "separate collection" and so the product must not be disposed of together with urban waste.
The user must take the product to special "separate waste collection centres" provided by local government, or deliver it to the retailer against the purchase of a new product.
Separate collection of waste and subsequent treatment, recycling and disposal operations promotes the production of equipment with recycled materials and limits negative effects on the environment and on health caused by improper handling of waste.
Illegal disposal of the product leads to the enforcement of administrative penalties.

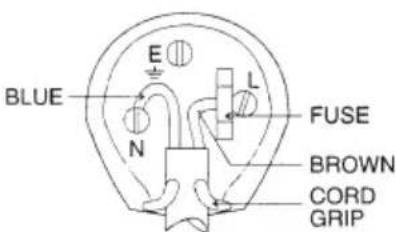
WIRES CONNECTIONS TO A UK THREE-PIN PLUG
The wires in this mains lead are coloured in accordance with the following wiring codes:
Blue: Neutral
Brown: Live
The wires in this mains lead must be connected to the terminals in the plug as follows:
Blue wire: N or Black
Brown wire: L or Red
Neither wire is to be connected to the earth (E or W) terminal of three-pin plug.
Should the fuse fail in the plug remove the plug form the wall socket and replace the fuse with a 3 Amp. ASTA approved BS 1362 fuse.