
XR 400 APP - Docking station Trevi - Free user manual and instructions
Find the device manual for free XR 400 APP Trevi in PDF.
| Product type | Docking station |
| Brand | Trevi |
| Model | XR 400 APP |
| Dimensions | 480 x 210 x 220 mm |
| Weight | 5.5 kg |
| Power supply | 100-240V ~ 50/60Hz, rechargeable lead-acid battery 12V 4Ah |
| Maximum power consumption | 35W |
| Maximum output power | 60W |
| FM radio frequency | 87.5 - 108.0 MHz |
| Bluetooth | 2.4 GHz band, transmission power 2.5 mW |
| Ports | AUX input (3.5 mm), USB input, USB charging port |
| Main functions | FM radio, Bluetooth, USB, AUX, USB charging, disco light effects, equalizer (FLAT, POP, CLASSIC, JAZZ, ROCK) |
| App control | Party King app (Android/iOS) |
| Battery | Rechargeable lead-acid 12V 4Ah (red/green charge indicator) |
| Display | Digital screen with LED indicators |
| Speakers | Front speakers and passive subwoofers |
| Maintenance and cleaning | Soft slightly damp cloth; avoid solvents and abrasive substances |
| Safety | Do not expose to water, do not block vents, avoid heat sources and vibrations |
| Repairability | TREVI authorized service center |
| Use | Non-professional domestic use |
Frequently Asked Questions - XR 400 APP Trevi
User questions about XR 400 APP Trevi
0 question about this device. Answer the ones you know or ask your own.
Ask a new question about this device
Download the instructions for your Docking station in PDF format for free! Find your manual XR 400 APP - Trevi and take your electronic device back in hand. On this page are published all the documents necessary for the use of your device. XR 400 APP by Trevi.
USER MANUAL XR 400 APP Trevi
PORTABLE SPEAKER WITH APP CONTROL, RADIO/USB/BT Connection and Operation Manual
HAUT-PARLEUR PORTABLE AVEC APP CONTROL, RADIO / USB / BT Mode d'emploi et branchement
WARNING: DO NOT OPEN THE SET. NEITHER CONTROLS OR SPARE PARTS TO BE USED BY THE USER ARE TO BE FOUND INSIDE IT. APPLY TO AUTHORISED TREVI CENTERS FOR SERVICE OPERATIONS.

ACHTUNG

ACHTUNG: DAS GERAT NICT OFFNEN. IM INNERN BEFINDEN SICH KEINE VOM BENUTZER SELBST INSTANDSETZBARENTEILE UND AUCH KEINE ERSATZEILE. FÜR JEGLiche SERVICEARBEITEN, WENDEN SIE SICH BITTE AN EINE TREVI AUTORISIERENT KUNDENDIENSTSTELLE.


ATENÇAO

Banda FM: 87.5 - 108.0 MHz
This is a precision electronic appliance; avoid using it in the following cases:
- Near strong heat sources, such as central heating plants or stoves.
- Listening to high volume for a long time could damage your hearing.
- In very humid places such as bathrooms, swimming pools, etc.
In very dusty places. - In places subject to strong vibrations.
- Position the appliance in such a way that there is always enough room for free air circulation (at least 5cm ).
- Do not block the air inlets.
- Keep the ear speaker during the steps of focusing point and volume adjustments, and in particular to keep the volume to a minimum in the ignition phase.
If any liquid enters the appliance, unplug it immediately from the socket and take it to the nearest TREVI authorised service centre. - Before switching on the appliance, always check that the power cable and the connection cable are properly installed.
The apparatus shall not be exposed to dripping or splashing water. No objects filled with liquid, such as vases, should be placed on the unit. - No naked flame sources, such as lighted candles, should be placed on.
- Keep this manual.
CARE AND MAINTENANCE
Use a slightly damp soft cloth for cleaning. Do not use solvents and abrasive substances.
IMPORTANT
This device is designed for home use (not professional use). This appliance has been carefully built to ensure long-lasting perfect performance. However, should any inconvenience occur, please contact your local authorised TREVI Service Centre.
TREVI follows a policy of ongoing research and development. Therefore products may have different features from those described.
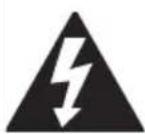
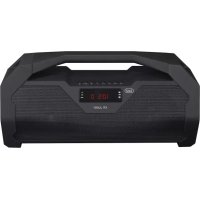
LOCATION OF CONTROL
- Button EQ / P-MODE
- Button /-10
- Button / + 10
- Button /II/BT/SCAN
- Volume Key -
- Volume Key +
- Button FUNC./STANDBY/LIGHT
- Front speakers
- AUX input
- USB input
- USB CHARGE, port for external device charging
- Rubber protection
- PAIR led indicator
- Charge LED indicator
- Display
- Handle
- Passive subwoofoers
- Rubber protection
- Power supply socket
- ON/OFF switch
- FM antenna
SUPPLY
This unit works with 12V 4Ah lead-acid rechargeable battery and 100-240V 50 / 60Hz mains power supply.
When the battery is running out or the unit does not turn on, plug the power cord into the socket (19) on the device and plug into a power outlet to charge.
CHARGE LED lights status:
- RED CHARGE lamp: the device is connected to the power cable and the battery is charging.
- CHARGE GREEN LED light: charging operation completed, the battery is charged.
- RED CHARGE lamp flashing: when the device is in use, it indicates that the battery is running out and needs to be recharged.
Do not connect the appliance to electrical outlets other than those indicated.
BASIC FUNCTIONS
ON/OFF
Press the power switch (20) and turn it to the ON / OFF position to turn the appliance on / off.
NOTE: After about 15 minutes of inactivity, the unit will automatically switch to standby mode.
To turn the unit on again, press the FUNC / STANDBY / LIGHT button (7) or turn the ignition switch (20).
In case of abnormal operation of the appliance, switch off the appliance, unplug the power cord and wait a few minutes before plugging it back in and switching the appliance on.
FUNCTION MODE SETTING
To change the operating mode, press the FUNC / STANDBY / LIGHT button (7) several times to select USB / AUX / RADIO / BLUETOOTH (BT appears on the display).
VOLUME ADJUSTMENT
Press the Volume - (5) or Volume + (6) keys to adjust the volume.
EQUALIZER
This unit has an integrated audio equalization system. Press the EQ button (1) to select a setting that best suits the current sound reproduction. It is possible to choose between FLAT, POP, CLASSIC, JAZZ, ROCK equalizations.
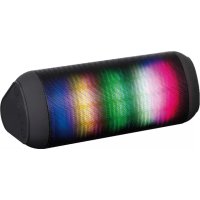
DISC-LIGHT EFFECTS
Long press the FUNC / STANDBY / LIGHT button (7) to activate the Disco-Light effects. You can choose from nine different effects.
To deactivate the disco-Light effect, press and hold the FUNC / STANDBY / LIGHT (7) button repeatedly until the display shows "OFF".
USB CHARGE OUTPUT
It is possible to use the USB CHARGE (11) socket to charge external USB devices.
Note1: it is not possible to use this socket to play audio files from external devices (use the USB input, see chapter USB INPUT).
FM RADIO
- Press the FUNC / STANDBY / LIGHT button (7) on the unit and select the radio function (the display shows the tuned frequency and FM indication).
- Hold down the / / BT / SCAN key (4) for a few seconds to search and store radio stations automatically; the search / memorization will stop at the completion of the entire radio band scan or the filling of all the available memories. It is possible to memorize up to a maximum of 30 radio stations. At the end, the first stored radio station will be played.
- To recall a stored station use the keys (3) to go to the next station, or (2) to go to the previous station.
- Hold down for a few seconds the keys (3) or (2) on the unit to tune to the next or previous radio station with the best signal received.
- To store a radio station:
- Go to the frequency to be memorized, long press the EQ / P.MODE key (1).
- Using the keys (3) or (2) select the memory number where you want to save the radio station.
- Long press the EQ / P.MODE button (1) to confirm.
- The unit can store up to 30 stations.
- The ST indication on the display indicates the reception of the stereo signal.
Note: FM reception depends very much on the location of the device.
The proximty of TV sets, neon lamps or other domestic appliances may cause disturbances in the reception of radio programs, in this case
USB INPUT
- Press the FUNC / STANDBY / LIGHT button (7) on the unit and select "USB".
- Insert a USB memory into the USB input (10). Playback starts automatically.
- To pause playback, press the / /BT/SCAN (4) button, the display will start to flash.
- To resume playback, press the / /BT/SCAN key (4) again.
- By pressing the button (3) during the listening, it goes to the next track, while with the button (2) to the previous tracks.
- Press and hold the (3) or (2) button to skip to the next or previous 10th track.
- By long pressing the EQ / P-MODE button (1) it is possible to activate the various repeat modes of the tracks. To deactivate the repetition, press the EQ / P-MODE button (1) several times until the icon disappears from the display.
NOTE
- Do not use the USB CHARGE (11) port for audio playback.
- The player may not support some USB devices, this is due to the incompatibility of some processors.
- To avoid harmful interference, always connect USB devices directly to the unit, do not use extension cords.
BLUETOOTH OPERATION
- Switch on the appliance and press the FUNC / STANDBY / LIGHT button (7) to select the bluetooth function, the message BT appears on the display.
- In Bluetooth mode, the indicator LED (13, PAIR) will start to flash, the system will automatically search.
- Activate the Bluetooth functionality on the external device to be paired.
- Start the device search. At the end select the "TREVI XR 400 APP" device.
Note: a second XR400APP device (without the word TREVI) may appear for the app to function. For the BT connection select TREVI XR 400 APP.
5. Enter the password "0000" if required.
6. Start music playback from your device. Press the / II / BT / SCAN key (4) to activate the pause and the (2) or (3) keys to select tracks.
7. Hold down the / / BT / SCAN key (4) for a few seconds to eliminate the pairing and perform a new pairing operation.
AUX-IN
- Press the FUNC / STANDBY / LIGHT button (7) on the unit to select "AUX" mode.
- Connect any unit with audio output through the appropriate 3.5mm jack cable (not included) to the AUX input (9).
- Adjust the external device from your commands.
"PARTY KING" APPLICATION
The application is only available in English for Android / iOS devices.
To control the device via smartphone, tablet, or other devices, download the "PARTY KING" application from the respective market stores.
The application will allow you to control the following modes: Player, Light, USB input, FM radio, Aux In input, equalizer.
Once the device is connected to the external device via Bluetooth connection (as described in the Bluetooth Operation section), open the "PARTY KING" app on the smartphone / tablet.
Party King
Pairing the application to the device
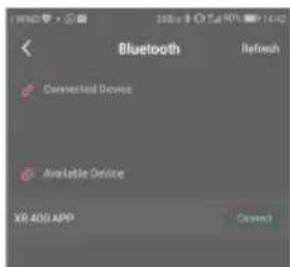
After pairing the smartphone / tablet as described in the Bluetooth Operation paragraph, it is necessary to make a further coupling of the application to the device:
- Press the REFRESH button and when the XR 400 APP appears in the list of available devices, select it.
Once connected, the device will move to the list of connected devices (Connected device).
On the main screen there are 8 icons:

Playing back audio files on the phone:
Press the A icon to access the music playback page of the music files that are inside the phone. Select the song you want to play. It is possible to pause the song, go to the previous / next song, activate repeat or random play. Press << to return to the main page.
Playing USB memory
Insert a USB memory into the unit, press the C icon to access USB memory playback. Choose a song to play from those shown in the list, press "..." to start playback, press "<" to return to the main page.
FM radio
Press the G icon to enter the FM Radio mode, press "SCAN" to start scanning and automatic storage.

Aux-in
After connecting as described in the AUX IN paragraph, press the H icon to access the AUX IN control page.
Led lighting control
Press the B icon to access the Light page, where you can select the color to be displayed on the unit, and adjust the brightness (LUMIN control). It is also possible to choose between 5 preset profiles (Profiles). Through the OFF / ON command it is possible to turn off or switch on the LED lighting.
To return to the main page, press << in the left corner.
Equalizer and volume regulation
Press the F icon to access the equalizer control page (Equalizer) and to adjust the volume.
It is possible to set a personal equalization or select one of the 5 preset equalization modes: Flat, Pop, Classic, Jazz, Rock.
The volume of the appliance can be adjusted.
Settings
Press the E icon to get information about the application version.
SPECIFICATIONS
Power Supply: 100-240V ~ 50/60Hz - internal lead acid rechargeable battery 12V = 4Ah
Consumption: Max 35W
FM frequency: 87,5 - 108,0 MHz
Maximum output power: 60W
Dimensions: 480x210x220mm
Bluetooth transmission power: 2,5mW
Band transmission Bluetooth: 2,4GHz
Weight: 5,5 kg
INFORMATION NOTE ON THE REMOVAL AND DISPOSAL OF BATTERIES
Warning: Only high-qualified personnel should perform this operation!
BATTERY REMOVAL
The appliance should not be plugged to the mains socket when performing this operation!
- Remove the screws that secure the structure of the trolley and take it apart.
- Remove the screws that secure the rear panel speaker amplified and remove the panel;
- Locate the battery;
- Remove the screws that secure the supports of the battery, remove the supports, disconnect the battery and remove it.
Used batteries should not be disposed of with household waste or thrown into fire or water. Used batteries should be recycled or disposed of in separate waste collection centres.
NOTES D'EMPLOI
Precautions for correct disposal of the product.
The symbol shown on the equipment indicates that waste must be disposed of in "separate collection" and so the product must not be disposed of together with urban waste.
The user must take the product to special "separate waste collection centres" provided by local government, or deliver it to the retailer against the purchase of a new product.
Separate collection of waste and subsequent treatment, recycling and disposal operations promotes the production of equipment with recycled materials and limits negative effects on the environment and on health caused by improper handling of waste.
Illegal disposal of the product leads to the enforcement of administrative penalties.
Simplified EU Declaration Of Conformity
Hereby TREVI S.p.a declares that the radio equipment type Power portable speaker model XR 400 APP is in compliance with Directive 2014/53/EU.
The full text of the EU declaration of conformity is available at the following internet address www.trevi.it
- CARE AND MAINTENANCE
- IMPORTANT
- LOCATION OF CONTROL
- SUPPLY
- BASIC FUNCTIONS
- ON/OFF
- FUNCTION MODE SETTING
- VOLUME ADJUSTMENT
- EQUALIZER
- DISC-LIGHT EFFECTS
- USB CHARGE OUTPUT
- FM RADIO
- USB INPUT
- NOTE
- BLUETOOTH OPERATION
- AUX-IN
- "PARTY KING" APPLICATION
- Pairing the application to the device
- Playing back audio files on the phone:
- Playing USB memory
- Led lighting control
- Equalizer and volume regulation
- Settings
- SPECIFICATIONS
- INFORMATION NOTE ON THE REMOVAL AND DISPOSAL OF BATTERIES
- BATTERY REMOVAL
- NOTES D'EMPLOI
- Precautions for correct disposal of the product.
- Simplified EU Declaration Of Conformity
Brand : Trevi
Model : XR 400 APP
Category : Docking station