Butler 901 Combo - Phone TOPCOM - Free user manual and instructions
Find the device manual for free Butler 901 Combo TOPCOM in PDF.

User questions about Butler 901 Combo TOPCOM
0 question about this device. Answer the ones you know or ask your own.
Ask a new question about this device
Download the instructions for your Phone in PDF format for free! Find your manual Butler 901 Combo - TOPCOM and take your electronic device back in hand. On this page are published all the documents necessary for the use of your device. Butler 901 Combo by TOPCOM.
USER MANUAL Butler 901 Combo TOPCOM
natural_image
Black and white photo of a telephones and a handheld phone on a plain surface (no visible text or symbols)SHORT USER GUIDE / BEKNOPTE HANDLEIDING NOTICE D'UTILISATION / KURZANLEITUNG GUÍA DEL USUARIO ABREVIADA / KORT ANVÄNDARHANDBOK BREVE GUIDA DELL'UTENTE / GUIA RESUMIDO DO UTILIZADOR KRÁTKÝ NÁVOD PRO UŽIVATELE / Σύντομος Οδηγος Χρήστη KRÓTKA INSTRUKCJA OBSŁUGI
V 1.0 - 03/12
CE
UK The features described in this manual are published with reservation to modifications.
NL De in deze handleiding beschreven mogelijkheden worden gepubliceerd onder voorbehoud van wijzigingen.
FR Les possibilités décrites dans ce manuel sont publiées sous réserve de modifications.
DE Die in dieser Bedienungsanleitung umschriebenen Möglichkeiten, werden vorbehaltlich Änderungen publiziert.
ES Las características descritas en este manual pueden ser objeto de futuras modificaciones.
SE Funktionerna i denna bruksanvisning publiceras med reservation för ändringar.
IT Le caratteristiche descritte nel presente manuale vengono pubblicate con riserva di modifica.
PT As características descritas neste manual são publicadas sob reserva de modificação.
CZ Možnost úpravy funkcí popsaných v této příručce vyhrazena.
GR Οι λειτουργίες που περιγράφονται στο παρόν εγχειρίδιο, δημοσιεύονται με επιφύλαξη τυχόν τροποποιήσεων.
PL Właściwości opisane w niniejszej instrukcji obsługi są publikowane z zatrzeżeniem prawa wprowadzenia zmian.
UK To be connected to the public analogue telephone network.
This product is in compliance with the essential requirements and other relevant provisions of the P&TTE directive 1999/5/EC. The Declaration of conformity can be found on :
http://www.tristar.eu
text_image
Diagram showing the wiring connections of a mobile phone with labeled parts and a battery, including a separate schematic for Figure 2.Figure 3
text_image
Diagram illustrating electron movement in a conductor with positive and negative charges, labeled with arrows and polarity indicators.Figure 2
text_image
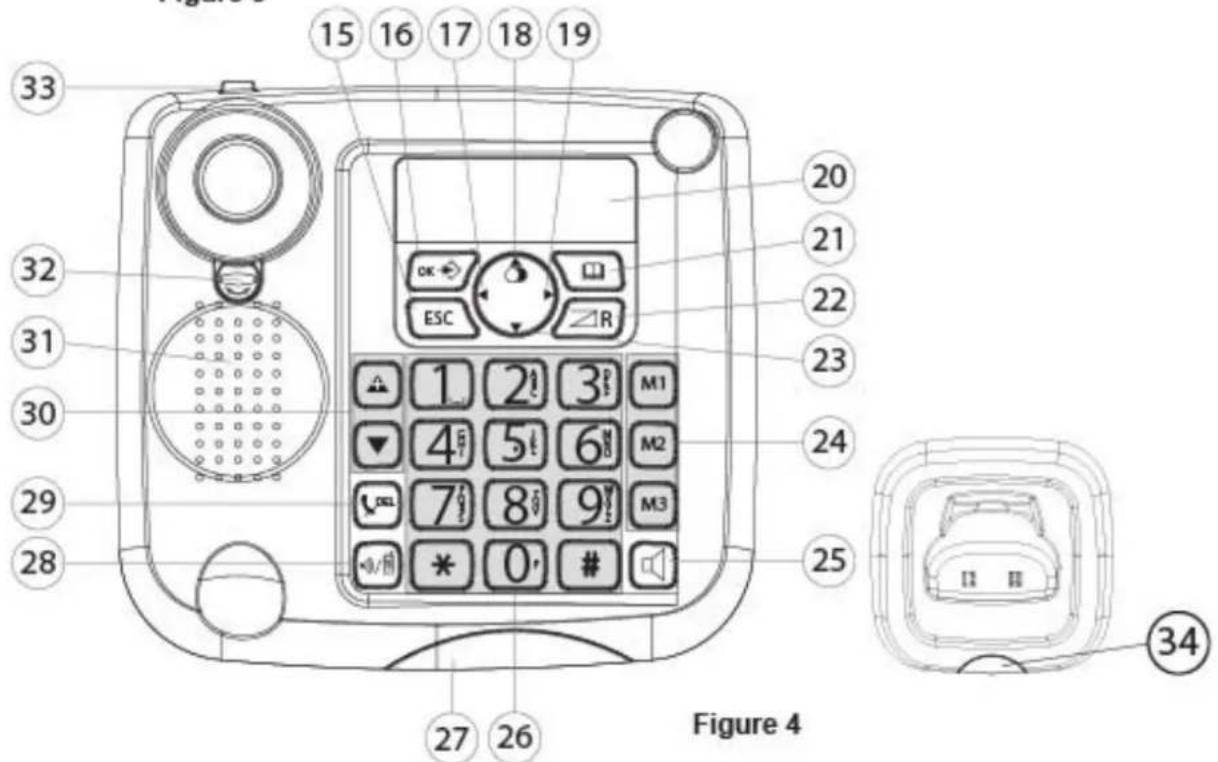
15 16 17 18 19 33 20 32 21 31 22 23 30 24 29 28 1 2 3 M1 4 5 6 M2 7 8 9 M3 25 27 26 Figure 4 34UK The CE symbol indicates that the unit complies with the essential requirements of the R&TTE directive.
NL Het toestel voldoet aan de basiseisen van de R&TTE-richtlijn. Dit wordt bevestigd door de CE-markering.
FR La conformité de l'appareil avec les exigences fondamentales de la directive européenne R&TTE relative aux terminaux, est confirmée par le label CE.
DE Die Übereinstimmung des Gerätes mit den grundlegenden Anforderungen der R&TTE-Directive ist durch das CE-Kennzeichen bestätigt.
ES El sello CE corrobora la conformidad del equipo con los requerimientos básicos de la directiva R&TTE.
SE CE-märket bekräftar att apparaten uppfyller de grundläggande kraven i R&TTE direktivet.
IT Il simbolo CE indica che l'unità è conforme ai requisiti fondamentali della direttiva R&TTE.
PT O símbolo CE indica que esta unidade cumpre com os requisitos essenciais da directiva R&TTE.
CZ Symbol CE znamená, že jednotka splňuje základní požadavky směrnice R&TTE.
GR To σύμβολο CE δείχνει ότι η μονάδα συμμορφώνεται με τις βασικές απαιτήσειστης οδηγίας R&TTE.
PL Symbol CE oznacza, że urządzenie spełnia istotne wymogi dyrektywy R&TTE.

UK This product works with rechargeable batteries only. If you put non-rechargeable batteries in the handset and place it on the base, the handset will be damaged and this in NOT covered under the warranty conditions.
Thank you for purchasing this TOPCOM product. This product has been designed and assembled with utmost care for you and the environment. Because we at TOPCOM like to think of the future of our planet and our children, we aim to do our best to help saving the environment. This is why we decided to reduce the number of pages of our user guides and product manuals. If you keep in mind that it takes up to 24 trees to produce 1 ton of paper, publishing product manuals in 11 languages costs our planet a lot of trees. In this short manual provided with your TOPCOM device you can find a brief explanation of how to install and use your TOPCOM device.
If you would still like to discover all the features of your new TOPCOM device, please visit our website (www.tristar.eu) where you can download the complete user manual in your language. By doing this TOPCOM hopes to do its share to make our planet a better place, but we can only succeed with your help!
2 First steps
2.1 How to use this User Guide
The following method is used in this User Guide to clarify instructions:

Text ..... „Display“.
Text that appears on the telephone display
Key to be pressed
2.2 Installing the base station
Install the base station as follows:
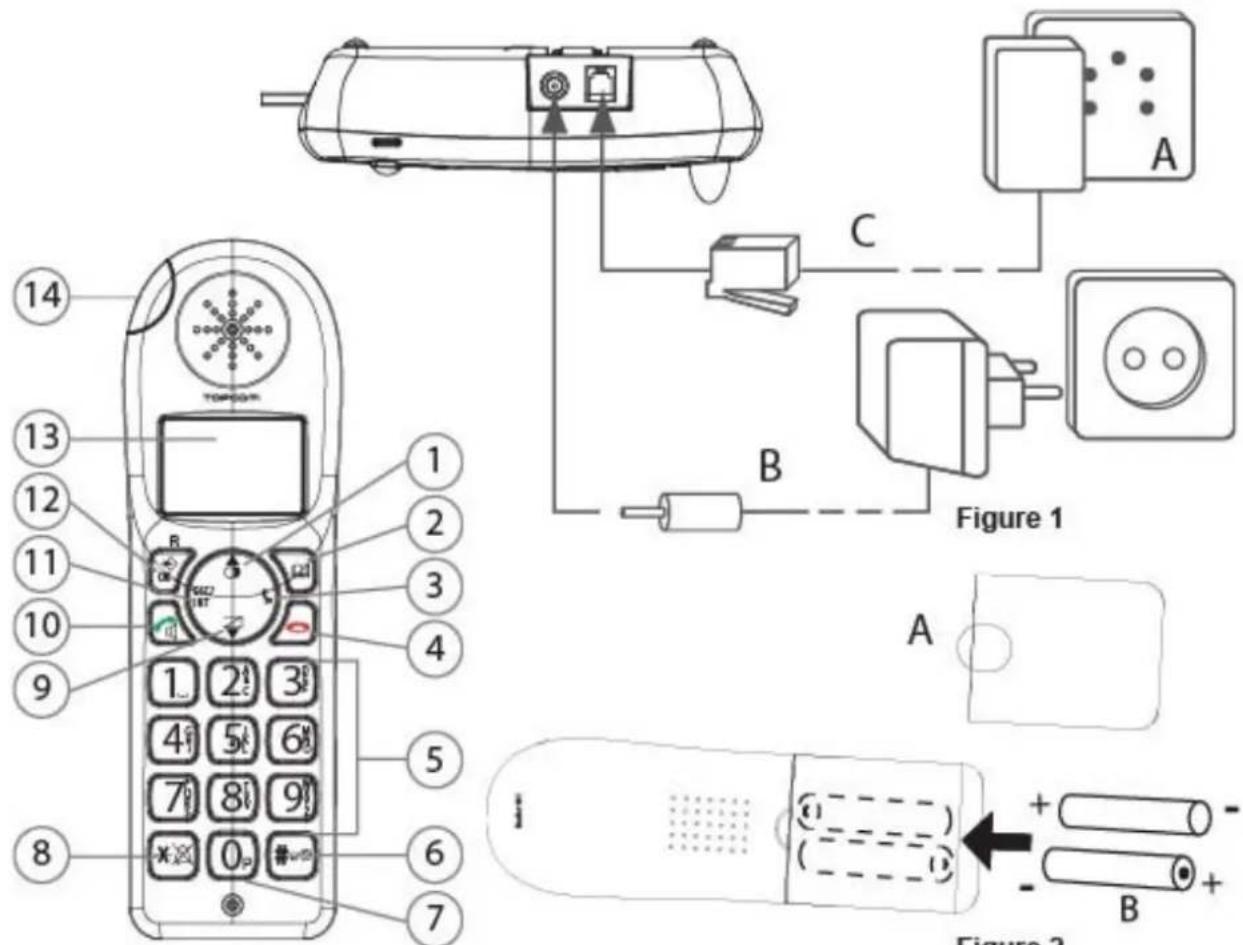
1Connect the mains adapter to the base station first and then to a socket.
2Connect one end of the telephone cable to the telephone socket on the wall and the other to the connector on the back of the base station.
3 The telephone and power cables should be connected as shown in figure 1.
2.3 Handset charger
1Plug the mains adapter into a power socket.
2.4 Handset
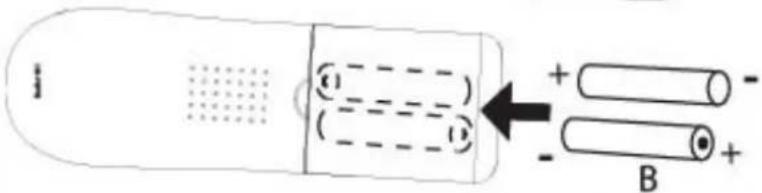
1 Open the battery compartment as shown in figure 2.
2 Insert the rechargeable batteries. Make sure the polarity is correct (+ and -).
3 Close the battery compartment.
4 Place the handset in the charger and charge it for 16 hours. The charging LED is illuminated
2.5 Keys/Display
Cordless handset
- Redial / up
- Phone book
- Mute / delete
- Hang up
- Alphanumeric keys
- Key lock
- Pause
-
Ringer on/off
-
Calls list / down
- Answer call / hands free / call button
- INT / escape
- Menu / OK / flash
- Display
- Red LED, flashes during a call
Base station
- Escape
- Menu / OK
- Left
- Redial / up
- Right
- Display
- Phone book
- Calls list / flash
- Down
- Abbreviated dialling (M1 - M2 - M3)
- Hands free
-
Alphanumeric keys
-
Red LED on the base station, flashes during a call
-
Paging / call diversion / internal call
- Mute / delete
- Volume control
- Loudspeaker
- Receiver holder for wall mounting
- Lug: for putting down the receiver briefly during a call when the phone is wall-mounted
Charger
- LED: handset charging in progress.
2.6 Handset display
HANIDSET 1
text_image
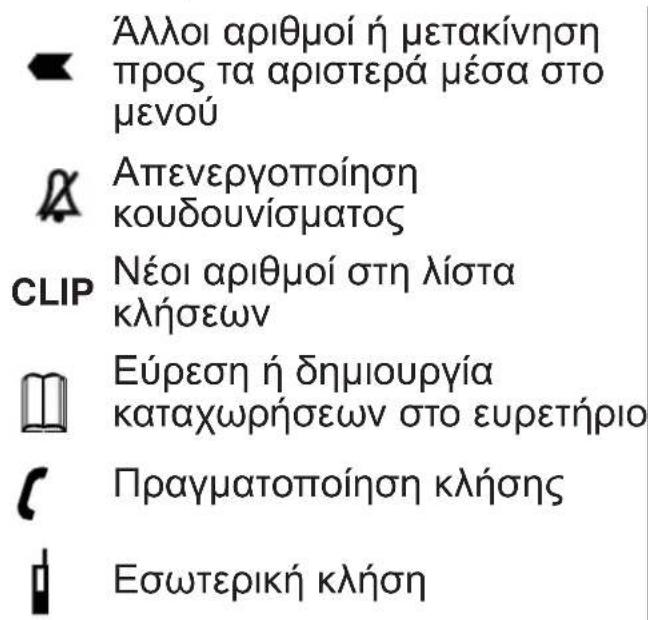
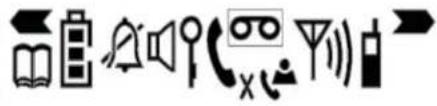
Collection of black-and-white icons representing various sound and media-related symbols, including books, speakers, a phone, and a radio.HANDSET X x = handset number

Other numbers or scroll left through the menu

Find or create phone book entries

Ringer off Hands free mode

Key lock on New voicemail

Call created Microphone muted

New numbers in the calls list

Internal call

Other numbers or scroll right through the menu

Battery status display

message


The antenna indicates the strength of the reception signal. The antenna flashes when the handset is out of range.
2.7 Base station display


Other numbers or scroll left through the menu

Ringer off New voicemail message
CLIP New numbers in the calls list

Find or create phone book entries

Call created Microphone muted

Internal call

Other numbers or scroll right through the menu

04
Item number in the calls list

Hands free mode on


Time and date
2.8 Navigating through the menu
The Butler 901 has an easy-to-use menu system. Every menu consists of a series of options.
A summary of the menus on the handset and base station can be found below.


ESC
1Press the Menu/OK key to open the main menu.
2 Scroll to the required menu option.
3 Press the Menu/OK key to open more options or to confirm the displayed setting.
4 Press the Escape key to go back to the previous menu level
2.9 Using the alphanumeric keys
You can use the alphanumeric keys to enter text. Press the appropriate alphanumeric key to select a letter 26 For example, if you press the 5 numeric key, the letter 'j' appears in the display first. Press the key several times to select the other letters.
Press the 2 key once to select the letter "a". If you want to enter the letters "a" and "b" in succession, first press the 2 key once to select the letter "a". Wait 2 seconds until the cursor has moved to the next position. Now press the 2 key twice to select "b". You can use the delete key to delete letters that have been entered incorrectly.
The letter before the cursor is deleted.
Use the Left/Right key ◀ /⑰to move the cursor.
3 Operating the telephone

Info This section only describes the functions of the base station! Information on using the handset can be found in „4 Using the cordless handset“.
3.1 Setting the display language

OK
1Press the Menu / OK key.
2 Select "LANGUAGE" and confirm.
3 Now select the language.
4 Press OK to confirm.
3.2 Setting the date and time

Info
If caller ID (CLIP) is activated on your telephone line and the provider transmits the date and time, the clock is set automatically when an incoming call is received.
When you have set the time, it will be adopted by all handsets registered to the base station.

OK

OK

OK
4 5 6
OK
4 5 6
OK
4 5 6
OK
4 5 6
OK
4 5 6
OK
1Press the Menu / OK key.
2 Select "TIME" and confirm.
3 Select "DATE/TIME" and confirm.
4 Enter the year and confirm.
5 Enter the month and confirm.
6 Enter the day and confirm.
7 Enter the hours and confirm.
8 Enter the minutes.
9 Press OK to confirm.

Important The date and time will be lost in the event of a base station power failure.
3.3 Setting the time format

OK
OK

OK

[Non-Text]
OK
1Press the Menu / OK key.
2 Select "TIME" and confirm.
3 Select "FORMAT" and confirm.
4 Select the time format as "24 HOUR" or "12 HOUR" and confirm.
3.4 Outgoing calls
Making a call
#
4 ^E 5 ^A 6 ^N
[Non-Text]
1 Lift the receiver or press the hands free key.
2 Enter the telephone number.
3 Hang up the receiver or press the hands free key again to end the call.
OR
4 ^c 5 ^l 6 ^m


1Enter the telephone number.
2 Lift the receiver or press the hands free key.
3 Hang up the receiver or press the hands free key again to end the call.
Redialling the last telephone number called


1 Lift the receiver or press the hands free key.
2 Press the redial key.
The last telephone number is automatically dialled.
Redialling one of the last 3 telephone numbers called


1Press the redial key.
2 Select one of the last 3 numbers dialled.
3 Lift the receiver or press the hands free key.
Calling a number in the phone book


1Press the phone book key.
2 Scroll to the required name or enter the initial letters of the name.
3 Press the Menu / OK key to display the telephone number.
4 Lift the receiver or press the hands free key.
The telephone number is automatically dialled.
3.5 Activating/deactivating hands free mode
You can use this function to answer a call without having to lift the receiver or if the receiver has already been lifted.


1Press the hands free key to activate the function.
2 Press the hands free key again to switch the call back to the receiver.
3.6 Phone book
50 telephone numbers and names can be stored in the phone book. Names may be up to 16 characters long and numbers up to 24 digits long.
Adding a new name and number


1Press the phone book key.
2 Press OK.
▲▼ OK
4f560K
4 ^c 5 ^1 6 ^m 0K
3 Select "NEW ENTRY" and confirm.
4 Enter the name and confirm.
5 Enter the telephone number and confirm.
6 A confirmation tone is now sounded.
Editing the name and telephone number
[Non-Text]
▲▼
OK
▲▼ OK
DEL 5
4 ^c 5 ^i 6 ^M 0K
4 5 6 0K
1Press the phone book key.
2 Select the name using the up and down keys. OR
Enter the initial letters of the name.
3 Press OK.
4 Select "EDIT ENTRY" and confirm.
Press the delete key to delete the letters.
6 Enter the name and confirm.
7 Enter the telephone number and confirm.
8 A confirmation tone is now sounded.
Deleting one entry or all entries in the phone book
The image is too blurry to recognize any text content.
▲▼
4 5 6
OK
▲▼
OK ESC
1Press the phone book key.
2 Select the name using the up and down keys. OR
Enter the initial letters of the name.
3 Press OK.
4 Select "DELETE ENTRY" or "DELETE ALL" and confirm.
5 Press OK to confirm or press the Escape key to go back.
3.7 Abbreviated dialling keys
You can store 3 direct abbreviated numbers M1, M2 and M3 (each up to 24 digits) in the base station.
Saving direct abbreviated dialling numbers (M1 - M2 - M3)
M1-M2-M3
OK
▲▼ OK
4 5 6 OK
1Press one of the abbreviated dialling keys.
2 Press OK.
3 Select "NEW ENTRY" and confirm.
4 Enter the name and confirm.
4 ^c 5 ^l 6 ^m 0K
5 Enter the telephone number and confirm.
A confirmation tone is now sounded.
Dialling an abbreviated number
M1-M2-M3
1 Lift the receiver or press the hands free key.
2 Press the abbreviated dialling key.
The telephone number is automatically dialled.
3 Hang up the receiver or press the hands free key again to end the call.
3.8 The call list
Incoming calls are stored in a calls list (max. 30 numbers) on the base station and the handsets.
The number of missed calls is shown by "X MISSED"
(X = number of missed calls) and the flashing CLIP symbol. Briefly press the calls list key to display the last call.

Important The "caller ID" (CLIP) feature is only available if it is activated for your line. Contact your telephone line provider for additional information.
The telephone number and name of the last caller appear in the display. If the telephone number is longer than 12 digits, you can show the remaining digits by pressing the key. If the calls list is empty, the word "EMPTY" appears in the display.
The date and time of the incoming call are displayed at the top right for every call.

1Press the up and down keys to scroll through the list.
The position number of the call in the calls list appears next to the CLIP symbol.

2 Press the left and right keys to display the name or number.

Info The phone reverts to standby mode if neither the up or down key is pressed within 15 seconds.
When a call is received, the caller's number is shown in the display for another 5-8 seconds after the last ring.
Calling a number in the call list


1Press the calls list key.
2 Press the up and down keys to scroll through the list.
3 Pick up the receiver or press the hands free key again to make the call.
3.9 Making an internal call to a handset and forwarding a call to the cordless handset
You can forward a call from the base station to the handset or talk to the external subscriber and a second subscriber on the cordless handset at the same time (conference call).


1Hold down the INT key for 3 seconds until you hear an audio signal, then release the key. "INT" appears in the display.
2 Enter the number of the handset. Once the call has been set up with the handset, you can talk internally.
3 Put the receiver down to transfer the call to the cordless handset.
OR
4 Hold down the INT key ② for 3 seconds to set up a conference call.
4 Using the cordless handset

Info This section only describes the functions of the cordless handset! Information on using the base station can be found in „3 Operating the telephone“.
4.1 Changing the language


OK

OK

OK
ESC
1Press the Menu / OK key.
2 Select "HANDSET" and confirm.
3 Select "LANGUAGE" and confirm.
4 Select the desired language and confirm.
5 Press the Esc key to return to standby mode.
4.2 Outgoing calls
Making a call


1Press the call button.
2 Enter the telephone number.
3 Press the hang up key to end the call.
Call preparation


1Enter the telephone number.
You can correct a wrong number using the mute key. If you do not press any key for 10 seconds, the number disappears and the handset reverts to standby mode.


2 Press the call button.
The telephone number is automatically dialled.
3 Press the hang up key to end the call.
Redialling the last telephone number called


1Press the call button.
2 Press the redial button.
The last telephone number is automatically dialled.
3 Press the hang up key to end the call.
4.3 Incoming calls
When an incoming call is received, the handset and the base station ring and the "Visual call signal" LED (see point 14 in figure 3 and point 27 in figure 4) flashes on the handset and base station.


1Press the answer call key to answer the call.
2 Press the hang up key to end the call.
4.4 Activating/deactivating hands free mode
During the call:


1Press the hands free key to activate the function.
2 Press the hands free key again to switch the call back to the handset.
4.5 Key lock
When the key lock is on, pressing any key in standby mode has no effect (with the exception of the key lock key).


1Press and hold the key lock key.
The symbol appears in the display.
2 Press the key lock key again to deactivate key lock. When key lock is activated, you can still answer incoming calls by pressing the answer call key. The keypad functions as usual during the call. Key lock is activated again after the call.
4.6 Phone book
You can store 50 entries in the phone book. Names may be up to 16 characters long and telephone numbers up to 24 digits long.
Adding a phone book entry

OK OK
4 5 6 0K
4 ^G 5 ^I 6 ^M 0K
1Press the phone book key.
2 Press the OK key twice.
3 Enter the name and confirm.
4 Enter the desired telephone number and confirm.
A confirmation tone is now sounded.
Dialling an abbreviated number


4 ^ii 5 ^i 6 ^ii


1Press the phone book key.
2 Scroll to the required name or enter the initial letters of the name.
3 Press the phone book key to display the telephone number.
4 Now press the call key.
The telephone number is automatically dialled.
5 Press the hang up key to end the call.
Editing a phone book entry


4H 5K 6W

1Press the phone book key.
2 Scroll to the required name or enter the initial letters of the name.
3 Press the phone book key to display the telephone number.

4 Press the Menu / OK key.

5 Select "EDIT ENTRY" and confirm.

6 Enter the name and confirm.

7 Enter or edit the telephone number and confirm.
4.7 Caller ID (CLIP)
The Butler 901 displays the telephone number of incoming calls. This function can only be used if you are registered for this service with your telephone line provider. Contact your provider for more information. When you receive a call, the telephone number is stored in a calls list. This list can hold up to 30 numbers (each of up to 23 digits).

If the telephone number consists of more than 12 digits, you can scroll to the right in the display to see the other digits.
New calls

When there is a new call received in the calls list, the CLIP symbol flashes in the display.
Opening the calls list

1Press the calls list key.
The last call received is displayed. If the calls list is empty, the word "EMPTY" appears in the display.

2 Press the phone book key to skip the number.

3 Press the phone book key to skip the date and time.

4 Press the up and down keys to scroll through the list.
ESC
5 Press the Esc key to exit the calls list.
Calling a number in the call list

1Press the calls list key.

2 Scroll through the calls list until the telephone number you want is displayed.

3 Press the call key to start the call.
The telephone number is automatically dialled.

4 Press the hang up key to end the call.
Deleting a number from the call list


OK
1Press the calls list key.
2 Scroll through the calls list until the telephone number you want is displayed.
3 Press the Menu / OK key.
4 Select "DELETE" to delete the current telephone number and confirm.
OR
5 Select "DELETE ALL" to delete all phone book entries and confirm.
6 Press to confirm or press the Esc key to return.

OK
OK
5 Call forwarding and internal calls from one handset to another
5.1 Call forwarding and conference calls during an external call
INT
4 ^G 5 ^J 6 ^M
1 During an external call, press the INT key and then the number of the handset (1-5, select "0" for the base station).
The other handset will ring.
If the call was set up with the other handset, you can talk internally. When you hang up, the external call will be forwarded to the other handset.
INT
2 Hold down the INT key for 3 seconds. You can now talk to the second handset and the external call at the same time (conference call).
INT
3 Press the INT key again to switch back to the external call.
4 Press the hang up key to end the call.

5.2 Internal call (house phone function)

Info You can conduct a call between the base station and the cordless handset.
The base station has the internal number "0".
INT
4 ^G 5 ^J 6 ^M


1 In standby mode, press the INT key and then the number of the handset (1-5, select "0" for the base station).
The handset or base station you have called will now ring.
2 Press the call key or pick up the receiver on the base station.
You can now talk internally.
1 Van start gaan
text_image
C×106:32 AM 08/12
The image contains no text.
▲▼
4 5 6
text_image
OK ▲▼ OK ▲▼ OKtext_image
OK ▲▼ 0K ▲▼ 0K 456' 0K 456' 0K 456' 0K 456' 0K 456' OKThe image contains no text.
▲▼
4 5 6
text_image
→ OK ▲▼ OK ▲▼ OKtext_image
OK ▲▼ ▲▼ OK OK OK OK OK OK OK OK OK OK OK OK OK OK1Premere menu/tasto OK.
4.3 Chiamate in arrivo
text_image
C×106:32 AM 08/12text_image
C×106:32 AM 08/12