
Norelco StyleShaver QS6161 - Shaver PHILIPS - Free user manual and instructions
Find the device manual for free Norelco StyleShaver QS6161 PHILIPS in PDF.
User questions about Norelco StyleShaver QS6161 PHILIPS
0 question about this device. Answer the ones you know or ask your own.
Ask a new question about this device
Download the instructions for your Shaver in PDF format for free! Find your manual Norelco StyleShaver QS6161 - PHILIPS and take your electronic device back in hand. On this page are published all the documents necessary for the use of your device. Norelco StyleShaver QS6161 by PHILIPS.
USER MANUAL Norelco StyleShaver QS6161 PHILIPS
Always here to help you
Register your product and get support at www.philips.com/welcome

text_image
Question? Contact PhilipsQS6161
QS6141

natural_image
PHILIPS digital hairbrush with black and white body, no visible text or symbols on the device itselfUser manual
PHILIPS
natural_image
Simple line drawing of an open book with a grid on the left and a closed page on the right (no text or symbols)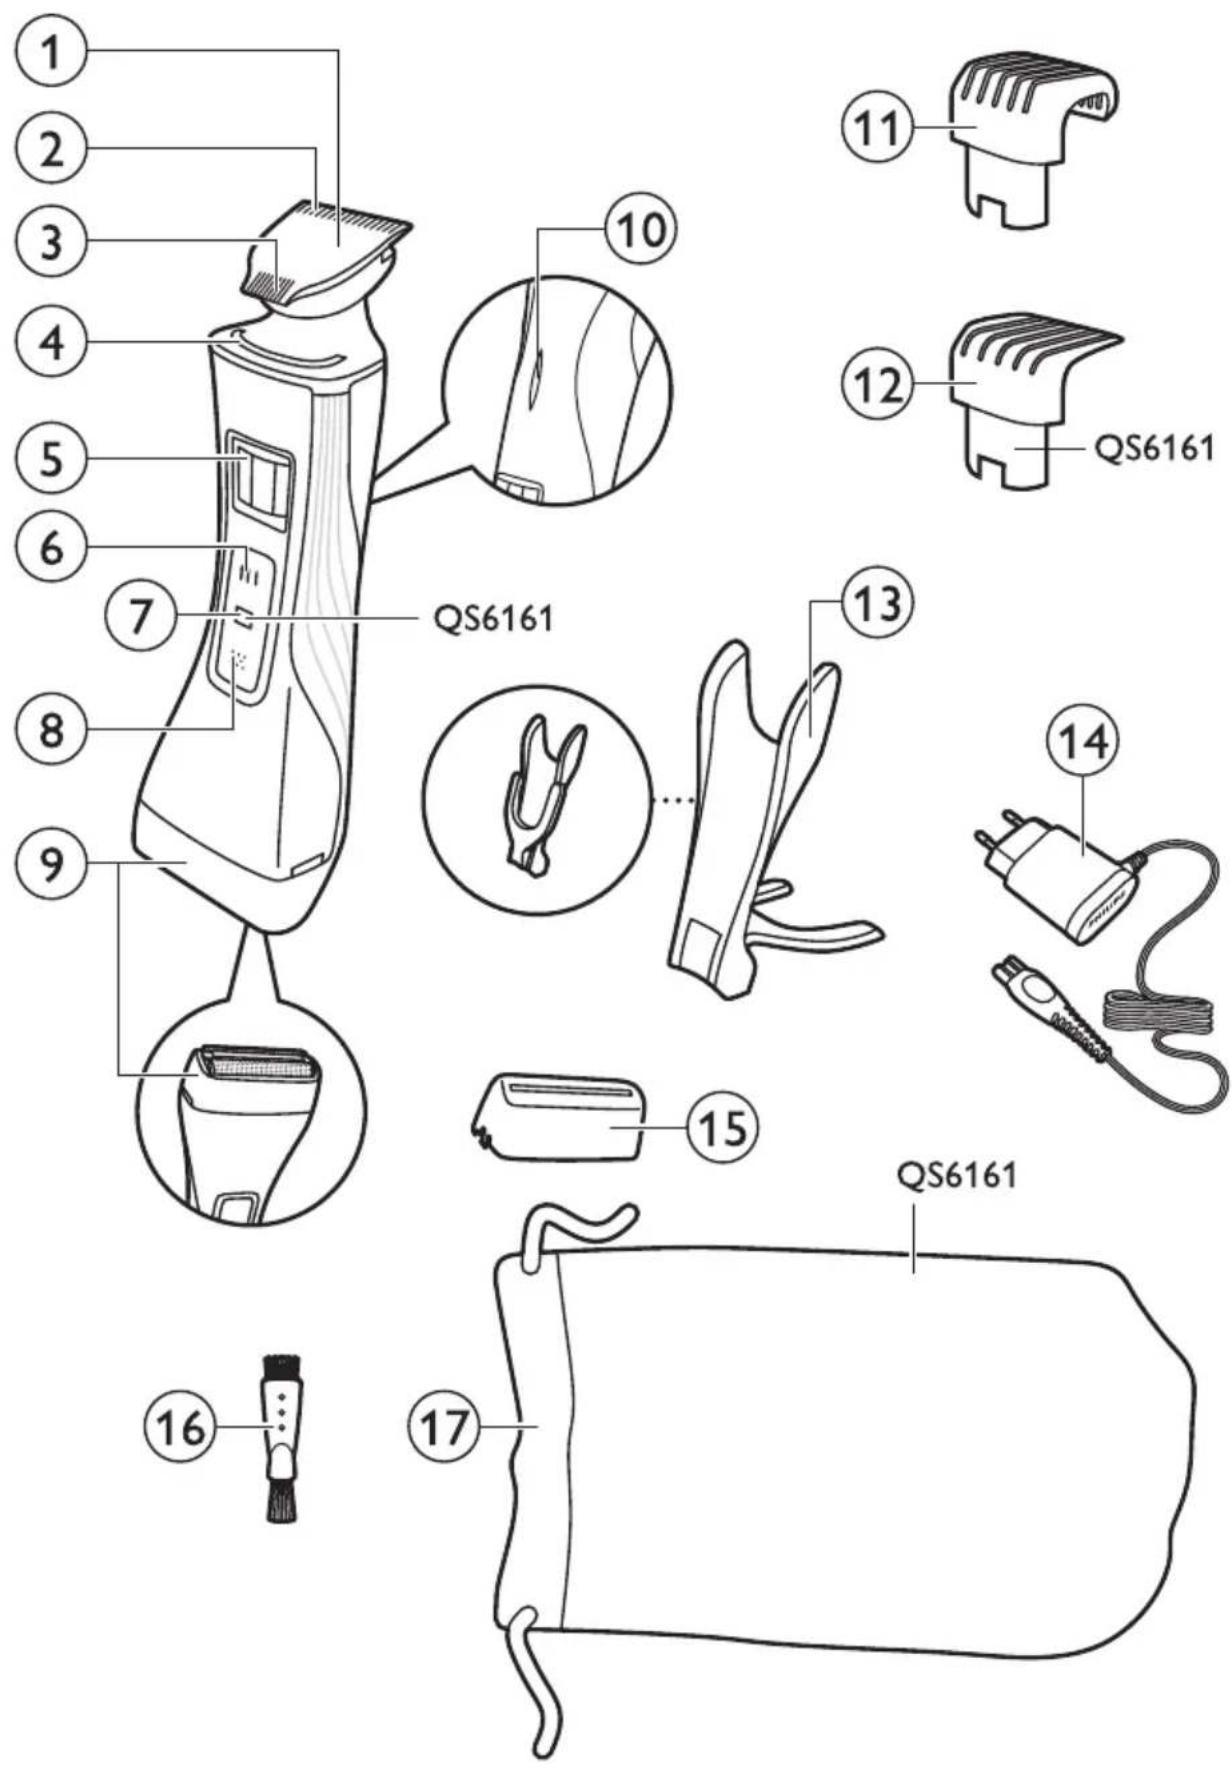
text_image
1 2 3 4 5 6 7 8 9 QS6161 10 11 12 QS6161 13 14 15 QS6161 16 17ENGLISH 6
ESPAÑOL 19
FRANÇAIS 33
INDONESIA 47
한국어 61
BAHASA MELAYU 74
PORTUGUÊS 88
ภาษาไทย 102
TIÊNG VIÊT 115
繁體中文 128
简体中文 141
۱66 فارسی
العربية 179
Introduction
Congratulations on your purchase and welcome to Philips! To fully benefit from the support that Philips offers, register your product at
www.philips.com/welcome.
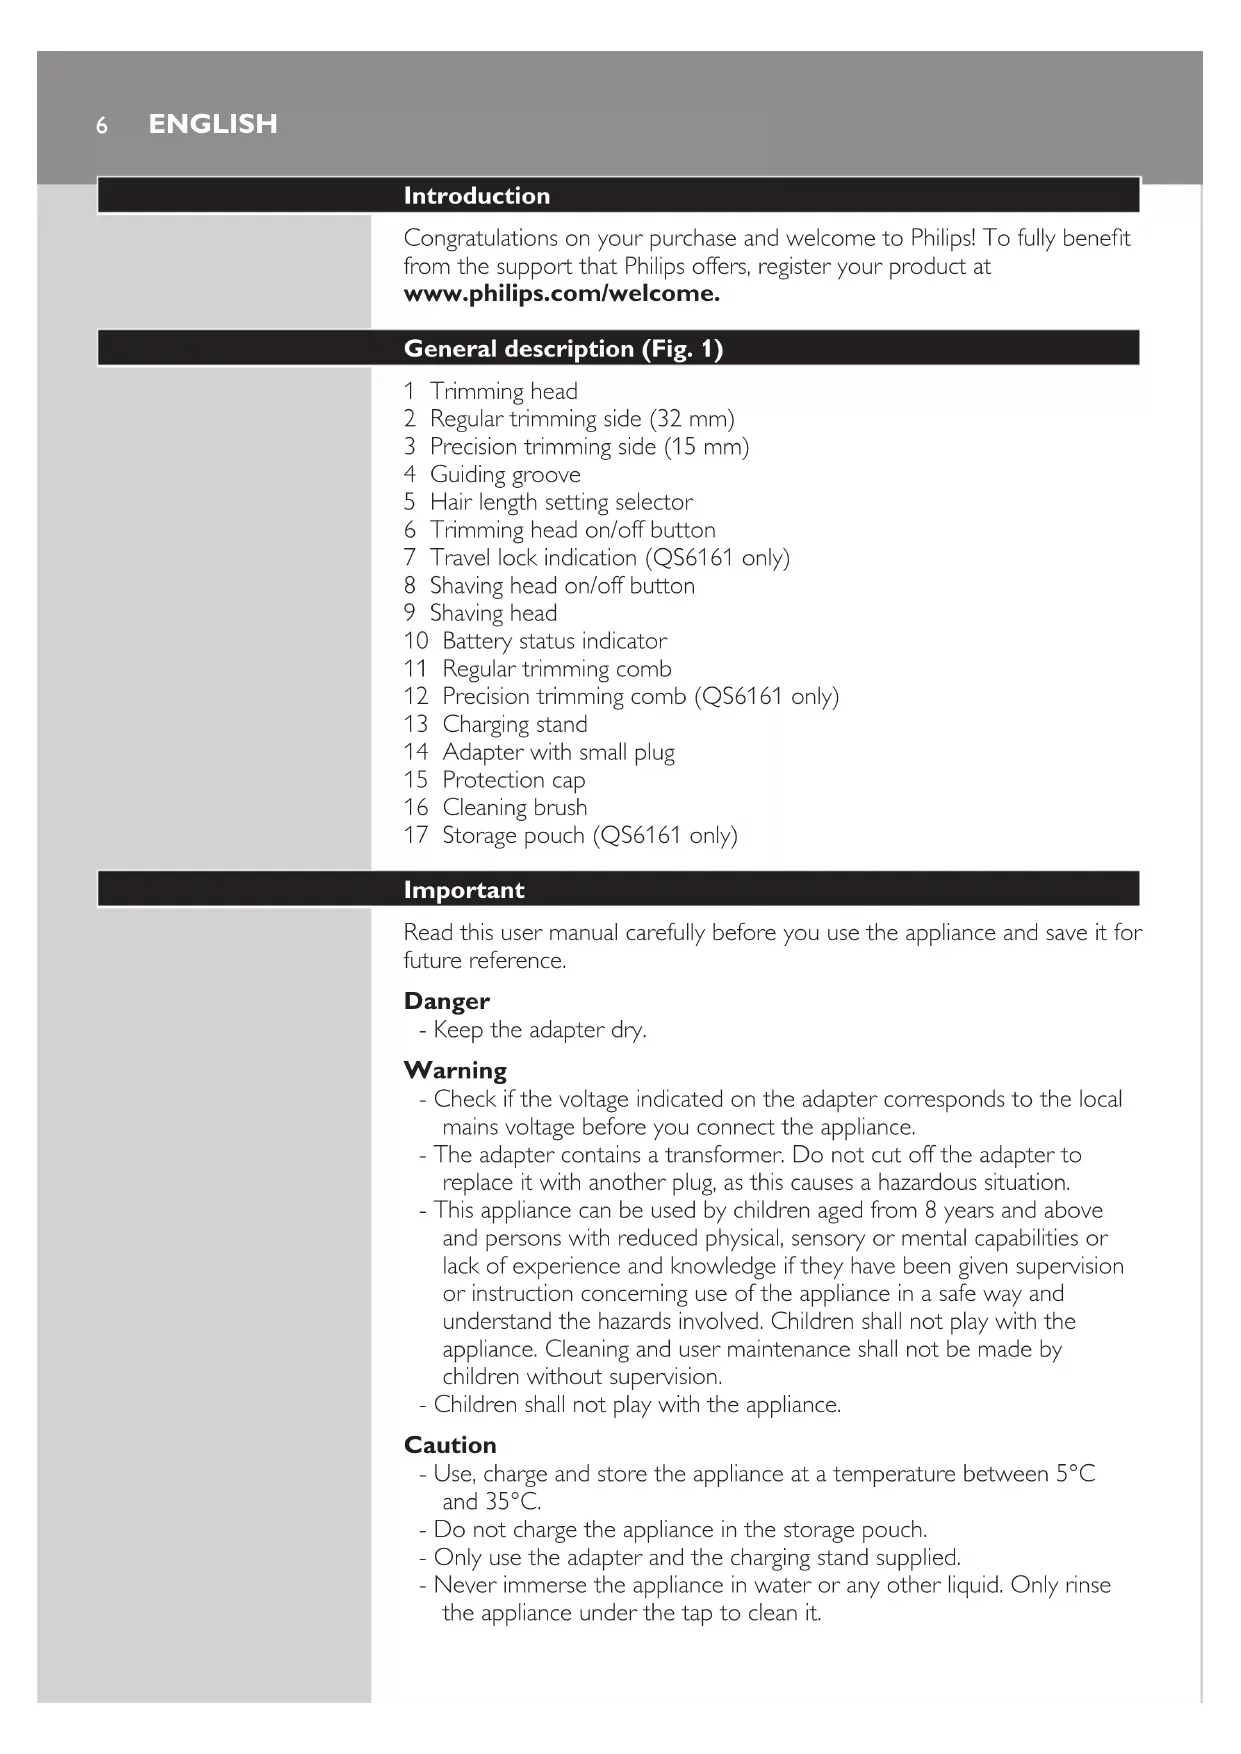
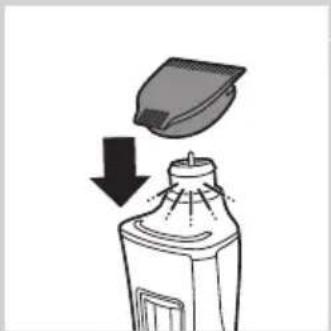
General description (Fig. 1)
1 Trimming head
2 Regular trimming side (32 mm)
3 Precision trimming side (15 mm)
4 Guiding groove
5 Hair length setting selector
6 Trimming head on/off button
7 Travel lock indication (QS6161 only)
8 Shaving head on/off button
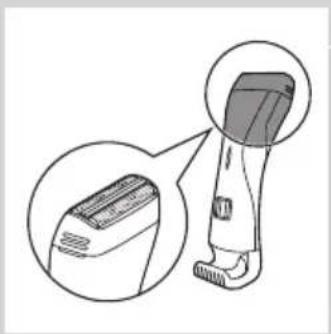
9 Shaving head
10 Battery status indicator
11 Regular trimming comb
12 Precision trimming comb (QS6161 only)
13 Charging stand
14 Adapter with small plug
15 Protection cap
16 Cleaning brush
17 Storage pouch (QS6161 only)
Important
Read this user manual carefully before you use the appliance and save it for future reference.
Danger
- Keep the adapter dry.
Warning
- Check if the voltage indicated on the adapter corresponds to the local mains voltage before you connect the appliance.
- The adapter contains a transformer. Do not cut off the adapter to replace it with another plug, as this causes a hazardous situation.
- This appliance can be used by children aged from 8 years and above and persons with reduced physical, sensory or mental capabilities or lack of experience and knowledge if they have been given supervision or instruction concerning use of the appliance in a safe way and understand the hazards involved. Children shall not play with the appliance. Cleaning and user maintenance shall not be made by children without supervision.
- Children shall not play with the appliance.
Caution
- Use, charge and store the appliance at a temperature between 5^ C and 35^ C.
- Do not charge the appliance in the storage pouch.
- Only use the adapter and the charging stand supplied.
- Never immerse the appliance in water or any other liquid. Only rinse the appliance under the tap to clean it.
- If the appliance is subjected to a major change in temperature, pressure or humidity, let the appliance acclimatise for 30 minutes before you use it.
- If the adapter or the charging stand is damaged, always have it replaced with one of the original types in order to avoid a hazard.
- Do not use the appliance if the shaving head or one of the trimming combs is damaged or broken, as this may cause injury.
- This appliance is only intended for trimming and dry shaving facial hair (beard, moustache and sideburns).
Compliance with standards
- The appliance complies with the internationally approved IEC safety regulations and can be safely used in the bath or shower.
- This Philips appliance complies with all applicable standards and regulations regarding exposure to electromagnetic fields.
Charging
QS6161 only: Charging normally takes approx. 1 hour.
QS6141 only: Charging normally takes approx. 4 hours.
When the appliance is fully charged, it has an operating time of 75 minutes.
Battery status indicator:
- When the battery status indicator flashes white, the battery is charging.
- When the battery status indicator lights up white continuously, the battery is fully charged. This indication is shown for 30 minutes. Then the battery status indicator goes out.
- When the battery status indicator flashes orange, the battery is almost empty (approx. 10 minutes of operating time left).
- When the battery status indicator flashes orange quickly, the battery is empty. You have to charge the appliance before you can use it again.
Note: The appliance can only be charged in the charging stand.

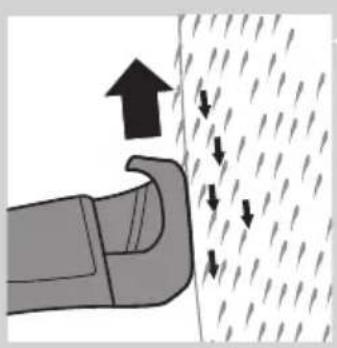
natural_image
Diagram showing a hand holding a tool with an inset close-up of a tool tip (no text or symbols)4 Put the appliance in the charging stand.
1 Insert the small plug into the charging stand.
Note: The small plug is easiest to insert when the charging stand is folded.
2 Unfold the charging stand ('click').
3 Put the adapter in the wall socket.

natural_image
Diagram of a mechanical or robotic arm with curved arrows indicating motion (no text or symbols)
natural_image
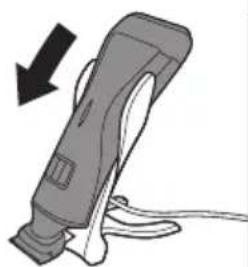
Illustration of a handheld electric shaver with a black arrow indicating compression or disassembly (no text or symbols)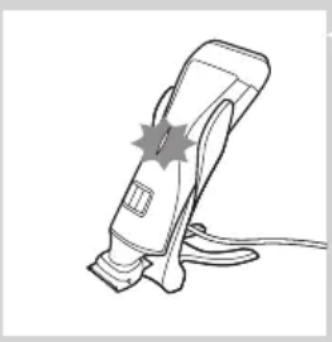
natural_image
Line drawing of a handheld electric shaver with a starburst effect on the blade (no text or symbols)The battery status indicator starts to flash white to indicate that the battery is charging.
When the battery is fully charged, the battery status indicator lights up white continuously.
Using the appliance
You can use the appliance to trim or dry shave facial hair (beard, moustache and sideburns). This appliance is not intended for shaving or trimming lower body parts.
Tip: Take your time when you first start to shave. You have to acquire practice with the appliance. Your skin also needs some time to adjust to the procedure.
Trimming with comb
The trimming combs allow you to trim to different lengths.
Start at the highest setting to acquire practice with this appliance.
See the table below for an overview of the hair length settings and the corresponding hair lengths.
Setting Hair length after trimming
| 1 1 mm - 3/64 inch. 1.5 mm - 1/16 inch2 2 mm - 5/65 inch. 2.5 mm - 3/32 inch3 3 mm - 1/8 inch4 4 mm - 5/32 inch5 5 mm - 3/16 inch6 6 mm - 1/4 inch7 7 mm - 9/32 inch8 8 mm - 5/15 inch9 9 mm - 3/8 inch10 10 mm - 13/32 in |
* no comb = 0.5mm - 1/32 inch
natural_image
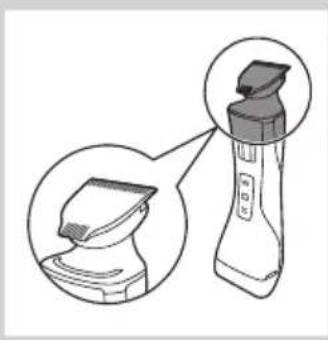
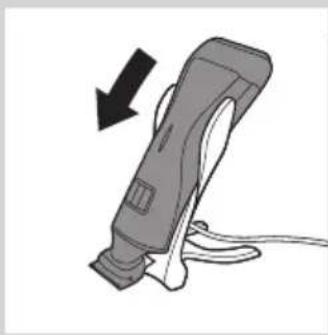
Illustration of a handheld device with a close-up view of its base (no text or symbols present)1 Hold the appliance in the trimming position, with the trimming head pointing upwards and the shaving head pointing downwards.
natural_image
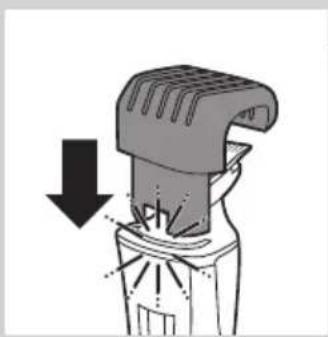
Diagram of a mechanical device with a downward arrow indicating compression or disassembly (no text or symbols present)2 Slide the comb into guiding groove of the appliance ('click').
natural_image
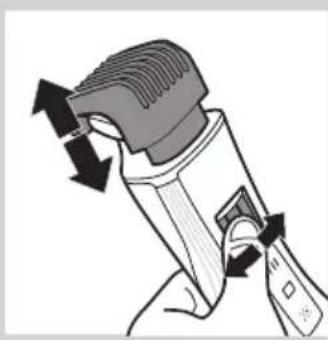
Illustration of a hand holding a handheld device with directional arrows indicating motion (no text or symbols)3 Press the hair length setting selector and then move it from left to right or right to left to select a setting.
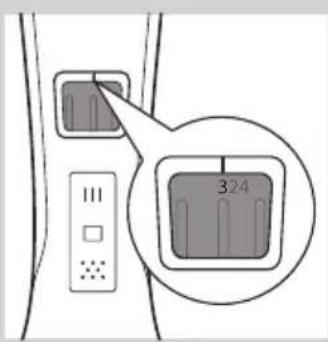
text_image
324- The line above the hair length setting selector shows which setting you have selected.
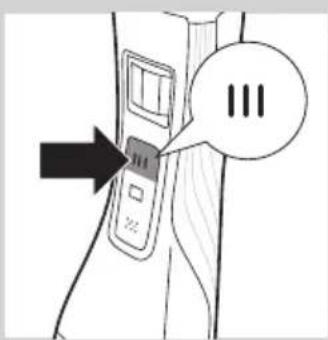
text_image
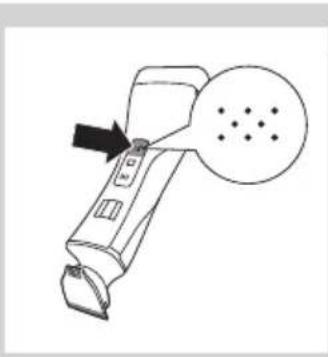
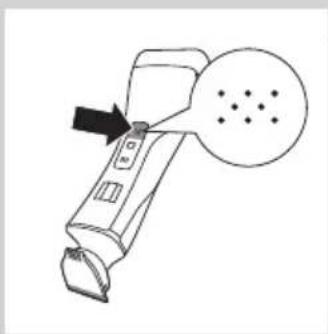
Diagram showing a device with three buttons and a speech bubble containing 'III', indicating a sequence or annotation.4 Press the trimming head on/off button once to switch on the trimming head. ▶QS6161 only: The on/off button lights up to indicate that the trimming head is operating.
natural_image
Diagram showing a hand pressing down a car hood with arrows indicating upward and downward motion (no text or symbols)
text_image
Diagram showing a device with three speech bubbles and an arrow pointing to it, possibly indicating a step or sequence.5 To trim the hair, move the trimming comb through the hair slowly.
Tips
- Always make sure that the tips of the trimming comb points in the direction in which you move the appliance.
- Make sure that the flat part of the trimming comb is always in full contact with the skin to obtain an even hair length result.
- Since hair grows in different directions, you need to move the appliance in different directions as well (upward, downward or across).
- You can switch on the trimming head while the shaving head is operating. If you do this, the shaving head is switched off immediately.
- Trimming is easier when the skin and hair are dry.
6 When you are finished, press the trimming head on/off button again to switch off the trimming head.
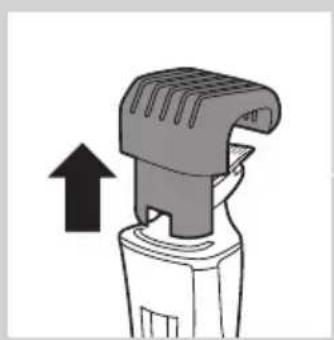
Trimming without comb
natural_image
Diagram of a mechanical device with an upward arrow indicating motion (no text or symbols present)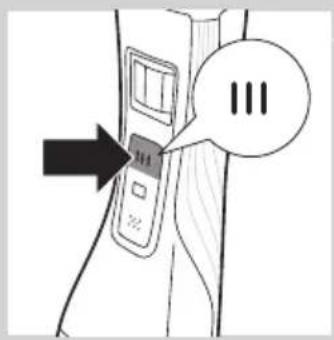
text_image
Diagram showing a device with three speech bubbles labeled 'III' pointing to its left panel, indicating a sequence or status.The comb keeps the trimming head at a set distance from your head. You can use the trimming head without comb. If you use the trimming head without comb, your hair is cut off close to the skin (approx. 0.5 mm).
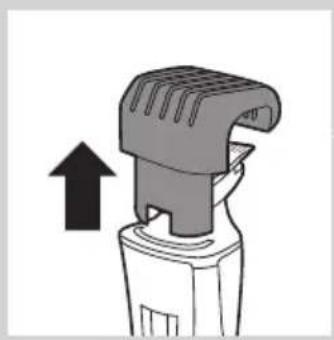
1 To remove the comb, pull it off the appliance.
Never pull at the flexible top of the comb. Always pull at the bottom part.
2 Press the trimming head on/off button to switch on the trimming head.
3 Hold the appliance with the trimming head pointing upwards and make downward strokes with the regular side of the trimming head.
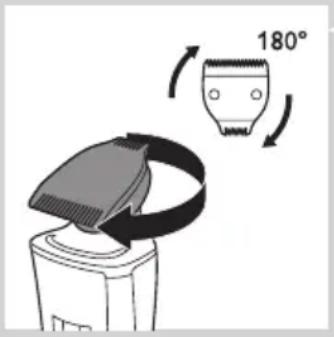
Using the precision side of the trimming head
The precision trimming head is only half as wide as the regular trimming head. It therefore allows more precise styling of the area around the ears, the sideburns and also around the mouth and under the nose.
text_image
180°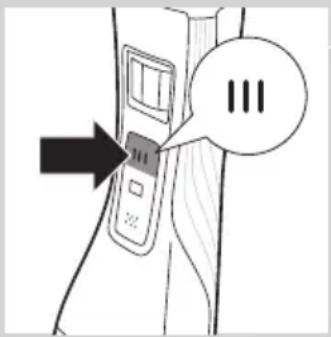
text_image
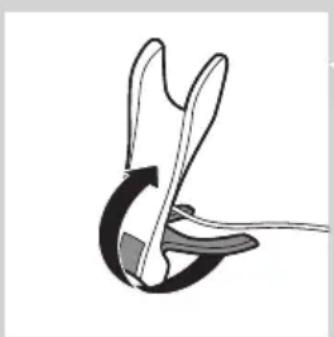
Diagram showing a device with three buttons and an arrow pointing to it, labeled 'III' in a speech bubble.1 To use the precision side of the trimming head, simply turn the trimming head until the precision side points towards the front of the appliance.
2 Press the trimming head on/off button to switch on the trimming head.
3 Hold the appliance with the trimming head pointing upwards and make downward strokes with the precision trimming head.
Shaving
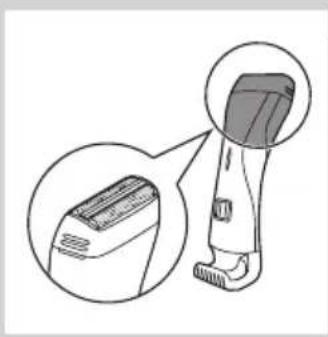
Before you use the shaving head, always check it for damage or wear. If the shaving head is damaged or worn, do not use it, as injury may occur. Replace a damaged shaving head before you use it again (see chapter 'Replacement').
Shaving tips and tricks
- The shaving head is suitable for both wet and dry use. Use the shaving head with shaving gel or foam for extra skin comfort, or use the shaving head dry for extra convenience.
Note: We advise you to use the shaving head with shaving gel or foam when you use it for a wet shave. Do not use thick shaving cream or shaving oil with this shaver.
- Make sure that the shaving head is in full contact with the skin.
- You can switch on the shaving head while the trimming head is operating. If you do this, the trimming head is switched off immediately.
- Your skin may need 2 or 3 weeks to get accustomed to the Philips shaving system.
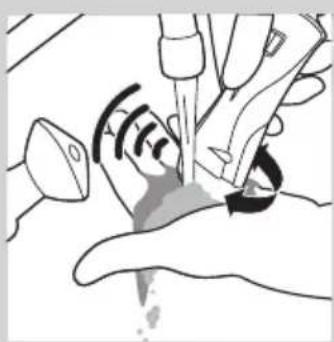
Wet shaving
1 Apply some water to your skin.
natural_image
Line drawing of a person applying facial massage or pressure to the ear (no text or symbols)ENGLISH ^12
natural_image
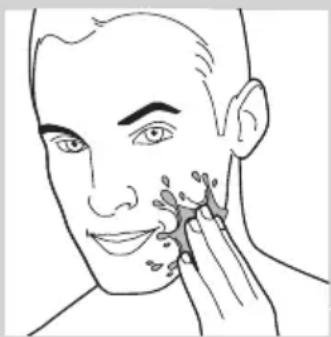
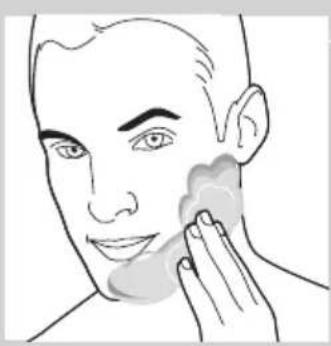
Line drawing of a person applying product to their face with a sponge (no text or symbols)2 Apply shaving foam or shaving gel to your skin.
3 Rinse the shaving unit under the tap to ensure that the shaving unit glides smoothly over your skin.
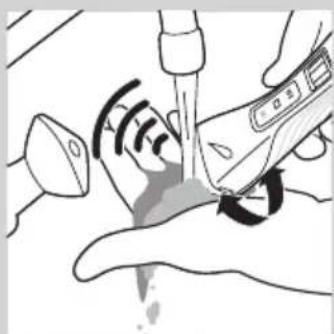
4 Hold the appliance in the shaving position, with the shaving head pointing upwards and the trimming head pointing downwards.
natural_image
Illustration of a hairbrush with magnified inset showing the blade and jaw (no text or symbols)5 Press the shaving head on/off button once to switch on the shaving head.
QS6161 only: The on/off button lights up to indicate that the shaving head is operating.

natural_image
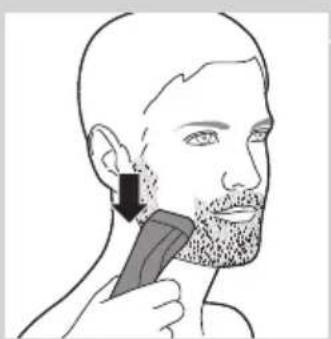
Line drawing of a handheld device with an arrow pointing to a button and a dotted circle containing dots (no text or symbols)6 Place the shaving head on the skin and move the appliance against the direction of hair growth while you press it lightly.
natural_image
Line drawing of a person applying a hairbrush to their ear (no text or symbols present)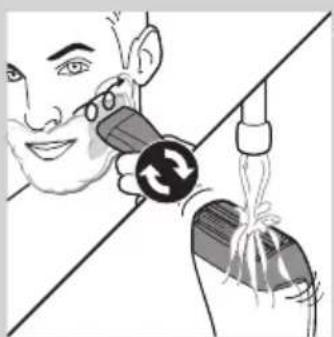
natural_image
Illustration of a person using a medical device to interact with another person (no text or symbols present)Note: Rinse the shaving head under the tap regularly to ensure that it continues to glide smoothly over your skin.
natural_image
Line drawing of a handheld device with a circular button and arrow pointing to it (no text or symbols)7 To switch off the shaving head after use, press the shaving head on/off button again.
8 Clean the shaving head (see chapter 'Cleaning and maintenance', section 'Quick cleaning the shaving head after wet shaving').
Note: Make sure you rinse all foam or shaving gel off the shaver.
natural_image
Illustration of a hairbrush with magnified inset showing the blade and handle (no text or symbols)Dry shaving
1 Hold the appliance in the shaving position, with the shaving head pointing upwards and the trimming head pointing downwards.
natural_image
Line drawing of a handheld device with an arrow pointing to a screen and a dotted pattern inside (no text or symbols)2 Press the shaving head on/off button once to switch on the shaving head.
QS6161 only: The on/off button lights up to indicate that the shaving head is operating.

natural_image
Illustration of a person using a hairbrush to apply product to their face (no text or symbols present)3 Place the shaving head on the skin and move the appliance against the direction of hair growth while you press it lightly.

natural_image
Line drawing of a handheld device with an arrow pointing to a screen and a dotted circle (no text or symbols)4 To switch off the shaving head after use, press the shaving head on/off button again.
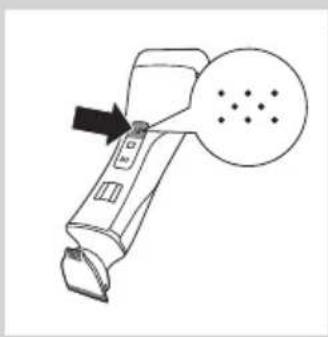
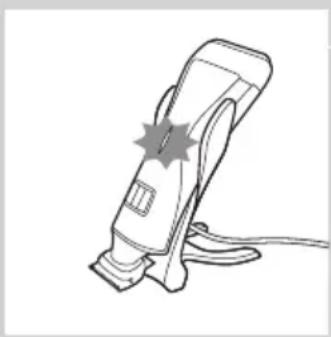
Overload protection
If you press the trimming head or shaving head too hard onto your skin or if its cutters gets blocked (e.g. by clothes etc.), the on/off button of the blocked trimming head or shaving head flashes quickly (QS6161 only) and the appliance switches off automatically. Remove whatever is blocking the cutters before you use the appliance again.
Cleaning and maintenance
Clean the appliance after every use.
Never use compressed air, scouring pads, abrasive cleaning agents or aggressive liquids such as petrol or acetone to clean the appliance.
Only clean the appliance and the adapter with the cleaning brush supplied.
Note: The trimming head and shaving head do not need any lubrication.
Cleaning the trimming head
1 Switch off the appliance.
2 Pull the comb off the trimming head.
3 Clean the trimming head under the tap.
Cleaning the trimming head connector
Note: Make sure that you clean the trimming head connector at least once every three months.
natural_image
Diagram of a hairbrush with an arrow indicating upward motion (no text or symbols)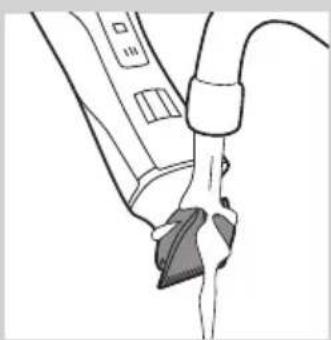
natural_image
Line drawing of a hand holding a device with a cable, no text or symbols present
text_image
Diagram showing a device with three speech bubbles labeled 'III' pointing to its left panel, indicating a sequence or annotation.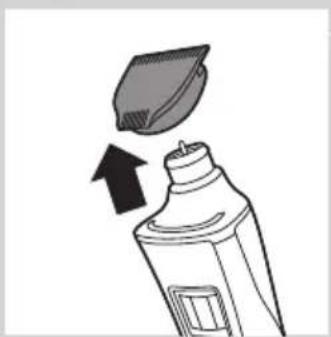
natural_image
Illustration of a toothpaste being poured into a bottle with an arrow indicating direction (no text or symbols)1 Switch off the appliance.
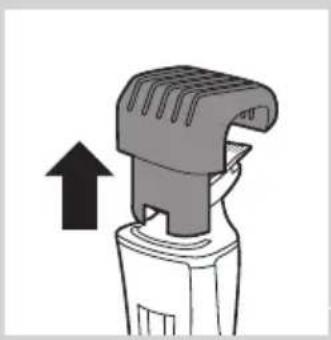
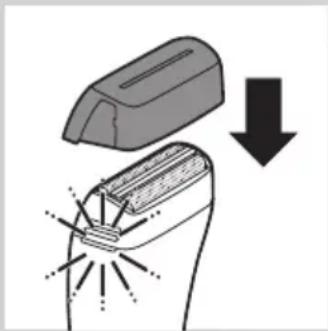
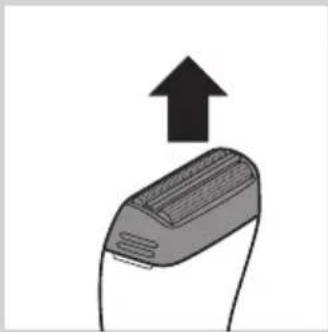
2 Gently pull the trimming head off the appliance.
natural_image
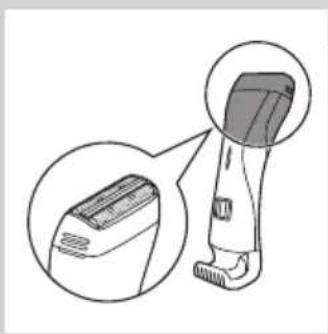
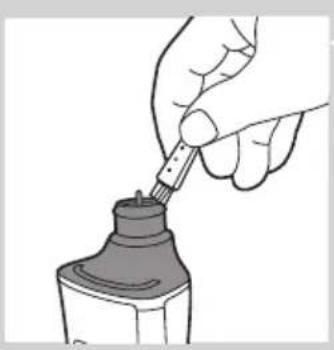
Illustration of a hand using a pipette to apply liquid into a bottle (no text or symbols visible)3 Remove the hairs from the inside of the trimming head connector with the cleaning brush.
natural_image
Hand holding a small mechanical component with a rod inserted, no visible text or symbols4 Clean the inside of the trimming head with the cleaning brush.
natural_image
Illustration of a spray bottle with a downward arrow indicating process (no text or symbols)5 After cleaning, put the trimming head back onto the appliance.
Quick cleaning of the shaving head after wet shaving or shaving with shaving foam
1 Cup your hand under a running tap and fill it with water.
natural_image
Illustration of a hand holding a medical device with a catheter inserted, showing internal components and a waveform (no text or symbols)2 Switch on the appliance and hold the shaving head in the water collected in your cupped hand.
The running motor will help clean the inside of the shaving head.
natural_image
Illustration of a medical procedure with surgical tools and a hand holding a needle (no text or symbols)3 Move the shaving head around until all visible foam has disappeared.
Note: The shaving head is fragile. Handle it carefully. Replace the shaving head if it is damaged.
natural_image
Line drawing of a handheld device with an arrow pointing to a circular diagram containing dots (no text or symbols)
natural_image
Illustration of a device with an upward arrow indicating motion or direction (no text or symbols)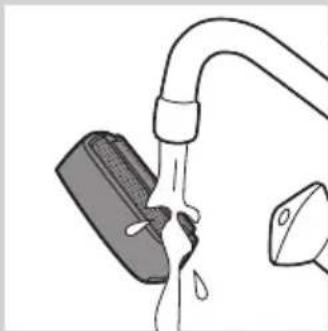
natural_image
Illustration of a faucet with a water droplet inside, connected to a container (no text or symbols)
natural_image
Hand inserting a plug into a connector (no text or symbols visible)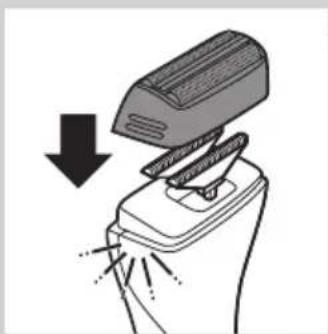
natural_image
Illustration of a hand presser emitting powder from a tray (no text or symbols)Thoroughly cleaning of the shaving head
1 Switch off the appliance.
2 Pull the shaving head off the appliance.
Note: The shaving head is fragile. Handle it carefully. Replace the shaving head if it is damaged.
3 Rinse the shaving head with lukewarm water.
Do not clean the shaving head with the cleaning brush, as this may cause damage.
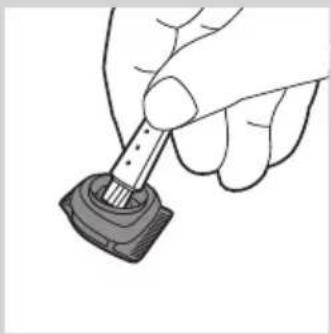
4 Remove hairs from the cutters with the cleaning brush.
Note: Do not brush the cutters in a different direction then indicated, as this may cause damage.
5 After cleaning, snap the shaving head back onto the appliance ('click').
Replacement
In case of frequent use, replace the shaving foil and the cutters every year.
Shaving foil
1 Pull the shaving head off the appliance.
2 Remove the old shaving foil from the shaving head.
3 Snap the new shaving foil into the shaving head ('click').
Cutters
1 Pull the shaving head off the appliance.
2 Remove the cutters.
3 Snap the new cutters onto the appliance ('click').
Storage
You can fold the charging stand for easy travelling or storage.
1 To fold the charging stand: fold the base of the charging stand against the appliance holder.
natural_image
Diagram of a mechanical or electrical component with curved and straight lines, no visible text or symbols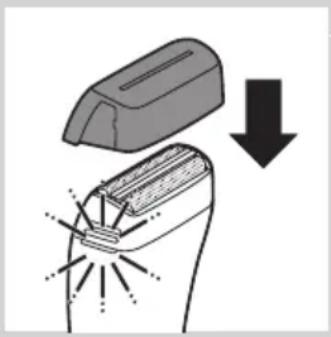
natural_image
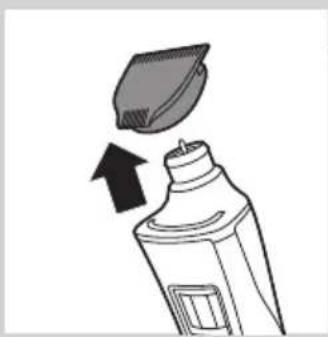
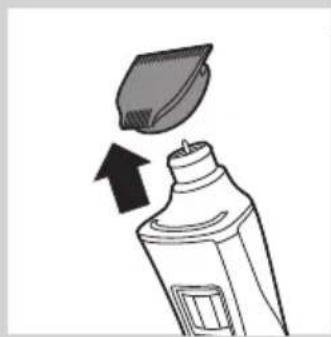
Diagram showing a welding process with an open weld pad and a downward arrow indicating compression (no text or symbols)2 Put the protection cap on the shaving unit.
Travel lock (QS6161 only)
The appliance has an integrated travel lock which prevents the appliance from accidentally being switched on during travel.
1 To activate the travel lock, press and hold the trimming head on/off button, the shaving head on/off button or both for at least 4 seconds while the travel lock indication flashes 3 times.
The travel lock is only activated when the indication lights up continuously.
2 To deactivate the travel lock, press and hold the trimming head on/off button, the shaving head on/off button or both for at least 4 seconds while the travel lock indication flashes 4 times.
The travel lock is now deactivated and the appliance switches on.
Note: You can also deactivate the travel lock by charging the appliance.
Ordering accessories
To buy accessories or spare parts, visit www.shop.philips.com/service or go to your Philips dealer. You can also contact the Philips Consumer Care Centre in your country (see the worldwide guarantee leaflet for contact details).
Environment
natural_image
Symbol of a trash bin with crossed lines indicating no waste or restriction, accompanied by a solid black rectangle below (no text or symbols)- Do not throw away the appliance with the normal household waste at the end of its life, but hand it in at an official collection point for recycling. By doing this, you help to preserve the environment.
- The built-in rechargeable battery contains substances that may pollute the environment. Always remove the battery before you discard and hand in the appliance at an official collection point. Dispose of the battery at an official collection point for batteries. If you have trouble removing the battery, you can also take the appliance to a Philips service centre. The staff of this centre will remove the battery for you and will dispose of it in an environmentally safe way.
Removing the rechargeable battery
Only remove the rechargeable battery if it is completely empty.
1 Disconnect the appliance from the mains and let the appliance run until the motor stops.
2 Remove the shaving head and the cutters from the appliance.
3 Undo the four screws of the top cover with a screwdriver.
4 Remove the cover.
5 Insert a screwdriver under the back panel and remove the panel.
6 Insert the screwdriver under the cover of the basic body and remove the cover.
Now you see a printed-circuit board.
7 Break the battery from the printed-circuit board.
Be careful, the battery strips are very sharp.
Guarantee and support
If you need information or support, please visit www.philips.com/support or read the separate worldwide guarantee leaflet.
Introducción
natural_image
Simple line drawing of a showerhead spraying over a water-filled basin (no text or symbols)natural_image
Diagram of a tool with a magnified inset showing a mechanical component (no text or symbols)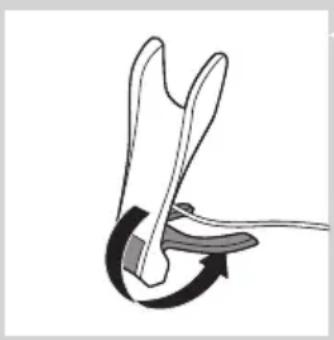
natural_image
Diagram of a mechanical or robotic joint with a curved arrow indicating rotation (no text or symbols present)natural_image
Illustration of a handheld device with a black arrow indicating motion (no text or symbols)natural_image
Line drawing of a handheld electric shaver with a starburst symbol on the blade (no text or labels)natural_image
Illustration of a handheld device with a close-up view of its cover (no text or symbols present)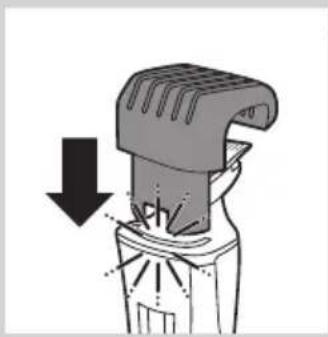
natural_image
Diagram of a mechanical device with a downward arrow indicating compression or disassembly (no text or symbols present)
natural_image
Illustration of a hand holding a handheld device with directional arrows indicating motion (no text or symbols)text_image
Diagram showing a device with three circles labeled 'III' pointing to its position on the back, with an arrow pointing to it.natural_image
Illustration of a car door handle with arrows indicating upward and downward motion, against a patterned background (no text or symbols)natural_image
Diagram of a hairdryer with an upward arrow indicating motion (no text or symbols)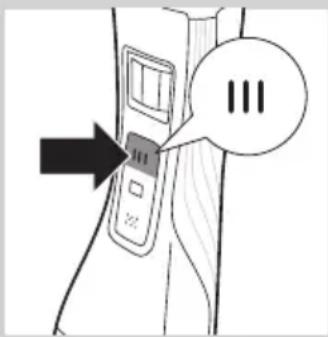
text_image
Diagram showing a device with three buttons and a speech bubble containing 'III', indicating a sequence or status.text_image
Diagram showing a device with three speech bubbles labeled 'III' pointing to its left panel, indicating a sequence or annotation.natural_image
Line drawing of a person applying facial massage or pressure to the ear (no text or symbols)
natural_image
Line drawing of a person applying face-to-face care to their ear (no text or symbols)
natural_image
Illustration of a hairless tool with a magnified inset showing the blade and base (no text or symbols)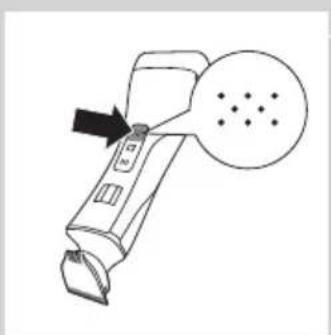
natural_image
Line drawing of a handheld device with an arrow pointing to a screen and a dotted circle (no text or symbols)natural_image
Illustration of a person using a hairbrush to apply product to their neck (no text or symbols present)
natural_image
Illustration of a person using a handheld device to interact with another device (no text or symbols visible)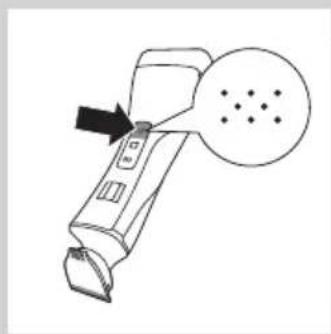
natural_image
Line drawing of a handheld device with an arrow pointing to a circular diagram containing dots (no text or symbols)
natural_image
Illustration of a hairbrush with magnified detail view (no text or symbols)
natural_image
Line drawing of a handheld device with an arrow pointing to a circular diagram containing dots (no text or symbols)natural_image
Illustration of a person using a hairbrush to apply a specific part of their ear (no text or symbols present)natural_image
Line drawing of a handheld device with a black arrow pointing to a circular button labeled 'S' (no text or symbols on the device itself)natural_image
Illustration of a hairdryer with an upward arrow indicating motion (no text or symbols)
natural_image
Line drawing of a hand holding a device with a mesh plug inserted (no text or symbols)ESPAÑOL28

text_image
Diagram showing a device with three buttons and a speech bubble containing 'III', indicating a sequence or status.natural_image
Illustration of a toothpaste being poured into a bottle with an arrow indicating direction (no text or symbols)natural_image
Hand holding a pipette dispensing liquid into a bottle (no text or symbols visible)natural_image
Hand holding a small mechanical component with a rod inserted (no text or symbols visible)natural_image
Illustration of a spray bottle emitting powder from a container with a lid, showing downward motion (no text or symbols)natural_image
Illustration of a hand holding a medical device with a catheter and pulse symbol (no text or labels)natural_image
Illustration of a medical procedure with surgical tools and a hand holding a needle (no text or symbols present)natural_image
Line drawing of a handheld device with an arrow pointing to a circular button labeled 'P' (no text or symbols on the device itself)natural_image
Illustration of a device with an upward arrow indicating motion or direction (no text or symbols)natural_image
Diagram of a hand washing a water bottle with a pipe, showing liquid flow (no text or symbols)natural_image
Hand using a tool to adjust or install a mechanical component (no text or symbols visible)natural_image
Illustration of a hand presser pressing down on a device with arrows indicating force (no text or symbols)natural_image
Diagram of a mechanical or electrical component with curved and straight sections, no visible text or symbols
natural_image
Diagram showing a welding torch with a downward arrow indicating compression or disassembly (no text or symbols present)natural_image
Symbol of a waste bin with crossed lines indicating no waste, and a solid black rectangle below (no text or labels)natural_image
Symbol of a trash bin crossed with a diagonal line, representing no waste or discharge (no text or numbers present)natural_image
Simple line drawing of a showerhead spraying over a water-filled basin (no text or symbols)natural_image
Illustration of a hand holding a tool with an inset showing a magnified view of the tool (no text or symbols present)
natural_image
Diagram of a mechanical or electrical component with curved arrows indicating motion (no text or symbols)
natural_image
Illustration of a handheld electric shaver with a black arrow indicating motion (no text or symbols)natural_image
Line drawing of a handheld electric shaver with a starburst symbol on the handle (no text or symbols present)natural_image
Illustration of a handheld device with a close-up inset showing its lid and base (no text or symbols)natural_image
Diagram of a mechanical device with a downward arrow indicating compression or disassembly (no text or symbols present)natural_image
Illustration of a hand holding a handheld device with directional arrows indicating motion (no text or symbols)text_image
Diagram showing a device with three buttons labeled 'III' and an arrow pointing to it, with speech bubble containing the number 'III'.natural_image
Illustration of a hand gripping a car with arrows indicating upward and downward motion (no text or symbols)text_image
Diagram showing a device with three buttons and a speech bubble containing '三' (three) in Chinese.Tonte sans sabot
natural_image
Diagram of a hairdryer with an upward arrow indicating motion (no text or symbols)text_image
Diagram showing a device with three speech bubbles and an arrow pointing to it, possibly indicating a step or sequence.text_image
Diagram showing a device with three circles labeled 'III' pointing to its position, and an arrow pointing to it.natural_image
Line drawing of a person applying facial contour to the nose area, with no text or symbols present.natural_image
Line drawing of a person applying a product to their face, showing the tooth and mouth area (no text or symbols)natural_image
Illustration of a hairbrush with magnified inset showing internal structure (no text or symbols)natural_image
Line drawing of a handheld device with a black arrow pointing to a circular button labeled 'S' (no text or symbols on the device itself)natural_image
Line drawing of a person applying a hair to their ear with a comb (no text or symbols)natural_image
Illustration of a person using a handheld device to interact with a bag, showing a circular arrow symbol (no text or labels present)
natural_image
Line drawing of a handheld device with an arrow pointing to a circular diagram containing dots (no text or symbols)
natural_image
Illustration of a hairless tool with an inset close-up view showing the blade and handle (no text or symbols)
natural_image
Line drawing of a handheld device with an arrow pointing to a circular button labeled 'D' (no text or symbols on the device itself)
natural_image
Line drawing of a person applying a hairbrush to their ear (no text or symbols)natural_image
Line drawing of a handheld device with a circular button and pointer, no text or symbols presentProtection anti-surcharge
natural_image
Diagram of a hairbrush with an arrow indicating upward motion (no text or symbols)
natural_image
Line drawing of a medical procedure with a tool inserted into a device (no text or symbols present)FRANÇAIS42

text_image
Diagram showing a device with three buttons and a speech bubble containing 'III', indicating a sequence or status.natural_image
Illustration of a toothpaste being poured into a bottle with an arrow indicating direction (no text or symbols)natural_image
Hand holding a pipette dispensing liquid into a bottle (no text or symbols visible)natural_image
Hand holding a small mechanical component with a rod inserted (no text or symbols visible)natural_image
Illustration of a spray bottle emitting powder from a container with a lid, showing downward motion (no text or symbols)natural_image
Illustration of a hand holding a medical device with a sensor symbol and forceps, no text or labels presentnatural_image
Illustration of a medical procedure with surgical tools and a hand holding a needle (no text or symbols)natural_image
Line drawing of a handheld device with an arrow pointing to a circular button labeled 'P' (no text or symbols on the device itself)natural_image
Illustration of a device with an upward arrow indicating motion or direction (no text or symbols)natural_image
Diagram of a hand washing a water bottle with a pipe, showing liquid flow (no text or symbols)natural_image
Hand using a tool to adjust or install a mechanical component (no text or symbols visible)natural_image
Illustration of a mechanical device with a downward arrow indicating compression or disassembly (no text or symbols present)natural_image
Diagram of a mechanical or electrical component with curved and straight lines, no visible text or symbolsnatural_image
Diagram showing a welding torch with a downward arrow indicating compression or disassembly (no text or symbols present)natural_image
Symbol of a waste bin with crossed lines indicating no waste, and a solid black rectangle below (no text or labels)natural_image
Simple line drawing of a showerhead spraying over a water-filled basin (no text or symbols)natural_image
Diagram showing a hand holding a tool with an inset close-up of the handle (no text or symbols)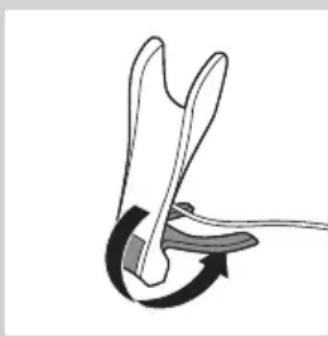
natural_image
Diagram of a mechanical or electrical component with curved arrows indicating motion (no text or symbols)
natural_image
Illustration of a handheld electric shaver with a black arrow indicating motion (no text or symbols)4 Pasang alat di dudukan pengisi daya.
natural_image
Line drawing of a handheld electric shaver with a starburst symbol on the handle (no text or symbols present)natural_image
Illustration of a cleaning brush with a magnified inset showing the blade and base (no text or symbols)natural_image
Diagram of a mechanical device with a downward arrow indicating compression or disassembly (no text or symbols present)natural_image
Illustration of a hand holding a handheld device with directional arrows indicating motion (no text or symbols)text_image
Diagram showing a device with three buttons and an arrow pointing to it, labeled 'III' in speech bubble.natural_image
Diagram showing a car door with arrows indicating upward and downward motion, next to a textured surface with directional arrows (no text or symbols)text_image
Diagram showing a device with three circles labeled 'III' and an arrow pointing to it, likely indicating a step or sequence.natural_image
Diagram of a hairbrush with an arrow indicating upward motion (no text or symbols)text_image
Diagram showing a device with three speech bubbles labeled 'III' pointing to its left panel, indicating a sequence or annotation.text_image
Diagram showing a device with three speech bubbles and an arrow pointing to it, possibly indicating a sequence or annotation.natural_image
Line drawing of a person applying facial contour to the nose area, with no text or symbols present.Pencukuran basah
natural_image
Line drawing of a person applying a product to their face, showing the tooth and mouth area (no text or symbols)natural_image
Illustration of a hairbrush with magnified inset showing internal structure (no text or symbols)natural_image
Line drawing of a handheld device with a black arrow pointing to a circular button labeled 'S' (no text or symbols on the device itself)natural_image
Line drawing of a person's head with a hairpin and beard, showing a specific technique to apply (no text or symbols present)natural_image
Illustration of a person using a handheld device to interact with a bag, showing a circular arrow symbol (no text or labels present)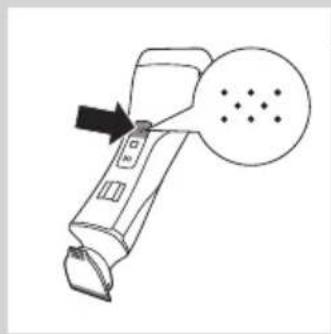
natural_image
Line drawing of a handheld device with an arrow pointing to a circular diagram containing dots (no text or symbols)
natural_image
Illustration of a hairless tool with an inset close-up view (no text or symbols)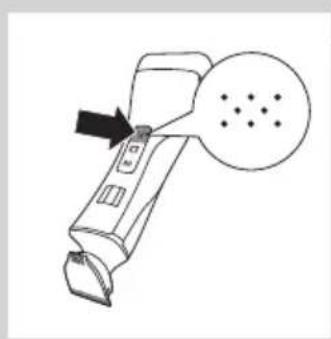
natural_image
Line drawing of a handheld device with an arrow pointing to a circular button labeled 'D' (no text or symbols on the device itself)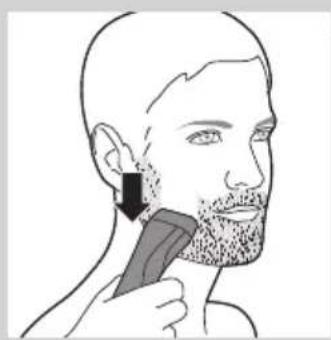
natural_image
Line drawing of a person applying a hairbrush to their ear (no text or symbols)natural_image
Line drawing of a handheld device with a circular button and arrow pointing to it (no text or symbols)natural_image
Diagram of a hairbrush with an arrow indicating upward motion (no text or symbols)
natural_image
Line drawing of a medical procedure with tubing and a clip (no text or symbols)INDONESIA56

text_image
Diagram showing a device with three buttons and a speech bubble containing 'III', indicating a sequence or status.1 Matikan alat.
natural_image
Illustration of a toothpaste being poured into a bottle with an arrow indicating direction (no text or symbols)natural_image
Illustration of a hand using a pipette to apply liquid into a bottle (no text or symbols visible)natural_image
Hand holding a small mechanical component with a rod inserted (no text or symbols visible)natural_image
Illustration of a spray bottle emitting powder from a container with a lid, showing downward motion (no text or symbols)natural_image
Illustration of a hand holding a medical device with a sensor symbol and forceps, no text or labels presentnatural_image
Illustration of a medical procedure with surgical tools and a hand holding a needle (no text or symbols present)natural_image
Line drawing of a handheld device with an arrow pointing to a circular button labeled 'P' (no text or symbols on the device itself)natural_image
Illustration of a device with an upward arrow indicating motion or direction (no text or symbols)natural_image
Diagram of a hand washing a water bottle with a pipe, showing liquid flow (no text or symbols)natural_image
Illustration of a hand presser pressing down on a device with a downward arrow indicating compression (no text or symbols present)natural_image
Diagram of a mechanical or anatomical component with curved and linear features, no visible text or symbolsnatural_image
Illustration of a welding torch with a downward arrow indicating compression or disassembly (no text or symbols present)natural_image
Symbol of a trash bin crossed with no text or symbols, representing waste sorting or disposal (no text present)natural_image
Illustration of a hand holding a tool with an inset showing a close-up of the tool tip (no text or symbols present)natural_image
Diagram of a mechanical or anatomical component with curved arrows indicating motion (no text or symbols)4 제품을 충전대에 올려놓으십시오.
natural_image
Illustration of a handheld device with a black arrow indicating compression or disassembly (no text or symbols)
natural_image
Line drawing of a handheld electric shaver with a starburst symbol on the blade (no text or labels)natural_image
Illustration of a hairdryer with a magnified inset showing the device's base and handle (no text or symbols)natural_image
Diagram of a mechanical device with a downward arrow indicating compression or disassembly (no text or symbols present)natural_image
Illustration of a hand holding a handheld device with directional arrows indicating motion (no text or symbols)text_image
Diagram showing a device with three buttons and a speech bubble containing 'III', indicating a sequence or annotation.natural_image
Illustration of a hand holding a curved object with arrows indicating flow or movement (no text or symbols)text_image
Diagram showing a device with three speech bubbles labeled 'III' pointing to its left side of the screen.natural_image
Diagram of a mechanical device with an upward arrow indicating motion (no text or symbols present)text_image
Diagram showing a device with three speech bubbles and an arrow pointing to it, possibly indicating a sequence or annotation.text_image
Diagram showing a device with three speech bubbles and an arrow pointing to it, possibly indicating a sequence or annotation.natural_image
Line drawing of a person applying facial massage or pressure to their face (no text or symbols)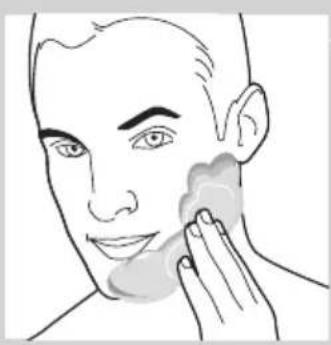
natural_image
Line drawing of a person applying a product to their face, no text or symbols present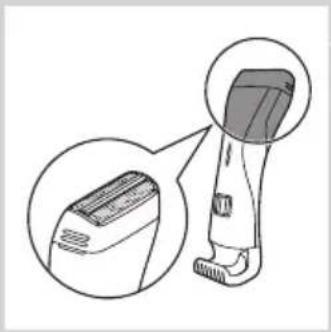
natural_image
Illustration of a hairless instrument with magnified detail view (no text or symbols)
natural_image
Line drawing of a handheld device with an arrow pointing to a screen and a dotted circle (no text or symbols)
natural_image
Line drawing of a person applying a hairbrush to their ear (no text or symbols)natural_image
Illustration of a person using a handheld device with a circular button and mechanical components (no text or symbols)natural_image
Line drawing of a handheld device with an arrow pointing to a screen and a dotted circle (no text or symbols)natural_image
Illustration of a hairless vacuum cleaner with a magnified inset showing the blade structure (no text or symbols)건식 면도
natural_image
Line drawing of a handheld device with an arrow pointing to a screen and a dotted circle nearby (no text or symbols)natural_image
Line drawing of a person applying a hairbrush to their ear (no text or symbols present)natural_image
Line drawing of a handheld device with an arrow pointing to a screen and a dotted circle (no text or symbols)natural_image
Diagram of a hairbrush with an arrow indicating upward motion (no text or symbols)
natural_image
Line drawing of a medical procedure showing a hand holding a device connected to a catheter (no text or symbols present)
text_image
Diagram showing a device with three buttons and an arrow pointing to it, labeled 'III' in speech bubble.1 제품 전원을 끄십시오.
natural_image
Illustration of a brush applying liquid to a bottle, with an arrow indicating the process (no text or symbols present)natural_image
Illustration of a hand using a pipette to apply liquid into a bottle (no text or symbols visible)natural_image
Hand holding a small mechanical component with a rod inserted (no text or symbols visible)natural_image
Illustration of a spray bottle emitting powder from a bag, with a downward arrow indicating motion (no text or symbols)natural_image
Illustration of a hand holding a medical device with a close-up view of the patient's ear and ear (no text or symbols present)
natural_image
Illustration of a medical procedure with gloved hands and surgical tools (no text or symbols)
natural_image
Line drawing of a handheld device with a black arrow pointing to a circular button labeled 'D' (no text or symbols on the device itself)
natural_image
Illustration of a device with an upward arrow indicating growth or direction (no text or symbols)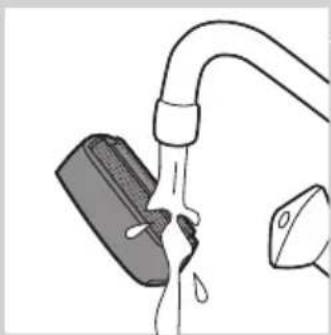
natural_image
Simple line drawing of a faucet with a submerged object and liquid, no text or symbols presentnatural_image
Hand using a tool to adjust or install electronic components on a terminal (no text or symbols visible)natural_image
Illustration of a printer with a downward arrow indicating compression or disassembly (no text or symbols present)natural_image
Diagram of a mechanical component with two curved arms and a central shaft (no text or symbols)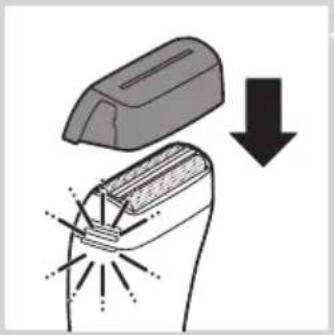
natural_image
Diagram showing a device with a lid and a downward arrow indicating process (no text or symbols)natural_image
Symbol of a waste bin with crossed lines indicating no waste, and a solid black rectangle below (no text or labels)natural_image
Simple line drawing of a showerhead spraying over a water-filled basin (no text or symbols)Awas
natural_image
Illustration of a tool tip with an inset showing a magnified view of the tool tip (no text or symbols present)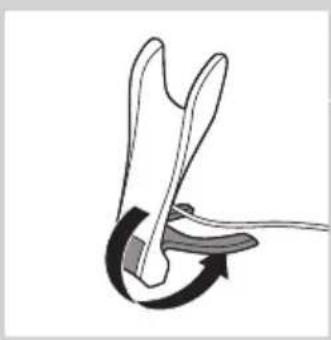
natural_image
Diagram of a mechanical or electrical component with curved arrows indicating motion (no text or symbols)
natural_image
Illustration of a handheld electric shaver with a black arrow indicating motion (no text or symbols)natural_image
Line drawing of a handheld electric shaver with a starburst symbol on the handle (no text or symbols present)natural_image
Illustration of a handheld device with a close-up inset showing its internal components (no text or symbols)natural_image
Diagram of a mechanical component with a downward arrow indicating compression or disassembly (no text or symbols present)natural_image
Illustration of a hand holding a handheld device with directional arrows indicating motion (no text or symbols)text_image
Diagram showing a device with three buttons labeled 'III' and an arrow pointing to it, with speech bubble containing the number 'III'.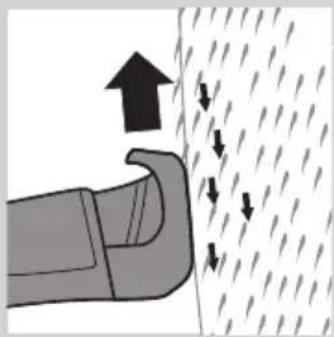
natural_image
Diagram showing a hand pressing down on a surface with arrows indicating direction (no text or symbols)
text_image
Diagram showing a device with three speech bubbles and an arrow pointing to it, possibly indicating a step or instruction.natural_image
Diagram of a hairdryer with an arrow indicating upward motion (no text or symbols)
text_image
Diagram showing a device with three speech bubbles labeled 'III' pointing to its interface, and an arrow pointing to it.text_image
Diagram showing a device with three circles labeled 'III' and an arrow pointing to it, likely indicating a step or sequence.natural_image
Line drawing of a person applying facial contour to the nose area, with no text or symbols present.
natural_image
Line drawing of a person applying a product to their face, showing the tooth and mouth area (no text or symbols)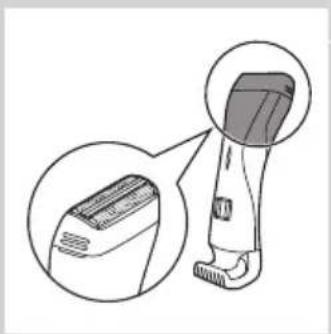
natural_image
Illustration of a hairbrush with magnified inset showing internal structure (no text or symbols)
natural_image
Line drawing of a handheld device with a black arrow pointing to a screen and a dotted circle (no text or symbols)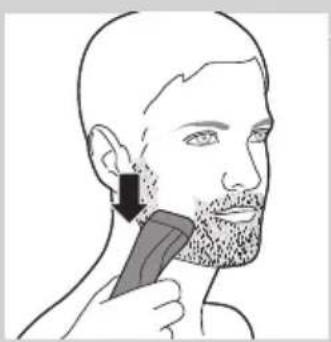
natural_image
Line drawing of a person applying a hair to their ear with a comb (no text or symbols)Pencukuran basah
natural_image
Illustration of a person using a handheld device to interact with a bag, no text or symbols presentnatural_image
Line drawing of a handheld device with an arrow pointing to a circular diagram containing dots (no text or symbols)natural_image
Illustration of a hairless tool with an inset close-up view (no text or symbols)Pencukuran kering
natural_image
Line drawing of a handheld device with an arrow pointing to a circular button labeled 'S' (no text or symbols on the device itself)natural_image
Line drawing of a person applying a hairbrush to their ear (no text or symbols)natural_image
Line drawing of a handheld device with a circular button and arrow pointing to it (no text or symbols)natural_image
Diagram of a hairbrush with an arrow indicating upward motion (no text or symbols)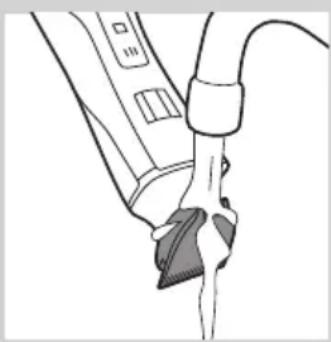
natural_image
Line drawing of a medical procedure with tubing and a clip (no text or symbols)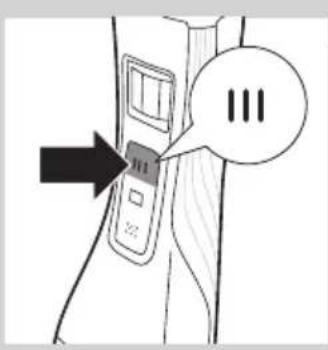
text_image
Diagram showing a device with three buttons and a speech bubble containing 'III', indicating a sequence or status.1 Matikan perkakas.

natural_image
Illustration of a toothpaste being poured into a bottle with an arrow indicating direction (no text or symbols)natural_image
Hand holding a pipette dispensing liquid into a bottle (no text or symbols visible)natural_image
Hand holding a small mechanical component with a rod inserted, no visible text or symbolsnatural_image
Illustration of a spray bottle emitting powder from a container with a downward arrow indicating flow (no text or symbols)natural_image
Illustration of a hand holding a medical device with a sensor symbol and forceps, no text or labels presentnatural_image
Illustration of a medical procedure with surgical tools and a hand holding a needle (no text or symbols present)3 Gerakkan kepala pencukur anda hinggalah busa tiada.
natural_image
Line drawing of a handheld device with an arrow pointing to a circular button labeled 'P' (no text or symbols on the device itself)natural_image
Illustration of a device with an upward arrow indicating growth or direction (no text or symbols)natural_image
Diagram of a hand washing a water bottle with a pipe, showing liquid flow (no text or symbols)natural_image
Hand using a tool to adjust or install electronic components (no text or symbols visible)natural_image
Illustration of a mechanical device with a downward arrow indicating compression or disassembly (no text or symbols present)natural_image
Diagram of a mechanical or anatomical component with curved and linear features, no visible text or symbolsnatural_image
Illustration of a welding torch with a downward arrow indicating compression or disassembly (no text or symbols present)natural_image
Symbol of a waste bin with crossed lines indicating no waste, and a solid black rectangle below (no text or labels)natural_image
Diagram showing a tool interacting with a mechanical component, with an inset magnified view highlighting a specific part (no text or symbols present)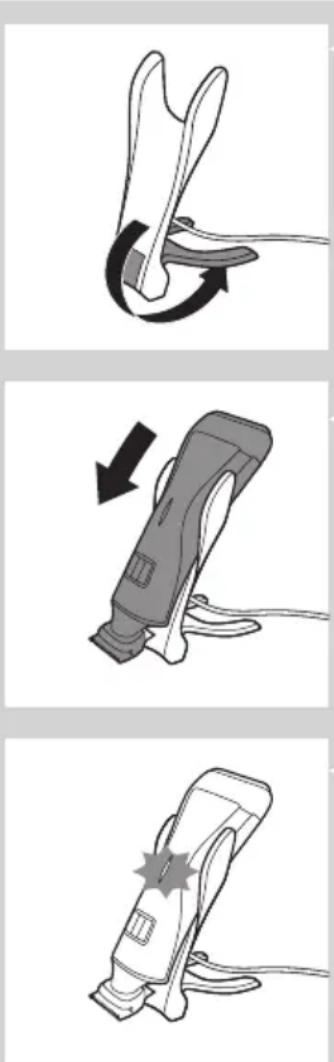
2 Abra a base de carga (ouve-se um estalido).
3 Ligue o adaptador à tomada eléctrica.
4 Coloque o aparelho na base de carga.
natural_image
Illustration of a handheld device with a close-up view of its cover and lid (no text or symbols present)
natural_image
Diagram of a mechanical device with a downward arrow indicating compression or disassembly (no text or symbols present)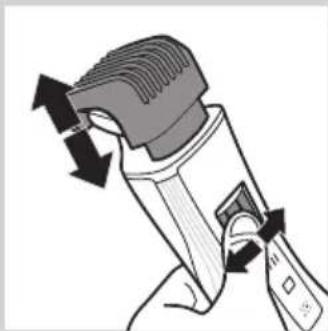
natural_image
Illustration of a hand holding a handheld device with directional arrows indicating motion (no text or symbols)text_image
Diagram showing a device with three buttons and a speech bubble containing 'III', indicating a sequence or annotation.
natural_image
Illustration of a car door handle with arrows indicating upward and downward motion (no text or symbols)
text_image
Diagram showing a device with three speech bubbles labeled 'III' pointing to its left side of the screen.natural_image
Diagram of a hairdryer with an upward arrow indicating motion (no text or symbols)text_image
Diagram showing a device with three buttons and a speech bubble containing 'III', indicating a sequence or status.text_image
Diagram showing a device with three buttons and a speech bubble containing 'III', indicating a sequence or annotation.natural_image
Line drawing of a person applying facial massage or pressure to the ear (no text or symbols)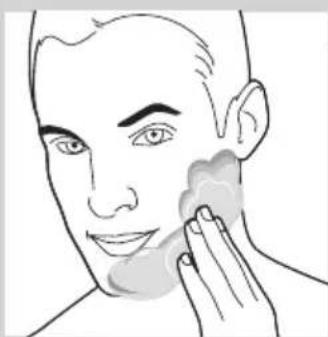
natural_image
Line drawing of a person applying product to their face, showing hand near product (no text or symbols)
natural_image
Illustration of a hairbrush with magnified inset showing the blade detail (no text or symbols)
natural_image
Line drawing of a handheld device with an arrow pointing to a circular button labeled 'S dot' (no text or symbols on the device itself)natural_image
Line drawing of a person using a hairbrush to apply a toothpick (no text or symbols present)
natural_image
Illustration of a person using a handheld device to interact with another device (no text or symbols visible)
natural_image
Line drawing of a handheld device with an arrow pointing to a circular diagram containing dots (no text or symbols)
natural_image
Illustration of a hairbrush with magnified detail view (no text or symbols)
natural_image
Line drawing of a handheld device with an arrow pointing to a circular diagram containing dots (no text or symbols)natural_image
Illustration of a person applying a hairbrush to their ear (no text or symbols present)natural_image
Line drawing of a handheld device with an arrow pointing to a screen and a dotted circle (no text or symbols)natural_image
Diagram of a mechanical device with an upward arrow indicating motion (no text or symbols present)
natural_image
Line drawing of a medical or laboratory procedure showing a tool interacting with a device (no text or symbols present)text_image
Diagram showing a device with three buttons and a speech bubble containing '三' (three) inside, pointing to a button labeled '二'.natural_image
Illustration of a toothpaste being poured into a bottle with an arrow indicating direction (no text or symbols)natural_image
Hand holding a pipette tip over a bottle (no text or symbols visible)natural_image
Hand holding a small mechanical component with a rod inserted (no text or symbols visible)natural_image
Illustration of a spray bottle emitting powder from a bag, with a downward arrow indicating the process (no text or symbols present)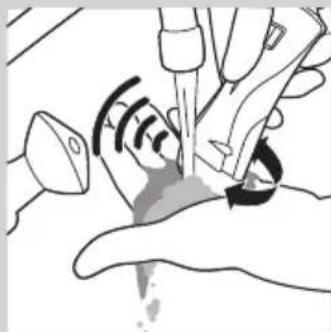
natural_image
Illustration of hands performing a medical procedure with a tool and pulse (no text or symbols)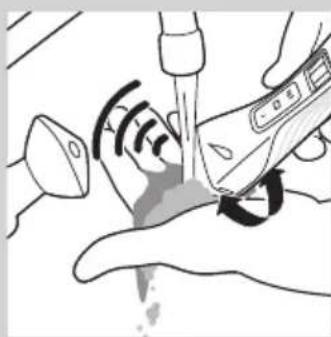
natural_image
Illustration of a medical procedure with surgical tools and tubing (no text or symbols)
natural_image
Line drawing of a handheld device with an arrow pointing to a circular button labeled 'S dot' (no text or symbols on the device itself)
natural_image
Illustration of a device with an upward arrow indicating growth or direction (no text or symbols present)natural_image
Diagram of a faucet with a submerged object and liquid, no text or symbols presentnatural_image
Hand using a tool to adjust or install electronic components on a terminal (no text or symbols visible)natural_image
Diagram of a printer with a downward arrow indicating compression or disassembly (no text or symbols present)natural_image
Diagram of a mechanical or electrical component with no visible text or symbolsPara dobrar a base de carga: dobra a parte inferior da base de carga contra o suporte do aparelho.
natural_image
Diagram showing a welding process with an open weld joint and a downward arrow indicating compression (no text or symbols)Encomendar acessórios
natural_image
Symbol of a waste bin with crossed lines indicating no waste, and a solid black rectangle below (no text or labels)natural_image
Diagram showing a hand holding a tool with an inset close-up of the tool tip (no text or symbols present)natural_image
Diagram of a mechanical or robotic arm with curved arrows indicating motion (no text or symbols)natural_image
Illustration of a handheld electric shaver with a black arrow indicating compression or disassembly (no text or symbols)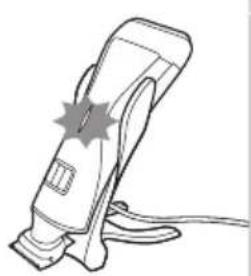
natural_image
Line drawing of a handheld electric shaver with a starburst symbol on the handle (no text or labels)natural_image
Illustration of a handheld device with a close-up view of its base (no text or symbols present)natural_image
Diagram of a mechanical device with a downward arrow indicating compression or disassembly (no text or symbols present)natural_image
Illustration of a hand holding a handheld device with directional arrows indicating motion (no text or symbols)text_image
Diagram showing a device with three buttons and a speech bubble containing 'III', indicating a sequence or annotation.natural_image
Illustration of a hand pressing down on a surface with arrows indicating direction (no text or symbols)
text_image
Diagram showing a device with three buttons and a speech bubble containing 'III', indicating a sequence or annotation.natural_image
Illustration of a hairdryer with an upward arrow indicating motion (no text or symbols)
text_image
Diagram showing a device with three speech bubbles labeled 'III' pointing to its left panel, indicating a sequence or annotation.text_image
Diagram showing a device with three speech bubbles labeled 'III' pointing to its left panel, indicating a sequence or status.natural_image
Line drawing of a person applying facial contour to the ear area (no text or symbols)
natural_image
Line drawing of a person applying face-to-face care to their cheek (no text or symbols)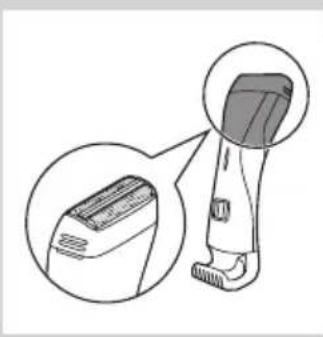
natural_image
Illustration of a hairless device with a magnified inset showing its interior structure (no text or symbols)natural_image
Line drawing of a handheld device with an arrow pointing to a circular button labeled 'S dot' (no text or symbols on the device itself)natural_image
Illustration of a person using a hairbrush to apply a specific part of their ear (no text or symbols present)natural_image
Illustration of a person using a handheld device to interact with a medical device (no text or symbols visible)natural_image
Line drawing of a handheld device with an arrow pointing to a screen and a dotted circle (no text or symbols)natural_image
Illustration of a hairless device with a magnified inset showing its interior structure (no text or symbols)การโกนแบบแห้ง
natural_image
Line drawing of a handheld device with an arrow pointing to a circular diagram containing dots (no text or symbols)natural_image
Line drawing of a person applying a hairbrush to their face, showing the brush's application (no text or symbols present)natural_image
Line drawing of a handheld device with an arrow pointing to a screen and a dotted circle nearby (no text or symbols)text_image
Illustration showing four steps of hair styling: hair being applied, using a brush, adjusting material, and applying a product.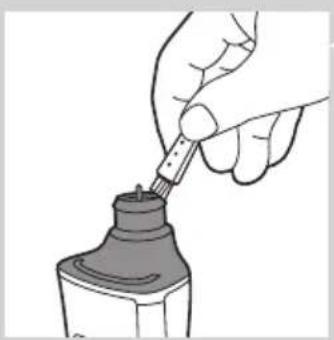
natural_image
Illustration of a hand using a pipette to apply liquid into a bottle (no text or symbols visible)natural_image
Hand holding a small mechanical component with a rod inserted, no visible text or symbolsnatural_image
Illustration of a spray bottle with a downward arrow indicating spray or dust (no text or symbols)natural_image
Illustration of a hand holding a medical device with a magnified view of the device inside (no text or symbols)natural_image
Illustration of a medical procedure with surgical tools and a hand holding a device (no text or symbols visible)natural_image
Line drawing of a handheld device with a black arrow pointing to a circular button labeled '3' (no text or symbols on the device itself)natural_image
Simple line drawing of a device with an upward arrow, no text or symbols presentnatural_image
Diagram of a faucet with a submerged object and liquid, no text or symbols presentnatural_image
Hand holding a tool interacting with a mechanical component (no text or symbols visible)natural_image
Illustration of a hand presser emitting powder from a device (no text or symbols)natural_image
Diagram of a mechanical clamp or clamping device with no visible text or symbolsnatural_image
Diagram showing a welding process with an open weld joint and a downward arrow indicating reduction (no text or symbols)natural_image
Simple line drawing of a showerhead spraying over a water-filled basin (no text or symbols)natural_image
Illustration of a hand holding a tool with an inset showing a close-up of the tool (no text or symbols present)natural_image
Diagram of a mechanical or anatomical component with curved arrows indicating motion (no text or symbols)natural_image
Illustration of a handheld electric shaver with a black arrow indicating motion (no text or symbols)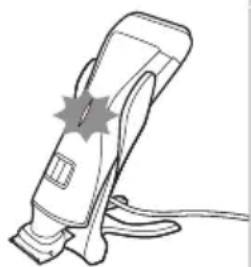
natural_image
Line drawing of a handheld electric shaver with a starburst symbol on the handle (no text or labels)natural_image
Illustration of a handheld device with a close-up view of its base (no text or symbols present)natural_image
Diagram of a mechanical device with a downward arrow indicating compression or disassembly (no text or symbols present)natural_image
Illustration of a hand holding a handheld device with directional arrows indicating motion (no text or symbols)text_image
Diagram showing a device with three buttons and a speech bubble containing 'III', indicating a sequence or annotation.natural_image
Diagram showing a hand pressing down on a surface with arrows indicating upward and downward motion (no text or symbols)
text_image
Diagram showing a device with three speech bubbles and an arrow pointing to it, possibly indicating a step or sequence.natural_image
Diagram of a hairbrush with an arrow indicating upward motion (no text or symbols)
text_image
Diagram showing a device with three speech bubbles labeled 'III' pointing to its left panel, indicating a sequence or status.1 public sector public sector public sector public sector public sector public sector public sector public sector public sector public sector public sector public sector public sector public sector public sector public sector public sector public sector public sector public sector public sector public sector public sector public sector public sector public sector public sector public sector public sector public sector public sector public sector public sector public sector public sector public sector public sector public sector public sector public sector public sector public sector public sector public sector public sector public sector public sector public sector public sector public sector public Sector Public Sector Public Sector Public Sector Public Sector Public Sector Public Sector Public Sector Public Sector Public Sector Public Sector Public Sector Public Sector Public Sector Public Sector Public Sector Public Sector Public Sector Public Sector Public Sector Public Sector Public Sector Public Sector Public Sector Public Sector Public Sector Public Sector Public Sector Public Sector Public Sector Public Sector Public Sector Public Sector Public Sector Public Sector Public Sector Public Sector Public Sector Public Sector Public Sector Public Sector Public Sector Public Sector Public Sector Public Sector Public Sector Public Sector Public Sector Public Sector Public Sector Public Sector Private Sector Public Sector Private Sector Private Sector Private Sector Private Sector Private Sector Private Sector Private Sector Private Sector Private Sector Private Sector Private Sector Private Sector Private Sector Private Sector Private Sector Private Sector Private Sector Private Sector Private Sector Private Sector Private Sector Private Sector Private Sector Private Sector Private Sector Private Sector Private Sector Private Sector Private Sector Private Sector Private Sector Private Sector Private Sector Private Sector Private Sector Private Sector Private Sector Private Sector Private Sector Private Sector Private Sector Private Sector Private Sector Private Sector Private Sector Private Sector Private Sector Private Sector Private Sector Private Sector private sector private sector private sector private sector private sector private sector private sector private sector private sector private sector private sector private sector private sector private sector private sector private sector private sector private sector private sector private sector private sector private sector private sector private sector private sector private sector private sector private sector private sector private sector private sector private sector private sector private sector private sector private sector private sector private sector private sector private sector private sector private sector private sector private sector private sector private sector private sector private sector private sector private sector private-sector private sector private-sector private-sector private-sector private-sector private-sector private-sector private-sector private-sector private-sector private-sector private-sector private-sector private-sector private-sector private-sector private-sector private-sector private-sector private-sector private-sector private-sector private-sector private-sector private-sector private-sector private-sector private-sector private-sector private-sector private-sector private-sector private-sector private-sector private-sector private-sector private-sector private-sector private-sector private-sector private-sector private-sector private-sector private-sector private-sector private-sector private-sector private-sector private-sector private-sector private-sector private-
text_image
Diagram showing a device with three speech bubbles labeled 'III' pointing to a button, and an arrow pointing to it.1 publicly supporting government's fiscal system, the implementation of the United States.
natural_image
Line drawing of a person applying facial massage or pressure to the ear (no text or symbols)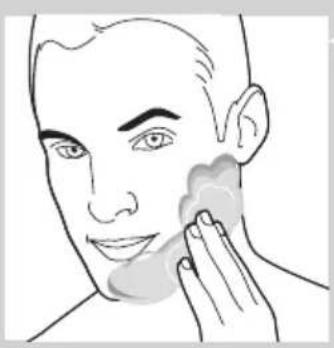
natural_image
Line drawing of a person applying a product to their face, no text or symbols presentnatural_image
Illustration of a hairbrush with magnified inset showing the blade and jaw (no text or symbols)natural_image
Line drawing of a handheld device with an arrow pointing to a screen and a dotted circle (no text or symbols)natural_image
Line drawing of a person applying a hair to their ear with a comb (no text or symbols)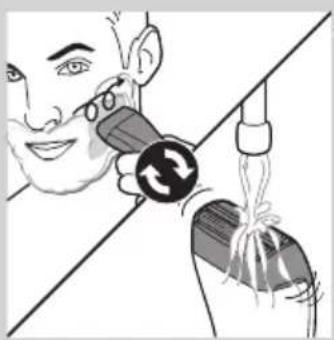
natural_image
Illustration of a person using a handheld device to interact with a bag, showing mechanical components and motion arrows (no text or symbols)natural_image
Line drawing of a handheld device with a black arrow pointing to a button and a circle containing dots (no text or symbols)7 public sector public sector public sector public sector public sector public sector public sector public sector public sector public sector public sector public sector public sector public sector public sector public sector public sector public sector public sector public sector public sector public sector public sector public sector public sector public sector public sector public sector public sector public sector public sector public sector public sector public sector public sector public sector public sector public sector public sector public sector public sector public sector public sector public sector public sector public sector public sector public sector public sector public sector public Sector Public Sector Public Sector Public Sector Public Sector Public Sector Public Sector Public Sector Public Sector Public Sector Public Sector Public Sector Public Sector Public Sector Public Sector Public Sector Public Sector Public Sector Public Sector Public Sector Public Sector Public Sector Public Sector Public Sector Public Sector Public Sector Public Sector Public Sector Public Sector Public Sector Public Sector Public Sector Public Sector Public Sector Public Sector Public Sector Public Sector Public Sector Public Sector Public Sector Public Sector Public Sector Public Sector Public Sector Public Sector Public Sector Public Sector Public Sector Public Sector Public Sector Public Sector Private Sector Public Sector Private Sector Private Sector Private Sector Private Sector Private Sector Private Sector Private Sector Private Sector Private Sector Private Sector Private Sector Private Sector Private Sector Private Sector Private Sector Private Sector Private Sector Private Sector Private Sector Private Sector Private Sector Private Sector Private Sector Private Sector Private Sector Private Sector Private Sector Private Sector Private Sector Private Sector Private Sector Private Sector Private Sector Private Sector Private Sector Private Sector Private Sector Private Sector Private Sector Private Sector Private Sector Private Sector Private Sector Private Sector Private Sector Private Sector Private Sector Private Sector Private Sector Private Sector private sector private sector private sector private sector private sector private sector private sector private sector private sector private sector private sector private sector private sector private sector private sector private sector private sector private sector private sector private sector private sector private sector private sector private sector private sector private sector private sector private sector private sector private sector private sector private sector private sector private sector private sector private sector private sector private sector private sector private sector private sector private sector private sector private sector private sector private sector private sector private sector private sector private sector private-sector private sector private-sector private-sector private-sector private-sector private-sector private-sector private-sector private-sector private-sector private-sector private-sector private-sector private-sector private-sector private-sector private-sector private-sector private-sector private-sector private-sector private-sector private-sector private-sector private-sector private-sector private-sector private-sector private-sector private-sector private-sector private-sector private-sector private-sector private-sector private-sector private-sector private-sector private-sector private-sector private-sector private-sector private-sector private-sector private-sector private-sector private-sector private-sector private-sector private-sector private-sector private-
8 Làm sạch đầu cạo (xem chương 'Vệ sinh và bảo dưỡng', phân 'Làm sạch nhanh đầu cạo sau khi cạo râu ướt').
natural_image
Illustration of a hairbrush with magnified inset showing the blade and handle (no text or symbols)Cạo râu khô
natural_image
Line drawing of a handheld device with a black arrow pointing to a circular button labeled 'S' (no text or symbols on the device itself)natural_image
Line drawing of a person applying a hairbrush to their neck (no text or symbols)natural_image
Line drawing of a handheld device with an arrow pointing to a screen and a dotted circle (no text or symbols)text_image
Illustration showing four steps of hair styling or cleaning process, with arrows indicating direction and a speech bubble containing '三'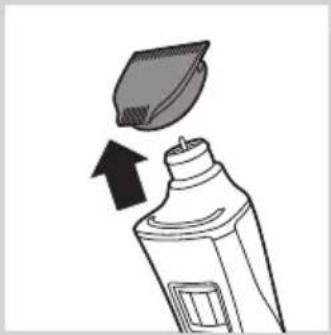
natural_image
Illustration of a toothpaste being poured into a bottle with an arrow indicating direction (no text or symbols)natural_image
Line drawing of a hand using a pipette to apply liquid into a bottle (no text or symbols)natural_image
Hand holding a small mechanical component with a rod inserted, no visible text or symbolsnatural_image
Illustration of a spray bottle emitting powder from a bag, with a downward arrow indicating motion (no text or symbols)natural_image
Illustration of a hand holding a medical device with a catheter inserted, showing internal components and a waveform (no text or symbols)natural_image
Illustration of a medical procedure with surgical tools and a hand holding a needle (no text or symbols)natural_image
Line drawing of a handheld device with a black arrow pointing to a screen and a dotted circle (no text or symbols)Làm sạch kỹ dâu cạo
1 Tắt thiết bị.
natural_image
Illustration of a device with an upward arrow indicating motion or direction (no text or symbols)natural_image
Simple line drawing of a faucet with liquid flowing from a container (no text or symbols)natural_image
Hand using a tool to adjust or install electronic components (no text or symbols visible)natural_image
Illustration of a hand presser emitting powder from a device (no text or symbols)natural_image
Diagram of a mechanical or electrical component with curved and straight lines, no visible text or symbolsnatural_image
Diagram showing a welding torch with a downward arrow indicating compression or disassembly (no text or symbols present)natural_image
Symbol of a waste bin with crossed lines indicating no waste, and a solid black rectangle below (no text or labels)natural_image
Diagram showing a hand holding a tool with an inset close-up of the tool tip (no text or symbols)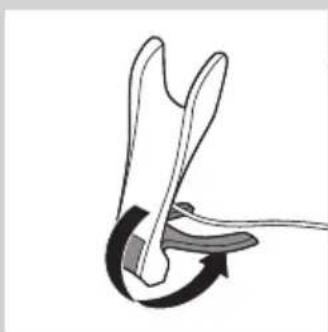
natural_image
Diagram of a mechanical or anatomical component with curved arrow indicating rotation (no text or symbols)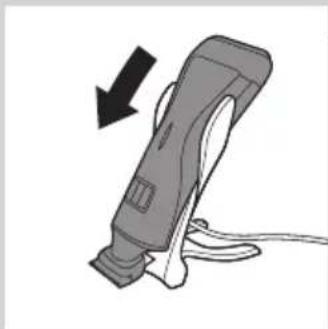
natural_image
Illustration of a handheld electric shaver with a black arrow indicating motion (no text or symbols)
natural_image
Line drawing of a handheld electric shaver with a starburst symbol on the handle (no text or labels)natural_image
Illustration of a hairdryer with a magnified inset showing the device's tip and base (no text or symbols)natural_image
Diagram of a mechanical device with a downward arrow indicating compression or disassembly (no text or symbols present)natural_image
Illustration of a hand holding a handheld device with directional arrows indicating motion (no text or symbols)text_image
Diagram showing a device with three buttons and a speech bubble containing 'III', indicating a sequence or annotation.natural_image
Illustration of a hand holding a curved object with arrows indicating upward and downward motion (no text or symbols)
text_image
Diagram showing a device with three speech bubbles labeled 'III' pointing to a button, indicating a sequence or status.natural_image
Diagram of a hairdryer with an arrow indicating upward motion (no text or symbols)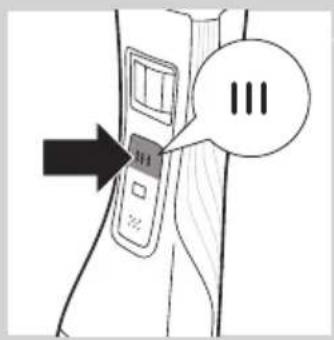
text_image
Diagram showing a device with three speech bubbles labeled 'III' pointing to its left panel, indicating a sequence or status.text_image
Diagram showing a device with three speech bubbles labeled 'III' pointing to its left side of the screen.natural_image
Line drawing of a person applying facial massage or pressure to the ear (no text or symbols)
natural_image
Line drawing of a person applying makeup to the ear (no text or symbols)繁體中文134
natural_image
Illustration of a hairless device with a magnified inset showing its interior structure (no text or symbols)natural_image
Line drawing of a handheld device with an arrow pointing to a circular diagram containing dots (no text or symbols)natural_image
Illustration of a person using a hairbrush to apply product to their face (no text or symbols present)natural_image
Illustration of a person using a handheld device to interact with a medical device (no text or symbols visible)natural_image
Line drawing of a handheld device with an arrow pointing to a circular button labeled 'S dot' (no text or symbols on the device itself)natural_image
Illustration of a hairless instrument with a magnified inset showing its internal structure (no text or symbols)乾刮
natural_image
Line drawing of a handheld device with an arrow pointing to a circular button labeled 'S' (no text or symbols on the device itself)natural_image
Line drawing of a person using a hairbrush to brush the ear (no text or symbols)natural_image
Line drawing of a handheld device with an arrow pointing to a screen and a dotted circle nearby (no text or symbols)natural_image
Illustration of a hand using a pipette to apply liquid into a bottle (no text or symbols visible)natural_image
Illustration of a hand holding a small mechanical component with a rod inserted (no text or symbols visible)4 使用清潔刷清潔修整刀頭內部。

natural_image
Illustration of a spray bottle emitting powder from a container with a downward arrow indicating flow (no text or symbols)natural_image
Illustration of hands performing a medical procedure with a tool and device (no text or symbols)natural_image
Illustration of a medical procedure with gloved hands and surgical tools (no text or symbols)natural_image
Line drawing of a handheld device with an arrow pointing to a screen and a dotted circle nearby (no text or symbols)徹底清潔刮鬍刀頭
1 關閉產品。

natural_image
Illustration of a device with an upward arrow indicating motion or direction (no text or symbols)2 將刮鬍刀頭從本產品抽出。
natural_image
Illustration of a faucet with a submerged object and liquid, no text or symbols present3 請以溫水清洗刮鬍刀頭。
natural_image
Hand using a tool to adjust or install electronic components on a device (no text or symbols visible)4 使用清潔刷清除刀具組中的毛髮。
natural_image
Illustration of a device with a downward arrow indicating compression or disassembly (no text or symbols present)natural_image
Diagram of a mechanical or electrical component with curved and straight lines, no visible text or symbols
natural_image
Diagram showing a welding torch being welded with a clamped component, indicated by a downward arrow (no text or symbols present)2 在電鬍刀組上蓋回保護蓋。
旅行鎖 (僅限 QS6161)
natural_image
Symbol of a waste bin with no text or labels, crossed by two crossed lines and a solid rectangle below (no readable text or symbols)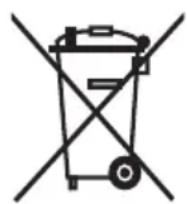
natural_image
Illustration of a hand holding a tool with an inset showing a close-up of the tool (no text or symbols present)1 将小插头插入充电座。
注意:小插头在充电座折叠时最容易插入。
natural_image
Diagram of a mechanical or anatomical component with curved arrows indicating motion (no text or symbols)4 将产品置于充电座中。
natural_image
Illustration of a handheld electric shaver with a black arrow indicating motion (no text or symbols)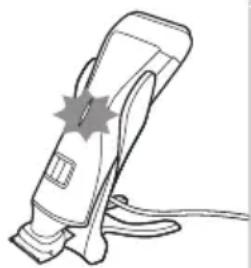
natural_image
Line drawing of a handheld electric shaver with a star symbol on the handle (no text or symbols present)natural_image
Illustration of a handheld device with a close-up inset showing its internal components (no text or symbols)natural_image
Diagram of a mechanical device with a downward arrow indicating compression or disassembly (no text or symbols present)natural_image
Illustration of a hand holding a handheld device with directional arrows indicating motion (no text or symbols)text_image
Diagram showing a device with three buttons and an arrow pointing to it, labeled 'III' in speech bubble.4 按一下修剪刀头开/关按钮,打开修剪刀头。 ▶仅限于 QS6161:开/关按钮亮起,表示修剪刀头正在运转。

natural_image
Diagram showing a hand pressing down with arrows indicating force or movement (no text or symbols)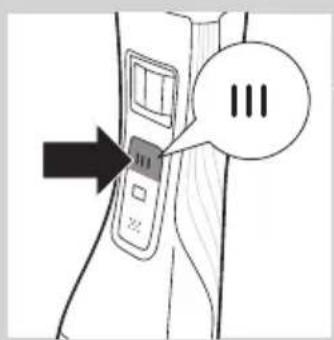
text_image
Diagram showing a device with three buttons and a speech bubble containing '三' (three) inside, with an arrow pointing to the button.natural_image
Diagram of a hairdryer with an arrow indicating upward motion (no text or symbols)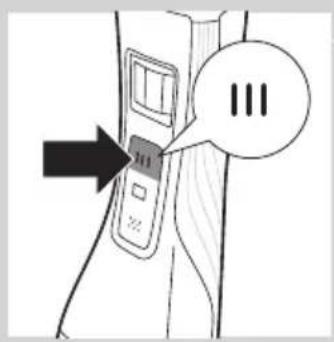
text_image
Diagram showing a device with three circles labeled 'III' and an arrow pointing to it, likely indicating a step or sequence.text_image
Diagram showing a device with three buttons and a speech bubble containing '三' (three) in Chinese.natural_image
Line drawing of a person applying facial contour or pressure application to the nose area (no text or symbols)
natural_image
Line drawing of a person applying product to their face with a sponge (no text or symbols)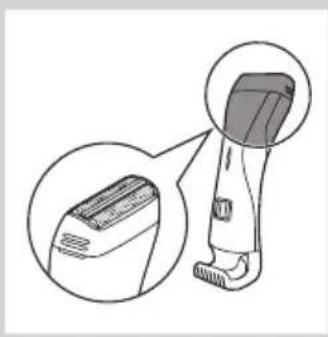
natural_image
Illustration of a hairless vacuum cleaner with a magnified inset showing its internal structure (no text or symbols)natural_image
Line drawing of a handheld device with an arrow pointing to a screen and a dotted circle nearby (no text or symbols)natural_image
Line drawing of a person applying a hairbrush to their face (no text or symbols)natural_image
Illustration of a person using a handheld device to interact with another person (no text or symbols present)natural_image
Line drawing of a handheld device with an arrow pointing to a button and a circle containing dots (no text or symbols)natural_image
Illustration of a hairless tool with a magnified inset showing the blade and handle (no text or symbols)干电式剃须刀
natural_image
Line drawing of a handheld device with an arrow pointing to a screen and a circle containing dots (no text or symbols)natural_image
Line drawing of a person applying a hairbrush to their ear (no text or symbols)natural_image
Line drawing of a handheld device with an arrow pointing to a screen and a dotted pattern inside (no text or symbols)text_image
Illustration showing four steps of hair styling or cleaning process, with arrows indicating direction and a speech bubble containing '三' (three) to press the product.1 关闭产品。
2 将修剪梳从修剪刀头中拉出。
3 在水龙头下清洁修剪刀头。
清洁修剪刀头连接器
natural_image
Illustration of a hand using a pipette to apply liquid into a bottle (no text or symbols visible)natural_image
Illustration of a hand holding a small mechanical component with a rod inserted (no text or symbols visible)4 用清洁刷清洁修剪刀头内侧。
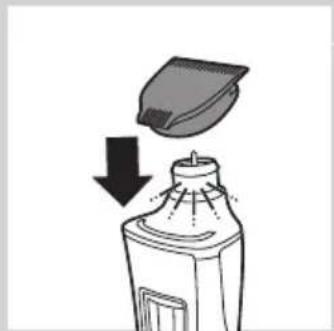
natural_image
Illustration of a spray bottle with a downward arrow indicating spray or dust (no text or symbols)natural_image
Illustration of a hand holding a medical device with a catheter inserted, showing internal components and motion lines (no text or symbols)natural_image
Illustration of a medical procedure with surgical tools and a hand holding a device (no text or symbols visible)3 来回移动剃毛刀头,直至看不到泡沫。
natural_image
Diagram of a handheld device with an arrow pointing to a circular button labeled 'S dot' (no text or symbols on the device itself)彻底清洁剃毛刀头
1 关闭产品。
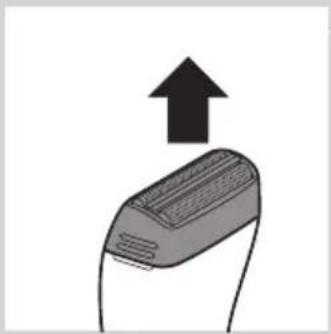
natural_image
Simple line drawing of a computer mouse with an upward arrow indicating motion (no text or symbols)2 将剃毛刀头用力从产品上拔下。
natural_image
Simple line drawing of a faucet with a submerged object and liquid, no text or symbols present3 用温水冲洗剃毛刀头。
natural_image
Illustration of a hand presser pressing down on a device with arrows indicating force or motion (no text or symbols)natural_image
Symbol of a waste bin with crossed lines indicating no waste, and a solid black rectangle below (no text or labels)
natural_image
Diagram showing a welding process with an open weld joint and a downward arrow indicating compression (no text or symbols)natural_image
Symbol of a trash bin crossed with a diagonal line and a horizontal bar below (no text or labels)natural_image
Symbol of a trash bin crossed out by two diagonal lines (no text or numbers present)natural_image
Hand using a tool to adjust or install electronic components (no text or symbols visible)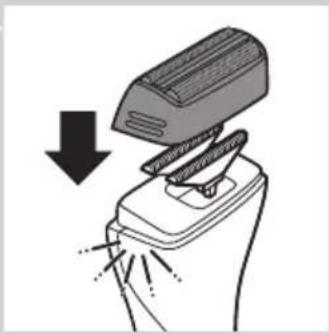
natural_image
Illustration of a hand presser pressing down on a device with a downward arrow indicating compression (no text or symbols present)تعويضى
natural_image
Diagram of a mechanical clamp or clip assembly (no text or symbols)text_image
Diagram showing a device with three buttons and a speech bubble containing 'III', indicating a sequence or step in the process.
natural_image
Illustration of a toothpaste being removed from a bottle, showing the brush tip and arrow (no text or symbols)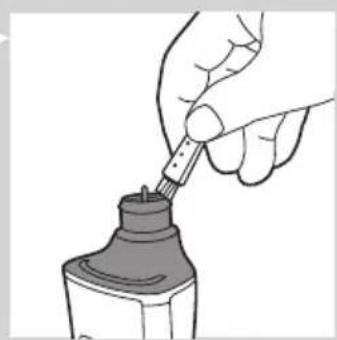
natural_image
Illustration of a hand using a pipette to apply liquid into a bottle (no text or symbols visible)
natural_image
Hand holding a small mechanical component with a rod inserted (no text or symbols visible)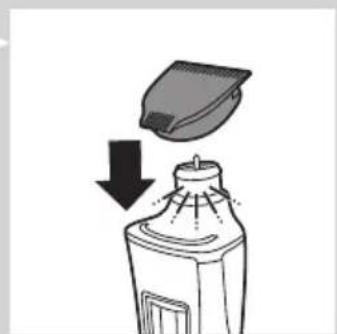
natural_image
Illustration of a spray bottle emitting powder from a container with a lid, showing downward motion (no text or symbols)natural_image
Line drawing of a person applying a hair to their face, showing a brush and a downward arrow (no text or symbols)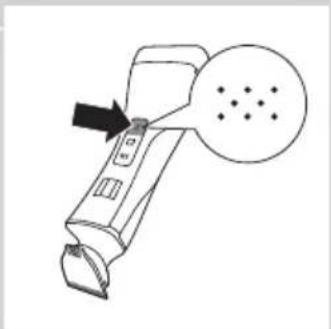
natural_image
Line drawing of a handheld device with an arrow pointing to a circular button labeled 'S dot' (no text or symbols on the device itself)natural_image
Illustration of a hairbrush with an upward arrow indicating motion (no text or symbols)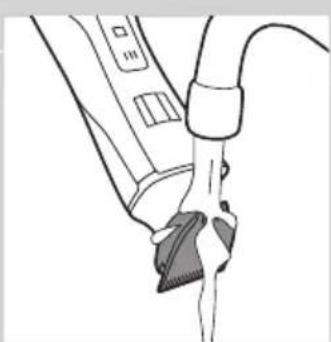
natural_image
Line drawing of a medical procedure with a tool and tubing (no text or symbols)natural_image
Line drawing of a person applying a hair to their neck, showing the brush and beard (no text or symbols)
natural_image
Illustration of a person using a handheld device to interact with another person (no text or symbols present)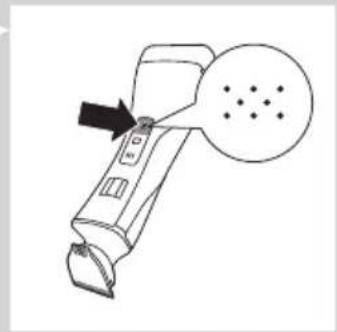
natural_image
Line drawing of a handheld device with a circular button and arrow pointing to it (no text or symbols)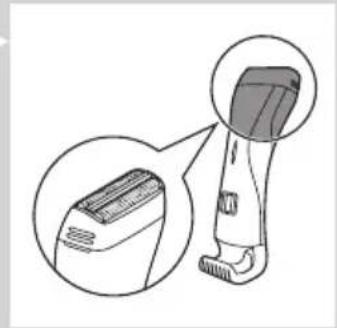
natural_image
Illustration of a hairbrush with magnified inset showing internal structure (no text or symbols)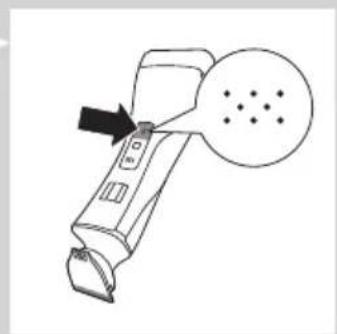
natural_image
Line drawing of a handheld device with an arrow pointing to a circular button labeled 'S' (no text or symbols on the device itself)اصلاح کردن
natural_image
Line drawing of a person applying facial massage to the ear (no text or symbols)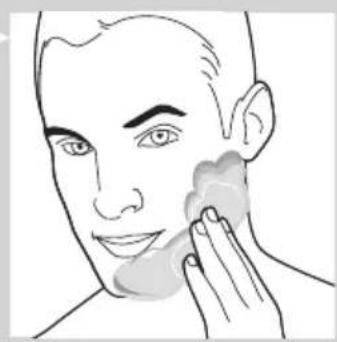
natural_image
Line drawing of a person applying face-to-face care to their cheek (no text or symbols)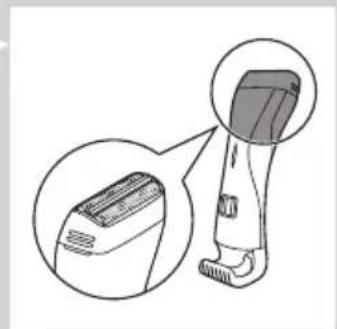
natural_image
Illustration of a hairbrush with magnified inset showing detailed detail (no text or symbols)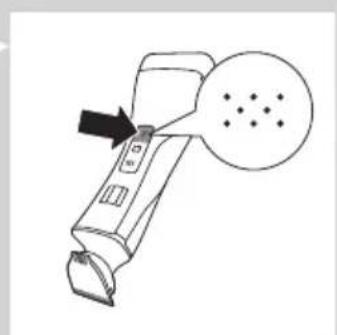
natural_image
Line drawing of a handheld device with an arrow pointing to a circular button labeled 'S' (no text or symbols on the device itself)text_image
Diagram showing a device with three vertical buttons and a speech bubble containing 'III', indicating a sequence or comparison.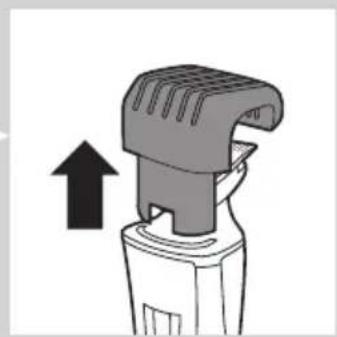
natural_image
Diagram of a hairbrush with an arrow indicating upward motion (no text or symbols)
text_image
Diagram showing a device with three vertical buttons and an arrow pointing to it, labeled 'III' in a speech bubble.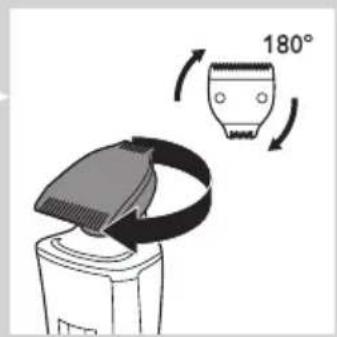
text_image
180°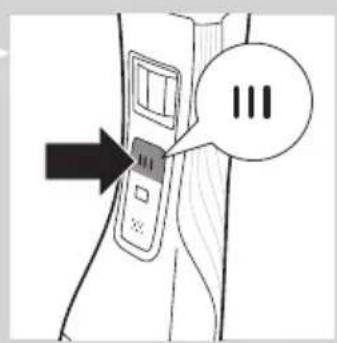
text_image
Diagram showing a device with three vertical buttons and an arrow pointing to it, labeled 'III' in a speech bubble.natural_image
Diagram of a mechanical device with a downward arrow indicating force or movement (no text or symbols present)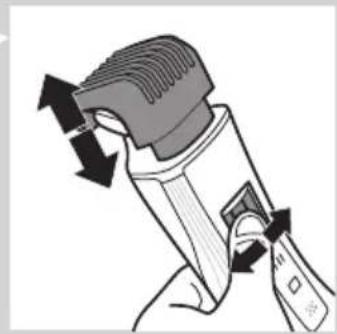
natural_image
Illustration of a hand holding a handheld device with arrows indicating motion (no text or symbols)
text_image
Diagram showing a device panel with labeled buttons and a highlighted rectangular button labeled 3, 4, 2, 1.
text_image
Diagram showing a device with three vertical buttons and an arrow pointing to it, labeled 'III' in a speech bubble.
natural_image
Diagram showing a hand pressing down on a textured surface with arrows indicating direction (no text or symbols)natural_image
Line drawing of a hairdryer with a starburst mark on the blade (no text or symbols)استفاده ازدستگاه
natural_image
Illustration of a hairdryer tool with a magnified inset showing the device's tip and base (no text or symbols)natural_image
Diagram of a hand tool interacting with a small object, showing a magnified inset (no text or symbols)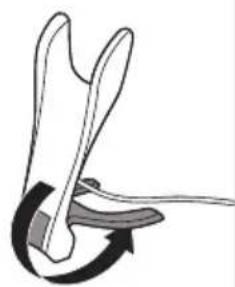
natural_image
Diagram of a mechanical or anatomical structure with curved arrows indicating motion (no text or symbols)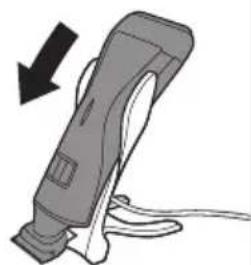
natural_image
Illustration of a handheld device with a black arrow indicating compression or disassembly (no text or symbols)The image is too blurry to recognize any text content.
natural_image
Diagram showing a welding process with a tool and a downward arrow indicating compression (no text or symbols)natural_image
Symbol of a waste bin with crossed lines indicating no waste, and a solid rectangle below (no text or labels)
natural_image
Symbol of a trash bin crossed out by two diagonal lines (no text or numbers present)natural_image
Hand holding a tool interacting with a mechanical component (no text or symbols visible)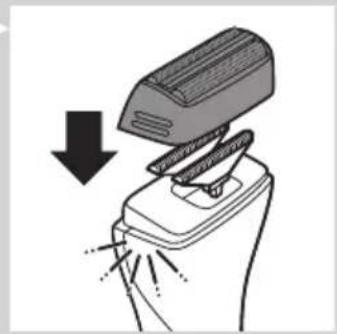
natural_image
Illustration of a hand using a power tool to lift a device (no text or symbols present)الاستبideal
natural_image
Diagram of a mechanical clamp or clip assembly (no text or symbols)natural_image
Illustration of a hand performing a medical procedure with forceps and surgical instruments (no text or symbols)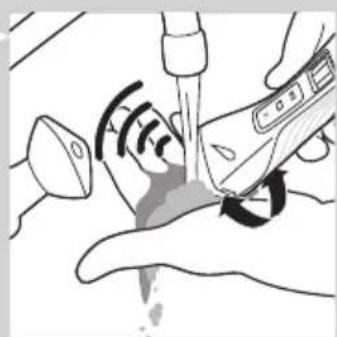
natural_image
Illustration of a medical procedure with surgical tools and a hand holding a device (no text or symbols visible)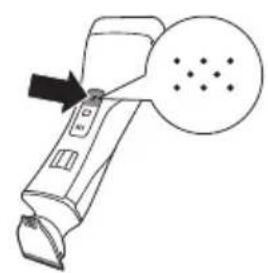
natural_image
Diagram of a handheld device with a circular button and arrow pointing to it (no text or symbols)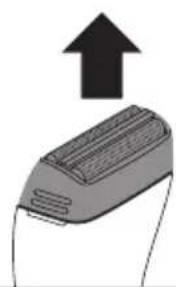
natural_image
Illustration of a device with an upward arrow, no text or symbols present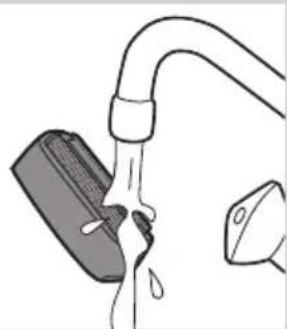
natural_image
Diagram of a hand holding a tool with liquid, no text or symbols presenttext_image
Diagram showing a device with three buttons and a speech bubble containing 'III', indicating a sequence or status.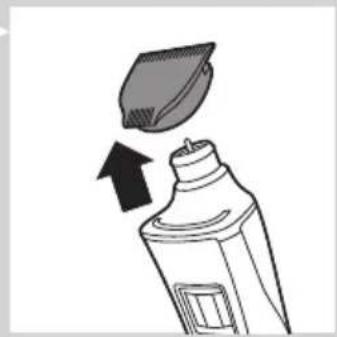
natural_image
Illustration of a toothpaste being poured into a bottle with an arrow indicating direction (no text or symbols)
natural_image
Illustration of a hand using a pipette to apply liquid into a bottle (no text or symbols visible)
natural_image
Hand holding a small mechanical component with a rod inserted (no text or symbols visible)
natural_image
Illustration of a spray bottle emitting powder from a container with a lid, showing downward motion (no text or symbols)natural_image
Line drawing of a person applying a hair to their neck, showing a brush and facial features (no text or symbols)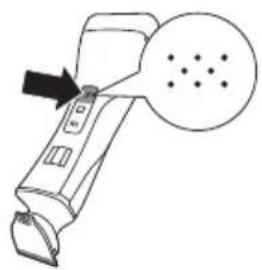
natural_image
Line drawing of a handheld device with an arrow pointing to a circular button labeled 'S dot' (no text or symbols on the device itself)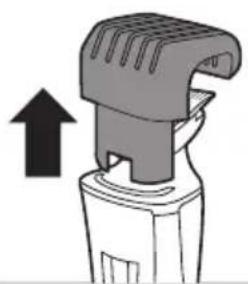
natural_image
Illustration of a hairdryer with an upward arrow indicating motion (no text or symbols)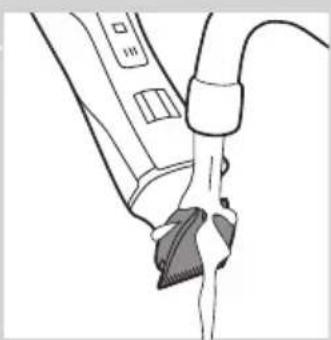
natural_image
Line drawing of a medical procedure with a tool and tubing (no text or symbols)natural_image
Line drawing of a person applying a hair to their beak, showing the brush and beard (no text or symbols)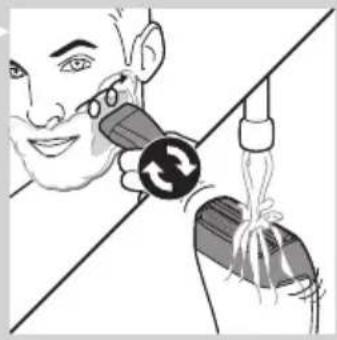
natural_image
Illustration of a person using a handheld device to interact with another person (no text or symbols present)
natural_image
Line drawing of a handheld device with a circular button and arrow pointing to it (no text or symbols)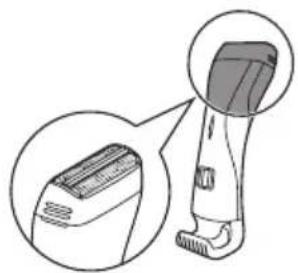
natural_image
Illustration of a hairbrush with magnified inset showing the blade and handle (no text or symbols)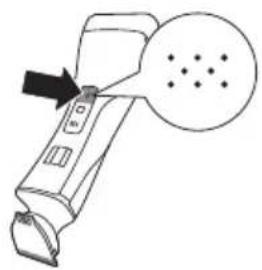
natural_image
Line drawing of a handheld device with a circular button and arrow pointing to it (no text or symbols)ال crudeقة
natural_image
Line drawing of a person applying facial massage to the ear (no text or symbols)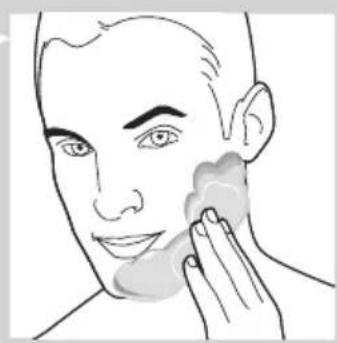
natural_image
Line drawing of a person applying product to their face with a sponge (no text or symbols)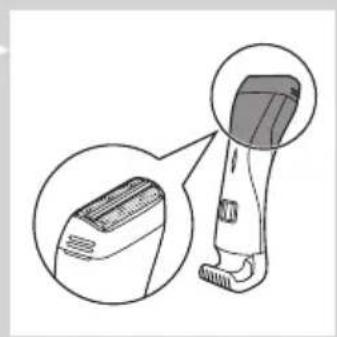
natural_image
Illustration of a hairbrush with magnified inset showing internal structure (no text or symbols)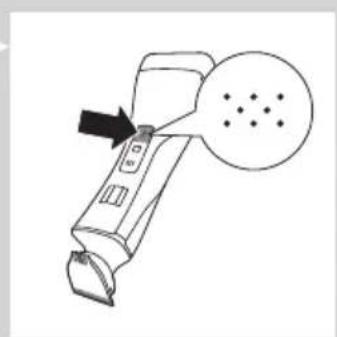
natural_image
Line drawing of a handheld device with an arrow pointing to a circular diagram containing dots (no text or symbols)text_image
Diagram showing a device with three vertical buttons and an arrow pointing to it, labeled with 'III' in a speech bubble.natural_image
Diagram of a hairbrush with an arrow indicating upward motion (no text or symbols)text_image
Diagram showing a device with three vertical buttons and an arrow pointing to it, labeled 'III' in a speech bubble.text_image
Diagram showing a device with three vertical buttons and an arrow pointing to it, labeled 'III' in a speech bubble.natural_image
Diagram of a mechanical device with a downward arrow indicating force or movement (no text or symbols present)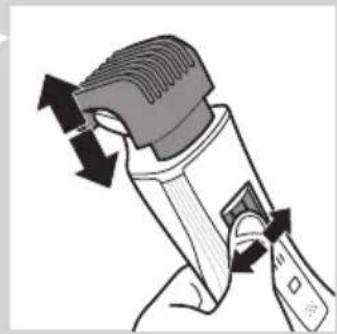
natural_image
Illustration of a hand holding a handheld device with directional arrows indicating motion (no text or symbols)
text_image
Diagram showing a device with labeled buttons and a highlighted square containing three numbered indicators (1, 2, 3) inside a panel.
text_image
Diagram showing a device with three vertical buttons labeled 'III' and an arrow pointing to it, likely indicating a sequence or status.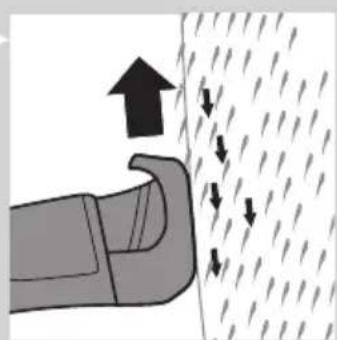
natural_image
Diagram showing a hand pressing down a curved object with arrows indicating upward and downward motion (no text or symbols)natural_image
Line drawing of a handheld electric shaver with a star-shaped head (no text or symbols)استخدام الجهاز
natural_image
Illustration of a hairdryer tool with a magnified inset showing the blade and base (no text or symbols)natural_image
Diagram showing a hand holding a tool with an inset magnified view of the tool tip (no text or symbols present)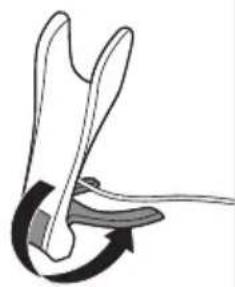
natural_image
Diagram of a mechanical or anatomical assembly with curved arrows indicating motion (no text or symbols)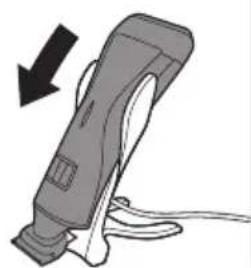
natural_image
Illustration of a handheld device with a black arrow indicating compression or disassembly (no text or symbols)m = 311
The Ground Truth image displays a single, solid horizontal line. According to Rule 2 (UNDERSCORE & LINE RULES), if the GT contains lines used for stylistic emphasis or as background elements (like ruled paper), the OCR result must ignore them. The provided OCR content is "____", which consists of four underscores. This is incorrect because underscores are not equivalent to a solid line and are not permitted under the “Stylistic/Background Lines (Ignore)” rule. The OCR has hallucinated underscores where none should exist in the GT, violating the “Stylistic/Background Lines (Ignore)” rule. Therefore, the OCR result is inconsistent with the Ground Truth.
تنبيه
-
-
-
-
1
-
The Ground Truth image displays a single, solid horizontal line. According to Rule 2 (UNDERSCORE & LINE RULES), this is a stylistic or background line, not a placeholder underscore. Therefore, the OCR result must ignore it and output nothing or only meaningful text. The provided OCR content is "____", which consists of four underscores. This is an incorrect interpretation of the line as a placeholder, violating the rule that stylistic lines must be ignored. The OCR has hallucinated underscores where none should exist based on the GT's visual context. Hence, the OCR result is inconsistent with the Ground Truth.
The Ground Truth image displays a single, solid horizontal line. According to Rule 2 (UNDERSCORE & LINE RULES), this is a stylistic or background line, not a placeholder underscore. Therefore, the OCR result must ignore it. The provided OCR content is "____", which consists of four underscores. This is an incorrect interpretation of the line as a placeholder, violating the rule that stylistic lines must be ignored. The OCR has hallucinated text (underscores) where none should exist, violating the rule to ignore such lines. Hence, the OCR result is inconsistent with the Ground Truth.
-
(1)
