
Series 9000 S9697 - Shaver PHILIPS - Free user manual and instructions
Find the device manual for free Series 9000 S9697 PHILIPS in PDF.

| Product Type | Electric Shaver |
| Brand | Philips |
| Model | Series 9000 S9697 |
| Dimensions (approx) | 6.5 x 2.5 x 2.5 inches |
| Weight (approx) | 0.5 lbs (220 g) |
| Power Supply | Rechargeable Li-ion battery, 100-240 V |
| Shaving System | MultiPrecision blade system with 3D contour detection |
| Cutting Elements | 3 rotary heads (replacement model SH90/50) |
| Wet & Dry Use | Yes |
| Pop-up Trimmer | Yes |
| Battery Life (approx) | 50 minutes |
| Charging Time | 1 hour (5 minutes quick charge for one shave) |
| Display | 3-level battery indicator, travel lock, cleaning reminder |
| Cleaning | Compatible with Philips SmartClean system (optional) |
| Water Resistance | IPX7 (submersible up to 1 m for 30 min) |
| Accessories | Charging stand, travel case, cleaning brush, power cord |
| Replacement Parts | Heads SH90/50, cleaning cartridge |
| Warranty | 2 years |
Frequently Asked Questions - Series 9000 S9697 PHILIPS
User questions about Series 9000 S9697 PHILIPS
0 question about this device. Answer the ones you know or ask your own.
Ask a new question about this device
Download the instructions for your Shaver in PDF format for free! Find your manual Series 9000 S9697 - PHILIPS and take your electronic device back in hand. On this page are published all the documents necessary for the use of your device. Series 9000 S9697 by PHILIPS.
USER MANUAL Series 9000 S9697 PHILIPS

natural_image
Black Philips 3000 Series electric shaver with three rotary buttons and digital display (no text or symbols on body)フィリップ ス電 動 シェー バー
品番 S9697/31, S9696/31 S9697/50, S9696/50
取扱説明書
natural_image
Line drawing of a handheld electronic device with two circular ports and a square button (no text or symbols)本体
クリーニング ブラシ
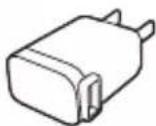
USB充電 アダプタ
natural_image
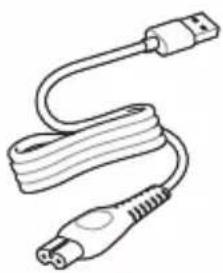
Line drawing of a USB cable with two connectors (no text or symbols)充電ケーブル
natural_image
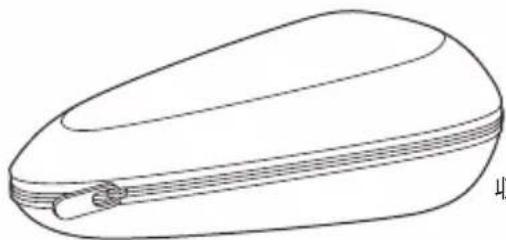
Line drawing of a closed, oval-shaped object with a zipper and handle (no text or symbols)収納ケース
natural_image
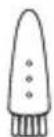
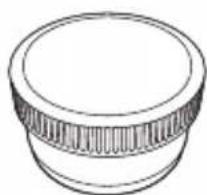
Simple line drawing of a cylindrical object with a flanged top and side ridges (no text or symbols)
natural_image
Line drawing of a mechanical component with no visible text or symbolsクイック クリーン クイック クリーン
ポッドカートリッジポッド
Guidance in English 30\~58
●保証
保証とアフターサービス……59
仕様 60
無料修理規定 62
保証書……最終ページ
必ずお 守り ください
安全上のご注意
natural_image
Simple line drawing of a three-tiered mechanical component (no text or symbols)ク イック チャージ
natural_image
Illustration of a person using a radial tool to apply facial contour or facial pressure (no text or symbols present)上手に 剃るには
natural_image
Illustration of a person applying eye care to their ear (no text or symbols present)ほお
natural_image
Illustration of a hand performing a neck massage technique with a finger and arrow (no text or symbols)あごの裏 側
natural_image
Illustration of a person performing a medical procedure on another hand, showing hand placement and motion arrow (no text or symbols)ほおの奥から首筋
natural_image
Line drawing of a person applying a medical or cosmetic tool to their face (no text or symbols present)鼻の下
natural_image
Illustration showing a person using a brush to apply a nasal swab near a bottle, with another hand holding a bottle above (no text or symbols present)[重要]
natural_image
Diagram of a mechanical component with arrows indicating motion or force direction (no text or symbols)![PHILIPS Series 9000 S9697 - [重要] - 1](/content/2026/05/833713/images/f6990a5d29f5534b47a06392238a3002b37cac9a7557a899aa42615efc12524f.jpg)
natural_image
Illustration of a person using a handheld device to apply facial care (no text or symbols present)![PHILIPS Series 9000 S9697 - [重要] - 2](/content/2026/05/833713/images/a087ad40994006e2716d54ea565b080f98be50b258c3b3be88b0d42157a307a8.jpg)
natural_image
Illustration of a person applying nasal pressure to their mouth (no text or symbols)natural_image
Illustration of a human head with abstract patterns and arrows indicating direction (no text or symbols)natural_image
Illustration of a medical procedure showing fluid flowing from a bottle into a container with a bag (no text or symbols)natural_image
Illustration of two hands performing a circular motion or vibration process, with no visible text or symbolsポップ アップトリマーのお手入れ方法
natural_image
Illustration of a hand holding a device with a handle and arrow indicator (no text or symbols)natural_image
Diagram showing two mechanical components with directional arrows, no text or symbols presentnatural_image
Illustration of hands using a tool to adjust or install a mechanical component (no text or symbols visible)natural_image
Diagram of a cylindrical object with two arrows indicating direction, no text or symbols presentnatural_image
Illustration of hands assembling a mechanical component with a downward arrow indicating motion (no text or symbols)natural_image
Illustration of two hands manipulating a cylindrical object with internal patterns, no text or symbols presentnatural_image
Diagram showing two views of a container with internal components and arrows indicating process (no text or symbols)
natural_image
Simple line drawing of a container with a cross mark and splashing liquid (no text or symbols)natural_image
Illustration of a hand using a tool to press or install a component, no text or symbols presentnatural_image
Diagram of a piston-cylinder assembly with hand holding a handle, showing internal components and motion arrow (no text or labels)S9697/31, S9696/31, S9697/50, S9696/50 English
English
Introduction
Congratulations on your purchase and welcome to Philips! To fully benefit from the support that Philips offers, register your product at www.philips.com/welcome or via the app.
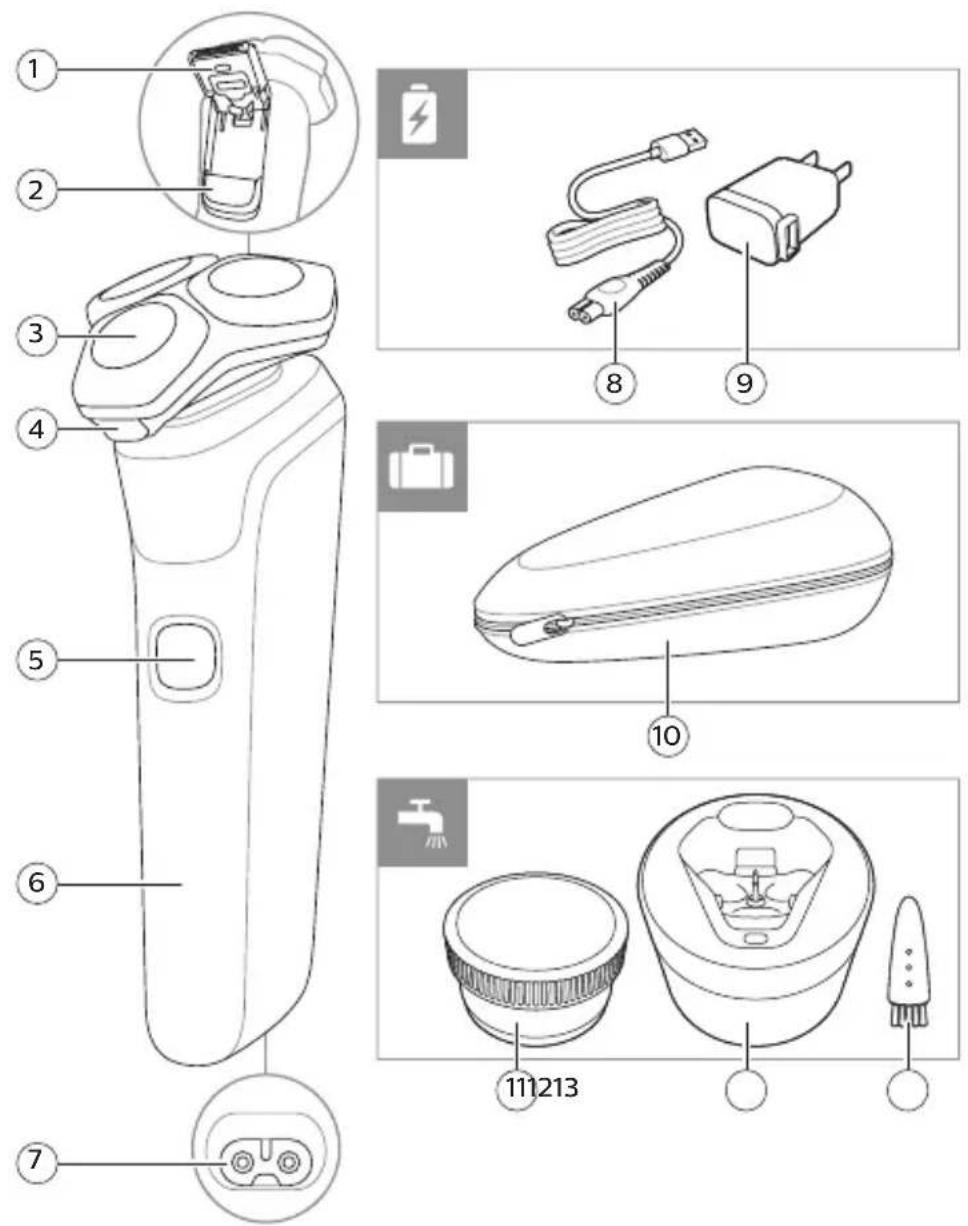
General description
1 Pop-up trimmer
2 Trimmer release slide
3 Shaving unit
4 Shaving unit release button
5 On/off button
6 Handle
7 Socket for small plug
8 Small plug
9 Supply unit
10 Pouch
11 Quick Clean Pod Cartridge (S9696/50, S9697/50 only)
12 Quick Clean Pod (S9696/50, S9697/50 only)
13 Cleaning brush
Note: The accessories supplied may vary for different products. The box shows the accessories that have been supplied with your appliance.
Important safety information
Only use the product for its intended purpose. Read this important information carefully before you use the product and its batteries and accessories, and save it for future reference. Misuse can lead to hazards or serious injuries. Accessories supplied may vary for different products.
Warning
- Only use original Philips accessories or consumables. Only use detachable supply unit HQ87.
English

natural_image
Prohibition sign showing a faucet without a shower, enclosed in a circle (no text or symbols)
-Keep the USB cable and the supply unit dry.
-This shaver is waterproof. It is suitable for use in the bath or shower and for cleaning under the tap. For safety reasons, the shaver can therefore only be used without cord.
-Do not modify the supply unit.
-This appliance can be used by children aged from 8 years and above and persons with reduced physical, sensory or mental capabilities or lack of experience and knowledge if they have been given supervision or instruction concerning use of the appliance in a safe way and understand the hazards involved. Children shall not play with the appliance. Cleaning and user maintenance shall not be made by children without supervision.
-Unplug the appliance before cleaning it with water.
-Do not use a damaged appliance. Replace damaged parts with new Philips parts.
-Only use cold or lukewarm water to clean the appliance.
English
-Because of hygiene, only one person should use the appliance.
- Never use compressed air, scouring pads, abrasive cleaning agents or aggressive liquids to clean the appliance.
-When the cleaning system is ready for use, do not move it to prevent leakage of cleaning fluid.
-Water may drip from the socket at the bottom of the shaver when you rinse it. This is normal and not dangerous because all electronics are enclosed in a sealed power unit inside the shaver.
-Do not use the supply unit in or near wall sockets that contain an electric air freshener to prevent irreparable damage to the supply unit.
-Be careful when handling your smartphone near water and in moist environments.
-Radio waves may impair the operation of pacemakers and other medical devices. Consult your phycisian for advice and keep the appliance at least 20 cm away.
-If your shaver comes with a cleaning system, always use the original Philips Quick Clean Pod cartridge.
-Always place the cleaning system on a stable, level and horizontal surface to prevent leakage.
-Always make sure the cartridge compartment is closed before you use the cleaning system.
-When the cleaning system is ready for use, do not move it to prevent leakage of cleaning fluid.
-Only use original Philips accessories or consumables.
-Charge, use and store the product at a temperature between 41 °F / 5 °C and 95 °F / 35 °C.
-Keep product and batteries away from fire and do not expose them to direct sunlight or high temperatures.
-If the product becomes abnormally hot or smelly, changes color or if charging takes longer than usual, stop using and charging the product and contact Philips.
-Do not place products and their batteries in microwave ovens or on induction cookers.
English
-Do not open, modify, pierce, damage or dismantle the product or battery to prevent batteries from heating up or releasing toxic or hazardous substances. Do not short-circuit, overcharge or reverse charge batteries.
-If batteries are damaged or leaking, avoid contact with the skin or eyes. If this occurs, immediately rinse well with water and seek medical care.
Philips Quick Clean Pod Cartridge Lemon Fragrance fluid
-Do not swallow.
-Keep out of reach of children.
Electromagnetic fields (EMF)
This Philips appliance complies with all applicable standards and regulations regarding exposure to electromagnetic fields.
Radio Equipment Directive
-S7000 series appliances are equipped with Bluetooth class 2.
-The frequency band in which the Bluetooth on S7000 series appliances operates is 2.4 GHz.
-The maximum radio frequency power radiated in the frequency band in which the S7000 series appliances operate is less than 20 dBm.
-This equipment has been so constructed that the product complies with the requirement of Article 10(2) as it can be operated in at least one EU Member State as examined and the product is compliant with Article 10(10) as it has no restrictions on putting into service in all EU member states.
-Hereby Philips declares that S7000 series appliances are in compliance with the essential requirements and other relevant provisions of Directive 2014/53/EU. The declaration of conformity may be consulted at www.philips.com/support.
English
What do the icons on my appliance handle mean?
Icon Behavior Meaning
| Flashing when you switch off the appliance | Clean the appliance under the tap (see 'How do I clean my shaver?'). Clean the attachments under the tap (see 'How do I clean my shaver?').S9696/50, S9697/50: Clean the shaver in the Quick Clean Pod. | |
| Lights up The SenseIQ technology is actively detecting your shaving behavior. | ||
| Lights upgreenThe correct shaving motion (circular movements) was used. | ||
| Lights uporangeYour shaving motion can be improved.See the app for details and advice. | ||
| Lights up Open the app. Either there is a notification waiting for you or you need to sync your shaves to prevent data loss. | ||
| Flashing slowly No connection is established between your shaver and smartphone. | ||
| Flashing quickly An error has occurred (e.g. the motor is blocked). Check the app for details. | ||
| Flashing The product must be disconnected from the power outlet before you can switch it on. | ||
| Flashing when you press the on/off button | The travel lock is activated (see 'Storage and travel'). | |
| Lights upwhitewhen you pick up the product. | The number of bars lit up show the remaining battery charge. | |
English
Icon Behavior Meaning
| Bottom light flashing orange | The battery is low. If the light flashes fast, the battery is almost empty. | |
| All three lights flashing in sequence | The appliance is in quick charge mode. | |
| One light flashing while the light bar/bars below continuously lighting up. | The appliance already has enough battery for one full shave and is now in regular charge mode. The constantly lighting bar/bars show the current battery level. | |
| Lights up continuously | The appliance is fully charged. After approx. 30 minutes, the lights go out automatically. | |
| S9696/50,S9697/50 only: | ||
| Pulsing blue The cleaning program is in progress. | ||
| Slowly flashing blue when you remove the shaver from the Quick Clean Pod during the cleaning program | The cleaning program was interrupted. If you put the shaver back into the Quick Clean Pod within four seconds, the cleaning program resumes automatically. | |
| Lights up continuously | The cleaning program is in progress. | |
| Flashing quickly when you remove the shaver from the Quick Clean Pod or press the on/off button during the cleaning program | The cleaning program was stopped. If you wish to continue, you need to restart the cleaning cycle by putting the shaver into the Quick Clean Pod and pressing the on/off button. | |
English
What does the icon on my Quick Clean Pod mean?
Icon Behavior Meaning

Becomes visible on the Quick Clean Pod
The Quick Clean Pod Cartridge needs to be replaced.
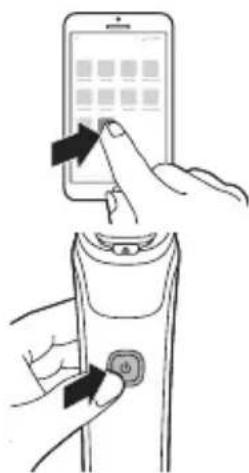
How do I connect my shaver and smartphone?
Note: Make sure your smartphone is equipped with Bluetooth ^® 4.2 or higher.
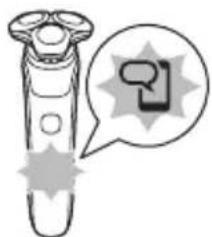
This shaver is equipped with Bluetooth® 4.2 and higher to connect to the app. When you have paired your shaver and smartphone, Bluetooth on your shaver is switched on automatically, even when the shaver is switched off. This allows your shave data to be synced later so you don't need to take your smartphone with you when you shave. The first few times you switch on the shaver, the notification symbol flashes if no connection is established with a smartphone.
natural_image
Illustration of a handheld device with a speech bubble containing a speech bubble icon (no text or symbols present)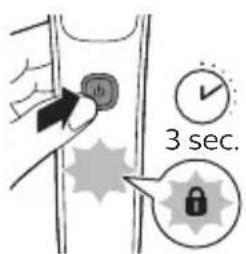
You can switch off Bluetooth on your shaver by activating the travel lock (see 'Storage and travel').
Pair the shaver and smartphone

The app is compatible with a wide range of iPhone and Android ^™ smartphones.
More information is available at www.philips.com/MyShaver9000-app
14 Download the app.
English
15 Make sure Bluetooth on your smartphone is switched on.
16 Switch on the shaver.
17 Open the app and follow the instructions to start the pairing process.
18 Once paired, the shaver and app connect automatically when the app is open and Bluetooth on your phone is switched on.
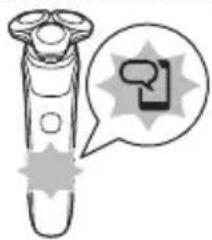
Notification symbol
natural_image
Illustration of a handheld device with a speech bubble containing a question mark (no text or symbols on the device itself)The shaver is equipped with a notification symbol. The notification symbol lights up when there is an important message for you in the app. When it lights up, simply open the app on your smartphone and follow the easy tips that the app gives you. If you need further support, visit www.philips.com/support.
Synchronize your shaves

natural_image
Illustration of a handheld device with a speech bubble containing a simple icon (no text or symbols present)This shaver stores your shave data so you don't need to take your smartphone with you when you shave. When the data storage is almost full, the notification symbol flashes. To prevent data loss, synchronize the shaver with the app. 19 Make sure your phone is close to the shaver and open the app. 20 The app connects automatically and synchronizes your last shaves.
Unpair the shaver and smartphone
You can pair your shaver with only one smartphone at a time. To unpair your shaver from your smartphone (e.g. when you get a new smartphone), follow these steps:
Unpair your shaver: Press and hold the on/off button on the handle for approx. 10 seconds to remove the bond between shaver and app.
English

natural_image
Illustration of a hairbrush with a speech bubble containing a speech bubble symbol (no text or labels present)Note: Unpairing is successful when the notification symbol lights up 4 times briefly.
Unpair your smartphone:
21 Go to the settings on your smartphone and select Bluetooth.
22 Tap on the name of the shaver.
23 Tap 'forget' or 'unpair'.
Note: The unpairing procedure may vary by smartphone. Please check your smartphone manual for more information.
How do I charge my product?
Charge the appliance before you use it for the first time and when the bottom light of the battery status indicator flashes orange, indicating that the battery is almost empty.
Charging takes approx. 1 hour.
Quick Charge: After approx. 5 minutes of charging, the battery contains enough energy for one full shave.
When the appliance is fully charged it has a cordless operating time of up to 60 minutes.
Note: You cannot use the appliance while it is charging.
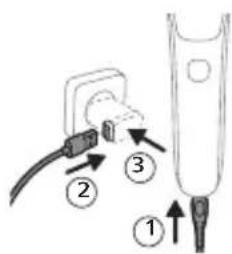
24 Make sure that the appliance is switched off.
25 Insert the small plug into the appliance.
26 Put the USB plug in the supply unit supplied and put the supply unit in the wall socket.
- While the appliance is in quick charge mode, the lights of the battery status indicator light up one after the other. After approximately 5 minutes, the bottom light of the battery status indicator flashes. The battery now contains enough energy for one full shave.
English
- While the appliance charges, first the bottom light of the battery status indicator flashes and then lights up continuously. Next the second light flashes and then lights up continuously, and so on until the appliance is fully charged.
- When the appliance is fully charged, all three battery indicator lights light up continuously. After approx. 30 minutes, the light goes out automatically.
27 After charging, remove the supply unit from the wall socket and pull the small plug out of the appliance.
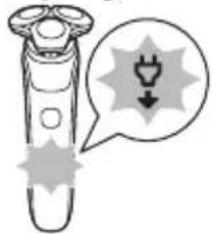
'Unplug for use' symbol
natural_image
Illustration of a handbrush with a thought bubble showing an electrical plug symbol (no text or labels)The 'unplug for use' symbol flashes to remind you to disconnect the appliance from the wall socket and remove the small plug from the appliance before you switch it on.
How do I use my product?
Warning: Always check the appliance and all accessories before use. Do not use the appliance or any accessory if it is damaged, as this may cause injury. Always replace a damaged part with one of the original type.
Note: This appliance is waterproof. It is suitable for use in the bath or shower and for cleaning under the tap. For safety reasons, the appliance can therefore only be used without cord.
English
SenseIQ technology
This product is equipped with SenseIQ technology which intelligently detects your beard density and shaving technique. You need to use the app to benefit from this feature. For a better technique, you can get personalized shaving advice in the app. You get advice in 2 ways: guided shaves in real time and synchronized shaves. We advise you to start with the guided shave to enhance your shaving experience.
-Correct handling of your product will contribute to the best shaving results.
-Follow the advice obtained from the synchronized shaves and the personalized programs.
English
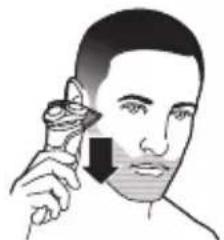
Shaving

natural_image
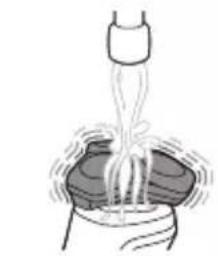
Illustration of a person using a handheld tool to apply facial contour or contour lines (no text or symbols present)You can use this appliance either wet or dry, or even under the shower. For a wet shave, apply some water and shaving foam or gel to your skin and rinse the shaving heads under the tap with warm water before following the steps below.
28 Switch on the appliance.
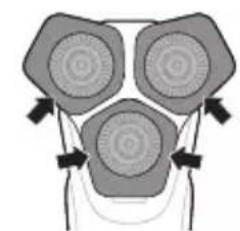
29 Move the shaving heads over your skin in circular movements to catch all hairs growing in different directions. Make sure each shaving head is fully in contact with the skin. Exert gentle pressure for a close, comfortable shave.
Note: Do not press too hard, as this can cause skin irritation.
Note: If you are shaving with gel or foam, rinse the shaving unit regularly during your shave to ensure that it continues to glide smoothly over your skin.
natural_image
Simple line drawing of a bottle being poured into a container with liquid (no text or symbols)30 Use the narrow sides of the shaving unit to shave in hard-to-reach areas such as along your jawline and under your nose.
natural_image
Diagram of a stylized face with three circular patterns and directional arrows, no text or symbols present.
natural_image
Illustration of a person's face with hand near mouth, showing eye and ear (no text or symbols)English
31 Switch off and clean the appliance after each use.
Note: Note: Make sure you rinse all foam or shaving gel off the appliance.
SenselQ: When you have finished shaving you receive feedback on the handle. The Motion Control sensor icon lights up in various colors, giving you feedback on your overall shave.

natural_image
Illustration of a handbrush with a circular button and arrow icon (no text or symbols)-When you shave in the correct motion (circular movements), the Motion Control sensor icon lights up green.
-When your shaving motion can be improved, the Motion Control sensor icon lights up orange. See the app for details and advice.
Skin adaptation period
Your first shaves may not bring you the result you expect and your skin may even become slightly irritated. This is normal. Your skin needs time to adapt to any new shaving system.
Follow the advice provided by the app and shave regularly (at least 3 times a week) with this shaver for a period of 3-4 weeks to allow your skin to adapt to the new shaver.
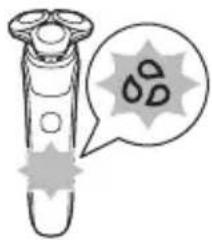
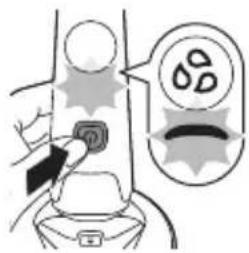
Cleaning reminder
natural_image
Illustration of a test tube with a magnified view showing droplets inside (no text or symbols)When you switch off the appliance, the cleaning reminder flashes to remind you to clean the appliance.
-Clean the appliance and attachments after each use to prevent clogging and damage (see 'How do I clean my shaver?').
-Clean the shaving heads thoroughly once a month or when the appliance does not shave as well as it used to.
Trimming
You can use the trimmer to groom your sideburns and moustache.
English
natural_image
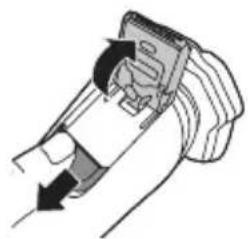
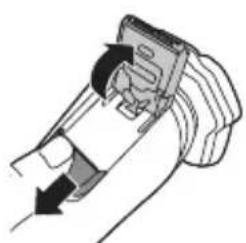
Illustration of a hand holding a device with a handle and arrow indicating direction (no text or symbols)32 Push the trimmer release slide downwards to open the trimmer.
33 Switch on the appliance.
34 Hold the trimmer perpendicular to the skin and move the appliance downwards while you exert gentle pressure.
natural_image
Illustration of a person applying a medical or cosmetic tool to their face (no text or symbols present)35 You can also use the trimmer under your nose.
36 Switch off the appliance and clean the trimmer after each use to prevent clogging and damage (see 'How do I clean my shaver?').
37 Close the trimmer.

natural_image
Illustration of a person applying nasal pressure or oral pressure to their mouth (no text or symbols present)How do I clean my shaver?
Clean the appliance and the attachments after each use for optimal performance.
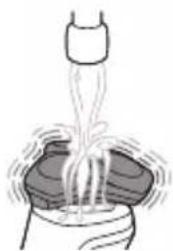
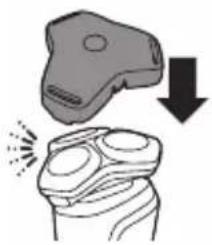
Cleaning the shaver under the tap
Clean the shaver after each use to prevent clogging and damage.
Never dry the shaving unit with a towel or tissue, as this may damage the shaving heads.
While rinsing the shaving unit, water may drip out of the base of the shaver. This is a normal occurrence.
38 Switch on the shaver.
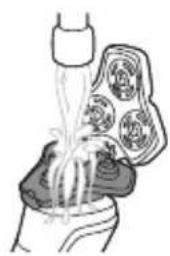
39 Rinse the shaving unit under a warm tap.
natural_image
Simple line drawing of a funnel pouring liquid into a container (no text or symbols)English

natural_image
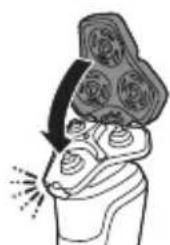
Illustration of a human head with abstract patterns and arrows indicating movement or process (no text or symbols)40 Switch off the shaver. Press the release button to open the shaving unit.
natural_image
Illustration of a hand holding a bottle with liquid flowing through a container (no text or symbols)41 Rinse the hair chamber under a warm tap.
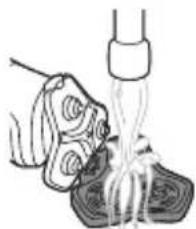
natural_image
Illustration of a hand pouring liquid into a container with a tool (no text or symbols)42 Rinse the shaving head holder under a warm tap.
43 Carefully shake off excess water and let the shaving head holder air-dry completely.
natural_image
Illustration of a person with floral patterns and a curved arrow indicating rotation (no text or symbols)44 Close the shaving unit.
Thorough cleaning
natural_image
Illustration of a human head with abstract patterns and an arrow pointing to the lower face (no text or symbols)We advise you to clean the shaving heads thoroughly once a month or when the shaver does not shave as well as it used to.
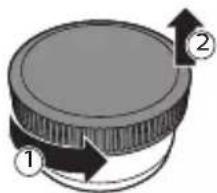
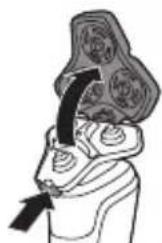
45 Make sure that the appliance is switched off and disconnected from the wall socket.
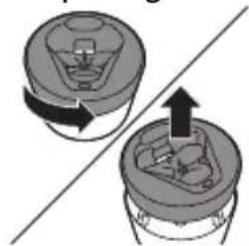
46 Press the release button on the shaving unit and pull the shaving head holder off the shaving unit.
English
natural_image
Diagram of a human torso with a medical device inserted, showing internal organs (no text or labels)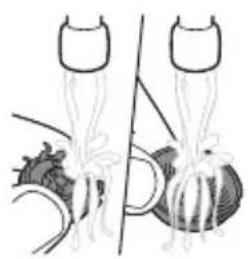
natural_image
Illustration of two anatomical structures with no visible text or symbols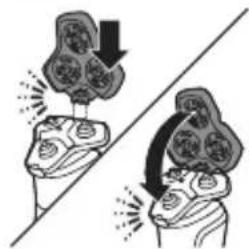
natural_image
Illustration of two hands performing a task with a flower-like object on top, no text or symbols present47 Rinse the hair chamber and shaving head holder under the tap.
48 Remove the shaving heads. For detailed instructions, see 'How do I replace the shaving heads?'.
Note: Do not clean more than one cutter and guard at a time, since they are all matching sets. If you accidentally put a cutter in the wrong shaving guard, it may take several weeks before optimal shaving performance is restored.
49 Clean the cutter and guard under the tap.
50 Shake off excess water.
51 Put the shaving heads back into the shaving unit. For detailed instructions, see 'How do I replace the shaving heads?'.
52 Insert the hinge of the shaving head holder into the slot in the top of the shaving unit and close the shaving unit.
Cleaning the pop-up trimmer
Clean the trimmer after each use to prevent clogging and damage.
Never dry the trimmer teeth with a towel or tissue, as this may damage the trimmer teeth.
53 Make sure that the appliance is switched off and disconnected from the wall socket.
54 Push the trimmer release slide down to open the pop-up trimmer.
natural_image
Diagram of a hand holding a device with arrows indicating motion (no text or symbols)English
natural_image
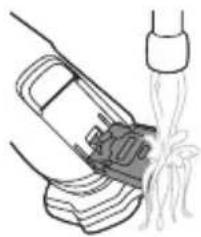
Line drawing of a car being dispensed into a bottle (no text or symbols)55 Switch on the appliance and rinse the pop-up trimmer with warm water.
56 After cleaning, switch off the appliance.
57 Carefully shake off excess water and let the pop-up trimmer air dry.
58 Close the trimmer.
natural_image
Illustration of a hand using a tool to adjust or install a mechanical component (no text or symbols visible)Tip: For optimal performance, lubricate the teeth of the pop-up trimmer with a drop of mineral oil every six months (oil not included).
How do I use the Quick Clean Pod? (S9696/50, S9697/50 only)
Preparing the Quick Clean Pod for use
natural_image
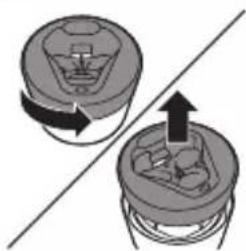
Diagram showing two mechanical components with directional arrows, no text or symbols present59 Twist and remove the top of the Quick Clean Pod.
60 Twist the lid off of the Quick Clean Pod Cartridge.
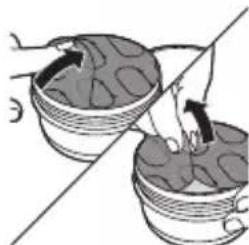
natural_image
Illustration of two woven baskets with arrows indicating movement, no text or symbols present61 Lift the tab on the seal and pull it by the corner to remove the seal from the Quick Clean Pod Cartridge.
English
natural_image
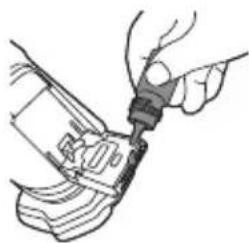
Illustration of hands using a mechanical device to adjust or install a component (no text or symbols visible)62 Press the small circular piece on the handle of the Quick Clean Pod Cartridge to break the snap hook on the handle.
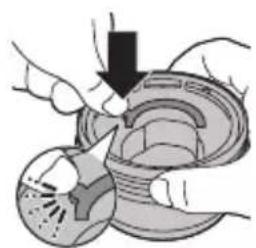
natural_image
Diagram of hands assembling a mechanical component with a downward arrow indicating motion (no text or symbols)63 Place the Quick Clean Pod Cartridge into the Quick Clean Pod.
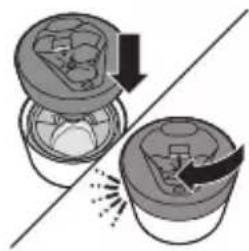
natural_image
Diagram showing two containers with arrows indicating a process or transformation, no text or symbols present.64 Put the top of the Quick Clean Pod back onto the base and turn it clockwise until you hear a click.
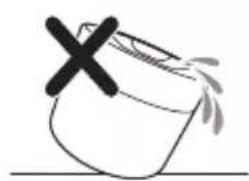
natural_image
Simple line drawing of a container with a cross mark and liquid, no text or symbols presentDo not tilt the Quick Clean Pod to prevent leakage.
Using the Quick Clean Pod
Note: If you use the shaver with shaving foam, shaving gel or pre-shave products, thoroughly rinse the shaving heads before you use the Quick Clean Pod (see 'How do I clean my shaver?').
natural_image
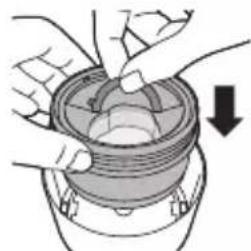
Illustration of a hand using a tool to press or adjust a device on a base (no text or symbols visible)Always shake excess water off the shaver before you place it in the Quick Clean Pod.
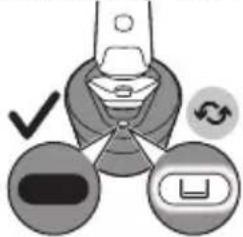
65 Place the shaver upside down into the Quick Clean Pod. The shaver automatically detects that it is in the Quick Clean Pod.
66 Switch on the shaver to start the cleaning program.
English
Each cleaning program takes approximately one minute. During the cleaning program the cleaning symbol lights up continuously and the blue icon pulses.
The shaver handle vibrates twice quickly when the cleaning program is finished.
67 Let the shaver air-dry completely in the Quick Clean Pod before storing it.
Replacing the Quick Clean Pod Cartridge
Replace the Quick Clean Pod Cartridge immediately when the cartridge replacement icon on the Quick Clean Pod becomes visible or follow the table below.
Frequency of use Cycles When to
replace the Quick Clean Pod Cartridge
Every day About 30 Every month
A few times per week About 20 Every 2 months
Every week About 13 Every 3 months
Every month About 3 Every 3 months
natural_image
Diagram showing two mechanical components with directional arrows, no text or symbols present68 Twist and remove the top of the Quick Clean Pod.
English
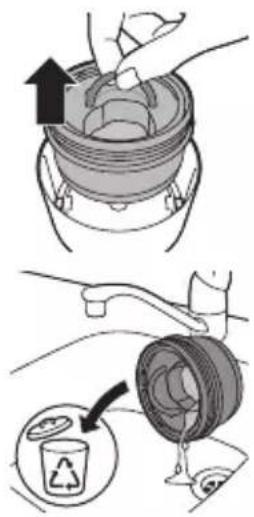
69 Lift the Quick Clean Pod Cartridge out of the Quick Clean Pod by the handle.
70 Pour any remaining fluid down a drain and recycle the empty cartridge in accordance with local waste regulations.
71 Place a new Quick Clean Pod Cartridge into the Quick Clean Pod.
Scan the QR code to the left or visit www.philips.com/cleaning-cartridge to order replacement Quick Clean Pod Cartridges.

Storage and travel
Note: We advise you to let the appliance and its attachments dry before you store them for the next use.
natural_image
Illustration of a hand holding a device with a downward arrow indicating compression or disassembly (no text or symbols present)-Put the protection cap (if supplied) on the shaver to protect it from dirt accumulation. -Store the appliance in the pouch (if supplied). -Alternatively, store the appliance on the charging stand (if supplied) or in the Philips Quick Clean Pod (if supplied).
Travel lock
You can lock the shaver when you are going to travel to prevent it from switching on accidentally.
English
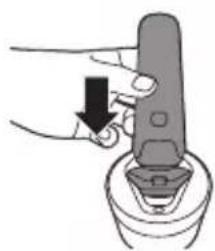
Activating the travel lock
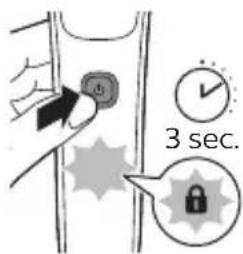
Press the on/off button for 3 seconds to use the travel lock mode.
When the travel lock is activated, the travel lock symbol flashes.
Note: When the travel lock is activated, Bluetooth is switched off automatically and your shaver is in energy saving mode.
Deactivating the travel lock
Press the on/off button for 3 seconds.
Once the travel lock is deactivated, the appliance switches on automatically.
Note: The shaver unlocks automatically when it is connected to a wall socket.

How do I replace the shaving heads?
For maximum shaving performance, we advise you to replace the shaving heads every two years.
Replace damaged shaving heads immediately.
Always replace the shaving heads with original Philips shaving heads (see 'Ordering accessories').
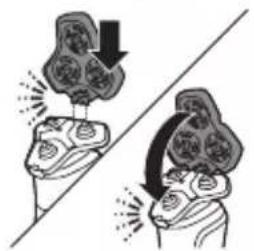
Replacing the shaving heads
natural_image
Illustration of a human head with arrows pointing to internal organs (no text or symbols)72 Switch off the shaver.
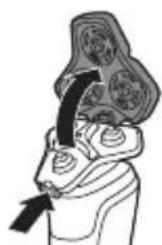
73 Press the release button on the shaving unit and pull the shaving head holder off the shaving unit.
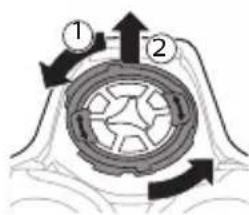
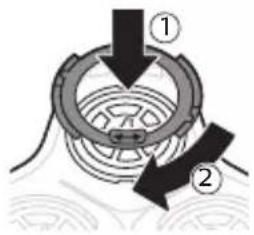
74 Turn the retaining rings anticlockwise and remove them. Place them aside in a safe place.
English
natural_image
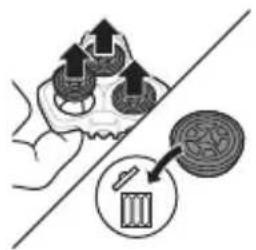
Illustration of a hand holding three circular objects with arrows pointing upward, alongside a magnified inset showing a cylindrical object (no text or symbols)75 Remove the shaving heads from the shaving head holder. Discard the used shaving heads immediately to avoid mixing them with the new shaving heads.
natural_image
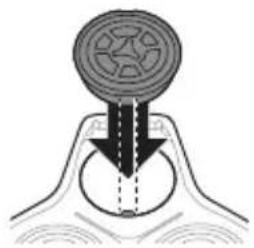
Diagram of a mechanical component with a circular top and arrow indicating direction (no text or symbols)76 Place new shaving heads in the holder.
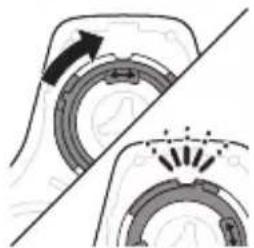
77 Place the retaining rings back onto the shaving heads and turn them clockwise to reattach the retaining rings.
natural_image
Diagram showing mechanical components with arrows indicating motion, no text or symbols present-Each retaining ring has two recesses that fit exactly into the projections of the shaving head holder. Turn the ring clockwise until your hear a click to indicate that the ring is fixed.
natural_image
Illustration of two hands performing a circular motion exercise with arrows indicating direction (no text or symbols)78 Insert the hinge of the shaving head holder into the slot in the top of the shaving unit and close the shaving unit.
Ordering accessories
To buy accessories or spare parts, visit www.philips.com/parts-and-accessories or go to your Philips dealer. You can also contact the Philips Consumer Care Center in your country (see the international warranty leaflet for contact details).
English
The following accessories and spare parts are available:
-SH91 replacement Philips shaving heads
-CP12 Philips Quick Clean Pod Cartridge Lemon Fragrance 2-pack
-CP13 Philips Quick Clean Pod Cartridge Lemon Fragrance 3-pack
-CP16 Philips Quick Clean Pod Cartridge Lemon Fragrance 6-pack
Troubleshooting
This chapter summarizes the most common problems you could encounter with the appliance. If you are unable to solve the problem with the information below, visit www.philips.com/support for a list of frequently asked questions or contact the Consumer Care Center in your country.
Problem Possible cause Solution
| I cannot connect the shaver. | You have not downloaded the app. | Download the app. |
| Your shaver and smartphone are not paired yet. | Pair your shaver and smartphone following the instructions in the app. | |
| The first pairing attempt failed. | Unpair your shaver and smartphone and try pairing them again. | |
| Your smartphone cannot find your shaver. | Make sure your smartphone is equipped with Bluetooth 4.1 or higher. | |
| Make sure Bluetooth is activated on your shaver and smartphone. |
English
Problem Possible cause Solution
| Make sure that your smartphone is within one meter of your shaver to enable a Bluetooth connection. | ||
| Make sure your shaver is charged. | ||
| I want to use the shaver without the app. | You do not have to connect your shaver with your smartphone before each shave. To get personalized shaving tips, just make sure that you connect it at least once every 20 shaves to synchronize your shave data. | |
| The appliance does not work when I press the on/off button. | The appliance is still attached to the wall socket. For safety reasons, the appliance can only be used without cord. | Unplug the appliance and press the on/off button to switch on the appliance. |
| The rechargeable battery is empty. | Recharge the battery. | |
| The travel lock is activated. | Press the on/off button for 3 seconds to deactivate the travel lock. | |
| The shaving unit is soiled or damaged to such an extent that the motor cannot run. | Clean the shaving heads thoroughly or replace them. | |
| The appliance does not shave as well as it used | The shaving heads are damaged or worn. | Replace the shaving heads. |
English
Problem Possible cause Solution
| Hairs or dirt obstruct the shaving heads. | Clean the shaving heads thoroughly. | |
| Water is leaking from the bottom of the appliance. | During cleaning, water may collect between the inner body and the outer shell of the appliance. | This is normal and not dangerous because all electronics are enclosed in a sealed power unit inside the appliance. |
Recycling
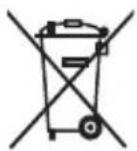
-This symbol means that electrical products and batteries shall not be disposed of with normal household waste.
-Follow your country's rules for the separate collection of electrical products and batteries.
Removal of built-in rechargeable battery
The built-in rechargeable battery must only be removed by a qualified professional when the appliance is discarded. Before removing the battery, make sure that the appliance is disconnected from the wall socket and that the battery is completely empty.
Take any necessary safety precautions when you handle tools to open the appliance and when you dispose of the rechargeable battery.
When you handle batteries, make sure that your hands, the product and the batteries are dry.
English
To avoid accidental short-circuiting of batteries after removal, do not let battery terminals come into contact with metal objects (e.g. coins, hairpins, rings). Do not wrap batteries in aluminum foil. Tape battery terminals or put batteries in a plastic bag before you discard them.
Be careful, the battery strips are sharp.
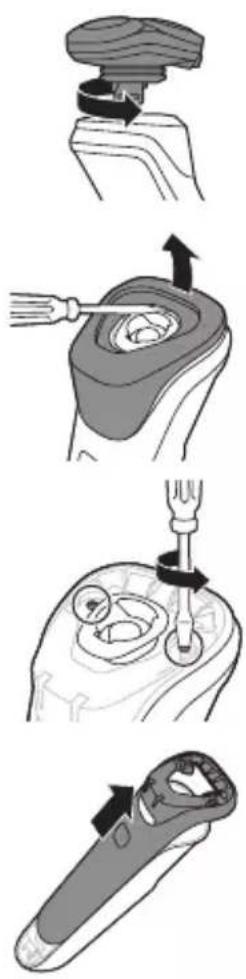
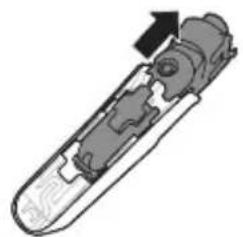
79 Twist the shaving head to remove it from the handle.
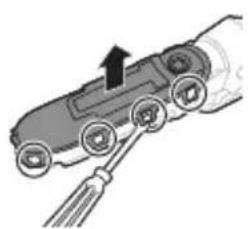
80 Insert a flat-head screwdriver under the rim of the panel and pry off.
81 Remove the two screws from the top with a torx or flat-head screwdriver.
82 Slide the front shell off.
English
natural_image
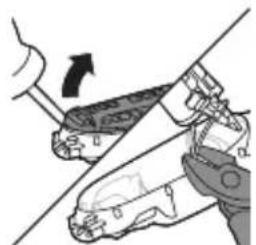
Mechanical assembly diagram showing two steps of tool manipulation (no text or symbols)83 Break the bridge on top with a wire cutter.
84 Insert a flat head screwdriver on either side of the shaver body to release the hooks.
natural_image
Cross-sectional diagram of a mechanical device with internal components and an arrow indicating direction (no text or symbols)85 Slide the power unit out of the body.
natural_image
Diagram of a car interior with a hand holding a cable, showing no text or symbols86 Bend the snap hooks aside and remove the transparent cover of the power unit.
natural_image
Diagram showing two hands operating a robotic arm with a tool, no text or symbols present87 Lift out out the battery holder and cut the wires with a pair of cutting pliers or scissors.
English
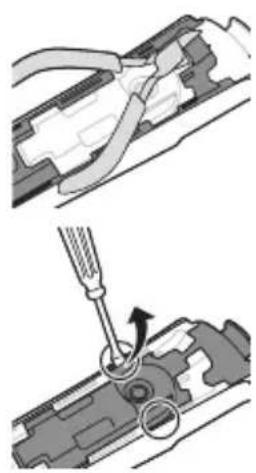
natural_image
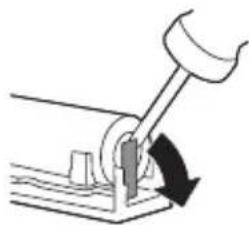
Simple line drawing of a mechanical lever with a curved arrow indicating motion (no text or symbols)88 Bend the battery tags aside with a pair of cutting pliers or a screwdriver.
89 Remove the rechargeable battery.
Trademarks
Apple, the Apple logo, iPad, and iPhone are trademarks of Apple Inc., registered in the U.S. and other countries. App Store is a service mark of Apple Inc.
Android is a trademark of Google Inc. Google Play and the Google Play logo are trademarks of Google Inc.
The Bluetooth® word mark and logos are registered trademarks owned by the Bluetooth SIG, Inc. and any use of such marks by Philips Personal Care is under license.
保証と アフターサービス
- 必ずお 守り ください
- 安全上のご注意
- ク イック チャージ
- 上手に 剃るには
- [重要]
- ポップ アップトリマーのお手入れ方法
- English
- Introduction
- General description
- Important safety information
- Warning
- Philips Quick Clean Pod Cartridge Lemon Fragrance fluid
- Electromagnetic fields (EMF)
- Radio Equipment Directive
- What do the icons on my appliance handle mean?
- Icon Behavior Meaning
- How do I connect my shaver and smartphone?
- Pair the shaver and smartphone
- Notification symbol
- Synchronize your shaves
- Unpair the shaver and smartphone
- Unpair your smartphone:
- How do I charge my product?
- 'Unplug for use' symbol
- How do I use my product?
- SenseIQ technology
- Shaving
- Skin adaptation period
- Cleaning reminder
- Trimming
- How do I clean my shaver?
- Cleaning the shaver under the tap
- Thorough cleaning
- Cleaning the pop-up trimmer
- How do I use the Quick Clean Pod? (S9696/50, S9697/50 only)
- Preparing the Quick Clean Pod for use
- Do not tilt the Quick Clean Pod to prevent leakage.
- Using the Quick Clean Pod
- Always shake excess water off the shaver before you place it in the Quick Clean Pod.
- Replacing the Quick Clean Pod Cartridge
- Frequency of use Cycles When to
- Storage and travel
- Travel lock
- Activating the travel lock
- Deactivating the travel lock
- How do I replace the shaving heads?
- Replacing the shaving heads
- Ordering accessories
- Troubleshooting
- Recycling
- Removal of built-in rechargeable battery
- Trademarks
- 保証と アフターサービス
Brand : PHILIPS
Model : Series 9000 S9697
Category : Shaver