
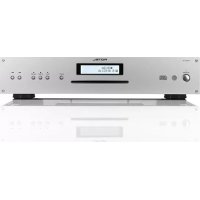
RCD1520ZIL - Cd player/recorder ROTEL - Free user manual and instructions
Find the device manual for free RCD1520ZIL ROTEL in PDF.
| Product type | CD player/recorder |
| Brand | Rotel |
| Model | RCD1520ZIL |
| Weight | 6.5 kg |
| Height (for rack mounting) | 88.1 mm (2U) |
| Power supply | 120 V AC / 60 Hz (USA) or 230 V AC / 50 Hz (Europe) |
| Maximum power consumption | 20 watts |
| Digital-to-analog converter | Wolfson |
| Analog outputs | 1 pair of RCA jacks (stereo) |
| Digital output | Coaxial (RCA jack, 75 ohms) |
| 12 V trigger input | Yes (3 to 30 V DC/AC) |
| External remote input | 3.5 mm jack |
| Computer interface | RJ-45 (external control) |
| Remote control | Infrared (RR-D95, AAA batteries) |
| Compatible formats | CD-DA, CD-R, MP3, WMA |
| Playback functions | Programming (20 tracks), repeat, random play, intro scan, fast forward/rewind (2x to 32x) |
| Display | Backlit: elapsed time, remaining time, disc remaining time |
| Laser class | Class 1 |
| Electrical protection | Double insulation (symbol) – no ground plug required |
| Maintenance and cleaning | Clean with a dry cloth or vacuum cleaner |
| Safety instructions | Do not expose to moisture; unplug before any maintenance; do not open the device |
| Spare parts and repairability | Use only accessories recommended by Rotel; contact an authorized dealer for any repairs |
| Warranty | Keep the invoice and original packaging |
Frequently Asked Questions - RCD1520ZIL ROTEL
User questions about RCD1520ZIL ROTEL
0 question about this device. Answer the ones you know or ask your own.
Ask a new question about this device
Download the instructions for your Cd player/recorder in PDF format for free! Find your manual RCD1520ZIL - ROTEL and take your electronic device back in hand. On this page are published all the documents necessary for the use of your device. RCD1520ZIL by ROTEL.
USER MANUAL RCD1520ZIL ROTEL
Stereo Compact Disc Player
Important Safety Instructions
WARNING: There are no user serviceable parts inside. Refer all servicing to qualified service personnel.
WARNING: To reduce the risk of fire or electric shock, do not expose the unit to moisture or water. Do not expose the unit to dripping or splashing. Do not place objects filled with liquids, such as vases, on the unit. Do not allow foreign objects to get into the enclosure. If the unit is exposed to moisture, or a foreign object gets into the enclosure, immediately disconnect the power cord from the wall. Take the unit to a qualified service person for inspection and necessary repairs.
Read all the instructions before connecting or operating the component.
Keep this manual so you can refer to these safety instructions. Heed all warnings and safety information in these instructions and on the product itself. Follow all operating instructions.
Clean the enclosure only with a dry cloth or a vacuum cleaner. Do not use this unit near water.
You must allow a minimum 10cm or 4 inches of unobstructed clearance around the unit.

Do not place the unit on a bed, sofa, rug, or similar surface that could block the ventilation openings. If the unit is placed in a bookcase or cabinet, there must be ventilation of the cabinet to allow proper cooling.
Keep the component away from radiators, heat registers, stoves, or any other appliance that produces heat.
WARNING: The rear panel power cord connector is the mains power disconnect device. The apparatus must be located in an open area that allows access to the cord connector.
The unit must be connected to a power supply only of the type and voltage specified on the rear panel. (USA: 120 V/60Hz, EC: 230V/50Hz)
Connect the component to the power outlet only with the supplied power supply cable or an exact equivalent. Do not modify the supplied cable. A polarized plug has two blades, with one wider than the other. A grounding plug has two blades plus a third grounding prong. These are provided for your safety. Do not defeat grounding and/or polarization safety provisions. If the supplied plug does not fit your outlet, please consult an electrician for replacement of the obsolete outlet. Do not use extension cords.
The main plug of the power cordset is a disconnect device of the apparatus. In order to completely disconnect the apparatus from the supply mains, the main plug of the power cordset should be unplugged from the mains (AC) outlet. The stand-by LED indicator will not be lit up to show the power cord is unplugged. The disconnect device shall remain readily operable.
Do not route the power cord where it will be crushed, pinched, bent, exposed to heat, or damaged in any way. Pay particular attention to the power cord at the plug and where the cord exits the back of the unit.
The power cord should be unplugged from the wall outlet during a lightning storm or if the unit is to be left unused for a long period of time.
Use only accessories specified by the manufacturer.
Use only with a cart, stand, rack, bracket or shelf system recommended by Rotel. Use caution when moving the unit in a stand or rack to avoid injury from a tip-over.

Immediately stop using the component and have it inspected and/or serviced by a qualified service agency if:
The power supply cord or plug has been damaged
- Objects have fallen or liquid has been spilled into the unit
The unit has been exposed to rain
The unit shows signs of improper operation
The unit has been dropped or damaged in any way

CAUTION
RISK OF ELECTRIC SHOCK DO NOT OPEN

CAUTION:TO REDUCE THE RISK OF ELECTRIC SHOCK,DO NOT REMOVE COVER. NO USER-SERVICEABLE PARTS INSIDE REFER SERVICING TO QUALIFIED SERVICE PERSONNEL.
APPLICABLE FOR USA, CANADA OR WHERE APPROVED FOR THE USAGE
CAUTION: TO PREVENT ELECTRIC SHOCK, MATCH WIDE BLADE OF PLUG TO WIDE SLOT. INSERT FULY.
ATTENTION: POUR EVITER LES CHOCES ELECTRIQUES, INTRODUIRE LA LAME LA PLUS LARGE DE LA FICHE DANS LA BORNE CORRESPONDANTE DE LA PRISE ET POUSSER JUSQU AU FOND.
This symbol is to alert the user to the presence of uninsulated dangerous voltages inside the product's enclosure that may constitute a risk of electric shock.
This symbol is to alert the user to important operating and maintenance (service) instructions in this manual and literature accompanying the product.

Rotel products are designed to comply with international directives on the Restriction of Hazardous Substances (RoHS) in electrical and electronic equipment and the disposal of Waste Electrical and Electronic Equipment (WEEE). The crossed wheelie bin symbol indicates compliance and that the products must be appropriately recycled or processed in accordance with these directives.

This symbol means that this unit is double insulated. An earth connection is not required.

IMPORTANT FOR LASER PRODUCTS
- CLASS 1 LASER PRODUCT
- DANGER:Visible laser radiation when open and interlock failed or bypassed. Avoid direct exposure to beam.
- CAUTION: Do not open the top cover. There are no user serviceable parts inside the player; leave all servicing to qualified service personnel.
WARNING!
To reduce the risk of electrical shock, fires, etc.:
- Do not remove screws, covers or cabinet.
- Do not expose the unit to rain or moisture.
- Do not touch the power cord or plug with wet hands.

| CAUTION | -LASER RADIATION WHEN OPEN. DO NOT STARE INTO BEAM. |
| ATTENTION | -RAYMONNEMENT LASER EN CAS D'OUVERTURE. NE PAS RégARDER DANS LE FAISCEAU. |
| VORSicht | -LASER STRAHLUNG, WENN ABOCKING GOFFENET. NICT IN DEN STRAH L BICKEN. |
| ADVASCER | -LASERSTRALING VED ABNING. SE IKKE IND I STRALEN. |
| ADVASCER | -LASERSTRALING NAR DEKSEL APNES. STRRR IKKE IIN I STRALEN. |
| VARNING | -LASERSTRALING NAR DENNA DEL AR OPPND. STRRA EJ IN I STRALEN. |
| VARO! | AVATTALESSA OLET ALTTINA LASERSATELYLLE. ALA TULOTA SATESEEN. |
| 注意 | 当打开这里会出现激光,请不要互相激光。 |
| 注意 | 二、此光可由以下光源发出: |
Commandes et branchements Bedienelemente und Anschlusses Controles y Conexiones De bedieningsorganen en aansluitingen Controll e connessioni Funktioner och anslutninger Opranby npablenn npa3bembl
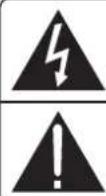
Figure 1: Controls and Connections
Figure 2: RR-D97 Remote Control
Telekomande RR-D97
Fernbedienung RR-D97
Mandoa Distancia RR-D97
De afstandsbediening RR-D97
Telecomando RR-D97
Fjarrkontroll RR-D97
IyR-DR97
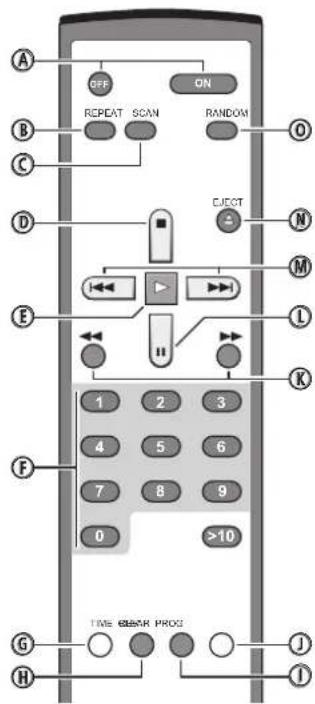
Figure 3: Analog Outputs
Sorties analogiques
Analoge Ausgabe
Salidas Analogicas
When making connections be sure to:
Turn off all the components in the system before hooking up any components, including loudspeakers.
Turn off all components in the system before changing any of the connections to the system.
It is also recommended that you:
Turn the volume control of the amplifier all the way down before the amplifier is turned on or off.
Remarques importantes
Important Safety Instructions 2
Figure 1: Controls and Connections 3
Figure 2: RR-D97 Remote Control 3
Figure 3: Analog Outputs 4
Figure 4: Digital Outputs 4
Important Notes 4
About Rotel 5
About the RCD-1520 6
Getting Started 7
A Few Precautions 7
Placement 7
Control Identification 7
AC Power and Control 7
AC Power Input 7
Power Switch and Power Indicator 1 and Remote On and Off Buttons A
Output Connections 8
Analog Outputs 8
Digital Output 8
12 Volt Trigger Input 8
EXT REMOTE IN Jack 8
Computer I/O Connector 20 8
Infrared Remote Control 8
Display 8
Disc Slot 12 8
Transport Control Buttons 9
PLAYButton 9
STOP Button 14 D 9
PAUSE Button ① 9
TRACK Buttons 16 7 M 9
DIRECT ACCESS BUTTONS F 9
SEARCH Buttons 9
EJECT Button 9
Additional Features 9
PROGRAMButton ① 9
REVIEWButton 10
CLEAR Button H 10
RANDOM Button 4 10
REPEAT Button 10
SCAN Button 10
TIME Button 10
Troubleshooting 11
Power Indicator Is Not Lit 11
Fuse Replacement 11
No Sound 11
Specifications. 11
About Rotel
Our story began nearly 50 years ago. Over the decades, we have received hundreds of awards for our products and satisfied hundreds of thousands of people who take their entertainment seriously - like you!
Rotel was founded by a family whose passionate interest in music led them to manufacture high-fidelity components of uncompromising quality. Through the years, that passion has remained undiminished and the family goal of providing exceptional value for audiophiles and music lovers, regardless of their budget, is shared by all Rotel employees.
Rotel's engineers work as a close team, listening to, and fine tuning, each new product until it reaches their exacting musical standards. They are free to choose components from around the world in order to make that product the best they can. You are likely to find capacitors from the United Kingdom and Germany, semiconductors from Japan or the United States, while toroidal power transformers are manufactured in Rotel's own factory.
We all have concerns about our environment. And, as more and more electronics are produced and later discarded, it is especially important for a manufacturer to do all it can to engineer products that have a minimum negative impact on landfill sites and water tables.
At Rotel, we are proud to do our part. We have reduced the lead content in our electronics by using special ROHS solder, while our new Class D (not digital) amplifiers are up to five times more efficient than our legacy designs and still deliver power and performance. These products run cool, give minimum wasted energy, are good for the environment and give better sound too.
Finally, we have printed this brochure on recycled paper stock.
While we understand that these are small first steps, they are still important ones. And we continue to pursue new methods and materials for a cleaner and greener manufacturing process.
All of us at Rotel thank you for buying this product. We are sure it will bring you many years of enjoyment.
About the RCD-1520
Simply stated, the RCD-1520 is designed to do one thing-deliver the most detailed, nuanced sound from every disc. Whether it is a conventional CD, or an MP3 or WMA encoded disc, the RCD-1520 will faithfully reproduce all that is recorded on the disc.
While the RCD-1520 was under development. The design team went far beyond the usual measurable technical performance characteristics. Listening panels spent hundreds of hours fine tuning the audio performance, choosing the components that produced the best sound, that would "release the emotion in the music". Whatever the artist and recording engineers put on the disc, the RCD-1520 will deliver.
That said, the RCD-1520 does feature some impressive hardware. The digital-to-analogue converter is a state of the art DAC from the world renowned British manufacturer, Wolfson. This very high performance stereo DAC is specifically designed for audio applications such as CD, DVD, and home theatre systems.
All this, combined with Rotel's Balanced Design, ensures the RCD-1520 will deliver the highest level of audio performance. When used in a high-quality audio system, your Rotel CD player will provide years of enjoyment.
Getting Started
A Few Precautions
Please read this manual carefully. In addition to installation and operating instructions, it provides valuable information on various RCD-1520 system configurations as well as general information that will help you get optimum performance from your system. Please contact your authorized Rotel dealer for answers to any questions you might have. In addition, all of us at Rotel welcome your questions and comments.
Save the RCD-1520 shipping carton and all enclosed packing material for future use. Shipping or moving the RCD-1520 in anything other than the original packing material may result in severe damage that is not covered by the warranty.
Fill out and send in the owner's registration card packed with the RCD-1520. Also be sure to keep the original sales receipt. It is your best record of the date of purchase, which you will need in the event warranty service is required.
Placement
Use common sense when placing the RCD-1520 in a cabinet or when stacking other equipment. Make sure that the shelf or cabinet can support its weight. Do not stack components on top of the RCD-1520. Avoid placing the unit where it may be subject to excessive heat such as on top of a large power amplifier or near a heat register. For best performance, avoid placing the unit where it may be subject to vibration, such as near a speaker.
Control Identification
The cover of this manual has a fold out panel that shows illustrations of the front and rear panels and the RR-D97 remote control. Each item in the illustrations is identified with a call out. Throughout this manual the items referred to in the text are identified by the corresponding call out. The items on the front and rear panels are identified with a number call out, such a 1. The items on the remote control are labeled with a letter call out, such as A.
AC Power and Control
AC Power Input
Your RCD-1520 is configured at the factory for the proper AC voltage in the country where you purchased it, either 120 volts or 230 volts. The AC line configuration is noted on a decal on the back panel.
Note: Should you move your CD player to another country, it may be possible to reconfigure it for use on a different line voltage. Do not attempt to perform this conversion yourself. Opening the enclosure of the RCD-1520 exposes you to dangerous voltages. Consult a qualified service person or the Rotel factory service department for information.
The RCD-1520 should be plugged directly into a 2-pin polarized wall outlet or into the switched outlet on another component in your audio system. Do not use an extension cord.
Be sure the power switch on the front panel of the RCD-1520 is turned off (in the "out" position). Then, connect the supplied power cord to the AC power receptacle on the rear of the unit and the AC power outlet.
If you are going to be away from home for an extended period of time such as a month-long vacation, it is a sensible precaution to unplug your CD player (as well as other audio and video components) while you are away.
Power Switch and Power Indicator 1 and Remote On and Off Buttons A
The Power switch is located on the front panel of your CD player. To turn the CD player on, push the switch in. The ring around the switch and the Display will light up, indicating that the CD player is turned on. To turn the CD player off, push the button again and return it to the "out" position.
When the Power switch is in the On position, the remote control ON and OFF buttons may be used to activate the CD player or put it in Standby mode. In Standby mode the ring around the power switch remains lit, but the display is turned off.
Note: If you are using a switched outlet to turn on and off your CD player, you should leave the power switch in the "on" position. When AC power is applied to the unit, it will power up in fully active mode.
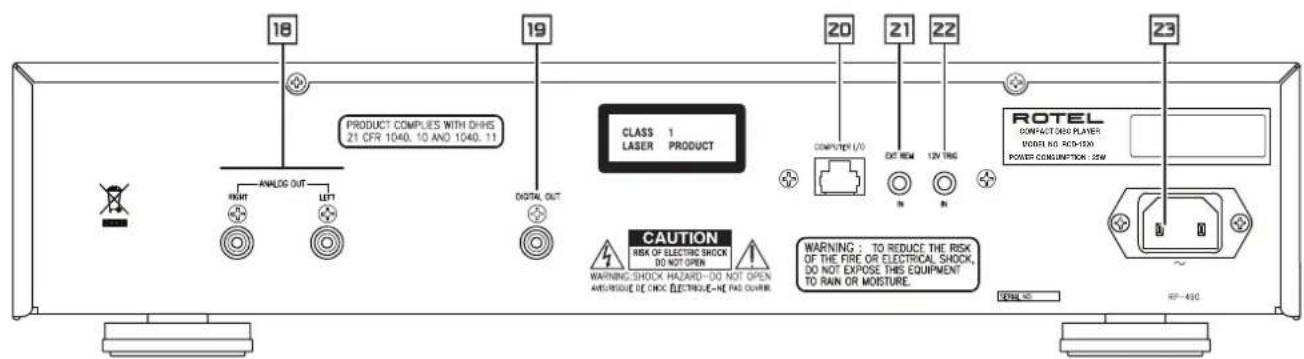
Output Connections
The RCD-1520 gives you a choice of two different kinds of outputs - an analog output signal from the built-in D/A converter for use with conventional analog audio components and a coax digital output which provides an unprocessed digital signal for use with outboard D/A converters or digital processors.
Note: To prevent loud noises that could damage your speakers, turn off all the system components when you make any signal connections.
Analog Outputs
[See Figure 3 for wiring illustration]
A pair of standard RCA jacks supplies an analog output signal from the RCD-1520 to the source inputs of an audio preamplifier, integrated amplifier, or receiver.
Select high quality audio interconnect cables. Connect the left and right channel outputs of the RCD-1520 to the corresponding inputs on the preamplifier or other component.
Digital Output
[See Figure 4 for wiring illustration]
If you are using an outboard D/A converter or other digital processor, you will need an unprocessed digital data stream from the RCD-1520. Using a standard 75 ohm coax digital cable, connect the RCD-1520's digital output to the digital input connector on the outboard D/A converter.
When playing CD-DA, MP3 and WMA discs the Digital Output provides a PCM data stream. When a dts-CD is played a dts data stream is provided.
Note: When an HDCD disc is played "HDCD" appears in the display. However the analog output is not HDCD decoded.
12 Volt Trigger Input
The RCD-1520 can be activated by a 12 volt trigger signal. The trigger input accepts any control signal (AC or DC) ranging from 3 volts to 30 volts. When a cable is connected to the 12V input and a trigger signal is present, the RCD-1520 is activated. When the trigger signal is turned off, the unit goes into standby mode. The front panel power indicator remains lit, but the display goes dark and the unit will not operate.
NOTE: When using the 12V Trigger feature, leave the POWER button in the ON position.
EXT REMOTE IN Jack
This 3.5mm mini-jack receives command codes from industry-standard infrared receivers via hard-wired connections. This feature could prove useful when the unit is installed in a cabinet and the front-panel sensor is blocked. Consult your authorized Rotel dealer for information on these external repeaters and the proper wiring of a jack to fit the mini-jack receptacle.
Computer I/O Connector 20
The RCD-1520 can be operated from a personal computer running audio system control software from third-party developers. This control is accomplished by sending the operating codes normally sent by the RR-D97 remote control over a hard-wired network connection from the computer.
The COMPUTER I/O input provides the necessary connection on the back panel. It accepts standard RJ-45 8-pin modular plugs, such as those commonly used in 10-BaseT UTP Ethernet cabling.
For additional information on the connections, software, and operating codes for computer control of the RCD-1520, contact your authorized Rotel dealer.
Operation
The RCD-1520 can be operated using its front panel buttons or from corresponding buttons on the supplied infrared remote control. Specific instructions for each of these controls are detailed below. Most of the buttons are duplicated on the front panel and on the IR remote control. However, there are a few exceptions where the buttons are only available on one or the other. These exceptions are noted in the instructions.
Infrared Remote Control
Before using the IR remote control, it is necessary to install two "UM-4/AAA" batteries (supplied). Remove the plastic cover on the back of the IR remote, install the batteries (observing the + and - polarity indications), and reinstall the cover.
To use the IR remote control, aim it at the IR sensor located in the lower left corner of the RCD-1520 front panel.
Display
A lighted Display on the front panel of the RCD-1520 provides useful information about the status of the unit, activation of special features, and track/time information for the disc being played. Each of these indicators is described in the detailed operating instructions that follow.
Disc Slot
A disc slot located in the center of the RCD-1520, accepts the disc and pulls it into the disc transport. Insert the disc label-side up. After the disc is loaded the display shows the number of tracks on the disc.
Transport Control Buttons
These buttons provide basic control functions for the disc transport mechanism. Except where noted, all functions are available on the RCD-1520 front panel and the IR remote control.
PLAYButton@E
After the disc is loaded, press the PLAY button to start playing the disc. The number of the track being played and the elapsed time will be shown in the display, along with the PLAY indicator. Normally, the disc will start playing with the first track. However, you can select a different track using the TRACK buttons or the DIRECT ACCESS buttons (see below) before pressing the PLAY button to start playing a different selection.
STOP Buiton
Press the STOP button once to stop disc play. Press the PLAY button to resume disc play where it was stopped. If the STOP button is press twice, disc play stops, the display shows STOP and programmed selections are deleted (see below). When the PLAY button is press after pressing the STOP button twice, the disc begins playing from the first track.
PAUSE Button 国①
The PAUSE II button is used to temporarily suspend play. The disc continues to spin and play will be resumed from the current position. The PAUSE indicator will light in the Display. To resume playing the disc, press the PLAY button.
TRACK Buttons 17
These buttons are used to select tracks on the disc. When a disc is playing, pressing the TRACK button advances to the beginning of the next track. Pressing the TRACK button returns to the beginning of the current track. Pressing TRACK twice quickly in succession returns to the beginning of the previous track. The new track number appears in the Display.
These buttons are also used to select a track before pressing the PLAY button or when memorizing tracks for the PROGRAM play mode (see below). These selections are made by continuously pressing the TRACK buttons until the desired track is reached.
In PROGRAM mode, the TRACK buttons advance or reverse to the next track in the memorized selection list.
DIRECT ACCESS Buttons ⑥
(remotonly)
These eleven numeric buttons (labeled 1 through 0 and >10 ) are used to directly access a track from the IR remote control instead of stepping through the tracks using the TRACK buttons.
The first ten tracks on a disc can be selected by pressing the corresponding button. For example, to play the third track, press the 3 button on the remote control. To play track 10 press the 0 button.
To select track numbers greater than 10 use the >10 button. For example, to select track 14, press the >10 button followed by the 4 button. To select track 23, press the >10 button twice followed by the 3 button. The number of the selected track will appear in the main numeric area at the center of the Display.
The DIRECT ACCESS buttons may also be used to memorize tracks in PROGRAM mode (see PROGRAM Button section).
SEARCH Buttons
The and buttons fast forward or fast reverse through the disc that is playing. One press of the or button will fast forward or fast reverse at 2X normal speed. Pressing the or button repeatedly will fast forward or fast reverse at 4X, then 8X, 16X and 32X normal speed. One more press of the or button, or pressing the Play button, returns the RCD-1520 to normal speed play. While the buttons are pressed, you will hear high-speed audio.
EJECT Button
When a disc is inserted into the front panel Disc Slot it is pulled into the disc transport. To eject the disc press the EJECT button on the front panel or the remote control.
If you accidentally press either of these buttons, press the button again to re-load the disc.
Additional Features
These convenience features add extra functionality to the RCD-1520, including the ability to memorize a group of tracks to be played, to repeat a disc, a program, or a track over and over, to play the tracks on a disc in random order, to automatically play the first 10 seconds of each track, and to select from several available time displays.
PROGRAMButton ②①
This button, labeled PROG, allows you to memorize more than 20 tracks on the current disc for playback in a specific order. For example, you could instruct the RCD-1520 to play track 5, followed by track 3, followed by track 8.
Note: Programmed play lists cannot be set up with MP3 and WMA discs.
To begin a program:
- Insert a disc in the front panel slot. The RCD-1520 will read the contents of the disc. You may press the PLAY button if you would like to listen to the tracks while you program them.
-
Press the PROGRAM button on the front panel or the remote control. The PROGRAM indicator will light up in the Display, along with "P:00" indicating that the unit is waiting for the first track to be memorized.
-
To program tracks from the handheld remote control, enter the first track number using the DIRECT ACCESS ① buttons. Your selection will be memorized automatically and the Display indicator will change to "P:01", indicating that one track has been memorized. Continue entering the rest of your selections using the DIRECT ACCESS buttons. Note that there is no need to press the PROGRAM button as each selection is memorized as it is entered.
- To program tracks from the front panel, select the first track number using the TRACK [0] buttons. To memorize additional tracks, select them with the TRACK buttons, pressing the PROGRAM button after each selection.
Once you have memorized a play list, the RCD-1520 remains in PROGRAM mode until you eject the disc or press the STOP button twice in succession. If you press the PLAY button, the memorized program will play instead of the entire disc, starting with the first selection in the memorized list.
When a PROGRAM has been memorized, most functions that would normally affect the entire disc operate on just the memorized program. For example, the TRACK buttons advance to the next track in the memorized program, not the next track on the disc. Likewise, the REPEAT button (see below) continuously plays the memorized program, not the entire disc.
Note: The Random Play feature cannot be used when using the Programmed Play feature.
REVIEWButton ③①
This button is used to review the memorized tracks in Program Play mode. Press the button and the first memorized track number and "Prog Review" will appear in the Display. Pressing the REVIEW button again while the track number is displayed will continue the review sequence, showing the next memorized track. Continue pressing the REVIEW button to see the complete memorized track list.
If the REVIEW button is not press again, after 5 seconds the review process is terminated and the unit resumes whatever mode it was in before you started the review process or resumes Program Play with the current track.
You may remove a selection from the Program Play list during the review procedure using the CLEAR button, as described below.
CLEAR Button
(remotonly)
This button allows you to remove a track selection from the memorized program play list during the review procedure described above. Follow the review procedure until the desired track number appears. Then, instead of pressing the REVIEW button to continue, remove the track by pressing the CLEAR button while the track number is displayed. You may then continue the review procedure.
RANDOM Button 4
This instructs the CD player to play tracks from the entire disc in random order. Once all of the selections have been played once, the disc will stop playing, unless the REPEAT Button (see below) has been engaged, in which case the random play will continue until the STOP button is pressed. When the RANDOM button is engaged, the icon appears in the Display.
REPEAT Button
This button allows you to repeat the current track or the entire disc continuously until the feature is cancelled by disengaging the REPEAT button or pressing STOP. The REPEAT button steps sequentially through the available options. Press the button once and the RCD-1520 will repeat just the current track. The icon appears in the Display. Press the button a second time and the RCD-1520 will repeat the entire disc. A second icon appears in the Display. Press the button a third time to cancel the REPEAT function.
As noted above, REPEAT can be used in conjunction with the RANDOM play feature. The REPEAT and RANDOM play combination can also be used when playing CD-DA discs.
Note: The REPEAT function is automatically cancelled when the disc is ejected
SCAN Button
This feature automatically plays the first ten seconds of each track on the disc (or the memorized program). To activate the feature, press the SCAN button. The Icon appears in the Display. To stop scanning and resume normal operation at the current track, press the SCAN button again or press the PLAY button.
The RANDOM and INTRO play combination can also be used when playing CD-DA discs.
TIME Button ⑥
Normally, the RCD-1520 displays the elapsed time of the currently playing track. The TIME button allows you to see alternative time displays. Pressing the button once displays the time remaining in the current track, which counts down as the track continues playing. Pressing the button a second time displays the time remaining on the entire disc (or memorized program). When the alternative time displays are selected an "R" icon appears in the display. Pressing the button a third time reverts to the standard elapsed time display.
Note: When playing MP3 and WMA discs, only the regular elapsed time and the time remaining in the current track can be displayed.
Troubleshooting
Most difficulties in audio systems are the result of incorrect connections, or improper control settings. If you encounter problems, isolate the area of the difficulty, check the control settings, determine the cause of the fault and make the necessary changes. If you are unable to get sound from the RCD-1520, refer to the suggestions for the following conditions:
Power Indicator Is Not Lit
The Power Indicator and the basic items in the Display window should be lit whenever the RCD-1520 is plugged into the wall power outlet and the Power button is pushed in. If it does not light, test the power outlet with another electrical device, such as a lamp. Be sure the power outlet being used is not controlled by a switch that has been turned off.
Fuse Replacement
If another electrical device works when plugged into the power outlet, but the Power Indicator and the Display still will not light when the RCD-1520 is plugged into the wall outlet, it indicates that the internal power fuse may have blown. If you believe this has happened, contact your authorized Rotel dealer to get the fuse replaced.
No Sound
Check the cables between the RCD-1520 and the amplifier inputs to be sure they are connected properly. Be sure the amplifier input that the RCD-1520 is selected. Be sure the tape monitor system of the amplifier has not been activated. Check the wiring between the amplifier and the speakers.
Specifications
Total Harmonic Distortion + Noise 0.0045% @ 1kHz
Intermodulation Distortion 0.0045% @ 1kHz
Frequency Response ± 0.5 20-20,000 Hz
Channel Balance ± 0.5 dB
Phase Linearity ± 0.5 degree
Channel Separation > 98 dB @ 1kHz
Signal to Noise Ratio >100dB
Dynamic Range >96 dB
Digital to Analog Converters Wolfson
Speed Accuracy,Wow & Flutter Quartz Crystal Precision
Maximum Audio Line Output 2V RMS
Output Impedance 100 Ohms
Digital Output Level (coax) 0.5 Volt, Peak to Peak
Digital Output Impedance 75 Ohms
Power Requirements
USA Version AC 120V,60 Hz
European Version AC 230V,50 Hz
Power Consumption 20 Watts
Dimensions (W x H x D) 17 x 4 x 125/8 inches
431 × 99 × 320 mm
Front Panel Height (for rack mount) 2U/3 1/2 inches / 88.1 mm
Weight (net) 6.5 kg, 14.3 lb.
All specifications are accurate at the time of printing. Rotel reserves the right to make improvements without notice.
Rotel and the Rotel HiFi logo are registered trademarks of The Rotel Co, Ltd., Tokyo, Japan.
Figure 2: Telecommandre RR-D97 3
Figure 3: Sorties analogiques 4
Entree commutation " trigger " 12V
TouchedeffacementCLEAR
BELANGRIJE INFORMATIE VOOR LASERPRODUCTEN
-
KLASSE 1 LASERPRODUCT
-
GEVAARLUK: Zichtbreg
straling van de laser wanner de spelier geopend is of wanner
ALGEMENE WAARSCHUWINGI
Ingang for extern stymming [21] 50
COMPUTER I/O-kontakt 20 50
Fjarrkontroll 50
Display 50
Skivspringa 12 50
Grundfunktioner. 51
PLAY-knappen 51
STOP-knappen 51
PAUSE-knappen 51
Hoppa framat/bakat 51
Direktknappar F 51
SEARCH-knapparna 51
EJECT-knappen 51
Ytterligare functorer. 51
PROGRAM-knappen 51
REVIEW-knappen 52
CLEAR-knuppen H 52
RANDOM-knappen 4 ① 52
REPEAT-knappen 52
SCAN-knappen 52
TIME-knappen 116 52
Felsökning 53
Precision (Wow and Flutter) Quartz Crystal-precision
Max linjesignal 2 volt RMS
Utgangsimpedans 100 ohm
Digital usignal 0,5 volt (peak to peak)
CetoeBOHnAPXHEM,KOTOPOMYNOEOOeHNRAETCN annapot, DOKJHO COOTBCTCTBOBATb Tpe6OBaHNUM,YK3aHHbHM Ha3dHHe naneHN annapota.(CLUA:120B,60Tc,E 230B,50Tc)
NoooeHnHTe KOMnoHENTK NNTaHOuEe PO3eTKe TOnbKO
pH Noomouc CteBoro UHypo nKOMNNEKTo NOCTABKN, HnE
ero ToHOrO XKBHBaENTHa. He NepeDcIbAoiTe NOCTABNEmbY
UHyp. NoJrAHOBANbHm WTEKe MNEe DBO HOJEBXb KOHTAKo
OHN Hc KOTOpBX WHe APyTORe. 3a3EMNoUH WTEKe HMeET
DOHOJEbIX KOHTAKTu HTrEtN 3a3EMHOuHM Wtbp5.
OhN OBeCNueuBaHOT BauSy Be30AnocHctb. He OTKa3bBAeTc6
OT MeP 6e30AnocHctn, PneOCTOBnEMBX 3a3EMHOuHM NnN
NoJrHOBANbHM WTEKePOM. EcnN OTOBnEMbH WTEKeP
HE NOxOaHT K BoWEn PO3eTKe, O6pTuMeTc6 K 3NeKTPKn yIaN
ZAMHe bY cTaPeBWeu PO3eTKn. He MCNoJIb3y Te YdINHITeB
NTHAHs.
OCHBOH Wtkepe CTeBOrO 1hHpy ABHETC TOKHNOUeMbIM OT
annapato NnNHOHRo OKIOHcHHe HNDENr OT NNTIOUe
CTM, OCHBOH Wtkepe CTeBOrO KOBEn CNEyET OTOeMHHTb
OT CTeBOr POeTKN NEpEMHnHO TOKA.CBToMDnHb
HNkKATOp XJMyEo pexHMa LED He 6yEt ropetb, NOKa3bBnA,
QTO CEBoH WtHy OPKNoHv.
He npoknabBaeTceBEOHHP T, 1e OH MoKet 6bIb
pa3aBneH, nepeXaT, cKpyE, noBepRyHT BoDBeCTNIO Tenna
mN NOBpEKdH KcKMM-NHO GnoC6oM. O6poaJIte oOc6oe
BHMMHHe HcTeBOW b6NJIN MTEKePnTAM, 1e OH
BXoJNT B3dHNO NHenbYCTPOCTBA.
Cetobov hunyp cneyet oTOeDHNbT ot TcENHOI PO8ETKNOB BVPMA rpo3bMnHcN pNp6Op OCTaBHeN HeCNIOb3YebMbIM DmTTelBoH BPMe.
HnOoB3yTeToTolbKO npHuaNExKHOCTM,yaKaaOHHe npOKoNDTeEM.
NcnoB3yTe TnBkToTEnKxy, NoCTABKy, CTOKY, KPOHHTe HIN NNOY CNTTEMbI, peKOMeHNoBOHHoKOMNoHMeR OTeL. BytBe octopoxhNpNnepeMeuEHn np6Opa Ha NOCTABKe HIN CTKE BO M36EaHHe pAehnAOT ONPOKDHBaAHn

MnEeJHNO npKpOHTMe KNOJb3OBHHe KOMHOHTe HnepeaTae HA o6CJIeBOHMe M/KNo 6cIyKbHMHe KBNfMnUPOBHOH NPMOTHOr OprHm3uEe cEM:
Cereboiunypnnnwtekep6bnnopekdeH
BHytpb np60pa ypoHnnn npdeMeTb mnnpoHnn XNkOCTb.
Pn6op no6bina nOIOJdo
- Pn6op demoHcTpmyet npi3HaKn HeHopMaIbHoH pa60tbl.
- Pm60p yoHnn nn noBpeHnn HIO6bM npyHM cnooc6m.
| CAUTION | -LASER RADIATION WHEN OPEN. DO NOT STARE INTO BEAM. |
| ATTENTION | -RAYMONNEMENT LASER EN CAS D'OUVERTURE. NE PAS REGARDER DANS LE FAISCEAU. |
| VORSicht | -LASER STRAHLUNG, WENN ABOCKING GÖFFENET. NIGHT IN DEN STRAH BLICKEN. |
| ADVARSL | -LASERSTRALING VED ABNING. SE IKKE IND I STRALEN. |
| ADVARSL | -LASERSTRALING NAR DEKSEL APNES. STRRR IKKE IIN I STRALEN. |
| VARNING | -LASERSTRALING NAR DENNA DEL AR OPPND. STRRA EJ INI I STRALEN. |
| VARO! | AVATTALESSA OLET ALTTINA LASERSATELYLLE. ALA TULOTA SATESEEN. |
| 注意 | 当打开这里会出现激光,请不要互相激光。 |
| 注意 | 二、此卡可不光出卖者。 一、此卡可不光出卖者。 |

JUCAHABJI INPVTXCTPAH, TAE YCTPOCTBO ODOBEPHO KICIOHB0ABAHIO.
CAUTION: TO PREVENT ELECTRIC SHOCK, MATCH WIDE BLADE OF PLUG TO WIDE SLOT, INSERT FULLY.
ATTENTION: POUR EVITER LES CHOCES ELECTRIQUES, INTRODUIRE LA LAME LA PLUS LARGE DE LA FICHE DANS LA BORNE CORRESPONDANTE DE LA PRISÉ ET POUSSER JUSQU AU FOND.


036p6a9eBnE BCKNlAteBnIHO 3baka B pABHOCOPOHBN TpyTIOHFKNE npDyNDPEXAET nalO bTaON O hANNNB C BOPOBQADQoenn A mApapat DOKYMENATMn BBAHbIX MhCTyPKN NO kCNPLYATUN I TEHXWBCMQO BYC

PpOdyKtBfoReI cnpoekTPOBOHbTaK, 406b6 COOTBEcTOBBoT TpeoobAHmM MEXyHApOBDHX DnEeKTHNo OOrpHnUHNO pIMMeHHN BpeDHBX BEeCTB B3NeKTPOTEXMHCKOM N3NeKTPOHHOM o6OpyOBaHHn (Restriction of Hazardous Substances -RoHS), TaKKe No o6pOuEHnIO COTcyKNBWMCBQoCpK 3NeKTPOTEXMHCKM N3NeKTPOHHbM o6OpyOBaHHm (Waste Electrical and Electronic Equipment - WEEE). M6OpOxHHe nepepekHyToR MycOpHOrO 6aKaHo KaONecax O3Haayet TaKke To, 0To 3TH npOyKTH DoJNKHb 6bHTBtOpNHIO HcNpO3BOAHb (peuKnHPOBaHb) INN Kc e6pOboTaN B COOTBEcTBnC yONMOHHTBM BBue MePckTHBAH.

3TOT CMMBOI O3HAAET, YTO YCTPOIcTBO MMeET BOIMHYO M0JIaMNo. 3aJemneHHe Tpe6yTeA.

CopepxaHne
Figure 1: OprahnypablennaH np3bemy 3
Figure 2: Πηνιβι Σιγ RR-D97 3
Figure 3: Cxema noiocenHHnHnHaanorororo BbXo4
Figure 4: Cxema noocnHneHnna HpOBOBbXo4
Baxhblae 3aemayehna 5
Baxkhie MHCTpykunno 6e3onachoctn 54
OKOMUNHNNROTEL 55
Onpnrpbatene RCD-1520 55
Iepbwea 56
PekomeHdaaunm 6oero xopaKTepa 56
Pa3MeueHHe 56
0603HauHnOprAHOynpBHeHn56
Pntanme npomrpbBatea 56
BxdoHn paoBem dnn eTeBoro uhypa 56
BbiknoateIb nHTaHn, HmHKATOp nHTaHn 1 KhoKn ON/OFF Ha nyIbte A 56
IopcoeHHHe BbyXoOB. 56
Anolorobbl BbXo1 16
LHpOoBbBxOa 57
12-B TprrrreepnB BxOa 57
BxOd 3JIeKTPuYeCKoRcHnHaIaIcTaNHOnHoNOrOy npabJeHHX EXT REM IN [2] 57
Pa3bEM KOMBIOTEPHO HHTeppeca-Computer I/O 20 57
IyntbDnctoHnHOHHoroynpOBneHn 57
Hnnne 57
Cnot dna 3aepyckn DnKOB 12 57
KhoNNynpaBHeHn DnCKOBbIM npMBoDm. 58
KhoKa PLAY E 58
Khonka STOP 14 D 58
KHonka PAUSE 58
KhoNN TRACK 17M 58
KhoNkDIRECT ACCESS F 58
KHONKSEARCH 58
KhoKa EJECT 58
IOnonHnTeNbHbIe yHKuM 58
KhoNka PROGRAM 21
KHonka REVIEW 59
Khonka CLEAR 59
Khonka RANDOM 4 59
KhoK REPT (REPEAT) 59
Khonka SCAN 59
Khonka TIME 59
Mharhoctka myctpaehme henoiaok. 60
HeCBETNTCHHnDnKATOPNITAHNA 60
3amehnnpdoxpannten 60
Her 38yka 60
Texnueckne xapaKtepcntkn 60
OKOMPAAHIN ROTEL
NCTOPH Hauwekompann Hauanacb noHT 50 net Ha3ad.3a npoeweDnne DecTInetn Mbl NOnyHnCOTn HArpa3a Hauw npoDyKbI n CEnaJI NCACTNNBbIMn COTHNbICH JIOHe, KOTOpBle OTHOCATK CBOHM pa3BneHnM BONNE Cepbe3HO-TAK KE,KAK B!
KOMnHnR RoteI 6bna OCHOBa CemeCTBOM, Hb CTpACTb K My3bke npoDnHa cTpeMHe Nco3DaBt hi- kOMnHOENTbl 6eCKOMPOMCCHOrO KaeeCTBa. 3a MHrHe rObl 3Ta cTpACTb HHyTyB He ocNa6Ba, n no Cei DeHb 06uaq CEb - BInyckatb npOyKtbl NcKnIOHTbHOu CEHHOCTn DnA yAnOCmOB n HIO6nteN My3bIKn, He3ABNCMO OT INx CFINAHCOBbIX BO3MOXHOCTe, pa3dennetc BCEm COpydHKAMn RoteI.
HHepeBo Rotel pa6otaT KAc EINHAR KOMHa, npocnyuBa n TtateBHO DOBDA KAKDb HOBn npOyKT Do TAkoro yOpBHc COBepuehCTBA, KOrDa OH 6yDet yOoBnetBOPaTB IX CTpornM My3bKaIbHbIM CTanapTAM. NppeIOCTaBHeNc CBO6Oda Bb6opa KOMnEeKTyOoiNx NO BCemy Mpy, YTO6bI CdenaTb Annapat KAC MOKHO nyUWe. BepoTHO, Bbl CMoxTe HaTN B HAux Annapatax OT6OpHbe KOHNecATOpBn I3 BeNikO6PrtAHn IN EpMaHHn, NOnynpOboDNKnNn I3 JnoHm n CLJIA, Ondako TopoindabHbte CInOBbte TpaHcΦopMatopBb Mbl n3rotabnBaem Ha Co6ctBeHHom 3aboDE ROTEL.
BceMb3a60tMcra 6 oxpnae Okpykaioe cipebl. Nmpe toro, KaK Bce 6oJIbwe 3neKtpOnHbIX yCTPOINCB Mnpe BByNcKaETC, a nocne OKOHuaHn CPOKA cnykbblb6paCbBaetc, dnn npOn3BOAnTeTn OOC6eHHo BaxHo npKoHCTpynpOBAHn npOyKTob Cdenatb BCE BO3MOxHoe, YTObI OHn HAHOHN MInHMnAbhBn yUep6 3emne n ICTOCHKAM BObl.
Mbl B KOMnAHn RoteI, ropDmcr CBOUM BKJADOM B 06uee IENO.
Bo-nerBbIX, Mbl cokpatnn Coepxahne CBHua C BcOe3NeKtpOnHeke, 3a CHT nONb3OBAHn npinor, OTBeauoero Tpe6OBAHnR OHS, BO-BTObIX, HsHn HOBHe ycHnTeH, pa6OtAoUne B KNaCe D, IMeHOT BnTepo 6Oone BtCOkN K.N.D., Yem npEduyUne pa3pa6OTKn, npu OINHAKOBB BixOHO MOHOCTH N KaeeCTBe 3ByAHHN. POno6Hhe npOdyKbI npakTNecKn He BblJeTnTenn, He pactpaunBaHOT noncyT3HeprnIO, XopoWn C ToQHn 3peHn OkpaHbI OKpyKaIoSei CpeBn BDO6aBOK NyUe 3ByHAT.
Hakoheu, dake 3ty nHCTpykuuMo Myo TneuataaHa 6ymare, nonyueHHou H3 BTOUPNHbIX pecypcoB.
Mbl noHmHaem,HTO 3TO manehBkne WAnr BnpeD,Ho OHn OueHb Baxhbl. BeMb MnpoOnjKaem NOnCKN HOBx MeToOB n MaTePnaNoB
IaI 60one uCtBx IN DpyKecTBENbX K OKpyKaIOuSe CpeDe
TexHONOrNuCeKnx npOeCCOB.
BceMb,coTpydHnKoKmHaHnROTEL,6NaorOapuM BAc 3a nokykny 3TOrO n3DeJn. Mby yBepeHb,4TO OHO DoCTABNT BAM MHORoNET yD0BOJbCTBn.
O npounrpbBaTeNe RCD-1520
RCD-1520 co3aH, npexde Bcero, nTTO, yTO6bI c HIO6OTo DNCKa
n3BNEKATb CAMOE dTeaJIbHOe 60ratoe HHOAHcMn 3ByuHHe. Bylb
3TO o6bHbN CD, nIN 3aINCb, KOINPOBaHNHAR B MP3 nIN WMA,
RCD-1520 npedEnbHO ToHObocnpOn3BeET BCE, yTO 6bINO Ha
dncke. KOrda RCD-1520 eue toIbko pa3pa6aTbBanc, kOMaHda nHKeHePob Bblua daNeKo 3a pamKn npocToO ueHKu N3MepeMbx texHnuecknx napametpo. rynna cneuaanictOB no npocnyuBaHHIO npOBena coTHN yacOB, TOHO HAcTpanBaJ KaueCTBO 3ByaHHa, OTbpaar KomnoHentb, daOHne HauNyUH pe3yIbTAT, cnOCo6hie «BbICbo6OaNTb 3MOunu», codepkaunecB My3bIke. KaKo 6bl nCnonHtten b HbI 3ancaH ha dncke, RCD-1520 cyMeet dohectn do Bac BCE 3MOoun.
Bce3to robopntoTOM,4TO BHytpn RCD-1520 nCnoIb3OBAhbl BneatnaIOUe KMOHOHTbI N DeTAn. UcfoaHOrOBbI KOHeBETep (LAII) 3deCb camoro BicOKoro Knacca,OT I3BeCTHO 6pntAChKOrO npOn3BOuTeJI-Wolfson.3T0BtBCOKOKaeeCTBeHHbI LAIcnueunbHo cnpoeKTnpOBAH dnyo npmeneHn,Taknx Ka CD,DVDnDomawHne TeATpbI.
Bce 3to coetaetc c konueiuee rapmoHnHoro KOHCTpynpoBAHHa "Balanced Design" n rapaHTnpyOT bIcoayuwee kaeeTBO Bocnpoun3BeDHeNRA 3Byka. B COCTABe BbICOKOkaeeTBHeHOJ ayDnOCInTeMb npOnrpbBatEnb RCD-15206ydet cnYkntb Bam MHOHne robl.
PepBbIe warn
Pekomehdaunn oouero xapaktepa
Bnmatelbno npoutaite 3to pykooboctBO. NOMMO OCHOBhIX nHCTpykun no yctahOBke n 3Knnyatau RCD-1520,B hem coepjatc peKomeHdaun, KOtOpbe nomoty Bam mKcmmalbo H nOnlb3OBaTB BCE BO3MOXHOCTNa Bawe cnCTembl. IIO BCEM nHTepecyHouim Bac Bonpocam o6paauTeCB k yonHomOueHHOMy dInepy Rotel.BceMb,cotpydHKnRotel,BCerda rotobb OTBeHtB Ha Baun Bonpoch i npinraB Baun 3ameuHna.
CoxpaHnTe Kopo6ky N Bceb ynaKoBOHyB MaTePnAn RCD-1520 nIa IcNoJIb3OBAHnB 6ByuIeM. NepeCbIka NII nepeBo3Ka annapata B IIO6oY naKOBke, KpOME 3aBODcKOn, MoKet Bbl3bBaTb cpe3HbIe NOBpeXdEHHa, He NOKpbIABaEMbIe rapaHTne.
CoxpaHnTe BbdaHbB Bam npn nokynke yek. 3To HauNyUwee noTBePckDeHne datbI nokynB clyuae, eCNI notpe6yETc rapaHTnHb peMOHT.
PazmeuHne
YCTAHABINBRA RCD-1520 B Wkafty HnI CTOKe dIa annapatpyb,
pkyOBoCTByTecb COOpaXeHNMa 3dpaBOrO Cmblcna. Y6eJntEc, YTO
nonka WkaCb cnoocb HbdepeKATb Bec annpata. He CTabte Ha
npoIRpbBatelb DpyrHe KOMNoHemtIb. He pa3MeauTe npoIRpbBatelb
tam, rDe OH 6yDet NOBepraTbc CInhHomy HarpeBy, HanpImep, Ha
ycnINTe moHOCTHn IIN PAnOM C OTOnITeBbIMn pN6OpAMn. Dnla
nonyueHn LyuWx pa6OuNx xapakTePncTK He yCTaHABINBaIte
npoIRpbBatelb MceTx, rDe HA Hero MoKet BO3JeCTBOBATb
Bn6paun, HanpImep, OKONO Akyctnueckoi CNTeMbI.
06o3haeHnOpraHOynpBHeHn
Ha 06noKke 3toi NcHctpyKun iMeetcNnIIOCTpaunnepeaeh n 3aHne naHEn, a TaKKe nybTa IY RR-D97. KaKdA detalb Ha He Hmeet yka3atnb. Iio Bcei NcHctpyKun B daJIbeHauX OnNCAHnx CbIKu B vIe du cnp, taKx KAK OTHocTcK JTeanampepeHne H 3aHne naHEn, a CbIKu B vIe du 6yKB, taKx KAK A, OTHOcTcK KHNKAM HA npIbTe.
IHTAHHe npOnrpbBaTeJIa
BxOaHn pa3bEm IJIa cTeBoro Whpyo
RCD-1520 Hactpoen Ha 3a0boge B cootbetCTBm CO CTanaptamn 3neKtpnueckoetnBaWaei Ctpane,120 B nIn 230 B. KOnchurpyaunnaeNektonuTahno6o3haueHa 3aHne naHenn annapata.
PIMMEAHNE: EcnBb nepeede B dpyruo ctpany, moxho npncnocobnt bpnpurpbbatel K dpyromy cetebomy HapxkeHHO. Ondako, He nbtaTecb caenatb 3TO camn. Pn otKpbHann KpbuKN Kopnyca Bbl moxete nonactb noa Bbcokoe HanpexHne. O6paNTecb K KBanuqmuopabahHom My mactepy u nn B cepbchhycnyk6y RoteI.
RCD-1520 cneyet nocknouatb Hanpmyo K hactehno 2-nolochon cetebo po3eTke, n6o Ko po3eTke, paocnoIooKeHHo Ha nprom komonoHente BaewcncTeMb. He noIb3yTecb ydlnHnteJIaMn.
Y6eHNTecb, 4TO KhONKa NHTAHn Ha nepeHne nahenn annapata HAXOHTCB BNOXKeHH "BbIKIOHeo" (BbCTynaet HAD NOBepxHOCTbO naHEn).3aTeM noCoeHNHTe WHPnTANHn annapata K pa3bemy Ha 3aHHe n aHEn annapata N K cTeBOI po3eK.
EcnBbHaonroye3kaeteH3Doma,Hanpimep,Ha mecau,pa3ymho 6ydet BbHytbBnknNshypa nHTAHNA CD npOnrpbIbATEeN npyrnx KOMNOHEHTOCBCTEMbln3po3etOK.
BbIKIOaTeNb NTaHn, HNdkatop NTaHn 1 n KhoNk ON/ OFF Ha nyIbTe A
BbkiouateNBnTAnHn HaxoundcHa nepeHne naHEnBaWero CD-nneepa. 4To6bl BkIOHTb npOurpbIbATEb, HxKMTe KhONky BbkiouateNBnTAnHn.3arOpNTc BbkiouateNBn Dncnne.4To6bl BbkioutbpOurpIbATEb, ChOBa HxKMITE KhONky. OHa DonXHa BePHyCbB OTKaote NOJoxeHne.
Korda bkiHouatEnb nHTAHn Power haxoNTcB noNOxehnOn, KhoKN ON n OFF ha npIbTe moXHO nCNoIb3OBaTb DnB BkHooHn CD-nneepa nn nepeBaOra ero B pexm oxuHaunr Standby. B peKmE Standby KObnO BOKpyr BkiHouatEnn HauHn npOdoJkaet CBETbC, HO dncnne OTKHouaETc.
PIMMEAHNE: EcnBbBkHIOaete N BbIKHOaete nponrpmbateIb uepe3 OTKnHOaemyo po3eTKy Ha Dpyrom annapate, OCTabte KONKY nHTAHBO BkHIOeHHOM NOXKeHN. PnnoDae NTANHn HA nponrpmbateIb OH 6ydet BkHIOaTcB B NoNHOeHHb paOohny peKmM.
IopcoeHHeBbIXoIOB
RCD-1520 MoKHO NOCoEOHNHT K aHAnorOBomy ayNo KOMNOHEHY uepe3 aHAnorobb bYbXo, N6o K uPpOBOMy ayNOKOMnoHETy (coepkaemy UAN nncpOBoN npouecop) uepe3 KoAKcnaNbHbI uCpOBoB bYbxo, HecyuH Heo6pa6oTahHbe uCpOBoB daHbIe.
INPME4AHNE:Bo 36eXaHne rpomKoro Wyma, onachoro dna Baunx KOHOHK, BbIKHOaHTe NtAOHne BCex KOMnoHEhTOB CnCTembl, Yem npO3BOJTH NIO6ble CoeUNHeHn.
AHAIOROBbI BbIXoD
(cm.puc.3)
Yepe3 ananorobb BbIXoD, npedctabnIOuOm co6oB dBa rHe3da Tna RCA,CunHan C RCD-1520 noaetcHa ayno npedycnntenb, INTerpnpobAHb ycnntenb nn peCBep.
Nob3yIteCb BbICOKOKaueCTBeHHbIMn CoeHNHTeBbHbIMn aydno Ka6enm. CoeHNHTe BbXOD neBOrKaHana RCD-1520 co BXoDMonBo rboKanana npEDynuTEnnn npDpyrO KOmNoHentA. CoeHNHTe Bxod npABoro KaHana RCD-1520 co BXoDM npABoro KaHana npEDynuTEnnn npDpyrO KOmNoHentA.
LHpOBoB BbIXoD
(cm.puc.4)
Дя noDAHn H BHeuHn LAn nIu CpPOBo npOeCCop Tpe6yETc
NOTOK Heo6pa6oTaHHbIX uCpPOBbix dAHbIX c RCD-1520. Tako
NOTOK oEocneuBaet uCpPOBoB bHXoR CRD-1520. NOpcoeHNHTe
3TOT bXoD CTaHApTbIM 75-OmHbIM Ka6eNm, npEHa3HaueHHbIM dIe
nepeDaHn CUnpPOBbIX daHHbIX, K UcPpOBOMy BXOy BHeuHero LAn.
PnBocnpoun3BeHn CD-DA, MP3 u WMA nckOB ufoBoB BbXoD Digital Output bdaet notOK daHHbIX B opMaTe PCM. PnBocnpoun3BeHn dts-CD nckOB bdaeTcnotOK daHHbIX B opMaTe dts.
IPNMEUHNE:PnBocpon3BeDenHDCD nckOB Ha nncnlee noBbTeTcH uNdkoun "HDCD".OHaKO Ha aHaNoRbOM BbXoHe He noBbTeTc DeKoHupOBaHHb HDCD cnHan.
12-B TprnrrepHbI BxOa
HITAHHE RCD-1520 MoXHO BKNIOUOATb TpURREPHbIM CnIHANOM yoBHr 12B OT npEDYCUNITeR RoTe. TpURREhBI BXo npINHMaET IIO6o CnHAn ynpABNeHHN (nepeMeHHoro nI IN NOCTOHNO TOKa) HApJxKeHNemOT3do30BObl.TIokaCnHAn npCytCTByET, CD npOnIRpbIBATEB BKNIOueH.KorDa CnHAn npONaAet, npOnIRpbIBATEB NEPExoNTB PexKIM rOToBHOCTN. B 3TOM pEXKIME INDnKATOp Ha nepeHei naHei CBtTC, Ho dncnne NORaWeH annapat HAXODITCB Hepa6OcM COCTOHNN.
PIMMEAHHE: EcnB Bbl BKIOUaete N bblKIOUaete npounrpbibatenb TprrrepHbIM CnHAnOM, OCTabTe KHONKY NITAHN BO BKIOUeHHOM nnoXeHN.
BxOJ 3JIeKTPueckoro CnHaaIa IInCTAHIOHHO ynpabHeHHEXTREMIN[21
Ha 3to 3,5 MM rHe3do, nomeeHnOe EXT REM IN, moXHO noDatb CnHAn OT BbIHeCehHOro CenCopa dNCTAHUOnHHOrO ynpabEnHn. 3To nOle3Ho, KOrDa npOnrPbBateJIb HaxOJntcRe He B rAbaHOB KOMHATE npocnyuWBAHn, a nOmeUeB CkpyIyHO cTOnky BmecTe C pyrMM KOMNoHEHTAMn DomaWHe ABtOMaTuK; NIO6 npOnrPbBateJIb HaxOJNTcB KOMHATE npocnyuWBAHn, HO B WkaFy dNl annapatypbc TEMbHM CTeknAm - CNOBM, ecN CnHAN C nybTa HE MOxET nonactb npraMo HA BCTpoEHnBI CEHCOP npOnrPbBateJIg. O BbIHOCbIX CeHCopax Ix NoCoEHNHeHn IpOKOHcyNbTupyIteb y ABTOp3OBAHHORO dInepa Rotel.
Pazbem KOMnbIOTepHoro HHTeppeca - Computer I/O
PpOurpbBateNem RCD-1520 MoXHO KOMAnDObatb c KOMnbTopepa, nONb3yI IO dny ynpabEnHn aydno CnCTeMaMn, pa3pa6OtahHoe cTOpOHHMn cHmuMaMn. Ia 3TOrO c KOMnbTopepa NocblaiOTcR KoDbI onepauu, KOtOpHe 06bHu O bdaet npbT RR-D97, Ho uepe3 npOBoHDoe CETeBOe CoeUNHeHne c KOMNbTopeom.
BxodCOMPUTERI/O 06ecneuBaet Heo6xoDnMbIe ceteBbIe coeHHeHna3aHNe nAHeN. OH npHnMaET CTAndapThIbe MoynbIbe pa3bEmbl 8-pin RJ-45, KOtOpBle 06bUHO nCNOJb3yOTcB Ka6enbHcx cetx Ethernet 10-BaseT UTP.
O6paaaiTecb K Baaemy ABTopn30BaHOMy dInepy Rotel 3a Hcnpmauei no pa3bemam, Ka6eIbHOI pa3bOKe, IIO, N Koam KOMAHd nny npabEnn RCD-1520 ot KomnbIoTepa.
YnpabBneHne
PiEEPOM RCD-1520 MoKHO ynpabnTb KaC c nepeHne naHEni, TAK C npnaraemoro nybTa. HcTpkyuIN no nCnoNtBcOBAHIO COOTBETCTByOuNX KNONK pnpBeHbHnxke. BOnBshnHCTBO nHnx npOdy6nlpObaHbI -Ha nepeHne naHEni, n Ha npbte . Ondako IMeETCA HeckonbKO NCKnHouHen, KOtOpBe yka3aHb B HcTpkyuIN.
IyIbT InCTAHUHNOHHO ynpabJeHna
PpeKJe, HEM noBbOBatc npbTom Dy, 3arpy3nTe B Hero Da
3nEmeHTa nHTAHN TnA UM-4/AAA, BXoJaUne B KOMnNeKT NOCTABKn.
ChHmnte NnactIKOByKO pbluKy C o6paTHoi CTOpHObl ynbTa,
ycTahOBtte 3nEmeHTb nHTAHN Co6NIOdA YkA3aHHy BHYTpN OTceKa
nonpHocTB (+ n -), 3aTEM BEPHnte KpbIuKy Ha MeCTo.
NocbnaKOMaHy, HanpaBnIe NynbT B cToPOHy NK ceHcopa 8, HaxoJaUeroOcB HxKHeM neBOM yrny nepedne NaHEni npOnpmbateJ.
Ducnne
Icnne n noCBetKoHa nepeHn naHn RCD-1520 oTo6paKaetkyuee coCTOHN eannapata, aKTUBHOCTb pa3NHybIX cyHKun, aTakke Homepa HBPem BOCnpou3BeHn DOpOKe npOnrpBbAemOrOdnka.Bce HndkatoPbHnx pa6ota onCbBAokTc danee.
Cnot 3aRpy3Kn DnCKOB
Cnot()n7a3arpy3knDnCKOBpacnoonoxeHaBcHTpe naHEn RCD-1520 n npHHMaet DnCKN, BTRnBaBnx BnpBOD nCKOB. NomeCTne DNCK B 9eNBMapKnPOBaHHO CTOPHOB BBepx.Nocne 3arpy3kn DnCKa Ha DnCnnee 6ydt NOKa3aHO KOnueCTBO TpeKOB HnEM.
KhoNk ynpabJeHnA nCKOBbIM npBODom
3n KhoNk 06ecneuHbOT OCHOBHe Oepaun No ynpabEnHO nCKOBbIM npBODom. Kpome CneuaIbHo OTmeueHbIX KHOONK, 6oJIbUHNCTBO n3 HxN npOy6IIpOBAHb - n Ha nepeJeHn naHenn RCD-1520, nHa nyIbTe.
Khonka PLAY
Iocne 3arpy3kn Dncka 3toi KhoKo3anyckaetcero Bocnpoun3BeDEHNE.B npocce Bocnpoun3BedeHn Dncnnne OTo6paKaET Homep Tekyuei DopokKn N BpeM, npweJWee C Hauana ee Bocnpoun3BedeHn.ObuHNO Bocnpoun3BedeHne HauHaetc C nepBoi dopokKn.OHaKO,ecn do HaxkTn KhoKn PLAY Bbl Bb6pani npryIO dopokKy KhoKamn TRACK nIn DIRECT ACCESS, Bocnpoun3BeDEHne HauHcTc C Hee.
Khonka STOP ④
Haxmte Ha KhoNk STOP oIN pA3 dIg octaHOBKn Bocnpoun3BeHHe. Haxmaite Ha KhoNk PLAY Dnra BO36HOBHeHH BOCpOun3BeHHe, eCIn OHO 6bIO OCTaHOBHeo. EcIn 6bICPo HaxKaTb Ha KhoNk STOP DBaXkb, Bocnpoun3BeHne DNCKA OCTaHABUNBaETc, Ha DCnNeB bYBOJNTc STOP N BBeHHa nporpAmma Bocnpoun3BeHHeN CTpaETc N nAMrTn (CM. HIXKe).EcIn HaxKaTb Ha KhoNk PLAY NOcNE HaxKATNa DaxKdHi HO STOP, BOCnpoun3BeHHe NDCKa HAHTetc C nepBoro TpeKa.
KHonka PAUSE
3a KhONKa Cnyknt DnBpeMeHHo octAHOBKn Bocnpon3BeHnnaDcKa. NpOdoJIkaet BpaAaTbCnOTomy MoXHO BO306HOBNTBBOcnpon3BeHne c MeCTa, rE OHO 6blNO OCTAHOBnHO. Ha dncnneeCBETTCa HmIKaTOP PAUSE. YTo6bl BO306HOBNTb Bocnpon3BeHne, HAXMNTe KHONKY PLAY.
KhoNkTRACK
3TN KHNKn NcONb3yOuTc DnB Bb6opa TpeKOB Ha DnCke. Ecnn nIeT Bocnpo3BeHne DnCKa, To HaxKatne npabBoi KHONKn TRACK Bb3bBAeT nepexod K Hauany CnedyUoSei DopoXKn. HaxKatne neBoi KHONKn TRACK Bb3bBAeT nepexod K Hauany TekyuSei DopoXKn, a Dba 6bictpbix Haxatna TRACK nOpDra - K Hauany npedByuSei dopoxKn. Homep Bb6paHNoDopoXKn OTo6pxaetca Ha DnCnnee.
3TN KONKn HcNoNb3yOToTc TAKKe IaBb6Opa DopoXKn Do HaxKaTHa KONKN PLAY, INN BpeXmne nporpammmopobAHNA PROGRAM (cm. Hnke).Ia Nb6Opa Heo6xOIMo HenpepbIBHO HaxkMaTb Ha KNONKN TRACK, NOKA He 6ydt DOCTURHT XeNaEMb TpeK.
PnBocnpo3BeHnn nporpammbb B pexkme PROGRAM Haxkatae KhONOK TRACK Bb3bBaet nepexoK cneIyoSe nIIN npedbyuSei dopoxke nporpammb.
KhoNkDIRECT ACCESS
(TonbkoHa npynte)
OINHnHaatb ucpobBxk HONOK (nomeHHhie ot "1" do "0" n >10^n ), nCnoNb3yHotc dI npAIMO r Bb6opa Dopoxknc c nybTa, BmecTo toro, yTo6bl Do6upatbcra do Hee nytem nepe6opa c nomoucbho KNONOK TRACK.
NepBbIe DecaTb DopoXek Bb6paHOTc npocTbHM HxKATnEM KhoNKn, HanpImep, YTo6bbl6paTb TpeTbHO dopoKky, HaxMnte KhoNky "3".YTo6bbl6paTb DopoKky CHomepOM 10,HaxMnte "0".YTo6bbl6paTb DopoKky CHomepOM 6Onbue 10,ncnoJb3yUte KhoNky
>10 .Hanpimep,HTo6bbl6paTbDopoxkky14,Haxmnte " > 10" a3aTeM"4".HTo6bbl6paTbDopoxkky23,Haxmnte " > 10" DBaXkbIa3aTeM"3".Homep Bbl6paHHOJDPoxkKn OTo6paXkaetcBOCHOHOnuΦpOBoi 0bactn Bu cHTpe DcNlner.
KhoNkDIRECT ACCESS MoXHO TAKKe HcNoIb3ObaT bIra BBOda nporpamMbI B pexIme nporpamMnpoBaHnA PROGRAM (cm. Hxke pa3dien-KhONka PROGRAM).
KhoNkN SEARCH
C NOMOJIbIO 3THX KNONK 一 _ 一 OcyuieCTBnIeTcYckOpEHoe BOCnpON3BeHHe B HAnpABNeHHn BnepeI nIu Ha3aI. OndHOKpAHOE HAKATNE HA KHONKY nIIN 一 BKIIHOaET nepEMOTKY BnepeI nIIN Ha3aI c yDBoEHHO CkOpocTbHO. Ecn HAXaTB eue HeCKoNbKO pa3, To CKOpocTb NepEMOTKn CTAHOBITcPabHOH 4x,8x,16x nIIN 32x KpatHOHOPMaNbHO. Pn DAnbHeMe HAXaTHN KNONK 一 _ 一 IIN 一 _ 一 IIN JKe KNONK PLAY 一 npOn3OJET BO3BPAT K HopMaJIbHOMy BOCnpON3BeHHO. Ioka KNONK HAXaTbI, MOKHO YCbIwAtb 3ByK YCKOpENHORo BOCnpON3BeHHO.
Khonka EJECT ⑥
Korda nck BCTabneB uenb (cnot) Ha nepeDne naHenn 12, OH BTARnBaETC BHYtpB B npuBOD nCKOB. Nna Blyaun nCKa o6paTHo Haxmamte Knonky EJECT 6 ha nepeDne naHenn, n6o Khonky N HA nyIbe.
EcnBbHeaHHO HaxannIO6yIO 3Tnx KhoNOK, HxMnTe Ha Hee eue pa3 dnn noBtOpHoi 3arpy3Kn DnCKa.
IonoHnTeIbHbIe yHKcN
3Tn cyHKuHmOeCneuBaHOT DonoHInTeBHe yOo6CTBa B pa6ote c RCD-1520, BKnHoua Bo3MOXHOCTb 3aONMHb rpynny TpeKOB dIra BOcnpOn3BeHEnr, NOBTOp DnCKa, nporpaMmbl INIe TpeKa MHOKeCTBO pa3, cnYauHOrO BOCnpOn3BeHEnr TpeKOB, ABTOMaTHueCKORO BOcnpOn3BeHEnr 10 nepBbIX CekyHd KaxDOrO TpeKa, a TAKKe Bb6Op OJHOro n3 HeckOJIbKnx BnIOB OTo6paXeHn HOpMaUN O BpEmEHn HA dnCnnee.
Khonka PROGRAM 2①
3a KhoNkca c 6o60haueHnem PROG no3BOnJET BBeCTn B nAmrB npOurpbBatena nporpammy Bocnpoun3BeHnna, coepkauyo do 20 dopoxek. Hanpimep, bbl moKete 3anporpammipobatb RCD-1520 ha Bocnpoun3BeHne Chauana Tpeka 5, 3aTeM Tpeka 3, notom Tpeka 8.
INPMEAHHE:CnncOKdIbBocnpOn3BeDeHnno nporpaMe Heh3a COCTABNTdIeNcKOBC CpaJnAmnB cOpMaTAX MP3 nWMA.
Khonka REPT (REPEAT) ②⑧
Nocne Haxatna 30n KHONK NOBTOHoe BOCPONBedeHne DOpOxKn, ncka nn nporpammbl npoOnkAetcdo tex nop, noka he 6ydet OTmeHno KhoNko REPEAT nnn STOP.Haxmna HA KhoNky Heckonbko pa3 moXHO nepe6paTb BCE bapnntb noBtopa. NepBoe Haxatne KhoNkn REPEAT BKNIOUaET pexm NoBtopa TeKyueuDopoxKn,BbBOra Ha dncnne nuktorpammy BTOPOe Haxatne BKNIOUaET pexm NOBtopa BCero nCKa C BBODOM COOTBeCTByIOero CNMOIa Tpetbe Haxatne OTmeHre pexm nobToPA.
Kak OTmeHc BbIe,peXmNOBtopa REPEAT moXet 6bItb
NCNoJIb3OBAH COBMeCTHO C peXmMOM BOCpOn3BeDeHnB C LyuaiHOM
nopAKe RANDOM. KOM6nHaunpeXmMoB REPEAT n RANDOM
MOxET 6bTb TAKXe NCNoJIb3OBAHa npBocPOn3BeHnDnCKOB
CD-DA.
PIMMEAHNE: Pekn noBtopa aBtOMaTneCKN OTMeHReTc npn BbIaue DnCKA.
Khonka SCAN
PnHaxKTHKNSCAN no oupeepi npourpBbAOTc nepBbIe DecTb cekynd kaskdo npoOxKn DnCKa (uNnporpAmbl,ecNb NamaTb BBeDeHa nporpamma).Ha dncnnee 3aropaeTc CmBOI cKaHNPOBAHn.4To6bl npekpatntb cKaHNPOBAHne H npoJXKTb Bocpnoun3BeHene TKyue npoOxKn B HopMaNBom pexKume, HAXMNTe KhoNky SCAN uN PLAY
Ko6nHaIpeXHMOB REPEAT n INTRO MoKeT 6bItb TaKKe IcNoIb3OBAHa npN BocPon3BeEHn DnCKOB CD-DA.
Khonka TIME
B npouecce Bocnpoun3BeHnHa Dncnnee RCD-1520 oTo6paKaetc Homep Tekyuei dopoxKn n Bpem, npoweuee c hauana ee Bocnpoun3BeHn. KhONKa TIME no3BOJnE r3MeHnTb peKmO to6paXeHn BpeHn. NepBoe Haxatne KhoNk TI M EHe T npoWeDwe Bpem Ha OCTabUeecr do KOHua DopoxKn. BToOpoe HxakTne KhoNk TI ME YbIOuNT Ha DncnneB Bpem, octabUeecr do KOHua BOCpoun3BeHn DnCKa (nnn nporpAmbl, eCIn B NAMrTB BBeHn nporpAmma). Ppi CmeHe pexKMa OTO6paXeHn BpeHn Ha DncnneB YbIOuNTc CMBOI .TpTeBbe HxKatne KhoNkn BO3BpaAaet K 06bHuHM NOKa3AHM Dncnner.
PIMMEAHHE: PnBocpon3BeHmMP3 nWMA dNcKOB, TOnbKO 06bIHyoe NCTeKUee BpEmn BpEmn DO KOHca TeKUeero TpeKa MoKet 6bIb BBBeDEHO Ha dnCnnNe.
ДиагнoctикayuctpaHeHne HenoJaDOK
BolbHnCTBO HENONAOK B ayDnOCnTeMaX npOnCxOaNT n3-3a HENpABINbHbIX COeHNHeH Nn HENpABINbHbIX yCTAHOBOK oPraHOB ynPABHeH.N. Ecnn, HeCMOTpr HA TtateNBHy IOpOBepKy coeHNHeH N yCTAHOBOK, Bbl He MoXeTe Do6ntbc4 3ByKa OT RCD-1520, npocMOTpTE npdctABNeHHb HnXe CNICOK.
He cBTNTcHnDKATOp nHTAHN
Korda Khonka nHTAHRA RCD-1520 hXkata, INBnKa erO shypa nHTAHRA BCTABNEHb BA cTeByKO po3Eky, DOJKNb CBETNBc HnNkATOp nHTAHRA N OCHOBHbIe 3NEMENTb DcNner. EcnOn OH He CBETrC, npOBepbTe HANUHne HAnpXeHnBA CteBOI po3EKe dpyrIM 3NeKTponPi6OpOM, HApPmep, PAMNoI. Y6eINTEcb, Yo po3EKA He KOHTPOINPyETCA KAKM-Nn6o BbIKHOaTeHem, KOTOpB b DAHHb MOMeHT BbIKIOUeyH.
3aMeHa npedoxpauHntela
Ecnn dpyro 3neKtponp6op, noKnHcHn K ToJKe po3eKe, pa6oTaet, a RCD-1520 - HET, BO3MOxHo, neperopen BHTpeHHn nnaBkn npdoxoPAHnten bpourPbBATen. B 3om cnyae o6paTntecb B ABTOPN3OBAHHyO cepBCHyO cnxy6y Rotel.
Het 3byko
PpOBeBte Ka6eHn, noCoEduHnOuHne BbXoD RCD-1520 K ycInntenIO; tot IIN BXoD Bb6paH Ha ycInntene; He BKnIOHeH nHa ycInntene pexKm KOHTPOrCArHana, 3aNcBbAeMOrO Ha MarHNTocPON (Tape Monitor). PpOBeBte TAKKe noCoEduHnHeHne ycInntenR K KOHOHKAM.
Ldpo-anaorosbnepeo6p308rwn Wolfson
Cto6nHbNoCTcbCKoPocT,TeTOHOu CTo6nHuaKKBOpueBBM
KpncTannom
MaKc. ypoBaHb HnHeHoro bAxoJa 2 B RMS
BixkOHOH mnnedao 100OM
Ldpoosb boko (ko0c.) po3max 0,5B
ImnadnOOKOHHORpy3750
Tpe6oBAAH K aenKpOHTAHMO
BeBopnayGLHJA 120B,60
Bepn Epon 230B,50T
Tnpe6nemMMOHOCb 20BT
431x99x320MM
Bucora nepenne naennn (MOHTOKA B CTOIKy) 2U 88.1 MM
Mocca Hrro 6,5
BceTexnueckneXapakTepeNCTKNOOTBCTBYOT DeHCTBnTeNbHOCTNaDAty 33000H.ΦnpMa Rotel octabniet 3a coo npBO moepn3npoBaTb n3denn 6e3 npDeBopntbHoro yEdomenHn.
TOrOtnBt RoTeI n RoTeI HiFi YnHOTc3 aperncntpnpOBaHbIM TOptOBbIMm Mapkamn KomnaHm The Rotel Co, Ltd., Tokno, noHn.

ROTEL
The Rotel Co. Ltd.
10-10 Shinsen-Cho
Shibuya-Ku
Tokyo 150-0045
Japan
Rotel of America
54 Concord Street
North Reading, MA 01864-2699
USA
Phone: +1 978-664-3820
Fax: +1 978-664-4109
Rotel Europe
Dale Road
Worthing, West Sussex BN11 2BH
England
Phone: +44 (0)1903 221 761
Fax:+44(0)1903221525
Rotel Deutschland

- Important Safety Instructions
- APPLICABLE FOR USA, CANADA OR WHERE APPROVED FOR THE USAGE
- IMPORTANT FOR LASER PRODUCTS
- WARNING!
- When making connections be sure to:
- It is also recommended that you:
- Remarques importantes
- About Rotel
- About the RCD-1520
- Getting Started
- A Few Precautions
- Placement
- Control Identification
- AC Power and Control
- AC Power Input
- Power Switch and Power Indicator 1 and Remote On and Off Buttons A
- Output Connections
- Analog Outputs
- Digital Output
- Volt Trigger Input
- EXT REMOTE IN Jack
- Computer I/O Connector 20
- Operation
- Infrared Remote Control
- Display
- Disc Slot
- Transport Control Buttons
- PLAYButton@E
- STOP Buiton
- PAUSE Button 国①
- TRACK Buttons 17
- DIRECT ACCESS Buttons ⑥
- SEARCH Buttons
- EJECT Button
- Additional Features
- PROGRAMButton ②①
- REVIEWButton ③①
- CLEAR Button
- RANDOM Button 4
- REPEAT Button
- SCAN Button
- TIME Button ⑥
- Troubleshooting
- Power Indicator Is Not Lit
- Fuse Replacement
- No Sound
- Specifications
- Entree commutation " trigger " 12V
- TouchedeffacementCLEAR
- BELANGRIJE INFORMATIE VOOR LASERPRODUCTEN
- ALGEMENE WAARSCHUWINGI
- JUCAHABJI INPVTXCTPAH, TAE YCTPOCTBO ODOBEPHO KICIOHB0ABAHIO.
- CopepxaHne
- OKOMPAAHIN ROTEL
- O npounrpbBaTeNe RCD-1520
- PepBbIe warn
- Pekomehdaunn oouero xapaktepa
- PazmeuHne
- 06o3haeHnOpraHOynpBHeHn
- IHTAHHe npOnrpbBaTeJIa
- BxOaHn pa3bEm IJIa cTeBoro Whpyo
- BbIKIOaTeNb NTaHn, HNdkatop NTaHn 1 n KhoNk ON/ OFF Ha nyIbTe A
- IopcoeHHeBbIXoIOB
- AHAIOROBbI BbIXoD
- LHpOBoB BbIXoD
- 12-B TprnrrepHbI BxOa
- BxOJ 3JIeKTPueckoro CnHaaIa IInCTAHIOHHO ynpabHeHHEXTREMIN[21
- Pazbem KOMnbIOTepHoro HHTeppeca - Computer I/O
- YnpabBneHne
- IyIbT InCTAHUHNOHHO ynpabJeHna
- Ducnne
- Cnot 3aRpy3Kn DnCKOB
- KhoNk ynpabJeHnA nCKOBbIM npBODom
- Khonka PLAY
- Khonka STOP ④
- KHonka PAUSE
- KhoNkTRACK
- KhoNkDIRECT ACCESS
- (TonbkoHa npynte)
- KhoNkN SEARCH
- Khonka EJECT ⑥
- IonoHnTeIbHbIe yHKcN
- Khonka PROGRAM 2①
- Khonka REPT (REPEAT) ②⑧
- Khonka SCAN
- Khonka TIME
- ДиагнoctикayuctpaHeHne HenoJaDOK
- He cBTNTcHnDKATOp nHTAHN
- 3aMeHa npedoxpauHntela
- Het 3byko
- ROTEL
Brand : ROTEL
Model : RCD1520ZIL
Category : Cd player/recorder