
RCD12 SI - Cd player/recorder ROTEL - Free user manual and instructions
Find the device manual for free RCD12 SI ROTEL in PDF.
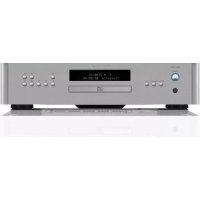
| Product type | CD player/recorder |
| Brand | Rotel |
| Model | RCD12 SI |
| Playable formats | CD, CD-R/RW, MP3, WMA |
| Loading mechanism | Motorized slot-in |
| Digital-to-analog converter | Wolfson (latest generation) |
| Analog outputs | 1 pair RCA (left/right) |
| Digital output | Coaxial (75 ohms) |
| Frequency response | 20 Hz – 20 kHz (±0.5 dB) |
| Signal-to-noise ratio | > 100 dB |
| Total harmonic distortion + noise | 0.0045% @ 1 kHz |
| Channel separation | > 98 dB @ 1 kHz |
| Analog output impedance | 100 ohms |
| Power supply | 120 V/60 Hz (USA) or 230 V/50 Hz (Europe) |
| Power consumption | 15 watts (standby: 0.5 watt) |
| Dimensions (W × H × D) | 430 × 93 × 313 mm |
| Front panel height | 80 mm |
| Net weight | 5.4 kg |
| Remote control | Infrared RR-D98 (AAA batteries included) |
| Playback functions | Program (20 tracks), random, repeat, scan, time |
| Connectivity | Rotel Link, Trigger 12V |
| Firmware update | Via mini-USB port (certified technicians) |
| Safety | Class 1 laser, double insulation, FCC/RoHS/WEEE compliant |
| Included accessories | Power cord, remote control, batteries, manual, registration card |
Frequently Asked Questions - RCD12 SI ROTEL
User questions about RCD12 SI ROTEL
0 question about this device. Answer the ones you know or ask your own.
Ask a new question about this device
Download the instructions for your Cd player/recorder in PDF format for free! Find your manual RCD12 SI - ROTEL and take your electronic device back in hand. On this page are published all the documents necessary for the use of your device. RCD12 SI by ROTEL.
USER MANUAL RCD12 SI ROTEL
Stereo Compact Disc Player
HCTpyKcna nonb30BaTeJIa
APPLICABLE FOR USA, CANADA OR WHERE APPROVED FOR THE USAGE
CAUTION: TO PREVENT ELECTRIC SHOCK, MATCH WIDE BLADE OF PLUG TO WIDE SLOT. INSERT FULLY.
ATTENTION: POUR EVITER LES CHOCSE ELECTRIQUES, INTRODUIRE LA LAME LA PLUS LARGE DE LA FICHE DANS LA BORNE CORRESPONDANTE DE LA PRISE ET POUSSER JUSQU AU FOND.
This Class B digital apparatus complies with Canadian ICES-003.
IMPORTANT FOR LASER PRODUCT
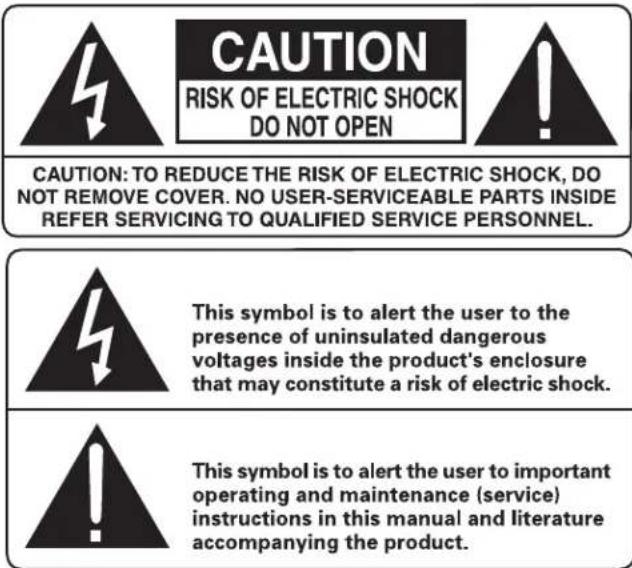
- CLASS 1 LASER PRODUCT
- DANGER: Visible laser radiation when open and interlock failed or bypassed. Avoid direct exposure to beam.
- CAUTION: Do not open the top cover. There are no user serviceable parts inside the player; leave all servicing to qualified service personnel.
WARNING!
To reduce the risk of electrical shock, fires, etc.:
- Do not remove screws, covers or cabinet.
- Do not expose the unit to rain or moisture.
- Do not touch the power cord or plug with wet hands.


Rotel products are designed to comply with international directives on the Restriction of Hazardous Substances (RoHS) in electrical and electronic equipment and the disposal of Waste Electrical and Electronic Equipment (WEEE). The crossed wheelie bin symbol indicates compliance and that the products must be appropriately recycled or processed in accordance with these directives.

This symbol means that this unit is double insulated. An earth connection is not required.

Place the unit on a fixed, level surface strong enough to support its weight. Do not place it on a moveable cart that could tip over.
The rear mini USB connection should be handled by authorized persons only.
FCC Information
This equipment has been tested and found to comply with the limits for a Class B digital device, pursuant to Part 15 of the FCC Rules. These limits are designed to provide reasonable protection against harmful interference in a residential installation. This equipment generates, uses and can radiate radio frequency energy and, if not installed and used in accordance with the instruction, may cause harmful interference to radio communications.
However, there is no guarantee that interference will not occur in a particular installation. If this equipment does cause harmful interference to radio or television reception, which can be determined by turning the equipment off and on, the user is encouraged to try to correct the interference by one or more of the following measures:
Reorient or relocate the receiving antenna.(TV, radio, etc.)
- Increase the separation between the equipment and receiver.
- Connect the equipment to an outlet on circuit different from that to which the receiver is connected.
- Consult the dealer or an experienced radio/TV technician for additional help.
Caution
This device complies with part 15 of the FCC Rules. Operation is subject to the following conditions: (1) This device may not cause harmful interference, and (2) this device must accept any interference received, including interference that may cause undesired operation.
NOTE TO CATV SYSTEM INSTALLER: Call the CATV system or antennino installer's attention to Article 820-40 of the NEC. This provides guidelines for proper grounding and, in particular, specifies that the cable ground shall be connected to the grounding system of the building, as close to the point of cable entry as practical. See installation diagram.
NOTE: This equipment has been tested and found to comply with the limits for a Class B digital device, pursuant to Part 15 of the FCC Rules. These limits are designed to provide reasonable protection against interference in a residential installation. This equipment generates and can radiate radio frequency energy and, if not installed and used in accordance with the instructions, may cause interference to radio or TV communications. There is no guarantee that interference will not occur in a particular installation. If this equipment does cause interference to radio or television reception, which can be determined by turning the equipment off and on, try to correct the interference by one or more of the following measures:
Reorient or relocate the receiving antenna.
- Increase the separation between the unit and the television tuner.
- Connect the unit to an AC power outlet on a different electrical circuit.
- Consult your authorized Rotel retailer for assistance.
Important Safety Instructions Notice
WARNING: There are no user serviceable parts inside. Refer all servicing to qualified service personnel.
WARNING: To reduce the risk of fire or electric shock, do not expose the unit to moisture or water. Do not expose the unit to dripping or splashing. Do not place objects filled with liquids, such as vases, on the unit. Do not allow foreign objects to get into the enclosure. If the unit is exposed to moisture, or a foreign object gets into the enclosure, immediately disconnect the power cord from the wall. Take the unit to a qualified service person for inspection and necessary repairs.
Read all the instructions before connecting or operating the component.
Keep this manual so you can refer to these safety instructions.
Heed all warnings and safety information in these instructions and on the product itself. Follow all operating instructions.
Clean the enclosure only with a dry cloth or a vacuum cleaner.
Do not use this unit near water.
You must allow a minimum 10cm or 4 inches of unobstructed clearance around the unit.
Do not place the unit on a bed, sofa, rug, or similar surface that could block the ventilation openings. If the unit is placed in a bookcase or cabinet, there must be ventilation of the cabinet to allow proper cooling.
Keep the component away from radiators, heat registers, stoves, or any other appliance that produces heat.
The unit must be connected to a power supply only of the type and voltage specified on the rear panel. (USA: 120 V/60Hz, EC: 230V/50Hz)
Connect the component to the power outlet only with the supplied power supply cable or an exact equivalent. Do not modify the supplied cable. A polarized plug has two blades, with one wider than the other. A grounding plug has two blades plus a third grounding prong. These are provided for your safety. Do not defeat grounding and/or polarization safety provisions. If the supplied plug does not fit your outlet, please consult an electrician for replacement of the obsolete outlet. Do not use extension cords.
The main plug of the power cardset is a disconnect device of the apparatus. In order to completely disconnect the apparatus from the supply mains, the main plug of the power cardset should be unplugged from the mains (AC) outlet. The power LED indicator will not be lit up to show the power cord is unplugged. The disconnect device shall remain readily operable.
Do not route the power cord where it will be crushed, pinched, bent, exposed to heat, or damaged in any way. Pay particular attention to the power cord at the plug and where the cord exits the back of the unit.
The power cord should be unplugged from the wall outlet during a lightning storm or if the unit is to be left unused for a long period of time.
Use only accessories specified by the manufacturer.
Use only with a cart, stand, rack, bracket or shelf system recommended by Rotel. Use caution when moving the unit in a stand or rack to avoid injury from a tip-over.
Immediately stop using the component and have it inspected and/or serviced by a qualified service agency if:
The power supply cord or plug has been damaged.
- Objects have fallen or liquid has been spilled into the unit.
The unit has been exposed to rain.
- The unit shows signs of improper operation.
The unit has been dropped or damaged in any way.
The batteries in the remote control shall not be exposed to excessive heat such as sunshine, fire or the like.
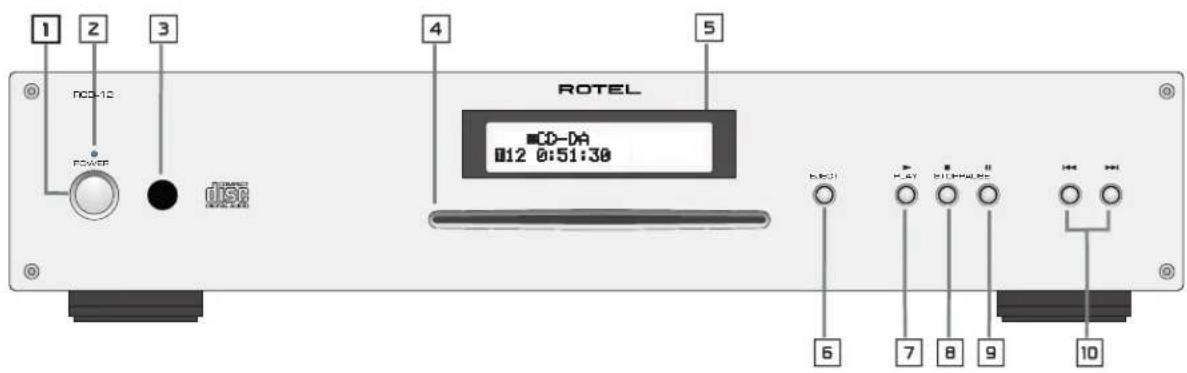
Figure 1: Controls and Connections Commandes et branchements Bedienelemente und Anschlisse Controles y Conexiones
Figure 1: Controllie connessioni De bedieningsorganen en aansluitingen Kontroller och anslutninger OpraHbI ynpaBHeNHa pa3beMbI
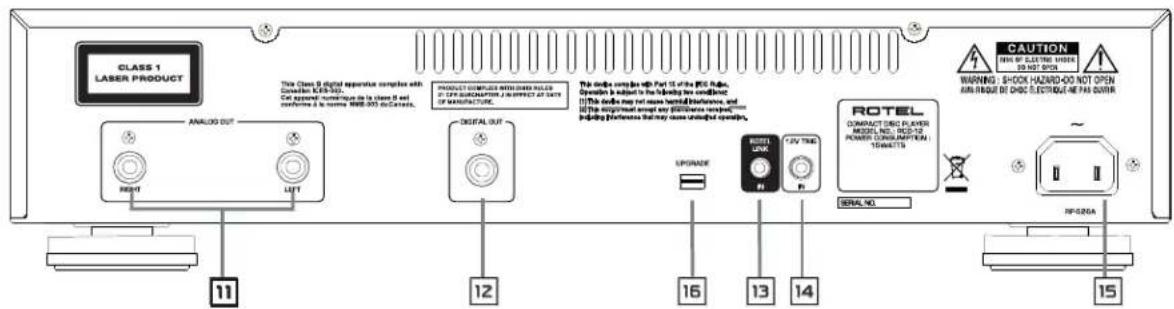
Figure 2: RR-D98 Remote Control
Telekomande RR-D98
Fernbedienung RR-D98
Telekomando RR-D98
Mando a Distancia RR-D98
De RR-D98 afstandsbediening
Fjarrkontroll RR-D98
Пульт ДУ RR-D98
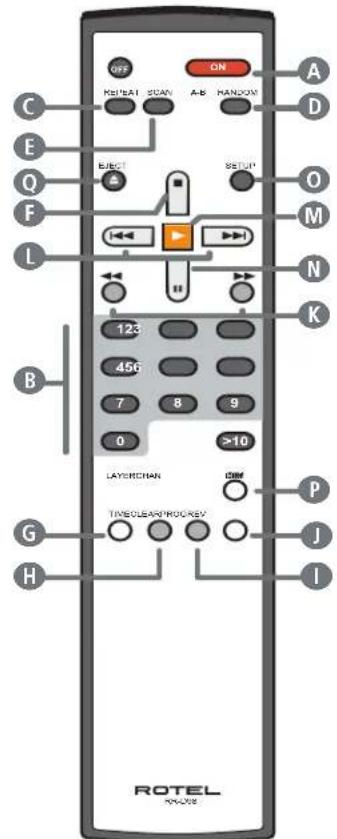
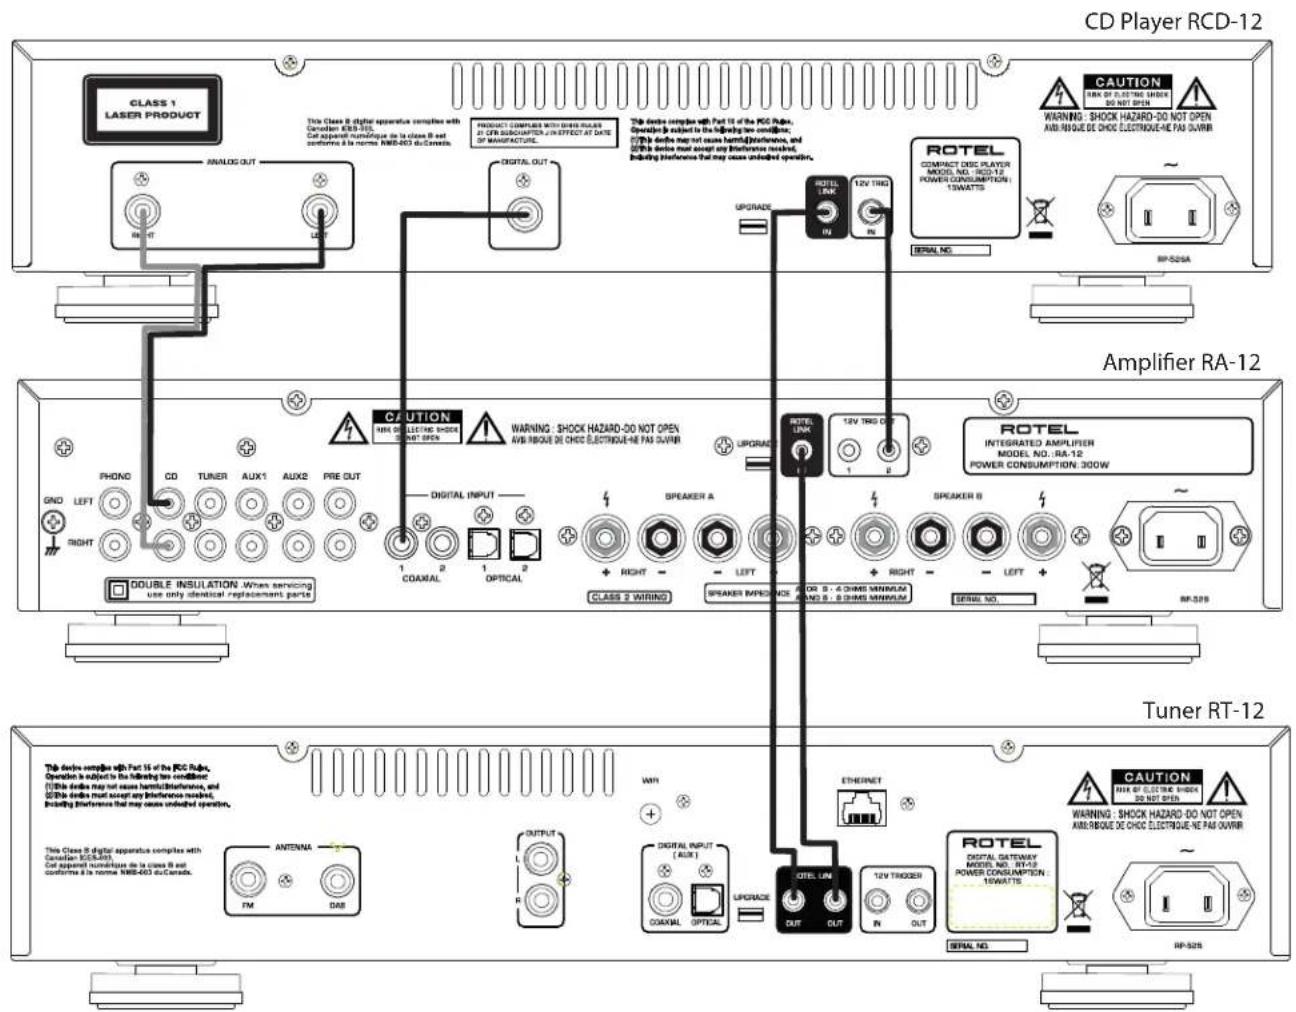
Figure 3: Connections Connexions Anschlussdiagramm Conexiones Collegamenti De verbindingen Anslutningar AnodcoeHHeHn
Contents
Important Safety Instructions 3
Figure 1: Controls and Connections 4
Figure 2: Remote Control RR-D98 4
Figure 3: Connections 5
About Rotel 6
About the RCD-12 6
Getting Started 7
A Few Precautions 7
AC Power and Control 7
AC Power Input 7
Power Switch and POWER Indicator 7
Output Connections 7
Analog Outputs 7
Digital Output 8
OPERATION 8
Infrared Remote Control 8
Display 8
Disc Loader Slot 4 8
EJECT Button 8
PLAYButton 8
STOP Button 8
PAUSE Button 8
TRACK Buttons 8
DIRECT ACCESS Buttons 8
Additional Features 9
Rotel-Link 10
12V Trigger Connection 10
Remote Control Advanced Buttons. 10
SETUP Button 10
DIM Button 10
Power Indicator Is Not Illuminated 10
Fuse Replacement 10
NO SOUND 10
Specifications. 11
About Rotel
Our story began over 50 years ago. Over the decades, we have received hundreds of awards for our products and satisfied hundreds of thousands of people who take their entertainment seriously - like you!
Rotel was founded by a family whose passionate interest in music led them to manufacture high-fidelity components of uncompromising quality. Through the years, that passion has remained undiminished and the family goal of providing exceptional value for audiophiles and music lovers, regardless of their budget, is shared by all Rotel employees.
Rotel's engineers work as a close team, listening to, and fine tuning, each new product until it reaches their exacting musical standards. They are free to choose components from around the world in order to make that product the best they can. You are likely to find capacitors from the United Kingdom and Germany, semiconductors from Japan or the United States, while toroidal power transformers are manufactured in Rotel's own factory
We all have concerns about our environment. And, as more and more electronics are produced it is especially important for a manufacturer to do all it can to engineer products that have a minimum impact on the environment.
At Rotel, we are proud to do our part. We have reduced the lead content in our products by using special lead-free ROHS solder and components. Our engineers continually strive to improve power supply efficiency without compromise to quality. When in standby mode Rotel products use minimal power to meet global Standby Power Consumption requirements.
The Rotel factory is also doing their part to help the environment through constant improvements to product assembly methods for a cleaner and greener manufacturing processes.
All of us at Rotel thank you for buying this product. We are sure it will bring you many years of enjoyment.
About the RCD-12
Simply stated, the RCD-12 is designed to do one thing—deliver the most detailed, nuanced sound from every disc. Whether it is a conventional CD, or an MP3 or WMA encoded disc, the RCD-12 will faithfully reproduce all that is recorded on the disc. While the RCD-12 was under development, the design team went far beyond the usual measurable technical performance characteristics. Listening panels spent hundreds of hours fine tuning the audio performance, choosing the components that produced the best sound, that would "release the emotion in the music". Whatever the artist and recording engineers put on the disc, the RCD-12 will deliver.
That said, the RCD-12 does feature some impressive hardware. The digital-to-analogue converter is a state of the art DAC from the world renowned British manufacturer, Wolfson. This very high performance stereo DAC is specifically designed for audio applications such as CD, DVD, and home theatre systems. All this, combined with Rotel's Balanced Design, ensures the RCD-12 will deliver the highest level of audio performance. When used in a high-quality audio system, your Rotel CD player will provide years of enjoyment.
Getting Started
A Few Precautions
WARNING: To avoid potential damage to your system, turn off ALL the components in the system when connecting or disconnecting the loudspeakers or any associated components. Do not turn the system components back on until you are sure all the connections are correct and secure.
Please read this manual carefully. In addition to installation and operating instructions, it provides valuable information on various RCD-12 system configurations as well as general information that will help you get optimum performance from your system. Please contact your authorized Rotel dealer for answers to any questions you might have. In addition, all of us at Rotel welcome your questions and comments.
Save the RCD-12 shipping carton and all enclosed packing material for future use. Shipping or moving the RCD-12 in anything other than the original packing material may result in severe damage that is not covered by the warranty.
If included in the box please fill out and send in the owner's registration card. Also be sure to keep the original sales receipt. It is your best record of the date of purchase, which you will need in the event warranty service is required.
Placement
Use common sense when placing the RCD-12 in a cabinet or when stacking other equipment. Make sure that the shelf or cabinet can support its weight. Do not stack heavy components on top of the RCD-12. Avoid placing the unit where it may be subject to excessive heat such as on top of a large power amplifier or near a heat register. For best performance, avoid placing the unit where it may be subject to vibration, such as near a speaker.
Control Identification
This manual shows illustrations of the front and rear panels and the RR-D98 remote control. Each item in the illustrations is identified with a call out in a grey box. Through out this manual the items referred to in the text are identified by the corresponding call out. The items on the front and rear panels are identified with a number call out, such a 1. The items on the remote control are labeled with a letter call out, such as 3.
AC Power and Control
AC Power Input
Your RCD-12 is configured at the factory for the proper AC voltage in the country where you purchased it (either 120 volts or 230 volts). The AC line configuration is noted on a decal on the back panel.
NOTE: Should you move your CD player to another country, it may be possible to reconfigure it for use on a different line voltage. Do not attempt to perform this conversion yourself. Opening the enclosure of the RCD-12 exposes you to dangerous voltages. Consult a qualified service person or the Rotel factory service department for information.
NOTE: Some products are intended for sale in more than one country and as such are supplied with more than one AC cord. Please use only the cord appropriate for your country/region.
The RCD-12 should be plugged directly into a 2-pin polarized wall outlet or into the switched outlet on another component in your audio system. Do not use an extension cord.
Be sure the power switch on the front panel of the RCD-12 is turned off (in the "out" position). Then, connect the supplied power cord to the AC power receptacle on the rear of the unit and the AC power outlet.
If you are going to be away from home for an extended period of time such as a month-long vacation, it is a sensible precaution to unplug your CD player (as well as other audio and video components) while you are away.
Power Switch 1 and POWER Indicator z
The power switch is located on the front panel of your CD player. To turn the CD player on, push the switch in. The LED indicator above the switch and the Display will light up, indicating that the CD player is turned on. To turn the CD player off, push the button again and return it to the "out" position.
NOTE: If you are using a switched outlet to turn on and off your CD player, you should leave the power switch in the "ON" position. When AC power is applied to the unit, it will power up in fully active mode.
NOTE: When the power switch is in the "ON" position, the remote control ON and OFF buttons may be used to activate the CD player or put it in Standby mode. In Standby mode the power LED remains lit, but the display is turned off.
Output Connections
The RCD-12 gives you a choice of two different kinds of output connections — an analog output signal from the built-in D/A converter for use with conventional analog audio components and a coax digital output which provides an unprocessed digital data signal for use with outboard D/A converters or digital processors.
NOTE: To prevent loud noises that neither you nor your speakers will appreciate, make sure the CD player is turned off when you make any signal connections.
Analog Outputs
See Figure 3
A pair of standard RCA jacks supplies an analog output signal from the RCD-12 to the source inputs of an audio preamplifier, integrated amplifier, or receiver.
Select high quality audio interconnect cables. Connect the left channel output of the RCD-12 to the left channel source input on the preamplifier or other component. Connect the right output of the RCD-12 to the right channel source input on the preamplifier or other component.
Digital Output
See Figure 3
If you are using an outboard D/A converter or other digital processor, you will need an unprocessed digital data stream from the RCD-12, taken before the built-in D/A converter. This signal is supplied by The RCD-12's back panel digital output jack. Using a standard 75 ohm coax digital cable, connect the RCD-12's coax digital output to the coax digital input connector on the outboard D/A converter.
NOTE: When playing CD-DA, MP3 and WMA discs, the Digital Output provides a PCM data stream.
OPERATION
The RCD-12 can be operated using its front panel buttons or from corresponding buttons on the supplied infrared remote control. Specific instructions for each of these controls are detailed below. Most of the buttons are duplicated on the front panel and on the IR remote control. However, there are a few exceptions where the buttons are only available on one or the other. These exceptions are noted in the instructions.
Infrared Remote Control
Before using the IR remote control, it is necessary to install two "UM-4/ AAA" batteries (supplied). Remove the plastic cover on the back of the IR remote, install the batteries (observing the + and - polarity indications), and reinstall the cover.
To use the IR remote control, aim it at the IR sensor located on the front panel of the RCD-12.
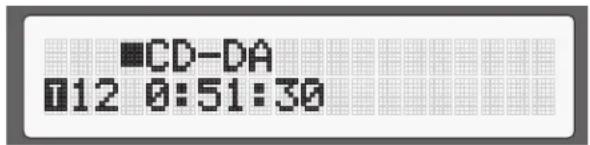
Display
A lighted Display on the front panel of the RCD-12 provides useful information about the status of the unit, activation of special features, and track/time information for the disc being played. Each of these indicators is described in the detailed operating instructions that follow.
Disc Loader Slot 4
A motor-driven slot loader, located in the center of the RCD-12, accept a compact disc. Place the compact disc into the slot, label-side up. Make sure the disc is properly centered before loading. The disc can be ejected by pressing the eject button as explained below.
Transport Control Buttons
These buttons provide basic control functions for the disc transport mechanism. Except where noted, all functions are available on the RCD-12 front panel and the IR remote control.
EJECT Button
When a disc is inserted into the front panel Disc Slot it is pulled into the disc transport. To eject the disc press the EJECT button on the front panel or the remote control. If you accidentally press either of these buttons, press the button again to re-load the disc.
When the eject button is pressed, the Display will read "EJECT". Once the disc is completely ejected, the display will read "NO DISC". When a disc is loaded, the Display will indicate the number of tracks on the disc and the total time of the disc in minutes and seconds.
PLAYButton
After the disc is loaded, press the PLAY button to start playing the disc. The number of the track being played and the elapsed time will be shown in the display, along with the PLAY indicator. Normally, the disc will start playing with the first track. However, you can select a different track using the TRACK buttons or the DIRECT ACCESS buttons (see below) before pressing the PLAY button to start playing a different selection.
STOP Button
Press the STOP button once to stop disc play. Press the PLAY button to resume disc play where it was stopped. If the STOP button is pressed twice, disc play stops, the display shows STOP and programmed selections are deleted (see below). When the PLAY button is pressed after pressing the STOP button twice, the disc begins playing from the first track.
PAUSE Button
This button is used to temporarily suspend play. The disc continues to spin and play will be resumed from the current position. The PAUSE indicator will light in the Display. To resume playing the disc, press the PAUSE button again or press the PLAY button.
TRACK Buttons
These buttons are used to select tracks on the disc. When a disc is playing, pressing the right TRACK button advances to the beginning of the next track. Pressing the left TRACK button returns to the beginning of the previous track. The new track number appears in the Display.
These buttons are also used to select a track before pressing the PLAY button or when memorizing tracks for the PROGRAM play mode (see below). These selections are made by continuously pressing the TRACK buttons until the desired track is reached.
In PROGRAM mode, the TRACK buttons advance or reverse to the next track in the memorized selection list.
DIRECT ACCESS Buttons
Remote Only
These eleven numeric buttons (labelled 1 through 0 and >10 ) are used to directly access a track from the IR remote control instead of stepping through the tracks using the TRACK buttons.
The first ten tracks on a disc can be selected by pressing the corresponding button. For example, to play the third track, press the 3 button on the remote control.
When accessing track numbers greater than 10, press the >10 button followed by the track number. For example, to select track 12, press the >10 button followed by the 1 button and then the 2 button.
The number of the selected track will appear in the main numeric area at the center of the Display.
The DIRECT ACCESS buttons may also be used to memorize tracks in PROGRAM mode (see below).
SEARCH Button
Remote Only
These buttons fast forward or fast reverse through the currently playing disc. One press of these buttons will fast forward or fast reverse at 2X normal speed. Press these buttons repeatedly will fast forward or fast reverse at 4X, then 8X, 16X, and 32X normal speed. One more press of these buttons, or by pressing PLAY button returns the player to normal speed. While the buttons are pressed, you will hear high-speed audio.
Additional Features
These convenience features add extra functionality to the RCD-12, including the ability to memorize a group of tracks to be played, to repeat a disc, program, or track over and over, to play the tracks on a disc in random order, to automatically play the first 10 seconds of each track, and to select from several available time displays.
PROGRAM Button
Remote Only
This button, labeled PROG, allows you to memorize as many as 20 tracks on the current disc for playback in a specific order. For example, you could instruct the RCD-12 to play track 5, followed by track 3, followed by track 8.
NOTE: Programmed play lists cannot be set up with MP3 and WMA discs.
To begin a program:
- Insert a disc into the slot loader. The RCD-12 will read the contents of the disc.
- Press the PROG button on the remote control. The PROGRAM indicator will light up in the Display, along with "P-00" indicating that the unit is waiting for the first track to be memorized.
- Enter the first track number using the DIRECT ACCESS buttons. Your selection will be memorized automatically and the Display indicator will change to "P-01", indicating that one track has been memorized. Continue entering the rest of your selections using the DIRECT ACCESS buttons. Note that there is no need to press the PROG button as each selection is memorized as it is entered.
Once you have memorized a play list, the RCD-12 remains in PROGRAM mode until you eject the disc or press the STOP button twice in succession. If you press the PLAY button, the memorized program will play instead of the entire disc, starting with the first selection in the memorized list.
When a PROGRAM has been memorized, most functions that would normally affect the entire disc operate on just the memorized program. For example, the TRACK buttons advance to the next track in the memorized program, not the next track on the disc. Likewise, the REPEAT button (see below) continuously plays the memorized program, not the entire disc.
NOTE: The Random Play feature can not be used when using the Programmed Play feature.
REVIEW Button
Remote Only
This button is used to review the memorized tracks in PROGRAM mode. Press the button and the first memorized track number will appear in order in the Display, for approximately five seconds. Pressing the REV button again while the track number is displayed will continue the review sequence, showing the next memorized track. Continue pressing the REV button to see the complete memorized track list.
If you do not press the REV button while the track number is displayed, the review process is terminated and the unit resumes whatever mode it was in before you started to review.
Note that you may remove a selection from the play list during the review procedure using the CLEAR button, as described below.
CLEAR Button
Remote Only
This button allows you to remove a track selection from the memorized program play list during the review procedure described above. Follow the review procedure until the desired track number is displayed. Then, instead of pressing the REVIEW button to continue, remove the displayed track by pressing the CLEAR button while the number is still showing. You may then continue the review procedure.
RANDOM Button
Remote Only
This instructs the CD player to play tracks from the entire disc in random order. Once all of the selections have been played once, the disc will stop playing, unless the REPEAT Button (see below) has been engaged, in which case the random play will continue until the STOP button is pressed. When the RANDOM button is engaged, an icon will be displayed.
REPEAT Button
Remote Only
This button allows you to repeat the current track or the entire disc continuously until the feature is cancelled by disengaging the REPEAT button or pressing STOP. The REPEAT button steps sequentially through the available options. Press the button once and the RCD-12 will repeat just the current track, displaying the icon in the Display. Press the button a second time and the RCD-12 will repeat the entire disc, displaying the Display. Press the button a third time to cancel the REPEAT function.
As noted above, REPEAT can be used in conjunction with the RANDOM play feature.
NOTE: The REPEAT function is automatically cancelled when the disc is ejected.
SCAN Button
Remote Only
This feature automatically plays the first ten seconds of each track on the disc (or the memorized program). To activate the feature, press the SCAN button. The icon appears in the Display. To stop scanning and resume normal operation at the current track, press the SCAN button again or press the PLAY button.
TIME Button
Remote Only
Normally, the RCD-12 displays the elapsed time of the currently playing track. The TIME button allows you to step through two alternative time displays. Pressing the button once displays the time remaining in the current track, which counts down as the track continues playing. Pressing the button a second time displays the time remaining on the entire disc (or memorized program). Pressing the button a third time reverts to the standard elapsed time display. When the TIME feature is activated, the icon appears in the Display in front of the time.
NOTE: When playing MP3 and WMA discs, only the regular elapsed time and the time remaining in the current track can be displayed.
Rotel-Link 13
This 3.5 mm stereo mini-jack (labeled ROTEL LINK IN) can optionally attach to Rotel network enabled products with ROTEL LINK OUT connections. This allows the attached Rotel products to communicate with each other and be controlled via the Rotel Remote App (available for download on the iTunes® store).
12V Trigger Connection 14
The RCD-12 can be activated by a 12 volt trigger signal from a Rotel preamplifier. The trigger input accepts any control signal (AC or DC) ranging from 3 volts to 30 volts. When a cable is connected to the input and a trigger signal is present, the CD Player is activated.
When the trigger signal is interrupted, the unit goes into standby mode. The front panel indicator light remains lit, but the display goes dark and the unit will not operate.
NOTE: When using the 12V Trigger feature, leave the POWER button in the ON position.
Remote Control Advanced Buttons
SETUP Button
Remote Only
By pressing the SETUP button, you can enter the following setup menu:
- DIMMER: Changes the display brightness.
NOTE: This setting is stored permanently even after the RCD-12 is powered off.
- FACTORY DEFAULT: Resets to factory default. Select
and press PLAY to confirm. - VERSION: Shows the current software version.
- DISPLAY CONTRAST: Changes the front panel display contrast between the back light and the actual characters.
NOTE: This setting is stored permanently even after the RCD-12 is powered off.
- AUTO POWER OFF: The RCD-12 can be configured to automatically power off if unused for a specified period. If the CD is paused or stopped within the specified "Auto Power Off" timer the unit will automatically go to STANDBY mode. The Auto Power Off timer will be restarted if the CD starts to play. The default for Auto Power Off is set to DISABLE.
Valid settings include: DISABLE, 30 mins, 60 mins, 90mins.
- EXIT: Exits this SETUP menu.
From the remote control, press the STOP/PAUSE/TRACK keys to change the contents of the menu, press PLAY to enter the setting or confirm.
NOTE: You can also access the SETUP menu without the remote control. Press the STOP key on the front panel for 5 seconds. Press the TRACK buttons to change the contents of the menu and press STOP to enter the settings or confirm.
DIM Button
Remote Only
Press the DIM key sequentially to change the DISPLAY brightness.
NOTE: Adjustments made using the button is temporary only and not saved after powering off the RCD-12.
This socket is reserved for future software upgrades when necessary.
Troubleshooting
Most difficulties in audio systems are the result of incorrect connections, or improper control settings. If you encounter problems, isolate the area of the difficulty, check the control settings, determine the cause of the fault and make the necessary changes. If you are unable to get sound from the RCD-12, refer to the suggestions for the following conditions:
Power Indicator Is Not Illuminated
The Power Indicator and the basic items in the Display window should be illuminated whenever the RCD-12 is plugged into the wall power outlet and the Power button is pushed in. If it does not light, test the power outlet with another electrical device, such as a lamp. Be sure the power outlet being used is not controlled by a switch that has been turned off.
Fuse Replacement
If another electrical device works when plugged into the power outlet, but the Power Indicator and the Display still will not light when the RCD-12 is plugged into the wall outlet, it indicates that the internal power fuse may have blown. If you believe this has happened, contact your authorized Rotel dealer to get the fuse replaced.
NO SOUND
Check the cables between the RCD-12 and the amplifier inputs to be sure they are connected properly. Be sure the correct amplifier input is selected. Be sure the tape monitor system of the amplifier has not been activated. Check the wiring between the amplifier and the speakers.
Specifications
Total Harmonic Distortion + Noise 0.0045% @ 1 kHz
Intermodulation Distortion 0.0045% @ 1 kHz
Frequency Response (± 0.5db) 20-20,000 Hz
Channel Balance ± 0.5 db
Phase Linearity ± 0.5 degree
Channel Separation >98 dB @ 1 kHz
Signal to Noise Ratio >100 dB
Dynamic Range > 96 dB
Digital to Analog Converters Wolfson
Analog Output impedance 100 Ohms
Speed Accuracy, WOW & Fluster Quartz Crystal Precision
Digital Output 0.5 Volt, Peak to Peak
Load Impedance 75 Ohms
Power Requirements [AC] AC 120V, 60 Hz (USA)
Power Consumption 15 Watts
Standby Power Consumption 0.5 Watts
Dimensions W,H,D 17^ × 2^7 / 8^ × 12^5 / 16^
430 × 73 × 313 mm .
Panel Height 60 mm / 23/8"
Weight (net) 5.4 kgs, 11.9 lbs.
All specifications are accurate at the time of printing. Rotel reserves the right to make improvements without notice.
Rotel and the Rotel HiFi logo are registered trademarks of The Rotel Co., Ltd. Tokyo, Japan.

ATTENTION: RISQUE D'ÉLECTROCUTION NE PAS OUVRIR

ATTENTION: POUR RÉDUIRE LE RISQUE D'ELECTROCUTION, NE PAS RETIRER LE CAPOT. IL N'Y A L'INTERIEUR AUCUNE PIECE SUSCEPTIBLE D'ETRE MODIFIÉE PAR L'UTILISATEUR, EN CAS DE PROBLEMÉ, ADRESSEZ-VOUS À UN REPARATEUR AGREE.

This Class B digital apparatus complies with Canadian ICES-003.

m = 311
Bouton SEARCH (RECHERCHE)
This Class B digital apparatus complies with Canadian ICES-003.
LASERPRODUKT DER KLASSE 1
WICHTIG FÜR LASERPRODUKTE
This Class B digital apparatus complies with Canadian ICES-003.
Distorsion Armonica Total + Ruid 0.0045% a 1 kHz
This Class B digital apparatus complies with Canadian ICES-003.
KLASSE 1 LASERPRODUCT
ALGEMENE WAARSCHUWING!
Intermodulatieveryorming 0.0045% @ 1 kHz
Frequeniebereik ( ± 0.5dBs ) 20 - 20,000Hz
The Rotel Co. Ltd. Tokyo, Japan.
ATTENZIONE
RISCHIO DI SCOSSA ELETTRICA, NON APRIRE

AWERTENZA: PER RIDURRE IL RISCHIO DI SCOSSA ELETTRICA, NON TOGRILE IL COPERCHION. NON CONTIENE PARTI UTILI PER L'UTENTE, PER L'ASSISTENZA FARE RIFERIMENTO A PERSONALE QUALIFICATO.
This Class B digital apparatus complies with Canadian ICES-003.
CLASS 1 LASER PRODUCT
IMPORTANT INFORMATION PER PRODOTI LASER
1.PRODOTTO LASER DI CLASSES 1
NOTA: Whenever the interruptor is in the middle of a lecture, it is important to be able to use the interruptor.
Premendo Anything to do.
This Class B digital apparatus complies with Canadian ICES-003.
Precision ("Wow and Flutter") Quartz Crystal-precision
Digital 0.5 Volt, (Peak to Peak)
Belastningsimpedans 75 ohm
Stromforsrning Europa 230 volt, 50 Hz
USA 120 volt, 60 Hz
CLASS1 LASER PRODUCT
BAXHBIE 3AMEYAHN OTHOCNTJEbHO JIA3EPA
1.YctpoCTBO COOTBETCTBYER KLIACCY 1 NO KIacCHHkaaUN naepnhkX3denn
2. ONACHOCTb: npn ChTm KpbIaKKn KopnyCa cyuecTBeyet onaCHOCTb obnyeHnaIazepom BUnMoro cneKtpa.36eraite nonadaHn noJ naIaePbHn ny.
3.BHIMAHVE:He CHIMaTe BepxHOIO KpbIbIKy. BHyTPn HET qAteT,doCTynbIX DnB 06CnyKbAHBaHNOJb3ObaTeNo.
OobepBe 06cnyKbHaBHe KBaHnHnHpoBaHHOMy MaCTepy. IPEIOCTEPEKHEME!
Bo n36eKaHne nopaxeHnE 3NeKtpuecknM TOKOM HnI Bo3ropaHn:
1.He ydaiyte BHTbI nnaHn KOpnyca.
2.HeDonyckaiTe Bo3eCTBnaHaannapat DojkaHn Bnarn.
3.He kacaTecb hypa nHTAHn HtencBhIX BnOK MOKpbIM pykAMN.

M3dennra Rotel cnpoektnpobaaHbI Ia COOTBcTbna MekdyhapodnbHM npedncaHnMa Ha orpaHueHne onaChbIX BceCTB (RoHS) B3eKtpnueckom n3eKtpnOHm 06pyoDBAHN uTynn3aunu TcTOO6pyoDBAHN (WEEE). CmBON nepeyepkHYTORo MycOpHO 6aka yKa3bBaet Ha COOTBcTbNE H a To, YTO Be N3dennn DOJXHB 6b1b nepepa60TaHb DOnxHBiM 06p3OM nNn O6pa60TaHb I COOTBcTbN C3TMn PpeDncaHnMn.

yctaHaBnBaIte ycTpoICTBO Ha poBHyO, ropHOnTaIbHyIO nobepxHocTB, cnoC6HyIO bIepeKAtb erO Bec. He CTabBeero HA noDnBuNHyToTeJeKky, KOtopa MoKeT OnpOKHyTbcR.

DAnHHb CnMBoN 03Haayet, YTO 3TO H3eHne HMeET DBOHyO H3oJauNo. 3a3eMHeHne He Tpe6yTeTc.
3aMeyahne
IIOcoeMHHeNE Kpa3bemy mini USB ha 3aAnei naHEn IOnJHo 6bItb ocUeCTBNeHO TOnbKO aBTOpN3OBAHbIM CneMaHnCTOM.
HΦopmaunFCCno3JektpomarHHTHOOBmecTHMOCTN
3To 06bpyoabHne npotechpoBaoHa npeMeT 3NeKtpomarHHTHO COBMeCTMOCTHn NOaTBePjdeHo, 7To OHO yOobnetBopAe Tpe6oBaanm dAnuΦpObox uYcTPOCTB KnaccCa Class B v aactn Part 15 npabHn FCC.3Tu Tpe6oBaanm cphiOpymuPoBaHbI dIraTOr, 7To6bI oBeceNHTb pa3yMHyO 3aunTy OT bpeDhX H3nyeHn B JkMbIx NomeeHnax.3To yCtpoCTBO rHeepHyET, HcNoJIb3yET m MoKeT h3NyauTahePHTHO Ha pAdnoaCToTAX H, 6dyUy UcTAHOBEnHbIM HcNoJIb3yeMbIM He B COOTBETCBM CnHCTpyuJmei, MoKeT co3DaBaTb NOMEx dJa paADIOCBaH.
Ondako 3To He rapaTnpye, 4To B HeKoToBx Chyayax He Bo3NHkyt NmExn Ia npHeMa paHIO nI Tenepepa. B TAKOM Cnyae bbl MoKeTe nonpO6oBaT ppePnHHrTcneDyouee:
-ПелерштюразыпгимнуантунHy.(TB,padno nT.n.)
- yBeHmHTb pacCToHHe MEXydy YcTPOIcTBOM npeCBHepom.
-нспьзоваты дугуpoэткудгТВ,радии.T.
-06paTb3a 3a KOHybTaIeM K dIepey mK bAanHmIuPobAHNo My cIeuaHnCTy no paDno TB.
IpeoctepxeHne
3To yctpoiCTBO yOBDNETBOPaET Tpe6oBAHnM qAChT Part 15 npabIN FCC n ABnIeTcCy6bekTom cnedyuonxYcNoB: (1)3To yctpoiCTBO He MoKet Bbl3BaBtBbpeDhBe NomExn, n (2)3To yctpoiCTBO doJKNHO BldepKHMBaT bIOble pNInHMaEmble NoMeXn, BKIOUqAra TaKe NOMExn, KOTOpbIe MOryt pNMBeCH N KeHexeNaTeNbHbIM OTKnIOHeHm OHTopMaNbHpaboTb.
3AMEYAHINI YCTAHOBUNKOB CNTEM KABENHORTO TB: 06paHTne BHNMAHNE yCTAHOBUNKA aHTEH NIN CNTEM CATV Ha naparpaΦ 820-40 Ppabn no yCTAHOBKE 3eNktpoO6OpOyobAHNA (Article 820-40 of the NEC).B Hne onncaHn npaBnna 3a3eMnHeH, B aCTHO TTo, YTO «3eMnRA YCTPOINCTBA DOJNHa 6bTb NODCoEINHeH K 3a3eMnHeH 3dAnHn, pnpHcKAK MOxHNO BInke K BBOy Ka6eJI. CM. UpeTeKN no yCTAHOBKe.
INPIME4AHNE: 3To o6OpyOBoHNe nPoTeCTMPOBaHO Ha npedMeT eNekTpOMaHTNHIOB COMEcTHMOCTNI NOITBepKJDeHO, qTO OHO yOBOJIeTBOPReTpe6OBAMHN DnI uNΦpOboXyCTPOICTB KNaCCa Class B B aactn Part 15 npabn FCC. 3TN Tpe6OBAMH CphiomYIpOBOHbI dnnrTO, qTO6bl o6ecneuHTb pa3ymHy0 3aunTy OT bPeDhIX u3NyueHH B Xmblx NOMEeHHx. 3To yCTPOCTBO reHeepnyET, MCNoJIb3yET H M0KeT h3NyUaTb 3HeprHNO Ha pAdnoQacTotaX H, bdyuN yCTAOHBENHbIM H NcNoJIb3YeMbIM He B COOTBeTCTBN CNTCPKyMe, MoKeT co3DaBaTb NOMEx dnnpaADIOBcBAH. Het rapaHTN, qTO B NEKOTbIX cNYaX H BO3NKNHY T NOMEX dnn PnmeMa pAdno NII IN TEnepePaq, KOtOpbe MOHNO 6bnapyKtB BKlOuaA H BkKnOaJa daHnoe yCTPOICTBO. B TakOM cNpyae Bbl MOKeTe nonp6oBaTb npedpnHATb cndyoouee:
BpeMeHHbOCTAHOBBOcPOn3BeHEnHnCKa.INGpOdoJNkaeT BpaauTbca, NOToMoy MoXHO BO3o6HOBNTB BOCPOn3BeHene C MeTa, rE OHO 6blNO OCTAHOBHeHo.Ha DnCnPeE CBETNC HnDnKaTOp PAUSE.HTo6bl BO3o6HOBNTB BOCPOn3BeHene, HaxmTe Ha KhoNky PAUSE nIN PLAY.
KhoIKNTRACK
Haxatne npabov KhoNk Bbl3bIbae nepexoK hauany cneDyoueJ dopoxKn. Haxatne leBoi KhoNk Bbl3bIbae nepexoK hauany npdebiyueJ dopoxKn. HomeBbl6paHHoJ dopoxKn OTo6paKaetcHa dncnnee.
Bb6opdoopkmoKHO npOIN3BOJNTb KaK BO Bpemr Bocnpn3BeHnra, TaK IN B pexime octaHOBA nI npOrpaMMPOBaHnra (cM. Hnke). HaxmaiTe HenpepbIBHO Na KhoNky TRACK, noka He noBUTc HyKbH Homep Tpeka.
PnBocpnon3BeDenHnn nporpammbI - PROGRAM haxaTne KhoNOK TRACK Bb3bBaet nepexoK cnelyuouen nn npdeidyuei dopoxke nporpammbI.
KhoNkDIRECT ACCESS
monbkoHa nylbme
UΦpObIe KHOKN, NOMEueHbIe OT "1" Do "10" n>10", NcNoJIb3yIOCTa IIN pIpmrOro Bbl6opAdoPoxKn CnyIbTa, BmecTo TOrO, YTO6bl DO6npaTbCn O Hee nyTem nepe6oPa c NOMOsbIO KHOtOK TRACK.
IpeBbIe DecaTb DOpOKe BblbupaOTcN PocTbIM HaKaTneM KHOIIK,HaPnIMep, TObbIyBbpaTbTeTbIO DOpOKeKy,HaKMInTe KHOINKy"3".
YTo6bI Bb6paTb DopoKkC Homepom 6onbIe 10, chaana HaxMnte ^>10^ ,3aTe M BBedNTe Homep DopoKkN. HanpImep, YTo6bI Bb6paTb DopoKkY 12, HaxMnte ^>10^ ,3aTEM "1" ,3aTEM "2".
Homep Bb6paHHoI DOpOxKIOTo6paKaetcHa Ndcnlee.
KhoNkDIRECT ACCESS MOxHTo TaKKe NcNoJb3ObaTb DnB BBoa nporpaMMbl -PROGRAM (cm.Hxke).
KhoIkn SEARCH
monbkoHa nyibme
C NOMOJIbIO 3TNX KHOJOK OCUIeCTBnIeTc YCKOpEHHoe BOCPON3BeIeHHe B HAnpabNeHN BnepeIINn Ha3aI. PIno ODHOKpaTHOM HaxaTI, INCK DIBNKeTc C NOBIIeHHo B 2X cKOpocTbIO. IN CblIeH 3ByK BbICOKOCKOPoCTHO CHTbIBAHNA. PIno NOBTOPHom HaxaTIIN KHOJKN IPOI3oIeT nepExoI K nepemOTke CO CKOpocTbIO 4X, 3ATeM 8X, 16X, n 32X OT HopMaJIbHO. Eue OND Ho HaxaTne IIN Xe HaxaTne KHOJKNI PLAY BEpHET Bac K HopMaJIbHomy BOCPON3BeIeHIO. Ioka KHOJKN HAXIMAIOTcA, 6yTeT CblIEH 3ByK BBICOKOCKOPoCTHO CHTbIBAHNA.
DoponHnteIbHbIe yHKcnn
3Tn yHKmN O6cneHbAOT DOnONHITeHbIe yIO6CTBa npyUnpaBHeHH RCD12, B TOM YNCNE BO3MOXHOCTb 3aONOMHTb rpyiNy TpeKOB IJIBO CBOCPON3BeDEHNA, NOBTOPNTB Bec bNCK, NpOgPAMMy IIN TpeK MHOROKpaTHO, BOCPON3BecTNDOPOXKN B CUYaHOM NopAKe, ABTOMaTueckN pOnrPaTB no 10 cekyHd CauJa KaKDoTo TpeKa, a TaKke Bbl6paTB oIN H3 cnocobOB OTbpaJHexHBApeMeHH BOCPON3BeDEHNA.
Khoinka PROGRAM
monbkoHa nyIbme
Moxho BBeCTn B namTb npOnrpbBateI nporpamMy BocnpOn3BeHnA, coepkauyo 20-Tn dopoxek.
PIMMEYAHNE: PpoepaMMUPO6AHHOe bocnpou3BedeHue Heo3MOxHo dIa duCKoe c MP3 uu WMA faunamu.
ДлсоэднгpoorpaMMbI:
1.Bctabte Dnck B Cnot.RCD-12 cuntaert coepkaHne ncka.
2. Haxmte KhoNky PROG ha nyIbTe. Ha dinnnee 3arOpntc INHdkaTOp PROGRAM nHaIncb P:00", O3NauaIOaJ, YTO npOnrpbIbATEJB XET BBOda Homepa nepBoI dopOKKN.
3. Пи поши Кнорok DIRECT ACCESS Вьдпite Homeр nepвд ДорожкnporpaMMbI.Homeр 3aonomHaetcA BtOMaTHyeCKN HaNDnCb MeHЯETcRaP0:01", pOKa3bIbA,чTO ODAн Дорожka Вьд�ЕнВ nAMrTb.ПOBTopЯЗТOTшг, Вьдпte OCTaJIbHbie ДорожкnporpaMMbl.
Pocne BBOda nporpammbi RCD-12 octaetcB pexmme nporpammbi do tex nop, noka He 6ydt BbdaH dNk nn DbaKdbn noprnd hXaT a KOnKa STOP. Pn Haxatnn KONKn PLAY 6ydt BOCPon3BODnTcH He BeCb DNck c Hauana, a BBedeHHa nporpamma.
Korda nporpamma PROGRAM 3aHeceHa a naMrtb,6oIbunHCTBO fHyHKnD 6ydt DeNCTBOBaT dna nporpaMMb Ka k dnn o6bHOrO nCKa. HanpImep, Haxatne KhoNk TRACK BbIOBET nepexo He K cJeNyIoSei dopoxke nCKa, a K cLeNyIoSei dopoxke nporpaMMb. KhoNka REPEAT (cm. HxKe) BbIOBET NOBtOp He nCKa, a nporpaMMb.
IPNME4AHHE: Bocnpou3eecmu dopoxkU b CnyaHOM nopAKe HnB3A, haxo8acb b pexume npo2pammuoBaHHOO Bocnpou3eedeHua.
Khoinka REVIEW I
monbkoHa nyibme
3a KhoNka NcNoB3yETc dIg npocMToPa 3anporpammmnpoBaHHbIX TpeKOB B pexime PROGRAM. Pocne ee haxaTna Ha nCnIe neonBnEca Homep nepBoi dopoxkN nporpamMb. OH bBbOuNTc npimepHo 5 ckyHd. Ecn ChOba HkaTb KhoNky REV, noka mraet Homep, 6ydt nokazH Homep cJeDyUoJ eDopoxkN. TaKIM o6pa3OM MoXHO npocMToPeTB CIO nporpamMy.
EcHHe HauKaTb KhoNkY REV, noka Homep dOpOxxHa nucnnee, npoucc npocMToPa OTMeHaeTcN annapat Bo3BpaaTaC B IxCxOdHoe CoctoHne.
B npocce pncmtpa moKHO ydaNTb dopokky n3 nporpaMMb npn nomoN KhoKn CLEAR, kak onicaHo Hxke.
Khonka CLEAR 1
monbkoHa nylme
3ToK KHOKNKo H3 nporpaMMb MOXHO ydaJIb Ty IIN INHyo DOPOXky. HaNDITE DOPOXky BnporpaMMe, BblIOHNHB IpOceIpyp IpOCMOtpa C nOMOsbIO KHOKNREVIEW, N HaxMITE CLEAR, NOKA HoMEp DOPOXKn MInraet Ha DnCnnee. Nocne 3TOrO MOxHO npoDOnJNtB npoueIpyp IpOCMOtpa.
Khonka RANDOM
monbkoHa nyibme
3Toi KHOKIO 3aYcKaTeC npOnrPbBAHne BceX DOpOKe DNcKa B CnyauHOM npAke. Korda BCE doopKK6dyT Bocnpn3BeHeBn IO odHom pa3y, Bocnpn3BeHeNE octAHOBITcE cnN He BKnUoye peXm NobTopa (REPEAT). B npOTNBOM cnuae BOCnpn3BeHeNE 6yET npOJNaTaBcB CnyauHOM npAke Do HaxaTMy KHOkNI STOP.Korda HaxaTaNHOKNA RANDM,HaDncnnee 3aropaetc HnIkaTOp
Khonka REPEAT
monbkoHa nylme
NobTOPhoe Bocpon3BedeHne DopokkN, DNCKa NIN nporpaMMb IpOdoJNaeTcdoTexnop,noka He 6yJeT OTMeHEno KhoNko REPEAT nIN STOP. NepBoe HaxaTne KhoNkn REPEAT BkIOuAeT pExm NOBTopa TeKyuEe DopokkN,BbIBoJa Ha dncnne CmBOI TOpoe HaxaTne BkIOuAeT pExm NOBtopf BCero DNCA, BBIORa Ha dncnne CmBOI PeTbe HaxaTne OTMeHEnT pExm NOBTopa.
Kak OTmeueHO BbIe, peXMM NOBTopa MoKeT 6bITb NcNOJIb3OBaH COBMeCTHO CpeXMMOM BOCPON3BeHnB B CnyauHOM NopJKe.
IPIMMEYAHNE: Pekum noobmopa abmomamuuecku ommehremc npu bidae ducka u3 cnoa.
Khoinka SCAN
monbkoHa nylme
PnnaKan KhoNk nScAN no oupeepn npoirpblaiotc nepBbie deacrbcekynd kaoDIO dopOxxKn DnCKa (nnnporpaMMb,ecn B naMrtB BBeDeHa npoRpaMa). Ha dncnnee 3aropaeTc nHnIkaTOp TTo6bl npekpTaNTb cKaHnpoBaHne n npoJOnKtB Bocpnon3BeHeHne Tekyuei dopOxxn B HopMaIbHom pexKmE, haxmnte KhoNk yScAN nn PLAY.
Khonka TIME
monbkoHa nyibme
B npocece Bocnpon3BeHnHa DnCnnee OTo6paxaetc HmOp Tekyuee dopokkn nBpeM, npoweJee c hana ee Bocnpon3BeHn. IepBoe haxatne kHONKTIIME mEnrT npoweJee BpeM Ha ocTabWeecsdo KOHua dopokKn. BtOpe haxatne KHNKNI TImE BbIOuNT Ha dnCnneBpeM, octabWeecsdo
KoHca Bocppon3BedeHnA DNCA (uN nporpaMMbl,ecnB namrB BBeHea nporpma).TpeIbe HaxaTne BO3Bpaaaet K ObbHbIM NOKa3AHm DnCnner. Korda AKTNBupOBAHa fynKnI TME,HaDnCnne BbBOIDTCa INDnKaTOp nepeD nOKa3AHM BpeMeHH.
PIMMEYAHNE: Ppu bocnpou3ebeehu MP u WMA ducko molbo 0bchybe nokaahur ucmekueo bpeenu u bpeenu, ocmabueoca do KOHua mpeka, bboodumc ha ducnnei.
Rotel-Link 13
3TOT 3.5-MM CTpeo pa3bem Tnna MNHn-1Jxek (MapknpoBaHHbl ROTEL LINK IN) N03BolnreT OTOIOHO CBA3bBaTaC cDpyrMMN PPOyKTAMN, COBMecTMbIMN C WInHO Rotor Link. 3To NO3BONReT CoeHNHeHHbIMN NO WInHE KOMNoHENTAM Rotel NOdEprKINBaTB CB3b Dpyr C Dpyrom NypaBnTb MMN C NOMOuBo npnloJeHnR Rotor Remote App (DocTyHnOrO dIra CkaUBaHHc caIraiTunes store).
12-B TpnrrephbBxOa 14
RCD-12 MoKHO BKNIOaTb TpIRIepHbIM CnHAnOM yPoBn 12 Bo npeDcNITeA RoteL. TpIRIepHbI BxO npINHMaET IIO6o CnHAn ynpabHeHn (nepeMeHHoro nIi NocToaHHoro ToKa) HApJxKeHNem O3 Do 30 BoNt. Noka cnHAn npncytCTByET, CD npOnrpBbATEb BKIOueH.
Korda cnHn nponaaet, npoRpbBatelnb nepExoNTB pexm rotobHoctn.B 3ToM pexime HndkaTop Ha nepeDne NaheN CBETcra, Ho dinCpne Norauen annapat haoDTcB Hepa6oem CoCTOHN.
PIMMEYAHNE: Ecnu Bby bknioaeme u bkiNIOaeme npouzpbiaemmbpuzzepbim cu2hanom, ocmabme Khonky numahue POWER 806kIooHHom nnonKeHu.
DOnonHnteBHeIe KHOKN nybTa Dy
Khoinka SETUP
monbkoHa nylbme
Haxkab Ha KhoNky SETUP, Bbl MoKeTe BoTn B MeHIO HAcTpoE:
DIMMER:IM3MeHReTApKoCTbDnCnIeA.
IIPMMEAHHE: 3ma ycmaHObKa coXpaHreMcra nocmHaHo, daKe npu BbIKIOueHu RCD-12.
-FACTORY DEFAULT: C6poc K 3aBODcM yCTaHOBKam no yMOJuaHIO. Bbl6epnte
- VERSION: BbIbOuNT Ha dncnneH Omepe Tekyuee Bepcn nporpaMmHoro o6ecneueHna.
DISPLAY CONTRAST:ИзмehгеткоHTpactHocTbДисплгЯHa nepedneи naheN, MeняярКОТБ NOCBETKN.
ПРМЕЧАНО: за мусяновka coхсань посторно, доже npu
eblknoyeenu RCD-12.
- AUTO POWER OFF: RCD-12 MOKHNO CCKHONHypnupoBaT TaK, TTo6bI OH ABTomatNueeCKN BbIKIOUaIcA, eCIN He NcOJIb3OBAIcB TteHeNe 3aHaHHOro nepiOnDa BpeMeHN. Ecn HnKakx n3MeHeHn He 6bIcNo cEnaHO cyCNITeEM B TeeHne 3aHaHHOro nepiOnDa BpeMeHN, B pexkme «Auto Power Off» TaImep nepeBeTeero B pexkM STANDBY.Bpem OTCHTbIaEBMoE TaImepom Auto Power Off 6yET c6poSeHo, eCIN n3MeHeHa rPOMKocTb, BbIbpAn dpyroI nCTouHIn K INBKnOeHo BocnpOnu3BeHne. IOpymoluaHIO Auto Power Off haxoNTca B noLoKeHHN DISABLE (OTKIOUeHo).
Дустmbie yctahOBKN - DISABLE, 30 MmHyt, 60 MmHyt, 90 MmHyt.
- EXIT: BbIXoN n3 MeHIO HacTpoEK SETUP.
Ha nyIbTe HaxMMTe KhoNKn STOP/PAUSE/TRACK dIy CMeHbI coepJahnM MeHIO,3aTEM HaxMMTe PLAY dIy BBOda yCTaHOBOK mIIN dIy NOITBepKdEHN.
IPIMUEAHHE: B MeHIO HAcmpoek SETUP MoXHO BoUmu maKxue u 6e3 nyIbma. Haxmume u ydepXume Khonky STOP Ha nepeDHeu naHenu b meueHue 5 cekyHd. 3amem Haxumaume Khonku TRACK dne CmeHbI codepaHuaMeHIO, u nomom Haxmume STOP dne BbOda ycmaHoBok unu dne noDMbePExDeHua.
Khoinka DIM P
monbkoHa nyibme
Hakimai Te Ha KhoNky DIM HeckoIbko pa3 Ira N3MeHeHna RpkocTn DcCnnne - DISPLAY.
PIMMEUHNE: 3ma ycmaHO6ka, cdehaHbIe c nomoubKhONKa P - ABIAOMC bpeMeHHbIMU u HE COxpaHbOMc noCe bIKIOueHua numAHua.
Pa3bem UPGRADE USB mini socket 16
3TOT pa3bem 3apeepBpuoan dny6ydux anrpeiIO, korga 3to 6ydet Heo6xoDIMO.
He cBeTcHnDkaTop nTaHn
Korda Khonka nHTAHNA RCD-12 haxkata, IN BnKka ero shhpa nITAHNA BCTABNeHa B cTeByIO pO3eTKy,doJXHbI CBeNTbCn HNdkaTOp NITAHNA IN OCHOBHbIE 3JIEMtBnCnPnE. Ecn OHn HE CBETATcR, npOBepbTe HANUne HAnpJKeHNBA CTeBOI pO3eTke DpyrHM 3JeNKTPoNPn6Opom, HApnpMep, lamnoi. Y6eINTecb, 4TO pO3eTKa He KOHTPONPuPyTcRA KAKM-NI60 BbIKNIOvATEMe, KOTopbIM BAHHbIM MOMENT BBKIOUeyH.
3amena npedeoxpaHnten
Ecn nproon 3nKtponp6op, noKnHueHHb K ToJKe po3eTke, pa6oTaT, a RCD-12-HET, BO3MOxHo, neperopeB BHTpeHHN PnaBKn npeOxAHNTeNB npnIpbBaTeNa. B 3Tom cnUyae 6paNTecb B ABTOpN30BaHHYIO cepBnCHyIO cnjX6y Rotel gn er O3aMeHbl.
Het 3Byka
PpOBeBpTe Ka6eN, NoDcoeINHIOUe BbXoD RCD-12 K ycInuTEnIO; ToT Nn BXoD Bb6paH Ha ycInuTene; He BKIOueH Nn Ha ycInuTene pexKIM KOHTpona CnHa, 3aIncBaEMoro Ha MarHITOnOH (Tape Monitor). PpOBeBpTe TaKke NoDcoEINHeHne ycInuTEnK KOJHOKaM.
TexHnueckne xapaKTepeNtIKn
06ue rapmoHueckne mckaeHHTHD+my 0,0045% Ha 1 KfU
VHTepmoqyunohmHne mckaxehn0 0,0045% Ha 1 K
YactonxapakTepeTka(0,5δ6)20-20000
BanacTepeoKaHao8±0,5
JHHeHoCTb 05rpaDyca
PaseneHne crepeoxahanos > 98 nHa 1 KtU
OTHOHnCmHn/ym>100d5
HnHAMHueckm Hnana3OH >9615
UHPO-ahAnorOBHe npeo6paObaTeHN Wolfson
InmndaHc ananoroboro bixoja 100OM
ImnepaHaC aHaNoRoBOr BbXoDa Cta6mnaZaN KBaPueBbIM
reHepaTopoM
BbXoHnHnnneHaHC 100OM
UphpobBbXo8 pa3Max0,5B
VIMnepaCOKOHeHHOHarpy3X 75OM
Tpe6oBaanK3aekkponnann 230B,50Tu
Iotpe6nemmaMoHocTb 15BT
430x73x313MM
Bbocata nepenne naehn 80 MM
Macca HETTO 5.4K
Bce TexHnueckne xapakTepeuNTKN COOTBeTCTBYOT DeeCTBnTeNbHOCT Ha DaTy 13dHa. Komnna Hrotel octaIaIET 3a cOoI npAO MoepHnnpOBaTB n3dEIn6 Be3 npEBApHTenbHorO yBedeMnHeN.
Rotel n norotin Rotel HiFi - 3to 3apertncptpobahhbte Toprobbe Mapkn Rotel Co., Ltd. Tokyo, Japan.
ROTEL
The Rotel Co. Ltd.
Tachikawa Bldg. 1F.,
2-11-4, Nakane, Meguro-ku,
Tokyo, 152-0031
Japan
Rotel of America
54 Concord Street
North Reading, MA 01864-2699
USA
Phone: +1 978-664-3820
Fax: +1 978-664-4109
Rotel Europe
Dale Road
Worthing, West Sussex BN1 12BH
England
Phone: +44 (0)1903 221 710
Fax:+4401903221525
Rotel Deutschland

- APPLICABLE FOR USA, CANADA OR WHERE APPROVED FOR THE USAGE
- This Class B digital apparatus complies with Canadian ICES-003.
- IMPORTANT FOR LASER PRODUCT
- WARNING!
- FCC Information
- Caution
- Important Safety Instructions Notice
- Contents
- About Rotel
- About the RCD-12
- Getting Started
- A Few Precautions
- Placement
- Control Identification
- AC Power and Control
- AC Power Input
- Power Switch 1 and POWER Indicator z
- Output Connections
- Analog Outputs
- See Figure 3
- Digital Output
- OPERATION
- Infrared Remote Control
- Display
- Disc Loader Slot 4
- Transport Control Buttons
- EJECT Button
- PLAYButton
- STOP Button
- PAUSE Button
- TRACK Buttons
- DIRECT ACCESS Buttons
- Remote Only
- SEARCH Button
- Additional Features
- PROGRAM Button
- REVIEW Button
- CLEAR Button
- RANDOM Button
- REPEAT Button
- SCAN Button
- TIME Button
- Rotel-Link 13
- 12V Trigger Connection 14
- Remote Control Advanced Buttons
- SETUP Button
- DIM Button
- Troubleshooting
- Power Indicator Is Not Illuminated
- Fuse Replacement
- NO SOUND
- Specifications
- ATTENTION: RISQUE D'ÉLECTROCUTION NE PAS OUVRIR
- Bouton SEARCH (RECHERCHE)
- WICHTIG FÜR LASERPRODUKTE
- ALGEMENE WAARSCHUWING!
- ATTENZIONE
- IMPORTANT INFORMATION PER PRODOTI LASER
- CLASS1 LASER PRODUCT
- BAXHBIE 3AMEYAHN OTHOCNTJEbHO JIA3EPA
- 3aMeyahne
- HΦopmaunFCCno3JektpomarHHTHOOBmecTHMOCTN
- IpeoctepxeHne
- KhoIKNTRACK
- KhoNkDIRECT ACCESS
- KhoIkn SEARCH
- monbkoHa nyibme
- DoponHnteIbHbIe yHKcnn
- Khoinka PROGRAM
- Khoinka REVIEW I
- Khonka CLEAR 1
- monbkoHa nylme
- Khonka RANDOM
- Khonka REPEAT
- Khoinka SCAN
- Khonka TIME
- 12-B TpnrrephbBxOa 14
- DOnonHnteBHeIe KHOKN nybTa Dy
- Khoinka SETUP
- Khoinka DIM P
- Pa3bem UPGRADE USB mini socket 16
- He cBeTcHnDkaTop nTaHn
- 3amena npedeoxpaHnten
- Het 3Byka
- TexHnueckne xapaKTepeNtIKn
- ROTEL
- The Rotel Co. Ltd.
- Rotel of America
- Rotel Europe
- Rotel Deutschland
Brand : ROTEL
Model : RCD12 SI
Category : Cd player/recorder