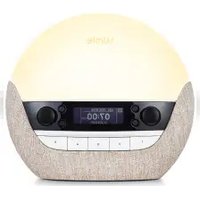
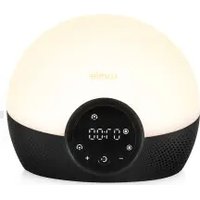
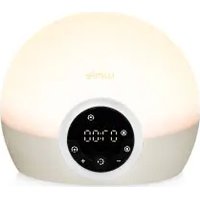
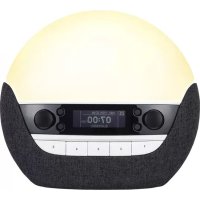
BodyClock Advanced 200 - Light therapy LUMIE - Free user manual and instructions
Find the device manual for free BodyClock Advanced 200 LUMIE in PDF.

User questions about BodyClock Advanced 200 LUMIE
0 question about this device. Answer the ones you know or ask your own.
Ask a new question about this device
Download the instructions for your Light therapy in PDF format for free! Find your manual BodyClock Advanced 200 - LUMIE and take your electronic device back in hand. On this page are published all the documents necessary for the use of your device. BodyClock Advanced 200 by LUMIE.
USER MANUAL BodyClock Advanced 200 LUMIE
1 Sa fety
2 G e t t i n g s t a r t e d
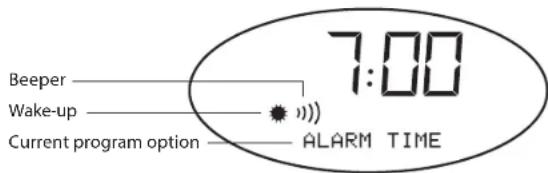
3 T h e d i s p l a y
4 Th e f o u r c o n t r o l b
5 Setting the time
6 Set ting the c l o c k
7 U s i n g t h e B o d y c l o c k a s a r e a d i n g I
8 Set ting t h e s u n r i s e (to wake you up)
9 Setting the wake - up – speeded
Bodyclock Advanced have been shown to improve mood, energy, productivity and the quality of sleep and awakening.*
Please read these instructions carefully to get the most out of your Bodyclock Advanced.
*Acta Psychiatr Scand 1993 Jul;88(1):67-71
t o 1 2 o r 2 4 h o u r
: kässäre aed ing
(to wake you up)
10 Using snooze
11 Disabling the back-up beeper
12 Setting the sunset (go-to-sleep program)
13 Setting the sunset to end as a nightlight
14 Adjusting the brightness of the clock display
15 Setting Sleepsound (white noise)
16 Security mode
17 Demo mode
18 Problem solving
19 Programming summary
INTRODUCTION
Congratulations on buying Bodyclock Advanced. With proper use, it will help regulate your circadian rhythm (sleep/wake pattern), leaving you feeling more energetic. Thousands of people have benefited from its positive effects, and it is especially useful in alleviating the symptoms of the Winter Blues or SAD (Seasonal Affective Disorder). In clinical trials, dawn simulators like the
English
1 Safety
- Keep the glass globe over the bulb, unless the bulb is cold and the lamp unplugged.
Maximum 42W halogen bulb/40W candle bulb.
The glass globe will be warm to the touch, so keep it clear of anything that might deteriorate in contact with heat. - Keep the Bodyclock away from water and damp. For indoor use only.
- Don't open the casing for any reason. There are no user-serviceable parts inside.
2 Getting started
- Remove the ' globe', the glass cover over the bulb, with a gentle upward tug.
Screw in the bulb firmly and replace the globe.
Find a good position for the Bodyclock close to the bed-head.
Plug the Bodyclock into the mains. The display will flash on and off until the time has been set.
Once you've programmed the Bodyclock Advanced, all settings will be memorised if the unit is unplugged or if there's a power failure. If the power is out for a short period, it will even keep track of time.
To program the clock A must be depressed ( not lit). Pressing the P button repeatedly will take you through each of the programming options in turn (see 19 for the list of options). Within the next few seconds press + or - to change the setting. NOTE: the clock will revert to its normal state if no button is pressed for 12 seconds. - When replacing the bulb, always unplug the Bodyclock. Spare sunshine neodymium bulbs are available from the Lumie Careline.
English
3 The display
4 The four control buttons

5 Setting the time
A must be OFF (button depressed).
Press P repeatedly until program message TIME appears.
- Immediately press + or - to set time.
- Press P to move on to the next setting or wait 12 seconds for the clock to revert to normal. The time is now set. If you are using the 12-hour clock, the PM indicator will light up when the time shown is between noon and midnight.
English
6 Setting the clock to 12 or 24 hours
The time display is pre-set as a 12-hour clock. If you prefer a 24-hour clock...
A must be OFF (button depressed).
Press P repeatedly until program message 12HR appears.
- Immediately press + or - until 24HR appears.
Press P to move on to the next setting or wait 12 seconds for the clock to revert to normal.
7 Using the Bodyclock as a reading light
Press + until the lamp is as bright as you want it.
To switch off the light, press - until it goes completely dark.
8 Setting the sunrise (to wake you up)
The wake-up function is ON when A is elevated and is lit up.
- Wake-up time is pre-set for 7:00a.m. If you want a different time...
A must be OFF (button depressed).
Press repeatedly until the program message ALARM TIME appears.
- Immediately press + or - until the alarm time is set. If you are using the 12-hour clock pay attention to the PM indicator to make sure you set the correct wake-up time! The PM indicator will light up when the time shown is between noon and midnight.
Press P to move on to the next setting or wait 12 seconds for the clock to revert to normal.
English
9 Setting the wake-up speed
The wake-up sequence is pre-set so the sunrise starts 30 minutes before wake-up time.
To change the speed of the wake-up sequence...
Make sure A is OFF (button depressed).
Press Prepeatedly until FADE UP 30 (or 60 or 90 or 15 or DEMO) appears on the display.
- Immediately press + or - until the desired wake-up speed appears.
- Press P to move on to the next setting or wait 12 seconds for the clock to revert to normal.
- Remember to press A again so that the wake-up is ON (button elevated).
10 Using snooze
- When the beeper sounds, press - once to turn it off and leave the light on. The beeper will sound again 9 minutes later.
If you prefer, when the beeper sounds press and hold - to turn off the beeper and dim the light. The light will re-illuminate to full strength over the next 9 minutes then the beeper will sound again.
11 Disabling the back-up beeper
To turn the beeper off at wake-up time when it is sounding, press A.
The beeper is pre-set to ON, to change this...
A must be OFF (button depressed).
- Press P repeatedly until the program message reads BEEP ON.
- Immediately press + or - until you see BEEP OFF.
- Press P to move on to the next setting or wait 12 seconds for the clock to revert to normal.
The beeper symbol) is displayed when the beeper is on.
English
12 Setting the sunset (go-to-sleep program)
To start the sunset sequence:
Press ^+ until the lamp is as bright as you want it.
Press A ON so button is elevated and is displayed.
Sunset will start and the lamp will slowly fade down. The wake-up sequence will activate at its usual time.
To start the sunset sequence when you don't want the wake-up sequence (such as on a Friday night):
Make sure A is OFF (button depressed).
Press + until the lamp is as bright as you want it.
Press + and - together.
Sunset will start and there will be no wake-up sequence.
To choose sunset speed:
Make sure A is OFF (button depressed).
Press repeatedly until program message FADE DOWN 30 (or 60 or 90 or 15) appears.
- Immediately press + or - until the desired sunset speed appears.
- Press P to move on to the next setting or wait 12 seconds for the clock to revert to normal.
13 Setting the sunset to end as a nightlight
Rather than have the sunset end in darkness, you can set it to act as a nightlight at 10% of the intensity of the lamp.
A must be OFF (button depressed).
Press P until program message NITELITE OFF appears.
- Immediately press + or - until NITELITE ON is set.
- Press P to move on to the next setting or wait 12 seconds for the clock to revert to normal.
English
14 Adjusting the brightness of the clock display
The DISPLAY AUTO mode automatically dims the display at sleep time (when the light is at a low level and the wake-up or sunset sequences are set).
To set the display to remain bright, then...
A must be OFF (button depressed).
Press P until the program message DISPLAY AUTO appears.
- Immediately press + or - until DISPLAY HIGH is set.
- Press P to move on to the next setting or wait 12 seconds for the clock to revert to normal.
15 Setting Sleepsound (white noise)
Sleepsound is a continuous white noise 'hiss' sound that is useful to mask outside noises when you want to sleep.
Make sure A is OFF (button depressed).
Press P repeatedly until program message SOUND OFF appears.
- Immediately press + or - until SOUND AUTO appears. This means the Sleepsound will become quieter with the sunset, falling silent as the light goes out.
- Alternatively press + or - until SOUND PERM (sound permanent) appears. This means whenever you turn the wake-up on (A ON, button elevated), the Sleepsound will be heard. The # symbol on the display shows when Sleepsound is enabled.
- To turn the Sleepsound off for just one night...while the hiss sound is audible, press A IN and immediately OUT again.
English
16 Security mode
Allows you to set the Bodyclock Advanced's light to switch on and off at random between 4pm and 11pm to give the impression the house is occupied.
A must be OFF (button depressed).
Press P until the program message SECURITY OFF appears.
- Immediately press + or - until SECURITY ON is set.
Press P to move on to the next setting or wait 12 seconds for the clock to revert to normal. The display will now read SECURITY.
- Pressing any button will cancel security mode. Remember, security mode is only set if the display reads SECURITY.
17 Demo mode
To demonstrate the Bodyclock Advanced's sunrise and sunset functions continuously, in short 4 minute cycles (rolling demonstration mode).
A must be OFF (button depressed).
Press + for about 12 seconds until you hear a beep and the program message reads SUNSET.
To stop the demonstration press + again for about 12 seconds until you hear 2 beeps and the program message goes blank.
- You might want to disable the beeper (see 11) before starting this mode.
For a demonstration mode in which the Bodyclock Advanced operates as normal except the sunrise and sunset take only 2 minutes, set FADEUP DEMO (see 9). In this mode press and hold P then press + briefly to start a sunrise.
English
18 Problem solving
The light will not come on but the clock still works.
Check to make sure the bulb is fully screwed into the socket. If this fails, try replacing the bulb.
Neither the clock nor the light works, or the clock is not doing what I expect it to.
Turn the power off at the wall. Now press and hold P as you turn the power back on. This re-sets all the program options to their default state. If this fails, check the fuse in UK plugs.
Please call the Lumie Careline (0845 658 9292) if you have any other problems with the Bodyclock Advanced, before doing anything else.
19 Programming summary
A summary of programs when P is pressed. The first setting is the default for each program.
ALARM TIME
TIME
12 HOUR )24 HOUR
BEEP ON) BEEP OFF
DISPLAY AUTO > DISPLAY HIGH
FADEUP 30)60)90)15
NITELITE OFF > NITELITE ON
SOUND OFF > SOUND AUTO > SOUND PERM
SECURITY OFF) SECURITY ON
Then reverts to normal operation.
English
Bodyclock Advanced Warranty
This unit is covered under warranty against any manufacturing defect for 24 months from the date of purchase. This is in addition to your statutory rights. If you are returning your Bodyclock Advanced for service, it must be in its complete original packaging including internal pieces. Make sure that the mains plug is prevented from moving in transit and damaging the unit. If the unit is received damaged or without original packaging, then regretfully we will have to charge to put it right. Please call us for advice before sending the unit back.
Contact us
The Lumie brand is a trademark of Outside In, Europe's leading specialist in light therapy. Our products are derived from the latest scientific studies and we are specialists in sleep science, circadian rhythms and SAD (Seasonal Affective Disorder). If you have any suggestions that you feel could help us improve our products or service, or if there are problems you think we should know about, please tell us.
Lumie Careline 0845 658 9292
- www.lumie.com
English
Technical specification
Specification subject to change without notice
Lumie Bodyclock Advanced model NSE/NSU
230Vac 50Hz 70W
Lamp E14 (SES) 35mm halogen capsule 240V 42W MAX
Operating temperature 0^ - 35^
Safety - EN60601
Class I Medical Device

Lumie is a trademark of:
Outside In (Cambridge) Ltd
3 The Links, Trafalgar Way
Bar Hill
Cambridge CB23 8UD
UK
Copyright Lumie 2009
Francais
NOTICE D'UTILISATION
Bodyclock Advanced 200
Classe I Appareil medical

Outside In (Cambridge) Ltd
3 The Links, Trafalgar Way
Bar Hill
Cambridge
CB23 8UD
Royaume-Uni
Copyright Lumie 2009
Deutsch
BEDIENUNGSANLEITUNG
Bodyclock Advanced 200
1 S i c h e r h e i t
2 E R S T E S C H R I T T E
3 D a s D i s p l a y
4 D i e v i e r B e d i e n
5 E i n s t e l l e n d e r
6 E i n s t e l l e n d e r
7 D i e B o d y c l o c k a
8 Eindhoven Leuven deere s
(zum Aufwachen)
9 E i n s t e l I e n d e r
Outside In (Cambridge) Ltd
3 The Links, Trafalgar Way
Bar Hill
Cambridge
CB23 8UD
GB
Copyright Lumie 2009
Svensk
BRUKSANVISNING
Bodyclock Advanced 200
1 Säk e r h e t
2 K o m m a i g Å n g
3 D i s p l a y e n
4 D e f y r a k o n t ro l
5 A t t s t ä | l a t i d e n
6 A t t s t ä | | a k | o c |
7 A t t a n v ä nd a B o d
8 A t t s t ä | l a v ä c k
9 A t t s t ä | l a s o l u |
15 Programmera 'sleepsound' (white noise)
Specification subject to change without notice
Lumie Bodyclock Advanced model NSE/NSU
230Vac 50Hz 70W
Lampa E14 (SES) 35mm halogenlampa 230V 42W MAX
Operating temperature 0^ - 35^
Safety-EN60601
Class I Medical Device

Outside In (Cambridge) Ltd
3 The Links, Trafalgar Way
Bar Hill
Cambridge
CB23 8UD
Storbritannien
Copyright Lumie 2009
Nederlandse
GEBRUKSAANWIZING
Bodyclock Advanced 200
1 V e i l i g h e i d
2 V O O R b e r e i d i n g e n v
3 D i s p l a y
4 B e d i e n i n g s k n o p p e
5 | n s t e l l e n v a n d e
6 O m s c h a k e l e n v a n 1
24 uurssysteme
7 G e b r u i k a l s l e e s l
8 Z o n s o p k o m s t i n s t e
9 W e k s n e l h e i d i n s t e
Outside In (Cambridge) Ltd
3 The Links, Trafalgar Way
Bar Hill
Cambridge
CB23 8UD
UK
Copyright Lumie 2009
Distributor details:
lumie
Lumie is a trademark of:
Outside In (Cambridge) Ltd
3 The Links, Trafalgar Way
Bar Hill
Cambridge CB23 8UD
UK
Copyright Lumie 2009