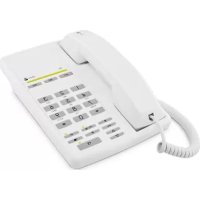
PhoneEasy 337ip - Phone DORO - Free user manual and instructions
Find the device manual for free PhoneEasy 337ip DORO in PDF.
| Product type | Fixed VoIP telephone |
| Brand | Doro |
| Model | PhoneEasy 337ip |
| Dimensions | 175 mm x 175 mm x 60 mm |
| Weight | 750 g |
| Power supply | 5 V DC power adapter with interchangeable plugs (EU, UK) |
| Network connection | Ethernet (RJ45) for VoIP |
| Display | Digital display with time and call duration indication |
| Main functions | VoIP calls, hands-free, pre-dialing, missed call, call log (15 incoming + 15 outgoing) |
| Phonebook | Up to 30 entries, search by first letter, edit and delete |
| Call memory | Last 15 incoming and outgoing calls with timestamp |
| Hands-free | Activation by dedicated button with LED indicator |
| Volume amplification | +15 dB during conversation, adjustable in "Always on" mode for the hearing impaired |
| Hearing aid compatibility | Yes, T-mode |
| Direct memory keys | 3 keys A/B/C for speed dial numbers |
| Flash key | For call transfer on PBX system |
| Ringtone and tone | Adjustments via sliders on bottom (melody) and right side (tone) |
| Handset volume | Adjustment under the handset; additional tone adjustment (bass/treble) |
| Ring volume | Switching via side slider |
| Wall mounting | Wall bracket included, screw spacing 83 mm |
| Warranty | 2 years (France) - parts and labor, excluding abnormal use |
Frequently Asked Questions - PhoneEasy 337ip DORO
User questions about PhoneEasy 337ip DORO
0 question about this device. Answer the ones you know or ask your own.
Ask a new question about this device
Download the instructions for your Phone in PDF format for free! Find your manual PhoneEasy 337ip - DORO and take your electronic device back in hand. On this page are published all the documents necessary for the use of your device. PhoneEasy 337ip by DORO.
USER MANUAL PhoneEasy 337ip DORO
text_image
PhoneEasy Doro Jan 04 08:04 A B C Ω 1 2 3 GHI 5 6 FQRS TUV WXYZ * 0 # C/+ ▼ Δ ●Doro PhoneEasy® 337ip
text_image
1 2 3 4 5 6 7 8 9 PhoneEasy A B C 10 11 12 13 14 15 16 17 18 19 5 4 3 R CEnglish
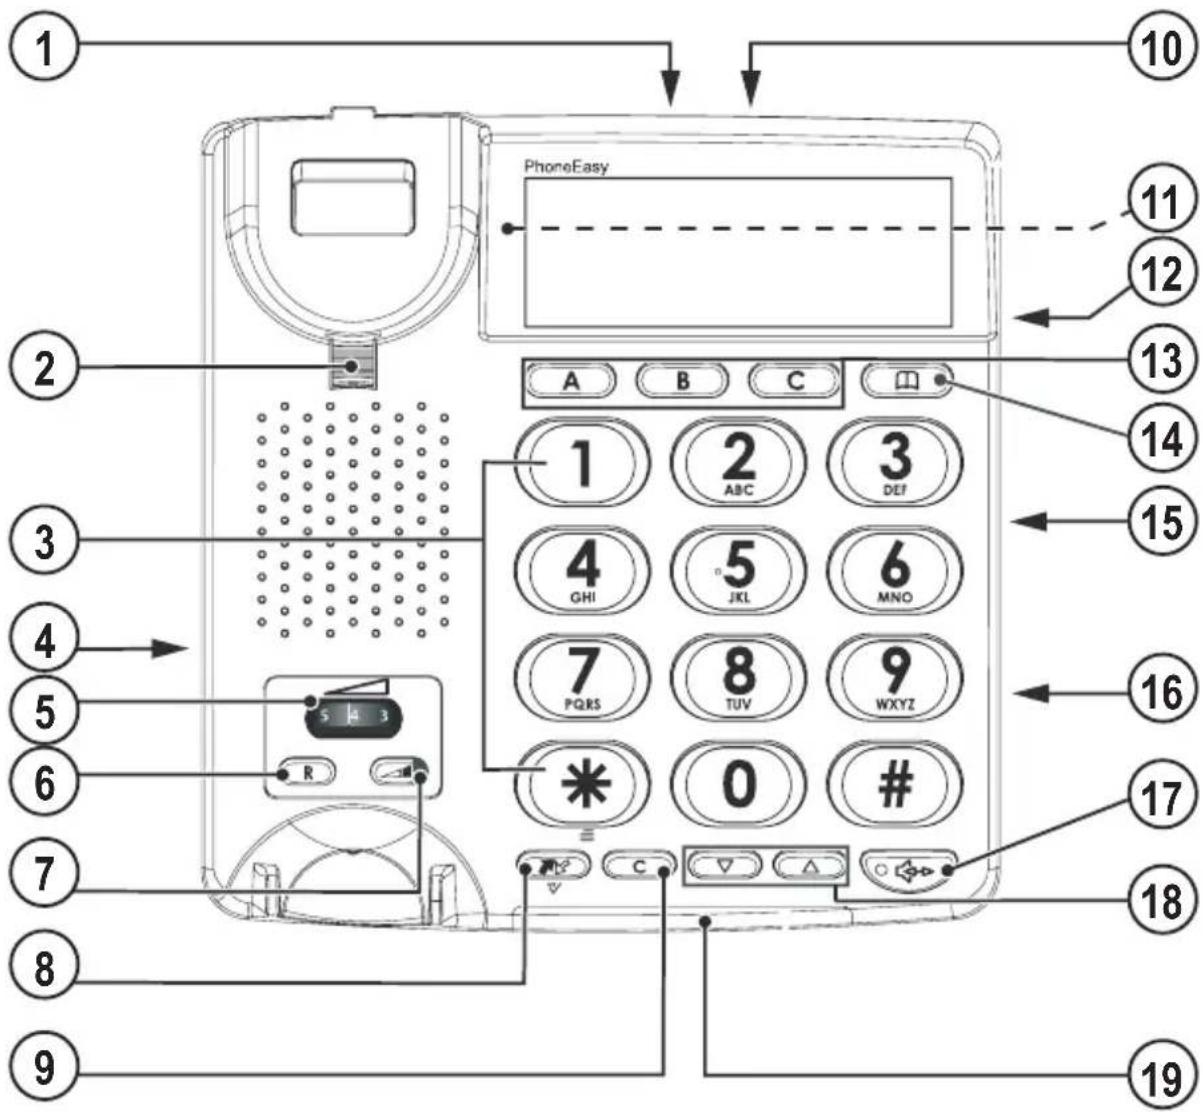
- Mains adapter socket
- Handset hook
- Keypad
- Handset cord socket
- Handset volume
- Recall
- Volume boost
- Call memory / OK
- Delete
-
Ethernet socket
-
Ring melody
- Ring volume
- Speed dial keys
- Phone book
- Handset tone
- Speaker volume
- Speakerphone
- UP/DOWN
- New call/ringer indicator
Svenska
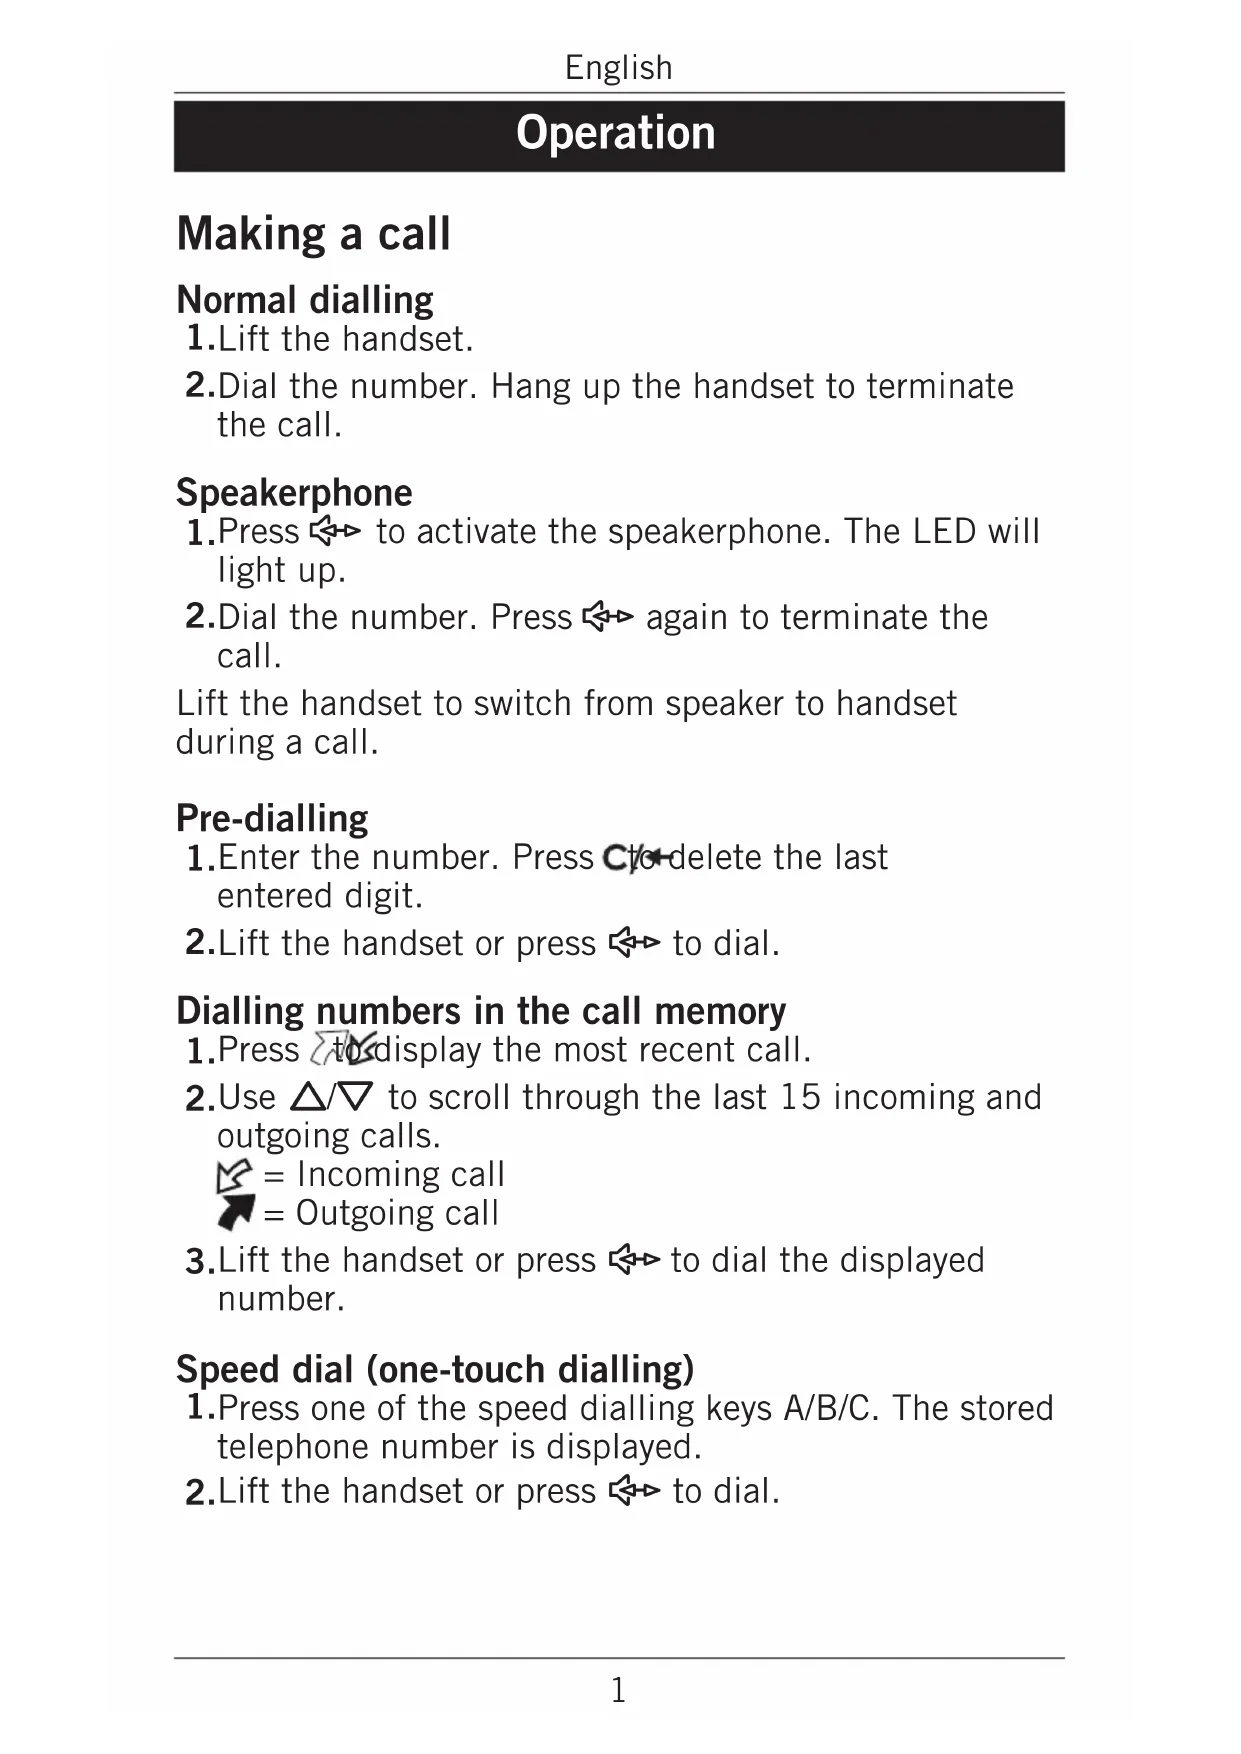
- Lift the handset.
- Dial the number. Hang up the handset to terminate the call.
Speakerphone
-
Press ◀▶ to activate the speakerphone. The LED will light up.
-
Dial the number. Press ↔ again to terminate the call.
Lift the handset to switch from speaker to handset during a call.
Pre-dialling
-
Enter the number. Press C to delete the last entered digit.
-
Lift the handset or press ↔ to dial.
Dialling numbers in the call memory
- Press to display the most recent call.
- Use / to scroll through the last 15 incoming and outgoing calls.

text_image
Incoming call Outgoing call- Lift the handset or press ↔ to dial the displayed number.
Speed dial (one-touch dialling)
- Press one of the speed dialling keys A/B/C. The stored telephone number is displayed.
- Lift the handset or press ↔ to dial.
Dialling numbers in the phone book
- Press 📄 to open the phone book.
- Use / to browse through the phone book, or enter the first character in the name to quickly find an entry (see Keypad characters).
- Lift the handset or press ◀ to dial.
Answering
Lift the handset to answer an incoming call, or press to answer using the speakerphone.
Ring signal
The ring melody and tone can be adjusted using the sliders on the bottom of the telephone.

Ring melody
Ring tone
The ring volume is adjusted with the switch on the right side of the telephone.
Volume control
The speaker volume is adjusted with a slider on the right side of the telephone.
The handset volume control is located under the handset.
Volume Boost

The handset volume can be raised another 15 dB by pressing the Volume Boost key while talking. The LED indicator on the key will light up. Press the key again or terminate the call to turn off Volume Boost.
Warning!
The handset volume can be very loud with this setting. Volume boost should only be used by persons with impaired hearing.
Handset tone

The speech tone (bass/treble) can be adjusted for better clarity using the handset tone control on the right side of the phone. PLEASE NOTE! Only works when Boost is active.
Keypad characters
Additional functions
Phone book
The phone book can store up to 30 entries.
Storing numbers in the phone book
- Press and hold 📄 until a blinking cursor is shown.
- Enter a name (up to 12 characters) for the contact to be stored, see Keypad characters. Use c to erase if needed.
- Press ▽. A blinking cursor will be shown on the second line on the display.
- Enter a telephone number (up to 31 digits). Use cto erase.
- Press to confirm.
- Repeat steps 2–5 to store another number, or press/← to exit.
Deleting numbers from the phone book
- Press 📄 to open the phone book.
- Use / to browse through the phone book, or enter the first character to quickly find an entry.
- Press and hold c to delete the entry.
Editing numbers in the phone book
- Press 📄 to open the phone book.
- Use / to browse through the phone book, or enter the first character to quickly find an entry.
- Press and hold 📄 until the blinking cursor appears.
- Use and the keypad to erase and enter new data.
- Press . The cursor will move to the second line.
- Use C and the keypad to erase and enter new data.
- Press to confirm.
Storing/Editing speed dial numbers
- Press one of the speed dialling keys A/B/C.
- Press and hold 📄 until a blinking cursor is shown.
- Enter a name (up to 12 characters) for the contact to be stored, see Keypad characters. Use cto erase if needed.
- Press ▽. A blinking cursor will be shown on the second line on the display.
- Enter a telephone number (up to 31 digits) using the keypad. Use cto erase if needed.
- Press to confirm.
- Repeat steps 1–6 to store numbers for the other speed dialling keys.
Deleting speed dial numbers
-
Press one of the speed dialling keys A/B/C. The stored telephone number is displayed.
-
Press and hold cto-delete the entry.
Caller ID and call memory
Caller ID allows you to see who is calling before you answer and to see who has called in your absence.
Note!
The Caller ID function must be subscribed. Please contact your network operator for more information.
The call memory will store the last 15 incoming and 15 outgoing calls. On the display, incoming (answered and unanswered) calls are indicated with and outgoing calls with
Browsing the call memory
- Press then / to scroll through the call memory. The number and time of each call will be displayed.
- Press cto exit.
Deleting numbers from the call memory
- Press then / to scroll through the call memory.
- Press and hold c to delete the selected entry.
Copying call memory entries to the phone book
- Press then / to scroll through the call memory.
- Press and hold ✝ until a blinking cursor is shown. Use and the keypad to erase and enter new data.
- Press ▽. The cursor will move to the second line.
- Use cand the keypad to erase and enter new data.
- Press to confirm.
- Press cto exit.
Call timer
The display shows the current time when in standby mode. During a call the display will show a call timer instead, indicating the duration of the call.
Recall key (R)
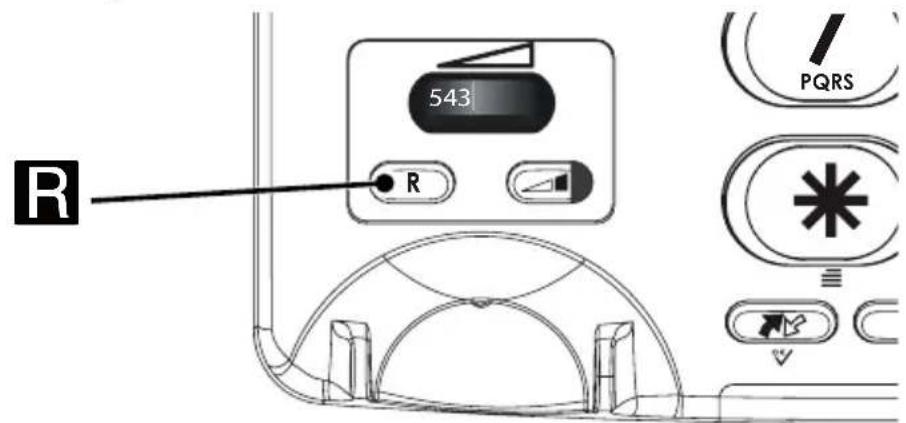
text_image
543 R PQRSPress the R key followed by the extension number to transfer a call. Press C to cancel.
Hearing aid
This telephone is hearing aid compatible. Select the T mode on your hearing aid to enable this feature.
Installation
Connection
- Connect the curly cord to the handset and to the socket marked 📋 on the telephone.
- Connect the Ethernet cable to a network wall socket and to the NET socket on the back of the telephone.
- Connect the mains adapter to the mains power wall socket and to the DC 5V socket on the telephone.
Changable adapters
The mains power adapter has changable plugs
- Place the appropriate plug in the adapter slot.
2.Slide it gently downwards. The adapter is now ready to use.
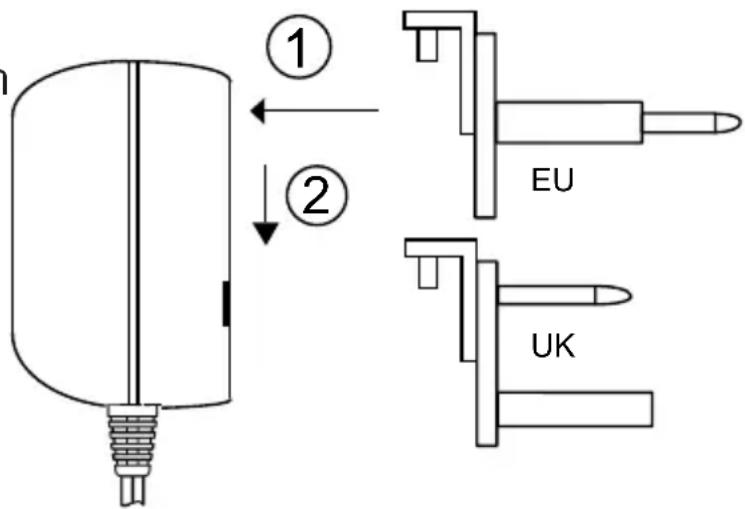
text_image
① ② EU UKBasic setup
Before using the telephone the first time, the following basic settings should be made.
For further information about settings and administration read the Administrator manual.
The phone will return to standby mode after 60 seconds of inactivity or when pressing C/←
- Press and hold ✝ for about 3 seconds until MENU is displayed.
- Use / to scroll through the options and confirm with
Options
-
Status: Use / to scroll.
-
IP: Displays the IP-address
- MAC: Displays the MAC-address
- Firmware: Displays the firmware version
2.Settings: Use / to scroll and confirm with

• Language: Select language
• Time: Set Time zone and Time format
• DND: Activate/deactivate Do Not Disturb.
- Boost: ON/Always On/OFF
ON = The Volume Boost is set to switch off after every call.
Always On = Volume Boost stays permanent switched on. This setting should only be activated if all users have impaired hearing and require powerful amplification.
OFF = Volume Boost deactivated.
3.Account: Use / to scroll and confirm with

- DspName: Set display name
- RegName (AuthName): Set authorisation name
- Account: Set Username
- Password: Set password
-
SIP Proxy: Set SIP Proxy address
-
Network: Use / to scroll and confirm with

- Network: Set DHCP/PPPoE/Static If PPPoE, then set User and Password If Static, then set.
- IP: Sets the Internet address.
- Netmask: Sets the Subnet mask.
- Gateway: Sets the Gateway (router) address.
- DNS1: Sets the IP address of the primary DNS server.
- DNS2: Sets the IP address of the secondary DNS server.
Wall mounting
The telephone can be wall mounted by using the included wall mount bracket and two screws (not included).
Warning!
Make sure that no cables, water pipes or gas pipes are located inside the wall before drilling into it.
- Drill two holes in the wall, vertically 83 mm apart.
- Insert the screws, allowing them to project \~5 mm out from the wall.
- Unplug and remove the handset.
- Fit the guide tabs (A) on the bracket into the slots (B) on the back of the telephone, then slide the bracket upwards until it snaps into place.
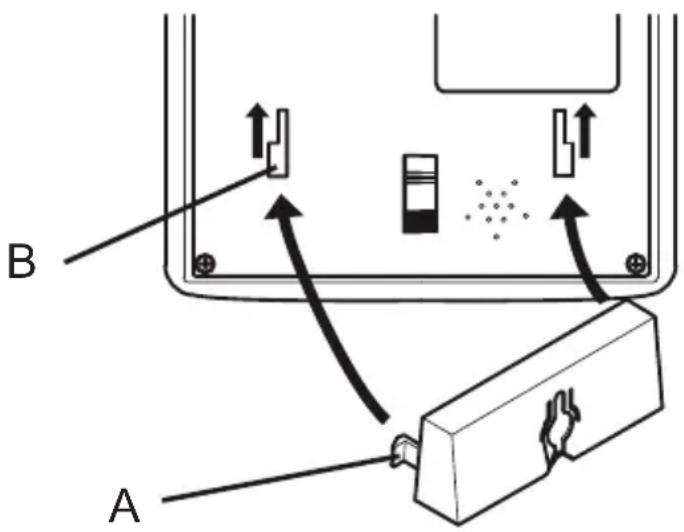
text_image
B A-
Position the telephone so that the screws on the wall fit into the slots in the bracket, then slide the telephone downwards until it is hanging on the screws.
-
Remove the handset hook (C) by pushing it upwards, and insert it in the reversed position so that the small tab (D) protrudes. The hook will now keep the handset in the cradle when the phone is wall mounted.
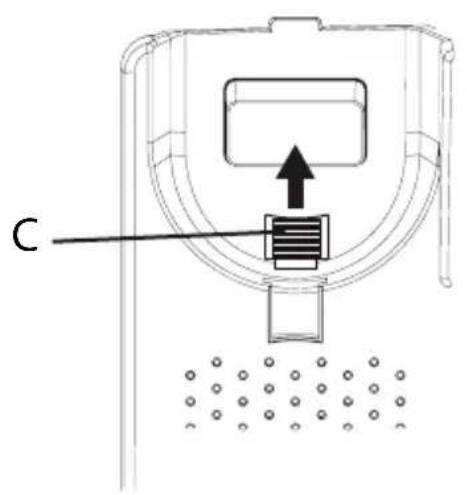
text_image
C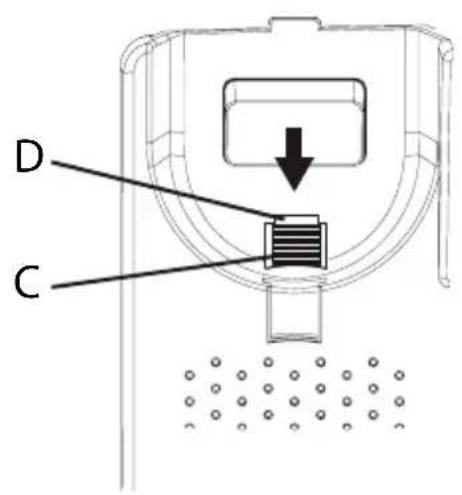
text_image
D C- Reconnect the handset and place it in the cradle.
Note!
If the phone is to be used as a desktop phone again, remember to reverse the position of the handset hook.
Care and maintenance
Your unit is a technically advanced product and should be treated with the greatest care. Negligence may void the warranty.
- Protect the unit from moisture. Rain/snowfall, moisture and all types of liquid can contain substances that corrode the electronic circuits. If the unit gets wet, you should remove the battery and allow the unit to dry completely before you replace it.
- Do not use or keep the unit in dusty, dirty environments. The unit's moving parts and electronic components can be damaged.
- Do not keep the unit in warm places. High temperatures can reduce the lifespan for electronic equipment, damage batteries and distort or melt certain plastics.
- Do not keep the unit in cold places. When the unit warms up to normal temperature, condensation can form on the inside which can damage the electronic circuits.
- Do not try to open the unit in any other way than that which is indicated here.
- Do not drop the unit. Do not knock or shake it either. If it is treated roughly the circuits and precision mechanics can be broken.
- Do not use strong chemicals to clean the unit.
- The mains socket-outlet shall be installed near the equipment and shall be easily accessible.
The advice above applies to the unit, mains adapter and other accessories. If the telephone is not working as it should, please contact the place of purchase for service.
Don't forget the receipt or a copy of the invoice.
Warranty and technical data
This product is guaranteed for a period of 12 months from the date of purchase. In the unlikely event of a fault occurring during this period, please contact the place of purchase. Proof of purchase is required for any service or support needed during the guarantee period.
This guarantee will not apply to a fault caused by an accident or a similar incident or damage, liquid ingress, negligence, abnormal usage, non-maintenance or any other circumstances on the user's part. Furthermore, this guarantee will not apply to any fault caused by a thunderstorm or any other voltage fluctuations. As a matter of precaution, we recommend disconnecting the device during a thunderstorm.
NOTE! This guarantee does not affect your legal (statutory) rights under your applicable national laws relating to the sale of consumer products.
Specifications
Size: 175 mm x 175 mm x 60 mm
Weight: 750 g
Declaration of Conformity
Doro hereby declares that Doro PhoneEasy 337ip conforms to the essential requirements and other relevant regulations contained in the Directives 1999/5/EC (R&TTE) and 2002/95/EC (RoHS).
A copy of the Declaration of Conformity is available at www.doro.com/dofc