MemoryPlus 319i ph - Phone DORO - Free user manual and instructions
Find the device manual for free MemoryPlus 319i ph DORO in PDF.

User questions about MemoryPlus 319i ph DORO
0 question about this device. Answer the ones you know or ask your own.
Ask a new question about this device
Download the instructions for your Phone in PDF format for free! Find your manual MemoryPlus 319i ph - DORO and take your electronic device back in hand. On this page are published all the documents necessary for the use of your device. MemoryPlus 319i ph by DORO.
USER MANUAL MemoryPlus 319i ph DORO
text_image
MemoryPlus daro R 19245 1 ABC DEF 4 5 6 GHI JKL MNO 7 8 9 PQRS TUV WXYZ * 0 #MemoryPlus 319i ph

text_image
1 MemoryPlus doro 2 R 12345 3 +15 dB 4 5 6 7 1 2 3 ABC DEF 4 5 6 GHI JKL MNO 7 8 9 PQRS TUV WXYZ * 0 #English
- Ringer indicator
- Flash button/programming
- Tone control
-
Volume control
-
Volume Boost
- Redial function
- Speed dial memories
Français
Declaration of conformity
- Pick up the handset.
- Enter the desired number.
Redial function
If a number was previously engaged or if you wish to redial the most recently entered number, pick up the handset and press the redial button
Memories
This telephone has 4 speed dial memories.
Once a number has been saved in a memory location, you only need to press one button to make the call. A picture or symbol can be placed under the transparent cover on the speed dial buttons so it is easy to see who you are calling.
Dialling with speed dial
- Pick up the handset and wait for the dialling tone.
- Select required speed dial by pressing on the appropriate button.
Volume control
This product can adjust the sound in a number of ways:

Normal volume control for the handset (under the handset).

Press the button (under the handset) to activate
Volume Boost. The LED indicator will light up.
Volume Boost is normally deactivated at the end of each call to avoid harming people with normal hearing. This safety function is adjustable, see Technical Information.

Change frequency range/sound level and quality (on the left side). PLEASE NOTE! Only works when the powerful amplification is active.
Settings
Connection
- Connect the telephone cord to a telephone network wall socket and to the 🔒 socket on the back of the telephone.
- Connect the spiral cord to the handset and to the socket on the base of the telephone. See Technical Information (6).
- You will hear a click when the modular plug is correctly in place.
- Set correct Flash (R) button time to 100. See Technical Information (4).
- Lift the handset and listen for the dial tone.
Memories
Saving speed dial numbers
- Make sure that theR/→ switch on the base of the telephone is set to→. See Technical Information (5).
- Lift the receiver and press→ (R) (ignore anything you hear in the earpiece).
- Enter the phone number (up to 16 digits) using the keypad. Press→(R).
- Select memory position by pressing the corresponding button.
- Replace the handset. The number has now been saved.
Remember to return theR /→ switch on the base of the telephone (5) to theR position when all the telephone numbers have been saved.
Press 📄 you want a pause in the telephone number.
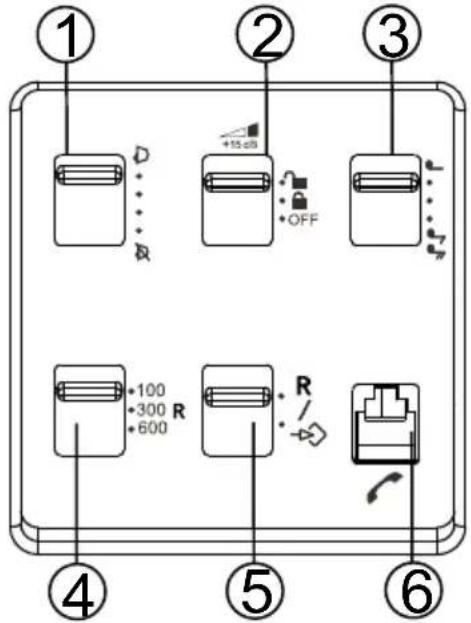
Technical Information
There are several switches on the underside.
text_image
① ② ③ +15 dB OFF ④ ⑤ R 600 ⑥1. Ring volume

2. Volume Boost (high amplification)

Standard setting. The Volume Boost is set to switch off after every call.

Volume Boost stays permanent switched on. This setting should only be activated if all users have impaired hearing and require powerful amplification.
OFF Volume Boost deactivated.
Warning!
The handset volume can be very loud with Volume Boost. Volume boost should only be used by persons with impaired hearing.
3. Ring tone
d...
4. Flash button time (100/300/600)
100 is the standard setting for most countries. 300 for France/Portugal. 600 for New Zealand.
Hearing loop
The handset has a built-in hearing loop for those who wish to use their hearing aids while using the telephone. Select the T mode on your hearing aid to enable this feature.
Others
Troubleshooting
Check that the telephone cord is undamaged and properly plugged in. Disconnect any additional equipment, extension cords and other phones. If the problem is resolved, the fault is with some other equipment. Test the equipment on a known working line (e.g. at a neighbour's house). If the equipment works there the fault is probably with your telephone line.
Please report this to your network operator. If you are still experiencing difficulties, contact the place of purchase.
Guarantee
This product is guaranteed for a period of 12 months from the date of purchase. If you experience any problems please contact the place of purchase. Proof of purchase is required for any service or support needed during the guarantee period. This guarantee shall not apply to a fault caused by an accident or a similar incident or damage, liquid ingress, negligence, abnormal usage or any other circumstances on the purchaser's part. Furthermore, this guarantee will not apply to any fault caused by a thunderstorm or any other voltage fluctuations. As a matter of precaution, we recommend disconnecting the telephone during a thunderstorm.
Declaration of conformity
Doro hereby declares that the product Doro MemoryPlus 319i ph conforms to the essential requirements and other regulations contained in the directives 1999/5/EC (R&TTE), 2002/95/EC (ROHS).
A copy of the manufacturer's declaration is available at www.doro.com/dofc