AE 3465 - Citrus juicers CLATRONIC - Free user manual and instructions
Find the device manual for free AE 3465 CLATRONIC in PDF.
User questions about AE 3465 CLATRONIC
0 question about this device. Answer the ones you know or ask your own.
Ask a new question about this device
Download the instructions for your Citrus juicers in PDF format for free! Find your manual AE 3465 - CLATRONIC and take your electronic device back in hand. On this page are published all the documents necessary for the use of your device. AE 3465 by CLATRONIC.
USER MANUAL AE 3465 CLATRONIC
De centrifugezeef is scherp!
Thank you for choosing our product. We hope you will enjoy using the appliance.
Symbols in these Instructions for Use
Important information for your safety is specially marked. It is essential to comply with these instructions in order to avoid accidents and prevent damage to the machine:

WARNING:
This warns you of dangers to your health and indicates possible injury risks.

CAUTION:
This refers to possible hazards to the machine or other objects.

OTE:
This highlights tips and information.
General Safety Instructions
Read the operating instructions carefully before putting the appliance into operation and keep the instructions including the warranty, the receipt and, if possible, the box with the internal packing. If you give this device to other people, please also pass on the operating instructions.
- The appliance is designed exclusively for private use and for the envisaged purpose. This appliance is not fit for commercial use.
Do not use it outdoors. Keep it away from sources of heat, direct sunlight, humidity (never dip it into any liquid) and sharp edges. Do not use the appliance with wet hands. If the appliance is humid or wet, unplug it immediately. - When cleaning or putting it away, switch off the appliance and always pull out the plug from the socket (pull the plug itself, not the lead) if the appliance is not being used and remove the attached accessories.
- Do not operate the machine without supervision. If you leave the room you should always turn the device off. Remove the plug from the socket.
- The device and the mains lead have to be checked regularly for signs of damage. If damage is found the device must not be used.
- Do not try to repair the appliance on your own. Always contact an authorized technician. To avoid the exposure to danger, always have faulty cable be replaced only by the manufacturer, by our customer service or by qualified person and with a cable of the same type.
- Use only original spare parts.
- Pay careful attention to the following "Special Safety Instructions".
Children and Frail Individuals
- In order to ensure your children's safety, please keep all packaging (plastic bags, boxes, polystyrene etc.) out of their reach.

WARNING!
Don't let small children play with foils for danger of suffocation!
- This device is not intended to be used by individuals (including children) who have restricted physical, sensory or mental abilities and/or insufficient knowledge and/or experience, unless they are supervised by an individual who is responsible for their safety or have received instructions on how to use the device.
Children should be supervised at all times in order to ensure that they do not play with the device.
Special Safety Instructions for this Machine
WARNING:
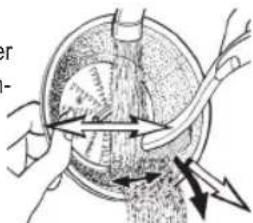
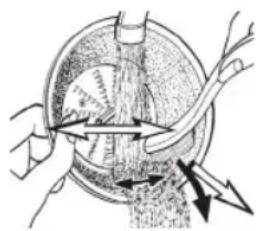
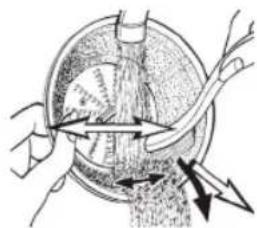
- Risk of cuts! The centrifuge sieve is sharp!
-
If the rotating sieve is damaged, the device shall not be operated.
Always use the supplied tamper. Do not insert your fingers or tools into the filler opening. -
Do not operate the appliance for longer than 3 minutes. Afterwards, let it cool for approximately 5 minutes before you use it again.
- Do not touch any moving parts of the machine and always wait for it to stop.
- The machine should only be used under supervision.
- Do not manipulate any of the safety switches.
- Do not remove the lid during operation.
- Do not put your fingers into the filler opening.
Designated use
This appliance is designed for the extraction of juice from fresh vegetables and fruits such as pineapples, apples, beetroot, celery, cucumbers, carrots and tomatoes.
As long as peelings are edible, they also can be processed.
Food containing starch, like bananas, papayas, avocados, figs, and mangos, as well as especially hard and fibrous fruit and vegetables, should not be processed with the device.
iNOTE:
Juice extraction from small fruit like for example berries with the centrifuge principle is difficult. You should use a suitable berry press for them.
The appliance may only be used in the manner described in this operating manual. You may not use it for commercial purposes.
Any other use shall be considered as not intended use and can lead to material damage or even personal injury.
The manufacturer shall not be liable for damages caused by not intended use.
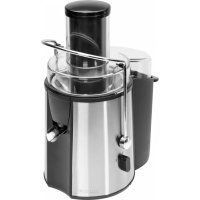
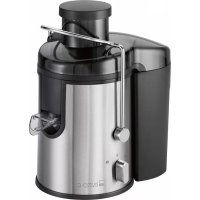
Supplied parts
1 base device with motor
1 transparent cover
1 tamper
1 centrifuge sieve
1 centrifuge housing
1 pomace container
Unpacking the appliance
- Remove the device from its packaging.
- Remove all packaging materials like foils, filling materials, cable holders, and carton packaging.
- Check the scope of deliveries for completeness.
NOTE:
There may still be dust or production remains on the device. We recommend that you clean the device as described under "Cleaning".
Description of the Parts
1 Tamper
2 Filler opening
3 Transparent cover
4 Centrifugal sieve
5 Centrifuge casing
6 Spout
7 Drive wheel (not detachable)
8 Safety bracket
9 Base device with motor
10 Setting selector
11 Pomace container
Setting up of the appliance
For assembly, also refer to the illustrations on page 3.
- Set the device so that the switch points towards you.
- Tilt the safety handle to the right.
- Attach the centrifuge casing on top of the base casing. The base casing has a recess. Here the spout of the centrifuge casing must be placed.

WARNING risk of cuts!
The centrifugal sieve is sharp!
- Place the centrifugal sieve on top of the drive wheel. Press it down. It clicks in place on the drive wheel.
-
Check the centrifugal sieve! Feel under the sieve edge. It should not loosen under slight tension.
-
Attach the pulp container on the left side. To do so, hold it slightly sideways to press the upper edge into the shroud of the centrifuge housing.
- Attach the transparent cover. It reaches all the way over the pulp container.
NOTE:
Your appliance is equipped with a safety switch. It prevents accidental motor start. Check the correct attachment of all components, centrifugal sieve and transparent cover.
- Lock the safety bracket over the transparent cover.
- Press the spout downwards to open the flow of the juice.
- Place the juice jug to the right of the appliance.
- Ensure that the control knob is set to "0" position.
Electric Connection
- Before inserting the power plug into the outlet, check that the mains voltage to be used matches that of the device. You can find the required information on the nameplate.
- Connect the device only to a correctly installed safety socket.
Operation
Switch settings
- Select step 1 for smaller fruit like strawberries.
- Select step 2 for larger pieces or hard vegetables, for example carrots.
Preparations
- Wash the fruit to be processed.
- Cut the fruit in pieces to fit through the filler opening.
- Remove large pips and stems.
Extracting Juice
NOTE:
The appliance is intended for short-term use. After operating it for 3 minutes, take a 5 minute break.
WA
- Check all accessories again for proper attachment before switching the appliance on.
-
Ensure that the spout is pressed downwards.
-
Set the switch to the desired position. The motor starts running.
- Insert the fruit pieces in the filler opening and push them down with the tamper. Please note! The tamper has a guide way in the filler opening.
- The juice flows out at the right side of the casing. The pulp is collected in the pulp container. If there is an excessive discharge of juice, switch to setting 1 and exert less pressure on the pusher.
NOTE:
- Observe the juice jug. Stop operation in time to prevent overflowing.
- Berries and citrus fruits (such as gooseberries, grapes, oranges) are usually not juiced but pressed.
- When juicing these fruits with their high juice content, splashing of juice from the area of the pomace container may occur. In this case, we recommend that the pomace container is emptied more frequently.
Stop Operation And Disassembly
- Set the control knob to "0" position and wait until the centrifugal sieve has come to a complete standstill.
- Disconnect from mains power supply.
- Press the spout upwards to prevent subsequent dripping.
- Take the juice jug to the side and open the safety bracket.
- Remove the transparent cover.
- Remove the pulp container.
- Remove the centrifugal sieve with the centrifuge casing. Use both hands to lift the centrifuge casing up.
WARNING risk of cuts! The centrifugal sieve has sharp knives! Only lift it on its outer edge.
- Lift the centrifugal sieve out of the centrifuge casing.
Cleaning
#
WARNING:
- Before cleaning always disconnect from mains power supply.
- Under no circumstances should you immerse the device in water for cleaning purposes. Otherwise this might result in an electric shock or fire.
- The centrifuge sieve is very sharp! Danger of injury!
#
CAUTION:
- Do not use a wire brush or any abrasive items.
- Do not se any acidic or abrasive detergents.
- Do not leave the pulp to dry on the centrifugal sieve. The fine pores will clog and become useless.
Tip
- Remove residues in the centrifugal sieve immediately under running water. Use a dishwashing brush.
- For cleaning the outside of the machine use only a damp washing-up cloth.
Plunger, transparent Cover, Centrifuge Sieve, Centrifuge Housing, Juice/Pulp Container
A
WARNING in regard to risk of cuts!
e centrifuge sieve is sharp!
A
CAUTION:
The attachments are not suitable for dishwasher. Heat and aggressive cleaning agents may warp or discolour the attachments.
- Clean these components in a rinsing bath.
- Clean the centrifugal sieve with a dishwashing brush. See Figure.
- Rinse with clean water.
- Only assemble the device when all parts have been dried.
Storage
- Clean the device as described. Let the accessories dry completely.
We recommend that you store the device in its original packaging when it is not to be used for a longer period.
Always store the device at a well ventilated and dry place outside the reach of children.
Troubleshooting
| Malfunction Possible cause Remedy | ||
| The device does not function. | The device is not supplied with power. Check the outlet with a different device. | |
| Insert the power plug correctly. | ||
| Check your domestic fuse. | ||
| The safety handle has not been closed. Check if all components were properly attached. | ||
| The device is defective. Contact our Service or a specialist. | ||
| The juice quantity is small | Wrong fruit type. Select a fruit type produces more juice. | |
| Juice cannot be extracted from small berries in the centrifuge. | ||
| Too much residue in the centrifuge sieve. Clean the centrifuge sieve. | ||
| Loud noise and imbalance during operation. | Bad assembly. Check that all components have been installed correctly. | |
| Too much residue in the centrifuge sieve. When processing larger quantities clean the centrifugal sieve in-between. | ||
Technical Data
Model: AE 3465
Power supply: 220-240 V~50/60 Hz
Nominal power consumption. 850 W
Max. power consumption 1000 W
Sound pressure level: 76 dB(A)
Protection class:
Short-time operation/Pause: 3/5 minutes
Net weight: approx. 3.85 kg
The right to make technical and design modifications in the course of continuous product development remains reserved.
This device complies with all current CE directives, such as electromagnetic compatibility and low voltage directive and is manufactured according to the latest safety regulations.
Disposal
Meaning of the "Wheelie Bin" Symbol
Take care of our environment, do not dispose of electrical appliances via the household waste.
Dispose of obsolete or defective electrical appliances via municipal collection points.
Please help to avoid potential environmental and health impacts through improper waste disposal.
You contribute to recycling and other forms of utilization of old electric and electronic appliances.
Your municipality provides you with information about collecting points.
Instrukcja obslugi
He Kopnctyntecr npnlndom DOBwe 3 xBNiH. NicIaTO ro daTe Homy oxoJOnHyTN BnpOdoBx np6nn3Ho 5 xBNiHN, nepu HIX BNKOpNCOTByBaTu 3HOBy.
3a60pOHaTeBcTOpKaTnC4oDteTaneI npnAdy, KOH BOHpyXaOTbC4i He 3yINHHNlncr NOBHicTH.
- EKcnnyatai npnnaDy D03B0n8eTbcra TINbKn niHarnaIOM.
- He pōbi 6yDb-αKnx 3mH b aBapiHOMy BmHKaqi.
- He 3nImaIte KpuIky niI yac po6oTn.
- He 3acobyTe pyknв 3aknaHn OTBip.
3acToCyBaHnI npnIaNy 3a Noro npn3HaueHHaM
Ie npnad npn3naheHO nra BnKMaHnCOKy 3i CBkNx OBOuiv i pkyTIB, k TO 3 J6JyK, bpyKa, cenepn, oripKIB, MOPKbTa nomiOpib.
KIOU KIPKa OOyIB UΦpyKTiB ICTIBH, IX TEK MOKHBA BIKOPNCTOBYBaTN.
IpoodykTn, kmiMiCTaB KPOxMaNb, HAnpNKJa6bHaHn, nana, abokado, firiimamro, a taKoJ dyKe TBepdi Ta BOJOKHncti fpyktn i oBOUH He cIid BVKOpNCtOByBatn 3cIM npNCTpoem.
ПРИМITKA.
Bnuabnt ciK i3 Mahehkyx fpykTiB, HnprnknaJrIi, 3a npHnnpom cHTpnOytn dyKe Baxko. Inn Hnx CnID BnKOpncTObYbATN BiDnOBiDnHn Ppec.
PpnaMoXHa BnKOpNCTOBvBaTn TiIbKn y cnoci6,OnncAHy ycbomy noci6Hnky KOpNCToYBaA.3a6opohcTBcBnKOpNCBOBvBaTny KOMepuiHnx ciJax.
BnKOpuctaHHe 6yDb-IAKIM IHINM YHOM BBAxatMeTbC8n BnKOpCTaHHm He 3a np3HaehHm I MOKe np3BeCTN Do N0WKoDxKeHH MaTepiany HABITb TpaBMyBaHH KOpNCtYBaHa.
Bipob6nHk He Hece BiIDNoBIaIaNbHocTi 3a NoIKoJxHeHH, cnpu- uHHe BKNOpNCtAHHHM He 3a npN3HaueHHM.
YactHH,akidoaIOTbcra
1 Ba3OBn npicTpri i3 DnryHOM
1 PpO3oPa KpIuIka
1 UTOBxay
1 CnTo ceHTpnDpyr
1 Kopnyc ueHTpnuyn
1 CMHicTb DnB BnABKIB
P03nakyBaHHn npncToPO
- BnmiTb npucTpri 3 ynaKOBKn.
- BnMItb yBecb nakyBaIbHn MaTePiaI, TaKn Jk foJbra, HAnOBHIOBau, qikcatOpn Ka6eNIO i KapToH.
- IpepeBipTe, Hn HaBHi yci YaCTuHn.

ПРИМITKA.
Ha npictroi moke 6ytn nnil a6o 3aIIuKn Bnpo6HnOro npouecy. PekomeHIOBaHO NOUcHTn npicTpri, kOncAHO b po3dii "OunueHHN".
Onnc yactnH
1 WToBxa
2 OTrbip HAnOBHIOBaHa
3Прозора кршka
4 Biüntpobni φijbtp
5 Kopnyc ceHTpnpyrn
6 HocNK
7 BeyuKe Koneco (He 3HimaTbcra)
8 3ana6iKHa dykk
9 Ba3OBn npicTpri i3 DBNrHyOM
10 Nepemkaay pexmib
11 CMHICTbIaBnBnABKBi
HanaTuBaHH npuJa
Texhiky MOHTyBaHHa DnBiTbCra TAKoX Ha MaJIIOHkax Ha CTOp 3.
- BctaHObITb npncptpi TAK, 06 nepeMnKau 6yB cnPMAHnn Do Bac.
- HaxiniiB pyky npaBopyu.
3.ПпсднaiteКорпсцentprnФугДоВерхньчactNHIOCHOBHOrO KOPnyca.Ha OCHOBHomy Koprnyci 3aRn6JIeHN.В龟3arN6IeHHpo3TaWObYeTBcHocNK KoprnycaZeHTprnФуrgn.

PONEPEDXEHH. p3NK TpaBM! ceHTPOBn fInbTp roCTpn!
- Po3aIyIe BiIeHTpOBn fIbTp 3BepxHa BeDyOmy Koneci. IpiTnCHITb Ioro, i3 KnaCaHHrMa BIn MaC CTaTI Ha CBOE Micue.
- Ipebeipte BiDcEHTPOBm fInbTp! 3nerka npntncHtB kpaI fInbtpa.BiH He NOBHeN 3MiuaTnCBAid NERKOro TnCKy.
- PnEHaHte EMHicTh DnJXOMy Do JIIBORO 60ky. Uo6 ce 3po6bntu, BiDBeDITb EMHicTh TPOxN B6ik, Uo6 BCTaBHTn BEPxHi KpaY KoPnyc CEHTpNpyrN.
- BctaHObITb npO3Opy KpUkky.BoHa MaE NOBHiCTIO HApNTM EMHICTb DnIgKOMy.

PIMMITKA.
Ppnilad ochaheo 3anobixhm nepemukayem.Bin 3a-nobirae Bnpaikobomy ncy Dvnhya. Ipeepite npabnblhe noJoxheny ycix deTanei, BiueHTPOBOrO pIb-tpa Ta npo3opoKpnkN.
- 3aΦikcyIte 3anobixkHy dykky HAp npo3opoIO KpuikoIO.
- PnTnCHiB HocIK DOHN3y, 106 cik Mir CTiKaTn.
- Pɔ3aŋyɪTe emHicTb DnIa coky npabOpyu BiD npinəny.
- YneBhitbcra, 0KhoNka KepyBaHHa 3haxoHtbcra y noJooXeHHi "0".
Pi'd'eHaHHaDo eNeKtpomepeksi
- Pepsh Hix BCTabTn WTeKepe KINBHeHHB Po3ETky, nepeBipTe, Hn Happya MepeXi BiNobIidae Hanpy3i npictpoH. BiNobIDhy IHΦopMaio MoXHa 3HaHTn Ha TaBnUci 3 TexHiHIMM DaHIMN.
PiEHyTe npctpi NHe Do HaJeKHM YHOM BCTaHOBJIeHOI 3axnueHOI po3ETKn
Eknnnyatauaia
PonoxeHHnepemnkaa
Bn6paTe nooxeHn 1 nna ManeHbKnx pkyTIB, HapnKnad noJyHnCi.
Bn6paTe nOxKeHHa 2 nIy BeNkX uMaTkIB u TBePnIX OBOuH, HapnKnaM oPKBn.
Пд罗товka
- POMNte ppyKT, 3 koro BNTnCKaTmETbCciK.
- P03piKTe 4pykT Ha 7MaTKn BiIDIOBbIHO O TBOpY IOnaHi.
Budanitb Benuki kictoyn ta cte6na.
BntnckaHHcoky

#
Ley npnna npn3haeHo nI KopoTkoCTpOKOBOr BkOpncTahH. Iicra 3 XBnHH po60Tu MaE 6yTu 5 XBnHHa nepeba.

NONEPENXEHH
- PpeB BKIOHcHnI npIaNy ue pa3 nepeBiTe npaBnIbHiCTb BCTaHOBHeHH ycIX DetanE.
-
YneBHITbcra, 10 HocNK npnTCHytn DoHn3y.
-
BctaHObITb nepemikau y notpi6He nonoKeHHa. DnurH no-ue He pO60Tu.
- KnaiTiB WMATKn FpykTb y OTbip noaHi Ta npoWToBxyuTe ix TpAm6iBkoIO. 3ayBaXte, uO TpaM6iBka Mae HaprAmHi y OTbopi noaHi.
- Cik BntiKae 3 npaboro 60ky Kopnyca. Km CkyNpyTbcra y EMHOCTI dIy KOMy. y pa3i HAdMipHOI KINbKOcTI cOky nepeKnHouITb npnaD y pexm1 i nere npitnckaiTe wTOB-xaH.

PUMITKA.
CTeXTe 3aEMHcTIOIINCOKy.3aBvacHO 3ynHnItepo60Ty,uo63anO6iITN nepenBaHHIO
3a3Bnaycik 3 aRiD i CHTpycoBnx (HapnKna3 aFpyca, BnHOpaNy, anJIbCnHiB) OTpIMyIOb He 3a DOnOMoHO COKOBNTNCKaHa, a 3a DonOMoROI npeca.
-ПдчсВNTNCKAHнСКУ3иxфpyKtIB uepe3 BnCOKnBMICTCOKBYHnxi3EMHOCTIДЯЖOMYMOKE6pnsKATNIcIK.YbOMByBnAPkypeKOMeHDoBAHO CnopoXHOBaNTMHHICTbДЯЖOMYчactiWe.
3ynnHka po60Tu ta po36panHa
- BctahOBiB KhoNky KepyBaHHy y noJIOKeHHa "0" i 3aekai-Te, DOKN BiDcEHTPOBn fJIbTp NOBHCtO 3yINHHTbcra.
- BiD'cHaIe Te npIaI d BiD MepeXj KInBJIeHnA.
3.Пи捜сіть HOCИДOROPи,063ano6iRn KpanaHHIO.
4.Пиберить EMHICTbДЯ COKY Ta BiДКрИТe 3anOБИЖHy DzyKKy. - 3HIMITb npo3opy kpiuKy.
- 3Himitb emHictb dnyxomy.
- 3HIMITb BiIeHTpOBuN fIInbTp pa3OM 3 KopnycOM ZeHTpn- cyrN. Kopnyc ZeHTpn- cyrN niDImaTe Dboma pykamn.

PONPEPENXEHN yOo np3nky npi3iB!
CnTo ceHtpnФуr roctpe!

YBAGA.
HacaKHe MoXHa MNTB NocyDomnHi MaunHi. Taepi arpeCnBHI 3ac06n IJI YIeHHa MoxyTb DeOpmyBatn a6o 3he6apBtN HacaKn.
CnonickyTe zi kOmnoHeHTN.
YIcTITbBIDUeHTPOBNIΦIpJBTpUJITKOOJNRA MNTTINOCyDy. INB.pncyHOK.
CnoonocHtB uCTOBOdoIO.
- 36upaTte npnnaTinbKnToi, KOni Bci DeTani cyxi.
36epiraHH
- UcTbTe npictpi, kOncaHo. DaIte npnlaHIO NOBHCIO BICOXHYTN.
KIO npncpti He BnKOpncToByBaTImeTcBc TpNbAInu Yac, peKOMeHDoBaHO 36epirAtn Ioro B opriHaIbHi ynaKOBui.
3aBKn 36epiraTe npncptiy cyxomy,do6pe npoBiproBaHOMyMiCi, no3a Mexamn doCzKHOCTi ditei.
YcyHeHH HeCnpaBHOcte
Yka3bBaet Ha BO3MOxHHyO ONaCHOCT bIgN I3JeINr N DpyTnx OKpyKaIOUxN PpeIMeTOB.
I P N I M E U A H N A:
JaetcoBebuHnHOpMaunIO.
06uye yka3aHnno TeXnke 6e3onacHOCTn
IpeepnHaayanom 3KcNpyaTauin np6opbaBnMaTeIbHno npOHTaIe npnaIraemyo IHCTpykUIO NO 3KcNpyaTaUIN COxpaHInTe ee HadeXHom MeCTe, BMeCTe C rapaHTnHBIM TaHOHOM, KACCOBbIM YekOM IN, NO BO3MOXHOCTN, KAPTOHNO KOPo6KOcCynakOBouHbIM MaTePnaIOM. Ecn daTe KOMyNo nonNoB3OBAtbscn np6Opom, O8aTeJIbHO daIte BnPaDuy daHHyIO IHCTpykUIO NO 3KcNpyaTaUIN.
-ПльзуITECBпибормTOЛБКОчснБIMOBpa3OMиnoHa3haueHnIO.ПибOPHeпрнla3HauEHДЯKOMMpeCCKOrOHCNoIb3OBAHnIENoIb3yIeCBпибOPmOДOTKpbITbIM He6OM.PpeDoxpanHTe ПибOPOTJkapbl,прmaBIXCOINHeHbIXJIyEeBnaxHOCTN(HN B KOEMcnyae He norpyxainTeeroBBOyuYdapOBo6OCTPbeYrbl.He npikacaiTEcbКпибOpByBnaxHbIMPykam.Εcnnpi6OpYbnaXHHncIINHaMOK,TytKeBbHteBnIKyHPO3ETKn.
- Поссные Кспунатуг,在 могтохе пинадпжност,在 сдк,在 ралмь,在 влку,在 po-3eTkn(TЯнITE 3aВИКу,a He 3a Ka6elenb).
HeocTbIaIe BkHoueHHbIe 3JIeKtpOnpnp6OpbI 6e3 npICMOTpa.BbIXoJn3 NOMEuEHNBa Ccerda BbIKNoaIte npi-6op.BbIHbTe WtKepe n3 po3eKn.
- Pnp6op n KaebIb cTeBOro nHTaHnHeo6xoJIMOp peryIpaH0 o6cneIOBaTb Ha HAnuHne CneIOB NOpeKJDeHn. PpO6hApUxKeHn IOBpeKJDeHn POJIb3OBA TbCpN6bOpom 3aPpeJureTcR.
HnB KOem cnyae He peMOHTpyuTe np6op camocToTeIbHo, a obpaaainTecb B TakOM cnyae 3a NmOuBo K CneuaJIncTy, MeoUeMy COOTBeCTbYUOni Donyck. N3 coobpaxhen 6e0NaChOCTN, 3aMeHa CETeBOrO shypa Ha
paBHO3NaHbI dOnyCKaETcT OToBko Yepe3 3aBoDn3rOToBtEnb, HAsy CepBnCHyIO MaCTepCkyIO INN COOTBeTCTByIOeRO KBaINΦuNpOBaHHORo CneLnaJIncTa.
IcnoJb3yIteToJIbKOopnHaJIbHbIe3aNpactN.
- PtoxanyuCTa, co6nOdaTe HNKeCNeIyHouIe "CneUnaHbHbIe yka3aHnro TeXnKe 6e3oNaChocTn".
DeTN N Iua HykaaOuaneC B npncmOTpe
- IV3 coo6paKeHn 6eONaCHocTn IINI DeTeH He octabIyTe IexKaTb yNAKOBky (IINaCTNKOBblc MeuKN, KapTOH, NeHOIIpact n T..) 6e3 npncmOTpa.
I PENEyPEXKDEHNEI
He no3B0nJaTe DeTAM nRpaTB c nonu3TuNEHOBOI npeH- KO. OnacHoCTb ydysb!
3TOT np6bOp He npedHa3HaueH dIg NOIb3OBAHn IInaMn (BkIOUaJeTei) COrpaHnueHHbIMN fN3NuCeKMM, CEHCOPHBIMN ININ yMCTBeHHbIMN cNoCObHoCTRM ININ IInaMM, He IMeIoUIMN OblTa N/IN INeHO6XoDImbIX 3HaHN. NCKIIOUHeHne COCTABJrOT cNyAn, KOrda ONH HaxOJaTcN IOI pncmToPOM IIna, OTBeTCTBeHHoro 3a INx 6e30NaCHOCTb, ININ KOrDa OT 3TOI IIna POnyHeHbI yKa3aHnI NOIpb3OBAHnIO np6bOpom.
Heo6xoJIMO npncMaTPnBaT 3a DeTbMn, YTO6bl y6eIHTB- CBA TOM, YTO OH He IrpaHc T np6opom.
Oco6bIe yka3aHnI NO TEXHnke 6e30nacHOTn DnI 3TOrO yCTpOuCtBa
A IPEyIpeKDEHNE:
- Onachoctb nope3OB! CnTo ueHTpnDpyrO octpoe!
- EcnBpaaioeecnTO nobpeKeHo, yctpoCTBO 3KcIIpyaTnpOBaTb HeIb3y.
Bcerda nCnoJIb3yIte TpAm6oBky, IMeHOuIyOcR B KOMIIeKTe. He BCTaBnIe NaIbIcI bI INHCTpyMeHTbI B OT-BepCTne BOPOHKn.
He nCnoJb3yIte 3OT npn6op 6Oonee 3 MnHyT noDpyI. Pocne pa60tI daIte emy oxnaIHTbcB TeheHne npImepHO 5 MNHyTbI nepeTe TM, KAK nCNoJb3oBaTb erO CHOBA.
He npikacaiTeCb K DnBxuyHmCg DeTaIyM yCTpoiCTBa, Bcerda Jxnte, noka OHN NOnHOCTbH He OCTaHOBTcA.
- YctpoiCTBO DoJIKHO paOtaTb ToJIbKO IOI npICMOTpOM.
- He mAHnHyInpyuTe BbIKIouaTeTЯMn 6e3oNaChOTn.
- He Chimaite Kpbliky BO Bpemra60tby yctpoiTCBA.
- He BCtABTnIe NaIbIbI B OTBepCTne BOPOHKn.
Ha3haeHne
3TOT np6bop npedHa3NaeH nIaN3BneEHHcKa I3 CBExnX OBOUeH ppyKTOB, HAnpIMep H3 aHaHacOB, RaIOK, CBeKnbl, CeJIbDEpeR, OrypOIB, MOpKOBn NOMIDOPOB.
EcIn Koxypa npOdyKta cbeO6Ha, ee TaKke MoxHObpa6aTbIBaTb.
Пицьгпсдуктб,codepжаик Крахмал,Takне кak baHbI,паай,abokado,Hxkp,MaHro,Nocobehno JecetKne INBOLOKNHCTBIEФуктБИОBOUH,HeDOLJKHbIOBpaBaTBiBaTbcRdaHHbIMyctpoiCTBOM.
I I PIMMEUAHNIA:
BbIXMaTb COK n3 He6oJIbXn PINOOB, TAKNX KaK, HAnpIMep, rOdbI, INcNoJIb3yR npHcN pIeHTpNpyr, IOBOJbHO TpydHO. B TAKNX cnyaXn Lyuwe INcNoJIb3ObaTb NOxOJaI nnPpecc dIra RoD.
Pn6op MoXHO nCNoIb3OBAbT ToIbKO yKa3aHHbIM B DaHHOM pyKoBOdCTBe CnOCo6om. PnimeHHeNBE KOMMepuecknx ZeJIAX 3anpeSeHo.
IIO6oe npryoe npimehene yctpoiCTBa cHTaETcNcNOb30B aHnem He no Ha3HaueHIO, N MOxET npuBecT K MaTePnaNb-HOMy uep6y nIu TpaBme.
PpOn3BODInTeNb He Hecet OTBeTCTBeHHOCTn 3a yUepe6, npuHHeHHbI INcNoJIb3OBAHNEM YcTpOJcTbA He No Ha3HaueHNI.
KomnneKT noCTaBKn
1 Kopnyc yctpoiCTBa cDburataeNEM
1 PpO3paHbI KOJNaK
1 Tpam60bka
1 CnTo ceHTpncpyr
1Koxyuchentpufym
1 EMKOCTbIJIy MRAKOTN
PacnaKOBka yctpoNCTBa
1.ИЗВЕКТЕУСТРОДТБОИЗЕУПАКOBКИ.
2. YdaJInte BCE ynaKOBOuHbIe MaTePnAJIbI, TAKHe KaK NOnNtTUNHeHOBA IJIeHka, MaTePnAIN HAnONHITeJIa, Ka6JIbHbIE CTJIKN IN KOPo6Kn.
3. Y6eIHTecb, yTO B Kopo6ke eCTb BeCb KOMIIeKT NocTaBKn.
IINPIMEUYAHNA:
Ha yctpoiCTBe BCE eue MoIyT OCTaBaTbCRe MeKne qactuBi I NblB, OCTaBUnieCe IocNe IpOIN3BOIDCTBeHHORo Ipocecca. PeKOMeHdyETcR IOUInCTMb yCTpoiCTBo, KaK OINCAHO B pa3- dene "YnCTKa".
CnncOK KOMnoHErTOB
1 Tpam6oBka
2 OTBepCTne BOpOHKn
3Прозарная Кршka
4 LcHtpo6exhoe cHTO
5 Kopnyc ceHTpnpyrn
6 HocNK
7 PnBODHoe KOJIeCo (He CbEMHOe)
8Прedoхрантельнаскоба
9 Kopnyc yctpoiCTBa C DnBraTeIeNEM
10 CenekTop Hac trojkn
11 EMKoCTb DnI MRAKOTN
IpoIroTobKa npI6opa KaPaboTe
I P N M E U A H N I:
Pnp6op npedHa3nueh TOnbKo IJN KpaTkoBpeMeHHoro NcIIOb3ObaHn. Pocne kaxdbix 3 MmHyT pa60tbi DeaTe na-y3y Ha 5 MmHyT.
IPEyPExkDEHNE!
-Перед BKЛIOЧЕНМпИБОа сCHOBA npOBeРte павиNBHOCTb yCTaHOBK BCEX KOMNHeHTOB.
- Y6eIITecb, YTO HOCIK Haxat BHN3.
- UctahOBITE nepeKIOUaTeNb B HxHHe NOIOXeHne. DnuratEnb NaHT p6oTaTb.
2.ПомecNTe KycOuKnФpyKTOB B OTBepCTne 3aONHnTeJI N HaxMnte Ha HIX TpaM6oBkOJ.ObpaTnte BHNMaHne! B OTBepCTnN 3aONHnTeJI JIr TpaM6oBKn PpeDyCMOTpeHa HappaBnIouaJ. - Cok BbiteKaet C npaBoi CTopoHbI KOpnyCa. MkaKoTb Co6npaEcB KOHTeHep dIra MkaKOTn. PpN N36bIToCHOM BblNyCke coka nepeKJIIOuHTecb B pexm 1 n npNKJaDbIBaIte MeHbWee ycInne K ToJkATEIIO (Tpam60Be).
I P R M E U A H N I:
CneHte 3a 3anonHeHnem KyBunHa nla coka. BobpemocTaHOBepeBoTo dI npedotbpaueHnepenonHeHHJ.
IyOdbi NcTpyCObBie (TaKne KaK KpbIKOBHnK, BnHOrpaI, anEJIbCuHBI) O6bIyHO He 6pa6aTBIBaIOTcB COKOBbIXMaJKe, a OTKIMaIOTcR.
-Пи ВьИКIMаниТакИx ФpyKTOB C BbICOKM coDEpЖa-HnEM cOKa N3 30HbI KOHTeHepa ДЯ BьIXIMOK MOKeT Na6IIOdAtebCЯ рacPnEeCKnBaHne.ВТakИx cIpyaX peKoMeHnyETcЯ aIe ocBO6OxdaT b KOTeHepДЯ BьIXIMOK.
OctahOBka pa60tbI npa36opka
- UctaHOBnTe pyUky ynpabLeHnB NOJIOKeHne "0" n DOxDInTEcB noHnO octaHOBKn ueHTpO6eKHO rO CnTa.
- OTKHIOHTe np6op OT 3JIeKTPocetn.
- Haxmte Hocnk BBepx, YTo6bI npedToBpaTntb kaIII.
- Y6epnte KByBmH dna coka n OTKpoTte npedoxpaHnTeNB Hyo CkO6y.
- CHIMnTe npo3paHny KpbIshKy.
- CHIMMTE KOHTeHep DJIa MAKOTN.
- ChHmnte ceHTpO6eXHoe cTTO cKOpnyca ceHTpnФуrN. POnHmnte ceHTpO6eXHoe cTTO o6eMn pykAmn.
PNEpyPExEHEHc: Pnck nope3oB! UeHTpo6exHoe cTo nMeet oCtpbIe Hoxn! PoDnMaTe TOnbKO 3a BHeuHn Kpa.
- BbHbTe ζeHTpObeXhOe CnTo n3 KOpnyCa ζeHTpnФуrN.
UcTka
A INPENEYNPEXKDEHNE:
-Передческов BCeгда BbIHIMaTe ceTeByIO BnIKy n3 pO3eTKI.
Hn npKaknx 6cToTaeBCTbX He norgykaTe yctpoiCTBO B BOY, YTO6bl NOUcHTb Ero. 3TO MOKeT npBeCTN K ydApy 3JIeKTPOtOKOM IIN NOkApy.
CnTo ueHtpnФytn ouehb ocTpoe! OnaHocTh TpaBMn-poBaHnI
BHIMAHHE:
He nCnoB3yIe npoBOIoHnyU 8eTky uIN dpyrne a6pa3NBbIe INCTpyMeHTbl.
He nCnoJIb3yIte KNCIOTHbIe IIN a6pa3NHBbIe MOIOUne cpeIcTBa.
He daBaIte MAKOTn 3acbixaTb Ha CEHTPO6eXHOM CNTe. MeJIKe Iopbl 3acOpA TcN HmN HeNb38 6yDet nOlb30BaTbcR.
Cobet
Cpa3y je ydaHNTe ocTaTKn C cHTpO6ExHO rTO cNtA NOc CTpyE BODo. IcNoJIb3yUte UETK DnI MaTbIocuDbl.
-Дя Oунстки NOВерховсгУстpoИCTBA ИСОЛьзУТЕТOLьКВlaЖHyIO BetoUb.
IpyHkep, npo3paHbI KOJINaK, cITo CEHTpnOyTu, KOxUx ceHTpnOyTu, EMKOCTb DnA COKA / MRAOTN
PENEYNPEXKDEHNE kacaTeNbHO pncKa nope3OB! CTo ceHTpnOytn Oeyb ocTpoe!
BHIMAHHE:
Hacaikn HeJIb3a MbITb B NocydomoeyHO MaUNHe. HarpeB n arpeccNBhIe YNCTAUIne CpeDCTBa MOrY TeOpMnPOBaT nIN oecuBetNTb HacaIK.
- Nouchte 3TN KOMNoHeHbI B paKOBHe.
ДячNTK ueHTpo6eXHOro cTnA nCNoJIb3yIte uTeKy dIЯMbITbIPOcyDbI.CM.puCyHOK. - Onolochite YNCTO BDOI.
- HauHnHaTe c6bOpky npnbopa ToIbKO nOcNe BbcIxAHNBAce erO COCTaBbIX YacteI.
XpaHHeHne
-ПочиТе yctpoIcTBО B COOTBETCTBIM C ONICAHHEM.ДаTe akceccyapam NOJIHOCTbIO BBICOXHyTb.
- PekomeHnyetc xpaHnTb yCTpoiCTBO B erO opuHaJIbHOI ynaKOBKe, ecm OHO He 6yDet NcNoIb30BaTbcr DInTeJIbHOE Bpemr.
Bcerda xpaHnTe yctpoNCTBO B cyXOM, XopoWo npoBeTpnaBaEMOM MeCTe, HeNoCTynHom dIaTei.
YcTpaHHe HEnCnpaBHOte
| Héncπpabhnoctb Bo3moxhna piuynha Deiactbna | ||
| UctpoicTBo He ΦyHKu-ohnpuyet. | K yctpoicTBy He IodKnIooHe OIeKtpoia TaHne. | FipobepbTe po3eTKy C IOMOuBHO dpyrTOO yCTpoicTBA. |
| BcTaBbTe ⅢTeNcEJIb B po3eTKy IpaBnIbHO. | ||
| IporobepbTe ceTeBOI npedoxpanHTeJIb. | ||
| PykOaTKa 6e3OpacHoCTn He 6bla 3akpyi ta. | IporobepbTe IpaBnIbHoCTb yCTaHOBKN BceX KOMIOHeNTOB. | |
| UctpoicTBo He nCπpavHIO. ObpaTIteCb B | HaII cepBnCHbI ζeHTP IIIN K cIeZnAJIcTу. | |
| CπlshKom MaIIO coka. H | He TOT TIN φpyKTob. Bbl6epITe φpyKT To | TINa, KOtbpI DaET MHOrO coka. |
| B ΑeHTpIφyIe HeIb3a OTkaTb COK I3 He6OJIbIXЯroI. | ||
| CπlshKom MHOrO MIAKOTn Ha CITE ζeHTPμ φyIru. | IocHCTte CITO ζeHTpIφyIru. | |
| CπlbHbI ΜyM i pa3bIaHnCpOBKa BO BVPemraPabotbI. | ΠIoXa C6opka. Y6eDiTEcB, qTO Bce Kom | IPOHEbI yCTpoiCTBa UcTAHOBJIeHbI IpaBnIbHO. |
| CπlshKom MHOrO MIAKOTn Ha CITE ζeHTPμ φyIru. | IprI o6pa6oTke 6OJIbIXx KoJInuCeTB IpoJyKToB IpePiOnuIck NcIcHCTte ζeHTpO6exHoe CITO. | |
TexHnueckne xapaKTepeNCTIKN
MoeB: AE 3465
3JIeKTPoPITaHHe: 220-240 B~ 50/60 T
HomHaIbHaI noTppeBnEma MoUHocTb: .850BT
MaKcImaJIbHa nTope6JIeMaJ MoUHocTb: 1000 Bt
YpOBeHb DaBHeHn 3ByKa: 76D6(A)
Klacc 3aunTbI:
KpaTKOBpeMeHHa pa60ta/nay3a: 3/5 MHyTbI
Bec HeTTo: npMepHo 3,85 K
CoxpaheNo npabo Ha TexHnueckne I KOHCTpyKUIOHHbIe
n3MeHeHnBpaMKax npoDJIkaHOUeCn pa3pa6OTKn
npoDyKta.
ДанhoeуctpoICTBO COOTBETCTByeT BCEM TEKUYIM
ДирекТИВамCE,TaКIMΚАнгТРOMAГNTHЯCOBMECTMIOCTb
HnH3Koe HApJxKeHne; OHO POn3BeDeHO B COOTBeTCTBmC
HOBeIIMMn npaBnIaMn TexNkN 6e3oNaChOCTN.
,gsrall 2jll e1b,crsall 2jll jy,laill lalil
1dgsjgall jll jg!Cg jll jil
4
abll pla cllgall bai 1 kail jil. gblal slj plsiuily jiall qiyy p . jbi elp dvi ly jyl abil . lai ci jy jy jy jy jy jy jy jy
#
Lolai Lai Jia Li Jia Gao gals jgali 1
Lolai Jia Pae Zie Jua Wai 4i Gao gai jgali nn jia i aai n
Jglia ne Jai gai gai gai gai gai gai gai gai gai
sla csiu ay sylal 2bll jin!gall jia
8
#
:
A
aai
2 1
J
J
J
J
J
J
J
J
J
J
J
J
J
J
J
J
J
J
J
J
J
J
J
J
J
J
J
J
J
J
J
J
J
J
J
J
J
J
J
J
J
J
J
J
J
J
J
J
J
J
J
J
J
J
J
J
J
J
J
J
J
J
J
J
J
J
J
J
J
J
J
J
J
J
J
J
J
J
J
J
J
J
J
J
J
J
J
Laiall ayai jaii
Jiai111 0"0"
jll jll 2
.3
yui jai jiei li jia jiy jiy jiy jiy jiy jiy jiy jiy jiy jiy jiy jiy jiy jiy jiy jiy jiy jiy jiy jiy jiy jiy jiy jiy jiy jiy jiy jiy jiy jiy jiy jiy jiy jiy jiy jiy jiy jiy jiy jiy jiy jiy jiy jiy jiy jiy jiy jiy jiy jiy juy
1j
1
aill 2
3
4
5
6
()
jol aoe 8
jglal jglal 9
S OBC = S COD + S_ BOC
Jull 11
216 ÷ 11 21.12( )
3.3a
1.
J 2
J 3
ab = 7ab
- d( s,s) all jall
aab ccaaae aee eae jssjll jia 4
aill alae s ciil pi loie
J 5
Jaaal aill yll l 100 8 6 .6
aill 1ggele 5
:
j 1 j 1 j 1 j 1 j 1 j 1 j 1 j 1 j 1 j 1 j 1 j 1 j 1 j 1 j 1 j 1 j 1 j 1 j 1 j 1 j 1 j 1 j 1 j 1 j 1 j 1 j 1 j 1 j 1 j 1 j 1 j 1 j 1 j 1 j
alil 1001 1001 1001 8
Jauaal jai Jaa Jauaal a baiai .9
jlll jn nn nnnnne nee eae 10
"0" 15.11
120
jia 1
1
(jj)
aai jao jg jgsal aiaai g aaii ai iaii (g)
Jaaee aae 12 21 aee 0 aee 1/3 aee
aaii iie 1
jie 1
jies
jglal 1g aolal aoLlcl
y = - ^2 4
1234567890
j1 = 32,j2 = - 32,j_3 = 0
alalal
1
5d2j4s j,diy 3 y
(2)已知数列 an = 1( 3n - 1) ( 3n + 5) ,求此数列的前 n 项和 Sn
a 1
abaaal coa bao slal po
Jusillblljy
juaal
451 gill , 与 与 jin bai li jiu you you you you you you
jiall jll jil 111
alolololol
Laiiie liai j 5yj 5yj a j 0aill plla
g jlll, jlll, jlll, jlll, jlll, jlll, jlll, jlll, jlll, jlll, jlll
j1
abgai
2jlll 1000
aill 1
y. jaiiill jilj g sioiaa aji bll lai jieall i
j
y
Jusua Jue laa aai 100
a=1j
2j = a
令 = | x - 1|
1
S_ ACD = 12 · AQ · CD = 12 × 2t × 5
S_ = 12 · OB · OD · ED
Joiie,1
L
jieil plisily giaini j Jai liia i Jai ic
alaiylllclayai jga
e 1
jglal al glall
y = - ( x - 2) ^2 + 9 = - x^2 + 4x + 5
a 1
auiu uuiiuiuiuiui
4
jglal jia jia 1aia jbi jia jai jai jai jai
S = 12
:abla
Cilgaalglil gailgai joll
aalei aei xie
y Luy caiyll bai y jayl lai yjay lai y jay lai y jay lai y jay lai y jay lai y jay lai y jay lai y jay lai y jay lai y jay lai y jay lai y jay lai y jay lai y jay lai y jay lai y jay lai y jay lai y jay lai y jay lai y jay lai y jay lai y
p 1
Jiaiui Cai jie li
- laa 2 gaaal jaijg jalil pliaa jao jao
.5jzill 1iinu jizlil lch
juaa jie aiaai ay jial slsfo jagall prnni 2 (g) g lalba uaiy) ayab jil yuulall qaal jayl jll 15 i, alno yjglal prnni y. sall (aillssla
sall gil sll gill jil s l jl 1
15 (Jusgill sllu g uai jalil 1aas yjss Jsill
J 1
jill jia jia jialg jil jai jialo jia jie jil
Jie 1
Jai jai Jai jai jai jai
Jiai jia jia jia jia jia jia jia jia jia jia jia jia jia jia jia jia jia jia jia jia jia jia jia jia jia jia jia jia jia jia jia jia jia jia jia jia jia jia jia jia jia jia jia jia jia jia
a a
ailllll aalil laiuul 1e 1
eannnnnns
(1)