AE 3666 - Citrus juicers CLATRONIC - Free user manual and instructions
Find the device manual for free AE 3666 CLATRONIC in PDF.

User questions about AE 3666 CLATRONIC
0 question about this device. Answer the ones you know or ask your own.
Ask a new question about this device
Download the instructions for your Citrus juicers in PDF format for free! Find your manual AE 3666 - CLATRONIC and take your electronic device back in hand. On this page are published all the documents necessary for the use of your device. AE 3666 by CLATRONIC.
USER MANUAL AE 3666 CLATRONIC
natural_image
Exterior view of a modern black and silver juice brush unit (no visible text or symbols)DEUTSCH
Inhalt
Location of Controls......Page 3
Instruction Manual......Page 30
Technical Data......Page 34
text_image
Exploded view diagram of a kitchen appliance with numbered parts for identificationBedienungsanleitung
natural_image
Medical illustration showing surgical procedure with arrows indicating force or movement (no text or labels)natural_image
Medical illustration showing internal organs and surgical tools (no text or labels)Stamper (1), Deksel (3), Filter / mes (4), Opvangbak (5), Pulpcontainer (11)
natural_image
Medical illustration showing internal anatomical structures with arrows indicating movement or force (no text or labels)natural_image
Medical illustration showing surgical procedure with forceps and arrows indicating movement (no text or labels)Émbolo (1), Tapa (3), Filtro / hoja (4), Receptáculo (5), Colector de pulpa (11)

natural_image
Medical illustration showing surgical procedure with arrows indicating force or movement (no text or labels)Thank you for choosing our product. We hope you will enjoy using the appliance.
Symbols in these Instructions for Use
Important information for your safety is specially marked. It is essential to comply with these instructions in order to avoid accidents and prevent damage to the appliance:

WARNING:
This warns you of dangers to your health and indicates possible injury risks.

CAUTION:
This refers to possible hazards to the appliance or other objects.

NOTE: This highlights tips and information.
General Notes
Read the operating instructions carefully before putting the appliance into operation and keep the instructions including the warranty, the receipt and, if possible, the box with the internal packing. If you give this appliance to other people, please also pass on the operating instructions.
- The appliance is designed exclusively for private use and for the envisaged purpose. This appliance is not fit for commercial use.
- Do not use it outdoors. Keep it away from sources of heat, direct sunlight, humidity (never dip it into any liquid) and sharp edges. Do not use the appliance with wet hands. If the appliance is humid or wet, unplug it immediately.
- When cleaning or putting it away, switch off the appliance and always pull out the plug from the socket (pull the plug itself, not the lead) if the appliance is not being used and remove the attached accessories.
- Do not operate the appliance without supervision. If you leave the room, you should always turn the appliance off. Remove the plug from the socket.
- The appliance and the mains lead have to be checked regularly for signs of damage. If damage is found the appliance must not be used.
- Use only original spare parts.
- In order to ensure your children's safety, please keep all packaging (plastic bags, boxes, polystyrene etc.) out of their reach.

WARNING:
Don't let small children play with foils for danger of suffocation!
Special Safety Instructions for this Appliance

WARNING:
- Risk of cuts! The filter / blade unit (4) is sharp!
- If the filter / blade (4) is damaged, the appliance shall not be operated.
• Always use the supplied pusher (1). Do not insert your fingers or tools into the chute (2).
• Always disconnect the appliance from the supply if it is left unattended and before assembling, disassembling or cleaning. - Prior to replacing accessories or attachments that are moved during operation, the appliance must be shut off and separated from the mains.

WARNING:
- Do not repair the appliance by yourself. Please contact authorized personnel. In order to avoid hazards, a damaged mains cable must be replaced with an equivalent cable by the manufacturer, our customer service or any other qualified specialist.
• This appliance shall not be used by children. - Keep the appliance and its cord out of reach of children.
• Children shall not play with the appliance. - Appliances can be used by persons with reduced physical, sensory or mental capabilities or lack of experience and knowledge if they have been given supervision or instruction concerning use of the appliance in a safe way and if they understand the hazards involved.
-
This appliance is not intended to be immersed in water during cleaning. Please observe the instructions that we have included in the chapter “Cleaning”.
-
Do not touch any moving parts of the appliance and always wait for it to stop.
- Do not manipulate any of the safety switches.
- Do not remove the lid (3) during operation.
Designated use
This appliance is designed for the extraction of juice from fresh vegetables and fruits such as pineapples, apples, beetroot, celery, cucumbers, carrots and tomatoes.
As long as peelings are edible, they also can be processed.
Food containing starch, like bananas, papayas, avocados, figs, and mangos, as well as especially hard and fibrous fruit and vegetables, should not be processed with the appliance.

NOTE:
Juice extraction from small fruit like for example berries with the centrifuge principle is difficult. You should use a suitable berry press for them.
The appliance may only be used in the manner described in this operating manual. You may not use it for commercial purposes.
Any other use shall be considered as not intended use and can lead to material damage or even personal injury.
The manufacturer shall not be liable for damages caused by not intended use.
Supplied parts
1 base appliance with motor
1 lid
1 pusher
1 filter / blade
1 receptacle
1 pulp collector
Unpacking the appliance
- Remove the appliance from its packaging.
- Remove all packaging materials like foils, filling materials, cable holders, and carton packaging.
- Check the scope of deliveries for completeness.
i NOTE:
There may still be dust or production remains on the appliance. We recommend that you clean the appliance as described under “Cleaning”.
i NOTE:
Remove the cardboard disk insert from the inside of the filter / blade unit (4) before starting the motor.
Description of the Parts
1 Pusher
2 Chute
3 Lid
4 Filter / Blade
5 Receptacle
6 Fold up spout
7 Drive wheel (not detachable)
8 Locking bar with safety switch
9 Base with motor
10 On / off speed control (I / 0 / II)
11 Pulp collector
Setting up of the appliance
For assembly, also refer to the illustrations on page 3.
- Set the appliance so that the speed controls (10) point towards you.
- Tilt the locking bar (8) to the right.
- Attach the receptacle (5) on top of the base casing. The base casing (9) has a recess. Here the spout (6) of the receptacle casing (5) must be placed.

WARNING risk of cuts!
The filter / blade (4) is sharp!
- Place the filter / blade (4) on top of the drive wheel. Press it down. It clicks in place on the drive wheel.
- Check the filter / blade (4)! Feel under the filter edge. It should not loosen under slight tension.
- Attach the pulp collector (11) on the left side. To do so, hold it slightly sideways to press the upper edge into the shroud of the receptacle casing (5).
- Attach the lid (3). It reaches all the way over the pulp collector (11).
i NOTE:
Your appliance is equipped with a safety switch. It prevents accidental motor start. Check the correct locking of the locking bar (8).
-
Lock the locking bar (8) over the lid (3).
-
Press the spout (6) downwards to open the flow of the juice.
- Place the juice jug to the right of the appliance.
- Ensure that the speed control (10) is set to "0" position.
Electric Connection
- Before inserting the power plug into the outlet, check that the mains voltage to be used matches that of the appliance. You can find the required information on the nameplate.
- Connect the appliance only to a correctly installed safety socket.
Operation
Speed control settings
- Select setting "I" for smaller fruit like strawberries.
- Select setting "II" for larger pieces or hard vegetables, for example carrots.
Preparations
- Wash the fruit to be processed.
- Cut the fruit in pieces to fit through the chute opening (2).
- Remove large pips and stems.
Extracting Juice
i NOTE:
The appliance is intended for short-term use. After operating it for 6 minutes, take a 5 minute break.
WARNING:
- Check all accessories again for proper attachment before switching the appliance on.
- Ensure that the spout is pressed downwards.
i NOTE:
Remove the cardboard disk insert from the inside of the filter / blade unit (4) before starting the motor.
- Set the speed control (10) to the desired position. The motor starts running.
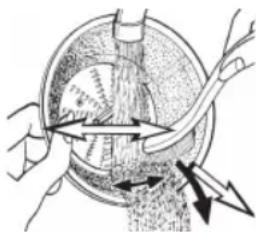
- Insert the fruit pieces in the chute opening (2) and push them down with the pusher (1). Please note! The pusher (1) has a guide way in the filler opening.
- The juice flows out at the right side of the casing. The pulp is collected in the pulp collector (11). If there is an excessive discharge of juice, switch the speed control (10) to setting "I" and exert less pressure on the pusher (1).
i NOTE:
- Observe the juice jug. Stop operation in time to prevent overflowing.
- Berries and citrus fruits (such as gooseberries, grapes, oranges) are usually not juiced but pressed.
- When juicing these fruits with their high juice content, splashing of juice from the area of the pulp collector (11) may occur. In this case, we recommend that the pulp collector (11) is emptied more frequently.
Stop Operation And Disassembly
- Set the speed control (10) to "0" position and wait until the filter / blade (4) has come to a complete standstill.
- Disconnect from mains power supply.
- Press the spout (6) upwards to prevent subsequent dripping.
- Remove the pusher (1) from the chute (2).
- Take the juice jug to the side and lower the locking bar (8) into the disengaged position.
- Remove the lid (3).
- Remove the pulp collector (11).
- Remove the filter / blade unit (4) from the base (9) by grasping the filter / blade (4) at its upper edge with two hands.

WARNING risk of cuts!
The filter / blade unit (4) has sharp knives! Only lift it on its outer edge.
- Then pull the filter / blade (4) in an upward direction until the filter / blade unit (4) is separated from the main base (9).

NOTE:
Do not remove screws from the blade (4). The filter and the blade (4) are one piece. They are not meant to be separated.
Cleaning

WARNING:
- Before cleaning always disconnect from mains power supply.
- Under no circumstances should you immerse the appliance in water for cleaning purposes. Otherwise this might result in an electric shock or fire.
• The filter / blade (4) is very sharp! Danger of injury!

CAUTION:
- Do not use a wire brush or any abrasive items.
- Do not use any acidic or abrasive detergents.
- Do not leave the pulp to dry on the filter / blade (4). The fine pores will clog and become useless.
Tip
- Remove residues in the filter / blade (4) immediately under running water. Use a dishwashing brush.
- For cleaning the outside of the appliance, use only a damp washing-up cloth.
natural_image
Medical illustration showing surgical procedure with arrows indicating force or movement (no text or labels)Pusher (1), Lid (3), Filter / blade (4), Receptacle (5), Pulp collector (11)

WARNING in regard to risk of cuts! filter / blade (4) is sharp!

CAUTION:
The attachments are not suitable for dishwasher. Heat and aggressive cleaning agents may warp or discolour the attachments.
- Clean these components in a rinsing bath.
- Clean the filter / blade (4) with a dishwashing brush.
- Rinse with clean water.
- Only assemble the appliance when all parts have been dried.
Storage
- Clean the appliance as described. Let the accessories dry completely.
- We recommend that you store the appliance in its original packaging when it is not to be used for a longer period.
• Always store the appliance at a well ventilated and dry place outside the reach of children.
Troubleshooting
| MalfunctionPossible cause Remedy | ||
| The appliance does not function. | The appliance is not supplied with power. | Check the outlet with a different device. |
| Insert the power plug correctly. | ||
| Check your domestic fuse. | ||
| The locking bar (8) has not been closed. | Check if all components were properly attached. | |
| The appliance is defective. Contact our Service or a specialist. | ||
| The juice quantity is small. | Wrong fruit type. Select a fruit type producing more juice. | |
| Too much residue in the filter / blade (4). | Clean the filter / blade (4). | |
| Loud noise and imbalance during operation. | Bad assembly. Check that all components have been installed correctly. | |
| Too much residue in the filter / blade (4). | When processing larger quantities clean the filter / blade (4) in-between. | |
Technical Data
Model: AE 3666
Power supply: 220-240 V\~ 50/60 Hz
Power consumption: 400 W
Sound pressure level:....71 dB(A)
Protection class:......II
Short-time operation / Pause: 6 / 5 minutes
Net weight: .... approx. 2 kg
The right to make technical and design modifications in the course of continuous product development remains reserved.
This appliance complies with all current CE directives, such as electromagnetic compatibility and low voltage directive and is manufactured according to the latest safety regulations.
Disposal
Meaning of the "Wheelie Bin" Symbol
Take care of our environment, do not dispose of electrical appliances via the household waste.
Dispose of obsolete or defective electrical appliances via municipal collection points.
Please help to avoid potential environmental and health impacts through improper waste disposal.
You contribute to recycling and other forms of utilization of old electric and electronic appliances.
Your municipality provides you with information about collecting points.
Instrukcja obsługi
natural_image
Medical illustration showing a surgical procedure with forceps and surgical instruments (no text or labels)CTC Clatronic Sp. z o.o
natural_image
Medical illustration showing surgical procedure with arrows indicating force or movement (no text or labels)natural_image
Medical illustration showing surgical procedure with arrows indicating force or movement (no text or labels)natural_image
Anatomical illustration of a surgical procedure showing tissue and surgical instruments (no text or labels)نصيحة
natural_image
Simple geometric line drawing with no text, numbers, or symbols
natural_image
Simple geometric line drawing with no text, numbers, or symbols
natural_image
Simple geometric line drawing with no text, numbers, or symbols
natural_image
Simple geometric line drawing with no text, numbers, or symbols
natural_image
Simple geometric lines forming a right angle, no text or symbols present
natural_image
Simple geometric lines forming a right angle, no text or symbols present
natural_image
Simple geometric lines forming a right angle, no text or symbols present
natural_image
Simple geometric lines forming a right angle, no text or symbols present
natural_image
Simple geometric lines forming a right angle, no text or symbols present


natural_image
Simple geometric line drawing with no text, numbers, or symbols
natural_image
Simple geometric line drawing with no text, numbers, or symbols
natural_image
Simple geometric line drawing with no text, numbers, or symbols
natural_image
Simple geometric line drawing with no text, numbers, or symbols
natural_image
Simple geometric lines forming a right angle, no text or symbols present
natural_image
Simple geometric lines forming a right angle, no text or symbols present
natural_image
Simple geometric lines forming a right angle, no text or symbols present
natural_image
Simple geometric lines forming a right angle, no text or symbols present
natural_image
Simple geometric lines forming a right angle, no text or symbols present


natural_image
Simple geometric line drawing with no text, numbers, or symbols
natural_image
Simple geometric line drawing with no text, numbers, or symbols
natural_image
Simple geometric line drawing with no text, numbers, or symbols
natural_image
Simple geometric line drawing with no text, numbers, or symbols
natural_image
Simple geometric lines forming a right angle, no text or symbols present
natural_image
Simple geometric lines forming a right angle, no text or symbols present
natural_image
Simple geometric lines forming a right angle, no text or symbols present
natural_image
Simple geometric lines forming a right angle, no text or symbols present
natural_image
Simple geometric lines forming a right angle, no text or symbols present


GARANTIEKARTE
warranty card · garantiekaart · carte de garantie · scheda di garanzia · tarjeta de garantía · cartão de garantia · garantikort · karta gwarancyjna · záruční list · kartica jamstva · carte de garanție · Γαρανησιονηα καρτα · záručný list · garancijski list · garanciajegy · гарантійнийформуляр · Γαραντιйный талон · بلاقة ضمان
AE 3666
24 Monate Garantie gemäß Garantieerklärung · 24 months warranty according to warranty declaration · 24 maanden garantie volgens garantieverklaring · 24 mois de garantie selon la déclaration de garantie · 24 mesi de garanzia secondo la dichiarazione di garanzia · 24 meses de garantia de acuerdo con la declaración de garantia · 24 meses de garantia, de acordo com a declaração de garantia · 24 mäneders garanti i henhold til garantibetingelsene · 24 miesiące gwarancji na podstawie oświadczenia gwarancyjnego · záruka 24 měsiců podle prohlásení o záruce · 24 mjesečno jamstvo u skladu s jamstvenom deklacaríjom · 24 luni garanție conform declarației de garantie · 24 месеца гаранция в съответствие с гаранционната декларация · 24-mesačná záruka podla vyhlásenia o záruke · 24-mesečna garancija, skladno z garancijsko izjavo · 24 hónap garancia a garanciafelételekben leitak szerint · гарантия на 24 місяці відповідно заяві про гарантію · Гарантия 24 месяца согласно заявленным гарантийным правилам · صман ا语音 24 شواز رифاً الامان
Kaufdatum, Händlerstempel, Unterschrift : date of purchase, dealer stamp, signature - aankoopdatum, dealerstempel, handtekening : date d'achat, tampon du concessionnaire, signature - data de acquisto, timbre del rivenditore, firma : fecha de compra, sello del distribuidor, firma : data de compra, canimbo do distribuidor, assinatura , kjepsdato, forhandlerstempel, signatur - data zakupu, pieczęf sprzedawcy, podpis - datum zakuoperi, nazitko prodeje, podpis : datum kupovine, zig trigovca, podpis : data de achizije, tampila furnizorului, semnatura : Data на покупката, Плечат на Продавача, Подпис - datum nákupu, pečitatka obchodnika/predajcu, podpis : datum nakupa, zig trigovca, podpis - vásárás dátuma, kereskedő belyegzője, aláírás : data придбання, печатка продавця, підпис - Data приобретення, Штамп продавца. Подпись - артиг «варт» (вартов)

CATRONIC® INTERNATIONAL GMBH
www.clatronic.com